
SpeechOne PSM6500 - Voice recorder PHILIPS - Free user manual and instructions
Find the device manual for free SpeechOne PSM6500 PHILIPS in PDF.


| Product Type | Digital Voice Recorder |
| Model | SpeechOne PSM6500 |
| Brand | Philips |
| Dimensions (H x W x D) | Approx. 5.5 x 2.2 x 1.3 cm (2.2 x 0.9 x 0.5 in) |
| Weight | Approx. 60 g (2.1 oz) including battery |
| Power Supply | Rechargeable Li-Ion battery (3.7V, 300 mAh) |
| Recording Format | DSS (Digital Speech Standard) and PCM (WAV) |
| Recording Modes | Dictation, Conference, and Custom Settings |
| Microphone | Built-in directional microphone with noise reduction |
| Speaker | Built-in speaker for playback |
| Memory | 8 GB internal flash memory (expandable via microSD up to 32 GB) |
| Display | OLED display, 1.0 inch |
| Connectivity | USB 2.0 (Type-C) for data transfer and charging |
| Battery Life | Up to 20 hours of continuous recording |
| Charging Time | Approximately 2.5 hours via USB |
| Languages Supported | Multiple (menu in English, French, German, etc.) |
| Maintenance | Wipe with a soft, dry cloth; avoid liquids and abrasive cleaners |
| Safety | Use only specified charger; avoid exposure to extreme temperatures |
| Spare Parts & Repairability | Replacement battery and USB cable available; contact Philips support |
| General Information | Professional dictation recorder; compatible with SpeechExec software |
Frequently Asked Questions - SpeechOne PSM6500 PHILIPS
User questions about SpeechOne PSM6500 PHILIPS
0 question about this device. Answer the ones you know or ask your own.
Ask a new question about this device
Download the instructions for your Voice recorder in PDF format for free! Find your manual SpeechOne PSM6500 - PHILIPS and take your electronic device back in hand. On this page are published all the documents necessary for the use of your device. SpeechOne PSM6500 by PHILIPS.
USER MANUAL SpeechOne PSM6500 PHILIPS
User manual
Table of contents
1 Important 3
Safety instructions 3
Cleaning and disinfection 4
Disposal of your old product 4
About this user manual 5
2 Your SpeechOne 6
Product highlights 6
What's in the box 6
Overview of your SpeechOne 7
Overview of the docking station 7
Overview of the remote control
(PSM6500, PSM6800) 8
3 Get started 9
Charging the battery 9
Charge via docking station 9
Charge via computer 10
Charge via USB power supply unit (optional) 10
Learn about the battery status 11
Pairing 11
Learn about wireless technology 12
Going out of range 12
Idle mode and Power down mode 12
Resetting the wireless connection 12
4 Use your SpeechOne
Wearing styles 13
Wearing with the headband attachment 13
Classic wearing style 14
Wearing with the neckband 14
Create a recording 15
Skype calls 15
Status light 16
Mount the status light on your computer 16
Do-not-disturb mode 16
Use the remote control (PSM6500, PSM6800) 16
Button modes 17
Event mode 17
Keyboard mode 17
Browser mode 17
Windows speech recognition mode 17
Dragon for Mac mode 17
Dragon for Windows mode 17
Button assignment for each mode 17
Switch between button modes on the
docking station 20
Switch between button modes on the
remote control (PSM6500, PSM6800) 21
Hands-free dictating with a Philips foot control 22
Button assignment of Philips foot controls 22
Upgrading the firmware 23
5 Service and support 24
Contact our supporting Philips partners 24
Troubleshooting 24
LED colors and meanings 26
6 Technical data 27
1 Important
Do not make any adjustments and modifications that are not described in this manual. Follow all safety instructions to ensure proper operation of the device. The manufacturer assumes no liability for damages resulting from non-compliance with the safety instructions.
Safety instructions
- Protect the device from rain and liquids to prevent damage to the device or a short circuit.
- Do not expose the device to excessive heat caused by placing it on a heating device or in direct sunlight.
- Protect the cables from damage by being trapped, particularly at the plugs and where cables exit the housing.
- Do not perform any maintenance operations that are not described in this user manual. Do not disassemble the device into its component parts to carry out repairs. The device may only be repaired in authorized service centers.
- All wireless devices may be susceptible to interference, which could affect performance.
- Back up your data and recordings. The manufacturer's warranty does not cover loss of data resulting from user actions.
Rechargeable built-in battery
- This device contains a built-in Li-polymer battery which should not be replaced by the customer. The battery may only be replaced in authorized service centers or by an authorized Philips partner for dictation equipment.
- Batteries contain substances that may pollute the environment. Used batteries should be disposed of at an official collection point.
Small children
Your device and its enhancements may contain small parts. Keep them out of the reach of small children.
Operating environment
This device meets RF exposure guidelines when used either in front of the mouth or when positioned at least 2.2 cm (0.87 inches) away from the body.
Parts of the device are magnetic. Metallic materials may be attracted to the device. Do not place credit cards or other magnetic storage media near the device or in the docking station because information stored on them may be erased.
Medical device interference
Operation of any radio transmitting equipment may interfere with the functionality of inadequately protected medical devices. Consult a physician or the manufacturer of the medical device to determine if they are adequately shielded from external RF energy or if you have any questions. Switch off your device in health care facilities when any regulations posted in these areas instruct you to do so. Hospitals or health care facilities may be using equipment that could be sensitive to external RF energy.
Implanted medical devices
SpeechOne contains components that emit electromagnetic waves. Electromagnetic waves might interfere with the operation of implanted medical devices, such as pacemakers or implanted cardioverter defibrillators. Manufacturers of medical devices recommend that a minimum separation of 15.3 cm (6 inches) should be maintained between a wireless device and an implanted medical device to avoid potential interference with the medical device. Persons who have such devices should:
• Always keep the wireless device more than 15.3 cm (6 inches) from the medical device when the wireless device is turned on.
- Not carry the wireless device in a breast pocket.
- Turn the wireless device off immediately if there is any reason to suspect that interference is taking place.
- Read and follow the directions from the manufacturer of their implanted medical device.
If you have any questions about using your wireless device with an implanted medical device, consult your health care provider.
Hearing aids
Some digital wireless devices may interfere with some hearing aids. If interference occurs, consult your service provider.
Vehicles
RF signals may affect improperly installed or inadequately shielded electronic systems in motor vehicles such as electronic fuel injection systems, electronic antiskid (antilock) braking systems, electronic speed control systems, and air bag systems. For more information, check with the manufacturer, or its representative, of your vehicle or any equipment that has been added.
Only qualified personnel should service the device or install the device in a vehicle. Faulty installation or service may be dangerous and may invalidate any warranty that may apply to the device.
Check regularly that all wireless device equipment in your vehicle is mounted and operating properly. Do not store or carry flammable liquids, gases, or explosive materials in the same compartment as the device, its parts, or enhancements. For vehicles equipped with an air bag, remember that air bags inflate with great force.
Use in aircraft
Wireless transmitters can negatively affect the operation of other electronic equipment, causing them to malfunction. Turn off your device when you travel in aircraft.
Cleaning and disinfection
- Before cleaning, disconnect all cables from the device.
• To clean the device, use a soft dry cloth. - To disinfect the device, use products for disinfection of surfaces in clinical areas and patient care equipment, such as surface disinfectant wipes.
- Do not use harsh chemicals or strong detergents.
- Avoid getting moisture in openings.
- Do not rub or strike the surface with anything hard or sharp as this may scratch or damage the surface permanently.
Disposal of your old product
Europe
A crossed-out wheeled bin symbol attached to a product indicates that the product is covered by the European Directive 2011/65/EU. Please get informed about the local separate collection system for electrical and electronic products. Please act according to your local rules and don't dispose of your old products with your normal household waste. Correct disposal of your old product helps to prevent potential negative consequences for the environment and human health.

United States
Rechargeable Li-ion battery:
- Your product is designed and manufactured with high quality materials and components, which can be recycled and reused. For recycling information, please contact your local waste management facilities or visit www.recycle.philips.com.
-
This appliance contains a rechargeable lithium-ion battery which must be disposed of properly.
-
Contact your local town or city officials for battery disposal information.
You can also call 1-800-822-8837 or visit www.call2recycle.org for battery drop-off locations.
- For assistance, visit our website www.philips.com/support or call 1-800-243-3050 toll free.
Rechargeable NiMH battery:
- Your product is designed and manufactured with high quality materials and components, which can be recycled and reused. For recycling information, please contact your local waste management facilities or visit www.recycle.philips.com.
- This appliance contains a rechargeable NiMH battery which must be disposed of properly.
- Contact your local town or city officials for battery disposal information. You can also call 1-800-822-8837 or visit www.call2recycle.org for battery drop-off locations.
- For assistance, visit our website www.philips.com/support or call 1-800-243-3050 toll free.
Canada
Rechargeable Li-ion battery:
- Your product is designed and manufactured with high quality materials and components, which can be recycled and reused. For recycling information, please contact your local waste management facilities or visit www.recycle.philips.com.
- This appliance contains a rechargeable lithium-ion battery which must be disposed of properly.
- Contact your local town or city officials for battery disposal information. You can also call 888-224-9764 or visit www.call2recycle.ca for battery drop-off locations
- For assistance, visit our website www.philips.com/support or call 1-800-243-7884 toll free.
Rechargeable NiMH battery:
- Your product is designed and manufactured with high quality materials and components, which can be recycled and reused. For recycling information, please contact your local waste management facilities or visit www.recycle.philips.com.
- This appliance contains a rechargeable NiMH battery which must be disposed of properly.
- Contact your local town or city officials for battery disposal information.
- You can also call 888-224-9764 or visit www.call2recycle.ca for battery drop-off locations.
About this user manual
Find a quick overview of your device on the next pages. For detailed description, see the following chapters of this user manual. Read the instructions carefully.
Symbols used

Tip
- This symbol identifies information that helps you to use your device more efficiently and simply.

Note
- This symbol indicates notices which you should observe when handling or operating the device.

Caution
- This symbol warns of damage to the device and possible data loss. Damage can be caused by improper handling.
2 Your SpeechOne
Product highlights
- Wireless recording
• Studio-quality microphone
• High-speed wireless charging - All-day battery life
• Modern, ergonomic design - Lossless audio transmission
- Skype support
What's in the box
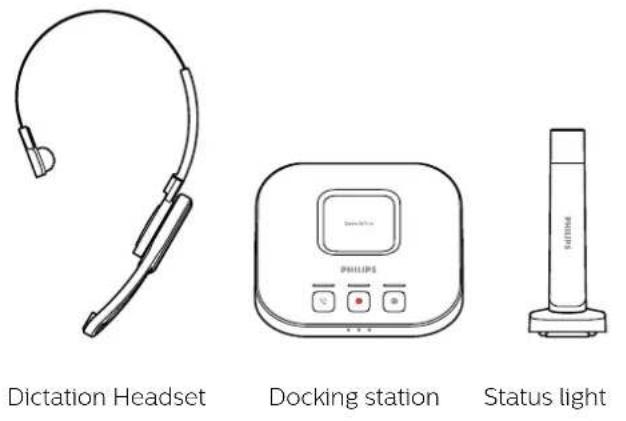

Ear cushion

Head cushion

Headset attachment
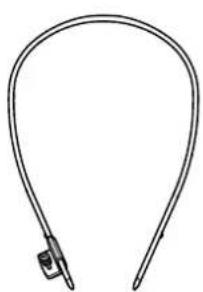
Neckband

Micro USB cable

Quick start guide
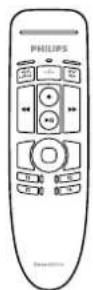
Remote control (PSM6500, PSM6800)
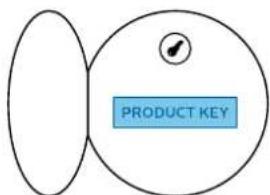
Product key for SpeechExec software (PSM6800)
Overview of your SpeechOne

① Microphone
② Microphone boom
③ Status LED
④ Headset button
⑤ Speaker
⑥ Detachable magnetic ear cushion
⑦ Head cushion pad
⑧ Detachable magnetic head cushion
⑨ Headband
⑩ Headband attachment
Overview of the docking station
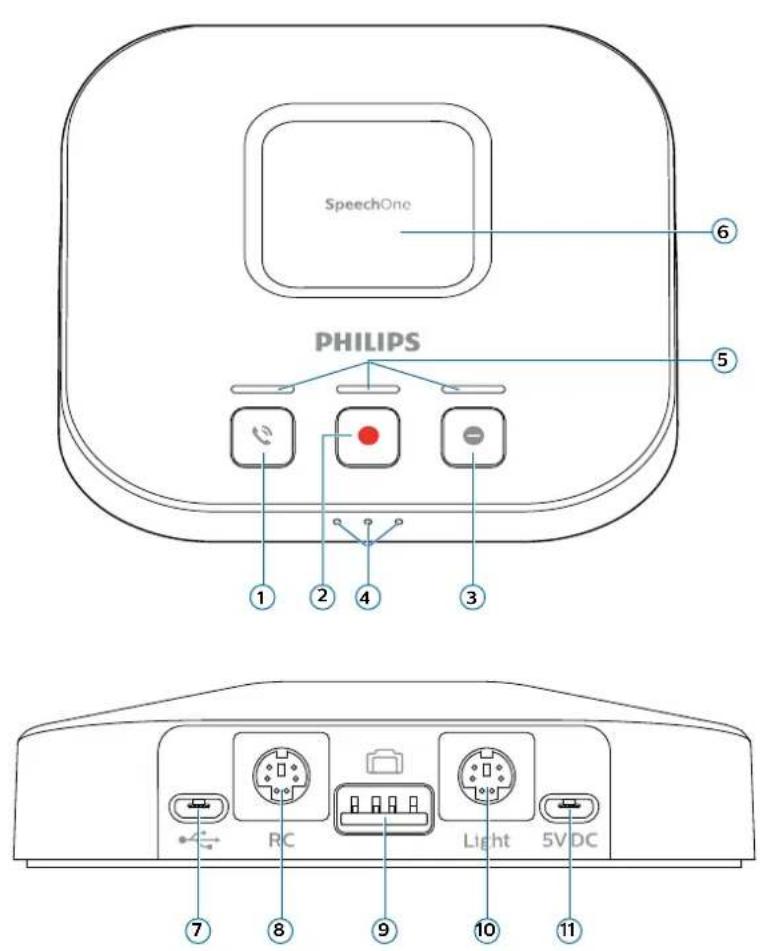
① Phone button
② Record button
③ Do-not-disturb button
④ Battery and pairing LEDs
⑤ Button LEDs
⑥ Magnetic pad for headset charging
⑦ Micro USB port for PC connection
⑧ Remote control port
⑨ Foot control port
⑩ Status light port
⑪ Micro USB port for charging
Overview of the remote control (PSM6500, PSM6800)

① Record LED
② Instruction button
③ Insert/overwrite button
④ End-of-letter/priority button
⑤ Record button
⑥ Rewind button
⑦ Fast forward button
⑧ Play/pause button
⑨ Touch navigation/left mouse button
⑩ Left mouse button
⑪ Right mouse button
⑫ Programmable function buttons
⑬ Command button
⑭ Left mouse button

3 Get started

Caution
- Before you connect your SpeechOne, first read the safety instructions (see Safety instructions).
Charging the battery
Charge the built-in battery before you use the device for the first time or if you haven't used it for an extended time period. If the battery is completely discharged and your device turns off, allow the battery to charge for a while before you turn on the device.

Note
• A complete recharge cycle takes about two hours.
Charge via docking station

Note
- If you charge your device via docking station, make sure that the micro USB connector is connected to the USB port for charging marked with 5V DC.

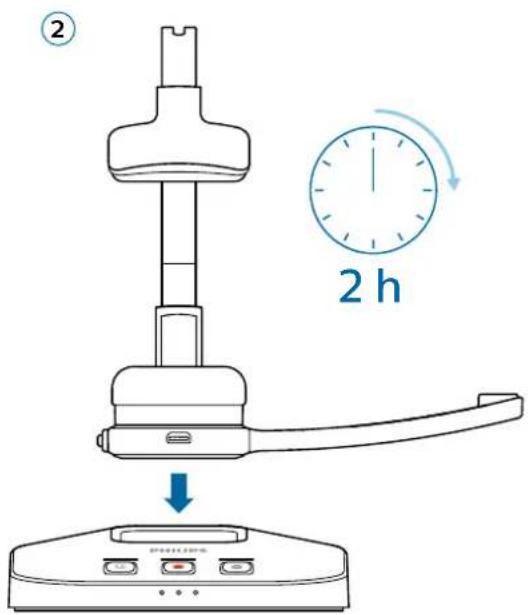
→During charging, the battery LEDs on the docking station subsequently light up in a loop until the headset is either removed or fully charged. →When charging is complete, all three battery LEDs on the docking station glow white.

Caution
- Make sure that there are no metallic parts on the docking station, otherwise the charging process is not possible.
Charge via computer
Before you charge the battery via computer, make sure that your computer is turned on.

Note
- Recording is not possible if only your SpeechOne is connected to the computer. To make a recording, you also need to connect the docking station to the computer.
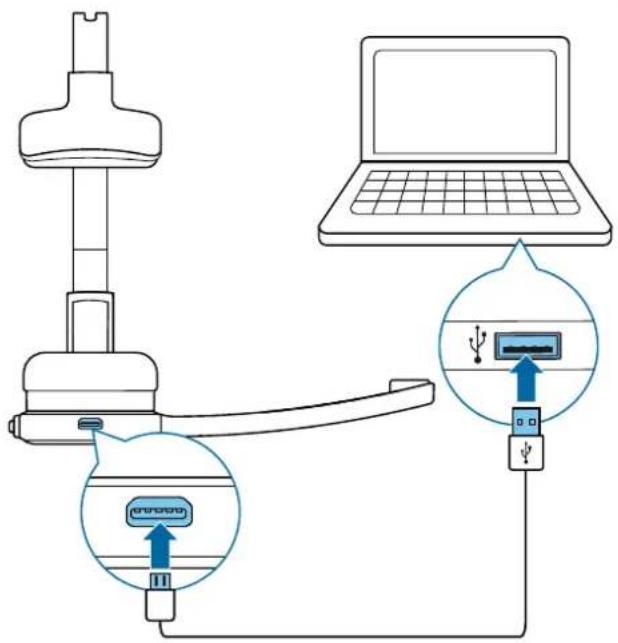
→During charging, the status LED on the headset is flashing.
→When charging is complete, the status LED on the headset stops flashing and starts glowing constantly.
Charge via USB power supply unit (optional)

Note
- For fast charging, you need a USB power supply unit with at least one ampere. The power supply unit is not included and needs to be purchased separately. - A complete fast recharge cycle takes about one hour.
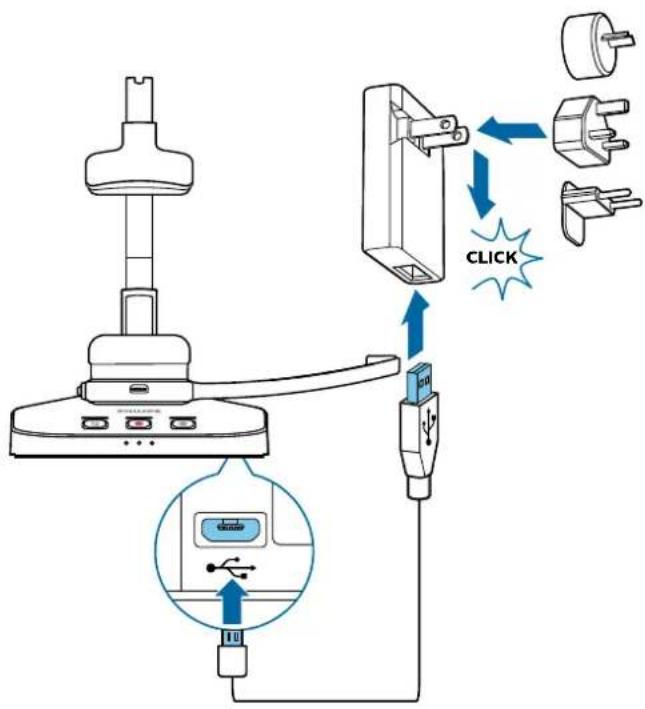
During charging, the battery LEDs on the docking station subsequently light up in a loop until the headset is either removed or fully charged.
When charging is complete, all three battery LEDs on the docking station glow white.
Learn about the battery status
When the SpeechOne is removed from the docking station, the battery LEDs on the docking station indicate the battery status.
Battery LED Battery status
| more than 7 hoursrecording time left | |
| 7 hours or less recordingtime left | |
| 2.5 hours or less recordingtime left |
Pairing
Once you have connected your SpeechOne to a docking station, you can dictate wirelessly and use the dictation headset on different workstations without any further pairing effort.

Note
- If you use several docking stations, make sure to keep a minimum distance of 50 cm (18 inches) between each docking station. If the distance is less than 50 cm (18 inches), there might be interferences between the docking stations.
- Make sure that the distance between the SpeechOne and the docking station is not more than 5 meters (16 feet). For more information, see Learn about wireless technology.
Pair the SpeechOne and the docking station
- Put the SpeechOne onto the docking station for about 4 seconds.
→The pairing process starts.
→When pairing is finished, the battery LEDs on the docking station light up for one second and display the battery status afterwards.

Change paired devices
If your desired docking station is already connected to a different SpeechOne, the battery LEDs on this docking station display the battery status of the connected headset.
To disconnect this existing connection and pair your own SpeechOne with the desired docking station, proceed as described in Pair the SpeechOne and the docking station.

Note
- Please differentiate between the following two situations:
- If the wireless connection between the SpeechOne and the docking station is lost, all three button LEDs on the docking station glow orange and the status LED on the headset glows red.
- If there is a problem with the USB connection of the docking station (e.g. the USB cable is connected to the wrong USB port on the docking station), all three button LEDs on the docking station glow orange and the status LED on the headset glows orange.
Learn about wireless technology
The SpeechOne uses wireless technology to establish a connection between the dictation headset and the docking station.
A wireless connection doesn't require that the SpeechOne and the docking station be in line of sight. However, the maximum distance between the SpeechOne and the docking station should not be more than 5 meters (16 feet). The closer the devices are to each other, the better is the performance. The connection is subject to interference from distance and obstructions or other electronic devices.

Note
- Make sure to keep a minimum distance of 50 cm (18 inches) between the docking station and other wireless devices, such as smartphones or laptops. If the distance is less than 50 cm (18 inches), there might be interferences between the docking station and other wireless devices.
Going out of range
When the wireless connection is lost, a voice prompt will notify you about this. If you have a SpeechExec application running on your computer, the software will be stopped.
In this case, move closer to the docking station to re-enter the reception area.
→The connection is reestablished.
→A voice prompt will notify you that the connection is established again.
Idle mode and Power down mode
Idle mode
After 4 minutes of inactivity, the SpeechOne automatically enters Idle mode.
→The status LED on the headset starts flashing green quickly.
To reactivate the device:
- Simply lift the headset up until the status LED on the headset glows green.
Power down mode
If the SpeechOne is not used for more than 6 hours, it automatically turns off to save battery life. The battery LEDs on the docking station are turned off then.
To turn the device on again:
- Place the device onto the docking station for about 4 seconds. →If the connection with the docking station succeeds, the battery LEDs on the docking station light up for one second and display the battery status afterwards.
or
- Press the Headset button until the status LED on the headset glows green.
Resetting the wireless connection
If you should encounter problems with your device, for example, the SpeechOne doesn't respond or doesn't connect to the docking station, you can reset the wireless connection.
1 Press the Headset button on the headset until the status LED on the headset turns off.
2 Release the Headset button on the headset and wait until the status LED on the headset turns on again.
3 Disconnect the docking station from your computer (and optionally from the power outlet).
4 Connect the docking station to your computer (or optionally to the power outlet) via the supplied USB cable. Make sure you use the USB port for PC connection marked with 📋 on the docking station.
5 Place the SpeechOne on the docking station and wait for about 4 seconds.
→The SpeechOne should be detected and be automatically paired with the docking station.
4 Use your SpeechOne

Note
- Any operations, e.g. recording or configuring your SpeechOne with SpeechControl driver and configuration software, have to be executed with the docking station connected to your computer. Do not connect the SpeechOne directly to the computer via a USB cable for this purpose. Connecting the SpeechOne directly to the computer is only intended for charging the device.
Wearing styles
You can wear the SpeechOne headset on the left or on the right side. Simply rotate the microphone boom by 180 degrees.
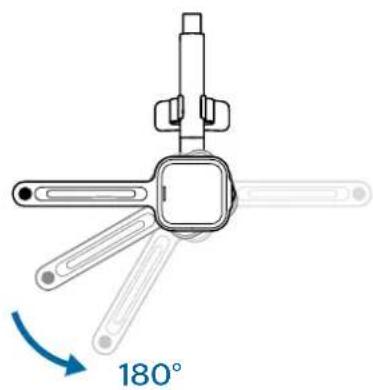
For best wearing comfort, you can wear the headset in the following ways:
Wearing with the headband attachment
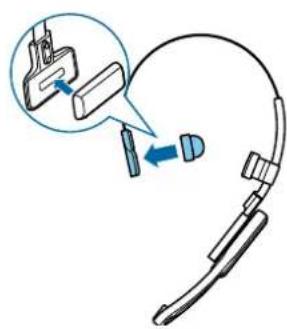
To adjust your headset perfectly to your head and achieve the best wearing comfort, you can use the supplied headband attachment.
1 Rotate the microphone boom if you want to change the wearing side.
2 Attach one of the two head cushions to the head cushion pad and one to the headband attachment.

3 Lengthen or shorten the headband until it fits comfortably.
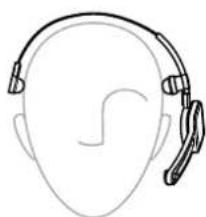
→The speaker should be aligned with the center of your ear.
Classic wearing style
The classic way to wear the headset is without the headband attachment.
1 Rotate the microphone boom if you want to change the wearing side.
2 Remove the headband attachment by pulling it up.

3 Attach the magnetic ear cushion to the speaker and the magnetic head cushion to the head cushion pad.
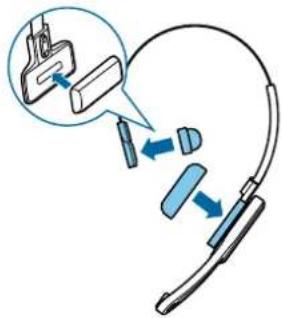
4 Lengthen or shorten the headband until it fits comfortably.
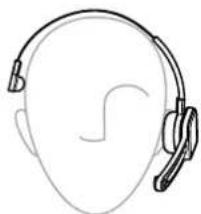
→The ear cushion should rest comfortably over the center of your ear.
→The microphone should be aligned with your mouth.
Wearing with the neckband
1 Detach the headband from the microphone boom by pulling it up at the junction.
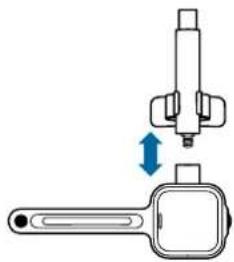
2 Attach the neckband to the microphone boom by pressing it down at the junction.

3 Pull the neckband over your ears.
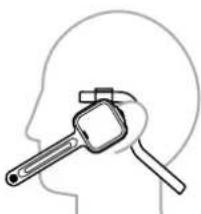
→The speaker should be aligned with the center of your ear.
Create a recording
Recording and playback of dictations with the SpeechOne requires dictation software such as Philips SpeechExec to be installed on the computer.
For more information on recording with the SpeechOne and the Philips SpeechExec software, download the SpeechExec user manual at www.philips.com/dictation.
For more information on recording with the remote control (PSM6500, PSM6800), see Use the remote control (PSM6500, PSM6800).

Note
- Make sure that the distance between the SpeechOne and the docking station is not more than 5 meters (16 feet).
For more information, see Going out of range. - Make sure the docking station is connected to your computer, otherwise recording is not possible.
1 Make sure the docking station is connected to your computer.
2 To start a recording, press the Record button on the docking station once or press the Headset button on the headset once.
3 To finish a recording, press the Record button on the docking station again or press the Headset button on the headset again.

Note
- If you receive a Skype call while you are in a recording session and you accept the call, you need to press the Record button again after finishing the call in order to continue recording.
Skype calls
Your SpeechOne also acts as a Skype headset which you can use to accept incoming Skype calls.
When you receive an incoming Skype call:
→The status light starts flashing red.
→The LED of the Phone button on the docking station glows green.
To accept an incoming Skype call:
- Press the Phone button on the docking station once or
- Press the Headset button on the headset once.
→Any active recording will be stopped.
→The LEDs of the Phone and the Do-not-disturb buttons on the docking station, and the status light glow red.
To end a Skype call:
- Press the Phone button on the docking station again or
- Press the Headset button on the headset again.
→The LEDs of the Phone and the Do-not-disturb buttons on the docking station turn off, and the status light glows green.
To reject a Skype call:
- Press the Phone button on the docking station twice or
- Press the Headset button on the headset twice.

Note
- To mute the microphone during a Skype call, move the microphone boom to an upright position.
- If you receive a Skype call while you are in a recording session and you accept the call, you need to press the Record button again after finishing the call in order to continue recording.
Status light
Use the status light in order to indicate to your colleagues if you are available or busy. This way, you can work more productively due to less interruptions.
Mount the status light on your computer
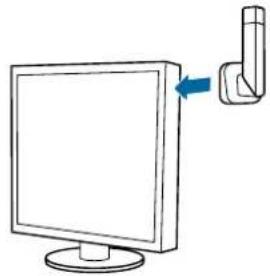
1 Turn the status light into the starting position as displayed in the illustration below. Then hold it at the bottom part and pull the upper part in your direction until it reaches a horizontal position.

2 Connect the docking station to your computer via the supplied USB cable. Make sure you use the USB port for PC connection marked with 📄 on the docking station. Then connect the status light to the status light port on the docking station.

3 Remove the sticker from the magnet on the bottom of the status light.
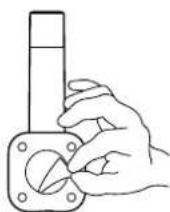
4 Mount the status light either on the side or on the back of your screen.
Do-not-disturb mode
While you are recording with your SpeechOne, the LED of the Do-not-disturb button on the docking station and the status light automatically glow red indicating that you are not available.
However, you can also activate the Do-not-disturb mode whenever you would like to indicate that you are busy.
To turn the Do-not-disturb mode on:
- Press the Do-no-disturb button on the docking station once.
→The LED of the Do-not-disturb button on the docking station and the status light glow red.
To turn the Do-not-disturb mode off:
- Press the Do-not-disturb button on the docking station again.
→The LED of the Do-not-disturb button on the docking station turns off and the status light glows green.

Note
- If you receive a Skype call while you are in a recording session and you accept the call, the status light and the LED of the Do-not-disturb button keep glowing red.
Use the remote control (PSM6500, PSM6800)
If you are a SpeechMike user:
- You can use the remote control of the SpeechOne headset just like you use your SpeechMike. The functions of the remote control are exactly the same. You only need to put the SpeechOne headset on, then start and control your recording with the remote control.
If you are not a SpeechMike user:
- Download the user manual for SpeechMike Premium Air at www.speechmike.com/premium-air/support.
Button modes
With your SpeechOne or the SpeechOne remote control (PSM6500, PSM6800), you can control various applications on your computer or in your browser. You have six different button modes available for this purpose: the Event mode, the Keyboard mode, the Browser mode, the Windows speech recognition mode, the Dragon for Mac mode, and the Dragon for Windows mode. You can change the button assignment for each mode in SpeechControl software. Download the software for free at www.dictation.philips.com/speechcontrol.
Event mode
The Event mode is the default mode of your SpeechOne. In this mode, each button on your SpeechOne is assigned to a command. In SpeechControl software, you can define which commands should be executed by pressing or releasing a desired button on your SpeechOne in order to control various computer applications.
Keyboard mode
Assign a button on your SpeechOne to a shortcut you are using on your computer in order to control various computer applications. In SpeechControl software, you can define which commands should be executed by pressing a desired button on your SpeechOne.
In this mode, you can also operate Dragon NaturallySpeaking speech recognition software on a Windows computer by using the pre-configured Dragon shortcuts.
Browser mode
Assign a SpeechOne button to a shortcut or a command in your browser in order to control various browser-based dictation applications. In SpeechControl software, you can define which commands should be executed by pressing a desired button on your SpeechOne.
Windows speech recognition mode
In this mode, you can operate the pre-installed Windows speech recognition software on a Windows computer by using the pre-configured Windows shortcuts.
Dragon for Mac mode
In this mode, you can operate Dragon Naturally Speaking speech recognition software on a Mac computer by using the pre-configured Dragon shortcuts.
Dragon for Windows mode
In this mode, you can operate Dragon Naturally Speaking speech recognition software on a Windows computer by using the pre-configured Dragon shortcuts.
Button assignment for each mode
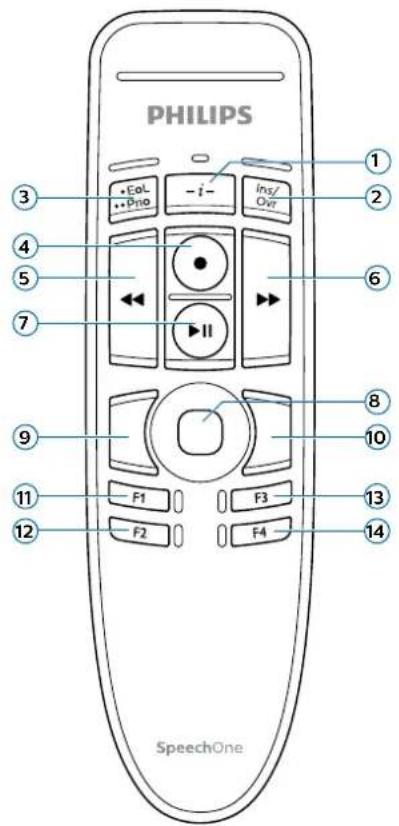
Event mode
| Command |
| 1 Instruction |
| 2 Insert/overwrite/append |
| 3 End-of-letter/priority |
| 4 Record |
| 5 Fast rewind |
| 6 Fast forward |
| 7 Play |
| 8 Touch navigation/left mouse button |
| 9 Left mouse button |
| 10 Right mouse button |
| 11 Programmable function button |
| 12 Programmable function button |
| 13 Programmable function button |
| 14 Programmable function button |
Keyboard mode
| Command | Shortcut in SpeechControl |
| 1 Record/Stop (Dragon microphone on/off) | [NumKey+] |
| 2 Tab forward [Tab] | |
| 3 Tab backward [Shift+Tab] | |
| 4 SpeechOne microphone on/off | [Microphone ON/OFF] |
| 5 Mark previous word(s) [Ctrl+Shift+Left] | |
| 6 Next field (Dragon) [Ctrl+Shift+N] | |
| 7 Play | |
| 8 Touch navigation/left mouse button | |
| 9 Left mouse button | |
| 10 Right mouse button | |
| 11 Show dictation box (Dragon) [Ctrl+Shift+D] | |
| 12 Transfer text (Dragon dictation box) | [Ctrl+Shift+T] |
| 13 Programmable function button | |
| 14 Switch to hidden mode (Dragon Medical Practice Edition) | [Ctrl+Shift+H] |
Browser mode (for Philips SpeechLive cloud dictation solution)

Note
- The button assignment in Browser mode depends on the application you are using in your browser. Therefore, there is no default configuration for this mode. The table below only describes the default button assignment for the Philips SpeechLive cloud dictation solution.
Command
① -
② Insert/overwrite/append
③ -
④ Record
⑤ Fast rewind
⑥ Fast forward
⑦ Play
⑧ Touch navigation/left mouse button
⑨ Left mouse button
10 Right mouse button
⑪ Jump to start of dictation
⑫ Jump to end of dictation
13 Programmable function button
14 Programmable function button
Windows speech recognition mode
Command
Shortcut in SpeechControl
① -
② Next field (Dragon) [Tab]
③ Tab backward [Shift+Tab]
④ Windows microphone on/off [Ctrl+Win]
⑤ Mark previous word(s) [Ctrl+Shift+Left]
⑥ Mark next word(s) [Ctrl+Shift+Right]
⑦ -
⑧ Touch navigation/left mouse button
⑨ Left mouse button
⑩ Right mouse button
⑪ Copy [Ctrl+C]
⑫ Cut [Ctrl+X]
⑬ Paste [Ctrl+V]
⑭ Programmable function [Ctrl+Shift+H] button
Dragon for Mac mode
| Command | Shortcut in SpeechControl |
| 1 - | |
| 2 Tab forward [Tab] | |
| 3 Tab backward [Shift+Tab] | |
| 4 Dragon microphone on/off [⌘+F11] | |
| 5 Mark previous word(s) [Alt+Shift+Left] | |
| 6 Mark next word(s) [Alt+Shift+Right] | |
| 7 Play | |
| 8 Touch navigation/left mouse button | |
| 9 Left mouse button | |
| 10 Right mouse button | |
| 11 Copy [⌘+C] | |
| 12 Cut [⌘+X] | |
| 13 Paste [⌘+V] | |
| 14 Programmable function button | |
Dragon for Windows mode
| Command | Shortcut in SpeechControl |
| 1 - | |
| 2 Tab forward [Tab] | |
| 3 Tab backward [Shift+Tab] | |
| 4 Dragon microphone on/off [NumKey+] | |
| 5 Mark previous word(s) [Ctrl+Shift+Left] | |
| 6 Next field (Dragon) [Ctrl+Shift+N] | |
| 7 Play | |
| 8 Touch navigation/left mouse button | |
| 9 Left mouse button | |
| 10 Right mouse button | |
| 11 Show dictation box (Dragon) [Ctrl+Shift+D] | |
| 12 Transfer text (Dragon dictation box) | [Ctrl+Shift+T] |
| 13 Programmable function button | |
| 14 Switch to hidden mode (Dragon Medical Practice Edition) | [Ctrl+Shift+H] |
Switch between button modes on the docking station
To switch between the button modes:
1 Make sure the docking station is not connected to your computer via the USB port for PC connection marked with ⚪ on the docking station.
2 Make sure the docking station is powered, either by connecting it to your computer via the USB port marked with 5V DC on the docking station or optionally by connecting it to a power supply unit (for more information, see Charge via USB power supply unit(optional)).
3 Press the Phone and the Do-not-disturb button on the docking station simultaneously for three seconds.
→ The battery LEDs on the docking station start flashing.
→ Your current mode is indicated as follows:
| Mode | Button LEDs | Function of Record button |
| Event mode Star | 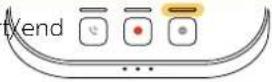 | recording |
| Keyboard mode |  | Turn on/off SpeechOne microphone when using Dragon speech recognition software |
| Browser mode |  | Start/end recording |
| Windows speech recognition mode | 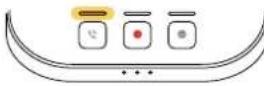 | Turn on/off Windows microphone |
| Dragon for Mac mode |  | Turn on/off Dragon microphone |
| Dragon for Windows mode | 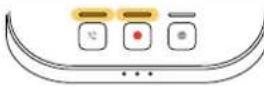 | Turn on/off Dragon microphone |
4 To switch to a different mode, press the Record button on the docking station repeatedly until you have reached the desired mode. E.g. if you are in Event mode and want to switch to Keyboard mode, press the Record button once. If you are in Event mode and want to switch to Dragon for Windows mode, press the Record button five times.
5 To confirm your selection of the desired mode and exit mode selection, briefly press the Phone and the Do-not-disturb button on the docking station simultaneously.

Tip
- You can always check your current button mode by briefly pressing the Phone and the Do-not-disturb button on the docking station simultaneously. Your currently selected mode will be displayed immediately (as illustrated in the previous table).
Switch between button modes on the remote control (PSM6500, PSM6800)
To switch between the button modes:
1 Press the End-of-letter/priority ( · EoL/ ·· Prio) button and the Insert/overwrite (INS/OVR) button simultaneously for three seconds.
→All button LEDs on the remote control flash simultaneously.
2 Press the corresponding button for the desired mode. The buttons are assigned to the button modes as follows:
Mode Button
Function of Record button
Event mode F1 Start/end recording
| Keyboard mode F2 | Turn on/offSpeechOne microphone when using Dragon speech recognition software |
Browser mode F3 Start/end recording
| Windows speech recognition mode F4 | Turn on/off Windows microphone | |
| Dragon for Mac mode | ·EoL/··Prio Turn on/off Dragon microphone | |
| Dragon for Windows mode | INS/OVR Turn on/off Dragon microphone | |
→The SpeechOne exits the mode selection and switches to the selected mode.

Note
- You have 10 seconds to select a mode. After 10 seconds, you will automatically exit mode selection and need to restart the mode selection steps.

Tip
- You can always check your current button mode by briefly pressing the End-of-letter/priority (•EoL/•Prio) button and the Insert/overwrite (INS/OVR) button simultaneously. The LED ogf the button assigned to the current mode (see previous table) shortly lights up orange. E.g. if the currently activated mode is the Event mode, the LED of the F1 button lights up orange.
Hands-free dictating with a Philips foot control
If you connect a Philips foot control, you can control the dictation functions with your foot control to have your hands free for your work.

Note
- Before you connect the foot control to the docking station, make sure that the docking station is neither connected to the computer nor to the power outlet, as otherwise the foot control might not be detected.
- Recording and playback of dictations with a Philips foot control requires dictation software such as Philips SpeechExec to be installed on the computer. When third-party dictation software other than Philips SpeechExec is used, driver software must be installed before connecting the SpeechOne and the foot control.
- For best recording results during hands-free dictation, you will probably have to adjust the recording volume. You can set the recording volume in the audio settings of your recording application, e.g. Philips SpeechExec dictation software or Dragon NaturallySpeaking speech recognition software.
To connect a foot control for hands-free dictation:
1 Connect a Philips ACC2300 series foot control to the docking station of your SpeechOne.

2 Connect the docking station to your computer.

Button assignment of Philips foot controls
Foot control ACC2310 / ACC2320
The Philips foot controls 2310 and 2320 have three pedals. By default, the foot controls 2310 and 2320 have the following configuration:
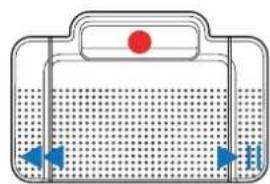
ACC2310
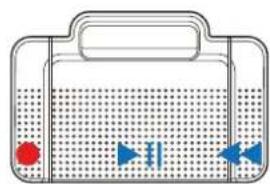
ACC2320
Foot control ACC2330
The Philips foot control 2330 has four pedals. By default, the foot control 2330 has the following configuration:
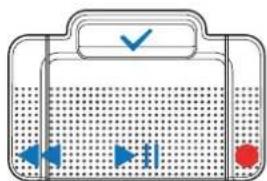
ACC2330
Upgrading the firmware
Your SpeechOne is controlled by an internal program called firmware. As a part of ongoing product maintenance, the firmware is upgraded and errors are corrected.
It is possible that a newer version (an 'update') of the firmware has been released since you purchased the device. In this case, you can easily update your device to the latest version.

Note
- A firmware upgrade is only possible if the following preconditions are met:
- At least two battery LEDs on the docking station must be glowing (which means the SpeechOne has at least 2.5 hours battery power left).
- The SpeechOne is not in Idle mode.
- Ideally, the SpeechOne is placed on the docking station.
• There is no recording or playback running.
1 Download the firmware update for your SpeechOne at www.speechone.com/support, or use the firmware upgrade function in SpeechControl driver and configuration software.
2 Connect the docking station to the computer by using the supplied USB cable. Make sure you use the USB port for PC connection marked with 🧑 on the docking station. Then place the SpeechOne onto the docking station.
3 If the option to start SpeechControl driver and configuration software automatically was selected during installation, open the program by clicking the icon in the notification area of the Windows task bar. To manually start the program, open the Windows start menu in Windows and select Philips Speech Control > Philips Device Control Center.
4 On the Device tab, click on Firmware upgrade.
5 Click the Import button and select the folder with the firmware files to be imported.
6 Click on the desired upgrade version from the Available firmware versions list.
7 Click the Upgrade button to install the new firmware.
→The firmware upgrade takes about 30 seconds.
→When the firmware upgrade is finished, the SpeechOne and the docking station are shortly disconnected and the button LEDs on the docking station glow orange.
→The pairing process starts automatically. When the connection is reestablished, the button LEDs on the docking station turn off.

Caution
- Do not disconnect the docking station from the computer during the firmware upgrade! This might damage your device.
5 Service and support
Don't perform any maintenance operations that aren't described in this user manual. Don't disassemble the device into its component parts to carry out repairs. The device may only be repaired in authorized service centers.
Contact our supporting Philips partners
If you have any questions about your SpeechOne or experience technical issues, contact one of our supporting Philips partners. The local partner you purchased your SpeechOne from will strive to answer your questions and to solve your problem as soon as possible.
Troubleshooting
Find the most common problems you could encounter with the SpeechOne in the following table. If you are unable to solve the problem with the information below, contact the supporting Philips partner you purchased the device from.
Problem Cause Solution
| The SpeechOne is completely without function. | Some computer providers limit the output power of USB ports to 100 mA. These ports may not provide enough power for the SpeechOne to function properly. | Use a power supply unit. (The power supply unit is not included and needs to be purchased separately.)Connect the SpeechOne via a self-powered hub. |
| The SpeechOne doesn't respond to input commands. | The wireless connection to the docking station may be interrupted.The USB cable is connected to the wrong USB port on the docking station (i.e. USB port for charging marked with 5V DC).Your computer is in sleep mode.The battery is empty. | Check the wireless connection.Move closer to the docking station.Start the pairing process as described in the chapterPairing.Disconnect the USB cable from the docking station and connect it to the USB port for PC connection marked withon the docking station.Wake your computer from sleep mode.Charge the SpeechOne.If none of the solutions provided above solves the problem, reset the wireless connection. For more information, seeResetting the wireless connection. |
The SpeechOne doesn't switch on. • The battery is very low. • Charge the SpeechOne.
| Problem Cause Solution | ||
| The SpeechOne doesn't connect to the docking station. | · Pairings may have been reset or the SpeechOne has been previously paired with another docking station. | · Start the pairing process as described in the chapter Pairing.· If re-pairing doesn't solve the problem, reset the wireless connection. For more information, see Resetting the wireless connection. |
| The SpeechOne is connected to the computer but sound will play on the computer's speaker only. | · SpeechOne is not selected as the default playback device. | · In the Windows sound settings, select SpeechOne as the default playback device. |
| The SpeechOne doesn't record sound. | · The input level is too low because of the wrong recording source. | · In the Windows sound settings, select SpeechOne as the default recording device. |
| My computer can't detect the foot control. | · The docking station was connected to the computer and/or to the power outlet before you connected the foot control. | · Disconnect the foot control from the docking station and the docking station from the computer and/or power outlet. Then reconnect the foot control to the docking station first and afterwards connect the docking station to the computer and/or to the power outlet. |
| The connection between the SpeechOne and the docking station is being interrupted. | · The docking station is connected to a low-power USB port on your computer. | · Additionally, connect the docking station via the supplied USB cable to the power supply unit and the USB port for charging (marked with 5V DC). For more information, see Charge via docking station. |
LED colors and meanings
The LEDs on your SpeechOne and the docking station indicate the connection and battery status as well as problems that might occur when using your SpeechOne and the docking station. Use the following table to learn more about the connection status, battery status, and potential problems:
| SpeechOne LED | Button LEDs on docking station | Battery LEDs on docking station | Meaning |
| green off · status | displayed | · connection OK | |
| red orange · status not | displayed | · connection interrupted or lost | |
| orange orange · status | displayed | · wireless connection OK but no USB connection | |
| green flashing off · status | displayed | · Idle mode | |
| off orange · status not | displayed | · SpeechOne power off | |
| red orange · status not | displayed | · no pairing | |
6 Technical data
Design and finishing
- Material: high-class polymers with antimicrobial additive
• Color: black
Dimensions and weight
- Headset incl. headband and cushions:
Dimensions (W × D × H): 155 × 150 × 140 mm
(6.1 × 5.9 × 5.5")
Weight: 81 g (2.6 oz)
- Docking station:
Dimensions (W × D × H): 120 × 120 × 32 mm
(4.7 × 4.7 × 1.3")
Weight: 395 g (13.9 oz)
- Remote control:
Dimensions: 158 × 45 × 30 mm (6.2 × 1.8 × 1.2")
Weight: 110 g (3.9 oz)
- Status light:
Dimensions: 36 × 36 × 98 mm (1.4 × 1.4 × 3.9")
Weight: 58 g (2.1 oz)
• Magnetic ear cushion: 50 mm (2")
• Magnetic head cushions: 48 × 12 mm (1.9 × 0.5")
Connectivity
• Wireless technology: 2.4 GHz ISM Band
- Modulation: 8 FSK
• Maximum range: up to 5 m (16 ft)
Audio
- Microphone type: electret condenser microphone
- Microphone capsule: 10 mm
• Characteristic: uni-directional
• Frequency response: 150 – 15,000 Hz
• Microphone sensitivity: -37 dBV
• Signal-to-noise ratio: > 70 dBA
Sound
- Speaker type: built-in 23 mm round, dynamic speaker
• Acoustic frequency response: 300 – 7500 Hz
• Output power: > 200 mW
Power
- Battery type: built-in rechargeable Li-polymer battery
• Battery capacity: 360 mAh
• Battery lifetime: up to 12 hours of recording - Standby time: > 100 hours
- Charging time: 80% after 60 min, approx. 2 hours for full charge
Docking station
• USB: micro USB for charging micro USB for data transfer USB type A for foot control
• Kensington Security Slot
Green specifications
• Compliant to 2011/65/EU (RoHS)
- Lead-free soldered product
- Certifications: CE, FCC, C-Tick (Australia and New Zealand)
Operation conditions
• Temperature: 5° – 45°C / 41° – 113°F
• Humidity: 10% – 90%
System requirements
- Processor: Intel dual core or equivalent AMD processor, 1 GHz or faster
• RAM: 2 GB (32 bit)/4 GB (64 bit) - Hard-disk space: 100 MB for SpeechExec software, 30 MB for SpeechControl software, 4.5 GB for Microsoft .NET Framework
- Operating system: Windows 10 Pro/Enterprise (64 bit), Windows 8.1/7 (32/64 bit), Windows Server 2012 (64 bit), Windows Server 2008 R2 (32/64 bit), macOS 10.13/10.12 (Mac functionality may be limited)
- One free USB port
- Graphics: DirectX-compliant graphics card with hardware acceleration recommended
• Sound: Windows-compatible sound device - Browser: Internet Explorer 9 or higher, or the current version of Chrome or Firefox
- Free USB port
- SpeechExec: Internet connection for required software activation
Additional system requirements for speech recognition software
• Supported speech recognition software:
Nuance Dragon Professional 13/14/15 Individual/Group,
Nuance Dragon Legal 13/14/15,
Dragon Medical Practice Edition 3.x/4.x,
Nuance Dragon SDK Client Edition 14,
M*Modal Fluency Direct 8.0 and above, M*Modal Fluency for Imaging 3 and above
- Processor: Intel dual core or equivalent AMD processor, 2.2 GHz or faster
• RAM: 4 GB (32 bit)/8 GB (64-bit)
• Free hard disk space: 8GB
Accessories (optional)
- SpeechOne Remote Control ACC6100
- SpeechOne Docking Station and Status Light ACC6000
• AirBridge Wireless Adapter for SpeechOne and SpeechMike Premium Air ACC4100
FCC Warning Statement

Changes or modifications not expressly approved by the party responsible for compliance could void the user's authority to operate the equipment.
This equipment has been tested and found to comply with the limits for a Class B digital device, pursuant to Part 15 of the FCC Rules. These limits are designed to provide reasonable protection against harmful interference in a residential installation. This equipment generates uses and can radiate radio frequency energy and, if not installed and used in accordance with the instructions, may cause harmful interference to radio communications. However, there is no guarantee that interference will not occur in a particular installation. If this equipment does cause harmful interference to radio or television reception, which can be determined by turning the equipment off and on, the user is encouraged to try to correct the interference by one or more of the following measures:
- Reorient or relocate the receiving antenna.
- Increase the separation between the equipment and receiver.
- Connect the equipment into an outlet on a circuit different from that to which the receiver is connected.
- Consult the dealer or an experienced radio/TV technician for help.
Neither Speech Processing Solutions GmbH nor its affiliates shall be liable to the purchaser of this product or third parties with respect to claims for damages, losses, costs or expenses incurred by purchaser or third parties as a result of an accident, misuse or abuse of this product or unauthorized modifications, repair, modification of the product or failure to meet the operating and maintenance instructions provided by the manufacturer.
This user manual is a document with no contractual nature. We accept no liability for changes, mistakes or printing errors.

Issue date 2018-11-14
Version 1.0
© 2018 Speech Processing Solutions GmbH. All rights reserved.
Specifications are subject to change without notice. Philips and the Philips shield emblem are registered trademarks of Koninklijke Philips N.V. and are used by Speech Processing Solutions GmbH under license from Koninklijke Philips N.V. All trademarks are the property of their respective owners.
www.philips.com/dictation


- USER MANUAL
- TABLE OF CONTENTS
- 1 IMPORTANT 3
- 2 YOUR SPEECHONE 6
- 3 GET STARTED 9
- 4 USE YOUR SPEECHONE
- 5 SERVICE AND SUPPORT 24
- 6 TECHNICAL DATA 27
- 1 IMPORTANT
- SAFETY INSTRUCTIONS
- RECHARGEABLE BUILT-IN BATTERY
- SMALL CHILDREN
- OPERATING ENVIRONMENT
- MEDICAL DEVICE INTERFERENCE
- IMPLANTED MEDICAL DEVICES
- HEARING AIDS
- VEHICLES
- USE IN AIRCRAFT
- CLEANING AND DISINFECTION
- DISPOSAL OF YOUR OLD PRODUCT
- EUROPE
- UNITED STATES
- RECHARGEABLE LI-ION BATTERY
- RECHARGEABLE NIMH BATTERY
- CANADA
- ABOUT THIS USER MANUAL
- SYMBOLS USED
- 2 YOUR SPEECHONE
- PRODUCT HIGHLIGHTS
- OVERVIEW OF THE REMOTE CONTROL (PSM6500, PSM6800)
- 3 GET STARTED
- CAUTION
- CHARGING THE BATTERY
- NOTE
- CHARGE VIA DOCKING STATION
- CHARGE VIA COMPUTER
- CHARGE VIA USB POWER SUPPLY UNIT (OPTIONAL)
- LEARN ABOUT THE BATTERY STATUS
- PAIRING
- PAIR THE SPEECHONE AND THE DOCKING STATION
- CHANGE PAIRED DEVICES
- LEARN ABOUT WIRELESS TECHNOLOGY
- GOING OUT OF RANGE
- IDLE MODE AND POWER DOWN MODE
- IDLE MODE
- TO REACTIVATE THE DEVICE
- POWER DOWN MODE
- TO TURN THE DEVICE ON AGAIN
- RESETTING THE WIRELESS CONNECTION
- WEARING STYLES
- WEARING WITH THE HEADBAND ATTACHMENT
- CLASSIC WEARING STYLE
- WEARING WITH THE NECKBAND
- CREATE A RECORDING
- SKYPE CALLS
- WHEN YOU RECEIVE AN INCOMING SKYPE CALL
- TO ACCEPT AN INCOMING SKYPE CALL
- TO END A SKYPE CALL
- TO REJECT A SKYPE CALL
- STATUS LIGHT
- MOUNT THE STATUS LIGHT ON YOUR COMPUTER
- DO-NOT-DISTURB MODE
- USE THE REMOTE CONTROL (PSM6500, PSM6800)
- IF YOU ARE A SPEECHMIKE USER
- IF YOU ARE NOT A SPEECHMIKE USER
- BUTTON MODES
- EVENT MODE
- KEYBOARD MODE
- BROWSER MODE
- WINDOWS SPEECH RECOGNITION MODE
- DRAGON FOR MAC MODE
- DRAGON FOR WINDOWS MODE
- BUTTON ASSIGNMENT FOR EACH MODE
- BROWSER MODE (FOR PHILIPS SPEECHLIVE CLOUD DICTATION SOLUTION)
- COMMAND
- SHORTCUT IN SPEECHCONTROL
- SWITCH BETWEEN BUTTON MODES ON THE DOCKING STATION
- TIP
- SWITCH BETWEEN BUTTON MODES ON THE REMOTE CONTROL (PSM6500, PSM6800)
- MODE BUTTON
- FUNCTION OF RECORD BUTTON
- HANDS-FREE DICTATING WITH A PHILIPS FOOT CONTROL
- BUTTON ASSIGNMENT OF PHILIPS FOOT CONTROLS
- FOOT CONTROL ACC2310 / ACC2320
- FOOT CONTROL ACC2330
- UPGRADING THE FIRMWARE
- 5 SERVICE AND SUPPORT
- CONTACT OUR SUPPORTING PHILIPS PARTNERS
- TROUBLESHOOTING
- LED COLORS AND MEANINGS
- 6 TECHNICAL DATA
- DESIGN AND FINISHING
- DIMENSIONS AND WEIGHT
- CONNECTIVITY
- AUDIO
- SOUND
- POWER
- DOCKING STATION
- GREEN SPECIFICATIONS
- OPERATION CONDITIONS
- SYSTEM REQUIREMENTS
- ADDITIONAL SYSTEM REQUIREMENTS FOR SPEECH RECOGNITION SOFTWARE
- ACCESSORIES (OPTIONAL)
- FCC WARNING STATEMENT
Brand : PHILIPS
Model : SpeechOne PSM6500
Category : Voice recorder