
DVD-RV60 - DVD player PANASONIC - Free user manual and instructions
Find the device manual for free DVD-RV60 PANASONIC in PDF.
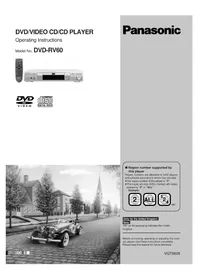


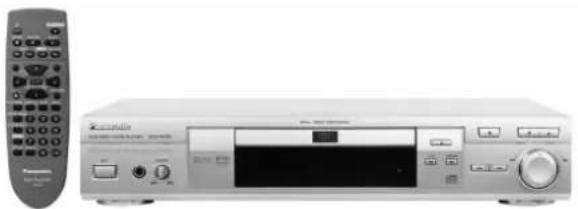
| Product Type | DVD Player |
| Brand | Panasonic |
| Model | DVD-RV60 |
| Disc Compatibility | DVD-Video, DVD-R/RW, CD, CD-R/RW, VCD, SVCD |
| Video Output | Composite, S-Video, Component (Y/Pb/Pr) |
| Audio Output | Analog stereo, Digital coaxial, Optical |
| Audio Decoding | Dolby Digital, DTS (2-channel downmix) |
| Playback Features | Repeat, Random, Program, A-B Repeat, Time Search |
| Progressive Scan | Yes (480p) |
| Dimensions (W x H x D) | 430 x 49 x 283 mm |
| Weight | 2.5 kg |
| Power Consumption | 12 W (standby: <1 W) |
| Power Supply | AC 120V/60Hz (US) or 220-240V/50Hz (EU) |
| Remote Control | Included (batteries: 2x AAA) |
| Front Panel | Power, Open/Close, Play, Stop, Next/Prev, Volume |
| Display | LED 4-digit timer |
| Maintenance | Clean lens with soft dry cloth; avoid liquids |
| Safety | Class 1 laser product; do not open casing |
| Repairability | Tested for 7 years after end of production: spare parts available via service centers |
| Environmental | RoHS compliant, recyclable packaging |
Frequently Asked Questions - DVD-RV60 PANASONIC
User questions about DVD-RV60 PANASONIC
0 question about this device. Answer the ones you know or ask your own.
Ask a new question about this device
Download the instructions for your DVD player in PDF format for free! Find your manual DVD-RV60 - PANASONIC and take your electronic device back in hand. On this page are published all the documents necessary for the use of your device. DVD-RV60 by PANASONIC.
USER MANUAL DVD-RV60 PANASONIC
Operating Instructions
Model No. DVD-RV60


Panasonic

■ Region number supported by this player
Region numbers are allocated to DVD players and software according to where they are sold.
• The region number of this player is "2". - The player will play DVDs marked with labels containing "2" or "ALL".
Example:

etc.
Only for the United Kingdom
Note
"EB" on the packaging indicates the United Kingdom.
Before connecting, operating or adjusting this product, please read these instructions completely. Please keep this manual for future reference.
VQT8626
Dear Customer
Thank you for purchasing this product.
For optimum performance and safety, please read these instructions carefully.
Accessories

Please check and identify the supplied accessories.
Use numbers indicated in parentheses when asking for replacement parts.
□ Remote control ....1 (VEQ2380)

□ Batteries ....2 for remote control

□ AC mains lead ....1
(For the United Kingdom) (For Continental Europe)

(VJA0940) (VJA0664-1)

□ Audio/video cable .... 1 (VJA1062 or VJA0788-D)

Note
- The included AC mains lead is for use with this unit only. Do not use it with other equipment.
Table of contents
Getting Started
Accessories 2
SAFETY INFORMATION 3
SAFETY PRECAUTIONS 3
Caution for AC Mains Lead 4
SCART and S video terminal information 5
Disc information 6
Remote control preparations.... 7
Control reference guide 8
Connection to a television 9
Basic Operations
Basic play 12
Stopping play.... 13
Other methods of play 14
Still picture (Pause) 14
Skipping chapters or tracks.... 14
Frame advance (Frame reverse) 14
Slow-motion play 15
Rapid advance (Rapid reverse) 15
Canceling playback control 16
Using menus to play 16
Advanced Operations
Advanced operations 17
Changing soundtrack language 17
Changing subtitle language.... 18
Viewing from another angle.... 18
Changing picture quality for movie viewing 19
Raising dialogue volume 19
Repeat play 20
Repeating sections between two specific points (A-B repeat) 21
Connecting headphones 21
Random play 21
Program play 22
Reproducing an Advanced Virtual Surround Sound (V.S.S.) effect 23
Using GUI screens 24
Common procedures.... 24
Detailed descriptions of each icon 25
Changing initial settings 27
Common procedures.... 27
1 Disc Languages 28
2 Ratings 29
3 Menu Language 30
4 On-Screen Messages 30
5 FL Display 30
9 Other Settings 31
How different kinds of software appear on your
television 32
Home Theater
Home Theater 33
Connecting an amplifier with 5.1-channel audio input terminals 34
Connecting an amplifier with a built-in decoder 35
Connecting audio equipment with 2-channel audio input terminals 36
Connecting audio equipment with digital audio input terminals 36
Selecting digital output 37
Speaker Setting 39
For Your Reference
Troubleshooting Guide 41
Disc handling 43
Maintenance 43
Specifications .... Back cover
SAFETY INFORMATION
Note
This player can be used only where the power supply is AC 220–240 V, 50 Hz. It cannot be used elsewhere.
CAUTION:
DVD/VIDEO CD/CD PLAYER IS A CLASS 1 LASER PRODUCT. HOWEVER, THIS DVD/VIDEO CD/CD PLAYER USES A VISIBLE LASER BEAM WHICH COULD CAUSE HAZARDOUS RADIATION EXPOSURE IF DIRECTED. BE SURE TO OPERATE THE DVD/VIDEO CD/CD PLAYER CORRECTLY AS INSTRUCTED.
WHEN THIS DVD/VIDEO CD/CD PLAYER IS PLUGGED TO THE WALL OUTLET, DO NOT PLACE YOUR EYES CLOSE TO THE OPENING OF THE DISC TRAY AND OTHER OPENINGS TO LOOK INTO THE INSIDE OF THIS PLAYER.
USE OF CONTROLS OR ADJUSTMENTS OR PERFORMANCE OF PROCEDURES OTHER THAN THOSE SPECIFIED HEREIN MAY RESULT IN HAZARDOUS RADIATION EXPOSURE.
DO NOT OPEN COVERS AND DO NOT REPAIR YOURSELF. REFER SERVICING TO QUALIFIED PERSONNEL.
WARNING:
TO REDUCE THE RISK OF FIRE OR ELECTRIC SHOCK, DO NOT EXPOSE THIS PLAYER TO RAIN OR MOISTURE.
TO REDUCE THE RISK OF FIRE OR ELECTRIC SHOCK, AND ANNOYING INTERFERENCE, USE THE RECOMMENDED ACCESSORIES ONLY.
THIS PLAYER IS INTENDED FOR CONTINUOUS OPERATION!
| CAUTION -LASER RADIATION WHEN OPEN.DO NOT STARE INTO BEAM. |
| ATTENTION-RAYOMNEMENT LASER EN CAS D'OUVERTURE.NE PAS REGARDER DANS LE FAISCEAU. |
| VORSICHT -LASERSTRAHLUNG, WENN ABDECKUNG GEÖFFNET.NICHT IN DEN STRAHL BLICKEN. |
| ADVARSEL -LASERSTRÄLING VED ÅBNING.SE IKKE IND I STRÄLEN. |
| ADVARSEL -LASERSTRÄLING NÄR DEKSEL ÄPNES.STIRR IKKE INN I STRÄLEN. |
| VARMING -LASERSTRÄLNING NÄR DENNA DEL ÄR ÖPPWAD.STIRRA EJ IN I STRÄLEN. |
| VARO! -AVATTAESSA OLET ALTTIINA LASERSÄTEILYLLE.ÄLA TULIOTA SÄTEESEN. |
| 注意 - 当打开这里会出现激光,请不要直视激光。 |
| 注意 - ここを囲くとレーザー光が出ます。レーザー光をのぞき込まないでください。 |
(Inside of player)

(Back of player)
SAFETY PRECAUTIONS
Placement
Set the unit up on an even surface away from direct sunlight, high temperatures, high humidity, and excessive vibration. These conditions can damage the cabinet and other components, thereby shortening the unit's service life.
Place it at least 15 cm away from wall surfaces to avoid distortion and unwanted acoustical effects.
Do not place heavy items on the unit.
Voltage
Do not use high voltage power sources. This can overload the unit and cause a fire.
Do not use a DC power source. Check the source carefully when setting the unit up on a ship or other place where DC is used.
AC mains lead protection
Ensure the AC mains lead is connected correctly and not damaged. Poor connection and lead damage can cause fire or electric shock. Do not pull, bend, or place heavy items on the lead.
Grasp the plug firmly when unplugging the lead. Pulling the AC mains lead can cause electric shock.
Do not handle the plug with wet hands. This can cause electric shock.
Foreign matter
Do not let metal objects fall inside the unit. This can cause electric shock or malfunction.
Do not let liquids get into the unit. This can cause electric shock or malfunction. If this occurs, immediately disconnect the unit from the power supply and contact your dealer.
Do not spray insecticides onto or into the unit. They contain flammable gases which can ignite if sprayed into the unit.
Service
Do not attempt to repair this unit by yourself. If sound is interrupted, indicators fail to light, smoke appears, or any other problem that is not covered in these instructions occurs, disconnect the AC mains lead and contact your dealer or an authorized service center. Electric shock or damage to the unit can occur if the unit is repaired, disassembled or reconstructed by unqualified persons.
Extend operating life by disconnecting the unit from the power source if it is not to be used for a long time.
Caution for AC Mains Lead
(Only for the United Kingdom)
For your safety please read the following text carefully
This appliance is supplied with a moulded three pin mains plug for your safety and convenience.
A 5 amp fuse is fitted in this plug.
Should the fuse need to be replaced please ensure that the replacement fuse has a rating of 5 amps and that it is approved by ASTA or BSI to BS 1362.
Check for the ASTA mark or the BSI mark on the body of the fuse.
If the plug contains a removable fuse cover you must ensure that it is refitted when the fuse is replaced.
If you lose the fuse cover the plug must not be used until a replacement cover is obtained.
A replacement fuse cover can be purchased from your local Panasonic Dealer.
IF THE FITTED MOULDED PLUG IS UNSUITABLE FOR THE SOCKET OUTLET IN YOUR HOME THEN THE FUSE SHOULD BE REMOVED AND THE PLUG CUT OFF AND DISPOSED OF SAFELY.
THERE IS A DANGER OF SEVERE ELECTRICAL SHOCK IF THE CUT OFF PLUG IS INSERTED INTO ANY 13 AMP SOCKET.
If a new plug is to be fitted please observe the wiring code as shown below.
If in any doubt please consult a qualified electrician.
IMPORTANT
The wires in this mains lead are colored in accordance with the following code:
Blue: Neutral
Brown: Live
As the colors of the wires in the mains lead of this appliance may not correspond with the colored markings identifying the terminals in your plug, proceed as follows:
The wire which is colored BLUE must be connected to the terminal in the plug which is marked with the letter N or colored BLACK.
The wire which is colored BROWN must be connected to the terminal in the plug which is marked with the letter L or colored RED.
Under no circumstances should either of these wires be connected to the earth terminal of the three pin plug, marked with the letter E or Earth Symbol ⊥.
How to replace the Fuse
- There are two types of the AC Mains Lead: Ⓐ or Ⓑ supplied with the player as shown below.
1 Open the fuse compartment with a screwdriver.
2 Replace the fuse and fuse cover.
TYPE A


TYPE Ⓑ


21-pin SCART terminal
| Pin NO | AV1 (Video)/ AV1 (S video)AV2 (Playback) AV2 (Standby) | AV1 (RGB, Standby)/AV2 (Playback) AV2 (Standby) | |
| 1 | Audio Output (R) Audio Output (R) | Audio Output (R) | |
| 2 | Audio Input (R) Audio Input (R) | Audio Input (R) | |
| 3 | Audio Output (L) Audio Output (L) | Audio Output (L) | |
| 4 | Audio GND Audio GND Audio GND | GND | |
| 5 | No Connection No Connection | Blue GND | |
| 6 | Audio Input (L) Audio Input (L) | Audio Input (L) | |
| 7 | No Connection No Connection | Blue | |
| 8 | Switching Voltage Switching Voltage | Switching Voltage | |
| 9 | No Connection No Connection | Green GND | |
| 10 | Through AV1 to AV2 Through | AV1 to AV2 Through AV1 to | AV2 |
| 11 | No Connection No Connection | Green | |
| 12 | No Connection No Connection | No Connection | |
| 13 | No Connection S video (C) Output GND | Red GND | |
| 14 | Blanking GND | Blanking GND | Blanking GND |
| 15 | No Connection S video (C) Output | Red | |
| 16 | Blanking | Blanking | Blanking |
| 17 | Video Output GND | S video (Y) Output GND | Video Output GND |
| 18 | Video Input GND | Video Input GND | Video Input GND |
| 19 | Video Output | S video (Y) Output | Video Output |
| 20 | Video Input | Video Input | Video Input |
| 21 | GND | GND | GND |
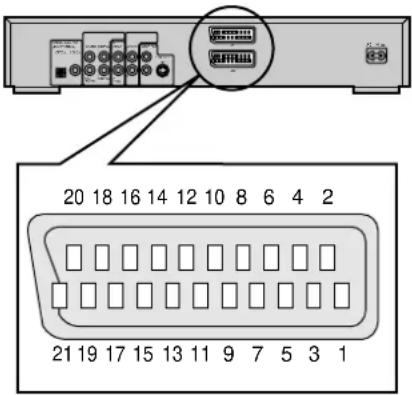
- You can select "Video", "S-Video" or "RGB" at the "6 AV1 Output" of the initial settings "9 Other Settings". (→ page 31.)
- RGB stands for: Red, Green and Blue colour signals. These are output as separate signals.
S video 4-pin terminal
| √ | Discs supported by this player | × | Discs not supported by this player | ||
| DVD-Video |  |  | 8 cm disc/12 cm disc | ●Do not try to play Photo CD or CD-R. (Data on the disc may be damaged.)●DVD with region number other than “2” or “ALL”●CD-G ●Divx Video Disc | |
| Video CD |  | 8 cm disc/12 cm disc | ●DVD-ROM ●CD-RW ●DVD-Audio●DVD-R ●DVD-RAM ●DVD+RW●DVD-RW ●SVCD ●CD-ROM | ||
| Audio CD |  | 8 cm disc/12 cm disc | ●CVD ●SACD ●VSD●CDVetc. | ||
For the purpose of these operating instructions, "DVD" stands for DVD-Video and "CD" stands for Audio CD.
■ Region number supported by this player
Region numbers are allocated to DVD players and software according to where they are sold.
- The region number of this player is "2".
- The player will play DVDs marked with labels containing "2" or "ALL".
Example:


etc.
■ Playing DVDs and Video CDs
The producer of the material can control how these discs are played. This means that you may not be able to control play of a disc with some operations described in these operating instructions. Read the disc's instructions carefully.
Example: •“∅” appears when you press the skip buttons to move to the next section. - Resume, repeat play, and markers may not work during play of interactive DVDs and menu play of Video CDs with playback control. - After showing the Karaoke menu, tracks are played successively without returning to the menu (Video CD with playback control).
■ "Copy Protection"
Some DVD discs contain a "Copy Protection" signal which can affect the video signal if the output of the player is fed through a VCR to the TV. The picture may become unstable or the picture contrast may change drastically. It is therefore very important to connect this DVD/VIDEO CD/CD player according to the diagram in these Operating Instructions.
■ Marks used in these operating instructions
DVD : indicates features applicable to DVD only.
VCD : Video CD only.
CD: CD only.
■ Compatible with PAL DVD/Video CD and NTSC DVD/Video CD
This player can play discs recorded in either PAL or NTSC format. However, the player must be connected to a Multi-system television or PAL television which is capable of receiving PAL 525/60 system to play both PAL DVD/Video CD and NTSC DVD/Video CD. The use of a Multi-system television is recommended.
■ Type of disc for the type of television
DVD and Video CDs are recorded using either PAL or NTSC. Refer to this table to select discs suitable for your television.
√ Clear images are shown on the screen.

Example:
× No clear images shown on the screen.
| TV type | Disc | TV Monitor |
| Multi-system TV | PAL | √ |
| NTSC | *1 | |
| NTSC | PAL | × |
| NTSC | × | |
| PAL | PAL | √ |
| NTSC | *2 |
※1 If you select "2 NTSC" in "7 NTSC Disc Output" in "9 Other Settings", the picture may be clearer (→page 31). ※2 In "9 Other settings" – "7 NTSC Disc Output", select "1 PAL 60" (→page 31).
Note
- The bottom part of the picture may be cut off if the Video CD played does not comply with standards.
■ Terms used in these operating instructions
• Title/Chapter DVD
DVDs are divided up into large sections, titles, and smaller sections, chapters. The numbers allocated to these sections are called title numbers and chapter numbers.

Track VCD CD
Video CDs and CDs are divided up into sections called tracks, and the numbers allocated to these sections are called track numbers.

-Playback control VCD
If a Video CD has "playback control" written on its disc or jacket, it means that particular scenes or information can be selected for viewing interactively with the TV monitor using the menu screen. This player can play Video CDs with playback control. Using menus to control play of a Video CD is called "menu play" in these operating instructions.
Display during menu play of a Video CD with playback control

- Interactive DVD DVD
An interactive DVD is DVD software which includes multiple angles, multiple plot endings, etc. The elapsed play time of some of these DVDs is not shown.
Display during play of an interactive DVD

Remote control preparations
Battery installation
Use of batteries
- Align the poles (+ and -) properly when inserting the batteries.
- Do not mix old and new batteries or different types of batteries.
- Do not recharge ordinary dry cell batteries.
- Do not heat or disassemble the batteries. Do not allow them to contact flame or water.
- Remove the batteries if the unit is not to be used for a long time.
- Do not keep together with metallic objects such as necklaces.
- Do not use rechargeable type batteries.
- Do not use batteries if the covering has been peeled off.
Mishandling of batteries can cause electrolyte leakage which can damage items the fluid contacts and may cause a fire.
If electrolyte leaks from the batteries, consult your dealer.
Wash thoroughly with water if electrolyte comes in contact with any part of your body.
Correct method of use
Operation notes
- Do not place obstacles between the remote control signal sensor and remote control unit.
- Do not expose the remote control signal sensor to direct sunlight or to the bright light of a fluorescent light.
- Take care to keep the remote control signal sensor and end of the remote control unit free from dust.
- If this system is installed in a rack with glass doors, the glass doors' thickness or colour might make it necessary to use the remote control a shorter distance from the system.
To prevent damage
- Never place heavy items on top of the unit.
- Do not disassemble or reconstruct the unit.
- Do not spill water or other liquids into the unit.
Control reference guide

Player
Page
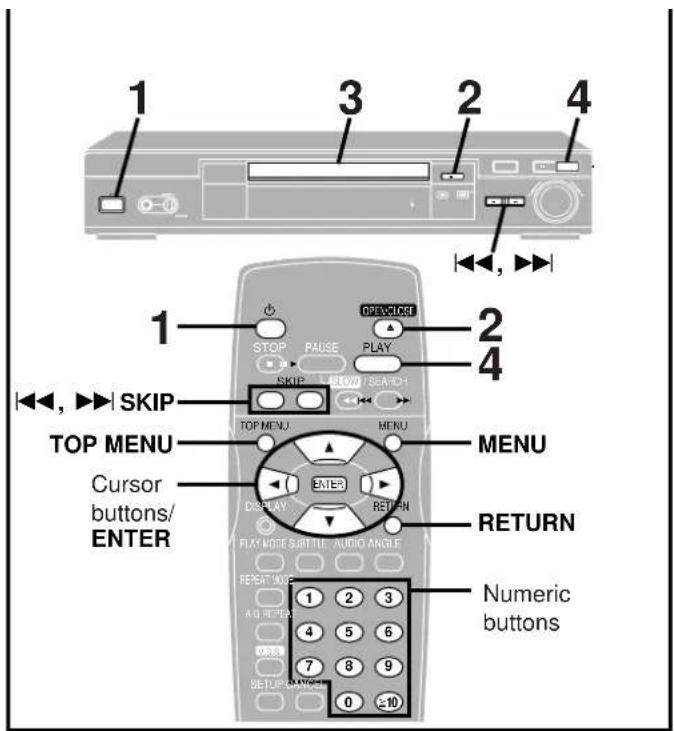
① Standby/on switch (⏻/l) 12
Press to switch the unit from on to standby mode or vice versa. In standby mode, the unit is still consuming a small amount of power.
② Disc tray 12
③ Disc tray open/close button (▲) 12
④ Stop button (■) 13
⑤ Pause button (Ⅱ) 14
⑥ Play button (▶) 12
⑦ Headphone jack 21
⑧ Headphone volume control (PHONES) 21
⑨ FL display
⑩ STANDBY indicator (⏻)
When the unit is connected to the AC mains supply, this indicator lights up in standby mode and goes out when the unit is turned on.
⑪ Virtual Surround Sound button/indicator (V.S.S.) ..... 23
⑫ Cinema button/indicator (CINEMA) 19
⑬ Skip buttons (|◀◀, ▶▶) ...... 14
⑭ Shuttle dial (◀◀, ▶▶) 15
⑮ Rotates during play.

Rotates fast clockwise or counterclockwise during rapid advance (reverse).
Rotates slowly clockwise or counterclockwise during slow-motion play. DVD VCD

Illuminates in the stop mode.
⑯ Illuminates during playback.
Flashes when the RESUME function is ON.
⑰ Illuminates during repeat play.
⑱ Illuminates in the still picture (pause) mode.
⑲ Elapsed playing time from the start of the title/track during play.
⑳ Audio channel information recorded in the disc being played back (e.g., 2ch or 5.1ch).

②1 A DVD is loaded.
②2 It is possible to change the angle. DVD
②3 Illuminates during program play. VCD CD
⑳ Title/chapter number DVD
Track number VCD CD
⑲ Linear PCM of 96 kHz sampling is being played.
② Linear PCM of 24 bit is being played.
Buttons such as 1 function in exactly the same way as the buttons on the player.

Remote control
Page
⑳ Top menu button (TOP MENU) 12
⑳ Cursor buttons (▲,▼,◀,▶)/Enter button (ENTER) ..... 12
⑲ Display button (DISPLAY) 19
③0 Subtitle button (SUBTITLE) 18
③1 Play mode button (PLAY MODE) 21
③2 Repeat mode button (REPEAT MODE) 20
③3 A-B repeat button (A-B REPEAT) 21
③4 Setup button (SETUP) 27
③5 Slow/Search buttons (◀◀, ▶▶ SLOW/SEARCH) ..... 15
③6 Menu button (MENU) 12
③7 Return button (RETURN) 11
③8 Audio button (AUDIO) 17
⑲ Angle button (ANGLE) 18
④ Numeric buttons (1-9, 0, ≧10) ..... 12
• To select a 2-digit number
Example: To select track 23
Press [≥10], then [2] and [3].
Cancel button (CANCEL)
Connection to a television
- Ensure that this player and other equipment to be connected are switched to the standby mode or off and disconnect the AC mains lead before commencing connection.
- Do not block ventilation holes of any of the equipment and arrange them so that air can circulate freely.
- Read through the instructions before connecting other equipment.
- Ensure that you observe the colour coding when connecting audio and video cables.
- See page 33 for information about how to upgrade your system with other audio/visual equipment.
Note
● Additional equipment and cables are not supplied. - TV volume may be lower when playing DVDs than during television broadcasts. Turn the volume up while playing DVDs and reduce it to the previous level before switching the source back to television to avoid sudden changes in volume. - When you have finished connection, select the appropriate screen type at the initial setting "6 TV Aspect" according to your television (4:3/16:9) (→ page 11). No changes are needed if you connect the player to a conventional television (4:3).
Conserving power
- The unit consumes approximately 4.0 W even when it is turned off with [⏻/l]. To save power when the unit is not to be used for a long time, unplug it from the mains socket.
Connect Your Player Directly To Your Television.
If the player is connected to the television through a video cassette recorder, the picture may not be played back correctly due to the copy guard. So we strongly recommend you do not connect the player to your video cassette recorder when setting up your home entertainment system.
- Connect to the television section if you connect the player to a combined television-video player.
Do not place the player on amplifiers or other equipment which may become hot.
The heat can damage the player.

Connecting to a television with video input terminal or S video input terminal

Note
- If your television is monaural, use a stereo-monaural audio cable instead of the supplied audio/video cable. The video part of the cable (yellow) can still be used if required. Audio cable

Connecting to a television and a video cassette recorder with 21-pin SCART terminal
![graph TD A["Television"] --> B["SCART terminal VOR"] B --> C["21-pin SCART cable"] C --> D["Back of the player"] D --> E["Radio/Audio Control Optical Control"] D --> F["Signal/Output Control"] D --> G["Radio/Output Control"] D --> H["Signal/Output Control"] style A fill:#f9f,stroke:#333 style B fill…](/content/2026/06/1329940/images/9f88e590c1cad5a5674e77008eaf3cf93033ab9ac3e60d46657962319a19049e.jpg)
Audio and video out through RCA terminals (AUDIO OUT jacks in red and white/VIDEO OUT jack in yellow) are only from DVD play-back, not from other sources connected to the SCART terminals.
![graph TD A["21-pin SCART cable"] --> B["Video cassette recorder"] B --> C["21-pin SCART terminals AV1"] B --> D["21-pin SCART terminals AV2"] C --> E["To 21-pin SCART terminal of television"] D --> F["21-pin SCART cables"] F --> G["Satellite receiver or Decoder"] G --> H["TV"] G --> I["VCR"] H --> J…](/content/2026/06/1329940/images/a2277edb1fa520f9a07eb510c26e4354f2f90644bce65a9b15d5d6cd5b824f1d.jpg)
Note
● Additional equipment and cables are not supplied. - To view pictures from the video cassette recorder, set the player to the standby mode.


Connection to a television
■ Before enjoying DVD/Video CD/CD
The menu language for this player has been set to English, but you can change the language to French (example) (→ "3 Menu Language", page 30). English has been used in the examples shown.
Selecting TV screen type
Select the TV aspect, conventional size screen (4:3) or wide-screen (16:9), and the TV type according to your television.
Preparation
- Ensure connections to your television and audio equipment are correct.
- Turn on your television and other equipment.
- Select the Audio/Video (AV) position, e.g., AV1, AV2, which has been connected to the player.
1 Press [⏻] to switch on the power.
2 Press [SETUP] in the stop mode.
The initial settings screen is displayed.
3 Press the cursor buttons [▲, ▼] to select "6 TV Aspect" and press [ENTER]. 4 Press the cursor buttons [▲, ▼] to select the TV aspect and press [ENTER].
1 4:3 (Factory preset)
Select when a conventional television is connected.
2 16:9
Select when a wide-screen television is connected.
Setting TV type
After step 4 above, the following TV types can be selected.
Press the cursor buttons [▲, ▼] to select the TV type and press [ENTER].
1 Standard (Direct View TV) (Factory preset)
Select when a standard television, wide-screen television, wide-screen plasma television, etc. is connected.
2 CRT Projector
Select when a CRT Projector is connected.
3 LCD Projector
Select when an LCD Projector is connected.
4 Projection TV
Select when a Projection TV is connected.
Setting is finished and the initial settings screen in step 2 is displayed.
To cancel during setup operation
Press [RETURN]. (The previous screen is displayed.)
To clear the initial settings screen
Press [SETUP] or [RETURN].
For your reference
- For further details on the images which appear on the TV screen, see page 32.
- The optimum settings for your television may differ from those shown above.
- You can also use the GUI screen to adjust picture quality (→ "⑨ Digital picture mode", page 26).

![graph LR A["Hand Click"] --> B["Close"] B --> C["Reading"]](/content/2026/06/1329940/images/c447baf043a289c90e01cd8cc120bde122b850acae0b91417b5ce6a5fa796ca5.jpg)

Basic play
Preparations
- Ensure connections to your television and audio equipment are correct.
- Turn on your television and other equipment.
- Select the Audio/Video (AV) position, e.g., AV1, AV2, which has been connected to the player.
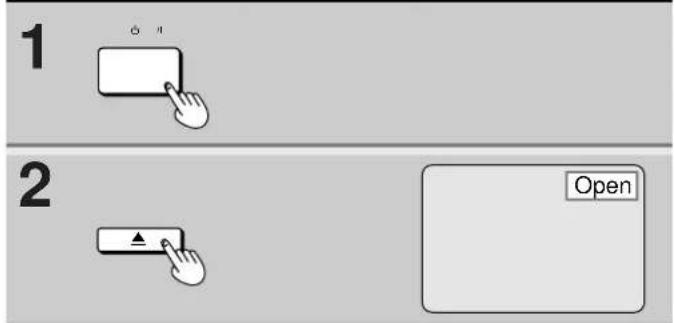
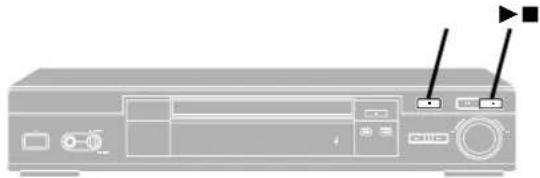
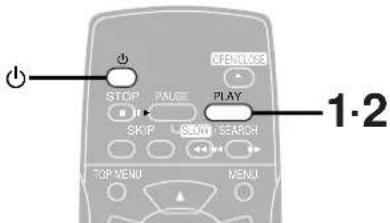
1 Press [⏻/l] to switch on the power. 2 Press [▲] to open the disc tray. 3 Place the disc on the disc tray.
- Insert inside the guides.
- Do not load more than one disc.
4 Press [▶].
The disc tray is automatically closed and play begins.

When a menu screen appears on the TV monitor
Press the cursor buttons [▲, ▼, ◀, ▶] and press [ENTER], or press the numeric buttons, to select the item.
Play of the selected item now begins.
- The cursor buttons are not effective for selecting items for Video CDs.
■ Other buttons used to operate menus
Read the disc's instructions for further details about operation.
[▶▶], [▶▶] SKIP: Shows the next menu.
[◀◀], [◀◀ SKIP]: Shows the previous menu.
[RETURN]: Shows the menu screen.
[TOP MENU]: Shows the first menu screen. DVD
[MENU]: Shows the menu screen. [DVD]
Note
- "NO PLAY" is displayed on the FL display if you load the following kinds of discs and they cannot be played:
- DVD for which playback is prohibited by the initial settings "2 Ratings" (→ page 29).
- DVD with a region number other than "2" or "ALL" (→ page 6).
- If the disc is put in upside down (and it is a single sided disc).
- When "⊗" appears on the TV monitor when a button is pressed, the operation is prohibited by the player or disc.
- When [▶] is pressed immediately after a DVD disc is loaded into the tray, playback will take a little longer to start than when [▶] is pressed from the stop mode. It usually takes a little while before picture and sound appear on the television after [▶] is pressed, this is not a malfunction of the player.
- When NTSC DVD/Video CD is played, the picture may roll up or down on some televisions; adjust this using the vertical hold control on the television. Televisions not equipped with a vertical hold control cannot correct this condition. The playback picture may shrink vertically and black bars may appear both on the top and bottom of the screen, or the picture may be in black and white. This does not indicate a malfunction.

A

B

C

1


2

Basic play
A Stopping play
Press [■] during play.
- The player records the point where [■] was pressed during play. ("D" flashes on the player's FL display.)
B
To resume play from where you stopped it (RESUME function)
Press [▶] while “▶” is flashing on the FL display.
Play will resume from the point where [■] was pressed.
To clear the RESUME function
Press [■] again or open the disc tray while “▷” is flashing on the FL display.
Note
- The RESUME function works only with titles for which the elapsed playing time appears on the player's FL display during playback.
- This feature remains active if the player is switched to the standby mode and then turned back ON.
Chapter review function
DVD
This function plays the first few seconds of each chapter from the beginning of the title up to the point where operation was stopped. This makes it possible to review previous chapters.
- Press [▶] while “▶” is flashing on the FL display. (The message illustrated is briefly displayed.)
- Press [▶] again while the message is displayed on the screen. Normal playback will commence from the point where operation was stopped.
Note
- Cancelling the RESUME function will also clear the chapter review function. ●The chapter review function may not work with some DVDs.
■ After operation
When the player is not in use, remove the disc and press [⏻/l] to switch the player to the standby mode.
The player is automatically switched to the standby mode after 30 minutes or so have elapsed in the stop mode.
(Auto power-off function)
Note
- The disc continues to rotate while the menu is displayed even after the player has finished playing a particular item. Stop the player when you finish viewing to preserve the player's motor and prevent screen burn.

A

B
C
Other methods of play
Features on the next few pages are accessed mainly by using the remote control.
A Still picture (Pause)
Press [II PAUSE] during play.
To return to normal play Press [▶ PLAY].
B Skipping chapters or tracks
Press [◀◀, ▶▶ SKIP] during play or while paused.

For your reference
- When [◀◀, ▶▶▶ SKIP] is pressed during menu play of Video CDs with playback control, a menu screen may sometimes be recalled.
C Frame advance (Frame reverse)
DVD VCD
Press the cursor buttons [◀, ▶] while paused.
- The disc is advanced (reversed) by one frame each time the cursor buttons [◀, ▶] are pressed.
- When the cursor buttons [◀, ▶] are kept pressed, consecutive frame advance (reverse) works.
To return to normal play
Press [▶ PLAY].
For your reference
- Pressing [II PAUSE] also activates frame advance.
- Whether the pictures are advanced by a "Frame" or "Field" is automatic, but you can change the initial settings to choose how the picture is advanced (→ "1 Still Mode" in "9 Other Settings", page 31).

A


B


Other methods of play
A Slow-motion play
DVD VCD
Press [◀◀, ▶▶ SLOW/SEARCH] while paused (→ page 14).
●Each press increases the speed of slow-motion.
On the Player
Turn the shuttle dial [◀◀, ▶▶] while paused (→ page 14).
- The speed of slow-motion increases the more you turn the shuttle dial.
●The picture stills again when you release the shuttle dial.
●There are five speeds of slow-motion.
To return to normal play
Press [▶ PLAY].
For your reference
- When [◀◀, ▶▶ SLOW/SEARCH] or the shuttle dial [◀◀, ▶▶] on the player is used during menu play of Video CDs with playback control, a menu screen may sometimes be recalled.
B Rapid advance (Rapid reverse)
Press [◀◀, ▶▶ SLOW/SEARCH] during play.
●Each press increases the speed of the search.
On the Player
Turn the shuttle dial [◀◀, ▶▶] during play.
- The speed of the search increases the more you turn the shuttle dial.
- Play starts again when you release the shuttle dial.
- There are five speeds of advance (reverse).
To return to normal play
Press [▶ PLAY].
For your reference
- When [◀◀, ▶▶ SLOW/SEARCH] or the shuttle dial [◀◀, ▶▶] on the player is used during menu play of Video CDs with playback control, a menu screen may sometimes be recalled.
- For DVDs and Video CDs, audio will be heard during searching (forward direction only) at the initial search speed (To turn audio off,
→ "2 Audio during Search" in "9 Other Settings", on page 31).


![graph TD A["Input Icon 1"] --> B["Arrow pointing to Button"] C["Input Icon 2"] --> B D["Input Icon 3"] --> B E["Input Icon 4"] --> B F["Input Icon 5"] --> B G["Input Icon 6"] --> B H["Input Icon 7"] --> B I["Input Icon 8"] --> B J["Input Icon 9"] --> B K["Input Icon 10"] --> B L["Input Icon 11"] -->…](/content/2026/06/1329940/images/47b7eb4ea2c876ea90a196b7494f615671ca79815d838bf7ee67aee87af72513.jpg)
Example: if you press the buttons while you are playing title 2
![graph TD A["The disc's top menu"] --> B["Menu"] B --> C["Title 1"] B --> D["Menu Menu"] C --> E["Title 2"] D --> F["Title 3"] G["TOP MENU"] --> H["MENU"] H --> I["Top Menu"]](/content/2026/06/1329940/images/954185c86bf1a170a0f2e19a13301c89717ea652c8e3d2cfb5353febd9f404ef.jpg)
Other methods of play
A Canceling playback control
VCD
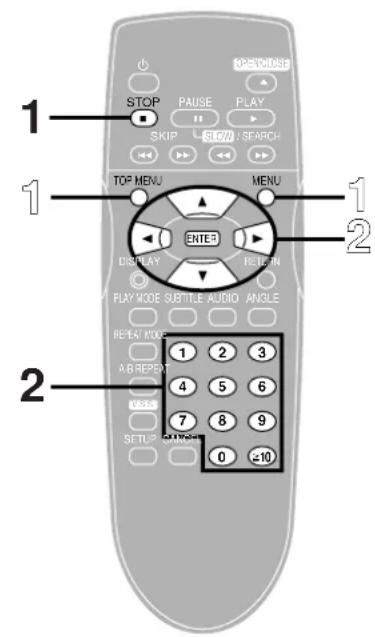
1 Press [■ STOP] after the menu screen appears (after step 4 on page 12).
“PBC” will be cleared from the player's FL display.
2 Press the numeric buttons to select a track. (→item 40 on page 8 for number entry.)
Play begins.
- Refer to the jacket etc. of the disc concerned for the track numbers.
- Press [1] to start play from the beginning of the disc.
To return to menu play
Press [■ STOP] to stop play, press [MENU], and press the numeric buttons to select an item.
"PBC" lights on the player's FL display.
B Using menus to play
DVD
By calling up menus during play, you can start play from a specific title or chapter, or change the soundtrack and subtitle languages.
1
Press [TOP MENU] or [MENU] during play to display the menu.
- Press again to return to what you were watching.
2
Press the cursor buttons [▲, ▼, ◀, ▶] to select an item and press [ENTER].
The selected item is confirmed.
- Repeat if other menus are shown.
DVDs can have several menus. The menu displayed when you press [TOP MENU] may be different to the menu displayed when you press [MENU].
For your reference
- Menu content depends on the disc. These operating instructions describe the basic steps.
- Both buttons take you to the same menu if the disc has only one menu.



Advanced operations
A Changing soundtrack language
DVD
Some DVDs have more than one soundtrack language recorded on them, and you can change the soundtrack language during play.
Press [AUDIO] during play to display the current language number.
The number changes each time you press the button.
- You can also use the cursor buttons [▲, ▼] or the numeric buttons to change the language number.
To clear the display
Press [ENTER].
For your reference
- You can only select languages or sound formats if they have been recorded on the disc you are playing.
- If the RESUME function (→ page 13) is canceled or if you stop play of an interactive DVD, the soundtrack languages revert to the initial settings (→ page 28).
- Some discs allow changes to soundtrack languages only by using the disc's menus.
B
Switching vocals ON or OFF for Karaoke discs
DVD VCD
- Press [AUDIO] during play.
- Press the cursor buttons [▲, ▼, ◀, ▶] or press [AUDIO] to change the setting.
DVD Karaoke [◀, ▶]
- Solo - Duet
---: Vocal OFF ---: Vocal OFF
ON: Vocal ON
1+2: Vocal 1, 2 ON
V1: Vocal 1 only ON
V2: Vocal 2 only ON
- Choose "——" for Karaoke.
- Choose "V1" or "V2" to duet with the player.
Video CD ([▲, ▼] or [AUDIO])
LR: Vocals (Vocals seem to come from the right)
L: No Vocals R: Vocals (Vocals seem to come from both left and right) - Choose "L" for Karaoke.
To clear the display
Press [ENTER].
For your reference
- Karaoke discs may show a menu after each track. Some will have a menu that allows you to play all the tracks.
- Some discs require different operations from those described. Read the disc's instructions for details.
A Cursor buttons/ENTER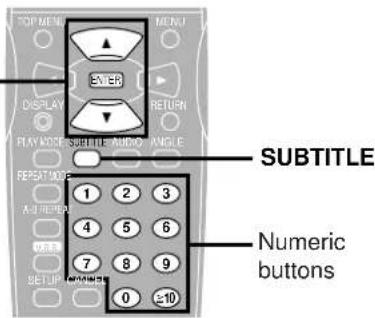

Subtitle language number being played back ("—" indicates subtitles are not recorded)


Angle number being played back
Advanced operations
A Changing subtitle language
DVD
Some DVDs have more than one subtitle language recorded on them, and you can change subtitle language during play.
Press [SUBTITLE] during play to display the current language number.
The number changes each time you press the button.
- You can also use the cursor buttons [▲, ▼] or the numeric buttons to change the language number.
To clear the display
Press [ENTER].
B To clear/display the subtitles
1. Press [SUBTITLE].
- Press the cursor buttons [◀, ▶] to select "ON" or "OFF".
Note
- In some cases, the subtitle language is not changed to the selected one immediately.
For your reference
- You can only select languages if they have been recorded on the disc you are playing.
- If the RESUME function (→ page 13) is canceled or if you stop play of an interactive DVD, the subtitle languages revert to the initial settings (→ page 28).
- Some discs allow changes to subtitle languages only by using the disc's menus.
C Viewing from another angle
DVD
Some DVDs allow you to view the same scene from different angles. "ANGLE" lights on the FL display to indicate that the feature is available.
Press [ANGLE] during play to display the current angle number.
The number changes each time you press the button.
- You can also use the cursor buttons [▲, ▼] or the numeric buttons to change the angle.
To clear the display
Press [ENTER].
For your reference
- You can only select angles if they have been recorded on the disc you are playing.
- Some discs allow you to set angles before multi-angle scenes are played.
- Some discs allow changes to angles only by using the disc's menus.
A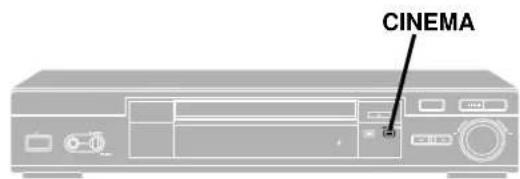

B
1
DISPLAY

2

3

Advanced operations
A
Changing picture quality for movie viewing
DVD
VCD
Press [CINEMA] on the player while a disc is loaded.
The indicator on the button lights.
Mellows movies, enhances detail in dark scenes and reduces picture noise.
To restore the standard picture mode
Press [CINEMA]
For your reference
You can also use the GUI screen to adjust picture quality. (→ "⑧ Digital picture mode", page 26)
B Raising dialogue volume
DVD
This mode makes the dialogue in movies easier to hear.
(→ "© Dialogue Enhancer", page 26)
This function is effective with Dolby Digital or DTS Digital Surround, three channels or over, where the dialogue is recorded in the center channel.
1 Press [DISPLAY] twice during play.
The GUI screen for player information (→ page 26) is displayed.
2 Press the cursor buttons [◀, ▶] to select the icon.
3 Press the cursor buttons [▲, ▼] to select the mode.
OFF: Normal volume
ON: Louder volume for dialogue
To clear the GUI Icons
Press [RETURN] or [CANCEL].

A
REPEAT MODE
![graph TD A["Step a"] --> B["Step b: C icon"] B --> C["Step c: T icon"] C --> D["Step d: OFF icon"] D --> E["Arrow right"] style A fill:#f9f,stroke:#333 style B fill:#ccf,stroke:#333 style C fill:#ccf,stroke:#333 style D fill:#cfc,stroke:#333](/content/2026/06/1329940/images/8fc49b284ee52eeb216cb2d1b826d4f233a8b5f246ac5ce70df65bc95822ec77.jpg)

B REPEAT MODE

Advanced operations
A Repeat play
Press [REPEAT MODE] during play.
Each time this button is pressed, the TV monitor changes as illustrated and the disc will repeat a chapter or title (DVD) or a track (Video CD/CD).
Repeat play starts when the display changes.
•DVD
① Normal play ⑥ Repeat of chapter being played © Repeat of title being played (d) Cancel repeat mode (Normal play)
•Video CD/CD
© Normal play ① Repeat of track being played ⑨ Repeat of entire disc contents ① Cancel repeat mode (Normal play)
To return to normal play
Press [REPEAT MODE] until "OFF" is displayed.
Note
- Repeat play may not work correctly with some DVDs.
- Repeat play does not work with an interactive DVD or during menu play of a Video CD with playback control. ●There is no mode for repeating the whole DVD.
B
To enjoy program repeat play
VCD CD
If [REPEAT MODE] is pressed during program play (→ page 22), the display changes as illustrated.
i Program play ① Repeat of track being played ④ Repeat of all programmed tracks ① Cancel repeat mode (Program play)
To return to program play
Press [REPEAT MODE] until "OFF" is displayed.
A
1
A-B REPEAT

2 A-B REPEAT

B
1
2

C
1
PLAY MODE Random Playback
Press PLAY to start 2
Advanced operations
A
Repeating sections between two specific points (A-B repeat)
1 Press [A-B REPEAT] during play at the point where repeat play is to start (A). 2 Press [A-B REPEAT] at the point where repeat play is to be concluded (B).
Repeat play of the section between points A and B starts.
To return to normal play
Press [A-B REPEAT] until “→ ••” is displayed.
Note
●A-B repeat play does not work with an interactive DVD. - Some subtitles recorded around point A or B may fail to appear (DVD). - A-B repeat play works only within a title (DVD) or a track (Video CD/CD).
For your reference
●The end of a track or title is automatically determined as point B.
B Connecting headphones
1 ① Set [PHONES] to "MIN".
② Connect the headphones (not supplied).
2 Adjust the volume with [PHONES].
Caution
- Avoid listening for prolonged periods of time to prevent hearing damage.
c Random play
VCD CD
The player plays the tracks on the disc in random order.
1 Press [PLAY MODE] while stopped until the illustrated screen appears.
- If “⊗” appears on the television, press [■ STOP] to cancel the RESUME function, then press [PLAY MODE].
2 Press [▶ PLAY].
Play now begins in random order.
To exit the screen
Press [PLAY MODE] once.
To return to normal play
- Press [■ STOP] twice during random play. (Random play is suspended.)
- Press [PLAY MODE] once.
- Press [▶ PLAY].

1

FL display (e.g. CD)

2

3
Advanced operations
Program play


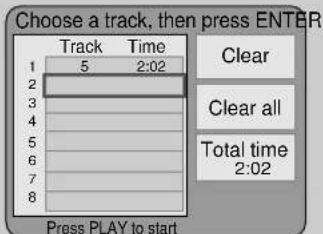
The player plays the tracks on the disc in the order you specify. Up to 32 tracks can be programmed.
1 Press [PLAY MODE] while stopped until the illustrated screen appears.
- If "☐" appears on the television, press [■ STOP] to cancel the RESUME function, then press [PLAY MODE].
2 Press the numeric buttons to select the track. (→ item 40 on page 8 for number entry.)
The selected track is stored in memory.
- If you press [ENTER], you can use the cursor buttons [▲, ▼] to select a track. Press [ENTER] to register the track number. (If you select "All", all the tracks on the disc will be selected.)
- Repeat step 2 to select another track.
- If you enter over 32 tracks, the last programmed track is replaced with the new one.

Press [▶ PLAY].
Play now begins in the programmed sequence.
To exit the screen
Press [PLAY MODE] twice.
To add tracks
- Press [■ STOP] twice during program play to show the program play screen.
- Select the available item with the cursor buttons [▲, ▼], then repeat step 2.
- Press [◀◀, ▶▶ SLOW/SEARCH] to turn the pages of the program to make selection quicker.
To return to normal play
- Press [■ STOP] twice during program play. (Program play is suspended.)
- Press [PLAY MODE] twice.
- Press [▶ PLAY]. ●The program is retained in memory.
Operation by observing the unit's FL display
- Use the numeric buttons to enter track numbers.
- To check the program, press the cursor buttons [▲, ▼].
Clearing the program
When the program play screen is displayed
• To clear the programmed tracks one by one Select the track, move to "Clear" with the cursor buttons [▲, ▼, ◀, ▶] and press [ENTER]. (Selecting the track and pressing [CANCEL] also clears the programmed track.) •To clear the whole program
Move to "Clear all" with the cursor buttons [▲, ▼, ◀, ▶] and press [ENTER].
(The program is also cleared when the player is switched to the standby mode or turned off, or the disc tray is opened.)



Reproducing an Advanced Virtual Surround Sound (V.S.S.) effect
DVD (Dolby Digital, 2-channel or over only)
Use this feature to enjoy a surround-like effect if you are using two front speakers or headphones.
Press [V.S.S.] during play.
Each time this button is pressed, the player's FL display changes:
(a) V.S.S. 1 (Natural effect) (b) V.S.S. 2 (Emphasized effect) (c) V.S.S. is canceled. The V.S.S. indicator lights when the V.S.S. function is activated.
B Enjoying V.S.S. through headphones
- Press [DISPLAY] twice to show the GUI screen on the television and select the V.S.S. icon with the cursor buttons [◀, ▶].
- Select the headphone V.S.S. mode with the cursor buttons [▲, ▼] [→ “① Virtual Surround Sound (V.S.S.)”, page 26].
- Each time [V.S.S.] is pressed, the player's FL display changes:
(d) Headphone V.S.S. 1 (Natural effect) (e) Headphone V.S.S. 2 (Emphasized effect) (f) Headphone V.S.S. is canceled
- Restore speaker mode when you are not using headphones or else the sound from the speakers will sound strange.
Note
• V.S.S. effect does not work with Karaoke DVDs. • V.S.S. will not work or will have less effect with some discs. - Turn off the TV surround sound and other surround sound effects when using this effect. • Sound will only come from the two front speakers if V.S.S. is on.
For your reference
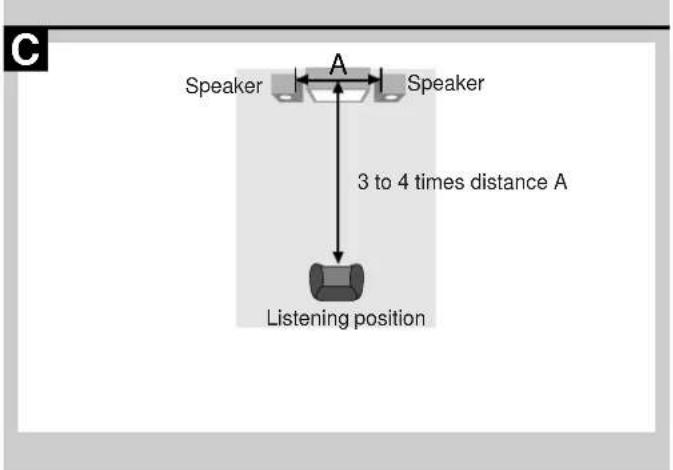
- For optimum effect, it is recommended that the distance between the television and the listening position be about 3 to 4 times the distance between the right and left front speakers.
- You can also change the V.S.S. level with the GUI screen [→ “① Virtual Surround Sound (V.S.S.)”, page 26].
•V.S.S. effects
| Stereo discs | Surround signal recorded discs | |
| V.S.S. 1 | The front speakers sound farther apart. | Surround sound seems to come from the side. |
| Headphone V.S.S. 1 | Sound seems to come from the front left and right. | Front sound seems to come from the front left and right, and surround sound from the rear left and right. |
| V.S.S. 2/Headphone V.S.S. 2 | The surround-like effect in V.S.S. 1/Headphone V.S.S. 1 is increased. | |
A
Video CD![graph TD A["1"] --> B["3:37"] B --> C["L R"] C --> D["PBC OFF"] D --> E["OFF"] E --> F["PRG"] F --> G["*******"] G --> H["N"] H --> I["dB 0"] I --> J["40"] J --> K["+48"] K --> L["End"]](/content/2026/06/1329940/images/967bcdea4b9197138649f32be102ef5c21573c476c7a5d8210b010edcc10cfae.jpg)
CD![graph TD A["1"] --> B["3:37"] B --> C["OFF"] B --> D["PRG"] B --> E["******"] B --> F["dB 0"] C --> G["-50"] D --> H["+"] E --> I["-50"] F --> J["↓"] G --> K["↓"] H --> L["↓"] I --> M["↓"] J --> N["↓"]](/content/2026/06/1329940/images/a6633780b25a5d369a1cda35c49455178f3a5a87252d011a237972b96c60d956.jpg)
B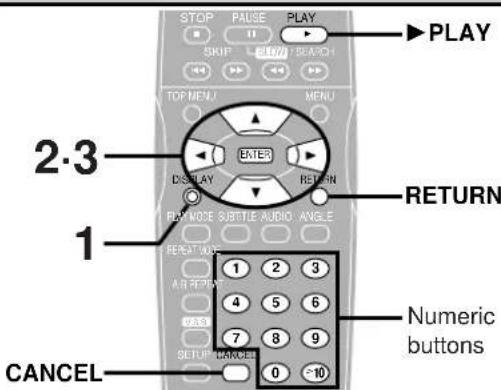
1
DISPLAY
2
3
Using GUI screens
GUI screens
GUI screens are long thin menus that contain information about the disc or player. These menus allow you to perform operations by changing this information.
Examples of GUI screens A
The screens depend on the disc contents.
B Common procedures
1 Press [DISPLAY] during play or in the stop mode.
Each time this button is pressed, the TV monitor changes as shown below.
![graph TD A["GUI screen for disc information"] --> B["GUI screen for player information"] B --> C["Shuttle screen"] C --> D["GUI screen cleared"]](/content/2026/06/1329940/images/1183b6b69a114a37b918f5402cd7250b59652084654eab31f750552ff722e76e.jpg)
- Some functions cannot be accessed from the stop mode.
2 Press the cursor buttons [◀, ▶] to select the item.
The item is highlighted in yellow.
3 Press the cursor buttons [▲, ▼] to select the setting.
- For some functions, the setting will be registered immediately; for others, [ENTER] or [▶ PLAY] must be pressed.
- When numbers are displayed (e.g. title No.), the numeric buttons are also effective for setting instead of the cursor buttons [▲, ▼]. When numbers are entered with numeric buttons, press [ENTER] to register the setting.
To clear the GUI screens
Press [RETURN] or [CANCEL].
For your reference
- The GUI screens may not be displayed when playing some kinds of DVD software, or if the television's automatic picture zoom function is on. Change the position of the GUI screens in "4 On-Screen Messages" if this occurs (→ page 30).
- The colour (blue, violet or green) of the GUI screens can be changed (→ page 30).
- “△, ▽” around the icon means that the item can be changed using the cursor buttons [▲, ▼].

Detailed descriptions of each icon
Screen for disc information
DVD

① Title No.
Change the No. with the cursor buttons [▲, ▼] or the numeric buttons and press [ENTER]. b Chapter No.
Change the No. with the cursor buttons [▲, ▼] or the numeric buttons and press [ENTER].
© Time
(hour:minute:second)
Enter the time from which you want to start play and press [ENTER].
Example: To specify "1 hour 6 min. 37 sec.", enter "10637".
(d) Soundtrack language No. Change the No. with the cursor buttons [▲, ▼] or the numeric buttons. ⑧ Soundtrack language
ENG: English
FRA: French
DEU: German
ITA: Italian
ESP: Spanish
NLD: Dutch
SVE: Swedish
NOR: Norwegian
DAN: Danish
POR: Portuguese
RUS: Russian
JPN: Japanese
CHI: Chinese, KOR: Korean, MAL: Malay, VIE: Vietnamese, THA: Thai, *: Others
① Audio attribute
Shows the audio attributes of the selected soundtrack (cannot be changed).
LPCM/□□ Digital/DTS/MPEG: Signal type
k: Sampling frequency (kHz)
b: Number of bits (bit)
ch: Number of channels ※
Vocal: Vocals indication
- You can switch vocals ON or OFF with the cursor buttons [▲, ▼]. [DVD Karaoke (Solo)]: —— (OFF) or ON [DVD Karaoke (Duet)]: --- (OFF), V1+V2, V1 or V2
⑨ Subtitle language No. Change the No. with the cursor buttons [▲, ▼] or the numeric buttons. h Subtitle on/off Select "ON" or "OFF" with the cursor buttons [▲, ▼]. OFF: Subtitle is cleared. ON: Subtitle is displayed. ① Subtitle language See the table under the item ⓔ. j Angle No. Change the No. with the cursor buttons [▲, ▼] or the numeric buttons.
■ Video CD/CD

© Track No.
Change the No. with the cursor buttons [▲, ▼] or the numeric buttons and press [ENTER].
① Time
(minute:second)
Display is changed each time the cursor buttons [▲, ▼] are pressed. The times cannot be changed.
Elapsed playing time←→Remaining time of the track
↑→Remaining time of the disc←↑
(m) Audio mode VCD
Change the mode with the cursor buttons [▲, ▼].
LR: Left channel sound is output from the left speaker (L), and right channel sound is output from the right speaker (R).
L: Left channel sound only is output from the speakers (L/R). R: Right channel sound only is output from the speakers (L/R).
Playback control VCD
Shows whether menu play is on or off (cannot be changed here).
OFF: Menu play is OFF.
ON: Menu play is ON.
Note
- The information actually displayed depends on the disc.
- During program and random play of Video CDs and CDs, the remaining time of the disc is not displayed.
Example:
3/2 .1ch
.1: Subwoofer signal (not displayed if there is no subwoofer signal) 0: No surround 1: Mono surround 2: Stereo surround (left/right) 1: Center 2: Front left+Front right 3: Front left+Front right+Center
Screen for player information

A-B repeat play
Press [ENTER] during play to store location A and press [ENTER] again to store location B. Repeat play between the two locations starts. Press [ENTER] again to return to normal play.
b Repeat play
Select the mode during play with the cursor buttons [▲, ▼].
DVD VCD CD
OFF: Normal play OFF: Normal play
C: Chapter repeat play T: Track repeat play
T: Title repeat play A: Disc repeat play
© Dialogue Enhancer (→ page 19) DVD

Select the mode during play with the cursor buttons [▲, ▼].
OFF: Normal volume
ON: Louder volume for dialogue
Play mode
VCD CD (→ page 21 and 22)

The current play mode is shown (cannot be changed here).
PRG: Program play RND: Random play
---: Normal play
(d) Marker (Marking parts you want to watch or listen to again)
Press [ENTER] during play and press [ENTER] again at the preferred point to store a marker. (Marker no. replaces “*”). Up to 5 markers can be stored in memory.
To store the next marker, press the cursor button [▶].
•To recall a marker
Select the marker no. with the cursor buttons [◀, ▶] and press [ENTER].
• To clear a marker
Select the marker no. with the cursor buttons [◀, ▶] and press [CANCEL].
●Some subtitles recorded around the marker may fail to appear.
● All the markers are cleared when the player is switched to the standby mode or turned off, or the disc tray is opened.
Note
●A-B repeat play does not work with an interactive DVD.
- Repeat play and marker functions do not work with an interactive DVD or during menu play of a Video CD with playback control.
- Dialogue Enhancer is effective with Dolby Digital or DTS Digital Surround, three channels or over, where the dialogue is recorded in the center channel.
e Digital picture mode DVD VCD
You can adjust picture quality to suit the disc or scene you are viewing. Select the mode with the cursor buttons [▲, ▼] while a disc is loaded.
N: Normal mode
U: User selection mode: Adjust the picture quality as you like. When "U" is selected and [ENTER] is pressed, the GUI screen as shown below appears. Select the item with the cursor buttons [◀, ▶] and select the value with the cursor buttons [▲, ▼].

Contrast (-7 to +7): Increase (+) or decrease (−) the contrast between bright parts of the picture and the dark parts.
① Colour (-7 to +7): Change the tone of the colours.
① Sharpness (-6 to +6): Increase (+) or decrease (-) the sharpness of outlines.
④ Brightness (0 to 15): Increase overall brightness.
① Digital noise reduction (0 to 4) : Reduces picture noise.
⑮ Gamma correction (0 to 5) :
You can modify the brilliance of the picture.
Detail and contrast in dark scenes can be increased by raising the brightness of the center ranges while maintaining the brightness of the blackest and whitest parts of the picture.
C: Cinema mode (Cinema position): Picture for viewing movies
F: Fine mode: Details are sharper.
S: Soft mode: Soft picture with fewer video artifacts.
DVD (Dolby Digital, 2-channel or over only) (→ page 23)
Select the mode during play with the cursor buttons [▲, ▼].

V.S.S

Headphone V.S.S
Select the level during play with the cursor buttons [▲, ▼].
OFF: V.S.S./Headphone V.S.S. off
1: V.S.S./Headphone V.S.S. natural effect
2: V.S.S./Headphone V.S.S. emphasized effect
⑨ Master volume
Adjust the master volume with the cursor buttons [▲, ▼]. -∞ or -127 to 0 (dB)
Shuttle screen
Maximum speed
DVD: -100
Video CD: -40
CD: -50

Maximum speed
DVD: +100
Video CD: +40
CD: +50
Slow-motion play (Backward) DVD
Press the cursor buttons [▲]→[◀].
Still/Pause
Press the cursor button [▲].
Slow-motion play (Forward) DVD VCD
Press the cursor buttons [▲]→[▶].
⑨ Rapid reverse
Press the cursor buttons [▼]→[◀].
r Play
Press the cursor button [▼].
s Rapid advance
Press the cursor buttons [▼]→[▶].

1


2
![graph TD A["▲"] --> B["ENTER"] C["▼"] --> B D["↑"] --> B](/content/2026/06/1329940/images/815d2184becb0e02ce1f5866bb729fbe891c1857b757afad9130886a475817b7.jpg)
3

Changing initial settings
Change the initial settings to suit your preference and to suit the player to the environment in which it is being used.
Common procedures
1 Press [SETUP] in the stop mode.
The initial settings screen is displayed.
2 Press the cursor buttons [▲, ▼] to select the item and press [ENTER].
Each item that can be modified is displayed.
1 Disc Languages (→ page 28) Change the soundtrack language, subtitle language and the language used in the disc's menu to be used for every disc played back. 2 Ratings (→ page 29) Change the ratings level to prevent play of discs, skip violent scenes, or replace scenes with others by entering a password. This is also called a parental lock. 3 Menu Language (→ page 30) Change the language used for the on-screen displays and initial settings menus. 4 On-Screen Messages (→ page 30) Choose whether "Play", "Still" and other displays will be displayed or not, and the colour and position of these displays as well as GUI screens. 5 FL Display (→ page 30) Change the brightness for the FL display. 6 TV Aspect (→ page 11) Change the settings to suit the type of television you have connected. 7 Digital Audio Output (→ page 37) Change the settings to suit the type of digital equipment you have connected. 8 Speaker Setting (→ page 39) Change the settings to suit the speakers you have connected. 9 Other Settings (→ page 31) Choose the kind of picture shown when play is paused, and various other settings to enhance your viewing experience.
3 Press the cursor buttons [▲, ▼] to select the setting and press [ENTER].
- Some items require additional steps. (See the respective page.)
Setting is finished and the initial settings screen is displayed.
To cancel during setup operation
Press [RETURN]. (The previous screen is displayed.)
To exit the initial settings screen
Press [SETUP] or [RETURN].
For your reference
- The numeric buttons can also be used instead of the cursor buttons [▲, ▼] for selecting items or settings. Pressing [ENTER] is not necessary.
1 Disc Languages
DVD
See page 27 for operation.
| Disc Languages | ||
| 1 | Audio | English |
| 2 | Subtitle | Automatic |
| 3 | Menus | English |
| Press RETURN to exit | ||
| 1 Audio | 1 English (Factory preset) 2 French 3 German4 Italian 5 Spanish6 OriginalThe original language of each disc will be selected.7 Other * * * *Another language can be selected.* |
| 2 Subtitle | 1 Automatic (Factory preset)Subtitle language will automatically be selected in accordance with the soundtrack language.If the language selected for the “1 Audio” is actually used during playback, the subtitles will not appear.If another language is used during playback, the subtitles will appear in the language selected at the setup “1 Audio”.2 English 3 French 4 German5 Italian 6 Spanish7 Other * * * *Another language can be selected.* |
| 3 Menus | 1 English (Factory preset) 2 French 3 German4 Italian 5 Spanish6 Other * * * *Another language can be selected.* |
※ Enter the language code if you select "Other". (See the language code list below.) Press [CANCEL] if you enter the wrong number.
Note
- If the language selected is not available on the disc, the language designated by each disc will be selected.
There are cases where the selected language is recorded but the disc designates another language.
Language code list
| 6565: Afar | 6890: Bhutani | 7285: Hungarian | 7679: Laotian | 8084: Portuguese | 8471: Tajik |
| 6566: Abkhazian | 6976: Greek | 7289: Armenian | 7684: Lithuanian | 8185: Quechua | 8472: Thai |
| 6570: Afrikaans | 6978: English | 7365: Interlingua | 7686: Latvian, Lettish | 8277: Rhaeto-Romance | 8473: Tigrinya |
| 6577: Ameharic | 6979: Esperanto | 7378: Indonesian | 7771: Malagasy | 8279: Romanian | 8475: Turkmen |
| 6582: Arabic | 6983: Spanish | 7383: Icelandic | 7773: Maori | 8285: Russian | 8476: Tagalog |
| 6583: Assamese | 6984: Estonian | 7384: Italian | 7775: Macedonian | 8365: Sanskrit | 8479: Tonga |
| 6588: Aymara | 6985: Basque | 7387: Hebrew | 7776: Malayalam | 8368: Sindhi | 8482: Turkish |
| 6590: Azerbaijani | 7065: Persian | 7465: Japanese | 7778: Mongolian | 8372: Serbo-Croatian | 8484: Tatar |
| 6665: Bashkir | 7073: Finnish | 7473: Yiddish | 7779: Moldavian | 8373: Singhalese | 8487: Twi |
| 6669: Byelorussian | 7074: Fiji | 7487: Javanese | 7782: Marathi | 8375: Slovak | 8575: Ukrainian |
| 6671: Bulgarian | 7079: Faroese | 7565: Georgian | 7783: Malay | 8376: Slovenian | 8582: Urdu |
| 6672: Bihari | 7082: French | 7575: Kazakh | 7784: Maltese | 8377: Samoan | 8590: Uzbek |
| 6678: Bengali; Bangla | 7089: Frisian | 7576: Greenlandic | 7789: Burmese | 8378: Shona | 8673: Vietnamese |
| 6679: Tibetan | 7165: Irish | 7577: Cambodian | 7865: Nauru | 8379: Somali | 8679: Volapük |
| 6682: Breton | 7168: Scots Gaelic | 7578: Kannada | 7869: Nepali | 8381: Albanian | 8779: Wolof |
| 6765: Catalan | 7176: Galician | 7579: Korean | 7876: Dutch | 8382: Serbian | 8872: Xhosa |
| 6779: Corsican | 7178: Guarani | 7583: Kashmiri | 7879: Norwegian | 8385: Sundanese | 8979: Yoruba |
| 6783: Czech | 7185: Gujarati | 7585: Kurdish | 7982: Oriya | 8386: Swedish | 9072: Chinese |
| 6789: Welsh | 7265: Hausa | 7589: Kirghiz | 8065: Punjabi | 8387: Swahili | 9085: Zulu |
| 6865: Danish | 7273: Hindi | 7665: Latin | 8076: Polish | 8465: Tamil | |
| 6869: German | 7282: Croatian | 7678: Lingala | 8083: Pashto, Pushto | 8469: Telugu |
2 Ratings
DVD
See page 27 for operation.

Level 8 (Factory preset) All DVDs can be played.
Level 7 to 1
Prevents play of DVDs with ratings recorded on them (those that contain adult or violent scenes).
Level 0
Playback of all DVDs is prohibited (e.g. to prohibit playback of DVDs for adults which are not encoded with rating information).
Note
- The rating method differs from disc to disc. There are discs designed for adults that do not have these ratings recorded on them. These discs can be played as normal. To prevent play of these discs, set the rating limit to "0 Lock All".
Setting ratings (When the level is "8")

1 Select the level with the cursor buttons [▲, ▼] and press [ENTER].
2 Enter a 4-digit password with the numeric buttons and press [ENTER].
- Press [CANCEL] if you enter the wrong number.
The lock symbol appears closed to show the rating is locked.
Do not forget your password.
3 Press [ENTER].
Setting is finished and the initial settings screen is displayed.
Now when you insert a DVD that exceeds the ratings limit you set, a message appears on the television.
If you want to play the disc, select "Yes" and enter your password. The unit will unlock temporarily, locking again when the disc tray is opened or the unit is turned off.

Example: "4343"
Changing ratings (When the level is "0" to "7")

Changes to the settings also requires a password.
1 Press the cursor buttons [▲, ▼] to select "2 Ratings" in the initial settings screen and press [ENTER].
2 Enter your 4-digit password with the numeric buttons and press [ENTER].
3 Press the cursor buttons [▲, ▼] to select the item.
To unlock the player (the rating level returns to 8)
Select "1" and then press [ENTER].
To change the password
Select "2" and press [ENTER]. Enter a new 4-digit password and press [ENTER], then press [ENTER] again.
To change the rating level
Select "3" and press [ENTER]. Select a new level with the cursor buttons [▲, ▼], then press [ENTER].
To unlock the player temporarily
Select "4" and then press [ENTER].
- The rating is unlocked temporarily for the current disc. The player is locked again when the disc tray is opened or the player is switched to the standby mode or turned off.
3 Menu Language
See page 27 for operation.


Example: If you selected "2 Français"

See page 27 for operation.

| 1 On-Screen Messages | 1 O n (Factory preset)2 Off |
| 2 Colour and Position | 1 Blue (Factory preset)2 Violet3 Green4 Blue5 Violet shown slightly lower. Select if the top of the screen is cut off.6 Green |
5 FL Display
See page 27 for operation.

1 Bright (Factory preset) 2 Dim 3 Dim During DVD/VCD Play (Auto) The FL display will be dimmed during playback of DVDs and Video CDs. The display resumes brightness when a button for special play such as [◀◀, ▶▶ SLOW/SEARCH] or [■■ PAUSE] is pressed.
9 Other Settings
See page 27 for operation.

| 1 Still ModeSelect either “Field still” or “Frame still” in the still picture mode. | 1 Automatic (Factory preset)2 FieldSelect this setting when jittering occurs in the still picture mode when “1 Automatic” is selected.3 FrameSelect if small text or fine patterns cannot be seen clearly in the still picture mode when “1 Automatic” is selected. |
| 2 Audio during SearchTo select whether audio is heard or not during search (forward direction) at the initial search speed. | 1 On (Factory preset)2 Off |
| 3 TV Mode (4:3)To select whether wide-screen material is played in the pan and scan style or in the letterbox style on a conventional TV (4:3). | 1 Pan & Scan (Factory preset)Wide-screen video material will be played in the pan and scan style (the picture is shown with either one or both sides cut off) on a conventional television (4:3).●Video material not formatted in the pan and scan style will be played back in the letterbox style.2 LetterboxWide-screen video material will be played in the letterbox style (black bands appear at the top and bottom of the screen) on a conventional television (4:3). |
| 4 D.(Dynamic) RangeCompressionTo compress the dynamic range (the difference between the loudest sound and the softest sound), making it easier to hear dialogue even at low volume. This function only works with Dolby Digital DVD. | 1 Off (Factory preset)The dynamic range remains as it was recorded on the disc.2 OnDynamic range is compressed by increasing soft sounds and reducing loud sounds. Select when viewing discs at low volume, such as late at night. |
| 5 Still Picture DisplayTo display the picture type (DVD), I, P or B in the still picture mode. | 1 Off (Factory preset)2 On Example: P-picture Example: P-picture |
| 6 AV1 OutputTo select the signal format (Video, S-Video or RGB) to be output from the AV1 SCART terminals. | 1 Video (Factory preset)Composite video signals will be output.2 S-VideoS video signals will be output.3 RGBRGB signals will be output. |
| 7 NTSC Disc OutputTo select whether PAL 60 signals or NTSC signals will be output during playback of NTSC discs. | 1 PAL 60 (Factory preset)Select when the player is connected to a PAL TV which is capable of receiving PAL 525/60 system.2 NTSCSelect when the player is connected to a Multi-system television. |
(Continued on next page)
Changing initial settings
Note
- Audio is heard at any speed when playing CDs, regardless of any settings at "2 Audio during Search".
- Audio is not heard at any speed when playing CDs encoded with DTS, regardless of any settings at "2 Audio during Search".
- It is recommended that "1 PAL60" is selected in "7 NTSC Disc Output" when a PAL TV is connected; however, the images shown below will appear on the TV screen.
The picture may be compressed vertically.

For your reference
• I/P/B
To efficiently store video on DVD, common elements among frames are used in common, and different elements are recorded with each individual frame. The frame that contains the common elements is called an I-picture, a complete frame in itself. A P-picture is calculated from past I or P-pictures. The frame that fills in the spaces between the I-and P-pictures is called the B-picture.
I-pictures have the best picture quality, so they should be used when making picture adjustments.
Frame
Individual images in a video or on the television are called frames.
•Field
Half of the video information (video signal) in a frame is called a field. With conventional TV systems, a single frame (a single screen) consists of two fields.
- Frame still
The two fields are displayed alternately on the TV screen, so the image may be blurry. However, the image quality is better than field images.
-Field still
Only one field (half of the video information) is displayed on the TV screen, so the apparent resolution is low. However, there is no blurring on the screen.
How different kinds of software appear on your television
DVD software is recorded in a variety of picture formats, and how they appear on your TV depends on the software, the kind of TV you have, and the picture mode your TV is set to.
- Letterbox refers to pictures where black bands appear at the top and bottom.
- Pan and scan refers to pictures where part of the picture is cut off so it fills the whole screen.
| Television and picture modeSoftware format | 4:3 | 16:9 full mode | 16:9 zoom mode | 16:9 auto mode |
Wide-screen, pan and scan | Edges cut off | Full screen | Top and bottom cut off | Full screen |
| Wide-screen, non-pan and scan | Letterbox | |||
Regular (4:3) | Full screen | Screen stretched horizontally | Top and bottom cut off | Full screen with black bands at right and left |
Regular (4:3) letterbox | Letterbox | Letterbox with screen stretched horizontally | Full screen | Letterbox with extremities of picture stretched |
The names given to the television picture modes depend on the make of your television. There may also be slight differences in how the pictures appear on the screen. Refer to your television's operating instructions for details.
■ Upgrading your audio equipment
| Setup chart | |||||
| Types of connection\Settings\Equipment and | Equipment | Speakers | Settings in “8 Speaker Setting” | Settings in “7 Digital Audio Output” | Page |
| To enjoy the 5.1-channel surround sound found on DVDs using the unit’s built-in decoder | Amplifier with 5.1-channel audio input terminals | ●Front speakers (L/R)●Subwoofer●Surround speakers (L/R)●Center speaker | Select “1 Multi-channel”●Speaker presence →Set speakers you have connected to “Yes”●Set delay time if necessary●Correct output balance if necessary | PCM Down Conversion=“No” | A34 |
| To enjoy the 5.1-channel surround sound found on DVDs using the decoder in another unit | Amplifier with built-in decoder or a separate decoder-amplifier combination*1 | ●Front speakers (L/R)●Subwoofer●Surround speakers (L/R)●Center speaker | Select “2 2-channel” | ●PCM Down Conversion=“Yes”●Dolby Digital/DTS Digital Surround/ MPEG→Settings depend on your decoding equipment | B35 |
| To enjoy stereo through an analogue amplifier *2 | Analogue amplifier or system component with 2-channel audio input terminals | Front speakers (L/R) | Select “2 2-channel” | PCM Down Conversion=“No” | C36 |
| To enjoy stereo through a digital amplifier *2 | Audio equipment with digital audio input terminals | Front speakers (L/R) | Select “2 2-channel” | ●PCM Down Conversion=“Yes”●Dolby Digital=“PCM”●DTS Digital Surround =“PCM”●MPEG=“PCM” | D36 |
※1 Connect speakers if necessary and make the speaker settings on the amplifier. ※2 If you have connected a Dolby Pro Logic amplifier, you may need to connect center and surround speakers.
■ Upgrading your television
- You can connect CRT projectors, LCD projectors, and projection televisions.
- See “Connection to a television” (→ pages 9 and 10) for details on connection.
Note
- The equipment connections described are examples.
- Additional equipment and cables are not supplied.
Manufactured under license from Dolby Laboratories. "Dolby", "Pro Logic" and the double-D symbol are trademarks of Dolby Laboratories. Confidential unpublished works. © 1992–1997 Dolby Laboratories. All rights reserved.
Manufactured under license from Digital Theater Systems, Inc. "DTS" and "DTS Digital Surround" are trademarks of Digital Theater Systems, Inc. © 1996 Digital Theater Systems, Inc. All rights reserved.
For your reference
- Dolby Digital is a digital sound compression technique developed by Dolby Laboratories.
Supporting 5.1-channel surround sound, as well as stereo (2-channel) sound, this technique enables a large quantity of sound data to be efficiently recorded on a disc.
- DTS Digital Surround is a 5.1-channel surround sound system, which is widely used in movie theaters around the world. The separation between channels is good and provides a very real surround effect.
- Linear PCM is an uncompressed digital audio signal. While a CD is recorded in 44.1 kHz/16 bit, a DVD is recorded in 48 kHz/16 bit up to 96 kHz/24 bit. Therefore, the sound reproduced with these signals is potentially better than that found on CDs. This player reproduces linear PCM in two channels.
- Bitstream is a compressed digital audio signal. This signal can be decoded into different channels to produce, for instance, 5.1-channel surround sound.
- The digital audio output terminal (optical) converts electrical signals into optical signals and transfers them to an amplifier. These optical signals are immune to electrical interference, and they also have minimal effect on other equipment.
A Connecting an amplifier with 5.1-channel audio input terminals
This unit has a built-in Dolby Digital/DTS Digital Surround decoder so you can enjoy surround sound encoded with these systems without having to connect this unit to an amplifier with a decoder. The amplifier must have 5.1-channel discrete input terminals.
![graph TD A["Back of the player"] --> B["Audio cable"] B --> C["Amplifier with 5.1-channel audio input terminals"] C --> D["Speakers"] D --> E["Back of the player"] subgraph Audio Cable F["Connect cables to terminals corresponding to the speakers you have connected."] end subgraph Amplifier G["Read i…](/content/2026/06/1329940/images/8e2946de766012d10b6b6927488da3917bbbf0e5406b4b87896ba8f52c31bbf5.jpg)
When you have finished connection
- In "8 Speaker Setting", select "1 Multi-channel" and make changes to suit your speakers (→ page 39).
Speaker presence: Select "Yes" if the corresponding speaker is connected.
Select "No" if the corresponding speaker is not connected.
Center and surround speaker delay time (Dolby Digital DVD only): Adjust if you cannot place your speakers in the optimum position.
Channel balance: Adjust the output level of the speakers to make up for differences in volume caused by different types of speaker or distance.
- Go to "7 Digital Audio Output" and set "1 PCM Down Conversion" to "No" (→ page 37).
Note
- Turn off V.S.S. (→ page 23) if you have connected a subwoofer, center speaker, or surround speakers as well as the front speakers. Sound will not come from the other speakers if V.S.S. is on.
- When playing DVDs recorded in MPEG 2 audio, multi-channel audio will be output as well as Dolby Digital or DTS Digital Surround.
● Additional equipment and cables are not supplied.
B Connecting an amplifier with a built-in decoder
You can enjoy multi-channel surround sound found on DVD recorded with Dolby Digital, DTS Digital Surround or MPEG by connecting an amplifier with a built-in decoder or a separate decoder-amplifier combination.
![graph TD A["Back of the player"] --> B["Optical digital audio cable"] B --> C["Coaxial audio cable"] C --> D["Amplifier with a built-in decoder"] D --> E["Speakers"] style A fill:#f9f,stroke:#333 style B fill:#ccf,stroke:#333 style C fill:#cfc,stroke:#333 style D fill:#fcc,stroke:#333 style E fill:#…](/content/2026/06/1329940/images/093f71bb1c8a202499d6bbbf1cfe337a8465744e16247992ac79b43d02bd0359.jpg)
When you have finished connection
- Make changes to "7 Digital Audio Output" to suit your decoder (→ page 37).
| Item\Decoder | Dolby Digital decoder | DTS Digital Surround decoder | Dolby Digital/ DTS Digital Surround decoder | Dolby Digital/ DTS Digital Surround / MPEG audio decoder |
| PCM Down Conversion | Yes* | Yes* | Yes* | Yes* |
| Dolby Digital | Bitstream | PCM | Bitstream | Bitstream |
| DTS Digital Surround | PCM | Bitstream | Bitstream | Bitstream |
| MPEG | PCM | PCM | PCM | Bitstream |
※If this is set to "No", no audio will be output when DVDs recorded in 96 kHz linear PCM are played. (Audio will be output as it is if the DVD does not have copyright protection recorded on it.) - These changes to digital audio output must be made, otherwise bitstream signals the decoder cannot handle will be output. If these signals are output, "noise" will be output which can cause harm to your ears and speakers. - In "8 Speaker Setting", select "2 2-channel" (→ page 39).
Note
- You cannot use DTS Digital Surround decoders not suited to DVD.
- Additional equipment and cables are not supplied.
c Connecting audio equipment with 2-channel audio input terminals
You can enjoy stereo sound if you connect an amplifier or system component that has 2-channel audio input terminals.

Amplifier and speakers or system component
- Read the instructions for the amplifier and speakers or system component for connection details.
Dolby Pro Logic amplifiers
- If you connect a Dolby Pro Logic amplifier, you will also need to connect center and surround speakers to enjoy surround sound. Read the instructions for the equipment for connection details.
- Turn V.S.S. off (→ page 23). Dolby Pro Logic will not function correctly if V.S.S. is on.
When you have finished connection
- Go to "7 Digital Audio Output" and set "1 PCM Down Conversion" to "No" (→ page 37).
- In "8 Speaker Setting", select "2 2-channel" (→ page 39).
Note
●Additional equipment and cables are not supplied.
D Connecting audio equipment with digital audio input terminals
![graph TD A["Back of the player"] --> B["OPTICAL COAXIAL"] B --> C["Speaker 1"] B --> D["Speaker 2"] B --> E["Speaker 3"] B --> F["Speaker 4"] B --> G["Speaker 5"] B --> H["Speaker 6"] B --> I["Speaker 7"] B --> J["Speaker 8"] B --> K["Speaker 9"] B --> L["Speaker 10"] B --> M["Speaker 11"] B --> N["…](/content/2026/06/1329940/images/b0e88632612e925fc3557fe2aecaf736462cad10fa3c225e96cbf5d3c8064e36.jpg)
Note when connecting the optical digital audio cable
- Remove the dust protection cap from the optical digital audio output terminal and connect the cable firmly so that the configurations of both the cable and the terminal match.
- Keep the dust protection cap and reattach when not using the terminal.
Optical digital audio cable
- Do not bend the optical digital audio cable when connecting it.
Coaxial audio cable
System component or amplifier with digital audio input terminals and speakers
- Read the instructions for the amplifier and speakers or system component for connection details.
When you have finished connection - Make changes to "7 Digital Audio Output" as shown (→ page 37).
| PCM Down Conversion | Yes * |
| Dolby Digital | PCM |
| DTS Digital Surround | PCM |
| MPEG | PCM |
※ If this is set to "No", no audio will be output when DVDs recorded in 96 kHz linear PCM are played. (Audio will be output as it is if the DVD does not have copyright protection recorded on it.)
- These changes to digital audio output must be made, otherwise signals the equipment cannot handle, bitstream, will be output. If the signals are output as bitstream, "noise" will be output which can cause harm to your ears and speakers.
- In "8 Speaker Setting", select "2 2-channel" (→ page 39).
Note
• Additional equipment and cables are not supplied.
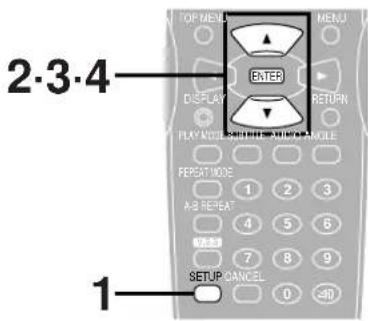
1
| 1 Disc Languages | |
| 2 Ratings | Level 8 |
| 3 Menu Language | English |
| 4 On-Screen Messages | |
| 5 FL Display | Bright |
| 6 TV Aspect | 4:3 |
| 7 Digital Audio Output | |
| 8 Speaker Setting | 2-channel |
| 9 Other Settings | |
| Press RETURN to exit | |
2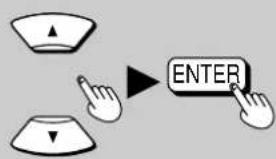
Digital Audio Output
1 PCM Down Conversion No
2 Dolby Digital Bitstream
3 DTS Digital Surround PCM
4 MPEG PCM
Press RETURN to exit
3![graph TD A["Input"] --> C["Click"] B["Input"] --> C["Click"] C --> D["ENTER"]](/content/2026/06/1329940/images/cfe35c139546f474a538ce4ed6db4481c045aca93532ad1ee875be0ad29d99ec.jpg)
4![graph TD A["Directional Arrow"] --> B["ENTER"] C["Directional Arrow"] --> B["ENTER"]](/content/2026/06/1329940/images/e1f578ab5c12115dffde57fd930c3d936bf835b0ec93a4b6097301b025f5fa11.jpg)
Home theater
Selecting digital output
Select the digital output to be output from the optical or coaxial digital audio output terminal of the player.
1 Press [SETUP] in the stop mode.
The initial settings screen is displayed.
2 Press the cursor buttons [▲, ▼] to select "7 Digital Audio Output" and press [ENTER].
3 Press the cursor buttons [▲, ▼] to select the item and press [ENTER].
1 PCM Down Conversion
Select whether to output audio on DVD recorded in 96 kHz linear PCM as is (No) or to convert it to 48 kHz for output (Yes).
2 Dolby Digital
To select the signal format (Bitstream or PCM) to be output from the optical digital or coaxial audio output terminal during playback of DVDs recorded in Dolby Digital.
3 DTS Digital Surround
To select the signal format (PCM or Bitstream) to be output from the optical digital or coaxial audio output terminal during playback of DVDs recorded in DTS Digital Surround.
4 MPEG
To select the signal format (PCM or Bitstream) to be output from the optical digital or coaxial audio output terminal during playback of the DVD recorded in MPEG audio.
4 Press the cursor buttons [▲, ▼] to select the setting and press [ENTER].
When "1 PCM Down Conversion" is selected
1 No (Factory preset)
No digital audio is output during playback of DVDs recorded in 96 kHz linear PCM.
- If the DVD is recorded in 48 kHz linear PCM, digital audio converted to 48 kHz/16 bit is output irrespective of the setting.
- Audio will be output using the original audio recording system if the DVD has not been copyright-protected.
2 Yes ※1
During playback of DVDs recorded in 48 kHz or 96 kHz linear PCM, digital audio converted to 48 kHz/16 bit is output.
(Digital output of PCM audio is restricted to 48 kHz/16 bit or below for copyright protection.)
When "2 Dolby Digital" is selected
1 Bitstream (Factory preset)
Dolby Digital bitstream (1ch–5.1ch) is output during playback of DVDs recorded in Dolby Digital.
2 PCM
Digital audio converted to 48 kHz/16 bit PCM (2ch) is output during playback of DVDs recorded in Dolby Digital.
When "3 DTS Digital Surround" is selected
1 PCM (Factory preset)
Digital audio converted to 48 kHz/16 bit PCM (2ch) is output during playback of DVDs recorded in DTS Digital Surround.
2 Bitstream
DTS Digital Surround bitstream (1ch–5.1ch) is output during playback of DVDs recorded in DTS Digital Surround.

Home theater
When "4 MPEG" is selected
1 PCM (Factory preset) Digital audio converted to 48 kHz/16 bit PCM (2ch) is output during playback of DVDs recorded in MPEG audio.
2 Bitstream MPEG audio bitstream (1ch–7.1ch) is output during playback of DVDs recorded in MPEG audio.
The screen illustrated in step 2 is displayed.
To cancel during setup operation
Press [RETURN]. (The previous screen is displayed.)
To exit the initial settings screen
Press [SETUP] or [RETURN].
Recommended setting of "Digital Audio Output"
Adjust settings as shown in the table below depending on the kind of equipment that is connected to the optical digital or coaxial audio output terminal.
| Type of equipment connected | Recommended setting | |||
| 1 PCM Down Conversion | 2 Dolby Digital | 3 DTS Digital Surround | 4 MPEG | |
| No equipment is connected | No | Bitstream | PCM | PCM |
| Digital audio equipment (no decoder) (→ page 36) | Yes*1 | PCM*2 | PCM*2 | PCM*2 |
| Dolby Digital decoder (→ page 35) | Yes*1 | Bitstream | PCM | PCM |
| DTS Digital Surround decoder (→ page 35) | Yes*1 | PCM | Bitstream | PCM |
| Dolby Digital/DTS Digital Surround decoder (→ page 35) | Yes*1 | Bitstream | Bitstream | PCM |
| Dolby Digital /DTS Digital Surround/ MPEG audio decoder (→ page 35) | Yes*1 | Bitstream | Bitstream | Bitstream |
- Underlined items are factory preset.
※1 If it is set to "Yes", the player converts linear PCM to 48 kHz even during analogue output.
Do the following if you wish to take advantage of high quality 96 kHz sound.
Select "No" and connect this player's audio output terminal to an amplifier's audio input terminal with the audio/video cable (supplied) or an audio cable (not supplied).
※2 When connecting an amplifier (with an optical or coaxial digital input terminal) which does not contain a Dolby Digital, DTS Digital Surround or MPEG audio decoder, be sure to select "PCM" at "2 Dolby Digital", "3 DTS Digital Surround" and "4 MPEG". If "Bitstream" is selected, any attempt to play DVDs (or CDs encoded with DTS) may cause such a high level of noise that can injure your ears and damage your speakers.

1


2

3

4


5


Home theater
Speaker Setting
Here you can change the settings for the built-in decoder. In general, these changes have no effect if you connect the player to other equipment through the digital audio output terminal (make the necessary changes on the other equipment). Multi-channel MPEG 2 audio is an exception (see below).
Common procedure
1 Press [SETUP] in the stop mode. The initial settings screen is displayed. 2 Press the cursor buttons [▲, ▼] to select "8 Speaker Setting" and press [ENTER]. 3 Press the cursor buttons [▲, ▼] to select the item and press [ENTER].
1 Multi-channel
If you have connected three or more speakers. (Proceed to step 4)
2 2-channel (Factory preset)
If you have connected 2 speakers. (You will return to the menu shown in step 1. Settings are not necessary.)
4 Change settings to suit your speakers and the listening position (→ page 40).
- Setting the size and presence of your speakers
Choose "Yes" for speakers you have connected. Sound will not be output if you choose "No".
- Delay time
Allows you to make up for differences in distance if you cannot place your speakers in the optimum position. (Dolby Digital DVD only)
•Channel balance
Allows you to adjust the output level of the speakers to make up for differences in volume caused by different types of speaker or distance.
5 Press the cursor buttons [▲, ▼, ◀, ▶] to select "Exit" and press [ENTER].
The screen illustrated in step 2 is displayed.
To cancel during setup operation
Press [RETURN]. (The previous screen is displayed.)
To exit the initial settings screen
Press [SETUP] or [RETURN].
When playing multi-channel MPEG 2 audio
To enjoy the multiple channels on this kind of software, do the following.
- Connect the player to an amplifier with the 5.1-channel audio input terminals (→ page 34) and select "1 Multi-channel" in step 3. or
- Connect to an amplifier that can decode MPEG 2 through the digital audio output terminal and in "7 Digital Audio Output", select "2 Bitstream" for "4 MPEG" (→ page 37).
If any other kind of connection is used, including headphones, be sure to select "2 2-channel" in step 3.
(Continued on next page)
A

- Underlined items are factory preset.
In case of surround speaker (L) No
Large/Yes
Small/Yes
B
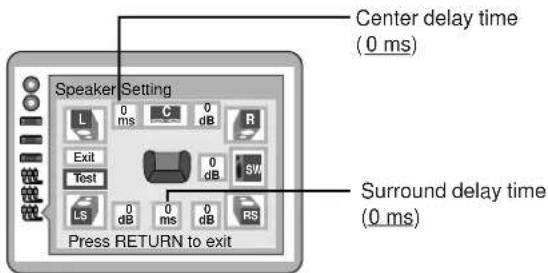
● Underlined items are factory preset.

Place all your speakers within this circumference
C

- Underlined items are factory preset.
Home theater
A
Setting the size and presence of your speakers
- Press the cursor buttons [▲, ▼, ◀, ▶] to select the item and press [ENTER].
- Press the cursor buttons [▲, ▼] to select the setting and press [ENTER].
• Large speaker icon
If the speaker supports low-frequency (under 100 Hz) reproduction
- Small speaker icon If the speaker does not support low-frequency reproduction.
- If you do not connect a subwoofer, it is preferable to connect front speakers (L/R) capable of producing bass of less than 100 Hz.
B
Delay time
DVD (Dolby Digital only)
- Press the cursor buttons [▲, ▼, ◀, ▶] to select the item and press [ENTER].
- Press the cursor buttons [▲, ▼] to adjust the delay time and press [ENTER].
● Center speaker
Set delay time to "0 ms" (factory preset) if DF is less than or equal to Dc .
| If DF-DC= | then set to |
| approx. 50 cm | 1.3 ms |
| approx. 100 cm | 2.6 ms |
| approx. 150 cm | 3.9 ms |
| approx. 200 cm | 5.3 ms |
● Surround speaker
Set delay time to "0 ms" (factory preset) if DF and DS are equal.
| If DF-DS= | then set to |
| approx. 200 cm | 5.3 ms |
| approx. 400 cm | 10.6 ms |
| approx. 600 cm | 15.9 ms |
C
Channel balance
- Press the cursor buttons [▲, ▼, ◀, ▶] to select "Test" and press [ENTER].
A test signal is output from one speaker at a time, starting with the front left speaker and proceeding clockwise.
![graph TD A["FRONT(L)"] --> B["CENTER"] B --> C["FRONT(R)"] D["SURROUND(L)"] <--_E["SURROUND(R)"]](/content/2026/06/1329940/images/d12d593b7001bea6af8c5c6735156fc766635ea7938b2d5e1e8554e604df3127.jpg)
- While listening to the test signal, press the cursor buttons [▲, ▼] to adjust the volume of the center and surround speakers so they are the same apparent volume as the front speakers. (The front speakers cannot be adjusted here.)
- Press [ENTER]. (The test signals are stopped.)
Note
- A test signal is not output from the subwoofer. To adjust its volume, play something, then return to this screen to adjust to your taste.
Troubleshooting Guide
Before requesting service for this player, check the chart below for a possible cause of the problem you are experiencing. Some simple checks or a minor adjustment on your part may eliminate the problem and restore proper operation.
If you are in doubt about some of the check points, or if the remedies indicated in the chart do not solve the problem, consult your dealer for instructions.
Reference pages are shown as black circled numbers ⑥.
Common Problems
| No power. | Insert the AC mains lead securely into the household mains socket.9 |
| The player is automatically switched to the standby mode. | To conserve power, the player automatically switches to the standby mode after approx. 30 minutes elapse in the stop mode (Auto power-off function). Turn the power back to ON. |
| Play fails to start even when [▶ PLAY] is pressed.Play starts but then stops immediately. | Condensation has formed: Wait about 1 to 2 hours for it to evaporate.This player cannot play discs other than DVD, Video CD and CD.6DVDs with a region number other than “2” or “ALL” cannot be played. DVDs with multiple region numbers including “2” can be played.6The disc may be dirty and may require cleaning.43Ensure that the disc is installed with the label of the side to be played facing upwards.12 |
| No picture. | Ensure that the equipment is connected properly.910Ensure the television’s video input setting (e.g. AV1, AV2) is correct. |
| No sound.Distorted sound. | Ensure that the equipment is connected properly.91033-36Ensure that the input settings for the television and stereo system are correct.Adjust the master volume using the GUI screen for player information.26Turn V.S.S. off or select the appropriate V.S.S. mode.24 |
| Picture is distorted during rapid advance or rapid reverse. | The picture will be somewhat distorted at times: This is normal. |
| No key operation (by the player and/or the remote control) is effective. | Some operations may be prohibited by the disc.Press [∅/l] to switch the player to the standby mode and then back to ON. Alternatively, press [∅/l] to switch the player to the standby mode, disconnect the AC mains lead and then reconnect it. (The player may not be operating properly due to lightning, static electricity or some other external factor.) |
| The picture shown on the television is not normal.(The sides of the picture are cut off or black bands appear at the top and bottom of the screen.) | Go to the initial settings menu “6 TV Aspect” and change the setting to suit your television. You may also need to change the screen mode on the television itself.1132 |
| No on-screen display. | The “Off” setting is selected for “1 On-Screen Messages” in “4 On-Screen Messages”:Select “On”.30 |
| GUI screens not displayed or only partially displayed on the TV screen. | Change the position of the GUI screens using “2 Colour and Position” in “4 On-Screen Messages” of the initial settings.30 |
| The language for the player’s menus and on-screen messages is wrong. | Go to the initial settings menu “3 Menu Language” and change the language.30 |
| No operations can be performed with the remote control. | To conserve power, the player is automatically switches to the standby mode after approx.30 minutes elapse in the stop mode (Auto power-off function). Turn the power back to ON.Check the batteries are installed with the correct polarities (+ and -).7The batteries are depleted: Replace them with new ones.7Point the remote control at the remote control sensor and operate.7Operate the remote control at a distance of not more than 7 m from the remote control sensor.7Remove the obstacles between the remote control and remote control sensor.7 |
DVD
| No subtitles. | Subtitles appear only with discs which contain them.Subtitles are cleared from the TV monitor. Display the subtitles.18 25 |
| Alternative soundtrack (or subtitle) languages fail to be selected. | An alternative language is not selected with discs which do not contain more than one language.In the case of some discs, the alternative language cannot be selected by operating the [AUDIO] or [SUBTITLE]. Try selecting it from the disc's menu if one is available.16 |
| Angle cannot be changed. | This function is dependent on software availability. Even if a disc has a number of angles recorded, these angles may be recorded for specific scenes only (when “ANGLE” lights up on the player's FL display). |
| Soundtrack and/or subtitle language is not the one selected at the initial settings. | If the soundtrack and/or subtitle language does not exist on the disc, the language selected at the initial settings will not be seen/heard. |
| The disc's menu is displayed in French (example). | The setup “3 Menus” of “1 Disc Languages” is set to French: Select English.28 |
| Sound does not come from a speaker. | Check the connections.9 10 43-46If you have connected this player to an amplifier through the audio output terminals, go to the initial settings menu “8 Speaker Setting” and change the settings to suit your speakers. Select “Yes” for all the speakers you have connected.49If you have connected this player to an amplifier (with built-in decoder) through the digital audio output terminal, go to the initial settings menu “7 Digital Audio Output” and change the settings to “Bitstream” for “2 Dolby Digital” or “3 DTS Digital Surround”.37Sound will only come from the two front speaker if V.S.S. is on. Turn V.S.S. off.23 |
| The password for rating level has been forgotten.Reset all the settings to Factory Preset. | While stopped, press and hold [|◀◀] and [■■] on the player and then also press and hold [▲] on the player until “Initialized” disappears from the television (after about 3 seconds).All initial settings will return to the default values. |
| The vocals cannot be turned off. | You have selected an audio channel that includes a vocal channel. Read the disc's jacket to choose the correct channel.17 |
| There are no vocals while playing Karaoke DVD. | When you have connected this unit to other equipment through a DIGITAL AUDIO OUT terminal, go to “7 Digital Audio Output” in the initial settings and change the setting for “2 Dolby Digital” to “PCM”.33 35 - 38 |
| A menu is shown after playing each song on a Karaoke DVD. | Most Karaoke DVDs are designed to do this. Some discs have an item in the menu that allows you to play all the songs. |
Video CD
| No menu play. | This function works only for Video CDs with playback control. 7 |
Self-diagnosis display function
When an error or trouble is detected during operation, a message appears in the FL display.
When a message has appeared, check the details given below.
| Message | Player status | Remedy |
| CHECK THE DISC | Disc is dirty. | Wipe the disc clean. |
| H□□□□stands for a number. | Trouble is likely to have occurred. The number following “H” differs depending on the status of the player. | Press [⏻/l] to switch the player to the standby mode and then back to ON. Alternatively, press [⏻/l] to switch the player to the standby mode, disconnect the AC mains lead, and then reconnect it. |
- If the message fails to be cleared, even when remedial action is taken, ask a service technician to repair the player.
Disc handling
Choose discs with these marks:




However, do not use irregularly shaped discs, such as heart-shaped. (Discs of this sort can damage the player.)

■ How to hold a disc
Do not touch the recorded surface.

■ If the surface is dirty
Wipe it with a damp cloth and then wipe dry.

■ If the disc is brought from a cold to a warm environment, moisture may form on the disc
Wipe with a soft, dry, lint-free cloth before using the disc.
■ Handling precautions
■ Do not place or store discs in the following places
- Do not write on the label side with a ball-point pen or other writing instrument.
- Do not use record cleaning sprays, benzine, thinner, static electricity prevention liquids or any other solvent.
- Do not attach labels or stickers to discs. (Do not use discs with exposed adhesive from tape or left over peeled-off stickers.)
- Do not use scratch-proof protectors or covers other than those specified for use with this player.
- Locations exposed to direct sunlight ● Humid or dusty locations
- Locations directly exposed to a heat vent or heating appliance
Maintenance
To clean this unit, wipe with a soft, dry cloth.
If the surfaces are extremely dirty, use a soft cloth dipped in a soap-and-water solution or a weak detergent solution.
- Never use alcohol, paint thinner or benzine to clean this unit.
- Before using chemically treated cloth, read the instructions that came with the cloth carefully.
Specifications
Power requirements: AC 220–240 V, 50 Hz
Power consumption: 18 W
Dimensions: 430 (W)×271 (D)×82 (H) mm (excluding protrusions)
Mass: 2.9 kg
Signal system: PAL 625/50, PAL 525/60, NTSC
Operating temperature range: +5 to +35 °C
Operating humidity range: 5–90 % RH (no condensation)
Discs played:
(1) DVD-Video disc:
12 cm single-sided, single-layer
12 cm single-sided, dual-layer
12 cm double-sided, single-layer
8 cm single-sided, single-layer
8 cm single-sided, dual-layer
8 cm double-sided, single-layer
(2) Compact disc (CD-DA, Video CD):
12 cm disc
8 cm disc
Video output:
Output level: 1 Vp-p (75 Ω)
Output terminal: RCA (2 systems), AV1/AV2
S video output:
Y output level: 1 Vp-p (75 Ω)
C output level:
NTSC: 0.286 Vp-p (75 Ω)
PAL: 0.300 Vp-p (75 Ω)
Output terminal: S terminal (1 system)/AV1
RGB video output:
R output level: 0.7 Vp-p (75 Ω)
G output level: 0.7 Vp-p (75 Ω)
B output level: 0.7 Vp-p (75 Ω)
Output terminal: AV1
Audio output:
Output level: 2 Vrms (1 kHz, 0 dB)
Output terminal:
Mixed output (L/R): RCA (1 system), AV1/AV2
5.1ch discrete output: RCA (1 system)
Audio signal output characteristics:
(1) Frequency response:
●DVD (linear audio): 4 Hz–22 kHz (48 kHz sampling)
4 Hz–44 kHz (96 kHz sampling)
- CD audio: 4 Hz–20 kHz (EIAJ)
(2) S/N ratio:
- CD audio: 115 dB (EIAJ)
(3) Dynamic range:
●DVD (linear audio): 103 dB
- CD audio: 99 dB (EIAJ)
(4) Total harmonic distortion:
• CD audio: 0.002 % (EIAJ)
Digital audio output:
Optical digital output: Optical terminal
Coaxial audio output: Pin jack
Headphone jack:
Output terminal: Stereo, 6.3 mm jack
Pickup: Wave length: 665 nm
Laser power: CLASS 2
Power consumption in standby mode: approx. 4.0 W
Note
Specifications are subject to change without notice.
Mass and dimensions are approximate.
This product incorporates copyright protection technology that is protected by method claims of certain U.S. patents and other intellectual property rights owned by Macrovision Corporation and other rights owners. Use of this copyright protection technology must be authorized by Macrovision Corporation, and is intended for home and other limited viewing uses only unless otherwise authorized by Macrovision Corporation. Reverse engineering or disassembly is prohibited.
Matsushita Electric Industrial Co., Ltd.
Osaka 542-8588, Japan
En
© 2000 Matsushita Electric Industrial Co., Ltd.
VQT8626
F0300ST1030


- PANASONIC
- REGION NUMBER SUPPORTED BY THIS PLAYER
- ONLY FOR THE UNITED KINGDOM
- NOTE
- DEAR CUSTOMER
- ACCESSORIES
- TABLE OF CONTENTS
- GETTING STARTED
- BASIC OPERATIONS
- ADVANCED OPERATIONS
- HOME THEATER
- FOR YOUR REFERENCE
- SAFETY INFORMATION
- CAUTION
- WARNING
- SAFETY PRECAUTIONS
- PLACEMENT
- VOLTAGE
- AC MAINS LEAD PROTECTION
- FOREIGN MATTER
- SERVICE
- CAUTION FOR AC MAINS LEAD
- (ONLY FOR THE UNITED KINGDOM)
- FOR YOUR SAFETY PLEASE READ THE FOLLOWING TEXT CAREFULLY
- IMPORTANT
- HOW TO REPLACE THE FUSE
- PLAYING DVDS AND VIDEO CDS
- COPY PROTECTION
- MARKS USED IN THESE OPERATING INSTRUCTIONS
- COMPATIBLE WITH PAL DVD/VIDEO CD AND NTSC DVD/VIDEO CD
- TYPE OF DISC FOR THE TYPE OF TELEVISION
- TERMS USED IN THESE OPERATING INSTRUCTIONS
- TITLE/CHAPTER DVD
- TRACK VCD CD
- PLAYBACK CONTROL VCD
- INTERACTIVE DVD DVD
- REMOTE CONTROL PREPARATIONS
- BATTERY INSTALLATION
- CORRECT METHOD OF USE
- TO PREVENT DAMAGE
- CONTROL REFERENCE GUIDE
- PLAYER
- REMOTE CONTROL
- CONNECTION TO A TELEVISION
- CONSERVING POWER
- CONNECT YOUR PLAYER DIRECTLY TO YOUR TELEVISION
- DO NOT PLACE THE PLAYER ON AMPLIFIERS OR OTHER EQUIPMENT WHICH MAY BECOME HOT
- CONNECTING TO A TELEVISION WITH VIDEO INPUT TERMINAL OR S VIDEO INPUT TERMINAL
- CONNECTING TO A TELEVISION AND A VIDEO CASSETTE RECORDER WITH 21-PIN SCART TERMINAL
- BEFORE ENJOYING DVD/VIDEO CD/CD
- SELECTING TV SCREEN TYPE
- PREPARATION
- SETTING TV TYPE
- TO CANCEL DURING SETUP OPERATION
- TO CLEAR THE INITIAL SETTINGS SCREEN
- BASIC PLAY
- PREPARATIONS
- A
- B
- C
- A STOPPING PLAY
- PRESS [■] DURING PLAY
- TO RESUME PLAY FROM WHERE YOU STOPPED IT (RESUME FUNCTION)
- TO CLEAR THE RESUME FUNCTION
- CHAPTER REVIEW FUNCTION
- DVD
- AFTER OPERATION
- (AUTO POWER-OFF FUNCTION)
- OTHER METHODS OF PLAY
- A STILL PICTURE (PAUSE)
- PRESS [II PAUSE] DURING PLAY
- B SKIPPING CHAPTERS OR TRACKS
- C FRAME ADVANCE (FRAME REVERSE)
- DVD VCD
- TO RETURN TO NORMAL PLAY
- A SLOW-MOTION PLAY
- ON THE PLAYER
- B RAPID ADVANCE (RAPID REVERSE)
- A CANCELING PLAYBACK CONTROL
- VCD
- PRESS [■ STOP] AFTER THE MENU SCREEN APPEARS (AFTER STEP 4 ON PAGE 12)
- PRESS THE NUMERIC BUTTONS TO SELECT A TRACK. (→ITEM 40 ON PAGE 8 FOR NUMBER ENTRY.)
- TO RETURN TO MENU PLAY
- B USING MENUS TO PLAY
- PRESS [TOP MENU] OR [MENU] DURING PLAY TO DISPLAY THE MENU
- PRESS THE CURSOR BUTTONS [▲, ▼, ◀, ▶] TO SELECT AN ITEM AND PRESS [ENTER]
- A CHANGING SOUNDTRACK LANGUAGE
- PRESS [AUDIO] DURING PLAY TO DISPLAY THE CURRENT LANGUAGE NUMBER
- TO CLEAR THE DISPLAY
- SWITCHING VOCALS ON OR OFF FOR KARAOKE DISCS
- A CHANGING SUBTITLE LANGUAGE
- PRESS [SUBTITLE] DURING PLAY TO DISPLAY THE CURRENT LANGUAGE NUMBER
- B TO CLEAR/DISPLAY THE SUBTITLES
- PRESS [SUBTITLE]
- C VIEWING FROM ANOTHER ANGLE
- PRESS [ANGLE] DURING PLAY TO DISPLAY THE CURRENT ANGLE NUMBER
- CHANGING PICTURE QUALITY FOR MOVIE VIEWING
- PRESS [CINEMA] ON THE PLAYER WHILE A DISC IS LOADED
- B RAISING DIALOGUE VOLUME
- A REPEAT PLAY
- PRESS [REPEAT MODE] DURING PLAY
- VIDEO CD/CD
- TO ENJOY PROGRAM REPEAT PLAY
- VCD CD
- TO RETURN TO PROGRAM PLAY
- REPEATING SECTIONS BETWEEN TWO SPECIFIC POINTS (A-B REPEAT)
- B CONNECTING HEADPHONES
- C RANDOM PLAY
- TO EXIT THE SCREEN
- PROGRAM PLAY
- PRESS [PLAY MODE] WHILE STOPPED UNTIL THE ILLUSTRATED SCREEN APPEARS
- PRESS THE NUMERIC BUTTONS TO SELECT THE TRACK. (→ ITEM 40 ON PAGE 8 FOR NUMBER ENTRY.)
- PRESS [▶ PLAY]
- TO ADD TRACKS
- OPERATION BY OBSERVING THE UNIT'S FL DISPLAY
- CLEARING THE PROGRAM
- REPRODUCING AN ADVANCED VIRTUAL SURROUND SOUND (V.S.S.) EFFECT
- PRESS [V.S.S.] DURING PLAY
- B ENJOYING V.S.S. THROUGH HEADPHONES
- USING GUI SCREENS
- GUI SCREENS
- EXAMPLES OF GUI SCREENS A
- B COMMON PROCEDURES
- PRESS [DISPLAY] DURING PLAY OR IN THE STOP MODE
- PRESS THE CURSOR BUTTONS [◀, ▶] TO SELECT THE ITEM
- PRESS THE CURSOR BUTTONS [▲, ▼] TO SELECT THE SETTING
- TO CLEAR THE GUI SCREENS
- DETAILED DESCRIPTIONS OF EACH ICON
- SCREEN FOR DISC INFORMATION
- SCREEN FOR PLAYER INFORMATION
- A-B REPEAT PLAY
- B REPEAT PLAY
- PLAY MODE
- TO RECALL A MARKER
- TO CLEAR A MARKER
- E DIGITAL PICTURE MODE DVD VCD
- ⑨ MASTER VOLUME
- SHUTTLE SCREEN
- ⑨ RAPID REVERSE
- S RAPID ADVANCE
- CHANGING INITIAL SETTINGS
- COMMON PROCEDURES
- PRESS [SETUP] IN THE STOP MODE
- PRESS THE CURSOR BUTTONS [▲, ▼] TO SELECT THE ITEM AND PRESS [ENTER]
- PRESS THE CURSOR BUTTONS [▲, ▼] TO SELECT THE SETTING AND PRESS [ENTER]
- DISC LANGUAGES
- RATINGS
- LEVEL 7 TO
- LEVEL
- SETTING RATINGS (WHEN THE LEVEL IS "8")
- CHANGING RATINGS (WHEN THE LEVEL IS "0" TO "7")
- MENU LANGUAGE
- FL DISPLAY
- OTHER SETTINGS
- I/P/B
- FRAME
- FIELD
- FRAME STILL
- FIELD STILL
- HOW DIFFERENT KINDS OF SOFTWARE APPEAR ON YOUR TELEVISION
- UPGRADING YOUR TELEVISION
- A CONNECTING AN AMPLIFIER WITH 5.1-CHANNEL AUDIO INPUT TERMINALS
- WHEN YOU HAVE FINISHED CONNECTION
- B CONNECTING AN AMPLIFIER WITH A BUILT-IN DECODER
- C CONNECTING AUDIO EQUIPMENT WITH 2-CHANNEL AUDIO INPUT TERMINALS
- AMPLIFIER AND SPEAKERS OR SYSTEM COMPONENT
- DOLBY PRO LOGIC AMPLIFIERS
- D CONNECTING AUDIO EQUIPMENT WITH DIGITAL AUDIO INPUT TERMINALS
- OPTICAL DIGITAL AUDIO CABLE
- DIGITAL AUDIO OUTPUT
- SELECTING DIGITAL OUTPUT
- WHEN "4 MPEG" IS SELECTED
- TO EXIT THE INITIAL SETTINGS SCREEN
- RECOMMENDED SETTING OF "DIGITAL AUDIO OUTPUT
- SPEAKER SETTING
- COMMON PROCEDURE
- SETTING THE SIZE AND PRESENCE OF YOUR SPEAKERS
- DELAY TIME
- DVD (DOLBY DIGITAL ONLY)
- ● SURROUND SPEAKER
- CHANNEL BALANCE
- TROUBLESHOOTING GUIDE
- SELF-DIAGNOSIS DISPLAY FUNCTION
- DISC HANDLING
- HOW TO HOLD A DISC
- IF THE SURFACE IS DIRTY
- IF THE DISC IS BROUGHT FROM A COLD TO A WARM ENVIRONMENT, MOISTURE MAY FORM ON THE DISC
- HANDLING PRECAUTIONS
- DO NOT PLACE OR STORE DISCS IN THE FOLLOWING PLACES
- MAINTENANCE
- TO CLEAN THIS UNIT, WIPE WITH A SOFT, DRY CLOTH
- SPECIFICATIONS
Brand : PANASONIC
Model : DVD-RV60
Category : DVD player