
DVD-CP72 - DVD Recorder PANASONIC - Free user manual and instructions
Find the device manual for free DVD-CP72 PANASONIC in PDF.


| Product Type | DVD Recorder |
| Brand | Panasonic |
| Model | DVD-CP72 |
| Dimensions (approx.) | 430 x 50 x 250 mm (16.9 x 2.0 x 9.8 inches) |
| Weight (approx.) | 3.0 kg (6.6 lbs) |
| Power Supply | AC 120V, 60 Hz |
| Power Consumption | 15 W (standby: <1 W) |
| Recordable Disc Types | DVD-R, DVD-RW, DVD+R, DVD+RW |
| Playback Disc Types | DVD-Video, DVD-R/RW, DVD+R/RW, CD, CD-R/RW |
| Video Outputs | HDMI, Component, Composite, S-Video |
| Audio Outputs | Digital Optical, Analog Stereo |
| Recording Features | Timer recording, One-touch recording, Flexible recording modes (XP, SP, LP, EP) |
| Playback Features | Slow motion, Still, Zoom, Program play, Repeat |
| Remote Control | Included (with batteries) |
| Maintenance | Clean lens with dry cloth; keep in well-ventilated area; avoid moisture |
| Safety | Do not disassemble; use only specified voltage; keep away from liquids |
| Spare Parts | Contact Panasonic customer support or authorized service centers |
| Repairability | Replacement of laser pickup and power supply possible by qualified technician |
| General Information | Full user manual available in PDF; compliance with safety standards |
Frequently Asked Questions - DVD-CP72 PANASONIC
User questions about DVD-CP72 PANASONIC
0 question about this device. Answer the ones you know or ask your own.
Ask a new question about this device
Download the instructions for your DVD Recorder in PDF format for free! Find your manual DVD-CP72 - PANASONIC and take your electronic device back in hand. On this page are published all the documents necessary for the use of your device. DVD-CP72 by PANASONIC.
USER MANUAL DVD-CP72 PANASONIC
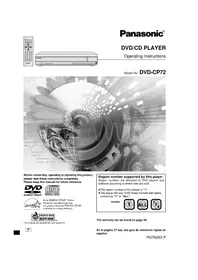
Panasonic®
DVD/CD PLAYER
Operating Instructions
Model No. DVD-CP72

Before connecting, operating or adjusting this product, please read these instructions completely. Please keep this manual for future reference.


As an ENERGY STAR® Partner, Panasonic has determined that this product meets the ENERGY STAR® guidelines for energy efficiency.

This manual was printed with soy based ink.

Region number supported by this player
Region numbers are allocated to DVD players and software according to where they are sold.
- The region number of this player is "1".
- The player will play DVD-Video marked with labels containing "1" or "ALL".
Example:


The warranty can be found on page 26.
Thank you for purchasing this product. For optimum performance and safety, please read these instructions carefully.
Operations in these instructions are described mainly with the remote control, but you can do the operations on the main unit if the controls are the same.
Accessories
Please check and identify the supplied accessories. Use numbers indicated in parentheses when asking for replacement parts.
To order accessories contact 1-800-332-5368 or web site (http://www.panasonic.com).
□1 Remote control (N2QAJB000052)
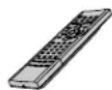
□2 Batteries for remote control

□1 Audio/video cable (K2KA6CA00001)

□1 AC power supply cord (RJA0065-A)

Note The included AC power supply cord is for use with this unit only. Do not use it with other equipment.
User memo:
DATE OF PURCHASE ____ DEALER NAME ____ DEALER ADDRESS ____
TELEPHONE NUMBER
The model number and serial number of this product can be found on either the back or the bottom of the unit. Please note them in the space provided below and keep for future reference.
DVD-CP72
MODEL NUMBER DVD-CP72
SERIAL NUMBER ____
Table of contents
Getting started
Accessories 2
IMPORTANT SAFETY INSTRUCTIONS ....4
Maintenance ....4
Disc information.... 5
Connection 6
Connection to a television 6
Home Theater—Enjoying more powerful sound 7
Control reference guide 8
The remote control 8
Quick setup 9
Basic operations
Basic play 9
Disc type information screen 10
When a menu screen appears on the television 10
Changing the display on the main unit 10
Sequential Mode 10
Changing other discs during play 10
Changing the disc in the play position 10
Replaying a scene — QUICK REPLAY 10
Skipping items 11
Fast forward and rewind—SEARCH 11
Slow-motion play 11
Frame-by-frame viewing 11
Starting play from a selected item 11
Resume function 11
Selecting groups to play 12
Selecting still pictures—Page Skip 12
To enjoy even higher quality sound—AUDIO ONLY 12
Setting the unit to turn off — SLEEP timer 12
Using menus to play WMA/MP3 discs and CD text 13
Advanced operations
Playing the programs on DVD-RAM 14
Selecting a program to play—DIRECT NAVIGATOR 14
Using the play list menu 14
Convenient features ....15
Changing soundtracks, subtitles and angles 15
4:3 TV ZOOM function 15
Program play 16
Random play 17
Repeat play 17
A-B repeat play.... 17
Using On-Screen Menu Icons 18
Common procedures 18
Disc information.... 18
Unit information 19
Progress indicator 20
Changing settings 21
Common procedures 22
Entering a password (Ratings) 22
Digital output 23
Speaker setting 23
Reference
Troubleshooting guide ....24
Glossary....25
Limited Warranty.... 26
Customer Services Directory.... 26
Product Service.... 26
(Spanish Quick Reference)
CAUTION!
THIS PRODUCT UTILIZES A LASER.
USE OF CONTROLS OR ADJUSTMENTS OR PERFORMANCE OF PROCEDURES OTHER THAN THOSE SPECIFIED HEREIN MAY RESULT IN HAZARDOUS RADIATION EXPOSURE.
DO NOT OPEN COVERS AND DO NOT REPAIR YOURSELF. REFER SERVICING TO QUALIFIED PERSONNEL.
WARNING:
TO REDUCE THE RISK OF FIRE, ELECTRIC SHOCK OR PRODUCT DAMAGE, DO NOT EXPOSE THIS APPARATUS TO RAIN, MOISTURE, DRIPPING OR SPLASHING AND THAT NO OBJECTS FILLED WITH LIQUIDS, SUCH AS VASES, SHALL BE PLACED ON THE APPARATUS.
CAUTION:
This equipment has been tested and found to comply with the limits for a Class B digital device, pursuant to Part 15 of the FCC Rules.
These limits are designed to provide reasonable protection against harmful interference in a residential installation. This equipment generates, uses and can radiate radio frequency energy and, if not installed and used in accordance with the instructions, may cause harmful interference to radio communications. However, there is no guarantee that interference will not occur in a particular installation. If this equipment does cause harmful interference to radio or television reception, which can be determined by turning the equipment off and on, the user is encouraged to try to correct the interference by one or more of the following measures:
● Reorient or relocate the receiving antenna. - Increase the separation between the equipment and receiver. - Connect the equipment into an outlet on a circuit different from that to which the receiver is connected. - Consult the dealer or an experienced radio/TV technician for help.
Any unauthorized changes or modifications to this equipment would void the user's authority to operate this device.
This device complies with Part 15 of the FCC Rules. Operation is subject to the following two conditions: (1) This device may not cause harmful interference, and (2) this device must accept any interference received, including interference that may cause undesired operation.

CAUTION
RISK OF ELECTRIC SHOCK DO NOT OPEN

CAUTION: TO REDUCE THE RISK OF ELECTRIC SHOCK, DO NOT REMOVE SCREWS. NO USER-SERVICEABLE PARTS INSIDE. REFER SERVICING TO QUALIFIED SERVICE PERSONNEL.

The lightning flash with arrowhead symbol, within an equilateral triangle, is intended to alert the user to the presence of uninsulated "dangerous voltage" within the product's enclosure that may be of sufficient magnitude to constitute a risk of electric shock to persons.

The exclamation point within an equilateral triangle is intended to alert the user to the presence of important operating and maintenance (servicing) instructions in the literature accompanying the appliance.
| DANGER - VISIBLE AND INVISIBLE LASER RADIATION WHEN OPEN, AVOID DIRECT EXPOSURE TO BEAM. (FDA 21 CFR) | |
| CAUTION - VISIBLE AND INVISIBLE LASER RADIATION WHEN OPEN, AVOID EXPOSURE TO BEAM. (IEC60825-1) | |
| ATTENTION: RAYONNEMENT LASER VISIBLE ET INVISIBLE EN CAS D'OUVERTURE, EXPOLUTION DANGEREVUE AUPO/ASOLIN. | |
| ADVARSEL- SYNJLG OG USYNLIG LASERSTRALING VED ABNING, UNIGA EKSPONERING OF STRALING. | |
| VARO! AWATTASSSA OLET ALTINA NAKYVAAG, JA NAKYMÁTON LASERSATEILYLE, ALA KATSO SATEESEEN. | |
| VARNING - SYNJLG OCH OSYNLIG LASERSTRALING NÄR DENNA DEL AR OPPMAD, BETRAKTA EL STRALIN. | |
| ADVARSEL- SYNJLG OG USYNLIG LASERSTRALING NAR DEKSEL APNES, UNIGA EKSPONERING FOR STRALIN. | |
| VORSICHTY - SCOTBARE UNO UNSCHTBARE LASERSTRALUNG, VIENN ABECKUNG GEÖFFRET, NCHOT STRAIH, AUSSETZEN. | |
| 注意 - 打开时有可见及不可见激光辐射,避免激光束照射。 | |
| 注意 - 二ことを開くと可視に不可視のレーザー先が出来ます。ピームを描頭見引し,触れていないください。ROLS2/233 |
(Inside of product)
IMPORTANT SAFETY INSTRUCTIONS
Read these operating instructions carefully before using the unit. Follow the safety instructions on the unit and the safety precautions listed below. Keep these operating instructions handy for future reference.
Safety
- Power source—Connect the unit to a power source of the type described in these instructions or as marked on the unit.
- Polarization—The unit is equipped with a polarized power plug where one blade is wider than the other. This safety feature ensures that the plug fits into your household AC outlet only one way. If the plug doesn't fit one way, try reversing it. If the plug still doesn't fit, contact an electrician to replace the obsolete outlet. Do not attempt to defeat the safety purpose of the plug.
- Power cord protection—Route the AC power supply cord so that it will not be walked on or pinched by items placed on or against it. Never take hold of the plug or cord with wet hands. Always grasp the plug body firmly when connecting and disconnecting it.
- Overloading—When connecting the AC power supply cord, be careful not to overload the household AC outlet, extension cord, or outlet from any other device as this can result in fire or electric shock.
- Nonuse periods—Turn the unit off when it is not in use. Unplug the unit from the household AC outlet if it is not to be used for a long time. Unplug the unit during lightning storms.
- Attachments and accessories—Use only the attachments and accessories recommended in these operating instructions.
Installation
Placement
- Ventilation—Situate the unit so that it receives proper ventilation. Do not install in a confined space such as a bookcase or cabinet. Allow at least 10 cm (4 inches) clearance from the rear of the unit. To prevent the risk of electric shock or fire due to overheating, ensure curtains and other materials do not obstruct the unit's ventilation.
- Foreign material—Ensure objects and liquids do not get into the unit. Avoid exposing the unit to excessive smoke, dust, mechanical vibration, and shock.
- Magnetism—Situate the unit away from equipment and devices that generate strong magnetic fields.
- Stacking—Do not place heavy objects on top of this unit.
- Surface—Place the unit on a flat, level surface.
- Carts and stands—Use the unit only with carts and stands recommended by the manufacturer. Move carts with care. Sudden stops, excessive force, and uneven surfaces can cause carts to overturn.
- Wall and ceiling mounting—Do not mount the unit on walls or ceilings unless specified in the instructions.

Do not place the unit on amplifiers or equipment that may become hot.
The heat can damage the unit.

Environment
- Water and moisture—Do not use the unit near water, such as near a bathtub or swimming pool. Avoid damp basements.
- Heat—Situate the unit away from heat sources, such as radiators. Do not situate where temperatures fall below 5°C (41°F) or rise above 35°C (95°F).
Maintenance
(See below for details.)
Unplug the unit from the household AC outlet before cleaning. Clean with a damp cloth.
Do not use abrasive pads, scouring powders, or solvents.
Service
- Damage requiring service—The unit should be serviced by qualified service personnel if: (a) The AC power supply cord or the plug has been damaged; or (b) Objects or liquids have gotten into the unit; or (c) The unit has been exposed to rain; or (d) The unit does not operate normally or exhibits a marked change in performance; or (e) The unit has been dropped or the cabinet damaged.
- Servicing—Do not attempt to service the unit beyond that described in these operating instructions. Refer all other servicing to authorized servicing personnel.
- Replacement parts—When parts need replacing ensure the servicer uses parts specified by the manufacturer or parts that have the same characteristics as the original parts. Unauthorized substitutes may result in fire, electric shock, or other hazards.
- Safety check—After repairs or service, ask the servicer to perform safety checks to confirm that the unit is in proper working condition.
Before moving the unit, ensure the disc trays are empty.
Failure to do so will risk severely damaging the discs and the unit.
Maintenance
To clean this unit, wipe with a soft, damp cloth.
●Never use alcohol, paint thinner or benzine to clean this unit.
- Before using chemically treated cloth, read the instructions that came with the cloth carefully.
- Never use alcohol, paint thinner or benzine to clean this unit. - Before using chemically treated cloth, read the instructions that came with the cloth carefully.
Disc information
■Discs that can be played
| Disc type | Logo |  | |
| DVD-RAM |  |  | |
| DVD-Audio |  |  | |
| DVD-Video |  |  | |
| DVD-R |  | ||
| Video CD |  |  | |
| CD |  |  | |
 | |||
| — |  | ||
| — |  | ||
Do not use irregularly shaped discs (e.g., heart-shaped), as these can damage the unit.
Discs that cannot be played
PAL discs (the audio on DVD-Audio can be played), DVD-ROM, CD-ROM, CDV, CD-G, +RW, DVD-RW, CVD, SVCD, SACD, Divx Video Discs, and Photo CD.
DVDs that can be played
You can play discs with these symbols.


Playing DVDs and Video CDs
The producer of these discs can control how they are played, so you may not always be able to control play as described in these operating instructions. Read the disc's instructions carefully.
CD-R and CD-RW discs
This unit can play CD-R and CD-RW if they are formatted as CD-DA (digital audio) or Video CD and finalized*.
DVD-R discs
Panasonic DVD-R recorded and finalized on a Panasonic DVD video recorder are played as DVD-Video on this unit.
A process that allows play on compatible equipment.
DVD-RAM discs
DVD-RAM discs must meet the following conditions for this unit to be able to play them.
| Type | ●Non-cartridge discs●Discs that can be removed from their cartridges(TYPE 2 and 4) |
| Capacity | ●12 cm (5") 9.4 GB (double-sided) and 4.7 GB (single-sided)●8 cm (3") 2.8 GB (double-sided) |
| Recording format | Discs recorded with DVD video recorders, DVD video cameras, personal computers, etc., using Version 1.1 of the Video Recording Format (a unified video recording standard). |
- Remove TYPE 2 and 4 discs from their cartridges before use, then return them when you are finished. Read the instructions for the disc carefully.
TYPE 2 or 4 disc Non-cartridge disc
- Some parts of the disc, for example where one program ends and another begins, may not play smoothly.
Note
It may not be possible to play CD-R, CD-RW, DVD-R and DVD-RAM in all cases due to the type of disc or condition of the recording.
■To clean discs
DVD-Audio, DVD-Video, Video CD, CD
Wipe with a damp cloth and then wipe dry.

DVD-RAM, DVD-R
- Clean only with the DVD-RAM/PD disc cleaner available as an optional accessory (part number LF-K200DCA1).
- Never use cloths or cleaners for CDs etc.
■Handling precautions
- Do not write on the label side with a ball-point pen or other writing instrument.
- Do not use record cleaning sprays, benzine, thinner, static electricity prevention liquids or any other solvent.
- Do not attach labels or stickers to discs. (Do not use discs with exposed adhesive from tape or left over peeled-off stickers.)
- Do not use scratch-proof protectors or covers.
- Do not use discs printed with label printers available on the market.
Connection to a television
This page explains how to connect the unit to a television and set it up so you hear the audio through the television's speakers. To get the full benefit from the powerful multi-channel audio found on DVDs, you should connect an amplifier and speakers (→ page 7).
Before connection
- Disconnect the AC power supply cord
- Refer to the television's operating instructions.

Enjoying higher picture quality
![graph LR A["COMPONENT VIDEO OUT (480P/490P)"] -->|Video cable (not included)| B["Television"] A --> C["VIDEO OUT"] B --> D["VIDEO IN"] D --> E["Y"] D --> F["P_B"] D --> G["P_R"]](/content/2026/06/1329864/images/cac60cae13808ad42145d3a24312eef3a712f7bf4c7f05b7685929b613cf3caa.jpg)
COMPONENT VIDEO OUT terminal
These terminals can be used for either interlace or progressive output and provide a purer picture than the S VIDEO OUT terminal. Connection using these terminals outputs the color difference signals (PB/PR) and luminance signal (Y) separately in order to achieve high fidelity in reproducing colors.
- The description of the component video input terminals depends on the television or monitor (e.g. Y/PB/PR, Y/B-Y/R-Y, Y/CB/CR). Connect to terminals of the same color.
- After making this connection, change the black level for a better picture. (→ page 21, Video—Black Level Control)
![graph LR A["S VIDEO OUT"] --> B["S video cable (not included)"] B --> C["Television S VIDEO IN"]](/content/2026/06/1329864/images/3bdecc11fc057591cd5a22742d3b7edb0dd4396accaad2b7de20fd27b2b35622.jpg)
S VIDEO OUT terminal
The S video terminal achieves a more vivid picture than the VIDEO OUT terminal by separating the chrominance (C) and luminance (Y) signals. (Actual results depend on the television.)
When making this connection, ensure you connect the audio cables to the corresponding audio input terminals on the television.
To enjoy progressive video
- Connect to the component video (480P) input terminals on a television compatible with this unit's copy guard system. (Video will not be displayed correctly if connected to an incompatible television.)
- In QUICK SETUP, set "Progressive Out" to "Enable" (→ page 9).
- All televisions manufactured by Panasonic and that have 480P input connectors are compatible. Consult the manufacturer if you have another brand of television.
For your reference
Home Theater—Enjoying more powerful sound
Enjoy the powerful movie theater and hall-like sound available with multiple channel audio found on DVDs by connecting an amplifier and speakers. There are two types of connection, digital and analog.
A Digital—Connect an amplifier with Dolby Digital and DTS decoders to enjoy surround sound. You can also enjoy high-quality stereo sound with sampling frequencies of 88.2 and 96 kHz if the material isn't copy-protected and the equipment you connect is compatible with these signals.
B Analog—Connect an amplifier with multi-channel audio input terminals to enjoy surround sound. This unit can decode Dolby Digital and DTS and there are no limitations on sampling frequency with this kind of connection.
Note
- The equipment connections described are examples.
- Peripheral equipment and optional cables sold separately unless otherwise indicated.
- Before connection, turn off all equipment and read the appropriate operating instructions.

A Digital connection![graph TD A["OPTICAL"] --> B["Optical digital audio cable"] B --> C["Insert fully, with this side facing up."] C --> D["Change "Digital output" (→ page 23)."] D --> E["Amplifier"] E --> F["Connect three or more speakers for surround sound."] style A fill:#f9f,stroke:#333 style B fill:#ccf,s…](/content/2026/06/1329864/images/270ab5290fd4cf36e75b7226e9fa03be2ea2755203ed9f8becb80f94c0cc5a2e.jpg)
Note
- If you don't connect a subwoofer, it is advisable to connect front speakers (L/R) capable of producing bass of less than 100 Hz.
- You cannot use DTS Digital Surround decoders not suited to DVD-Video.
■ Recording
- Digital recording (→ Connection A above) You can record the digital signal directly to digital recording equipment.
Note
- With DVD, the following conditions must be met: a the disc doesn't have protection preventing digital recording, and b the recording equipment can handle signals with a sampling frequency of 48 kHz.
- You cannot record WMA/MP3. When recording DVDs, make the following settings. Advanced Surround (VSS): OFF (→ page 19) — Digital Audio Output: On (→ page 21) — PCM Down Conversion: Yes Dolby Digital/DTS Digital Surround: PCM (→ page 23)
- Analog recording (→ Connection B above) You can record to a cassette deck or other recording equipment. There are no limitations on recording analog signals as there are with digital signals.
Control reference guide
Getting started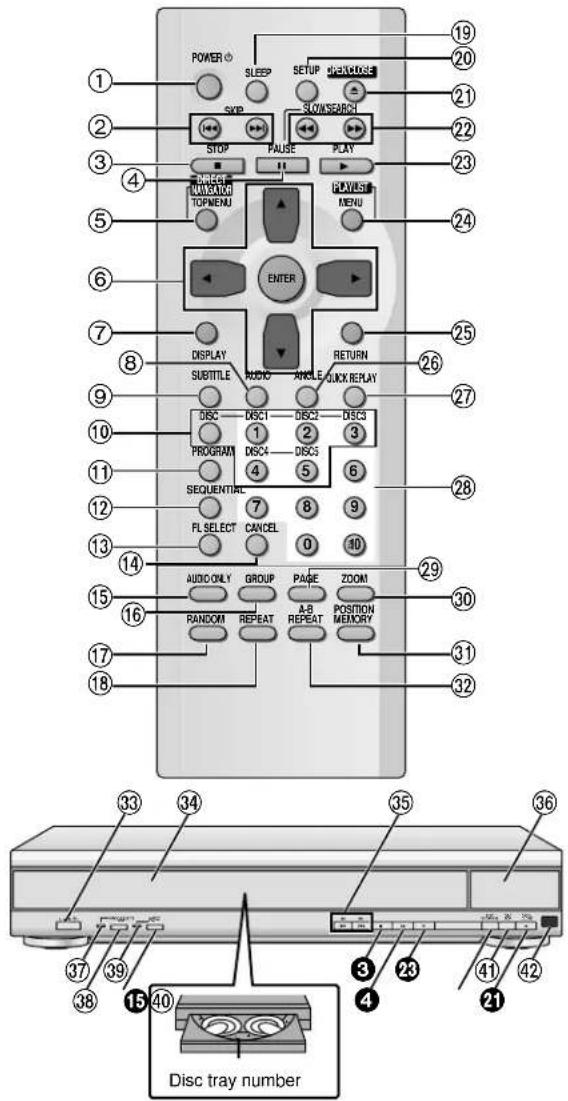
Buttons such as ③ function the same as the controls on the remote control.
Page
① Standby/on button (POWER ⏻) 9
② Skip buttons (|◀◀, ▶▶| SKIP).... 11
③ Stop button (■ STOP) 9
④ Pause button (II PAUSE)....9
⑤ Top menu, Direct navigator button (TOP MENU, DIRECT NAVIGATOR) 10, 14
⑥ Cursor buttons (▲, ▼, ◀, ►), Enter button (ENTER) ...... 9
⑦ Display button (DISPLAY) 18
⑧ Audio button (AUDIO) 15
⑨ Subtitle button (SUBTITLE) 15
⑩ Disc select button (DISC), Disc buttons (DISC 1 – DISC 5) ..... 10
⑪ Program button (PROGRAM).... 16
⑫ Sequential button (SEQUENTIAL) 10
⑬ FL select button (FL SELECT) 10
⑭ Cancel button (CANCEL) 12
⑮ Audio only button (AUDIO ONLY) 12
⑯ Group button (GROUP) 12
⑰ Random button (RANDOM).... 17
⑱ Repeat button (REPEAT) 17
⑲ Sleep button (SLEEP) 12
⑳ Setup button (SETUP) 9, 22
②1 Drawer open/close button (▲ OPEN/CLOSE) 9
② Slow/Search buttons (◀◀, ▶▶ SLOW/SEARCH).... 11
②3 Play button (▶ PLAY)....9
②4 Menu, Play list button (MENU, PLAY LIST) 10, 14
⑲ Return button (RETURN) 9
②6 Angle button (ANGLE) 15
⑳ Quick replay button (QUICK REPLAY) 10
②8 Numbered buttons (1-9, 0, ≥10) 10
⑲ Page button (PAGE) 12
⑳ 4:3 TV zoom button (ZOOM) 15
③1 Position memory button (POSITION MEMORY).... 11
③2 A-B repeat button (A-B REPEAT) 17
③ Standby/on switch (POWER ⏻/I) 9
Press to switch the unit from on to standby mode or vice versa. In standby mode, the unit is still consuming a small amount of power.
Drawer 9
Skip, Search buttons (|◀◀ ▶▶|, ◀◀ ▶▶) ...... 11
FL Display 10
Progressive out indicator 9
Progressive out button (PROGRESSIVE OUT) 9
Audio only indicator 12
Disc exchange button (DISC EXCHANGE) 10
Disc skip button (DISC SKIP) 10
Remote control signal sensor
The remote control
Batteries
RQT6263 - Insert so the poles (+ and -) match those in the remote control. - Do not use rechargeable type batteries.
Do not:
- mix old and new batteries.
- use different types at the same time.
- heat or expose to flame.
- take apart or short circuit.
- attempt to recharge alkaline or manganese batteries.
- use batteries if the covering has been peeled off.
Mishandling of batteries can cause electrolyte leakage which can damage items the fluid contacts and may cause a fire.
Remove if the remote control is not going to be used for a long period of time. Store in a cool, dark place.
■ Use
Aim at the sensor (→ above, Control reference guide), avoiding obstacles, at a maximum range of 7 m (23 feet) directly in front of the unit.


Quick setup
The QUICK SETUP screen appears when you press [SETUP] the first time after purchase and assists you to make necessary settings. You can access this screen again later if you need to (→ page 21, Others—QUICK SETUP).
Preparation
Turn on the television and select the appropriate video input on the television to suit the connections for the player.
1 Press [POWER ⏻] to turn on the unit.
2 Press [SETUP] to show the QUICK SETUP screen.

3 Press [▲, ▼] to select the menu language and press [ENTER]. 4 Press [▲, ▼] to select "Yes" to continue and press [ENTER]. 5 Press [▲, ▼] to select the item and press [ENTER].
● Audio Language (→ page 21) - Subtitle Language (→ page 21) • TV Aspect (→ below) ● Progressive Out (→ page 21) • Speaker Setting (→ page 21)
6 Press [ENTER] and then [SETUP] to end the settings.
To return to the previous screen
Press [RETURN].
■ TV Aspect
Select "4:3" (regular) or "16:9" (widescreen) to suit your television. If you have a regular 4:3 television, you can also select how video on some discs is shown (→ page 21, Video—TV Aspect).
- 4:3 Pan&Scan (Factory preset) Widescreen software is expanded to fill the screen of a 4:3 aspect television (unless prohibited by the producer of the disc).
- 4:3 Letterbox
Widescreen software is shown in the letterbox style on a 4:3 aspect television.

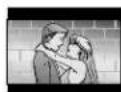
■ Viewing 4:3 aspect pictures on a 16:9 widescreen television using progressive output
16:9 aspect pictures are shown correctly, but 4:3 aspect pictures are stretched horizontally to fill the screen. - If your television can change the aspect when input is progressive Use the television to change the aspect to the correct one. - If your television cannot change the aspect when input is progressive Press [PROGRESSIVE OUT] so the indicator goes out. Output will now be interlace and 4:3 aspect picture is shown in the middle of the screen.
Basic play
RAM DVD-A DVD-V VCD CD WMA MP3
1 Press [POWER ⏻] to turn on the unit. For progressive output
Press [PROGRESSIVE OUT] so the indicator lights.
2 Press [▲] to open the drawer.
3 Place the disc(s) on the disc tray(s).
You can load discs on the other trays by pressing [DISC SKIP] on the main unit.
- Remove TYPE 2 and 4 discs from their cartridges before use. RAM
- The label of the disc must face upward. (With double-sided discs, load so the label for the side you want to play is facing up.)
Play starts from the disc in the front-left position.
4 Press [▲] to close the drawer.
The disc indicator will go out when the unit reads a tray as empty.
- If a menu screen is shown, see page 10. WMA MP3 Group and track names are displayed on the television. Press [SUBTITLE] to turn the display on or off.
5 Press [▶] (PLAY).
Play begins.

When the disc finishes playing
If Sequential Mode (→ page 10) is off, select the disc using the disc type information screen (→ page 10).
To stop play
Press [■] (→ page 11, Resume function).
To pause play
Press [11].
Press [▶] (PLAY) to restart play.
To prevent damage
Do not load more than one disc per tray.
- Do not touch the drawer or the carousel while they are in motion.
- Do not rotate the carousel by hand.
- Do not close the drawer by hand.
Note
If "⊗" appears on the television
The operation is prohibited by the unit or disc.
- Discs continue to rotate while menus are displayed even after playing an item. Press [■] when you finish to preserve the unit's motor and your television screen.
- Volume may be lower when playing DVDs than when playing other discs or during television broadcasts. Reduce the volume before playing other sources so that a sudden increase in output does not occur.
- Progressive output is not possible if the "Progressive Out" setting is left as "Disable" in the QUICK SETUP menus.
- Although the progressive out indicator lights if you press [PROGRESSIVE OUT] after changing the "Progressive Out" setting to "Enable", output will still only be interlace if you have connected the unit to your television through the VIDEO OUT or S VIDEO OUT terminals.
- When progressive output is on, closed captions will not be displayed.

Disc type information screen
RAM DVD-A DVD-V VCD CD WMA MP3
You can check the kinds of discs loaded on the trays, and start playing the preferred disc.
1 Press [DISC].
Disc type information screen appears.

DVD-VR: DVD-RAM VCD: Video CD
DVD-A: DVD-Audio CD: Audio CD
DVD-V: DVD-Video WMA/MP3: WMA/MP3 formatted CD
---: The unit has not determined the kind of the disc.
NoDisc: There is no disc on the tray.
2 Press the disc button ([DISC 1] - [DISC 5]).
The disc on the selected tray starts playing.
To clear the disc type information screen
Press [DISC].
Note
When you play a disc that contains both WMA and MP3 files, the unit displays the format of the track being played.
When a menu screen appears on the television
DVD-A DVD-V VCD
Press the numbered buttons to select an item.
To select a 2-digit number
e.g. 23: [≥10] → [2] → [3]
- When playing DVDs, you can also use [▲, ▼, ◀, ▶] to select items.
Press [ENTER] to confirm your selection.
Play of the selected item now begins.
Other buttons used to operate menus
Read the disc's instructions for further details about operation.
[▶▶]: Shows the next menu.
[◀◀]: Shows the previous menu.
[RETURN]: Shows the menu screen. VCD
[TOP MENU]: Shows the first menu screen. DVD-A DVD-V
[MENU]: Shows the menu screen. DVD-V
Changing the display on the main unit
RAM DVD-A DVD-V VCD CD WMA MP3
Press [FL SELECT].
Each time you press the button:
Program/Group/Title/Chapter/Track display

Sequential Mode
RAM DVD-A VCD CD WMA MP3
While stopped
Press [SEQUENTIAL].
Each time you press the button:
SEQ on: Plays all type of the discs (except DVD-Video)
once each in turn.
●The playback control function on Video CDs is canceled.
e.g. CD
SEQ off: Plays only one disc in the play position (This mode is on whenever you turn the unit on.)
Note
- This feature doesn't work during program/random play.
- If you turn Sequential Mode on during play:
—DVD-Video: Play will stop and start again with the next disc.
—Other discs: The unit will stop and then resume play from the beginning of the disc.
Changing other discs during play
RAM DVD-A DVD-V VCD CD WMA MP3
You can change the other discs without interrupting play.
Main unit only
During play
1 Press [▲] to open the drawer. 2 Press [DISC SKIP] to rotate the disc tray to the desired position.
The carousel will move clockwise by one disc tray. Then, each press moves the carousel in the opposite direction by two disc trays.
3 Change the disc and press [▲] to close the drawer.
Changing the disc in the play position
RAM DVD-A DVD-V VCD CD WMA MP3
Main unit only
During play or while stopped
1 Press [DISC EXCHANGE].
Play is stopped (if pressed during play), the drawer opens and the disc tray that was in the play position comes to the front-left position.

2 Change the disc in the front-left position. 3 Press [DISC EXCHANGE].
The drawer closes and play begins from the new disc.
Replaying a scene — QUICK REPLAY
RAM DVD-A DVD-V VCD CD WMA MP3
Skip back a few seconds within the current item (program, track or title).
During play
Press [QUICK REPLAY].
Note
This feature may not work while playing some parts of a disc or at all with some discs.
Skipping items
RAM DVD-A DVD-V VCD CD WMA MP3
You can skip chapters on DVD-Video, tracks on DVD-Audio, CDs and Video CDs, and on DVD-RAM you can skip to the start of a program, scene in a play list, or to a marker.
During play or while paused
Press [◀◀] or [▶▶].
Each press increases the number of skips.
Fast forward and rewind—SEARCH
RAM DVD-A DVD-V VCD CD WMA MP3
During play
Press [◀◀] or [▶▶].
- Press and hold [◀◀] or [▶▶] on the main unit.
- You may erase sound during search (→ page 21, Audio—Audio during Search).
Slow-motion play
RAM DVD-A DVD-V VCD
While paused
Press [◀◀] or [▶▶].
Press and hold [◀◀] or [▶▶] on the main unit.
Frame-by-frame viewing
RAM DVD-A DVD-V VCD
While paused
Press [◀] or [▶].
The frame changes each time you press the button.
- The frames change in succession if you press and hold the button.
- Pressing [III] also activates forward frame-by-frame.
Notes
●The speed of search and slow-motion increases up to 5 steps. - Press [▶] (PLAY) to restart play. - You cannot move backwards with Video CD during slow-motion and frame-by-frame. - Slow-motion and frame-by-frame only work on the moving picture parts of DVD-Audio. - When playing Video CDs with playback control
Pressing buttons to perform skip, search or slow-motion may take you to a menu screen.
Starting play from a selected item
RAM DVD-A DVD-V VCD CD WMA MP3
Press the numbered buttons to select the item.
To select a 2-digit number
e.g. 23: [≥10] → [2] → [3]
WMA MP3
Press [ENTER] after pressing the numbered buttons.
(You do not have to press [≥10].)
Play starts from the selected item.
Note
●This works only when stopped with some discs. - When playing DVD-Audio and you want to start play from a track in a different group, select the group first (→ page 12).
Resume function
RAM DVD-A DVD-V VCD CD WMA MP3
(When the elapsed play time is displayed)
The position you stopped play at is recorded by the unit when “>” is flashing on the display.

While "I> is flashing, press [▶] (PLAY) to start play from where you stopped it. (When playing DVD-Video → Chapter Preview below)
- The position is cleared when the disc is changed or the unit is switched to standby.
To clear the position
Press [■] before recalling the memorized position.
Position Memory function
This function allows you to memorize a position to start from even after switching the unit to standby or changing discs. You can memorize positions on up to five different discs at a time. When you memorize another position, the earliest position is replaced.
●This function doesn't work:
— while playing play lists on DVD-RAM.
— while playing some DVDs.
- During play, press [POSITION MEMORY].

Light as you memorize positions.
- Press [POWER ⏻] to switch the unit to standby, or change the disc.
- Press [▶] (PLAY) to begin playback from the memorized position (the position is cleared). If you return to a disc to play it back again, playback will begin automatically.
(When playing DVD-Video ⇒ Chapter Preview below)
To clear the position
Press [■] before recalling the memorized position.
Note
You cannot recall the memorized position in Sequential Mode.
Chapter Preview DVD-V
The message appears immediately after you press [▶] (PLAY).
Press PLAY to Preview Chapters
Press [▶] (PLAY) while the message is displayed and the beginning portions of each chapter up to the current one are played. Full play resumes from the point where you pressed [■] or [POSITION MEMORY]. (This feature works only within a title.)
If you do not press [▶] (PLAY), the message disappears and play starts from where you pressed [■] or [POSITION MEMORY].
Basic play

Selecting groups to play
DVD-A WMA MP3
The tracks on DVD-Audio and WMA/MP3 are divided into groups. How these groups are played depends on the recording method.
1 Press [GROUP].
The group number changes each time you press the button.

2 Press [ENTER].
3 Press the numbered buttons to select the track number and press [ENTER].
The selected group and track begin to play.
Note
- You can also select groups and tracks with the cursor buttons.
- Selection may not be allowed in some situations.
- You can play all the groups in succession in Sequential Mode (→ page 10). DVD-A
Playing bonus groups
DVD-A
Some discs contain bonus groups. To enjoy these groups you may have to enter a password. Refer to the disc's jacket.
- Select the bonus group while stopped (→ steps 1 and 2, above).
- Enter the 4-digit password with the numbered buttons.
- You can erase it by pressing [CANCEL].
- Press [ENTER].
- Press the numbered buttons to select a track and press [ENTER] to start play.
Note
RQT6263
- Some discs will show a menu screen to accept your password. Follow the on-screen instructions.
- You may have to reenter the password after removing the disc in the play position or switching the unit to standby.
- In Sequential Mode, bonus groups can be played as long as your password is accepted.
Selecting still pictures—Page Skip
DVD-A
During play or while paused
Press [PAGE].
The page changes each time you press the button.
PAGE 1
To enjoy even higher quality sound—AUDIO ONLY
RAM DVD-A DVD-V VCD CD WMA MP3
You can enjoy higher quality audio by stopping the video signal.
During play
Press [AUDIO ONLY].
●The indicator on the main unit lights. - AUDIO ONLY is canceled if you press the button again or turn the unit off.
Note
- Video is output when you stop the disc and during operations such as search.
- The television screen can appear unusual while video signals are not being output.
Setting the unit to turn off—SLEEP timer
RAM DVD-A DVD-V VCD CD WMA MP3
Press [SLEEP] to select the setting.
Each time you press the button: OFF -> AUTO* -> 60 min -> 90 min -> 120 min ↑
![PANASONIC DVD-CP72 - Press [SLEEP] to select the setting. - 1](/content/2026/06/1329864/images/cb81a3cea2883732900d56075e6bb640ac5666803dbfdf8880be3e888fb1723c.jpg)
*The unit turns off 5 minutes after play finishes.
![PANASONIC DVD-CP72 - Press [SLEEP] to select the setting. - 2](/content/2026/06/1329864/images/9f784ccde2fc2b5f1c364a4726555d4d784466f21d5ea35d4d71250dabb03fda.jpg)
The unit turns off after 60 minutes.
To cancel the SLEEP timer
Press [SLEEP] to select "OFF".
To confirm the remaining time
Press [SLEEP].
Note
●AUTO also works with DVDs that show a menu after play finishes. - AUTO does not work if you press [■], [MENU] or [TOP MENU]. It is activated again when you restart play. - AUTO does not work correctly with some discs (e.g., if menus appear after playing Video CDs).
Auto standby
The unit switches to standby mode after about 30 minutes in stop mode, regardless of the SLEEP setting.
Using menus to play WMA/MP3 discs and CD text
WMA/MP3: This unit can play WMA (Windows Media Audio) and MP3 files recorded on CD-R/RW with a computer. Files are treated as tracks, and folders are treated as groups.
CD (CD text): This unit reads and displays the information on CD text discs. You can display disc titles, artist names, and track titles.
1 Press [TOP MENU]. e.g., MP3
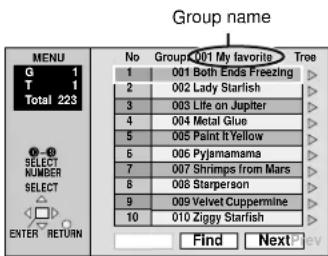
2 Press [▲, ▼] to select the track and press [ENTER].
Play continues to the last track in the last group. "☐" indicates the track currently playing.
To show other pages
Press [▲, ▼, ◀, ▶] to select "Prev" or "Next" and press [ENTER]. After listing all the tracks in one group, the list for the next group appears.
To exit the file list, press [TOP MENU].
Note
- Discs must conform to ISO9660 level 1 or 2 (except for extended formats).
- This unit is compatible with multi-session, but if there are many sessions, it takes more time for play to start. Keep the number of sessions to a minimum to avoid this.
- If you play a WMA/MP3 track that includes still picture data, it will take some time before the music itself starts playing, and the elapsed time will not be displayed during this time. Even after the track starts, the correct play time will not be displayed.
- When creating a WMA disc, ensure the copyright feature is off.
- WMA files must have the extension ".WMA" or ".wma".
- Noise may occur when playing WMA files.
- There are some files this unit cannot play (e.g., copyright protected). "TRACK PROTECTED" or "CANNOT PLAY THIS TRACK" appear on the unit's display to indicate such tracks.
- MP3 files must have the extension ".MP3" or ".mp3". ●This unit is not compatible with ID3 tags. ●This unit is not compatible with files with a sampling rate of 32 kHz.
MP3
Naming folders and files
At the time of recording, prefix folder and file names with 3-digit numbers in the order you want to play them (this may not work at times).
• CD (CD text)
When making your own CD text discs The unit plays the tracks in the order you record them so you do not have to prefix the titles with numbers.
![graph TD A["001"] --> B["001.mp9"] A --> C["002.mp9"] A --> D["003.mp9"] A --> E["002"] F["003"] --> G["001.mp3"] F --> H["002.mp3"] F --> I["003.mp3"] F --> J["004.mp3"]](/content/2026/06/1329864/images/248dd38a4f98370c863873105d45d0334c5df6b29552a4de9bcf3f5a80a350e3.jpg)
Windows Media, and the Windows logo are trademarks, or registered trademarks of Microsoft Corporation in the United States and/or other countries. WMA is a compression format developed by Microsoft Corporation. It achieves the same sound quality as MP3 with a file size that is smaller than that of MP3.

Using the tree screen to find a group WMA MP3
1 Press [▶] while a track is highlighted to display the tree screen.

You cannot select groups that contain no compatible files.
2 Press [▲, ▼] to select a group and press [ENTER].
The file list for the group appears.
For your reference
Press [◀, ▶] to jump layers in the tree screen.
To return to the file list
Press [RETURN].
To show the text information for a track CD (CD text)
1 Press [▲, ▼] to select a track.
2 Press [▶] to show the text information.
- Press [◀, ▶] to select other tracks. Press [ENTER] to play tracks selected here.

To return to the list screen
Press [RETURN].
Finding a track to play
Enter part of a track title to make a search. Although the characters are upper case, the unit also searches for lower case.
Example: search for tracks including the word "LOVE".
1 Press [▲, ▼] to select "Find" and press [ENTER].
![PANASONIC DVD-CP72 - Press [▲, ▼] to select "Find" and press [ENTER]. - 1](/content/2026/06/1329864/images/d2f697e678fa4288ab1e204390f586dc96f73f13cc069a898fcf276ac3f720b8.jpg)
2 Press [▲, ▼] to select "L" and press [ENTER].
Characters change in alphanumeric order each time you press [▲].
- Press [◀◀, ▶▶▶] to skip between A, E, I, O and U.
- Press [◀] to erase a character.
- Repeat this step to enter "O", "V", and "E".
3 Press [▶] to select "Find" and press [ENTER].
The search results screen appears.
4 Press [▲, ▼] to select the track and press [ENTER].
Press [▼] to show other tracks if there are more than fifteen.
- To search for the first word in a title, erase the asterisk (*) first.
- You can also enter numbers with the numbered buttons.
To return to the list screen
Press [RETURN].
Playing the programs on DVD-RAM

RAM
Selecting a program to play — DIRECT NAVIGATOR
Use the program list to find programs to play.
Note
DIRECT NAVIGATOR doesn't work in Sequential Mode.
1 Press [DIRECT NAVIGATOR].

2 Press [▲, ▼] to select the program.
The selected program plays in the background.
- Press [▼] to show other programs if there are more than five.
- You can select programs with the numbered buttons.
To select a 2-digit number
e.g. 23: [≥10] → [2] → [3]
3 Press [ENTER].
The program being played in the background continues.
To clear the program list
Press [DIRECT NAVIGATOR]
(The unit returns to the condition it was in before you called up the program list.)
To display information about a selected program
Select the program and press [▶]. (The background picture pauses.)
Press [◀, ▶] to show the other programs.
To return to the previous screen
Press [RETURN].
Note
- Titles appear only if you have entered them.
- You cannot change program and disc titles.
Using the play list menu
You can play a group of scenes, a play list, created on other equipment such as a DVD video recorder.
You can also specify a scene to play.
Note
Play lists don't work in Sequential Mode.
Playing a play list
1 Press [PLAY LIST].

2 Press [▲, ▼] to select the play list.
- Press [▼] to show other play lists if there are more than six.
- You can select play lists with the numbered buttons.
To select a 2-digit number
e.g. 2 3: [10] → [2] → [3]
3 Press [ENTER] to start play.
To clear the play list screen
Press [PLAY LIST].
(The unit returns to the condition it was in before you called up the play list.)
■ To display information about a selected play list
- Select the play list and press [▶]
- Press [▲, ▼] to select "Contents" and press [ENTER].
Press [◀, ▶] to show other play lists.

To return to the previous screen
Press [RETURN].
Playing a specific scene
1 Press [PLAY LIST].
2 Press [▲, ▼] to select the play list.
- You can select play lists with the numbered buttons.
To select a 2-digit number
e.g., 2 3: [≥10] → [2] → [3]
3 Press [▶].
4 Press [▲, ▼] to select "Scene List" and press [ENTER].

Page Total pages
5 Press [▲, ▼, ◀, ▶] to select a scene and press [ENTER].
- If there are more than 9 scenes, press [▲, ▼, ◀, ▶] to select "Next" and press [ENTER]. Select "Prev" to move back.
- You can also select a page with the numbered buttons.
To select a number
e.g. 23: [2] → [3] → [ENTER] (You do not have to press [≥10].)
To return to the previous screen
Press [RETURN].
Convenient features

Changing soundtracks, subtitles and angles
Some DVDs have multiple soundtracks, subtitle languages and camera angles, and you can change them during play.
- “—” or “—”—” is displayed instead of the language number in circumstances such as when no language is recorded on the disc.
Soundtracks
RAM DVD-A DVD-V VCD During play Press [AUDIO].
RAM VCD Each time you press the button:


DVD-A Soundtrack playing
Soundtrack selected
DVD-V
The number changes each time you press the button.
- Indicates that a multi-channel soundtrack can be down-mixed to two channels.

- Depending on the signal type of the recording on DVD-RAM, sometimes the audio settings will not be activated even if the display changes.
- Play restarts from the beginning of the soundtrack when playing DVD-Audio and DVD-RAM soundtracks that are accompanied by still pictures.
- Even if a second soundtrack isn't recorded on a DVD-Audio, two soundtrack numbers will normally be shown when you press [AUDIO]. The soundtrack currently playing is number 1.
- You can also use this button to turn the vocals on and off on karaoke discs. Read the disc's instruction for details.
- Refer to B (→ page 19) for audio signal type details.
Subtitles
DVD-A DVD-V: You can change the subtitle language and turn the subtitles on and off.
RAM : You can turn the subtitles on and off.
During play
Press [SUBTITLE].
The number changes each time you press the button.
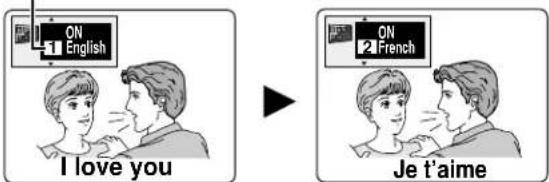
- In some cases, the subtitle language is not changed to the selected one immediately.
- If the subtitles overlap closed captions recorded on discs, turn the subtitles off.
To clear/display the subtitles
- Press [SUBTITLE].
- Press [▶]. (DVD-A DVD-V)
- Press [▲, ▼] to select "OFF" or "ON".
Angles
DVD-A DVD-V
During play
Press [ANGLE].
The angle changes each time you press the button.

4:3 TV ZOOM function
RAM DVD-A DVD-V
Widescreen software often appears as a letterbox picture (→ page 9) when shown on a regular 4:3 aspect television. Use 4:3 TV ZOOM to expand these pictures to fill more of the television. (The sides of the picture are cut off when you do this.)
During play
Press [ZOOM].
Each time you press the button:
ON ←→ OFF (Factory preset)
- 4:3 TV ZOOM is canceled when the disc is changed or the unit is switched to standby.
Note
- Depending on the video format of the disc and current play status, this feature may not work as described.
- Menus may act or appear differently while 4:3 TV ZOOM is on.

Convenient features

Program play
You can select up to 32 items to play in the order you choose.
When Sequential Mode is on
RAM DVD-A VCD CD WMA MP3
You can program all the items on discs.
While stopped
1 Press [PROGRAM].


RAM: Program No.
DVD-A WMA MP3 : Group No.
2-① Press the numbered buttons to select a disc.
- ② DVD-A | WMA | MP3
Press the numbered buttons to select a group.
3 Press the numbered buttons to select a program
(RAM) or a track (DVD-A, VCD, CD, WMA, MP3).
(WMA, MP3 and press [ENTER]).
- Repeat steps 2 and 3 to program other items.
4 Press [▶] (PLAY).
Play now begins in the programmed sequence.
Note
- You may be able to enter DVDs, empty trays, and item numbers for items not recorded on discs, but they are not played.
- If the chapter or track number flashes after entering it with the numbered buttons, press [ENTER] to continue to the next item.
When Sequential Mode is off
RAM, DVD-A, DVD-V, VCD, CD, WMA, MP3
You can program all the items on a disc in the play position.
While stopped
1 Press [PROGRAM].
2 DVD-A DVD-V WMA MP3
Press the numbered buttons to select a group (DVD-A | WMA | MP3) or title (DVD-V).
- Some items cannot be selected.
3 Press the numbered buttons to select a program (RAM), a track (DVD-A VCD CD WMA MP3) or chapter (DVD-V). (WMA MP3 and press [ENTER]).
- Repeat steps 2 and 3 to program other items.
WMA MP3
- Select "ALL" using [▲, ▼] to enter all items (on the disc or in the group).
VCD CD
- Press [ENTER] and [▲, ▼] to select "ALL".
4 Press [▶] (PLAY).
- Some items will not be played even if you programmed them. DVD-V
Note
You cannot program if there is no disc on the tray in the play position.
To select using the cursor buttons
Press [ENTER] and [▲, ▼] to select an item, then press [ENTER] again to register.
Changing the program
Press [▲, ▼] to select an item.
—To change an item, repeat steps 2 and 3.
—To clear an item, press [CANCEL] (or select "Clear" and press [ENTER]).
Press [◀◀] or [▶▶] to change pages.
To exit the program mode
Press [PROGRAM] while stopped.
To clear the whole program
Move to "Clear all" with [▲, ▼, ◀, ▶] and press [ENTER]. The whole program is also cleared when the disc is moved out of the play position while the sequential mode is off or the unit is turned off.
For your reference
You can program bonus groups as long as your password is accepted (→ page 12).
Random play
When Sequential Mode is on
RAM DVD-A VCD CD WMA MP3
You can play all discs (except DVD-Video) in random order.
While stopped
1 Press [RANDOM].


2 Press [▶] (PLAY).
Note
DVD-Video and empty trays are skipped during random play.
When Sequential Mode is off
RAM VCD CD WMA MP3
You can play all the items on a disc in the play position in random order.
DVD-A DVD-V
You can play selected item(s) on a disc in the play position in random order.
While stopped
1 Press [RANDOM].
2 DVD-A DVD-V
Press the numbered buttons to select a group (DVD-A) or a title (DVD-V).
DVD-A
- You can select more than one group. Select "All" using [◀, ▶] to enter all groups, and press [ENTER] to register.
• To deselect a group, press the numbered buttons corresponding to the group you want to clear.
DVD-V
- Some titles cannot be selected.
3 Press [▶] (PLAY).
To exit the random mode
Press [RANDOM] while stopped.
Note
- The playback control function on Video CDs is canceled.
- As long as your password is accepted, bonus groups can be played during random play (→ page 12).
RAM DVD-A DVD-V VCD CD WMA MP3
(When the elapsed play time is displayed)
Repeat play
During play
Press [REPEAT].
The indication changes each time you press the button:
| RAM | DVD-A | WMA | MP3 | DVD-V | VCD | CD |
| Program*1 | Track*1 | Chapter*1 | Track*1 | |||
| Disc*2 | Disc*2*5 | Title*2 | Disc*2 | |||
| Sequential*3 | Sequential*3 | Off Sequential |
Off Off Off
Scene 254
Playlist 4


*1"1 Step" during program play.
*2 All" during program and random play when Sequential Mode is off.
*3 Only when Sequential Mode is on.
*During play list play. "Playlist" is not displayed while playing a specific play list scene.
*5"Group" when Sequential Mode is off.
If the Video CD has playback control
- Press [■] to clear "PBC" from the display.
- Press the numbered buttons to select a track to start play (→ page 11).
- Press [REPEAT] (→ above).
Note
You cannot use repeat play to repeat an entire DVD-Video, an entire WMA/MP3 disc or all the play lists on a DVD-RAM.
■ To repeat only your favorite programs/tracks / chapters
RAM DVD-A DVD-V VCD CD WMA MP3
Start program play (→ page 16) and press [REPEAT] to display "All".
A-B repeat play
You can repeat a section between points A and B within a program, title or track.
During play
1 Press [A-B REPEAT] at the starting point (A).
2 Press [A-B REPEAT] at the finishing point (B).


To cancel
Press [A-B REPEAT] to display “**”.
Note
- Some subtitles recorded around point A or B may fail to appear. DVD-V
- The unit automatically determines the end of a program/title/track as point B when the end of the program/title/track is reached.
- A-B repeat is canceled when you press [QUICK REPLAY].

RAM DVD-A DVD-V VCD CD WMA MP3
On-Screen Menu Icons are menus that contain information about the disc or unit. These menus allow you to perform operations by changing this information.
Common procedures
1 Press [DISPLAY].
Each time you press the button:
Disc information (→ right) → Progress indicator (→ page 20)
Original display ← Unit information (→ pages 19–20)
2 Unit information only
While the leftmost icon is highlighted
Press [▲, ▼] to select the menu.
Each time you press the button:
Play Menu ← Picture Menu ↓ Display Menu ← Audio Menu
3 Press [◀, ▶] to select the item.
4 Press [▲, ▼] to select the setting.
- Items with “▲” or “▼” above and below can be changed by [▲, ▼].
- Press [ENTER] if the setting does not change after pressing [▲, ▼].
- Some items require different operations. Read the following explanations.
For your reference
- Depending on the condition of the unit (playing, stopped, etc.) and the type of software, there are some items that you cannot select or change.
- When numbers are displayed (e.g. title No.), the numbered buttons are also effective for setting. Press [ENTER] to register the setting.
To clear the menus
Press [RETURN] until the menus disappear.
■ To change the position of the icons
- Press [◀, ▶] to select the Bar Position icon.
- Press [▲, ▼] to move the icons. (There are 5 positions.)

Disc information
e.g. DVD-Video

e.g. WMA/MP3 disc

e.g. Video CD

e.g. DVD-Audio

a D: Disc number RAM DVD-A DVD-V VCD CD WMA MP3
⑥ PG: Program number RAM
PL: Play list number RAM
T: Title number DVD-V
Track number VCD | CD
G: Group number DVD-A WMA MP3
© T: Track number in group DVD-A WMA MP3
C: Chapter number DVD-V
Time RAM DVD-A DVD-V
- Press [▲, ▼] to show the elapsed play time or remaining time for the program, group, track or title (or chapter during program and random play).
- Select a position to start play by specifying a time with the numbered buttons and press [ENTER].
Changing the time display VCD CD
Press [▲, ▼] to show the elapsed play time, remaining time for the track, or remaining time for the disc.
Elapsed play time WMA MP3
(display only, cannot be changed)
© Soundtrack language DVD-A DVD-V (→ page 15)
(See A on page 19 for language abbreviations.)
① Audio signal type RAM DVD-A DVD-V (→ page 15)
(See B on page 19 for details.)
Karaoke vocal on/off (Karaoke DVD only) DVD-V
Solo: OFF or ON
Duet: OFF, V1 + V2, V1 or V2
⑨ Subtitle language DVD-A DVD-V (→ page 15)
(See A on page 19 for language abbreviations.)
Subtitles on/off RAM DVD-A DVD-V
ON ↔ OFF
Track information on/off WMA MP3 CD (CD text)
ON ↔ OFF
① Angle number DVD-A DVD-V (→ page 15)
① Track number in disc | WMA | MP3
① Total number of tracks on disc | WMA | MP3
Current bitrate WMA MP3
① Current sampling frequency | WMA | MP3
m Audio mode RAM VCD (→ page 15)
① Menu play VCD (with playback control only)
Indicates whether menu play (playback control) is on or off.
© Still picture number DVD-A
Selected picture is shown during play.
Unit information
Play Menu
e.g. DVD-Video

(a) A-B Repeat RAM DVD-A DVD-V VCD CD WMA MP3 (→ page 17)
[ENTER] (start point) → [ENTER] (finish point) To cancel: [ENTER]
⑥ Repeat Mode (→ page 17)

*1 Step" during program play.
2 All" during program and random play when Sequential Mode is off. 3 Only when Sequential Mode is on.
“During play list play. “Playlist” is not displayed while playing a specific play list scene.
"Group" when Sequential Mode is off.
© Play mode display RAM DVD-A DVD-V VCD CD WMA MP3
---: Normal play PGM: Program play RND: Random play
(d) Marker
DVD-A DVD-V VCD CD WMA MP3 : 5 positions
RAM : 999 positions
[ENTER] (The unit is now ready to accept markers.)
To mark a position: [ENTER] (at the desired point)
To mark another position: [◀, ▶] → [ENTER]
To recall a marker: [◀, ▶] → [ENTER]
To erase a marker: [◀, ▶] → [CANCEL]
RAM
To mark the eleventh point and beyond
- [◀, ▶] to select the marker pin icon
- [▲,▼] to select "11-20"
You can select the next group when the current group is full.

- This feature doesn't work while using a play list.
- The markers are ordered by time. This means that the marker numbers can change when you add and erase markers.
- Markers placed using a recording device (e.g., DVD video recorder) will be displayed. While these may be erased temporarily, they will be redisplayed if the disc is changed or the unit is switched to standby.
Note
- This feature doesn't work during program and random play.
- All the markers are cleared when the disc is changed or the unit is switched to standby.
A Audio/Subtitle language
ENG: English SVE: Swedish CHI: Chinese
FRA: French NOR: Norwegian KOR: Korean
DEU: German DAN: Danish MAL: Malay
ITA: Italian POR: Portuguese VIE: Vietnamese
ESP: Spanish RUS: Russian THA: Thai
NLD: Dutch JPN: Japanese *: Others
B Signal type/data
LPCM/PPCM/□□ Digital/DTS/MPEG: Signal type
k (kHz): Sampling frequency
b (bit): Number of bits
ch (channel): Number of channels
Example: 3/2 1ch

Audio Menu
e.g. DVD-Video

a Advanced Surround (VSS) RAM DVD-V VCD
SP: (Dolby Digital, DTS, LPCM, 2-channel or over only) HP: (Dolby Digital, LPCM, 2-channel or over only)
Use Advanced Surround to enjoy a surround-like effect if you are using 2 front speakers (SP) or headphones (HP). (To enjoy HP-VSS, connect the unit to equipment that has a headphone jack.) If you are playing a disc with surround effects recorded on it, the effect is broadened and sound seems to come from virtual speakers on either side.
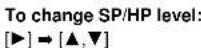
•VSS mode: SP←→HP
- SP/HP level: 1 (Natural effect) ↔ 2 (Emphasized effect) ↑ OFF (Cancel: Factory preset) ↔

Optimum seating position <When using the
television's speakers>
Distance A=
Television's width

Note
- Advanced Surround will not work, or will have less effect with some discs.
- Turn off the surround sound effects on the equipment you have connected when using this effect.
- Turn Advanced Surround off if it causes distortion.
- Even if three or more speakers are connected, output from this unit will be in stereo (two channels) when Advanced Surround is on.
- Turn Advanced Surround off when using Dolby Pro Logic. Dolby Pro Logic will not work correctly if it is on.
⑥ Dialogue Enhancer DVD-V
(Dolby Digital/DTS, 3-channel or over, where the dialogue is recorded in the center channel)
This makes the dialogue in movies easier to hear.
ON ←→ OFF
Note
Dialogue Enhancer will not work or will have less effect with some discs.
Display Menu

④ 4:3 TV ZOOM RAM DVD-A DVD-V (→ page 15)
ON ←→OFF
⑥ Bitrate display RAM DVD-A DVD-V VCD
Displays the bitrate (approximate values) and type of picture
(→ page 25, Glossary—I/P/B)
ON ←→OFF
To change the bitrate display: [◀, ▶]

© OSD Brightness (-3 to +3)
Adjust the brightness of the on-screen displays.
FL Dimmer RAM DVD-A DVD-V VCD CD WMA MP3 Changes the brightness of the unit's display.

*The display is dimmed during play, but brightens when you perform operations such as slow-motion, search, and pause.
Unit information
RAM DVD-A DVD-V VCD
Picture Menu

■ User mode ■ User mode

① Picture Mode
•N: Normal mode
•C1 (Cinema 1): Mellows images and enhances detail in dark scenes •C2 (Cinema 2): Sharpens images and enhances detail in dark scenes •U1/U2/U3*: User mode (→ right) *U3 appears only when PROGRESSIVE OUT indicator is off.
⑥ Video Output Mode
(→ page 25, Glossary—Interlace and progressive output)
480I: Interlace video (PROGRESSIVE OUT indicator off)
480P: Progressive video (PROGRESSIVE OUT indicator on)
You can change the video output mode only when "Progressive Out" in the Video menu is set to "Enable" (→ page 21).
© Transfer Mode
Select the method of conversion for progressive output to suit the type of material being played (→ page 25, Glossary—Film and video).
●Auto 1 (normal): for viewing film material ●Auto 2: for viewing film material (the same as Auto 1, but able to convert 30-frame-per-second progressive video) ●Video: for video material
Change the picture's position if it is off center.
- Press [ENTER].
- Press [◀, ▶] to move the picture.
- Press [ENTER] to enter the position (saved even if you turn the unit off).
Progress indicator
Indicates how far you have played through an item.

Current position RAM DVD-A DVD-V VCD CD WMA MP3
⑥ PG: Program number RAM
PL: Play list number RAM
T: Title number DVD-V
Track number VCD CD
G: Group number DVD-A WMA MP3
T: Track number in group DVD-A WMA MP3
C: Chapter number DVD-V
When PROGRESSIVE OUT indicator is off


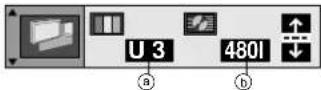
■ User mode
To change the user mode
- Select User mode and press [▶] to highlight the number.
- Press [▲,▼] to select "1", "2" or "3".

—MPEG Digital Noise Reduction—
3D-NR (0 to +4) Reduces overall noise. Block NR (0 to +3) Smoothes block noise. Mosquito NR (0 to +3) Reduces the smudging that appears around contrasting sections of the picture.
—Picture Control—
Contrast (-7 to +7) Increases the contrast between light and dark parts of the picture. Brightness (0 to +15) Brightens the picture. Color (-7 to +7) Adjust the shade of the picture's color.
Changing settings
This chart shows the settings for this unit. Change the settings to suit your preferences and to suit the unit to the environment in which it is being used. These settings are retained in memory until they are changed, even if the unit is turned off. See page 22 for details on menu operation.
| Menus | Items | Options (Underlined items are the factory preset.) |
Disc | AudioChoose the audio language. | English French SpanishOriginal*1 Other * * * * *2 |
| SubtitleChoose the subtitle language. | Automatic*3 English French SpanishOther * * * * *2 | |
| MenusChoose the language for disc menus. | English French SpanishOther * * * * *2 | |
| RatingsSet a ratings level to limit DVD-Video play.The password screen is shown if you choose levels 0 to 7 or if you choose "Ratings" when levels 0 to 7 have been selected (→ page 22).Select "Level 0" to prevent play of discs that do not have ratings levels recorded on them. | Setting ratings (When level 8 is selected)8 No Limit 1 to 7 *4 0 Lock AllChanging ratings (When level 0–7 is selected)Unlock Player Change PasswordChange Level Temporary Unlock | |
Video | TV Aspect (→ page 9)Choose the setting to suit your television and preference. | 4:3 Pan&Scan 4:3 Letterbox 16:9 |
| Progressive OutChoose "Enable" to enable progressive output. | Disable Enable | |
| Still Mode (→ page 25, Glossary—Frame still and field still)Specify the type of picture shown when paused. | Automatic Field Frame | |
| Black Level ControlChange the black level of the picture if you connected a television through the COMPONENT VIDEO OUT terminals. | Lighter: when connected to a TV through the VIDEO OUT or S VIDEO OUT terminal.Darker: when connected to a TV through the COMPONENT VIDEO OUT (Y/PB/PR) terminals. | |
Audio | Speaker Setting (→ page 23)Choose the settings to suit your audio system and the listening environment. | Multi-channel:when 3 or more speakers are connected.Speaker presence and sizeDelay time Channel balance2-channel:when 2 speakers or an amplifier with a Dolby Pro Logic decoder is connected. |
| Digital Audio OutputSelect whether to output digital signals or not. | On: Digital signals are output.Off: Digital signals are not output. This improves sound quality when you are using analog connection. | |
| PCM Down Conversion (→ page 23) | No Yes | |
| Dolby Digital (→ page 23) | Bitstream PCM | |
| DTS Digital Surround (→ page 23) | PCM Bitstream | |
| Dynamic Range Compression (Dolby Digital only) (→ page 25, Glossary)Change the dynamic range for late night viewing. | Off On | |
| Audio during Search*5Choose whether to have sound during search. | On Off | |
Display | Menu LanguageChoose the language for these menus and the on-screen messages. | English Français Español |
| On-Screen MessagesChoose whether to show on-screen messages or not. | On Off | |
Others | DVD-Video ModeSelect how to play pictures contained on some DVD-Audio. The setting returns to "Off" when you change the disc or turn the unit off. | Off: DVD-Audio are played as DVD-Audio.On: DVD-Video contents found on DVD-Audio can be played. |
| DemoA demonstration of the unit's on-screen displays starts when you select "On". The demonstration stops when you press a button and the setting reverts to "Off". | Off On | |
| QUICK SETUP (→ page 9)Answer questions to make basic settings. | Yes No |
The original language of each disc will be selected.
*2 Input a code number with the numbered buttons (→ page 22).
*3 If the language selected for “Audio” is not available, subtitles of that language will automatically appear if available on that disc.
*4 Prohibits play of DVD-Video with corresponding ratings recorded on them.
*5 The feature doesn't work for WMA files and DTS-CD discs. Audio will be heard when playing some DVD-Audio despite the settings you make here.
Changing settings

Common procedures
See page 21 for menu and option details.
1 Press [SETUP] to show the menus.
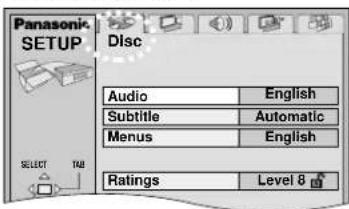
- The QUICK SETUP screen appears when you press [SETUP] the first time after purchase (→ page 9).
2 Press [◀, ▶] to select the menu's tab.
The screen changes to display the menu.
![graph TD A["Disc Video Audio"] <--> B["Computer"] C["Speaker"] <--> D["Display"] E["Others Display"] <--> F["Computer"]](/content/2026/06/1329864/images/25f5d69f4f780185b2493a654cc00704189d888aec1d938a1740f2d668fa22a3.jpg)
3 Press [▲, ▼] to select the item you want to change and press [ENTER].
4 Press [▲, ▼] to select the option and press [ENTER].
The screen now shows the menu again.
To return to the previous screen
Press [RETURN].
To exit the SETUP menu
Press [SETUP].
Entering a password (Ratings)
DVD-V
The password screen is shown when you select levels 0 to 7.
- Input a 4-digit password with the numbered buttons.
- If you enter a wrong number, press [CANCEL] to erase it.
- Press [ENTER].
●The lock symbol appears closed to show the rating is locked.
- Do not forget your password.
- Press [ENTER] to confirm the 4 digits.
Now, when you insert a DVD-Video that exceeds the ratings limit you set, a message appears on the television. Follow the on-screen instructions.
Language code list
| Abkhazian: 6566 | Byelorussian: | Georgian: 7565 | Kazakh: 7575 | Nauru: 7865 | Serbian: 8382 | Tibetan: 6679 |
| Afar: 6565 | 6669 | German: 6869 | Kirghiz: 7589 | Nepali: 7869 | Serbo-Croatian: | Tigrinya: 8473 |
| Afrikaans: 6570 | Cambodian: 7577 | Greek: 6976 | Korean: 7579 | Norwegian: 7879 | 8372 | Tonga: 8479 |
| Albanian: 8381 | Catalan: 6765 | Greenlandic:7576 | Kurdish: 7585 | Oriya: 7982 | Shona: 8378 | Turkish: 8482 |
| Ameharic: 6577 | Chinese: 9072 | Guarani: 7178 | Laotian: 7679 | Pashto, Pushto: | Sindhi: 8368 | Turkmen: 8475 |
| Arabic: 6582 | Corsican: 6779 | Gujarati: 7185 | Latin: 7665 | 8083 | Singhalese: 8373 | Twi: 8487 |
| Armenian: 7289 | Croatian: 7282 | Hausa: 7265 | Latvian, Lettish: | Persian: 7065 | Slovak: 8375 | Ukrainian: 8575 |
| Assamese: 6583 | Czech: 6783 | Hebrew: 7387 | 7686 | Polish: 8076 | Slovenian: 8376 | Urdu: 8582 |
| Aymara: 6588 | Danish: 6865 | Hindi: 7273 | Lingala: 7678 | Portuguese: 8084 | Somali: 8379 | Uzbek: 8590 |
| Azerbaijani: 6590 | Dutch: 7876 | Hungarian: 7285 | Lithuanian: 7684 | Punjabi: 8065 | Spanish: 6983 | Vietnamese: 8673 |
| Bashkir: 6665 | English: 6978 | Icelandic: 7383 | Macedonian:7775 | Quechua: 8185 | Sundanese: 8385 | Volapük: 8679 |
| Basque: 6985 | Esperanto: 6979 | Indonesian: 7378 | Malagasy: 7771 | Rhaeto-Romance: | Swahili: 8387 | Welsh: 6789 |
| Bengali; Bangla: | Estonian: 6984 | Interlingua: 7365 | Malay: 7783 | 8277 | Swedish: 8386 | Wolof: 8779 |
| 6678 | Faroese: 7079 | Irish: 7165 | Malayalam: 7776 | Romanian: 8279 | Tagalog: 8476 | Xhosa: 8872 |
| Bhutani: 6890 | Fiji: 7074 | Italian: 7384 | Maltese: 7784 | Russian: 8285 | Tajik: 8471 | Yiddish: 7473 |
| Bihari: 6672 | Finnish: 7073 | Japanese: 7465 | Maori: 7773 | Samoan: 8377 | Tamil: 8465 | Yoruba: 8979 |
| Breton: 6682 | French: 7082 | Javanese: 7487 | Marathi: 7782 | Sanskrit: 8365 | Tatar: 8484 | Zulu: 9085 |
| Bulgarian: 6671 | Frisian: 7089 | Kannada: 7578 | Moldavian: 7779 | Scots Gaelic: | Telugu: 8469 | |
| Burmese: 7789 | Galician: 7176 | Kashmiri: 7583 | Mongolian: 7778 | 7168 | Thai: 8472 |
Digital output
DVD-A DVD-V
Change the settings when you have connected equipment through this unit's DIGITAL AUDIO OUT terminal (OPTICAL).
PCM Down Conversion
Select how to output audio with a sampling frequency of 96 kHz or 88.2 kHz.
- Select "Yes" if the equipment you connect cannot process signals with a sampling frequency of 96 kHz or 88.2 kHz.
No (Factory preset): Output as 96 kHz or 88.2 kHz
Yes: Converted to 48 kHz or 44.1 kHz
Note
- Make sure that "Digital Audio Output" setting (→ page 21) is "On".
- Signals are converted to either 48 kHz or 44.1 kHz despite the above settings if the signals have a sampling frequency of over 96 kHz, or the disc has copy protection.
- Some equipment cannot handle sampling frequencies of 88.2 kHz, even if they can handle 96 kHz. Read your equipment's operating instructions for details.
Dolby Digital and DTS Digital Surround
Bitstream (Factory preset for Dolby Digital):
Select if the equipment you connected can decode the signal.
PCM (Factory preset for DTS Digital Surround):
Select if the equipment you connected cannot decode the signal.
IMPORTANT
If the equipment you connected cannot decode the signal, the setting must be changed to PCM. If not, signals the equipment cannot process will be output by this unit, causing high levels of noise which can damage your hearing and the speakers.
Speaker setting
Change speaker presence and size ⓐ, delay time Ⓐ, and channel balance ⓒ to suit the speakers you have connected.
These settings are not necessary when you select "2-channel" (only two speakers are connected).
Note
This feature works only for analog connection (→ page 7).

Speaker presence and size (a)
- Press [▲, ▼, ◀, ▶] to select the item and press [ENTER].
- Press [▲, ▼] to select the setting and press [ENTER].
Icon examples:
Surround speaker (LS)
No
Large Small

• Large: When the speaker supports low-frequency (under 100 Hz) reproduction. - Small: Select when the speaker does not support low-frequency reproduction.
If the subwoofer is set to No, the front speakers will automatically be set to Large.
Delay time (b)
DVD-V (Dolby Digital and DTS, center and surround speakers only)
For optimum listening with 5.1-channel sound, all the speakers, except for the subwoofer, should be the same distance from the seating position. If you have to place the center or surround speakers closer to the seating position, adjust the delay time to make up for the difference.

(d) Center speaker
| Difference | Setting |
| Approx. 50 cm (1 1/2 feet) | 1.3 ms |
| Approx. 100 cm (3 feet) | 2.6 ms |
| Approx. 150 cm (5 feet) | 3.9 ms |
| Approx. 200 cm (6 feet) | 5.3 ms |
① Surround speakers
| Difference | Setting |
| Approx. 200 cm (6 feet) | 5.3 ms |
| Approx. 400 cm (12 feet) | 10.6 ms |
| Approx. 600 cm (18 feet) | 15.9 ms |
If distances ⓐ (from the center speaker) and ⓕ (from the surround speakers) are the same as or greater than ⓔ (from the front speakers), leave the delay time as "0", the factory preset.
If either distance ⓐ or ⓕ is less than ⓑ, find the difference in the relevant table and change to the recommended setting.
Changing the delay time
- Press [▲, ▼, ◀, ▶] to select the delay time box and press [ENTER].
- Press [▲, ▼] to adjust the delay time and press [ENTER].
Channel balance (©)
- Press [▲, ▼, ◀, ▶] to select "Test" and press [ENTER].
A test signal is output from one speaker at a time, starting with the front left speaker and proceeding clockwise.
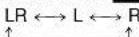
Front (L) → Center → Front (R)
Surround (LS) ← Surround (RS)
- While listening to the test signal, press [▲, ▼] to adjust the volume of the center and surround speakers so they are the same apparent volume as the front speakers (-6 to +6).
(The front speakers cannot be adjusted here.)
3. Press [ENTER].
The test signal stops.
- No signal is output for the subwoofer. To adjust its volume, play something, then return to this screen to adjust to suit your taste.
To finish the speaker setting
Press [▲, ▼, ◀, ▶] to select "Exit" and press [ENTER].
Note
The unit may be unable to output as set here due to limitations imposed by the unit itself or the disc being played. (The display's "D.MIX" indicator goes out in these cases.)
Troubleshooting guide
Before requesting service, make the below checks. If you are in doubt about some of the check points, or if the remedies indicated in the chart do not solve the problem, contact the Panasonic Customer Call Center at 1-800-211-7262, or e-mail consumerproducts@panasonic.com, or web site (http://www.panasonic.com).
Power Page
| No power. | ●Insert the AC power supply cord securely into the household AC outlet. | 6 |
| The unit is automatically switched to the standby mode. | ●To conserve power, the unit automatically switches to standby after approximately 30 minutes in the stop mode. Turn the power back to ON.●The unit was switched to standby by the SLEEP timer. | -12 |
Operation
| No response when buttonspressed. | Some operations may be prohibited by the disc.The unit may not be operating properly due to lightning, static electricity or some other external factor.Reset procedure:Press [POWER ⏻] to switch the unit to the standby mode and then back to ON.Alternatively, press [POWER ⏻] to switch the unit to the standby mode, disconnect the AC powersupply cord, and then reconnect it. | -- |
| No operations can be performedwith the remote control. | Check that the batteries are installed correctly.The batteries are depleted: Replace them with new ones.Point the remote control at the remote control signal sensor and operate. | 888 |
| Play doesn't start (or stopsimmediately) when you press[▶] (PLAY). | Condensation has formed: Wait 1 to 2 hours for it to evaporate.This unit cannot play discs other than the ones listed in these operating instructions.You can only play DVD-Video if their region number is “1”, “ALL” or multiple region numberincluding “1”.The disc may be dirty and require cleaning.Ensure that the disc is installed with the label of the side to be played facing upwards.Check that the DVD-RAM has something recorded on it. | 5Cover59- |
| Cannot play DVD-Video. | Sequential Mode is on. Press [SEQUENTIAL] to turn Sequential Mode off. | 10 |
| Cannot select alternativelanguages. | This function is dependent on software availability.Try selecting from the disc's menu if one is available. | -10 |
| No menu play. | This function is dependent on software availability. | - |
| No subtitles. | This function is dependent on software availability.Subtitles are cleared from the television. Display the subtitles. | -15 |
| Soundtrack and/or subtllelanguage is not the one selectedwith the SETUP menus. | This function is dependent on software availability. | - |
| Cannot change angle. | This function is dependent on software availability. Even if a disc has a number of anglesrecorded, these angles may be recorded for specific scenes only. | - |
| Dialogue Enhancer has noeffect. | This feature does not work when the unit is outputting bitstream signals. | - |
| You have forgotten your ratingspassword.Reset all the settings to FactoryPreset. | While stopped, press and hold [◀◀] and [■■] on the unit and then also press and hold [▲]on the unit until “Initialized” disappears from the television. Turn the unit off and on again.All settings will return to the default values. | - |
| The drawer stops whileopening. | If possible, remove the discs at the front of the drawer, then turn the unit off and back on again. | - |
| The progressive out indicatordoes not light. | Go to Video in the SETUP menus, and select “Enable” in “Progressive Out”. | 21 |
| Picture distorted. | Some distortion is normal during SEARCH.The screen may be disrupted briefly when you turn off the AUDIO ONLY feature.If “This disc is PAL system. The output is sound only.” is on the television, then you have loaded a PAL system DVD-Audio and only the audio portion of the disc can be played. | - |
| - | ||
| - | ||
| No picture. | Check the connection.Make sure the television is on.Ensure the television's video input setting (e.g., VIDEO 1) is correct. | 6- |
| - | ||
| The picture shown on the television is not normal.(The sides of the picture are cut off, the picture is stretched horizontally, or black bands appear at the top and bottom of the screen.) | Go to Video in the SETUP menus, and change “TV Aspect” to suit your television.Use the television to change the aspect to the correct one.If your television cannot change the aspect when input is progressive, press [PROGRESSIVE OUT] so the indicator goes out. Output will now be interlace.The 4:3 TV ZOOM function is on.Ensure that the unit is connected directly to the television, and is not connected through a video cassette recorder.Connect to the component video (480P) input terminals on a television compatible with this unit’s copy guard system. You cannot view progressive video if your television is not compatible. | 9, 2191566 |
| There is ghosting when progressive output is on. | Press [PROGRESSIVE OUT] so the indicator goes out. This problem is caused by the editing method or material used on DVD-Video, but should be corrected if you use interlace output. | 9 |
| Picture quality is poor. | Check the settings in the On-Screen Menu Icons' Picture Menu. | 20 |
| The picture is off center when progressive output is on. | Adjust the horizontal position in the On-Screen Menu Icons' Picture Menu. | 20 |
| No sound. Distorted sound. | ●Check the connections. ●Check the volume on the equipment you have connected. ●Ensure that the input settings on the other equipment are correct. ●Turn Advanced Surround off if it causes distortion. ●Output from this unit will be in stereo (two channels) when Advanced Surround is on. Turn Advanced Surround off if you are using three or more speakers. ●If you have connected this unit to an amplifier through the AUDIO OUT terminals, go to the Audio menu in the SETUP menu, and change “Speaker setting” to suit to your speakers. Select the large or small icon for all the speakers you have connected. ●Due to the specifications on some types of televisions, both video and audio may be cut off when you turn the AUDIO ONLY feature on. ●If the “D.MIX” indicator on the display goes out while playing a multi-channel DVD-Audio disc, sound will only be output from speakers specified by the disc. Read the disc’s instructions for details. | 6, 7 - - 19 19 23 - - |
| Piercing noise comes from the speakers. | ●If you have connected this unit to other equipment through the DIGITAL AUDIO OUT terminal, ensure you have selected the correct settings for “Dolby Digital” and “DTS Digital Surround” in the SETUP menus’ Audio menu. | 23 |
Unit displays
| “NoPLAY” | ●You inserted a disc the unit cannot play; insert one it can.●You inserted a blank DVD-RAM. | 5- |
| “CHECK” | ●Disc is dirty: Wipe it clean. | 5 |
| “H□□”□□ stands for a number. | ●Trouble may have occurred. The number following “H” depends on the status of the unit.Reset procedure:Press [POWER ⏻] to switch the unit to the standby mode and then back to ON. Alternatively, press [POWER ⏻] to switch the unit to the standby mode, disconnect the AC power supply cord, and then reconnect it.●If the service numbers fail to clear, note the service number and contact a qualified service person. | - |
Television displays
| “The progressive out is set to “Disable”” | ●Go to Video in the SETUP menus, and select “Enable” in “Progressive Out”. | 21 |
| “The software has a 4:3 aspect ratio” | ●Use the television to change the aspect to the correct one.If your television cannot change the aspect when input is progressive, press [PROGRESSIVE OUT] so the indicator goes out. Output will now be interlace. | 9 |
| No on-screen display. | ●Go to Display in the SETUP menus, and select “On” for “On-Screen Messages”. | 21 |
| On-screen displays (including On-Screen Menu Icons and disc type information screen) not displayed or only partially displayed on the television. | ●Press [DISPLAY], and press [◀, ▶] to highlight the Bar Position icon, then press [▲, ▼] to adjust the position. | 18 |
| The disc’s menu is displayed in a different language. | ●Go to Disc in the SETUP menus, and select the preferred language for “Menus”. | 21 |
Glossary
Bitstream
This is the digital form of multi-channel audio data (e.g., 5.1 channel) before it is decoded into its various channels.
Decoder
A decoder restores the coded audio signals on DVDs to normal. This is called decoding.
Dolby Digital
This is a method of coding digital signals developed by Dolby Laboratories. Apart from stereo (2-channel) audio, these signals can also be multi-channel audio. A large amount of audio information can be recorded on one disc using this method.
Dolby Pro Logic
A surround system where a 4-channel audio track is recorded as 2 channels and then is restored to 4 channels for play. The surround channel is monaural and can reproduce up to 7 kHz.
DTS (Digital Theater Systems)
This surround system is used in many movie theaters around the world. There is good separation between the channels, so realistic sound effects are possible.
Dynamic range
Dynamic range is the difference between the lowest level of sound that can be heard above the noise of the equipment and the highest level of sound before distortion occurs.
Film and video
DVD-Videos are recorded using either film or video. Usually, film is recorded at 24 frames per second, the rate movies are filmed at, while video is recorded at 30 frames per second.
Frame still and field still
Frames are the still pictures that go together to make a moving picture.
There are about 30 frames shown each second.
One frame is made up of two fields. A regular television shows these fields
one after the other to create frames.
A still is shown when you pause a moving picture. A frame still is made up of two alternating fields, so the picture may appear blurred, but overall quality is high. A field still is not blurred, but it has only half the information of a frame still so picture quality is lower.
Interlace and progressive output
NTSC, the video signal standard, has 480 interlaced (I) scan lines, whereas progressive scanning uses twice the number of scan lines. This is called 480P. The video signals output from this unit's COMPONENT VIDEO OUT terminals (Y, Pe, PR) allow you to enjoy higher quality pictures than if the signals were output from the VIDEO OUT terminal or S VIDEO OUT terminal.
I/P/B
MPEG 2, the video compression standard adopted for use with DVD-Video, codes frames using these 3 picture types.
I: Intra coded picture
This picture has the best quality and is the best to use when adjusting the picture.
P: Predictive coded picture
This picture is calculated based on past I or P-pictures.
B: Bidirectionally-predictive coded picture
This picture is calculated by comparing past and future I and P-pictures so it has the lowest volume of information.
Linear PCM (pulse code modulation)
These are uncompressed digital signals, similar to those found on CDs.
Playback control (PBC)
If a Video CD has playback control, you can select scenes and information with menus (called menu play in these instructions).
Limited Warranty
Panasonic Consumer Electronics Company,
Division of Matsushita Electric Corporation of America
One Panasonic Way Secaucus, New Jersey 07094
Panasonic Sales Company, Division of Matsushita Electric of Puerto Rico, Inc.
San Gabriel Industrial Park, Carolina, Puerto Rico 00985
Panasonic DVD Player/Recorder Limited Warranty
Limited Warranty Coverage
If your product does not work properly because of a defect in materials or workmanship, Panasonic Consumer Electronics Company or Panasonic Sales Company (collectively referred to as "the warrantor") will, for the length of the period indicated on the chart below, which starts with the date of original purchase ("warranty period"), at its option either (a) repair your product with new or refurbished parts, or (b) replace it with a new or a refurbished product. The decision to repair or replace will be made by the warrantor.
| Product or Part Name | Parts | Labor |
| DVD Player | One (1) Year | Ninety (90) Days |
| DVD Recorder | One (1) Year | One (1) Year |
| Rechargeable Batteries, DVD-RAM Disc (in exchange for defective item) | Ten (10) Days | Not Applicable |
During the "Labor" warranty period there will be no charge for labor. During the "Parts" warranty period, there will be no charge for parts. You must carry-in or mail-in your product during the warranty period. If non-rechargeable batteries are included, they are not warranted. This warranty only applies to products purchased and serviced in the United States or Puerto Rico. This warranty is extended only to the original purchaser of a new product which was not sold "as is". A purchase receipt or other proof of the original purchase date is required for warranty service.
Carry-In or Mail-In Service
For Carry-In or Mail-In Service in the United States call 1-800-211-PANA (7262) or visit Panasonic Web Site: http://www.panasonic.com
For assistance in Puerto Rico call Panasonic Sales Company (787)-750-4300 or fax (787)-768-2910.
Limited Warranty Limits And Exclusions
This warranty ONLY COVERS failures due to defects in materials or workmanship, and DOES NOT COVER normal wear and tear or cosmetic damage. The warranty ALSO DOES NOT COVER damages which occurred in shipment, or failures which are caused by products not supplied by the warrantor, or failures which result from accidents, misuse, abuse, neglect, mishandling, misapplication, alteration, faulty installation, set-up adjustments, misadjustment of consumer controls, improper maintenance, power line surge, lightning damage, modification, or commercial use (such as in a hotel, office, restaurant, or other business), rental use of the product, service by anyone other than a Factory Servicenter or other Authorized Servicer, or damage that is attributable to acts of God.
THERE ARE NO EXPRESS WARRANTIES EXCEPT AS LISTED UNDER “LIMITED WARRANTY COVERAGE”. THE WARRANTOR IS NOT LIABLE FOR INCIDENTAL OR CONSEQUENTIAL DAMAGES RESULTING FROM THE USE OF THIS PRODUCT, OR ARISING OUT OF ANY BREACH OF THIS WARRANTY. (As examples, this excludes damages for lost time, travel to and from the servicer, loss of media or images, data or other recorded content. The items listed are not exclusive, but are for illustration only.) ALL EXPRESS AND IMPLIED WARRANTIES, INCLUDING THE WARRANTY OF MERCHANTABILITY, ARE LIMITED TO THE PERIOD OF THE LIMITED WARRANTY.
Some states do not allow the exclusion or limitation of incidental or consequential damages, or limitations on how long an implied warranty lasts, so the exclusions may not apply to you.
This warranty gives you specific legal rights and you may also have other rights which vary from state to state. If a problem with this product develops during or after the warranty period, you may contact your dealer or Servicenter. If the problem is not handled to your satisfaction, then write to the warrantor's Consumer Affairs Department at the addresses listed for the warrantor.
PARTS AND SERVICE WHICH ARE NOT COVERED BY THIS LIMITED WARRANTY ARE YOUR RESPONSIBILITY.
Customer Services Directory
For Product Information, Operating Assistance, Literature Request, Dealer Locations, and all Customer Service inquiries please contact:
1-800-211-PANA (7262), Monday–Friday 9 am–9 pm; Saturday–Sunday 9 am–7 pm, EST.
Web Site: http://www.panasonic.com You can purchase parts, accessories or locate your nearest servicenter by visiting our Web Site.
Accessory Purchases:
1-800-332-5368 (Customer Orders Only)
Panasonic Services Company 20421 84th Avenue South, Kent, WA 98032
(6 am to 5 pm Monday–Friday; 6 am to 10:30 am Saturday; PST)
(Visa, MasterCard, Discover Card, American Express, Check)
Service in Puerto Rico
Matsushita Electric of Puerto Rico, Inc. Panasonic Sales Company/Factory Servicenter:
Ave. 65 de Infanteria, Km. 9.5, San Gabriel Industrial Park, Carolina, Puerto Rico 00985
Phone (787) 750-4300 Fax (787) 768-2910
Product Service
- Damage requiring service—The unit should be serviced by qualified service personnel if:
(a) The AC power supply cord or AC adaptor has been damaged; or
(b) Objects or liquids have gotten into the unit; or
(c) The unit has been exposed to rain; or
(d) The unit does not operate normally or exhibits a marked change in performance; or
(e) The unit has been dropped or the cabinet damaged.
- Servicing—Do not attempt to service the unit beyond that described in these operating instructions. Refer all other servicing to authorized servicing personnel.
- Replacement parts—When parts need replacing ensure the servicer uses parts specified by the manufacturer or parts that have the same characteristics as the original parts. Unauthorized substitutes may result in fire, electric shock, or other hazards.
- Safety check—After repairs or service, ask the servicer to perform safety checks to confirm that the unit is in proper working condition.
Product information
For product information or assistance with product operation:
Contact the Panasonic Customer Call Center at 1-800-211-7262, or e-mail consumerproducts@panasonic.com, or web site (http://www.panasonic.com).
Operating temperature range: +5 to +35 °C (+41 to +95 °F)
Operating humidity range: 5 to 90 % RH (no condensation)
Discs played [8 cm (3") or 12 cm (5")]:
(1) DVD-RAM (DVD-VR compatible)
(2) DVD-Audio
(3) DVD-Video
(4) DVD-R (DVD-Video compatible)
(5) CD-Audio (CD-DA)
(6) Video CD
(7) CD-R/CD-RW (CD-DA, Video CD formatted discs)
(8) WMA/MP3
● Maximum number of tracks and groups recognizable: 999 tracks and 99 groups
- Compatible compression rate: WMA: between 48 kbps and 192 kbps MP3: between 32 kbps and 320 kbps
Video output:
Output level: 1 Vp-p (75 Ω)
Output terminal: Pin jack (1 system)
S video output:
Y output level: 1 Vp-p (75 Ω)
C output level: 0.286 Vp-p (75 Ω)
Output terminal: S terminal (1 system)
Component video output (480P/480I):
Y output level: 1 Vp-p (75 Ω)
PB output level: 0.7 Vp-p (75 Ω)
PR output level: 0.7 Vp-p (75 Ω)
Output terminal: Pin jack (1 system)
(Y: green, PB: blue, PR: red)
Audio output:
Output level: 2 Vrms (1 kHz, 0 dB)
Output terminal: Pin jack
Number of terminals:
2 channel: 1 system
5.1-channel discrete output (5.1 channel): 1 system
Audio performance:
(1) Frequency response:
●DVD (linear audio):
4 Hz–22 kHz (48 kHz sampling)
4 Hz–44 kHz (96 kHz sampling)
4 Hz–88 kHz (192 kHz sampling)
• DVD-Audio:
- CD audio: 4 Hz–20 kHz
(2) S/N ratio:
- CD audio: 115 dB
(3) Dynamic range:
●DVD (linear audio): 102 dB
- CD audio: 98 dB
(4) Total harmonic distortion:
- CD audio: 0.0025 %
Digital audio output:
Optical digital output:
Optical terminal
Pickup: Wave length:
Laser power:
658 nm/790 nm
CLASS IIa/CLASS I
Power supply:
AC 120 V, 60 Hz
Power consumption:
16 W
Dimensions:
430 (W)×406.5 (D)×75.8 (H) mm
16 15/16" (W) × 16" (D) × 3" (H)
4.5 kg (9.9 lb.)
Mass:
Power consumption in standby mode: approx. 2.5 W
Note
Specifications are subject to change without notice.
Mass and dimensions are approximate.
Manufactured under license from Digital Theater Systems, Inc. US Pat. No. 5,451,942, 5,956,674, 5,974,380, 5,978,762 and other world-wide patents issued and pending. "DTS" and "DTS Digital Surround" are registered trademarks of Digital Theater Systems, Inc. © 1996, 2000 Digital Theater Systems, Inc. All rights reserved.
Manufactured under license from Dolby Laboratories.
"Dolby", "Pro Logic" and the double-D symbol are trademarks of Dolby Laboratories.
Apparatus Claims of U.S. Patent Nos. 4,631,603, 4,577,216, and 4,819,098, licensed for limited viewing uses only.
This product incorporates copyright protection technology that is protected by method claims of certain U.S. patents and other intellectual property rights owned by Macrovision Corporation and other rights owners. Use of this copyright protection technology must be authorized by Macrovision Corporation, and is intended for home and other limited viewing uses only unless otherwise authorized by Macrovision Corporation. Reverse engineering or disassembly is prohibited.
Panasonic Consumer Electronics
Company, Division of Matsushita
Electric Corporation of America
One Panasonic Way Secaucus,
New Jersey 07094
http://www.panasonic.com
Panasonic Sales Company,
Division of Matsushita Electric of
Puerto Rico, Inc. ("PSC")
San Gabriel Industrial Park, Carolina,
Puerto Rico 00985
- PANASONIC®
- DVD/CD PLAYER
- REGION NUMBER SUPPORTED BY THIS PLAYER
- ACCESSORIES
- USER MEMO
- TELEPHONE NUMBER
- TABLE OF CONTENTS
- GETTING STARTED
- BASIC OPERATIONS
- ADVANCED OPERATIONS
- REFERENCE
- CAUTION
- WARNING
- RISK OF ELECTRIC SHOCK DO NOT OPEN
- IMPORTANT SAFETY INSTRUCTIONS
- SAFETY
- INSTALLATION
- PLACEMENT
- DO NOT PLACE THE UNIT ON AMPLIFIERS OR EQUIPMENT THAT MAY BECOME HOT
- ENVIRONMENT
- MAINTENANCE
- SERVICE
- BEFORE MOVING THE UNIT, ENSURE THE DISC TRAYS ARE EMPTY
- DISC INFORMATION
- DISCS THAT CANNOT BE PLAYED
- DVDS THAT CAN BE PLAYED
- PLAYING DVDS AND VIDEO CDS
- CD-R AND CD-RW DISCS
- DVD-R DISCS
- DVD-RAM DISCS
- NOTE
- TO CLEAN DISCS
- DVD-RAM, DVD-R
- HANDLING PRECAUTIONS
- CONNECTION TO A TELEVISION
- BEFORE CONNECTION
- COMPONENT VIDEO OUT TERMINAL
- S VIDEO OUT TERMINAL
- TO ENJOY PROGRESSIVE VIDEO
- FOR YOUR REFERENCE
- HOME THEATER—ENJOYING MORE POWERFUL SOUND
- RECORDING
- CONTROL REFERENCE GUIDE
- THE REMOTE CONTROL
- DO NOT
- USE
- QUICK SETUP
- PREPARATION
- TO RETURN TO THE PREVIOUS SCREEN
- TV ASPECT
- LETTERBOX
- BASIC PLAY
- WHEN THE DISC FINISHES PLAYING
- TO STOP PLAY
- TO PAUSE PLAY
- IF "⊗" APPEARS ON THE TELEVISION
- DISC TYPE INFORMATION SCREEN
- WHEN A MENU SCREEN APPEARS ON THE TELEVISION
- CHANGING THE DISPLAY ON THE MAIN UNIT
- SEQUENTIAL MODE
- CHANGING OTHER DISCS DURING PLAY
- CHANGING THE DISC IN THE PLAY POSITION
- REPLAYING A SCENE — QUICK REPLAY
- SKIPPING ITEMS
- FAST FORWARD AND REWIND—SEARCH
- SLOW-MOTION PLAY
- FRAME-BY-FRAME VIEWING
- NOTES
- STARTING PLAY FROM A SELECTED ITEM
- PRESS THE NUMBERED BUTTONS TO SELECT THE ITEM
- RESUME FUNCTION
- POSITION MEMORY FUNCTION
- CHAPTER PREVIEW DVD-V
- SELECTING GROUPS TO PLAY
- DVD-A WMA MP
- PRESS [GROUP]
- PRESS [ENTER]
- PRESS THE NUMBERED BUTTONS TO SELECT THE TRACK NUMBER AND PRESS [ENTER]
- PLAYING BONUS GROUPS
- DVD-A
- SELECTING STILL PICTURES—PAGE SKIP
- DURING PLAY OR WHILE PAUSED
- PRESS [PAGE]
- TO ENJOY EVEN HIGHER QUALITY SOUND—AUDIO ONLY
- RAM DVD-A DVD-V VCD CD WMA MP
- DURING PLAY
- PRESS [AUDIO ONLY]
- SETTING THE UNIT TO TURN OFF—SLEEP TIMER
- PRESS [SLEEP] TO SELECT THE SETTING
- TO CANCEL THE SLEEP TIMER
- TO CONFIRM THE REMAINING TIME
- AUTO STANDBY
- USING MENUS TO PLAY WMA/MP3 DISCS AND CD TEXT
- PRESS [TOP MENU]. E.G., MP
- PRESS [▲, ▼] TO SELECT THE TRACK AND PRESS [ENTER]
- TO SHOW OTHER PAGES
- TO EXIT THE FILE LIST, PRESS [TOP MENU]
- MP
- NAMING FOLDERS AND FILES
- CD (CD TEXT)
- PRESS [▶] WHILE A TRACK IS HIGHLIGHTED TO DISPLAY THE TREE SCREEN
- PRESS [▲, ▼] TO SELECT A GROUP AND PRESS [ENTER]
- TO RETURN TO THE FILE LIST
- PRESS [▲, ▼] TO SELECT A TRACK
- PRESS [▶] TO SHOW THE TEXT INFORMATION
- TO RETURN TO THE LIST SCREEN
- FINDING A TRACK TO PLAY
- EXAMPLE: SEARCH FOR TRACKS INCLUDING THE WORD "LOVE
- PRESS [▲, ▼] TO SELECT "FIND" AND PRESS [ENTER]
- PRESS [▲, ▼] TO SELECT "L" AND PRESS [ENTER]
- PRESS [▶] TO SELECT "FIND" AND PRESS [ENTER]
- PLAYING THE PROGRAMS ON DVD-RAM
- SELECTING A PROGRAM TO PLAY — DIRECT NAVIGATOR
- PRESS [DIRECT NAVIGATOR]
- PRESS [▲, ▼] TO SELECT THE PROGRAM
- TO CLEAR THE PROGRAM LIST
- TO DISPLAY INFORMATION ABOUT A SELECTED PROGRAM
- USING THE PLAY LIST MENU
- PLAYING A PLAY LIST
- PRESS [PLAY LIST]
- PRESS [▲, ▼] TO SELECT THE PLAY LIST
- PRESS [ENTER] TO START PLAY
- TO CLEAR THE PLAY LIST SCREEN
- TO DISPLAY INFORMATION ABOUT A SELECTED PLAY LIST
- PLAYING A SPECIFIC SCENE
- PRESS [▶]
- PRESS [▲, ▼] TO SELECT "SCENE LIST" AND PRESS [ENTER]
- PRESS [▲, ▼, ◀, ▶] TO SELECT A SCENE AND PRESS [ENTER]
- CONVENIENT FEATURES
- CHANGING SOUNDTRACKS, SUBTITLES AND ANGLES
- SOUNDTRACKS
- SUBTITLES
- PRESS [SUBTITLE]
- TO CLEAR/DISPLAY THE SUBTITLES
- ANGLES
- DVD-A DVD-V
- PRESS [ANGLE]
- TV ZOOM FUNCTION
- RAM DVD-A DVD-V
- PRESS [ZOOM]
- PROGRAM PLAY
- WHEN SEQUENTIAL MODE IS ON
- WHEN SEQUENTIAL MODE IS OFF
- RANDOM PLAY
- REPEAT PLAY
- A-B REPEAT PLAY
- COMMON PROCEDURES
- TO CLEAR THE MENUS
- UNIT INFORMATION
- PLAY MENU
- RAM
- A AUDIO/SUBTITLE LANGUAGE
- B SIGNAL TYPE/DATA
- AUDIO MENU
- ⑥ DIALOGUE ENHANCER DVD-V
- DISPLAY MENU
- ① PICTURE MODE
- ⑥ VIDEO OUTPUT MODE
- © TRANSFER MODE
- PROGRESS INDICATOR
- USER MODE
- TO CHANGE THE USER MODE
- MPEG DIGITAL NOISE REDUCTION
- PICTURE CONTROL
- CHANGING SETTINGS
- ENTERING A PASSWORD (RATINGS)
- DVD-V
- DIGITAL OUTPUT
- PCM DOWN CONVERSION
- DOLBY DIGITAL AND DTS DIGITAL SURROUND
- IMPORTANT
- SPEAKER SETTING
- SPEAKER PRESENCE AND SIZE (A)
- DELAY TIME (B)
- DVD-V (DOLBY DIGITAL AND DTS, CENTER AND SURROUND SPEAKERS ONLY)
- CHANGING THE DELAY TIME
- CHANNEL BALANCE (©)
- TO FINISH THE SPEAKER SETTING
- TROUBLESHOOTING GUIDE
- GLOSSARY
- BITSTREAM
- DECODER
- DOLBY DIGITAL
- DOLBY PRO LOGIC
- DTS (DIGITAL THEATER SYSTEMS)
- DYNAMIC RANGE
- FILM AND VIDEO
- FRAME STILL AND FIELD STILL
- INTERLACE AND PROGRESSIVE OUTPUT
- I/P/B
- LINEAR PCM (PULSE CODE MODULATION)
- PLAYBACK CONTROL (PBC)
- LIMITED WARRANTY
- PANASONIC DVD PLAYER/RECORDER LIMITED WARRANTY
- LIMITED WARRANTY COVERAGE
- CARRY-IN OR MAIL-IN SERVICE
- LIMITED WARRANTY LIMITS AND EXCLUSIONS
- CUSTOMER SERVICES DIRECTORY
- ACCESSORY PURCHASES
- PRODUCT SERVICE
- PRODUCT INFORMATION
Brand : PANASONIC
Model : DVD-CP72
Category : DVD Recorder