
CQ-RD153N - Car radio PANASONIC - Free user manual and instructions
Find the device manual for free CQ-RD153N PANASONIC in PDF.


| Product Type | Car Stereo Receiver |
| Brand | Panasonic |
| Model | CQ-RD153N |
| Form Factor | 1-DIN |
| Dimensions (W x H x D) | Approx. 178 x 50 x 155 mm |
| Weight | Approx. 1.2 kg |
| Power Supply | 12V DC (Negative ground) |
| Maximum Power Output | 4 x 50 Watts |
| RMS Power Output | 4 x 22 Watts |
| Audio Sources | CD Player, Cassette Player, FM/AM Tuner |
| CD Playback | CD, CD-R, CD-RW |
| Radio Bands | FM (87.5-108 MHz), AM (531-1602 kHz) |
| Preset Stations | 30 (18 FM + 12 AM) |
| Equalizer | Preset EQ settings (Rock, Pop, Classic, etc.) |
| Front Panel | Detachable (security feature) |
| Display | LCD with multi-color illumination |
| Auxiliary Input | 3.5mm AUX-in on front |
| Speaker Impedance | 4-8 Ohms |
| Bass/Treble Control | Yes (separate controls) |
| Maintenance | Clean with soft dry cloth; avoid solvents |
| Safety Features | Detachable front panel, reverse polarity protection |
| Spare Parts / Repairability | Contact Panasonic service centers; user manual includes wiring diagram |
| General Information | User manual available in PDF (12 pages) for download |
Frequently Asked Questions - CQ-RD153N PANASONIC
User questions about CQ-RD153N PANASONIC
0 question about this device. Answer the ones you know or ask your own.
Ask a new question about this device
Download the instructions for your Car radio in PDF format for free! Find your manual CQ-RD153N - PANASONIC and take your electronic device back in hand. On this page are published all the documents necessary for the use of your device. CQ-RD153N by PANASONIC.
USER MANUAL CQ-RD153N PANASONIC
Removable Front Panel Cassette Player/Receiver with CD Changer Control

CQ-RD153/RD143/RD133N
(CQ-RD133N)
Operating Instructions


Matsushita Electric Industrial Co., Ltd.
Web Site : http://www.panasonic.co.jp/global/
YFM284C378ZA TAMACO1202-1013
Printed in Taiwan
Please read these instructions carefully before using this product and keep this manual for future reference.
Removable Front Panel Cassette Player/Receiver with CD Changer Control

CQ-RD153/RD143/RD133N
Panasonic welcomes you to their constantly growing family of electronic products owners. We endeavor to give you the advantages of precise electronic and mechanical engineering, manufactured with carefully selected components, and assembled by people who are proud of the reputation their work has built for our company. We know this product will bring you many hours of enjoyment, and after you discover the quality, value and reliability we have built into it, you too will be proud to be a member of our family.
Precautions
Volume Level
For your driving safety, keep the volume level low enough to be aware of road and traffic conditions.
Car Washing
To avoid electrical shorts which may cause fire, or other damage, do not expose this product (including the speakers and tape) to water or excessive moisture.
Car Ventilation
If your car is parked for several hours in direct sunlight, the temperature inside the car may become very high. It is advisable to drive the car and give the interior a chance to cool down before switching the unit on.
Power Supply
This product is designed to be used in a car having a 12-Volt negative ground battery system.
Tape Mechanism
Keep magnets, screwdrivers and other metallic objects away from the tape mechanism and tape head.
Service
This product is made of precision parts. Do not attempt to disassemble or adjust any parts. For repair, please consult your nearest authorized Panasonic Service Centre.
Note: This operating instruction manual is for three models CQ-RD153N, CQ-RD143N and CQ-RD133N. The differences between three models are listed below.
| Features\Model | CQ-RD153N | CQ-RD143N | CQ-RD133N |
| Tlurination Colors | Red/Blue | Amber | Green |
CQ-RD153/RD143/RD133N
Power and Sound Controls
Power
Turn the key in the ignition until the necessary
indicator lights. Power on: Press [PWR]
Volume


Volume Level (0 to 40)

Mute
Press [MUTE] to mute the sound.
Press [MUTE] again to unmute.
Loudness
Press and hold MUTE for more than 2 seconds to enhance bass and treble tones at low or medium volume.
Press and hold MUTE again to cancel.
Audio Mode (Volume/Bass/Treble/Balance/Fader)
1. Push [SEL] to select the audio mode.

2. Turn to
Note: If no operation takes place for more than 5 seconds in the audio mode (2 seconds in volume mode), the display returns to regular
![graph TD A["Regular Mode"] --> B["Volume"] B --> C["Base"] C --> D["Triple"] D --> E["Balance"] E --> F["Peder"] B --> G["WOL 20"] C --> H["BAS+ 3dB"] D --> I["TRE+ 3dB"] E --> J["HAL L 2 (Left / Right: 1 to 15)"] F --> K["FAD F 3 (Right / Right: 1 to 15)"] F --> L["FAD L1 : centre"]](/content/2026/06/1328296/images/04335a41dcf18388d1729652636ca2d12173487df13b9d9c461fc659b100b3d9.jpg)
Radio
1. Mode Selection
You can switch to the radio mode as shown below.

② Band
Press [BAND] to change the bands.
![graph TD A["FM 18750"] --> B["Ban"] A --> C["SFM stereo indi-"] C --> D["F-X1"] C --> E["F-M2"] C --> F["F-M3"] D --> G["Λ_M"] E --> H["Λ_M"] F --> I["Λ_M"]](/content/2026/06/1328296/images/ad99c81b51d8ed53243512196c08af47fd7af919c48fc9d0c92c18a9549e807d.jpg)
③ Manual
Tuning
[>]: Higher frequency [<]: Lower frequency
Seek Tuning
Press and hold for more than 0.5 seconds then released.
[>]: Higher frequency [<]: Lower frequency

4 Mono/Local Selection
(MONO/LOC)
MONO: Noise is significantly decreased when weak signals are received from an FM broadcast station.
FM broadcasts
Press and hold [PTY]
(MONO/LOC) to change the mode. Release when
AM broadcast
Press and hold [PTY]
(MON/OOC) to switch LOCAL mode on and off.


CQ-RD153/RD143/RD133N
Preset Station Setting
Up to 5 stations each can be saved in the FM1, FM2, FM3 and AM (LW/MW) preset station memories.
1 Band
FMI 8750

② Auto Station Preset (APM)
Press and hold [BAND] (ADM) for more than 2 seconds (Auto Preset Memory). The 5 best receiving stations will be automatically saved in the memory under press buttons [1] to [5]. Once set, the preset stations are sequentially scanned for 5 seconds each.
Note: Only RDS stations will be saved at default setting (AF ON). To select non-RDS stations too, set AF to OFF. See page 81.
Manual Station Preset
- Use manual or seek tuning to find a station. (= page 6)

Caution: To ensure safety, never attempt to preset stations while you are driving.
3 Tuning in a Preset Station: Press the corresponding preset button [1] to [5] to tune in a preset station.
Note: You can change the memory presetting by repeating the above procedure.
CQ-RD153/RD143/RD133N
RDS (Radio Data System)
RDS Basics
The following functions are available when receiving RDS stations.
PS Display
(Program Service name)
The station name is displayed instead of the frequency.
CT Service
(Clock Time)
When receiving an RDS sta-
tion, the CT (Clock Time)
The following table is provided in the image.
sets the time, 105-01-19
displayed in areas where this service is not available. (The
clock is not adjustable by hand.)
AF Mode
Default: A3 mode is active (AF ON)
(Press [AF] on the main unit to switch the AF mode on or off)
AF ON: AF, Best Station and PT. Seek function are active.


Preset Memory
Best Station Research Best Station Research is automatically activated to store the station with the best reception for each preset button.
PT (Program
Identification) Seek If Best Station Research does not work properly and reception is too weak when tuning in a preset station, press the same process again. PT Seek will search for an AF station with good reception.
REG (Region) Mode
changes the selection range of AF, Best Station Research and PT Seek. Press and hold [AF] (REG).
REG ON
This frequency is changed only for programs within the region.
REG OFF
(default) The frequency is changed
Display Change
Press [DISP] to change the display as follows.
23 (Program Service


208 service availability by various work areas. Please understand if 608 services is not available in your area. This chapter explains the summary and operation regarding 108,
Traffic Announcements
Some RDS TM stations periodically provide traffic information.
TP
(Trellie Program Journal (as-
Broadcasting of traffic information
TA
Trellie: Announcements Identification
radio announcements on traffic conditions
TA Mode
Press [TA] to switch the TA mode on. (Press again to switch the TA mode off.)
TA ON: If the station received is not a TP station, the unit simultaneously searches for a TP station to tune in to it. When the TP station received begins a traffic announcement, you can hear it.


Muting in TA Mode
To listen to only traffic announcements while muting, press and hold [TA] for more than 2 seconds.
To cancel the muting in TA mode (muting in TA mode / TA mode), take either of the following two actions.
Press [TA] again.
Turn the [VOL] knob.
Note: To switch to TA off, press [TA] again and hold for more than 2 seconds.
TP Auto Search
When reception of a TP station is poor, TP Auto Search will automatically search for a TP station with better reception.
TP Seek Tuning
Seek tunes only TP stations. ( = page
51 Auto TP Station Press
TA Standby Mode
When TA is on, tape or CD changer playback will be

CQ-RD153/RD143/RD133N
CQ-RD153/RD143/RD133N
RDS (Radio Data System) (continued)
PTY Reception (Program Type)
FM stations provide a program type identification signal. Example: news, rock, classical music, etc.
PTY Mode
PTY ON: Take either of the following actions.
Press [PTY] to switch PTY mode on.
Press [DISP] to select PTY mode.
PTY OFF: Take either of the following actions.
Press [PTY] again to switch PTY mode off.
Press [DISP] to select a mode other than PTY mode.
Note: When there is no corresponding program type, "NO PTY" is displayed.

PTY Preset Search
Program types are stored in memory under preset buttons [1] to [5] as shown in the table: Preset No. Program Type Display
| News1 | NEWS | |
| Speech2 | SPEECH | |
| Sport3 | SPORT | |
| Pop. Music4 | POP | |
| 5 | Classic Music | CLASSICS |
Select a program type by pressing the preset button. The preset program type appears on the display for 5 seconds.
(Example) Press preset button [1].

Press the same preset button again (or press [<] or [>]) to tune in to the desired program type station.
(Example) Press preset button [1] again.
PTY Search
While a program type is displayed, press [<] or [>] to tune in to other stations of the same PTY.
| SPEECH | MUSIC | NEWS | AFFAIRS |
| INFO | SPORT | EDUCATE | DRAMA |
| CULTURE | SCIENCE | VARIED | POP_M |
| ROCK_M | EASY_M | LIGHT_M | CLASSICS |
| OTHER_M | WEATHER | FINANCE | CHILDREN |
| SOCIAL | RELIGION | PHONE_IN | TRAVEL |
| LEISURE | JAZZ | COUNTRY | NATION_M |
| OLDIES | FOLK_M | DOCUMENT |

If PTY Search cannot find the program from other stations, the search goes back to the station that was tuned in just before PTY Search.
CQ-RD153/RD143/RD133N
Other RDS Functions
EON (Enhanced Other Networks) When EON data is received, the EON indicator lights and the TA and AF functions are supported.
TA: Traffic information from the current and other network stations can be received.
AF: The frequency list of present RDS stations is updated by EON data.
EON involves radio to move further next of .006 information. It constantly updates the AF list of preset stations, including that currently tuned in to. For example, if you preset a station for your area, you will better be able to receive the same station at an alternative frequency, or any other station serving the same program. EON also keeps
Emergency
Announcement Reception
When an emergency announcement is broadcast, the unit is automatically switched to receiving that broadcast. If this happens in a mode other than radio mode (tape mode, CD changer mode) or in
CQ-RD153/RD143/RD133N
Cassette Tape Player
Mode Selection
You can switch to the cassette player mode as shown below.
From: CD Changer Mode Insert a cassette
Note: You cannot select CD Changer mode or Radio mode while logo is playing. If you want to do so, exit CD Changer mode.
Caution: Make sure that tape is not in the deck before inserting a tape.
Tape Insert and Playback Insert a cassette tape. Playback will start automatically.
Stop and Tape Eject Press [▲] to stop tape play and eject the cassette tape. The unit will be automatically switched back to radio mode.

Exposed tape and
Notes on Cassette Tape
Tape Slack:
Use a pencil or nail object to take up the slack as shown. If a loose tape is mixed, then may

Notes:
To maintain your cassette player in top condition, avoid using tapes longer than 50 minutes (C-50). If you insert into the unit a cassette with a loose tape caused by forcing it into the cassette with a finger or the side, the cassette may not be properly reproduced. In such a case, eject the cassette, make the tape tight, then insert it back into the
CQ-RD153/RD143/RD133N
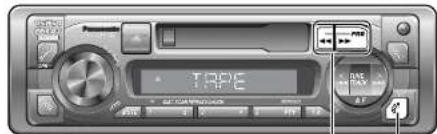
Rewind and Fast Forward
The functions of [◀◀] and [▶▶] vary with the tape running direction, as indicated by the arrow below.

Top side play
▶ : Fast forward (To cancel, press ◀ softly)

Bottom side play
◀ : Fast forward (To cancel, press ▶ softly)

TAPE
Play side change
Press [◀◀] and [▶▶] at the same time.
Top side
Bottom side
Display change
Press [DISP] to switch to the clock display. Press again to cancel.

CQ-RD153/RD143/RD133N
CD Changer Control
Notes: The CD Changer functions are designed for an optional CD changer unit. This unit cannot support the reproduction of MP3 and WMA and does not display any CD-Text, even if the CD changer unit supports them.
Mode Selection
You can switch to the CD changer mode as shown below.
From: Radio [MDE] (to changer)
![Tape Mode Elect a cassette tape. a press [CD-C] (CD changer), 1.2C 2-02 Disc Frock Change inst-](/content/2026/06/1328296/images/b1559d201ef703415d40a5a6723b6b50f0c410d277b885006e605dfd0252eba6.jpg)

Track Selection
Selection
▶ : Advance to the next track. ◀ : Back to beginning of the current track.
Fast Forward and Fast Reverse
Reverse
Press and hold ▶: Fast forward. ◀ : Fast reverse.
Display Change
Press [DISP] to change the display.

Press and hold [DISP] for more than 2 seconds to change the clock display. Press again to resume.


Playing Mode

| Track Scan | Press [3] (SCAN).This I'd not. 10 seconds of each trackof all slices are played in sequences.Press again to cancel. | Play timeCIC 3-02Blue and TrackCIC 2-02 |
| Track Repeat | Press [4] (REPEAT).The current track is repeated.Press again to cancel. | CIC 2-02 |
| Random Play | Press [5] (RANDOM).All tracks on all slices in the secondare played in random order.Press again to cancel. | CIC 2-02 |
Error Display Messages
| DSC No. | Appears on the display when the compact disc is dirty or inverted, the next available compact disc will be selected automatically. |
| DSC No. | Appears on the display when compact disc is scratched.The next available compact disc will be selected automatically. |
| DSC 63 | Appears on the display when the unit stage operating for some reason. From the reset switch on the CS changes. |
| DSC 0000 | Appears on the display when there is no disc in the magazine. |
CQ-RD153/RD143/RD133N
CQ-RD153/RD143/RD133N
Installation
Preparation
Before installation, check the operation with the antenna and power cord. Disconnect the cable from the negative (-) battery terminal (see caution below). The unit should be installed in a horizontal position with the front end up at a convenient angle, but not more than 30°.

Caution: Do not disconnect the battery terminals of a car with a trip or navigational computer, since all user settings stored in memory will be lost. Instead, take extra care when installing the unit.
Dashboard
Installation
Installation Opening
The unit can be
198.8 x 13 in any
dashboard having an opening as shown at right. The dashboard should be 4.5 mm - 6 mm thick in order to be able to support the unit.
Installation Precautions
This product should be installed by a professional installer, if possible. In case of difficulty, please consult your nearest authorized Panasonic Service Center. 1. This system is to be used only in a 12-volt battery system (with negative ground). 2. Follow the electrical connections carefully (see page 20). Failure to do so may result in damage to the unit. 3. Connect the power lead (red) after all other connections are made. 4. Be sure to connect the battery lead (yellow) to the positive terminal (+) of the battery or the fuse-block (BMT) terminal. 5. Insulate all exposed wires to prevent short circuiting.
CQ-RD153/RD143/RD133N
Supplied Hardware
| ItemNo. | Diagram | Q'ty | |
| 1 | Mounting Collector | 1 | |
| 2 | Mounting solt (5 mm) | 1 | |
| 3 | Power and Speaker Connector | 1 | |
| 4 | Removable Face Plate Case | 1 | |
| 5 | Trim Plate | 1 | |
| 6 | Dismounting Plate | 2 |
Methods for Fixing the Rear of the

(b) Using the Rubber Cushion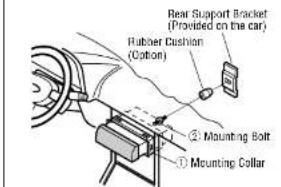
Cautions:
We strongly recommend that you wear gloves during installation to protect yourself from injuries.
When bending the mounting tab of the mounting collar with a screwdriver, be careful not to injure your hands and fingers.
First complete the electrical connections, and then check them for correctness.
The included Mounting Collar ①
is designed specially for this unit. Do not use it to attach a


Establish the rear connections of the unit. After fixing Mounting Bolt (2) and Rear and Speaker Connection (3), establish the rear connections of the unit to the car body by either
Trim Plate ⑤.

After installation, reconnect the negative (-) battery terminal.
Engage the Mounting Springs (※) in the mounting holes of the Mounting Collar
Mounting

CQ-RD153/RD143/RD133N
Installation (continued)
To Remove the Unit
1. Switch off the power of the unit. Remove the removable face plate.


2. Remove the upper plastic ⑤ with a screwdriver.

3. Pull out the unit while pushing down the lock lever with the disassembly tool.

4. Remove the unit pulling with both hands.

Cautions:
Do not touch the contacts on the face plate or on the main unit, as this may result in poor electrical contacts.
CQ-RD153/RD143/RD133N
Anti-Theft System
This unit is equipped with a removable face plate. Removing this face plate makes the radio totally inoperable.
Place Removable Face Plate into Case
① Switch off the power of the unit. ② Remove the removable face plate. See page 81.
③ Gently press the bottom of the case and open the cover. Place the face plate into the case.
Install Removable Face Plate
Slide the left side of the removal face plate in place.


CQ-RD153/RD143/RD133N
Electrical Connections
Cautions:
Check the connectors provided on your car (see precaution below) before connecting the system. This unit is designed for use in a car having a 12-volt, negative ground battery system. To prevent damage to the unit, be sure to follow the connection diagram. Strip about 5 mm of the lead ends for connection (only for non-ISO connector cords). Do not insert the power connector into the unit until the wiring is complete.
Precautions (ISO
Connector)
The pin arrangement of the power connector conforms to ISO standard. The ISO 10487 connector in some cases may differ from the ISO standard. Please check that the pin arrangement of the connector in your car conforms to ISO standard. For car types A and B, change the wiring of the red and yellow leads as shown below. After connection, insulate the portions.

Standard ISO
Car Type A

Car Type B

Wiring Diagram
Example: Connection with CD changer CX-
CQ-RD153/RD143/RD133N

To remove the fuse, use a fuse puller (15 A).
If the case (near the fuse block) frequently blows, there may be something wrong with the unit. Consult your nearest Panasonic dealer.

For details, consult your nearest authorized Panasonic dealer. For connection to a CD changer, refer to the spot-
-C1: External Mute Lead (Orange) (not used);
C3: External Remote Control Lead (Brown w/black stripe) (not used)
A: Blue w/white
Speaker B8: Rear Right - B7: Rear Left B6: Front Right B5: Front Left B4: Front High -
A8: Ground Lead (Black) To a clean, bare metallic part of the A7: Power Lead (ACC or IGN) (Red) A4: Battery Lead (Yellow) To the other battery, continuous A5: Motor Antenna Relay Control Lead (Blue w/white stripe) To Motor Antenna (Max. 500 mA). This lead is not intended for use with a switch actuated power antenna. Note: The power antenna extends
A5': This lead can be used as a other Auto-Telay Control Power Lead or Motor Antenna Relay Control Lead, or both at the same time. However, the current capacity of this lead is 500
CQ-RD153/RD143/RD133N
CQ-RD153/RD143/RD133N
Speaker Connections
Caution: Please follow the instructions given below. Failure to do so will cause damage to
w/black stripe
Use ungrounded speakers only.
The maximum speaker input should be 45 W or more. (If used with the optional power amplifier, the speaker input should be higher than the maximum amplifier output.)
The speaker impedance should be 4 - 8 Ω. This unit uses the STCL circuit, so each speaker should be connected separately using parallel vinyl insulated cords.
Never connect the speaker cord to the body of the car.
Do not use a 3-wire type speaker system having a common earth lead.
Do not connect more than one speaker to one set of speaker leads.
Fuse
Use fuses of the same specified rating (15 A). Using different substitutes or fuses with higher ratings, or connecting the unit directly without a fuse, could cause fire or damage to the unit.
Maintenance
Your product is designed and manufactured to ensure the minimum of maintenance. Use a soft cloth for routine exterior cleaning, never use benzine, thinner, or other solvents.
CQ-RD153/RD143/RD133N
Specifications
| FM Stereo RadioGeneral | |
| Power Supply :DC 12 V (11 V - 16V), Test Valuges14.4 V, Negative GroundTone Controls :Delta: 2 dT at 100HzFreeble: ± 12 dbat 10 kHzCurrent Consumption :Less than 2.5 A(Tape mode, 0.5 d4 Speaker)Maximum Power Output : 45 N x4 for 4 Ω;Power Output :20 W x(DFN4x 324, at 4 Ω)Speaker Impedance :14 8 ΩDimensions (main unit): 178(W)x 50(H)x155(D) | Frequency Range : 8/5 108 kHzDisable Sensitivity : 6 dB/μ V(8/9 30dB)Stereo Separation : 35 dB (at 1 kHz) |
| MW RadioFrequency Range : 531 1,602 kHzDisable Sensitivity : 28 ds/μ V (S/N 20dB)LW RadioFrequency Range : 153 - 279 kHzDisable Sensitivity : 32 ds/μ V (S/N 20dB)Cassette Tape PlayerReproduction system : 4 track, 2 program stereo Tape Speed : 4.76 cm/sec. |
Note: Specifications and design are subject to modification without notice due to improvement.
| shop Panasonicwww.panasonic.co.uk (for UK cus | proter accessory and consumable items for yourproduct with ease and confidence by telephoningour Customer Care Centre Mor-Friday0:00am 5:30pm. (Excluding public holidays.)for go on line through our Internet Accessoryordering applicationmostat major credit and debit cards accepted.All enquiries transactions and distribution facili | |
| Customer Care CentreFor UK customers: 08705 357357 | technical SupportFor UK customers: 0870 505610 | |
| This Technical Support Tot Tires number is for Panasonic PC software related productonly.For Republic of Ireland, please use the Customer Care Console marker Intels above for all | ||
CQ-RD153/RD143/RD133N
- PRECAUTIONS
- POWER AND SOUND CONTROLS
- AUDIO MODE (VOLUME/BASS/TREBLE/BALANCE/FADER)
- RADIO
- MODE SELECTION
- ② BAND
- ③ MANUAL
- TUNING
- MONO/LOCAL SELECTION
- (MONO/LOC)
- FM BROADCASTS
- AM BROADCAST
- PRESET STATION SETTING
- BAND
- ② AUTO STATION PRESET (APM)
- MANUAL STATION PRESET
- RDS (RADIO DATA SYSTEM)
- RDS BASICS
- PS DISPLAY
- CT SERVICE
- AF MODE
- PRESET MEMORY
- PT (PROGRAM
- REG (REGION) MODE
- REG ON
- REG OFF
- DISPLAY CHANGE
- TRAFFIC ANNOUNCEMENTS
- TP
- TA
- TA MODE
- MUTING IN TA MODE
- TP AUTO SEARCH
- TA STANDBY MODE
- RDS (RADIO DATA SYSTEM) (CONTINUED)
- PTY RECEPTION (PROGRAM TYPE)
- PTY MODE
- PTY PRESET SEARCH
- PTY SEARCH
- OTHER RDS FUNCTIONS
- EMERGENCY
- ANNOUNCEMENT RECEPTION
- CASSETTE TAPE PLAYER
- CAUTION: MAKE SURE THAT TAPE IS NOT IN THE DECK BEFORE INSERTING A TAPE
- NOTES ON CASSETTE TAPE
- TAPE SLACK
- NOTES
- REWIND AND FAST FORWARD
- PLAY SIDE CHANGE
- CD CHANGER CONTROL
- TRACK SELECTION
- SELECTION
- FAST FORWARD AND FAST REVERSE
- REVERSE
- PLAYING MODE
- INSTALLATION
- PREPARATION
- INSTALLATION OPENING
- INSTALLATION PRECAUTIONS
- CAUTIONS
- INSTALLATION (CONTINUED)
- TO REMOVE THE UNIT
- ANTI-THEFT SYSTEM
- PLACE REMOVABLE FACE PLATE INTO CASE
- INSTALL REMOVABLE FACE PLATE
- ELECTRICAL CONNECTIONS
- PRECAUTIONS (ISO
- CONNECTOR)
- WIRING DIAGRAM
- SPEAKER CONNECTIONS
- FUSE
- MAINTENANCE
- SPECIFICATIONS
Brand : PANASONIC
Model : CQ-RD153N
Category : Car radio