
DP-2330 - Fax machine PANASONIC - Free user manual and instructions
Find the device manual for free DP-2330 PANASONIC in PDF.


| Product Type | Plain Paper Fax Machine |
| Brand | Panasonic |
| Model | DP-2330 |
| Technology | Laser / Thermal Transfer |
| Paper Size | Letter, A4 |
| Paper Input Capacity | 250 sheets |
| Modem Speed | 33.6 kbps |
| Memory Capacity | 2 MB (approx. 120 pages) |
| Functions | Fax, Copy, Scan (optional PC connect) |
| Dimensions (W x D x H) | 400 x 300 x 200 mm |
| Weight | 12 kg |
| Power Supply | 120 V ~ 60 Hz |
| Power Consumption | Standby: 20 W, Operating: 500 W |
| Display | 2-line LCD |
| Connectivity | Phone line (RJ11), Parallel port (optional) |
| Maintenance | Regular cleaning of scanner glass and thermal head |
| Safety Features | Auto shut-off, thermal overload protection |
| Spare Parts & Repairability | Common parts available: toner cartridge, drum unit, pickup rollers |
| General Information | Desktop type, user-replaceable consumables |
Frequently Asked Questions - DP-2330 PANASONIC
User questions about DP-2330 PANASONIC
0 question about this device. Answer the ones you know or ask your own.
Ask a new question about this device
Download the instructions for your Fax machine in PDF format for free! Find your manual DP-2330 - PANASONIC and take your electronic device back in hand. On this page are published all the documents necessary for the use of your device. DP-2330 by PANASONIC.
USER MANUAL DP-2330 PANASONIC
Operating Instructions
(For Panasonic Printing System Ver. 6)
Model No. DP-180/190/1520P/1820P/1820E/2330/3030/3530/4530/6030

WORKIO™
Before operating this software, please read these instructions completely and keep these operating instructions for future reference.
English
The following trademarks and registered trademarks are used throughout this manual:
Microsoft, MS-DOS, Windows and Windows NT are registered trademarks of Microsoft Corporation in the USA and other countries.
i386, i486 and Pentium are trademarks of Intel Corporation.
Centronics is a registered trademark of Centronics Data Computer Corporation.
The USB-IF Logos are trademarks of Universal Serial Bus Implementers Forum, Inc.
TrueType is a registered trademark of Apple Computer, Inc.
PEERLESSPAGE™ is a trademark of the PEERLESS System Corporation; and,
PEERLESSPrint® and Memory Reduction Technology® are registered trademarks
PEERLESS System Corporation; and COPYRIGHT© 2000 PEERLESS System Corporation
Universal Font Scaling Technology (UFST) and all typefaces have been licensed from Agfa Monotype.
Novell and NetWare are registered trademarks of Novell, Inc. in the USA and other countries.
All other trademarks identified herein are the property of their respective owners.
Copyright © 2004 by Panasonic Communications Co., Ltd.
All rights reserved. Unauthorized copying and distribution is a violation of law.
Published in Japan.
The contents of these Operating Instructions are subject to change without notice.
Before Starting
System Requirements.... 4
Printer Section
Installing the Printer Driver 5
Installation Procedures.... 5 Connecting with a USB Cable (Windows 98).... 12 Connecting with a USB Cable (Windows Me) 16 Connecting with a USB Cable (Windows 2000).... 19 Connecting with a USB Cable (Windows XP/Windows Server 2003) ...... 22
Installing the LPR (Line Printer Remote) Monitor 24
Windows 98/Windows Me 24 Windows NT 4.0 28 Windows 2000/Windows XP/Windows Server 2003 32
Configuring the Printer Driver Settings 36
Windows 98/Windows Me 36 Windows NT 4.0 (Administrator) 48 Windows NT 4.0 (User).... 60 Windows 2000/Windows XP/Windows Server 2003 (Administrator)....61 Windows 2000/Windows XP/Windows Server 2003 (User) 74 Windows Common Settings 75
Print Operation 89
Printing from Windows Applications 89 Printing on Network.... 90 Internet Printing Protocol (IPP) Printing 92 Setting the IPP Printing 92
IPX-SPX Setup Wizard 96
Specifications 101
Available Paper Type and Paper Size.... 101 Available Paper Weight and Capacity 105 Transparencies and Labels 107 Envelopes (For DP-180/190/1520P/1820P/1820E) 108 Loading the Envelopes (For DP-180/190/1520P/1820P/1820E).... 110 Printer Specifications.... 111
Troubleshooting
Troubleshooting....112
Printing Operation Failure 112 Documents Not Printing Correctly 113
Appendix
Appendix 114
Printing Area.... 114 Symbol Table 115
- Personal Computer : IBM PC/AT and compatibles (CPU Pentium II or greater)
- Operating System : Windows 98 1 , Windows Me 2 , Windows NT 4.0 3 , Windows 2000 4 , Windows XP 5 , Windows Server 2003 6
- System Memory: The minimum recommended Memory for each OS is as follows: Windows 98, Windows Me : 64 MB or greater Windows 2000, Windows XP, Windows NT 4.0, : 128 MB or greater Windows Server 2003
- Free Disk Space: 40 MB or greater (not including storage space for images for the Image Overlay function).
- CD-ROM Drive: Used for installing the software and utilities from the CD-ROM.
- Interface: 10Base-T/100Base-TX Ethernet port, USB port (except for DP-3530/4530/6030), Parallel Port (DP-3530/4530/6030 only)
*1 Microsoft® Windows® 98 operating system (hereafter Windows 98) *2 Microsoft® Windows® Millennium Edition operating system (hereafter Windows Me) *3 Microsoft® Windows NT® operating system Version 4.0 (hereafter Windows NT 4.0) *4 Microsoft® Windows® 2000 operating system (hereafter Windows 2000) *5 Microsoft® Windows® XP operating system (hereafter Windows XP) *6 Microsoft® Windows Server™ 2003 operating system (hereafter Windows Server 2003)
Installation Procedures
This manual provides examples of instructions for installing, configuring, and using the printer driver for your version of Windows OS.
To use as a USB Printer:
| Windows 98 | : Follow the procedures on pages 12 to 15. (Connecting with a USB Cable) |
| Windows Me | : Follow the procedures on pages 16 to 18. (Connecting with a USB Cable) |
| Windows NT : This Windows OS does not support a USB Printer. | |
| Windows 2000 | : Follow the procedures on pages 19 to 21. (Connecting with a USB Cable) |
| Windows XP/ | : Follow the procedures on pages 22 to 23. (Connecting with a USB Cable) |
| Windows Server 2003 | |
To use as a Network Printer:
| Windows 98 | : Follow the procedures on pages 6 to 11 (Installing the Printer Driver) and then pages 24 to 27 (Installing the LPR Monitor). |
| Windows Me | : Follow the procedures on pages 6 to 11 (Installing the Printer Driver) and then pages 24 to 27 (Installing the LPR Monitor). |
| Windows NT | : Follow the procedures on pages 6 to 11 (Installing the Printer Driver) and then pages 28 to 31 (Installing the LPR Monitor). |
| Windows 2000 | : Follow the procedures on pages 6 to 11 (Installing the Printer Driver) and then pages 32 to 35 (Installing the LPR Monitor). |
| Windows XP/Windows Server 2003 | : Follow the procedures on pages 6 to 11 (Installing the Printer Driver) and then pages 32 to 35 (Installing the LPR Monitor). |
1
2

Insert the Panasonic Printing System CD-ROM.
Click on the desired language.
Note: 1. If the CD-ROM does not launch automatically, double-click the My Computer icon on the Desktop or on the Start menu, then double-click the CD-ROM icon. 2. The language screen differs depending on the models.
3

Click the
button
Note for Windows 98/Windows Me users: If your computer does not have the LPR Port Monitor installed, please proceed to "Installing the LPR Monitor" on page 24 before continuing this installation.
4

Click Install Printer Driver.
5

Select Local Printer and click the button.
Next
Note: If your machine has been installed on your network, click the button to find it. Then, select the machine from the list of network connected units, and click the Next button.
6

Select your machine's model(s) check box and
click the button
7
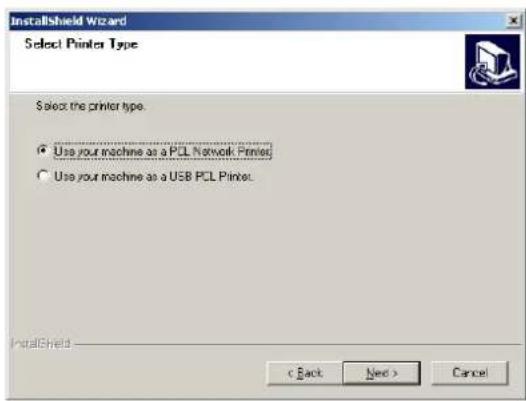
Select how your machine will be used, either as a
Network Printer or as a USB Printer.
If USB Printer is selected, click the Next
button and skip to Step 12.
Note: 1. Make sure that the Power Switch of your machine is OFF and the USB cable is not connected to your computer.
- If DP-3530/4530/6030 is selected on the previous step, this screen is not shown. Proceed on the next step.
8

Check LPT1: and click the button
9

Click the button if you would like to change your current default printer to the one that you are installing.
Note: This dialog box only appears if another printer is already installed.
10

Select your new default printer from the New Printer List and click the button
11

The required files are copied.
12a

When this screen appears, turn the Power Switch of your machine ON and connect your machine to an available USB Port on your computer.
Note: (For Windows 98 users)
If your PC does not detect the device, and a dialog box does not appear confirming its detection after the USB cable is connected, proceed as follows:
- Locate the DrvUnIns.exe file under the D:\Tools\DrvUnIns directory on the CD-ROM and execute the file to delete the Printer Driver (where "D:" is your CD-ROM drive).
- Follow the procedures on pages 12 to 15 to reinstall the Printer Driver.
12b

Click the buttons

When this message appears, turn the Power Switch of your machine ON and connect your machine to an available USB Port on your computer.

Click the buttons
12c

When this screen appears, turn the Power Switch of your machine ON and connect your machine to an available USB Port on your computer.

Select No, not this time and click the
Next
button.

Select "Install the software automatically" and
click the
Next button.

This screen may appear if you have a previous version of the printer driver installed.
Select the latest version of the *.inf file and click
the
Next
button.
12c

Click the button.
13

When the setup process is completed, a screen is displayed prompting you to restart your computer.
Click the button to restart your computer.
The Panasonic/Panafax Printer Driver has been installed, and the Panasonic/Panafax Printer icon(s) are added to the Printer folder.
If you are installing the Printer Driver for network printing, please contact your network administrator for the IP Address of the machine and proceed to the next section to install the LPR Monitor service for the version of Windows you are using after your computer has rebooted.
NOTE
- When installing on Windows NT 4.0, Windows 2000, Windows XP or Windows Server 2003, logon to the computer/network using an account with administrator rights.
- To remove the Printer Driver, select Panasonic DP-xxx in Add/Remove Programs
Properties in the Control Panel and click the Add... Remove button.
Installing the Printer Driver
Connecting with a USB Cable (Windows 98)
To use the printer by means of a USB cable connection, install the printer driver by following the steps below.
1
Connect the printer to the PC with a USB cable. Turn the Power Switch of your machine ON.
2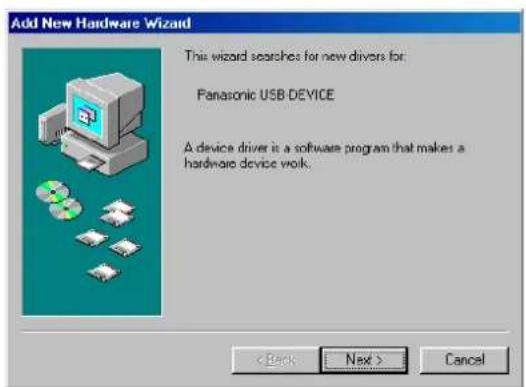
The New Hardware Found dialog box appears for a brief moment, followed by the Add New Hardware Wizard dialog box.
Click the
butNext
Connecting with a USB Cable (Windows 98)
3
Add New Hardware Wizard
Select "Search for the best driver for your device."
Click the Next button.
4
5
Add New Hardware Wizard
Insert the CD-ROM included with the PCL Option.
Select "Specify a location" and type D:\English\PCL\Driver\UsbDrv\Win9x
(where "D:" is your CD-ROM drive).
Click the Next button.
6
Add New Hardware Wizard
Click the Next button.
7
Add New Hardware Wizard
Click the button.
Installing the Printer Driver
Connecting with a USB Cable (Windows 98)
8

The New Hardware Found dialog box appears for a brief moment, followed by the Add New Hardware Wizard dialog box.
Click the Next button.
9

Select "Search for the best driver for your device."
Click the Next button.
10

Select "Specify a location" and type D:\English\PCL\Driver\Win9x (where "D:" is your CD-ROM drive).
Click the button.
11

Click the button.
Connecting with a USB Cable (Windows 98)
12
Add Printer Wizard
You can type a name for this printer, or you can use the name supplied below. When you have finished, click Next.
Printer name:
Panasonic DP-1820E PCL6
Your Windows-based programs will use this printer as the default printer.
Back
Next
Cancel
Enter the Printer name and click the
Next
button.
13
Add New Hardware Wizard

Panasonic OP-1820E PCL6
Windows has finished installing the software that your new hardware device requires.
Finish
Cancel
Click the
button
Connecting with a USB Cable (Windows Me)
1
Connect the printer to the PC with a USB cable. Turn the Power Switch of your machine ON.
2
The New Hardware Found dialog box appears for a brief moment, followed by the Add New Hardware Wizard dialog box.
Select Specify the location of the driver.
Click the
Next button
Insert the CD-ROM included with the PCL Option.
Connecting with a USB Cable (Windows Me)
Add New Hardware Wizard
Select Specify a location and type D:\English\PCL\Driver\UsbDrv\Win9x (where "D:" is your CD-ROM drive).
Click the button next
Add New Hardware Wizard
Click the button next
Add New Hardware Wizard
Click the button finish
Add New Hardware Wizard
The New Hardware Found dialog box appears for a brief moment, followed by the Add New Hardware Wizard dialog box.
Select Specify the location of the driver.
Click the Next button.
Installing the Printer Driver
Connecting with a USB Cable (Windows Me)
8

Select Specify a location and type D:\English\PCL\Driver\Win9x (where "D:" is your CD-ROM drive).
Click the Next button.
9

Click the Next button.
10

Enter the Printer name and click the Next button.
11

Click the Finish button.
Connecting with a USB Cable (Windows 2000)
Connect the printer to the PC with a USB cable. Turn the Power Switch of your machine ON.
The Found New Hardware Wizard dialog box appears.
Click the
Next button
Installing the Printer Driver
Connecting with a USB Cable (Windows 2000)
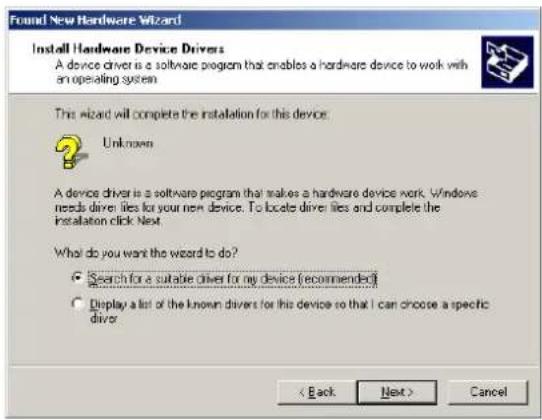
Select "Search for a suitable driver for my device".
Click the Next button

Insert the CD-ROM included with the PCL Option.
Select "Specify a location".
Click the button.
6

Type D:\English\PCL\Driver\WinXP-2K-2003 (where "D:" is your CD-ROM drive).
Click the button.
Connecting with a USB Cable (Windows 2000)
7

Click the
Next button.
8

Click the
Finish button.
9

Click the
Finish button.
Connecting with a USB Cable (Windows XP/Windows Server 2003)
Connect the printer to the PC with a USB cable. Turn the Power Switch of your machine ON.
Select No, not this time and click the
Next
button.
Connecting with a USB Cable (Windows XP/Windows Server 2003)

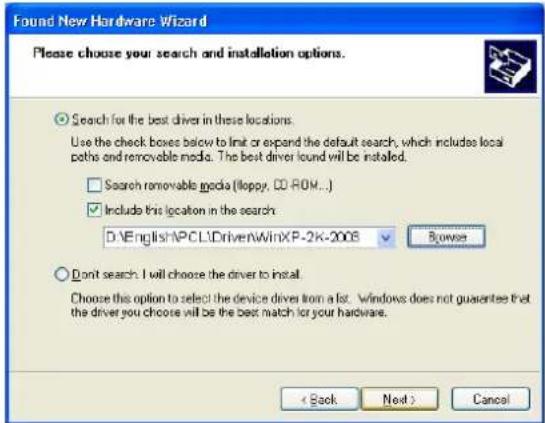


The Found New Hardware Wizard dialog box appears. Select Install from a list or specific location (Advanced).
Click the Next button.
Select Include this location in the search. Type D:\English\PCL\Driver\WinXP-2K-2003 (where "D:" is your CD-ROM drive). Insert the CD-ROM included with the PCL Option.
Click the Next button.
This screen may appear if you have a previous version of the printer driver installed.
Select the latest version of the *.inf file and click the button.
Click the button.
Installing the LPR (Line Printer Remote) Monitor
Windows 98/Windows Me
1
2

Insert the Panasonic Printing System CD-ROM.
Click on the desired language.
Note: 1. If the CD-ROM does not launch automatically, double click the My Computer icon on the Desktop or on the Start menu, then double click the CD-ROM icon. 2. The language screen differs depending on the models.
3

Click the
button
4

Click Install LPR Monitor.
5
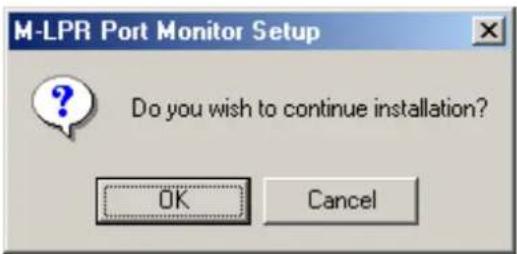
The M-LPR Port Monitor Setup dialog box appears.
Click the
button.
Installing the LPR (Line Printer Remote) Monitor
Windows 98/Windows Me
6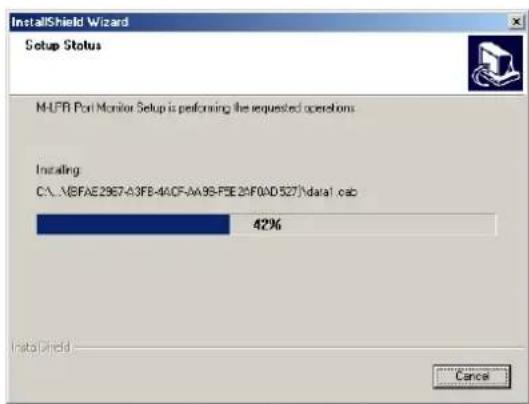
The required files are copied.
7
The setup program copies the necessary files onto your hard disk.
When the setup process is completed, a message is displayed prompting you to restart your computer.
It is recommended that you restart your computer now so that the LPR Monitor can be started.
Click the button.
If you have not installed the printer driver yet, please proceed to "Installing the Printer Driver" on page 5.
8
After your computer has rebooted, click the Start button, select Settings, and then click Printers.
The Printers folder appears.
Right-click on the desired printer icon and select Properties from the pop-up menu.
Installing the LPR (Line Printer Remote) Monitor
Windows 98/Windows Me
9
The printer properties dialog box appears.
The following step is to register the LPR Port for network printing.
Before proceeding, ensure that the printer is installed, connected to the network, turned ON and is operating properly.
10
Select the Details tab and click the Add Port... button.
11
The Add Port dialog box appears. Click the Other radio button, select M-LPR Port Monitor from the "Click the type of port you want to add:" list, and click
the

button.
Windows 98/Windows Me
12

The M-LPR Port Monitor dialog box appears.
Type the IP Address of the machine in the Host name or IP address: text box and the queue name (e.g. New105) in the Queue name: text box.
Click the button. If an error occurs because the queue name has already been used for the same IP Address, select a different unique name such as "New106".
The screen reverts to Printer Properties.
Check that "Print to the following port:" has been changed as entered in step 12, and click the
Apply button, and then the OK
button.
The printer properties dialog box closes and you have now configured the printer as a network printer.
13

Installing the LPR (Line Printer Remote) Monitor
Windows NT 4.0
Logon using an account with administrator rights.
1

Click the Start button, select Settings, and click Control Panel.
The Control Panel window appears.
Double-click the Network icon.
The Network dialog box appears.
2

Click the Services tab.
Verify whether the LPR Service is already installed. (Indicated by Microsoft TCP/IP Printing shown in the Network Services list.)
If it is already installed, skip to Step 7. Otherwise continue installing the LPR Service.
Windows NT 4.0
3

Click the button to display the Select
Network Service dialog box, and select Microsoft TCP/IP Printing.
Click the buttonK
4

The Windows NT Setup dialog box appears.
Insert the Windows NT 4.0 CD-ROM, and type D:\i386 (where "D:" is your CD-ROM drive).
Click the button to continue.
5

After the files have been copied into the hard drive of your PC, the display returns to the Network dialog box. Confirm that the Microsoft TCP/IP Printing service has been added to the Network Services list.
Click the button to close.
Note: If the OK button does not change into a Close button, remove and reinstall the Microsoft TCP/IP Printing service.
6

When the Network Settings Change dialog box is displayed, click the button to restart your computer now.
You have now completed the LPR Service installation.
Installing the LPR (Line Printer Remote) Monitor
Windows NT 4.0
7

After your computer has rebooted, click the Start button, select Settings, and then click Printers.
The Printers folder appears.
Right-click on the desired printer icon and select Properties from the pop-up menu.

The following step is to register the LPR Port for network printing.
Before proceeding, ensure that the printer is installed, connected to the network, turned ON and is operating properly.
Select the Ports Tab and click the button. Add Port...

The Printer Ports dialog box appears.
Select LPR Port and click the New Port ... button.

The Add LPR compatible printer dialog box appears.
Enter the IP Address of the printer in the upper field, and "lp" for the print queue name in the lower field.
Click the button.
(Please wait while the wizard verifies the IP Address and connectivity to the network).
Installing the LPR (Line Printer Remote) Monitor
Windows NT 4.0

The Printer Ports dialog box appears.
Click the buttons.
12

Select the printer port and click the OK button.
The printer properties dialog box closes and you have now configured the printer as a network printer.
Installing the LPR (Line Printer Remote) Monitor
Windows 2000/Windows XP/Windows Server 2003
Log on using an account with administrator rights.
1
Open the Printers (Windows XP/Windows Server 2003: Printers and Faxes) folder.
Right-click on the desired printer icon and select Properties from the pop-up menu.
The printer properties dialog box appears.
2
Select the Ports tab and click the Add Port... button.
3
Select Standard TCP/IP Port and click the New Port... button.
Installing the LPR (Line Printer Remote) Monitor
Windows 2000/Windows XP/Windows Server 2003
4
Click the
Next button
5
Enter the IP Address and the Port Name and
click the
Next button
Note:
The Port Name is automatically entered together with the IP Address. You may need to change it as required.
6
Select Custom and click the
Settings...
button.
or
Select Standard and click the
Next
button. Then, go to step 9.
Installing the LPR (Line Printer Remote) Monitor
Windows 2000/Windows XP/Windows Server 2003
7

- In the Protocol section, select LPR.
- In the LPR Settings section, enter the Queue Name (e.g. LPR1) and select LPR Byte Counting Enabled.
- Click the button.
8

Click the butnext

Click the button
Installing the LPR (Line Printer Remote) Monitor
Windows 2000/Windows XP/Windows Server 2003
Click the
button
Click the
button.
Click the
button
The printer properties dialog box closes and you have now configured the printer as a network printer.
Configuring the Printer Driver Settings
Windows 98/Windows Me
To change the printer settings, open the dialog box for the printer properties by performing the following steps.
1 Click the Start button, select Settings, and then click Printers. 2 Right-click on the desired printer icon in the Printers folder, and select Properties in the pop-up menu.
The following printer properties dialog box appears.

Configuring the Printer Driver Settings
Windows 98/Windows Me
General Tab

1. Comment
Enter comments regarding the properties, if any.
If another user sets up this printer on his or her computer when sharing the printer, the comment specified here will also appear on that computer. However, the comment displayed for an existing user will remain unchanged even if this comment is modified later.
2. Separator page
This feature does not function properly on your machine. We recommend that you do not use this feature.
3. bRmbTest Page
Prints a test page. This allows the user to verify if the printer is installed properly.
Configuring the Printer Driver Settings
Windows 98/Windows Me
Details Tab

1. Print to the following port
Displays either the port where the printer is connected or the path to the network printer.
To change the printing destination, either select the printing destination port from the list or enter the network path here.
2. Print using the following driver
Displays the type of the printer driver. Specify the printer being used or a printer model which can be emulated with the printer being used.
3. / button Printer Port... End Capture...
Assigns a local port to the network connected printer or cancels a local port assigned to the network printer.
4. Timeout settings - Not selected
Specify the amount of time (in seconds) allowed to elapse before the printer comes online. If the printer is not online within this duration, an error message will be displayed.
5. Timeout settings - Transmission retry
Specify the amount of time (in seconds) allowed to elapse before the printer is ready for printing. If the printer is not ready for printing within this duration, an error message will be displayed.
Increase this value if a timeout error occurs when printing a large document.
6. / AbutFont... Delete Port...
Adds/deletes a new port or a new network path.
7. Driver... button
Updates or modifies the printer driver.
Configuring the Printer Driver Settings
Windows 98/Windows Me
8. Settings... button
Specify the method of sending (spooling) documents from the program to the printer.
9. Port Settings... button
Modifies printer port settings.
Configuring the Printer Driver Settings
Windows 98/Windows Me
Sharing Tab

1. Not Shared/Shared As
Select whether to display or share this printer with other computers.
2. Share Name
Specify the name of the shared printer. The displayed name can be used as is or a new name may be entered. The name specified here will be displayed when other users view information about the printer on the network.
3. Comment
You can enter comments regarding a shared printer (such as the type of printer and the location where it is installed). When other users view information about the printer on the network, the comment specified here will be displayed.
4. Password
Specify the password required when other users connect to this printer. Leave the box blank in order not to use any password.
NOTE
- Sharing Tab in property dialog box is not displayed unless printer sharing has been specified.
Configuring the Printer Driver Settings
Windows 98/Windows Me
Device Options Tab (DP-180/190/1520P/1820P/1820E)

1. HDD
Select Installed if the HDD Unit is installed.
2. buttonConfiguration
When your machine is connected to the network (TCP/IP), click this button to set the Options Configuration automatically.
3. Number of Paper Trays
Select the number of available paper trays if optional Paper Feed Module(s) are installed.
4. Editor (For USA models only)
Edit the URL address that will be displayed when clicking the Tab (see page 77).
Configuring the Printer Driver Settings
Windows 98/Windows Me

URL Title
Enter an applicable URL title.
URL
Enter the URL address to be associated with the
Support Contacts (W)... button of the Paper Tab.
Contact
Enter applicable contact information
(i.e.: The email address of the contact person)
NOTE
- Device Options Tab specifies device-specific settings and settings of optional devices. Make sure that the Device Option Tab is set properly before printing a document, or printing problems may occur.
Configuring the Printer Driver Settings
Windows 98/Windows Me
Device Options Tab (DP-2330/3030)

1. Outer Option
Select the installed outer option.
2. Inner Tray
Select Installed if the Inner Tray is installed.
3. Duplex Unit
Select Installed if the Duplex Unit is installed.
4. HDD
Select Installed if the HDD Unit is installed.
5. buttonConfiguration
When your machine is connected onto the network (TCP/IP), click this button to set the Options Configuration automatically.
6. Number of Paper Trays
Select the number of available paper trays if optional Paper Feed Module(s) are installed.
7. Change Paper Tray
Auto Select, when chosen, allows the paper to be fed continuously if the same size of paper is loaded in another paper tray (Auto Tray Switching). If Specified Tray is selected, the machine will stop if paper runs out in the chosen paper tray.
Configuring the Printer Driver Settings
Windows 98/Windows Me
8. Editor (For USA models only)
Edit the URL address that will be displayed when clicking the Paper Tab (see page 77).

URL Title
Enter an applicable URL title.
URL
Enter the URL address to be associated with the
Support Contacts (W)... button of the Paper Tab.
Contact
Enter applicable contact information
(i.e.: The email address of the contact person)
NOTE
- Device Options Tab specifies device-specific settings and settings of optional devices. Make sure that the Device Option Tab is set properly before printing a document, or printing problems may occur.
Windows 98/Windows Me
Device Options Tab (DP-3530/4530/6030)

- Finisher
Select the type of finisher if one is installed.
- Punch Unit
Select Installed if the Punch Unit is installed.
- Large Capacity Paper Tray (LCT)
Select Installed if the Large Capacity Paper Tray is installed.
- HDD
Select Installed if the HDD Unit is installed.
- buttonConfiguration
When your machine is connected onto the network (TCP/IP), click this button to set the Options Configuration automatically.
- Number of Paper Trays
Select the number of available paper trays if optional Paper Feed Module(s) are installed.
- Change Paper Tray
Auto Select, when chosen, allows the paper to be fed continuously if the same size of paper is loaded in another paper tray (Auto Tray Switching). If Specified Tray is selected, the machine will stop if paper runs out in the chosen paper tray.
- Editor (For USA models only)
Edit the URL address that will be displayed when clicking the button of contacts (W)... Paper Tab (see page 77).
Configuring the Printer Driver Settings
Windows 98/Windows Me

- URL Title
Enter an applicable URL title.
• URL
Enter the URL address to be associated to the
Support Contacts (W)... button of the Paper Tab.
- Contact
Enter applicable contact information
(i.e.: The email address of the contact person)
NOTE
- Device Options Tab specifies device-specific settings and settings of optional devices. Make sure that the Device Option Tab is set properly before printing a document, or printing problems may occur.
Configuring the Printer Driver Settings
Windows 98/Windows Me
Paper/Output/Quality/Fonts/Watermark/Overlay/Secure Tab
Refer to All Windows Common Settings (see pages 75 - 88).
Configuring the Printer Driver Settings
Windows NT 4.0 (Administrator)
To change the printer settings, open the dialog box for the printer properties by performing the following steps.
1. Log on to the computer/network using an account with administrator rights. (See Note 1) 2. Click the Start button, select Settings, and then click the Printers icon. 3. Right-click on the desired printer icon in the Printers folder, and select Properties in the pop-up menu.
The printer properties dialog box appears.

NOTE
- In Windows NT 4.0, setting of the properties depends on the logon account. This section describes properties to be specified by the administrator (system manager). See "Configuring the Printer Driver Settings (User)" for details on user properties. (See page 60)
Configuring the Printer Driver Settings
Windows NT 4.0 (Administrator)
General Tab
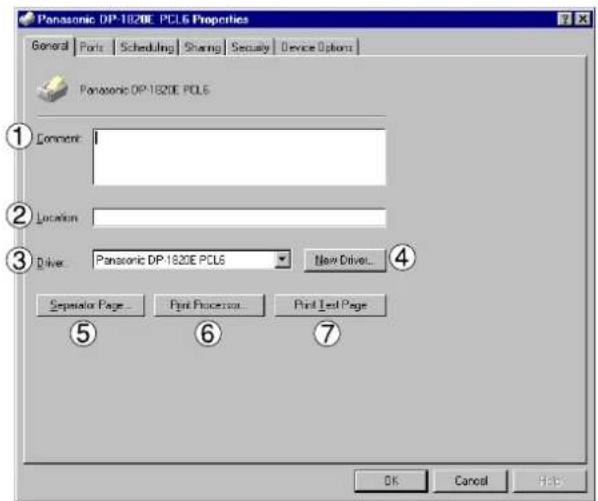
1. Comment
Enter comments regarding the properties, if any.
If another user sets up this printer on his or her computer when sharing the printer, the comment specified here will also appear on that computer. However, the comment displayed for an existing user will remain unchanged even if this comment is modified later.
2. Location
Specifies the printer location.
3. Driver
Displays the printer driver type. Specify the printer being used or a printer model that can be emulated with the printer being used.
4. Driver... button
Updates or modifies the printer driver.
5. Separator Page... button
This feature does not function properly on your machine. We recommend that you do not use this feature.
6. Processor... button
Specify the processor to be used for printing (Print Processor) and the data type (Default Data type).
The processor and data type affect the manner in which the printer functions in Windows NT. Normally they do not need to be modified. However, modification might be necessary when the printer is used with a special application.
7. Test Page button
Prints a test page. This allows the user to verify if the printer is installed properly.
Configuring the Printer Driver Settings
Windows NT 4.0 (Administrator)
Ports Tab

1. Print to the following port(s)
Displays a list of available ports for printing (Port), their status (Description) and printers that are connected to these ports (Printer).
2. Add/Delete Port button
Adds/deletes a new port or a new network path.
3. Configure Port... button
Configures the selected port. In case of a parallel port, Transmission Retry should be specified. (See Note 1 and 2)
4. Enable bidirectional support
This setting enables reception of configuration data and status data from the printer.
5. Enable printer pooling
Printer pooling allows data sent to one logical printer to be received and printed by two or more printers. With printer pooling enabled, a transmitted printing job is output to the first printer that is ready for printing.
NOTE
- Specify the waiting time (seconds) for the printer to be ready for printing. If a printer is not ready for printing after the specified time has elapsed, an error message is displayed.
- If a timeout error occurs frequently upon printing a large size document, specify a larger value here.
Configuring the Printer Driver Settings
Windows NT 4.0 (Administrator)
Scheduling Tab
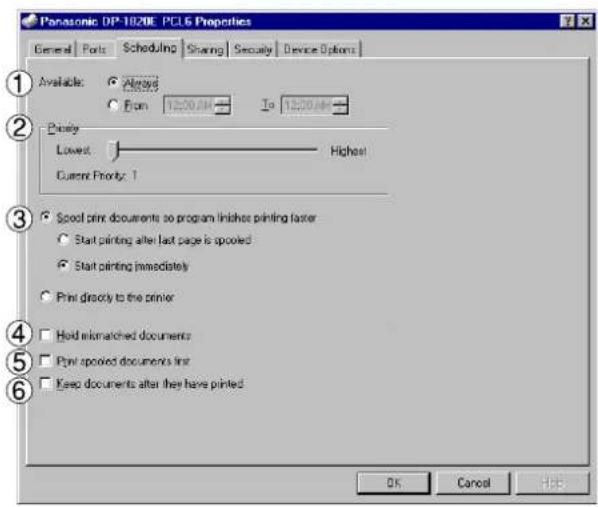
1. Available
Schedules when the printer is available for operation. Specify operating hours when From-To is selected.
2. Priority
Sets printing priority. The slider allows the priority to be adjusted from 1 through 99.
3. Spool print documents... / Print directly to the printer
Specify how documents should be sent from an application to the printer.
4. Hold mismatched documents
This feature does not function properly on your machine. We recommend that you do not use this feature.
5. Print spooled documents first
Always prints spooled documents first regardless of printing priority.
6. Keep documents after they have printed
Holds documents in the print queue even after they have been printed. These documents can be printed again directly from the queue regardless of the state the application is in.
Configuring the Printer Driver Settings
Windows NT 4.0 (Administrator)
Sharing Tab

1. Not Shared/Shared
Select whether to display or share this printer with other computers.
2. Share Name
Specify the name of the shared printer. The displayed name can be used as is or a new name may be entered. The name specified here will be displayed when other users view information about the printer on the network.
3. Alternate Drivers (See Note 1)
Allows other operating systems' printer drivers to be loaded. When users of these operating systems connect to the printer, the printer driver is automatically loaded.
NOTE
- When sharing a printer on the network, the print driver needs to be installed on the print server only; and other computers will automatically copy and use that driver.
For this reason, the print server must be ready with printer drivers for all the operating systems of all the computers that will be sharing the printer.
Configuring the Printer Driver Settings
Windows NT 4.0 (Administrator)
Security Tab

1. Permissions
Set printer access privileges.
2. Buttons
Displays the users who have used this printer and how they used it.
3. Ownership
Set the ownership of the printer.
NOTE
- In order to utilize these features, first you need to select Audit... from User Manager's Policies and enable File and Object Access in the Audit Policy dialog box.
Configuring the Printer Driver Settings
Windows NT 4.0 (Administrator)
Device Options Tab (DP-180/190/1520P/1820P/1820E)
![Panasonic DP-1820E PCL6 Properties dialog box. Tabs: General, Ports, Scheduling, Sharing, Security, Device Options. In the Device Options tab, there is a dropdown labeled 'Letter > Letter [1820E]' and a field 'Number of Paper Trays' set to 4. A checkbox for 'HDD' is checked. Below, a section labeled…](/content/2026/06/1328211/images/deb69eaa174bc36bc19e24146af18f074d64d27b8c7228ca22c268c7f3048cbd.jpg)
1. HDD
Select Installed if the HDD Unit is installed.
2. Button Configuration
When your machine is connected to the network (TCP/IP), click this button to set the Options Configuration automatically.
3. Number of Paper Trays
Select the number of available paper trays if optional Paper Feed Module(s) are installed.
4. Editor (For USA models only)
Edit the URL address that will be displayed when clicking the Button of the Paper(W)... Tab (see page 77).
Configuring the Printer Driver Settings
Windows NT 4.0 (Administrator)

URL Title
Enter an applicable URL title.
URL
Enter the URL address to be associated with the
Support Contacts (W)... button of the Paper Tab.
Contact
Enter applicable contact information
(i.e.: The email address of the contact person)
NOTE
- Device Options Tab specifies device-specific settings and settings of optional devices. Make sure that the Device Option Tab is set properly before printing a document, or printing problems may occur.
Configuring the Printer Driver Settings
Windows NT 4.0 (Administrator)
Device Options Tab (DP-2330/3030)

1. Outer Option
Select the installed outer option.
2. Inner Tray
Select Installed if the Inner Tray is installed.
3. Duplex Unit
Select Installed if the Duplex Unit is installed.
4. HDD
Select Installed if the HDD Unit is installed.
5. Button Configuration
When your machine is connected onto the network (TCP/IP), click this button to set the Options Configuration automatically.
6. Number of Paper Trays
Select the number of available paper trays if optional Paper Feed Module(s) are installed.
7. Change Paper Tray
Auto Select, when chosen, allows the paper to be fed continuously if the same size of paper is loaded in another paper tray (Auto Tray Switching). If Specified Tray is selected, the machine will stop if paper runs out in the chosen paper tray.
Configuring the Printer Driver Settings
Windows NT 4.0 (Administrator)
8. Editor (For USA models only)
Edit the URL address that will be displayed when clicking the button of contacts (W)... Paper Tab (see page 77).

URL Title
Enter an applicable URL title.
URL
Enter the URL address to be associated with the
Support Contacts (W)... button of the Paper Tab.
Contact
Enter applicable contact information
(i.e.: The email address of the contact person)
Configuring the Printer Driver Settings
Windows NT 4.0 (Administrator)
Device Options Tab (DP-3530/4530/6030)
![Panasonic DP-6030 PCL6 Properties dialog box. Tabs: General, Ports, Scheduling, Sharing, Security, Device Options. In the Device Options tab, there is a dropdown labeled 'Letter-Late[100%]' and a field 'Number of Paper Trays'. A section 'Change Paper Tray' has radio buttons for 'Auto Select' and 'Sp…](/content/2026/06/1328211/images/27bfa2da96033980625081258b7310e46f1a52c4a6afee8da0fbf01810bdda41.jpg)
1. Finisher
Select the type of finisher if one is installed.
2. Punch Unit
Select Installed if the Punch Unit is installed.
3. Large Capacity Paper Tray (LCT)
Select Installed if the Large Capacity Paper Tray is installed.
4. HDD
Select Installed if the HDD Unit is installed.
5. Button Configuration
When your machine is connected onto the network (TCP/IP), click this button to set the Options Configuration automatically.
6. Number of Paper Trays
Select the number of available paper trays if optional Paper Feed Module(s) are installed.
7. Change Paper Tray
Auto Select, when chosen, allows the paper to be fed continuously if the same size of paper is loaded in another paper tray (Auto Tray Switching). If Specified Tray is selected, the machine will stop if paper runs out in the chosen paper tray.
8. Editor (For USA models only)
Edit the URL address that will be displayed when clicking the Paper Tab (see page 77).
Configuring the Printer Driver Settings
Windows NT 4.0 (Administrator)

- URL Title
Enter an applicable URL title.
• URL
Enter the URL address to be associated to the
Support Contacts (W)... button of the Paper Tab.
- Contact
Enter applicable contact information
(i.e.: The email address of the contact person)
NOTE
- Device Options Tab specifies device-specific settings and settings of optional devices. Make sure that the Device Option Tab is set properly before printing a document, or printing problems may occur.
Configuring the Printer Driver Settings
Windows NT 4.0 (User)
To change the printer settings, open the dialog box for the printer properties by performing the following steps.
1 Select Print in the File menu of the application. 2 Select the printer model in the name list box. 3 Click the button in the Print dialog box. 4 The printer properties dialog box appears. Click the desired tabs of the dialog box and specify the properties. (See Note 1) (See pages 75 - 88)
NOTE
- In Windows NT 4.0, setting properties depends on the logon account. This section describes properties to be specified by a user, upon executing a print operation in an application. See "Configuring the Printer Driver Settings (Administrator)" for details on administrator properties. (See page 48)
Configuring the Printer Driver Settings
Windows 2000/Windows XP/Windows Server 2003 (Administrator)
To change the printer settings, open the dialog box for the printer properties by performing the following steps.
1 Logon to the computer/network using an account with administrator rights. 2 Click the Start button, select Settings, and then click the Printers (Windows XP/Windows Server 2003: Printers and Faxes) icon. 3 Right-click on the desired printer icon in the Printers folder, and select Properties in the pop-up menu.
The following printer properties dialog box appears. (See Note 1)

NOTE
- In Windows 2000/Windows XP/Windows Server 2003, setting the properties depends on the logon account. This section describes properties to be specified by the administrator (system manager). See "Configuring the Printer Driver Settings" for details on user properties. (See page 74)
Configuring the Printer Driver Settings
Windows 2000/Windows XP/Windows Server 2003 (Administrator)
General Tab

1. Printer Name
Displays the name of the printer specified during installation.
2. Location and Comment
Enter a comment about the printer's location and information about the printer.
If the printer is shared, the location and comments specified in this field will appear when another user sets up this printer on their computer. However, after setup is complete, changing this comment does not update the location and comment that appear on users' PCs.
3. Model
Displays the model name of the printer.
4. Features
Displays the printer's functions and settings.
5. Printing Preferences...
Changes properties (print settings) that can be specified for each user.
Refer to "Configuring the Printer Driver Settings (User)" for details on settings (see page 74).
6. Print Test Page
Prints a test page. This allows the user to verify if the printer is installed properly.
Configuring the Printer Driver Settings
Windows 2000/Windows XP/Windows Server 2003 (Administrator)
Sharing Tab
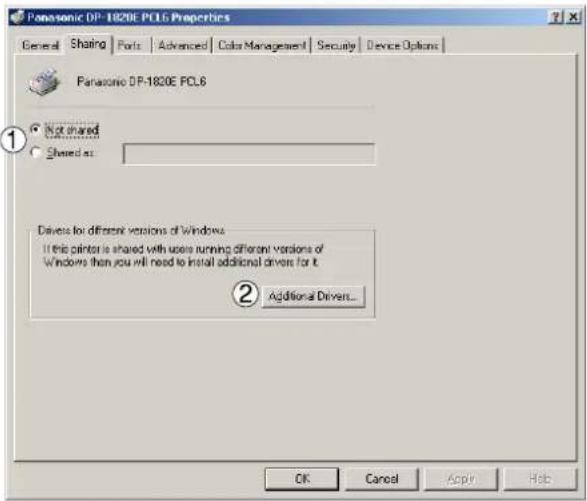
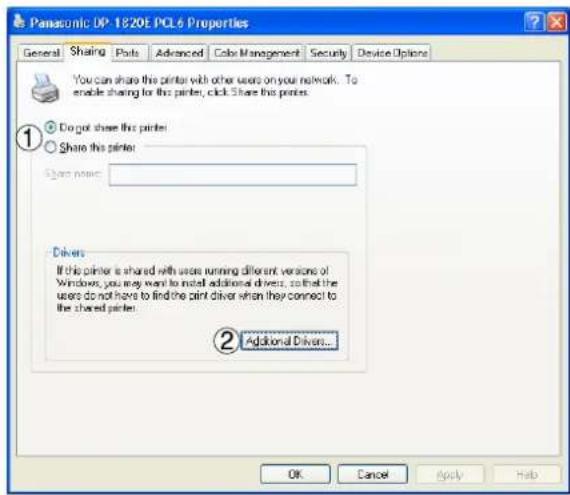
1. Not shared/Shared as (Do not share this printer/Share this printer)
Specify if this printer is displayed or shared with other computers.
For sharing a printer, specify the share name of a printer to be shared. A name specified here appears when other users view the printer information on a network.
2. Additional Drivers...
Install additional printer drivers on the system. (See Note 1)
NOTE
- When sharing a printer on the network, the print driver needs to be installed on the print server only; and other computers will automatically copy and use that driver. For this reason, the print server must be ready with printer drivers for all the operating systems of all the computers that will be sharing the printer.
- If Windows is set to disable remote access to your PC for security purpose, Windows will ask you to activate the Network Setup Wizard. Follow the messages to enable the Sharing Tab.
Configuring the Printer Driver Settings
Windows 2000/Windows XP/Windows Server 2003 (Administrator)
Ports Tab

1. Print to the following port(s)
Displays a list of ports that allow printing, their status (description), and printers connected to the ports.
- / ButtonPort... Delete Port
Adds/deletes a new port or a new network path.
- buttofigure Port...
Configure the port that is selected. On a parallel port, wait time (in seconds) for retransmission is specified. (See Notes 1 and 2)
4. Enable bidirectional support
This setting enables reception of configuration data and status data from the printer.
5. Enable printer pooling
Printer pooling allows data sent to one logical printer to be received and printed by two or more printers. With printer pooling enabled, a transmitted printing job is output to the first printer that is ready for printing.
NOTE
- Specify the waiting time (seconds) for the printer to be ready for printing. If the printer is not ready for printing after the specified time has elapsed, an error message is displayed.
- If a timeout error occurs frequently upon printing a large size document, specify a larger value here.
Configuring the Printer Driver Settings
Windows 2000/Windows XP/Windows Server 2003 (Administrator)
Advanced Tab

1. Always available/Available from
Specify the operating schedule for a printer. Selecting Available from allows specifying an available operation time.
2. Priority
Specify the priority in printing. Priority is adjustable from 1 to 99. Documents of higher priority are printed before those of lower priority.
3. Driver
Displays the printer driver type. Specify the printer being used or a printer model that can be emulated with the printer being used.
4. buttonDriver...
Updates or modifies the printer driver.
5. Spool print documents so program finishes printing faster
Specify the method of sending a document from the program to the printer.
6. Print directly to the printer
Specify that the document should be sent directly to the printer device and not spooled. Use this if you cannot print using either of the print spooling options.
7. Hold mismatched documents
This feature does not function properly on your machine. We recommend that you do not use this feature.
8. Print spooled documents first
Always prints spooled documents first regardless of printing priority.
9. Keep printed documents
After printing, documents are kept in the queue. The documents are allowed to be reprinted directly from the queue regardless of the status of an application.
Configuring the Printer Driver Settings
Windows 2000/Windows XP/Windows Server 2003 (Administrator)
10. Enable advanced printing features
Enables advanced printing features. Optional printer features (page ordering, booklet printing, numbering on sheets) are enabled. These features can be disabled if a problem occurs due to incompatibility. Disabling the features may also disable the printing options.
11. Setting Defaults...
Specifies standard (default) values for the properties (print settings) specifiable for each user. If a local printer is shared, the settings here are used as printing defaults for other users.
Refer to "Configuring the Printer Driver Settings (User)" for detailed settings. (See page 74)
12. Print Processor...
Specify a print processor and data type to be used for printing.
The processor and data type define operations of printers in Windows 2000/Windows XP/Windows Server 2003.
Usually no change is required in the settings. Use of a printer from some applications, however, may require changes in the settings.
This feature does not function properly on your machine. We recommend that you do not use this feature.
Configuring the Printer Driver Settings
Windows 2000/Windows XP/Windows Server 2003 (Administrator)
Security Tab

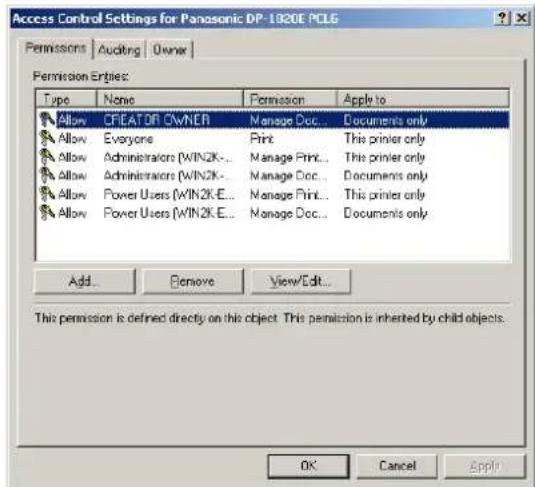
Displays a list of users and groups to whom printer access is assigned. A list of standard permissions for each group or user is displayed. Check or uncheck the checkboxes for permitting or prohibiting access. Gray checkbox indicates the permission inheritance.
1. Add/Remove button
Add or delete a user or group from the list.
2. Advanced button
Specify access to a printer, audit, and owner. (See Notes 1 and 2)
NOTE
- Windows 2000 provides the capability of managing access to various objects (e.g. printers) by users.
- Refer to Windows 2000 documentation for details on access permission, audit, and owner.
- Windows XP/Windows Server 2003 users should refer to the documentation to enable the Security Tab if this tab is not shown on your PC.
Configuring the Printer Driver Settings
Windows 2000/Windows XP/Windows Server 2003 (Administrator)
Device Options Tab (DP-180/190/1520P/1820P/1820E)
![Panasonic DP-1820E PCLs Properties. General | Sharing | Ports | Advanced | Color Management | Security | Device Options. Lotus to Letters [100%]. Number of Paper Trays 4. HDD. Inscribed. ① ② ③. WORKIO. Auto Configuration. Remove Defaults. Edit URL... (TCP/IP only). OK Cancel Apply Help.](/content/2026/06/1328211/images/60c2d07167f4b314f5faebd6ac2159450426658e1155f126247384e1d919ac80.jpg)
1. HDD
Select Installed if the HDD Unit is installed.
2. Button Configuration
When your machine is connected to the network (TCP/IP), click this button to set the Options Configuration automatically.
3. Number of Paper Trays
Select the number of available paper trays if optional Paper Feed Module(s) are installed.
4. Button (For USA models only)
Edit the URL address that will be displayed when clicking the Button of the Paper(W)... Tab (see page 77).
Configuring the Printer Driver Settings
Windows 2000/Windows XP/Windows Server 2003 (Administrator)

URL Title
Enter an applicable URL title.
URL
Enter the URL address to be associated with the
Support Contacts (W)... button of the Paper Tab.
Contact
Enter applicable contact information
(i.e.: The email address of the contact person)
NOTE
- Device Options Tab specifies device-specific settings and settings of optional devices. Make sure that the Device Option Tab is set properly before printing a document, or printing problems may occur.
Configuring the Printer Driver Settings
Windows 2000/Windows XP/Windows Server 2003 (Administrator)
Device Options Tab (DP-2330/3030)
![Panasonic DP-3030 PLC6 Properties. General Sharing Ports Advanced Color Management Security Device Options. Letter1.Letter[100]. Number of Paper Tray 4. Change Paper Tray. AutoSelect. Specified Tray. WORKIO. ① Quick Option. ② Inner Tray. ③ Duplex Unit. ④ HPD. Finish (DA FS30) Installed. Installed. I…](/content/2026/06/1328211/images/faa15632c6b42a31f9a4724903dd19d8f458200556aec4c1caa125c2ec71c2f3.jpg)
1. Outer Option
Select the installed outer option.
2. Inner Tray
Select Installed if the Inner Tray is installed.
3. Duplex Unit
Select Installed if the Duplex Unit is installed.
4. HDD
Select Installed if the HDD Unit is installed.
5. Button Configuration
When your machine is connected onto the network (TCP/IP), click this button to set the Options Configuration automatically.
6. Number of Paper Trays
Select the number of available paper trays if optional Paper Feed Module(s) are installed.
7. Change Paper Tray
Auto Select, when chosen, allows the paper to be fed continuously if the same size of paper is loaded in another paper tray (Auto Tray Switching). If Specified Tray is selected, the machine will stop if paper runs out in the chosen paper tray.
Configuring the Printer Driver Settings
Windows 2000/Windows XP/Windows Server 2003 (Administrator)
8. Editor (For USA models only)
Edit the URL address that will be displayed when clicking the button of contacts (W)... Paper Tab (see page 77).

URL Title
Enter an applicable URL title.
URL
Enter the URL address to be associated with the
Support Contacts (W)...
button of the Paper Tab.
Contact
Enter applicable contact information
(i.e.: The email address of the contact person)
Configuring the Printer Driver Settings
Windows 2000/Windows XP/Windows Server 2003 (Administrator)
Device Options Tab (DP-3530/4530/6030)

1. Finisher
Select the type of finisher if one is installed.
2. Punch Unit
Select Installed if the Punch Unit is installed.
3. Large Capacity Paper Tray (LCT)
Select Installed if the Large Capacity Paper Tray is installed.
4. HDD
Select Installed if the HDD Unit is installed.
5. Button Configuration
When your machine is connected onto the network (TCP/IP), click this button to set the Options Configuration automatically.
6. Number of Paper Trays
Select the number of available paper trays if optional Paper Feed Module(s) are installed.
7. Change Paper Tray
Auto Select, when chosen, allows the paper to be fed continuously if the same size of paper is loaded in another paper tray (Auto Tray Switching). If Specified Tray is selected, the machine will stop if paper runs out in the chosen paper tray.
Configuring the Printer Driver Settings
Windows 2000/Windows XP/Windows Server 2003 (Administrator)
8. Editor (For USA models only)
Edit the URL address that will be displayed when clicking the Button of the Contacts (W)... Paper Tab (see page 77).

- URL Title
Enter an applicable URL title.
• URL
Enter the URL address to be associated to the Support Contacts (W)... button of the Paper Tab.
- Contact
Enter applicable contact information (i.e.: The email address of the contact person)
NOTE
- Device Options Tab specifies device-specific settings and settings of optional devices. Make sure that the Device Option Tab is set properly before printing a document, or printing problems may occur.
Configuring the Printer Driver Settings
Windows 2000/Windows XP/Windows Server 2003 (User)
To change the printer settings, open the printer settings dialog box by performing the steps below:
1
Select Print in the File menu of the application.


2
Select the printer model in the name list box.
3
Right-click on the desired printer icon and select the
the button in the Print dialog box.
4
The printer properties dialog box appears. Click the desired tabs of the dialog box and specify the properties.
(See Note 1)
(See pages 75 - 88)
NOTE
- In Windows 2000/Windows XP/Windows Server 2003, setting of the properties depends on the logon accounts. This section describes properties to be specified by a user, upon executing a print operation in an application. See "Configuring the Printer Driver Settings (Administrator)" for details on administrator (system manager) properties. (See page 61)
Configuring the Printer Driver Settings
Windows Common Settings
Paper Tab
![Panasonic DP-1820E PCL6 Printing Preferences Paper Output Quality Fonts Watermark Overlay Secure Letter -> Letter [100%] 1 Paper Size Letter 2 Consider 1 [1 - 999] 3 Orientation Portrait Rotate 4 Output Size Letter 5 Zoom 100 % [25 - 400] 6 Image Painting 7 Paper Type Plain Paper 8 Paper Square Auto…](/content/2026/06/1328211/images/45159cf2aadea6b1804439bcfc1b97783cb50595dcc0db6501793d9eb526873b.jpg)
1. Paper Size
Select a document size.
2. Copies (1-999)
Specify the number of copies to be printed. If the number of copies to be printed can be specified within the application, indicate one copy here and specify the number of copies in the Print dialog box of the application.
3. Orientation
Specifies how the document is positioned on the page. Portrait orients the print vertically. Landscape orients the print horizontally. Rotate orients the printing document(s) direction by 180 degrees.
4. Output Size
Specifies the paper size to be used. The various paper sizes listed match those supported by your printer.
5. Zoom (25-400%)
Specify an enlargement or reduction percentage when printing documents. If enlargement/reduction can be set within the application, indicate 100% here and specify the enlargement/reduction percentage in the Print dialog box of the application.
Note:
If the Resolution on the Quality Tab is set to 600 dpi or 1200 dpi, the zoom ratio is changed depending on the paper size.
Legal : 25 - 390%
Others : 25 - 400%
6. Image Position
Specify the image position when setting the zoom ratio.
7. Paper Type
Select the Paper Type you want to use.
Configuring the Printer Driver Settings
Windows Common Settings
8. Paper Source
Specify where the paper you want to use is located in the device. If you choose Auto Tray Selection, the printer driver will automatically select an appropriate tray according to the Paper Size selected.
Note: 1. If the matching paper size is not found, the printer driver will select Tray 1. (DP-180/190) 2. If the matching paper size is not found, the printer driver will select the Bypass Tray. (DP-1520P/1820P/1820E) 3. 8K and 16K size paper is available if the paper is loaded in the Tray 1. (DP-1520P/1820P/1820E Chinese models only)
9. Print Properties Status Icons
Show the current selections for the following properties.
• Paper Style (Output Tab) • N in 1 (Output Tab) - Sort (Output Tab) - Watermark • Overlay
10. Profile
- button
Edits the print properties setting.

Add : Enter the Profile Name and click the button to save the current properties setting.
Close : Close the Edit Profile window.
Import : Import the exported print properties file.
DP-180/190/1520/1820: *.PR0
DP-2330/3030: *.125
DP-3530/4530/6030: *.m25
Export: Exports the print properties file saved on your PC.
DP-180/190/1520/1820: *.PR0
DP-2330/3030: *.125
DP-3530/4530/6030: *.m25
Deletes the print properties setting.
- ButtonMonitor
Recalls the Network Status Monitor.
Displays the copyright and the version of the printer driver files.
Configuring the Printer Driver Settings
Windows Common Settings
13. Button Defaults
Click to restore all items in this window to the default settings.
14. Button (Font USA Models only)
Open the Support window. The URL address(es) will be displayed if they were entered in the Device Options Tab. Click the button to open the Web page.

Configuring the Printer Driver Settings
Windows Common Settings
Output Tab


![Pawsonos OP - 8000 PCSA Printing Preferences Paper | Output | Quality | Font | Microsoft | Overview | Secure [ ] (AutoCAD) 1 Power Style 2 Booklet 3 Top-1 4 Top 5 Top 6 Top 7 Auto Selection 8 Auto Format 9 Advanced... 10 Custom Defaults OK Cancel Help](/content/2026/06/1328211/images/8b3536e11069d2b14244936c1de7349e8fee1c280ca0ffc4fffb93d4212aad2c.jpg)
1. Paper Style (Except for DP-1520P/1820P)
Select duplex printing for printing on both sides of the paper.
You can select the printing style from among 1-Side/2-Sided (Long Edge) /2-Sided (Long Edge Margin) /2-Sided (Short Edge) /2-Sided (Short Edge Margin).
- Binding Position
Select the binding side (Long Edge/Short Edge) for duplex printing.
- Binding Margin
Select the binding margin upon duplex printing. The width of the binding margin is specified on the device.
2. Booklet (Except for DP-1520P/1820P)
Formats output in order so document can be folded and/or saddle stitched like a book.
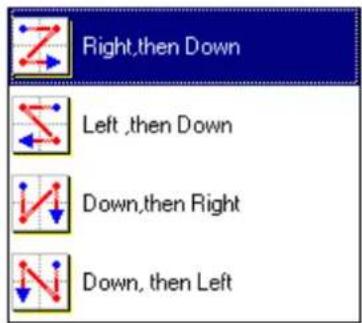
3. N in 1
Specify the layout pattern for printing multiple documents on a single sheet of paper.
If you select an item other than "None," N in 1 order is displayed, allowing you to select the following patterns.


Configuring the Printer Driver Settings
Windows Common Settings
4. Poster (DP-180/190/1520P/1820P/1820E only)
Specify the layout pattern for Poster mode printing on multiple sheets of paper.

5. Sort
Select whether to Stack or Sort when printing multiple copies.
Note: Paper must be loaded into the machine in both directions when using the Rotate Stack and Rotate Sort functions (i.e. Letter and Letter-R, A4 and A4-R).

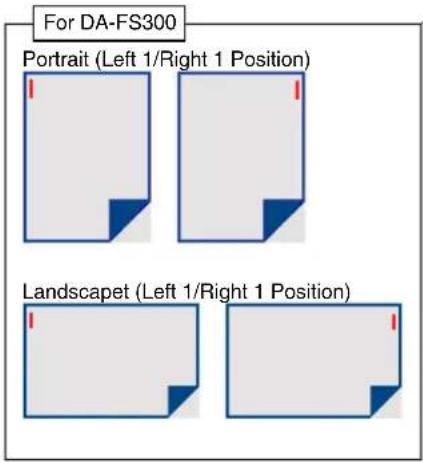
6. Staple (For DP-2330/3030/3530/4530/6030 only)
Select the staple position. Available if the optional Finisher (DA-FS300, FS330, FS355, FS600 or FS605) is installed. Available for up to 30 sheets (Letter/A4).
For DA-FS330, 355, 600 or 605
Portrait (Left 1/Left 2/Right 1/Right 2 Position)



Portrait (Saddle Stitch)

Landscape (Saddle Stitch)
Landscape (Left 1/Right 1/Top Position)




Configuring the Printer Driver Settings
Windows Common Settings
7. Punch (For DP-3530/4530/6030 only)
Select the punch position. Available if the optional Punch Unit (DA-SP31/SP41) is installed.


Punch is not available when the Rotate Stack or Rotate Sort mode is selected.
8. Finisher Bin/Output Tray (For DP-2330/3030/3530/4530/6030 only)
You can select the type of the output bin.
Possible when the optional finisher is installed.
Note:
Before selecting the Inner Upper Exit Tray, please ensure that the Exit Tray (Inner) (DA-XN200) is installed.
Configuring the Printer Driver Settings
Windows Common Settings

1) Print All Text as Black
All colored text is printed as solid black
2) Print Blank Pages
Select whether the blank pages are printed.
3) Check Printer Status Prior to Printing
Check the status of the printer connected to your network before printing the data.
4) Duplex Notice (For DP-2330/3030 only)
Check whether "2-Sided Print" is printed on the footer of 1st page when printing with 2-Sided Page Style.
5) Copies (Printer controlled / Printer Driver controlled)
When printing a large amount of data with sort mode, the machine might not be able to print due to lack of memory capacity.
In this case, select Printer Driver controlled, and sorting will be processed by the printer driver. However, this mode may take more time to print.
6) Front Cover
Set to insert a blank or printed page as the Front Cover. Specify where the paper you want to use is located in the device. If you choose Auto Tray Selection, the printer driver will automatically select an appropriate tray according to the Paper Size selected.
7) Back Cover
Set to insert a blank or printed page as the Back Cover. Specify where the paper you want to use is located in the device. If you choose Auto Tray Selection, the printer driver will automatically select an appropriate tray according to the Paper Size selected.
Configuring the Printer Driver Settings
Windows Common Settings
Click to restore all items in this window to the default settings.
Configuring the Printer Driver Settings
Windows Common Settings
Quality Tab

![Panasonic DP-3030 PCL6 Printing Preferences. Paper | Output | Quality | Fonts | Watermark | Overlay | Secure. Letter > Letter [100%]. ① Graphics Mode: Vector. ② Halftone: Fine. ③ Resolution: 600 dpi. Profile Edit Delete. None. Status Monitor... ⑥ Print E-mail Patterns. ⑤ Time Style. ⑦ About... ⑧ Res…](/content/2026/06/1328211/images/e23beee10f80814dcf0ae968697dd4ef903737ffff4b9d22626bf7b6929d05bf.jpg)
1. Graphics Mode
Vector
Treat line information as graphic data.
Raster
Treat all information as Bitmap data.
2. Halftone
Select Normal/Fine/Coarse.
3. Resolution
Select the print resolution (300 dpi / 600 dpi / 1200dpi Enhanced). (See Note 1)
4. Density (For DP-180/190 only)
Defines the darkness of the dots printed on the paper.
5. Toner Save (For DP-180/190/2330/3030/3530/4530/6030 only)
This function is only available if Graphics Mode is set to "Raster". It will print using less toner, thus, saving toner consumption when you are printing many drafts prior to printing the final document.
6. Print Fine Patterns (For DP-2330/3030/3530/4530/6030 only)
Change this option if you are getting unexpected results with print files and patterns. If this option is set to ON, it may cause differences between on-screen appearance and printed output.
7. button...
Displays the copyright and the version of the printer driver files.
8. Button Defaults
Click to restore all items in this window to the default settings.
NOTE
- dpi (dots per inch) represents the number of dots contained in one inch. The larger the value, the higher the resolution.
Configuring the Printer Driver Settings
Windows Common Settings
Fonts Tab

1. TrueType Mode
Download PC fonts (TrueType) as bitmap image or as TrueType font.
2. Use Printer TrueType fonts
Select whether the printer TrueType fonts are used or not.
3. button...
Displays the copyright, the version of the printer driver files.
4. Buttore Defaults
Click to restore all items in this window to the default settings.
Configuring the Printer Driver Settings
Windows Common Settings
Watermark Tab

1. Watermark
To enable the watermark feature, check Watermark.
2. Message
Displays the selected text. (CONFIDENTIAL, COPY, etc.)
3. button Delete
Add or delete watermark messages.
4. Text
Input text that you want to add or update as the watermark.
5. Button
Update the text of the existing watermark message.
6. Fonts
Select the text font.
7. Style
Select the font style.
8. Size
8 - 400 point.
9. Angle
Select the text angle.
10. Density
Varies from light to dark.
Configuring the Printer Driver Settings
Windows Common Settings
11. Transparent Text
Use watermark print as transparent text.
12. As Outline Only
Print the watermark character as an outlined image.
13. First Page Only
Use watermark only for the first page.
14. Position
Specify inch or metric units for adjustment.
- Center
button
Position the watermark relative to center of the document.
- button...
Displays the copyright, the version of the printer driver files.
- Restore Defaults
Click to restore all items in this window to the default settings.
Configuring the Printer Driver Settings
Windows Common Settings
Overlay Tab

- Print Using Overlay File
Set overlay function.
- Make Overlay File
When making an overlay file, check this box, then type a filename in the Overlay List box.
- Overlay List
Select the file to be used for the overlay.
- File Delete button
Click the button to set the directory to save the overlay file.
Click the button to delete the overlay file.
- button...
Displays the copyright, the version of the printer driver files.
- Button Defaults
Click to restore all items in this window to the default settings.
Configuring the Printer Driver Settings
Windows Common Settings
Secure Tab

- Mailbox (Available if the optional Hard Disk Drive Unit (DA-HD18/HD19/HD30/HD60) is installed.) Check this box and enter the User ID (up to 8 digits) if storing the print data into the mailbox of the machine.
Note: 1. DA-HD18: For DP1520P/1820P/1820E
DA-HD19: For DP-180/190
DA-HD30: For DP-2330/3030
DA-HD60: For DP-3530/4530/6030
- Turning the Power Switch OFF while a print file is being stored (DATA indicator lamp is flashing) into the Mailbox may cause all files in it to be lost.
- Secure Mailbox (Available if the optional Hard Disk Drive Unit (DA-HD18/HD19/HD30/HD60) is installed.)
Check this box, enter the User ID (up to 8 digits) and the password (4 digits) if storing the print data into the secure mailbox of the machine.
Note: 1. DA-HD18: For DP1520P/1820P/1820E
DA-HD19: For DP-180/190
DA-HD30: For DP-2330/3030
DA-HD60: For DP-3530/4530/6030
- Turning the Power Switch OFF while a print file is being stored (DATA indicator lamp is flashing) into the Secure Mailbox may cause all files in it to be lost.
- Dept. counter mode On
Check this box and enter the department code if your administrator requires departmental codes in order to print.
- button...
Displays the copyright, the version of the printer driver files.
- Button Defaults
Click to restore all items in this window to the default settings.
Printing from Windows Applications
If the printer driver is installed properly and a printer is selected as the default printer (see Note 1) in the printer setup, printing can be accomplished from any Windows application with simple operations.
To print from most Windows applications, use the Print... command in the File menu. Selecting the Print... command typically displays the following Print dialog box:

After selecting the page range to be printed and the number of copies, click the OK button to start printing.
While documents are being printed, a printer icon appears in the System Tray near the clock in the bottom right hand corner of the screen. The icon disappears when printing is completed.
You may double-click the printer indicator in the system tray to open and verify the details of the print queue in the spooler.
NOTE
- Follow the steps below to set a default printer:
a) Click the Start button and select Printers in the Settings menu. b) Select the printer icon in the window and select [Set As Default] in popup menu by right-clicking it. Then the check mark is displayed.
Printing on Network
When sharing a printer by connecting two computers via a crossover cable or using a hub, a connection among computers must be established. (See Notes 1 and 2)
Establishing a connection among computers can be verified by displaying the connected computers in Network Neighborhood on the desktop.
The settings for printer sharing are specified by performing the following steps:
Printer Server (PC connected to a printer)
1 Install the printer driver on the computer to be connected to the machine. 2 Click the Start button, select Settings, and then click Printers. 3 Right-click on the desired printer icon and select [Sharing...] in the popup menu. 4 Select Shared As in the properties dialog box. 5 Click the button.
Upon completing this setting, the shape of the icon changes indicating that the printer is shared.
NOTE
- Refer to the manual for the network card and Windows users' guide for connections among computers.
- On Windows 98/Windows Me, a computer connected to a printer must be set up to allow printer sharing by performing the following operations:
a) Double-click on Network in control panel, and then click in the Network Configuration tab.
Click File and Print Sharing...
b) Check [I want to be able to allow others to print to my printer(s).] in the File and Print Sharing dialog box.
Printing on Network
Remote (PC that uses another computer's printer)
1 Click the Start button, select Settings, and then Printers. 2 Double-click Add Printer in the printers folder. The Add Printer Wizard appears.
Click the Next button.
Select Network Printer.
Click the Next button.
4 Specify the other computer's printer by entering the network path.
Then, complete the installation following the instructions of the Add Printer Wizard.
The operations above enable the output from a remote computer to a printer connected to the printer server.
Print Operation
Internet Printing Protocol (IPP) Printing
Prints documents from a machine located in a remote area via the Internet without its access being blocked by a proxy server. This feature is only available on Windows 2000, Windows XP or Windows Server 2003.
Compatible Models
- DP-1520P/1820P/1820E with PCL Printer Module (DA-PC180) or PS Printer Module (DA-MC180)
- DP-180/190 with PCL Printer Module (DA-PC188) or PS Printer Module (DA-MC188)
- DP-2310/3010 with PCL Printer Module (DA-PC300) or PS Printer Module (DA-MC300)
- DP-2330/3030 with PCL Printer Module (DA-PC301) or PS Printer Module (DA-MC301)
- DP-3510/3520/4510/4520/6010/6020 with PCL Printer Module (DA-PC600/601) or PS Printer Module (DA-MC600/601)
- DP-3530/4530/6030 with PCL Printer Module (DA-PC602) or PS Printer Module (DA-MC602) • UF-9000 with PCL Printer Module (DA-PC190) or PS Printer Module (DA-MC190)
![graph LR A["A Client WORKIO"] -->|Print| B["INTERNET"] B -->|LAN| C["Printer"] C -->|Print| D["WORKIO PINITIAL ENGINEERING SYSTEM"] style A fill:#f9f,stroke:#333 style B fill:#ccf,stroke:#333 style C fill:#cfc,stroke:#333 style D fill:#fcc,stroke:#333](/content/2026/06/1328211/images/e51c07f201c54855b31897552f4e6f8432d12dc91ba3be4b250cc0485f45e9b5.jpg)
Windows 2000
Windows XP
Windows Server 2003
Setting the IPP Printing
1
Verify whether your PC is connected to the Internet or to the Intranet.
Open the Add Printer Wizard.
2

Select Network printer and click the button.

Setting the IPP Printing
3
![Add Printer Wizard - Locate Your Printer. How do you want to locate your printer? If you don't know the name of the printer, you can browse for one on the network. What do you want to do? Type the printer name, or click Next to browse for a printer. Name: [text field]. Connect to a printer on the In…](/content/2026/06/1328211/images/86a4edac1b87d4bcbdca0910f52252c5c604033e77ff3c7c512720dc014dfeb4.jpg)
Select Connect to a printer on the Internet or on your Intranet and type the IP address of the remote machine and /printer in the URL window. (e.g. http://10.74.229.176/printer)
Click the Next button.
4

Click the button if this message is shown.
If not, skip to Step 11.
5

- Insert the CD-ROM included with the Option.
- Click the Browse... button.
6
![Install From Disk. Insert the manufacturer's installation disk into the drive selected, and then click OK. Buttons: OK, Cancel. Copy manufacturer's files from: A:\ [text field]. Button: Browse...](/content/2026/06/1328211/images/4bbbbf271d9dba5d689a3d9aad2eef6b08b95a6b50de89080c0d9d0db65748f6.jpg)
The Install From Disk dialogue box appears.
Click the buttons...
D:\English\PCL\Driver\WinXP-2K-2003 (where "D" is your CD-ROM drive).
7

Select the remote machine.
Click the Open button.
Setting the IPP Printing
8
![Install From Disk. Insert the manufacturer's installation disk into the drive selected, and then click OK. Buttons: OK, Cancel. Copy manufacturer's files from: D:\English\PCL\Driver\WINKP-2K-2003 [text field]. Button: Browse...](/content/2026/06/1328211/images/bb549807ae8d22e101581429ce491274aa40a535d26250841627d87cab179ecd.jpg)
Click the
button.
9

Select the remote machine.
Click the
button.
10

Click the
buttons
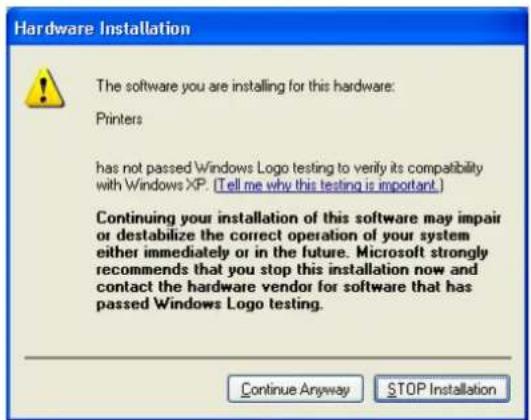
Click the
button
Setting the IPP Printing
11
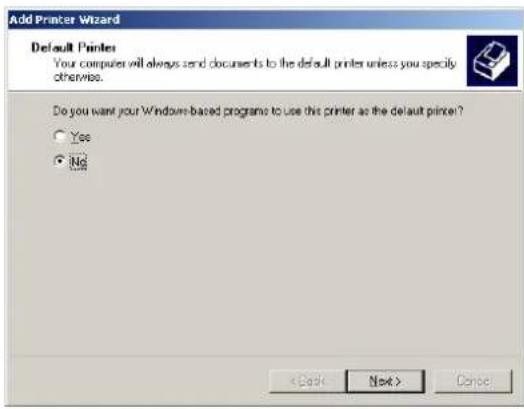
Select Yes if you would like to change your current
default printer and click the
button
12

Click the
button
The IPP Printer Driver has been installed, and the Printer icon has been added to the Printer folder.
If you wish to use your machine as a printer on the NetWare environment, install the set-up utility first using the Custom installation menu for the Panasonic Document Management System.
Compatible Models
- DP-2330/3030 with IPX/SPX Printer Module (DA-GC601, PC301, MC301)
- DP-3530/4530/6030 with IPX/SPX Printer Module (DA-GC601, PC602, MC602)
Note: DA-GC601 is not available in the USA and Canada.
Select Panasonic → Panasonic Document Management System → IPX-SPX Setup Wizard from Programs on the Start menu to activate the utility. To configure your PC for the NetWare environment, follow the procedure below:
1

The machine(s) that are available on the NetWare environment are shown on the list.
Select the desired machine and click the

button.
2

Make sure that the Do not use NetWare is not selected.
Select the desired NetWare mode and click
the
Next
button.
- NDS print server
- Bindery print server
- Remote printer
3
Select the Frame type and click the

button.
- Automatic
- IEEE 802.2
- IEEE 802.3
- ETHERNET II
- IEEE SNAP
4a

Set the Tree, Context, Print server name, Printer server password and Print port name for the NDS Printer Server and click the
Next
button.
Note: Log on to NetWare using an account with administrator rights.

Enter the print queue name and click the
Next
button.

Enter the queue volume and click the
Next
button.
4b
Set the file server, print server name, and print server password for the Bindery print
server and click the Next button.
Note: Log on to NetWare using an account with administrator rights.

Enter the print queue and click the
Next
4c
Set the printer port name for the Remote
printer and click the button
5

The settings are shown on the list.
Click the
buffedext
6

Click the button to apply the settings.
7

Click the
butfornish
Available Paper Type and Paper Size
Available Paper Type and Paper Size
DP-180/190
| Paper Type Paper Size Print from Paper Tray | Print from Sheet Bypass | Print from 2nd Paper Tray (Optional) | Print by 2-Sided Print Mode | ||
| Plain Paper Letter | Yes Yes Yes Yes | ||||
| Legal Yes Yes Yes Yes | |||||
| Invoice No Yes No No | |||||
| FLS1 No Yes No No | |||||
| FLS2 No Yes No No | |||||
| A4 | Yes Yes Yes Yes | ||||
| B5 | Yes *1 | Yes | Yes *1 | Yes *1 | |
| A5 | Yes *1 | Yes | No | No | |
| Thick Paper | Letter | No | Yes | No | No |
| Legal | No Yes No No | ||||
| Invoice No Yes No No | |||||
| FLS1 No Yes No No | |||||
| FLS2 No Yes No No | |||||
| A4 | No Yes No No | ||||
| B5 | No Yes No No | ||||
| A5 | No Yes No No | ||||
| Cotton Paper | Letter | Yes | Yes | No | No |
| Legal Yes Yes No No | |||||
| Invoice No Yes No No | |||||
| FLS1 No Yes No No | |||||
| FLS2 No Yes No No | |||||
| A4 | Yes Yes No No | ||||
| B5 | Yes *1 | Yes | No | No | |
| A5 | Yes *1 | Yes | No | No | |
| Transparency | Letter Yes Yes No No | ||||
| A4 | Yes Yes No No | ||||
| Label | Letter | No | Yes | No | No |
| A4 | No Yes No No | ||||
| Envelope | #9 | No | Yes | No | No |
| #10 | No Yes No No | ||||
| Monarch | No Yes No No | ||||
| DL | No Yes No No | ||||
| C5 | No Yes No No | ||||
*1: For DP-180 only
Available Paper Type and Paper Size
■ DP-2330/3030
| Paper Type Paper Size Print from Paper Tray | Print from Sheet Bypass | Print from Optional Paper Trays | Print with 2-Sided Print Mode | ||
| Plain Paper Ledger | Yes Yes Yes Yes | ||||
| Letter Yes Yes Yes | Yes | ||||
| Legal Yes Yes Yes | Yes | ||||
| Invoice Yes Yes Yes | Yes | ||||
| FLS1 Yes Yes Yes | Yes | ||||
| FLS2 Yes Yes Yes | Yes | ||||
| A3 Yes Yes Yes Yes | |||||
| B4 Yes Yes Yes Yes | |||||
| A4 Yes Yes Yes Yes | |||||
| B5 Yes Yes Yes Yes | |||||
| A5 Yes Yes Yes Yes | |||||
| Thick Paper | Ledger | No | Yes | No | No |
| Letter | No | Yes | No | No | |
| Legal | No | Yes | No | No | |
| Invoice | No | Yes | No | No | |
| FLS1 | No | Yes | No | No | |
| FLS2 | No | Yes | No | No | |
| A3 | No | Yes | No | No | |
| B4 | No | Yes | No | No | |
| A4 | No | Yes | No | No | |
| B5 | No | Yes | No | No | |
| A5 | No | Yes | No | No | |
| Transparency | Letter | No | Yes | No | No |
| A4 | No | Yes | No | No | |
| Label | Letter | No | Yes | No | No |
| A4 | No | Yes | No | No | |
Available Paper Type and Paper Size
DP-3530/4530/6030
| Paper Type Paper Size Print from | Paper Tray | Print from Sheet Bypass | Print from Optional Paper Trays | Print with 2-Sided Print Mode | |
| Plain Paper Ledger | No Yes Yes Yes | ||||
| Letter Yes Yes Yes | Yes | ||||
| Legal No Yes Yes Yes | |||||
| Invoice No Yes Yes Yes | |||||
| FLS1 No Yes Yes Yes | |||||
| FLS2 No Yes Yes Yes | |||||
| A3 No Yes Yes Yes | |||||
| B4 No Yes Yes Yes | |||||
| A4 | Yes Yes Yes Yes | ||||
| B5 No Yes Yes Yes | |||||
| A5 No Yes Yes Yes | |||||
| Thick Paper | Ledger | No | Yes | No | No |
| Letter | No | Yes | No | No | |
| Legal | No | Yes | No | No | |
| Invoice | No | Yes | No | No | |
| FLS1 | No | Yes | No | No | |
| FLS2 | No | Yes | No | No | |
| A3 | No | Yes | No | No | |
| B4 | No | Yes | No | No | |
| A4 | No | Yes | No | No | |
| B5 | No | Yes | No | No | |
| A5 | No | Yes | No | No | |
| Transparency | Letter | No | Yes | No | No |
| A4 | No | Yes | No | No | |
| Label | Letter | No | Yes | No | No |
| A4 | No | Yes | No | No | |
Available Paper Weight and Capacity
| Paper Type Print from Paper Tray | Print from Sheet Bypass | Print from Optional Paper Trays | Print with 2-Sided Print Mode | ||
| Paper Weights Plain Paper 16 –24 lb | (60 - 90 g/m2) | 15 –34 lb (55 - 133 g/m2) | 16 –24 lb (60 - 90 g/m2) | 17–24 lb (64 - 90 g/m2) | |
| Thick Paper | No | 25 –34 lb (94 - 133 g/m2) | No No | ||
| Paper Capacity Plain Paper20 lb (75 g/m2) | 550 sheets 50 sheets 550 sheets 550 sheets | ||||
■ DP-180/190
| Paper Type | Print from Paper Tray | Print from Sheet Bypass | Print from 2nd Paper Tray (Optional) | |
| Paper Weights | Plain Paper | 16 -28 lb(60 -105 g/m2) | 16 -28 lb(60 -105 g/m2) | 16 -28 lb(60 -105 g/m2) |
| Thick Paper | No | 29 -44 lb(106 -165 g/m2) | No | |
| Envelope | No | 24 lb (90 g/m2) | No | |
| Paper Capacity | Plain Paper20 lb (75 g/m2) | 250 sheets | 1 sheet | 550 sheets |
| Transparency | 20 sheets | 1 sheet | No | |
| Label | No | 1 sheet | No | |
| Envelope | No | 1 sheet | No |
Available Paper Weight and Capacity
■ DP-2330/3030
| Paper Type Print from Paper Tray | Print from Sheet Bypass | Print from Optional Paper Trays | Print with 2-Sided Print Mode | ||
| Paper Weights Plain Paper 16 –24 lbs. | (60 - 90 g/m2) | 15 –24 lbs. (55 - 90 g/m2) | 16 –24 lbs. (60 - 90 g/m2) | 17 –24 lbs. (64 - 90 g/m2) | |
| Thick Paper No 15 | –34 lbs. | (55 - 130 g/m2) | No No | ||
| Paper Capacity Plain Paper 20lbs (75 g/m2) | 550 sheets 50 sheets 550 sheets – | ||||
DP-3530/4530/6030
| Paper Type Print from Paper Tray | Print from Sheet Bypass | Print from Optional Paper Trays | Print with 2-Sided Print Mode | ||
| Paper Weights Plain Paper 16 –24 lbs. | (60 – 90 g/m2) | 15 –24 lbs.(55 – 90 g/m2) | 16 –24 lbs.(60 – 90 g/m2) | 17 –24 lbs.(64 – 90 g/m2) | |
| Thick Paper No 15 | –35 lbs. | (55 – 133 g/m2) | No No | ||
| Paper Capacity Plain Paper 20lbs (75 g/m2) | 1550+550 sheets | 50 sheets 550 | sheets -- | ||
Transparencies and Labels
You may also print on high quality labels and transparencies that are made specifically for Laser printers. We recommend using the following types.
| Paper Type Paper Size | Recommended Type | |
| Transparency Letter/A4 3M | PP2500 (For DP-1520P/1820P/1820E)3M CG3300 (For DP-180/190)3M PP2500(For DP-2330/3030)3M PP2500 (For DP-3530/4530/6030) | |
| Label Letter Avery 5160 – | 5163, Avery 5660 – 5663 (For DP-180/190) | |
| A4 Avery L7159 –L7164 (For DP-180/190) | ||
- To avoid damaging the printer, do not use transparencies made for Inkjet printers.
- Do not use transparencies that have already been fed through the printer once.
Note: The labels must completely cover the backing material as shown below.
Labels cover the entire backing material


The backing material is exposed.
Envelopes (For DP-180/190/1520P/1820P/1820E)
It is recommended that you purchase only high quality envelopes with diagonal seams as shown below.

High quality envelopes have the following characteristics:
- A thin, sharply creased leading edge. • Paper weight of 24 lb (90 g/m²).
- Flat, free of curls, wrinkles, nicks, etc.
It is not recommended that you use envelopes with any of the following characteristics (using these may result in paper jams or print quality problems).
- Irregularly shaped envelopes
- Envelopes with curls, wrinkles, nicks, twists, dog-ears or other damage
- Envelopes with side seam construction
- Highly textured envelopes, or with extremely shiny surfaces
- Envelopes that seal by removing a peel-off strip
- Envelopes with more than one flap to be sealed • Self-adhesive envelopes
- Envelopes that are baggy or not sharply creased
- Embossed envelopes
- Envelopes that have previously been printed with a laser printer
- Envelopes that have been previously printed inside

Envelopes (For DP-180/190/1520P/1820P/1820E)
Do not attempt to print on any of the following types of envelopes. These may cause damage to your printer.
- Envelopes with clasps, snaps or tie strings (see Figure 1)
- Envelopes with transparent windows (see Figure 2)
- Envelopes that will melt, discolor, scorch, offset or release hazardous emissions when exposed to 200°C (392 °F) for 0.1 second
- Envelopes that use encapsulated types of adhesive that do not require moistening but rely on pressure to seal them

Figure 1

Figure 2
Always test a sample of the envelopes you are thinking of buying. Confirm that the envelope performs acceptably.
For best printing results
- Avoid printing in high humidity.
High humidity may cause the envelope to curl and pick up excess toner.
High humidity may also cause the envelope to seal.
- Envelope storage is very important. Store them away from moisture and humid air, where they can lay flat and their edges will not be bent or damaged. The humidity should not exceed 70% RH.
Loading the Envelopes (For DP-180/190/1520P/1820P/1820E)
■ DP-180/190

(International C5 - opening on the shorter edge)
Printer Specifications
| Printing Speed DP-1520P: 15 sheets/minute | (A4/Letter size plain paper, simplex printing)DP-180: 18 sheets/minute(A4 size plain paper, simplex printing)DP-1820P/1820E: 18 sheets/minute(A4/Letter size plain paper, simplex printing)DP-190: 19 sheets/minute(Letter size plain paper, simplex printing)DP-2330: 23 sheets/minute(A4/Letter size plain paper, simplex printing)DP-3030: 30 sheets/minute(A4/Letter size plain paper, simplex printing)DP-3530: 35 sheets/minute(A4/Letter size plain paper, simplex printing)DP-4530: 45 sheets/minute(A4/Letter size plain paper, simplex printing)DP-6030: 60 sheets/minute(A4/Letter size plain paper, simplex printing) |
| Resolution (dots per inch) 300 x 300, 600 x 600, 1200 (Equivalent) x 600 | |
| Interface USB 1.1 (Except for DP-3530/4530/6030)Parallel Port (DP-3530/4530/6030 only)Ethernet (10Base-T/100Base-TX) | |
| Applicable OS Windows 98, Windows Me, W | Windows NT 4.0 (With Service Pack 3 or later is required), Windows 2000, Windows XP, Windows Server 2003 |
| Printer Working Memory 20 MB | |
Printing Operation Failure
If the printing operation fails, check the following items first:
- Whether the connecting cable (USB or Ethernet LAN cable) is properly connected. • Power of the device is turned ON. • Paper is loaded properly in the device.
- An error message is not displayed on the device.
The above points can be verified by printing a test page. Refer to the following pages for the procedures on test page printing:
Windows 98/Windows Me [General Tab] (See page 37)
Windows NT 4.0 [General Tab] (See page 49)
Windows 2000/Windows XP/Windows Server 2003 [General Tab] (See page 62)
Documents Not Printing Correctly
| Problem Possible Cause / Solution(s) | |
| Characters are not printed in the correct positions or the characters near the edges of the page are missing. | Check and specify the paper size and orientation settings in the printer driver to coincide with the application.The characters are outside the printing area of the machine. |
| Incorrect font type. • Check whether the selected font is installed on the PC.Select "Use Printer TrueType fonts" on the Font tab of the Printer Driver Properties dialog box. | |
| Printing stops in the middle of the run. • Check whether there is a Network problem. | |
| Although print data is transferred to your machine, it does not print. | Make sure the printer is online.Make sure the machine is not in the Shutdown Mode. Press ENERGY SAVER key to return to standby mode. See the Operating Instructions for Copier & Network Scanner for details.Make sure the USB printer cable is connected properly.Restore the power if the ON LINE LED is Off even if the USB printer cable is connected. |
Printing Area
When printing to the device, there is a 0.2 inches (5.0 mm) non-printable margin on all 4 sides.

Symbol Table
No. Symbol Set
| 0 Legal (HP Legal) |
| 1 ISO 4 (United Kingdom) |
| 2 ISO 6 (ANSI, ASCII) |
| 3 ISO 11 (Swedish/French) |
| 4 ISO 15 (Italian) |
| 5 ISO 17 (Spanish) |
| 6 ISO 21 (German) |
| 7 ISO 60 (Norwegian, v.1) |
| 8 ISO 69 (French) |
| 9 ISO 8859/2 Latin 2 |
| 10 ISO 8859/2 Latin 5 |
| 11 PC-8 (IBM-8, Code Page 437) |
| 12 PC-8 DN (Denmark/Norway) |
| 13 PC-850 (IBM-850) |
| 14 PC-8 TK (Code Page 437T) |
| 15 PC-852 Latin 2 |
| 16 Roman 8 |
| 17 Desk Top |
| 18 ECMA 94 (Latin 1) |
| 19 Macintosh |
| 20 Math 8 (HP Math 8) |
| 21 Microsoft Publishing |
| 22 Pi Font (HP Pi Font) |
| 23 PS Math |
| 24 PS Text |
| 25 Ventura International |
| 26 Ventura Math |
| 27 Ventura US |
| 28 Windows |
| 29 Windows 3.1 |
| 30 Windows 3.1 Latin 2 |
| 31 Windows 3.1 Latin 5 |
| 32 Symbol, Windows 3.1 |
| 33 Wingdings, Windows 3.1 |
| 34 Baltic (PC-1004) |
| 35 Baltic (PC-775 Baltic) |
WARRANTY
PANASONIC DIGITAL DOCUMENT COMPANY MAKES NO WARRANTIES, GUARANTEES OR REPRESENTATIONS, EXPRESSED OR IMPLIED, TO THE CUSTOMER WITH RESPECT TO THIS PANASONIC MACHINE, INCLUDING BUT NOT LIMITED TO, ANY IMPLIED WARRANTY OF MERCHANTABILITY OR FITNESS FOR A PARTICULAR PURPOSE.
PANASONIC DIGITAL DOCUMENT COMPANY ASSUMES NO RISK AND SHALL NOT BE SUBJECT TO LIABILITY FOR ANY DAMAGE, INCLUDING, BUT NOT LIMITED TO DIRECT, INDIRECT, SPECIAL, INCIDENTAL OR CONSEQUENTIAL DAMAGES OR LOSS OF PROFITS SUSTAINED BY THE CUSTOMER IN CONNECTION WITH THE USE OR APPLICATION OF THIS PANASONIC MACHINE. SEE YOUR DEALER FOR DETAILS OF DEALER'S WARRANTY.
For Service, Call:
Panasonic Digital Document Company,
Unit of Panasonic Corporation of North America
Two Panasonic Way
Secaucus, New Jersey 07094
http://panasonic.co.jp/pcc/en/
Panasonic Canada Inc.
5770 Ambler Drive
Mississauga, Ontario L4W 2T3
For Customer Support (Except for
USA and Canada Users):
Panasonic Communications Co., Ltd.
Fukuoka, Japan
- OPERATING INSTRUCTIONS
- (FOR PANASONIC PRINTING SYSTEM VER. 6)
- WORKIO™
- BEFORE STARTING
- PRINTER SECTION
- TROUBLESHOOTING
- APPENDIX
- INSTALLATION PROCEDURES
- A
- NOTE: (FOR WINDOWS 98 USERS)
- B
- C
- NOTE
- INSTALLING THE PRINTER DRIVER
- CONNECTING WITH A USB CABLE (WINDOWS 98)
- CONNECTING WITH A USB CABLE (WINDOWS ME)
- CONNECTING WITH A USB CABLE (WINDOWS 2000)
- CONNECTING WITH A USB CABLE (WINDOWS XP/WINDOWS SERVER 2003)
- INSTALLING THE LPR (LINE PRINTER REMOTE) MONITOR
- WINDOWS 98/WINDOWS ME
- WINDOWS NT
- WINDOWS 2000/WINDOWS XP/WINDOWS SERVER
- CONFIGURING THE PRINTER DRIVER SETTINGS
- GENERAL TAB
- COMMENT
- SEPARATOR PAGE
- BRMBTEST PAGE
- DETAILS TAB
- PRINT TO THE FOLLOWING PORT
- PRINT USING THE FOLLOWING DRIVER
- BUTTON PRINTER PORT... END CAPTURE
- TIMEOUT SETTINGS - NOT SELECTED
- TIMEOUT SETTINGS - TRANSMISSION RETRY
- ABUTFONT... DELETE PORT
- DRIVER... BUTTON
- SETTINGS... BUTTON
- PORT SETTINGS... BUTTON
- SHARING TAB
- NOT SHARED/SHARED AS
- SHARE NAME
- PASSWORD
- DEVICE OPTIONS TAB (DP-180/190/1520P/1820P/1820E)
- HDD
- BUTTONCONFIGURATION
- NUMBER OF PAPER TRAYS
- EDITOR (FOR USA MODELS ONLY)
- URL TITLE
- URL
- CONTACT
- DEVICE OPTIONS TAB (DP-2330/3030)
- OUTER OPTION
- INNER TRAY
- DUPLEX UNIT
- CHANGE PAPER TRAY
- DEVICE OPTIONS TAB (DP-3530/4530/6030)
- WINDOWS NT 4.0 (ADMINISTRATOR)
- LOCATION
- DRIVER
- SEPARATOR PAGE... BUTTON
- PROCESSOR... BUTTON
- TEST PAGE BUTTON
- PORTS TAB
- PRINT TO THE FOLLOWING PORT(S)
- ADD/DELETE PORT BUTTON
- CONFIGURE PORT... BUTTON
- ENABLE BIDIRECTIONAL SUPPORT
- ENABLE PRINTER POOLING
- SCHEDULING TAB
- AVAILABLE
- PRIORITY
- SPOOL PRINT DOCUMENTS... / PRINT DIRECTLY TO THE PRINTER
- HOLD MISMATCHED DOCUMENTS
- PRINT SPOOLED DOCUMENTS FIRST
- KEEP DOCUMENTS AFTER THEY HAVE PRINTED
- NOT SHARED/SHARED
- ALTERNATE DRIVERS (SEE NOTE 1)
- SECURITY TAB
- PERMISSIONS
- BUTTONS
- OWNERSHIP
- BUTTON CONFIGURATION
- FINISHER
- PUNCH UNIT
- LARGE CAPACITY PAPER TRAY (LCT)
- WINDOWS NT 4.0 (USER)
- WINDOWS 2000/WINDOWS XP/WINDOWS SERVER 2003 (ADMINISTRATOR)
- PRINTER NAME
- LOCATION AND COMMENT
- MODEL
- FEATURES
- PRINTING PREFERENCES
- PRINT TEST PAGE
- NOT SHARED/SHARED AS (DO NOT SHARE THIS PRINTER/SHARE THIS PRINTER)
- ADDITIONAL DRIVERS
- ADVANCED TAB
- ALWAYS AVAILABLE/AVAILABLE FROM
- BUTTONDRIVER
- SPOOL PRINT DOCUMENTS SO PROGRAM FINISHES PRINTING FASTER
- PRINT DIRECTLY TO THE PRINTER
- KEEP PRINTED DOCUMENTS
- ENABLE ADVANCED PRINTING FEATURES
- SETTING DEFAULTS
- PRINT PROCESSOR
- ADD/REMOVE BUTTON
- ADVANCED BUTTON
- BUTTON (FOR USA MODELS ONLY)
- WINDOWS 2000/WINDOWS XP/WINDOWS SERVER 2003 (USER)
- WINDOWS COMMON SETTINGS
- PAPER TAB
- PAPER SIZE
- COPIES (1-999)
- ORIENTATION
- OUTPUT SIZE
- ZOOM (25-400%)
- IMAGE POSITION
- PAPER TYPE
- PAPER SOURCE
- PRINT PROPERTIES STATUS ICONS
- PROFILE
- BUTTON DEFAULTS
- BUTTON (FONT USA MODELS ONLY)
- OUTPUT TAB
- PAPER STYLE (EXCEPT FOR DP-1520P/1820P)
- BINDING POSITION
- BINDING MARGIN
- BOOKLET (EXCEPT FOR DP-1520P/1820P)
- N IN
- POSTER (DP-180/190/1520P/1820P/1820E ONLY)
- SORT
- STAPLE (FOR DP-2330/3030/3530/4530/6030 ONLY)
- PUNCH (FOR DP-3530/4530/6030 ONLY)
- FINISHER BIN/OUTPUT TRAY (FOR DP-2330/3030/3530/4530/6030 ONLY)
- QUALITY TAB
- GRAPHICS MODE
- VECTOR
- RASTER
- HALFTONE
- RESOLUTION
- DENSITY (FOR DP-180/190 ONLY)
- TONER SAVE (FOR DP-180/190/2330/3030/3530/4530/6030 ONLY)
- PRINT FINE PATTERNS (FOR DP-2330/3030/3530/4530/6030 ONLY)
- BUTTON
- FONTS TAB
- TRUETYPE MODE
- USE PRINTER TRUETYPE FONTS
- BUTTORE DEFAULTS
- WATERMARK TAB
- WATERMARK
- MESSAGE
- BUTTON DELETE
- TEXT
- FONTS
- STYLE
- SIZE
- ANGLE
- DENSITY
- TRANSPARENT TEXT
- AS OUTLINE ONLY
- FIRST PAGE ONLY
- POSITION
- OVERLAY TAB
- SECURE TAB
- PRINTING FROM WINDOWS APPLICATIONS
- PRINTING ON NETWORK
- PRINTER SERVER (PC CONNECTED TO A PRINTER)
- REMOTE (PC THAT USES ANOTHER COMPUTER'S PRINTER)
- PRINT OPERATION
- INTERNET PRINTING PROTOCOL (IPP) PRINTING
- COMPATIBLE MODELS
- SETTING THE IPP PRINTING
- AVAILABLE PAPER TYPE AND PAPER SIZE
- AVAILABLE PAPER WEIGHT AND CAPACITY
- TRANSPARENCIES AND LABELS
- ENVELOPES (FOR DP-180/190/1520P/1820P/1820E)
- FOR BEST PRINTING RESULTS
- LOADING THE ENVELOPES (FOR DP-180/190/1520P/1820P/1820E)
- PRINTER SPECIFICATIONS
- PRINTING OPERATION FAILURE
- DOCUMENTS NOT PRINTING CORRECTLY
- PRINTING AREA
- SYMBOL TABLE
- WARRANTY
Brand : PANASONIC
Model : DP-2330
Category : Fax machine