
HDTP8530 - Voice recorder PHILIPS - Free user manual and instructions
Find the device manual for free HDTP8530 PHILIPS in PDF.


| Product Type | Digital Voice Recorder |
| Model | HDTP8530 |
| Brand | Philips |
| Dimensions (approx.) | 10.8 x 4.5 x 1.6 cm |
| Weight | Approx. 50 g (with battery) |
| Power Source | 2 x AAA batteries |
| Battery Life | Up to 20 hours of recording |
| Internal Memory | 4 GB (approx. 280 hours in LP mode) |
| Recording Formats | MP3, PCM (WAV) |
| Playback Formats | MP3, WMA, PCM |
| Microphone | Built-in stereo microphone |
| Speaker | Built-in speaker |
| Connectivity | USB 2.0 (micro USB) |
| Display | OLED display |
| Key Features | Voice activated recording, noise reduction, variable playback speed |
| Included Accessories | USB cable, earphones, user manual |
| Cleaning | Use a soft dry cloth; avoid liquids |
| Safety | Keep away from moisture and extreme temperatures |
| Repairability | Battery and memory card (if any) user-replaceable; other repairs by authorized service |
| Warranty | 2 years (check local terms) |
Frequently Asked Questions - HDTP8530 PHILIPS
User questions about HDTP8530 PHILIPS
0 question about this device. Answer the ones you know or ask your own.
Ask a new question about this device
Download the instructions for your Voice recorder in PDF format for free! Find your manual HDTP8530 - PHILIPS and take your electronic device back in hand. On this page are published all the documents necessary for the use of your device. HDTP8530 by PHILIPS.
USER MANUAL HDTP8530 PHILIPS
User manual
PHILIPS
Congratulations!
ThisHighDefinitionDigitalTelevisionReceiver(DTR)isan innovativeproductfromthelatestgenerationofPhilipsdigitalTV recorders,dedicatedtoDigitalTerrestrialTelevision.Equippedwitha silentharddiskdrive,itallowseasyreceptionandrecordingofdigital programmes,includingthosebroadcastedinHighDefinition. Onceyouhaveconnectedyourrecorderandperformedtheinitial installation,youwillbeabletowatchandenjoyalltheFREEVIEW channelsavailableinyourgeographicalarea.Thankstoitembedded 'overtheair'upgradefeature,youcanupdateyourrecorderwith newfeaturesorserviceswhentheybecomeavailable. ThePhilipsrecorderfollowsacontinuousdevelopmentstrategy. Therefore,wereservetherighttomakechangesandimprovements totheproductdescribedinthisusermanualwithoutanyprior notice.
CEMarking:
TheCEmarkingcertifiesthattheproductcomplieswiththeessential requirementsoftheDirective1999/5/ECconcerningradioequipment andtelecommunicationequipment,andofDirectives2006/95/EC concerningsafety,2004/108/ECconcerningelectromagnetic compatibilityandErP2009/125/ECconcerningecodesign requirements,definedbytheEuropeanParliamentandCouncilto minimizeelectromagneticinterferences,ensurethesafetyofusers andtheirequipmentandprotecttheirhealth,andminimizethe impactofproductsontheenvironment. TheCEdeclarationofconformitycanbeviewedinthesupport sectionofthePhilipssitewww.philips.com,
TheFREEVIEWandFREEVIEW+HDwordsandlogosare trademarksofDTVServicesLtdandareusedunderlicence.
HDMI,HDMIlogoandHigh-DefinitionMultimedialInterfaceare trademarksorregisteredtrademarksofHDMI LicensingLLC. ManufacturedunderlicensefromDolbyLaboratories.Dolbyandthe double-DsymbolareregisteredtrademarksofDolbyLaboratories Inc.
Telephone number for your local store is on your till receipt. Should your Store be unable to help, please check the following Websites for
Digital Television Terrestrial signal coverage: http://www.dtg.org.uk/consumer/freeview.html http://www.freeview.co.uk http://www.bbc.co.uk/digital

Note
- In order to receive digital signal of good quality you may need an antenna upgrade.
Contents
1 Safety recommendations 4
Wheretoputyourrecorder?4
Warningsandsafetyinstructions4
Batteries5
Interference5
Harddisk5
USBStoragedevices5
Cleaningtherecorder5
2 What's in the box 6
Frontpaneloftherecorder7
Rearpaneloftherecorder7
Overviewoftheremotecontrol8
3 Connecting your devices 10
Connectiontotheterrestrialantenna 10
ConnectiontotheTVset 10
ConnectiontoaVCR/DVDrecorder 11
ConnectiontoaHomecinemasystem 11
Connectiontoahi-fiunit 11
ConnectiontoyourEthernetnetwork 11
4 Before starting 12
Basics of the menu system 12
Menutree 13
5 Running your first installation 14
VideoSettings 14
ParentalControl 14
ChannelSearch 14
Selectingyourregion 15
6 Your recorder's main commands 16
Selecting a TV channel 16
Adjustingtheaudiovolume 17
UsingthePictureinPicture(PIP)feature 17
Changingthefavouriteslist 17
Temporarilyselectingaudiolanguages,subtitlesandaudio description 18
ActivatingandUsingAudiodescription 18
Teletextandinteractiveservices 18
TV/AUXSwitch 18
TVGuide 18
Livemode/Deferredmode 19
Recordingprogrammes 19
7 Video Recordings 20
Immediaterecording(LiveorDeferredprogramme) 20
RecordingprogrammesfromtheRecordingSchedule menu 20
RecordingprogrammesfromtheTVGuide 21
RecordingList 22
ManagingtheRecordinglist 22
8 Multimedia Player 24
AccessingtheMediaPlayer 24
NavigatingintheMediaPlayer 24
Viewingphotofiles 25
Playingaudiofiles 25
Viewingyourownvideofiles 25
Importing/Exportingmultimediafiles 25
9 Adjusting the installation parameters 26
ChannelSearch 26
ChannelManagement 27
TechnicalSettings 28
InformationandSupport 30
10 Environment 31
Meaningoflogospresentontheproductoritspackaging 31
Productrecyclinganddisposal 31
European Directive on Waste Electrical and Electronic Equipment (WEEE) 31
DirectiveontheRestrictionofuseofcertainhazardous substancesinelectronicequipment(RoHS) 31
Electricalconsumptionoftherecorder 31
11 Troubleshooting 32
FAQ 32
Using the recorder 32
Updatingthesoftware 33
12 Customer Support 34
13 Specifications 35
14 Guarantee Terms 37
1 Safety recommendations
Useoftherecorderissubjecttosafetymeasuresdesignedtoprotect usersandtheirenvironment.
Where to put your recorder?
Inordertoguaranteethecorrectoperationofyourrecorder,you must:
- placeitindoorstoprotectitfromlightning,rain,anddirect sunlight,
- placeitinadryandwellventilatedarea,
- keepitawayfromheatsourcessuchasradiators,candles,lamps, etc.
- protectitfromdampness,placeitonaflatsurfacefromwhereit willnotfallandisoutofthereachofchildren,
- avoidviolentshocks.Chooseastable,horizontalsurfaceon whichtherecorderwillnotbeexposedtointensevibrations.
- donotplaceanythingontopofyourrecorder(asitwould restrictventilation):theventilationslotslocatedonthecasing preventyourrecorderfromoverheating.Ifyouplacethe recorderinacompartmentorotherclosedspace,leaveaspace ofatleast10cmoneachsideand20cmonthefrontandback oftherecorder,
- connectitdirectlytothemainswiththeprovidedcords,the socketmustbeneartherecorderandeasytoaccess.Theuseof anextensioncable(withmulti-points)isnotrecommended.

Warnings and safety instructions
- Useonlythepowersupplyunitsuppliedwiththe recordertoconnectittothemains.Otherpractice maybedangerous.
- Asaprecaution,incaseofdanger,thepowersupply unitactsasadisconnectingmechanismforthe230V powersupply.Thatiswhyitisimperativethatyou connecttherecordertoapoweroutletlocated nearbyandeasilyaccessible.
- Connecttherecordertothermainsinaccordancewiththe indicationsmentionedontheidentificationlabelaffixedonthe recorder(voltage,current,frequencyofelectricitynetwork).
- Theidentificationlabelislocatedundertherecorderoronthe rearpanel.
- Youmustimperativelyconnectthepowersupplyunittothe recorderbeforeconnectingthepowersupplyunittothepower socket.Ensurethepowercordiscorrectlyconnectedtothe mainspowersocketandtotherecorder.Otherwise,thereisa riskoffireandyouriskgettinganelectricshockwhentouching therecorder.
- Youmustimperativelyusetherecorderinanenvironmentthat complieswiththefollowingrequirements:
• temperature: between0°C[32°F] and 40°C[104°F].
• ambient humidity: between 20% and 90%.
• altitude:below2000m[6562ft].
- To avoid short-circuits (fireorelectrocution hazard), donot expose your recordertodampness. Donot place any object containing liquid (vaseforexample) on the appliance. Thereorder must not be splashed with liquid. If liquid is spilled onto therecorder, unplug it immediately from them and consult your supplier.
• Takecarenottoallowliquidsometalobjectstoenterthe recorderthroughtheventilationslots.
- Avoidreconnectingtherecorderafterithasbeensubjectedto largechangesintemperature.
- Therecordermustbedisconnectedfrommainssupply(fromthe poweroutletorrearpanel)beforeanymodificationof connectionbetweenTV, VCRorantenna.
- Intheeventofastorm,itisadvisabletounplugtheantenna. Eveniftherecorderandthetelevisionsetaredisconnectedfrom thepowersupply,lightningcanstilldamagethem.
- If you hear unusual noise coming from themains powersocket or from the power cordor adapter, disconnect immediately the power cord from themains powersocket in accordance with all the precaution so fuse, your risk getting an electric shock, and contact your retailer.
- Neverconnecttherecordertoamainspowersocketwhichis loose,showssignsofwearordamage,youriskgettinganelectric shock.
- Nevertouchthepowercordwithwethands.Youriskgettingan electricshock.
- Whenconnectingord disconnecting the powercord, alway stake hold of the plug without pulling on the cord. Adamaged cord presents a potential risk of fire electric shock. Never pull the power cord when disconnecting from themains powersocket.
- Neverplaceobjectsonthepowercord,andneverpullonitor foldit.Thismaycauseariskoffireorelectricshock.Ensurethat therecorderneverliesonthepowercordoranyothercables.
- Neverplaceobjectsonthepoweradapter;neversteponitor rolloveritwitharollingdevice.Youriskdamagingthepower adapterandcreatingariskoffireorelectricshock.
- Ensuretherecorderisplacedonaflatandstablesurface,placing itincorrectlymayleadtothepowercordbeingdisconnected. Thismaycauseariskoffireorelectricshock.
- Alwaysconnectthepoweradaptercordtotherecorderfirst, thenconnectthepowercordtothepoweradapter,andfinally connectthepowercordtothemainspowerspowersocket.Bynot observingtheorderindicated,youriskgettinganelectricshock.
- Ensurethepowercordiscorrectlyconnectedtothepower adapter, and that it is firmly inserted in its slot. It is important that you push the connector into its slot. There is a risk fire or electric shock case of incorrect connection.
- Alwayskeepthepowercordandpowersupplyunitoutofthereachofchildrenordomesticanimals.
- Onlypersonnelapprovedbythemanufacturercanrepairtherecorder.Failuretocomplywiththesesafetyprecautionswillinvalidatetheguarantee.
- Haveaspecialisedinstallerperformallconnectionsifyouwantto usecablesthatarenotprovidedwiththerecorder.
Batteries
Batteriesareeasilyswallowedbyyoungchildren.Donotallowyoung childrentoplaywiththeremotecontrol.
Alwayskeepbatteriesawayfromexcessiveheatsourcessuchas directsunlight,fireorsimilarsources.
To avoid damaging theremote control, only use identical batteries or batteries of an equivalent type. The batteries provided are not rechargeable.
Interference
Donotplacetherecordernearappliancesthatmaycause electromagneticinterferences(forexample,loudspeakers,modems, routerscordlessphones).Thiscouldaffectrecorderoperation and distortthepictureorsound.
Hard disk
Thisunitcontainsaharddiskdrive.Pleaseawaitfortheunittoginto standbymodebeforeunpluggingandmovingit.
Nevercutofftheelectricalsupplywhilethediskisreadingorwriting, youmaylosedataand/ordamagetheharddisk.
USB Storage devices
Pleasewaituntiltherecorderorthemultimediafileapplicationexits themultimedialistmanager(multimediafileapplication)orisin standbymodebeforedisconnectingyourstoragedevices. Otherwise, yourisklosingdataordamageyourstoragedevice.
When connecting a USB peripheral device, respect the way of insertion and never use force. You may damage your peripheral device and/or the appliance.
Cleaning the recorder
The outercasing of therecorder can be cleaned with asoftand dry cloth. Donotuse any type of abrasive pad, scouring powder or solvents, such as alcohol turpentine, asthey could damage the surface of therecorder.
Yournewequipmentincludes:

High Definition Digital Television Recorder (DTR)

Remote control with 2 batteries (AAA)

Power supply unit (power adapter and power cord)
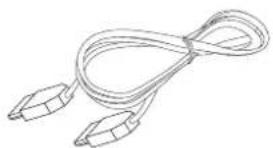
HDMI® lead for connection to a High Definition TV set

This user manual

Quick start guide
Front panel of the recorder
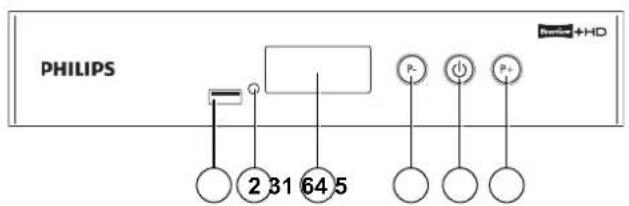
① USB port
② LED
- Green:Operating
- Red:Standby
③ Digital display
• Showsthecurrenttimewhentherecorderisinstandby.
• Showstheprogrammenumberwhentherecorderison.
• Showsharddiskactivity(recordinginprogress,programme playback,...)
④ P-
- Changechannel(Down)
⑤
- Puttherecorderinstandbymode/Wakeuptherecorder fromstandbymode(pressandletgo)
⑥ P+
- Changechannel(Up)
Rear panel of the recorder
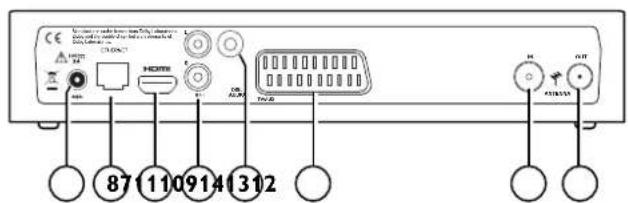
⑦ Power supply unit connector
⑧ Ethernet port
⑨ HDMI Digital video audio connector
⑩ Analogue audio connectors (to hi-fi unit)
⑪ Digital audio connector (S/PDIF)
⑫ SCART connector (to TV or VCR/ DVD)
⑬ Antenna input
⑭ Antenna output (Loopthrough only)
Overview of the remote control
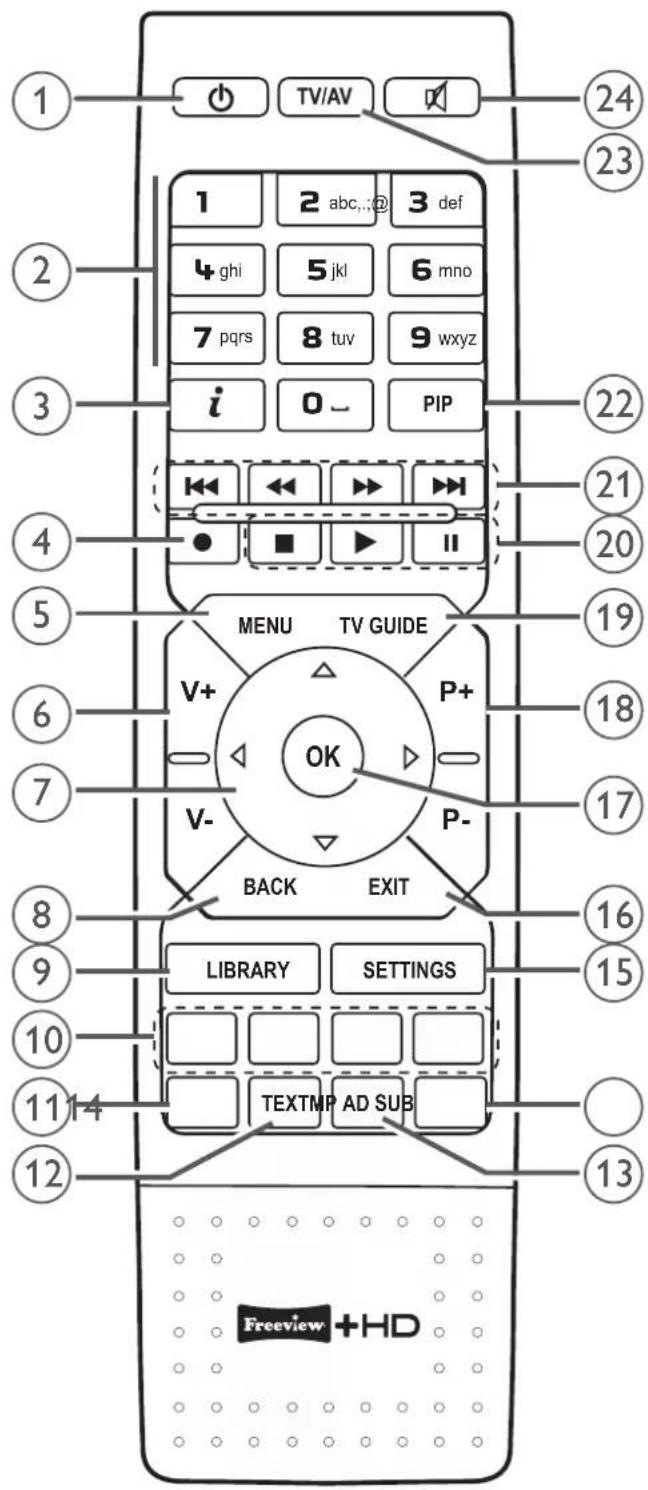
①
- Puttherecorderinstandbymode/Wakeuptherecorder fromstandbymode.
② 0 to 9
- Accesschannelsandvariouson-screenoptions.
③ i
• Displayprogrammeinformationandoptions.
④
- Launchimmediaterecording, Schedulearecordingfromthe TVGuide
⑤ MENU
- Accessmenus
⑥ V+ V-
- Increaseordecreasetheaudiovolume
⑦ ◀ ▷ △ ▽
- Moveinapage,amenu,thePIPwindow...
⑧ BACK
• Gobacktothepreviouschannel, screenormode
⑨ LIBRARY
- Accessyourrecordinglibrary
•
⑩On-screen options (MHEG, Teletext pages and menu)
⑪ MP
- AccesstoMediaPlayer
⑫ TEXT
- DisplayTeletextpageswhenavailable
⑬ AD
- ThiskeyonlybecomesactivewhenAudioDescriptionis activatedinyourUserPreferences.Whenactivateditwill allowyoutosetAudioDescriptionwhereavailableonyour currentprogramme(seesectionAudio settings,page28).
⑭ SUB
- Selectsubtitlesandaudiotracks
⑮ SETTINGS
- Accessrecordersettings
⑯ EXIT
- Exitfromcurrentscreenorsetting
⑰ OK
• Displaythechannellist, confirmaselection
⑱ P+ P-
- ChangechannelinthemainscreenandinPIPmode
⑲ TV GUIDE
- DisplaytheTVGuide
20 ■ ▶ II
- Stop/Play/Pause
⑳
- Skipbackward/Rewind/Fastforward/Skipforward
22 PIP
- ActivatePIPfeature
②3 TV/AV
- TogglebetweenTVandAUXmodesontheSCARToutput
24
- Tumthesoundoff/on
Batteries
Theremotecontrolneedstwobatteries(AAA)tooperate. The drawinginthebatterycompartmentindicateshowtoinstallthem. Thebatteriesprovidedarenotrechargeable.
3 Connecting your devices
Beforeinstallingyourrecorder:
- Pleasecheckthatthedeliveryiscomplete(seeWhat's in the box,page6).
- Pleaseensurethattheappliancestobeconnectedtogether (recorder, TVset, VCR/DVD...)areunpluggedbeforemaking anyconnections.
- PleaseensurethatDigitalTerrestrialTelevision(DTT)isavailable inyourarea.
Connection to the terrestrial antenna
Veryoftentogetthebestreception,youmaysimplyneedtoadjust yourantenna.Alternatively,youcanconnectanindoorantennato yoursystem.Formoreinformation,pleasecontactyourspecialised distributor.
Standard outdoor antenna
Preferablyuseanoutsideroofantennathatisdesignedtoreceive UHFchannels(21 to69).However:
- ifyourbuildingisequippedwithanoldantennamodel,digital channelsmaybedifficultorevenimpossibletoreceive.The problemcanonlyberesolvedbychangingtheantenna.
- ifyourbuildingisequippedwithacommonantennawhich containsselectivefiltersdevisedforanaloguechannels,reception willmostprobablynotworkcorrectly.Inthiscase,youwillhave tocontacttheadministratorofthebuilding.
- someantennasdirectedtowardsananalogueTVtransmitter mustbere-adjustedtowardsadigitalTVtransmitter.Ifyou encounterreceptionproblems,youcanalsotryplacingthe antennaatdifferentheights.
Indoor antenna
Inidealreceptionconditions, thistypeofantennaissufficient. Here, however, aresomeusefultips:
- useanantennadesignedtoreceivechannels21to69.
- installtheantennaclosetothewindowanddirectittowardsthe digitalTVtransmitter.
- ifpossible,useanantennawithanamplifier.Therecordercan provideremotepowersupplytoyourindoorantenna(see Setting the power parameters,page29).
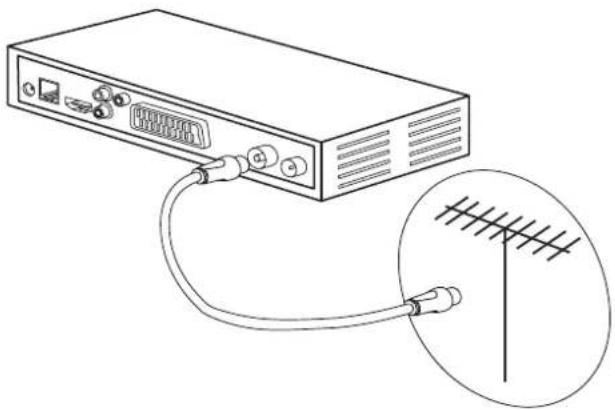
Connection to the antenna
1 Plug the antenna cable (not supplied) into the ANTENNA IN input connector on your recorder.
2 You can connect the RF output connector of your recorder to the antenna input of the television set or VCR/DVD recorder (cable not supplied).
Connection to the TV set
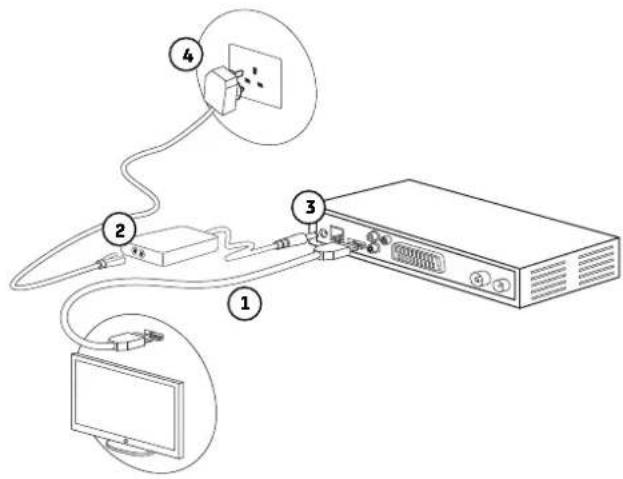
Connection to a High-Definition television set using an HDMI lead
1 To take advantage of High Definition picture quality, you must connect the HDMI connector of your recorder to the HDMI connector on your television set (cable supplied).
2 To connect other devices to the recorder (VCR/DVD, Home cinema...), refer to the following sections.
3 Connect the power adapter to the power cable. Then, connect the power cable into the 12 V connector on the recorder.
4 Plug the power cord into the wall socket.
Connection to a Standard-Definition television set
1 You must connect the television set to your recorder using a SCART connector (not supplied).
2 To connect other devices to the recorder (Home cinema...), refer to the following sections.
3 Connect the power adapter to the power cable. Then, connect the power cable into the 12V connector on the recorder.
4 Plug the power cord into the wall socket.

Connection to a VCR/DVD recorder
SeethediagrambelowtoconnectyourecordertoaVCR/DVD recorder.


Note
- When you connect VCR/DVR recorder to the scart connector, select Recorder mode in the Scart Output field of the video settings (see section Picture settings, page 29).
Connection to a Home cinema system
Someprogrammesarebroadcastwithahighqualitymultichannel digitalsound. TheconnectionofyourrecordertoaHomecinema systemwillgiveyouacinematicsurroundsoundexperiencewhen watchingtheseprogrammes.
This can easily be done by connecting with a coaxial cable (not supplied) the DIGITAL AUDIO output of your record to the digital audio coaxial input of your home cinema amplifier. Dolby® Digital Plus one of the latest innovations of Dolby Laboratories in high quality digital audio. Compatible with Dolby Digitalsystems, it addresses the expectations of most demanding viewers, and shall be to the diverse world of content delivery, such as, for instance, High Definition TV broadcast.


Note
- For more information, please visit the following website: http://www.dolby.com/consumer/setup/index.html
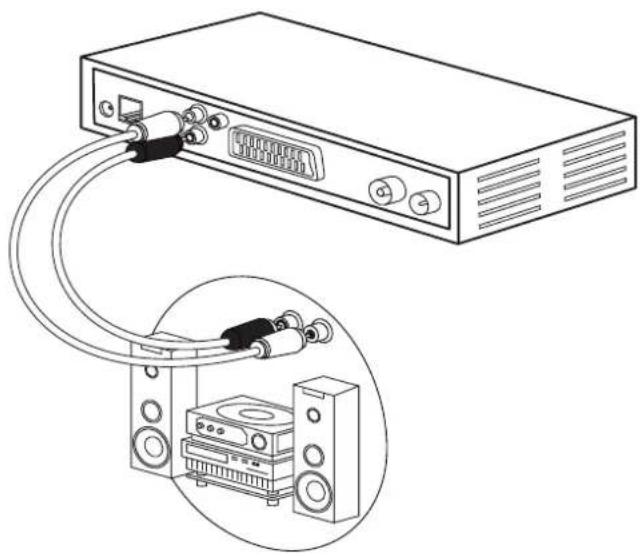
Connection to a hi-fi unit
Tomakethemostofthequalitysoundandlistentoradiochannels withtheTVtumedoff,justconnecttherightandleftaudiooutputs oftherecordertotheauxiliaryinputofyourhi-fisystem(cablenot supplied).
Connection to your Ethernet network
Tofullybenefitfrominteractiveservicesdirectlyfromyourrecorder, youmustconnectyourrecordertothelntemetthroughyourbroadbandrouter.
1 Connect one end of a RJ45 Ethernet cable (not supplied) to the ETHERNET port of your recorder.
2 Connect the other end of the Ethernet cable to a free Ethernet port on your broadband router.

4 Before starting
Basics of the menu system
Howtoaccessthemainmenu?
Press the [mkey].
Howtoaccessafeature?
You can access some features using the remote control as well as the main menu.
When both possibilities are available, the corresponding procedures are proposed.
Howtonavigatethroughthevariousscreensandsetparameters?
Use the remote keys:
• △to navigate in the menus and submenus,
- or OKo enter a menu,
- or BACK access the previous menu,
- to Exit the screens.
Menuspresentation
For ease of understanding, accessing a menu is described in this manual as follows:
MENU > Menu > Submenu
For example, when you read "Go to Configuration >
Technical Settings", you should perform the following actions on your remote control:
1 Press the Keyno access the main menu.
2 Press the of key to select Configuration.
3 Press the key to select Technical Settings, then enter the menu with the OK
Controlspresentation
The controls displayed on the screen are indicated as follows:
This control on the screen...
is indicated as follows in your manual
"Press the □[Save] key":
- OK for the corresponding key of your remote control,
- [Save] for the name of the control on the screen, introduced between brackets.
Menu tree
The tree below introduces the recorder menus:
Watch TV

Scheduled TV Guide

DVR Recording Library
Recording Schedule

Catch up TV BBC i-Player

Media Player Media Player PICTURES
PICTURES
| MUSIC | |
| VIDEOS | |
| ALL MEDIA |

Features Channel Locking
Favourites
FAQ

Configuration Channel Search Automatic search
| Channel Management | Manual search |
| Channel Locking | |
| Technical Settings | Favourites |
| Parental Control | |
| User preferences | |
| Information and Support | Languages |
| Audio Settings | |
| Video settings | |
| Power Settings | |
| Factory reset | |
| Signal Information | |
| Network Information | |
| Product Data | |
| HDD Data | |
| Support and Help |
5 Running your first installation
Oncetherecorderisphysicallyconnected,youneedtogothrough thesetupproceduretogetyourFREEVIEWchannels.
1 Switch on your TV.
2 If necessary, press the Standby button on your remote control to wake the recorder up from standby mode.
3 The first installation screen should appear.
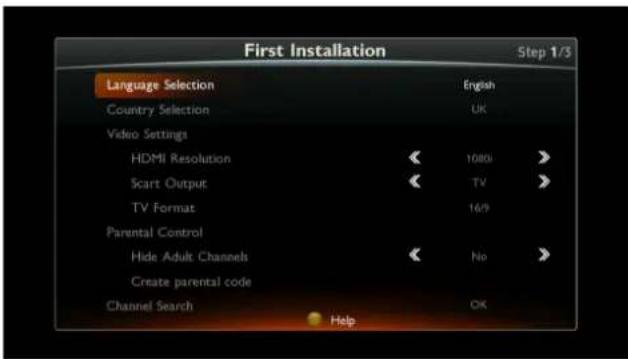
Video Settings
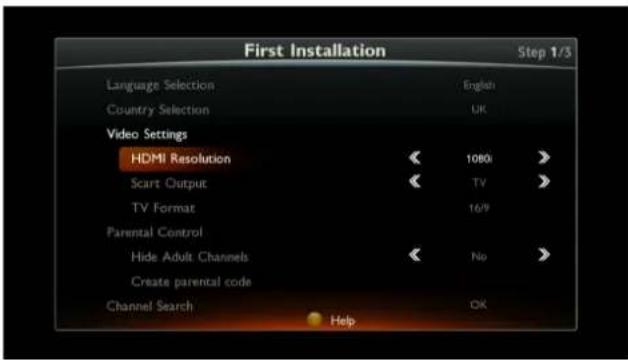
4 Choose the settings according to your needs.
Use the △ and keys to highlight a setting, use the and keys to select a value.
- HDMI Resolution: If your TV set is connected to the recorder with an HDMI cable, select the resolution better suited to your HD TV set (1080p, 1080i, 720p or 576p). If you have a standard TV set, set the resolution at 576p.
- Scart Output: If you connected your standard TV set to the recorder with a SCART cable, select TV mode. If you connected a VCR/DVD recorder to the SCART connector, select Recorder mode.
- TV format: select the display mode for your standard TV set: 16/9 (widescreen TV), 4/3 (Traditional TV) or Auto (programme format will be respected - 16:9 or 4:3).
5 Press the OK to validate then key to continue.
Parental Control

6 To hide adult genre channels, set Hide adult channels to Yes.
7 Select Create parental code.
8 Enter a parental four-digit code using the remote control (0000 is not accepted).
9 Enter the same code to confirm it.
Press the OK to validate then key to continue.

Note
- The parental code is used to lock access to the recorder and channels. Make sure you remember it for future use. You can change the code at any time (see Changing your Parental code, page 27).
Channel Search
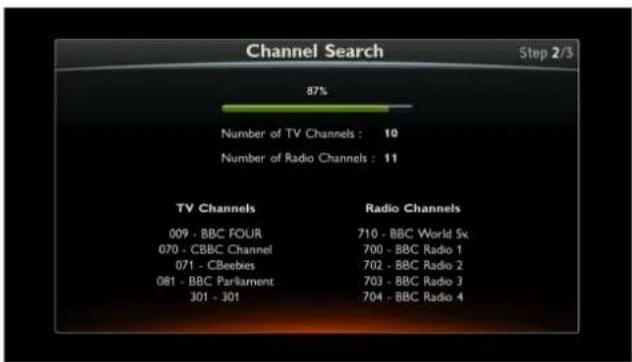
10 The recorder automatically searches for available FREEVIEW TV and radio channels. Press the clay to save the channels found.

Note
- If the recorder cannot find any channels, you will be asked to adjust the antenna. The reception strength and quality of the antenna signal are displayed. Check the antenna cable connections.
- When the signal level is satisfactory, press the key to resume the installation.
- If the level and quality of reception remain insufficient, contact your antenna installer.
- If you use an indoor antenna with an amplifier, it is possible to power the antenna from the recorder (+5VDC, 50mA).
- In the Power Settings menu, set Aerial Power Amplification to Yes (see Setting the power parameters, page 29).
Selecting your region

11 Select your region.
12 Select [Save] and press the key to confirm.
Yourecorderisnowset.Youcanstartwatchingandenjoyingallyour FREEVIEWchannels.
Shouldanyproblemthatpreventsyoufromcompletingthe installationarise,pleasecontactyourretailerorthePhilipsHotline.
UK Hotline: 08450 900 315
6 Your recorder's main commands
Selecting a TV channel
Using the keys P+ and P-, or keys 0-9
Pressor you note control to change channel or entents number on then numeric key pad to switch to the channel you want. You can also set to BACK the channel you last watched.
Using the channel list
1 Press the lock to display the channel list.
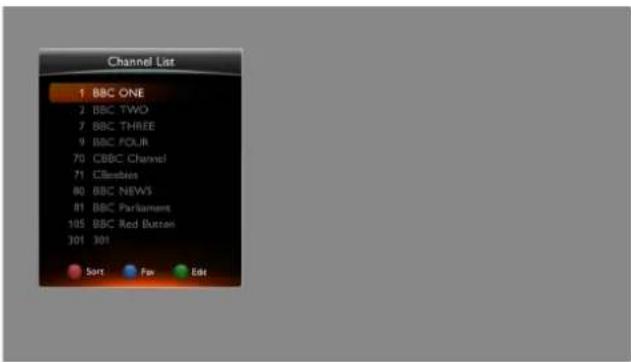
2 Select your channel then press the Iok again to confirm.
3 To hide the channel list without changing channel, press the BACK or EXT.
Program information banner
Eachtimeyouswitchchannels,theinformationbannerappears onscreen.Youcanalsodisplayitbypassingthekeyongwhile watchingaprogramme. YoucansetthedisplaytimeoftheinformationbannerinyourUser Preferences(seeSetting your User preferences,page28).
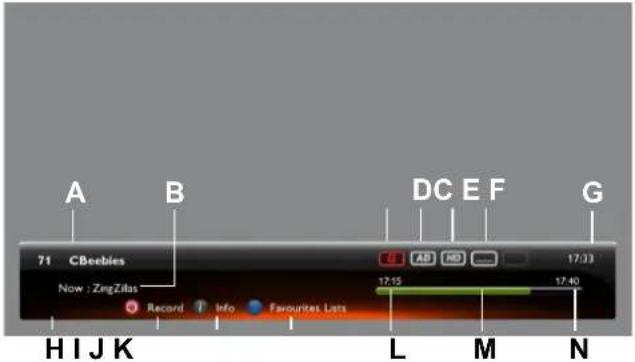
Ⓐ Channel number and name
B Name of programme
© Parental guidance
(D) Audio description available (AD)
E Programme broadcast in HD
F Subtitles available
G Current time
(H) Favourite list name
① Immediate recording
① Extended program information access
© Change of Favourite list
L Start time of programme
M Elapsed time
N End time of programme

Note
- The availability and accuracy of the programme information depend on the channel broadcaster
Detailed programme information
If you want more information on the current and following programme, press the key twice while watching a program to display the extended information banner.
![Genre: Children's Duration: 0h 25min Tang's Clubhouse: A band of promate friends play music in their tropical paradise. Tang needs peace and quiet to practise his guitar solo, so Todd builds him a clubhouse of his own. [ADS] 71 CBeebles Now : ZingZilas 17.33 17.40 Record Info Favourites Lists](/content/2026/06/1320389/images/1a796f85a3319b1d57b760edce9113a7219edb8269726e1f34d93a0b83143df3.jpg)
The following actions are available:
Use this key... to...

view information on the next/current programme

view information on the current/next programme on other channels

switch to the selected channel

hide the extended information banner
Adjusting the audio volume
• Volume: Use and keystrotum the volume up and down.
- Mutemode:Usethekeytotumthesoundoff.Pressthe samekeyagaintotumthesoundbackon.

Note
• These operations do not affect the sound on the Scart socket if you set Scart Output to Recorder mode (see Picture settings, page 29).
Using the Picture in Picture (PIP) feature
YoucanwatchaprogrammeonthefullTVscreenanddisplayatthe sametimeanotherprogrammeinaninsetwindow.
Pleasenotethatthesoundisfromthemainprogrammeonly.
TousethePIPfeature,pressthekey. PIP

Aninsetwindowisdisplayed.
The following actions are available:
Use this key... to...

move the PIP window in the main window.

change channel.

activate/deactivate the PIP feature.
Changing the favourites list
Youcancreateandmanagefavouritechannelslistsinthe
Favourites menu (see Creating and managing favourite lists, page27).
Toswitchfromonechannellist(mainchannellistincluded)toan existingfavouritelist:
1 Press the key once or twice to display the detailed information banner, or press the OKy to display the channel list.
2 Press the [Blue] Favourites lists or [Fav] key to switch to the next available favourite list.
Repeatthisoperationuntilthefavouritelistofyourchoiceis selected,ortoreturntothemainchannellist.
Temporarily selecting audio languages, subtitles and audio description

Note
- All modifications take place immediately. However, temporary adjustments are not retained when you change channel.
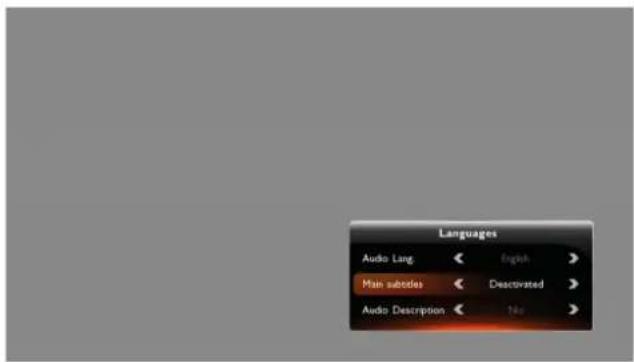
Youcandisplaytheaudiotracks, subtitlesandaudiodescription
screenbypassingthekeySUB
Use the key to select your settings then press the OK confirm.
Activating and Using Audio description
Audiodescriptionisanaccessibilityfeaturethatprovidesvisually impairedviewerswithaspokendescriptionofwhatishappeningon screen.
If you want to set the Audiodescription feature, activate it first in the
Audio Settings menu (see Audio settings, page 28).
Programmesprovidingthisservicewillbeshownwiththeservice activatedusingthemainaudiolanguage.
YoucanthenusethekeyAImproarilydeactivatetheaudio descriptionfeature,changethelanguageandadjusttheaudio descriptionvolume.PleasenotethathekeyAOnlyrespondif theaudiodescriptionisactivatedintheAudio Settings menu.
Teletext and interactive services
Whenever Teletextorinteractiveservicesareavailable(news,local weatherinformation,etc.),aninvitationtopresstheredkeyappears onscreen.
Youcanthenpressthe[Red]orthekeyonyTEXTremote controltoaccessavailableservices.
Browse the services, teletextpages and local information available following the onscreen indications.
TV/AUX Switch
Pressthe kdytAVvitchthesignalstotheTV/AUXSCART output.ThisfeatureisonlypossiblewhenthedeVICESareconnected togetherviaaSCARTlead.
- Firstpress:theTVsetisselected,anddoesnotdisplaytherecordersignals.
- Secondpress:backtostandardmode;theTVsetdisplaysthe signalsreceivedfromtherecorder.
TV Guide
The TV Guided displays programme information for all available channels (depending on the information provided by channel broadcasters). You can also record programmes directly from the TV Guide (see Recording programmes from the TV Guide, page 21).
To access the TV Guide:
• pressthekey.0Y GUIDE
- goto>SdMENued>TV Guide.
![71 CBeebies 17:15 - 17:40 ZingZillas Tang's Clubhouse: A band of primate friends play music in their tropical paradise. Tang needs peace and quiet to practise his guitar solo, so Todd builds him a clubhouse of his own. [AD$] TV Guide Today Channel List 17:30 18:00 18:30 19:00 19:30 20:00 BBC FOUR Th…](/content/2026/06/1320389/images/6236f6527af0a79a94ff2279259b1e607569721e7519c6d467aaedab6edcf52b.jpg)
Youcanlockaccesstoadultchannelsandage-restrictedprogrammes usingtheparentalcontrolfeature(seeParental control level, page28).
To help you navigate in the TV Guide, a vertical line displays the current time on the guide.
The following actions are available:
Use this key... to...
 | select a channel/programme. You can also change the page of channels displayed by using the P keys. |
 | zap to a selected channel. You can also zap to the channel by entering the channel number directly on the remote control using the number keys. |
 | see extended information on a programme/a programme. |
 | jump to the next/previous day. |
 | |
 | record the selected programme and choose recording options. (see Recording programmes from the TV Guide, page 21 for more information on this feature) |
 | Filter the TV Guide display by selecting by genre or title. |
| [STD2] | return to the current time and programme in the TV Guide. |
 | exit the TV Guide. |
Live mode/Deferred mode
When you start viewing an new channel, therecorder automatically start to save a buffer of the channels as long as it is being watched up to 120 minutes depending on the signal.
Thiscontinuousrecordingbuffermakesitpossibletopausefromlive, rewindandrewatchtheprogrammethatwasrecordedmoments before.
Presstheand keysto interdeferredmode.

AbannerwiththeDeferred/Livetimeshiftisdisplayonthescreen.
Pause / Play
- Youcanpauseaprogrammewithoutmissingwhat'snextby pressingthekeH
- Toresumethecurrentprogrammewhereyouleftit,pressthe ▶ key.
Rewind
- Youcanrewindbypassingthekey.
- YouwillthenseetheDeferred/Livedelayincrease.Bypressing thekeyseveraltimes,youcanincreasetherewindspeed(upto 64timesthenormalspeed).
- Itispossibletorewindupto2hoursbutyoucanonlyrewindas farasthepointwhenyouchangedtothechannel.

Fast forward
- Youcanfastforwardbypassingthekey.
- YouwillthenseetheDeferred/Livedelaydecrease.Bypressing thekeyseveraltimes,youcanincreasethefastforwardspeed (upto64timesthenormalspeed).
- If you continue fast forwarding through the buffer you will eventually return to livemode.

Stop
YoucanexittheDeferredmodeatanytimeandgobacktothelive programme.
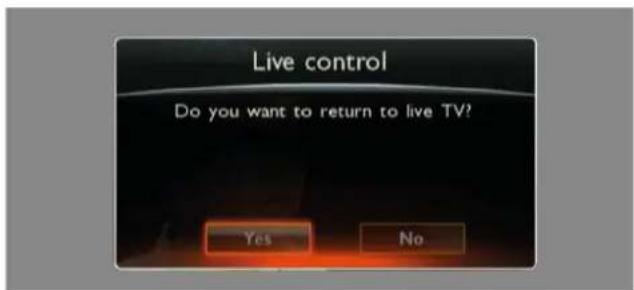
1 To do so, press the key.
2 Press the [Yks] key to validate.
Recording programmes
Recording a live programme
1 Select the desired channel.
2 Press the key:
Recording programmes from the TV Guide
1 Press the TV GUIDE key or select MENU > Scheduled > TV Guide.
![2 BBC TWO 18:00 - 18:30 Eghead Dermot Muraghan hosts a general knowledge quiz in which teams from all over the UK battle to beat the Eghead, some of the country's top quiz champions. [5] TV Guide Channel List BBC TWO BBC THREE BBC FOUR CBBC Channel CBebies BBC NEWS Today 17:30 The Hairy This Is BBC…](/content/2026/06/1320389/images/509349f67a5bb9af199b34924da0de0ef09ba00e9714ccdc18ffec670dc7fcb5.jpg)
2 Select the channel using the keys △ ▼ ▶ ▶ and programme you want to record.
3 Press the [Record] key to schedule the recording of the selected programme.
The recording icon appears in the programme cell.
4 Repeat the operation for all the programmes you want to record.
5 To cancel the recording of a programme, press the [Record] key again.
Play a recording program
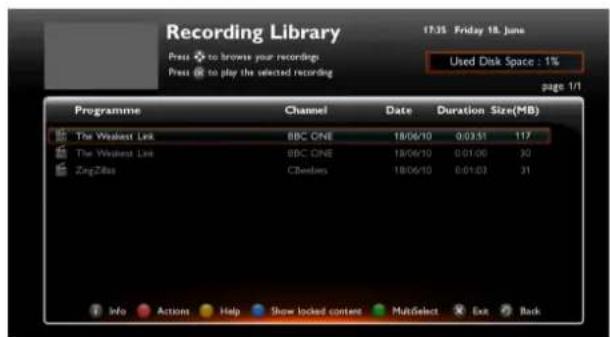
To access the recording library:
1 Press the LIBRARY key or select DVR > Recording library..
2 Select the desired recording using the keys ☐.
3 Press on OK key to view the recording.
7 Video Recordings
Therecordingcapacityofyourrecorderdependsonthemodelandonthetypeofprogrammesyouchoosetorecord.Onaverage,onehourofrecordingrequiresbetween1GB(SDprogramme)and2.5GB(HDprogramme)ofharddiskspace.
Youcansimultaneously:
• recordaprogrammeandwatchanotherprogramme,
- record2programmesandwatchoneoftheprogrammesbeing recorded.
Inaddition,youcansimultaneously:
- watchaprogrammeindeferredmodewhilerecordinganother programme,
- watchaprogrammefromyourrecordinglibraryandrecordone ortwoprogrammes.

Note
- If MHEG services are available on the programme you are recording, they will not be included in the recording.
Immediate recording (Live or Deferred programme)

To record a live programme:
1 Select the desired channel.
2 Press the key:
- The number of the channel being recorded is displayed on the screen.
- By default, the recorder will record the selected channel from the time you press record until the current programme is scheduled to end.
- You can then change channel without the recording being affected.
To stop a recording:pressthekey
To record a programme that you have been watching from an earlier point (2hoursmaximum).
1 Enter the deferred mode using the ◀ and □ keys until reaching the wanted starting point.
2 Press the key when you want to start recording.

Note
- You can then put the recorder in standby: the recording will stop automatically at the end of the recording time.
- When recording in deferred mode, the recorder can add a few seconds of video at the beginning.
- Once you have started a recording in live or deferred mode, you can no longer rewind further than the point at which the recording started.
Recording programmes from the Recording Schedule menu
Goto>MENU>Recording Schedule.
TheRecording Schedule screenshot of your scheduled recordings.

Therearetwotypesofrecordingtimersavailable:
- Manual Timers-Goto>DVMER Recording Schedule toentereventinformationmanuallyortoeditscheduled recordings
- Programme Timers-Goto > DVPMENU recordings according to the programme information broadcast in the TV Guide
Scheduling a recording manually
Tomanuallyschedulearecording:
1 Go to MENU > DVR > Recording Schedule.
2 Press the Green [Add] key.
A manual timer screen appears allowing you to set recording parameters.

3 Select the Schedule Type to record.
4 Select the Channel to record.
5 Select the recording Date.
6 Enter the recording Start time and End time.
7 Select the recording Frequency:
• Once: only once at the scheduled time.
• Weekly: once a week at the scheduled time.
• Daily (Mon-Fri): at the scheduled time, every day from Monday to Friday.
• Daily (Mon-Sat): at the scheduled time, every day from Monday to Saturday.
• Daily (Mon-Sun): at the scheduled time, every day and every week.
8 If you want to lock the recording by requiring your parental code and hiding it in the Recording List, set Parental control to locked (see section Accessing Locked Recordings, page 22).
9 Press the OK [Save] key to confirm the schedule.
Editing scheduled recordings
Tomodifyanexistingscheduledrecording,selectitinthelist.Only timersenteredmanuallycanbechanged.Thenpressthe OK
[Change]key:themanualtimerscreenwillappearallowingyouto makechangestotherecordingoptions.Pleasenotethatchangingthe repetitioncannotbeundone.

Note
- Editing a recording scheduled from the TV Guide, page 14 is possible, but by doing so, you will lose all automatic information update (automatic reschedule, series recording, etc.). We recommend that you delete instead the event in the Recording Timer, page 14 list and reschedule the recording from the TV Guide, page 14.
Tocancelanexistingscheduledrecording,justselectitinthelistand press the Red [Delete] key.
Tolock/unlockaccesstoanexistingscheduledrecording,justselectit in the list and press the Blue [Lock/Unlock] key.
Recording programmes from the TV Guide
TheadvantageofrecordingfromtheTVGuideisthatyoucan recordspecificprogrammesinsteadofchoosingchanneltimeslots. Youcanonlydothisiftheprogrammeinformationisprovidedbythe channelbroadcaster.
Recording modes: Timer or Programme
Therecordercanhandletwoprogrammerecordingmodesusingthe TVGuide:
- recordingatafixedtime(Timer mode)
• recording by event (Programme mode).
Timer mode
ByprogrammingarecordingusingtheTVGuide,therecorder memorisesthechannel,thedateandtheannouncedstartandend timeoftheprogrammetorecord.
Therecorderthenrecordsthespecifiedchannelatthedayandtime specified.
To avoid possibleshifts between the announced schedules and the actual schedules of broadcast, you can specify safety margins in your User Preferences. There order will then begin and stop recording from 1 to 5 minutes before and after the announced time.
Programme mode
ByprogrammingarecordingusingtheTVGuide,therecorder memorisesinformationoftheprogrammetorecord,providedbythe broadcaster:name,summary,date,channelandtimeofbroadcast.
Asthebeginningofrecordingapproaches(10minutesbeforethe announcedtime),therecordermonitorsthechannelandawaitsthe broadcastsignalmarkingthebeginningoftheprogramme.The recorderbeginsrecordingonlywhentheprogrammestarts.
Whenthesignalmarkingtheendoftheprogrammeisreceived,the recorderstopsrecording.
YoucancustomiseinyourUserPreferencestherecordingmodeto beappliedbydefaultandthesafetymarginstobeappliedinthe
Timer mode (see Setting your User preferences, page 28).
Recording programmes using the TV Guide
1 Press the TV GUIDE key or select MENU > Scheduled > TV Guide.
![2 BBC TWO 18:00 - 18:30 Eggheads Dermot Murnaghan hosts a general knowledge quiz in which teams from all over the UK battle to beat the Eggheads, some of the country's top quiz champions. [S] Friday 18 June 17:34 Freeview TV Guide Channel List BBC TWO BBC THREE BBC FOUR CBBC Channel CBeebies BBC NEW…](/content/2026/06/1320389/images/42a23d1a335ffa1830fe2695cea5961aa632569393dcd35923e6a0c163c61e21.jpg)
2 Select the channel and programme you want to record.
3 Press the [Record] key to schedule the recording of the selected programme.
The recording icon appears in the programme cell.
4 Repeat the operation for all the programmes you want to record.
- If a recording is conflicting with another recording (scheduled at the same time), the recorder will ask you to resolve the schedule conflict.
- If the programme you want to record is part of a series (symbolised by a multipage icon above the programme start time), the recorder will ask if you want to record the single episode or all future episodes of that series.
- If the programme you want to record is also broadcast in HD, you will have the choice to record in SD or HD.
- If the broadcast information includes a recommendation for a similar programme, you will also be able to choose to record the recommended programme.
5 To cancel the recording of a programme move the cursor to the cell then press the [Record] key.

Note
- If you manually edit a recording that has been scheduled from the TV Guide, you will lose all automatic information update made available by the EPG (automatic reschedule, series recording, etc.).
Recording List

To access the recording list:
- Pressthekey,orLIBRARY
- Goto>DMMEN Recording library.
Youwillbeabletocreatefolderstoorganiseyourrecordings,and checkhowmuchremainingdiskspaceisavailable.
- Thescreendisplaystheexistingfolders,andtheprogrammesyou haverecorded(lockedrecordingswillnotbedisplayed).
- Highlightarecordingusingthekeys, then press the OK keytoplayit.
- Dependingonthegenreoftherecordedprogramme,youmay beaskedtoentertheparentalPIN-codebeforeyoucanplayit.
The following actions are available in Playmode:
Use this key... to...

view a recording

stop playback of the recording.
Accessing Locked Recordings
- If you want to access the complete list of recordings, including those which have been locked with the parental code, press the Blue [Show blocked content] key. You will be asked to enter the parental PIN-code before you can view them.
- Press the Blue key again to switch back to the restricted list of recordings.
Managing the Recording list
Action keys used
Thecolouredandactionkeysletyoumanagetherecordinglistandofferyouthefollowingactions:
Use this key... to...

display information about the selected recording.
[Information]
Red [Actions] Manage the selected recording.
Blue [Show blocked content]
Access locked recordings.
Green
Select several recordings.
[Multiselect]
Yellow [Help] Display useful help information.
Selecting recorded programmes
Youcanmanageseveralrecordingsatthesametime,forexample movingthemintoanewfolder.
Toselectseveralrecordings:
1 Highlight one recording.
2 Press the Green [Multiselect] key.
The highlighted recording text will change to green.
3 Repeat the same action to select other recordings.
4 Once all the desired recording are selected, press the Red [Actions] key to access the recording management menu.
Sorting your recordings
Youcansortyourecordingsbyalphabeticalorderorbydate.
1 Press the Red [Actions] key.
2 Select the relevant action, Sort by program name to sort recordings by date or Sort by date to sort recordings in alphabetical order.
Yourrecordingsaresortedbytheselectedorder.
Creating folders
Youcancreatefolderstoorganiseyourrecordings.Youcancreateup tothreelevelsoffolders.
Youcanusethecharacters:","_and"-
1 Press the Red [Actions] key.
2 Select Create new folder and validate with the [OK] key. A virtual keypad appears onscreen
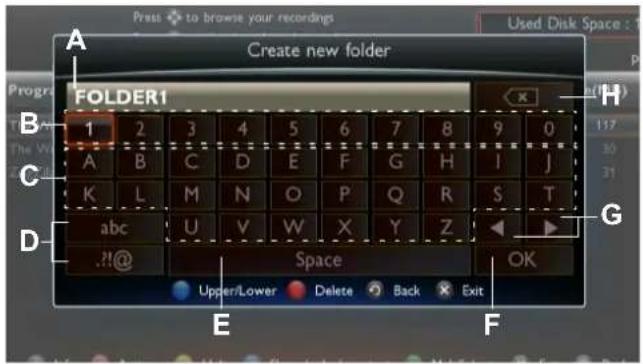
Item Description
Ⓐ Input field.
B Numeric keypad.
© Alphabetical keypad.
(D) Toggle between alphabetical and symbols tables.
E Space bar.
F Validation key.
© Navigation keys of the title field.
(H) Delete key.
3 To enter the desired name, use the △ ▽ ▶ ▶ keys and validate with the [OK] key at each step to input letters, symbols and/or numbers.
4 Select the [OK] key of the virtual keypad and validate to save the new title.
Moving recordings in an existing folder
1 Select the recording(s) that you want to move with the Green [Multiselect] key (see Selecting recorded programmes, page 22).
2 Press the Red [Actions] key.
3 Select Move and validate.
4 Use the 4 keys to select the new location.
5 Press the Red [Actions] key.
6 Select Move here! and validate to transfer the selected recording(s).
Erasing recordings
1 Select the recording(s) that you want to erase with the Green [Multiselect] key (see Selecting recorded programmes, page 22).
2 Press the Red [Actions] key.
3 Select Erase and validate. A warning message appears for each item to erase.
4 Press the [Yks] key to confirm.
Renaming recordings
1 Select the recording or folder you want to rename with the Green [Multiselect] key (see Selecting recorded programmes, page 22).
2 Press the Red [Actions].
3 Select Rename and validate. The virtual keypad appears onscreen.
4 To delete letters, press the △ ▼ ◀ ▶ keys to select the <× key of the virtual keypad.
5 Press the as many times as required - to delete the existing title.
6 Then to enter the desired name, use the △ keys ◀ ▶ and validate at each step to input letters, symbols and/or numbers.
7 Select the [OK] key of the virtual keypad and validate the new title.
8 Multimedia Player
Therecorderallowsyoutoviewandplaymediafilesstoredon compatiblemassstoragedevices.

Note
- Please note that the devices must be formatted FAT or FAT32.
TheMediaPlayer(multimediaapplicationoftherecorder)enables youto:
• viewyourphotofiles(*.jpeg)
- playyouraudiofiles(*.mp3)
- playyourownvideofiles(*.mpeg,*.mp4)
TheMediaPlayerincludesalsoaDLNAfeaturethataallowsyouto
displayafilefromanexternalDLNAserveronyourTVSet.Forthis,
therecordemustbeconnectedviayourethemetnetworktoa
DLNAserver.
Accessing the Media Player
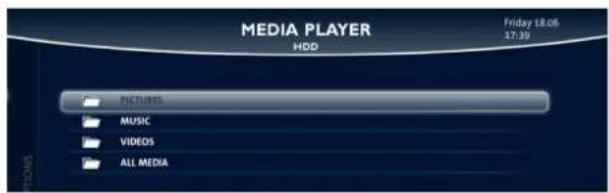
ToaccesstheMediaPlayer:
1 Insert a USB storage device in the USB port of the recorder while watching TV or connect an external DLNA server.
2 Press MP from the remote control or go to > MENU
Media Player > Media Player.
Therecorderthendisplaysthefoldersofthedeviceconnectedthat containyoumediafiles.
Youcanatanytimeexittheselectionwindowofthemedialistand returntothechannelviewedearlierbypassingthekey. EXIT
Navigating in the Media Player
ToaccessMediaPlayerscreen:
1 If required, press the 📂 selection the device that contains the files to read (USB device or DLNA server).
2 Select the required folder:
• PICTURES to view photo files only.
• MUSIC to view audio files only.
• VIDEOS to view videos files only.
- ALL MEDIA to view multimedia files (photo, audio and video).
3 Press the OK to display the folder content. The following screen appears:
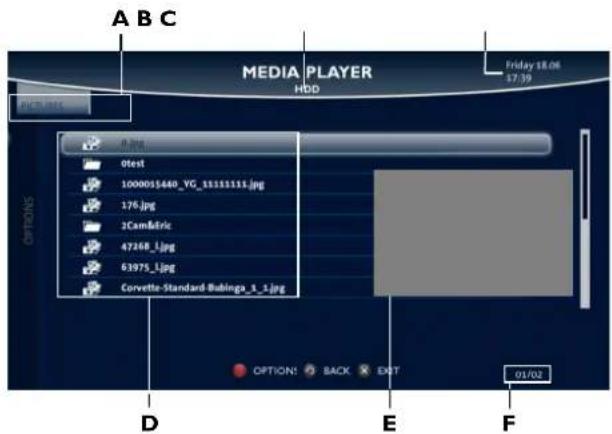
Ⓐ path in the device tree
⑧ name of the device connected
© current date and time
(D) files contained in the device
E preview of the file selected
⑤ page and total number of pages
Meaning of the icons
This icon... represents...

a picture file

an audio file

a video file

a folder
Navigating in the Media Player screen
Use this key...

to...

browse the files and folders.

navigate within pages.

display the media file selected or open a folder.

return to the previous screen or level.
exit the Media Player and return to the channel being viewed earlier.
Viewing photo files
Toplayapicturefile(*.jpeg),selectitandpressthekeyto displayitinfullscreenmode. Tolaunchaslideshow,selectapicturefileandpressthekey. Slideshow action keys:
| Use this key... | to... |
| pause/resume the slideshow. | |
| stop the diaporama. | |
| view the next file in the slideshow. | |
| display file information. | |
| view the previous file in the slideshow. | |
| return to the previous screen | |
| exit the Media Player and return to the channel being viewed earlier. |
Playing audio files
Toplayanaudiofile(*.mp3),selectitandpressthekey. Wha theaudiofilereachesitsend,theMediaPlayerautomaticallyplaysthe nextavailableaudiofilelocatedinthesamefolder. Toplayapicturefile,selectitandpressthekeytod OK vitin fullscreenmode. Tolaunchaslideshow,selectapicturefileandpressthekey. Available action keys:
| Use this key... | to... |
| pause/resume the audio file. | |
| stop playing the audio file. | |
| skip to the next audio file. | |
| skip to the previous audio file. | |
| BACK | return to the previous screen |
| EXIT | exit the Media Player and return to the channel being viewed earlier. |
Viewing your own video files
Toviewavideofile(*.mpeg,*.mp4),selectitandpressthekey. Toplayapicturefile,selectitandpressthekeytod OKtin fullscreenmode. Tolaunchaslideshow,selectapicturefileandpressthekey. Available action keys:
| Use this key... | to... |
| pause/resume the video file. | |
| stop playing the video file. | |
| Jump to the next video file. | |
| Jump to the previous video file. | |
| skip to the next video file. | |
| skip to the previous video file. | |
| BACK | return to the previous screen |
| EXIT | exit the Media Player and return to the channel being viewed earlier. |
Importing/Exporting multimedia files
Forstoragemanagementpurposes,youcanimportmultimediafiles toyourrecorder'sharddiskdriveandexportvideofilestoa connectedUSBstoragedevice.
1 In the Media Player screen, select the desired file (photo, audio and video).
2 Press the MEMO display the options banner.
3 Select the desired action, Import or Export.
9 Adjusting the installation parameters

Notet
• To see the menu tree and learn how to navigate through the various screens, see Before starting, page 12.
Channel Search
Searching for channels
ThismenuletsyousearchforallavailableFREEVIEWchannelsand updatethechannellist.
1 Go to MENU > Configuration > Channel Search.

2 If the recorder lock is activated, enter your parental code (to change your parental code, see Changing your Parental code, page 27).
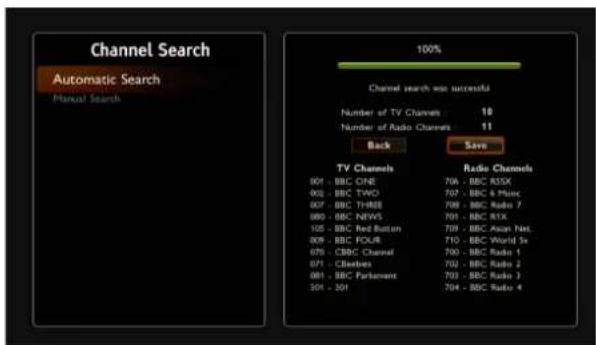
3 Select Automatic search and validate. A bar shows you the search progress.
4 Once the search is complete, select [Save] and press the OK key to save the channels list.
Searching manually for channels
Thismenuletsyoumanuallysearchforaspecificchannel,ona specificfrequencyorwithaspecificmodulation.
1 Go to MENU > Configuration > Channel Search.

2 If the recorder lock is activated, enter your parental code (to change your parental code, see Changing your Parental code, page 27).
3 Select Manual search and validate with the OK key.
4 Set your search criteria: press the keys to select a channel number (21 to 69) or a frequency and validate with the [OK] key.
5 Select Launch scan and validate with the OK key to launch the channel search.
6 Once the search is complete, select [Save] and press the OK key to save the channels list.
Channel Management
Creating and managing favourite lists
To create a favourite list:
1 Go to MENU > Configuration > Channel Management > Favourites.
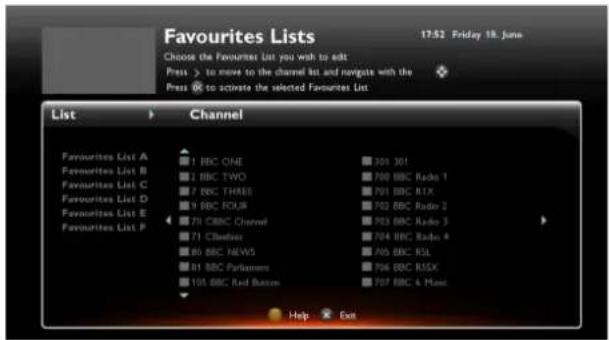
2 Press the △ ▽ keys to select an empty List (list B to D) and press the OK.
3 Press the key to select the channels to lock.
4 Press the keys to highlight a channel and press the OK key to add it in/remove it from your favourite list.
5 Once your favourite list is ready, press it.
Tomanageafavouritelist,selectthelistandmakeanychanges
• To edit a favourite list, just select it and carry out the desired modifications.
- To set a favourite list as the default channel list, select it and press the 📄. The list then appears with a 'check' mark symbol.
Channel Locking
Youcanlockaccesstospecificchannels.Ifyouactivatethechannel lock,youwillneedtoentertheparentalcodeeverytimeyouswitch toalockedchannel.
1 Go to MENU > Configuration > Channel Management > Channel Locking.

2 To set the list of channels you want to lock, press the to select the channel(s) to lock.
3 Press the Red [Activate] to activate the channel locking.
4 Press the BACK to EXIT your modifications.
Parental control options
Tosetyourparentalcontroloptions.goto> MENU Configuration > Channel Management > Parental Control.
Receiver locking
Youcanlockaccesstotherecorder.Ifyouactivatetherecorderlock, youwillneedtoentertheparentalcodeeverytimeyouswitchthe recorderon,orwanttoaccesstherecordermenus(Receiver settings,Channels,etc.).
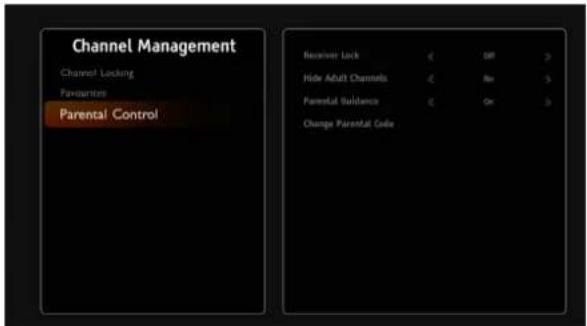
1 Go to Receiver Lock.
2 Set the parameter to On.
3 Press the OK to validate.
Hiding Adult channels
Thisfeatureletsyouhideadultgenrechannels.Ifyouactivatethis feature,alladultgenrechannelswillbehidden;youwillnotbeableto switchtoanadultgenrechannel,orbrowsethiscategoryintheTV Guide.
Usethisfeaturetohelpprotectyourchildrenfromadultcontent.
1 Go to Hide adult channels.
2 Set the parameter to Yes.
3 Press the OK to validate.
Parental Guidance
Youcanlockaccesstoprogrammesforwhichparentalguidanceis required.
If you activate this lock, you will need to enter the parental code every time you want to watch a program that requires parental guidance.
Use this feature to prevent your children from viewing content without your guidance.
1 Go to Parental Guidance.
2 Set the parameter to On.
3 Press the OK to validate.
Changing your Parental code
Theparentalcodeisinitiallydefinedduringthefirstinstallation,andisusedtolockaccesstotherecorderandchannels.
1 Go to Change parental code.
2 Enter the current four-digit code using the remote control.
3 Enter your new parental code and confirm it (0000 is not accepted).
4 Press the OK to validate.
Technical Settings
Setting your User preferences
1 Go to MENU > Configuration > Technical Settings > User preferences.
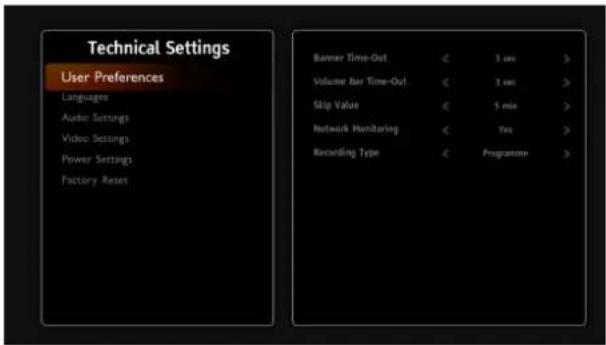
2 Select the settings best suited to your needs:
- Banner time-out: you can set how long you want the channel bar and information banners to stay onscreen.
• Volume bar time-out: you can set how long you want the volume bar to stay onscreen when you turn the volume up, down, or mute it. - Skip value: you can define how many minutes you want to skip forward or backwards when you use the [id] keys.
• Network monitoring: by activating this feature, you will be automatically informed when any new channels or services become available.
- Recording type: By default, the recorder will monitor the signalisation to start and end the recording when the programme is really broadcasted. It allows also to have recording of series. If the programme starts slightly early or finishes slightly late you may sometimes miss part of the expected programme. This recording mode is identified as Programme type.
You can programme recording margins which will be automatically added to the recordings carried out via the TV Guide. This allows you to avoid missing the beginning or end of programmes that start slightly early or finish slightly late by setting the receiver to start recording before the programme is due to start and stop after it is due to end.
- If you select recording type to Timer you will loose the automatic rescalling of schedule recodrdings and the possibility to record all episodes of a serie automatically.
To activate this feature: - Set the recording type to Timer.
- Select the desired starting and ending times (from 0 to 15 minutes).
Setting your language options
Tosetyourlanguageoptions:
1 Go to MENU > Configuration > Technical Settings > Languages

2 Select the audio and subtitle languages you want.
Programmes will be broadcast in the selected audio language, provided it is available. Your choice of subtitle language will be applied if available.
3 You can also activate the Audio Description feature and Subtitles features in this menu.
Programmes providing this service will be shown with the service activated using the main audio language.
Audio settings
Checktheuserguidesofyouraudioequipmenttoknowwhat settingsyouneed.
1 Go to MENU > Configuration > Technical Settings > Audio Settings.
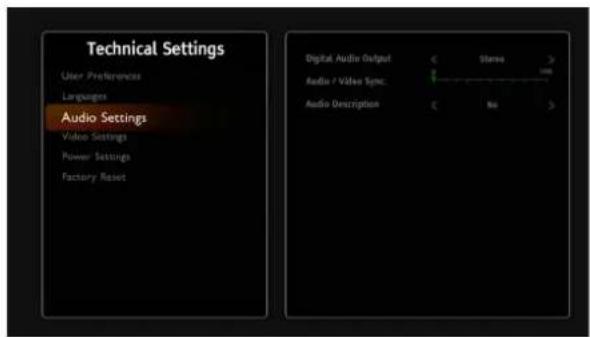
2 If you have connected your receiver to a home cinema system via the Digital audio connector, set Digital audio output to Dolby. Otherwise, leave it set to Stereo.
3 If the sound and picture are not perfectly synchronised, adjust the Audio / Video sync setting (default value is 0 milliseconds) using the and keys.
4 If the audio volume varies noticeably between programmes because of the audio type broadcast (Stereo, Dolby, etc.), adjust the volume (default value is 12 decibels) in Adjusting level of Dolby using the and keys.
5 To activate the Audio description feature, set Audio description to Yes.
6 Adjust the Audio description level volume using the ▶ and ▶ keys.
Picture settings
Checkthemanualsofyourvideoequipmenttoknowwhatsettingsyouneed.Yourchoicesofpicturesettingswillapplytoallprogrammes,onallchannels.
1 Go to MENU > Configuration > Technical Settings > Video settings.
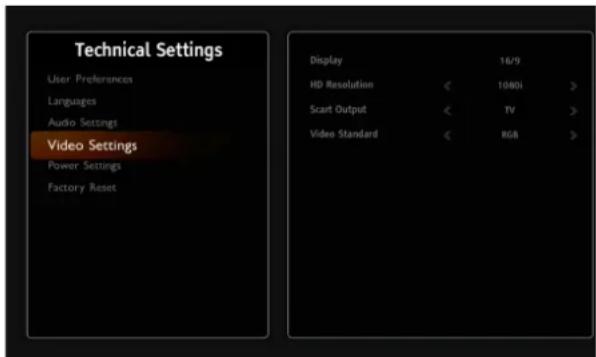
2 Select the settings best suited to your needs:
- Display: select the display mode for your TV: 16/9 (widescreen TV), 4/3 (Traditional TV) or Auto (programme format will be respected - 16:9 or 4:3).
- HD Resolution: If your TV set is connected to the recorder with an HDMI cable, select the resolution better suited to your HD TV set (1080p, 1080i, 720p or 576p). If you have a standard TV set, set the resolution at 576p.
- Scart Output: if you connected your TV to the recorder with a SCART cable, select TV mode. If you connected a VCR/DVD recorder to the SCART connector, select Recorder mode.
In TV mode, audio volume changes and onscreen messages will be sent to the TV set. In Recorder mode, none of these operations are sent to the external recording device so that they do not affect your recordings.
- Video standard: select the video standard (PAL, RGB or S-Video) best suited for the TV/AUX SCART output.
Setting the power parameters
1 Go to MENU > Configuration > Technical Settings > Power Settings.
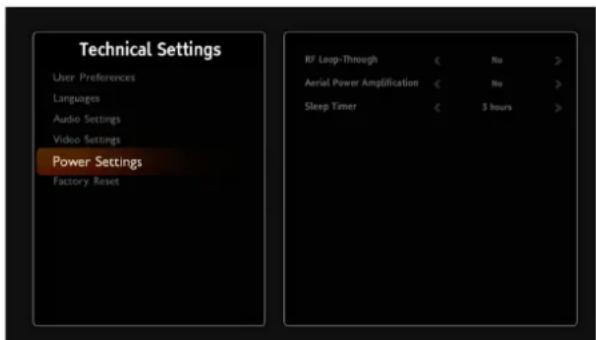
2 Select the settings best suited to your needs
- RF Loop-Through: set this parameter to Yes if you have a device connected to the RF loop-through output of the box.
An RF loop-through is used to forward the raw antenna signal coming into your receiver to another TV or receiver. Activate this option if the other TV or receiver does not receive signal.
- Aerial Power Amplification: If you use an indoor active antenna with an amplifier and if you want the recorder to supply it with power (5V power voltage -50mA max.), set Aerial Power Amplification to Yes. Otherwise, leave it on No.
- Sleep Timer: you can set the recorder to automatically switch to standby mode after a specific period of inactivity. If you activate this feature, select the desired sleep time (from 1 hour to 12 hours). By default, the recorder automatically switch to standby mode after 3 hours.
Resetting the recorder and formatting the hard disk drive

Warning
- If you reset the default settings, you lose the channels, settings and scheduled recordings you made.
- If you format the hard disk drive, you lose all the recordings saved in your recording library.
- Take care that the format of the hard disk drive can take several minutes at next initialization and is depending of the size of the hard disk drive.
1 Go to MENU > Configuration > Technical Settings > Factory reset.
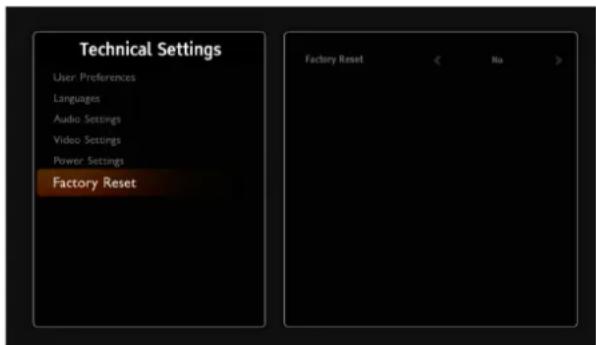
2 Enter your parental code and press the key
3 Select Yes or Include HDD Format. If you choose to Include HDD Format, the receiver will return to default settings and also ALL of your recordings will be deleted. To cancel the operation, select No, or press the BACK EXIT key.
4 Press the key to confirm the reset.
5 Once the default settings are restored, the recorder installation screen is displayed.
You can then reconfigure your recorder (see Running your first installation, page 14).
Information and Support
The information contained in this menum may be requested if you contact your supplier or our technical support service.
You will find here important information about there recorder, the hard disk drive, the embedded software and the customers support details.
Toaccesstherecordertechnicalinformation,goto>
MENU
Configuration >Information and Support.
Antenna Signal Information
GotoSignal Information.
Thismenuletsyoufindoutthesignallevelandqualityofyour antenna,basedonthechannelbeingwatched.
Network Information
GotoNetwork Information.
Thismenudisplaysthenetworkinformationofyourdecoder(IP address,etc...)whenitisconnectedtoyourhomenetworkvia Ethernet.
Recorder Information
GotoProduct Data.
Thismenuprovidesinformationontherecordersoftwareandhardware.
Hard disk drive Information
GotoHDD Data.
Thismenuprovidesinformationontheharddiskdrive.
Customer support information
GotoSupport and Help.
Thismenuprovidesinformationonwheretogettechnicaladviceand supportifneeded.
10 Environment
PreservationoftheenvironmentisanessentialconcernofPhilips. ThedesireofPhilipsistoooperatesystemsobservingthe environmentandconsequentlyithasdecidedtointegrate environmentalperformancesinthelifecycleofitsproducts,from manufacturingtocommissioning,useandelimination.
Meaning of logos present on the product or its packaging
Europeanregulationsrequirepackagingtoberecycled.It mustnotbediscardedwithunsortedwaste.Therearelocal arrangementsforsortingandrecyclingthiswaste.

The loopedarrowsignmeansthatthepackagingmaybe recycledandmustnotbedisposedofwithhousehold waste.

Theologowiththreearrowsshownontheplasticparts meansthattheymayberecycledandthattheymustnotbe disposedofwithhouseholdwaste.

Thecrossed-outdustbinsignstuckontheproductorits accessoriesmeansthatattheendofitslife,theproductis subjecttoselectivecollectionandmustnotbethrownaway inunsortedhouseholdwaste.
Product recycling and disposal
Tofacilitaterecycling,pleaserespectthesortingrulesetuplocally forthiskindofwaste.
If your product contains batteries, they must be disposed of at appropriate collection points.

Europeanregulationsaskyoutodisposeofproductsbelonging efamilyofelectricalandelectronicequipmentssselectively:
- Atthecollectionpointsmadeavailabletoyoulocally(drop-off centre,selectivecollection,etc.),
- Atsalespointsintheeventofthepurchaseofsimilarequipment. Inthiswayyoucanparticipateinthere-useandupgradingof ElectricalandElectronicEquipmentWaste,whichcanhaveaneffect ontheenvironmentandhumanhealth.
European Directive on Waste Electrical and Electronic Equipment (WEEE)
Inthecontextofsustainabledevelopment,thereductionofwastes tobeeliminatedbyreusing,recycling,compostingandenergy recoveryisstronglyadvised.
InordertocomplywiththisdirectivewhichisapplicabletoEEEssold after 13/08/2005,yourrecorderwillbetakenbackfreeofchargeand recycledbythedistributoroftheEEEwithinthelimitsofthequantity andtypesofequipmentboughtfromthem.Theseapplianceswhich containsubstancespotentiallydangeroustohumanhealthandthe environmentwillberecycled.
Directive on the Restriction of use of certain hazardous substances in electronic equipment (RoHS)
Yourrecorderalongwiththebatteriessuppliedcomplywiththe directiverelatingtotheRoHS—dangerousmaterialssuchaslead, mercuryorcadmiumarenotused. Thisavoidsenvironmental hazardsandanyriskstothehealthofpersonnelattherecycling centres. Thebatteriesoftheremotecontrolcanberemovedsimply. Note: Whenthebatteriesoftheremotecontrolarewomout, pleasedisposeofthematacollectionpointandnotwithhousehold waste.
Electrical consumption of the recorder
Toreducetheconsumptionofyourrecorder,youarerecommended toplaceitinstandbymodewhennotinuse.Werecommendthat youtumofftherecorderorunplugitfromthemainsifyouwillnot beusingitforaprolongedperiodoftime.
FAQ
AFAQ(Frequently asked questions) is available for the common questions.
To access the FAQ, go to MENU > Features > FAQ
Using the recorder
| Problem Solution | |
| The remote control is not working. | Point the remote control at the recorder.Check the battery life and check the batteries are inserted properly. |
| The recorder display shows no information (no time, no channel number, etc.). | Switch the recorder on by pressing the On/Off button.Check all the connections (seeConnecting your devices, page 10). |
| The recorder displays - -: - - in standby mode. | Take the recorder out of standby mode by pressing the ⏻ key.Check that the antenna signal is correctly detected (seeAntenna Signal Information, page 30). |
| The recorder displays a black screen or an error message. | Check that the antenna signal is correctly detected (seeAntenna Signal Information, page 30).Search for programmes (seeSearching for channels, page 26). |
| The picture is frozen / unclear. | Check all the connections, check the antenna and search for programmes again (seeSearching for channels, page 26). |
| The recorder cannot find any channels. | Check the antenna reception (seeAntenna Signal Information, page 30).Search for programmes (seeSearching for channels, page 26).Contact your antenna installer/dealer for more information on your antenna installation. |
| The TV set does not switch to the recorder when it leaves standby mode. | Check that your TV set is correctly connected to your recorder (seeConnection to the TV set, page 10).Select the appropriate input on your TV set. |
| There is no sound in HOME CINEMA mode on some channels. | Check that the recorder is connected to a Home cinema amplifier with a digital link (seeConnection to a Home cinema system, page 11). |
| Black and white video on TV/AUX output (during VCR/DVD recording). | Check that the signal type chosen for TV/AUX SCART output is compatible with your VCR (select PAL on VCR, seePicture settings, page 29). |
| I cannot reach all channels when I am recording two programmes at the same time. | When you are recordings two programmes at the same time, you are only able to view one of the two channels being recorded. As soon as one of the recordings ends, you will be able to access other channels normally again. |
| A black screen (no video) appears at the end of a recording. | Some channels stop their broadcast with a fixed image or no video. When a recording ends on such programmes, the video recording stops but the time counter continues until the end of the scheduled recording time. Make sure that you set your manual recordings with the correct end time. |
| For any other problem. | Perform a default factory reset (seeResetting the recorder and formatting the hard disk drive, page 29). |
Updating the software
Therecorderautomaticallydownloads'overtheair'newsoftware andserviceswhentheybecomeavailable.
YoucanalsoupdateyourdecoderusingaUSBkey.Pleasecheck www.philips.comtofindmoreinformationandthemostrecent softwareversionforyourproduct.Acleardemonstrationvideowill showyouhowtoeasilyupdateyourrecorderusingtheUSBport. Ifaproblemisencounteredduringthedownload,therecorder displaysonitsfrontpanelanerrorcode.
Error code Meaning/Action
| • Er00 | The software currently in the recorder is identical to the software available. Recorder updating is therefore not necessary. |
| • Er02• Er09• Er10• Er11 | • The signal quality does not enable the software to be correctly acquired. Press the key to continue the process.• Check the signal strength and quality (see Antenna Signal Information, page 30) then retry. |
Foranyothererrormessages, contact our customers service team on 08450900315.
12 Customer Support
AtPhilipswebelievethatahighqualityproductshouldcomewith thehighestqualitycustomerservice.
Inthedesignofthisproductwehavetakengreatcaretoensurethe maximumqualitypossibleandaresurethatyouwillbedelighted withyourpurchase.
However, in ther are event that you have any problem with the product and need advice or support you can be confident that we will do our best to help you.
Ourdedicatedtechnicalhelpdeskcanbecontactedfrom09:00-17:00,MondaytoFridayandwillofferexpertguidanceonyour product.
Intheeventofanytrouble, pleasedonothesitatetocallthemon:
0845 090 0315*
*3.95 pence per minute from all fixed lines, tariff cost effective from 01/09/2009
13 Specifications
DUAL DVB-T/T2 FRONT END
RF INPUT
• 2RFtuners(w.intemalsplitter)
- Inputfrequencyrange:UHF470-862(8MHzbandwidth)
- Inputsignallevel:-90to-20dBm
- Inputimpedance:75Ohmsunbalanced
• Tuningstep | 66,66kHz
DVB-T DEMODULATOR
• Transmissionmode: FFT2k&8k, MFN and SFN network supported
• Constellation: QPSK, 16-QAM&64-QAM
• Guardinterval: 1/4, 1/8, 1/16&1/32
- Mode:Nonhierarchical
• Coderate: 1/2,2/3,3/4,5/6&7/8
• Outerdecoder:ReedSalomon(204,188,8)
DVB-T2 DEMODULATOR
- Transmissionmode: FFT1K,2k,4K,8k,8KEXT,16K,16KEXT,32K&32KEXT
MFNandSFNnetworksupported
• Constellation:QPSK,16-QAM,64-QAM&256-QAM
• Guardinterval: 1/4, 19/128, 1/8, 19/256, 1/16, 1/32 & 1/128 - Singleandmultiple-PLPs
• LDPCCoderate: 1/2,3/5,2/3,3/4,4/5&5/6 - Outerdecoder:BCH
Data Port
ETHERNET 10/100BT
• FullyintegratedIEEE802.3/802.3u10/100baseT-Physicallayer
• Auto-negotiation 10/100
- HostUSB2.0Highspeed(480Mbits/s)
USB
Processor and Memories
- Processor:STi7105-800MIPS
• RAMmemory256Mbytes - Flashmemory64Mbytes
- EEPROMemulatedintoFlash
2½" hard disk drive
- Capacity:therecordingcapacityofyourrecorderdependson themodel.
- Noiseunderoperation(typ.):<30dBA
Video Decoding
MPEG2
• StandardMPEG-2MP@HLfor50Hz
- Inputrates(max):15Mbit/s
MPEG-4 Part 10 / H.264
• MPEG-4AVCHP@L4(HD)for50Hz
- Inputrates(max):20Mbit/sforHP@L4
• MPEG-4AVCHP@L3(SD)for50Hz
- Inputrates(max):10Mbit/sforHP@L3
• CABACandCAVLCdecoding
- Supportsallintra/interpredictionmodesandblocksizes,I,Pand Bpicturetypes
- Fidelityrangeextensions(8x8Transforms,8x8SpatialPrediction Mode,DynamicQuantizationMatrix)
Audio Decoding
Stereo 2.0
• MPEG-1 layer I & II (Musicam)
- MPEG-2layerII
• AAC
• Mode:Mono, stereo, jointstereo
• Samplingrates32,44.1 or 48KHz
Multichannel 5.1
• DOLBYDigital(AC3)
• Mode: passthroughanddownmixing
• DOLBYDigital+(E-AC3)
• Mode:passthrough,transcodingDolbyDigital,anddownmixing
- MP3codec
Output Resolution Format
For HD broadcast
• 1280×720@50Hz(progressive)
• 1920×1080@25Hz(interlaced)
- Unscaled(originalformat)orscaled576i,720pand1080pbyset upmenu
For SD broadcast
• 720x576@50Hzinterlaced
- Unscaled(originalformat)orscaled720pand1080ibysetup menu
Format function on TV SCART
• 4/3and16/9withconversionPanandScan,Letterbox
SD INPUT/OUTPUT
SCART (TV setup configuration)
- RGBout, PALin/out, volumecontrolAudioR/L, Fastblanking out, Slowblankingout
SCART (Recorder setup configuration)
- RGBin, PALout, S-Videoout, fixedvolumeAudioR/L, Slow blankingout
HDMI Output
HDMI 1.3 and HDCP 1.1
• VIDEO:YCrCb
• AUDIO
• 2 channels PCM in case of MPEG1-layer II
• Dolby Digital or PCM in case of AC3 beat stream (*)
- Dolby Digital Plus, Dolby Digital or PCM in case of E-AC3 beat stream (*)
• (*)accordingofE(EDID)information
AUDIO Output
HiFi audio output
- Adjustableaudiolevel
• Mono/Stereo in case of MPEG1-layer II - Two channels down mixed in case of AC3, E-AC3, HEAAC audio stream
Coax S/PDIF
- Stereoaudio setup:
• Fixedaudiolevel-20dBLKFS
- Two channels PCM in case of MPEG1-layer II or AAC stream
- Two channels PCM down mix in case of AC3/E-AC3/HEAAC streams
• Multichannelaudiosetup:
• Fixedaudiolevel-31 dBLKFS
- Two channels PCM in case of MPEG1-layer II or AAC stream
• Originally received bit stream in case of AC3
• Transposed AC3 in case of E-AC3
Front panel
- 1x4-Digit7-segmentLEDdisplay
- IxlRsensor:38kHz
- IxBicolourLED
- 3xButtons(P+,P-,Standby)
- 1xUSB2.0connector(TypeAHost)
Rear panel
- IxRInput(IEC169-24-F)
• IxRFoutput(IEC169-24-M)
• 1xRJ45(Ethernet10/100BT)
• IxSCART(IEC60807-9)
• 3xRCA(StereoL/R,S/PDIF) - IxHDMIwithHDCP
power supply
- ExternalAC/DCadapter
- Mainsupplyvoltage:220-240V\~50Hz
• Max.Powerconsumption:<13W - Standbyconsumption:<1W
Physical Specifications
Recorder:
• Size(wxdxh):260x160x48mm
- Weight:\~0.8Kg
- Operatingtemperature: 0°Cto + 40°
- Storagetemperature:-25°C to +65°C
Accessories
- IxExternalAC/DCadapter+Powercord
- IxRemotecontrol
- 2xAABatteries
- 1xHDMIcord(1.5m)
- |xUsermanual
- IxQuickstartguide
14 Guarantee Terms

Note
• In order to apply the guarantee, you should contact your retailer or Philips helpdesk at 0845 090 0315* or visit www.philips.co.uk/support
• Proof of purchase will be required. Should any malfunctioning arise, the retailer or Philips helpdesk will advise you what to do.
If you bought your equipment from Philips directly, the following shall apply:
1) Philipsundertakestoremedybyrepair,freeofchargeforlabour andreplacementparts,anydefectsintheequipmentduringaperiod oftwentyfour(24)monthsfromthedateoforiginaldeliveryofthe equipment,wherethosedefectsarearesultoffaultyworkmanship. Duringthisttwelve-monthguaranteeperiod,thedefectiveequipment willberepairedfreeofcharge;thecustomermusthoweverreturn thedefectiveequipmentinitsoriginalpackagewithallaccessoriesat his/herownexpense,totheaddressgivenbyPhilipsAfterSales Department,thephonenumberofwhichcanbefoundonthe deliveryslip.UnlessthecustomerhasconcludedwithPhilipsa maintenancecontractfortheequipmentwhichspecificallyprovides forrepairstobecamiedoutatthecustomer'sresidence,therepairs willnotbecarriedoutontheequipmentatthecustomer'sresidence. Thefollowingsentenceappliestopurchasesofequipmentforthe customer'strade,businessorprofession.
ExceptasotherwiseexpresslyprovidedinthisDocumentandtothe extentpermittedbylaw,Philipsmakesnorepresentationsor warranties,expressorimplied,statuetteorotherwise,andtosuch extent,alltermsandconditionsimpliedbylawareherebyexcluded. ThisguaranteedoesnotaffecttheCustomer'sstatutoryrights.
2) Exclusions from Guarantee
Philipsshallhavenoliabilityundertheguaranteeinrespectof:
- damage, defectsbreakdownnormalfunctiondueto:
- failuretoproperlyfollowtheinstallationprocessand instructionsforuse,or
- anexternalcausetotheequipment(includingbutnotlimited to,lightning.fire,shockorwaterdamageofanynature),or
- modificationsmadewithoutthewrittenapprovalofPhilips, or
- afailureomeglecttomaintaintheequipmentor inappropriatemaintenance,or
- unsuitableoperatingconditions,particularlyoftemperature andhumidity,or
- repairormaintenanceoftheequipmentbypersonsnot authorisedbyPhilips,
- theremovaland/ordestructionofthelabelpositionedonthe fixationscrewofthelowerplasticcover,
- wearandtearfromnormaldailyuseoftheequipmentandits accessories,
- damageduetoinsufficientorbadpackagingofequipmentwhen returnedtoPhilips,
• supplyofnewversionsofsoftware,
• workonanyequipmentorsoftwaremodifiedoraddedwithout thepriorwittenconsentofPhilips,
- malfunctionsnotresultingfromtheEquipmentorfromsoftware installedinuserworkstationsforthepurposeofuseofthe equipment,
- communicationproblemsrelatedtoanunsuitableenvironment, including:
- problemsrelatedtoaccessand/orconnectiontothelntemet suchasinterruptionsbyaccessnetworksormalfunctionof thelineusedbythesubscriberorhiscorrespondent,
• transmissionfaults(forexamplepoorgeographicalcoverage byradiotransmitters,interferenceorpoorlinequality), - thelocalnetworkfault(wiring,servers,workstations)orthe failureofthetransmissionnetwork,
- thenormalservicing(asdefinedintheuserguidesuppliedwith theequipment)aswellasmalfunctioningduetoservicingnot beingcarriedout,servicingcostsareinanyeventalwaysborne bythecustomer.
* 3.95 pence per minute from all fixed lines, tariff cost effective from 01/09/2009

PHILIPS and the PHILIPS' Shield Emblem are registered trademarks of Koninklijke Philips Electronics N.V. and are used by Sagemcom Broadband SAS under license from Koninklijke Philips Electronics N.V.
© 2012 Sagemcom Broadband SAS
All rights reserved
Broadband Business Unit


- USER MANUAL
- PHILIPS
- CONGRATULATIONS
- CEMARKING
- CONTENTS
- 1 SAFETY RECOMMENDATIONS 4
- 2 WHAT'S IN THE BOX 6
- 3 CONNECTING YOUR DEVICES 10
- 4 BEFORE STARTING 12
- 5 RUNNING YOUR FIRST INSTALLATION 14
- 6 YOUR RECORDER'S MAIN COMMANDS 16
- 7 VIDEO RECORDINGS 20
- 8 MULTIMEDIA PLAYER 24
- 9 ADJUSTING THE INSTALLATION PARAMETERS 26
- 10 ENVIRONMENT 31
- 11 TROUBLESHOOTING 32
- 12 CUSTOMER SUPPORT 34
- 13 SPECIFICATIONS 35
- 14 GUARANTEE TERMS 37
- 1 SAFETY RECOMMENDATIONS
- WHERE TO PUT YOUR RECORDER
- WARNINGS AND SAFETY INSTRUCTIONS
- BATTERIES
- INTERFERENCE
- HARD DISK
- USB STORAGE DEVICES
- CLEANING THE RECORDER
- FRONT PANEL OF THE RECORDER
- REAR PANEL OF THE RECORDER
- ①
- ② 0 TO 9
- ③ I
- ④
- ⑤ MENU
- ⑥ V+ V
- ⑦ ◀ ▷ △ ▽
- ⑧ BACK
- ⑨ LIBRARY
- ⑩ON-SCREEN OPTIONS (MHEG, TELETEXT PAGES AND MENU)
- ⑪ MP
- ⑫ TEXT
- ⑬ AD
- ⑭ SUB
- ⑮ SETTINGS
- ⑯ EXIT
- ⑰ OK
- ⑱ P+ P
- ⑲ TV GUIDE
- 20 ■ ▶ II
- ⑳
- 22 PIP
- ②3 TV/AV
- 24
- 3 CONNECTING YOUR DEVICES
- CONNECTION TO THE TERRESTRIAL ANTENNA
- STANDARD OUTDOOR ANTENNA
- INDOOR ANTENNA
- CONNECTION TO THE ANTENNA
- CONNECTION TO THE TV SET
- CONNECTION TO A HIGH-DEFINITION TELEVISION SET USING AN HDMI LEAD
- CONNECTION TO A STANDARD-DEFINITION TELEVISION SET
- CONNECTION TO A VCR/DVD RECORDER
- CONNECTION TO A HOME CINEMA SYSTEM
- CONNECTION TO A HI-FI UNIT
- CONNECTION TO YOUR ETHERNET NETWORK
- 4 BEFORE STARTING
- BASICS OF THE MENU SYSTEM
- MENU TREE
- 5 RUNNING YOUR FIRST INSTALLATION
- NOTE
- SELECTING YOUR REGION
- 6 YOUR RECORDER'S MAIN COMMANDS
- SELECTING A TV CHANNEL
- USING THE KEYS P+ AND P-, OR KEYS 0-9
- USING THE CHANNEL LIST
- PROGRAM INFORMATION BANNER
- DETAILED PROGRAMME INFORMATION
- USE THIS KEY... TO
- ADJUSTING THE AUDIO VOLUME
- USING THE PICTURE IN PICTURE (PIP) FEATURE
- CHANGING THE FAVOURITES LIST
- TEMPORARILY SELECTING AUDIO LANGUAGES, SUBTITLES AND AUDIO DESCRIPTION
- ACTIVATING AND USING AUDIO DESCRIPTION
- TELETEXT AND INTERACTIVE SERVICES
- TV/AUX SWITCH
- TV GUIDE
- LIVE MODE/DEFERRED MODE
- PAUSE / PLAY
- REWIND
- FAST FORWARD
- STOP
- RECORDING PROGRAMMES
- RECORDING A LIVE PROGRAMME
- RECORDING PROGRAMMES FROM THE TV GUIDE
- PLAY A RECORDING PROGRAM
- TO ACCESS THE RECORDING LIBRARY
- 7 VIDEO RECORDINGS
- IMMEDIATE RECORDING (LIVE OR DEFERRED PROGRAMME)
- TO RECORD A LIVE PROGRAMME
- TO RECORD A PROGRAMME THAT YOU HAVE BEEN WATCHING FROM AN EARLIER POINT (2HOURSMAXIMUM)
- RECORDING PROGRAMMES FROM THE RECORDING SCHEDULE MENU
- SCHEDULING A RECORDING MANUALLY
- EDITING SCHEDULED RECORDINGS
- RECORDING MODES: TIMER OR PROGRAMME
- TIMER MODE
- PROGRAMME MODE
- RECORDING PROGRAMMES USING THE TV GUIDE
- TO ACCESS THE RECORDING LIST
- ACCESSING LOCKED RECORDINGS
- MANAGING THE RECORDING LIST
- ACTION KEYS USED
- SELECTING RECORDED PROGRAMMES
- SORTING YOUR RECORDINGS
- CREATING FOLDERS
- ITEM DESCRIPTION
- MOVING RECORDINGS IN AN EXISTING FOLDER
- ERASING RECORDINGS
- RENAMING RECORDINGS
- 8 MULTIMEDIA PLAYER
- NAVIGATING IN THE MEDIA PLAYER
- THIS ICON... REPRESENTS
- VIEWING PHOTO FILES
- PLAYING AUDIO FILES
- VIEWING YOUR OWN VIDEO FILES
- IMPORTING/EXPORTING MULTIMEDIA FILES
- 9 ADJUSTING THE INSTALLATION PARAMETERS
- CHANNEL SEARCH
- SEARCHING FOR CHANNELS
- SEARCHING MANUALLY FOR CHANNELS
- CHANNEL MANAGEMENT
- CREATING AND MANAGING FAVOURITE LISTS
- TO CREATE A FAVOURITE LIST
- CHANNEL LOCKING
- PARENTAL CONTROL OPTIONS
- RECEIVER LOCKING
- HIDING ADULT CHANNELS
- PARENTAL GUIDANCE
- CHANGING YOUR PARENTAL CODE
- TECHNICAL SETTINGS
- SETTING YOUR USER PREFERENCES
- SETTING YOUR LANGUAGE OPTIONS
- AUDIO SETTINGS
- PICTURE SETTINGS
- SETTING THE POWER PARAMETERS
- WARNING
- INFORMATION AND SUPPORT
- CONFIGURATION >INFORMATION AND SUPPORT
- ANTENNA SIGNAL INFORMATION
- NETWORK INFORMATION
- RECORDER INFORMATION
- HARD DISK DRIVE INFORMATION
- CUSTOMER SUPPORT INFORMATION
- 10 ENVIRONMENT
- MEANING OF LOGOS PRESENT ON THE PRODUCT OR ITS PACKAGING
- PRODUCT RECYCLING AND DISPOSAL
- EUROPEAN DIRECTIVE ON WASTE ELECTRICAL AND ELECTRONIC EQUIPMENT (WEEE)
- DIRECTIVE ON THE RESTRICTION OF USE OF CERTAIN HAZARDOUS SUBSTANCES IN ELECTRONIC EQUIPMENT (ROHS)
- ELECTRICAL CONSUMPTION OF THE RECORDER
- FAQ
- USING THE RECORDER
- UPDATING THE SOFTWARE
- 12 CUSTOMER SUPPORT
- 13 SPECIFICATIONS
- DUAL DVB-T/T2 FRONT END
- RF INPUT
- DVB-T DEMODULATOR
- DVB-T2 DEMODULATOR
- DATA PORT
- ETHERNET 10/100BT
- USB
- PROCESSOR AND MEMORIES
- 2½" HARD DISK DRIVE
- VIDEO DECODING
- MPEG2
- MPEG-4 PART 10 / H.264
- AUDIO DECODING
- STEREO 2.0
- MULTICHANNEL 5.1
- OUTPUT RESOLUTION FORMAT
- FOR HD BROADCAST
- FOR SD BROADCAST
- FORMAT FUNCTION ON TV SCART
- SD INPUT/OUTPUT
- SCART (TV SETUP CONFIGURATION)
- SCART (RECORDER SETUP CONFIGURATION)
- HDMI OUTPUT
- HDMI 1.3 AND HDCP 1.1
- AUDIO OUTPUT
- HIFI AUDIO OUTPUT
- COAX S/PDIF
- FRONT PANEL
- REAR PANEL
- POWER SUPPLY
- PHYSICAL SPECIFICATIONS
- RECORDER
- ACCESSORIES
- 14 GUARANTEE TERMS
Brand : PHILIPS
Model : HDTP8530
Category : Voice recorder