
Traveller - Knife Victorinox - Free user manual and instructions
Find the device manual for free Traveller Victorinox in PDF.


| Product Type | Pocket Knife |
| Brand | Victorinox |
| Model | Traveller |
| Blade Material | Stainless steel |
| Handle Material | Cellidor (synthetic) |
| Number of Tools | 12 |
| Locking Blade | Yes |
| Closed Length | 91 mm (3.6 inches) |
| Weight | 82 g (2.9 oz) |
| Key Features | Locking blade, scissors, corkscrew, can opener, bottle opener, reamer, tweezers, toothpick |
| Power Source | None (manual) |
| Maintenance | Rinse with water, dry thoroughly, lubricate moving parts with oil |
| Cleaning Instructions | Hand wash only; do not use dishwasher or abrasive cleaners |
| Safety Features | Locking mechanism prevents accidental closure; blunt tip on some tools |
| Warranty | Limited lifetime warranty |
| Country of Origin | Switzerland |
| Repairability | Replacement parts and service available from Victorinox |
| Included Accessories | Belt pouch (depending on packaging) |
Frequently Asked Questions - Traveller Victorinox
User questions about Traveller Victorinox
0 question about this device. Answer the ones you know or ask your own.
Ask a new question about this device
Download the instructions for your Knife in PDF format for free! Find your manual Traveller - Victorinox and take your electronic device back in hand. On this page are published all the documents necessary for the use of your device. Traveller by Victorinox.
USER MANUAL Traveller Victorinox
Traveller, Traveller Lite and Expedition Lite
Operating instructions and product features
Initial startup (m, °C, 24h)
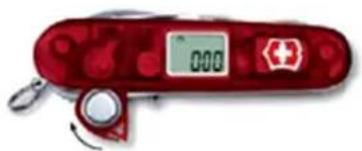
The functions of the Traveller can be checked when the battery is inserted:
- Segment check Do all segments light up?
- Beep tone Is a sound heard?
- Background Is the light switched lighting on briefly?
After this automatic function test, the present altitude is first displayed briefly after which the display changes over to the time mode. The European system of units (height = m, temperature = °C, time mode = 24h) is already preset.
Initial startup (ft, °F, 12h)

To set the American system of units (height = ft, temperature = °F, time mode = 12h). Insert new battery, press the Victorinox emblem while closing the battery compartment. The function test then takes place as described above.
Choice of menu

Press the Victorinox emblem briefly to select the desired menu.
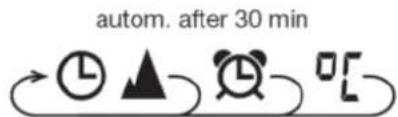
If the button is not pressed for more than 30 min in the "Altimeter", "Alarm" and "Temperature" menus, the display automatically reverts to the time mode.
Background lighting
Press the Victorinox emblem for 1.5 seconds to switch the background lighting on. The light goes out again 3 seconds after the last actuation. The background lighting is automatically switched off on changeover to the setting mode (except in the alarm function).
C = continuous pressure
Setting watch
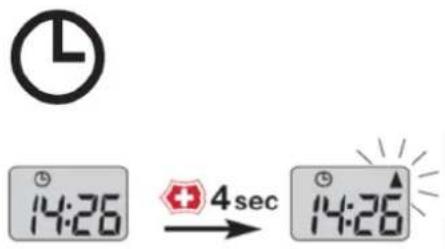
Press the Victorinox emblem for 4 seconds until the display flashes. Now release the Victorinox emblem again. You have changed to the time setting mode.
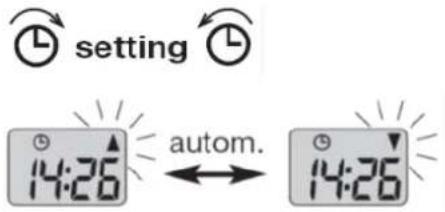
The arrow shows the current setting direction. The change takes place automatically.

If the Victorinox emblem is pressed for longer than this (min. 6 seconds), the adjusting speed is increased (20 digits/s).
C = continuous pressure min. 6 sec
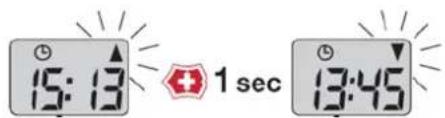
Brief pressure on the Victorinox emblem alters the display by one digit in the arrowed direction.
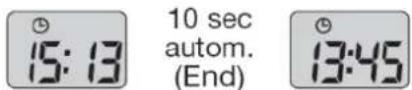
If the button is not pressed within 10 seconds, the setting mode is quit automatically and the new display accepted.
Setting the time format
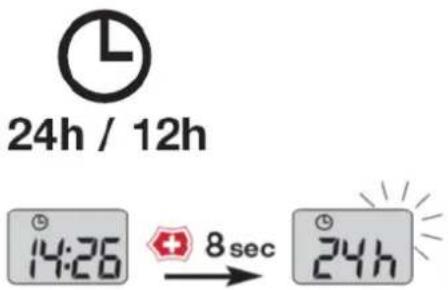
Press the Victorinox emblem for 8 seconds until the display changes to the "24h/12h" submenu. Release the Victorinox emblem again.
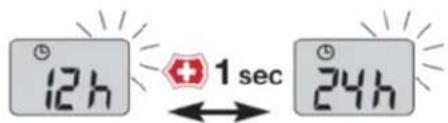
Press the Victorinox emblem briefly while the display is flashing to change the time format. In the 12h mode, the time is indicated with the added letters "pm" in the afternoon (0.00 - 12.00).
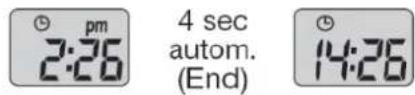
If the button is not pressed within 4 seconds, the setting mode is quit automatically and the new display accepted.
Setting the altimeter
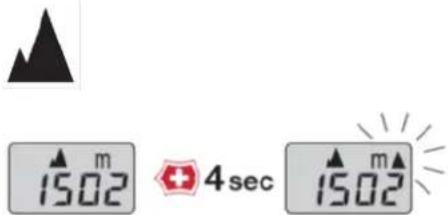
Press the Victorinox emblem for 4 seconds until the display flashes. Now release the Victorinox emblem again. You have changed over to the altimeter setting mode.
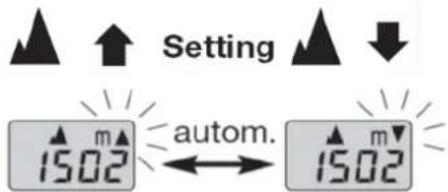
The arrow shows the present adjustment direction. The changeover is automatic.
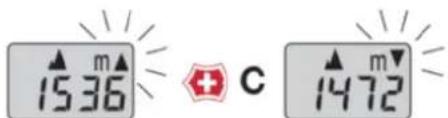
If the Victorinox emblem is pressed for a longer period (at least 6 seconds), the adjusting speed is increased (20 digits/s).

Brief pressure on the Victorinox emblem changes the display by 1 digit (meter). To increase the value which is shown, press the Victorinox emblem repeatedly while the arrow points upwards. When the correct altitude is shown on the display, wait for 10 seconds until the system has accepted the entry made by you.
![graph TD A["5nd"] --> B["1sec"] B --> C["Cold"] B --> D["Hot"] C --> E["↓"] D --> F["↓"]](/content/2026/06/1319156/images/c381852c92b8bb5e78982f03fb67f7c77a9e1e61164597ab3ee7e103ba26b4e0.jpg)
The display then changes over to the "Weather correction mode". When the Victorinox emblem is pressed briefly, the correction setting can be altered in the sequence "Stnd", "Cold", "Hot".
Stnd standard temperature for a particular altitude (tolerance ±5°C)
Cold colder than standard (difference greater than 5°C)
Hot warmer than standard (difference greater than 5°C) (Standard values see table on page 4)

If the button is not pressed within 4 seconds, the "Weather correction mode" is quit automatically and the new setting accepted.
Warning!!!
To extend the battery life many times over, the altitude display has a built-in delay, therefore, the altimeter must not be used during sky diving or other similar sports.
Altitude error / Impact of atmospheric pressure fluctuations
A change in the weather causes the barometric pressure to alter; this in turn means that the displayed altitude differs from the effective altitude. The error can be eliminated by adjusting the altitude. Even on a stable day, temperature-related air pressure fluctuations of ±1 mbar may occur; this is equivalent to an altitude error of ±8 meters. Under normal weather variations, an altitude difference of 40 - 50 m may easily occur after a single day. If the pressure difference is great (storm front), a change of up to 100 m is also realistic. Over a two-day period, a difference of 200 - 250 m may occur in the event of extreme weather changes.
1 mbar > approx. 8 m
(or approx. 16 m at 5'500 m above sea level)
1 hPa = 1 mbar = 0.001 bar = 0.75 mmHg
Because of these air pressure fluctuations, an altimeter must always be readjusted before use. Set the altitude on a daily basis if you are hiking or climbing or wish to take account of weather changes. This means that the altimeter must be reset at a known altitude (e.g. at home, at a railway station, mountain hut etc.).
Altitude setting with weather correction
The altitude calculation is made using the inter-national altitude formula. This is based on an average air temperature value and pressure distribution. The different air pressure must be set before leaving on a hike by entering the known present altitude. However, the formula does not make allowance for the different temperature layers which influence the effective air pressure. It is also difficult to measure the precise air temperature in a layer of air. The subjective impression as to whether it is warmer or colder than the US standard is much simpler.
h = 2 8 8/0 . 0 0 6 5 * (1 - √ [5] pp _ 0)
Altitude formula
Standard: based on CINA- and US-Standard
These are the standard values on which the altitude formula is based:
Sea level 15°C
per 1000 m altitude increase 6.5°C temperature reduction
Example:
Sea level = 15°C
1000 m above sea level 15° C- 6.5° C = 8.5°C
| Altitude | Temperature based on CINA- and US-Standard | Normal pressure based on CINA- and US- Standard | ||
| [m] | [ft] | [°C] | [°F] | [hPa] |
| 0 | 0 | 15.00 | 59.00 | 1013.25 |
| 200 | 656 | 13.70 | 56.66 | 989.45 |
| 400 | 1'312 | 12.40 | 54.32 | 966.11 |
| 600 | 1'969 | 11.10 | 51.98 | 943.22 |
| 800 | 2'625 | 9.80 | 49.64 | 920.76 |
| 1'000 | 3'281 | 8.50 | 47.30 | 898.75 |
| 1'200 | 3'937 | 7.20 | 44.96 | 877.16 |
| 1'400 | 4'593 | 5.90 | 42.62 | 855.99 |
| 1'600 | 5'249 | 4.60 | 40.28 | 835.24 |
| 1'800 | 5'906 | 3.30 | 37.94 | 814.89 |
| 2'000 | 6'562 | 2.00 | 35.60 | 794.95 |
| 2'400 | 7'874 | -0.60 | 30.92 | 756.26 |
| 2'800 | 9'186 | -3.20 | 26.24 | 719.10 |
| 3'000 | 9'843 | -4.50 | 23.90 | 701.09 |
| 3'400 | 11'155 | -7.10 | 19.22 | 666.15 |
| 3'800 | 12'467 | -9.70 | 14.54 | 632.64 |
| 4'000 | 13'123 | -11.00 | 12.20 | 616.40 |
| 4'500 | 14'764 | -14.25 | 6.35 | 577.28 |
| 5'000 | 16'404 | -17.50 | 0.50 | 540.20 |
| 5'500 | 18'045 | -20.75 | -5.35 | 505.07 |
| 6'000 | 19'685 | -24.00 | -11.20 | 471.81 |
Example 1 (Stnd)
You are at an altitude of 600 m above sea level and measure a temperature of 13° C. The standard temperature for this altitude is 11.1° C. As the temperature difference from this standard value ( 13° C - 11.1° C = 1.9° C) is
in the range of ±5°C , the setting is left as "Stnd" in the "weather correction mode".
Example 2 (Hot)
You are at an altitude of 600 m above sea level and measure a temperature of 25° C. The standard temperature for this altitude is 11.1° C. As the temperature difference from this standard value ( 25° C - 11.1° C = 13.9° C) is greater than 5° C, the setting must be changed to "Hot" in the "weather correction mode". The standard curve is adjusted (shifted) and the altitude value is therefore calculated more precisely.
Example 3 (Cold)
You are at an altitude of 600 m above sea level and measure a temperature of 3° C. The standard temperature for this altitude is 11.1° C. As the temperature difference from this standard value ( 3° C - 11.1° C = -8.1°C) is greater than 5° C, the setting must be changed to "Cold" in the "weather correction mode". The standard curve is adjusted (shifted) and the altitude value is therefore calculated more precisely.
Note
The altimeter can also be used as a barometer (see description of the barometer).
Altitude rises > Air pressure drops > bad weather
Altitude falls > Air pressure rises > weather is improving
Barometer indicator
baro
Reference to changing air pressure at the same site enables weather forecasts to be made. If the air pressure rises, the weather can be expected to improve; if the air pressure falls, the weather is worsening.
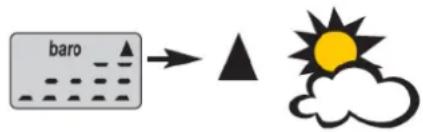
If the chart is rising from left to right, the air pressure has risen and the weather can be expected to improve.
![graph LR A["baro"] --> B["Storm Cloud"] style A fill:#f9f,stroke:#333 style B fill:#ccf,stroke:#333](/content/2026/06/1319156/images/f9912698b38eac3cd219a55a349ca9f1f742c2d5e858aaab6836d84c2ba94af3.jpg)
If the chart is falling, the weather can be expected to deteriorate.
If the chart remains stable, the weather is constant.
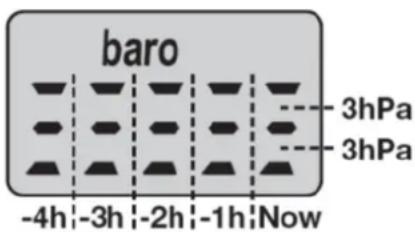
The bar chart in the main barometer menu displays the air pressure trend for the past 4 hours and therefore enables a weather forecast to be made. The chart compares the air pressure values measured 4, 3, 2 and 1 hour previously with the present value. One bar height is equivalent to 3 hPa (3 mbar).

If the difference over a 4 hour period is greater than 7hPa, the segments which extend beyond the range of 6hPa begin to flash. This is a clear indication that the air pressure is changing fast. If this happens with falling air pressure, a severe weather deterioration or even a storm, must be expected.
Barometer display reset
Reset
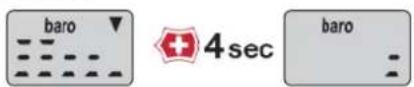
Press the Victorinox emblem for 4 seconds to reset the display.

If the difference between two measured values is too great, the barometer is automatically reset. This is equivalent to an altitude difference of 50 m within thirty minutes. The assumption is that the position rather than the weather has changed.
Significance of the arrow
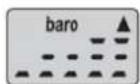
The arrow shows the barometer trend. If the arrow points upwards, the air pressure is tending to rise. If the arrow points downwards, the air pressure is tending to fall. The arrow shows whether the air pressure change is persistent. If the change is only a fluctuation, the arrow does not appear.
Setting alarm

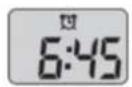


Press the Victorinox emblem for 4 seconds until the display flashes. Release the Victorinox emblem again. You have now changed over to the alarm setting mode.
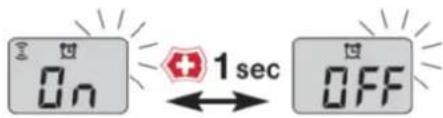
By pressing the Victorinox emblem briefly while the display is flashing, the alarm can be switched on or off. When it is switched on (On), the symbol = appears in the display.
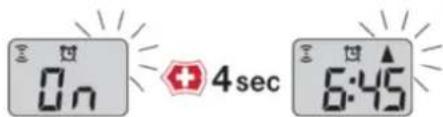
In the "On/OFF" setting mode, press the Victorinox emblem again for 4 seconds until the display flashes. Now release the Victorinox emblem. You have changed over to the setting mode submenu.

The arrow indicates the present setting direction. The change takes place automatically.
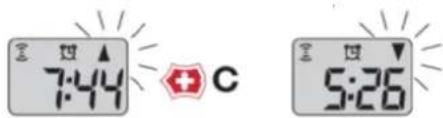
If the Victorinox emblem is pressed for longer (at least 6 seconds), the adjustment speed is increased (20 digits/s).
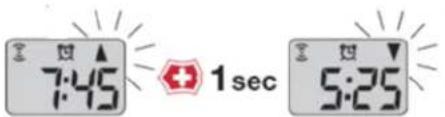
Brief pressure on the Victorinox emblem causes the display to change by one digit in the arrowed direction.
10 sec autom. (End)
If the button is not pressed within 10 seconds, the setting mode is quit automatically and the new display is accepted.
Switching the alarm off
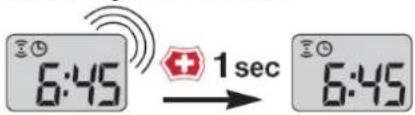
When the alarm sounds, it can be switched off by applying brief pressure to the Victorinox emblem. The alarm acknowledgement takes priority in all menus (even in the setting menus). For example, if a button is pressed in a setting mode and the alarm is actuated, the button can be released, acknowledged with a brief pressure and the action begun previously repeated again.
Deactivating the alarm
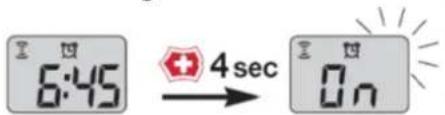
Press the Victorinox emblem for 4 seconds until the display flashes. Release the Victorinox emblem again. You have now changed over to the alarm setting mode.
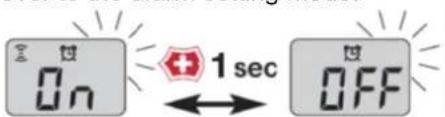
Brief pressure on the Victorinox emblem causes the alarm to be switched off (OFF).
The symbol in the display goes out.
4 sec autom. (End)
If the button is not pressed within 4 seconds, the setting mode is quit automatically.
Setting Countdown
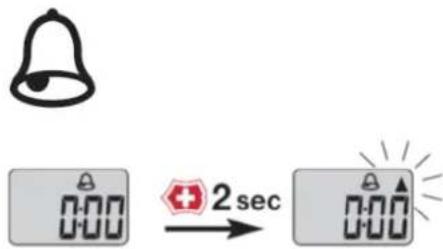
Press the Victorinox emblem for 2 seconds until a beep tone is heard and the display flashes. Release the Victorinox emblem again. You have now changed to the count-down setting mode.
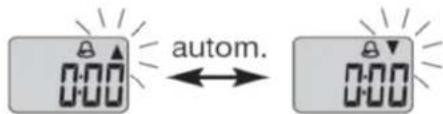
The arrow indicates the present setting direction. The changeover takes place automatically.
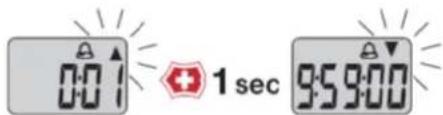
When the Victorinox emblem is pressed briefly, the display is adjusted by 1 digit in the direction of the arrow.
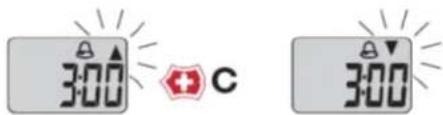
If the Victorinox emblem is pressed for longer than this (min. 6 seconds), the adjustment speed is increased (20 digits/s).
10 sec autom. Start
If the button is not pressed for 10 seconds, the setting mode is quit automatically and the time begins to run.
Switching the Countdown-Alarm off

The alarm can be switched off by pressing the Victorinox emblem briefly.
Restart Countdown
Restart


The countdown can be started with the value set previously. Press the Victorinox emblem for 2 seconds until a beep tone is heard and the display flashes. The countdown jumps to the value set last. After 10 seconds, the countdown is started with this value.
Reset Countdown
Reset

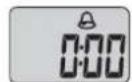
When the Victorinox emblem is pressed for 8 seconds, the most recently set value changes to 0 (Reset). If the button is not pressed within 10 seconds, the adjusting mode is quit automatically.
Setting walking/travel time (Timer)
Start timer
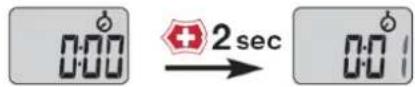
Press the Victorinox emblem for 2 seconds and the timer is started with a beep tone.
Stop timer
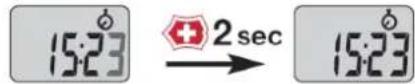
Press the Victorinox emblem again for 2 seconds and the timer is stopped with a beep tone. The value is maintained and can be restarted after a pause in the walk (2 seconds).
Reset timer
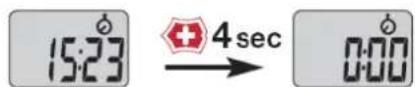
Press the Victorinox emblem for 4 seconds. The timer is started first and then set to 0 (Reset). This is confirmed in each case by a beep tone.
Setting combinations (Temperature menu)
![graph TD A["210°C"] --> B["8 sec"] B --> C["or m"] C --> D["ft"] D --> E["or"] E --> F["ft"] F --> G["or"] G --> H["Fahrenheit / Meter"] H --> I["Fahrenheit / Feet"]](/content/2026/06/1319156/images/a5f20ff14a61556c810bf011223cdfc40ff8c724cb8d0f9f275b9e02fc43be3a.jpg)
Press the Victorinox emblem for 8 seconds until the display flashes. Release the Victorinox emblem again. You have now changed over to the unit setting mode. By pressing the Victorinox emblem briefly while the display is flashing, the temperature and altitude units can be changed (see illustration).
3 sec autom. (End)
If the button is not pressed for 3 seconds, the setting mode is quit automatically and the new setting accepted.
Battery operating voltage
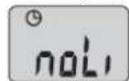
no Light
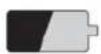
The background lighting consumes the most current. If the battery voltage drops below a specified value, the background lighting is switched off (or not switched on at all). When the next menu change occurs, the display shows "noLi" (no light). The background lighting can be switched on again if the battery voltage rises.
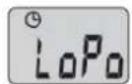
Low Power
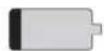
In normal operation, the battery voltage is measured at 15 minutes intervals or whenever the menu is changed. If the voltage falls below 2.2 V when measured 4 times, at the next menu change the "LoPo" (low battery power) message appears. The battery should be replaced soon. The electronic functions continue to operate until the battery is fully depleted.
Battery change
LED module (for Traveller Lite only)
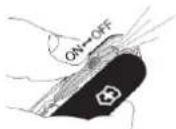
Electronic
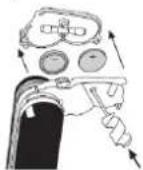

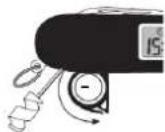
The electronic system is fitted in the factory with one, and the LED module with two, 3 volt lithium batteries - type CR1225. Before replacing the batteries in the LED module, the module must first be swung out and the housing cover ejected from the back using the mini-screwdriver. The mini-screwdriver can also be used to open the swivelling battery compartment for the electronic system (see illustration). Take the new battery with the «+» sign down and carefully push it into the battery compartment.
Author:
Change:
Franziska Zuber
April 13, 2012
Qd-00029
May 8, 2013


- OPERATING INSTRUCTIONS AND PRODUCT FEATURES
- INITIAL STARTUP (M, °C, 24H)
- INITIAL STARTUP (FT, °F, 12H)
- CHOICE OF MENU
- BACKGROUND LIGHTING
- SETTING WATCH
- SETTING THE TIME FORMAT
- SETTING THE ALTIMETER
- WARNING
- ALTITUDE ERROR / IMPACT OF ATMOSPHERIC PRESSURE FLUCTUATIONS
- ALTITUDE SETTING WITH WEATHER CORRECTION
- STANDARD: BASED ON CINA- AND US-STANDARD
- EXAMPLE
- EXAMPLE 1 (STND)
- EXAMPLE 2 (HOT)
- EXAMPLE 3 (COLD)
- NOTE
- BAROMETER INDICATOR
- BARO
- BAROMETER DISPLAY RESET
- SIGNIFICANCE OF THE ARROW
- SETTING ALARM
- SWITCHING THE ALARM OFF
- DEACTIVATING THE ALARM
- SETTING COUNTDOWN
- 10 SEC AUTOM. START
- SWITCHING THE COUNTDOWN-ALARM OFF
- RESTART COUNTDOWN
- RESTART
- RESET COUNTDOWN
- RESET
- SETTING WALKING/TRAVEL TIME (TIMER)
- START TIMER
- STOP TIMER
- RESET TIMER
- SETTING COMBINATIONS (TEMPERATURE MENU)
- 3 SEC AUTOM. (END)
- BATTERY OPERATING VOLTAGE
- BATTERY CHANGE
Brand : Victorinox
Model : Traveller
Category : Knife