
HTM611A - Thermostat UPM - Free user manual and instructions
Find the device manual for free HTM611A UPM in PDF.


| Product Type | Thermostat |
| Brand | UPM |
| Model | HTM611A |
| Dimensions | Approx. 120 x 80 x 25 mm |
| Weight | Approx. 150 g |
| Power Supply | 2 x AA batteries or 24VAC |
| Display | LCD with backlight |
| Temperature Range | 5°C to 35°C (41°F to 95°F) |
| Accuracy | ±0.5°C |
| Programmable | 7-day programmable schedule |
| Control Type | Digital |
| Mounting | Wall mount with included screws |
| Compatibility | Most 24V heating and cooling systems |
| Maintenance | Clean with dry cloth |
| Safety | Low voltage, CE certified |
| Spare Parts | Batteries (AA) |
| Warranty | 1 year |
Frequently Asked Questions - HTM611A UPM
User questions about HTM611A UPM
0 question about this device. Answer the ones you know or ask your own.
Ask a new question about this device
Download the instructions for your Thermostat in PDF format for free! Find your manual HTM611A - UPM and take your electronic device back in hand. On this page are published all the documents necessary for the use of your device. HTM611A by UPM.
USER MANUAL HTM611A UPM
7 Day Programmable Thermostat for electric baseboards and radiant heating


High VOLTAGE 120V/240V AC, 60Hz
UPM

Model No. HTM611A
Features:
- Ideal for electric base boards, fan assisted (convectors) and radiant floor/ceiling heating
• 7 day prog ramming with 4 prog rams per day - Copy one day's prog ram to another day
• Temperature display and prog ramming in Celsius or Fahrenheit - Precisi on temperature con trol, set in half de gree s
- Precisi on heating (Variance ±0.3 Celsius)
- Selectab le cycle rates for more energy efficient heating
• TRIAC system (Quiet operation) - Usage monitor - tr acks accu mulated hea ting "ON" time
• 12 or 24 hour clock display
• Simple two wire installation
• High-l imit function
Installation kit includes:
SPECIFICATIONS
Rating: 120V /240 V AC, 60Hz
MAXIMUM LOAD: (12.5A)
3000W @ 240V or
1500W @ 120V
MINIM UM LOAD: 500W
- 2 Screws
- 2 Wire Nuts
* NOT COMPATIBLE WITH ANY
LOW VOLTAGE CIRCUIT
OR CENTRAL HEATING FURNACE
Table of Contents
Installation Guide 2
Programming Guide 9
LCD Diagram 10
Button Diagram 11
Set Clock 12
Set ^ C or ^ F 13
Program Heating 14
Copy Function 17
Reset 18
Temporary Override 19
Hold Function....19
Operation....20
Usage Monitor 21
Memory Backup....21
Thermostat Surface Temperature....21
Option Settings....22
Pre-comfort Recovery 23
Heating Cycle Rate 24
High-Limit Function 25
Specifications....25
Troubleshooting 26
Warranty 26
Installation Guide
Installation Guide
Introduction
This thermostat is compatible with electric baseboards, fan- forced (convectors) and radiant floor/ceiling heating systems. The unit is rated for high voltage wiring only (120V / 240V). The minimum load requirement is 500W. This thermostat is NOT compatible with central heating systems (24 volt or millivolt). Please see the compatibility chart on the next page for more details.
Warning
IT IS STRONGLY RECOMMENDED TO HAVE A CERTIFIED ELECTRICIAN ON SITE TO ENSURE THE SAFE INSTALLATION OF YOUR THERMOSTAT.
The manufacturer assumes no responsibility for improper wiring, or any resulting damages. Improper installation by a non-professional automatically voids the warranty.
Compatibility
Generally, equipment with high voltage control is only compatible with the electric baseboards, convectors or radiant heating systems.
| System Type | Compatible with Thermostat |
| Central Heating Furnace System(24V) | No |
| Radiant Floor | No |
| Baseboard Electric Heater (120/240V) | Yes |
| Fan Assisted (Convectors) | Yes |
| Radiant Floor or Ceilings | Yes |
* NOT COMPATIBLE WITH CENTRAL HEATING FURNACES (LOW VOLTAGE CIRCUITS)
* DO NOT WIRE TO A SYSTEM EXCEEDING 12.5A (3000@240V, 1500W@120V)
Choosing a location for the new thermostat
Thermostat should be mounted:
- On the existing metal electrical box which controls your heater.
Note: Ensure the thermostat is not near heat sensitive / flammable material such as exposed wood, wallpaper or a desk full of papers. The normal surface temperature of the thermostat 45^ C - 50^ C ( 113^ F - 122^ F) while in operation. The thermostat is rated to operate safely at these temperatures but should be kept away from fire hazards.
For NEW home installation, the metal electrical box and thermostat should NOT be mounted:
- Near temperature-radiating objects which may cause false readings
(For example: in front of a window, next to a door leading outside, or near the heat from a lamp, direct sunlight, or a fireplace)
• Near concealed pipes and chimneys.
- In areas with poor air circulation, such as behind a door or in an alcove.
INSTALLATION
IT IS STRONGLY RECOMMENDED TO HAVE A CERTIFIED ELECTRICIAN ON SITE TO ENSURE THE SAFE INSTALLATION OF YOUR THERMOSTAT.
The manufacturer assumes no responsibility for improper wiring, or any resulting damages. Improper installation by a non-professional automatically voids the warranty.
Before installation begins:
- Verify that the heating appliance being connected to is within the specified load range
- Ensure that the thermostat being replaced is also rated for 120 or 240 volts.
- Ensure that the heating system is protected by appropriate circuit breakers or fuses
- Connect to COPPER conductors only.
TO AVOID FIRE, SHOCK, OR DEATH; SHUT OFF POWER SUPPLY AT THE CIRCUIT BREAKER OR FUSE AND TEST THAT THE POWER IS OFF BEFORE WIRING.
INSTALLATION
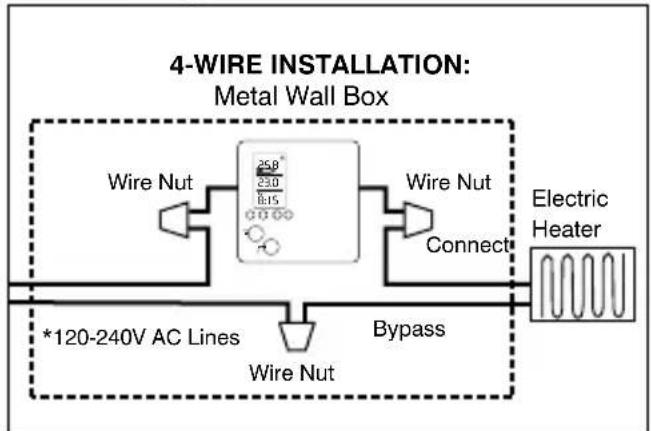
1 Remove the old thermostat carefully and identify the two wires from the wall box.
The wiring designation is generally:
BYPASS / CONNECT
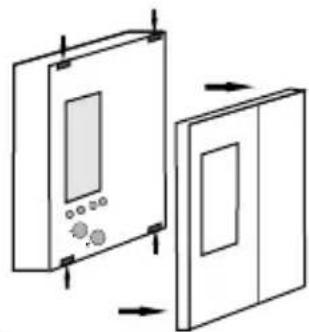
2 Gently remove the faceplate from the new thermostat but DO NOT remove the screws from the back of the unit because these screws hold the thermostat together.
3 Using the wire nuts provided, securely fasten each wire from the new thermostat to the live wires in the wall box. Refer to the diagram.
NOTE: ENSURE NO BARE WIRE IS EXPOSED.
*Note: If there are 4 wires connected to the old thermostat, the 2 extra wires should be connected together a wire nut. (not supplied)
4 Mount the thermostat into the wall box, using two screws through the mounting holes, then replace the faceplate. (Place screws in the 2 right or 2 left holes)
5 Reconnect power supply.
natural_image
Diagram showing two door compartments with control panel and directional arrows indicating movement (no text or symbols)\* Remove Faceplate
To remove the thermostat faceplate, very gently apply pressure to the crease of the thermostat to detach the four notches, then pull the faceplate forward.
flowchart
graph LR
    A["Wire Nut"] --> B["25.8 23.0 18.15"]
    B --> C["Connect"]
    C --> D["Electric Heater"]
    E["Bypass"] --> F["Wire Nut"]
    G["*120-240V AC Lines"] --> H["Wire Nut"]
    I["Bypass"] --> J["Wire Nut"]
RESET
If you have successfully installed the thermostat, but the LCD screen does not display or the display seems abnormal, remove the faceplate and press the RESET button. (The reset button must be gently pressed in with a small blunt object.)
RESET ALL SETTINGS
To delete all settings:
① Remove the thermostat faceplate to reveal the RESET button.
② Press and hold down the HOLD/DAY button while you press and release the RESET button.
Note: This is a total reset, which clear settings for custom programs, clock time, and option settings.
The unit will be restored to factory default settings.

natural_image
Illustration of a stylized plant with leaves against a brick wall background (no text or symbols)Programming Guide

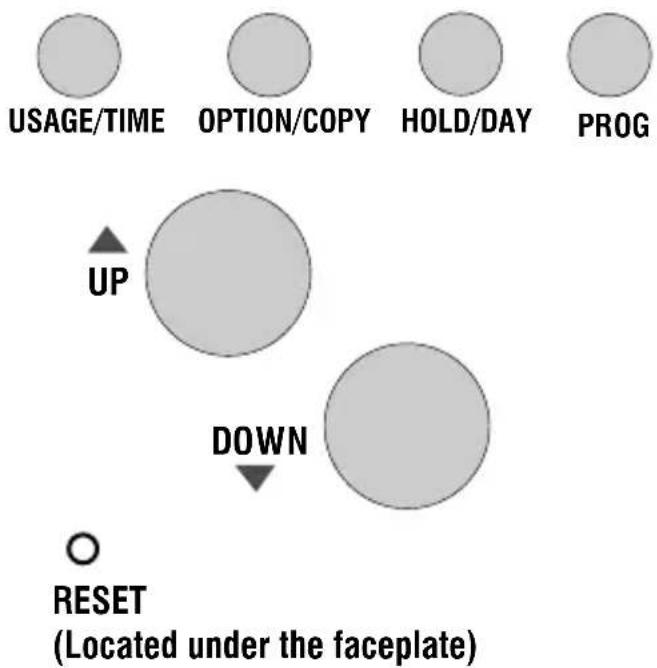
Buttons
USAGE/TIME
To set the current and program time or to display the total heater usage time per day or week.
OPTION/COPY
To set the user options or copying program settings from one weekday to another.
HOLD/DAY
To override temperature programs or to set the program the day of the week.
PROG
To enter PROGRAM mode and scroll settings.
UP/DOWN
To manually adjust the temperature or to make selections in program mode or option mode.
RESET
Resets program /clock to factory defaults.
SET CLOCK
Choose 12 or 24 hour clock
Note: 12 hour mode is the default.
① Press OPTION/COPY for 3 seconds to enter the option setting mode. (12Hr or 24Hr will flash on the bottom pane of the LCD screen)
② Press UP or DOWN to toggle between 12 or 24 hour display.
③ Wait 15 seconds for normal display to return.
Set Clock / Weekday
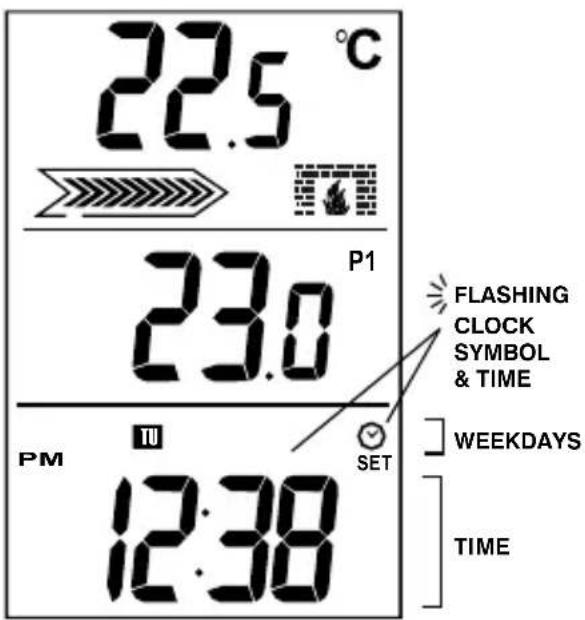
1 Press and hold the USAGE/TIME button for 3 seconds to enter the clock setting mode. (SET will display and the clock symbol/time flashes)
② Press the UP or DOWN button to scroll to the correct time of day, hold the button to accelerate.
③ Press HOLD/DAY repeatedly to change the day of the week.(Weekday symbols will flash)
4 Press USAGE/TIME to end the time mode or wait 15 seconds for normal display to return.
CELSIUS DEFAULT: Since Celsius (°C) is the default mode no action is required to use the thermostat in this mode.
(°C or °F) It is VERY IMPORTANT that you choose Fahrenheit (°F) before you begin using the thermostat. If you proceed to program the thermostat with the default Celsius(°C)and THEN change to the Fahrenheit (°F) setting; all programs set by the user will be deleted.
Select °C or °F (Celsius or Fahrenheit)
① Press OPTION/COPY for 3 seconds to enter the option setting mode.
② Press OPTION/COPY 3 times (until °F / °C begins flashing)
③ Press UP or DOWN to toggle between the °F or °C setting.
4 Wait 15 seconds for normal display to return. (See Option section for more details)
Program Heating
This thermostat is equipped with 7 DAY PROGRAMMING. Monday + Tuesday + Wednesday + Thursday + Friday + Saturday + Sunday programming with 4 settings per day. This thermostat is pre-programmed for your convenience or you can set your own programs as desired. The program periods (P1, P2, P3, P4) allow you to set the temperature settings and start times throughout the day.
P1: MORNING This is typically the morning period, when you may prefer to wake up to a warmer temperature.
P2: DAY This is usually an energy-savings period, for the time when you are away from home. The temperature setting can be reduced to minimize energy consumption. If you are not away from home on a particular day you may override this setting by manually adjusting the temperature buttons.
P3: EVENING This is the period when you typically return home, and would like the house at a comfortable temperature. Generally, the temperature is set warmer settings during the winter and cooler settings during the summer. If you do not often leave the house during the day, period 1, 2 or 3 can be set at the same temperature for comfort.
P4: NIGHT This is the period when you would typically be asleep. You may choose to set the temperature for energy savings or comfort as desired.
Set Program
The program periods (P1, P2, P3, P4) allow you to set the temperature settings and start times throughout the day. These are examples of possible temperature settings, the first being the factory default setting and second a custom setting.
1) DEFAULT / PRE-PROGRAMMED TIME AND TEMPERATURE SETTINGS
| PERIOD | P TIME | HEAT SET POINT |
| MORNING | P1 | 6:00am 20.5 C (69.0 F) |
| DAY | P2 | 8:00am 17.5 C (63.5 F) ° |
| EVENING | P3 | 5:00pm 21.0 C (70.0 F) ° |
| NIGHT | P4 | 10:00pm 7.5 C (82.5 F) ° |
2) CUSTOM / PRE-PROGRAMMED TIME AND TEMPERATURE SETTINGS
| PERIOD | P TIME | HEAT SET POINT |
| MORNING | P1 7:00am 20.5 C (69.0 F)° | |
| DAY | P2 8:00am 20.5 C (69.0 F)° | |
| EVENING | P3 5:00pm 20.5 C (69.0 F)° | |
| NIGHT | P4 11:00pm 7.5 C (82.5 F)° |
Example 1
This setting is a default and will activate automatically. Convenient for people who are away from home during the day with wish to maximize energy savings.
Example 2
This is custom program set by the user. Convenient for people who are at home during the day, and want the home warm all day, but want a cooler temperature at night.
Set Program
First select the weekday you wish to program, then select the start times and temperature settings for all four program periods. Scroll through the daily Program Periods in this order P1, P2, P3, P4. You may select any weekday to begin programming:

① Press PROG to enter program setting mode.
② Press HOLD/DAY to change weekday being programmed. (Period 1 (P1) will appear.)
③ Press UP or DOWN to set the temperature for P1. (The temperature digits will flash)
4 Press USAGE / TIME to switch to the start time mode. (start time will flash)
5 Press UP or DOWN to set the start time for P1. (The time will flash)
Note: USAGE/TIME will toggle between the temperature and start time modes.
6 Press PROG again to adjust the next Program Periods P2, P3, P4. Repeat the above steps above until all four programs are adjusted to your needs. Then program the rest of the week, either by programming each day individually or by using the COPY function.
COPY FUNCTION - After one day is programmed, you may copy all 4 of that day's program settings to any other weekday using the COPY program function. (see next section)
Copy Program Function
This thermostat can copy program period settings from one weekday to another using the COPY function. All four period settings (P1, P2, P3, P4) will be copied. This is faster than programming each day one at a time.
If you are not already in program mode, press PROG to enter program setting mode.
① Press HOLD/DAY to select the weekday you wish to COPY FROM.
② Press OPTION/COPY. (the COPY symbol will display, and the next weekday will flash, indicating the weekday being COPIED TO)
③ Press HOLD/DAY to skip the next weekday(s)
4 Press OPTION/COPY again, to copy all four program settings to the flashing day. (The COPY symbol will disappear to indicate the COPY function is complete)
Note: To copy the program to another day press copy again, and repeat.
For example: If you press COPY 12 times consecutively, the selected program will be copied to the entire week).
High-Limit Function
The high-limit function is a security feature which allows you to select the maximum temperature limit which the thermostat will not go over. For more details see the High-Limit setting section.
RESET
If you have difficulties programming your thermostat you may wish to reset the unit to begin again.
RESET PROGRAMS
To delete all custom programs:
1 Press USAGE/TIME for 3 seconds to enter the Options mode.
② Press PROG for 3 seconds to clear all custom programs.
Note: This reset will clear custom programs only, but will not affect the clock time or option settings.
RESET ALL SETTINGS
To delete all settings:
1 Remove the thermostat faceplate to reveal the RESET button.
② Press the HOLD/DAY and the RESET buttons at the same time to clear all settings.
Note: This is a total reset, which clear settings for custom programs, clock time, and option settings.
The unit will be restored to factory default settings.
Temporary Override
This function will allow you to change the temperature setting, until the start time of next program period.
① Press the UP or DOWN button to manually adjust to the desired temperature setting.
NOTE:
- The temperature can be set in increments of 0.5^ or 0.5^ .
• The temperature setting range is from 5^ C to 35^ C ( 41^ F to 95^ F). - Press and hold the UP or DOWN button down to accelerate the setting.
- The thermostat will automatically return to the regular program at the next scheduled program period.
HOLD Function
This function maintains a constant temperature and disables temperature program periods.
1 Press the HOLD/DAY button once to enter the HOLD mode. (HOLD symbol will appear) (*When HOLD is activated, you may manually adjust the temperature by pressing UP or DOWN. However all programs will be disabled. If no temperature changes are manually selected, the current temperature setting will remain the same indefinitely)
② To CANCEL the HOLD function, press the HOLD/DAY button again. (HOLD symbol will disappear)
OPERATION
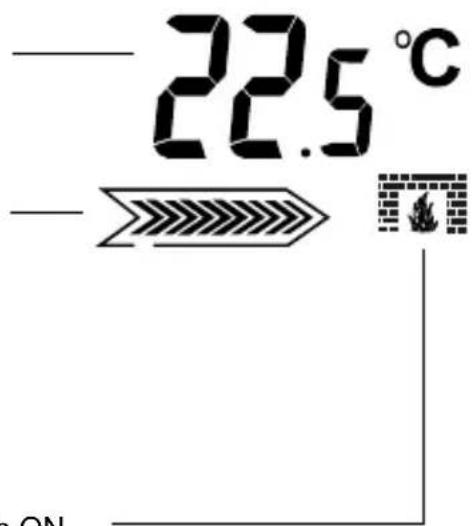
Current Temperature Display
The current (room) temperature is displayed on the LCD screen.
Power Bar Arrows
This thermostat is equipped with an proportional regulation system, to determine the precise amount of power required by the electric heater to maintain the temperature setting.
The "Power Bar Arrows" indicate the current output power level. 1 ARROW = 10%, 10 ARROWS = 100%
When the heating system is activated at partial power, a proportional number of arrows bars will appear (e.g. 60% - 6 arrows). When the heating system is activated at maximum power all 10 arrows will display.
Fireplace Symbol
The flashing fireplace symbol will display WHEN the heating system is ON.
Usage Monitor
The thermostat tracks the system "ON" time; the total time the heating equipment is running.
Press the USAGE button once to view USAGE TODAY;
Press the USAGE button again to view the USAGE THIS WEEK (total time from Monday to today);
Press USAGE again to view 7 DAY USAGE (total time from last 6 days plus today).
- USAGE TODAY starts at midnight.
- USAGE THIS WEEK automatically resets itself on Monday morning, after midnight on Sunday.
- A new week begins Monday morning.
Memory Backup
The memory backup will save and protect programs and option settings indefinitely. If a power outage occurs only the clock setting may be affected. The clock will continue to run, and display on the LCD screen, for up to 1-2 days even without power, due to the re-chargeable backup battery inside the unit. However, if the power outage is longer than 2 days the clock will need to be reset (the unit will reset itself to a 9:00 default).
Thermostat Surface Temperature
In normal operation the thermostat may range in temperature from 45°C to 55°C (113 F to 131 F)
This is perfectly normal, as this thermostat is rated to operate safely at these temperatures.
However it is recommended that the thermostat not be installed near heat sensitive / flammable material such as exposed wood, wallpaper or other fire hazards.
OPTION SETTINGS
This thermostat has 4 OPTION settings which the user can change. The OPTION data will appear in the lower pane of the LCD screen.
OPTION 1 - 12 or 24 Hour Clock Format
1 Press and hold OPTION/COPY for 3 seconds to enter the Option Setting mode. The first option is 12 or 24 hour clock format. (12:Hr will be flashing)
② Press UP or DOWN to toggle between 12 or 24 hour format.

OPTION 2 - Heat Cycle Rate
① Press OPTION/COPY again to advance to the second option (Cycle rate. Cr:1 will flash)
② Press UP or DOWN button to adjust setting (see cycle rate definition on following pages)
Cr0 = Full Power, No Cycle (for fan assisted baseboards and electric heating devices)
Cr1 = 20 Sec. Proportional Power (for non-fan assisted baseboards and electric heating devices)
Cr2 = 240 Sec. Proportional Power (for fan assisted heaters and radiant floor/ceiling)
OPTION 3 - Pre-Comfort Recovery
1 Press OPTION/COPY again to select pre-comfort recovery. (rE:0 will flash on screen)
② Press UP or DOWN to adjust setting (see pre-comfort recovery definition on following pages)
rE:0 means pre-comfort recovery feature is disabled
rE:1 means pre-comfort recovery feature is enabled
OPTION 4 - °C or °F Display
1 Press OPTION/COPY again to select Celsius or Fahrenheit scale (the current temperature will flash)
② Press UP or DOWN to toggle between the °C or °F temperature scales.
Note: (°C or °F) It is VERY IMPORTANT that you choose Fahrenheit (°F) before you begin using the thermostat. If you proceed to program the thermostat with the default Celsius(°C)and THEN change to the Fahrenheit (°F)setting; all programs set by the user will be deleted.
Pre-comfort Recovery
This thermostat is equipped with a ‘Pre-comfort Recovery’ system that will activate the heating system in advance of the actual set program time so that the room will be at the desired temperature at the start of the program time.
It is normal for the system to be activated earlier than the actual set program time (up to one hour). The Pre-comfort Recovery can be disabled if desired. If pre-comfort recovery is turned off (rE:0), heating will only be initiated at the exact start time the program period.
Heat Cycle Rate
Cycle rate determines the heating on/off time cycles and the level of proportional power required to operate the heater. (To have the heater operate at full power all the time, select Cr 0 to disable heat cycling.) The cycle rate is based on the type of heating system and the power load required to operate the device. The higher the load (size of baseboard or radiant heater) the greater the heat generated.
Cr 0 is continuous operation (no cycling), with a variance of +/- 0.3°C (+/- 0.6°F). The heating unit will operate at full power and the arrow bar icon will appear full. This function is for users who do not want their electric heating devices to turn on and off frequently.
Cr 1 is a 20 second cycle rate with proportional heating. This means the heating will be turned on and off once every 20 seconds to provide a stable room temperature. This cycle rate allows a proportion level of power to the heating device. This is indicated on the thermostat display by the arrow bar icon which will be partially filled, indicating the amount of power going to the heater. This setting is recommended for standard electric heating devices, without fans, and will provide the most energy efficient heating and a stable temperature.
Cr 2 is a 240 second span. This means the heating will be turned on and off once every 240 seconds. This is the recommended setting for fan assisted heaters and radiant floors and ceilings.
High-Limit Function
The high-limit function is a security feature which allows you to select the maximum temperature limit of the thermostat. When this function is ON the thermostat will not allow heating settings to exceed this temperature limit.
To enable the high-limit setting feature:
① Press "UP" or "DOWN" to scroll to the desired high limit temperature
(this temperature will display in the program temperature pane on the LCD screen)
② Press the USAGE/TIME button and OPTION/COPY button for 3 seconds (both at the same time)
(the LOCK symbol will appear to confirm that the high-limit feature is ON)
To disable the high-limit setting feature:
① Press and hold the (R) RESET button (located under faceplate / press with a narrow blunt object) (The lock symbol will begin flashing)
② Press the USAGE/TIME button and OPTION/COPY button for 3 seconds (both at the same time)
(When the LOCK symbol disappears this indicates that the high-limit feature is OFF)
Note: When the high-limit function is ON all existing programs will be changed. If any temperature settings are above the high-limit they will be reduced to the high-limit setting. The temporary override maximum temperature setting will also be limited.
Specifications:
Number of programs: 7 Day with 4 settings per day
Temperature display range: 0 - 55°C (34 - 99.5°F)
Temperature setting range: 5 - 35°C (41 - 95°F)
TROUBLESHOOTING GUIDE
SPECIFICATIONS
Rating: 120V/240V AC, 60Hz
MAXIMUM LOAD: 3000W
(12.5A)
3000W @ 240V or
1500W @ 120V
MINIMUM LOAD: 500W
PROBLEM SOLUTION
| LCD screen is blank. | - Check if the circuit breaker is open.- Check if there has been a power failure.- Check that the thermostat is wired to a 500W or greater circuit- Check the wiring installation with a certified electrician.- Press the RESET button under the faceplate |
| Programming Issues: Heating is not being activated at the programmed times. | - Review the programming guide to ensure the programs have been entered correctly- Check that the clock has been set to the correct time. (e.g. AM/PM reversed)- Check if there has been a power failure.- PROGRAM RESET: Press OPTION/COPY for 3 seconds to enter the option mode, then press PROG for 3 seconds to clear programs settings only.- RESET ALL: Press and hold the HOLD/DAY and the RESET button at the same time to restore all setting to factory default. |
PROBLEM SOLUTION
| The heating system will not activate. | - Check the thermostat LCD display to see if there has been a power failure.- Check if the circuit breaker is open.- Check heating device to see if it is disabled.- Check the wiring installation with a certified electrician. |
| The heating system is running constantly. | - Check the temperature is not set too high.- Check the wiring installation with a certified electrician. |
| The temperature display is incorrect. | - Ensure thermostat is not installed near a draft, in direct sunlight or near any devices such are air conditioners or heaters. |
| Heating system seems to cycle too often. | Check and ensure that you have selected a Cycle Rate that matches your particular heating system. |
| The thermostat feels HOT to the touch. | - In normal operation the thermostat may range in temperature from 45°C to 55°C (113°F to 131°F) This is perfectly normal, as this thermostat is rated to operate safely at these temperatures. However is recommended that the thermostat not be installed near heat sensitive / flammable material such as exposed wood, wallpaper or other fire hazards. |
Limited 5-year Repair Warranty
This product carries a five (5) year repair warranty against defects in workmanship and materials. This product is not guaranteed against wear or breakage due to misuse and/or abuse.
If the product is defective,
(i) return it, with a dated proof of purchase, to the retailer from which you purchased it
Attention:
IT IS STRONGLY RECOMMENDED TO HAVE A CERTIFIED ELECTRICIAN ON SITE TO ENSURE THE SAFE INSTALLATION OF YOUR THERMOSTAT. The manufacturer assumes no responsibility for improper wiring, or any resulting damages. Installation by a non-professional automatically voids the warranty.
Note: shipping and handling for returns is not included under this warranty.
Customer Service Centre
1-888-468-6876
* NOT COMPATIBLE WITH ANY LOW VOLTAGE CIRCUIT
OR CENTRAL HEATING FURNACE
- Day Programmable Thermostat for electric baseboards and radiant heating
- Features:
- SPECIFICATIONS
- Table of Contents
- Installation Guide
- Introduction
- Warning
- IT IS STRONGLY RECOMMENDED TO HAVE A CERTIFIED ELECTRICIAN ON SITE TO ENSURE THE SAFE INSTALLATION OF YOUR THERMOSTAT.
- Compatibility
- Choosing a location for the new thermostat
- Thermostat should be mounted:
- INSTALLATION
- Before installation begins:
- NOTE: ENSURE NO BARE WIRE IS EXPOSED.
- \* Remove Faceplate
- RESET
- RESET ALL SETTINGS
- Programming Guide
- Buttons
- USAGE/TIME
- OPTION/COPY
- HOLD/DAY
- PROG
- UP/DOWN
- Choose 12 or 24 hour clock
- Note: 12 hour mode is the default.
- Set Clock / Weekday
- Select °C or °F (Celsius or Fahrenheit)
- Program Heating
- Set Program
- Example 1
- Example 2
- Copy Program Function
- High-Limit Function
- RESET PROGRAMS
- Temporary Override
- NOTE:
- HOLD Function
- OPERATION
- Current Temperature Display
- Power Bar Arrows
- Fireplace Symbol
- Usage Monitor
- Memory Backup
- Thermostat Surface Temperature
- OPTION SETTINGS
- OPTION 1 - 12 or 24 Hour Clock Format
- OPTION 2 - Heat Cycle Rate
- OPTION 3 - Pre-Comfort Recovery
- OPTION 4 - °C or °F Display
- Pre-comfort Recovery
- Heat Cycle Rate
- To enable the high-limit setting feature:
- To disable the high-limit setting feature:
- Specifications:
- TROUBLESHOOTING GUIDE
- Limited 5-year Repair Warranty
Brand : UPM
Model : HTM611A
Category : Thermostat