
DVDP-7R - Portable DVD Player BRANDT - Free user manual and instructions
Find the device manual for free DVDP-7R BRANDT in PDF.


| Product Type | Portable DVD Player |
| Brand | Brandt |
| Model | DVDP-7R |
| Screen Size | 7 inches |
| Display Type | TFT LCD |
| Disc Compatibility | DVD, DVD±R/RW, CD, CD-R/RW |
| Media Formats | DVD Video, VCD, SVCD, Audio CD, MP3, JPEG, DivX |
| Built-in Speakers | Yes, stereo |
| Headphone Jack | Yes (3.5mm) |
| Audio/Video Output | AV out (RCA) |
| USB Port | USB 2.0 for media playback |
| Memory Card Slot | SD/MMC |
| Battery Type | Rechargeable lithium-ion |
| Battery Life | Up to 3 hours |
| Power Input | DC 9-12V (AC adapter included) or car adapter |
| Remote Control | Yes (included) |
| Dimensions (W x H x D) | 19.5 x 15.5 x 3.5 cm (7.7 x 6.1 x 1.4 in) |
| Weight | Approx. 0.8 kg (1.76 lbs) |
| Region Code | Region 2 (can be changed via menu) |
| Safety Certifications | CE, RoHS |
| Accessories Included | AC adapter, car adapter, AV cable, remote control, user manual |
Frequently Asked Questions - DVDP-7R BRANDT
User questions about DVDP-7R BRANDT
0 question about this device. Answer the ones you know or ask your own.
Ask a new question about this device
Download the instructions for your Portable DVD Player in PDF format for free! Find your manual DVDP-7R - BRANDT and take your electronic device back in hand. On this page are published all the documents necessary for the use of your device. DVDP-7R by BRANDT.
USER MANUAL DVDP-7R BRANDT
INSTRUCTION MANUAL
CONTENTS
WARNINGS 2
IMPORTANT SAFETY INSTRUCTIONS .... 3
PACKAGE CONTENT 6
IDENTIFICATION OF CONTROLS....7
GETTING STARTED 11
CONNECTING TO AC POWER 11
CONNECTING TO A CAR CIGARETTE LIGHTER SOCKET 11
CONNECTING AUDIO/VIDEO CABLE 11
CHARGING THE INCORPORATED BATTERY OF THE DVD PLAYER.... 11
OPERATION 12
PLAYING A DVD/VCD 12
CONTROLLING PLAYBACK 12
ADJUSTING THE VOLUME.... 13
PLAYING AN AUDIO CD, MP3 DISC 16
PLAYING A JPEG DISC 17
USB PLAY 18
SETUP MENU 18
SPECIFICATIONS....22
CLEANING AND MAINTENANCE 23
TROUBLESHOOTING....23
WARNINGS
This appliance is intended for domestic household use only and should not be used for any other purpose or in any other application, such as for non-domestic use or in a commercial environment.
Prior to cleaning or other maintenance, the appliance must be disconnected from the supply mains.
The ventilation should not be impeded by covering the ventilation openings with items, such as newspapers, table-cloths, curtains, etc.
No naked flame sources, such as lighted candles, should be placed on the apparatus.
The apparatus shall not be exposed to dripping or splashing and that no objects filled with liquids, such as vases, shall be placed on the apparatus.
Ventilation
Allow at least a 10 cm gap all around the product.
This apparatus is not suitable for use in a tropical climate.
Batteries (battery pack or batteries installed) shall not be exposed to excessive heat such as sunshine, fire or the like.
To protect the environment, use local recycling facilities for battery disposal.
Where the MAINS plug or an appliance coupler is used as the disconnect device, the disconnect device shall remain readily operable.
IMPORTANT SAFETY INSTRUCTIONS
This equipment is designed to operate from a 100-240 Volt, 50/60Hz AC mains supply. Other power sources may damage it. - Check that the voltage marked on the rating plate on the power adapter is the same as your mains supply. If the power adapter becomes damaged, it should be replaced with an adapter of the same type and rating to avoid a hazard. If the incorporated battery starts to leak or becomes too hot during operation or charging, please stop operation immediately and dispose of the unit. The marking plate is located at the bottom of the apparatus.
Symbols

This equipment is double insulated and an earth connection is not required.

This mark is applied to show the equipment conforms to European safety and electromagnetic compatibility standards.

Dangerous voltage constituting a risk of electric shock is present inside this equipment.

There are important operating and maintenance instructions in the literature accompanying this equipment.
Battery handling and usage Remote control battery:
The battery should only be replaced by adults. Do not allow children to use the remote control unless the battery cover is attached.
The battery type used in the remote is one CR2025 3V Lithium battery which is accessible and can be replaced. Remove the battery holder located on the bottom of the remote control to remove the battery.
Li
Incorporated Battery
The battery type used in the unit is one lithium battery pack. The battery is incorporated and is not readily accessible.
The battery must be disposed of at your local recycling point.
Installing Remote Control Battery
Push 1 and pull to slide out the battery holder from the remote control and insert one 3V CR2025 lithium battery in the battery holder with the print face up, then replace the battery holder.

WARNING:
To save power: switch off mains power or pull out the power adapter plug when you are not using the apparatus.
Never operate the apparatus and try to view video while driving a vehicle.
Class 1 laser product

This product contains a low power laser device. Invisible laser radiation when the enclosure is opened and interlocks are defeated.
Avoid exposure to beam.

This digital video disc player employs a laser system. Use of controls, adjustments, or the performance of procedures other than those specified herein may result in hazardous radiation exposure.
To prevent direct exposure to laser beam, do not open the enclosure. Never stare directly into the laser beam.
Do not install this product in a confined space such as a book case or similar unit.
Notes on Copyrights:
- It is forbidden by law to copy, broadcast, show, broadcast via cable, play in public, or rent copyrighted material without permission.
- This product features the copy protection function developed by Macrovision. Copy protection signals are recorded on some discs. When recording and playing the pictures of these discs picture noise will appear. This product incorporates copyright protection technology that is protected by method claims of certain U.S. Patents and other intellectual property rights owned by Macrovision Corporation and other rights owners. Use of this copyright protection technology must be authorised by Macrovision Corporation, and is intended for home and other limited viewing uses only unless otherwise authorised by Macrovision Corporation. Reverse engineering or disassembly is prohibited.
Region Code
This DVD player is designed and manufactured for play of region "2" encoded DVD software.

Notes on Discs
Handling Discs
Do not touch the play side of the disc. Hold the disc by the edges so that fingerprints do not get on the surface. Never stick paper or tape on the disc.

Storing Discs
After playing, store the disc in its case. Do not expose the disc to direct sunlight or source of heat and never leave it in a parked car exposed to direct sunlight.
Cleaning Discs
Fingerprints and dust on the disc can cause poor picture quality and sound distortion. Before playing, clean the disc with a clean cloth. Wipe the disc from the centre out.

Do not use strong solvents such as alcohol, benzine, thinner, commercially available cleaners, or anti-static spray intended for older vinyl records.
PACKAGE CONTENT
Your box should contain:
- 9" DVD player
- Carry bag
- Earphones
- Remote control with battery
- Power adapter
- Car adapter
- AV cable
- Instruction manual
IDENTIFICATION OF CONTROLS
DVD player
EN-7
- △ button
- //buttons
- Press and hold / for previous /next function
- Press and hold Vol+/- function
- button
- SETUP button
- SOURCE button
Earphones: Insert standard 3.5 mm earphones into the earphone socket. The speakers will be muted.
EARPHONE VOLUME WARNING
Connect earphones with volume set low and increase it if required. Prolonged listening through some earphones at high volume settings can result in hearing damage.
- USB port
- Earphone socket
- AV OUT jack
- ON/OFF switch
- DC IN 9-12V jack for
- Connect to the AC power adapter or car adapter.

To prevent possible hearing damage, do not listen at high volume levels for long periods.
Remote Control

Note:
The first time you use the remote control, you must remove the film between the band and the compartment cover to activate the remote control.
Point the remote control at the DVD player no more than 5-8 metres
from the remote control sensor. The remote control will operate in a ± 30 degree angle in each direction of the remote control sensor.
Buttons:
1. ZOOM
2. SEARCH
• To go to a track, title, or chapter you want
3. SUBTITLE
• To select a subtitle language (DVD)
4. ANGLE
• To select a DVD viewing angle if available
5. TITLE
• To return to DVD title menu
6. ENTER
7. SETUP
8. VOL-
9. REPEAT
10. SLOW
- Press Slow button repeatedly to enter slow playback, and cycle between different speeds. The speeds are 1/2, 1/4, 1/8, 1/16, and normal.
11. PROGRAM
12. DISPLAY
• To display the play time status information
13. SOURCE
• To switch among DVD and USB
14. MUTE
- 0-9 numeric buttons
16. 10+
- To select a track greater than or equal to 10, first press 10+ and then press a numeric button.
17. STEP
18. MENU
- To return to DVD root menu - To switch PBC on/off (VCD)
19. AUDIO
- To select an audio language (DVD) - To select an audio channel (CD, VCD)
20.
21.
22. MODE
- Set LCD parameters (adjust brightness, contrast, hue and saturation).
23. VOL+
24.
25.
26.
27.
GETTING STARTED
Connecting to AC Power
Plug one end of the power adapter into the DC IN 9-12V jack on the side of your player, and the other end into the mains socket.
Caution!
When you unplug the adapter, always pull the plug from the mains socket. Never pull the cord.
Connecting to a car cigarette lighter socket
- Plug one end of the car adapter into the DC IN 9-12V jack on the side of your player.
- Plug the other end of the adapter into a car cigarette lighter socket.
- Turn on your player.
Connecting Audio/Video Cable
- Connect the single-connector end of the supplied audio/video cable to the AV OUT jack of the unit.
- Connect the triple-connector end of the supplied audio/video cable to the corresponding jacks of the TV display.
NOTE: Match the colour of the AV cable with the jacks of TV display. The yellow cable is for the yellow video jack, the red/white cable is for the red/white audio jacks.
Charging the Built-in Battery of the DVD Player
The DVD player has a built-in battery. To charge the battery, connect the supplied power adapter cable to the DC IN 9-12V jack. The red charge indicator light will illuminate. When the battery is fully
charged, the red charge indicator light will turn green.

NOTE: It will take approximately 4 hours to fully charge the battery.
OPERATION
PLAYING A DVD/VCD
- Slide the ON/OFF switch at the side of the player to "ON" to turn on the player.
- The power indicator light will illuminate.

- Press △ to open the disc tray and insert your chosen disc in the tray, with the label side facing up.
- Close the tray by pressing the PRESS position until a click is heard.
- Play will start automatically.

Controlling Playback
- Press ■ on the remote once to stop playback. Your player remembers where you stopped. If you press ▶ on the remote, your player starts playing at the point where you stopped.
- Press ■ twice to stop playback. If you press ▶, your player starts playing at the beginning of the disc.
- Press ▶ to pause playback. Press this button again to resume playback.
- Press ▶▶ on the remote to fast-forward on the disc. Each time you press this button, the fast-forward speed changes from 2, 4, 8, 16 to 32 times the normal speed.
- Press ◀◀ on the remote to fast-reverse on the disc. Each time you press this button, the fast-reverse speed changes from 2, 4, 8, 16 to 32 times the normal speed.
- Press ▶▶ on the remote or keep pressing the next title, chapter, page or track.
- Press ◀◀ on the remote or keep pressing the previous title, chapter, page or track.

on the unit to go to

on the unit to go to
Adjusting the volume
Use VOL+/VOL- on the remote or △/ VOL- ▶ on the unit to adjust the volume.
When the volume is increased to a specific level, a warning window will pop up to let you know the higher volume level may damage your hearing.

If you wish to further increase the volume, press ENTER on the remote control and then repeatedly press VOL+ and desired level is reached.
If you wish to turn the sound off, press MUTE on the remote. Press this button again to resume audio listening.
Repeat viewing
During playback repeatedly press REPEAT on the remote to select the following options:
"Repeat chapter / title / all" (for DVD)
CHAPTER: repeat the current chapter. TITLE: repeat the current title. ALL: repeat all the tracks on a disc.
"Repeat track / all" (for VCD)
TRACK: repeat the current track.
ALL: repeat all the tracks on a disc.
"Repeat track / all" (for CD)
TRACK: repeat the current track.
ALL: repeat all the tracks on a disc.
For MP3
SHUFFLE → RANDOM → SINGLE → REPEAT ONE → REPEAT FOLDER → FOLDER
SLOW
Press Slow button repeatedly to enter slow playback, and cycle between different speeds. The speeds are 1/2, 1/4, 1/8, 1/16, and normal.
Zoom
You can zoom in for video images.
Repeatedly press ZOOM on the remote to change the size in the following sequence.
2X size → 3X size → 4X size → 1/2 size → 1/3 size → 1/4 size → normal size
JPEG: Use ZOOM to enlarge or shrink the picture.
- Press 'ZOOM'.
Use "▶" to enlarge, or "◀" to shorten the picture.
Use the ▲▼◀▶ button to move through the zoomed picture.
Menu
Press MENU on the remote. During DVD playback, if the current title has a menu, the menu appears on the screen. During VCD playback, press this button to turn the PBC function on or off.
Selecting the audio language
For DVDs that contain two or more audio languages, during play press
AUDIO on the remote until the desired language is selected.
For VCD, repeatedly press AUDIO to select the desired audio mode.
Selecting the language
For DVDs that contain two or more subtitle languages, during play
press SUBTITLE on the remote until the desired language is selected.
Camera angle
If the disc contains scenes recorded at different camera angles, you can change to a different camera angle during playback. Repeatedly press ANGLE on the remote during play to select a desired angle. Note that the number of the current angle will appear on screen.
Title
Press TITLE on the remote, then the DVD menu or titles available on the disc will be displayed. Then you can use ▲▼◀▶ and ENTER to select programs.
Step
Repeatedly press STEP on the remote to play the disc frame by frame.
Program Play
- Press PROGRAM on the remote, the program menu will appear (take DVD for example).
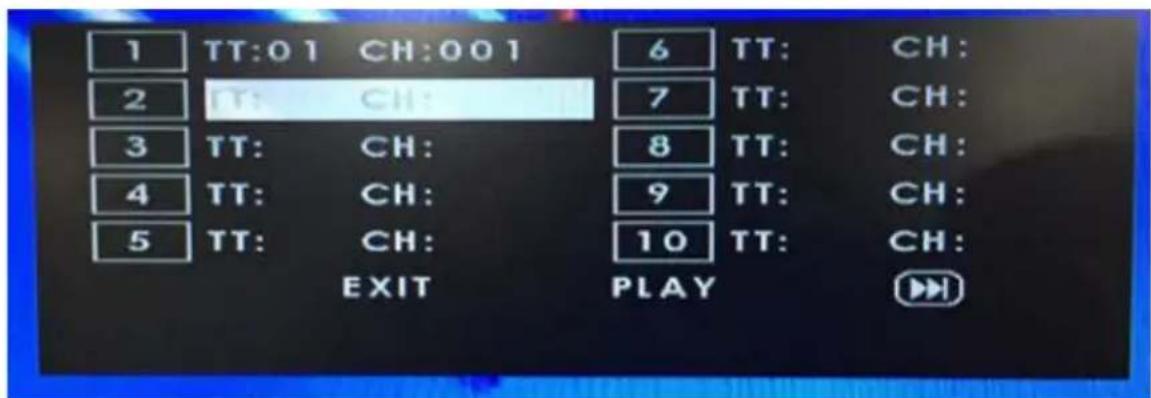
- Use the numeric keypad to input the titles, tracks or chapters.
- Move the cursor by pressing ▲▼◀▶ to select PLAY and press ENTER.
- To resume normal play from programmed play, press PROGRAM and select CLEAR on the program menu.
Displaying disc information
Press DISPLAY on the remote control to display the title number, chapter number, and other information on the screen.
PLAYING AN AUDIO CD, MP3 DISC
Audio CD
Once an Audio CD is inserted it will be played automatically. Its play information will be shown.
When you press DISPLAY the display will show the playtime.
Press ◀▶▶ to move to the next / previous track.
Repeatedly press ◀◀/▶▶ to play (search) the current track at different speeds, each press will select 2X, 4X, 8X, 16X, 32X or back to play, the sound will be muted during search, press ▶▶ to return to normal play.
MP3
- Press ▲ /▼ to select a folder if available and press ENTER to check the folder contents.
- Press ▲/▼ to select a track then press ▶II. Play will start.
Pause:
- Press ▶ during play.
- To return to play, press ▶ again.
Moving to a Desired Track:
Press ◀◀/▶▶ during play to play the desired track or repeatedly press ▲/▼ to select the track you want to play and then press ENTER to play.
You can play any track by inputting its number.
Repeat:
During playback repeatedly press REPEAT on the remote to select the following options
For MP3
SHUFFLE → RANDOM → SINGLE → REPEAT ONE → REPEAT FOLDER → FOLDER
PLAYING A JPEG DISC
Viewing a JPEG Disc:
- Insert a JPEG disc and close the tray.
- Use ▲▼ to highlight the file you want to play and press ENTER or ▶II.
- Slide show will start from the selected file.
3 During playing JPEG disc, press ▶▶ to move to the next picture, press ◀◀ to return to the previous picture, and press MENU to enter the folder menu.
- Press DISPLAY on the remote to show the file number and the total number of files on screen.
Slide Show:
There are 16 wipe modes for slide show.
You can repeatedly press PROGRAM on the remote to select the desired slide show mode.
Still Picture:
- Press ▶ during slide show. The player will now go into PAUSE mode.
- To return to the slide show, press ▶ again.
Zoom:
JPEG: Use ZOOM to enlarge or shrink the picture.
- Press 'ZOOM'. 2. Use "▶" to enlarge, or "◀" to shorten the picture.
Use the ▲▼◀▶ button to move through the zoomed picture.
To rotate a picture:
Press ▲▼◀▶ during play to rotate the picture clockwise or counter-clockwise or have an invert or mirror picture.
USB PLAY
USB with mp3 & pictures (.jpg) may be played and displayed through the unit. The USB port can be used to supply signals to the unit from USB sources.
- Switch the unit on.
- Insert a USB device into the USB port on the side of the unit.
- Press SOURCE and then press ◀/▶ to highlight "USB".
- Press ENTER on the remote and the unit will automatically detect the USB.
- If USB is selected, the unit will begin to read the USB connected to it.
- Use ▲▼◀▶ to select the desired folder and then press ENTER.
SETUP MENU
Your player has a Setup menu to adjust settings for your player.
- Press SETUP to access the setup menu.
- Press ◀/▶ to select the menu page you want.
- Press ▲/▼ to select an option, then press ▶ to enter the sub-option.
- Press ▲/▼ to select an item, then press ENTER to confirm your selection.
- To go to previous menu, press ◀.
Setup menu pages
| Page Op ons | ti |
| General Setup | TV Display — Selects the aspect ratio. You can select:4:3 PANSCAN – Select this option when the player is connected to a normal TV. Wide-screen images are shown on the screen, but with some parts cropped automatically.4:3 LETTERBOX – Select this when the player is connected to a normal TV. Wide-screen images are shown on the screen, with a black band on the top and bottom.16:9 displays the vide image full-screen when your player is connected to a widescreen TV.Wide Squeeze displays the screen squeezed to 4:3.Angle Mark – Displays current angle sting information on the screen if available on the disc.OSD Language – selects the language for the Setup menu.Closed Captions – Data that are hidden in the video signal of some discs. Before you select this function ensure that the disc contains closed captions information and your TV set also has this function.Screen Saver – This function is used to turn the screen save on or off.Auto Standby – This function is used to select auto standby setting if there is no operation within 3 or 4 hours. |
| Audio Setup | DOWNMIX – The function allows you to set the stereo analog output of your DVD player.→ LT/RT: To select this option if your DVD player is connected to a Dolby Pro Logic decoder.→STEREO: To select this option when output delivers sound from only the two front speakers.DOLBY DIGITAL – This function is used for the setting of dual mono and dynamic range compression.Dual Mono→STEREO: Left mono sound will send output signals to the left speaker and right mono sound will send ou tput signals to the right speaker.→L-MONO: Left mono sound will send output signals to the left and right speakers.→R-MONO: Right mono sound will send output signals to the left and right speakers.→MIX-MONO: Left and right mixed mono sound will send output signals to the left and right speakers.DynamicDynamic range compression |
| Video Setup | Brightness – Increases the brightness to add more light to dark areas of the picture or decreases the brightness to add more dark to light areas of the picture. Contrast – Increases the picture level to adjust the white areas of the picture or decreases the picture level to adjust the black areas of the picture. Hue – Increases the colour level to add more green to skin tones or decreases the colour level to add more purple to skin tones. Saturation – Adjusts the colour saturation. |
| Preference (accessible when no disc is inserted) | TV Type — Select the colour system. You can select NTSC, PAL or Auto. Audio – selects the audio language. Subtitle – Selects the subtitle language. Disc Menu – Selects the DVD menu language. Parental – Select a rating level for the disc to be played. Default – Reset all settings except parental controls to the factory default. |
| Password Setup | Password Mode – Turn password mode on or off. If this mode is turned off, password will not be required when you select a rating level. Password – To change the password, enter the old password or default password (1369), then enter a new password and press ENTER on the remote control or OK on the player to confirm.Note:·If the password has been changed, the parental password will also be changed.·The default password (1369) is always active even if the password has been changed. |
SPECIFICATIONS
Unit
DC IN=9-12 V, 1A
Compatible discs: DVD/MP3/CD/JPEG
Rechargeable lithium battery pack
Output: 7.4V
Storage temperature: 0°C-40°C
Storage humidity: 45%-85%
CLEANING AND MAINTENANCE
Cleaning the unit
To clean the player, use a soft, dry cloth. If the surfaces are extremely dirty, use a soft cloth lightly moistened with a mild detergent solution. Do not use strong solvents such as alcohol, benzine or thinner, as these might damage the surface of the unit.
Maintaining the unit
The DVD player is a high-tech, precision device. If the optical pick-up lens and disc drive parts are dirty or worn, the picture quality could be diminished. Depending on the operating environment, regular inspection and maintenance are recommended after every 1,000 hours of use.
TROUBLESHOOTING
| Problem | Solution |
| No sound or distorted sound. | Adjust the volume.Make sure that earphones are not plugged in. When earphones are plugged in, the internal speakers are turned off.Make sure that all cables are inserted correctly into the appropriate jacks. |
| Picture is distorted. | During fast-forwarding or fast-reversing, distortion is normal.The DVD may be damaged. Try another one. |
| Remote control does not work. | Make sure that the battery is fresh.Make sure that nothing is blocking the IR sensor.Make sure that you point the remote directly at the IR sensor. |
| Disc does not play. | Make sure that the disc is inserted with the label side up.Make sure that the disc is compatible your player.Make sure that the region code of a DVD matches the region code for your player.your player's region code is 2. |
| Play starts, then stops immediately. | Make sure that the disc is not dirty.If chasformedinside your player, let your player dry out. |
EN-23
We apologize for any inconvenience caused by minor inconsistencies in these instructions, which may occur as a result of product improvement and development.
Disposal

As a responsible retailer we care about the environment. As such we urge you to follow the correct disposal procedure for the product, packaging materials and, if applicable, accessories and batteries. This will help conserve natural resources and ensure that the materials are recycled in a manner that protects health and the
environment. You must follow laws and regulations about disposal.
Waste electrical products and batteries must be disposed of separately from household waste when the product reaches the end of its life.
Contact the store where you bought the product and your local authority to learn about disposal and recycling.
The batteries must be disposed of at your local recycling point. See the operating instructions to find out how to remove the batteries for disposal.
We apologize for any inconvenience caused by minor inconsistencies in the operating instructions, which may occur as a result of product improvement and development.
Darty Holdings SNC © 14 route d'Aulnay 93140 Bondy, France 09/10/2015
- CONTENTS
- WARNINGS
- IMPORTANT SAFETY INSTRUCTIONS
- PACKAGE CONTENT
- IDENTIFICATION OF CONTROLS
- GETTING STARTED
- OPERATION
- SETUP MENU
- SPECIFICATIONS
- CLEANING AND MAINTENANCE
- TROUBLESHOOTING
- SYMBOLS
- BATTERY HANDLING AND USAGE REMOTE CONTROL BATTERY
- INCORPORATED BATTERY
- INSTALLING REMOTE CONTROL BATTERY
- WARNING
- CLASS 1 LASER PRODUCT
- NOTES ON COPYRIGHTS
- REGION CODE
- NOTES ON DISCS
- HANDLING DISCS
- STORING DISCS
- CLEANING DISCS
- EARPHONE VOLUME WARNING
- REMOTE CONTROL
- NOTE
- BUTTONS
- ZOOM
- SEARCH
- SUBTITLE
- ANGLE
- TITLE
- ENTER
- SETUP
- VOL
- REPEAT
- SLOW
- PROGRAM
- DISPLAY
- SOURCE
- MUTE
- STEP
- MENU
- AUDIO
- MODE
- CONNECTING TO AC POWER
- CAUTION
- CONNECTING TO A CAR CIGARETTE LIGHTER SOCKET
- CONNECTING AUDIO/VIDEO CABLE
- CHARGING THE BUILT-IN BATTERY OF THE DVD PLAYER
- PLAYING A DVD/VCD
- CONTROLLING PLAYBACK
- ADJUSTING THE VOLUME
- REPEAT VIEWING
- REPEAT CHAPTER / TITLE / ALL" (FOR DVD)
- SELECTING THE AUDIO LANGUAGE
- SELECTING THE LANGUAGE
- CAMERA ANGLE
- PROGRAM PLAY
- DISPLAYING DISC INFORMATION
- PLAYING AN AUDIO CD, MP3 DISC
- AUDIO CD
- MP
- PLAYING A JPEG DISC
- USB PLAY
- CLEANING THE UNIT
- MAINTAINING THE UNIT
- DISPOSAL
Brand : BRANDT
Model : DVDP-7R
Category : Portable DVD Player