
H 4081 BM - Microwave MIELE - Free user manual and instructions
Find the device manual for free H 4081 BM MIELE in PDF.


| Product Type | Built-in Microwave Oven |
| Brand | Miele |
| Model | H 4081 BM |
| Capacity | Approx. 25 liters |
| Dimensions (H x W x D) | 38.2 cm x 59.5 cm x 38.6 cm |
| Weight | Approx. 27 kg |
| Power Supply | 230 V, 50 Hz, 10 A |
| Power Consumption | 1450 W (Microwave) |
| Microwave Power | 1000 W (variable levels) |
| Functions | Microwave, Defrost, Quick Start, Timer |
| Control Type | Touch control + rotary dial |
| Display | Digital LED display |
| Interior Material | Stainless steel with EasyClean coating |
| Door Type | Drop-down door with glass window |
| Safety Features | Child lock, Overheat protection, Door interlock |
| Cleaning | EasyClean interior, removable glass turntable |
| Available Spare Parts | Turntable, filter, door seal, control board |
| Repairability Index | 8.5/10 (estimated) |
| Warranty | 2 years (depending on region) |
Frequently Asked Questions - H 4081 BM MIELE
User questions about H 4081 BM MIELE
0 question about this device. Answer the ones you know or ask your own.
Ask a new question about this device
Download the instructions for your Microwave in PDF format for free! Find your manual H 4081 BM - MIELE and take your electronic device back in hand. On this page are published all the documents necessary for the use of your device. H 4081 BM by MIELE.
USER MANUAL H 4081 BM MIELE
Operating instructions

Microwave combination oven SuperVision H 4081 BM
To avoid the risk of accidents or
damage to the appliance, it is
essential to read these instructions
before it is installed and used for the first time.
Description of the appliance 4
Appliance overview 4
Control panel 5
Accessories supplied 6
Optional accessories....7
Warning and Safety instructions 8
Caring for the environment 15
Functions and features 16
Functions 16
Safety features....17
Energy saving functions 17
Operating modes 18
Microwave function 18
Traditional oven functions 19
Fan plus 19
Auto roast 19
Grill 19
Fan grill 19
Combination programmes....20
Automatic programmes 20
Controls 21
Before using for the first time....23
Cleaning the appliance 23
Using for the first time 23
Heating up for the first time 24
Operating sequence 25
Programming cooking times....28
Automatic programmes....30
User programmes 32
To create a User programme 32
Settings 34
Language....34
Time (of day) 34
Light 34
Main menu 34
Quick MW 34
Keeping warm (MW only) 34
Recommended temperatures 35
MW power levels 35
Display 35
Buzzer tones 35
Safety (System lock) 35
Units 35
Showroom 36
Factory default 36
Miele@home. 36
Minute minder....37
Suitable containers for microwave ovens 38
Defrost....43
Chart for defrosting food....44
Reheat 45
Chart for reheating food 47
Cooking 48
Chart for cooking, browning and crisping food . . . . . . . . . . . . . . . . . . . . . . . . . . . . . . . 51
Defrosting and Reheating / Cooking 52
Grilling 53
Chart for grilling 54
Roasting 55
Using the roast probe 57
Roasting 59
Chart for roasting 59
Baking 60
Baking chart 62
Cleaning and care 63
Problem solving guide....67
After sales service 70
Miele@home SuperVision 71
Electrical connection IRL, U.K., ZA 74
Installation 75
Appliance overview
① Control panel ② Grill element ③ Oven interior lighting
④ Connection socket for the roast probe ⑤ Three shelf levels ⑥ Appliance door
Control panel

① Sensors for selecting menu options in the display ② Context sensitive numerical key pad ③ ON/OFF ① sensor ④ Display ⑤ Minute minder △ sensor ⑥ ◀ C (Clear) sensor for cancelling the last entry and returning to the previous menu
See "Controls" for more details.
Description of the appliance
Accessories supplied
Glass tray
The glass tray is suitable for use with all cooking functions.
Combi rack for use with a glass tray
The combi rack must always be used with a glass tray.

It can be used either way up to vary the height between it and the grill element, depending on the cooking function and type of food being cooked.
The combi rack is designed to be compatible with microwaves. However, it must not be placed directly on the stainless steel floor of the oven, as this could cause arcing to occur.
Boiling rod
When heating liquids, the boiling rod provided should always be placed in the container. It helps liquids to heat evenly.
Roast probe
The roast probe enables the roasting process to be monitored simply and reliably. See "Using the roast probe" for details.
Optional accessories
Miele@home
The Miele@home system allows you to call up your appliance at any time to check information, e.g. about a programme which is in progress (temperature, delay start time, time remaining ...).
As your appliance is equipped with SuperVision, you will be able to use it to call up information about all appliances which have been signed on to the Miele@home system.
To do this, your appliance must be fitted with Communication module (XKM 2000 SV). Each of the Miele@home enabled appliances will also need to be fitted with a Communication module.
An InfoControl unit is available which can also be used to display information about the status of your appliances.
This appliance complies with all relevant legal safety requirements. Improper use can present a risk of both personal injury and material damage.
To avoid the risk of accidents and damage to the appliance please read these operating instructions carefully before installation and before using it for the first time. They contain important notes on installation, safety, operation and care of the appliance.
Keep these operating instructions in a safe place and pass them on to any future user.
Correct use
The appliance is intended for domestic use only: to cook food, and in particular to defrost, reheat, cook, bake, roast and to grill. Any other usage is not supported by the manufacturer and could be dangerous. The manufacturer cannot be held liable for damage caused by incorrect or improper use of the appliance. Never use the appliance to store or dry items which could ignite easily. Moisture evaporates. Fire hazard. The use of the appliance by the elderly or infirm or those who have not used the appliance before should be supervised by a competent and responsible person to avoid the risk of injury.
This appliance is not a toy! To avoid the risk of injury, keep children well away and do not let them play with it or use the controls. They will not understand the potential dangers posed by it. They should be supervised whenever you are working in the kitchen. Older children may use the appliance only when its operation has been clearly explained to them and they are able to use it safely, recognising the dangers of misuse.
Technical safety
If the connection cable is damaged, the new cable must be fitted by a Miele approved service technician. Do not use the microwave function of the appliance if - the door is warped, - the door hinges are loose, - holes or cracks are visible in the casing, the door, the door seal or the oven interior walls. Operating the appliance with this type of damage will result in microwave leakage and present a hazard to the user. Never open the casing of the appliance.
Tampering with electrical connections or components and mechanical parts is highly dangerous and can cause operational faults or electric shock.
Before connecting the appliance, make sure that the connection data on the data plate (voltage and connected load) match the mains electricity supply. This data must correspond in order to avoid risk of damage to the appliance. Consult a qualified electrician if in any doubt.
Do not connect the appliance to the mains electricity supply by an extension lead.
Extension leads do not guarantee the required safety of the appliance (e.g. danger of overheating).
The electrical safety of this appliance can only be guaranteed when continuity is complete between it and an effective earthing system which complies with local and national safety regulations. It is most important that this basic safety requirement is present and regularly tested, and where there is any doubt, the household wiring system should be inspected by a qualified electrician. The manufacturer cannot be held liable for the consequences of an inadequate earthing system (e.g. electric shock).
The appliance must be built in before operation to ensure that no electrical components are accessible.
Installation work and repairs may only be carried out by suitably qualified and competent persons in accordance with local and national safety regulations. Repairs and other work by unqualified persons could be dangerous and the manufacturer will not be held liable.
Ensure current is not supplied to the appliance until after maintenance or repair work has been carried out.
This equipment may only be installed in mobile installations such as ships, caravans, aircraft etc. if a risk assessment of the installation has been carried out by a suitably qualified engineer.
The appliance is only completely isolated from the electricity supply when:
– the mains fuse is disconnected, – or the screw-out fuse is removed (in countries where this is applicable), - or it has been switched off at the isolator switch or at the wall socket and the plug has been withdrawn.
Use
General notes
Always ensure that food is sufficiently cooked or reheated. Many factors will affect the overall cooking time, including the size and amount of food, its initial temperature, changes to recipe, and the shape and size of the cooking container. Some foods may contain micro-organisms which are only destroyed by thorough cooking. Therefore, when cooking or reheating foods, e.g. poultry, it is particularly important that food is fully cooked through (at temperatures over 70°C for more than 10 minutes). If in doubt, select a longer cooking or reheating time.
It is important that the heat is allowed to spread evenly throughout the food being cooked. This can be achieved by stirring and/or turning the food, and by observing a sufficiently long standing time, which should be added to the time needed for cooking, reheating, or defrosting.
Always remember that cooking times using microwave power are usually considerably shorter than with traditional methods of food preparation (Fan plus, Auto Roast, Grill, Fan Grill). Excessively long cooking times can lead to food drying out and burning, or could even cause it to catch fire. Do not use the microwave function to dry breadcrumbs, flowers, herbs, grain, etc. Use the Fan plus function for this type of procedure and do not leave the oven unattended.
Do not use the microwave function to heat up cushions or pads filled with cherry kernels, wheat grain, lavender, or gel, such as those used in aromatherapy. These pads can ignite when heated even after they have been removed from the appliance.
Exercise caution when cooking or reheating food with a high sugar content, e.g. Christmas pudding. If heated for too long, the sugar may caramelise or ignite. Always ensure that this type of procedure is supervised.
Do not use full power to warm empty dishes. The lack of food or incorrect loading could cause damage to the appliance.
Do not leave the oven unattended when cooking with oils and fats, as these can be a fire hazard if allowed to overheat.
If smoke occurs in the oven, to avoid fuelling any flame, do not open the oven door. Switch the appliance off by pressing the ON/OFF selector, switch off at the mains socket, and remove the plug from the socket. Do not open the oven door until the smoke has dispersed.
Only use the Miele roast probe supplied with this appliance. If a replacement is necessary, it can be obtained from the Miele Spare Parts Department or your Miele dealer.
When not in use, do not leave the roast probe in the oven, especially when grilling.
The high temperatures used for grilling could cause plastic components on the roast probe to melt.
Never heat undiluted alcohol in the oven, as this can easily ignite.
Do not heat up tins in the appliance. Pressure can build up and they may explode, resulting in injury or damage.
Cover any food which is left in the oven to be kept hot, as moisture in the food could lead to corrosion damage in the oven. This also prevents the food from drying out.
Try to avoid the interior walls being splashed with food or liquids containing salt. If it does happen, wipe these away thoroughly to avoid corrosion on the stainless steel surfaces.
If you wish to leave food in the oven after cooking, e.g., to take advantage of the residual heat, do not turn the oven off. Simply select the lowest temperature and leave the function at the position set.
Do not switch the appliance off until the food has been removed. Otherwise, moisture in the oven could lead to condensation forming on the control panel and surrounding kitchen furniture, and drops of moisture collecting under the worktop.
Condensation can:
– damage the housing unit / worktop.
– lead to moisture damage in the oven.
The glass tray and the combi rack take a maximum load of 8 kg.
Exceeding this weight limit can cause them damage.
Do not lean or sit on an open oven door, or place heavy items on it.
This could damage the appliance. The oven door can support a maximum load of 8 kg.
Never place the hot glass tray (or any other hot cooking containers)
on a cold surface, such as a tiled or granite worktop.
The glass tray or container could crack or shatter, and the worktop surface could get damaged. Place it on a suitable pot rest or a wire rack.
Do not use a steam-cleaning appliance to clean this appliance.
Pressurised steam could reach the electrical components and cause a short circuit.
Do not use the appliance to heat up the room. Due to the high temperatures radiated, objects left near the appliance could catch fire.
When using kitchen appliances connected to sockets near the appliance, ensure that the cable cannot get trapped in a hot oven door, which could melt the cable insulation and be dangerous.
Microwave function
Before serving, remember to allow a sufficient standing time and then always check the temperature of the food after taking it out of the oven. The temperature of the container is not an indication of the temperature of the food or liquid in it. When heating food and drink, remember that the heat is created in the food itself and that the container will normally be cooler. The dish is only warmed by the heat of the food.
This is particularly important when preparing food for babies, children, and the elderly or infirm.
Always stir or shake baby milk and food after heating it up, and taste it first to make sure it is not too hot.
Never cook or reheat food or liquids in sealed containers, jars or bottles.
With baby bottles, the screw top and teat must be removed. Otherwise pressure builds up which can cause the bottle or container to explode posing a severe risk of injury.
When heating liquids, the boiling rod provided should always be placed into the container.

When heating liquids, milk, sauces etc., using microwave heat without the boiling rod, the boiling point of the liquid may be reached without the production of typical bubbles. The liquid does not boil evenly throughout. This so-called 'boiling delay' can cause a sudden build up of bubbles, when the container is removed from the oven or shaken. This can lead to the liquid boiling over suddenly and explosively. Danger of burning.
The formation of bubbles can be so strong that the pressure forces the oven door open. The user could be injured and the appliance damaged.
The boiling rod ensures that the liquid boils evenly and that bubbles form at an early stage during the operation.
Do not use any containers or cutlery made from or containing metal, aluminium foil, lead crystal glassware, temperature-sensitive plastics, wooden utensils or cutlery, metal clips or wire ties. Do not use bowls with milled rims, or cream pots with the tinfoil lid only partially removed. Such items could be damaged or cause a fire hazard.
The combi rack supplied with the appliance must be used with the glass tray. It is designed to be compatible with microwaves and can therefore be used with the microwave function. Do not place it on the oven floor. N.B. It gets hot when using the microwave function. Danger of burning.
Do not leave the oven unattended when reheating or cooking food in disposable containers made of plastic, paper or other inflammable materials. Before using single use containers make sure they are suitable for use in microwave ovens. See appropriate section.
Eggs can only be cooked in their shells using microwave heat in a specially designed egg-boiling device available from specialist shops. Similarly, hard-boiled eggs should not be reheated using microwave heat as this may lead to the eggs exploding, even after they have been taken out of the oven.
Eggs can be cooked without their shells using microwave heat only if the yolk membrane has been punctured several times first. The pressure could otherwise cause the egg yolk to explode. Danger of injury.
Do not reheat food in the oven in heat-retaining bags which are intended for use in normal ovens. These heat-retaining bags usually contain a thin layer of aluminium foil which reflects microwaves. This reflected energy can, in turn, cause the outer paper covering to become so hot that it ignites.
Food with a thick skin or peel, such as tomatoes, sausages, jacket potatoes and aubergines, should be pierced or cut in several places to allow steam to escape and prevent the food from bursting.
Ovenproof earthenware can retain a considerable amount of moisture. Earthenware and porcelain containers with hollow handles and lid knobs must only be used with the microwave function if they have vent holes, which allow the moisture to escape. Without vent holes there can be a pressure build-up, causing the container to crack or shatter, with the danger of injury.
To check food temperature, first interrupt the cooking process.
Then use a thermometer specifically approved for food use to measure the temperature of the food. Never use a thermometer containing mercury or liquid, as these are not suitable for use with very high temperatures and will break very easily.
Traditional oven functions: Fan plus, Auto roast, Grill, Fan grill
Caution. Danger of burning. When the oven is being used as a traditional oven it can get very hot.
Great care should be taken to ensure that small children do not touch the oven when it is being used. Children's skin is far more sensitive to high temperatures than that of adults. External parts of the oven such as the door glass, vents, handle and fascia panel can become quite hot. Danger of burning.
Wear oven gloves when placing food in the oven, turning it or removing it. When the Grill is being used, either solo or in a combination programme, the element becomes very hot and there is a danger of burning.
Wait until the grill element has cooled down before lowering it for cleaning. Danger of burning! Do not use force to lower it as this can cause it to break.
In countries where there are areas which may be subject to infestation by cockroaches or other vermin, pay particular attention to keeping the appliance and its surroundings in a clean condition at all times. Any damage which may be caused by cockroaches or other vermin will not be covered by the guarantee.
Disposal of your old appliance
Before disposing of your old appliance, first make it unusable.
Disconnect it from the mains, cut off the cable near the appliance and render any plug unusable. Appliances which have been built-in should be disconnected from the mains supply by a qualified person. This will prevent the appliance from being misused.
The manufacturer cannot be held liable for damage caused by non-compliance with these Warning and Safety instructions.
Disposal of the packing material
The transport and protective packing has been selected from materials which are environmentally friendly for disposal and can normally be recycled.
Ensure that any plastic wrappings, bags etc. are disposed of safely and kept out of the reach of babies and young children. Danger of suffocation!
Rather than just throwing these materials away, please ensure they are offered for recycling.
Disposal of your old appliance
Electrical and electronic appliances often contain materials which, if handled or disposed of incorrectly, could be potentially hazardous to human health and to the environment. They are, however, essential for the correct functioning of your appliance. Please do not therefore dispose of your old appliance with your household waste.

Please dispose of it at your local community waste collection / recycling centre and ensure that it presents no danger to children while being stored for disposal.
It should be unplugged or disconnected from the mains electricity supply by a competent person. The plug must be rendered useless and the cable cut off directly behind it to prevent misuse. See the "Warning and Safety" section of this booklet for further details.
Functions
"Solo" functions
- Microwave For defrosting, reheating and cooking food in a short time.
- Fan plus For baking and cooking food using hot air circulation.
- Auto roast This function provides an initial high temperature to seal meat, followed by a lower temperature for normal roasting.
- Grill For grilling flat pieces of meat and fish. Grill with the oven door closed.
- Fan grill Ideal for grilling thicker items such as stuffed meat, kebabs and pieces of poultry etc. Grill with the oven door closed.
Combination programmes
In the combination programmes microwave power is used in conjunction with a traditional function (Fan plus, Fan grill, Grill, Auto roast).
Quick MW
This sets the microwave operating at maximum power for one minute. The duration and power level can be changed.
Automatic programmes
For cooking, reheating, and defrosting selected food groups using microwave power or combination programmes.
User programmes
You can save settings you use frequently as user programmes and also give them special names to help you select them easily.
Automatic switching on and off
For switching a cooking programme on and off automatically.
Automatic switching off
For switching a cooking programme off automatically.
Minute minder
For monitoring other kitchen activities, e.g. boiling an egg on a hob.
Time of day display
When the appliance is switched off, the time of day will still appear in the display. The time of day display can also be switched off.
Safety features
System lock
This safety feature prevents functions being entered unintentionally (see "Settings - Safety").
Safety cut-out
A process using a traditional oven function can be started without programming in a time. To prevent over-use and the consequent danger of fire, the appliance switches off automatically after a certain length of time. This can be between 1 hour and 10 hours depending on the function and temperature chosen.
If the microwave is switched off in between using two microwave cooking processes, there will be a delay of about 30 seconds before the new setting is accepted. Therefore wait a short while before starting the second process.
Energy saving functions
Door contact switch
If the door is opened during a programme, the heating element and fan are automatically switched off. The programme will continue to run again as soon as you shut the door and confirm "Start". If the door is opened during a conventional programme, i.e. one without microwave power, the programme will continue to run again as soon as the door is shut. You do not need to start it again.
Making use of residual heat
With Fan plus and Auto roast, the heating shuts off automatically if the ambient temperature is sufficient to finish cooking the food and the door has not been opened. Whenever heat is lost, e.g. if the door is opened, the heating will switch on again automatically.
Optional oven interior lighting
You can turn off the oven interior lighting if you do not want it to remain on during the entire cooking process.
Microwave function
Microwave cooking offers the benefits of speed, convenience and nutritional advantages when food does not require browning or crisping.
The following power levels can be selected:
80 W, 150 W, 300 W, 450 W, 600 W, 850 W and 1000 W.
How does the microwave oven function?
In a microwave oven there is a high-frequency tube called a magnetron. This converts electrical energy into microwaves. These microwaves are distributed evenly throughout the oven interior and rebound off the metal sides of the oven interior to reach the food from all sides.
In order for microwaves to reach the food, they must be able to penetrate the cooking utensil being used. Microwaves can penetrate porcelain, glass, cardboard and plastics, but not metal. Do not, therefore, use utensils made of metal, or which contain metal, for example in the form of gold or silver trim. The metal reflects the microwaves and this could lead to the creation of sparks. The microwaves cannot be absorbed.
Microwaves pass through a suitable container and find their way directly into the food.
All food contains moisture molecules which, when subjected to microwave energy, start to oscillate 2.5 thousand million times a second. The friction caused by this vibration creates heat, which first starts developing around the outside of the food and then slowly penetrates towards the centre.
The moisture, fat and sugar content of food will affect the speed at which it is cooked.
As heat is produced directly in the food,
– food can generally be cooked without adding much liquid or cooking oil. – cooking, reheating and defrosting in a microwave oven is quicker than using conventional methods. – nutrients, such as vitamins and minerals, are generally retained. – the colour, texture and taste of food are not impaired.
Microwaves stop being produced as soon as the cooking process is interrupted or the appliance door is opened.
When the appliance is in operation, the closed, sealed door prevents microwaves escaping from the appliance.
Traditional oven functions
This oven offers the following traditional oven functions:
- Fan plus
- Auto roast
- Grill
- Fan grill
These cook and brown the food.
Fan plus
This system works by the circulation of heated air.
A fan in the back wall draws in the air, heats it over a heater element and blows it back into the oven cavity through the carefully spaced openings in the back panel.
The oven does not usually need to be pre-heated as the heated air reaches the food straight away. Pre-heating may be necessary for foods such as puff pastry and yeast mixtures where instant heat is required to make them rise quickly.
When using Fan plus, you can bake and roast on two different levels at the same time.
Auto roast
After the selected temperature is entered, the oven heats initially to a high temperature which seals the meat to keep it succulent and tasty. The oven temperature is then automatically returned to the pre-selected setting after this initial boost of heat.
Grill
The grill is ready for use when it glows red a few minutes after being switched on. Pre-heat the oven with the door closed for approx. 5 minutes before starting to cook. Grill with the oven door closed.
Fan grill
The hot air from the grill is distributed over the food by the fan on the back wall of the oven. This enables a lower temperature to be selected than for normal oven grilling. Pre-heat the oven with the door closed for approx. 5 minutes before starting to cook. Grill with the oven door closed.
Combination programmes
- Microwave + Fan plus
- Microwave + Auto roast
- Microwave + Grill
- Microwave + Fan grill
The combination programmes enable food to be reheated and cooked quickly with even browning results.
The combination programmes enable the grill or the fan setting to be used in conjunction with the microwave facility.
The Microwave + Fan plus combination programme is the most effective because the heat reaches the food to be baked or cooked immediately, giving the greatest savings in both time and energy.
In general when using the combination programmes, you should not set the microwave power level higher than 150 W for baking, and not higher than 450 W for cooking, roasting and grilling.
Automatic programmes
- Defrosting
- Reheating
- Cooking
Food can be cooked, reheated or defrosted using microwave power or combination programmes. Automatic programmes are dependent on weight, i.e. after selecting the appropriate food group, you then enter the weight of the food and the microwave power setting and time will be calculated automatically.

Sensors
The electronic sensors around the large graphic display react to touch.
They are used to operate the appliance.
Every time a sensor touch control is touched, an acoustic signal is heard. You can deactivate this tone if you want (see "Settings - Buzzer tones").

When the appliance is switched on, the allocations for these sensors appear in the display.

Touching this sensor switches the appliance on and off.

This sensor is used to enter a time for the minute minder for timing any activity in the kitchen, e.g. boiling eggs.

This sensor is used to cancel an entry.
The numerical key pad will light up when a temperature or time can be entered.
Display
●
The dot symbol appears next to an option or a command such as "Continue", "OK", "Back" etc.
You can select the entry by touching the sensor beside the dot.
The display shows a maximum of three options.
Arrows in the display indicate if more than three options are available. Touch the sensors on the right hand side of the arrows to scroll up or down to the other options.
A dotted line will appear under the last option available.
+ and -
When times or temperatures can be entered, these will appear highlighted in the display. + and - will appear for using to enter a time or temperature.
You can also use the numerical keypad.
A tick will appear beside the setting which is currently selected.
i
Touching this sensor calls up additional information for the option selected. Select "OK" to close the information screen.
Cleaning the appliance
Remove any protective foil from the oven front.
Wipe out the oven interior with hot water and a little washing up liquid. Dry using a soft cloth.
Do not close the door until the oven interior is dry. Otherwise this could cause a build up of unpleasant odours and corrosion in the appliance.
Wash the accessories.
Using for the first time
A welcome screen will appear in the display when the appliance is connected to the electricity supply. You will then be prompted to select a language.
The choice of languages will appear in alphabetical order in the left-hand column of the display. A tick (√) will appear beside the language that has been set.
To select another language:
Touch one of the sensors beside the arrows until the language you want appears in the display. Select the language you want. A tick (√) will appear beside the language you have selected. Confirm your entry with "Continue".
The request to select a clock format will then appear.
Select the clock format you want (12-hour or 24-hour) and confirm this with "Continue".
You now need to set the correct time of day.
You can use the sensors next to + and - to enter the current time of day: First enter the hour and confirm with "Continue". Then enter the minutes and confirm with "Continue". Alternatively, you can use the keypad: You can enter the minutes immediately after entering the hour and then confirm both entries with "Continue".
You can now choose to switch off the time of day display:
The time of day will then only appear for a short time when the ON/OFF sensor is touched.
If you decide you would like the time of day to be visible all the time, touch the sensor next to "Always show the time".
After you have confirmed your selection with "Continue", the display will show messages to tell you that:
- your appliance is set up ready to take the Miele@home system.
- Setting up for using for the first time has been successfully completed.
The current time of day will then appear. The appliance is now ready for use.
Heating up for the first time
With new appliances there is usually a smell during the first use. High temperatures will help dissipate this more quickly.
Run the empty appliance on the Fan plus setting for at least an hour.
Please ensure the room is well ventilated during this operation.
■ Touch the ON/OFF sensor to call up the main menu. ■ Select Fan plus. The fan starts running and the recommended temperature of 160 °C is highlighted. ■ Increase the temperature to 225 °C (the highest temperature). ■ Select "OK" to confirm your selection of the maximum temperature. ■ Run the programme for at least one hour. You can then switch the appliance off by touching the ON/OFF sensor.
The appliance is operated as follows:
■ Switch the appliance on with the ① sensor.
The Main menu will appear in the display.
The main menu contains 9 sub-menus, which are also further sub-divided. The first four functions in the main menu (Quick MW, Microwave, Fan plus, Grill) are suggestions only. You can change the order in which they appear or replace them with programmes you use more frequently.
■ Select the option you want by touching the sensor beside it.
The following main menu options are available:
- Quick MW
This programme uses microwave power at 1000 W for one minute. It can be used for heating up liquids and you can alter the settings to suit your personal requirements.
- Microwave
The parameters for a microwave programme can be pre-set, including the power level, the duration and also the settings for delaying the start.
- Fan plus
As soon as this programme is selected the hot air fan can be heard, and the appliance starts heating up using the pre-set temperature of 160°C. The temperature can be changed within a range of 30 to 225°C. The duration and a delay start time can also be programmed in. If you prefer to start the programme manually you can set up the appliance so that the hot air fan does not start immediately (see "Settings - Start"). A tone will sound when the set temperature is reached.
- Grill
You can pre-set the grilling duration and also the settings for delaying the start.
- Microwave +
This programme combines microwave power with the following traditional oven functions: Auto roast, Grill, Fan plus and Fan grill.
The microwave power level (max. 450 W), the total duration and the temperature for the traditional oven function can be set.
You can also programme in a delayed start time.
- All functions
All functions, such as Auto roast, Grill, Fan plus, Microwave, Microwave +, Fan grill and Quick MW can be selected via this menu.
- Automatic
A number of automatic programmes are stored in this menu. See "Automatic programmes" for details.
- User programmes
You can save settings you use frequently as user programmes and also give them special names to help you select them easily.
- SuperVision
(optional accessory)
This option will only appear if your appliance is fitted with Communication module XKM 2000 SV and has been signed on to the Miele@home SuperVision system.
You can use this to call up the SuperVision display, see "Miele@home SuperVision".
- Settings
A number of settings, such as a language choice, can be selected or changed in this menu (see "Settings").
If you call up a sub-menu (e.g Automatic, User programmes, Settings) you will be taken to the next level.
From there you can move on to the next sub-menu by calling up an option. You can now select the language you want the display to appear in, for example.
A tick √ will appear beside the setting currently selected.
After selecting an oven function (e.g. Fan plus) options which can be entered or changed for the cooking process will appear in the display, e.g.:
- Temperature
- Power level
- Duration
- Start time
The appliance is set up at the factory so that it starts automatically. Only the programmes which use microwave power need to be started manually.
If you prefer to start all programmes manually, you will have to alter the standard setting for Start to "manual" (see "Settings - Start").
Example:
■ Switch on the appliance.

■ Select the function you want (e.g.: Microwave). The sub-menu will appear.

■ The display will show a suggested power level of 1000 W. You can select a different power level. ■ Confirm the power level you have selected with "OK".

Now set the duration you want.
■ Confirm your entry with "OK". You can now start the programme.
Whilst the programme is running the time left, power level and time of day will be shown in the display.
The oven door is not locked during microwave operation and can be opened at any time. The programme will continue as soon as you close the door.
You can finish a programme early by pressing the ON/OFF sensor.
The oven can be set to switch off, or on and off automatically.
As soon as you have called up a function or confirmed a temperature, the following sub-menus are available:
- Duration
You enter the cooking duration you require.
The oven will switch itself off automatically at the end of the cooking duration.
- Start time
- Finish
You can set the Start time and Finish to specify when you want cooking to start or finish.
The oven will switch on or off automatically at the time you have set.
To switch a programme off automatically you can either enter the Duration or just the Finish time.
To switch a programme on and off automatically you have three choices:
- Enter the Duration and Finish time
- Enter the Duration and the Start time
- Enter the Start time and the Finish time
The time which has not been entered is calculated automatically.
You can save the settings you have entered for a programme as a User programme using "Save as" (see "User programmes").
The Start time will be shown in the display up until the oven heating switches on.
When a programme is in progress the display will show the time left counting down.
At the end of the programme the message "Programme finished" will appear in the display and an audible tone will sound. (See "Settings - Buzzer tones" for details on how to alter the tone).
Using the residual heat, Energy-save function
Shortly before the end of a programme using a traditional function, the oven heating will be switched off automatically.
The residual heat is sufficient to finish cooking.
Using the residual heat in the oven saves energy.
"Energy save phase" will appear in the display to show that the oven is in energy save mode. The actual temperature is no longer visible.
The cooling fan continues to run, as does the hot air fan if a "fan" setting had been chosen.
To check and change an entered time
It is possible to check or change times entered for a cooking programme at any time by calling up the relevant function.
To delete a set time
■ Touch the ON/OFF sensor.
If there is a power cut, all data entered will be deleted.
Automatic programmes can be used for cooking, reheating and defrosting.
The oven must be allowed to cool down to room temperature before starting an automatic programme. Cooking results will be affected if the oven is too hot when you start an automatic programme.
Pay careful attention to what is shown in the display. For instance, you will be asked to enter the weight or number of items, or to add liquid.
Automatic programmes can also be saved as "User Programmes" and be saved into the Main menu.
Select the "Automatic" main menu option.
The following sub-menu options will appear:
- Defrost
Meat, Poultry, Fish, Vegetables, Fruit, Casserole, Soup, Bread, Plated meals
- Reheat
Meat, Poultry, Fish, Vegetables, Casserole, Soup, Plated meals
- Cook
(see the Automatic cooking programme chart).
Follow the messages given in the display until the programme starts. You can also delay the start time.
If you have already started an automatic programme it can only be stopped by switching the appliance off.
Once the automatic programme has started, the display will show the time left counting down.
At the end of the programme the message "Programme finished" will appear in the display and an audible tone will sound. (See "Settings - Buzzer tones" for details on how to alter the tone).
Automatic cooking programmes
Food is cooked using microwave power or a combination programme.
| Meat | |
| Poultry | |
| Fish | |
| Baking | |
| Apple | |
| Gateau | |
| Plaited loaf | |
| Marble cake | |
| Streusel cake | |
| Cookies/muffins | |
| Bread | |
| Heat up | |
| Bakes/Gratin | |
| Lasagne | |
| Potato gratin | |
| Pasta bake | |
| Frozen food | |
| Baguettes with topping | |
| Croquettes | |
| Fish pie 400 g | |
| Vegetables | |
| Fruit | |
| Casserole | |
| Soup | |
You can save settings you use frequently as user programmes. You can choose your own names for these programmes and then call them up whenever you want. You can also enter these programmes into the main menu.
Select "User Programmes" from the main menu.
If you have not yet saved any User programmes, follow the on-screen instructions for creating a new User programme. The steps are the same as those given under "To create a user programme" below.
If you have already saved a User programme, you will be offered the following options:
- Select
This is used to call up and start an existing User programme.
- Create
This is used to create a new User programme.
- Change
Existing programmes can be altered.
- Delete
Existing programmes can be deleted.
To create a User programme
Select "User Programmes" from the main menu and then the "Create" option. Then select the function you want. Confirm the selection of, for example, "Fan plus". If necessary, alter the recommended temperature. Select a duration or a core temperature if using the roast probe and confirm. Check the settings and confirm them with "Continue". If you are not using the roast probe then you can add one more programme step. For example, to set the oven to start another function immediately after the first one. The procedure is the same as described above. You can also set the shelf level to be used. After confirming with "Continue" you can either choose one of the existing programme names or set your own user programme name. To do this: Select the letters or numbers by touching the sensors beside the arrows.
When the letter or number you want is highlighted, confirm it with "Select character". The letter or number you have selected will appear in the top line of the display after "Name". Select the rest of the letters or numbers for your programme name.
You can use the "Delete character" option to correct any wrong entries. The last character entered will then disappear.
Use the "Space" option to insert a space.
■ Confirm the programme name with "Save name".
To call up an existing User programme
■ Select "User Programmes" from the main menu, and then the "Select" option. Programmes saved under User programmes will then appear in the display.
Selecting "Settings ▶" in the main menu allows you to select or change the following options:
Language
You can alter the language currently set. Once changed, all display text will appear in the new language.
This option has a flag ▶ to guide you should you select a language you do not understand by mistake.
If this happens, select the last option (Settings) in the main menu, then from the sub-menu select the last option (Language).
Time (of day)
The time display can be set to be on all the time or to go out after 60 seconds. It can be set to appear as a 24 hour or 12 hour clock.
To enter or alter the time:
■ Select "Settings" from the main menu. ■ Select "Time" from the sub-menu and then "Set" from the next sub-menu. ■ Now enter the correct time. ■ Confirm your entry with "OK".
Light
You can choose between the default setting of the light coming "On for 15 seconds" and "On".
If you keep the default setting, the light in the oven interior will go out 15 seconds after the programme has started. If you touch a sensor next to the display, the light will come on again for another 15 seconds.
If you select "On", the light will remain on during the entire programme.
Main menu
The first four options in the main menu can be allocated to programmes which you use more frequently than the pre-set programmes, Quick MW, Microwave and Fan plus and Grill.
Each option is shown as a position and can be changed. You can select other options from the range of functions and from your user programmes.
Confirming "Continue" will take you through the four positions. You can either choose a different option for the position or keep the pre-set programme. Once you have chosen the programmes for all four positions, keep confirming "Back" to take you back to the Main menu.
Quick MW
This setting is for when you want to use the microwave quickly. It has a pre-set power level of 1000 W and will operate for a duration of 1 minute. The duration and power level can be changed.
Keeping warm (MW only)
A warming function is activated as standard with the microwave programme.
Food will be warmed for a certain period if it is not removed from the appliance at the end of the programme.
"Keeping warm" will appear in the display.
You can switch the warming function off. The warming function cannot be set as a separate function.
Cooling fan run-on
You can select either a temperature or a time controlled fan run-on.
The fan will then switch off automatically if the temperature in the oven is 70°C (temperature controlled) or after approx. 20 minutes (time controlled).
Start
Programmes can be started automatically or manually. Microwave programmes can only be started manually.
The automatic setting enables a programme to start automatically without having to select Start. With the manual setting, you have to select and confirm "Start".
Recommended temperatures
This setting calls up the recommended temperatures for the traditional oven functions and also the microwave combination programmes. These can be changed.
MW power levels
You can alter the recommended power levels for solo programmes and for combination programmes using microwave heat.
Display
You can set the display contrast and display brightness.
Buzzer tones
There is a choice of different tones and volumes.
The "Melody" option offers you different sounds for the minute minder tone and the cooking duration tone. This means you will be able to differentiate between the minute minder tone and the tone which indicates that a programmed cooking duration has finished if you are using both at the same time.
The length of the tone can also be set to allow you to differentiate between a short tone and long tone.
You can also deactivate the tone which sounds each time a sensor is pressed.
Safety (System lock)
Call up the Safety menu to display the System lock option.
By activating this option you can prevent the appliance from being used. You can change from "Off" to "On". A lock symbol will then be visible on the right hand side of the bottom line of the display. The lock symbol will be open when the system is unlocked and closed when the system is locked. If you select the lock symbol, you can open or close it. You can still use the minute minder.
The system lock will remain activated even after a power cut.
Units
You can alter the units, namely the weight from kg to lbs and the temperature from °C to °F.
Showroom
This setting is for dealers who want to demonstrate the appliance without the heating working. Do not activate this setting for domestic use!
Factory default
You can delete your own personal settings and alterations and reinstate the factory settings.
You can either reinstate all the settings at once or you can select individual settings. For example, you can delete only your user programmes, reinstate the content and order of the original main menu and re-set the recommended values for temperatures and MW power levels.
Miele@home
(optional accessory)
This option will only appear if your appliance is fitted with Communication module XKM 2000 SV.
Installation
This option will only appear when the Miele@home system is being installed for the first time. Please refer to the "Miele@home" installation instructions supplied with Communication module XKM 2000 SV for information on how to do this.
SuperVision
This option will only appear if your appliance is signed on to the Miele@home with SuperVision system.
See "Miele@home SuperVision - Settings" for more information on settings.
The minute minder can be used to time any activity in the kitchen, e.g. boiling eggs. You can use the minute minder on its own or at the same time as other functions.
To set the minute minder
■ Touch the "△" sensor. ■ Enter the time you want for the minute minder. ■ Confirm your entry with "OK".
If you use the minute minder at the same time as a cooking programme you will be able to tell which one has finished first by its audible tone.
At the end of the minute minder time, the time will carry on counting and will appear flashing in the display beside the "△" symbol.
To delete the time set for the minute minder
■ Call up the minute minder and set it to 0:00.
Suitable containers for microwave ovens
Microwaves

- are reflected by metal,

– pass through glass, porcelain, plastic and card,

- and are absorbed by food.
When using microwave power, always place the food or dish centrally on the glass tray and slide the tray into the first shelf level from the bottom. Placing the dish on the floor of the oven will give unsatisfactory and uneven results.
Material and shape
The material and shape of containers used affect cooking results and times. Heat distribution is more even in round and oval shaped flat containers than in rectangular containers, providing better results.
Metal
Metal containers, aluminium foil and metal cutlery, or china with metallic decoration such as gold rims or cobalt blue must not be used in microwave mode.
The metal reflects the microwaves, hindering the cooking process.
Exceptions:
- If recommended by the producer, pre-cooked meals in aluminium foil containers can be defrosted and reheated in the appliance using microwave power. Important: Remove the lid first. However, as food is only heated from the top it is better to remove the food from the aluminium foil container and transfer it to a dish suitable for a microwave oven. The heat distribution will be more even.
Do not place aluminium foil containers on the metal rack as this can cause arcing to occur and damage the oven.
- For even defrosting and to avoid overcooking unevenly shaped cuts of meat, poultry or fish, small pieces of aluminium foil may be used to mask wing-tips or other thin parts for the last few minutes of the process.
Make sure that the aluminium foil is at least 2 cm from the oven walls at all times. It must not touch the walls.
- Metal meat skewers or clamps should only be used if they are very small in comparison to the size of the cut of meat.
The combi rack supplied with the appliance is suitable for use with microwave power. However, it must not be placed on the oven floor.
The rack can get hot.
Glassware
Heat-resistant glass or ceramic glass are ideal for use in the microwave oven.
Crystal glass contains lead which could cause the glass to crack. Glass dishes with a milled rim are subject to the same risk. Both are unsuitable.
Porcelain
Porcelain is a suitable material.
Do not use porcelain with gold or silver edging or items with hollow knobs or handles, as insufficient ventilation may cause pressure.
Earthenware
Decorated earthenware is only suitable if the decoration is beneath an all-over glaze.
Earthenware can get very hot, and may crack.
Glazes and colours
Some glazes and colours contain metals which make them unsuitable for use in a microwave oven.
Plastics
Plastics must only be used with Microwave Solo. They must be heat-resistant to a minimum of 110 °C. Otherwise the plastic may melt and fuse with the food.
Special plastic utensils designed for use in microwave ovens are available from good retail outlets. When purchasing plasticware, make sure that it is suitable for use in a microwave oven.
Melamine is not suitable for use in this oven. Melamine absorbs microwave energy and gets hot.
Plastic boiling bags can be used for cooking and reheating.
They should be pierced beforehand so that steam can escape. This prevents a build-up of pressure and reduces the risk of the bag bursting.
Roasting bags and tubes
Roasting tubes should be about 40 cm longer and roasting bags about 20 cm longer than the food being roasted, and carefully tied with string. Turn the ends over and secure them. The bag should be pierced according to the manufacturer's instructions.
Do not use metal clips, plastic clips containing metal parts or paper ties containing wire.
There is a danger that they will ignite when heated.
Wood
Wooden dishes are not suitable. Moisture contained in the wood evaporates when exposed to microwave energy, causing the wood to dry and crack.
Disposable containers
Only those plastic disposable containers which are specified by the manufacturer as suitable for use in a microwave oven may be used.
Disposable containers, such as trays made from polystyrene, can only be used for very short timed warming and reheating the food.
Do not leave the oven unattended when reheating or cooking food in disposable containers made of plastic, paper or other inflammable materials.
Disposable containers are not always recyclable or bio-degradable.
Testing dishes for their suitability
If in doubt as to whether glass, earthenware or porcelain plates or dishes are suitable for use in a microwave oven, a simple test can be performed:
Place the empty container centrally on the glass tray and slide it into the lowest shelf level. Close the door.
A microwave oven process cannot be started until the door is closed.
Touch the ON/OFF sensor to call up the main menu. Select Microwave.
The highest microwave power level is then highlighted (1000 W).
Confirm with "OK". Enter a duration of 30 seconds and confirm with "OK".
If a crackling noise is heard accompanied by sparks during the test, switch off the appliance immediately by touching the ON/OFF sensor.
Any crockery which causes this reaction is unsuitable for use with microwave power.
If any doubt exists about the suitability of containers, please contact the supplier.
This test cannot be used to check whether items with hollow knobs or handles are suitable for use with microwave power.
A cover
- prevents too much steam escaping, especially when cooking foods which need longer to cook, such as potatoes.
- speeds up the cooking process. – prevents food from drying out.
- prevents any loss of aroma. – helps keep the oven interior clean.

Always use lids or covers made of microwave-safe glass or plastic, or use a clingfilm recommended for use in a microwave oven, (pierce as instructed by the manufacturer).
Unsuitable clingfilm can melt into the food.
Sealed glass containers, such as jars of baby food, must be opened before they are placed in the oven. Do not attempt to heat them up unopened.
Do not use a cover if
- food coated with breadcrumbs is being cooked. – cooking meals which are to be given a crisp finish. – using a combination programme.
The cover supplied may only be used in microwave-solo operation.
The cover can only withstand temperatures of up to 110 °C. Higher temperatures generated by grilling or fan heat could cause the plastic to distort and fuse with the food.
The cover must not create a seal over the container. If the cover is used with a container which only has a narrow diameter, condensation may not be able to escape through the holes in the cover. The cover could get too hot and could start to melt.
The microwave function can be used to defrost food gently and quickly.
The following settings are recommended as a general guide:
- 80 W for defrosting very delicate food, e.g. cream, butter, gateau and cheese.
- 150 W for defrosting everything else.
The appropriate automatic programmes are ideal for defrosting.
See the chart on the next page for defrosting durations.
■ Remove the food from its packaging and place it in a microwave-safe container.
■ Place the container centrally on the glass tray and slide into the lowest shelf level.
If defrosting a large quantity, e.g. 2 kg of fish, you can place the food directly on the glass tray and then slide it into the lowest shelf level.
Important when using an automatic programme for defrosting:
When defrosting a large amount of food which has been wrapped in individual portions, enter a lower total weight than the actual total weight.
This will give a more even result.
Example:
1.5 kg sliced steak packed into 3 individual 500 g portions Enter weight as: 1000 g instead of 1500 g
Turn, stir or separate the food about half-way through the defrosting time. The automatic programme has an audible tone which sounds as a reminder.
After defrosting
Allow the food to stand at room temperature long enough to allow the temperature to spread evenly throughout the food.
Chart for defrosting food
| Quantity 150 W | Microwave power settings | |||
| Time in min. | 80 W Time in min. | Standing time at room temperature 1) in min. | ||
| Dairy products | ||||
| Cream | 250 ml | - | 13 – 17 | 10 – 15 |
| Butter | 250 g | - | 8 – 10 | 5 – 10 |
| Cheese slices | 250 g | - | 6 – 8 | 10 – 15 |
| Milk | 500 ml | 14 – 16 | - | 10 – 15 |
| Quark / Cream cheese | 250 g | 10 – 12 | - | 10 – 15 |
| Cakes / Pastry / Bread | ||||
| Sponge cake | 1 piece approx. 100 g | 1 – 2 | - | 5 – 10 |
| Sponge cake | 300 g | 4 – 6 | - | 5 – 10 |
| Fruit cake | 3 pieces approx. 300 g | 6 – 8 | - | 10 – 15 |
| Butter cake | 3 pieces approx. 300 g | 5 – 7 | - | 5 – 10 |
| Cream cake | 1 piece approx. 100 g | - | 1.5 | 5 – 10 |
| 3 pieces approx. 300 g | - | 4 – 4.5 | 5 – 10 | |
| Yeast buns, puff pastries | 4 pieces | 6 – 8 | - | 5 – 10 |
| Meat 2) | --- 10 – 15 | |||
| Poultry 2) | --- 10 – 15 | |||
| Fish 2) | --- 10 – 15 | |||
| Vegetables 2) | --- 10 – 15 | |||
| Fruit 2) | --- 5 – 10 | |||
| Casserole 2) | --- 10 – 15 | |||
| Soup 2) | --- 10 – 15 | |||
| Bread 2) | --- 5 – 10 | |||
| Plated meals 2) | --- 5 – 10 | |||
1) During this time the temperature spreads evenly through the food. 2) Use the appropriate automatic programme. The information given in this chart is intended only as a guide.
The microwave function is particularly suitable for reheating food.
Select the following microwave power settings to reheat food
drinks....1000 W food....850 W or 600 W baby food....450 W
Food for babies and young children or the elderly must not be allowed to get too hot. We do not recommend heating or reheating foods or drinks for babies or young children in the microwave oven. Any decision to do this is the responsibility of the user, and should only be done with the utmost care. Pasteurised or sterilised cooked food should be gently heated using 450 watts, and tasted to make sure it is not too hot for a baby's palate before serving. When reheating other food or drink, heat to a high temperature and allow to cool to a suitable heat for eating. For formula milk follow the manufacturer's instructions.
The appropriate automatic programmes are also ideal for reheating.
Always use a lid or cover for reheating food, except when a drier finish is needed, e.g. breaded poultry/meat.
Always remove the lids from jars, e.g. jars of baby food.
Remove the rubber teat and screw cap before warming baby bottles.
When reheating liquids, place the boiling rod supplied with the appliance into the cup or glass.
Never reheat hard boiled eggs using microwave power, even without the shell. The eggs can explode.
The time required depends largely on the nature of the food, the amount and its initial temperature. Food taken straight from the refrigerator takes longer to reheat than food stored at room temperature.
Always ensure that food is sufficiently reheated.
If in any doubt that a sufficiently high temperature has been reached, continue reheating for a little longer.
Stir or turn food from time to time during reheating.
With the automatic programme a buzzer sounds as a reminder. Stir the food from the outside towards the middle, as food heats more quickly from the outside.
After reheating
Be careful when removing a dish from the oven. It may be hot.
Although heat is not normally produced in the container itself by the microwaves (apart from stoneware), heat transfer from the food to the container may be considerable, making the container itself hot.
Allow food to stand for a few minutes at room temperature once a programme has ended to allow the heat to be distributed evenly.
After reheating food, especially food for babies and small children, stir the food or shake the container and check that the temperature does not pose any danger. Double check after it has been left to stand.
Chart for reheating food
| Drinks ** Microwave power | settings | |||
| Quantity 1000 W | 450 W | Standing time at room temperature * in min. | ||
| Time in min. | Time in min. | |||
| Coffee, drinking temperature 60 – 65 °CMilk, drinking temperature 60 – 65 °CWaterbring to the boilBaby bottles (milk)Glühwein, punchdrinking temperature 60 – 65 °C | 1 cup, 200 ml | 0:50 – 1:10 | - | - |
| 1 cup, 200 ml | 1– 1:50*** | - | - | |
| 1 cup, 125 ml | 1 – 1:50 | - | - | |
| approx. 200 ml | - | 0:50 – 1*** | 1 | |
| 1 glass, 200 ml | 0:50 – 1:10 | - | - | |
| Food *** Microwave power | settings | |||
| Quantity 600 W | 450 W | Standing time at room temperature * in min. | ||
| Time in min. | Time in min. | |||
| Baby foodat room temperatureMeat **** | 1 jar, 200 g | - | 0:30 – 1 | 1 |
| - | - | - | 3 – 5 | |
| Poultry **** | - | - | - | 3 – 5 |
| Fish **** | - | - | - | 3 – 5 |
| Vegetables **** | - | - | - | 3 – 5 |
| Casseroles **** | - | - | - | 3 – 5 |
| Soup **** | - | - | - | 3 – 5 |
| Plated meals **** | - | - | - | 3 – 5 |
| Frankfurters in 250 ml water | 100 g | 3 – 4 | - | 1 |
| Cutlets, grilled | 200 g | 3 – 5 | - | 2 |
| Fillet of fish, grilled | 200 g | 3 – 4 | - | 2 |
| Potato cakes | 250 g | 3 – 5 | - | 1 |
| Gravy | 250 ml | 4 – 5 | - | 1 |
| Sauces | 250 ml | - | 3*** | 1 |
* During this time the temperature spreads evenly through the food. ** Put the boiling rod in the container. *** Times are based on an initial temperature of approx 5 °C. **** Use the appropriate automatic programme. For food not normally stored in a fridge assume an initial temperature of 20 °C. All food except delicate sauces should be reheated to 70 – 75 °C. Temperature should be tested for palatability before serving to babies, young children, the elderly or infirm. See note on food and drink for babies. The information given in this chart is intended only as a guide.
Microwave, traditional and combination programmes are all suitable for cooking.
Microwave
This method is suitable for cooking casseroles as well as dishes with pasta, rice and semolina etc. which need water to help them swell up.
First select 850 W to bring the food up to a boil and then turn the power level down to 450 W to continue cooking or to 150 W for simmering.
Fan plus
This method is recommended for cooking and steaming food such as potatoes and vegetables.
Microwave + Fan plus
This method is useful when you want to shorten cooking times and have a browned finish to the dish.
Microwave + Grill
This method is good for cooking food which needs a well cooked top or browned finished to it, such as macaroni cheese or pasta tuna bake.
Microwave
Place the food in a microwave-safe dish and cover it.
Place the dish on the glass tray and slide into the lowest shelf level.
Add a little water to vegetables which have been kept stored. Vegetable cooking times depend on the texture of the vegetable. Fresh vegetables contain more water than vegetables which have been stored and usually cook more quickly.
Food taken straight from the refrigerator requires longer to reheat than food stored at room temperature.
Stir and turn food at least once during cooking. With the automatic programme a buzzer sounds as a reminder.
Food with a thick skin or peel, such as tomatoes, sausages, jacket potatoes and aubergines, should be pierced or cut in several places to allow steam to escape and prevent the food from bursting.
Similarly, hard-boiled eggs should not be cooked using microwave power as this may lead to the eggs exploding, even after they have been taken out of the oven. Eggs can, however, be cooked using microwave power if you have purchased special containers designed for this purpose.
Eggs can be cooked without their shells using microwave power only if the yolk membrane has been punctured several times first. The pressure could otherwise cause the egg yolk to explode.
Fan plus
Slide the glass tray with the combi rack into the first shelf level from the bottom.
The following containers are suitable:
Ovenproof glass, china and earthenware pots with heat-resistant handles and knobs.
Cover dishes which are to be cooked in their own juice and/or steam, e.g. potatoes or vegetables. This also prevents the food from drying out.
Where a crisp finish is required e.g. for meat, cook without a lid.
Combination programmes
Place the dish on the glass tray and slide into the lowest shelf level.
Only use heat-resistant, microwave-safe crockery. No metal.
Generally you can cook without a lid when using the combination programmes.
Never use a lid when using Microwave + Grill! The food will not brown!
Ensure that foods such as meat and fish are thoroughly cooked for an appropriate length of time.
Cooking chart
| Microwave power settings | |||||
| Quantity 850 W | +450 W | Standing time at room temperature *in min. | |||
| Time in min. | Time in min. | ||||
| Meat | |||||
| Meat balls in sauce ** | - | - | - | 2 - 3 | |
| Stew ** | - | - | - | 2 - 3 | |
| Poultry | |||||
| Chicken in mustard sauce ** | - | - | - | 2 - 3 | |
| Chicken curry ** | - | - | - | 2 - 3 | |
| Chicken risotto | approx. 1.6 kg | 10 | + | 15 | 3 - 5 |
| Fish | |||||
| Fillet in sauce ** | - | - | - | 2 - 3 | |
| Fish curry ** | - | - | - | 3 - 5 | |
| Fresh vegetables | |||||
| Carrots ** | - | - | - | 2 - 3 | |
| Cauliflower florets ** | - | - | - | 2 - 3 | |
| Peas ** | - | - | - | 2 - 3 | |
| Peppers (sliced) ** | - | - | - | 2 - 3 | |
| Vegetable / batons ** | - | - | - | 2 - 3 | |
| Brussels sprouts ** | - | - | - | 2 - 3 | |
| Asparagus ** | - | - | - | 2 - 3 | |
| Broccoli florets ** | - | - | - | 2 - 3 | |
| Leeks ** | - | - | - | 2 - 3 | |
| Green beans ** | - | - | - | 2 - 3 | |
| Frozen vegetables | |||||
| Peas, mixed veg. | 450 g | 5 | + | 11 | 2 |
| Spinach | 450 g | 5 | + | 7 | 2 |
| Brussels sprouts | 300 g | 4 | + | 6 | 2 |
| Broccoli | 300 g | 3 | + | 6 | 2 |
| Leeks | 450 g | 4 | + | 8 | 2 |
| Desserts | |||||
| Cheese cake (500 g cream cheese) | 10 - 12 | - | - | ||
| Fruit compote (500 ml fruit juice or 500 g fruit) | 6 - 8 | - | - | ||
* During this time the temperature spreads evenly through the food. ** Use the appropriate automatic programme. The information given in this chart is intended only as a guide.
Chart for cooking, browning and crisping food
| Quantity Oven function Time in min. | |||
| Meat1) | |||
| Roast ham | 1000 g | 300 W + Fan plus 160 °C | approx. 65 |
| Pork loin | 1000 g | Fan plus 180 °C | approx. 70 |
| Veal roast | 1000 g | Fan plus 180 °C | approx. 120 |
| Meat loaf | approx. 1200 g | 300 W + Fan plus 180 °C | approx. 40 |
| Poultry1) | |||
| Chicken, whole | 1000 g | 300 W + Fan plus 180 °C | 35 - 45 |
| Turkey thighs, 3 pieces | approx. 1500 g | Fan plus 170 °C | approx. 120 |
| Turkey breast | approx. 1000 g | Fan plus 170 °C | approx. 100 |
| Snacks2) | |||
| Toast with topping | 4 pieces | Grill | 5 - 93) |
| Baked artichoke hearts | 8 - 10 pieces | Grill | 8 - 103) |
| Chicken nuggets, fresh1) | approx. 1000 g | Fan plus 190 °C | approx. 204) |
1) lowest shelf level
2) second shelf level, rack in the highest position
3) Pre-heat the grill for 5 minutes, place food on the rack
4) Pre-heat the oven.
Slide the glass tray with the rack into the shelf level quoted.
Allow a standing time at room temperature of:
approx. 2 minutes for cooking times under 10 minutes,
or
approx. 5 minutes for cooking times over 10 minutes.
The information given in this chart is intended only as a guide.
For simultaneous defrosting and reheating or cooking the following functions are suitable:
- Microwave
- Microwave + Grill
Microwave is suitable for defrosting and then reheating or cooking deep frozen ready made meals which you do not wish to brown.
Microwave + Grill is suitable for ready made meals which also need to be browned.
Microwave
Deep frozen ready made meals can be defrosted and then reheated or cooked. Please follow instructions given on the packet.
Remove the food from its packaging and place in a covered microwave-safe dish for defrosting and reheating or cooking. Soups, stew and vegetables should be stirred several times during the process. Carefully separate and turn slices of meat halfway through the programme. Turn pieces of fish at the halfway stage.
Deep-frozen ready made meals in card trays which, according to manufacturer's instructions, are suitable for use in a normal oven, are normally also microwave-safe.
Combination programme
Select Microwave + Grill for cooking ready made meals, which are to be crisped and browned. Select a microwave power level of 450 watts. The grill temperature is automatically set and cannot be changed.
Put the ready made meal in a heat resistant, microwave-proof dish, and place on the glass tray. Slide the glass tray into the second shelf level. Do not cover.
Ready made meals in aluminium dishes must be placed directly on to the glass tray.
If this does not brown the food as much as you would like, next time put the dish on the rack, and slide this together with the glass tray into the first level from the bottom.
This oven offers several grill settings: Grill, Fan Grill, Microwave + Grill and Microwave + Fan Grill.
Grill is suitable for flat items such as cutlets, steak, burgers, toast etc.
Fan grill is suitable for grilling thick cuts, e.g. rolled meat, poultry.
In the Combination programmes microwave power output is limited to 450 W for the entire duration of the programme.
Preparing food for grilling
Rinse meat under cold running water and then pat dry. Do not season meat with salt before grilling as this draws the juices out. Add a little oil if necessary. Do not use other types of fat as they can get too dark, burn and cause smoke. A little butter can be added to chicken if desired. Clean flat fish and slices of fish in the normal way. To enhance the taste add a little salt or squeeze a little lemon juice over the fish.
Grilling
The grill temperature cannot be altered, the grill is either on or off.
Pre-heat the grill for approx. 5 minutes with the oven door shut before grilling. Do not engage microwave power during the pre-heating phase.
Brush the rack with oil and place the prepared food on the rack.
It is best to grill food of a similar thickness at the same time so that the grilling time for each item does not vary too greatly.
Place the rack on the glass tray and slide into the second or third shelf level from the bottom, depending on the type of food you are grilling.
The rack can be used either way up to achieve the best distance from the grill element.
Most items should be turned half way through cooking.
Fan grill
It is usually best to use the lowest shelf level. The rack can be used either way up. Using the rack with the raised section facing upwards allows more space underneath the food for hot air to circulate. If necessary you can use the second shelf level from the bottom, for instance where the meat is not too thick or large.
Test to see if cooked
One way of finding out how far through a piece of meat has been cooked is to press down on it with a spoon:
- If there is very little resistance to the pressure of the spoon, it is still red on the inside ("rare").
- If there is some resistance the inside will be pink ("medium").
- If there is great resistance, it is thoroughly cooked through ("well done").
Chart for grilling
Pre-heat the grill for approx. 5 minutes.
| Flat items1) | Total grilling time in min.2) |
| Steak 25 – 30 | |
| Burgers 30 – 35 | |
| Sausages 20 – 25 | |
| Fish fillet 16 – 20 | |
| Toast 2 – 4 | |
| Toast with topping 5 – 9 | |
| Tomatoes 8 – 10 | |
| Peaches 7 – 10 |
1) Third shelf level 2) Turn half way through the grilling time.
The information given in this chart is intended only as a guide. See the cookbook supplied with your oven and/or a good microwave or microwave combi-oven cookbook for further details on these and other foods.
The following settings are suitable for roasting:
- Auto roast
- Microwave + Auto roast
Use Auto roast to give meat or poultry a crisp browned finish.
Select the combination programme to cook in a shorter time.
The combination programme is not usually suitable for cooking roast beef or fillet steak. The centre would be too well cooked before the exterior is browned.
Put meat or poultry into the oven without pre-heating.
Exception: Pre-heat at the temperature suggested when cooking beef and beef fillet.
Cooking in a covered pot is highly recommended:
– the meat stays succulent, - the oven interior stays cleaner than when roasting on the rack. - this ensures that sufficient stock remains for making gravy.
Half way through the cooking time remove the lid from the pot if browning the meat.
Auto roast
Slide the glass tray with the combi rack into the first shelf level from the bottom.
Roasting pots with a lid, made from earthenware, cast iron, ovenproof china or glass, and roasting foil are suitable. Make sure that the pot and lid have heat-resistant handles.
Place the dish directly on the glass tray.
The roasting time will depend on the type of meat, the size and thickness of the cut, and can be calculated as follows:
The traditional method is to calculate 20 mins per lb plus 20 mins over.
The larger the roast, the lower the temperature to be selected. For cuts above 3 kg select a temperature approx. 10 °C lower than that given in the roasting chart. Roasting will take longer at the lower temperature, but will be more even.
To roast on the rack place the rack with the raised side upwards on the glass tray and set the temperature 20°C lower than for pot roasting.
Do not select a higher temperature than that advised. This would brown, but not completely cook the meat.
Microwave + Auto roast
Slide the glass tray with the rack into the first runner level from the bottom.
Use only heat resistant pots, with no metal in the pot or lid. Microwaves cannot penetrate metal to reach the food in the pot.
If using roasting foil
- cut the foil approx. 40 cm longer than the piece of food
- and tie carefully. Make sure the pot, foil and ties are suitable for microwave use.
After selecting an Auto roast temperature, select a microwave setting for the total cooking time of:
- 300 W for roasting meat or fish,
- 150 W for roasting poultry.
After the roasting process is finished
Take the roast out of the oven, wrap in aluminium foil and leave to stand for about 10 minutes. This helps retain the juices when the meat is carved.
Useful hints
Roasting in a covered pot
Season the meat and place in the pot. Add some knobs of butter or margarine or baste with a little oil or cooking fat. Add about 1/8 litre of water when roasting a big lean joint of meat (2-3 kg) or roasting poultry with a high fat content.
Browning only occurs towards the end of the roasting time. 15 - 20 minutes before the end of roasting time take the lid off the pot.
Roasting on the rack
Add a little fat or oil to very lean meat or place a few strips of streaky bacon on the top.
Do not add too much liquid to the tray during cooking as this will hinder the browning process.
Please note that open roasting can give rise to excessive smoke.
The temperature required can be set 20°C lower than for pot roasting.
Roasting poultry
For a crisp finish, baste the poultry ten minutes before the end of cooking time with slightly salted water.
Frozen meat
Deep frozen meat should be thoroughly defrosted before roasting.
This appliance is supplied with a roast probe, which enables the roasting process to be monitored simply and reliably.
The tip of the probe is pushed into the centre of the meat where it measures the core temperature continuously. When the pre-selected core temperature is reached, the oven heating is switched off automatically.
The roast probe can be used with the following functions:
- Auto roast
- Fan plus
- Microwave (Solo and combination programmes)
Using the roast probe
■ Prepare the meat in the usual way. ■ Insert the probe into the meat until the tip of the probe reaches the centre of the meat.
Please note:
You can place the meat in a pot or on the rack on the glass tray. Roasting bags or foil may also be used. Insert the probe through the foil or bag into the centre of the meat.
If fat or bone come into contact with the probe, this can lead to the oven being switched off too early. Therefore:
– do not let the probe touch any bones. – do not insert it into a particularly fatty area of the meat.
If the meat is very heavily marbled with fat, select the highest core temperature given in the roasting chart.
The roast probe should not be used with poultry or fish. Because of the amount of bone and cavity space it is difficult to find a good place to insert the probe.
■ Place the food in the oven.

■ Insert the plug of the roast probe into the socket until you feel it engage. ■ Close the door. ■ Select the required function.
The recommended oven temperature (e.g. 160 °C) and the recommended core temperature of 60°C will appear in the display.
■ Alter the recommended oven temperature if necessary ■ Call up and change the "Core temperature".
The core temperature required will depend on what is being roasted. See the Roasting chart for suggested temperatures.
Once the programme has started, the core temperature rise can be followed in the display.
The cooking duration is calculated automatically.
As soon as the core temperature selected has been reached
- the "Programme finished" message will appear in the display.
- the audible tone will sound. (See "Settings - Buzzer tones" for details on how to alter the tone). – the oven will switch itself off automatically.
- the cooling fan will continue to run for a while.
Note
You can also delay the start of the programme.
When finished, cover the meat with aluminium foil and allow to stand for approx. 10 minutes. During this time the core temperature rises another 5 – 10°C.
You may need to insert the probe in a different place and start again, if:
- the cut of meat was too large (3 kg or more) for the probe to be inserted right to the centre.
- the meat is not sufficiently roasted to your taste.
The duration for roasting meat by temperature using the probe is similar to the duration when cooking by time.
Chart for roasting
| Auto roast Microwave + Auto roast | Core temperature °C | |||||
| Temp in °C1) | Time in min. | Microwave setting in W | Temp in °C1) | Time in min. | ||
| Roast beef (approx. 1 kg) 170 | - 190 | 100 - 120 | 300 | 60 - 85 | 3) | |
| Beef fillet2) (approx. 1 kg) 190 | - 210 | 45 - 55 | - - - 45 | - 70 | ||
| Venison (approx. 1 kg) 180 - 200 | 90 | - 110 | 300 | 180 | - 75 | |
| Pork joint (approx. 1 kg) | 170 | - 190 | 100 - 120 | 300 | 180 | 70 - 80 |
| Ham joint (approx. 1 kg) | 170 | - 190 | 70 - 80 | 300 | 180 | 40 - 50 |
| Meat loaf (approx. 1 kg) | 170 | - 190 | 50 - 60 | 300 | 180 | 35 - 40 |
| Veal (approx. 1 kg) | 180 | - 200 | 90 - 110 | 300 | 180 | 70 - 80 |
| Leg of lamb (approx. 2.5 kg) | 170 | - 190 | 120 - 140 | 300 | 180 | 70 - 80 |
| Poultry (0.8 - 1 kg) | 170 | - 190 | 50 - 60 | 180 | 40 - 45 - | |
| Poultry (approx. 2 kg) | 170 | - 190 | 90 - 110 | 180 | 70 - 80 - | |
| Poultry (approx. 4 kg) | 160 | - 180 | 150 - 180 | 150 | 170 | 100 - 120 |
| Whole fish (approx. 1.5 kg) | 160 | - 180 | 35 - 55 | - | ||
The times given are calculated on the basis of an oven which has not been pre-heated.
1) Roasting in a pot.
If open roasting on the rack, set the temperature 20 °C lower.
2) Pre-heat the oven.
3) rare 60 -65°C, medium 70 - 75°C, well done 80 - 85°C
The information given in this chart is intended only as a guide.
Baking
The following settings are suitable for baking:
- Fan plus
- Microwave + Fan plus
Fan plus is suitable for baking small cakes, swiss roll and pastries.
Microwave + Fan plus is suitable for doughs which require longer baking, such as rubbed in and beaten mixtures, yeast recipes and cheesecake.
Fan plus
Cake tins should be placed on the first shelf level from the bottom. Place the rack with the raised section facing upwards in the glass tray. This ensures sufficient air circulation all around the tin.
When baking flat items such as biscuits you should select the second shelf level from the bottom to ensure even browning results.
When baking on two levels at the same time select the second and third shelf levels from the bottom.
Any heat-resistant material is suitable for baking in.
Thin-walled and bright, non-reflective metal tins can be used, but results may not be as good as with dark non-reflective tins.
Baking times should not be set too long. This can lead to the cake etc. drying out.
Microwave + Fan plus
Slide the glass tray into the 1st shelf level from the bottom, and place the baking container on it.
For preference use ovenproof glass or ceramic baking dishes, as microwaves can penetrate these materials into the food being cooked. Metal tins would reflect microwaves so that they would only reach the cakes from the top, resulting in a longer cooking time.
Metal baking tins can also cause sparking. Place the tin on the glass tray, and make sure it does not touch the interior walls.
If sparking continues, do not use this tin again in microwave combination mode.
Do not use paper based containers coated with aluminium foil, such as are sometimes provided with packet cake mixes. There is the danger of these catching fire.
Switch on the microwave setting for the total cooking time. The microwave setting should not be higher than 150 W.
Tips on baking
Temperature settings, times and microwave power settings in the Baking Chart are suggestions only. Select an average temperature and time for first attempts and adapt accordingly.
Place cakes in rectangular tins with the longer side across the width of the oven for optimum heat distribution and even results.
Eating food which has been cooked correctly is important for good health.
Only bake cakes, pizza, chips etc until they are golden brown. Do not allow them to become dark brown.
To achieve even results without over-browning the food . . .
... when baking cakes, pastries, deep frozen foods such as chips, croquettes, frozen pizza, baguettes etc.
- always select the lowest temperature given in the recipe/cooking instructions on the packaging. Do not set a temperature higher than that recommended. Increasing the temperature may reduce the cooking time, but will lead to uneven browning, and unsatisfactory cooking results.
- Check if the food is cooked at the end of the shortest time quoted. To check if a cake is ready, insert a wooden skewer into the centre. It is ready if the skewer comes out clean, without dough or crumbs sticking to it.
- Place chips, croquettes and similar types of food on baking parchment.
Baking chart
| Fan plus Microwave + Fan plus | |||||
| Temp. in °C | Time in min. | Microwave setting in W | Temp. in °C | Time in min. | |
| Creamed mixture | |||||
| Victoria sandwich | 150 - 170 | 55 - 70 | - | - | - |
| Farmhouse\ fruit\ cake2) | 150 - 170 | 70 - 80 | 80 | 160 | 60 - 70 |
| Muffins1) | 150 - 170 | 25 - 35 | - | - | - |
| Marble cake | 150 - 170 | 60 - 70 | - | - | - |
| Fresh fruit cake with topping (glass tray) 1) | 150 - 170 | 45 - 50 | - | - | - |
| Fresh\ fruit\ cake\ (glass\ tray)1) | 150 - 170 | 35 - 45 | - | - | - |
| Fresh fruit cake (tin) | 150 - 170 | 55 - 65 | - | - | - |
| Flan base | 150 - 170 | 25 - 30 | - | - | - |
| Biscuits1) | 150 - 170 | 20 - 30 | - | - | - |
| Whisked mixture | |||||
| Tart | 160 - 180 | 30 - 35 | - | - | - |
| Flan base | 160 - 180 | 25 - 30 | - | - | - |
| Swiss\ roll1) | 160 - 180 | 20 - 25 | - | - | - |
| Rubbed in mixture | |||||
| Flan base | 150 - 170 | 25 - 30 | - | - | - |
| Streusel\ cake\ (glass\ tray)1) | 150 - 170 | 40 - 50 | - | - | - |
| Biscuits1) | 150 - 170 | 20 - 30 | - | - | - |
| Cheese cake | 150 - 170 | 85 - 95 | - | - | - |
| Apple pie | 150 - 170 | 45 - 55 | - | - | - |
| Apricot tart with topping | 150 - 170 | 60 - 70 | - | - | - |
| Yeast mixtures and dough | |||||
| Streusel\ cake\ (glass\ tray)1) | 150 - 170 | 35 - 45 | - | - | - |
| Fresh\ fruit\ cake\ (glass\ tray)1) | 160 - 180 | 40 - 50 | 150 | 170 | 35 - 40 |
| Stollen | 150 - 170 | 55 - 65 | - | - | - |
| White bread | 160 - 180 | 40 - 50 | - | - | - |
| Dark rye bread | 140 - 160 | 150 - 180 | - | - | - |
| Pizza\ (glass\ tray)1) | 170 - 190 | 40 - 50 | 150 | 180 | 30 - 40 |
| Onion tart (glass tray) 1) | 150 - 170 | 35 - 40 | - | - | - |
| Apple\ turnovers1) | 150 - 170 | 25 - 30 | - | - | - |
| Choux pastry, Eclairs 1) | 160 - 180 | 30 - 40--- | |||
| Flaky pastry 1) | 180 - 200 | 20 - 25--- | |||
| Meringues, Macaroons 1) | 120 - 140 | 35 - 45--- | |||
Unless otherwise stated, the times given are for an oven which has not been pre-heated. With a pre-heated oven shorten times by up to 10 minutes. 1) Second shelf level 2) Place the dish directly on the glass tray.
The information given in this chart is intended only as a guide. See the cookbook supplied with your oven and/or a good microwave or microwave combi-oven cookbook for further details on these and other foods.
Oven interior and inside of the door
The oven interior and the inside of the door are hot after use. Danger of burning.
Wait until the interior, inside of the door and the door seal have cooled down before cleaning them. Clean the oven at regular intervals, preferably after each use. Waiting too long can make cleaning unnecessarily difficult and in some cases impossible.
In certain circumstances, very heavy soiling can even damage the appliance.
Check the oven interior, door and door seal at regular intervals for any sign of damage.
If any damage is noticed, the oven should not be used again in microwave mode until the fault has been rectified by a service technician.
The oven interior is stainless steel. The high temperatures possible when operating in a traditional oven mode can cause the steel to darken slightly.
Clean the oven interior, inside of the door and door seal using warm water with a little washing-up liquid applied with a soft sponge or cloth. Wipe dry with a soft cloth.
For more heavy soiling, heat a glass of water for 2 to 3 minutes until the water begins to boil. The steam will collect on the walls and soften the soiling. The oven interior can now be wiped clean using a little washing-up liquid if necessary.
If food has burnt on, use a mild non-abrasive cleaner or a proprietary cleaner for stainless steel, applied with a non-scouring kitchen sponge.
Do not use abrasive cleaning agents as the material is susceptible to scratching.
Do not use sharp metal tools to clean glass as these can scratch the surface.
If using an oven spray, the manufacturer's instructions must be followed. Do not spray into any of the openings.
Do not use too much water on the cloth or sponge and do not let water or any other substance find its way into any openings.
To neutralise odours in the oven, put a cup of water with some lemon juice in the oven and simmer for a few minutes.
Residues of fruit juices as well as cake mixtures are best removed while the oven is warm.
Spilt fruit juices may cause lasting discolouration to the surfaces.
Oven interior roof
If the oven interior roof is badly soiled, the grill element can be lowered to make cleaning easier.
Wait until the grill element has cooled down before lowering it to avoid the danger of being burnt.
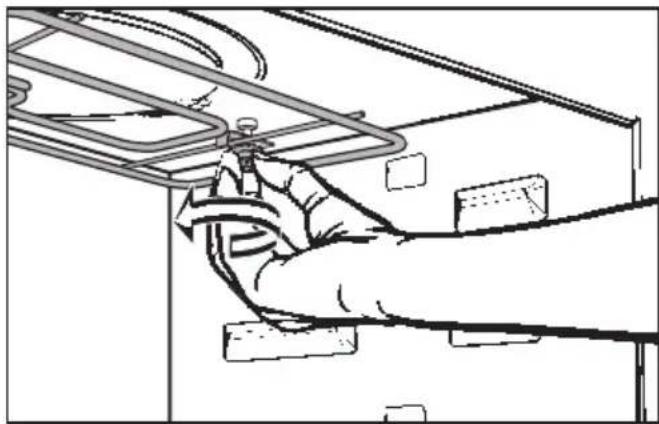
■ To lower the grill element loosen and then remove the nut.

■ Lower the grill element gently.
Do not use force to lower the element as this could break it.
■ After cleaning the grill element, raise it gently back up again. Refit the nut and tighten to secure the grill element back in position.
Appliance front
All surfaces and controls should be cleaned using an E-Cloth or with warm water with a little washing up liquid applied with a soft sponge or cloth. Wipe the surfaces dry using a soft cloth.
Clean the door handle and the control elements regularly, preferably after each use.
This will help prevent grease and other deposits adhering to surfaces and becoming difficult to remove.
E-Cloth
A micro-fibre "E-Cloth" is available from the Miele UK Spare Parts Department, which is suitable for cleaning surfaces such as stainless steel, glass, plastic and chrome without the use of chemicals.
Glass surfaces
Glass surfaces are susceptible to scratches and abrasions.
Avoid:
- abrasive cleaning agents, e.g. powder cleaners and cream cleaners,
- abrasive sponges, e.g. pot scourers or sponges which have been previously used with abrasive cleaning agents,
- sharp metal tools,
- oven sprays.
Aluminium fronted appliances
Aluminium is affected by the way that light falls on it, by the surrounding environment and by the angle you observe it from.
Aluminium surfaces and controls may suffer discolouration or damage if soiling is left on them for too long. Remove any soiling straight away.
Aluminium surfaces are susceptible to scratches and abrasion.
Avoid:
- cleaning agents containing soda, acids or chlorides,
- abrasive cleaning agents, e.g. powder cleaners and cream cleaners,
- abrasive sponges, e.g. pot scourers or sponges which have been previously used with abrasive cleaning agents,
- stainless steel cleaners,
- cleaning agents containing descaling agents,
- dishwasher detergent,
- oven sprays.
Stainless steel fronted appliances
Stainless steel surfaces are susceptible to scratches and abrasion.
Stainless steel surfaces can be cleaned using a Miele E-Cloth or with a proprietary non-abrasive cleaning agent designed specifically for use on stainless steel.
Avoid:
- cleaning agents containing soda, acids or chlorides,
- abrasive cleaning agents, e.g. powder cleaners and cream cleaners,
- abrasive sponges, e.g. pot scourers, or sponges which have been previously used with abrasive cleaning agents.
To help prevent re-soiling, a conditioning agent for stainless steel such as Neoblank (available from the Miele Spare Parts Department) can also be used.
Apply sparingly following the manufacturer's instructions on the packaging.
Accessories supplied
Combi rack
Wash and dry the rack after each use. Remove stubborn soiling with a stainless steel cleaner.
Glass trays
The glass trays can be washed in hot water and washing up liquid, or in the dishwasher.
Do not use scouring agents. These would scratch.
Boiling rod
The boiling rod can be washed in a dishwasher.
Roast probe
This should be wiped clean with a damp cloth only.
Do not put the roast probe into water, or clean it in the dishwasher as this would damage it.
Installation work, maintenance and repairs may only be carried out by suitably qualified and competent persons in accordance with national and local safety regulations. Repairs and other work by unqualified persons could be dangerous and the manufacturer will not be held liable.
Ensure current is not supplied to the appliance until after maintenance or repair work has been carried out.
Some minor problems can be corrected without contacting the Miele Service Department.
What to do if ....
... the display does not light up
■ Check whether
– the appliance is correctly plugged in at the mains socket and switched on, - the mains fuse has blown (call the Service Department), - the time of day display has been set to switch off after 60 seconds (see "Time of day - Display" in the Settings menu).
...a programme will not start
■ Check whether
- the appliance door is properly shut if operating in microwave mode,
- if operating in microwave mode a power setting and time have been entered,
- if operating with a combination programme, the following have been entered: a power setting, a time for the microwave mode and a temperature for the conventional oven operating mode.
... no operating noise is heard when the appliance door is opened during a cooking process in conventional oven mode
This is not a fault.
If the door is opened during a cooking process the door contact switch will switch off the heating and depending on the function chosen, the hot air fan.
... a noise is heard after a process has finished
This is not a fault.
The cooling fan continues to run for a short time depending on how hot the oven interior is.
If the door is opened during this run-on time the fan will be switched off. If the door is then shut the fan will start again.
... the microwave / heating functions but not the interior lighting
- Check whether the oven interior lighting has been switched off, (see "Light" in the "Settings" menu).
If it has not been switched off, the halogen lamp is defective and needs to be replaced:
Disconnect the appliance from the electricity supply, (switch off and unplug at the socket, or remove the fuse, or switch off at the isolator as appropriate).
■ Unscrew and remove the lamp cover. ■ Pull the halogen lamp out. ■ Fit a new halogen lamp.
Specification:
12 V, 10 W,
heat resistant to 300 °C,
fitting W271, Osram, Type 64418
■ Replace the cover and screw into place. ■ Reconnect the appliance to the mains supply.
... the food is not sufficiently heated or is not cooked at the end of a set time
Check whether - after interrupting a cooking process using microwave power - you remembered to restart the programme, and if cooking/reheating in microwave mode, whether the correct duration was selected for the setting chosen. The lower the power level, the longer the duration.
... cakes or biscuits are not cooked after a recommended time
Check whether
- the correct temperature was set.
- there were any alterations to the recipe. The addition of more liquid or more eggs makes a moister mix which would take longer to cook.
... cakes or biscuits are unevenly browned
There will always be a slight unevenness.
If browning is very uneven, check
- whether the temperature was set too high,
- the colour and material of the baking tins being used. Bright shiny tins are not very suitable. Try using a different tin next time.
...food cools down too quickly after being reheated or cooked in microwave mode
When cooked by microwaves, food begins to cook from the outside first, the inside of the food relying on the slower conduction of heat.
If food is cooked at a high power level it is possible that the heat may not have reached the centre of the food. Food may be warm in the middle but cool on the edge. When reheating food with different densities, such as plated meals, it is sensible to start with a low power level and lengthen the time required.
... strange noises are heard when the microwave or microwave / combination mode is being used.
Check whether
- Sparks are being created by the use of metallic crockery (see "Suitable crockery").
- The food is covered with aluminium foil. If so, remove it.
... a fault message appears in the display.
Fault – 54 Roast probe short circuit
The roast probe is defective. Remove the probe from its socket and the message will disappear.
Fault – 55 Over-riding time
The oven has automatically switched itself off during use. This is a safety feature to protect the oven if it has been operating for an exceedingly long period. The length of time depends on the oven function selected.
The oven will be ready for use again after it has been switched off and then back on again. You will need to select the cooking process again.
Any other fault messages:
If any other fault message appears in the display, this will need a service visit.
If it is not possible to remedy a fault by following the instructions given above, contact the Service Department. On no account open the appliance casing.
This appliance should only be repaired by a suitably qualified technician trained by Miele.
In the event of any faults which you cannot easily remedy, please contact
- your Miele Dealer
or
- the Miele Service Department (see back cover for address).
When contacting your Dealer or the Service Department, please quote the model and serial number of your appliance. These are given on the data plate which is located on the front of the oven cavity.
Please note that calls may be monitored and recorded for training purposes.
You can sign a maximum of 11 appliances on to the system. These can include:
– up to three washing machines, - up to three tumble dryers, - up to two dishwashers, – up to three refrigeration and/or freezing appliances.
If several appliances of the same type are signed on, these will appear with a number beside them in ascending order, e.g. washing machine 1, washing machine 2.
SuperVision display
All signed on appliances will appear in the display. The current status of the appliances as well as the start time, duration or time remaining will also be shown.
The display will change back to the oven display when the oven master appliance is selected.
Fault messages are marked with the ⚠ symbol and an audible tone will also sound.
The SuperVision display will appear automatically and an audible tone will sound at the end of a programme of a signed on appliance.
To call up the SuperVision display ...
... when the oven is switched on:
■ Select "SuperVision" from the main menu.
... when the oven is operating and a selected programme is running or a programme has been selected with delay start:
Select the "SuperVision" option from the display.
If an automatic programme has started, the "Save as" option will be shown in the display at first. This will change to "SuperVision" after a short time.
... when the oven is switched off:
The time will be shown in the display if none of the signed on appliances are in use. The SuperVision display will appear automatically as soon as a signed on appliance is started.
The SuperVision display can also be switched off or set so that it will only appear if there is a fault (see "Settings - Display options").
Settings
You can select and alter the following sub-menus in the "Settings ▶ - Miele@home" menu:
The Miele@home option will only appear if your appliance is fitted with Communication module XKM 2000 SV and has been signed on to the Miele@home with SuperVision system.
Display options
- Display all the time The SuperVision display will appear automatically.
- Only display when there is a fault Only faults on the signed on appliances will be shown in the display.
- Do not display The SuperVision display will not appear automatically and it cannot be selected.
Appliances signed on
The signed on appliances will be listed and described as:
- Master appliance.
- Connected: The appliance is connected to the electricity supply.
- Not connected: The appliance is disconnected from the electricity supply.
Sign on another appliance
Communication enabled appliances as well as master appliances can be signed on at a later date.
Search for appliances
All appliances which have been signed on to the Miele@home system will be searched for and listed in the display.
Sign an existing appliance off
Communication enabled appliances as well as master appliances can be signed off from the Miele@home system.
Set the same time for all appliances
The time is relayed to the appliance and automatically updates the appliance display (this function must also have been activated on the appliance). This function can be deactivated.
If another master appliance is signed on to the Miele@home system and it is set as the "Time controller", this function will be automatically switched off on the SuperVision appliance.
Deactivate SuperVision
You can deactivate the SuperVision appliance if you no longer wish it to be connected to the Miele@home system.
Problem solving guide
| Problem Possible cause Remedy | ||
| A communication enabled appliance does not appear in the list of signed on appliances. | The appliance has not been signed on. | ■ Repeat the signing on procedure on the SuperVision oven and on the appliance, see "Signing on additional appliances" in the "Miele@home" installation book. |
| There was a problem when setting up the SuperVision oven. | ■ Select the "Search for appliances" function on the master appliance. | |
| The SuperVision option is not listed in the main menu. | The SuperVision oven has not been signed on to the Miele@home system. | ■ Repeat the sign on procedure. |
| There was a problem when setting up the SuperVision oven. | ■ Select the "Search for appliances" function on the master appliance. |
If you cannot remedy the problem yourself, please contact the Miele Service Department or your dealer.
Other fault messages
Please refer to the Miele@home installation instructions for information on other fault messages which can occur during the installation of the Miele@home system or during the signing on and off procedures on a Communication enabled appliance / master appliance.
All electrical work should be carried out by a suitably qualified and competent Miele approved service technician in strict accordance with current national and local safety regulations (BS 7671 in the UK).
This appliance is supplied with a mains cable and plug for connection to a 230 - 240 V, 50 Hz single phase supply.
The voltage and connected load are given on the data plate situated at the front of the oven interior. Please ensure that these match the household mains supply. The fuse rating is quoted on the plug.
Connection should be made via a fused connection unit or a fused plug and a suitable switched socket, which complies with national and local safety regulations, and the on/off switch should be easily accessible after the appliance has been installed.
If the socket is not accessible after installation (depending on country) an additional means of disconnection must be provided for all poles.
For extra safety it is advisable to install a residual current device with a trip current of 30 mA (in accordance with DIN VDE 0664, VDE 0100 Section 739).
If the cable is damaged a new cable must be fitted by a Miele approved service technician.
This appliance conforms with European Standard EN 55011 as a Group 2, Class B product. Group 2 appliances use high frequency energy in the form of electro-magnetic waves to create heat in food. Class B is assigned to appliances that are suitable for domestic use.
Non-rewireable plugs BS 1363
The fuse cover must be re-fitted when changing the fuse, and if the fuse cover is lost the plug must not be used until a suitable replacement is obtained. The colour of the correct replacement cover is that of the coloured insert in the base of the plug, or the colour that is embossed in words on the base of the plug, (as applicable to the design of plug fitted).
Replacement fuses should be ASTA approved to BS 1362 and have the correct rating. Replacement fuses and fuse covers may be purchased from your local electrical supplier.
WARNING
THIS APPLIANCE MUST BE EARTHED
Building-in options
The appliance is suitable for installation:
- in a tall unit in combination with an oven
- in a tall unit on its own
- in a base unit
Building-in dimensions
Installation in a tall unit in combination with an oven

Installation in a tall unit
Installation in a base unit
If fitted underneath a hob, the installation instructions for the hob must also be taken into account.
Installation
■ Connect the appliance to the electricity supply. ■ Place the oven into the oven housing unit as far as the oven trim and align.

■ Open the oven door, and with two screws secure the oven to the side walls of the furniture unit through the holes in the oven trim.
The oven must not be operated until it has been correctly installed in its housing unit.
United Kingdom:
Miele Co. Ltd.
Fairacres, Marcham Road
Abingdon, Oxon, OX14 1TW
Tel.: (01235) 554455
Fax.: (01235) 554477
Service Office Tel.: (08707) 554466
E-mail: info@miele.co.uk
Internet: www.miele.co.uk
Ireland:
Miele Ireland Ltd.
Broomhill Road, Tallaght, Dublin 24
Tel: (01) 46 10 710, Fax: (01) 46 10 797
Email: info@miele.ie
Internet: http://www.miele.ie
Australia:
Miele Australia Pty. Ltd.
A.C.N. 005635398
1 Gilbert Park Drive
Knoxfield, VIC 3180
Telephone: (03) 9764 7100
Fax: (03) 9764 7129
Internet: www.miele.com.au
Distributor New Zealand:
Steelfort Engineering Company. Ltd.
500 Rangitikei Street
Palmerston North, Priv. Bag 11045, NZ
Telephone: (06) 350 1350
Fax: (06) 356 1507
South Africa:
Miele (Pty) Ltd
63 Peter Place
Bryanston 2194
P.O. Box 69434
Bryanston 2021
Tel.: (011) 548 1900
Telefax (011) 548 1935
E-mail: info@miele.co.za
Internet: www.miele.co.za
Singapore:
Miele Southeast Asia
Miele Pte. Ltd.
163 Penang Road
# 04 - 02/03 Winsland House II
Singapore 238463
Tel : +65-67351191
Fax: +65-67351161
Email: infosea@miele.com.sg
Internet: www.miele.sg
Hong Kong:
Miele (Hong Kong) Limited
AIA Plaza, 24th Floor
18 Hysan Avenue
Causeway Bay
Hong Kong
Tel.: (852) 2610 1331
Fax: (852) 2610 1013
E-mail: mielehk@miele.com.hk


- OPERATING INSTRUCTIONS
- MICROWAVE COMBINATION OVEN SUPERVISION H 4081 BM
- DESCRIPTION OF THE APPLIANCE
- WARNING AND SAFETY INSTRUCTIONS
- CARING FOR THE ENVIRONMENT
- FUNCTIONS AND FEATURES
- OPERATING MODES
- CONTROLS
- BEFORE USING FOR THE FIRST TIME
- OPERATING SEQUENCE
- PROGRAMMING COOKING TIMES
- AUTOMATIC PROGRAMMES
- USER PROGRAMMES
- SETTINGS
- CONTROL PANEL
- ACCESSORIES SUPPLIED
- GLASS TRAY
- COMBI RACK FOR USE WITH A GLASS TRAY
- OPTIONAL ACCESSORIES
- MIELE@HOME
- CORRECT USE
- TECHNICAL SAFETY
- USE
- GENERAL NOTES
- MICROWAVE FUNCTION
- THIS IS PARTICULARLY IMPORTANT WHEN PREPARING FOOD FOR BABIES, CHILDREN, AND THE ELDERLY OR INFIRM
- TRADITIONAL OVEN FUNCTIONS: FAN PLUS, AUTO ROAST, GRILL, FAN GRILL
- DISPOSAL OF YOUR OLD APPLIANCE
- DISPOSAL OF THE PACKING MATERIAL
- FUNCTIONS
- SOLO" FUNCTIONS
- COMBINATION PROGRAMMES
- QUICK MW
- AUTOMATIC SWITCHING ON AND OFF
- AUTOMATIC SWITCHING OFF
- MINUTE MINDER
- TIME OF DAY DISPLAY
- SAFETY FEATURES
- SYSTEM LOCK
- SAFETY CUT-OUT
- ENERGY SAVING FUNCTIONS
- DOOR CONTACT SWITCH
- MAKING USE OF RESIDUAL HEAT
- OPTIONAL OVEN INTERIOR LIGHTING
- HOW DOES THE MICROWAVE OVEN FUNCTION
- TRADITIONAL OVEN FUNCTIONS
- FAN PLUS
- AUTO ROAST
- GRILL
- FAN GRILL
- SENSORS
- DISPLAY
- ●
- AND
- I
- CLEANING THE APPLIANCE
- USING FOR THE FIRST TIME
- HEATING UP FOR THE FIRST TIME
- THE FOLLOWING MAIN MENU OPTIONS ARE AVAILABLE
- MICROWAVE
- ALL FUNCTIONS
- AUTOMATIC
- SUPERVISION
- EXAMPLE
- DURATION
- START TIME
- FINISH
- TO SWITCH A PROGRAMME ON AND OFF AUTOMATICALLY YOU HAVE THREE CHOICES
- USING THE RESIDUAL HEAT, ENERGY-SAVE FUNCTION
- TO CHECK AND CHANGE AN ENTERED TIME
- TO DELETE A SET TIME
- THE FOLLOWING SUB-MENU OPTIONS WILL APPEAR
- DEFROST
- REHEAT
- COOK
- AUTOMATIC COOKING PROGRAMMES
- SELECT
- CREATE
- CHANGE
- DELETE
- TO CREATE A USER PROGRAMME
- TO CALL UP AN EXISTING USER PROGRAMME
- LANGUAGE
- TIME (OF DAY)
- LIGHT
- MAIN MENU
- KEEPING WARM (MW ONLY)
- COOLING FAN RUN-ON
- START
- RECOMMENDED TEMPERATURES
- MW POWER LEVELS
- BUZZER TONES
- SAFETY (SYSTEM LOCK)
- UNITS
- SHOWROOM
- FACTORY DEFAULT
- INSTALLATION
- TO SET THE MINUTE MINDER
- TO DELETE THE TIME SET FOR THE MINUTE MINDER
- SUITABLE CONTAINERS FOR MICROWAVE OVENS
- MICROWAVES
- MATERIAL AND SHAPE
- METAL
- EXCEPTIONS
- GLASSWARE
- PORCELAIN
- EARTHENWARE
- GLAZES AND COLOURS
- PLASTICS
- ROASTING BAGS AND TUBES
- WOOD
- DISPOSABLE CONTAINERS
- TESTING DISHES FOR THEIR SUITABILITY
- A COVER
- DO NOT USE A COVER IF
- IMPORTANT WHEN USING AN AUTOMATIC PROGRAMME FOR DEFROSTING
- AFTER DEFROSTING
- AFTER REHEATING
- MICROWAVE + FAN PLUS
- MICROWAVE + GRILL
- ALLOW A STANDING TIME AT ROOM TEMPERATURE OF
- COMBINATION PROGRAMME
- PREPARING FOOD FOR GRILLING
- GRILLING
- TEST TO SEE IF COOKED
- CHART FOR GRILLING
- MICROWAVE + AUTO ROAST
- AFTER THE ROASTING PROCESS IS FINISHED
- USEFUL HINTS
- ROASTING IN A COVERED POT
- ROASTING ON THE RACK
- ROASTING POULTRY
- FROZEN MEAT
- USING THE ROAST PROBE
- AS SOON AS THE CORE TEMPERATURE SELECTED HAS BEEN REACHED
- NOTE
- BAKING
- TIPS ON BAKING
- TO ACHIEVE EVEN RESULTS WITHOUT OVER-BROWNING THE FOOD
- OVEN INTERIOR AND INSIDE OF THE DOOR
- OVEN INTERIOR ROOF
- APPLIANCE FRONT
- E-CLOTH
- GLASS SURFACES
- AVOID
- ALUMINIUM FRONTED APPLIANCES
- STAINLESS STEEL FRONTED APPLIANCES
- COMBI RACK
- GLASS TRAYS
- BOILING ROD
- ROAST PROBE
- WHAT TO DO IF
- THE DISPLAY DOES NOT LIGHT UP
- A PROGRAMME WILL NOT START
- NO OPERATING NOISE IS HEARD WHEN THE APPLIANCE DOOR IS OPENED DURING A COOKING PROCESS IN CONVENTIONAL OVEN MODE
- A NOISE IS HEARD AFTER A PROCESS HAS FINISHED
- THE MICROWAVE / HEATING FUNCTIONS BUT NOT THE INTERIOR LIGHTING
- FOOD COOLS DOWN TOO QUICKLY AFTER BEING REHEATED OR COOKED IN MICROWAVE MODE
- STRANGE NOISES ARE HEARD WHEN THE MICROWAVE OR MICROWAVE / COMBINATION MODE IS BEING USED
- A FAULT MESSAGE APPEARS IN THE DISPLAY
- FAULT – 54 ROAST PROBE SHORT CIRCUIT
- FAULT – 55 OVER-RIDING TIME
- ANY OTHER FAULT MESSAGES
- SUPERVISION DISPLAY
- TO CALL UP THE SUPERVISION DISPLAY
- DISPLAY OPTIONS
- APPLIANCES SIGNED ON
- SIGN ON ANOTHER APPLIANCE
- SEARCH FOR APPLIANCES
- SIGN AN EXISTING APPLIANCE OFF
- SET THE SAME TIME FOR ALL APPLIANCES
- DEACTIVATE SUPERVISION
- OTHER FAULT MESSAGES
- NON-REWIREABLE PLUGS BS
- WARNING
- THIS APPLIANCE MUST BE EARTHED
- BUILDING-IN OPTIONS
- BUILDING-IN DIMENSIONS
- UNITED KINGDOM
- IRELAND
- AUSTRALIA
- DISTRIBUTOR NEW ZEALAND
- SOUTH AFRICA
- SINGAPORE
- HONG KONG
Brand : MIELE
Model : H 4081 BM
Category : Microwave