
M 638-1 EC - Microwave MIELE - Free user manual and instructions
Find the device manual for free M 638-1 EC MIELE in PDF.


| Product Type | Built-in Microwave Oven |
| Model | M 638-1 EC |
| Brand | Miele |
| Dimensions (H x W x D) | 38.2 x 59.5 x 50.8 cm |
| Weight | Approx. 35 kg |
| Power Supply | 230 V, 50 Hz, 16 A |
| Microwave Power | 900 W |
| Grill Power | 1000 W |
| Combination Power | Yes, microwave + grill |
| Capacity | 25 L |
| Control Type | Electronic touch controls with LCD display |
| Functions | Microwave, Grill, Combination, Auto Cook, Defrost, Keep Warm |
| Interior Material | Stainless steel with EasyClean enamel coating |
| Safety Features | Child lock, door interlock, overheat protection |
| Cleaning | EasyClean system for easy interior cleaning |
| Spare Parts & Repairability | Spare parts available through Miele service; designed for easy repair |
| Energy Efficiency Class | A (EU energy label) |
| Standby Power Consumption | 0.5 W |
| Noise Level | Approx. 48 dB(A) |
| Installation Type | Built-in, suitable for high installation |
| Accessories Included | Glass turntable, wire rack, grill rack |
| Warranty | 2 years, extendable |
Frequently Asked Questions - M 638-1 EC MIELE
User questions about M 638-1 EC MIELE
0 question about this device. Answer the ones you know or ask your own.
Ask a new question about this device
Download the instructions for your Microwave in PDF format for free! Find your manual M 638-1 EC - MIELE and take your electronic device back in hand. On this page are published all the documents necessary for the use of your device. M 638-1 EC by MIELE.
USER MANUAL M 638-1 EC MIELE
Operating instructions

Microwave oven M 638 EC
To avoid the risk of accidents or damage to this appliance it is essential to read these instructions before it is installed or used for the first time.

M.-Nr. 05 785 100
Description of the machine 4
Caring for the environment 5
Warning and Safety instructions 6
How the microwave oven functions 12
Suitable containers for microwave ovens 13
Material and shape 13
Testing dishes for their suitability....15
Accessories 16
Accessories supplied 16
A cover 16
Ceramic glass guard 17
Grilling rack....17
Glass tray 17
Baking tray 17
Optional accessories....17
Gourmet plate (MGP 24)....17
Preparation for use 18
Setting time of day....18
Altering the time of day 18
Switching off the time of day display 18
Night time....18
Minute minder 18
To open the door 19
Types of operation....20
Microwave-Solo mode 21
Microwave power settings 21
Times for defrosting, reheating, cooking 21
Placing the container in the oven 21
Turntable....21
Starting a process....22
Interrupting a process / Re-starting a process....22
Altering settings 22
To cancel a process 22
Automatic "warming" function 23
Quick-Start (programmable) 23
Programming the end of cooking time....24
Reheating 25
Cooking 26
Cooking fresh vegetables in the microwave 27
Cooking pasta and rice in the microwave 28
Defrosting / Defrosting and reheating / cooking....29
Cooking frozen vegetables in the microwave 30
Practical tips....31
Grilling 32
Combination mode - Microwave + Grill 33
Fan grill 34
Combination mode Microwave + Fan grill. 35
Cooking with Grill and Fan Grill 36
Fan heat 37
Combination mode - Microwave + Fan heat 38
Using the combination microwave and fan 39
Automatic programmes....40
Cleaning and care 41
Problem solving guide 45
After sales service 47
Electrical connection 48
Electrical connection U.K. 48
Electrical connection (AUS / NZ) 50
Installation and connection 51
Technical data 52


① Appliance door ② Door lock ③ Grill / browning element ④ Control panel ⑤ Grilling rack ⑥ Turntable ⑦ Baking tray (do not use with microwave power) ⑧ Glass tray ⑨ Ceramic glass splash guard ⑩ Electronic clock with display ⑪ Selector switch for microwave power levels and automatic programmes ⑫ Rotary selector: time, weight, temperature ⑬ Grill button ⑭ Fan grill button ⑮ Fan button ⑯ Time of day button ⑰ Minute minder button ⑱ Stop / cancel button ⑲ Turntable button ⑳ START / Quick-Start (programmable) ㉑ Door release button
Using the microwave oven
- Food can be defrosted, reheated or cooked by entering a power setting and a time.
- Deep frozen ready-made meals can be defrosted and then reheated or cooked.
- The microwave oven can also be used for other tasks, e.g. for proving dough, melting chocolate and butter, dissolving gelatine etc.
Disposal of the packing material
The transport and protective packing has been selected from materials which are environmentally friendly for disposal and can normally be recycled.
Ensure that any plastic wrappings, bags etc. are disposed safely and kept out of the reach of babies and young children. Danger of suffocation!
Rather than just throwing these materials away, please ensure they are offered for recycling.
Disposal of your old appliance
Old appliances may contain material which can be reclaimed or recycled.
Please contact your dealer, your local waste collection centre or scrap merchant about potential recycling schemes.
Ensure that the appliance presents no danger to children while being stored for disposal.
See the appropriate section in the Warning and Safety instructions.
This appliance complies with all relevant legal safety requirements. Before installation and before using the appliance for the first time, read the operating instructions carefully. They contain important notes on installation, safety, operation and care of the appliance. This way you will avoid the risk of accidents and damage to the appliance. Keep these instructions in a safe place and pass them on to any future user.
Correct use
The appliance is intended for domestic use only: to cook food, and in particular to defrost, reheat, cook, and to grill. Any other usage is not supported by the manufacturer and could be dangerous.
The manufacturer cannot be held liable for damage caused by improper or incorrect use of the appliance.
Never use the microwave to store or dry items which could ignite easily. Fire hazard!
Do not let children access the appliance or its controls. Supervise its use by older children, the elderly or infirm. If allowing older children to use the appliance without supervision please ensure that they are aware of how a microwave oven works and understand the dangers of improper use.
Technical safety
Do not use the microwave if
- the door is warped.
- the door hinges are loose.
- holes or cracks are visible in the casing, the door, the door seal or the oven interior walls.
Operating the appliance with this type of damage will result in microwave leakage, and present a hazard to the user.
Repairs may only be carried out by a suitably qualified and competent person in accordance with national and local safety regulations. Repairs and other work by unqualified persons could be dangerous. The manufacturer cannot be held liable for unauthorized work.
Never open the casing of the appliance.
Tampering with electrical connections or components and mechanical parts is highly dangerous and can cause operational faults or electric shock.
If the connection cable is damaged, the new cable must be fitted by a Miele approved service technician.
Before connecting the appliance to the mains supply, make sure that the rating on the data plate corresponds to the voltage and frequency of the household supply. This data must correspond in order to avoid risk of damage to the appliance. Consult a qualified electrician if in doubt.
The electrical safety of this appliance can only be guaranteed when continuity is complete between the appliance and an effective earthing system, which complies with local and national safety regulations. It is most important that this basic safety requirement is present. If in any doubt, the electrical wiring should be checked by a qualified electrician.
The manufacturer cannot be held liable for the consequences of an inadequate earthing system (e.g. electric shock).
The appliance is only completely isolated from the electricity supply when:
- it is switched off at the wall socket and the plug removed.
(Do not pull on the cable, only on the plug).
- the mains fuse is withdrawn.
- or the screw-out fuse is removed (in countries where this is applicable).
Do not connect the appliance to the mains electricity supply by an extension lead.
Extension leads do not guarantee the required safety of the appliance (e.g. danger of overheating).
- Ensure that current is not supplied to the appliance while maintenance or repair work is being carried out.
This equipment is not designed for maritime use or for use in mobile installations such as caravans, aircraft, etc. However, it may be suitable for such usage subject to a risk assessment of the installation being carried out by a suitably qualified engineer.
Use
Always ensure that food is sufficiently heated.
Many factors will affect the overall cooking time, including the size and amount of food, its initial temperature, changes to the recipe, and the shape and size of the cooking container.
Some foods may contain microorganisms which are only destroyed by thorough cooking. Therefore, when cooking or reheating foods, e.g., poultry, it is particularly important that food is fully cooked through (at temperatures over 70 °C for at least 10 minutes). If in doubt, select a longer cooking or reheating time.
It is important that the heat is allowed to spread evenly throughout the food being cooked. This can be achieved by stirring and/or turning the food, and by observing a sufficiently long standing time, which should be added to the time needed for cooking, reheating, or defrosting.
Always remember that times for cooking, reheating, and defrosting are usually considerably shorter than with traditional methods of food preparation.
Excessively long cooking times can lead to food or liquid drying out and burning or could even cause it to catch fire. There is also a danger of fire if breadcrumbs, flowers, herbs, etc., are dried in the microwave oven. Always ensure that this type of procedure is supervised.
Do not use the microwave to heat up herb cushions or pads filled with wheat grains or lavender, such as those used in aromatherapy. These pads can ignite when heated even after they have been removed from the microwave.
Fire hazard!
Exercise caution when cooking or reheating food with a high sugar content, e.g., Christmas pudding. If heated for too long, the sugar may caramelise or ignite.
Do not use full power if you warm empty dishes. The lack of food or incorrect loading could cause damage to the appliance.
Never cook or reheat food or liquids in sealed containers or bottles.
With baby bottles, the screw top and teat must be removed.
Otherwise pressure builds up which can cause the bottle or container to explode posing a severe risk of injury.
Before serving, remember to allow a sufficient standing time and then always check the temperature of the actual food itself after taking it out of the microwave. The temperature of the container is not an indication of the temperature of the food or liquid in it. This is particularly important when preparing food for babies, children, and the elderly or infirm.
When heating liquids, the boiling rod provided should be placed into the container.

When heating liquids, milk, sauces, etc., in the oven without the boiling rod, the boiling point of the liquid may be reached without the production of typical bubbles. The liquid does not boil evenly throughout.
This so-called 'boiling delay' can cause a sudden build-up of bubbles when the container is removed from the oven or shaken. This can lead to the liquid boiling over suddenly and explosively. Danger of burning.
The formation of bubbles can be so strong that the pressure forces the oven door open. The user could be injured and the appliance damaged.
The boiling rod ensures that the liquid boils evenly and that bubbles form at an early stage during the operation.
If smoke occurs in the oven interior, to avoid fuelling any flames do not open the oven door. Interrupt the process (by pressing the Stop/C button twice). Switch off at the wall socket, and where applicable remove the plug. Do not open the door until the smoke has dispersed.
Never heat undiluted alcohol in the microwave oven as this can easily ignite. Fire hazard!
Do not heat up tins in the microwave oven. Pressure can build up and they may explode. This could result in injury or damage.
Do not use any containers or cutlery made from or containing metal, aluminium foil, lead crystal glassware, temperature-sensitive plastics, wooden utensils or cutlery, metal clips or wire ties. Do not use bowls with milled rims, or cream pots with the tinfoil lid only partially removed. Such items could be damaged or cause a fire hazard. The rack supplied with the appliance is designed to be compatible with microwaves and can therefore be used for grilling with or without the microwave function.
Do not leave the oven unattended when reheating or cooking food in disposable containers made of plastic, paper or other inflammable materials. Before using single-use containers, make sure they are suitable for use in microwave ovens. See appropriate section.
Eggs can only be cooked in their shells in the microwave oven in a specially designed egg-boiling device available from specialist shops. Similarly, hard-boiled eggs should not be reheated in the microwave oven as this may lead to the eggs bursting, even after they have been taken out of the oven.
Eggs can be cooked without their shells in the microwave oven only if the yolk membrane has been punctured several times first. The pressure could otherwise cause the egg yolk to explode.
Food with a thick skin or peel, such as tomatoes, sausages, jacket potatoes and aubergines, should be pierced or the skin cut in several places before cooking to allow steam to escape and prevent the food from bursting.
Do not reheat food in the oven in heat-retaining bags, such as those used for ready grilled chicken or naan bread from take-aways which are intended for use in normal ovens. These heat-retaining bags usually contain a thin layer of aluminium foil which reflects microwaves. This reflected energy can, in turn, cause the outer paper covering to become so hot that it ignites.
Always ensure that food or a browning dish has been placed in the microwave, and that the turntable is in place, before switching on.
Do not leave the oven unattended when cooking with oils and fats as these can be a fire hazard if allowed to overheat.
Ovenproof earthenware can retain a considerable amount of moisture. Earthenware and porcelain containers with hollow handles and lid knobs must only be used in this oven if they have vent holes which allow the moisture to escape. Without vent holes there can be a pressure build-up, causing the container to crack or shatter, with the danger of injury.
With all functions except microwave solo mode the rack, oven interior, grill element, side runners, door and housing can get hot! Do not let small children touch the oven while it is in operation, there is the danger of being burnt. Supervise its use by the elderly or infirm.
- Wear oven gloves when taking dishes in and out of the oven, or when handling dishes or food in the oven if the grill is on or has just been in operation.
The rack, glass tray and baking tray become hot when the oven is in operation. Take care not to burn yourself on them!
Only use the baking tray with the fan heat function. It must not be used with the microwave function.
Never place the hot glass tray (or any other hot cooking containers) on a cold surface, such as a tiled or granite worktop. The glass tray or container could crack or shatter, and the worktop surface could get damaged. Use a heat-resistant mat or wire cooling rack.
Do not use the oven to heat up the room. Due to the high temperatures radiated, objects left near the oven could catch fire.
Do not use the appliance as a resting place for other items. The heat from the top of the appliance could cause some kinds of items to melt.
To check the temperature of the food, first interrupt the cooking process. Then use a thermometer specifically approved for food use to measure the temperature of the food. Never use a thermometer containing mercury or liquid, as these are not suitable for use with very high temperatures and will break very easily.
Never use a steam-cleaning appliance to clean this appliance. Pressurised steam could reach the electrical components and cause a short circuit.
In countries where there are areas which may be subject to infestation by cockroaches or other vermin, pay particular attention to keeping the appliance and its surroundings in a clean condition at all times. Any damage which may be caused by cockroaches or other vermin will not be covered by the appliance guarantee.
When using browning dishes:
Always use oven gloves when handling the browning dish to avoid burns. Never place the browning dish directly on to a table or work surface. Use a suitable heat-resistant mat, grid or board to protect the work surface or table and prevent heat-marks. Browning dishes should only be used in a microwave oven, or as a serving dish.
In a conventional oven the special glaze would suffer damage.
Disposal of your old appliance
Before disposing of your old appliance first make it unusable. Cut off and render any plug unusable. Cut off the cable directly behind the appliance to prevent misuse. This should be done by a competent person.
The manufacturer cannot be held liable for damage caused by non-compliance with these Warning and Safety instructions.
In the microwave oven, food is cooked, reheated or defrosted quickly.
How does the microwave oven function?
In a microwave oven there is a high-frequency tube called a magnetron. This converts electrical energy into microwaves. These microwaves are distributed evenly throughout the oven interior and rebound off the metal sides of the oven interior to reach the food from all sides. Microwave distribution is improved with the turntable engaged.
In order for microwaves to reach the food, they must be able to penetrate the cooking utensil being used. Microwaves can penetrate porcelain, glass, cardboard and plastics but not metal. Do not, therefore, use utensils made of metal, or which contain metal, for example in the form of gold or silver trim. The metal reflects the microwaves and this could lead to the creation of sparks. The microwaves cannot be absorbed.
Microwaves pass through a suitable container and find their way directly into the food. All food contains moisture molecules which, when subjected to microwave energy, start to oscillate 2.5 thousand million times a second. The friction caused by this vibration creates heat, which first starts developing around the outside of the food and then slowly penetrates towards the centre. The moisture, fat and sugar content of food will affect the speed at which it is cooked.
As heat is produced directly in the food,
- food can generally be cooked without adding much liquid or cooking oil.
- cooking, re-heating and defrosting in a microwave oven is quicker than using conventional methods.
- Nutrients, such as vitamins and minerals, are generally retained. – Colour, texture and taste of food are not impaired.
Microwaves stop being produced as soon as the cooking process is interrupted or the appliance door is opened. When the appliance is in operation, the closed, sealed door prevents microwaves escaping from the appliance.
Microwaves

- are reflected by metal,

- pass through glass and chinaware,

- and are absorbed by food.
Material and shape
The material and shape of containers used affect cooking results and times. Heat distribution is more even in round and oval shaped flat containers than in rectangular containers, providing better results.
Metal
Metal containers, aluminium foil and metal cutlery, or china with metallic decoration, such as gold rims or cobalt blue must not be used in an oven being used in microwave mode.
The metal reflects the microwaves, hindering the cooking process.
Exceptions:
- If recommended by the producer, pre-cooked meals packed in aluminium foil containers can be defrosted and reheated in the microwave oven. Important: remove the lid first.
However, as food is only heated from the top it is better to remove the food from the aluminium foil container and transfer it to a dish suitable for a microwave oven. The heat distribution will be more even.
If sparks and arcing occur when using a metal container, stop and transfer the food to a microwave safe container.
- For even defrosting and to avoid overcooking unevenly shaped cuts of meat, poultry or fish, small pieces of aluminium foil may be used to mask wingtips or other thin parts for the last few minutes of the process.
Make sure that the aluminium foil is at least 2 cm from the oven walls at all times. It must not touch the walls.
- Metal meat skewers or clamps should only be used if they are very small in comparison to the size of the cut of meat.
Glassware
Heat-resistant glass or ceramic glass are ideal for use in the microwave oven.
Crystal glass contains lead which could cause the glass to crack. Glass dishes with a milled rim are also subject to this risk. Both are unsuitable.
Porcelain (chinaware)
Porcelain (chinaware) is a suitable material.
Do not use porcelain with gold or silver edging or items with hollow knobs or handles, as insufficient ventilation may cause pressure.
Earthenware
Decorated earthenware is only suitable if the decoration is beneath an all-over glaze.
Earthenware can get very hot, and may crack.
Glazes and colours
Some glazes and colours contain metal.
This makes them unsuitable for use in a microwave oven.
Plastics
Plastic containers must only be used for microwave mode alone.
Plastics must be heat-resistant to a minimum of 110 °C. Otherwise the plastic may melt and fuse with the food.
Special plastic utensils, designed for use in microwave ovens are available from good retail outlets.
Melamine ware is not suitable as it absorbs energy and heats up. When purchasing plasticware, make sure that it is suitable for use in a microwave oven.
Disposable containers, such as trays made from polystyrene, can only be used for very short timed warming and reheating of food.
Plastic boiling bags can be used for cooking and re-heating. They should be pierced beforehand so that steam can escape. This prevents a build-up of pressure and reduces the risk of the bag bursting.
Roasting bags and tubes can be used. Roasting tubes should be about 40 cm longer and roasting bags about 20 cm longer than the food being roasted, and carefully tied with string. Turn the ends over and secure them. The bag should be pierced according to the manufacturer's instructions.
Do not use metal clips or wire ties, even if bound by paper.
There is a danger that they will ignite when heated.
Wood
Wooden dishes are not suitable.
Moisture contained in the wood evaporates when exposed to microwave energy, causing the wood to dry and crack.
Disposable containers
Only those plastic disposable containers which are specified by the manufacturer as suitable for use in a microwave oven may be used.
Do not leave the oven unattended when reheating or cooking food in disposable containers made of plastic, paper or other inflammable materials.
Disposable containers are not always recyclable or bio-degradable.
Testing dishes for their suitability
If in doubt as to whether glass, earthenware or porcelain plates or dishes are suitable for use in a microwave oven, a simple test can be performed:
Place the item you wish to test in the centre of the oven, fill a suitable glass with water and also place this in the oven.
Close the door.
Turn the power selector to 900 watts.
Enter a time of 30 seconds with the time selector.
Press START.
At the end of the test, the water in the small container should be warm but the dish cool. If the dish is very hot and the water is cold, it would be unwise to use the dish.
If a crackling noise is heard accompanied by sparks during the test, switch the appliance off immediately (press button Stop/C twice).
Any crockery which causes this reaction is unsuitable for use in the microwave oven.
If any doubt exists about the suitability of containers, please contact the supplier.
This test cannot be used to check whether items with hollow knobs or handles are suitable for use in a microwave oven.
Accessories supplied
A cover
- prevents too much steam escaping, especially when cooking foods which need longer to cook, such as potatoes.
- shortens and evens out the cooking process. – prevents food from drying out.
- prevents any loss of aroma.

Always cover food with the cover supplied.
Alternatively, use lids or covers made of microwave-safe glass or plastic, or use a clingfilm recommended for use in a microwave oven, (pierce as instructed by the manufacturer).
Normal clingfilm can distort.
Sealed glass containers, such as jars of food and babyfood must be opened before they are placed the oven.
Do not use a lid or cover if
- food coated with breadcrumbs is being cooked
- cooking meals which are to be given a crisp finish.
The cover supplied may only be used in solo microwave operation.
The cover can only withstand temperatures of up to 110 °C.
Higher temperatures generated by grilling/fan heat could cause the plastic to distort and fuse with the food.
Ceramic glass guard
The ceramic splash guard supplied protects the roof of the oven interior from soiling. It is important to make sure this is inserted when the appliance is being operated.
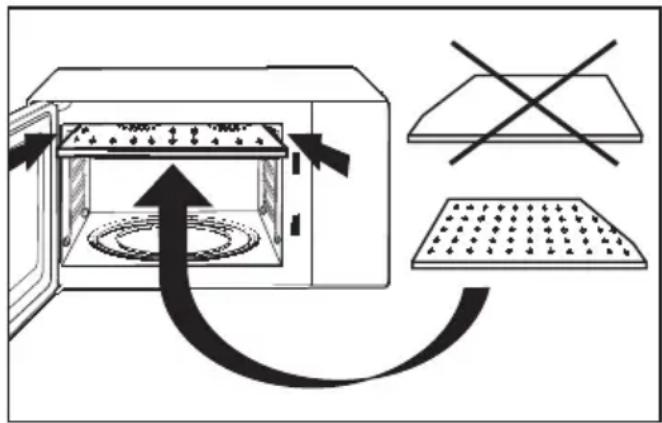
Insert the splash guard above the grill. Make sure that the rough side (see illustration) faces towards the roof.
Grilling rack
The grilling rack is specially designed for use in a microwave oven. It can be used when grilling or using fan grill (with or without the microwave function).
Glass tray
When grilling directly on the rack the glass tray should be placed underneath the rack to catch any fat or juices.
The glass tray is suitable for use with all cooking functions.
Baking tray
The baking tray is only suitable for use with the fan heat oven function. It must not be used with microwave mode. When used with fan heat, the baking tray gives a well baked finish to the base of the food.
When inserting the baking tray, make sure that the sloping edge faces towards the front, as otherwise the fan heat cannot circulate evenly.
Optional accessories
Gourmet plate (MGP 24)
The Gourmet plate is a round grilling plate with an anti-stick coating.
It is available from the Miele Spare Parts Department or your dealer.
Setting time of day
Connect the appliance to the mains electricity supply.
"12:00" flashes in the display for approx. 4 seconds and the ⏻ symbol lights up.

Use the time selector to set the time of day.
The time set is automatically registered by the appliance after 4 seconds. The colon between hours and minutes flashes.
Altering the time of day
Press the ⏻ button.
The time of day flashes in the display and the ⏻ symbol lights up.
Use the time selector to alter the time of day.
Switching off the time of day display
Press the ⏻ button twice.
The display area goes dark.
Pressing the ⏻ button twice will bring the time of day back in the display.
Night time
The time of day display can be switched off from 23:00 hours until 04:00 hours.
Press the Stop/C button and hold pressed in while you press the ⏻ button. ON will appear in the display. The display is now programmed to switch off at night time.
The appliance can still be operated.
To cancel, press and hold Stop/C while pressing the ⏻ button.
OFF appears in the display.
Minute minder
The minute minder can be used to time any activity in the kitchen, e.g. boiling eggs. The time set counts down in one-second steps.
Press the 🔊 button.
0:00 flashes in the display and the △ symbol lights up.
Use the time selector to set the minute minder time you require.
Press the START button.
At the end of the minute minder time, an audible tone sounds. The time of day reappears and the ⚠ symbol flashes.
Press the Stop/C button once and the △ symbol disappears.
Altering a minute minder entry
Press the Stop/C button. The minute minder time is interrupted. The time left and the △ symbol light up in the display. The Start symbol ◇ flashes. Use the time selector to alter the minute minder time and then press the START button.
To open the door
Press the “○—” button to open the door.
If the microwave oven is being used, opening the door will interrupt the cooking process.
To close the door
Push the door firmly shut.
Press the START button to continue an interrupted cooking process.
The appliance will not start again if the door has not been closed properly.
Audible tone
An audible tone sounds after the set times have elapsed.
Press any button to cancel the tone early.
Safety lock
The safety lock prevents the appliance being used, by children, for example.
To activate the safety lock
Press and hold the button in until an audible tone sounds and the key symbol appears in the display:

The key symbol disappears from the display after a short time and the time of day reappears.
The key symbol reappears whenever any button or one of the rotary selectors is operated.
After an interruption to the mains power supply, the safety lock will need to be re-activated.
Cancelling the safety lock
Press the 📋 button again and hold it pressed in until an audible tone sounds.
Types of operation
Microwave-Solo mode
Suitable for defrosting, reheating and cooking.
Grill
Ideal for grilling thin cuts of meat, e.g. steak or sausages.
Fan grill
This function is suitable for cooking food which needs to be browned at the same time, e.g. thicker cuts of meat and pieces of poultry. The fan and the browning element work at the same time.
Fan heat
is ideal for baking.
Combination mode (Microwave + Grill)
Ideal for browning dishes and dishes with toppings. The microwave cooks the food and the grill browns it.
Combination mode (Microwave + Fan grill)
This combination is particularly suited to food which needs to be cooked and browned.
Combination mode (Microwave + Fan heat)
This combination is ideal for cooking one pot dishes e.g. casseroles.
Automatic programmes
You can choose from the following automatic programmes:
- three automatic defrosting programmes (* * *),
- two automatic cooking programmes ( ...... ...... )
- and two combination programmes (150 450).
These programmes are weight dependent. You enter the weight of the food and then the cooking time is calculated automatically.
Microwave-Solo mode
Microwave power settings
There are 7 different power settings to choose from.
The higher the power setting, the more microwaves reach the food.
When heating up food which cannot be stirred or turned during cooking, as with a plated meal, it is preferable to use a lower microwave setting and heat for long enough to reach the temperature required. This ensures the heat is distributed evenly.
Times for defrosting, reheating, cooking
The time required depends on:
- The initial temperature of the food. Food taken from the refrigerator will need longer to reheat or cook than food already at room temperature.
- The type and texture of the food. Fresh vegetables contain more water and cook more quickly than stored vegetables.
- The amount of food.
As a general rule, allow approximately one and a half times the time for double the quantity. For a smaller quantity, possibly shorten the time but ensure food is cooked thoroughly.
The shape and material of the container.
Placing the container in the oven
Ideally the dish should be placed in the middle of the oven.
Turntable
Do not operate the microwave without the turntable in place. The turntable starts turning automatically when the appliance is operated.
The turntable helps the food to cook, reheat or defrost more evenly.
Check that the dish or food to be cooked is not larger in size than the turntable.
It is best not to switch the turntable off. Only switch it off if there is a danger of something blocking it, e.g. a large dish which is wider than the turntable. (Press the 📋 button to switch the turntable off).
Make sure that you stir the food during the cooking time or that you turn the food so that it can heat up evenly.
Starting a process
Use the appropriate selector to choose the microwave power setting and the time. It does not matter which is chosen first.

Turn the power selector to the required setting. The symbol for microwave lights up in the display, 0:00 flashes.

Set the required time using the time selector. Any time between 5 seconds and 60 minutes can be selected. Press the START button to start the process. The interior lighting comes on.
A process can only be started if the door is closed.
Interrupting a process / Re-starting a process
Programmes can be interrupted and re-started at any time.
To interrupt a process, press the Stop/C button once or open the appliance door.
The time stops counting down.
To continue the process, close the door and press the START button.
The process continues.
Altering settings
If you discover after starting a process that
... the microwave power setting is too high or too low, you can select a new setting.
... the time set is too short or too long, you can
interrupt the process (press the Stop/C button once), use the time selector to set a new time and continue the process (press the START button).
■ interrupt the process (press the Stop/C button once), use the time selector to set a new time and continue the process (press the START button).
To cancel a process
Press the Stop/C button twice.
At the end of a process
An audible tone will sound when the cooking process is complete. The oven interior lighting goes out.
Automatic "warming" function
The "warming" function will switch on for a maximum of 15 minutes, approx. 2 minutes after the end of a cooking process which used at least 600 watts, providing that the door remains closed and no buttons are pressed.
H:H lights up in the display. If the turn-table was engaged it will start turning. If it was turned off during the cooking process it will not come on.
Opening the door or pressing the Stop/C button while the "warming" function is in process cancels the function.
The "warming" function cannot be set as a separate function.
Quick-Start (programmable)
Pressing the START /◆button is sufficient to set the appliance operating on maximum power. Three set times are stored in memory:
■ 30 s: Press START / once ■ 1 min: Press START / twice ■ 2 mins: Press START /◆three times
Pressing the START /◆button four times in succession will bring back the first stored time and so on.
Programming times
To alter the set times:
Use the START /◆ button to select the relevant set time (press once, twice or three times) and hold the START /◆ button pressed in. Alter the time with the time selector. The altered time is stored in memory when the START /◆ button is released.
An interruption to the power supply will cancel any altered programmed times and they will need to be entered again.
Programming the end of cooking time
The duration and end of a process can be pre-programmed. This applies to any method of operation your appliance offers.
Proceed as for starting a process. However at the end do not press the START button. Instead press the ⏻ button.
The time of day will flash in the display (The programme duration is automatically added).
Use the rotary selector to set the time you wish the process to finish. The ◆ symbol flashes, the end time, the symbols for the method of operation selected and a symbol for a programmed end of cooking time will light up. Press START.
The time of day will light up in the display.
The appliance will switch on automatically and then off at the selected end of cooking time.
If the end of cooking time is programmed for microwave operation make sure that there is food in the oven.
To check the end of cooking time
It is possible to check the end of cooking time before a programmed process has started.
Press the ⏻ button. The selected method of operation and the pre-selected end time will appear.
Large cooking dishes
If the dish extends beyond the size of the turntable it might not turn around in the oven. If this is the case the turntable must be switched off.
Press
If the door is opened before a starting time has commenced
Press the Start button again after closing the door. The appliance will then start at the pre-selected time.
To change programmed times
Press the Stop/C button and programme the times in again.
To delete programmed times
Press the Stop/C button.
Select the following microwave power settings to reheat food:
Drinks 900 watts
Food 600 watts
Food for babies and toddlers. 450 watts
We do not recommend heating or reheating foods or drinks for babies or young children in the microwave oven. Any decision to do this is the responsibility of the user, and should only be done with the utmost care. Pasteurised or sterilised cooked food should be gently heated at 450 watts, and tasted so that it is not too hot for a baby's palate before serving. Other food or drink when reheated should be heated to a high temperature and allowed to cool to a suitable heat for eating. For made-up milk follow the maker's instructions.
Always use a lid or cover for reheating food, except when a drier finish is needed, e.g. breaded poultry/meat.
Always remove the lids from jars, especially jars of baby food.
Remove the rubber teat and seal top before warming baby bottles.
When reheating liquids, place the boiling rod supplied with the appliance into the cup or glass.
Never reheat hard boiled eggs in a microwave oven, even without the shell. The eggs can burst.
Food taken straight from the refrigerator requires longer to reheat than food stored at room temperature. The time required depends largely on the nature
of the food, its initial temperature and the amount to be cooked.
Always ensure that food is sufficiently cooked or reheated.
If in any doubt that a sufficiently high temperature has been reached, continue reheating for a little longer.
Stir or turn food from time to time during cooking. Stir the food from the outside towards the middle, as food heats more quickly from the outside.
After reheating
Be careful when removing a dish from the oven. It may be hot.
Although heat is not normally produced in the container itself by the microwaves, (apart from stoneware and similar dishes), heat transfer from the food to the container may be considerable, making the container itself hot.
Allow food to stand for a few minutes at room temperature at the end of a reheating process to enable the heat to spread evenly throughout the food.
After heating food, especially food for babies and small children, stir the food or shake the container and check that the temperature does not pose any danger. Double check after it has been left to stand.
Place the food in a microwave-safe dish and cover it.
When cooking fresh vegetables, fish, meat, poultry first select power setting of 750 watts and then turn it down to 450 watts for more gentle continued cooking.
Vegetable cooking times depend on the texture of the vegetable. Fresh vegetables contain more water than vegetables which have been stored and usually cook more quickly. Add a little water to vegetables which have been kept stored. Stir and turn food at least once during cooking.
Ensure that food, such as meat and fish, is cooked for an appropriate length of time.
For dishes such as rice or semolina pudding, first select a power setting of 750 watts and then turn down to 150 watts to simmer.
Food with a thick skin or peel, such as tomatoes, sausages, jacket potatoes, and aubergines, should be pierced or the skin cut in several places before cooking to allow steam to escape and prevent the food from bursting.
Eggs can only be cooked in their shells in the microwave oven in a specially designed egg-boiling device available from specialist shops. Similarly, hard-boiled eggs should not be reheated in the microwave oven as this may lead to the eggs bursting, even once they have been removed from the oven.
Eggs can be cooked without their shells in the microwave oven only if the yolk membrane has been punctured several times first. The pressure could otherwise cause the egg yolk to explode.
Cooking fresh vegetables in the microwave
| Vegetable Quantity Wattage Approx. Time Techniques | ||||
| Carrots 450 g (1 lb) sliced | 750 6–8 minutes Add 4 tbsp water. | |||
| Stir or shake during cooking. | ||||
| Corn-on-the-cob 2 cobs 450 g (1 lb) | 750 6–9 minutes Wrap individually in greased greaseproof paper.Do not add water.Turn after 3 minutes. | |||
| Mange-tout 450 g (1 lb) 750 7–9 minutes Add 4 tbsp water. | Stir or shake during cooking. | |||
| Parsnips 450 g (1 lb) halved | 750 10–16 minutes Place thinner parts towards the centre.Add a knob of butter and 15ml (1tbsp) lemon juice with 150ml (1⁄4 pint) water. | |||
| Peas | 450 g (1 lb) 750 6–9 minutes Add 4 tbsp water. | Stir or shake during cooking. | ||
| Potatoes (boiled) (halved) | 450 g (1 lb) 750 7–10 minutes Add 4 tbsp water. | |||
| Stir or shake during cooking. | ||||
| Potatoes (boiled) | 450 g (1 lb) 750 7–12 minutes Add 4 tbsp water. | |||
| Stir or shake during cooking. | ||||
| Sweet Potato | 450 g (1 lb) 750 5–9 minutes Wash and prick skin with a fork. | |||
| Place on absorbent paper.Turn over half way through. | ||||
| Spinach | 450 g (1 lb) 750 5–6 minutes Do not add water. | |||
| Stir or shake during cooking. | ||||
| Swede | 450 g (1 lb) 2 cm (3/4 inch) dice 750 9–11 minutes | Stir or shake during cooking. | ||
* Cover the microwave-safe container with cling film and pierce. ** If cooking smaller or larger quantities of food respectively, reduce or increase the cooking time accordingly.
Cooking pasta and rice in the microwave
| Type Quantity Water Wattage Time | |||
| Dried wholemeal pasta 225 g (8 oz) 900 ml | (11/2 pints) | 900 8–10 minutes | |
| Dried wholemeal pasta 450 g (1 lb) 1.7 litres | (3 pints) | 750 12–14 minutes | |
| Brown Rice 225 g (8 oz) 650 ml | (1pint) | 750 30–35 minutes | |
| White Rice 225 g (8 oz) 450 ml | (3/4 pint) | 750 10–12 minutes | |
Cooking times should only be used as a guide.
Times will vary depending on the quantity and thickness of the food.
Defrosting
Remove the food from its packaging and place it in a microwave-safe container. Do not cover. Turn, stir, or separate the food about halfway through the defrosting time.
To defrost delicate foods, e.g., cream, butter, gateau, and cheese, select 80 watts. However, to achieve an even result, remove from the oven and finish defrosting at room temperature.
To defrost meat, unpack the frozen meat and lay it on an upturned plate in a glass or china container so that the meat juice can run out but be collected. Turn halfway through defrosting.
For defrosting food such as bread, cakes, or fruit, a setting of 150 watts is recommended.
After defrosting
Allow the food to stand at room temperature for a few minutes after defrosting to enable the heat to spread evenly throughout the food.
Defrosting and reheating / cooking
Deep-frozen food can be defrosted and immediately reheated or cooked.
After defrosting select 750 watts followed by 450 watts.
Remove the food from its packaging and place in a covered microwave-safe dish for defrosting and reheating or cooking. Exception: Minced meat should be left uncovered while cooking. Soups, stew and vegetables should be stirred several times during the process. Separate slices of meat half-way through the programme. Turn pieces of meat and fish at the half-way stage.
Deep-frozen pre-cooked meals in cardboard trays which, according to manufacturer's instructions are suitable for use in a conventional oven, are microwave-safe.
If defrosting is followed by reheating or cooking
Allow the food to stand at room temperature for a few minutes to enable the heat to spread evenly throughout the food.
Cooking frozen vegetables in the microwave
| Vegetable Quantity Wattage Approx. Time Techniques | ||||
| Beans, broad 225 g (8 oz) 750 7–9 minutes Stir or shake during cooking. | ||||
| Peas 225 g (8 oz) 750 5–6 minutes Stir or shake during cooking. | ||||
| Spinach 275 g (10 oz) 750 7–9 minutes Do not add water. | Stir or shake during cooking. | |||
Melting margarine, butter
Melt 100 g at 450 watts uncovered for approx. 1-1 1/2 minutes.
Melting chocolate
Break 100 g into pieces, melt at 450 watts uncovered for approx. 2 minutes.
Dissolving gelatine
Add water according to manufacturer's instructions given on the packet and melt at 450 watts for approx. 1/2 - 1 minute, stirring occasionally.
Preparing flan topping / jelly glaze
Gently heat 1 sachet + 1/4 litre liquid at 450 watts uncovered for approx. 4-5 minutes, stirring occasionally.
Proving dough
(500 g flour) cover and leave to rise for approx. 8-10 minutes at 80 watts.
Skinning tomatoes
Cut 3 tomatoes crosswise, drop into water and heat at 450 watts for approx. 2 minutes. The skin can now be peeled away easily. Take care, the tomatoes may be very hot.
The grill temperature can be set between 50 and 200°C.
When cooking flat pieces of meat just below the grill, use the top setting of 200 °C so that it cooks in the shortest time possible.
The suggested temperature of 200 °C can be reduced depending on the type of food being grilled, the browning level required and the length of time needed to cook the food.
The temperature can be changed at any time during cooking.
Some recipes quote grill levels.
Grill setting 2 is approx. 175 °C.
Grill setting 3 is approx. 200°C.
If the total grilling time required is less than 15 minutes, the grill should be pre-heated for at least 5 minutes before placing food under the grill.
Flat pieces of fish and meat should usually be turned halfway through grilling for even results. Larger pieces should be turned several times.
When grilling directly on the rack, the glass tray should be placed underneath the rack to catch any fat or juices.
Place food on the rack and/or glass tray into the oven on the required runner level, or place the food directly on the turntable.
Use the 2nd runner from the top for thicker items such as pork chops and the top runner for thinner items such as bacon.
The glass tray and grill rack will be easier to clean if washed in soapy water immediately after grilling.
If placing food on the turntable, leave the turntable switched on to give a more even result.

Turn the power selector to the point (12 o'clock position). Press
The grill symbol and the recommended temperature of 200 °C will flash in the display, and 0:00 lights up.
Use the rotary selector to change the grill temperature if required. A few seconds later 0:00 will flash. The duration can now be set using the rotary selector.
Use the button to alternate between temperature and duration.
Once a temperature and duration have been selected, press START. The grill symbol will flash in the display until the selected temperature has been reached. An audible tone will sound when the cooking process is complete.
The rack and glass tray become hot during use.
Danger of burning!
To change a time
The time entered can be changed during operation by interrupting the process (press the Stop/C button), and change the time. To continue, press the START button.
To change the temperature
The temperature can be changed during operation without interrupting the programme. Press ☐, and change the temperature using the rotary selector.
Combination mode - Microwave + Grill
When used in combination with the microwave function (except with automatic programmes) the grill can be switched on either at the beginning or during cooking. This is useful when food needs to be given a crispy top.
Selecting grilling at the beginning
■ Use the power selector to select a microwave power level. The microwave symbol ≈ lights up in the display and 0:00 flashes. ■ Press 📋. The grill symbol 📌 and the recommended temperature of 200 °C flash in the display and ≈ and 0:00 light up. ■ Use the rotary selector to change the grill temperature if required. ■ A few seconds later 0:00 will flash. The duration can now be set using the rotary selector.
Use the 📋 button to alternate between temperature and duration.
■ Once a temperature and duration have been selected press START. The grill symbol 📋 will flash in the display until the temperature selected has been reached. An audible tone will sound when the cooking process is complete.
The microwave power level, grill level and duration can be entered in any order.
Switching on the grill after a cooking process has started
Interrupt the process (press Stop/C once), then press ☐, select a grill temperature and start the process again (press START).
To switch off the grill
The grill can only be switched off during cooking by cancelling the cooking process.
Fan grill
The Fan grill function is ideal for grilling or roasting larger pieces of meat and poultry. The fan and the grill element operate at the same time.
The temperature can be set in a range between 50 and 200 °C.
The recommended temperature of 200 °C can be altered at any time even when the oven is operating.
When grilling directly on the rack, the glass tray should be placed underneath the rack to catch any fat or juices.
Place food on the rack and/or glass tray into the oven on the required runner level, or place the food directly on the turntable.
Use the 2nd runner from the top for thicker items such as pork chops and the top runner for thinner items such as bacon.
If placing food on the turntable, leave the turntable switched on, to give a more even result.

Turn the power selector to the point (12 o'clock position).
Press 📁. The Fan grill symbol 📁 and the recommended temperature of 200 °C flash in the display and 0:00 lights up.
Use the rotary selector to change the temperature if required.
A few seconds later 0:00 will flash. The duration can now be set using the rotary selector.
Use the 📁 button to alternate between temperature and duration.
Once a temperature and duration have been selected press START. The Fan grill symbol 📁 will flash in the display until the temperature selected has been reached. An audible tone will sound when the cooking process is complete.
The rack and glass tray become hot during use.
Danger of burning!
Combination mode Microwave + Fan grill
This combination is very good for roasting and grilling. When used in combination with the microwave function (except with automatic programmes), fan grill can be switched on either at the beginning or during cooking.
Selecting Fan grill at the beginning
Use the power selector to select a microwave power level. The microwave symbol lights up in the display and 0:00 flashes. Press the button. The Fan grill symbol and the recommended temperature of 200 °C flash in the display and the button and 0:00 light up. Use the rotary selector to change the temperature if required. A few seconds later 0:00 will flash. The duration can now be set using the rotary selector.
Use the button to alternate between temperature and duration.
Once a temperature and duration have been selected press START. The Fan grill symbol will flash in the display until the temperature selected has been reached. An audible tone will sound when the cooking process is complete.
The microwave power level, temperature and duration can be entered in any order.
Selecting Fan grill after a cooking process has started
Interrupt the process (press Stop/C once), then press the button, select a grill temperature and start the process again (press START).
Switching off Fan grill
Fan grill can only be switched off during cooking by cancelling the cooking process.
Cooking with Grill and Fan Grill
| Type Function Temperature Shelf Position Time | ||||
| Sausages (thick) Grill 200°C 4 10–12 minutes | turn half way | |||
| Sausages (thick) Fan Grill 200°C 4 9–10 minutes | turn half way | |||
| Bacon Grill 200°C 5 6–8 minutes | turn half way | |||
| Cod Fillet Grill 185°C 4 10–12 minutes | ||||
| Cod Fillet | Fan Grill 185°C 4 | 8–10 minutes | ||
The Fan heat system is ideal for baking.
The temperature can be set in a range between 50 and 250 °C.
The recommended temperature of 160 °C can be altered at any time even when the oven is operating.
Pre-heat the oven for approx. 10 minutes at the required temperature.
Make use of residual heat by leaving the baking in the oven for five minutes after the end of the cooking time.
Place food on the baking tray and/or glass tray into the oven at the required runner level, or place the food directly on the turntable.
If placing food on the turntable, leave the turntable switched on, to give a more even result.
The side runners can be taken out to give more room if a large dish is being used.

Turn the power selector to the point (12 o'clock position).
Press 📁. The Fan heat symbol 📋 and the recommended temperature of 160 °C flash in the display and 0:00 lights up.
Use the rotary selector to change the temperature if required. A few seconds later 0:00 will flash. The duration can now be set using the rotary selector.
Use the ☒ button to alternate between temperature and duration.
Once a temperature and duration have been selected press START. The Fan heat symbol 📁 will flash in the display until the temperature selected has been reached. An audible tone will sound when the cooking process is complete.
When inserting the baking tray, make sure that the sloping edge faces towards the front, as otherwise the fan heat cannot circulate evenly.
The baking tray and glass tray become hot. Danger of burning!
To achieve the best results only bake on one level at a time.
Combination mode - Microwave + Fan heat
This combination is ideal for reheating and cooking one pot dishes e.g. casseroles. When used in combination with the microwave function (except with automatic programmes), Fan heat can be switched on either at the beginning or during cooking.
Do not use the baking tray when using combination mode.
If using metal baking tins in combination mode, do not place them on the rack as this could create sparks between the rack and the tin. Place metal baking tins on the glass tray.
Pre-heat the oven for approx. 10 minutes at the required temperature.
Selecting fan heat at the beginning of a cooking process
■ Use the power selector to select a microwave power level. The microwave symbol ≈ lights up in the display and 0:00 flashes. ■ Then press 📁. The 🔒 symbol and the recommended temperature of 160 °C flash in the display and 🔒 and 0:00 light up. ■ Use the rotary selector to change the temperature if required. ■ A few seconds later 0:00 will flash. The duration can now be set using the rotary selector.
Use the ☒ button to alternate between temperature and duration.
■ Once a temperature and duration have been selected press START. The Fan heat symbol 📁 will flash in the display until the temperature selected has been reached. An audible tone will sound at the end of the cooking process.
The microwave power level, temperature and duration can be entered in any order.
Selecting fan heat after a cooking process has started
Interrupt the process (press Stop/C once), then press ☒, select a temperature and start the process again (press START).
Fan heat can only be switched off during cooking by cancelling the cooking process.
| Type of Meat Mins per lb Microwave | Wattage | Oven Temp. Approx. Internal Temp. | |
| Whole chicken 10 plus 10 mins 150 190°C – | |||
| Quarters 8-10 150 190°C – | |||
| Drumsticks 10-12 150 190°C – | |||
| Whole duck 12 plus 12 150 200°C – | |||
| Quarters | 10-12 150 200°C – | ||
| Lamb: Medium | 12 plus 12 mins 150 180°C | 70-75°C | |
| Well done | 15 plus 15 mins 150 180°C | 75-80°C | |
| Lamb chops | 10-12 150 180°C | ||
| Beef: Rare | 10 plus 10 mins 150 | 180°C | 60°C |
| Medium | 12 plus 12 mins 150 180°C | 70°C | |
| Well done | 15 plus 15 mins 150 180°C | 80°C | |
| Pork: Well done 15-18 plus 15 mins | 150 185°C | 80-85°C | |
| Chops | 11-12 150 185°C 220 | ||
N.B. The above chart is intended as a guide only.
Cakes can be baked on this setting if the baking time is longer than 20 mins. Select the temperature recommended in the recipe e.g. 160°C and a microwave setting of between 80 - 150 watts.
To reheat food e.g. pies and pastries select a temperature between 180 - 200°C and a microwave setting of between 150 - 300 watts.
To bake jacket potatoes set the temperature to 200°C and the microwave to 300 W. A small potato will take about 20 minutes and a large one about 20 minutes. Add 5 minutes to the cooking time if baking 2 potatoes.
Automatic programmes
The seven automatic programmes are weight dependent. Simply select an automatic programme and then enter the weight of the food.
Automatic defrosting
There are three programmes for defrosting different types of food.
* Fruit / vegetables (100 g - 1 kg)
* Fish / poultry (100 g - 2 kg)
* Meat (100 g - 2 kg)
Automatic cooking
There are two programmes suitable for cooking food weighing from 100 g up to 1 kg.
Fresh vegetables, e.g.: carrots, white cabbage, Brussels sprouts
Fresh vegetables, e.g.: potatoes, courgettes, leeks, spinach, broccoli
Combination programmes
With these programmes the grill works in combination with a microwave power setting of 150 or 450 watts.
Poultry (100 - 1500 g), Grill temperature 180 °C Pork (500 - 1500 g) Grill temperature 160 °C

Turn the selector to the automatic programme you require. The Start symbol and 100 g flash in the display (500 g with setting 450).
Use the rotary selector to enter the weight.
Press the START button.
The appropriate time for the weight will begin to count down.
An audible tone will sound half-way through the cooking time.
Interrupt the programme to turn or stir the food and then continue the programme.
If necessary, the programmed times can be altered during the course of a programme (interrupt the programme, alter the time and then continue the programme).
An audible tone will sound when the cooking process is complete. The oven interior lighting goes out.
Disconnect the microwave oven from the power supply before cleaning (e.g. remove the plug from the electrical socket).
Oven housing and interior
The housing and interior can be cleaned using a damp cloth with a little washing up liquid or a mild detergent and water. Wipe dry with a soft cloth.
Avoid too much water as this could penetrate the openings.
Do not use abrasive cleaning agents which could scratch.
Stainless steel surfaces can be cleaned with a proprietary non-abrasive cleaner for stainless steel.
The ceramic splash guard supplied protects the roof of the oven interior from soiling.
To neutralise odours in the microwave, put a cup of water with some lemon juice in the oven and simmer for a few minutes.
For more heavy soiling, heat a glass of water for 2 to 3 minutes until the water begins to boil. The steam will collect on the walls and soften the soiling a little. The oven interior can now be wiped clean using a little washing up liquid if necessary.

■ The turntable can be removed for cleaning. ■ Always keep the roller ring underneath it clean as well as the oven floor. Otherwise the ring might not run smoothly. ■ Clean the area between the turntable and the carrier. The carrier is located in the middle of the oven floor and can be removed for cleaning.
Do not turn the carrier manually, as this could damage the drive motor.
Door interior
Always keep the door interior clean. Do not use abrasive cleaning agents. Check the door and door seal at regular intervals for any sign of damage. If any damage is noticed, the appliance should not be used until the fault has been rectified by a Miele authorised and trained service technician.
Air vents
Do not let water or any other object find its way into or block the air vents.
Appliance front and control panel
■ All external surfaces and controls can be cleaned using warm water with a little washing up liquid applied with a soft sponge or cloth. ■ Wipe the surfaces dry using a soft cloth.
E-Cloth
A microfibre "E-Cloth" is available from the Miele UK Spare Parts Department, Part Number 98013530, which is suitable for cleaning surfaces such as stainless steel, glass, plastic and chrome without the use of chemicals. It can be washed 300 times.
To prevent the risk of scratches and damage to the surface structure of your appliance pay particular attention to the following cleaning instructions.
Glass fronts
The appliance front and controls are susceptible to scratches and abrasion.
Avoid:
- abrasive cleaning agents, e.g. powder cleaners and cream cleaners,
- abrasive sponges, e.g. pot scourers or sponges which have been previously used with abrasive cleaning agents,
- oven sprays.
Stainless steel fronts
The appliance front and controls are susceptible to scratches and abrasion.
Please observe the cleaning instructions for
- stainless steel surfaces, – stainless steel coloured controls.
Stainless steel surfaces
Stainless steel surfaces can be cleaned using a proprietary non-abrasive cleaning agent designed specifically for use on stainless steel, or with the Miele E-Cloth.
Avoid:
- cleaning agents containing soda, acids or chlorides,
- abrasive cleaning agents, e.g. powder cleaners and cream cleaners,
- abrasive sponges, e.g. pot scourers or sponges which have been previously used with abrasive cleaning agents.
To help prevent re-soiling, proprietary conditioning agents for stainless steel can also be used. Apply sparingly following the direction of the grain. Wipe dry with a soft cloth.
Stainless steel coloured controls
The controls may suffer discolouration or damage if soiling is left on them for too long.
Remove any soiling straight away.
Avoid:
- cleaning agents containing soda, acids or chlorides,
- abrasive cleaning agents, e.g. powder cleaners and cream cleaners,
- abrasive sponges, e.g. pot scourers or sponges which have been previously used with abrasive cleaning agents,
- stainless steel cleaners,
- oven sprays.
Accessories supplied
Boiling rod
The boiling rod can be washed in a dishwasher.
Cover
The cover can be washed in a dishwasher. However discolouration may occur. Natural dyes, e.g. from carrots, tomatoes or ketchup may be the cause. This discolouration is irreversible but does not affect the stability of the cover.
Side runners
The side runners can be removed for cleaning the side walls of the oven cavity.

Pull the bottom of the runners away from the side walls and then pull up and out of the bracket at the top.
Refit in the reverse order.
Rack, baking tray, side runners
The rack, baking tray and side runners should be washed by hand using a solution of hot water and washing up liquid and dried after each use.
To remove stubborn soiling
– from stainless steel: use a proprietary stainless steel cleaner. - from enamelled surfaces: Soak in a solution of hot water and a little washing up liquid and clean off using a soft nylon brush or sponge.
Glass tray
The glass tray can be washed by hand using a solution of hot water and washing up liquid or in a dishwasher.
Do not use abrasive cleaning agents.
Ceramic splash guard
The ceramic splash guard can be washed by hand using a solution of hot water and washing up liquid or in a dishwasher.
It should be cleaned after each use.
An oven spray may be used for particularly stubborn soiling. Soiling may cause slight discolouration of the splash guard.
Repairs to this appliance should only be carried out by a Miele approved service technician in accordance with local and national safety regulations. Repairs and other work by unqualified persons could be dangerous. The manufacturer cannot be held liable for unauthorised work.
Some minor problems can be corrected without contacting the Service Department.
What to do if ...
... a process will not start
Check whether:
■The appliance door is closed properly. ■The appliance is plugged into the mains supply. ■ The mains fuse has blown (call a qualified electrician or the Service Department if it has. See "After Sales Service").
... the display does not light up
Check whether:
■ The time of day display has been switched off (press the ⏻button twice).
■ The display has been programmed to switch off at night.
... the turntable does not turn smoothly
Check whether:
■ The area underneath the roller ring is soiled. ■ The surfaces between the turntable and the carrier are clean.
Remove any soiling.
...food is not adequately defrosted, heated or cooked at the end of the selected time
Check whether:
■The correct power setting was selected for the time set. The lower the power setting the longer the time required.
■The process has been interrupted and not restarted.
... strange noises are heard when the microwave oven is being used
Check whether:
■ The food is covered with aluminium foil.
If so, remove it.
Sparks are being created by the use of crockery with a metallic finish. See notes on suitable types of containers.
... the time of day in the display is not accurate
If there has been a power cut lasting longer than a couple of minutes, the time automatically switches back to 12.00.
The time of day needs to be re-set.
■ Set the correct time of day.
...food cools down too quickly
In the microwave oven, food begins to cook from the outside first, the inside of the food relying on the slower conduction of heat.
If food is cooked at a high power level it is possible that the heat may not have reached the centre of the food. During standing time heat is transferred to the centre of the food. Food may be warm in the middle but cool on the edge.
When reheating food with different densities, such as plated meals it is sensible to start with a low power level and lengthen the time required.
... the microwave switches itself off during a cooking, reheating or defrosting process
There may be insufficient air circulation.
Check whether:
■ The air inlet is blocked. ■ An object is blocking the ventilation outlets. ■ Anything is blocking the gap between the base of the appliance and the worktop surface.
Remove any objects if necessary. The appliance switches off automatically in the case of overheating. Cooking can be recontinued after a cooling-down period.
If the microwave oven switches itself off repeatedly, please call the Miele Service Department.
If it is not possible to remedy a fault by following the instructions given above, on no account open the appliance casing.
This microwave oven should only be repaired by a suitably qualified technician trained by Miele.
In the event of any faults which you cannot remedy yourself, please contact
- Your Miele Dealer or
- The Miele Service Department (see back cover for address).
When contacting the Service Department, please quote the model and serial number of your appliance, both of which are shown on the data plate at the rear of the appliance.
Please note that telephone calls may be monitored and recorded to improve our service.
Before connecting the appliance, ensure that it has not been damaged in any way. Do not use a damaged appliance.
Electrical connection U.K.
All electrical work should be carried out by a suitably qualified and competent person in strict accordance with national and local safety regulations.
The appliance is supplied with a cable and moulded plug ready for connection to a 230-240 V/50 Hz a.c. single phase supply.
The voltage, rated load and fusing are given on the data plate which is located externally on the rear wall of the appliance. Please ensure that these match the household mains supply.
Connection should be made via a fused connection unit or a fused plug and a suitable switched socket, or via a suitable isolator, which complies with national and local safety regulations, and the on/off switch should be easily accessible after the appliance has been installed.
If the socket is not accessible after installation (depending on country) an additional means of disconnection must be provided for all poles.
When switched off there must be an all-pole gap of 3 mm in the isolator switch (including switch, fuses and relays acc. to EN 60335).
For extra safety it is advisable to install a residual current device with a trip current of 30 mA (in accordance with DIN VDE 0664, VDE 0100 Section 739).
If the appliance is connected via an isolator switch the plug must be cut off and rendered useless.
Important
The wires in the mains lead of this appliance are coloured in accordance with the following code:
Green / yellow = Earth, Blue = Neutral, Brown = Live
As the colours of the wires in the mains lead of this appliance may not correspond with the markings identifying the terminals in your plug, proceed as follows:
The wire coloured green and yellow must be connected to the terminal in the plug which is marked with the letter E or by the earth symbol or coloured green or green and yellow.
The wire coloured blue must be connected to the terminal marked with the letter "N" or coloured black. The wire coloured brown must be connected to the terminal marked with the letter "L" or coloured red.
WARNING
THIS APPLIANCE MUST BE EARTHED
Non-rewireable plugs BS 1363 (UK only)
If this machine or appliance is fitted with a non-rewireable plug, the following information applies: if the socket outlets are not suitable for the plug supplied with this product, it must be cut off and an appropriate plug fitted. The fuse carrier and fuse should be removed from the plug and disposed of. The plug cut from the flexible cord should then be disposed of and on no account be inserted into any socket elsewhere in the house (electric shock hazard).
The fuse cover must be re-fitted when changing the fuse, and if the fuse cover is lost the plug must not be used until a suitable replacement is obtained. The colour of the correct replacement cover is that of the coloured insert in the base of the plug, or the colour that is embossed in words on the base of the plug, (as applicable to the design of plug fitted).
The correct rating of the replacement fuses that are ASTA approved to BS 1362 should be fitted. Replacement covers may be purchased from your local electrical supplier, electricity showroom or Miele service agent.
Electrical connection (AUS / NZ)
All electrical work should be carried out by a suitably qualified and competent person in strict accordance with national and local safety regulations.
The appliance is supplied with a cable and moulded plug ready for connection to a 230-240 V/50 Hz a.c. single phase supply.
The voltage, rated load and fusing are given on the data plate which is located externally on the rear wall of the appliance. Please ensure that these match the household mains supply.
Connection should be made via a suitable isolator, which should be easily accessible after the appliance has been installed.
For extra safety it is advisable to install a residual current device with a trip current of 30 mA.
AUS / NZ
The plug rating is 15 A.
Test marks Electrical safety,
C-Tick
Mark
Electrically suppressed according to AS/NZS 1044
Important
The wires in the mains lead of this appliance are coloured in accordance with the following code:
Green/yellow = Earth
Blue = Neutral
Brown = Live
As the colours of the wires in the mains lead of this appliance may not correspond with the markings identifying the terminals in your plug, proceed as follows:
The wire coloured green and yellow must be connected to the terminal in the plug which is marked with the letter E or by the earth symbol ± or coloured green or green and yellow.
The wire coloured blue must be connected to the terminal marked with the letter "N" or coloured black. The wire coloured brown must be connected to the terminal marked with the letter "A" or coloured red.
WARNING
THIS APPLIANCE MUST BE
EARTHED
If the connection cable is damaged the new cable must be fitted by a Miele approved service technician.
Do not position the appliance too close to adjacent furniture.
A ventilation gap of at least 5 cm is required around the appliance. The ventilation gap above the appliance should be at least 14 cm.
When installing the appliance ensure there is sufficient ventilation underneath and to the rear of the appliance.
Do not place any objects on the ventilation outlets or block the gap between the base of the appliance and the worktop surface.
The microwave oven can be:
- placed on a worktop.
- built into a tall unit or into a unit under a worktop.
Exception: Appliances with a stainless steel front must not be built under a worktop.
A building-in frame must be used.
The measurements given in its fitting instructions must be observed.
A building-in frame is available from your Miele Dealer or the Miele Spare Parts Department. It is supplied with fitting instructions.
M 638 EC
Voltage ..... 220-230 V, 50 Hz
Rated load ..... see data plate
Power settings.....7 (80/150/300/450/
600/750/900 Watt)
Fuse rating (GB)....13 A
Timer 60 / 90 minutes
Freestanding appliance:
Dimensions (H x W x D) in mm:
Housing . . . . . . . . . . 348 x 555 x 484
Nett weight 26 kg
United Kingdom:
Miele Co. Ltd.
Fairacres, Marcham Road, Abingdon, Oxon, OX14 1TW
tel. Abingdon (01235) 554455 - fax (01235) 554477
Service Office, tel. Abingdon (01235) 554466
Internet: www.miele.co.uk
Ireland:
Miele Ireland Ltd.
Broomhill Road, Tallaght, Dublin 24
Tel: (01) 46 10 710, Fax: (01) 46 10 797
Email: info@miele.ie
Internet: http://www.miele.ie
Australia:
Miele Australia Pty. Ltd.
A.C.N. 005635398
- 1 Gilbert Park Drive
Knoxfield, VIC 3180
Telephone: (03) 9764 7100
Fax: (03) 9764 7129
- 3 Skyline Place
Frenchs Forest, NSW 2086
Telephone: (02) 8977 4200
Fax: (02) 8977 4219
- 25 Lavarack Avenue
Eagle Farm, QLD 4009
Telephone: (07) 3632 2400
Fax: (07) 3632 2449
-209 Richmond Road
Richmond, SA 5033
Telephone: (08) 8351 8500
Fax: (08) 8354 1717
Distributor Western Australia:
G.B.I. Sales Pty. Ltd.
27-33 Cleaver Terrace
Belmont, WA 6104
Telephone: (08) 9478 0466
Fax: (08) 9478 0470
Miele Southeast Asia
Miele Pte. Ltd.
163 Penang Road
# 04 - 02/03 Winsland House II
Singapore 238463
Tel: +65-67351161
Fax: +65-67351191
Email: mielesea@miele.com.sg
South Africa:
Miele (Pty.) Ltd.
304 Tungsten Road
Strydom Park 2194
P.O. Box 1654, Randburg 2125
Tel. (011) 793-7452
Telefax (011) 793-7447
E-mail: mieleza@iafrica.com
Internet: www.miele.co.za
Distributor New Zealand:
Steelfort Engineering Company Ltd.
- 500 Rangitikei Street
Palmerston North, Priv. Bag 11045, NZ
Telephone: (06) 350 1350
Fax: (06) 356 1507
- Unit L, 10-20 Sylvia Park Road,
Mt. Wellington, Auckland, NZ
Telephone: (09) 573 1269
Fax: (09) 573 1268


- OPERATING INSTRUCTIONS
- MICROWAVE OVEN M 638 EC
- USING THE MICROWAVE OVEN
- DISPOSAL OF THE PACKING MATERIAL
- DISPOSAL OF YOUR OLD APPLIANCE
- CORRECT USE
- TECHNICAL SAFETY
- USE
- WHEN USING BROWNING DISHES
- HOW DOES THE MICROWAVE OVEN FUNCTION
- MICROWAVES
- MATERIAL AND SHAPE
- METAL
- EXCEPTIONS
- GLASSWARE
- PORCELAIN (CHINAWARE)
- EARTHENWARE
- GLAZES AND COLOURS
- PLASTICS
- WOOD
- DISPOSABLE CONTAINERS
- TESTING DISHES FOR THEIR SUITABILITY
- ACCESSORIES SUPPLIED
- A COVER
- DO NOT USE A LID OR COVER IF
- CERAMIC GLASS GUARD
- GRILLING RACK
- GLASS TRAY
- BAKING TRAY
- OPTIONAL ACCESSORIES
- GOURMET PLATE (MGP 24)
- SETTING TIME OF DAY
- ALTERING THE TIME OF DAY
- SWITCHING OFF THE TIME OF DAY DISPLAY
- NIGHT TIME
- MINUTE MINDER
- ALTERING A MINUTE MINDER ENTRY
- TO OPEN THE DOOR
- TO CLOSE THE DOOR
- AUDIBLE TONE
- SAFETY LOCK
- TO ACTIVATE THE SAFETY LOCK
- CANCELLING THE SAFETY LOCK
- TYPES OF OPERATION
- MICROWAVE-SOLO MODE
- GRILL
- FAN GRILL
- FAN HEAT
- COMBINATION MODE (MICROWAVE + GRILL)
- COMBINATION MODE (MICROWAVE + FAN GRILL)
- COMBINATION MODE (MICROWAVE + FAN HEAT)
- AUTOMATIC PROGRAMMES
- MICROWAVE POWER SETTINGS
- TIMES FOR DEFROSTING, REHEATING, COOKING
- PLACING THE CONTAINER IN THE OVEN
- TURNTABLE
- STARTING A PROCESS
- INTERRUPTING A PROCESS / RE-STARTING A PROCESS
- ALTERING SETTINGS
- TO CANCEL A PROCESS
- AT THE END OF A PROCESS
- AUTOMATIC "WARMING" FUNCTION
- QUICK-START (PROGRAMMABLE)
- PROGRAMMING TIMES
- PROGRAMMING THE END OF COOKING TIME
- TO CHECK THE END OF COOKING TIME
- LARGE COOKING DISHES
- IF THE DOOR IS OPENED BEFORE A STARTING TIME HAS COMMENCED
- TO CHANGE PROGRAMMED TIMES
- TO DELETE PROGRAMMED TIMES
- AFTER REHEATING
- DEFROSTING
- AFTER DEFROSTING
- DEFROSTING AND REHEATING / COOKING
- IF DEFROSTING IS FOLLOWED BY REHEATING OR COOKING
- MELTING MARGARINE, BUTTER
- MELTING CHOCOLATE
- DISSOLVING GELATINE
- PREPARING FLAN TOPPING / JELLY GLAZE
- PROVING DOUGH
- SKINNING TOMATOES
- TO CHANGE A TIME
- TO CHANGE THE TEMPERATURE
- COMBINATION MODE - MICROWAVE + GRILL
- SELECTING GRILLING AT THE BEGINNING
- SWITCHING ON THE GRILL AFTER A COOKING PROCESS HAS STARTED
- TO SWITCH OFF THE GRILL
- COMBINATION MODE MICROWAVE + FAN GRILL
- SELECTING FAN GRILL AT THE BEGINNING
- SELECTING FAN GRILL AFTER A COOKING PROCESS HAS STARTED
- SWITCHING OFF FAN GRILL
- COOKING WITH GRILL AND FAN GRILL
- COMBINATION MODE - MICROWAVE + FAN HEAT
- SELECTING FAN HEAT AT THE BEGINNING OF A COOKING PROCESS
- SELECTING FAN HEAT AFTER A COOKING PROCESS HAS STARTED
- AUTOMATIC DEFROSTING
- AUTOMATIC COOKING
- COMBINATION PROGRAMMES
- OVEN HOUSING AND INTERIOR
- DOOR INTERIOR
- AIR VENTS
- APPLIANCE FRONT AND CONTROL PANEL
- E-CLOTH
- GLASS FRONTS
- AVOID
- STAINLESS STEEL FRONTS
- STAINLESS STEEL SURFACES
- STAINLESS STEEL COLOURED CONTROLS
- BOILING ROD
- COVER
- SIDE RUNNERS
- RACK, BAKING TRAY, SIDE RUNNERS
- CERAMIC SPLASH GUARD
- WHAT TO DO IF
- A PROCESS WILL NOT START
- THE DISPLAY DOES NOT LIGHT UP
- THE TURNTABLE DOES NOT TURN SMOOTHLY
- FOOD IS NOT ADEQUATELY DEFROSTED, HEATED OR COOKED AT THE END OF THE SELECTED TIME
- STRANGE NOISES ARE HEARD WHEN THE MICROWAVE OVEN IS BEING USED
- THE TIME OF DAY IN THE DISPLAY IS NOT ACCURATE
- FOOD COOLS DOWN TOO QUICKLY
- THE MICROWAVE SWITCHES ITSELF OFF DURING A COOKING, REHEATING OR DEFROSTING PROCESS
- ELECTRICAL CONNECTION U.K
- IMPORTANT
- WARNING
- THIS APPLIANCE MUST BE EARTHED
- NON-REWIREABLE PLUGS BS 1363 (UK ONLY)
- ELECTRICAL CONNECTION (AUS / NZ)
- AUS / NZ
- M 638 EC
- FREESTANDING APPLIANCE
- UNITED KINGDOM
- IRELAND
- AUSTRALIA
- MIELE SOUTHEAST ASIA
- SOUTH AFRICA
- DISTRIBUTOR NEW ZEALAND
Brand : MIELE
Model : M 638-1 EC
Category : Microwave