
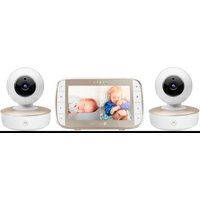
MBP27T-4 - Baby monitor MOTOROLA - Free user manual and instructions
Find the device manual for free MBP27T-4 MOTOROLA in PDF.


| Product Type | Video Baby Monitor |
| Brand | Motorola |
| Model | MBP27T-4 |
| Parent Unit Screen Size | 2.0-inch Color LCD |
| Camera Resolution | VGA (640 x 480 pixels) |
| Night Vision | Yes, infrared LEDs (automatic activation) |
| Wireless Range | Up to 300 meters (outdoor line of sight) |
| Two-Way Talk | Yes, built-in microphone and speaker |
| Temperature Sensor | Yes, displays room temperature on parent unit |
| Lullabies | Yes, 5 pre-installed lullabies |
| Power Source (Parent Unit) | Rechargeable Li-Ion battery (3.7V, 1000mAh) or AC adapter |
| Power Source (Camera) | AC adapter (5V, 1A) |
| Battery Life (Parent Unit) | Up to 4 hours (normal use) |
| Frequency | 2.4 GHz FHSS (Frequency Hopping Spread Spectrum) |
| Dimensions (Parent Unit) | 2.99 x 2.01 x 0.98 inches (76 x 51 x 25 mm) |
| Dimensions (Camera) | 3.0 x 3.5 x 3.7 inches (76 x 89 x 94 mm) |
| Weight (Parent Unit) | 3.5 oz (100 g) |
| Weight (Camera) | 7.0 oz (200 g) |
| Warranty | 1 year limited warranty |
| Cleaning Instructions | Wipe with a dry, soft cloth. Do not use liquid cleaners. |
| Safety Compliance | FCC, CE certified |
| Spare Parts Availability | Contact Motorola support or authorized retailers |
| User Manual | Free PDF download available on notice-facile.com |
Frequently Asked Questions - MBP27T-4 MOTOROLA
User questions about MBP27T-4 MOTOROLA
0 question about this device. Answer the ones you know or ask your own.
Ask a new question about this device
Download the instructions for your Baby monitor in PDF format for free! Find your manual MBP27T-4 - MOTOROLA and take your electronic device back in hand. On this page are published all the documents necessary for the use of your device. MBP27T-4 by MOTOROLA.
USER MANUAL MBP27T-4 MOTOROLA
natural_image
Abstract black and white logo with stylized letter M (no text or symbols)motorola
natural_image
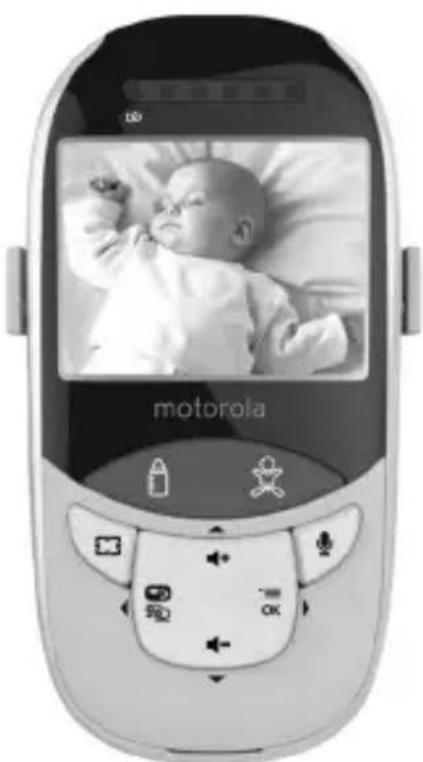
Front view of a Motorola mobile phone with a baby photo displayed on screen (no visible text or symbols on device body)
natural_image
White digital camera with black lens and 'DIGITAL NAV STLEZ' branding (no additional text or symbols visible)User's Guide
Baby Monitor with Touchless thermometer
Models: MBP27T, MBP27T/2, MBP27T/3, MBP27T/4
Welcome...
to your new Motorola Baby Monitor!
Thank you for purchasing the MBP27T, MBP27T/2, MBP27T/3, MBP27T/4.
Now you can see and hear your baby sleeping in another room or you can monitor your older children in their playroom.
Please retain your original dated sales receipt for your records.
For warranty service of your Motorola product, you will need to provide a copy of your dated sales receipt to confirm warranty status. Registration is not required for warranty coverage.
For product related questions, please call:
UK 0845 218 0890
ROI 08187 62092
This User's Guide provides you with all the information you need to get the most from your product.
Before you can use the baby monitor, we recommend you insert and fully charge the battery in the parent unit, so that it continues to work if you disconnect it from the power supply to carry it to another location. Please read the Safety Instructions on page 6 before you install the units.
Got everything?
- 1 x Parent unit
- 1 x Baby unit (camera)
- 1 x Rechargeable Ni-MH battery pack for the Parent unit
- 1 x Power adapter for the Parent unit
- 1 x Power adapter for the Baby unit
- 1 x Belt Clip
In multi-camera packs, you will find one or more additional camera units with power adapter units.
Overview of the Parent Unit
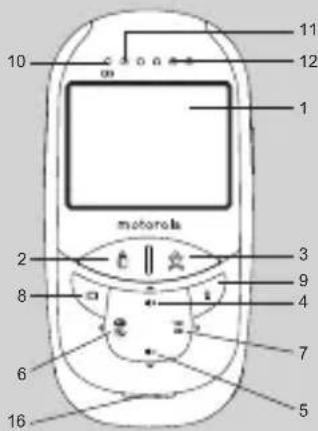
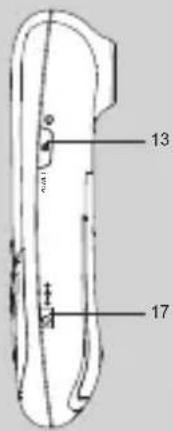


-
Display (LCD screen)
-
Object temperature mode Press and hold to measure the liquid temperature
-
Forehead temperature mode Press and hold to measure the body temperature at forehead
-
Scroll Up/Volume+ Button
-
Scroll Down/Volume-Button
-
Return/Switch Camera Button Press to return to previous menu level. Press to switch camera units (if paired with more than one camera). Press to pan left in digital pan/tilt mode.
-
Menu/OK Button Press to open the menu options. Press to confirm a selection. Press to pan right in digital pan/tilt mode.
-
Digital Pan/Tilt Press to enter/exit digital pan/tilt mode
-
Talk Key
Press and hold to talk back through the camera.
-
Power indicator LED Blue when mains adaptor power ON.
-
Unit ON/OFF LED (Green)
-
Audio Level LED (Green, Orange, Red, Red)
-
Power / Video On-Off Button Press and hold to turn the unit ON or OFF. In monitor mode, press to turn the display ON/OFF
-
Battery cover
-
Stand
-
Speaker
-
Power Adapter Socket
-
Belt Clip
-
Probe tip
Parent unit menu icons
| Signal Level Indication (5 Levels) | |
| Night Vision Mode (Video also changes to Black/White) | |
| Battery Level Indication (4 Levels) | |
| Volume Level Control (8 Levels) | |
| Brightness Level Control (8 Levels) | |
| Alarm Setting (6h, 4h, 2h, OFF) | |
| Camera setting | |
| Add Camera | |
| Delete Camera | |
| Select Camera | |
| Digital Pan/Tilt mode On | |
| Camera scan mode set | |
| Forehead Temperature Record | |
| Select C/F |
Overview of Your Baby Unit

- Photo Sensor (Night Vision Mode) 6. Power Adapter Socket
- Camera Lens 7. Pair Key
- Infrared LEDs 8. Microphone
- Power LED 9. Speaker
- ON/OFF Switch
Important guidelines for installing your Baby Monitor
• To use your Video Monitor Baby and Parent Units together, you must be able to establish a radio link between them, and the range will be affected by environmental conditions.
- Any large metal object, like a refrigerator, a mirror, a filing cabinet, metallic doors or reinforced concrete between the Baby and Parent Unit may block the radio signal.
- The signal strength may also be reduced by other solid structures, like walls, or by radio or electrical equipment, such as TVs, computers, cordless or mobile phones, fluorescent lights or dimmer switches.
- Use of other 2.4 GHz products, such as wireless networks (Wi-Fi ^ routers), Bluetooth ^ systems, or microwave ovens, may cause interference with this product, so keep the baby monitor away at least 1.5m from these types of products, or turn them off if they appear to be causing interference.
- If the signal is weak, try moving the Parent and/or the Baby Unit to different positions in the rooms.
Table of contents
- Safety Instructions....6
- Getting Started....8
2.1 Baby Unit Power Supply......8
2.2 Parent Unit Battery Installation 8
2.3 Parent Unit Power Supply 9
2.4 Registration (Pairing)....11
- Using the Baby Monitor....12
3.1 Setting up....12
3.2 Night Vision Mode....12
3.3 Video ON/OFF....12
3.4 Talk Mode....12
3.5 Touchless Thermometer....12
3.5.1 Forehead temperature mode 13
3.5.2 Object Temperature Mode 13
- Parent Unit Menu Options.... 14
4.1 Volume....14
4.2 Brightness ....14
4.3 Digital Pan and Tilt....14
4.4 Alarm....14
4.5 Camera Control 15
4.5.1 Add (pair) a camera ....15
4.5.2 View a camera 15
4.5.3 Delete a camera 16
4.5.4 Scan the cameras 16
4.6 Body temperature measurement review ....17
4.7 Change of Measurement Scale 17
-
Disposal of The Device (environment) 18
-
Cleaning 19
- Help....20
- General Information ......23
1. Safety Instructions

WARNING:
STRANGULATION HAZARD - Keep the unit and adapter cord more than 1 meter from the cot and out of baby's reach.
NEVER place camera or cords within the cot.
Secure the cord more than 1 meter away from baby's reach.
Never use extension cords with AC Adapters. Only use the AC Adapters provided.
CAMERA SET UP & USE:
● Determine a location for the BABY UNIT that will provide the best view of your baby in his cot.
● Place the BABY UNIT on a flat surface, such as a dresser, bureau, or shelf, or wall mount it securely using the keyhole slots under the stand.
● NEVER place the baby unit or cords within the cot.
- Do not place the baby unit or cords in the cot or within reach of the baby (the unit and cords should be more than 1 meter away).
WARNING
This digital video baby monitor is compliant with all relevant standards regarding electromagnetic fields and is, when handled as described in the User's Guide, safe to use. Therefore, always read the instructions in this User's Guide carefully before using the device.
- Adult assembly is required. Keep small parts away from children when assembling.
• This product is not a toy. Do not allow children to play with it.
• This baby monitor is not a substitute for responsible adult supervision. - Keep this user's guide for future reference.
- Do not place the baby unit or cords in the cot or within the reach of the baby (the unit and cords should be more than 1 meter away.)
-
Keep the cords out of reach of children.
-
Do not cover the baby monitor with a towel or blanket.
- Test this monitor and all its functions so that you are familiar with it prior to actual use.
- Do not use the baby monitor in moist places or close to water.
- Do not install the baby monitor in extreme cold or heat, or in direct sunlight, or close to a heat source.
- Only use the chargers and power adapters provided. Do not use other chargers or power adapters as this may damage the device and battery pack.
- Only insert a battery pack of the same type.
- Do not touch the plug contacts with sharp or metal objects.
- Connect the power adapters to easily accessible mains sockets.
CAUTION
Risk of explosion if battery is replaced by an incorrect type.
Dispose of used batteries according to their instructions.
2. Getting Started
2.1 Baby Unit Power Supply

natural_image
Illustration of a portable electrical device connected to a cylindrical cable via a stand (no text or symbols visible)- Connect the small plug of the power adapter to the baby unit (camera) and the other end to the electrical outlet.
NOTE
Only use the enclosed power adapter (6V DC / 500mA) with the slightly larger DC plug.
-
Slide the ON/OFF switch to the ON position. The power LED will light up in orange.
-
Slide the ON/OFF switch to the OFF position to turn the Baby Unit off.
2.2 Parent Unit Battery Installation
The supplied rechargeable battery pack should be fitted so the parent unit can be moved without losing the link with the camera. Charge the battery in parent unit before first time use or when the parent unit indicates the battery is low.

- Insert the plug of the rechargeable battery pack into the small socket inside the battery compartment as shown above and fit the battery pack into the compartment.
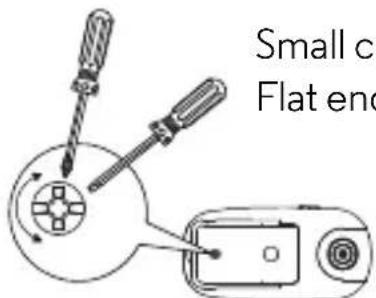
Small cross head or Flat end screwdriver.
- Place the battery cover over the compartment and gently tighten the screw in a clockwise direction using a Small cross head or Flat end screwdriver.
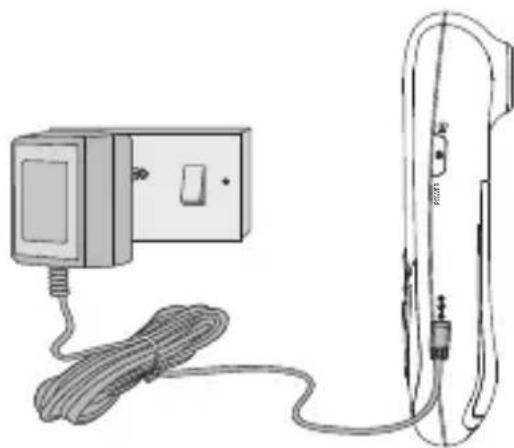
2.3 Parent Unit Power Supply
natural_image
Line drawing of a wall-mounted electrical device connected to a cable, with no visible text or symbols.IMPORTANT
Installing the rechargeable battery pack and charging it fully before use is recommended. This will allow the unit to operate on battery in the event of a power failure, or when moving to a different room.
- Connect the small plug of the power adapter to the parent unit and the other end to the electrical outlet. Only use the enclosed power adapter (6V DC/500mA) with the slightly smaller DC plug.
- Press and hold the POWER ON/OFF button for 1 second to turn ON the parent unit.
-
Once the baby and parent units are switched on, the display on the parent unit will show the video captured by the baby unit.
-
If there is no connection or you are out of range, the video display will go off and the symbol will flash on the LCD display, and the unit will beep every 9 seconds. (If the unit is on scan the 1? symbol displays.) Move the parent unit closer to the baby until the link is re-established.
-
Press and hold the ⏻ POWER ON/OFF button, until the progress bar scrolls fully across, to turn OFF the parent unit.
NOTE
The battery icon turns RED and flashes to indicate that the battery is low, and it gives a beep every 5 seconds. The battery needs to be recharged. Battery pack takes about 16 hours to charge fully.
When charging
- If the parent unit is turned OFF, when the adapter is plugged in, it displays a "mains plug" icon briefly, then a large battery icon with internal segments cycling for 60 seconds, before the display goes blank, but the unit continues to charge. The Blue LED at top left corner lights up to indicate the adapter is plugged in.
- If the parent unit is turned ON, when the adapter is plugged in, the battery icon in the screen's top right corner will show that the battery is charging by cycling the internal segments. The segments stop cycling when the battery is fully charged. The Blue LED at top left corner lights up to indicate the adapter is plugged in.
2.4 Registration (Pairing)
The Baby monitor camera is pre-registered to your Parent Unit. You do not need to register it again unless the Baby Unit loses its link with the Parent Unit.
To re-register your Baby Unit, or register a new Baby Unit, follow the procedure below:
-
Press the OK button of the parent unit and then press the ▼ DOWN button to select the Camera setting icon and press the OK button to enter.
Press the ▼ DOWN button to select ADD CAMERA icon, and press the ≡ button to confirm. -
1 / 2 / 3 / 4 will pop up, press the ▲ UP button or ▼ DOWN button to select the desired Camera identification number and press the ≡ button to start searching for a camera unit. The Green Audio Level LED turns on while searching.
-
Press and hold the PAIR button under the bottom left edge of the camera unit until the parent unit finds the camera, beeps and the video from the camera appears.
NOTE
If a particular Baby Unit was registered previously, registering this current Baby Unit again will overwrite the old registration.
If no camera unit is found within about 30 seconds, the search will end and the parent unit will return to its previous mode.
3. Using the Baby Monitor
3.1 Setting up
- Place the baby unit in a convenient location (e.g. on a table) and point the camera lens towards the area you want to monitor.
- Adjust the baby unit's head angle by rotating the camera up, down, left and right until you are satisfied with the image in the parent unit.
NOTE
Do not place the baby unit within reach of a child or baby(s)! If there is interference with the picture or sound, try moving the units to different locations, and ensure they are not close to other electrical equipment.
3.2 Night Vision Mode
The baby unit has 8 high-intensity infrared LEDs for picking up clear images in the dark. When the built-in photo sensor on the top of the unit detects a low level of ambient light, the LEDs will automatically activate and the screen on the parent unit will display in black and white. The icon will be displayed at the top of the screen.
3.3 Video ON/OFF
Press the VIDEO ON/OFF button ☐ on the parent unit to turn the LCD display on or off, but still leave the audio monitor on.
3.4 Talk Mode
Press and hold the 📋 TALK button on the parent unit to talk to your baby through the baby unit's loudspeaker. The 🔔 icon will be displayed at the top of the LCD screen.
3.5 Touchless Thermometer
The thermometer has been designed for practical use. It is not meant to replace a visit to the doctor. Please also remember to compare the measurement result to your regular body temperature. Please consult with doctor if you have health concerns.
3.5.1 Forehead temperature mode
• Always make sure the probe lens is clean without any damage and the forehead is clean.
- Point the probe tip at about 1 cm away from the central forehead of the baby (Fig. 1)
- Press and hold the Forehead Temperature button until you hear the beep and the reading displays on the LCD screen.
natural_image
Close-up of a baby's face with visible teeth and hair (no text or symbols)Figure 1
Note:
a. Temperature Measurement Range: Forehead temperature mode: 32\~42.2°C (89.6\~108°F)
b. Forehead temperature is displayed in oral mode. This mode converts the forehead temperature to display its "oral-equivalent" value.
c. Before the measurement, please stay in a stable environment for 5 minutes and avoid exercise, bath for 30mins. “Normal” body temperature varies from person to person and changes according to time of day and body location. Hot or cold baths, physical exercise, smoking and drinking hot or cold drinks may change body temperature by one degree or more.
d. Remember to keep the forehead area clean and away from sweat, cosmetics and scar while taking temperature.
e. Holding the device too long may cause a higher ambient temperature ready of the probe. This could make the body temperature measurement lower than actual.
3.5.2 Object Temperature Mode
Point the probe tip at about 1 cm away from the liquid surface. Press and hold the liquid temperature button to the liquid surface temperature like milk or bath tub temperature. The reading will be displayed at the LCD screen.
Note:
a. Temperature Measurement Range: Object temperature mode: -20\~80°C (-7.6\~176°F)
b. Application include temperature measurements for water, milk, cloth, skin or other objects.
c. This mode shows the actual and unadjusted surface temperature which is different from the body temperature.
4. Parent Unit Menu Options
4.1 Volume
- While in monitor mode, press the ▲ UP button or ▼ DOWN button to select the desired volume level from level 1 \~ 8. (The default volume level setting is level 4.)
4.2 Brightness
- Press the OK button and the first menu option will appear.
- To select the BRIGHTNESS icon press the OK button.
- Press the ▲ UP button or ▼ DOWN button to select the desired brightness level from level 1 \~ 8. (The default brightness level setting is level 4.)
- Press the 📄 button to return to the monitor mode or the device will automatic return to the monitor mode after 30 seconds.
4.3 Digital Pan and Tilt
- Press the Pan & Tilt button.
- Press the ▲ UP button or ▼ DOWN button to move the display view up or down, or press the and OK buttons to pan the display view left and right.
4.4 Alarm
- Press the OK button and the first menu option will appear.
- Press the ▼ DOWN button to show the ALARM icon and press button to confirm.
- Press the ▲ UP button or ▼ DOWN button to select the alarm time (6h, 4h, 2h). (The default setting is Alarm OFF (X).)
If an alarm time is selected, the parent unit will beep at the end of the selected 6, 4 or 2 hour period, and the alarm icon will flash red. The alarm is cancelled after about 60 seconds or by pressing any button on the parent unit.
Set the alarm again if you want another alarm call.
4.5 Camera Control
4.5.1 Add (pair) a camera
- Press the OK button and the first menu option will appear.
- Press the ▼ DOWN button to select the Camera setting icon □nd press the ≡ button to enter. Press the ▼ DOWN button to select ADD CAMERA icon □nd press the ≡ button to confirm.
- 1 / 2 / 3 / 4 will pop up, press the ▲ UP button or ▼ DOWN button to select the desired Camera identification number, and press the ≡ button to start searching for a camera unit. The Green Audio Level LED turns on while searching.
- Press and hold the PAIR button underneath the baby unit until the parent unit finds the camera, beeps and the picture from the camera appears.
NOTE
A camera can only be registered to one parent unit at any one time.
4.5.2 View a camera
- Press the OK button and the first menu option will appear.
- Press the ▼ DOWN button to select the Camera setting icon □nd press the ≡ button to enter. Press the ▼ DOWN button to select VIEW CAMERA icon □nd press the ≡ button to confirm.
- 1/2/3/4 will pop up, press the ▲ UP button or ▼ DOWN button to select the desired Camera unit, and press the ≡ button to view the picture from that camera.
TIP
Quick Method to View Cameras instead of using the menu.
Directly press repeatedly to select 1/2/3/4or.
4.5.3 Delete a camera
- Press the OK button and the first menu option will appear.
- Press the ▼ DOWN button to select the Camera setting icon □nd press the ≡ button to enter. Press the ▼ DOWN button to select DELETE CAMERA icon □nd press the ≡ button to confirm.
- 1 / 2 / 3 / 4 will pop up, press the ▲ UP button or ▼ DOWN button to select the desired Camera unit, press the ≡ button then press the ▼ DOWN button to select the DELETE CAM icon ✗
- Press the OK button to confirm the deletion or RETURN button to exit.
NOTE
You cannot delete the camera if it is the only camera paired in the system.
4.5.4 Scan the cameras
- Press the ⚪ button and the first menu option will appear.
- Press the ▼ DOWN button to select the Camera setting icon and press the ≡ button to enter. Press the ▼ DOWN button to select and choose the symbol for scan selection.
- The screen will then display images from each registered cameras in a loop, changing about every 10 seconds.
TIP
Quick Method to View Cameras instead of using the menu.
Directly press repeatedly to select 1/2/3/4 or ↗.
NOTE
If the parent unit is in scan mode and one of the registered cameras is turned off or out of range, the scan will stop at the missing camera
(e.g. camera) and display the 3? icon while emitting a warning beep every 8 seconds.
WARNING
Check the camera and correct the fault immediately if you are using that camera to monitor your baby.
If you want to continue in camera scan mode without that camera, delete the camera (see 4.5.3 Delete a camera) and start the scan again.
4.6 Body temperature measurement review
- Press the ⋯ button and the first menu option will appear.
- Press the ▼ DOWN button to show the record icon 🔴 and press OK button to confirm.
- Press ▼ button to review previous measurement record (body temperature only).
4.7 Change of Measurement Scale
- Press the ⬆ OK button and the first menu option will appear.
- Press the ▼ DOWN button to show the Thermometer icon 🔊 and press OK button to confirm.
- Press the OK button to show the C/F selection icon °C and °F.
- Press the ▲ UP button or ▼ DOWN button to select.
5. Disposal of The Device (environment)
At the end of the product lifecycle, you should not dispose of this product with normal household waste. Take this product to a collection point for the recycling of electrical and electronic equipment. The symbol on the product, user's guide and/or box indicates this.

natural_image
Symbol of a trash bin with crossed lines indicating no waste or discharge (no text or labels)Some of the product materials can be reused if you take them to a recycling point. By reusing some parts or raw materials from used products you make an important contribution to the protection of the environment.
Please contact your local authorities in case you need more information on the collection points in your area.
Dispose of the battery pack in an environmentally-friendly manner according to your local regulations.
6. Cleaning
Clean the MBP27T, MBP27T/2, MBP27T/3, MBP27T/4 with a slightly damp cloth or with an anti-static cloth.
Never use cleaning agents or abrasive solvents.
Cleaning and care
- Do not clean any part of the product with thinners or other solvents and chemicals – this may cause permanent damage to the product which is not covered by the warranty.
- Please make sure the probe is clean to ensure an accurate reading.
- The probe tip is the most delicate part of the thermometer. Use with care when cleaning the probe tip to avoid damage.
- Use the 70% alcohol swab or the soft cotton moistened with the 70% alcohol to clean the probe lens.
- Allow the probe to fully dry for at least 1 minute.
- Keep the unit dry and away from any liquids and direct sunlight.
- The device should not be submerged into liquids.
- Keep your MBP27T, MBP27T/2, MBP27T/3, MBP27T/4 away from hot, humid areas or strong sunlight, and don't let it get wet.
- Every effort has been made to ensure high standards of reliability for your MBP27T, MBP27T/2, MBP27T/3, MBP27T/4. However, if something does go wrong, please do not try to repair it yourself – contact Customer Service for assistance.
7. Help
Display
No display
- Try recharging or replacing the battery pack.
- Reset the units. Disconnect the battery pack of the parent unit and unplug both the units' electrical power, then plug them back in.
- Is the unit turned on? Press and hold the ON/OFF button ⏻ on the parent unit to turn it ON.
- Is the correct camera selected? Change the camera number, if necessary.
- Is the video display turned on? Press the VIDEO ON/OFF button 📋 to turn it on.
- When operating using batteries only, the Display will go blank after 4 minutes to save power. The unit is still active and will give you audio alerts. You can reactivate the screen by pressing any button.
Registration
If the Baby Unit has lost its link with the Parent Unit
- Try recharging or replacing the battery pack.
- If the Baby Unit is too far away it may be going out of range, so move the Baby Unit closer to the Parent Unit.
- Reset the units by disconnecting them from the battery and electrical power. Wait about 15 seconds before reconnecting. Allow up to one minute for the Baby Unit and the Parent Unit to synchronise.
• See 2.4 Registration (Pairing), if there is a need to re-register the units.
Interference
Noise interference on your parent unit
- Your baby and parent units may be too close. Move them farther apart.
- Make sure there is at least 1 to 1.5 meters (3 to 4.5 feet) between the 2 units to avoid audio feedback.
- If the baby unit is too far away it may be out of range, so move the baby unit closer to the parent unit.
- Make sure the baby and parent units are not near other electrical equipment, such as a television, computer or cordless/mobile telephone.
- Use of other 2.4 GHz products, such as wireless networks (Wi-Fi ^ routers), Bluetooth ^ systems, or microwave ovens, may cause interference with this product, so keep the baby monitor away at least 1.5m from these types of products, or turn them off if they appear to be causing interference.
- If the signal is weak, try moving the Parent and/or Baby Unit to different positions in the rooms.
Reasons of Measurement Error
- Dirty probe tip
Please refer to the cleaning process in the manual to make sure the cleanness of probe tip. - Unstable human status, such as: hot or cold baths, physical exercise, smoking and drinking hot or cold drinks ... etc.
Please avoid exercise, bath for 30mins, and keep the forehead clean & dry before measurement. - Unstable environment, such as: the vent of air conditioning or fan.
Please stay in door and do not stay in the area where the temperature of skin would be influenced. - Wrong measurement area
Users should measure the correct position as Fig. 1 shown on page 13. - Wrong measurement way
When scanning, the probe should face the Middle of Forehead area & the measurement distance should be as close as possible. - Holding the thermometer too long
This may cause the temperature measurement result lower than usual.
Error Message
| Problem Solution | ||
 | The system is not functioning properly. | Repower it. If the message reappears, contact the retailer for service. |
 | The ambient temperature is not within the range between 10°C and 40°C (50°F ~104°F). | Allow the thermometer to rest in a room for at least 30 minutes at room temperature: 10°C and 40°C (50°F ~104°F). |
 | (1) In forehead mode: Temperature taken is higher than +42.2°C (108°F)(2) In surface mode: Temperature taken is higher than +80°C (176°F) | Please select the target within specifications. If a malfunction still exists, please contact the nearest retailer. |
 | (1) In forehead mode: Temperature taken is lower than +32°C (89.6°F)(2) In surface mode: Temperature taken is lower than -20°C (-7.6°F) |
8. General Information
If your product is not working properly....
- Read this User's Guide or the Quick Start Guide.
- Contact Customer Service:
UK 0845 218 0890
ROI 08187 62092
To order a replacement battery pack, contact customer service.
Consumer Products and Accessories Limited Warranty ("Warranty: 12 months")
Thank you for purchasing this Motorola branded product manufactured under license by Binatone Electronics International LTD ("BINATONE").
What Does this Warranty Cover?
Subject to the exclusions contained below, BINATONE warrants that this Motorola branded product ("Product") or certified accessory ("Accessory") sold for use with this product that it manufactured to be free from defects in materials and workmanship under normal consumer usage for the period outlined below. This Warranty is your exclusive warranty and is not transferable.
Who is covered?
This Warranty extends only to the first consumer purchaser, and is not transferable.
What will BINATONE do?
BINATONE or its authorised distributor at its option and within a commercially reasonable time, will at no charge repair or replace any Products or Accessories that does not conform to this Warranty. We may use functionally equivalent reconditioned/ refurbished/ pre-owned or new Products, Accessories or parts.
What Other Limitations Are There?
ANY IMPLIED WARRANTIES, INCLUDING WITHOUT LIMITATION THE IMPLIED WARRANTIES OF MERCHANTABILITY AND FITNESS FOR A PARTICULAR PURPOSE, SHALL BE LIMITED TO THE DURATION OF THIS LIMITED WARRANTY, OTHERWISE THE REPAIR OR REPLACEMENT PROVIDED UNDER THIS EXPRESS LIMITED WARRANTY IS THE EXCLUSIVE REMEDY OF THE CONSUMER, AND IS PROVIDED IN LIEU OF ALL OTHER WARRANTIES, EXPRESS OR IMPLIED. IN NO EVENT SHALL MOTOROLA OR BINATONE BE LIABLE, WHETHER IN CONTRACT OR TORT (INCLUDING NEGLIGENCE) FOR DAMAGES IN EXCESS OF THE PURCHASE PRICE OF THE PRODUCT OR ACCESSORY, OR FOR ANY INDIRECT, INCIDENTAL, SPECIAL OR CONSEQUENTIAL DAMAGES OF ANY KIND, OR LOSS OF REVENUE OR PROFITS, LOSS OF BUSINESS, LOSS OF INFORMATION OR OTHER FINANCIAL LOSS ARISING OUT OF OR IN CONNECTION WITH THE ABILITY OR INABILITY TO USE THE PRODUCTS OR ACCESSORIES TO THE FULL EXTENT THESE DAMAGES MAY BE DISCLAIMED BY LAW.
Some jurisdictions do not allow the limitation or exclusion of incidental or consequential damages, or limitation on the length of an implied warranty, so the above limitations or exclusions may not apply to you. This Warranty gives you specific legal rights, and you may also have other rights that vary from one jurisdiction to another.
| Products Covered Length of Coverage | |
| Consumer Products One (1) year from the date of the products original purchase by the first consumer purchaser of the product. | |
| Consumer Accessories | Ninety (90) days from the date of the accessories original purchase by the first consumer purchaser of the product. |
| Consumer Products and Accessories that are Repaired or Replaced | The balance of the original warranty or for Ninety (90) days from the date returned to the consumer, whichever is longer. |
Exclusions
Normal Wear and Tear. Periodic maintenance, repair and replacement of parts due to normal wear and tear are excluded from coverage.
Batteries. Only batteries whose fully charged capacity falls below 80% of their rated capacity and batteries that leak are covered by this Warranty.
Abuse & Misuse. Defects or damage that result from: (a) improper operation, storage, misuse or abuse, accident or neglect, such as physical damage (cracks, scratches, etc.) to the surface of the product resulting from misuse; (b) contact with liquid, water, rain, extreme humidity or heavy perspiration, sand, dirt or the like, extreme heat, or food; (c) use of the Products or Accessories for commercial purposes or subjecting the Product or Accessory to abnormal usage or conditions; or (d) other acts which are not the fault of MOTOROLA or BINATONE, are excluded from coverage.
Use of Non-Motorola branded Products and Accessories. Defects or damage that result from the use of Non-Motorola branded or certified Products or Accessories or other peripheral equipment are excluded from coverage.
Unauthorised Service or Modification. Defects or damages resulting from service, testing, adjustment, installation, maintenance, alteration, or modification in any way by someone other than MOTOROLA, BINATONE or its authorised service centres, are excluded from coverage.
Altered Products. Products or Accessories with (a) serial numbers or date
tags that have been removed, altered or obliterated; (b) broken seals or that show evidence of tampering; (c) mismatched board serial numbers; or (d) nonconforming or non-Motorola branded housings, or parts, are excluded from coverage.
Communication Services. Defects, damages, or the failure of Products or Accessories due to any communication service or signal you may subscribe to or use with the Products or Accessories is excluded from coverage.
How to Obtain Warranty Service or Other Information?
To obtain service or information, please call:
UK 0845 218 0890
ROI 08187 62092
You will receive instructions on how to ship the Products or Accessories at your expense and risk, to a BINATONE Authorised Repair Centre.
To obtain service, you must include: (a) the Product or Accessory; (b) the original proof of purchase (receipt) which includes the date, place and seller of the Product; (c) if a warranty card was included in your box, a completed warranty card showing the serial number of the Product; (d) a written description of the problem; and, most importantly; (e) your address and telephone number.
These terms and conditions constitute the complete warranty agreement between you and BINATONE regarding the Products or Accessories purchased by you, and supersede any prior agreement or representations, including representations made in any literature publications or promotional materials issued by BINATONE or representations made by any agent employee or staff of BINATONE, that may have been made in connection with the said purchase.
Manufacture Date: as the serial number (please open the battery cover, it is shown on the inside of the device.)
NOTE
The thermometer is calibrated at the time of manufacture. If at any time you question the accuracy of temperature measurements, please contact the dealers or nearest service address.

Foshan Shunde Alford Electronics Co Ltd
Add: Xinjiao Industrial Park, Daliang,
Shunde, Foshan City, Guangdong province,
China.

Shanghai International Trading Corp. GmbH (Hamburg)
Add: Eiffestrasse 80, 20537 Hamburg, Germany




Ref No.: 112013
| Symbol Descriptions | |
| [WX34] | The CE mark and Notified Body Registration Numbers, the requirement of Annex II from Medical Device Directive 93/42/EEC are met. |
 | Caution |
 | BF type applied part |
 | Indicates this device is subject to the Waste Electrical and Electronic Equipment Directive in the European Union. To protect the environment, dispose of useless device at appropriate collection sites according to national or local regulations. |
 | Please read the instructions for use |
 | Battery Recycling |
 | Authorized representative in the European community |
 | Manufacturer |
 | Paper Recycling |
| Guidance and manufacturer's declaration - electromagnetic emissions | ||
| The MBP27T/MBP27T-2/MBP27T-3/MBP27T-4 is intended for use in the electromagnetic environment specified below. The customer or the user of the MBP27T/MBP27T-2/MBP27T-3/MBP27T-4 should assure that it is used in such an environment. | ||
| Emissions test Compliance Electromagnetic environment - guidance | ||
| RF emissionsCISPR 11 | Group 1 The MBP27T/MBP27T-2/MBP27T-3/MBP27T-4 uses RF energy only for its internal function. Therefore, its RF emissions are very low and are not likely to cause any interference in nearby electronic equipment. | |
| RF emissionsCISPR 11 | Class B | The MBP27T/MBP27T-2/MBP27T-3/MBP27T-4 is suitable for use in all establishments, including domestic establishments and those directly connected to the public low-voltage power supply network that supplies buildings used for domestic purposes. |
| Harmonic emissionsIEC 61000-3-2 | Not applicable | |
| Voltage fluctuations/flicker emissionsIEC 61000-3-3 | Not applicable | |
EC Declaration of Conformity
We the manufacturer / Importer : Binatone Telecom Plc
1 Apsley Way London
NW2 7HF, United Kingdom.
Declare under our sole responsibility that the following product
Type of equipment:
Digital Baby Monitor
Model Name: MBP27T, MBP27T/2, MBP27T/3, MBP27T/4
Country of Origin:
China
Brand:
Motorola
complies with the essential protection requirements of R&TTE Directive 1999/5/EC on the approximation of the laws of the Member States relating to Radio Spectrum Matters, the Council Directive 2004/108/EC on the approximation of the laws of the Member States relating to electromagnetic compatibility (EMC) and the European Community Directive 2006/95/EC relating to Electrical Safety. Directive 2011/65/EC on the restriction of use of hazardous substances (RoHS) and 2009/125/EC relating to ecodesign requirement for Energy-Related Products (ErP).
Assessment of compliance of the product with the requirements relating to the essential requirements according to Article 3 R&TTE was based on Annex III of the Directive 1999/5/EC and the following standard:
Radio Spectrum: EN300328 V1.7.1:2006
EMC: EN301489-17 V2.2.1:2009,
EN301489-1 V1.8.1:2008
Electrical Safety:
EN60950-1/A12: 2011
RF safety:
EN62311/EN62479
Medical:
IEC 60601-1:2005+A1:2012
IEC 60601-2:2007
IEC 60601-1-11:2010
IEC80601-2-56:2009
The product is labelled with the European Approval Marking CE as show. Any Unauthorized modification of the product voids this Declaration.


Manufacturer / Importer (Signature of authorized person)

London, 24 Sept, 2013
| Guidance and manufacturer's declaration - electromagnetic immunity | |||
| The MBP27T/MBP27T-2/MBP27T-3/MBP27T-4 is intended for use in the electromagnetic environment specified below. The customer or the user of the MBP27T/MBP27T-2/MBP27T-3/MBP27T-4 should assure that it is used in such an environment. | |||
| Immunity test IEC 60601 test level | Compliance level | Electromagnetic environment - guidance | |
| Conducted RFIEC 61000-4-6Radiated RFIEC 61000-4-3 | 3 Vrms150 kHz to 80 MHz3 V/m80 MHz to 2,5 GHz | Not applicable3 V/m | Portable and mobile RF communications equipment should be used no closer to any part of the MBP27T/MBP27T-2/MBP27T-3/MBP27T-4, including cables, than the recommended separation distance calculated from the equation applicable to the frequency of the transmitter.Recommended separation distanced=1,2√Pd=1,2√P80MHzto800MHzd=2,3√800MHz to 2,5 GHzwhere P is the maximum output power rating of the transmitter in watts (W) according to the transmitter manufacturer and d is therecommended separation distance in meters (m).Field strengths from fixed RF transmitters, as determined by an electromagnetic site survey, a should be less than the compliance level in each frequency range b.Interference may occur in the vicinity of equipment marked with the following symbol: |
| NOTE 1 At 80 MHz and 800 MHz, the higher frequency range applies.NOTE 2 These guidelines may not apply in all situations. Electromagnetic propagation is affected by absorption and reflection from structures, objects and people. | |||
| a. Field strengths from fixed transmitters, such as base stations for radio (cellular/cordless) telephones and land mobile radios, amateur radio, AM and FM radio broadcast and TV broadcast cannot be predicted theoretically with accuracy. To assess the electromagnetic environment due to fixed RF transmitters, an electromagnetic site survey should be considered. If the measured field strength in the location in which the MBP27T/MBP27T-2/MBP27T-3/MBP27T-4 is used exceeds the applicable RF compliance level above, the MBP27T/MBP27T-2/MBP27T-3/MBP27T-4 should be observed to verify normal operation. If abnormal performance is observed, additional measures may be necessary, such as reorienting or relocating the MBP27T/MBP27T-2/MBP27T-3/MBP27T-4.b. Over the frequency range 150 kHz to 80 MHz, field strengths should be less than 3 V/m. | |||
| Guidance and manufacturer's declaration - electromagnetic immunity | |||
| The MBP27T/MBP27T-2/MBP27T-3/MBP27T-4 is intended for use in the electromagnetic environment specified below. The customer or the user of the MBP27T/MBP27T-2/MBP27T-3/MBP27T-4 should assure that it is used in such an environment. | |||
| Immunity test IEC 60601 test level | Compliance level | Electromagnetic environment – guidance | |
| Electrostatic discharge (ESD)IEC 61000-4-2 | 6 kV contact8 kV air | 6 kV contact8 kV air | Floors should be wood, concrete or ceramic tile. If floors are covered with synthetic material, the relative humidity should be at least 30 %. |
| Electrical fast transient/burstIEC 61000-4-4 | 2 kV for power supply lines1 kV for input/output lines | Not applicable Mains power quality should be that of a typical commercial or hospital environment. | |
| SurgeIEC 61000-4-5 | 1 kV line(s) to line(s)2 kV line(s) to earth | Not applicable Mains power quality should be that of a typical commercial or hospital environment. | |
| interruptions and voltage variations on power supply input linesIEC 61000-4-11 | <5 % UT(>95 % dip in UT)for 0,5 cycle40 % UT(60 % dip in UT)for 5 cycles70 % UT(30 % dip in UT)for 25 cycles<5 % UT(>95 % dip in UT)for 5 sec | Not applicable Mains power quality should be that of a typical commercial or hospital environment. If the user of the MBP27T/MBP27T-2/MBP27T-3/MBP27T-4 requires continued operation during power mains interruptions, it is recommended that the MBP27T/MBP27T-2/MBP27T-3/MBP27T-4 be powered from an uninterruptible power supply or a battery. | |
| Power frequency (50/60 Hz)magnetic fieldIEC 61000-4-8 | 3 A/m 3 A/m Power frequency magnetic fields should be at levels characteristic of a typical location in a typical commercial or hospital environment. | ||
| NOTE UT is the a.c. mains voltage prior to application of the test level. | |||
| Recommended separation distances between portable and mobile RF communications equipment and the ME EQUIPMENT or ME SYSTEM | |||
| The MBP27T/MBP27T-2/MBP27T-3/MBP27T-4 is intended for use in an electromagnetic environment in which radiated RF disturbances are controlled. The customer or the user of the MBP27T/MBP27T-2/MBP27T-3/MBP27T-4 can help prevent electromagnetic interference by maintaining a minimum distance between portable and mobile RF communications equipment (transmitters) and the MBP27T/MBP27T-2/MBP27T-3/MBP27T-4 as recommended below, according to the maximum output power of the communications equipment. | |||
| Rated maximum output power of transmitter W | Separation distance according to frequency of transmitter m | ||
| 150 kHz to 80 MHz d = 1,2 | 80 MHz to 800 MHz d = 1,2 | 800 MHz to 2,5 GHz d = 2,3 | |
| 0,01 0,12 0,12 0 | 23 | ||
| 0,1 0,38 0,38 0 | 73 | ||
| 1 | 1 | , | 2 |
| 10 3,8 3,8 7,3 | |||
| 100 12 12 23 | |||
| For transmitters rated at a maximum output power not listed above, the recommended separation distance d in meters (m) can be estimated using the equation applicable to the frequency of the transmitter, where P is the maximum output power rating of the transmitter in watts (W) according to the transmitter manufacturer.NOTE 1 At 80 MHz and 800 MHz, the separation distance for the higher frequency range applies.NOTE 2 These guidelines may not apply in all situations. Electromagnetic propagation is affected by absorption and reflection from structures, objects and people. | |||
Technical Specifications
Baby unit
Frequency 2.4 GHz to 2.48 GHz
Image sensor colour CMOS 0.3M Pixels
Lens f 2.5mm, F 2.4
IR LED 8 pcs
Power Adapter: 5E-AD 060050-U; Input: 100-240V,
50/60Hz 300mA; Output: 6V, 500mA
OR
Adapter: BLJ5W060050P; Input: 100-240V,
50/60Hz 150mA; Output: 6V, 500mA
WARNING
Use only with provided power supply.
Parent unit
| Frequency 2.4 GHz to 2.48 GHz | |
| Display 2.35" diagonal | |
| Display colours 16M colour LCD | |
| Brightness control 8 steps | |
| Volume control 8 steps | |
| Power Adapter: 5E-AD 060050-U; Input: 100-240V,50/60Hz 150mA; Output: 6V, 500mAORAdapter: BLJ5W060050P; Input: 100-240V,50/60Hz 150mA; Output: 6V, 500mAWARNINGUse only with provided power supply.ORBattery: Model - JUSTHIGH Ni-MH AAA 3 x 1.2V900mAh rechargeable battery packWARNINGDo not use non-rechargeable batteries for the Parent Unit. Risk of explosion if battery is replaced by an incorrect type. Dispose of used batteries according to the instructions. | |
| Temperature measurement range of the touchless thermometer | Forehead mode: 32~42.2°C (89.6~108°F)Surface mode: -22~80°C (-4~176°F) |
| Accuracy Forehead mode: ±0.3°C (0.5°F). This thermometerconverts the forehead temperature to display its "oral equivalent."Surface mode: ±0.3°C (0.5°F) within 22~42.2°C(71.6~108°F), others ±4% or ±2°C (4°F) whichever is greater |
Enclosure rating IP22
| Compliance Comply with ASTM E1965-98, IEC/EN60601-1-2(EMC), IEC/EN60601-1(Safety) standards. |
| Note The device should not submerge into any liquids andexpose it to direct moisture.There is no gender and age limitation for using theinfrared thermometer. |

motorola
Manufactured, distributed or sold by Binatone Electronics International LTD., official licensee for this product. MOTOROLA and the Stylized M Logo, are trademarks or registered trademarks of Motorola Trademark Holdings, LLC. and are used under license. All other trademarks are the property of their respective owners.
© 2013 Motorola Mobility LLC. All rights reserved.
Printed in China


- motorola
- User's Guide
- Welcome...
- to your new Motorola Baby Monitor!
- Got everything?
- Overview of the Parent Unit
- Parent unit menu icons
- Overview of Your Baby Unit
- Important guidelines for installing your Baby Monitor
- Table of contents
- Safety Instructions
- WARNING:
- CAMERA SET UP & USE:
- WARNING
- CAUTION
- Getting Started
- Baby Unit Power Supply
- NOTE
- Parent Unit Battery Installation
- Parent Unit Power Supply
- IMPORTANT
- When charging
- Registration (Pairing)
- Using the Baby Monitor
- Setting up
- Night Vision Mode
- Video ON/OFF
- Talk Mode
- Touchless Thermometer
- Forehead temperature mode
- Note:
- Object Temperature Mode
- Parent Unit Menu Options
- Volume
- Brightness
- Digital Pan and Tilt
- Alarm
- Camera Control
- Add (pair) a camera
- View a camera
- TIP
- Delete a camera
- Scan the cameras
- Body temperature measurement review
- Change of Measurement Scale
- Disposal of The Device (environment)
- Cleaning
- Cleaning and care
- Help
- Display
- No display
- Registration
- If the Baby Unit has lost its link with the Parent Unit
- Interference
- Noise interference on your parent unit
- Reasons of Measurement Error
- General Information
- Consumer Products and Accessories Limited Warranty ("Warranty: 12 months")
- What Does this Warranty Cover?
- Who is covered?
- What will BINATONE do?
- What Other Limitations Are There?
- Exclusions
- How to Obtain Warranty Service or Other Information?
- EC Declaration of Conformity
- Technical Specifications
- Baby unit
Brand : MOTOROLA
Model : MBP27T-4
Category : Baby monitor