
Pinguino PAC A120E - Air Conditioning DELONGHI - Free user manual and instructions
Find the device manual for free Pinguino PAC A120E DELONGHI in PDF.


| Product Type | Portable Air Conditioner |
| Brand | DeLonghi |
| Model | Pinguino PAC A120E |
| Cooling Capacity (BTU/h) | 12,000 |
| Cooling Capacity (kW) | 3.5 |
| Power Supply | 230 V ~ 50 Hz |
| Power Consumption (Cooling) | Approx. 1,300 W |
| Refrigerant | R290 (propane) or R410A |
| Dimensions (W x D x H) | 450 x 350 x 750 mm |
| Weight | 30 kg |
| Noise Level | 55 dB(A) |
| Airflow Volume | 400 m³/h |
| Functions | Cooling, Dehumidification, Fan, Sleep Mode, Timer |
| Control | Remote Control and Digital Display |
| Exhaust Hose Length | 1.5 m (extendable) |
| Window Kit | Included |
| Castor Wheels | Yes |
| Maintenance | Washable air filter; clean every 2 weeks |
| Safety Features | Overheat protection, auto restart after power failure |
| Spare Parts | Air filter, remote control, exhaust hose adapter |
| Energy Efficiency | EER: 2.7 (approx.) |
Frequently Asked Questions - Pinguino PAC A120E DELONGHI
User questions about Pinguino PAC A120E DELONGHI
0 question about this device. Answer the ones you know or ask your own.
Ask a new question about this device
Download the instructions for your Air Conditioning in PDF format for free! Find your manual Pinguino PAC A120E - DELONGHI and take your electronic device back in hand. On this page are published all the documents necessary for the use of your device. Pinguino PAC A120E by DELONGHI.
USER MANUAL Pinguino PAC A120E DELONGHI
IMPORTANT SAFEGUARDS
- Use this appliance only as described in this instruction manual.
As with any electrical appliance, the instructions aim to cover as many eventualities as possible.
Caution and common sense should be used when operating and installing this air conditioner. - This appliance has been manufactured to cool and dehumidify domestic environments and should not be used for other purposes.
- I t is dangerous to alter or modify the unit's characteristics in any way.
- The appliance must be installed in line with the relevant national legislation.
- Should repairs be necessary, contact the nearest authorized Repair Service Center. Unauthorized servicing can be dangerous.
- The appliance is not intended for use by persons (including children) with reduced physical, sensory or mental capabilities, or lack of experience and knowledge, unless they have been given supervision or instruction concerning use of the appliance by a person responsible for their safety. Children should be supervised to ensure that they do not play with the appliance.
- In the case that the power cord becomes damaged, this must be substituted only by specialized personnel authorized by the manufacturer, to protect against fire.
- Always ensure the appliance is grounded. If you have any doubts check with a qualified electrician.
- We strongly discourage the use of an extension cord due to potential safety hazards for temporary situations, use only CSA certified and UL listed 3-wire grounded extension cord, attachment plug and connector, rated 15A, 125V
- Before cleaning or maintenance operations, always unplug the unit from the outlet.
- Do not pull on or place strain on the power cord when moving the appliance.
- The appliance should not be installed where the atmosphere may contain combustible gases, oil or sulphur, or near heat sources.
- Do not rest hot or heavy objects on the appliance.
- Clean the filters at least once a week.
• A void using heaters near the unit. - The unit should be transported in a vertical position. If this is not possible secure the unit at an angle, do not lie it horizontally.
- Before transporting the unit, drain the unit. After transportation, wait at least 4 hour before switching the unit on.
- The packaging materials can be recycled. You are therefore recommended to place them in the special containers for differentiated waste collection.
- This appliance is fitted with a special safety device. When the compressor switches off, this device prevents it from switching on again for at least 3 minutes.
SAVE THESE INSTRUCTIONS
THIS PRODUCT IS FOR HOUSEHOLD ONLY
DESCRIPTION
1 air outlet grille
2 control panel
3 remote control receiver
4 castors
5 handles
6 filter
7 evaporator air intake grille
8 air exhaust hose housing
9 drainage hose
10 power cable
11 wall flange
12 sucker
13 air exhaust hose
14 window outlet
15 castor locks
16 remote control unit
17 window bracket with locking pins
INSTALLING YOUR PORTABLE AIR-CONDITIONER
ELECTRICAL CONNECTIONS
Before plugging the appliance into the mains socket, check that:
• The mains power supply corresponds to the value indicated on the rating plate on the back of the appliance;
• The mains socket and electrical circuit are adequate for the appliance;
• The mains socket matches the plug. If this is not the case, have the plug replaced;
• The mains socket is adequately earthed.
Failure to follow these important safety instructions absolves the manufacturer of all liability.
The power cable must be replaced by a qualified professional only.
The instructions below will enable you to prepare your air conditioner for operation as efficiently as possible.
Before use, make sure the air intake and outlet grilles are unobstructed.
AIR-CONDITIONING WITHOUT INSTALLATION
Just a few simple steps and your comfort is ensured with your air conditioner:
- Fit the air exhaust hose in the housing
8 at the back of the appliance.
Insert it as shown in figure A.

For optimum results:
- If you have a sash window, place the bracket d7 the window sill, extend the bracket fully within the window frame, fix the bracket by using the pin then lower the window onto the bracket. Insert the window outlet d4 the exhaust hose into the slot, then connect the hose to the air conditioner (fig. B).

Thanks to the locking pins, it's possible to use the window bracket also for sliding windows. Position the hole of the bracket so to allow a correct installation of the exhaust hose (see figure C).

- If you have a double window, use the sucker provided to hold the two parts of the window together (fig. D).
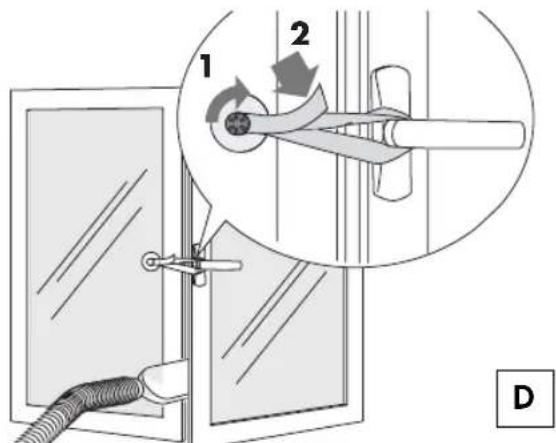
Keep the air hoses as short and free of curves as possible to avoid constrictions
Preparing for use
SEMI-PERMANENT INSTALLATION
If required, your appliance can also be installed semi-permanently (Fig. E).
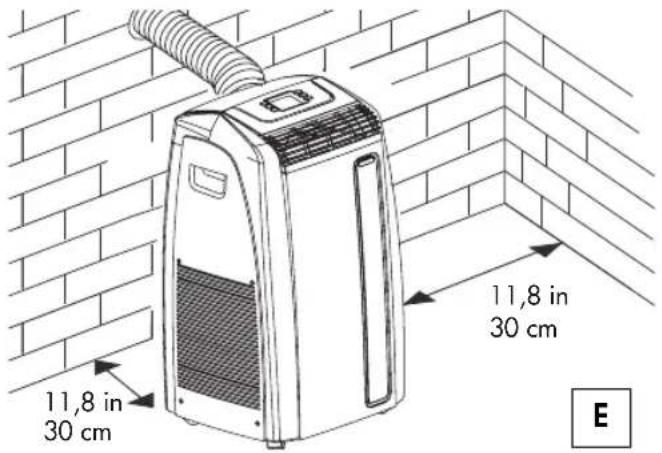
Proceed as follows:
- Drill a hole 5,25 inches ( 134 mm) in an outside wall or through a window pane. Respect the dimensions and height of the hole given in figure F and G.

- Fit the wall flange into the hole.
- Fit the air exhaust hose in 18e relevant hose located on the rear side of the appliance (fig. A page 5).
- Fit the end of the hose to the wall flange as shown in fig. G.
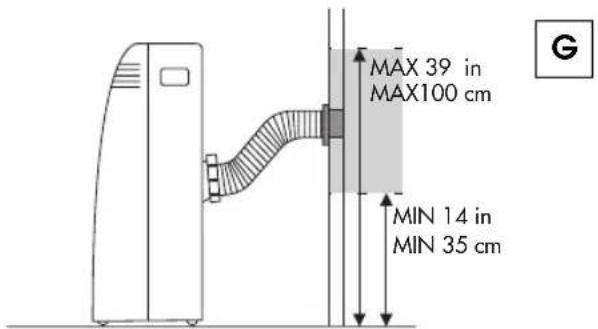
When the hose (9) is not fitted, the drilled hole can be closed with the flange cap (11).
NOTE: When installing the air conditioner semi-permanently, you should leave a door slightly open as little as 1/2" (1 cm) to guarantee correct ventilation.
Keep the air hoses as short and free of curves as possible to avoid constrictions.
As special tools are required for installation, we suggest you let install the appliance by specialized personnel.
Control panel
THE CONTROL PANEL
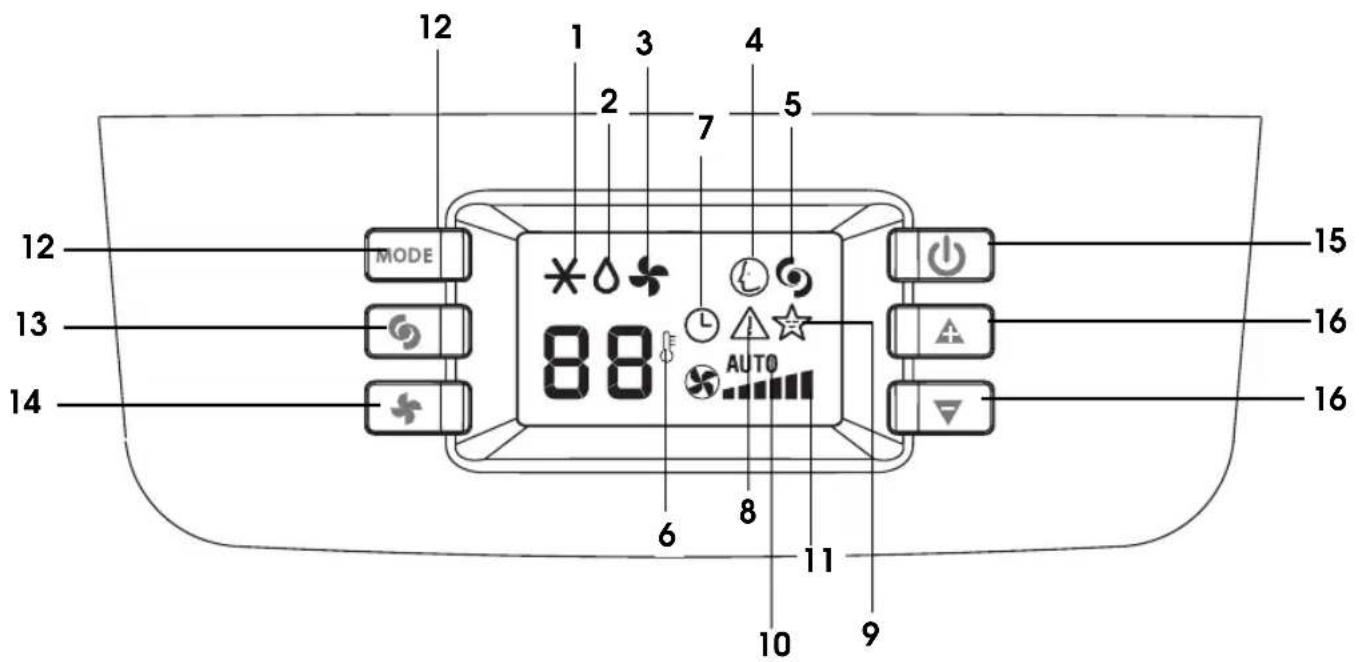
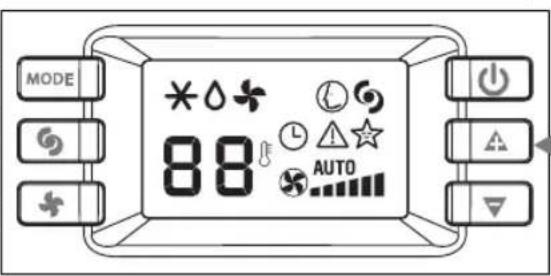
DESCRIPTION OF THE CONTROL PANEL
1 Air conditioning symbol
2 Dehumidifying symbol
3 Fan symbol
4 SMART symbol
5 BOOST symbol
6 T emperature indicator
7 Timer symbol
8 Alarm symbol
9 S LEEP symbol
10 AUTOFAN indicator
11 Speed indicator
12 MODE button (selects the modes)
13 BOOST button
14 FAN button
15 ON/Standby button
16 Increase (+) and decrease (-) temperature button
The control panel enables you to manage all the main functions of the appliance, but to fully exploit its potential, you must use the remote control unit.
TURNING THE APPLIANCE ON
- Plug into the mains socket. Two lines appear on the display indicating that the appliance is in standby mode.
- Press the ⏻ (15) button until the appliance comes on. The last function active when it was turned off will appear.


Never turn the air conditioner off by unplugging from the mains. Always press the ⏻ button, then wait for a few minutes before unplugging. This allows the appliance to perform a cycle of checks to verify operation.
Operation

AIR CONDITIONING MODE
Ideal for hot muggy weather when you need to cool and dehumidify the room.
To set this mode correctly:
- Press the MODE button a number of times until the air-conditioning symbol appears.
- Select the target temperature by pressing the + or ▼ button until the corresponding value is displayed.
- Select the required fan speed by pressing the FAN button. Four speeds are available:

Maximum speed: to achieve the target temperature as rapidly as possible

Medium speed: reduces noise levels but still maintains a good level of comfort

Low speed: for silent operation

AUTO: the appliance automatically selects the most suitable fan speed in relation to the temperature set on the digital display.
The most suitable temperature for the room during the summer varies from 75° F to 81° F (24 to 27° C). You are recommended, however, not to set a temperature much below the outdoor temperature.


DEHUMIDIFYING MODE
Ideal to reduce room humidity (spring and autumn, damp rooms, rainy periods, etc).
In dehumidifying mode, the appliance should be prepared in the same way as for air conditioning, with the air exhaust hose attached to enable the moisture to be discharged outside.
To set this mode correctly:
- Press the MODE button a number of times until the dehumidifying symbol appears.
In this mode, fan speed is selected automatically by the appliance and cannot be set manually.

Operation

FAN MODE
When using the appliance in this mode, the air hose does not need to be attached.
To set this mode correctly:
- Press the MODE button a number of times until the fan symbol appears.
- Select the required fan speed by pressing the FAN button. Three speeds are available:


Maximum speed: for maximum fan power

Medium speed: reduces noise levels but still maintains a good level of comfort

Low speed: for silent operation
In this mode, AUTO speed cannot be selected.

SMART MODE
The appliance chooses automatically whether to operate in air conditioning or fan. Fan speed is also set automatically according to the conditions.
To set this mode:
- Press the MODE button a number of times until the SMART symbol appears.


BOOST FUNCTION
Ideal for the summer to cool rooms rapidly.
To set this mode:
- Press the button.
The appliance operates in air conditioning mode at maximum fan speed. While this function is selected, it is not possible to set the temperature or change fan speed.

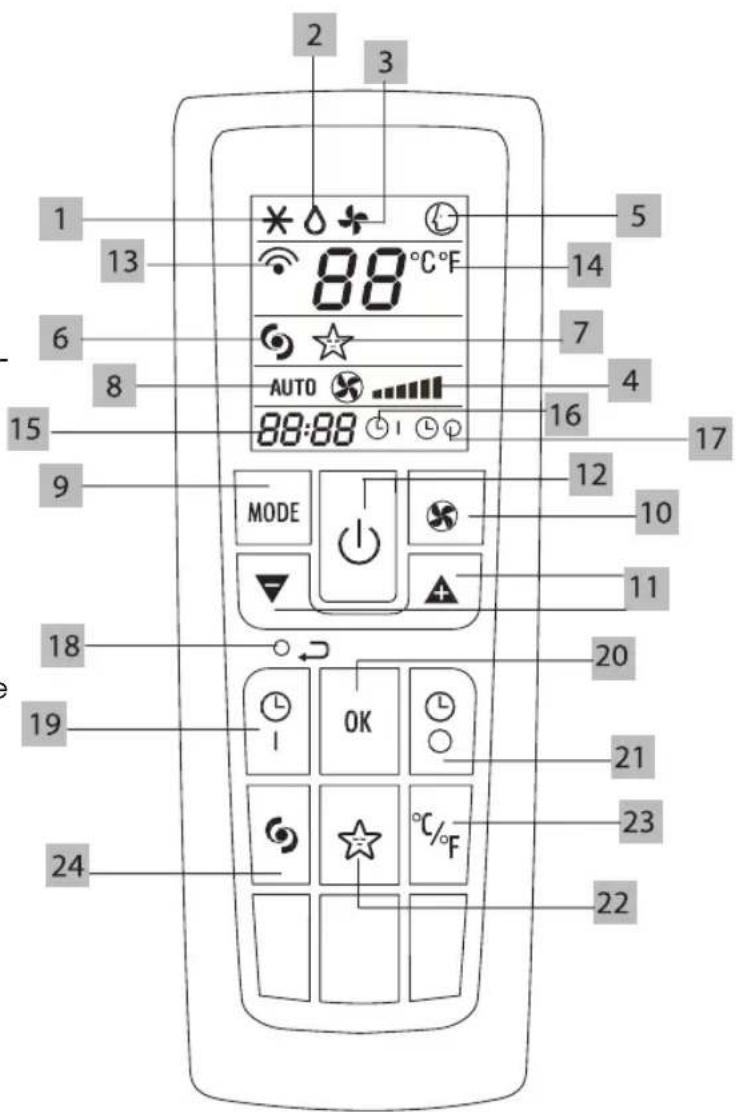
Description of the remote control
DESCRIPTION OF THE REMOTE CONTROL
1 Air conditioning symbol
2 Dehumidifying symbol
3 Fan symbol
4 Fan speed indicator
5 SMART symbol
6 BOOST symbol
7 SLEEP symbol
8 AUTOFAN indicator
9 MODE button (selects the modes)
10 FAN button
11 Increase (+) and decrease (-) temperature button
12 ON/Standby button
13 Signal transmission
14 Selected temperature scale indicator
15 Clock
16 Timer ON symbol
17 Timer OFF symbol
18 Reset button (resets the appliance to the original settings)
19 Timer ON button
20 OK button
21 Timer OFF button
22 SLEEP button
23 °C or °F selection button
24 BOOST button
USING THE REMOTE CONTROL
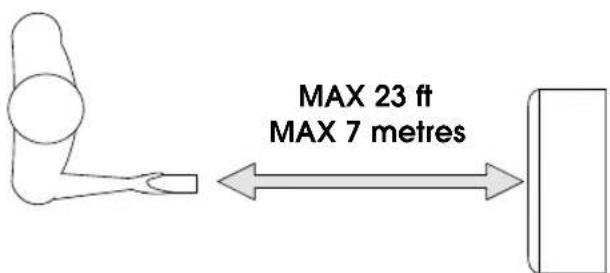
√ Point the remote control at the receiver on the appliance. The remote control must be no more than 23 ft (7 metres) away from the appliance (without obstacles between the remote control and the receiver).
√ The remote control must be handled with extreme care. Do not drop it or expose it to direct sunlight or sources of heat.
Using the remote control unit
INSERTING OR REPLACING THE BATTERIES
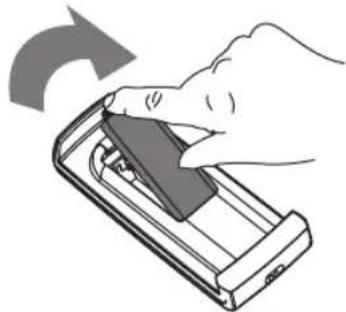
- Remove the cover on the rear of the remote control.
- Insert two "AAA" 1.5V batteries, making sure they are in the correct position (see the instructions inside the battery compartment).
- Replace the cover.
√ If the remote control unit is replaced or discarded, the batteries must be removed and disposed of in accordance with current legislation as they are harmful to the environment.
√ Warning: do not mix old and new batteries. Do not mix alkaline, standard (carbon-zinc) or rechargeable (nickel-cadmium) batteries. Do not dispose of batteries in fire. Batteries may explode or leak. If the remote control is not be used for a certain length of time, remove the batteries.
SETTING THE TIME
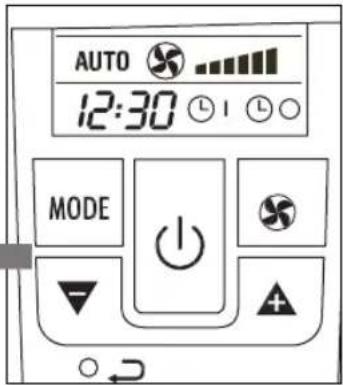
After having inserted the batteries, the clock on the display flashes until the time is set.
Proceed as follows:
- Press the ▲ or ▼ button until the correct time is reached. Hold the button down to run rapidly through first the minutes, then the tens of minutes and then the hours.
- Once the correct time has been reached, release the button and press the OK button to confirm.
- To cancel the settings programmed on the remote control and restore the original settings, press the reset button lightly with the point of a pencil or pen.
USING THE REMOTE CONTROL UNIT
The buttons of the first part of the controls on the remote control are the same as those on the control panel of the appliance. You should therefore refer to the instructions in the chapter Operating from the control panel to turn the appliance on, select the operating mode (AIR CONDITIONING, DEHUMIDIFYING, FAN, or SMART) and the fan speed.
The following section describes the additional functions corresponding to the controls on the bottom part of the remote control.

BOOST FUNCTION
Ideal for the summer to cool rooms rapidly.
To set this mode:
- Press the button.
The appliance operates in air conditioning mode at maximum fan speed. While this function is selected, it is not possible to set the temperature or change fan speed.

Using the remote control unit

SLEEP FUNCTION
This function is ideal for the night as it gradually reduces operation of the appliance.
To set this function correctly:
- Select the operating mode (air conditioning, dehumidifying or smart) as described above.
- Press the button. The appliance operates in the previously selected mode with low fan speed.
The SLEEP function maintains the room at optimum temperature without excessive fluctuations in either temperature or humidity and with silent operation. Fan speed is always at minimum, while room temperature and humidity vary gradually to ensure the most comfortable conditions. During air conditioning, the temperature increases by 2° F ( 1° C) after 60 minutes and 4° F ( 2° C) after 2 hours.


SELECTING THE TEMPERATURE SCALE
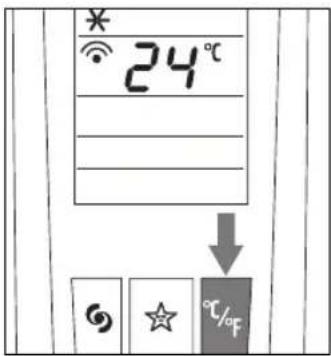
Press the 1/F button to switch the temperature scale from Centigrade to Fahrenheit and vice-versa.
PROGRAMMING THE TIMER
The appliance can be programmed to start up and shut down when required.
Programming start up
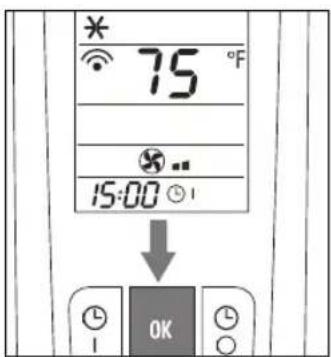
- P press the button.
The start-up time and message ( L1 ) flashes on the remote control display.
- Press the + or ▼ buttons to set the time you want the appliance to start up.
- When that time is reached, press the OK button to confirm. The message (☐) appears on the remote control display and the ☐ symbol is displayed on the appliance to indicate that the timer is active.

Self-diagnosis
Programming shutdown
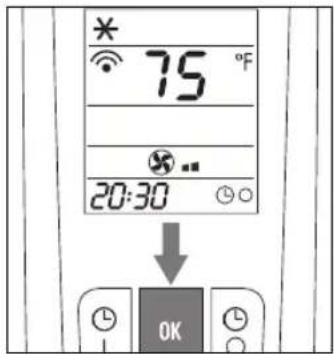
- Press the button. The shutdown time and message ( ) flash on the remote control display.
- Press the + or ▼ buttons to set the time you want the appliance to shut down.
- When that time is reached, press the OK button to confirm. The message (☐) appears on the remote control display and the ☐ symbol is displayed on the appliance to indicate that the timer is active.

SELF-DIAGNOSIS
The appliance has a self diagnosis system to identify a number of malfunctions. Error messages are displayed on the appliance display.
IF...IS DISPLAYED,

LOW TEMPERATURE
(frost prevention)

PROBE FAILURE
(sensor damaged)

FULL TANK
(empty the internal tank)
WHAT SHOULD I DO?
The appliance is fitted with a frost protection device to avoid excessive formation of ice.
The appliance starts up again automatically when the defrosting process is completed.
If this is displayed, contact your local authorised service centre.
See page 15 "END OF SEASON OPERATIONS"
Tips
To get the best performance once from your air conditioner, follow these recommendations:
- close the windows and doors in the room to be air conditioned. The only exception is when the appliance is installed through a hole in the wall. In this case, you are recommended to leave a slight draught through a door or window to guarantee correct ventilation.
- Never use the appliance in very damp rooms (laundries for example).
- Never use the appliance outdoors.

- P rotect the room from direct exposure to the sun by partially closing curtains and/or blinds to make the appliance much more economical to run.
- Never rest objects of any kind on the air conditioner.
- Never obstruct the air intake or outlet 1 grilles.
- Make sure there are no heat sources in the room.

do not cover the appliance when in use

close blinds or curtains
- Make sure the air conditioner is on a level floor. If necessary, place the two castor locks under the wheels 415
Cleaning
Before cleaning or maintenance, turn the appliance off by pressing the ON/STAND-BY button then always unplug the appliance from the mains socket.
CLEANING THE CABINET
You should clean the appliance with a slightly damp cloth then dry with a dry cloth.
For safety reasons, never wash the air conditioner with water.
Precautions
Never use petrol, alcohol or solvents to clean the appliance. Never spray insecticide liquids or similar.
CLEANING THE AIR FILTERS
To keep your air conditioner working efficiently, you should clean the dust filter every week of operation.
The filter is housed in the intake grille.
To clean the filters, proceed as follows:
-
Remove the dust filter by extracting it upwards (figure H).
-
Use a vacuum cleaner to remove dust accumulations from the filter. If it is very dirty, immerse in warm water and rinse a number of times. The water should never be hotter than 104°F (40°C). After washing, leave the filter to dry, then put it back in place.

START OF SEASON CHECKS
Make sure the power cable and plug are undamaged and the earth system is efficient.
Follow the installation instructions precisely.
END OF SEASON OPERATIONS
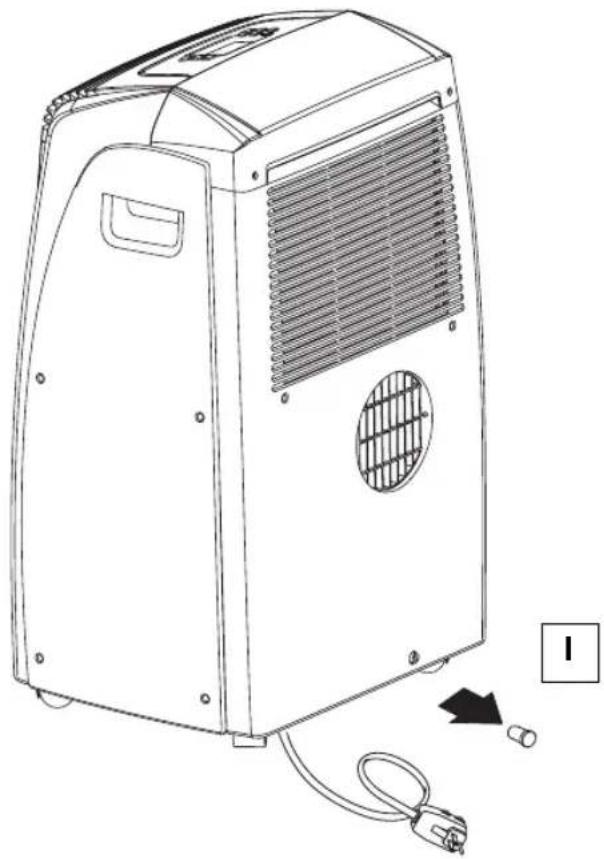
- T o empty the internal circuit completely of water, remove the cap (figure I).
- Run off all water left into a basin. When all the water has been drained, put the cap back in place.
- Clean the filter and dry thoroughly before putting back.
Troubleshooting
PROBLEM
CAUSE
REMEDY
| The air conditioning unit does not start. | No electricity.It is not plugged into the socket.The safety device of the plug has tripped.The internal safety device has tripped. | Restore electricity.Plug into the socket.Reset the safety plug.W ait 30 minutes, if the problem persists, contact your service center. |
| The air conditioning unit works for a short time only. | The air exhaust hose has a constriction.The air exhaust hose is blocked.There are tight bends in the air exhaust hose. | Position the exhaust hose correctly.Check there are no obstacles Obstructing air discharge.Eliminate the tight bends. |
| The air conditioner works, but does not cool the room. | W indow open.There are heat sources in the room (lamps, etc.).The exhaust hose is detached.Air filters clogged. | Close the window.Eliminate the heat source.Connect the exhaust hose.C lean or replace the filters. |
| Bad odour in the room. | The filter is clogged. | C lean or replace the filter. |
| The air conditioner does not operate for about 3 minutes after turning it on. | The internal compressor safety device prevents the appliance from being restarted until three minutes have elapsed since it was last turned off. | W ait. This delay is part of normal operation. |
| Le / PPEFE appears on the display. | The appliance has a self diagnosis system to identify a number of malfunctions. | See the self-diagnosis chapter. |
Technical specification
TECHNICAL SPECIFICATION
Power supply voltage see rating plate
Max. absorbed power
during air conditioning "
Refrigerant "
Cooling capacity "
Dimensions of appliance:
• width 18 in - 463 mm
• height 30 in - 775 mm
• depth 15 in - 382 mm
• weight 70 lb - 32 kg
LIMIT CONDITIONS
Room temperature for air conditioning 64 ÷ 95°F ( 18° ÷ 35°C )
Transport, filling, cleaning, recovery and disposal of refrigerant should be performed by a technical service centre appointed by the manufacturer only.
The appliance should be disposed of by a specialist centre appointed by the manufacturer only.
NEVER TURN THE APPLIANCE UPSIDE DOWN OR ON ITS SIDE.
IF THIS OCCURS, WAIT AT LEAST 4 HOURS BEFORE TURNING THE APPLIANCE ON
This appliance is equipped with a 3 prong grounding plug. The plug must be connected into an outlet that is properly installed and grounded in the accordance with all local codes and ordinances. Do not modify the plug provided with the appliance. If it will not fit the outlet, have a proper outlet installed by a qualified electrician.
If the household electrical supply does not meet the above specifications, or if you are not sure your home has an effective ground, have a qualified electrician or your local electrical utility company check it and correct any problems.
SAFETY PLUG
The appliance is fitted with a safety plug to protect the power cable.
If power is cut off, unplug from the mains and make sure the power cable is undamaged.
If the cable is damaged, call the service center immediately.
If power cuts off frequently and the power cable is undamaged, contact a qualified electrician.
If the safety device incorporated in the plug trips and cuts off the power supply, check that the power cable and plug are not damaged.
If the power cable is undamaged, to restore operation press the "RESET" button.
To verify correct operation of the plug, press the "TEST" button periodically and make sure the appliance disconnects. If this is not the case, contact the service center.
To restore operation, press the "RESET" button.
Limited Warranty
De'Longhi is the distributor of Kenwood home appliances.
This warranty applies to all home appliances with De'Longhi or Kenwood brand names.
FOR CONTIGUOUS UNITED STATES ONLY
Limited Warranty
We warrant each De'Longhi AIR CONDITIONER to be free from defects in material and workmanship. From the purchase date, our obligation under this warranty is to provide one (1) year free parts and labor on the entire AIR CONDITIONER, with an additional four (4) years free on any part of the sealed system consisting of the compressor, evaporator, condenser and factory connected refrigerant tubing. Labor and all other parts during the additional four (4) year warranty are to be paid by the owner. All AIR CONDITIONERS in need of repair are to be shipped to an authorized De'Longhi service center at the owner's expense, and De'Longhi will then incur the return shipping costs. After the first five (5) years of ownership, all expenses (all parts, labor and shipping) are to be paid by the owner of the unit. This warranty shall apply only if the AIR CONDITIONER is used in accordance with the factory directions that accompany it, and on an Alternating Current (AC) circuit. This warranty is in lieu of all other warranties and representations, expressed or implied, and all other obligations or liabilities on our part. We do not authorize any other person or company to assume for us any liability in connection with the sale or use of our AIR CONDITIONER. This warranty shall not apply to any AIR CONDITIONER that has been repaired or altered outside our factory nor shall it apply to any AIR CONDITIONER that has been subjected to misuse, negligence or accidents.
If repairs become necessary, see contact information below:
U.S. Residents:
Please contact our toll free hotline at 1-800-322-3848 or log onto our website at www.delonghi.com.
For all accessories, spare parts or replacement parts, please contact our parts division at 1-800-865-6330.
CANADA Residents:
Please contact our toll free hotline at 1-888-335-6644 or log onto our website at www.delonghi.com.
Other countries:
Please visit: www.delonghi.com.


- IMPORTANT SAFEGUARDS
- SAVE THESE INSTRUCTIONS
- THIS PRODUCT IS FOR HOUSEHOLD ONLY
- DESCRIPTION
- INSTALLING YOUR PORTABLE AIR-CONDITIONER
- ELECTRICAL CONNECTIONS
- AIR-CONDITIONING WITHOUT INSTALLATION
- PREPARING FOR USE
- SEMI-PERMANENT INSTALLATION
- PROCEED AS FOLLOWS
- CONTROL PANEL
- THE CONTROL PANEL
- DESCRIPTION OF THE CONTROL PANEL
- TURNING THE APPLIANCE ON
- OPERATION
- AIR CONDITIONING MODE
- DEHUMIDIFYING MODE
- FAN MODE
- SMART MODE
- BOOST FUNCTION
- DESCRIPTION OF THE REMOTE CONTROL
- USING THE REMOTE CONTROL
- USING THE REMOTE CONTROL UNIT
- INSERTING OR REPLACING THE BATTERIES
- SETTING THE TIME
- SLEEP FUNCTION
- SELECTING THE TEMPERATURE SCALE
- PROGRAMMING THE TIMER
- PROGRAMMING START UP
- SELF-DIAGNOSIS
- PROGRAMMING SHUTDOWN
- IF...IS DISPLAYED
- LOW TEMPERATURE
- PROBE FAILURE
- FULL TANK
- WHAT SHOULD I DO
- TIPS
- CLEANING
- CLEANING THE CABINET
- PRECAUTIONS
- CLEANING THE AIR FILTERS
- START OF SEASON CHECKS
- END OF SEASON OPERATIONS
- TROUBLESHOOTING
- TECHNICAL SPECIFICATION
- LIMIT CONDITIONS
- SAFETY PLUG
- LIMITED WARRANTY
- U.S. RESIDENTS
- CANADA RESIDENTS
- OTHER COUNTRIES
Brand : DELONGHI
Model : Pinguino PAC A120E
Category : Air Conditioning