
Pinguino PAC W120A - Air Conditioning DELONGHI - Free user manual and instructions
Find the device manual for free Pinguino PAC W120A DELONGHI in PDF.


| Product Type | Portable Air Conditioner |
| Model | Pinguino PAC W120A |
| Cooling Capacity (BTU/h) | 12,000 |
| Cooling Capacity (kW) | 3.5 |
| Room Area Coverage (sq. ft.) | Up to 500 |
| Energy Efficiency Ratio (EER) | 11.0 |
| Power Supply | 115 V / 60 Hz |
| Power Consumption (Cooling) | 1,300 W |
| Dimensions (W x D x H) | 17.7 x 13.8 x 28.3 in (45 x 35 x 72 cm) |
| Package Weight | 66 lbs (30 kg) |
| Refrigerant Type | R410A |
| Functions | Cooling, Dehumidification, Fan, Auto Mode |
| Dehumidification Capacity (pints/day) | 65 |
| Fan Speeds | 3 (Low, Medium, High) |
| Thermostat Control | Yes, adjustable |
| Remote Control | Yes (included) |
| Timer | 24-hour on/off timer |
| Air Filter | Washable, pre-filter |
| Filter Cleaning Indicator | Yes |
| Condensate Drain | Continuous or manual drain |
| Castor Wheels | Yes, 4 with brakes |
| Safety Features | Auto shutoff, thermal overheat protection |
| Spare Parts Available | Filter, remote, drain hose, exhaust hose |
| Repairability Index | 7.5 / 10 (based on manufacturer design) |
Frequently Asked Questions - Pinguino PAC W120A DELONGHI
User questions about Pinguino PAC W120A DELONGHI
0 question about this device. Answer the ones you know or ask your own.
Ask a new question about this device
Download the instructions for your Air Conditioning in PDF format for free! Find your manual Pinguino PAC W120A - DELONGHI and take your electronic device back in hand. On this page are published all the documents necessary for the use of your device. Pinguino PAC W120A by DELONGHI.
USER MANUAL Pinguino PAC W120A DELONGHI
- Use this appliance only as described in this instruction manual.
As with all electrical equipment, whilst the instructions aim to cover as many eventualities as possible, caution and common sense should be applied when operating and installing this appliance.
- This appliance is designed for home air conditioning and must not be used for other purposes.
- It is dangerous to modify or alter the characteristics of the appliance in any way.
- The appliance must be installed in conformity with national legislation regulating electrical equipment and installations.
- If the appliance requires repair, contact a Service Centre authorised by the manufacturer only. Repairs carried out by unauthorised personnel may be dangerous.
- This appliance must be used exclusively by adults.
- Never allow the appliance to be used by people (including children) with psychological, physical or sensory impairments or with insufficient experience and knowledge, unless closely supervised and instructed by someone responsible for their safety.
Young children should be supervised to ensure that they do not play with the appliance.
- The appliance must be connected to an efficient earth system.
Have your electrical circuit checked by a qualified electrician.
- Do not use extension cables.
- Before cleaning or maintenance, always unplug the appliance from the mains socket.
- Never unplug the appliance by pulling on the power cable.
- Do not install the appliance in rooms containing gas, oil or sulphur. Do not install near sources of heat.
- Keep the appliance at least 50 cm away from flammable substances (alcohol etc) or pressurised containers (eg aerosol cans).
- Do not rest heavy or hot objects on top of the appliance.
- Clean the air filter at least once a week.
• A void using heating appliances near the air conditioner.
• Always transport the appliance upright or resting on one side.
Before moving the appliance, empty the internal circuit completely of water.
After moving the appliance, wait at least 1 hour before starting it
- When putting the appliance away, do not cover with plastic bags.
- The materials used for packaging can be recycled.
You are therefore recommended to dispose of them in special differentiated waste collection containers.
- At the end of its working life, consign the appliance to a specialist collection centre.
- If the power cable is damaged, it must be replaced by the manufacturer or an authorised technical service centre in order to avoid all risk.
- Remember to descale the appliance at the end of every season and always after 500 hours of operation (see page 38).
In areas with particularly hard water, you are recommended to add special water softener obtainable from authorised service centres to the water.
SPECIFIC WARNINGS FOR APPLIANCES WITH R410A\* REFRIGERANT GAS
R410A refrigerant gas conforms to EC regulations on the environment.
Avoid perforating the refrigerant circuit of the appliance.
ENVIRONMENTAL INFORMATION: This unit contains fluorinated greenhouse gases covered by the Kyoto Protocol.
Maintenance and disposal must be carried out by qualified personnel only (R410A, GWP=1975).
* Verify the type of refrigerant gas used in your appliance on the rating plate.
SPECIFIC WARNINGS FOR APPLIANCES WITH R290\* REFRIGERANT GAS


- Read the warnings carefully.
- When defrosting or cleaning, use only the implements recommended by the manufacturer.
- The appliance must be placed in a room without continuously operating sources of ignition (for example: open flames, an operating gas appliance or an operating electric heater).
- Do not pierce or burn.
- Refrigerant gas may be odourless.
- The appliance must be installed, used and stored in a room with a surface area greater than 15m2 .
- This appliance contains about 300 g of R290 refrigerant gas.
- R290 refrigerant gas complies with European environmental directives. Do not perforate any of the components in the refrigerant circuit.
- If the appliance is installed, used or stored in an unventilated room, the room must be such as to prevent stagnation of possible leaks of refrigerant gas as there could be a danger of fire or explosion hazard should the refrigerant come into contact with electric heaters, stoves or other sources of ignition.
- The appliance must be stored in such a way as to prevent mechanical faults.
- Persons working on a refrigerant circuit must have the relative authorisation issued by an accredited body certifying their competence to handle refrigerants in compliance with a standard assessment recognised by sector associations.
- All repairs must be carried out in accordance with the manufacturer's recommendations. Maintenance and repairs requiring the assistance of other qualified personnel must be carried out under the supervision of specialists in the use of inflammable refrigerants.
* Verify the type of refrigerant gas used in your appliance on the rating plate.
IMPORTANT INFORMATION FOR CORRECT DISPOSAL OF THE PRODUCT IN ACCORDANCE WITH EC DIRECTIVE 2002/96/EC.

At the end of its working life, the product must not be disposed of as urban waste. It must be taken to a special local authority differentiated waste collection centre or to a dealer providing this service.
Disposing of a household appliance separately avoids possible negative consequences for the environment and health deriving from inappropriate disposal and enables the constituent materials to be recovered to obtain significant savings in
energy and resources. As a reminder of the need to dispose of household appliances separately, the product is marked with a crossed-out wheeled dustbin.
ELECTRICAL CONNECTIONS
Before plugging the appliance into the mains socket, check that:
- the mains power supply corresponds to the value indicated on the rating plate on the back of the appliance;
- the power socket and electrical circuit are adequate for the appliance.
- the mains socket matches the plug. If this is not the case, have the plug replaced;
- the mains socket is adequately earthed. Failure to follow these important safety instructions absolves the manufacturer of all liability.
WHAT IS THE WATER-AIR PINGUINO
During the summer, you feel comfortable at a temperature of between 24 and 27ircC with a relative humidity of about 50% .
An air conditioner removes excess moisture and heat from the room where it is located. Compared with installed models, portable air conditioners have the advantage that they can be moved from one room to another in the home or be transported from one building to another.
Hot air from the room is passed through a coil cooled by refrigerant gas. Excess heat and moisture are removed before the air is re-emitted into the room.
In single unit models, a small part of this air is used to cool the refrigerant gas and then, when hot and damp, is discharged outside.
In exclusive De'longhi water-air models, the heat is removed from the room through the cooling effect of the water which is obviously much greater than air.
This gives this air conditioner unbeatable cooling efficiency.
MODELS WITH R290 REFRIGERANT GAS
The Pinguino ECO is a latest generation environmentally-friendly air conditioner. The Pinguino ECO does not, in fact, contain gases (CFC/HCFC) dangerous to the ozone layer or with a marked greenhouse effect (HFC).
As well as reducing energy consumption, the high efficiency of the appliance also minimises impact on the greenhouse effect.

DESCRIPTION
A Air outlet grille
B Control panel with advanced LCD display
C Handle
D Grille
E Castors
F Air intake grille with dust filter
G Air exhaust hose compartment
H Water drainage hose door
I Power cable compartment door
J Water fill door
K Air exhaust hose
L Remote control
M Filling jug
N Window outlet
- Silver ion filter (certain models only)
P 3M filter (certain models only)
Q Sucker
R Castor locks
S Flange with cap
T Adjustable bar


PREPARING FOR USE
The instructions below will enable you to prepare your air conditioner for operation as efficiently as possible.
Before use, make sure the air intake and outlet grilles are unobstructed.
AIR-CONDITIONING WITHOUT INSTALLATION
Just a few simple steps and your comfort is ensured with your appliance:
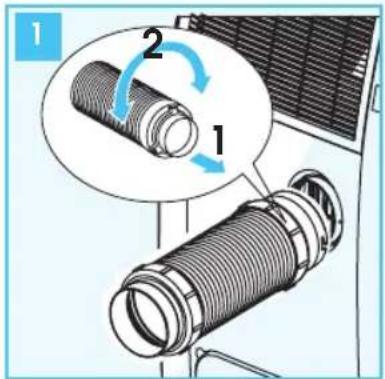
- Fit the air exhaust hose in the housing at the back of the appliance (fig. 1).
• Fit the window outlet to the end of the hose. - Place the air conditioner near a window or French window.
- Adjust the length of the hose to reach the window.
• Make sure the air exhaust hose is unobstructed. - Open the window or French window slightly and position the outlet (fig. 2).
- If you have a double window, use the sucker provided to hold the two parts of the window together (fig. 3).
You can also use the "adjustable bar" accessory.
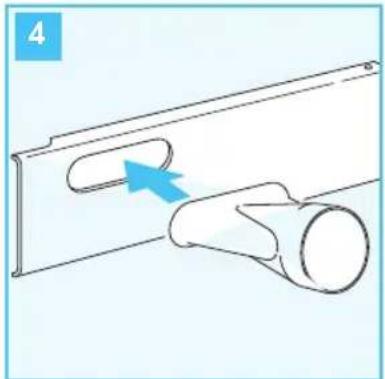
- Fit the window outlet in the housing in the bar (fig. 4)
- Position the bar on the window sill and adjust until it fits in the guides of the blind (the length can be blocked with the plastic pin provided), then lower the blind (fig. 5).
- Fit the air hose to the end of the window outlet.
- Place the air conditioner near a window or French window and connect the end of the hose as shown in figure 6.
Keep the air hose as short and free of curves as possible to avoid bottlenecks.

natural_image
Illustration of a car being connected to a vertical pole, showing airflow or dust (no text or symbols)
natural_image
Diagram showing a pipe being inserted into a container with a blue arrow indicating direction (no text or symbols)

AIR-CONDITIONING WITH INSTALLATION
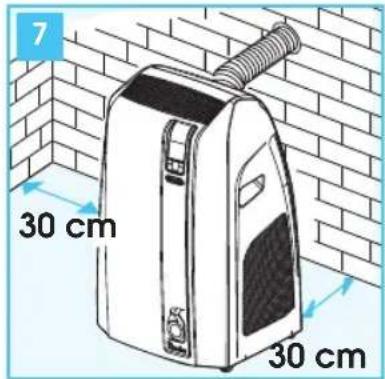
If required, your appliance can also be installed semi-permanently (Fig. 7).
Proceed as follows:
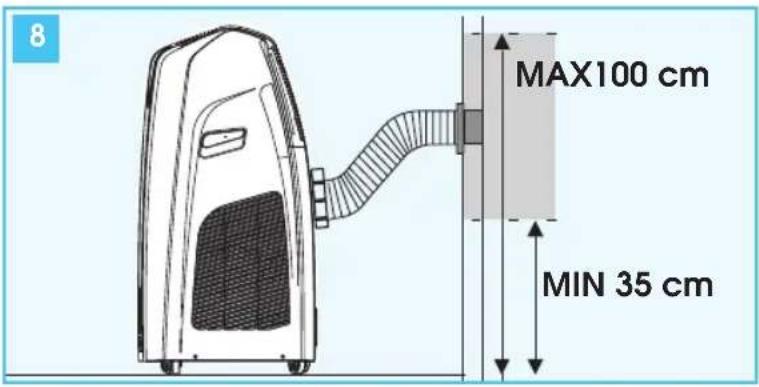
- Drill a 106 mm dia. hole respecting the heights shown in fig. 8 and following the indications in figs. 9, 10 and 11.

in the window pane
- Fit the flange accessory provided in the hole
- Fit the hose in the housing at the back of the appliance (fig. 1).
- Fit the end of the hose to the flange as shown in fig. 8. When the hose is not fitted, the hole can be closed with the flange cap.
Keep the air hose as short and free of curves as possible to avoid bottlenecks.
√ When installing the air conditioner semi-permanently, you should leave a door slightly open (as little as 1 cm) to guarantee correct ventilation.

natural_image
Cross-sectional diagram of a mechanical or structural component with no visible text or symbolsin the wooden kickboard of a French window

natural_image
Diagram showing a divided layout with patterned panels and a door, no text or symbols presentin the wall: you are recommended to insulate the section of wall using suitable insulation.
PREPARING FOR OPERATION IN WATER MODE
Once the appliance has been installed following the instructions above, it is ready for use. However, its efficiency can be enhanced by operating it in the exclusive De'longhi water mode. The water in the tank increases the cooling power of your Pinguino and at the same time reduces noise levels and electrical consumption. Compared to air, water reduces the temperature of the cooling circuit much more efficiently, before being given off from the air exhaust hose in the form of vapour.
Remember that:
• Y ou must always use salt-free clean mains water.
- The length of time the water in the tank lasts depends greatly on environmental conditions such as temperature, humidity, insulation, the exposure of the room, the number of people present, etc. Indicatively it lasts about six hours. By using the WATERSAVE function (see page 34), the length of time can be extended to 10 hours, with a slightly lower cooling power and efficiency.
- When the water in the tank runs out, the light comes on and operation of the appliance switches automatically to air-air. At the same time, the quantity of air given out from the rear hose increases.
FILLING THE TANK
You can fill the tank in one of two ways:
1) By using the jug provided or another recipient:
Instead of the jug provided, you can use any recipient (plastic or glass bottle, watering can etc), providing the neck of the recipient enters the filling hole to avoid spilling water on the appliance.
- Without using force, open the rear door completely, then remove the rubber cap (fig. 12).
- Pour the water into the tank (fig. 13). When the tank is full, the water level window (fig. 14) becomes completely red. Indicatively, you will need to refill the jug three times to fill the tank completely.
• After filling, put the rubber cap back in place, then close the door.
2) Using the extendible hose:
- Without using force, open the rear door completely, then remove the rubber cap (fig. 12). Pull out the extendible hose (fig. 15) and place near a tap.
- Fill the tank to the required level.
- When the tank is full, the water level window (fig. 14) becomes completely red (about 14 l).
• After filling, put the rubber cap back in place, then close the door.


natural_image
Illustration of a blue plastic device with internal components, connected to a wire (no text or symbols)

natural_image
Technical line drawing of a mechanical component with a curved pipe or duct (no text or symbols)√ The tank does not have to be full to use the water function, but the length of time the appliance will operate in water mode will be shorter.
√ When the level window has become completely red, do not add further water or it could overflow. The tank has no overflow prevention system.
DESCRIPTION OF THE CONTROL PANEL WITH ADVANCED LCD DISPLAY
1 Signal receiver
2 Air conditioning symbol
3 Dehumidifying symbol
4 Fan symbol
5 Heating symbol (certain models only)
6 Temperature indicator
7 Timer symbol
8 Alarm symbol
9 WATERSAVE symbol
10 Ioniser symbol (certain models only)
11 Speed indicator
12 SMART symbol
13 "No water" symbol
14 BOOST symbol
15 SLEEP symbol
16 AUTOFAN indicator
17 MODE button (selects the modes)
18 FAN button
19 Increase (+) and decrease (-) temperature button
20 ON/Standby button

The control panel enables you to manage all the main functions of the appliance, but to fully exploit its potential, you must use the remote control unit.
TURNING THE APPLIANCE ON
- Plug into the mains socket.
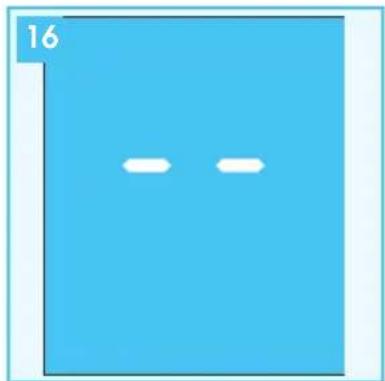
Two lines appear on the display indicating that the appliance is in standby (fig. 16). - Press the ⏻ button until the appliance comes on. The last function active when it was turned off will appear.
natural_image
Blue rectangular panel with two white oval shapes on the left side, labeled '16' in top-left corner (no other text or symbols)
Never turn the air conditioner off by unplugging from the mains. Always press the ⏻ button, then wait for a few minutes before unplugging. This allows the appliance to perform a cycle of checks to verify operation.

AIR CONDITIONING MODE (FIG. 17)
Ideal for hot muggy weather when you need to cool and dehumidify the room.
Always make sure the water fill door is completely closed before setting this mode.
To set this mode correctly:
- Press the MODE button a number of times until the air-conditioning symbol appears.
- Select the target temperature by pressing the ▲ or ▼ button until the corresponding value is displayed.
- Select the required fan speed by pressing the FAN button. Four speeds are available:

Maximum speed: to achieve the target temperature as rapidly as possible

Medium speed: reduces noise levels but still maintains a good level of comfort

Low speed: for silent operation

AUTOFAN: the appliance automatically selects the most suitable fan speed in relation to the temperature set on the digital display.
The most suitable temperature for the room during the summer varies from 24 to 27°C. You are recommended, however, not to set a temperature much below the outdoor temperature.

DEHUMIDIFYING MODE (FIG. 18)
Ideal to reduce room humidity (spring and autumn, damp rooms, rainy periods, etc).
In dehumidifying mode, the appliance should be prepared in the same way as for air conditioning, with the air exhaust hose attached to enable the moisture to be discharged outside.
To set this mode correctly:
- Press the MODE button a number of times until the dehumidifying symbol appears.
In this mode, fan speed is selected automatically by the appliance and cannot be set manually.


FAN MODE (FIG. 19)
When using the appliance in this mode, the air hose does not need to be attached.
To set this mode correctly:
- Press the MODE button a number of times until the fan symbol appears.
- Select the required fan speed by pressing the FAN button. Three speeds are available:

Maximum speed: for maximum fan power

Medium speed: reduces noise levels but still maintains a good level of comfort

Low speed: for silent operation
In this mode, AUTO speed cannot be selected.

HEATING MODE (FIG. 20)
CERTAIN MODELS ONLY
This is ideal in spring and autumn when outdoor temperatures are not particularly severe.
When using the appliance in this mode, the air hose does not need to be attached.
To set this mode correctly:
- Press the MODE button a number of times until the heating symbol appears.
- Select the target temperature by pressing the ▲or ▼out-ton until the corresponding value is displayed.
In this mode, fan speed is selected automatically by the appliance and cannot be set manually.

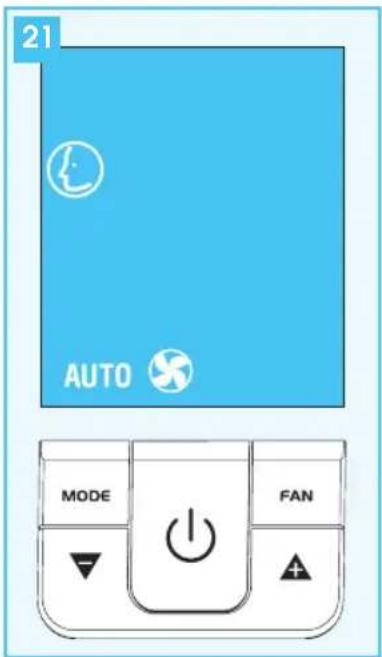
SMART MODE (FIG. 21)
The appliance chooses automatically whether to operate in air conditioning, fan or heating (certain models only) mode. Fan speed is also set automatically according to the conditions. To set this mode:
- Press the MODE button a number of times until the SMART symbol appears.


DESCRIPTION OF THE REMOTE CONTROL
2 Air conditioning symbol
3 Dehumidifying symbol
4 Fan symbol
5 Heating symbol (certain models only)
9 WATERSAVE symbol
10 Ioniser symbol (certain models only)
11 Fan speed indicator
12 SMART symbol
14 BOOST symbol
15 SLEEP symbol
16 AUTOFAN indicator
17 MODE button (selects the modes)
18 FAN button
19 Increase (+) and decrease (-) temperature button
20 ON/Standby button
21 Signal transmission
22 Selected temperature scale indicator
23 Clock
24 Timer ON symbol
25 Timer OFF symbol
26 Reset button (resets the appliance to the original settings)
27 Timer ON button
28 SET button
29 Timer OFF button
30 SLEEP button
31 °C or °F selection button
32 Swing button (function not available in these models)
33 WATERSAVE button
34 Ioniser button (certain models only)
35 BOOST button

USING THE REMOTE CONTROL

Point the remote control at the receiver on the appliance. The remote control must be no more than 7 metres away from the appliance (without obstacles between the remote control and the receiver).

The remote control must be handled with extreme care. Do not drop it or expose it to direct sunlight or sources of heat.

INSERTING OR REPLACING THE BATTERIES
- Remove the cover on the rear of the remote control (fig. 22);
- Insert two R03 "AAA" 1.5V batteries, making sure they are in the correct position (see the instructions inside the battery compartment);
- Replace the cover.

If the remote control unit is replaced or discarded, the batteries must be removed and disposed of in accordance with current legislation as they are harmful to the environment.

natural_image
Illustration of a hand pressing down on a smartphone with a blue arrow indicating rotation (no text or symbols)SETTING THE TIME
After having inserted the batteries, the clock on the display flashes until the time is set. Proceed as follows.
- Press the ▲ or ▼ button until the correct time is reached. Hold the button down to run rapidly through first the minutes, then the tens of minutes and then the hours.
- Once the correct time has been reached, release the button and press the SET button to confirm.
- To cancel the settings programmed on the remote control and restore the original settings, press the RESET button lightly with the point of a pencil or pen.
USING THE REMOTE CONTROL UNIT
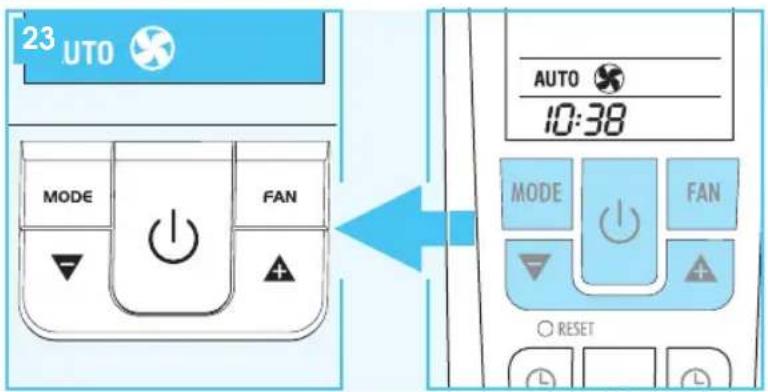
The first part of the controls on the remote control are the same as those on the control panel of the appliance (fig. 23).
You should therefore refer to the instructions in the chapter Operating from the control panel to turn the appliance on and select the operating mode (AIR CONDITIONING, DEHU-MIDIFYING, FAN, HEATING or SMART) and the fan speed.
The following section describes the additional functions corresponding to the controls on the bottom part of the remote control.

BOOST FUNCTION (FIG. 24)
Ideal for the summer to cool rooms rapidly.
Activate by simply pressing the 📄 button.
The appliance operates in air conditioning mode at maximum fan speed. While this function is selected, it is not possible to set the temperature or change fan speed.


SELECTING THE TEMPERATURE SCALE (FIG. 25)
Press the ircC/%F button to switch the temperature display from ircC to ircF and vice versa.


SLEEP FUNCTION (FIG. 26)
This function is ideal for the night as it gradually reduces operation of the appliance.
To set this function correctly:
- Select the operating mode (air conditioning, dehumidifying, smart or heating (certain models only) as described above.
- Press the button. The appliance operates in the previously selected mode with low fan speed.
The SLEEP function maintains the room at optimum temperature without excessive fluctuations in either temperature or humidity and with silent operation.
Fan speed is always at minimum, while room temperature and humidity vary gradually to ensure the most comfortable conditions. During air conditioning, the temperature increases by 1°C after 60 minutes and a further 1°C after 2 hours.
In dehumidifying mode, the dehumidifying power of the appliance is partially reduced every hour for the first two hours. In heating mode, the temperature drops by 1°C every hour, three times.


IONISER FUNCTION (CERTAIN MODELS ONLY) (FIG. 27)
The ioniser is an electronic component which releases negative ions into the air. Rooms with a clean pleasant atmosphere have been shown to have an abundance of negative ions, while rooms with stale air contain abundant positive ions.
The ioniser restores the correct balance between the two types of ion, reducing dust in the air and generating a pleasant sensation of well-being. This button activates the ioniser present in certain models. This function can be activated in all operating modes.

WATERSAVE FUNCTION (FIG. 28)
This function is designed to increase the operating time of the appliance when operating in water mode and can be activated in air conditioning and SMART mode.
When the button is pressed, the appliance is slightly less efficient, but consumption of water in the tank is considerably reduced. With a full tank, the appliance normally operates for six hours. With this function activated, the operating time increases to 10 hours, avoiding the need to top up frequently.
If the water runs out when this function is active, the quantity of air given out from the rear hose increases and the light comes on. To restore operation in water mode, fill the tank.

SWING FUNCTION
Not available in these models.


PROGRAMMIN THE TIMER
The appliance can be programmed to start up and shut down when required.
Programming start up
- Press the ON button.
The start-up time and message "ON TIMER" flash on the remote control display (fig. 29). - Press the button to set the time you want the appliance to start up.
- When that time is reached, press the SET button to confirm (fig. 30). The message "ON TIMER" appears on the remote control display and the Ⓛ symbol is displayed on the appliance to indicate that the timer is active.
Programming shutdown
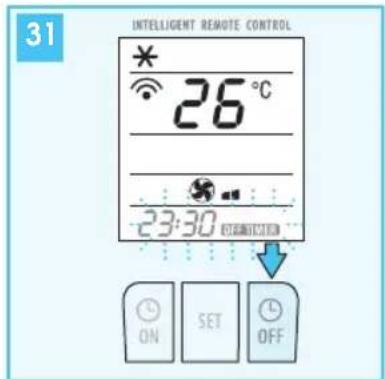
- Press the OFF button. The shutdown time and message "OFF TIMER" flash on the remote control display (fig. 31).
- Press the button to set the time you want the appliance to shut down.
- When that time is reached, press the SET button to confirm (fig. 32). The message "OFF TIMER" appears on the remote control display and the Ⓛ symbol is displayed on the appliance to indicate that the timer is active.

![30 INTELLIGENT REMOTE CONTROL * 26 °C 17:30 [ON TIMER] ON SET OFF](/content/2026/06/1292071/images/476020441718b1c839d804b091f3d1548ff4c4bd2f6e73c7557bda0bb7d85acf.jpg)

SELF-DIAGNOSIS
The appliance has a self diagnosis system to identify a number of malfunctions.
Error messages are displayed on the appliance display.
| IF...IS DISPLAYED, | WHAT SHOULD I DO? | IF...IS DISPLAYED, | WHAT SHOULD I DO? |
 | The appliance is fitted with a frost protection device to avoid excessive formation of ice.The appliance starts up again automatically when the defrosting process is completed. |  | Empty the internal safety tank, following the instructions in the "End of season operations" paragraph.If this reoccurs, contact your local authorised service centre. |
| LOW TEMPERATURE (frost prevention) | HIGH LEVEL (safety tank full) | ||
 | If this is displayed, contact your local authorised service centre. |  | This message appears after about 500 hours of operation in water mode and indicates that the appliance requires descaling as described in the "descaling" paragraph. |
| PROBE FAILURE (sensor damaged) | CLEAN | ||
| After descaling or if the alarm reappears too soon after the last descaling (carried out before the message is displayed), reset the alarm by holding the ⏻ button down for 10 seconds. | |||
TIPS FOR CORRECT USE
To get the best from your air conditioner, follow these recommendations:
- close the windows and doors in the room to be air conditioned (fig. 33). When installing the air conditioner semi-permanently, you should leave a door slightly open (as little as 1 cm) to guarantee correct ventilation.
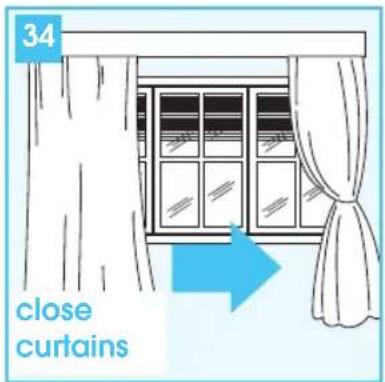
- p rotec the room from direct exposure to the sun by partially closing curtains and/or blinds to make the appliance much more economical to run (fig. 34);
- never rest objects of any kind on the air conditioner;
- do not obstruct the air intake and outlet (fig. 35). Leave both grilles free;
• make sure there are no heat sources in the room. - never use the appliance in very damp rooms (laundries for example).
- never use the appliance outdoors.
• make sure the air conditioner is standing on a level surface. If necessary, place the castor locks under the front wheels.
AIR PURIFYING FILTERS
The appliance is fitted with a dust filter which retains impurities in the air drawn in from the room.
Certain models also include other filters with a high filtering capacity, namely a silver ion filter and a 3M® electrostatic filter.
SILVER ION FILTER
The silver ion filter not just retains dust particles, but also has an efficient antibacterial action. It also greatly reduces concentrations of irritants such as pollen and spores.
The filter is treated with small particles of silver (on the scale of millionths of a millimetre) which are able to block the multiplication of and kill any nearby bacteria or spores.
3M® ELECTROSTATIC FILTER
The 3M® electrostatic filter retains the finest dust particles, thus enhancing the filtering capacity of the appliance.
FITTING THE FILTERS TO THE GRILLE
The appliance can be used with just the dust filter already inserted in the grille.
To use the two supplementary filters (if provided with your model), remove them from the packaging and attach them to the dust filter, inserting them under the special clips (fig. 36).
If you decide not to use them, keep them sealed in the packaging.



CLEANING
Before cleaning or maintenance, turn the appliance off by pressing the ⏻ button on the control panel or remote control, wait for a few seconds then unplug from the mains socket.
CLEANING THE CABINET
You should clean the appliance with a slightly damp cloth then dry with a dry cloth.
√ Never wash the air conditioner with water. It could be dangerous.
√ Never use petrol, alcohol or solvents to clean the appliance. Never spray insecticide liquids or similar.
CLEANING THE AIR FILTERS
To keep your air conditioner working efficiently, you should clean the dust filters every week of operation.
Dust filter supplied with all models
The filter is housed in the intake grille.
To clean the filters, proceed as follows:
- Remove the intake grille by pulling it outwards (fig. 37).
- Remove the dust filter by detaching it from the grille (Fig. 38).
- Use a vacuum cleaner to remove the dust collected on the filter. If it is very dirty, immerse in warm water and rinse a number of times. The water should never be hotter than 40°C.
• After washing, leave the filter to dry completely. - To replace, put the filters back in the intake grille then attach the intake grille to the appliance.
Silver ion filter and 3M® electrostatic filter (certain models only) These two filters are located behind the dust filter.
To clean the dust filter, the two supplementary filters must be temporarily removed.
To clean, use a vacuum cleaner at medium power.
The silver ion filter can be washed with cold water. Leave to dry completely and replace. It should be replaced at least once every two seasons.
The 3M® filter is not washable and must replaced at the end of the season or when it is exhausted and no longer efficient.
√ The silver ion filter and 3M® filter can be bought from shops selling De'longhi accessories or authorised service centres.

natural_image
Illustration of a blue solar panel mounted on a vehicle (no text or symbols visible)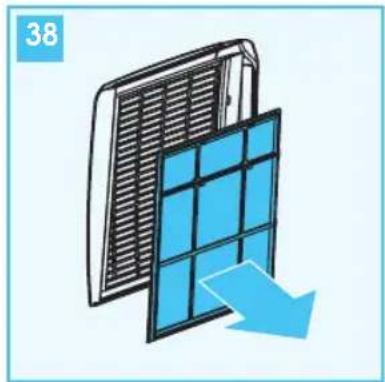
natural_image
Illustration of a solar panel with blue panels and a blue arrow indicating airflow or cooling (no text or symbols)RECOMMENDED END OF SEASON OPERATIONS
- Descale as described in the following paragraph.
- Empty the water from the tank and internal circuit by extracting and opening the two hoses inside the rear door (fig. 39).
- Operate the appliance with the water tank empty in fan only mode for about half an hour. This dries any water remaining inside the appliance.
• T urn the appliance off and unplug from the mains.
- Remove the air exhaust hose.
- Clean the dust filters and (in certain models) the air purifying filters.
- Place the power cable in the special rear cable compartment (fig. 40).
• Cover the appliance to avoid dust.
DESCALING
When using the appliance in water mode, lime scale will inevitably form and must be removed to maintain efficiency. After about 500 hours of operation, the appliance therefore warns that descaling is required by displaying the message ⚠️ (CLEAN).
Descale the appliance.
- Turn off the appliance and unplug from the mains. Empty all water from the inside of the appliance through the drain hoses (fig. 39).
- C lose and replace the drain hoses. Pour 0.5 l of descaler (one bottle) and 1.5 l of clean water into the tank.
- Plug in and operate the appliance in air conditioning mode with the BOOST function selected until the "no water" symbol appears on the display.
- Turn off the appliance and unplug from the mains. Empty all water from the inside of the appliance through the drain hoses.
- C lose and replace the drain hoses. Pour 2 l of clean water into the tank and rinse the internal circuits of dirt and descaler.
- Plug in and operate the appliance until the "no water" symbol appears on the display.
- Turn off the appliance and unplug from the mains. Empty all rinsing water from the inside of the appliance through the drain hoses.
- If the water drained off is very dirty or contains large quantities of foam, repeat the rinsing operation.
- Close the drain hoses and replace.
• After descaling, reset the alarm by pressing the button for 10 seconds.

natural_image
Illustration of a robotic arm interacting with a bowl containing liquid, showing mechanical components and a blue arrow indicating direction (no text or symbols)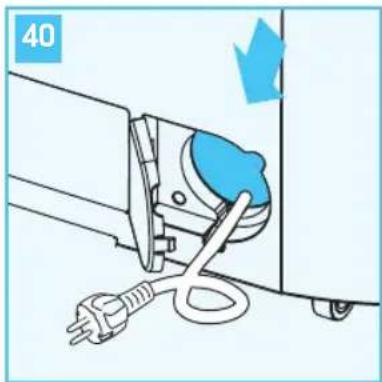
natural_image
Diagram of an electric vehicle charging plug with a blue bulb and power cord, showing wiring (no text or symbols)√ The descaler can be bought from your local De'longhi service centre. Always use original descaler. Use of other products could damage internal components and invalidate the guarantee.
PROBLEM CAUSE SOLUTION
| The air conditioner does not come on | there is no currentit is not plugged into the mainsthe internal safety device has tripped | waitplug into the mainscall the Service Centre |
| The air conditioner works for a short time only | there are bends or kinks in the air exhaust hosesomething is preventing the air from being discharged | position the air hose correctly, keeping it as short and free of curves as possible to avoid bottlenecks.check and remove any obstacles obstructing air discharge |
| The air conditioner works, but does not cool the room | windows, doors and/or curtains openthere are heat sources in the room (oven, hairdryer, etc)the air exhaust hose is detached from the appliancedust filter and (when present) silver ion filter and 3M® filter cloggedthe technical specification of the appliance is not adequate for the room in which it is located. | close doors, windows and curtains, bearing in mind the "tips for correct use" given aboveeliminate the heat sourcesfit the air exhaust hose in the housing at the back of the appliance (fig. 1).clean the filters as described above |
| During operation, there is an unpleasant smell in the room | dust filter and (when present) silver ion filter and 3M® filter clogged | clean the filters as described above |
| The air conditioner does not operate for about three minutes after restarting it | the internal compressor safety device prevents the appliance from being restarted until three minutes have elapsed since it was last turned off. | wait. This delay is part of normal operation. |
| The symbol ⚠ and one of the following messages appears on the appliance display: LTT PF / HAU CCL | The appliance has a self diagnosis system to identify a number of malfunctions. | see the SELF-DIAGNOSIS chapter. |
TECHNICAL CHARACTERISTICS:
Power supply voltage see rating plate
Max. power input
during air conditioning "
Absorbed power heating
(certain models only) "
Refrigerant "
Cooling capacity "
LIMIT CONDITIONS
Room temperature for air conditioning MAX 25°C21÷35°C
Room temperature for heating MAX 25°C
(certain models only)
APPLIANCE DIMENSIONS :
- width 570 mm
- height 910 mm
- depth 465 mm
- weight 51 kg

GUARANTEE AND TECHNICAL ASSISTANCE
The conditions of the guarantee and technical assistance are given on the certificate supplied with your appliance.

- SPECIFIC WARNINGS FOR APPLIANCES WITH R410A\* REFRIGERANT GAS
- SPECIFIC WARNINGS FOR APPLIANCES WITH R290\* REFRIGERANT GAS
- IMPORTANT INFORMATION FOR CORRECT DISPOSAL OF THE PRODUCT IN ACCORDANCE WITH EC DIRECTIVE 2002/96/EC.
- ELECTRICAL CONNECTIONS
- WHAT IS THE WATER-AIR PINGUINO
- MODELS WITH R290 REFRIGERANT GAS
- DESCRIPTION
- PREPARING FOR USE
- AIR-CONDITIONING WITHOUT INSTALLATION
- AIR-CONDITIONING WITH INSTALLATION
- Keep the air hose as short and free of curves as possible to avoid bottlenecks.
- PREPARING FOR OPERATION IN WATER MODE
- FILLING THE TANK
- 1) By using the jug provided or another recipient:
- 2) Using the extendible hose:
- DESCRIPTION OF THE CONTROL PANEL WITH ADVANCED LCD DISPLAY
- TURNING THE APPLIANCE ON
- AIR CONDITIONING MODE (FIG. 17)
- Always make sure the water fill door is completely closed before setting this mode.
- DEHUMIDIFYING MODE (FIG. 18)
- FAN MODE (FIG. 19)
- HEATING MODE (FIG. 20)
- CERTAIN MODELS ONLY
- SMART MODE (FIG. 21)
- DESCRIPTION OF THE REMOTE CONTROL
- USING THE REMOTE CONTROL
- INSERTING OR REPLACING THE BATTERIES
- SETTING THE TIME
- USING THE REMOTE CONTROL UNIT
- BOOST FUNCTION (FIG. 24)
- SELECTING THE TEMPERATURE SCALE (FIG. 25)
- SLEEP FUNCTION (FIG. 26)
- IONISER FUNCTION (CERTAIN MODELS ONLY) (FIG. 27)
- WATERSAVE FUNCTION (FIG. 28)
- SWING FUNCTION
- PROGRAMMIN THE TIMER
- Programming start up
- Programming shutdown
- SELF-DIAGNOSIS
- TIPS FOR CORRECT USE
- AIR PURIFYING FILTERS
- SILVER ION FILTER
- 3M® ELECTROSTATIC FILTER
- FITTING THE FILTERS TO THE GRILLE
- CLEANING
- CLEANING THE CABINET
- CLEANING THE AIR FILTERS
- Dust filter supplied with all models
- RECOMMENDED END OF SEASON OPERATIONS
- DESCALING
- TECHNICAL CHARACTERISTICS:
- LIMIT CONDITIONS
- APPLIANCE DIMENSIONS :
- GUARANTEE AND TECHNICAL ASSISTANCE
Brand : DELONGHI
Model : Pinguino PAC W120A
Category : Air Conditioning