
RT8PT - Receiver MTX Audio - Free user manual and instructions
Find the device manual for free RT8PT MTX Audio in PDF.


| Product Type | Receiver |
| Brand | MTX Audio |
| Model | RT8PT |
| Dimensions (W x H x D) | 17.0 x 3.5 x 12.0 inches |
| Weight | 15.2 lbs |
| Power Output (RMS per channel) | 100 watts at 8 ohms, 20 Hz - 20 kHz |
| Amplifier Class | Class AB |
| Frequency Response | 20 Hz - 20 kHz ±0.5 dB |
| Total Harmonic Distortion | <0.08% |
| Signal-to-Noise Ratio | >100 dB |
| Inputs | 5 analog RCA, 1 digital optical, 1 digital coaxial, 1 phono |
| Outputs | Zone 2 pre-out, subwoofer pre-out, headphone jack |
| Supported Audio Formats | Dolby Digital, DTS, PCM |
| Bluetooth | Yes, version 4.2 with aptX |
| USB Port | Type A for media playback |
| Speaker Impedance | 4-16 ohms |
| Tuner | FM/AM with 40 presets |
| Power Consumption | 350 W (max), 0.5 W standby |
| Clean | Wipe with a dry soft cloth; avoid solvents |
| Safety | Do not expose to moisture; ensure adequate ventilation |
| Spare Parts & Repairability | Contact MTX support for authorized service centers |
Frequently Asked Questions - RT8PT MTX Audio
User questions about RT8PT MTX Audio
0 question about this device. Answer the ones you know or ask your own.
Ask a new question about this device
Download the instructions for your Receiver in PDF format for free! Find your manual RT8PT - MTX Audio and take your electronic device back in hand. On this page are published all the documents necessary for the use of your device. RT8PT by MTX Audio.
USER MANUAL RT8PT MTX Audio
20cm (8") Powered Tube Enclosure
120W RMS
Designed in Phoenix - AZ, USA
www.mtx.eu.com
www.mtx.com
Introduction
Thank you for purchasing an MTX Audio Hi-Performance powered tube. Proper installation matched with MTX speakers and amplifiers provide superior sound and performance for endless hours of waking the neighbors, slammin' your friends or flat out stomping wanna-be players. Congrats and enjoy the ultimate audio experience with MTX!
Features
- Powered vented enclosure
- Subwoofer: 20cm (8")
• Amplifier Max Power : 360W
• Amplifier RMS Power : 120W
• EBC remote included
• High and low level inputs
• Dimensions: 25x25x54cm
Control Panel on the Amplifier

Speaker level inputs - This input will allow the amplifier to operate from source units with speaker-level outputs. Output speaker leads from the source unit should be tied directly to the wire harness provided with the amplifier. Note: When speaker level inputs are used, a remote turn on wire must used to switch the amplifier on and off.
2 EBC Port (External Bass Control) - The Remote Subwoofer Level Control (EBC) plugs directly into this port, while the EBC itself can be placed anywhere in the vehicle for on demand bass adjustments. EBC is included.
3 RCA Inputs - These RCA inputs are used with source units that have RCA or Line level outputs. (Source units need a minimum level of 100mV output for proper operation of the amplifier). MTX recommends only high quality twisted pair cables (such as StreetWires) to decrease the possibility of radiated noise entering the system.
4 Gain Control - The gain control matches the input sensitivity of the amplifier to the source unit being used. The operating range varies from 100mv to 6V.
Adjusting the gain
- Turn the gain control on the amplifier all the way down (counter clockwise).
- Turn up the volume control on the source unit to approximately 3/4 of maximum.
- Adjust the gain control on the amplifier until audible distortion occurs.
- Adjust the gain control down until audible distortion disappears.
- The amplifier is now calibrated to the output of the source unit.
5 Low Pass X-Over Frequency Control - Used to select the desired low-pass (LP) x-over frequency. The frequency is adjustable from 50Hz to 200Hz..
6 Protection LED - When the amps is in thermal protection, the LED turns to red.
7 PowerOn LED - The LED illuminates red when the amp is switched on.
8 (+12V) Power Terminal - This is the main power input for the amplifier and must be connected directly to the positive terminal of the vehicles battery for proper operation. Use caution when installing (+12V) power cable in the vehicle. Avoid running this cable parallel with RCA cables, antennas, or other sensitive equipment due to massive currents that can induce noise into the audio system. It is also very important to have a tight, secure connection for maximum performance. MTX recommends using a minimum of 6mm ^2 full copper power wire with the MTX RT8PT powered tube.

9 Remote Terminal – The powered tube can be turned on by applying 12 volts to this terminal. Typically this voltage is supplied by a wire from the source unit marked "remote" or "power antenna".
10 Ground Terminal – A proper ground is required for your amplifier to operate at peak performance. A short ground cable the same diameter as the power cable should be used to attach the ground terminal directly to the chassis of the vehicle. Always remove paint, dirt or debris to expose bare metal where the ground will be attached.
11 Fuses - When the fuse blows, replace it with the same value. The RT8PT uses a 20A fuse. Caution : Never use a higher rated fuse !
Installation & Mounting
MTX recommends your new RoadTHUNDER powered tube to be installed by an Authorized MTX retailer. Any deviation from specified installation instructions can cause serious damage to the amplifier, speakers and/or vehicles electrical system. Damage caused from improper installation is NOT covered under warranty. Please verify all connections prior to turn on your system!
- Disconnect the vehicle's negative battery cable.
- Determine the mounting place for your MTX powered enclosure. Hook it with the provided belts. Keep in mind there should be sufficient air flow for proper cooling.
-
Install a positive (+) power cable from the vehicle's battery through the firewall using a grommet or firewall bushing to avoid cable damage from sharp edges of the firewall. Run the cable through the interior of the vehicle and connect it to the amplifier's (+12V) terminal (8). Do Not connect to the battery at this time. Note : Use only proper gauge wire for both positive and negative connections.
-
Install a circuit breaker or fuse within 20cm of the battery. This effectively lowers the risk of severe damage to you or your vehicle in case of a short circuit or accident. Make sure the circuitbreaker is switched off or the fuse is taken out of the fuse holder until all connections are made. Now connect your positive power cable to the positive battery terminal of the battery.
-
Grounding - Locate a proper ground point on the vehicle's chassis and remove all paint, dirt or debris to reveal a bare metal surface. Attach the ground wire to that contact point. Connect the opposite end of the ground wire to the (GND) terminal on the MTX amplifier (10).
-
Connect a remote turn-on wire from the source unit to the powered tube remote terminal (9). If the source unit does not have a dedicated Remote Turn-on lead, you may connect to the source unit's Power Antenna lead.
-
Connecting signal cables to the amplifier: There are two ways to supply the signal to your MTX powered tube. • To get maximum performance, we suggest connecting a high quality RCA to the corresponding outputs at the source unit and inputs of the amplifier. • If a source unit is being used without RCA outputs, use the included high-level amplifier's speaker terminals (1) using the right gauge speaker wire.
-
Double check all previous installation steps, in particular, wiring and component connections. Once verified, reconnect the vehicle's negative battery cable, turn the circuit breaker on or place the fuse in the fuse holder.
Note : Gain Levels on the amplifier should be turned all the way down (counter clockwise) before proceeding with adjustments.
Introduction :
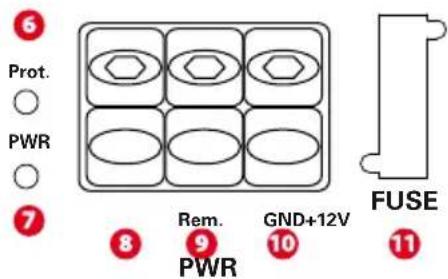
9 Remote Terminal: The powered tube can be turned on by applying 12 volts to this terminal. Typically this voltage is supplied by a wire from the source unit marked "remote" or "power antenna".
(low pass) (low pass X-over) - (Low pass X-over) 5
MTX is a proud member of Mitek Corp high quality consumer audio product lines.

MX®
AUDIO
STREETWIRES®
Designed and Engineered by Mitek in Phoenix - AZ, USA.
© 2009 Mitek. All rights reserved.
MTX, STREETWIRES and Road THUNDER
are registered trademarks of Mitek.
Due to continual product development, all
specifications are subject to change without notice.
MTX Audio,
4545 East Baseline Rd.
Phoenix, AZ 85042
USA
Brand : MTX Audio
Model : RT8PT
Category : Receiver