
C430H - Telephone GIGASET - Free user manual and instructions
Find the device manual for free C430H GIGASET in PDF.


| Product Type | Cordless DECT phone |
| Model | Gigaset C430H |
| Dimensions (Handset) | 160 x 50 x 30 mm |
| Weight (Handset) | 130 g |
| Power Supply | 2 x AAA NiMH rechargeable batteries; mains adapter (AC 100-240V, 50/60Hz) |
| Display | 1.8 inch monochrome LCD with backlight |
| Phonebook Capacity | Up to 150 contacts |
| Call Features | Caller ID (CLIP), call list for up to 20 entries, redial list |
| Speakerphone | Yes, handsfree mode |
| Ringtones | Polyphonic, selectable from 20 melodies |
| Additional Functions | Alarm clock, baby monitor mode, ECO DECT for low radiation |
| Range | Up to 50 m indoors, up to 300 m outdoors |
| Mounting | Desktop or wall-mountable base station |
| Maintenance | Clean with a soft, dry cloth; do not use solvents |
| Security | Encrypted DECT transmission for secure calls |
| Spare Parts & Reparability | Batteries, charger, and handset available; repair by authorized service centers |
| General Information | For indoor use only; operating temperature 5°C to 45°C |
Frequently Asked Questions - C430H GIGASET
User questions about C430H GIGASET
0 question about this device. Answer the ones you know or ask your own.
Ask a new question about this device
Download the instructions for your Telephone in PDF format for free! Find your manual C430H - GIGASET and take your electronic device back in hand. On this page are published all the documents necessary for the use of your device. C430H by GIGASET.
USER MANUAL C430H GIGASET
By purchasing a Gigaset, you have chosen a brand that is fully committed to sustainability.
This product's packaging is eco-friendly!
To learn more, visit www.gigaset.com.


1 Display in idle status
2 Status bar ( → page 34)
Icons display current settings and operating status of the phone
3 Display keys ( → page 14, → page 24)
4 Message key (→ page 15)
Access to the calls and message lists;
Flashing: new message or new call
5 End call key, On/off key
End call, cancel function, go back one menu level (press briefly), back to idle status (press and hold), switch handset on/off (press and hold in idle status)
6 Hash key
Keypad lock on/off (press and hold in idle status);
Toggles between upper/lower case and digits;
Insert a dialling pause (press and hold)
7 Microphone
8 Recall key
Consultation call (flash) (press and hold)
9 Star key
In idle status: Ringtone on/off (press and hold);
With an open connection: switch from pulse dialling to tone dialling (press briefly);
When inputting text: Open special characters table
10 Connection socket for headset
(→ page 10)
11 Key 1
Select network mailbox (press and hold)
12 Answer call key / Handsfree key
Dial number displayed;
Accept call; switch from earpiece to handsfree mode;
Open the redial list (press briefly); start dialling (press and hold);
13 Control key / Menu key ( → page 13)
Content
Overview of handset 1
Safety precautions 3
Getting started 4
Understanding the operating steps in the user guide 12
Getting to know your phone 13
Making calls 17
Adjusting the telephone settings 20
Restoring phone to default setting 25
ECO DECT 25
Multiple handsets 26
Phonebook (Address book) 27
Call list 29
Calendar 30
Alarm clock 31
Baby monitor 32
Display icons 34
Menu tree 36
Customer Service & Assistance 37
Environment 40
Appendix 41
Index 43
Safety precautions
Warning
Read the safety precautions and the user guide before use.
Explain their content and the potential hazards associated with using the device to your children.







Please note
The device cannot be used in the event of a power failure. It is also not possible to transmit emergency calls.
Emergency numbers cannot be dialled if the keypad/display lock is activated!
Getting started
Checking the contents of the package
One handset,
◆ One charging cradle incl. power adapter,
◆ One battery cover (rear cover for the handset),
◆ Two batteries,
One belt clip,
◆ One user guide.
Setting up the charging cradle
The charging cradle is designed for use in closed, dry rooms in a temperature range of +5°C to +45°C.
▶ Set up the charging cradle on a flat, non-slip surface.
The phone's feet do not usually leave any marks on surfaces. However, due to the multitude of different varnishes and polishes used on today's furnishings, marks on the surfaces cannot be completely ruled out.
Notes
- Never expose the telephone to the effects of heat sources, direct sunlight or other electrical devices.
◆ Protect your Gigaset from moisture, dust, corrosive liquids and fumes.
◆ Pay attention to the range of the base. This is up to 50 m inside buildings and up to 300 m in unobstructed outdoor areas. The range is reduced when Maximum Range is deactivated.
Connecting the charging cradle

Connect the flat plug to the charging cradle . 1
▶ Plug the power adapter into the power socket . 2
If you have to remove the plug from the charging cradle again:
▶ Disconnect the power adapter from the mains power supply.
▶ Press the release button and disconnect the plug 4.
Setting up the handset for use
The display is protected by a plastic film. Please remove the protective film!
Inserting the batteries and closing the battery cover
Caution
Use only rechargeable batteries recommended by Gigaset Communications GmbH ( → page 41), as this could otherwise result in significant health risks and personal injury. For example, the outer casing of the batteries could be destroyed or the batteries could explode. The phone could also malfunction or be damaged as a result of using batteries that are not of the recommended type.

▶ Insert the batteries with the polarity in the right direction (for correct +/- direction, see diagram).
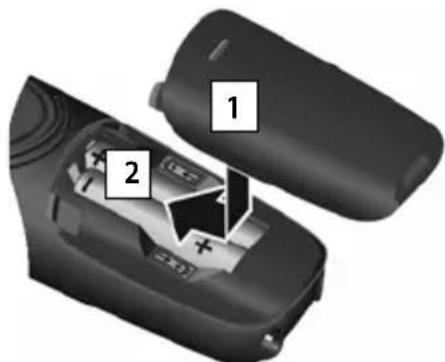
- Insert the battery cover on the top .1 - Then press the cover until it clicks into place .2

To open the battery cover, for example to change the batteries:
▶ Grip the notch on the cover and slide it downwards 4.
Belt clip
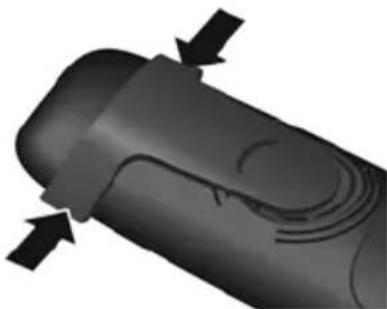
The handset has notches on each side to attach the belt clip.
◆ T o attach — press the belt clip onto the back of the handset so that the tabs on the belt clip click into place in the notches.
- To remove — press the centre of the belt clip firmly with your right thumb, push the fingernail of your left thumb up between the clip and the casing and pull the clip in an upward direction.
Getting started
Charging the batteries
The batteries are supplied partially charged. Please charge completely before use. (The batteries are fully charged when the power icon ⚡ disappears from the display.)
▶ Charge the handset in the charging cradle for 7.5 hours.

Notes
◆ The handset may only be placed in the designated base/charging cradle.
◆ The battery may heat up during charging. This is not dangerous.
◆ After a time, the charge capacity of the battery will decrease for technical reasons.
Changing the display language
You can also change the display language via the menu:





or, if you do not understand the language currently set, go to:
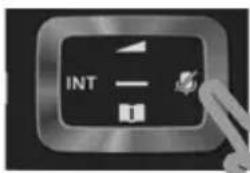


▶ Press right on the control key.
▶ Press keys 6MNO and 5JKL slowly one after the other.
Example

The language selection display appears.
The current language (e.g. English) is selected.
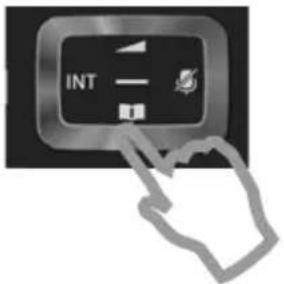
Example

▶ Press the down control key 🔒 ...
... until the language you wish to use is displayed e.g. French.
▶ Press the right key, directly under the display, to select the language.
Example
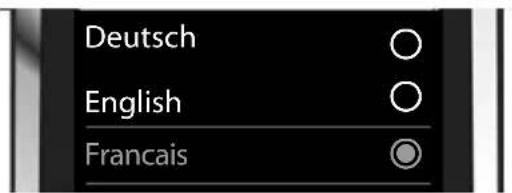
The selection is marked with Ⓞ.
▶ Press and hold the End call key 🔒 to return to idle status.
Registering the handset
The registration process depends on the base.
◆ A automatically registering the Gigaset C430-C430A handset to base station:
▶ Place the handset in the base.
If automatic registration does not work, the handset will have to be registered manually.
◆ Manually registering the handset:
You must initiate registration on the handset and on the base. Both must be carried out within 60 secs.
On the base: Press and hold (min. 3 secs) the Registration/paging key.
On the handset, press the display key Register.
Or:


Registration

Please register
handset
Register
Display shows: Searching for a base in registration mode. The connection to the base will be established; this may take some time.
▶ Enter the system PIN if required (factory setting: 0000). ▶ OK
When registering, the display screen shows: Handset is registering
After registering successfully, the display screen shows: Handset registered
Your handset can be registered on up to four bases. To see how to use your handset with multiple bases and de-register a handset, refer to the user guide for the base.
Setting the date and time
Set the date/time so that the correct date and time can be assigned to incoming calls, and so that you can use the alarm.

▶ Press the key Time below the display screen to open the input field. (If you have already set the date/time, open the input field via the menu:


The submenu Date/Time is shown on the display.
The active input position flashes. Enter the day, month and year as an 8-digit number via the keypad, e.g. 1 w 4 GHI 1 w 0 R 2 ABC 0 R 1 w 3 DEF for 14.10.2013.

Press the right or left control key to change the input position, e.g. to correct an entry.


▶ Press the down control key to switch to the time input field.
Enter the hours and minutes in 4-digit format via the keypad e.g., 0.8, 7p085 1.00 5.00 for 07:15 am. Change the input position with the control key if necessary.
▶ Press the key Save below the display screen to save the entry.
Getting started

Display shows: Saved. You will hear a confirmation tone.

You will automatically return to idle status.
Your phone is now ready for use.
Connecting the headset
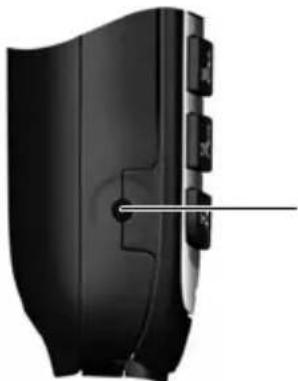
You can connect a headset with 2.5 mm jack connectors. For information on recommended headsets, see the relevant product page at www.gigaset.com
What would you like to do next?
After successfully setting up the phone, you can make calls straight away, customise your Gigaset according to your requirements or firstly familiarise yourself with the operation.
Setting ringtones
Assign specific tunes to internal and external calls, reminders ( → page 21), wake-up calls ( → page 31) and to certain callers ( → page 27).
Protecting yourself against unwanted calls
Set your phone up so that it doesn't ring if there is an anonymous call or use the time control ( → page 23).
Register an existing Gigaset handset and add it to the phonebook
Use available handsets to continue calling from your new base. Transfer directory entries from these handsets to your new handset ( → page 28).
Configuring ECO DECT settings
Reduce the transmission power (emissions) of your phone ( → page 25).
If you have any questions about using your phone, please read the tips on troubleshooting ( → page 38) or contact our Customer Service team ( → page 37).
Understanding the operating steps in the user guide
The keys on your Gigaset handset are set out in these operating instructions as follows:

Answer call key / Menu key / End call key
0 R to 9 wxyz Number / Letter keys
* ♀ / #→ Star key / Hash key
/0 Message key / Recall key
Overview of display icons (→ page 34).
Example: Activating/deactivating Auto Answer
Illustration in the user guide:

Follow this procedure:
▶ ☐: With the handset in idle status, press the right control key to open the main menu.
▶ ⚙️: Navigate to the ⚙️ icon using the control key ⏻.
▶ OK: Press the display key OK or the middle of the control key ☐ to open the submenu Settings.
Telephony: Scroll to the entry Telephony with the control key
▶ OK: Press the display key OK or the middle of the control key ☐ to open the submenu Telephony.
▶ Auto Answer: The activate/deactivate auto answer function is selected.
▶ Change (☑ = activated): Press the display key Change or the middle of the control key ☐ to alternate between activating or deactivating (☑ = activated, □ = deactivated).
Switching the handset on/off
▶ Press and hold the End call key 🔒 in idle status to switch the handset on or off.
Locking/unlocking the keypad
The keypad lock prevents any accidental use of the phone. If you press a key when the keypad is locked, a message is displayed.
▶ Press and hold the #→ key to lock or unlock the keypad.
If a call is signalled on the handset, the keypad automatically unlocks. and you can accept the call. It then locks again when the call is finished.
Control key
In the description below, the side of the control key (up, down, right, left, middle) that you have to press in the different operating situations is marked in black, e.g. ▶ for "press right on the control key".
The control key allows you to navigate within menus and entry fields. In idle status or during an external call, it has the following functions:

When the handset is in idle status
Open the phonebook.
or Open the main menu.
Open list of handsets.
Bring up the menu for setting the handset's call volume ( → page 19).
During an external call
Open the phonebook.
Initiate an internal consultation call.
Adjust the loudspeaker volume for earpiece and handsfree mode.
Functions when pressing the centre of the control key
The key has different functions, depending on the operating situation.
◆ In idle status, it opens the main menu.
- In submenus, selection and entry fields, the key takes on the function of the display keys OK, Yes, Save, Select or Change.
Note
These instructions demonstrate opening the main menu by pressing the right of the control key and confirming the functions by pressing the appropriate display key. However, if you prefer, you can also press the middle of the control key.
Getting to know your phone
Display keys
The display keys have a function preset by default in idle status, but the keys can be re-assigned ( → page 24).
The functions of the display keys change depending on the operating situation.
Example

Some of the important display keys are:
Options O pen a menu for further functions.
OK Confirm selection.
Back Skip back one menu level or cancel operation.
Save Save entry.
Overview of icons on the display keys (→ page 35).
Menu guidance
The functions of your telephone are displayed on a menu that consists of several levels. Menu overview → page 36.
Main menu (first menu level)
When the handset is in idle status, press right on the control key ☐ to open the main menu.
The main menu functions are shown in the display as icons. The icon for the selected function is highlighted and the name of the associated function appears in the display header.
Accessing a function, i.e. opening the corresponding submenu (next menu level):
▶ Use the control key ⏻ to navigate to the required function and press the display key OK.
Returning to idle status: Briefly press the display key Back or End call key 🔒.
Example

Submenus
The functions in the submenus are displayed as lists.
To access a function:
▶ Scroll to the function using the control key ⏻ and press OK.
Returning to the previous menu level: Briefly press the display key Back or End call key 🔒.
Returning to idle status
From any menu:
▶ Press and hold the End call key 🔒.
Or:
If you do not press a key, the display automatically returns to idle status after 2 minutes.
Example

Message lists
Any messages you receive are saved in the message lists.
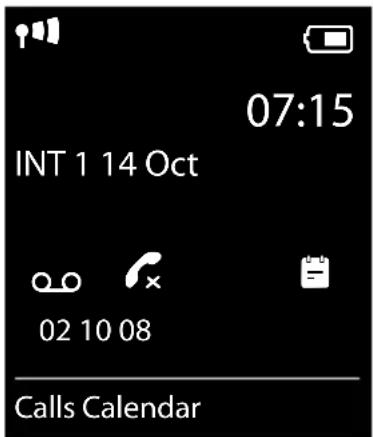
An advisory tone sounds as soon as a new entry appears on a list. The Message key also flashes. Icons for message types and the number of new messages are shown on the idle display.
New messages available:
◆ On the answer machine (depending on the base)/network mailbox
◆ In the missed calls list
In the missed alarms list
Open the message list by pressing the Message key ☑. You can access the following message lists:
◆ Ans wer Mach.: Answer machine list (depending on the base)
- Mailbox: Network mailbox (if your network provider supports this function and the number of the network mailbox has been stored.)
♦ Missed Calls: Missed call list (see "Call list" → page 29)
◆ Missed Alarms: Missed appointments list
The icon for the network mailbox is always displayed, provided the number is stored in the telephone. The other lists are only displayed if they contain messages.
Opening the list: Select required list. OK
Exception: If you select the network mailbox, the number of the network mailbox will be selected. Lists are not opened on the display.
Example
Entering numbers and text
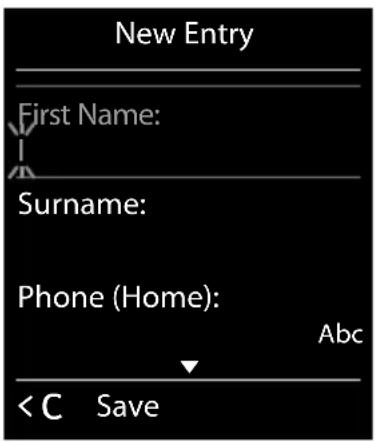
If several number and/or text fields are displayed (e.g.
First Name and Surname in a phonebook entry), the field is automatically activated. The following fields must be activated by navigating with the control key ⏻. A field is activated when a cursor is blinking inside it.
Correcting incorrect entries
- Deleting characters before the cursor: press the display key <C briefly.
- Deleting words before the cursor: press and hold the display key
.
Entering text
- Letters/Characters: Multiple letters and characters are assigned to each key between 0.8 and 9 wxvz . The characters are shown according to the key in a selection line at the bottom left of the display. The selected character is highlighted. Briefly press the key several times in succession to select the required letter/character.
- Placing the cursor: Letters/characters are inserted at the cursor position. You can insert the cursor by pressing the control key ⏻, or ⏻ in fields with multiple characters.
- Typing lower case, upper case and numbers: Press the hash key #→ to switch between lower case, upper case or numbers for the following letters.
When editing a phonebook entry, the first letter and each letter following a space is automatically in upper case. - Special characters: Press the star key * △ to open the special characters table. Navigate to the character desired using the star key and press the display key Insert to select it.
- Special letters: Umlauts or other marked/diacritic characters can be selected by pressing the corresponding letter several times. See the character table → page 42.
Making an external call
▶ Enter number, briefly press the Answer call key 📂.
Or:
▶ Press and hold the Answer call key ⬆, enter number.
You can cancel the dialling process with the End call key 🔒.
Dialling with the redial list
The redial list contains the 20 numbers last dialled with the handset. You can manage this similarly to your phone's message lists ( → page 15).
Press the Answer call key 📂 briefly to open the redial list.
▶ Select entry. ▶ Press the Answer call key 🔍. The number is dialled.
When a name and corresponding phone number are displayed: Press the display key View.
Managing entries in the redial list:
▶ Open redial list. ▶ Select entry. ▶ Options
You can select the following functions:
◆ Co py to Directory ▶ OK
Copy an entry to the phonebook ( → page 27).
◆ Display number ▶ OK
Copy a number into the display and edit it or add to it, then select with 🔔 or save as a new entry in the phonebook with ➕.
◆ Delete entry ▶ OK
Delete the selected entry.
◆ Delete all ▶ OK
Delete all entries.
Dialling from the call list
▶ OK ▶ Select list. ▶ OK
▶ Select entry. ▶
▶ The number is dialled.
Notes
- You can also bring up the call list using the display key Calls, but you must assign a display key accordingly (→ page 24).
- You can also open the list Missed calls using the Message key ☑.
Example
All calls
James Foster Today, 18:30
01712233445566 11/06/2013, 18:30
→ 0168123477945 10/06/2013, 17:13
View Options
Making calls
Dialling with the phonebook
Select entry.
▶ If multiple numbers are entered: Select the number with 📋 and press the Answer call
key or OK.
▶ The number is dialled.
One touch call
You can set up your phone so that you can dial a specific number when you press any key on the keyboard. This allows children, who are unable to enter a number, to call a certain number, for example.
OK ▶ One Touch Call ▶ OK
▶ Activation: On / Off
▶ Call to: Enter or change the number that you wish to dial.
▶ Save
The activated One Touch Call appears on the idle display. The saved number is dialled by pressing any key. Press the End call key 🔒 to cancel dialling.
Ending one touch call mode:
▶ Press the display key OFF. ▶ Press and hold the #→ key.
Or:
▶ Press and hold the #→ key.
Accepting a call
You have the following options:
▶ Press
▶ If Auto Answer is switched on (→ page 21), remove the handset from the charging cradle.
Handsfree mode
If you are going to let someone listen in, you should tell the other party that this is happening.
▶ Press 📋.
Placing the handset in the charging cradle during a call:
▶ Press and hold ⬆ for a further 2 seconds while placing the handset in the charging cradle.
Adjusting the loudspeaker volume
◆ Accessing the settings via the menu:


▶ Earpiece: Volume can be set at 5 levels for the earpiece and headset.
▶ Speaker: ☐ Set the volume at 5 levels.
▶ Save
- Accessing the settings during a call for the mode currently in use (handsfree, earpiece, headset):
▶ control key □ ▶.
The setting is saved automatically after 2 seconds or press the display key Save. The screen reverts back to its previous display.
Switching the microphone on/off (muting)
If you turn the microphone off during a call, your caller can no longer hear you.
▶ Press ☐ to switch the microphone on/off.
Adjusting the telephone settings
The handset and base station are preconfigured, but you can change the settings to suit your individual requirements.
The settings can be changed via the menu Settings whilst on a call or in idle status.
Changing the display language



Setting your country and local area codes
Your area code (international and local area code) must be saved on the phone before you can transfer phone numbers (e.g. in vCards). Some of these numbers are already preset. Please ensure that the prefix is correctly separated from the rest of the area code.


▶ Area Codes ▶ OK ▶ Navigate to the entry field, delete the number using <C if needed ▶ Enter the number ▶ Save
Example
![Area Codes International code: 00 - 49 Local area code: 0 - [8 : ] < Save](/content/2026/06/1288756/images/da979f19a12b2a2c436eea6e038b6ce3d1635a8abe751ac6439eac596ae9eab6.jpg)
Adjusting the handset display settings
Setting a screensaver
You can set a screensaver for the display when in idle status. You can choose from an analogue clock, a digital clock or an image.
To show the display in idle status, briefly press 🔒.


▶ Screensaver (√ = activated) ▶ Edit
▶ Activation: On / Off
Selection:

Digital Clock / Analog Clock / [Images]
Or:
▶ View (View screensaver)
▶ Select screensaver ▶ OK
▶ Save
Example

Setting the colour scheme
You can set the display to show a dark or a light background.


Colour Schemes ▶ OK


Setting the display backlight
The display backlight is always lit when the handset is not in the base/charging cradle or when a key is pressed. Any digit keys pressed appear on the display for pre-dialling.
You can also activate/deactivate the display backlight for idle status:
OK ▶ Display ▶ OK ▶ Backlight ▶ OK
In Charger: On / Off
Out of Charger: On / Off
▶ Save
Note
The handset's standby time can be significantly reduced if the display backlight is activated.
Activating/deactivating Auto Answer
When set to Auto Answer, the handset accepts an incoming call as soon as you remove it from the charging cradle.
OK ▶ Telephony ▶ OK ▶ Auto Answer ▶ Change (☑ = activated)
Regardless of the setting Auto Answer, the connection ends as soon as you place the handset back in the charging cradle. Exception: Press and hold 📋 for a further 2 seconds while placing the handset in the charging cradle.
Setting earpiece profiles
You can set various profiles for the earpiece to optimally adapt your phone to your environment. Check which is the most comfortable for you.
▶ OK ▶ Audio Settings ▶ OK ▶ Earpiece Profiles ▶ OK ▶ Select profile ▶ Select (○ = selected)
Earpiece Profiles: High and Low. The default is Low.
Setting the handset ringtones
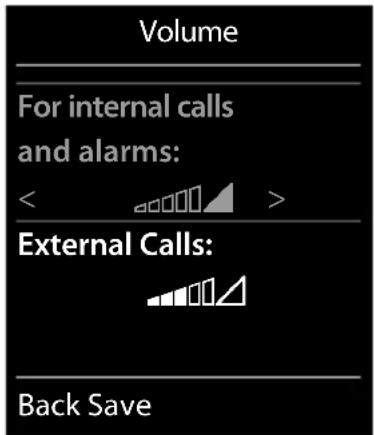
Setting the ringtone volume
OK ▶ Audio Settings ▶ OK ▶ Ringtones (Handset) ▶ OK ▶ Volume ▶ OK
For internal calls and alarms:
Volume can be set at 5 levels or crescendo (increasing volume) for internal calls and anniversaries.
▶ External Calls:
Volume can be set at 5 levels or crescendo (increasing volume) for external calls.
▶ Save
Example
Adjusting the telephone settings
Setting the ring melody
OK ▶ Audio Settings ▶ OK ▶ Ringtones (Handset) ▶ OK
▶ Melodies ▶ OK
▶ Internal Calls: Ⓞ Setting the volume/melody for internal calls and anniversaries.
▶ External Calls: ⏻ Setting volumes/melodies for external calls.
▶ Save
Activating/deactivating the ringtone
Activating/deactivating the ringtone permanently: Press and hold the star key * △.
When the ringtone is deactivated, ✗ appears in the status bar.
Deactivating the ringtone for a current call: Press Silence or 🔒.
Activating/deactivating the alert tone (beep)
You can activate an alert tone (beep) instead of the ringtone.
Press and hold the star key ☐ and within three seconds ▶ Beep.
When the alert tone is activated, -→ appears in the status bar.
Press and hold the star key ☐ to deactivate the alert tone again.
Activating/deactivating advisory tones
Your handset uses advisory tones to tell you about different activities and statuses. These advisory tones can be activated/deactivated independently of each other.
OK ▶ Audio Settings ▶ OK ▶ Advisory Tones ▶ OK
▶ Key Tones: On / Off
Tone when keys are pressed.
▶ Confirmation: On / Off
Confirmation/error tone after making entries, advisory tone when a new message has been received.
▶ Battery: On / Off
Warning tone when there are fewer than 10 minutes of talktime remaining (every 60 seconds). There is no battery warning when the baby monitor is activated.
▶ Save
Protection against unwanted calls
Setting time control for external calls
You can specify a time period when you do not want the telephone to ring.


If activated:
▶ Suspend ring. from: Enter the start of the period.
▶ Suspend ring. until: Enter the end of the period.
▶ Save
Example
Time Control
For external calls:
On
Suspend ring. from:
22:00
Suspend ring. until:
07:00
Back Save
Note
During this period, your phone will continue to ring for numbers to which you have assigned a VIP ringtone in the phonebook.
Protection from anonymous callers
You can set your phone so that it doesn't ring for anonymous calls (callers who have withheld Calling Line Identification). The call is only signalled on the display. The setting only applies to handsets for which the setting is configured.


Calls Silent


Quick access to numbers and functions
The digit keys 2ABC up to 9WXYZ can be assigned to a number from the phonebook.
The left and right display keys have a function preset by default, but the keys can be re-assigned ( → page 24).
You can then dial the number or start the function by simply pressing a key.
Assigning digit keys
Prerequisite: You must assign a number to the digit key.
▶ Press and hold the digit key.
Or:
Briefly press the digit key. ▶ Press the display key QuickDial.
▶ The phonebook opens. ▶ Select entry. ▶ OK
The entry is saved to the corresponding digit key.
Note
If you delete or edit the entry in the phonebook at a later date, this will not affect the assignment to the number key.
Adjusting the telephone settings
Selecting numbers/changing an assignment
Prerequisite: You must have assigned a number to the digit key.
When the handset is in idle status
▶ Press and hold the digit key: The number is dialled immediately.
Or:
▶ Briefly press the digit key: Press the left-hand display key with the number/name (abbreviated if necessary) to dial the number.
Or:
Press the display key Change to change the key assignment, or press the display key Clear Key to delete the assignment.
Assigning display keys
In idle status, press and hold the left or right-hand display key. The list of possible key assignments is opened. Select entry OK
Choose from the following functions:
Baby Monitor Set and activate the baby monitor ( → page 32).
Alarm Clock Set and activate the alarm clock ( → page 31).
Calendar Op en calendar ( → page 30).
One Touch Call Set up one touch call(→ page 18).
Redial Sh ow redial list ( → page 17).
More Functions... You can also choose further functions:
Call Lists Show call list ( → page 29).
Restoring phone to default setting
You can reset individual modifications to handset settings.
The following are not affected by the reset:
◆ Date / time,
◆ Registration of handsets to the base and the current selection of the base,
◆ Entries in the calendar and phonebook,
◆ Redial list.
When resetting the handset (Handset Reset), audio and display settings will be deleted.
Resetting the handset
OK ▶ System ▶ OK ▶ Handset Reset ▶ OK ▶ Confirm security prompt with Yes
ECO DECT

ECO DECT uses less energy and reduces transmission power.
Reducing radiation (depending on the base)
The radiation can only be reduced if your base supports this function.
Your telephone's transmission power is automatically reduced according to the distance to the base.
You can reduce the radiation from the handset and the base even further by
◆deac tivating Maximum Range,
◆activating No Radiation.
For more details, see the user guide for your base station.
Making internal calls
Internal calls to other handsets registered to the same base are free of charge.
(press briefly) ▶ The list of handsets is opened. Your own handset is marked <. ▶
Select the handset or Call all (group call) from the list if required.
Holding down ↻ immediately starts a call on all registered handsets.
Internal consultation/internal transfer
You receive a call from an external participant and would like to transfer the call to an internal participant or wish to consult him/her.
The list of handsets is opened. ▶ If more than two handsets are registered to the base, select one handset or Call all. ▶ 📄 or OK
Holding a consultation call: You are speaking to the internal participant and are returning to your external call: ▶ Options ▶ End active call ▶ OK
Transferring an external call: You have two options to transfer the call:
▶ Wait until the participant called answers, then hang up:
Press the End call key 🔒.
Or:
▶ Hang up before the participant calls: Press the End call key 🔒.
If the participant called does not answer of does not transfer the call, end the consultation with End.
Establishing a conference call/call swapping
You are taking a call while a second call is being held. Both callers are indicated on the display.
▶ Call swapping: You can switch between both participants using 📄.
▶ Establishing a three-way conference call: Press Conf.
Ending a conference call: Press End Conf. You are reconnected with the external participant. You can switch again between both participants using 🔒.
Each of the callers can end their participation in the conference call by pressing the End call key ☎.
Accepting/rejecting call waiting
If you get an external call while conducting an internal call, you will hear the call waiting tone. If the number is transferred, you will see it or the name of the caller on the display.
▶ Rejecting a call: ▶ Press the display key Reject.
Accepting a call: ▶ Press the display key Accept. You are now speaking to the new caller.
The previous call is placed on hold.
Ending the current call and returning to the call on hold:
▶ Options ▶ End active call ▶ OK.
Phonebook (Address book)
In a phonebook entry, you can store first names and surnames, up to three numbers, an anniversary with a reminder, and caller melody.
You can create the directory (with up to 200 entries) individually for each of your handsets. You can also send lists/entries to other handsets ( → page 28).
Length of the entries
3 numbers: Max. 32 digits each
First name and surname: Max. 16 characters each
Managing directory entries
Opening phonebook
Press the key ☐ in idle status or, depending on the situation, the display key 📋.
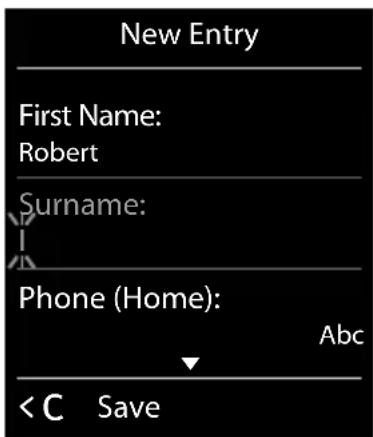
Creating a new entry
▶ Open directory. ▶
▶ Switch between the input fields using ⬆ and enter the relevant components of the entry (names, numbers, anniversary, ringtone).
Navigate downwards to display further components.
▶ Press the display key Save.
To create an entry, you must enter at least one number. If you have assigned a caller melody, the entry in the phonebook is supplemented with the symbol VIP.
Displaying/changing an entry
▶ Open phonebook. ▶ Select the desired entry.
▶ View ▶ Display all components of the entry. ▶ Edit
Or:
▶ Options ▶ Edit entry ▶ OK
Example
Deleting an entry
▶ Open phonebook. ▶ Select the desired entry. ▶ Options ▶ Delete entry ▶ OK
Delete all entries in the directory:
▶ Open phonebook. ▶ Options ▶ Delete List ▶ OK
Defining the order of the contacts entries
You can define whether the entries are to be sorted by first name or surname.
▶ Open phonebook. ▶ Options ▶ Press Sort by Surname or Sort by First Name.
If no name was entered, the default number is shown in the surname field. These entries appear at the beginning of the list, regardless of how the entries are sorted.
The sort order is as follows:
Space | Digits (0-9) | Letters (alphabetical) | Other characters
Displaying the number of entries that are available in the directory
▶ Open phonebook. ▶ Options ▶ Available Memory ▶ OK
Selecting a phonebook entry, searching in the phonebook
▶ Open phonebook.
▶ Scroll to the name you are searching for using ⏻. Holding down ⏻ scrolls continuously upwards or downwards through the phonebook.
Or:
▶ Enter the first few letters (max. 8 letters) using the keypad. The display jumps to the first name that begins with these letters. If necessary, scroll on to the desired entry using ⏻.
Transferring an entry/phonebook to another handset
Prerequisites:
◆ The sending and receiving handsets must both be registered to the same base.
◆ The other handset and the base can send and receive directory entries.
You can transfer the entire directory, an individual entry or several individual entries.
Notes
◆ An external call interrupts the transfer.
- Caller pictures and sounds are not transferred. Only the date is transferred for an anniversary.
When transferring an entry between two vCard handsets:
If the recipient does not yet have an entry with that name, a new entry is created.
If there is already an entry with that name, this entry is expanded with the new numbers.
If the entry contains more numbers than the recipient permits, a further entry is created with the same name.
If the recipient is not a vCard handset: A separate entry is created and sent for each number.
- Your handset receives entries from a non-vCard handset: Entries with numbers that are already stored are discarded, otherwise a new entry is created.
Transferring individual entries
▶ Open phonebook. ▶ Select the desired entry. ▶ Options
▶ Copy Entry ▶ OK ▶ to Internal ▶ OK ▶ Select the recipient handset. ▶ OK
Transferring the entire directory
▶ Open phonebook. ▶ Select the desired entry. ▶ Options
▶ Copy List ▶ OK ▶ to Internal ▶ OK ▶ Select the recipient handset. ▶ OK
Transferring a displayed number to the phonebook
▶ The number is displayed or highlighted.
▶ Press display key ➕ or Options ▶ Copy to Directory. ▶ OK
- ▶
▶ Complete the entry. ▶ OK
Or:
- ▶ Select entry. ▶ OK ▶ Select number type. ▶ OK
The number is entered or an existing number is overwritten (answer the prompt using Yes/No).
▶ Save
Call list
Your telephone stores calls in various lists. Opening the lists:
◆ M issued calls list: Message key ▼ ▶ Missed Calls: ▶ OK
◆ List selection: ▶ ➤ ⬇ ➤ OK ➤ Select list. ➤ OK
The last 20 entries are displayed in the call list.
List entry
The following information is displayed in the list entries:
◆T he list type (in the header row)
◆ Icon for the type of entry:
× (Missed calls), (Accepted calls), → (Outgoing calls)
◆ Caller's number. If the number is stored in the phonebook, name and number type are displayed instead (☐ Phone (Home), ☐ Phone (Office), ☐ Phone (Mobile)). For missed calls, the number of missed calls from this number is also shown in square brackets.
◆ Date and time of call (if set).
▶ Select entry. ▶ Options
▶ View: All available information is displayed, e.g. the corresponding number when a name is displayed.
▶ Options: You can delete the entry or transfer the number to the phonebook (→ page 29).
View Options
Calling back a caller from the call list:
▶ Select entry. ▶ Press the Answer call key ↗.
Example
All calls

James Foster
Today, 18:35

01712233445566
11/06/2013, 18:30

0168123477945
10/06/2013, 17:13
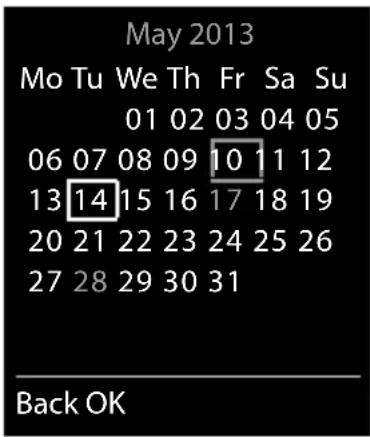
You can remind yourself of up to 30 appointments.
In the calendar, the current day is outlined in white; on days with appointments, the numbers are displayed in colour.
When a day is selected, it will be highlighted.
Saving appointments to the calendar
Prerequisite: Date and time are set (→ page 9).

- Appointments that have already been stored are shown.
- If no appointments have been entered, the data input window will open immediately to add the new appointment.
Activation: On/Off
The following information can be added:
◆Da te: The selected day is preset. Enter new data to change.
◆ Time: Time (hour and minute) of the appointment.
◆ Text: Appointment name (e.g. dinner, meeting).
◆ Signal: Select the melody of the reminder signal or deactivate the acoustic signalling.
▶ Save
Signalling of appointments/anniversaries
Anniversaries are transferred from the phonebook and displayed as an appointment. An appointment/anniversary is displayed in idle status and signalled for 60 seconds with the selected ringtone.
You can deactivate the reminder call:
▶ Press OFF to acknowledge and end the reminder call.
When you are on the phone, a reminder call is indicated on the handset with a single advisory tone.
Displaying missed appointments/anniversaries
The following appointments and anniversaries are stored in the Missed Alarms list:
◆T he appointment/anniversary call was not acknowledged.
◆ The appointment/anniversary was signalled during a phone call.
◆The handset was switched off at the time of the appointment/anniversary.
The last 10 entries are stored. The 📋 icon and the number of new entries are shown in the display. The most recent entry appears at the head of the list.
To open the list: ▶ Message key ☑ ▶ Missed Alarms ▶ OK
Or via the menu: 📋 ▶ ★ ▶ OK ▶ Ⓞ Missed Alarms ▶ OK
▶ scroll in the list if required
Information about the appointment/anniversary is displayed. You can:
▶ Delete an appointment/anniversary: Delete
Displaying/changing/deleting stored appointments
OK ▶ Calendar ▶ OK ▶ Select the desired day. ▶ OK ▶ The appointment list is displayed. ▶ Select the desired appointment.
▶ View: Display appointment settings, change, if required using Edit.
Or:
▶ Options: Change settings or delete appointments.
- Edit entry ▶ OK
- Delete entry ▶ OK
- Activate/Deactivate ▶ OK
- Delete all Appoints. ▶ OK ▶ Confirm prompt with Yes. All appointments for the selected day are deleted.
Alarm clock
Prerequisite: Date and time are set (→ page 9).
You can activate/deactivate and set the alarm clock as follows:
OK Activation: On/Off
▶ Changing the settings:
- Time: Set the hour and minute for the wake-up time (time setting → page 9).
- Occurrence: 📋 Daily/Monday-Friday
- Volume: ☐ Volume can be set at 5 levels or crescendo (increasing volume).
- Melody: ☐ Select a ringtone for the alarm call.
▶ Press the display key Save.
When the alarm clock is activated, the icon ⏻ and the alarm time is displayed in idle status.
An alarm call is signalled in the display and with the selected ringtone for a maximum of 60 seconds. During a call, the wake-up call is only signalled by a short tone.
Deactivating the alarm call/repeating after a pause (snooze mode)
Prerequisite: One alarm call sounds.
▶ Deactivating until the next alarm call: Press OFF.
Or:
▶ Snooze mode:
Press Snooze or any key. The wake-up call is deactivated and then repeated after 5 minutes. Or:
Press nothing. The alarm call is deactivated after 60 seconds and then repeated after 5 minutes. After the fourth repetition, the alarm call is deactivated for 24 hours.
Example

Baby monitor
When the baby monitor is switched on, the stored (internal or external) destination number is called as soon as a defined noise level is exceeded in the vicinity of the handset. The baby monitor alarm to an external number is cancelled after approximately 90 seconds.
In baby monitor mode, incoming calls are only signalled on the display (without ringtone). The display backlight is reduced to 50%. Advisory tones are deactivated. All keys are locked, with the exception of the display keys and pressing the middle of the control key.
You can answer the baby monitor alarm using the Two Way Talk function. Deactivate/activate the speaker of the handset with this function.
If you accept an incoming call, the baby monitor mode is suspended for the duration of the call, but the function remains activated. The baby monitor mode is not deactivated by switching the handset off and on again.
Caution
Ensure the following points:
- The handset should be positioned 1 to 2 metres away from the baby. The microphone must be pointed towards the baby.
- Activating the function reduces the operating time of your handset. If necessary, place the handset in the charger.
◆ The baby monitor is activated 20 seconds after switching on.
Please always check the functionality when you switch on:
◆ Test the sensitivity.
- Check the connection if you are forwarding the baby monitor alarm to an external number.
◆ Make sure that the answer machine at the target number is switched off.
Activating/deactivating and setting the baby monitor

▶ Setting the baby monitor:
- Send alarm to: Internal (at least 2 handsets are registered)/ External
If Internal is selected:
▶ Handset: Press the Change display key. ▶ Select handset. ▶ OK
If External is selected:
▶ Number: Enter the number directly or select from the phonebook (press the display key 📋).
Baby monitor activated


▶ Save
The target number is displayed in idle status when the baby monitor alarm is activated. The baby monitor is deactivated using the OFF display key.
Cancelling the baby monitor alarm
Cancelling during a baby monitor alarm: Press 🔒.
Deactivating the baby monitor remotely
Prerequisites: The baby monitor alarm is forwarded to an external destination number.
The recipient's phone supports tone dialling.
▶ Accept the baby monitor alarm and press the 9 # keys.
The call is ended. The baby monitor is deactivated and the handset is in idle status.
Icons in the status bar
The following icons are displayed in the status bar depending on the settings and the operating status of your telephone:
| Icon Meaning | |
| Signal strength (No Radiation off) | |
 | 76% - 100% |
 | 51% - 75% |
 | 26% - 50% |
 | 1% - 25% |
 | Red: no connection to the base |
 | No Radiation activated: white, if Maximum Range is on; green, if Maximum Range is off |
 | Ringtone deactivated |
 | "Beep" ringtone activated |
 | Key lock |
| Icon Meaning | |
 | Battery charge status:White: charged over 66% |
 | White: charged between 34 and 66% |
 | White: charged between 11 and 33% |
 | Red: charged below 11% |
 | Flashes red: battery almost empty (approx. 5 minutes talktime remaining) |
| Battery is charging (current charge status): | |
 0% - 10% 0% - 10% | |
 11%-33% 11%-33% | |
 34% - 66% 34% - 66% | |
 67% - 100% 67% - 100% | |
Menu icons
| Alarm Clock | |
| Call Lists | |
| Answer Machine |
| Select Services | |
| Additional Features | |
| Settings |
Display key icons
The following icons indicate the current function of the display keys according to the operating situation:
| Icon Action | |
| Last number redial | |
| Deleting text |
| Icon Action | |
| Opening phonebook | |
| Copy number to the phonebook |
Display icons for signalling of

Establishing a call (outgoing call)

Connection established

No connection established/connection terminated

External call Internal ca

call for
anniversary

Reminder call for appointment

Alarm call
Other display icons

Information

(Security) prompt
Ple


Action complete (green)

Action failed (red)
Menu tree
Opening the main menu: Press ☐ whilst the telephone is in idle status.
Note
Not all functions described in this user guide are available in all countries or with all network providers.

Alarm Clock
→ page 31

Call Lists
(depending on base)

Answer Machine
(depending on base)

Select Services
(depending on base)

Additional Features
| Calendar → page 30 | |
| Baby Monitor | → page 32 |
| → page 18 | |
| One Touch Call | → page 30 |
| Missed Alarms |

Settings
| Date/Time → page 9 | ||
| Audio Settings Handset Volume | → page 19 | |
| → page 21 | ||
| → page 22 | ||
| → page 21 | ||
| (further submenus depending on base) | ||
| Display Screensaver | → page 20 | |
| → page 20 | ||
| → page 21 | ||
| Language | → page 20 | → page 8 |
| Registration Register Handset | → page 8 | |
| (further submenus depending on base) | ||
| Telephony Auto Answer | → page 21 | |
| → page 20 | ||
| (further submenus depending on base) | ||
| System Reset Handset | → page 25 | |
| (further submenus depending on base) | ||
Customer Service & Assistance
Do you have any questions? As a Gigaset customer, you can find help quickly in this User Manual and in the service section of our Gigaset online portal www.gigaset.com/service.
Please register your phone online right after purchase.
This enables us to provide you with even better service regarding questions or a warranty claim. In order to contact our customer service via email, please use the email contact form from our Gigaset online portal after selecting your home country.
Our representatives are also available on the telephone hotlines for consultation.
Australia - - - - - - - - +61 1300 780 878 Jordan - - - - - - - - 00962 6 5625460/1/2
Austria 0043 1 311 3046 Kuwait +965 -22458737/22458738
Bahrain 31 73 11 173 Lebanon +9611240259/
Belgium-07815 6679 +9611236110
Bosnia Herzegovina-033 276 649 Luxembourg-(+352)8002 3811
Brazil Malaysia +603-8076 9696
Please have your record of purchase ready when calling.
Replacement or repair services are not offered in countries where our product is not sold by authorised dealers.
Questions and answers
If you have any queries about the use of your telephone, suggested solutions are available on our web-site at
www.gigaset.com/service ▶ FAQ ▶ First steps for troubleshooting.
The table below also lists steps for troubleshooting.
The display is blank.
- The handset is not activated.

- The battery is empty.
▶ Charge the battery or replace it (→ page 5).
- The key and display lock is activated.
▶ Hold down the hash key #→.
"No Base" flashes on the display.
- The handset is outside the range of the base.
▶ Move the handset closer to the base.
- The base is not activated.
▶ Check the base power adapter.
- The base's range is reduced because Maximum Range is deactivated.
▶ Activate Maximum Range (→ page 25) or reduce the distance between the handset and base.
"Please register handset" or "Place handset in base" flashes on the display.
The handset has not yet been registered or was de-registered due to the registration of an additional handset (more than six DECT registrations).
▶ Register the handset again (→ page 8).
The handset does not ring.
- The ringtone is deactivated.
▶ Activate ringtone (→ page 22).
- Call forwarding is set.
▶ Deactivate call forwarding.
- The phone does not ring if the caller has withheld his number.
▶ Activate the ringtone for unknown calls (→ page 23).
- The phone does not ring during a specific period or for certain numbers.
▶ Check time control for external calls (→ page 23).
The other party cannot hear you.
The handset is "muted".
▶ Activate the microphone again (→ page 19).
The caller's number is not displayed.
- Calling Line Identification (CLI) is not approved for the caller.
The caller should ask the network provider to enable Calling Line Identification (CLI).
- Caller display (CL IP) is not supported by the network provider or is not enabled for you.
▶ Caller display (CLIP) is enabled by the network provider.
- Your telephone is connected via a PABX or a router with an integrated PABX (gateway) that does not transmit all information.
Reset the system: Briefly pull out the power plug. Reinsert the plug and wait until the device restarts.
▶ Check the settings on the PABX and activate phone number display, if necessary. To do this, search for terms such as CLIP, calling line identification, phone number identification, caller ID, etc. in the system's user guide or ask the system manufacturer.
| You hear an error tone when keying an input.Action has failed/invalid input.▸ Repeat the process.Read the display and refer to the user guide if necessary. |
| You cannot listen to messages on the network mailbox.Your PABX is set to pulse dialling.▸ Set your PABX to tone dialling. |
Authorisation
This device is intended for use within the European Economic Area and Switzerland. If used in other countries, it must first be approved nationally in the country in question.
Country-specific requirements have been taken into consideration.
We, Gigaset Communications GmbH, declare that this device meets the essential requirements and other relevant regulations laid down in Directive 1999/5/EC.
A copy of the Declaration of Conformity is available at this Internet address: www.gigaset.com/docs
CE 0682
Exclusion of liability
Your handset display has a resolution of 128 x 160 pixels. Each pixel consists of three sub-pixels (red, green, blue).
It may be the case that a pixel is incorrectly controlled or has a colour deviation. This is normal and no reason for a warranty claim.
The following table shows the number of pixel errors that may occur without leading to a warranty claim.
| Description Maximum number of permitted pixel errors | |
| Colour illuminated sub-pixels 1 | |
| Dark sub-pixels 1 | |
| Total number of coloured and dark sub-pixels 1 |
Note
Signs of wear on the display and housing are excluded from the warranty.
Our environmental mission statement
We, Gigaset Communications GmbH, bear social responsibility and are actively committed to a better world. Our ideas, technologies and actions serve people, society and the environment. The aim of our global activity is to secure sustainable life resources for humanity. We are committed to a responsibility for our products that comprises their entire life cycle. The environmental impact of products, including their manufacture, procurement, distribution, utilisation, service and disposal, are already evaluated during product and process design.
Further information on environmentally friendly products and processes is available on the Internet at www.gigaset.com.
Environmental management system

Gigaset Communications GmbH is certified pursuant to the international standards ISO 14001 and ISO 9001.
ISO 14001 (Environment): Certified since September 2007 by TÜV SÜD Management Service GmbH.
ISO 9001 (Quality): Certified since 17/02/1994 by TÜV SÜD Management Service GmbH.
Disposal
Batteries should not be disposed of in general household waste. Observe the local waste disposal regulations, details of which can be obtained from your local authority.
All electrical and electronic products should be disposed of separately from the municipal waste stream via designated collection facilities appointed by the government or the local authorities.

This crossed-out wheeled bin symbol on the product means the product is covered by the European Directive 2002/96/EC.
The correct disposal and separate collection of your old appliance will help prevent potential negative consequences for the environment and human health. It is a precondition for reuse and recycling of used electrical and electronic equipment.
For more detailed information about disposal of your old appliance, please contact your local council refuse centre or the original supplier of the product.
Care
Wipe the device with a damp cloth or an antistatic cloth. Do not use solvents or microfibre cloths.
Never use a dry cloth; this can cause static.
In rare cases, contact with chemical substances can cause changes to the device's exterior. Due to the wide variety of chemical products available on the market, it was not possible to test all substances.
Impairments in high-gloss finishes can be carefully removed using display polishes for mobile phones.
Contact with liquid

If the device comes into contact with liquid:
1 D isconnect the power supply.
2 Remo ve the batteries and leave the battery compartment open.
3 Allow the liquid to drain from the device.
4 Pa t all parts dry.
5 P lace the device in a dry, warm place for at least 72 hours (not in a microwave, oven etc.) with the battery compartment open and the keypad facing down (if applicable).
6 Do not switch on the device again until it is completely dry.
When it has fully dried out, you will normally be able to use it again.
Technical data
Batteries
Technology: 2 x AAA NiMH
Voltage: 1.2 V
Capacity: 800 mAh
Handset operating times/charging times
The operating time of your Gigaset depends on the capacity and age of the battery and the way it is used. (All times are maximum possible times).
| Standby time (hours) * 320 * | 170 ** |
| Talktime (hours) 14 | |
| Operating time for 1.5 hours of calls per day (hours) * 130 * | 100 ** |
| Charging time in base (hours) 8.5 | |
| Charging time in charging cradle (hours) 7.5 |
* No Radiation deactivated, without display backlight in idle status
** No Radiation activated, without display backlight in idle status
General specifications
DECT
| DECT standard Supported | |
| GAP standard Supported | |
| No. of channels 60 duplex channels | |
| Radio frequency range 1880-1900 MHz | |
| Duplex method | Time division multiplexing, 10 ms frame length |
| Repetition frequency of the transmission pulse | 100 Hz |
| Duration of the transmission pulse 370 μs | |
| Channel grid 1728 kHz | |
| Bit rate 1152 kbit/s | |
| Modulation GFSK | |
| Language code 32 kbit/s | |
| Transmission power | 10 mW average power per channel, 250 mW pulse power |
| Range | Up to 50 m indoors, up to 300 m outdoors |
| Environmental conditions for operation +5°C | to +45°C, 20% to 75% relative humidity |
Character charts
Standard characters
Press the relevant key the number of times indicated.
| 1x | 2x | 3x | 4x | 5x | 6x | 7x | 8x | 9x | 10x | |
| 1ΔO | 1 | |||||||||
| 2ABC | a | b | c | 2 | ä | á | à | â | ã | |
| 3DEF | d | e | f | 3 | ë | é | è | ê | ||
| 4GH | g | h | i | 4 | ï | í | ì | î | ||
| 5JXL | j | k | l | 5 | ||||||
| 6MIXO | m | n | o | 6 | ö | ñ | ó | ò | ô | õ |
| 7PQRS | p | q | r | s | 7 | β | ||||
| 8TUV | t | u | v | 8 | ü | ú | ù | û | ||
| 9WXYZ | w | x | y | z | 9 | y | y | æ | ||
| 0B | 1) | . | , | ? | ! | 2) | 0 |
1) Space
2) Line break
Index
A
Address book, see Phonebook
Advisory tones 22
Alarm clock 31
Alert tone (beep) 22
Anniversary 27
displaying missed 30
Anonymous calls off 23
Answer call key 1
Answer machine
answer machine list....15
Appointment
displaying missed 30
Area code
setting own area code....20
Assigning number key....23
Authorisation 39
Auto Answer 21
B
Baby monitor....32
Backlight, display....21
Base
setting up. 4
Base station
changing the settings....20
Battery
charging....6
charging status 34
display 1
icon....1
inserting....5
Beep (alert tone) 22
Birthday, see Anniversary
C
Call
accepting 18
accepting automatically....21
external....17
internal 26
transferring (connecting) 26
transferring internally (connecting)....26
Call lists 29
deleting an entry 29
Call protection....23
Call waiting
external during an internal call ..... 26
internal during an external call .....26
Calling
external....17
internal 26
Care 41
Care of the device....41
Changing
display language....7
Changing the phone settings. . . . . . . . . 20
Changing the settings 20
Character charts 42
Charge status indicator. 1
Charge status of the batteries 34
Charging cradle (handset)
connecting 4
setting up 4
Charging time of handset. 41
Colour scheme 20
Connecting the headset.... 10
Consultation call
internal 26
Contact with liquid 41
Contents of the package 4
Control key 1, 13
Correcting incorrect entries ..... 16
Correction of incorrect entries ..... 16
Customer Care....37
Customer Service & Assistance ..... 37
Index
D
Deactivating baby monitor....33
Default setting 25
Dialling from the call list....17 using speed dial....23 using the redial list....17 with directory....18
Directory saving entry....27
Display backlight ..... 21 changing display language..... 7 colour scheme..... 20 network mailbox message ..... 15 phonebook memory..... 28 screensaver ..... 20 setting ..... 20 setting the backlight..... 21
Display icons 34
Display keys ....1, 14
assigning ....23
icons....35
Displays missed appointments/anniversaries . . . 30 Disposal ....40
E
Earpiece profile ....21 Earpiece volume ....19 ECO DECT ....25 Emergency numbers not possible....3
End call key .... 1 End call/End key.... 17 Ending a conference call .... 26 Entering special characters .... 16 Entering special letters .... 16
Entering text .... 16 Entering umlauts .... 16 Environment .... 40 Exclusion of liability .... 39
External call transferring internally (connecting) .... 26 External calls time control for ringtone .... 23
F
Factory settings....25 Field strength....34
G
Getting started 4
H
Handset advisory tones....22 changing the settings....20 colour scheme....20 connecting the charging cradle....4 display backlight....21 display language....7, 20 earpiece volume....19 idle status....15 list....13 muting....19 registering....8 restoring to default setting....25 screensaver....20 setting....20 setting up....5 speaker volume....19 switching on/off....13 transferring a call....26 use as a baby monitor....32 using multiple....26 Handsfree mode....18 Handsfree volume....19 Hash key....1 Headset socket....10 Hearing aids....3 Help....38
|
Icon alarm clock .... 31 Icons displaying new messages.... 15 on display keys .... 35 status bar.... 34
Idle status returning to....15
Internal making calls .... 26 Internal call .... 26 call waiting .... 26 Internal consultation call .... 26
K
Key
assigning to a function or number.....23
Key 1 (fast access) .... 1
Keys
Answer call key 1
control key....1, 13
display keys....1, 14
End call key 1
End call/End key 17
fast access 1
Hash key.....1
Message key 1
On/off key 1
Recall key....1
Star key....1
L
Language
display 7
Liquid 41
List
accepted calls 29
answer machine 15
call lists....29
handsets....13
missed calls 29
outgoing calls 29
List entry....29
Locking/unlocking the keypad ..... 13
Lower/upper case 16
M
Making calls
accepting a call 18
external....17
internal 26
Managing the calendar.... 30
Marked characters. 16
Medical equipment. 3
Melody
ringtone for internal/external calls .... 22
Memory in the phonebook 28
Menu
opening....13
tree 36
Message key 1
Message lists 15
opening....15
Microphone....1
Missed anniversaries/appointments ..... 30
Missed call....29
Muting the handset 19
N
Number
copying to the phonebook 29
Numbers
entering....16
0
On/off key 1
One touch call....18
Operating time of handset....41
Order in the phonebook. 27
Index
P
Phone
restoring to default setting....25
setting 20
Phonebook....27
copying number from text ..... 29
opening 13
order of entries 27
sending entry/list to handset ..... 28
sending to handset....28
Power adapter .... 3
Protection against unwanted calls ..... 23
Protection from anonymous callers ..... 23
Q
Questions and answers....38
R
Range....4
reducing....25
Recall key 1
Redial list 17
Reducing radiation 25
Reducing transmission power ..... 25
Registering (handset) 8
Restoring to default setting 25
Restoring to factory settings....25
Ringtone
changing 21
melody for internal/external calls.....22
silencing for anonymous calls. . . . . . . . 23
time control for external calls ..... 23
Ringtones....21
S
Safety precautions....3
Saving a number in the directory ..... 27
Screensaver 20
Searching
in directory....28
Selecting an entry from the phonebook .. 28
Sending
phonebook entry to handset ..... 28
Setting an appointment.... 30
Setting options
phone 20
Setting the date 9,36
Setting the display language ..... 20
Setting the time 9,36
Setting up
handset 5
Signal tone, see Advisory tones
Snooze mode (alarm) 31
Sound, see Ringtone
Speaker 18
Speed dial 23
Star key 1
Status bar....1
icons 34
Switching microphone
(handset) on/off 19
T
Technical data 41
Telephone
operating....13
Three-way conference call
ending....26
Time control
ringtone for external calls ..... 23
Transferring an external call internally....26
Troubleshooting
general 38
U
Upper/lower case 16
V
Viewing network mailbox message.....15
VIP ringtone. 27
Volume
handset handsfree/
earpiece volume.... 19
W
Warning tone, see Advisory tones
Issued by
Gigaset Communications GmbH
Frankenstr. 2a, D-46395 Bocholt
© Gigaset Communications GmbH 2013
Subject to availability.
All rights reserved. Rights of modification reserved.
www.gigaset.com
This user guide is made from 100% recycled paper.

- CONTENT
- SAFETY PRECAUTIONS
- WARNING
- PLEASE NOTE
- GETTING STARTED
- CHECKING THE CONTENTS OF THE PACKAGE
- SETTING UP THE CHARGING CRADLE
- NOTES
- CONNECTING THE CHARGING CRADLE
- SETTING UP THE HANDSET FOR USE
- INSERTING THE BATTERIES AND CLOSING THE BATTERY COVER
- CAUTION
- BELT CLIP
- CHARGING THE BATTERIES
- CHANGING THE DISPLAY LANGUAGE
- REGISTERING THE HANDSET
- SETTING THE DATE AND TIME
- CONNECTING THE HEADSET
- WHAT WOULD YOU LIKE TO DO NEXT
- SETTING RINGTONES
- PROTECTING YOURSELF AGAINST UNWANTED CALLS
- REGISTER AN EXISTING GIGASET HANDSET AND ADD IT TO THE PHONEBOOK
- CONFIGURING ECO DECT SETTINGS
- UNDERSTANDING THE OPERATING STEPS IN THE USER GUIDE
- EXAMPLE: ACTIVATING/DEACTIVATING AUTO ANSWER
- SWITCHING THE HANDSET ON/OFF
- LOCKING/UNLOCKING THE KEYPAD
- CONTROL KEY
- WHEN THE HANDSET IS IN IDLE STATUS
- DURING AN EXTERNAL CALL
- FUNCTIONS WHEN PRESSING THE CENTRE OF THE CONTROL KEY
- NOTE
- GETTING TO KNOW YOUR PHONE
- DISPLAY KEYS
- MENU GUIDANCE
- MAIN MENU (FIRST MENU LEVEL)
- SUBMENUS
- RETURNING TO IDLE STATUS
- MESSAGE LISTS
- ENTERING NUMBERS AND TEXT
- CORRECTING INCORRECT ENTRIES
- ENTERING TEXT
- MAKING AN EXTERNAL CALL
- DIALLING WITH THE REDIAL LIST
- MANAGING ENTRIES IN THE REDIAL LIST
- DIALLING FROM THE CALL LIST
- MAKING CALLS
- DIALLING WITH THE PHONEBOOK
- ONE TOUCH CALL
- ENDING ONE TOUCH CALL MODE
- ACCEPTING A CALL
- HANDSFREE MODE
- ADJUSTING THE LOUDSPEAKER VOLUME
- SWITCHING THE MICROPHONE ON/OFF (MUTING)
- ADJUSTING THE TELEPHONE SETTINGS
- SETTING YOUR COUNTRY AND LOCAL AREA CODES
- ADJUSTING THE HANDSET DISPLAY SETTINGS
- SETTING A SCREENSAVER
- SETTING THE COLOUR SCHEME
- SETTING THE DISPLAY BACKLIGHT
- ACTIVATING/DEACTIVATING AUTO ANSWER
- SETTING EARPIECE PROFILES
- SETTING THE HANDSET RINGTONES
- SETTING THE RINGTONE VOLUME
- EXAMPLE
- SETTING THE RING MELODY
- ACTIVATING/DEACTIVATING THE RINGTONE
- ACTIVATING/DEACTIVATING THE ALERT TONE (BEEP)
- ACTIVATING/DEACTIVATING ADVISORY TONES
- PROTECTION AGAINST UNWANTED CALLS
- SETTING TIME CONTROL FOR EXTERNAL CALLS
- TIME CONTROL
- FOR EXTERNAL CALLS
- PROTECTION FROM ANONYMOUS CALLERS
- QUICK ACCESS TO NUMBERS AND FUNCTIONS
- ASSIGNING DIGIT KEYS
- SELECTING NUMBERS/CHANGING AN ASSIGNMENT
- ASSIGNING DISPLAY KEYS
- RESTORING PHONE TO DEFAULT SETTING
- RESETTING THE HANDSET
- ECO DECT
- REDUCING RADIATION (DEPENDING ON THE BASE)
- MAKING INTERNAL CALLS
- INTERNAL CONSULTATION/INTERNAL TRANSFER
- ESTABLISHING A CONFERENCE CALL/CALL SWAPPING
- ACCEPTING/REJECTING CALL WAITING
- PHONEBOOK (ADDRESS BOOK)
- LENGTH OF THE ENTRIES
- MANAGING DIRECTORY ENTRIES
- OPENING PHONEBOOK
- CREATING A NEW ENTRY
- DISPLAYING/CHANGING AN ENTRY
- DELETING AN ENTRY
- DEFINING THE ORDER OF THE CONTACTS ENTRIES
- DISPLAYING THE NUMBER OF ENTRIES THAT ARE AVAILABLE IN THE DIRECTORY
- SELECTING A PHONEBOOK ENTRY, SEARCHING IN THE PHONEBOOK
- TRANSFERRING AN ENTRY/PHONEBOOK TO ANOTHER HANDSET
- PREREQUISITES
- TRANSFERRING INDIVIDUAL ENTRIES
- TRANSFERRING THE ENTIRE DIRECTORY
- TRANSFERRING A DISPLAYED NUMBER TO THE PHONEBOOK
- CALL LIST
- LIST ENTRY
- SAVING APPOINTMENTS TO THE CALENDAR
- ACTIVATION: ON/OFF
- SIGNALLING OF APPOINTMENTS/ANNIVERSARIES
- DISPLAYING MISSED APPOINTMENTS/ANNIVERSARIES
- DISPLAYING/CHANGING/DELETING STORED APPOINTMENTS
- ALARM CLOCK
- DEACTIVATING THE ALARM CALL/REPEATING AFTER A PAUSE (SNOOZE MODE)
- BABY MONITOR
- ACTIVATING/DEACTIVATING AND SETTING THE BABY MONITOR
- CANCELLING THE BABY MONITOR ALARM
- DEACTIVATING THE BABY MONITOR REMOTELY
- ICONS IN THE STATUS BAR
- DISPLAY KEY ICONS
- DISPLAY ICONS FOR SIGNALLING OF
- OTHER DISPLAY ICONS
- MENU TREE
- CALL LISTS
- ANSWER MACHINE
- SELECT SERVICES
- ADDITIONAL FEATURES
- SETTINGS
- CUSTOMER SERVICE & ASSISTANCE
- QUESTIONS AND ANSWERS
- THE DISPLAY IS BLANK
- NO BASE" FLASHES ON THE DISPLAY
- PLEASE REGISTER HANDSET" OR "PLACE HANDSET IN BASE" FLASHES ON THE DISPLAY
- THE HANDSET DOES NOT RING
- THE OTHER PARTY CANNOT HEAR YOU
- THE CALLER'S NUMBER IS NOT DISPLAYED
- AUTHORISATION
- CE 0682
- EXCLUSION OF LIABILITY
- OUR ENVIRONMENTAL MISSION STATEMENT
- ENVIRONMENTAL MANAGEMENT SYSTEM
- DISPOSAL
- CARE
- CONTACT WITH LIQUID
- TECHNICAL DATA
- BATTERIES
- HANDSET OPERATING TIMES/CHARGING TIMES
- GENERAL SPECIFICATIONS
- CHARACTER CHARTS
- STANDARD CHARACTERS
- INDEX
- A
- B
- C
- D
- E
- F
- G
- H
- K
- L
- M
- N
- 0
- P
- Q
- R
- S
- T
- U
- V
- W
Brand : GIGASET
Model : C430H
Category : Telephone