
RO-E6208TA-EM - Oven Rinnai - Free user manual and instructions
Find the device manual for free RO-E6208TA-EM Rinnai in PDF.


| Product Type | Built-in Electric Oven |
| Brand | Rinnai |
| Model | RO-E6208TA-EM |
| Dimensions (H x W x D) | 595 mm x 595 mm x 550 mm |
| Weight | Approximately 35 kg |
| Power Supply | 220-240 V ~ 50/60 Hz |
| Power Consumption | 3000 W (max) |
| Oven Capacity | 70 liters |
| Energy Efficiency Class | A+ |
| Cooking Functions | Convection, Grill, Fan-forced, Rotisserie, Defrost |
| Temperature Range | 50°C to 250°C |
| Control Type | Touch control with digital display |
| Cleaning Type | Catalytic self-cleaning on back wall |
| Safety Features | Child lock, auto shut-off, cool-touch door |
| Spare Parts Availability | Genuine parts via Rinnai service centers |
| Repairability Index | 8.4/10 (estimated) |
| Warranty | 2 years parts and labor |
Frequently Asked Questions - RO-E6208TA-EM Rinnai
User questions about RO-E6208TA-EM Rinnai
0 question about this device. Answer the ones you know or ask your own.
Ask a new question about this device
Download the instructions for your Oven in PDF format for free! Find your manual RO-E6208TA-EM - Rinnai and take your electronic device back in hand. On this page are published all the documents necessary for the use of your device. RO-E6208TA-EM by Rinnai.
USER MANUAL RO-E6208TA-EM Rinnai
Operation / Installation Manual
Electric Oven
RO-E6208TA-EM
Rinnai Corporation
CONTENTS
Safety warnings 2
Appliance specifications 3
Control panel 3
Guide to the appliance 4
Using for the first time 4
Oven operation 5
Oven Function 7
Using the accessories 10
Maintenance and care 11
Troubleshoot 12
Installation 13

IMPORTANT
To register your product warranty, please paste the serial numbers stickers enclosed with the packaging on your warranty card.
Please contact your local Rinnai Customer Care Centre should you require further assistance.
Version: 2015 11
SAFETY WARNINGS
Please read this user manual thoroughly before attempting to use appliance for the first time. This manual contains important information on safe installation, use and care of the appliance. Keep these instructions for reference and pass them on to any future user.
Unpacking
- Do not use the appliance if there are obvious signs of transportation damage.
- If the power supply cord is damaged, it must be replaced by the manufacturer, its service agent or qualified technician to avoid hazard.
- Please ensure that young children do not play with plastic bag packaging.
For the user
- This appliance is for home food preparation only. Do not use the appliance other than its specific purpose.
- This appliance is not intended for use by young children or infirm persons without supervision.
- Installation and repair should only be attempted by qualified technician.
- It is dangerous to modify any part of this appliance. Tampering with electrical connections or mechanical parts can cause operation faults and may put the user at risk.
- Always open the oven door carefully as hot steam may escape.
- To avoid danger of burning, never touch the internal surfaces of the oven and heating elements during its use.
- Accessible surfaces of the oven, including oven door may become hot during operation. Care should be taken when appliance is in use.
- Pay special attention when preparing food in the oven. Baking pans, wire shelf and internal surfaces may become very hot during use. Always wear heat-resistant oven gloves when handling cookware during food preparation.
- Always use oven-safe cookware and never place combustible items in the oven to avoid risk of fire.
- Be careful with food that is prepared with drinks with high alcohol content (e.g. cognac, rum). Alcohol evaporates at high temperatures and cooking in large amounts, the alcoholic vapours may catch fire in the oven. Only use small quantities of drinks with high alcohol content and open the oven door carefully.
- Never leave the appliance unattended when cooking with oils or fats as these are a fire hazard if allowed to overheat.
- Never use a steam cleaner to clean the appliance. The steam could attack the electrical components and result in a short circuit.
- Oven door hinges can be damaged when overloaded. Do not place heavy items on the oven door when cleaning the oven interior. Before cleaning, remove the oven door if necessary.
- Never trap cables of electrical appliances in the hot oven door. The cable insulation may melt and there is a risk of short-circuiting.
- Always disconnect the power supply cord before carrying out any cleaning or maintenance work on the appliance.
- Ensure that the power supply chord is free from heat source or sharp objects.
- Before connecting the appliance to the power mains, make sure that the voltage and frequency corresponds to the rating as shown on the rating plate attached to the appliance.
- The electrical safety of this appliance can only be guaranteed if the appliance is correctly and efficiently earthed. See “Electrical connections” in this manual.
- The basic safety requirement should be tested by a qualified technician. Multiple plugs and extension cables must not be used. Overloading is dangerous and may cause a fire hazard.
Disposal
- This appliance and its packaging are environmentally friendly and recyclable. Please help us to care for the environment by disposing the packaging in a proper manner and recycling any old appliances.
- Before disposing an old appliance, disconnect it from the power supply and cut the power supply cord to prevent hazards.
The manufacturer will not be held liable for any damages resulting from improper installation nor failure to adopt proper safety measures during installation and operational use of the appliance.
APPLIANCE SPECIFICATIONS
| Voltage and frequency of power supply | 220V – 240V / 50Hz . 60Hz |
| Total connected load | 2875W |
| Appliance dimension | W594 X D594 X H568.8 mm |
| Cavity dimension | W423 X D392 X H407 mm |
| Oven capacity | 70 litres |
| Maximum temperature | 260°C |
| Net weight | Approx. 38 kg |
CONTROL PANEL

flowchart
graph TD
    A[" "] --> B[" "]
    A --> C[" "]
    A --> D[" "]
    A --> E[" "]
    A --> F[" "]
    A --> G[" "]
    A --> H[" "]
    A --> I[" "]
    A --> J[" "]
    A --> K[" "]
    A --> L[" "]
    A --> M[" "]
    A --> N[" "]
    A --> O[" "]
    A --> P[" "]
    A --> Q[" "]
    A --> R[" "]
    A --> S[" "]
    A --> T[" "]
    A --> U[" "]
    A --> V[" "]
    A --> W[" "]
    A --> X[" "]
    A --> Y[" "]
    A --> Z[" "]
MODE SELECTOR
ELECTRONIC PROGRAMMER


TEMPERATURE SELECTOR
1 - End cooking time knob
2 - Cooking timer setting
3 - End cooking timer setting
4 - Carrying forward button
5 - Carrying backward button
6 - Clock
GUIDE TO THE APPLIANCE
H

|

J
K
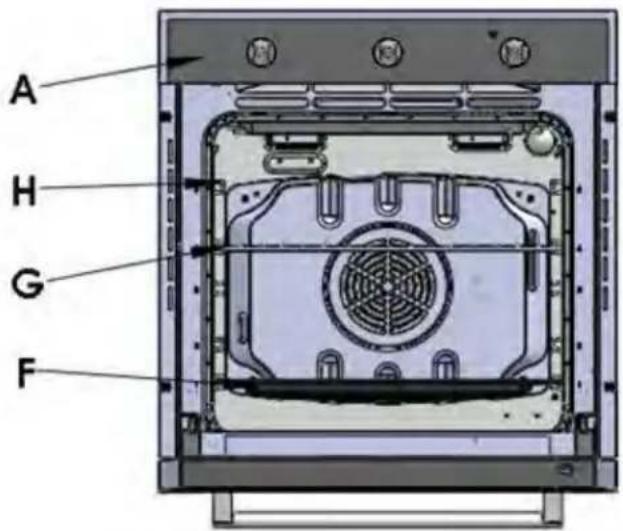
A Control panel
H Guides for sliding in the racks
G Oven rack
F Dripping pan or baking pan
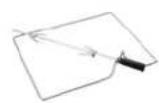
H Rotisserie (1)
I Grilling rack (1)
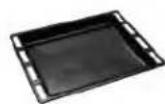
J Universal pan (1)
K Deep baking tray (1)
USING FOR THE FIRST TIME
New appliances have a slight smell on first use. The first time you use your appliance, it is advisable to set the thermostat to the highest setting and leave the empty oven on for at least half an hour.
The unpleasant odour and slight smoke that is often detected during the initial use is caused by the burning away of protective substances used during the manufacturing process. This phenomenon will disappear after a period of using.
Remove packaging material
Ensure that all packaging material is removed before using the oven for the first time.
Pre-cleaning the accessories
Remove all accessories from the oven and wash them thoroughly with warm soapy water.
OVEN OPERATION
Timer
23 hours 59 minutes can be set as maximum.
To set the time, press the button, and then + or - button, until the required time is shown on the screen. After the setting, the correct time (hour, minute) and the button will show on the screen. When the button is pressed the time displaced will be seen. When the set time is reached, disappears and the alarm will ring again. To stop the alarm, press the button.
Notice: After pressing the related button, setting is supposed to be done in 5 seconds. In case of blackout, the set process as well as the real time (hour, minute) will disappear. After the power is on again, three "0" and "AUTO" shows on the screen, and the oven will automatically reset.
3-key timer procedure baking mode (only available on certain models)
Adjust the clock after switch on:
Once it connected with electrical power, the display will show "12:00" with the square symbol above "○";
Press the “+” or “-” button will increase or decrease the number until it reaches the right time; after 5 seconds it will start automatically or you can press the function button to make it work.
Automatic setting (set the time of full automatic starting and ending)
- Press the function button repeatedly until the square symbol above the “###” flashes, and press “+” or “-” button to set the time frame baking for;
- Press the function button repeatedly until the square symbol above the “ ” flashes, and press “+” or “-” button to set the time to switch off;
- Adjusting the constant temperature button and choosing button to set temperature and baking method.
- After these setting, the symbols above the “☐” and “☒” will flash, it indicates the baking procedure of oven has been set.
For example: if the food is required to bake for 45 minutes, and it is supposed to stop at 14:00.
Press the function button repeatedly until the square symbol above “_” flashes, and set the time of baking to 45 minutes;
Press the function button repeatedly until the square symbol above "☒" flashed, and set the end time of baking at 14:00.
After these settings, the proper clock (hour, minute) and the square symbol will show on the display, it indicates the setting of baking procedure has been remembered automatically.
When the clock shows at 13:15 (between 14 -15min), the oven will switch on automatically.
During the baking time frame, the square symbol will keep flashing.
When the clock shows 14:00, baking will switch off automatically. The alarm will ring, the square symbol will flash, To stop the ringing press any button.
Semi-automatic setting (set the time of automatic starting and ending)
A. Setting the time frame of baking (10 hours longest)
Press the function button repeatedly until the square symbol above “ ”, and set the time frame of baking;
Switch on the oven immediately, the square symbol above “” begins to flash. When the baking is done the square symbol above “” will flash, and alarm ring, To stop the ringing press any button.
B. Setting the end time off baking (23 hours and 59 minutes longest)
Press the function button repeatedly until the square symbol above “☒” flashes, and set the end time of baking; Switch on the oven immediately, the square symbol above “☒” begins to flash. When it reaches the time set, baking procedure will switch off automatically. The square symbol above “☒” flashes, the alarm will ring, the square symbol will flash. To stop the ringing press any button.
The set baking procedure could be seen by pressing any function button repeatedly at any time, only if the time frame of baking is at "0" position. By adjusting the end time of baking to the current time, the set baking procedure can be cancelled.
The oven light
Set knob "B" to the ☐ symbol to turn it on. It lights the oven and stays on when any of the electrical heating elements in the oven come on.
Cooling ventilation
In order to cool down the exterior of the appliance, this model is equipped with a cooling fan, which comes on automatically when the oven is hot.
When the fan is on, a normal flow of air can be heard exiting between the oven door and the control panel.
Note: When cooking is done, the fan stays on until the oven cools down sufficiently.
OVEN FUNCTION
Mode setting
This programme allows 8 function settings.
| Conventional | |
| Grill with Fan | |
| Bottom Heater and Fan | |
| 3D Hot Air | |
| Upper Heater |
| Defrost | |
| Full Surface Grill | |
| Oven Light |
Conventional mode

2145-2540W
Position knob "C": Between 60°C and Max. on this setting, The top and bottom heating elements come on. This is the classic, traditional type of oven which has been perfected, with heat distribution and reduced energy consumption. It remains the best system for baking cakes and cooking using covered casserole dishes for oven baking. When cooking in convection mode, only use one dripping pan or cooking rack at a time, otherwise the heat distribution will be uneven. Using the different rack heights available, you can balance the amount of heat between the top and the bottom of the oven. Select from among the various rack heights based on whether the dish needs more or less heat from the top.
Position knob “C”: Between 60^ C and 200^ C. The top central heating elements and the fan come on. This combination of features increases the effectiveness of the indirect thermal radiation of the heating elements through forced circulation of the air throughout the oven. This helps prevent food from burning on the surface, allowing the heat to penetrate right into the food. Excellent results are achieved with kebabs made with meats and vegetables, sausages, ribs lamb chops, chicken in a spicy sauce, quail, pork chops, etc.
Cook food in "Grill with Fan mode" with the oven door shut.
This mode is also ideal for cooking fish steaks, like swordfish, stuffed cuttlefish...etc.
Bottom Heater and Fan

1205-1435W
Position knob "C": Between 60°C and 250°C. The bottom heating element and the fan come on. Suitable for pastries, cakes and non-dry sweets in baking tins or moulds. Excellent results are also obtained in cooking requiring above all heat from the bottom. You are advised to put the pan on a low level.
Upper Heater ☐ 995-1195W
Position knob "C" Between 60°C and Max. The top heating element comes on. This mode can be used to brown food at the end of cooking.
3D Hot Air 1705-2030W
Position knob "C": Between 60°C and 250°C. The rear heating element and the fan comes on, guaranteeing delicate heat distributed uniformly throughout the oven.
This mode is ideal for baking and cooking delicate foods - especially cakes that need to rise, and for the preparation of certain tarts on 3 shelves at the same time. Here are a few examples: cream puffs, sweet and savory biscuits, savoury puffs, Swiss rolls and small portions of vegetables au gratin, etc.
Full Surface Grill 2385-2835W
Position knob "C": Max. The top central heating elements comes on. The extremely high and direct temperature of the grill makes it possible to brown the surface of meats and roasts while locking the juices in to keep them tender.
The grill is also highly recommended for dishes that require a high heat on the surface: beef steaks, veal, rib steak, filets, hamburgers...etc.
"Defrosting" Mode 45-55W
Position of thermostat knob "C": Any
The fan located on the bottom of the oven makes the air circulate at room temperature around the food. This is recommended for the defrosting of all types of food, but in particular for delicate types of food which do not require heat, such as for example: ice cream cakes, cream or custard desserts, fruit cakes. By using the fan, the defrosting time is approximately halved. In the case of meat, fish and bread, it is possible to accelerate the process using the "Baking" mode and setting the temperature to 80°C-100°C.
The turnspit (only available on certain models)
To start the turnspit, proceed as follows:
Place the oven tray on the 1st rack ;
-Insert the special turnspit support on the 2nd rack and position the spit by inserting it through the special hole
| Selector knob setting | Food to be cooked | Weight (in kg) | Cooking rack position from bottom | Preheating time (Minutes) | Thermostat knob setting | Cooking time (Minutes) |
| Convection | Duck | 1 | 3 | 15 | 200 | 65-75 |
| Roast veal or beef | 1 | 3 | 15 | 200 | 70-75 | |
| Pork roast | 1 | 3 | 15 | 200 | 70-80 | |
| Biscuits (short pastry) | - | 3 | 15 | 180 | 15-20 | |
| Tarts | 1 | 3 | 15 | 180 | 30-35 | |
| Full Surface Grill | Soles and cuttlefish | 1 | 4 | 5 | Max | 8-10 |
| Squid and prawn kebabs | 1 | 4 | 5 | Max | 6-8 | |
| Cod filet | 1 | 4 | 5 | Max | 10 | |
| Grilled vegetables | 1 | 3/4 | 5 | Max | 10-15 | |
| Veal steak | 1 | 4 | 5 | Max | 15-20 | |
| Cutlets | 1 | 4 | 5 | Max | 15-20 | |
| Hamburgers | 1 | 4 | 5 | Max | 7-10 | |
| Mackerels | 1 | 4 | 5 | Max | 15-20 | |
| Toasted sandwiches | - | 4 | 5 | Max | 2-3 | |
| With rotisserie | ||||||
| Veal on the spit | 1.0 | - | 5 | Max | 80-90 | |
| Chicken on the spit | 1.5 | - | 5 | Max | 70-80 | |
| Lamb on the spit | 1.0 | - | 5 | Max | 70-80 | |
| Upper Heater | Browning food to perfect Cooking | - 3/4 | 15 220 - | |||
| Defrosting All | frozen food | |||||
| Grill with Fan | Grilled chicken | 1.5 | 3 | 5 | 200 | 55-60 |
| Cuttlefish | 1.5 | 3 | 5 | 200 | 30-35 | |
| With rotisserie | ||||||
| Veal on the spit | 1.5 | - | 5 | 200 | 70-80 | |
| Chicken on the spit | 2.0 | - | 5 | 200 | 70-80 | |
| Chicken (on the spit) | 1.5 | - | 5 | 200 | 70-75 | |
| + potatoes (roasted) | - | 2 | 5 | 200 | 70-75 | |
| Lamb on the spit | 1.5 | - | 5 | 200 | 70-80 | |
| 3D Hot Air | Tarts | 0.5 | 3 | 15 | 180 | 20-30 |
| Fruit cakes | 1 | 2/3 | 15 | 180 | 40-45 | |
| Fruitcake | 0.7 | 3 | 15 | 180 | 40-50 | |
| Sponge cake | 0.5 | 3 | 15 | 160 | 25-30 | |
| Stuffed pancakes (rack 2) | 1.2 | 2-4 | 15 | 200 | 30-35 | |
| Small cakes (rack 2) | 0.6 | 2-4 | 15 | 190 | 20-25 | |
| Cheese puffs (rack 2 ) | 0.4 | 2-4 | 15 | 210 | 15-20 | |
| Cream puffs (rack 3) | 0.7 | 1-3-5 | 15 | 180 | 20-25 | |
| Biscuits (rack 3) | 0.7 | 1-3-5 | 15 | 180 | 20-25 | |
| Meringues (rack 3) | 0.5 | 1-3-5 | 15 | 90 | 180 |
Notice: Cooking times are approximate and may vary according to personal taste. When cooking using the grill or fan assisted grill, the dripping pan must always be placed on the 1st oven rack from the bottom.

Environmental tips
- Do not open the oven door more than necessary during cooking.
- After the oven is turned off it retains heat for some time. You can use the residual heat in the oven for keeping the food warm.
- Check the door seal regularly and wipe clean to ensure that they are free of food deposits so that the seal stick properly to the door and do not allow heat to disperse.
USING THE ACCESSORIES
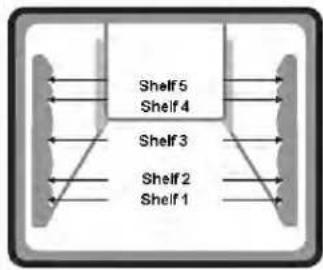
Oven accessories can be positioned in accordance to individual cooking requirements.
flowchart
graph TD
    A["Shelf 1"] --> B["Shelf 2"]
    B --> C["Shelf 3"]
    C --> D["Shelf 4"]
    D --> E["Shelf 5"]
    style A fill:#f9f,stroke:#333
    style B fill:#f9f,stroke:#333
    style C fill:#f9f,stroke:#333
    style D fill:#f9f,stroke:#333
    style E fill:#f9f,stroke:#333
Universal pan
Use the universal pan as a
- Drip pan to collect food juices and fat drip from food
• Dish support for all dishes
We do not recommend use of universal pan on upper 4^th and 5^th shelves.
Grill rack
- Position the universal pan on lower 1st and 2nd shelves to collect oil drip.
- Depending on the size of the food, position the grill on the upper shelves.

natural_image
Technical line drawing of an oven with internal grating and blue directional arrows indicating airflow or movement (no text or symbols)The rotisserie
This accessory is ideal for meat roasting. The motorised turnspit rotates the rotisserie slowly and browns the food uniformly.
Note: When positioning the rotiserrie assembly, ensure that the meat is in centre of spit. Then fasten the food with the forks on both sides.
natural_image
Pure technical diagram of a mechanical component without any text, numbers, or symbols- Always keep the oven door shut when using the rotisserie and start with the oven cold in order to avoid scalding yourselves when positioning the spit.
- Position the universal pan on the 1st shelf (to collect oil drip).
- Position the rotiserrie grill rack on the 3^rd shelf.

natural_image
Technical line drawing of an internal air conditioner unit with fan and cooling fins (no text or symbols)- Place the rotiserrie set on the rotisserie grill rack. Insert the rotisserie firmly into the motor slot at the back wall of oven cavity.
- Unscrew the spit handle before cooking.
- Turn the oven selector to "Rotasserie Grill" mode.

natural_image
Technical diagram of a mechanical assembly with internal gears and a close-up inset showing a rotating component (no text or labels)- To remove the spit, screw on the spit handle tightly (do not screw on the spit handle during cooking). The spit handle avoids scalding when taking out the spit at end of cooking.
MAINTENANCE AND CARE

Disconnect the power supply cord before carrying out any cleaning or maintenance activities.
Cleaning the oven interior
We recommend you to clean your oven after each use. Clean with warm soapy water and a soft damp cloth. Wipe dry with a lint-free cloth. Avoid using corrosive or abrasive products that could damage the enamel coating. It is advisable to keep the oven clean and remove any food deposits. Built-up food deposits may overheat, release smoke and unpleasant odours.
Never line the bottom of the oven with aluminium foil. The aluminium foil sheet in direct contact with the heated enamel coating could melt and damage the enamel coating inside the oven irreversibly.
Cleaning the oven exterior
Enamel or stainless steel surfaces can be cleaned with warm soapy water and a soft damp cloth. Wipe dry with a lint-free cloth. Avoid using corrosive or abrasive products that could damage the surface.
For stainless steel surfaces, always wipe in the direction of the grain so as not to scratch the surface. For tougher stains, use a specific non-abrasive product (please observe the manufacturer's instructions).
Door glass
Clean the glass using non-abrasive cleaning agents and sponges. Wipe dry after cleaning.
Door seal
Clean with warm soapy water and a soft damp cloth. Wipe dry and fix it in place after cleaning.
Glass cover on the oven light
Clean with warm soapy water and a soft damp cloth. Wipe dry after cleaning.
Cleaning the accessories
Soak in hot soapy water to remove the grease or food residue. Clean with brush or sponge.
Catalytic layer
Avoid using abrasive cleaning agents on the oven cavity walls. We highly recommend you to apply mild cleaning agents onto a damp cloth, and then wipe the oven interior.
Detaching and attaching the oven door
The oven door can be removed for a more thorough cleaning.
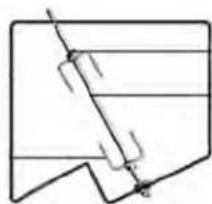
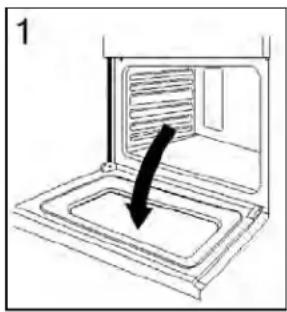
To detach the oven door,
- Open the oven door fully
- Lift up the small levers located on the two hinges
- Shut the door but not completely
- Hold the door firmly at both sides and lift upwards off the hinges guide
To attach the oven door, reverse the sequence.
natural_image
Line drawing of a microwave oven with a black arrow indicating airflow direction (no text or symbols)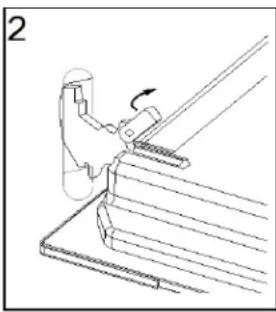
natural_image
Technical line drawing of a mechanical assembly with a lever and base plate (no text or symbols)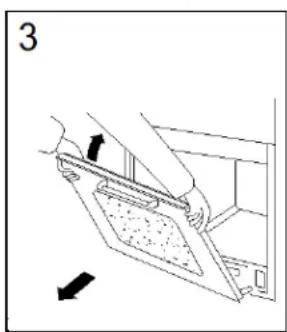
natural_image
Diagram of a person using a device to clean or remove granular material, with no visible text or symbolsDo not lift the door off by the handle. The handle could break and damage the glass.
Make sure that you lift the door off equally on both sides.
Replacing the oven lamp
Ensure that the power supply cord is disconnected.
- Remove the glass cover of the lamp
- Remove lamp and replace with a similar heat-resistant bulb of the same characteristics
- Replace the glass cover

natural_image
Diagram showing two circular components with directional arrows, no text or symbols presentThe glass cover on the oven lamp must be replaced if it is damaged.
For purchase of spare part, please check with your local Rinnai Customer Care Centre.
TROUBLESHOOT
In case of minor faults or problems with the appliance operation, please check the following instructions to see if you could resolve the problem before calling for technician service.
The oven does not work
- Check that the main switch is turned on and the plug is properly inserted in the electrical outlet.
Oven light does not work
- Replace or tighten oven lamp. See 'Replacing the oven lamp' section in this manual.
Oven smokes excessively during cooking
- Check if you have selected the correct cooking mode for the dish.
- Check if you have used the correct accessories and placed the dish in the oven at the recommended height.
- Check the temperature selected.
- Food deposits sticking onto the enamel coating inside the oven becomes charred and creates both smoke and unpleasant odours. Regular cleaning is necessary to remove grease build-up.
- Grease or food spatters can also cause excessive smoking.
Food does not bake or roast properly
- Check if oven functions are properly set.
- Check if correct temperature is set.
- Rack position may be incorrect for the cooking mode selected.
- Check if you are using the correct cookware type and size.
Condensation build-up on oven door
- Excess condensation may fog the oven door. This may happen when you are cooking large quantities of food from a cold start. If you are using water in cooking, this will turn to steam and may condense outside your appliance. This is not a problem or fault with your oven.
Noise can be heard after cooking programme
- The cooling fan remains switched on after the end of a cooking programme.
If the problem persists despite observing the above checks, please contact your local Rinnai Customer Care Centre for assistance. For service calls under warranty, please note that it is necessary to product your proof of purchase and valid warranty card.
INSTALLATION
Installation must be performed by qualified personnel only. The manufacturer declines all responsibility for improper installation and does not accept responsibility for appliance warranty in the event of damage caused by incorrect installation.
Fit the appliance in appropriate cabinet
- The panels of the adjacent cabinets must be made of heat-resistant material. The oven should be installed on a flat, level surface able to withstand the weight of the appliance and its contents. The oven must be in a stable position to avoid the possibility of causing noise vibration.
- Cabinets with a veneer exterior must be assembled with glues which can withstand temperatures of up to 100^ C.
- For installation under the counter and in a kitchen cabinet, the housing unit must have the following dimensions:
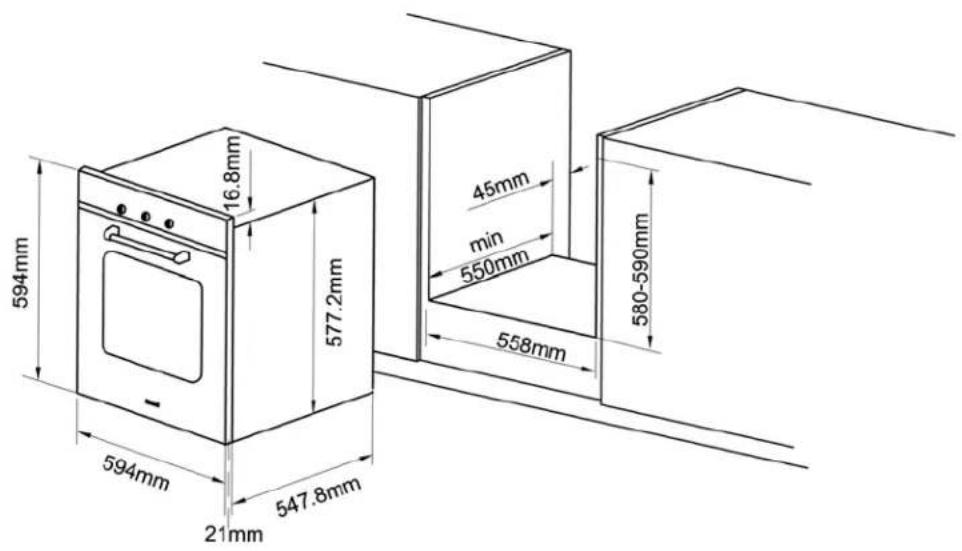

Ventilation
- To ensure adequate ventilation, a minimum ventilation gap of 45mm is required from the back of appliance to cabinet wall.
- For bench top installation, minimum 5mm ventilation gap is required on both sides of the appliance.
- If oven is installed below a hob, minimum 30mm ventilation gap between hob and oven, or the distance instructed in the hob manufacturer's instruction manual is required. Follow the higher distance if in doubt.
Securing the appliance
- Connect the power supply cord. Do not turn on the power mains.
- Push the oven into the housing unit as far as the oven trim and align it.
- Open the oven door. Fix the oven in position with 4(four) screws provided.
- Check that it is correctly aligned.
- Check that the door is free to open and close.
- Turn on the power mains. The appliance must only be operated when it has been built in to avoid electric shock hazard.
Electrical connections
Connecting the supply cable to the power mains
- Install a standardized plug corresponding to the load indicated on the rating label attached to the appliance.
- If the appliance is being directly connected to the power mains supply, an omnipolar circuit breaker must be installed with a minimum gap of 3mm between the contacts, suitable for the load indicated and complying with current electrical regulations (the earthing wire must not be interrupted by the circuit breaker). The supply cable must not come into contact with surfaces with temperatures higher than 50°C.
- The installer must ensure that the correct electrical connection has been made and that it is compliant with local safety regulations.
Before connecting to the power supply, ensure that:
• The appliance is correctly and efficiently earthed. - The socket can withstand the maximum power of the appliance, and voltage within the value range indicated on the rating label attached to the appliance.
- The basic safety requirement should be tested by a qualified technician. Multiple plugs and extension cables must not be used. Overloading is dangerous and may cause a fire hazard.
- Once the appliance has been installed, the power supply and electrical socket must be easily accessible.
The installer must ensure that the correct electrical connection has been made and that it is compliant with local safety regulations.
The manufacturer declines any liability should these safety measures not be observed.
Rinnai Customer Care Centres
China | 中国
Guangzhou Rinnai Gas & Electric
Room 2805, No.31 Jianghe Building,
Tianshou Road, Guangzhou, China
广州林内燃具电器有限公司
(0815 112 99999 (SMS Center)
Email: customercare_bit@yahoo.com
URL: www.rinnai.co.id
Macau | 澳門
Rinnai Appliance Service Center
Edificio Industrial, 3 andar F.A da Zona Macau
林內爐具服務中心
澳門青洲跨境工業大廈3樓F座
Phone電話:+853 2852-7799
Fax 傳真: +853 2827-0572
No.199, Ground Floor, 34th Street (Upper Block),
Kyauktada Township, Yangon, Myanmar
(###) (###)
Highway, Dalandan Valenzuela City,
Philippines
Tel : (63) 2 292 9177 / 292 9179
Fax : (63) 2 292 8187
Singapore
Rinnai Holdings (Pacific) Pte Ltd
61 Ubi Road 1 #02-20 & 21
Oxley Bizhub Singapore 408727
Tel : (65) 6748 9478
Fax : (65) 6745 9240
Email: service@rinnai.sg
URL : www.rinnai.sg
61/1 Soi Kingkaew 9, Kingkaew Rd.
Racha Thewa, Bangphli, Samutprakarn 10540, Thailand
Rong Viet Commerce Company Limited
120 3/2 Street, Ward 12, District 10,
Ho Chi Minh City, Vietnam

- CONTENTS
- IMPORTANT
- SAFETY WARNINGS
- Unpacking
- For the user
- Disposal
- APPLIANCE SPECIFICATIONS
- CONTROL PANEL
- GUIDE TO THE APPLIANCE
- USING FOR THE FIRST TIME
- Remove packaging material
- Pre-cleaning the accessories
- OVEN OPERATION
- Timer
- Adjust the clock after switch on:
- Automatic setting (set the time of full automatic starting and ending)
- Semi-automatic setting (set the time of automatic starting and ending)
- The oven light
- Cooling ventilation
- OVEN FUNCTION
- Mode setting
- Conventional mode
- Cook food in "Grill with Fan mode" with the oven door shut.
- Bottom Heater and Fan
- Upper Heater ☐ 995-1195W
- 3D Hot Air 1705-2030W
- Full Surface Grill 2385-2835W
- "Defrosting" Mode 45-55W
- The turnspit (only available on certain models)
- Environmental tips
- USING THE ACCESSORIES
- Universal pan
- Grill rack
- The rotisserie
- MAINTENANCE AND CARE
- Cleaning the oven interior
- Cleaning the oven exterior
- Door glass
- Door seal
- Glass cover on the oven light
- Cleaning the accessories
- Catalytic layer
- Detaching and attaching the oven door
- To detach the oven door,
- Replacing the oven lamp
- TROUBLESHOOT
- The oven does not work
- Oven light does not work
- Oven smokes excessively during cooking
- Food does not bake or roast properly
- Condensation build-up on oven door
- Noise can be heard after cooking programme
- INSTALLATION
- Fit the appliance in appropriate cabinet
- Ventilation
- Securing the appliance
- Electrical connections
- Connecting the supply cable to the power mains
- Rinnai Customer Care Centres
- Macau | 澳門
- Singapore
Brand : Rinnai
Model : RO-E6208TA-EM
Category : Oven