
WA3716 battery charger - Battery charger WORX - Free user manual and instructions
Find the device manual for free WA3716 battery charger WORX in PDF.


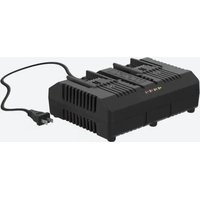
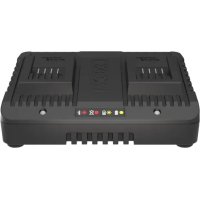
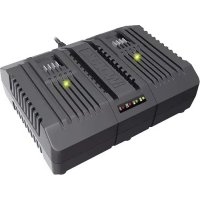
| Product Type | Battery Charger |
| Brand | Worx |
| Model | WA3716 |
| Compatible Batteries | Worx 20V Max Li-ion batteries (e.g., WA3520, WA3572) |
| Input Voltage | 100-240V AC, 50/60Hz |
| Output Voltage | 20V DC |
| Charging Current | 2.0A |
| Charging Time | Approx. 60 minutes for a 2.0Ah battery |
| Number of Charging Ports | 1 |
| LED Indicators | Red (charging), Green (fully charged) |
| Safety Features | Overcharge protection, short circuit protection, overheat protection |
| Dimensions (approx.) | 150 × 80 × 50 mm |
| Weight (approx.) | 0.5 kg |
| Wall Mountable | Yes (keyhole slots on back) |
| Cooling System | Natural convection (fanless) |
| Operating Temperature | 0°C to 40°C |
| Storage Temperature | -20°C to 60°C |
| Certifications | CE, RoHS, UKCA |
| Included Accessories | Charger only (battery sold separately) |
| Warranty | 2 years |
Frequently Asked Questions - WA3716 battery charger WORX
User questions about WA3716 battery charger WORX
0 question about this device. Answer the ones you know or ask your own.
Ask a new question about this device
Download the instructions for your Battery charger in PDF format for free! Find your manual WA3716 battery charger - WORX and take your electronic device back in hand. On this page are published all the documents necessary for the use of your device. WA3716 battery charger by WORX.
USER MANUAL WA3716 battery charger WORX
LANDROID®
UNMANNED MOWING VEHICLE
SAFETY AND OPERATING MANUAL
Lawn Mowing Robot WG794E
ORIGINAL INSTRUCTIONS
TABLE OF CONTENTS
1. Safety Instruction 3
1.1 General & Additional safety instructionr ____ 3
1.2 Information on the Landroid ® M ____ 5
2. Technical Data and Component List ____ 7
2.1 Technical data 7
2.2 Component list 8
3. Understanding Your Android ® M ____ 10
3.1 How does my Landroid®M know what to mow? ____ 10
3.2 How does my Landroid®M know where to go? ____ 11
A. Finding the charging base 11
B. Rain sensors 11
C. Sensing the boundary wire 11
D. Starting and stopping while mowing 11
3.3 How big an area can my Landroid®M mow? 12
3.4 How efficiently will my Landroid® M mow the grass? 12
4. Boundary Wire Basics 13
4.1 Pegging the Boundary Wire 13
4.2 Burying the Boundary Wire 13
4.3 Joining the Boundary Wire 13
4.4 Turn on and test installation 14
5. Maintenance 14
5.1 Keep it Sharp 14
A. Rotate and Flip the Blades 14
B. Replace the Blades 14
5.2 Keep it Clean 15
A. Cleaning the Body 15
B. Cleaning the Underside 15
C. Clean the contact pins and the charging strips 15
5.3 Battery Life 16
5.4 Winter Hibernation 16
5.5 Replacing the battery 16
1. Product Safety
1.1 Safety Warnings for power tool
WARNING: Read all safety warnings and all instructions. Failure to follow the warnings and instructions may result in electric shock, fire and/or serious injury.
Carefully read the instructions for the safe operation of the machine.
Save all warnings and instructions for future reference.
- This appliance is not intended for use by persons (including children) with reduced physical, sensory or mental capabilities, or lack of experience and knowledge, unless they have been given supervision or instruction concerning use of the appliance by a person responsible for their safety.
• Children should be supervised to ensure that they do not play with the appliance.
IMPORTANT
READ CAREFULLY BEFORE USE
KEEP FOR FUTURE REFERENCE
SAFE OPERATION PRACTICES
Training
a) Read the instructions carefully. Make sure you understand the instructions and be familiar with the controls and the proper use of the appliance;
b) Never allow people unfamiliar with these instructions or children to use the appliance. Local regulations can restrict the age of the operator;
c) The operator or user is responsible for accidents or hazards occurring to other people or their property
Preparation
a) Ensure the correct installation of the automatic perimeter delineation system as instructed.
b) Periodically inspect the area where the appliance is to be used and remove all stones, sticks, wires, bones, and other foreign objects.
c) Periodically visually inspect to see that the blades, blade bolts and cutter assembly are not worn or damaged. Replace worn or damaged blades and bolts in sets to preserve balance.
d) On multi-spindle appliances, take care as rotating one blade can cause other blades to rotate.
OPERATION
1. GENERAL
a) Never operate the appliance with defective guards, or without safety devices, for example deflectors, in place;
b) Do not put hands or feet near or under rotating parts. Keep clear of the discharge opening at all times;
c) Never pick up or carry an appliance while the motor is running;
d) Operate the disabling device from the appliance;
– Before clearing a blockage;
– Before checking, cleaning or working on the appliance;
e) It is not permitted to modify the original design of robotic lawnmower. All modifications are made at your own risk.
f) Start robotic lawnmower according to the instructions. When the main switch is in the ON position, make sure you keep your hands and feet away from the rotating blades. Never put your hands and feet under the mower.
g) Never lift up robotic lawnmower or carry it around when the main switch is in the ON position.
h) Do not let persons who do not know how robotic lawnmower works and behaves use the mower.
i) Do not put anything on top of robotic lawnmower or its charging station.
j) Do not allow robotic lawnmower to be used with a defective blade disc or body. Neither should it be used with defective blades, screws, nuts or cables.
k) Do not use robotic lawnmower if the main switch does not work.
I) Always switch off robotic lawnmower using the main switch when you do not intend to use the mower. Robotic lawnmower can only start when the main switch is moved to the ON position and the correct PIN code has been entered.
2. ADDITIONALLY WHEN THE APPLIANCE IS OPERATING AUTOMATICALLY
a) Do not leave the machine to operate unattended if you know that there are pets, children or people in the vicinity.
3. ADDITIONALLY WHEN USING THE MANUAL CONTROLLER
a) Mow only in daylight or in good artificial light;
b) Avoid operating the equipment in wet grass;
c) Do not operate the appliance when barefoot or wearing open sandals. Always wear substantial footwear and long trousers;
d) Always be sure of your footing on slopes;
e) Use extreme caution when reversing the appliance towards you;
f) Always switch on the motor according to instructions with feet well away from the blades(s);
MAINTENANCE AND STORAGE

WARNING! When the mower is turned upside down the main switch must always be set to the OFF position
The main switch should be set to the OFF position during all work on the mower's underframe, such as cleaning or replacing the blades.
a) Keep all nuts, bolts and screws tight to be sure the appliance is in safe working condition;
b) Inspect the robotic lawnmower each week and replace worn or damaged parts for safety;
c) Check especially that the blades and blade disc are not damaged. Replace all blades and screws at the same time if necessary so that the rotating parts are balanced.
d) Ensure that only replacement cutting means of the right type are used;
e) Ensure that batteries are charged using the correct charger recommended by the manufacturer. Incorrect use may result in electric shock, overheating or leakage of corrosive liquid from the battery;
f) In the event of leakage of electrolyte flush with water/neutralizing agent, seek medical help if it comes into contact with the eyes etc;
g) Servicing of the appliance should be according to manufacturers instructions.
Transport
The original packaging should be used when transporting robotic lawnmower over long distances.
To safely move from or within the working area:
a) Press the STOP button to stop the mower. If the anti-theft alarm is activated, enter the first digit of the PIN code. You select the four digit PIN code when you start the mower for the first time.
b) Move the main switch to the OFF position if you intend to carry the mower.
c) Carry the mower by the handle at the rear under the mower. Carry the mower with the blade disc away from the body.
1.2 Information on the Landroid®M

WARNING - Robotic lawnmower can be dangerous if incorrectly used.
Read through the Operator's manual carefully and understand the content before using your robotic lawnmower.
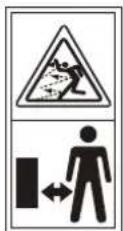
WARNING - Keep a safe distance from the machine when operating.

WARNING - Operate the disabling device before working on or lifting the machine.
Keep your hands and feet away from the rotating blades. Never place your hands or feet close to or under the body when robotic lawnmower is in operation.
Robotic lawnmower can only start when the ON/OFF button press ON and the correct PIN code has been entered. Inspection and/or maintenance must be carried out with the main switch set to OFF.

WARNING - Do not ride on the machine.

Do not burn

Batteries may enter water cycle if disposed improperly, which can be hazardous for ecosystem. Do not dispose of waste batteries as unsorted municipal waste.

Li-Ion battery. This product has been marked with a symbol relating to 'separate collection' for all battery packs and battery pack. It will then be recycled or dismantled in order to reduce the impact on the environment. Battery packs can be hazardous for the environment and for human health since they contain hazardous substances.


Do not wash the machine with a high pressure washer
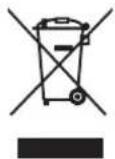
This product has been marked with a symbol relating to removing electric and electronic waste. This means that this product shall not be discarded with household waste but that it shall be returned to a collection system which conforms to the European Directive 2002/96/CE. It will then be recycled or dismantled in order to reduce the impact on the environment. Electric and electronic equipment can be hazardous for the environment and for human health since they contain hazardous substances.

C-tick marking
2. Technical Data and Component List
2.1 Technical data
Type: WG794E (790-799-Designation of machinery, representative of lawn mowing robot)
| Rated voltage 28V Max* | --- | |
| No load speed 2800/min | ||
| Cutting diameter 180mm | ||
| Cutting height 20-60mm | ||
| Cutting height positions 5 | ||
| Battery type Lithium-Ion | ||
| Battery model WA3225 | ||
| Charging time 1.5h approx. | ||
| Charger model WA3716 | ||
| Charger rating | Input: 100-240V~50/60Hz, 50W, | |
| Output: 24-28V DC, 1.5A | ||
| Machinery weight 8.9kg | ||
| Protection degree | IPX4 | |
*Voltage measured without workload. Initial battery voltage reaches maximum of 28 volts. Nominal voltage is 25.2 volts.
Noise and technical data
| A weighted sound pressure | 44.5dB(A), KPA : 3.25dB(A) |
| A weighted sound power | 63dB(A) |
| Wear ear protection when sound pressure is over | 80dB(A) [IMAGE] |
Accessories
| Charging base with 15m extension cable | 1 |
| Blades (WA0176) | 9 |
| Screws | 9 |
| Wire pegs (WA0179) | 200 |
| 180m boundary wire | 1 |
| Charging base fixing nails | 4 |
| Power adaptor (WA3716) | 1 |
| Boundary wire distance gauge | 2 |
| Hex key | 1 |
We recommend that you purchase genuine accessories listed in the above list from the same store that sold you the tool. Use good quality accessories marked with a well-known brand name. Refer to the accessory packaging for further details. Store personnel can assist you and offer advice.
2.2 Component List

Lawn Mowing Robot WG794E
- hANDLE BAr
- LOW VOLTAgE CABLE
- CONTACT PINS
- ChArgINg BASE
- ChArgINg STrIP
- DISPLAY WINDOW
- CONTROL PANEL COVER
- STOP BUTTON
- rAIN SENSOR
- rEAr DrIVINg WhEEL
- hANDLE
- BATTETY PACK
- BLADE TURNINg DISC
- CUTTING BLADE
- FrONT WhEEL
- STA rT KEY
- DISPLAY
- KEYPAD
- ON/OFF KEY
- POWER ADAPTOR
- BOUNDArY WIrE(180m)
- WlrE PEGS
- ChArgINg BASE FIXINg NAILS
- BOUNDArY WIrE DISTANCE gAUgE
- hEX KEY
3. Understanding Your Landroid®M
We would like to congratulate you on your new purchase of the Landroid®M and entering into the care-free life of automatic mowing. In the following, we would like to help you better understand how your Landroid®M thinks.

3.1 How does my Landroid ® M know what to mow?
The Android ® M chooses its direction at random. It will make sure your entire lawn is evenly mowed without leaving behind any unattractive mowing paths (See Fig. A).

A
Lawn Mowing Robot WG794E
3.2 How does my Android®M know where to go?
Your Android ® M is capable of doing things on its own. The Android ® M knows when it needs to go to its Charging Base (4) to charge, can sense when it is raining, can stop itself if it senses a problem, and knows to stop, draw back, and then turn around when it bumps into something blocking its path, such as a person, pet, or other object. The Android ® M will also automatically stop its Blade Turning Disc (13) from rotating if it is lifted off the ground to prevent an accident.
A. Finding the charging base
When your Landroid ® M needs to recharge, it will stop mowing and follow the Boundary Wire (21) in an anti-clockwise motion back to its Charging Base. Landroid ® M will automatically stop rotating its Blade Turning Disc when returning to its Charging Base. However, if it is required to go back the Charge Base manually (when you press the home button), the Blade Turning Disc will rotate and cut the grass near the boundary wire. So if you want to mow the grass near the boundary wire, just press the home button. We suggest you use this function when the battery power is more than 75%. You can check the battery power in the display.
B. Rain sensors
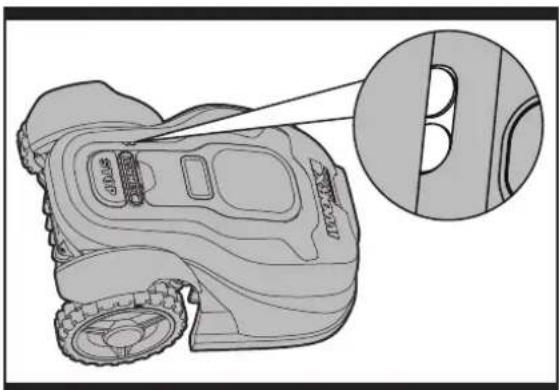
The Landroid®M is fitted with a Rain Sensor (9) that will detect rain drops and tell the Landroid®M to stop mowing and follow the Boundary Wire back to its Charging Base (See Fig. B) The Landroid®M is programmable to have a delay start function (0 – 180 mins) when it rains. When the rain sensors are wet, the Landroid®M returns to its docking station. Only when the rain sensors
B

C
become dry will the Landroid ® M begin the delay start countdown or return to mowing immediately. See the Programming and Troubleshooting Guide for more details.
C. Sensing the boundary wire
The Landroid®M always obeys the border set by the Boundary Wire and uses two sensors at its front to sense when it is getting close(See Fig. C). Before changing direction, the Landroid®M will overrun the Boundary Wire up to 20 cm*. This is the recommended distance. Use the provided distance gauge to ensure proper installation.
D. Starting and stopping while mowing
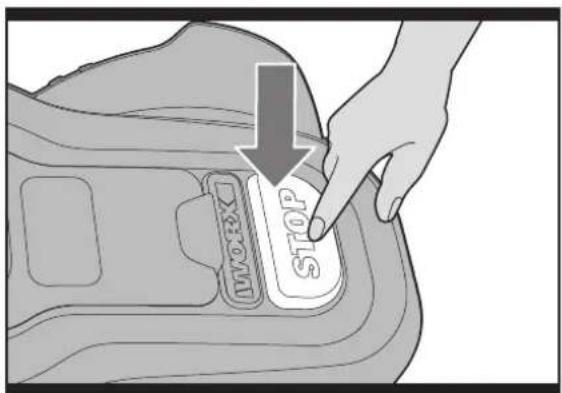
If you would like to command the LandroidTM to stop mowing, then simply press the STOP button (8) on top of the mower. To start mowing, open the Control Panel Cover and press the ON/OFF key, then press START key directly or input your further commands, then press the START key (See Fig. D,E).
D

E
Lawn Mowing Robot WG794E
If the LandroidTM senses that something is wrong, it will display a fault message on the Display (16), and will turn itself off if it does not receive any input from the user within 20 min (for information on fault messages refer to the Programming and Troubleshooting Guide).
To resume:
- Press the STOP Key to correct the problems.
- Press ON/OFF Key (19) twice to restart the machine.
- Press START Key.
- Now the Landroid M will begin to mow!
3.3 How big an area can my Landroid® M mow?
Your Android ® M is capable of mowing areas of up to around 1000m 2 , although this depends on various factors, such as:
• Sharpness of the Cutting Blades (14)
- Humidity
• Surrounding temperature
• Amount of obstacles in your Lawn
• Species of grass in your lawn and its growth rate
If the surrounding temperature is very hot where you live then your LandroidM may charge at a slightly slower rate. The LandroidM uses less energy in open areas that have fewer obstacles, such as flower beds, fountains, walkways, etc... You could find more details about default work time of LandroidM in following table:
LandroidM WG794E - AUTO MOWING TIME SCHEDULE.
| Area m2 | Auto Mowing Runtime - Hours | Monday Mowing Hours | Tuesday Mowing Hours | Wednesday Mowing Hours | Thursday Mowing Hours | Friday Mowing Hours | Saturday Mowing Hours | Sunday Mowing Hours |
| 100 | 3 | 7:00-8:30 | / | / | 7:00-8:30 | / | / | / |
| 200 7 7:00-8:24 7:00-8:24 7:00-8:24 7:00-8:24 // | ||||||||
| 300 8 7:00-8:36 7:00-8:36 7:00-8:36 7:00-8:36 // | ||||||||
| 400 | 11 | 7:00-9:12 | 7:00-9:12 | 7:00-9:12 | 7:00-9:12 | 7:00-9:12 | / | / |
| 500 | 13.5 | 7:00-9:42 | 7:00-9:42 | 7:00-9:42 | 7:00-9:42 | 7:00-9:42 | / | / |
| 600 | 16.5 | 7:00-10:18 | 7:00-10:18 | 7:00-10:18 | 7:00-10:18 | 7:00-10:18 | / | / |
| 700 | 19 | 7:00-10:48 | 7:00-10:48 | 7:00-10:48 | 7:00-10:48 | 7:00-10:48 | / | / |
| 800 | 21.6 | 7:00-11:18 | 7:00-11:18 | 7:00-11:18 | 7:00-11:18 | 7:00-11:18 | / | / |
| 900 | 24.3 | 7:00-11:54 | 7:00-11:54 | 7:00-11:54 | 7:00-11:54 | 7:00-11:54 | / | / |
| 1000 | 27 | 7:00-12:24 | 7:00-12:24 | 7:00-12:24 | 7:00-12:24 | 7:00-12:24 | / | / |
Mowing times are different for every lawn depending on the factors mentioned previously. Gradually adjust the time you allow your Landroid®M to mow each day until you find the most suitable setting.
You can also program Android ® M working time to suit your schedule – refer to Programming Guide.
3.4 How efficiently will my Landroid ® M mow the grass?
The LandroidM 's cutting height can be adjusted between 2cm - 6cm. Before starting your LandroidM for the first time, you should cut the grass to the height not more than 9 cm. Then make sure you open the Control Panel Cover (7) and set the cutting height to its maximum cutting height of 6cm (See Fig. F,G).
Your Android ® M will cut its best in dry weather. It does not like wet grass, which can build up on the Blade Turning Disc (13) and within the motor, and can also cause loose traction and slippage while working.
Your Android ® M is afraid of Lightening Storms. In case of a Lightening Storm, protect the Android ® M by unplugging the Charging Base (4), disconnecting the Boundary Wire (21), and making sure the Android ® M is not allowed to charge.
Your Landroid ® M loves mowing grass and requires its Cutting Blades

F
(14) to be kept in good condition to cut at its best. The Landroid®M can do most things by itself, but will need your help sometimes to prevent damage to itself.
- Never let the Landroid M travel over gravel.
- Remove or block off obstacles that the Landroid®M could accidentally climb on and damage its Blade Turning Disc.
- Remove all debris and foreign objects from your lawn.
4. Boundary Wire Basics
4.1 Pegging the Boundary Wire
Use the Boundary Wire Distance Gauge (24) to set the correct distance from the border of your lawn (More than 35cm *).
* This is the recommended distance. Use the provided distance gauge to ensure proper installation. If your neighbor also uses a Landroid®M , then you must keep a spacing of at least 2 metres between your Boundary Wire and your neighbors.
Please be aware that your Landroid ® M will not be able to receive a signal from the Boundary Wire beyond the distance of 18m.
The boundary wire must outline the intended mowing area exactly. Your Landroid®M will become confused by extra bends or coils of Boundary Wire that are not part of its mowing area (See Fig. H). If there is excess Boundary Wire after the mowing area has been outlined, then cut it off and store this additional wire in a separate location. However, it is important to leave the necessary length where it connects to the Charging Base so it can be connected and still remain buried.

G

H
4.2 Burying the Boundary Wire
We recommend that you bury your boundary wire a few centimeters underground. This will ensure trouble-free operation year after year, season after season. For burying the Boundary Wire you may purchase the optional WORX Territorial Marker Tool accessory at the same store that sold you your Landroid ® M.
If you are planning to bury the Boundary Wire then it should be noted that when entering its Charging Base for the first time, your Android ® M may find problems with the way you have laid the wire. It is recommended to first peg down the Boundary Wire to the lawn so it is easy to make adjustments if necessary. This will allow the Android ® M to become adjusted to its new environment and ensures it will successfully work with the charging base before the Boundary Wire is buried.
When you have completed installing the boundary wire, it is recommended that you ask LandroidTM to follow the boundary wire by pressing the home button.
Whilst observing LandroidM locating the charging station you can then make alterations to the boundary wire route to ensure trouble free tracking of the boundary wire by LandroidM when locating the charging station.
4.3 Joining the Boundary Wire
The Boundary Wire (21) can be extended simply by splicing the ends and connecting it to the ends of another piece of wire. You can use insulating tape to secure the joined part of the wire. (See Fig. I)

I
4.4 Turn on and test installation
If the charger light does not come on, then check the power connections.
If the charger base LED is flashing green, check if the boundary wire is connected correctly.
Red light on: charging.
Red light flashing: error message, refer to Trouble Shooting and correct the problems.
Green light flashing: check if the boundary wire is connected correctly.
When the green light on the charging base is on, place your LandroidM over the boundary wire, if LandroidM follows the boundary it is connected correctly.
If your Android ® M is inside its territory but the display says "out of cutting area", and the charger base LED is green, it means you clamped the boundary wire ends incorrectly. Just reverse them.
5. Maintenance
Your Android ® M needs to be checked from time to time. The Android ® M works hard and after time needs a good cleaning as well as having some parts replaced, as they can become worn.
In the following we want to let you know how to take care of your Android ® M.
5.1 Keep it sharp

WARNING: Before cleaning, adjusting, or replacing the Blades, turn your AndroidM OFF by pressing the ON/OFF Button to OFF and put on protective gloves.

WARNING: When fitting new blades, make sure you replace ALL the blades. Always use new screws when fitting blades . This is important to ensure blade retention. Failure to use new vs could cause serious injury.
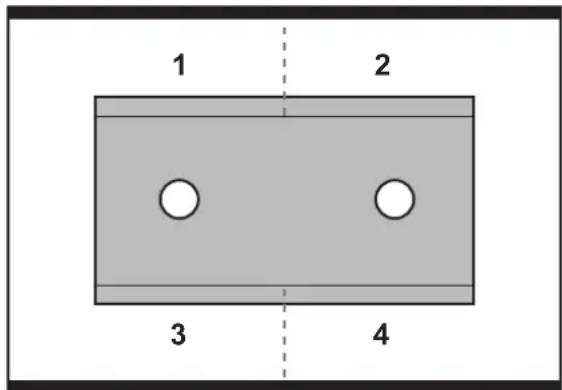
The Landroid®M does not cut grass like other mowers. Its Cutting Blades (14) are razor sharp on all 4 edges and spin in both directions for maximum cutting capacity (See Fig. J). Each blade of your Landroid®M has 4 cutting edges. Depending on the frequency the Landroid®M mows your lawn, the cutting blades will need to be flipped/rotated periodically for a new cutting edge. If your Landroid®M is programmed to mow the lawn every day then the cutting blades will need to be rotated monthly for the best mowing results. Each cutting blade will last up to 4 months when it is programmed to mow every day. When the cutting blades are dull and worn out, they should be replaced with the spare blades provided with your Landroid®M . Spare blades are also available at your nearest WORX retailer.
J
A. Rotate and flip the blades
Your Landroid®M carries 3 Blades that are all screwed onto your its Blade Turning Disc (13). The Blades are what let the Landroid®M do its job and need care and attention. Every once in awhile, you should simultaneously rotate and flip all
3 blades for a perfect cut. When rotating and flipping the Blades, make sure all the Blades are adjusted at the same time or else it could make the Blade Disc off balance. If your Android ® M mows on a normal schedule (daily) then the Blades should last one season if they are rotated and flipped every month. Always check to see if the Blades are chipped or damaged and replace them if they are.
B. Replace the blades
After some time, usually every season, your Landroid®M's Blades will need to be replaced. Your Landroid®M does not like mowing while using Blades of different age and quality. So when replacing the Blades, make sure to replace all of them at the same time. You can replace them with one of the three spare Blade kits and extra Blade screws supplied with your Landroid®M .

K
Before attempting to replace your Landroid®M's Blades, turn the power off and put on protective gloves. Then follow these steps:
- Gently flip the Landroid M over
- Take the screws off the Blades with a screwdriver
- Firmly screw on the new Blades (See Fig. K)
IMPORTANT: After screwing the Blade to the Blade Disc, make sure the Blade is able to spin freely.
5.2 Keep it clean

WARNING: Before cleaning turn your Landroid® M OFF by pressing the ON/OFF Button. Put on protective gloves before cleaning the Blade Turning Disc (13) and do not use running water.
(See Fig. L,M)
A. Cleaning the body
Your Android ® M will live a much happier and longer life if it is cleaned regularly. Although, as your Android ® M is an electric machine, you will need to take care when cleaning, so DO NOT use a hose, high pressure washers or otherwise pour running water on your Android ® M, it is best to use a spray bottle filled with water. When cleaning the machine body use a soft brush or clean cloth and avoid using solvents or polishes (See Fig. L). Lastly, make sure that you remove all build up of grass clippings and debris.
B. Cleaning the Underside
Again, it is important that you power the Landroid® M OFF using the ON/Off Button and wear protective gloves before touching the Blade Turning Disc (13).
First, flip your Landroid®M upside down to expose its underside. Here you will see the Blade Disc (a), the chassis (b), and the Front Wheel (15) and Driving Wheel(10). Clean everything thoroughly with a soft brush or moist rag(See Fig. M). Rotate the Blade Disc to make sure it moves freely and that there is not anything lodged between it and the surrounding Motor Frame Box. Also, make sure the Blades are able to spin freely and that there's no grass obstructing them.
IMPORTANT: Remove any lodged debris so that it does not cause a crack in the Blade Disc. Even the tiniest crack can decrease your LandroidM's mowing output.
C. Clean the contact pins and the charging strips
Clean the Contact Pins (3) located on the Charging Base (4) and the Charging Strip (5) located on the Landroid ® M using a cloth. Remove any build up of grass clippings and debris around the contact pins and charge strips periodically to ensure the Landroid ® M successfully charges each time.

LM

5.3 Battery life
The heart of the LandroidM is its 28-volt lithium-ion battery. No maintenance is required. For proper storage of the battery, make sure it is fully charged in kept in a cool dry place between (20°C-60°C). The life-span of the LandroidM 's battery depends on various factors, such as:
• The time span of the mowing season in your region
• Amount of hours the Landroid ® M mows per day
• Battery maintenance during storage

N
Landroid®M can be charged manually without the boundary wire
(See Fig. N).
To manually charge the battery without connecting the boundary wire to the charging base;
- Connect the Charging Base to a suitable power supply.
- Manually dock the Landroid ® M into the Charging Base while the Landroid ® M is powered off.
- The charging base red light will turn on.
- Within 3 seconds and before the charging base light turns green, press the Android power ON/OFF button.
- Landroid will begin to charge.
5.4 Winter hibernation
Your Android ® M will live longer and healthier if it is allowed to hibernate. So even though it is tough, we would recommend that you store your Android ® M in your shed or garage during the winter.
Before you prepare your Landroid®M for winter hibernation, we recommend you:
• Thoroughly clean your Landroid ® M
• Fully charge the battery
- Turn the power off
To maximize the battery life, it is recommended to fully charge the battery before storage during winter.
The Boundary Wire can be left in the ground although its ends should be protected, such as placed in a tin can with grease. If the Charging Base is left outside for winter, leave the Boundary Wire connected.
NOTE: Before storing for winter, you can take your Android ® M to a dealer for a thorough cleaning and tune-up, where its functions will be tested and worn parts will be replaced.
When bringing the Android ® M back to work after winter hibernation, make sure the Charging Strips (5) and Contact Pins (3) are clean, it is recommended to use a fine grade emery cloth to clean. Then make sure the date and time are correct and send the Android ® M back to what it loves doing: mowing.

0
5.5 Replacing the battery

WARNING: Press the ON/OFF Key to OFF before attempting any adjustment, replacement or repair.
If you need to replace the Battery, follow these steps:
- Gently turn your Android ® M upside down.
- Remove the four screws on the battery cover (See Fig. O).
- Take out the old battery (See Fig. P).
- Put in the new battery.
- Firmly replace the 4 screws.

P
Lawn Mowing Robot WG794E
PIN Code Area:


WORX
it's your nature
Copyright © 2014, Positec. All Rights Reserved.


- LANDROID®
- SAFETY AND OPERATING MANUAL
- ORIGINAL INSTRUCTIONS
- TABLE OF CONTENTS
- SAFETY INSTRUCTION 3
- TECHNICAL DATA AND COMPONENT LIST ____ 7
- UNDERSTANDING YOUR ANDROID ® M ____ 10
- BOUNDARY WIRE BASICS 13
- MAINTENANCE 14
- PRODUCT SAFETY
- 1.1 SAFETY WARNINGS FOR POWER TOOL
- IMPORTANT
- READ CAREFULLY BEFORE USE
- KEEP FOR FUTURE REFERENCE
- SAFE OPERATION PRACTICES
- TRAINING
- PREPARATION
- OPERATION
- GENERAL
- ADDITIONALLY WHEN THE APPLIANCE IS OPERATING AUTOMATICALLY
- ADDITIONALLY WHEN USING THE MANUAL CONTROLLER
- MAINTENANCE AND STORAGE
- WARNING! WHEN THE MOWER IS TURNED UPSIDE DOWN THE MAIN SWITCH MUST ALWAYS BE SET TO THE OFF POSITION
- THE MAIN SWITCH SHOULD BE SET TO THE OFF POSITION DURING ALL WORK ON THE MOWER'S UNDERFRAME, SUCH AS CLEANING OR REPLACING THE BLADES
- TRANSPORT
- 1.2 INFORMATION ON THE LANDROID®M
- TECHNICAL DATA AND COMPONENT LIST
- 2.1 TECHNICAL DATA
- 2.2 COMPONENT LIST
- UNDERSTANDING YOUR LANDROID®M
- 3.1 HOW DOES MY LANDROID ® M KNOW WHAT TO MOW
- 3.2 HOW DOES MY ANDROID®M KNOW WHERE TO GO
- FINDING THE CHARGING BASE
- RAIN SENSORS
- SENSING THE BOUNDARY WIRE
- STARTING AND STOPPING WHILE MOWING
- TO RESUME
- 3.3 HOW BIG AN AREA CAN MY LANDROID® M MOW
- 3.4 HOW EFFICIENTLY WILL MY LANDROID ® M MOW THE GRASS
- BOUNDARY WIRE BASICS
- 4.1 PEGGING THE BOUNDARY WIRE
- 4.2 BURYING THE BOUNDARY WIRE
- 4.3 JOINING THE BOUNDARY WIRE
- 4.4 TURN ON AND TEST INSTALLATION
- MAINTENANCE
- 5.1 KEEP IT SHARP
- ROTATE AND FLIP THE BLADES
- REPLACE THE BLADES
- 5.2 KEEP IT CLEAN
- CLEANING THE BODY
- CLEANING THE UNDERSIDE
- CLEAN THE CONTACT PINS AND THE CHARGING STRIPS
- 5.3 BATTERY LIFE
- LANDROID®M CAN BE CHARGED MANUALLY WITHOUT THE BOUNDARY WIRE
- (SEE FIG. N)
- 5.4 WINTER HIBERNATION
- 5.5 REPLACING THE BATTERY
- WARNING: PRESS THE ON/OFF KEY TO OFF BEFORE ATTEMPTING ANY ADJUSTMENT, REPLACEMENT OR REPAIR
- LAWN MOWING ROBOT WG794E
Brand : WORX
Model : WA3716 battery charger
Category : Battery charger