
W 80 KAU - Refrigerator SIBIR - Free user manual and instructions
Find the device manual for free W 80 KAU SIBIR in PDF.


| Product Type | Freestanding Refrigerator |
| Total Gross Capacity | Approx. 200 L |
| Energy Efficiency Class | A+ |
| Annual Energy Consumption | Approx. 220 kWh |
| Climate Class | N-ST (16°C - 38°C) |
| Noise Level | Approx. 42 dB(A) |
| Dimensions (H x W x D) | 85 cm x 60 cm x 60 cm |
| Weight | Approx. 35 kg |
| Power Supply | 220-240 V, 50 Hz |
| Temperature Control | Mechanical thermostat |
| Interior Light | LED |
| Shelves | 3 adjustable glass shelves |
| Door Storage | 3 door balconies + 1 egg tray |
| Vegetable Drawer | 1 crisper drawer with humidity control |
| Defrosting | Manual (refrigerator) / No frost (freezer not present) |
| Refrigerant | R600a |
| Cleaning | Wipe interior with damp cloth and mild detergent |
| Safety Features | Stable base, child lock (door) |
| Spare Parts Availability | Available from SIBIR authorized service centers |
| Repairability Index | 7.5/10 (estimated) |
Frequently Asked Questions - W 80 KAU SIBIR
User questions about W 80 KAU SIBIR
0 question about this device. Answer the ones you know or ask your own.
Ask a new question about this device
Download the instructions for your Refrigerator in PDF format for free! Find your manual W 80 KAU - SIBIR and take your electronic device back in hand. On this page are published all the documents necessary for the use of your device. W 80 KAU by SIBIR.
USER MANUAL W 80 KAU SIBIR
Operating instructions
Page 26
Gebruiksaanwijzing
Pagina 35
Fig 1
Dear customer, please read the instruction book and all additional information before using the appliance. It is most important that they should be retained with the appliance for future reference!
1. Warnings and directions
These warnings are provided in the interest of safety. You must read them carefully before installing or using the appliance!
- This product is designed to be operated by adults. Children should not be allowed to tamper with the controls or play with the product.
- Any electrical work required to install this appliance should be carried out by a qualified electrician.
- It is dangerous to alter the specifications or modify this product in any way.
- The absorption refrigerator is designed to be used specifically for the storage of edible foodstuffs and drinks only.
- There are working parts in this product which heat up. Always ensure that there is adequate ventilation as a failure to do this will result in component failure and possible food loss (refer to relevant instructions for unit installation under point 4.).
- Before defrosting, cleaning or maintenance work is carried out, be sure to switch off the appliance and unplug it. Shut down gas operation!
- Manufacturers' food storage recommendations should be strictly adhered to. Refer to relevant instructions for food and drink storage under point 13.
- Under no circumstances should you attempt to repair the appliance yourself. Repairs carried out by inexperienced persons may cause injury or more serious malfunctioning. This product should be serviced by an authorised Service Engineer, and only genuine spare parts should be used.
2. Area of use
The unit may not be installed in motor vehicles and boats when using the gas operation method!
Operation using liquid gas in enclosed spaces in not permitted!
The room should have a capacity (length x width x height) of at least 20 m 3 and have a window (which can be opened) or a door to the outside.
Outdoor use includes tents (awnings) which are well ventilated throughout unit operation and flat garden terraces.
There are no restrictions on electrical operation.
Site of operation must be protected from rain and other water sources.
3. Storage of gas cylinders
Liquid gas cylinders should never be stored in unventilated areas or below ground (funnel-shaped holes). Avoid direct sunlight. The gas cylinder should not be exposed to temperatures in excess of 50° C.
4. Installation
To be installed horizontally on a smooth, firm or any other appropriate surface. If necessary, adjust/align using a spirit level or a water-filled vessel.
There should be a distance of at least 10cm between the back of the unit and any other object (wall).
Avoid placing unit in direct sunlight and next to other sources of heat.
Ventilating ducts of the refrigerator should be kept clear of all obstructions to ensure a good air circulation.
This will result in a good, energy-saving cooling system.
5. Cleaning
Before initial use and after defrosting or before prolonged periods of disuse, clean the unit containers and door with luke-warm water and, if necessary, washing-up liquid. Warning: do not inadvertently press or force the opened door past its stop-point (this could cause the hinges to break). Never use scouring or corrosive agents to clean the unit. Wipe cleaned surfaces dry with a soft cloth.
6. A/C operation
Do not use any additional form of energy (batteries/gas).
Check that the supply voltage and line voltage data correspond to the type-plate in the unit.
(The following instructions refer in the main to coolers manufactured for the United Kingdom).
The mains lead of your refrigerator is fitted with a non-rewirable moulded-on 13 amp plug containing a 3 amp fuse. It is a regular earthed plug for connection to a regular earthed socket.
Due to the difference in the plugs used, an adapter will be necessary for other countries.
If the fuse requires replacing at any time, the fuse cover/carrier should be removed using a small screwdriver to lever it out. The old fuse should be replaced by a 3 amp ASTA approved BS 1362 fuse and the fuse cover/carrier must be refitted before the plug is used again.
If the fuse cover/carrier is lost, a replacement can be obtained from the service shops. The fuse cover/carrier must be of the same colour as that of the coloured
GB
insert in the base of the plug. In no circumstances must the plug be used without a correct fuse cover/carrier fitted.
If the plug supplied on the mains lead is not suitable for the socket in your home, it should be cut off and disposed of safely, or destroyed, to avoid any possible shock hazard resulting from the plug being inserted into a 13 amp socket elsewhere in the house. A suitable replacement plug should then be fitted as given below.
General guide to fitting any plug
Ensure the lengths of wire inside the plug are prepared correctly. Connections should be firmly made after all conductor strands are entered into the terminal posts. When preparing the cable ends take care not to damage the outer sheath, or the insulation surrounding the inner conductors. Tighten all screws. Replace the top cover of the plug and secure.
Other versions
Your refrigerator has a 3-wire mains lead which is intended for connection to a 3-pin plug and a properly earthed socket outlet.
IMPORTANT: The wires in the mains lead of this appliance are coloured in accordance with the following code:
As the colours of the wires in the mains lead may not correspond with the coloured markings identifying the terminals in your plug, proceed as follows: the wire which is coloured GREEN-AND-YELLOW must be connected to the terminal in the plug which is marked with the letter E or by the earth symbol or coloured green or green-and-yellow. The wire which is coloured BLUE must be connected to the terminal which is marked with the letter N or coloured black. The wire which is coloured BROWN must be connected to the terminal which is marked with the letter L or coloured red.

WARNING - THIS APPLIANCE MUST BE EARTHED!
If a 13 amps (B.S. 1363) fused-plug is used, it should be fitted with a 3 amp fuse. In other cases, the circuit to which the refrigerator is connected should be fitted with a 5 amp fuse.
To turn on (Fig. 1)
- 3-way-switch (D) should be in position 230V.
- Turn thermostat knob (A) clockwise to position 6/MAX. Only after approximately 1 hour will the unit become noticeably cool (frost on evaporator).
- The temperature can be regulated using the thermostat knob: '0'=off, 1-6 increasing degrees of coolness.
- After sufficient cooling (approximately 5 hours), the thermostat position can be set to a lower temperature, between 2-5. The thermostat will now automatically regulate the set temperature.
To turn off (Fig. 1)
- 3-way-switch (D) should be in position '0'.
- Turn thermostat knob (A) anticlockwise to position '0' (a slight resistance will be felt just before this position).
- Pull out mains plug.
7. D/C operation
Do not use any additional form of energy (mains/gas). A safety fuse must be installed in the electricity supply between battery and refrigerator in a duct.
12 V: maximum 15 amps; 24 V: maximum 7.5 amps.
max. cable lengths
| Cable cross section 12 V 24 V | |
| 2.5 mm2 | until 2.5 m 5 m |
| 4.0 mm2 | until 4.0 m 8 m |
| 6.0 mm2 | until 6.0 m 12 m |
It is not necessary to consider the polarity when connecting the unit. Check that the battery voltage and line voltage data correspond to the type-plate on the back of the unit.
If no batteries are used independently of the vehicle, the mobile cooler should not be operational when the vehicle is in motion, since the battery can discharge to the extent that the vehicle engine cannot restart when the vehicle is at a standstill.
During transport, the door safety button (G) must remain depressed, so that the door is kept in a closed and safe position.
Recommendation: before journey, pre-cool the unit using A/C operation.
To turn on
Plug the car plug must be mounted according to your car on the connecting cable into the plug connector/cigarette lighter.
When using battery operation, the cooling performance is not thermostatically regulated, i.e. knob (A) is ineffective.
When knob (A) is ineffective or if the temperature is unnecessarily too low:
Turn off unit
Pull out plug from socket.
8. Liquid gas operation
Do not use any additional form of energy (mains/battery). The unit must not be connected to town or natural gas pipelines. It is only suitable for use with propane/butane gas (e.g. Calor Gas, Camping Gaz, Caravangas, etc).
The refrigerator is equipped for a specific gas-pressure, corresponding to the standard pressure of the country in which it is sold. The rating-plate states the pressure which is correct. It is important that a non adjustable pressure-regulator is used to reduce the pressure in the gas cylinder to the operating pressure specified on the rating-plate, no other pressure may be used.
Needle valve operated gas control taps are NOT suitable for use with this appliance and must not be used as a substitute for a pressure regulator.
9. Connection of gas supply
(The following instructions refer in the main to coolers manufactured for the United Kingdom. For other countries please refer to your supplier).
Always connect in the following sequence:
GAS BOTTLE → PRESSURE-REGULATOR → APPLIANCE.
To connect the appliance to the pressure regulator an APPROVED GAS TUBING should be used. This should be minimum in length-have an inside dimension of 8mm and be marked BS3212/2/8.
The pressure-regulator must be compatible for Butan 11 in(28mbar) or for Propane(37mbar).
To connect the pressure-regulator to the gas bottle, the valve of gas bottle must be closed. After connecting the pressure-regulator to the bottle by screwing, connect the two ends of the tubing to the nipples and secure them with the two hose clipse.
When fitting the connection to the gas inlet of the appliance, hold counterpart to avoid straining and possibly damaging.
The gas bottle must only be used in an upright position and particular care must be taken every time the appliance is connected to the gas bottle to ensure that there are no leaks, that the gas pipe (rubber hose) is not under tension or kinked, and that it is not in contact with hot surfaces.
The connection pipe and gas bottle should always be located in positions where they will not be tripped over or otherwise inadvertently disturbed.
Before attempting to light the burner, every time after connection, turn on the gas at the bottle and check the gas connections for leaks by applying a soap and water solution over them and watching for bubbles, which would indicate a leak.
After testing dry off traces of detergent.
For your safety
Do not check for leaks with a naked flame!
Do not smoke while checking for leaks!
10. Gas equipment system (Fig. 1)
The gas equipment consists of a multiple value (B) [value with built-in thermoelectric ignition control], the piezo-gas lighter (E), a burner with sparking plug and the gas-thermostat.
Knob (B) can be turned to 2 function positions:
: large flame = gas-flow open;
●: out position = gas supply to burner is closed.
If, for any reason the gas flame extinguishes, the ignition control is working automatically and shuts off gas supply.
11. Igniting the gas burner (Fig. 1/4)
-
- 3-way-switch (D) should be in position "0"
- Open gas cylinder or pressure regulating valve.
- Turn knob (F) to position 6.
- Turn knob (B) anticlockwise to the MAX position, press and hold down.
- After approximately 10 seconds, press knob (E) several times. After ignition, hold down knob (B) for a further 20-30 seconds before releasing.
The flame can be controlled by aperture (C).
Should no ignition occur, repeat the ignition process after 1 minute.
(This could lake longer than 10 seconds if the unit has been out of operation for a prolonged period or after replacing the gas cylinder. Cause: air in the lines.)
- When a sufficient low internal temperature of the refrigerator has been reached, it may be necessary to set the control knob (F) to MIN-position, particularly at night, in cool weather conditions or when the refrigerator is only lightly loaded, respectively the ambient temperature is below 18° C, in order to avoid overfreezing the contents.
12. Shutting down gas operation (Fig. 1+5)
- Close gas cylinder or pressure regulating valve.
- Turn knob (B) clockwise to the off position*.
*excluding units for the United Kingdom.
13. Food and drink storage
- Foodstuffs and drinks should always be stored sealed in the unit. Thus, changes in taste and smell are avoided.
- Food and drink should be so placed in the cooler so as to allow air to circulate freely.
- Do not place hot food or drinks in the cooler!
- Under no circumstances should inflammable liquids and/or gases be stored in the cooler. Explosion hazard!
14. Defrosting and measures for prolonged periods of disuse
A build up of too much ice on the evaporator hinders cooling of the unit and thus reduces effectiveness. Therefore, it is recommended to defrost the mobile cooler as soon as an approximately 5mm thick layer of ice has formed. This is done by turning off the unit and removing any food or drink therin. Never use heated appliances, heaters, etc. to speed up the defrosting process! If necessary, a cloth dipped in warm water can be placed on the unit to help the defrosting process. After defrosting, clean up the defrosted water with a clean cloth and clean the cooler containers as described in chapter 4.
Should the unit be out of operation for a prolonged period, turn off unit and remove contents. After defrosting, the cooler should be cleaned carefully and dried.
To avoid any unpleasant smells forming in the cooler, the lid should be left slightly open.
15. Measures after prolonged periods of disuse
Should the refrigerator not function correctly after being switched on, place the unit upside down WITHOUT ANY CONNECTING POWER SUPPLY. After a few minutes return the refrigerator to its correct position and switch on again.
Should the unit still not fuction correctly, repeat the process several times.
16. Maintenance
Changing the gas filter: the cellulose gas filter is situated at the back in the gas connection piece. When it becomes necessary to replace the gas filter, remove
the filter from the duct and replace it with a new one. Any other maintenance and repair works, especially those relating to the cooling aggregate and the gas-burner system, may only be undertaken by authorized customer service points.
17. After-sales service
Should a problem arise with the unit, please check the following before contacting customer service:
- is the unit suitably placed and is it well ventilated?
- is the unit placed on a flat surface?
- does the socket supply current?
- is the connecting cable damaged in any way?
- is there a loose connection?
- has the plug been properly plugged into the socket?
- has the electrothermostat been correctly adjusted?
- in the case of gas operation, has the safety pilot knob (regulator) been pressed down long enough?
- has the regulating knob been turned to the correct position?
- is the gas cylinder or pressure regulating valve open?
- does the liquid gas cylinder still contain gas? If no liquid movement is evident on shaking the cylinder, then the gas cylinder is empty.
- are several operating methods being used simultaneously?
- have warm foodstuffs been stored in the cooler?
- was a too large a quantity of food or drink stored at any one time? Food and drink should be so stored as to allow free air circulation. Do not use paper or plastic plates. Always keep containers for liquids sealed.
When contacting our customer service department, please indicate the unit type, product number, serial number and type of defect.
We accept responsibility for the perfect condition of the unit, the guarantee being in accordance with our guarantee conditions.
18. Technical Data
Gas operation butane (propane):
Rated thermal loading: 189 W (195W)
Min. thermal loading: 112 W (115W)
Connected load, gas: 13.6 g/h (13,9g/h)
Connection pressure: 28-30/37 mbar
Category: I 3+
Climate class: 'N'
Electric operation
220 V - 240 V (mains) 50 Hz: 130/50 W
12 V/24 V (car battery): 120 W
Capacity: 70
Refrigerant: 0.18 kg NH 3 absorber
The refrigeration cycle has been checked for leaks.
Depending on the model, the controls can be positioned either at the top (as depicted) or at the bottom (no picture). Operation is the same in both cases (Fig.1).
Sodium chromate is used for corrosion protection (less than 2 weight % of the coolant).
This appliance complies with the following EEC directives:
- LVD-Directive 73/23/EEC with amendment 90/683/EEC;
- EMC-Directive 89/336/EEC;
- Gas-Directive 90/396/EEC.
**************************

Fig 2

Fig 3

Fig 4
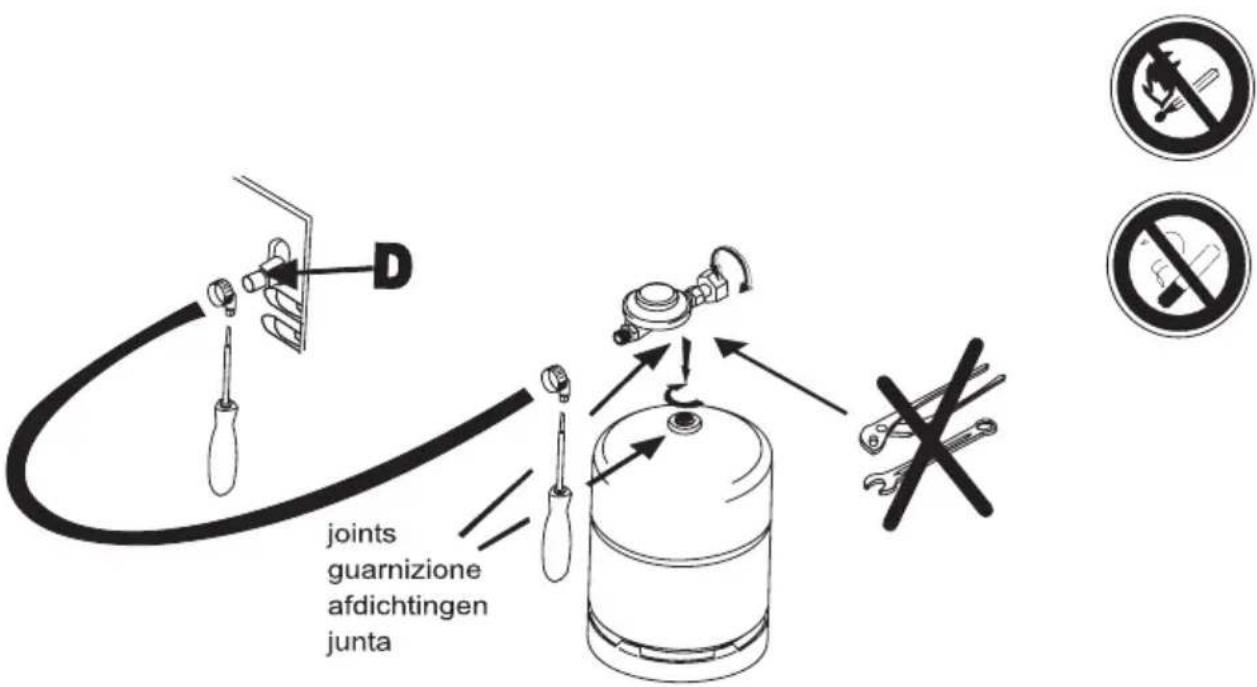
Fig 5


- WARNINGS AND DIRECTIONS
- AREA OF USE
- STORAGE OF GAS CYLINDERS
- INSTALLATION
- CLEANING
- A/C OPERATION
- GB
- GENERAL GUIDE TO FITTING ANY PLUG
- OTHER VERSIONS
- WARNING - THIS APPLIANCE MUST BE EARTHED
- TO TURN ON (FIG. 1)
- TO TURN OFF (FIG. 1)
- D/C OPERATION
- TO TURN ON
- TURN OFF UNIT
- LIQUID GAS OPERATION
- CONNECTION OF GAS SUPPLY
- FOR YOUR SAFETY
- GAS EQUIPMENT SYSTEM (FIG. 1)
- IGNITING THE GAS BURNER (FIG. 1/4)
- SHUTTING DOWN GAS OPERATION (FIG. 1+5)
- FOOD AND DRINK STORAGE
- DEFROSTING AND MEASURES FOR PROLONGED PERIODS OF DISUSE
- MEASURES AFTER PROLONGED PERIODS OF DISUSE
- MAINTENANCE
- AFTER-SALES SERVICE
- TECHNICAL DATA
Brand : SIBIR
Model : W 80 KAU
Category : Refrigerator