
the Scraper Mixer Pro - Hand blender SAGE - Free user manual and instructions
Find the device manual for free the Scraper Mixer Pro SAGE in PDF.


| Product Type | Hand Blender (Immersion Blender) |
| Brand | Sage |
| Model | The Scraper Mixer Pro |
| Power Rating | 800 W |
| Variable Speed Control | Yes, with 15 speed settings |
| BPA-Free Materials | Yes, all food contact parts are BPA-free |
| Blending Shaft Length | 21 cm (8.3 in) |
| Weight | 1.2 kg (2.6 lbs) |
| Cord Length | 1.5 m (59 in) |
| Dishwasher Safe Parts | Yes, blending shaft and attachments |
| Scraper Blade | Integrated scraper for efficient mixing |
| Whisk Attachment | Included for whipping cream, egg whites, etc. |
| Chopper Attachment | Included for chopping nuts, herbs, etc. |
| Beaker Included | Yes, 1 L (34 oz) blending beaker |
| Ice Crushing Capability | Yes, can crush ice for smoothies |
| Non-Slip Handle | Soft-grip handle for comfortable control |
| Safety Lock | Requires two hands to operate for safety |
| Heat Resistance | Can be used in hot liquids up to 100°C |
| Warranty | 2 years limited warranty |
Frequently Asked Questions - the Scraper Mixer Pro SAGE
User questions about the Scraper Mixer Pro SAGE
0 question about this device. Answer the ones you know or ask your own.
Ask a new question about this device
Download the instructions for your Hand blender in PDF format for free! Find your manual the Scraper Mixer Pro - SAGE and take your electronic device back in hand. On this page are published all the documents necessary for the use of your device. the Scraper Mixer Pro by SAGE.
USER MANUAL the Scraper Mixer Pro SAGE
Sage™ by Heston Blumenthal® Customer Service Centre
Freephone (UK Landline): 0808 178 1650 Mobile Calls (National Rate): 0333 0142 970
www.sageappliances.co.uk customerservice@sageappliances.co.uk
Register your product and get more from your purchase
Product registration takes only a few minutes and ensures a record of your purchase. Registration also makes it easier to get support and advice on any questions or issues that you might have in the future. If you wish, we can also send you free recipes and additional hints and tips on making the best of your appliance.
Go to www.sageappliances.co.uk and click on 'Product Registration'.
What's on your mind?
Our constant aim is to improve the quality and features of our appliances. We welcome your comments and ideas in assisting our ongoing development.
Go to www.sageappliances.co.uk and click on 'Support'.

Registered in England & Wales No. 8223512. Due to continued product improvement, the products illustrated or photographed in this document may vary slightly from the actual product. Copyright BRG Appliances 2014 BEM800UK Issue - E14
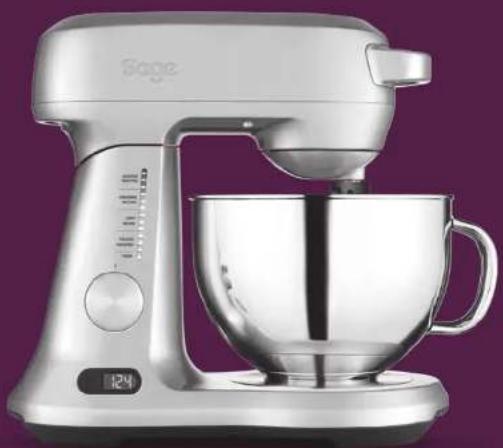
the Scraper Mixer Pro™
Instruction Booklet
natural_image
Modern kitchen stand mixer with a bowl and control panel, set against a solid purple background (no text or symbols visible)BEM800UK

by heston blumenthal
bNtENtS
3 We recommend safety first
8 Getting to know your new appliance
10 Assembly & operation
16 Troubleshooting
18 Care, cleaning & storage
19 Bread - recommendations
20 Bread - the vital ingredients
22 Baking- recommendations
23 Baking - the vital ingredients
24 Measuring & weighing
25 Heat guide
26 Recipes
WE RECoMMENd SafEty FIRST
At Sage ^™ by Heston Blumenthal ^® we are very safety conscious. We design and manufacture consumer products with the safety of you, our valued customer, foremost in mind. In addition we ask that you exercise a degree of care when using any electrical appliance and adhere to the following precautions.
IMpoRtaNt SaFEgUaRdS
REad aLL INSTRUCTIoNS BEFoRE USE aNd SaVE FoR FUtURE REFERENCE
- Before using for the first time please ensure that your electricity supply is the same as shown on the rating label on the underside of the appliance. If you have any concerns please contact your local electricity company.
- Your Sage™ appliance includes a BS 13 amp moulded mains plug on the supply cord.
- Should you need to change this plug, please complete the rewiring as follows (after safe disposal of the moulded plug).
- Please note that a cut off plug inserted into a socket is a serious danger risk
- Wires are coloured as follows: - Blue = Neutral - Brown = Live - Green & Yellow = Earth
- As the colours of the wire may not correspond with the coloured markings which identify the terminals in your plug, please refer to the following:
-The Blue wire must be connected to the terminal which is marked 'N'.
-The Brown wire must be connected to the terminal which is marked with the letter 'L'.
-The Green & Yellow wire must be connected to the terminal which is marked with the letter E or the earth symbol ± .
- Please note that if a 13 amp plug is used, a 13 amp fuse should be used.
E RECoMMENd SaFEty FIRST
- Carefully read all instructions before operating the bench mixer for the first time and save for future reference.
- Remove and safely discard any packaging material and promotional labels before using the bench mixer for the first time.
• To eliminate a choking hazard for young children, remove and safely discard the protective cover fitted to the power plug of this appliance. - Do not place the bench mixer near the edge of a bench or table during operation. Ensure the surface is level, clean and free of water and other substances. Vibration during operation may cause the appliance to move.
- Do not use the bench mixer on a sink drain board.
-
Do not place the bench mixer on or near a hot gas or electric burner, or where it could touch a heated oven.
• Always ensure the bench mixer is completely assembled before operating. Follow the instructions provided in this book. -
Ensure the speed control dial is in the OFF position and the bench mixer is switched off at the power outlet and the power cord is unplugged before attaching the beater, whisk or dough hook.
- Do not use attachments other than those provided with the bench mixer. Use only the beater whisk and dough hook supplied with the mixer.
- The maximum dough this machine can mix is 600 grams flour plus 375ml water. If your recipe is more than this, machine must be rested after 3 minutes of use to avoid overloading the motor.
- Do not operate the appliance continuously on heavy loads for more than 3 minutes. None of the recipes in this book are considered a heavy load.
- Handle the bench mixer and attachments with care. Never place your fingers inside the mixing bowl or near the beater, whisk or dough hook during operation.
WE RECoMMENd SaFEty FIRST
- Keep hands, hair, clothing, as well as, spatulas and other utensils away from moving beater, whisk or dough hook during operation.
- Should an object such as a spoon or spatula fall into the bowl while mixing, immediately ensure the speed control dial is in the OFF position, turn the bench mixer off, unplug at the power outlet and remove the object.
- Do not place hands in the mixing bowl unless the bench mixer is disconnected from the power outlet. Ensure the speed control dial is in the OFF position, the bench mixer is switched off and unplugged from the power outlet before removing the beater, whisk or dough hook.
- Ensure the motor and beater, whisk or dough hook have completely stopped before disassembling.
• Always remove the beater, whisk or dough hook from the bench mixer before cleaning.
- Care should be taken when removing the food from the mixer bowl by ensuring the motor and the beater, whisk, or dough hook have completely stopped before disassembling. Ensure the speed control dial is in the OFF position, the appliance is switched off at the power outlet and unplugged before unlocking the mixer motor head and moving into the upright position. The beater, whisk or dough hook should be released from the mixer motor head before removing the processed food from the mixer bowl and the beater, whisk or dough hook.
- Ensure the mixer motor head is locked into the horizontal (closed) position when not in use and before storing.
WE RECOMMEND SAFETY FIRST WE RECOMMEND SAFETY FIRST
• Always ensure the speed control dial is in the OFF position, the power is switched off at the power outlet and the power cord is unplugged from the power outlet before attempting to move the bench mixer, before assembling or disassembling, when not in use and before cleaning or storing.
- Do not move the bench mixer whilst in operation.
- Do not leave the bench mixer unattended when in use.
- Do not place any part of the bench mixer in the dishwasher other than the bowl, splash guard, beater, dough hook and whisk.
- Do not place any part of the bench mixer in the microwave oven.
• Always disconnect the appliance from the supply if it is left unattended and before assembling, disassembling or cleaning.
- Keep the bench mixer clean. Follow the cleaning instructions provided in this book.
- CAUTION: In order to avoid a hazard due to inadvertent resetting of the thermal cut-out, this appliance must not be supplied through an external switching device, such as a timer, or connected to a circuit that is regularly switched on and off by the utility.
IMPORTANT SAFEGUARDS FOR ALL ELECTRICAL APPLIANCES
- Fully unwind the power cord before use.
-
Do not let the power cord hang over the edge of a bench or table, touch hot surfaces or become knotted.
• To protect against electric shock do not immerse the power cord, power plug or appliance in water or any other liquid.
• Children should be supervised to ensure that they do not play with the appliance. -
Do not use the appliance if power cord, power plug or appliance becomes damaged in any way. If damaged or maintenance other than cleaning is required, please contact Sage™ Customer Service on 0808 178 1650 | 0333 0142 970 or go to www.sageappliances.co.uk
- This appliance is for household use only. Do not use this appliance for anything other than its intended use. Do not use in moving vehicles or boats. Do not use outdoors. Misuse may cause injury.
- The installation of a residual current device (safety switch) is recommended to provide additional safety protection when using electrical appliances. It is advisable that a safety switch with a rated residual operating current not exceeding 30mA be installed in the electrical circuit supplying the appliance. See your electrician for professional advice.
- This appliance can be used by persons with reduced physical, sensory or mental capabilities or lack of experience and knowledge if they have been given supervision or instruction concerning use of the appliance in a safe way and understand the hazards involved.

WARNING
This appliance shall not be used by children. Keep the appliance and its cord out of the reach of children.

The symbol shown indicates that this appliance should not be disposed of in normal household waste. It should be taken to a local authority waste collection centre designated for this purpose or to a dealer providing this service. For more information, please contact your local council office.
SAVE THESE INSTRUCTIONS
GETTING TO KNOW YOUR NEW APPLIANCE
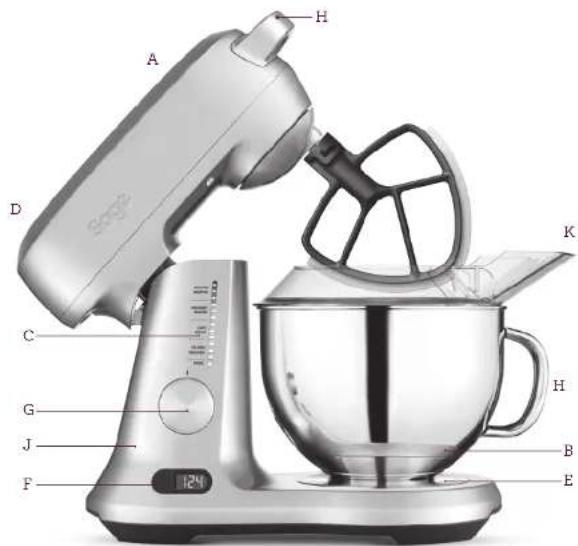
A. Motor head Powerful motor for thorough mixing results
B. 4.7L stainless steel mixing bowl with handle
C. Illuminated LED speed indicator band displays selected mixing task
D. Tilt back and lock down hinge button the motor head tilts back and locks into position to allow easy removal of the mixing bowl and attachments
E. Bowl locking recess the bowl locking recess allows the bowl to be securely locked into place for safety and stability when the mixer is in operation
F. LCD screen with count up & down timer mixer can be set to count down according to a specified time on a recipe or set to count up to asses mixing time
G. Pause function rotate dial to "pause" to temporarily stop mixing and pause the timer
H. Sage Assist™ handles handles on base and on motor head allow for easy and comfortable lifting of the mixer
I. Load Sensing Technology internal sensors detect when heavy batters are being mixed and automatically adjust to maintain the selected speed (not shown)
J. Internal Cord Storage located in the rear of the mixer. Cord pushes into the mixer base for convenient and tidy storage
K. Splash guard prevents ingredients from splattering out of the bowl
GETTING TO KNOW YOUR NEW APPLIANCE
natural_image
Metallic kitchen pan with three panes and a central handle, labeled 'A' at bottom right (no text or symbols on pan itself)
natural_image
Line drawing of a wire mesh ball with no text or symbols

natural_image
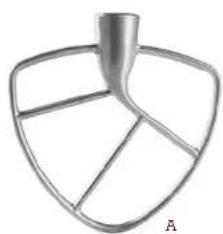
Close-up of a black metal mixing bowl with radial blades (no text or symbols visible)A. Flat beater thoroughly mixes a variety of mixtures such as cake and biscuit batter, pastries, and mashed potatoes
B. Wire whisk consistently mixes and aerates for egg whites, cream and thin batters
C. Dough hook effectively kneads heavy dough for bread and pizza
D. Scraper beater Scrapes the sides and bottom of the bowl for exceptionally thorough mixing, of cake and biscuit batter, pastry and frosting.
E. Spatula (not shown)
About your scraper beater
The Sage™ scraper beater folds ingredients and continuously scrapes down the sides and bottom of the bowl for exceptionally thorough mixing. It virtually eliminates the need to scrape the bowl by hand with a spatula and cuts mixing time up to 60%. Under-mixed batters produce poorly baked results, resulting in collapsing, unevenness of crumb, holes, low rising, streaking and course textures. The scraper beater will help to ensure a thoroughly mixed batter for your favourite cakes, biscuits, frosting and more.
Before using your bench mixer for the first time, remove any packaging material and promotional labels. Ensure the speed control dial is in the OFF position, the mixer is switched off at the power outlet and the power cord is unplugged.
Remove the mixing bowl, beater, whisk and dough hook and wash in warm soapy water with a soft cloth. Rinse and dry thoroughly. The bowl and the attachments may be washed in the dishwasher.
When first using your bench mixer, you may notice an odour coming from the motor. This is normal and will dissipate with use.
Attaching the bowl
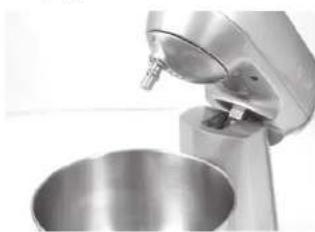
- To remove or insert the mixing bowl, the mixer motor head must be raised and locked into the open position.
- Place the mixer on a level, dry bench top. The mixer motor head should be in the horizontal (closed) position when moving. Raise the mixer motor head by pressing the RELEASE button.

natural_image
Close-up of a modern kitchen mixer (no visible text or labels)- Lift the mixer motor head up until it tilts back and locks into the open position.
natural_image
Close-up of a stainless steel kitchen mixer with a bowl (no visible text or symbols)- Insert the mixing bowl into the bowl locking recess of the mixer stand and turn clockwise until the bowl locks securely into place.
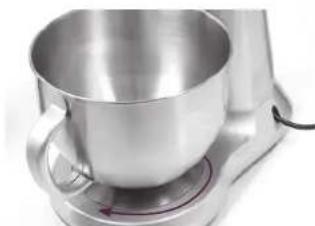
natural_image
Close-up of a stainless steel kitchen mixer on a stand (no visible text or symbols)Attaching mixing and whisking tools
- Raise the motor head by pressing the RELEASE button.
- Align the groove in the top of the mixing attachment with the locking pin on the spindle extending down from the mixer motor head.
- Push the attachment upwards and turn clockwise until it locks securely onto the locking pin on the spindle (see Fig. 1).

natural_image
Close-up of a kitchen mixer blending a metal mixing bowl with a rotating wheel (no text or symbols visible)- Lower the mixer motor head by pressing the RELEASE button and gently lowering the mixer motor head until it locks into the closed position.
- The splash guard can now be assembled if required. Slide the main ring into position on top of bowl, then assemble the pour spout.
Operating the mixer
Planetary mixing action
By replicating a similar mixing action used by commercial mixers in bakeries and patisseries, the Scraper Mixer Pro head rotates around the bowl while rotating the beater in the opposite direction. This ensures a superior and thorough mixing result without the need for a rotating bowl.

natural_image
Close-up of a kitchen mixer with a stand mixer bowl (no visible text or symbols)- Ensure the speed control dial is set to the OFF position, plug the cord into a 220-240V power outlet and switch the power ON at the power outlet. The illuminated LED speed indicator band will flash and the count up/down timer will display 0:00. The mixer is now ready.
- Add ingredients to the mixing bowl as indicated in the recipe.
- Always begin mixing by selecting a low speed setting on the speed control dial. Starting on a low speed will prevent ingredients splattering. Increase the speed as suited to the mixing task. The speed setting can be adjusted during operation. If necessary, stop the mixer during operation and scrape any food mixture down the sides of the mixing bowl with a spatula.
- If the mixer has not been used for 5 minutes it will automatically change from STANDBY mode to a power saving OFF mode and the illuminated LED will switch off. To exit OFF mode and begin mixing, turn the dial to the selected speed or press one of the count up/down timer buttons.
- Do not turn the mixer on with the scraper beater in place if the mixing bowl is empty. This will cause the scraper beater to make a loud noise as it scrapes the bowl.
- When ingredients are in the mixing bowl, the scraper beater may make a slight noise as it scrapes the sides and bottom of the bowl. This is normal and should not cause concern.
Count-up timer
The count-up timer is for gauging mixing time. You can monitor the time it takes to thoroughly mix the ingredients, so that the next time you mix the same ingredients you can set the count-down timer for the specific time.
The count-up timer will automatically begin counting up as soon as the dial is rotated from OFF to one of the speeds. When the dial is turned to PAUSE the total time will be displayed on the LCD and will flash. When the dial is turned to OFF, the LCD display will reset back to 0:00.

natural_image
Close-up of a digital kitchen appliance with a digital display showing 0:00 (no visible text or symbols beyond the display)Count-down timer
The count-down timer is for any recipe that specifies the length of time ingredients should be mixed. For example, if a recipe reads, "beat for 3 minutes".
To set the count-down timer, press the up or down arrows until the desired mixing time is displayed on the LCD screen. Press and hold to scroll more quickly.
Rotate the dial to select the desired speed, and begin mixing. When the timer has finished counting down, it will beep. The motor will automatically turn off and the timer will flash OFF.
The control dial must to be rotated to the OFF position to reset the timer and to continue mixing.
The maximum time displayed on the timer is 60 minutes. The mixer will automatically switch OFF at 60 minutes. The control dial needs to be rotated to the OFF position to reset the timer and to continue mixing.
Pause mode
While mixing, at any stage, you can rotate the control dial to the PAUSE setting. This will suspend the timer, and turn the motor off. This enables you to assess the mixing progress or add additional ingredients without affecting the timer.
For example, if you are mixing using the count-up timer mode, you can rotate the control dial from one of the mixing speeds to PAUSE. The mixer motor will stop and the timer will pause.
Once ready, rotate the dial back to one of the mixing speeds and the timer will continue to count-up from the exact time it was paused. Alternatively, if the mixer is on PAUSE, you can reset the timer to 0:00 by rotating the dial to OFF.
The PAUSE function can also be used in the count-down timer mode. To continue mixing, rotate the dial back into one of the mixing speeds to allow the timer to continue counting down.
| SPEED SETTING ATTACHMENT FOR | ||
| Kneading/Folding Bread dough | [###] | |
| Creaming/Beating | [###] | Packet cake mixes, muffins.Creaming butter and sugar,cream cheese,heavy batters |
| Whipping/Aerating |  | Cream, egg white/meringues,marshmallow |
Using the scraper beater
- The scraper beater can be used for a variety of mixing tasks. These include creaming butter and sugar, pastry, cake and biscuit doughs, batters, icing and frosting. The scraper beater creates a much more efficient mixing action, which means the mixing time of many recipes will be reduced. Refer to the chart below for approximate mixing times for common mixing tasks.
- Longer mixing times may be required for larger or double quantities.
- Do not use the scraper beater for mixing heavy dough (bread, pizza etc) or whisking egg whites.
- When adding flour to the mixing bowl, always use splash guard and ensure the mixer is on the folding/kneading setting. This will prevent flour from escaping the bowl.

natural_image
Person pouring liquid into a baking tray (no text or symbols visible)- The scraper beater can also be used as a spatula when removing cake, biscuits or other mixtures from the mixing bowl.
| MIXTURE MIXING TASK APPROX. MIXING TIME | ||
| Butter & sugar Creaming 1-4 minutes (or until mixture is pale and creamy) | ||
| Cake, muffin batter Incorporating wet and dry ingredients | 30-40 seconds (or until all ingredients are combined) | |
| Biscuits & cookie mixtures Incorporating wet and dry ingredients | 30-40 seconds (or until all ingredients are well combined) | |
| Thin/light batters (ie. Pancakes) | Incorporating wet and dry ingredients | 30-40 seconds (or until all ingredients are combined) |
| Icing Incorporating wet and dry ingredients | 40-50 seconds (or until all icing is smooth) | |
| Frosting Creaming butter | Combining icing sugar, butter & liquid ingredients | 1-2 minutes (or until butter is smooth & creamy)50-60 seconds (or until mixture is light and fluffy) |
| ISSUE TIP | |
| Choice of attachments Use the beater for all mixing tasks. Use the whisk for all whipping or sensation tasks. Use dough hook only for kneading bread dough. | |
| Speed settings Use the mixing guide to select a suitable mixing speed when preparing recipes. Begin mixing at lowest speed then increase to higher speed to prevent splattering. | |
| Mixing Mix for the recommended time in the recipe - avoid over mixing.Should an object such as a spoon or spatula fall into the bowl while mixing, immediately turn the mixer off, unplug at the power outlet and remove the object. | |
| Egg white Be sure the whisk and bowl are completely clean and dry before use - a small amount of fat or egg yolk will affect whipping performance. | |
| Bread dough | Add liquid ingredients to the dry ingredients. Use Kneeding/Folding setting to knead ingredients into a dough ball.DO NOT place hands near dough hook when mixer is operating. |
Disassembling the mixer
- When mixing is complete, turn the speed control dial to the OFF|STANDBY position, switch the appliance off at the power outlet and unplug the cord.
- To remove splash guard, separate the pour spout, then slide main ring out of position.
- Raise the mixer motor head by pressing the RELEASE button. Lift the motor head up until it locks into the open position.
- Remove the mixing or whisking tool by holding the mixer motor head and pressing the tool upwards on the spindle. Then turn the attachment anti-clockwise to release it from the pin on the spindle.
- Use a soft plastic spatula to remove mixture from the beater, dough hook or whisk attachment.
- Release and remove the mixing bowl from locking recess on mixer base by turning anti-clockwise.
- Use a soft plastic spatula to remove mixture from the mixing bowl.
- Lower the mixer motor head by pressing the RELEASE button and lowering the mixer motor head down until it locks into the horizontal position.
- When lowering or lifting the mixer, always support the motor head with your other hand to prevent from free-falling.

WARNING
Avoid contact with beater/dough hook/whisk during operation. Keep hands, hair, clothing, spatulas and other utensils out of the way to prevent personal injury or damage to the mixer.
TROUBLESHOOTING
Motor head safety cut-off
The mixer is equipped with a motor head safety cut-off. If the mixer head is lifted up at any time while the mixer motor is switched on, the safety cut-off will automatically switch the motor off and set the mixer into standby mode.
To restart the motor within 5 minutes, lower the mixer head into the horizontal (closed) position, and turn the dial away then back to the required speed setting. This will resume mixing and the timer will resume counting. To restart the motor after 5 minutes or more, lower the mixer head and turn the dial to OFF then back to the required speed. The timer will start from 0.
To turn the mixer off (instead of restarting), turn the dial to OFF, and unplug from the wall.
Electronic protection cut-off (current overload)
The mixer is equipped with an electric protection cut-off and will automatically stop operating if the motor is stalled or overloaded. This is normally a result of excessive ingredients being processed at one time. Should the mixer go into this mode, the LED indicator band will flash and the error message "E1" will flash on the LCD screen and the buzzer will "deep" 3 times.

If this error occurs, turn the speed control dial to the OFF position, switch the appliance off at the power outlet and unplug the cord. Remove some of the ingredients in the mixing bowl and then restart the mixer.
Thermo protection cut-off (temperature overload)
The mixer is equipped with a self-resetting safety device which safeguards against overheating the motor with excessive loads. If overheating occurs, the mixer will automatically activate the overhearing protection device and the motor will switch itself off. Should the mixer go into this mode, the LED indicator band will flash and the error message "E2" will flash on the LCD screen and the buzzer will "beep" 3 times.

natural_image
Close-up of a digital kitchen appliance with a digital display showing the number 2 (no visible text or symbols)If this error occurs, turn the speed control dial to the 'OFF' position, switch the appliance off at the power outlet and unplug the cord. Wait at least 15 minutes before restarting the mixer.
TROUBLESHOOTING
PROBLEM EASY SOLUTION
| Machine will not work when switched ON | · Always ensure the speed control dial is in the OFF position before start.· The temperature overload protection (thermo cut-off) device has not been activated automatically, allow more time for the motor to cool down. |
| Cannot set the time on the count-down timer | · Always ensure the speed control dial is in the OFF position before trying to set the count-down time. |
| Mixer suddenly switches off during mixing | · The mixer has been stressed by overloading or stalling. The mixer will automatically activate the overload protection button and the unit will switch itself off. If this happens, switch the mixer off at the outlet and unplug it for at least 15 minutes. The overload protection device will reset, and the mixer will be ready to use again when it powers back into standby mode. |
| “E1” error message is flashing on the count-up/down timer display | · The mixer will automatically stop operating if the motor is stalled. If this occurs, the ‘E1’ error message will flash on the count-up/down timer display. This is an electronic safety feature. This is normally a result of too much ingredients being processed at one time. Try removing some of the ingredients from the bowl. To continue mixing, turn the speed control dial to the off position and unplug the mixer from the power outlet. Then plug the mixer into the power outlet and use as normal. |
| “E2” error message is flashing on the count-up/down timer display | · This may indicate that the motor has been stressed by overheating with excessive load. The mixer is fitted with a self-resetting safety device which safeguards against overheating on the motor with excessive loads. If overheating occurs, the mixer will automatically activate the overheating protection device and the motor will switch itself off. When the overheating protection is activated, unplug the mixer from the power outlet for at least 15 minutes to allow the unit to cool. Turn the speed control dial to the OFF position then plug the mixer into the power outlet and use as normal. |
| Noise is heard when scraper beater is mixing | · When ingredients are in the mixing bowl, the scraper beater may make a slight noise as it scrapes the sides and bottom of the bowl. This is normal and should not cause concern. Do not turn the mixer on with the scraper beater in place if the mixing bowl is empty. This will cause the scraper beater to make a loud noise as it scrapes the bowl. |
CARE, CLEANING & STORAGE
Motor head and mixer base
Do not wash or immerse the mixer motor head or mixer base in water. Do not allow water or other liquids to enter the gear system, as this may result in damage.
Wipe clean with a soft, damp cloth then dry thoroughly. Wipe any excess food particles from the power cord.
Cleaning agents
Do not use abrasive scouring pads or cleaners on the mixing bowl, flat beater, dough hook or whisk, as they may scratch the surface. Use only warm soapy water with a soft cloth.
Also do not soak attachments for extended periods of time, for example several hours or overnight, as this may damage the finish.
Bowl and attachments
Wash the bowl and attachments (beater, scraper beater, whisk and dough hook) with warm soapy water and a soft cloth or a soft bristled brush. Rinse and dry thoroughly. Avoid abrasive scouring pads or cleaners, as they may damage the surfaces..
Dishwasher
The bowl and attachments (beater, scraper beater, whisk and dough hook) can also be washed in the dishwasher on a standard wash cycle. Place scraper beater on the top shelf only.
Storage
Store your mixer on the kitchen bench, or upright in an accessible cupboard.
Always ensure the speed control dial is in the OFF position, the mixer is off at the wall, and the power cord is unplugged.
Store the mixing bowl locked into the bowl recess in the mixer base.
Place the attachments inside the mixing bowl and lower the mixer head into the horizontal (closed) position.
Do not take off the motor head for any purpose.
BREAD - RECOMMENDATIONS
Hints & tips for better bread-making
Do check the ingredients and read the recipe before starting to bake.
- Do measure ingredients accurately – weighed measurements are more accurate than volume measurements.
• Do use bread flour unless recipe states otherwise.
• Do check use-by-dates on ingredients.
- Do add ingredients in the order stated in the recipe.
• Do store opened ingredients in airtight containers.
- Do use ingredients at room temperature.
- Don't use flour that contains a protein level of less than 11%.
- Don't use tableware cups, jugs or spoons for measuring.
- Don't use hot water or liquids.
- Don't use self-raising flour to make yeasted bread unless recipe states otherwise.
• In high altitude areas above 900m, lower air pressure causes the dough to rise faster. Try reducing yeast by 1/4 teaspoon.
- If the weather is hot and humid, reduce the yeast by 14 teaspoon to avoid over rising of the dough.
- Flour properties can alter on a seasonal or storage basis, so it may be necessary to adjust the water and flour ratio. If the dough is too sticky, add extra flour 1 tablespoon at a time if the dough is too dry add extra water 1 teaspoon at a time A few minutes is needed for these extra ingredients to be absorbed. Dough with the correct amount of flour and water should form into a smooth, round ball that is damp to the touch but not sticky.
Sponging yeast
- Instant active dried yeast is used in the recipes in this book however fresh or compressed yeast can be substituted, if required, for specific flavour or religious dietary requirements.
- Fresh or compressed yeast needs to be 'sponged' (fermentation started) before adding to the other ingredients.
• To substitute, use three times the amount of fresh or compressed yeast for the amount of dry yeast in a recipe.
• To sponge the yeast: Place the quantity of fresh compressed yeast in the quantity of (warmed) water from the recipe together with 1 teaspoon sugar and 1 teaspoon flour into a clean glass bowl, stir to dissolve and cover with plastic wrap. Allow to stand in a warm area (30°C) for about 30 minutes or until the mixture starts to bubble and froth. This mixture should be used without delay.
Warm area for rising
- Yeast, either when sponging or in the dough, requires warmth to rise.
• To create a 'warm area' for dough to rise, place baking tray over a bowl of fairly warm water, place prepared dough item on baking tray, cover loosely with lightly greased thicker-style plastic wrap or a tea towel. Ensure kitchen is warm and free of draughts. Allow the dough to rise until doubled in size.
BREAD - THE VITAL INGREDIENTS
Vital ingredients for bread-making
Flour is the most important ingredient used for bread making. It provides food for the yeast and gives structure to the loaf. When mixed with liquid, the protein in the flour starts to form gluten. Gluten is a network of elastic strands that interlock to trap the gases produced by yeast. This process increases as the dough continues kneading and provides the structure required to produce the weight and shape of the baked bread.
White wheat flour sold as baker's, bread or plain flour may be used. Plain flour is most readily available, however, best results are obtained with flour at least 11% protein content. For this reason, the recipes in this book requiring bread flour have been made using flour with 11% protein content. This is normally indicated on the packaging. Do not sift the flour or use self-raising flour for bread making unless indicated in the recipe. When using a low protein, plain, stone ground or wholemeal flour the quality of the bread can be improved by adding gluten flour.
There are several brands of bread or bakers flour available nationally at larger supermarkets. It is a high protein, white bread flour, with 11% protein.
Wholemeal wheat flour contains the bran, germ and flour of the wheat grain. Although breads baked with this type of flour will be higher in fibre, the loaf may be heavier in texture. Lighter textured bread can be achieved by replacing 160g of wholemeal flour with white bread flour.
Rye flour, popular for bread making, is low in protein so it is essential to combine rye flour with bread flour to make the bread rise successfully. Rye flour is traditionally used to make the heavy, dense Pumpemickel and Black Breads.
Gluten flour is made by extracting the gluten portion from the wheat grain. Adding gluten flour can improve the structure and quality of bread when using low-protein, plain, stone ground and whole meal flour.
Bread mixes contain flour, sugar, milk, salt, oil and other ingredients such as bread improver. Usually only the addition of water and yeast is required.
Bread improvers are available nationally in supermarkets and health food stores. The ingredients in a bread improver are usually a food acid such as ascorbic acid (Vitamin C) and other enzymes (umylases) extracted from wheat flours. Adding a bread improver will help strengthen the dough resulting in a loaf that is higher in volume, softer in texture, more stable and has improved shelf life qualities. A simple bread improver can be a crushed unflavoured vitamin C tablet added to the dry ingredients.
Sugar provides sweetness and flavour, browns the crust and produces food for the yeast. White sugar, brown sugar, honey and golden syrup are all suitable to use. When using honey or golden syrup it must be counted as additional liquid. We have successfully tested granular 'Splenda' brand low calorie sweetener as a sugar substitute.
Powdered milk and milk products enhance the flavour and increase the nutritional value of bread. Powdered milk is convenient and easy to use (store in an airtight container in the refrigerator).
Low fat or skim milk powder can be used with good results. Soy milk powder can also be used but produces a denser loaf. Fresh milk should not be substituted unless stated in the recipe.
BREAD - THE VITAL INGREDIENTS
Salt is an important ingredient in bread making. In the dough, salt increases water absorption, improves kneading, strengthens the gluten development and controls fermentation of the yeast which results in improved loaf shape, crumb structure, crust colour, flavour and keeping qualities. As salt inhibits the rising of bread be accurate when measuring.
Fat adds flavour and retains the moisture. Vegetable oils such as safflower, sunflower, canola, etc. can be used. Butter or margarine can be substituted for oil in recipes but may give a yellow coloured crumb.
Yeast is used as the raising agent for the breads and requires liquid, sugar and warmth to grow and rise. Dried yeast has been used in the recipes in this instruction book where appropriate. Before using dried yeast always check the use by date, as stale yeast will prevent the bread from rising. 'Tandaco' brand yeast (available nationally in most supermarkets) was used in the development of all yeasted recipes contained in this book. Smaller packets of bread mix usually contain sachets of yeast. Larger bulk bags of bread mix usually do not include the yeast sachets, however the corresponding brand of yeast may be purchased separately.
Some bulk and imported yeasts are more active, therefore it is recommended to use less of these yeasts. Yeast may also be more active in hot weather. For information on other brands of yeast relating to quantities contact the manufacturer listed on the package.
Rapid rise yeast is a mixture of yeast and bread improver. Brands will vary in strength. If wishing to substitute for yeast in a recipe, omit the bread improver. Rapid rise yeasts should not be used with bread mix as bread improver is already included.
Water from the tap is used in all bread recipes. If using water in cold climates or from the refrigerator, allow water to come to room temperature. Extremes of hot or cold water will prevent the yeast activating.
Eggs can be used in some bread recipes and provide liquid, aid rising and increase the nutritional value of the bread. They add flavour and softness to the crumb and are usually used in sweeter types of bread.
Other ingredients such as fruit, nuts, chocolate chips, etc., required to remain whole in the baked bread, should be suspended in the dough. These ingredients should be gradually added during the kneading and before the dough rises for the first time.
For more information about bread mixes please contact the relevant number listed below. Or refer to contact details on the packaging of the bread.
BAKING - RECOMMENDATIONS
Hints & tips for better baking
- Check the ingredients and read the recipe before starting to bake.
- Weigh and measure ingredients correctly.
- Variations may occur in raw ingredients use so adjust other ingredients and baking times if required.
- Preheat oven before starting recipe preparation, this will ensure the correct temperature is achieved before baking starts.
• Temperature and cooking times may vary with some ovens so adjust accordingly. If using a fan forced oven reduce the temperatures in the recipes by 10-20°C. - When mixing, start the mixer at a lower speed then gradually increase to the recommended speed in the recipe especially when adding dry ingredients.
- When using smaller quantities turn off the mixer from time to time and scrape the bowl with a spatula.
- Ensure beaters and mixing bowl are clean and free of fats when whipping egg whites as these will impede aeration.
- Spray trays and cake pans with an oil spray and line with baking paper; this will make removing your food easier.
- Butter should be softened at room temperature to make creaming butter and sugar easier.
- Keep surfaces and ingredients chilled when making, handling or rolling out pastry. Butter for pastry making should be kept refrigerated.
-
Avoid stretching pastry when rolling out as it will shrink when baking. Use light, even strokes in one direction and avoid pressing down hard on the rolling pin. Where possible, rest pastry in the refrigerator before baking.
-
Eggs should be at room temperature to give better volume when whipping.
- Break eggs individually into another container before adding to other ingredients to avoid potential spoilage.
- Separate egg whites carefully to avoid inclusion of egg yolks. Egg yolks contain fat and will prevent successful whipping of egg whites.
- Rinse beaten egg residue from beater and mixing bowl or other utensils with cold water immediately after use. Using hot water will set the egg and make removal difficult.
- Test if cakes are cooked 3-4 minutes before end of recommended cooking time by inserting a wooden skewer into the centre of the cake. The skewer should come out clean or with small dry crumbs on it.
- For crisper results when baking biscuits, remove the baking trays from the oven and placed directly onto wire racks. Move the biscuits slightly away from their baked position on the trays and cool completely before removing.
BAKING - THE VITAL INGREDIENTS
Vital ingredients for cake & pastry making
Flour, such as plain, self raising and wholemeal, used for cake and pastry making should be lower in protein (gluten) than flour used for bread making.
Plain flour has a higher protein (gluten) content and gives baked products, such as cakes, muffins, pastries, scones and pancakes, a softer texture.
Self-raising flour is a blend of plain flour and raising agents such as baking powder. Self raising flour can be used in recipes to replace plain flour and baking powder. To make 1 cup self-raising flour sift together 1 cup plain flour and 2 teaspoons baking powder.
Wholemeal flour contains more parts of the whole wheat grain - flour, bran and wheat germ - and can be used in muffins, breads and pie cases but will have a denser texture.
Corn flour is made from maize (corn) and is used in some baked products to give a finer texture and can also be used as a starch to thicken sauces and desserts. Wheaten cornflour is recommended when making sponge cakes.
Rice flour is derived from rice and is used to give a finer texture in baked products such as shortbread biscuits.
Baking powder is a mixture of cream of tartar and bicarbonate of soda and is used as a raising agent in baking.
Bicarbonate of soda also known as baking soda is an ingredient in baking powder and can be used as an additional raising agent or to darken some baked products.
Butter will give particular flavour and soft texture to baked products. Margarine can replace butter to give a similar result. Oil can be used in some baking to replace butter but will give texture and flavour differences.
Eggs should be at room temperature to give better volume when making cakes and sponges. Standard 60g eggs were used in the recipes.
Milk should be full cream unless specified. Light, low fat or skim milk can be used but will give texture and flavour differences.
Sugar (white crystal sugar) is used to give flavour, texture and colour to baked products.
Caster sugar is often used in baking as it is easier to dissolve when creaming butter and sugar.
Brown sugar is also easy to dissolve and can be used to give a different flavour and texture.
The large crystals of raw sugar are slower to dissolve and can be suitable for baked products such as muffins.
MEASURING & WEIGHING
Measuring and weighing ingredients
The accuracy of measurements can affect the critical balance of the recipe. Use accurate and appropriate measuring equipment to ensure the best results.
Do not use tableware, or common cups or spoons when measuring ingredients.
Dry measuring cups & spoons
For dry ingredients, use nested plastic or metal dry measuring cups and spoons. Do not use tableware cups or spoons.
It is important to spoon or scoop the dry ingredients loosely into the cup. Do not tap the cup or pack the ingredients into the cup unless otherwise directed (eg. packed brown sugar). The extra amount gained from packing or tapping down ingredients can affect the critical balance of the recipe. Level the top of the cup by sweeping the excess with the back of a knife.
When using measuring spoons for either liquid or dry ingredients such as yeast, sugar, salt, dry milk or honey, measurements should be level, not heaped.
Liquid measuring cups
For liquid ingredients, use transparent plastic or glass liquid measuring cups with the measurements marked clearly on the side. Do not use non-transparent plastic or metal measuring cups unless they have measurement markings on the side.
Measuring cup must be on a flat and horizontal surface. For accuracy, bend to view the liquid level at eye level. An inaccurate measurement can affect the critical balance of the recipe.
Units of measurement
Some units of measurement are different in different countries. Please consider the guide below if using recipes from international sources.
Cups
• 250ml for Australia, New Zealand & UK
237ml for USA
Tablespoons
20ml for Australia
• 15ml for New Zealand, UK and USA
Teaspoons
- 5ml for all regions.
HEAT GUIDE
The following oven temperature settings are included as a guide. These settings may need to be adjusted to suit the individual oven.
| THERMOSTAT SETTINGSDESCRIPTION OF OVENTEMPERATURES | °C ELECTRIC °F | °C GAS °F | GAS MARK | ||||
| Very slow 120 | 250 | 120 | 250 | 1 | |||
| Slow 150 | 300 | 150 | 800 | 2 | |||
| Moderately slow 170 | 325 | 160 | 325 | 3 | |||
| Moderate 180 | 350 | 180 | 350 | 4 | |||
| Moderately hot 200 | 400 | 190 | 375 | 5 | |||
| Hot 220 425 200 | 400 | 6 | |||||
| Very hot | 230 | 450 | 230 | 450 | 7 | ||
If using fan forced ovens be sure to turn the temperature down by 15-20°C. Also check recipes at the back of this book.
STARTER RECIPES FROM SAGE
STARTER RECIPES FROM SAGE
LEMON SHORTBREAD
Makes approximately 22
INGREDIENTS
250g butter, softened
110g caster sugar
1 tablespoon finely grated lemon rind
335g plain flour
Icing
160g icing sugar, sifted
1 tablespoon lemon juice
1 teaspoon milk or water
METHOD
- Preheat oven to 150^ C. Line two baking trays with baking paper.
- Assemble mixer with the scraper paddle. Combine butter and caster sugar and lemon rind in mixer bowl.
- Turn the mixer to LIGHT MIXING setting, beat until butter, sugar and rind start to combine. Gradually increase to CREAM/BEAT setting. Beat mixture for about 5 minutes or until butter is very pale in colour.
- Reduce speed to LIGHT MIXING and gradually add flour. Once all flour is added increase speed slightly to mix thoroughly for 30 seconds.
- Lightly knead dough on a flat surface.
TIP
The buttery texture of the mixture should not need a floured surface but if very sticky on your work surface then lightly flour the surface.
- Using a lightly floured rolling pin roll the mixture out to a 1cm thickness. Using a 5cm round pastry cutter cut rounds of shortbread and place onto baking trays. Reshape shortbread mixture to get as many rounds as possible. Refrigerate shortbread rounds for 15 minutes.
- Bake rounds in preheated oven for about 25-30 minutes or until firm. Allow to cool on trays for 5 minutes before transferring to a wire rack. Once cool drizzle with icing.
- To make icing, combine icing sugar, lemon juice and water in a small bowl. If mixture is still thick add another ¼ - ½ teaspoon water. Mix well to combine. Spoon mixture into a zip lock bag. To drizzle over shortbread cut the edge of one corner of the bag to make a small opening and gently squeeze icing.
STARTER RECIPES FROM SAGE STARTER RECIPES FROM SAGE
GINGERBREAD
Makes 15-20
INGREDIENTS
90g butter
60g firmly packed soft brown sugar
14 teaspoon salt
150g trescle
1 tablespoon ground ginger
14 teaspoon ground cloves
12 teaspoon ground cinnamon
12 teaspoon ground nutmeg
225g plain flour
14 teaspoon bicarbonate of soda
METHOD
-
Preheat oven to 170^ C. Line two trays with baking paper.
-
Assemble mixer using scraper beater, Add the butter, sugar, salt, treacle and spices in mixer bowl. Turn the mixer to CREAM/BEAT setting and beat for 1 minute.
-
Reduce speed to KNEAD/FOLD setting; add remaining ingredients and mix until mixture just forms a thick dough.
-
Place dough onto a floured surface. Roll out to a 5mm thickness. Using a shaped cutter approximately 10-12cm in size cut out shapes and place onto baking trays.
-
Bake for about 13–15 minutes. Cool for 5 minutes before transferring to a wire rack. Repeat with remaining dough.
-
For decorating gingerbread use the royal icing recipe on page 49.
TIP
To make a gingerbread house the mixture needs to be doubled. We recommend using the standard paddle if doubling the recipe.
CARAMEL CHIP PEANUT BUTTER COOKIES
Makes 36
INGREDIENTS
125g butter, softened
280g crunchy peanut butter
220g firmly packed brown sugar
1 egg
260g plain flour
12 teaspoon baking powder
70g roasted salted peanuts, chopped
95g caramel choc chips (see note)
METHOD
-
Preheat oven to 170^ C fan forced. Line two baking trays with baking paper.
-
Assemble mixer using scraper beater. Combine butter, peanut butter and brown sugar in the mixer bowl. Slowly turn mixer to LIGHT MIXING setting and for 30 seconds. Increase speed to CREAM/BEAT and beat for 2 minutes until pale and creamy.
-
Reduce speed to LIGHT MIXING setting; add egg and beat 30 seconds. Sift the flour and baking powder over the butter mixture then beat on KNEAD/FOLD setting for about 30 seconds or until just combined.
-
Remove the bowl from the mixer and stir through the peanuts and caramel choc chips. Roll tablespoons of mixture into balls. Place onto prepared baking trays, allowing room for spreading. Flatten with fingertips to about 1cm thick. Bake for 15-18 minutes or until golden. Allow to stand on trays for 5 minutes before transferring to a wire rack to cool. Repeat with remaining cookie mixture.
NOTE
Caramel choc chips are available in baking section of most supermarkets, alternately use white, milk or dark choc chips.
PASSIONFRUIT YO YO'S
Makes 20 sandwiched biscuits
INGREDIENTS
250g butter, softened
80g icing sugar
1 teaspoon vanilla extract
225g plain flour
80g custard powder
Extra Icing sugar, for dusting
Filling
125g butter, softened
240g icing sugar
60ml passionfruit pulp
METHOD
-
Preheat oven to 160^ C fan forced. Line two baking trays with baking paper. Assemble mixer using scraper beater. Add butter, sugar and vanilla in mixer bowl; slowly turn mixer to LIGHT MIXING setting and beat for 1 minute.
-
Increase speed to CREAM/BEAT and beat for 3-4 minutes until pale and creamy. Reduce speed to LIGHT MIXING setting; add flour and custard powder and beat until just combined.
-
Roll heaped teaspoons of mixture into balls. Place onto prepared baking trays. Press with a floured fork to flatten slightly. Bake for 15–18 minutes or until firm to touch. Allow to stand on trays for 5 minutes before transferring to a wire rack to cool. Repeat with remaining biscuit mixture.
-
For the filling: Assemble mixer using scraper beater. Combine the butter and icing sugar in the mixer bowl. Slowly turn mixer to AERATE/WHIP setting and beat 1 minute, increase speed to CREAM/BEAT setting and beat further 1-2 minutes until thick and pale. Fold through the passionfruit pulp.
-
Spread half the biscuits with passionfruit filling and sandwich together with remaining biscuits. Dust with extra icing sugar just before serving serve.
StaRtER RECIpES FRoM SagE
REd VELVEt CUpCaKES
Makes 20
INgREdIENtS
410g plain flour
25g cocoa powder
1½ teaspoon baking powder
14 teaspoon salt
185g butter, softened
330g caster sugar
2 eggs
180g sour cream
1 tablespoon pillar box red food colouring
125ml buttermilk
12 teaspoon bicarbonate of soda
1 teaspoon white vinegar
Cream cheese frosting, to ice
MEtHod
-
Preheat oven to 160^ C fan-forced. Line two x 12 hole 80ml capacity muffin trays with 20 cupcake liners.
-
Sift flour, cocoa, baking powder and salt onto a sheet baking paper.
-
Assemble mixer using scraper beaker. Add butter and sugar to mixer bowl. Beat on LIGHT MIXING setting for 1 minute then increase speed to CREAMING setting and beat for 2 minutes until pale and creamy.
-
With the mixer on LIGHT MIXING setting add the eggs one at a time then add the sour cream. Combine food colouring and milk together and pour half into the batter. Beat in half the flour mixture, then repeat with remaining milk and flour mixtures. Turn the mixer to KNEAD/FOLD setting, combine the bi-carb and vinegar and pour into the batter, mixing 20 seconds.
-
Spoon into paper cases, filling each about two-thirds full. Bake for 20-25 minutes or until a skewer inserted in centre of cupcakes comes out clean. Stand in pans for 5 minutes then remove to a wire rack to cool completely.
-
Once cool top with cream cheese frosting on page 50.
StaRtER RECIpES FRoM SagE
RaSpBERRy CUpCaKES
Makes 12
INgREdIENTs
125g unsalted butter, softened
120g caster sugar
12 teaspoon vanilla extract
2 eggs
160ml milk
125g fresh or frozen raspberries
Cream cheese or buttercream icing, to serve
MEtHod
- Preheat oven to 180^ C no fan ( 160^ C with fan). Line a 12 hole 80ml capacity muffin tray with cupcake liners.
- Assemble mixer using scraper beaten. Add butter and sugar to mixer bowl. Turn the mixer to slowly to CREAM/BEAT setting and beat for 1 minute. Add vanilla then eggs one at a time. Reduce speed to KNEAD/FOLD setting and add half the milk. Beat in half the flour mixture, then repeat with remaining milk and flour mixtures. Do not over beat. Add raspberries and fold through once.
- Divide mixture into patty cases. Bake for about 20 minutes or until a wooden skewer inserted into centre of the cupcakes comes out clean. Turn onto wire racks to cool.
- Once cool top with cream cheese or buttercream icing on page 50.
tIp
If using frozen raspberries, thaw first on paper towelling.
RICotta paNCaKES
Makes 6 to 8
INqREdIENTs
3 eggs, separated
2 tablespoons caster sugar
200g fresh ricotta
125ml milk
110g self-raising flour
1 ½ teaspoons baking powder
Unsalted butter for greasing
Fresh berries, to serve
Maple syrup, to serve
METHod
- Assemble mixer using the whisk attachment. Add egg whites to mixer bowl. Tum the mixer to AERATE/WHIP setting and whisk egg whites until soft peaks form. Add sugar and whisk for 1 minute. Transfer egg white mixture to another bowl.
- Place egg yolks, ricotta and milk into bowl of mixer. Still using the whisk attachment, turn the mixer to CREAM/BEAT setting and mix until combined. Reduce speed and add sifted flour and baking powder and mix until just combined. Return egg white mixture back into mixer bowl and mix on KNEAD/FOLD setting until just combined.
- Heat a heavy base frying pan or griddle over a low to moderate heat. Lightly grease with butter.
- Spoon about 2 heaped tablespoons of the mixture into pan and cook until golden brown on both sides.
- Serve with fresh blueberries and maple syrup.
tIp
For berry pancakes pour mixture into pan; top with several fresh berries before flipping over and cooking other side.
STARTER RECIPES FROM SAGE
Plain flour, for dusting
450g self-raising flour
160g chopped dates
200ml thickened cream
200ml lemonade
Cinnamon sugar butter
100g butter, softened
40g icing sugar
1 teaspoon ground cinnamon
METHOD
-
Preheat oven 230°C fan forced. Dust a flat oven tray with plain flour.
-
Assemble mixer using the dough hook. Sift the flour into mixer bowl, add the dates, cream and lemonade. Turn the mixer to KNEAD/FOLD setting and mix 30 seconds to 1 12 minutes until scone mixture just comes together. Turn onto a lightly floured surface and knead gently until base is smooth.
-
Press dough out to 2cm-thick. Use a 5cm round scone cutter to cut as many scones from dough as possible. Place onto tray just touching each other. Press dough together gently and repeat using the remaining dough. Bake 15 minutes until golden and well risen. Serve hot with cinnamon sugar butter or cream.
-
For the cinnamon sugar butter; Assemble mixer using scraper beater, combine all the ingredients in mixer bowl. Slowly turn mixer to CREAM/ BEAT setting and beat for 2-3 minutes until well combined.
BANANA CAKE WITH LEMON ICING
Serves 10
INGREDIENTS
200g butter, softened
330g caster sugar
2 eggs
360g (approx 3 large) very ripe mashed bananas
1 teaspoon vanilla extract
125ml buttermilk
335g self-raising flour
1 teaspoon ground cinnamon
METHOD
-
Preheat oven to 180^ C no fan ( 160^ C with fan). Grease and line base and sides of a 23cm round cake pan with baking paper.
-
Assemble mixer using scraper beaten. Add butter and sugar to the mixer bowl. Slowly turn mixer to CREAM/BEAT setting and beat for about 1 minute or until well combined. Add eggs, one at a time, beating well between each addition. Add bananas and vanilla and mix well.
-
Reduce speed to KNEAD/FOLD setting; add half the buttermilk. Beat in half the sifted flour and cinnamon, then repeat with remaining milk and flour mixtures; mix until just combined.
-
Spoon mixture into prepared pan and bake for about 60 minutes or until a wooden skewer inserted into centre comes out clean.
-
Allow cake to cool in pan for 5 minutes before transferring to a wire rack to cool completely.
-
Serve with lemon icing on page 49.
STARTER RECIPES FROM SAGE
LAMINGTONS
Makes 24
INGREDIENTS
75g self-raising flour
75g plain flour
75g cornflour
6 eggs
220g caster sugar
1 tablespoon boiling water
240g-320g desiccated coconut
Chocolate icing
640g icing sugar mixture
70g cocoa powder
250ml boiling water
METHOD
-
Preheat oven to 160^ C fan forced. Grease and line 4cm deep, 22 x 28cm (base) baking pan with baking paper, allowing it to overhang slightly. Sift flours together onto a sheet baking paper. Repeat twice more.
-
Assemble the mixer using the whisk attachment. Crack eggs into the mixer bowl. Add the sugar. Slowly turn mixer to AERATE/WHIP setting and whisk for 7-8 minutes, or until the mixture is thick and pale.
-
Silt flour mixture again over egg mixture, reduce speed to KNEAD/FOLD setting and whisk 20-30 seconds until just combined. With mixer on KNEAD/FOLD setting pour the water down the side of the bowl, whisk 10 seconds.
-
Spread sponge mixture into the pan and bake, for 20-25 minutes or until sponge springs back when gently touched in the centre. Set aside and allow to cool in the pan. Turn onto a tray lined with a tea-towel. Freeze 4-5 hours or overnight if time permits.
-
Trim the edges if necessary then cut the sponge into 24 x 5cm squares. Spread the coconut over a tray.
-
For the chocolate icing, sift the icing sugar and cocoa powder into a medium bowl. Add the water and stir until smooth. Place the bowl over a saucepan of hot water (this helps keep icing soft and runny).
-
Dip 1 piece of cake at a time into the warm icing to coat. Allow excess to drip back into the bowl. Roll the cake in the coconut and place on a wire rack to set. Repeat with the remaining cake, icing and coconut.
STARTER RECIPES FROM SAGE
ORANGE SOUR CREAM CAKE
Serves 8
INGREDIENTS
1 navel orange
150g butter, softened
150g caster sugar
2 tablespoons orange marmalade
3 eggs
160g lite sour cream
185g self-raising flour
35g plain flour
160g pure icing sugar, sifted
Double cream, to serve
METHOD
-
Preheat the oven to 160^ C fan forced. Grease base and sides of 20cm (base) round cake tin. Line the base with baking paper.
-
Assemble mixer using scraper beater. Remove rind from orange and juice orange; reserve juice. Combine orange rind, butter, caster sugar and orange marmalade in the mixer bowl and beat on LIGHT MIXING for 1 minute then increase speed to CREAM/BEAT for 2 minutes until pale and creamy.
-
With the mixer on LIGHT MIXING setting add the eggs 1 at a time then add the sour cream and beat 20 seconds. Sift the flours together into the bowl and mix on KNEAD/FOLD setting for 30-45 seconds until batter in smooth.
-
Spoon into the tin and smooth the top. Bake for 50-55 minutes or until a wooden skewer inserted into centre comes out clean. Stand the cake in the tin for 15 minutes then turn onto a wire rack to cool.
-
For the icing; combine the icing sugar and 1½ tablespoons of the orange juice in a small saucepan over medium heat. Stir until smooth and runny. Pour the icing over the cake allow to set.
STARTER RECIPES FROM SAGE
GLAZED CITRUS POPPY SEED CAKE
Serves 16
INGREDIENTS
160ml milk
80g poppy seeds
250g butter, softened
330g caster sugar
1 tablespoon finely grated orange rind
1 tablespoon finely grated lime rind
1 teaspoon vanilla extract
4 eggs
300g self-raising flour
Glaze
2 teaspoons orange rind
125ml orange juice
125ml lemon juice
220g caster sugar
METHOD
-
Preheat oven to 160^ C. Grease and line base and sides of a 23cm round cake pan with baking paper.
-
Combine milk and poppy seeds in a small bowl and soak for 10 minutes.
-
Assemble mixer using scraper beater. Add butter and sugar to mixer bowl. Slowly turn mixer to CREAM/BEAT setting and beat for 1-2 minutes or until pale and creamy.
NOTE
As this is a large quantity of butter and sugar some may beat over the scraper. Mixture may need to be pushed down once.
-
Add rind and vanilla and beat till combined. Add eggs one at a time, beating well between each addition.
-
ReducetoKNEAD/FOLD setting and add half the poppy seed mixture. Beat in half the flour mixture, then repeat with remaining poppy seed and flour mixtures; mix until just combined.
-
Spread mixture into prepared pan and cook in oven for about 1 hour and 20 minutes or until a wooden skewer inserted into centre comes out clean.
-
Meanwhile combine the rind, juices and sugar in a small saucepan. Stir over a low heat until the sugar has dissolved; bring to the boil, simmer for 2 minutes.
-
Turn cake out on to a cooling tray with a baking tray underneath. Using a wooden skewer, poke several holes into the cake then pour the hot syrup over the hot cake.
StaRtER RECIpES FRoM SagE
apRICot aNd aLMoNd tEa CaKE
Serves 10
INgREdIENtS
1kg apricot halves in natural juice
4 eggs
440g caster sugar
12 teaspoon vanilla extract
250ml sunflower, canola or light olive oil
450g plain flour
1 teaspoon baking powder
25g flaked almonds
icing sugar, for dusting
MEtHod
-
Preheat oven to 150^ C fan forced. Grease and line the base and sides of a 4cm deep, 22cm x 28cm slab pan with baking paper, allowing a 2cm overhang at both long ends.
-
Drain the apricots reserving 250ml of the juice.
-
Assemble mixer using the whisk attachment. Add eggs, sugar and vanilla to the mixer bowl. Slowly turn mixer to AERATE/WHIP setting; whisk for 6-7 minutes until pale and thick. Reduce speed to KNEAD/FOLD setting; pour in the 250ml juice and oil and whisk for 30 seconds.
-
Sift the flour and baking powder together over the egg mixture. Whisk on KNEAD/FOLD setting a further 30 seconds until just combined. Pour cake batter into the cake pan. Stand for 5 minutes (this helps thicken the batter)
-
Top with the apricots and sprinkle over the almonds. Bake for 55–60 minutes or until a wooden skewer inserted into the centre comes out clean. Stand in the pan for 30 minutes then carefully lift onto a wire rack to cool. Dust with icing sugar and serve.
RaSpBERRy JaM RoLL
Serves 6
INgREdIENtS
3 eggs
110g caster sugar
100g self-raising flour
1 tablespoon cornflour
1 tablespoon white sugar, to sprinkle
165g raspberry jam
40g fresh or frozen raspberries
MEtHod
-
Preheat oven to 180^ C fan forced. Grease and line base and sides of a 25 x 30cm (base) swiss roll pan with baking paper, allowing 2cm overhang along both long ends.
-
Assemble mixer using the whisk attachment; add eggs and sugar to the mixer bowl. Slowly turn mixer to AERATE/WHIP setting and whisk for 5-6 minutes, or until the mixture is thick and pale.
-
Sift flour and cornflour together over the mixture. Turn the speed to KNEAD/FOLD setting and whisk 20-30 seconds until just combined.
-
Spread sponge mixture into the pan and bake, for 10-12 minutes or until sponge springs back when touched in centre and edges start to shrink from sides.
-
Meanwhile, place a sheet of baking paper onto a clean tea-towel. Sprinkle with a little white sugar. Turn hot cake out onto the sugared paper. Remove paper lining and starting from 1 short side, gently roll the sponge and paper up. Roll in the clean tea towel and set aside to cool completely.
-
Unroll the sponge and spread with jam. Scatter over the raspberries. Re-roll sponge, this time without the paper, to enclose the filling. Place onto a serving plate and serve.
StaRtER RECIpES FRoM SagE
NaNNa'S CaRRot CaKE
Serves 10
INgREdIENTs
250g butter, softened
330g caster sugar
3 eggs
300g self-raising flour
2 teaspoons ground cinnamon
1 teaspoon bicarbonate soda
180ml buttermilk
80g desiccated coconut
310g (approx 3 carrots) finely grated carrot
1 x 440g can crushed canned pineapple in juice, well drained
125g chopped walnuts
Cream cheese frosting, to serve
MEtHod
-
Preheat oven to 180^ C no fan ( 160^ C with fan). Grease and line base and sides of 23cm square cake pan with baking paper.
-
Assemble mixer using scraper beater. Add butter and sugar to the mixer bowl. Slowly turn mixer to CREAM/BEAT setting and beat for about 1 minute or until well combined.
NotE
As this is a large quantity of butter and sugar some may beat over the scraper. Mixture may need to be pushed down once.
-
Add eggs, one at a time, beating well between each addition.
-
Reduce speed to KNEAD/FOLD setting; add sifted flour, cinnamon and bi-carb then and add half the buttermilk. Beat in half the coconut, then repeat with remaining buttermilk and coconut mixtures; mix until just combined. Lastly on same setting fold through carrot, pineapple and walnuts until just combined.
-
Spoon mixture into prepared pan and bake for about 1 hour and 5 minutes or until a wooden skewer inserted into centre comes out clean.
-
Allow cake to cool in pan for 5 minutes before transferring to a wire rack to cool completely.
-
Once cake is cool spread with cream cheese frosting on page 50 if desired.
StaRtER RECIpES FRoM SagE
pUMpKIN SULtaNa LoaF
Serves 8
INgREdIENtS
250g cooled mashed butternut pumpkin
(see note)
100g butter, softened
275g firmly packed soft brown sugar
2 tablespoons maple syrup
2 teaspoons mixed spice
2 eggs
300g self-raising flour
12 teaspoon bicarbonate of soda
80g sultanas
60g chopped pecan halves
Extra pecan halves, to decorate
MEtHod
-
Preheat oven to 170^ C fan forced. Grease and line base and sides of a 6cm deep, 10cm x 20.5cm (base) loaf pan.
-
Assemble mixer using scraper beater. Combine butter, sugar, maple syrup and mixed spice in the mixer bowl. Slowly turn mixer to LIGHT MIXING setting and for 1 minute. Increase speed to CREAM/BEAT setting and beat for 2-3 minutes until pale and creamy. Reduce speed LIGHT MIXING setting, add eggs one at a time then pumpkin and, beat for 30 seconds (mixture may curdle a little but it will be fine once flour added).
-
Sift the flour and bicarbonate of soda over the pumpkin mixture then beat on KNEAD/FOLD setting until just combined. Remove the bowl from the mixer and fold through sultanas and chopped pecans.
-
Spoon into prepared pan. Smooth surface. Decorate with pecans if desired. Bake for 50-55 minutes or until a skewer inserted into the centre comes out clean. Stand in pan for 30 minutes then turn onto a wire rack to cool. Serve warm or cold spread with butter or cream cheese.
NotE
For 250g mashed pumpkin; Peel & cut 600 g butternut pumpkins into 3-4cm pieces. Place in a single layer on a microwave-safe plate. Cover with plastic and microwave on High/100% power for 6-8 minutes or until pumpkin is tender. Set aside to cool. Drain any excess water then mash until smooth.
StaRtER RECIpES FRoM SagE
CLaSSIC SpoNgE CaKE WItH JaM aNd CREaM
Serves 8
INgREdIENTs
100g wheaten cornflour
50g self-raising flour
1 teaspoon cream of tartar
4 eggs
165g caster sugar
300ml cream
165g strawberry jam, lightly warmed
6-8 fresh strawberries, thinly sliced
Icing sugar, to serve
MEtHod
-
Preheat oven to 180^ C no fan ( 160^ C with fan). Grease and line bases of 2 x 22cm cake pans with baking paper.
-
Sift flours and cream of tartar onto a sheet of baking paper two times and set aside.
-
Assemble mixer using the whisk attachment. Add eggs and sugar into mixer bowl. Slowly turn mixer to AERATE/WHIP setting and whisk for about 10 minutes or until the mixture is very thick.
-
Remove bowl from mixer and sift flour over the egg mixture a third time. Using the mixer's whisk, carefully stir flour through egg mixture until just combined.
-
Divide mixture evenly among cake pans; bake in oven about 17–18 minutes or until sponge springs back when gently touched in the centre.
-
Allow cakes to cool in pans for 5 minutes before transferring to a wire rack to cool completely.
-
Once cool, assemble mixer using the whisk attachment. Add cream to mixer bowl. Slowly turn mixer to CREAM/ BEAT setting for about 1 minute or until just thicked. Top one sponge with warmed jam, fresh strawberries and some of the whipped cream. Top with second sponge. Dust with icing sugar. Serve with remaining cream.
STARTER RECIPES FROM SAGE
CHOCOLATE BROWNIE CHEESECAKE
Serves 12-16
INGREDIENTS
Base
200g dark chocolate, chopped
200g butter, chopped
220g brown sugar
2 eggs
75g plain flour
35g self-raising flour
40g desiccated coconut
Cheesecake top
500g cream cheese, softened
220g caster sugar
1 teaspoon vanilla extract
2 eggs
300ml thickened cream
METHOD
- Preheat oven 160^ C fan forced. Grease and line a 5cm deep, 28cm (base) slab pan with baking paper, extending 2cm overhang along both long ends.
-
Combine chocolate and butter in a small saucepan. Stir constantly over low heat until melted and smooth. Remove from the heat and stir in sugar. Transfer mixture to a bowl, add eggs one at a time, whisking well then stir in the flours and coconut. Spread mixture over the base of the pan and bake for 15 minutes (base will still be soft). Remove from the oven and set aside 15 minutes. Reduce oven 150°C fan forced.
-
Assemble mixer using scraper beater. Combine cream cheese, sugar and vanilla in the mixer bowl. Turn mixer to KNEAD/FOLD setting and mix for 1 minute. Increase speed to LIGHT MIXING setting and beat for 2-3 minutes until creamy. Reduce speed to KNEAD/FOLD setting again and add eggs 1 at a time then the cream, beat 20-30 seconds until just combined.
- Carefully pour cheesecake mixture over the lukewarm base. Bake for 35-40 minutes or until cocked, the centre will still wobble slightly. Turn oven off and leave door ajar for 2 hours. Refrigerate overnight. Cut into pieces and serve.
STARTER RECIPES FROM SAGE
PAVLOVA
Serves 8
INGREDIENTS
4 egg whites (150g)
220g caster sugar
300ml carton cream
Fresh berries, to serve
Fresh passionfruit pulp, to serve
METHOD
- Preheat oven to 140^ C no fan ( 120^ C with fan). Mark a 20cm circle onto a sheet of baking paper. Turn paper over and place onto a greased baking tray.
- Assemble mixer using the whisk attachment. Add egg whites to mixer bowl. Slowly turn mixer to AERATE/WHIP setting and whisk until soft peaks form.
- Gradually add sugar making sure sugar is dissolved between each addition. This can take about 10 minutes.
- Spoon meringue onto paper within the circle; use a spatula to shape into a dome shape.
- Place in oven and bake for about 1 hour or until dry then turn oven off and allow pavlova to cool completely in oven with door slightly ajar.
- Once cool, assemble mixer using the whisk attachment. Add cream to mixer bowl. Slowly turn mixer to CREAM/BEAT setting for about 1-2 minutes or until just thickened. Spread over pavlova and top with berries and passionfruit.
CHOCOLATE CAKE
Serves 10
INGREDIENTS
4 egg whites (150g)
200g good quality dark chocolate
200g butter, softened
220g caster sugar
1 teaspoon vanilla extract
2 eggs
225g self-raising flour
30g cocoa powder
310ml buttermilk
METHOD
- Preheat oven to 180^ C no fan ( 160^ C with fan). Grease and line base and sides of a 22cm cake pan with baking paper.
- Melt chocolate in a heatproof bowl over hot water. Set aside.
- Assemble mixer using scraper beater. Add butter, sugar and vanilla in mixer bowl. Slowly turn mixer to CREAM/ BEAT setting; beat for 1-2 minutes or until pale and creamy. Add eggs one and at time, beat until combined. Add melted chocolate and mix until combined.
- Reduce speed to KNEAD/FOLD setting; add sifted dry ingredients and buttermilk in two batches. Spoon mixture into prepared pan and bake for about 1 hour and 10 minutes or until a wooden skewer inserted into centre comes out clean.
- Allow cakes to cool in pan for 5 minutes before transferring to a wire rack to cool completely.
- Serve cake with chocolate ganache on page 49.
StaRtER RECIpES FRoM SagE
CHoCoLatE RoULadE
Serves 6
INgREdIENtS
3 eggs
110g caster sugar
100g plain flour
1 teaspoon baking powder
2 tablespoons cocoa powder
3 teaspoons boiling water
1 tablespoon white sugar, to sprinkle
300ml thickened cream
2 tablespoons icing sugar
1 teaspoon vanilla extract
1 tablespoon icing sugar mixed with
1 tablespoon cocos powder, for dusting
MEtHod
- Preheat oven to 180^ C fan forced. Grease and line base and sides of a 25 x 30cm (base) swiss roll pan with baking paper, extending 2cm overhang along both long ends.
- Assemble mixer using the whisk attachment. Combine eggs and sugar into mixer bowl. Slowly turn mixer to AERATE/WHIP setting and whisk for 5–6 minutes, or until the mixture is thick and pale.
- Meanwhile, sift flour, baking powder and cocoa powder together onto a sheet baking paper twice. Turn the mixer off and sift the flour mixture for the third time over the egg mixture. Turn the speed KNEAD/FOLD setting and whisk 20-30 seconds until just combined. Pour the water down the side of the bowl and mix 10 seconds.
-
Spread sponge mixture into the pan and bake, for 10-12 minutes or until sponge springs back when touched in centre and edges start to shrink from sides.
-
Meanwhile, place a sheet of baking paper onto a clean tea towel. Sprinkle with a little white sugar. Turn hot cake out onto the sugared paper. Remove paper lining and starting from 1 short side; gently roll the sponge and paper up. Roll in the clean tea towel and set aside to cool completely.
- Wash and dry mixer bowl. Assemble mixer using the whisk attachment; combine the cream, icing sugar and vanilla in the bowl. Slowly turn mixer to AERATE/WHIP setting and whisk for 40-50 seconds until firm peaks form. Cover and refrigerate until ready to serve.
- Unroll the sponge and spread evenly with the cream. Re-roll sponge, this time without the paper, to enclose the cream. Place onto a serving plate, dust with icing sugar and cocoa powder and serve.
StaRtER RECIpES FRoM SagE
pRoFItERoLES
Makes 16
INgREdIENTs
100g butter, chopped
250ml water
150g plain flour
4 eggs, lightly beaten
300ml thickened cream
2 tablespoons icing sugar
1 teaspoon vanilla extract
Icing sugar, to serve
MEtHod
- Position 1 shelf just above the centre and 1 shelf just below the centre position in the oven. Preheat oven 220°C fan forced. Line two baking trays with baking paper.
- Combine the butter and water in a medium saucepan over medium-low heat, heat, stirring often, 5 minutes until butter melts. Increase heat to high, bring to a rolling boil (the mixture should start to rise in the pan). As it does, quickly remove from heat, add all the flour, stirring constantly until mixture comes together in a ball and leaves the sides of the saucepan. Transfer the hot dough to bowl of the mixer.
-
Assemble mixer using scraper beater. Slowly turn mixer to LIGHT MIXING setting, add a quarter of the egg and beat until well combined; continue adding the egg until the choux pastry is thick and shiny.
-
Pipe or spoon choux pastry onto trays allowing room for spreading. Bake for 10 minutes. Reduce oven to 200°C fan forced and bake a further 15-20 minutes, or until the choux is puffed, golden and firm to touch. Allow to cool completely on trays.
- Wash and dry mixer bowl. Assemble mixer using the whisk attachment. Combine the cream, icing sugar and vanilla in the mixer bowl. Slowly turn mixer to AERATE/WHIP setting and whisk for 40-50 seconds until firm peaks form. Cover and refrigerate until ready to serve.
- Cut the profiteroles in half with kitchen scissors. Fill with cream. Dust with icing sugar to serve.
StaRtER RECIpES FRoM SagE
MaRSHMaLLoWS
Makes 24
INgREdIENtS
440g caster sugar
200ml lukewarm water
6 teaspoons gelatine
125ml cold water
1 teaspoon vanilla bean paste
160g toasted desiccated coconut
MEtHod
-
Grease and line a 3cm deep, 16.5cm x 26.5cm (base) slab pan, allowing paper to hang over sides.
-
Combine the sugar and lukewarm into a saucepan and cook over medium heat, stirring constantly, until sugar dissolves. Brush sides of pan with a wet pastry brush to dissolve any sugar crystals. Bring to boil and boil gently, without stirring for 5 minutes until thermometer reaches 110°C.
-
Sprinkle the gelatine over cold water and stir with a fork to combine. Spoon the gelatine mixture into hot sugar syrup and cook, whisking constantly until the gelatine has dissolved then bring to gentle boil. Pour into mixer bowl and set aside for 20-30 minutes to cool to room temperature.
-
Add the vanilla to the bowl. Assemble the mixer using whisk attachment. Slowly turn mixer to AERATE/WHIP setting and whisk for 4½-5 minutes, or until the mixture is very thick and white.
- Spoon into the prepared pan and set aside to cool. Once set (about 1 hour in fridge, 2 hours room temp) turn out of the pan and use a wet knife to cut into 24 squares. Toss in coconut and set aside until surface feels dry. Serve.
tIp
You can replace the coconut with good quality finely grated milk chocolate.
StaRtER RECIpES FRoM SagE
ICINg aNd FRoStINgS
RoyaL ICINg
Makes about 500ml
INgREdIENTs
2 egg whites
pinch cream of tartar
280g pure icing sugar, sifted
MEtHod
- Assemble mixer using the scraper beater. Add egg whites and cream of tartar in mixer bowl. Turn mixer to LIGHT MIXING setting until egg whites are lightly mixed.
- Reduce speed to KNEAD/FOLD setting and add icing sugar a heaped spoonful at a time until well combined.
- Place icing into a piping bag and pipe. Icing will harden on standing.
LEMoN ICINg
For 1 x 23cm cake
INgREdIENTs
375 icing sugar mixture, sifted
1 teaspoon grated lemon rind
2 tablespoons lemon juice
100g butter, melted
MEtHod
- Assemble mixer using scraper beater. Add icing sugar mixture and lemon rind into mixer bowl. Turn mixer to KNEAD/FOLD setting and pour in lemon juice and butter. Mix until combined.
- Spread on cooled cake.
CHoCoLatE gaNaCHE
For 1 x 23cm cake
INgREdIENtS
200g good quality dark chocolate, chopped
170ml cream
MEthod
- Stir ingredients in small saucepan over a low heat until smooth. Cool to spreading consistency.
- Spread on cooled cake.
StaRtER RECIpES FRoM SagE
BUttER CREaM ICINg
For 1 x 23cm cake
INgREdIENTs
125g butter, softened
185g icing sugar mixture, sifted
1-2 tablespoons milk
MEtHod
-
Assemble mixer using scraper beater. Add butter to the mixer bowl. Slowly turn mixer to CREAM/BEAT setting and beat for about 1-2 minutes or until pale in colour.
-
Reduce speed to KNEAD/FOLD setting and add sugar; once added increase speed again until mixed well. Adjust thickness of icing with milk. Spread on cooled cake.
tIp
If adding food colourings you may not need to add any milk at all.
CREaM CHEESE FRoStINg
For 1 x 23cm cake
INgREdIENTs
60g butter, softened
250g cream cheese, softened
1 teaspoon vanilla extract
375g icing sugar, sifted
MEtHod
-
Assemble mixer using scraper beater. Add butter, cheese and vanilla into the mixer bowl. Slowly turn mixer to CREAM/BEAT setting and beat for about 1 minute or until well combined.
-
Reduce speed to KNEAD/FOLD setting and add sugar; once added increase speed again until mixed well. Spread on cooled cake.
StaRtER RECIpES FRoM SagE
BaSIC WHItE BREad
INgREdIENTs
600g bread flour
3 tablespoons milk powder
1½ teaspoons salt
1½ tablespoons sugar
1 teaspoon bread improver
2 teaspoons Tandaco yeast
2 tablespoons oil
375ml water
Extra bread flour, for kneading
MEtHod
-
Assemble mixer using dough hook.
-
Place flour, milk powder, salt, sugar, bread, improver and yeast into mixing bowl.
-
Using speed 1-2, slowly add the oil then the water to the dry ingredients. Mix until a dough ball starts to form. Turn the dough out onto a lightly floured surface and knead by hand until the dough is soft and pliable.
tIp
The dough should be well kneaded at this stage to develop the gluten that provides the elasticity to the dough and enables it to rise.
-
Shape dough into a roll shape to fit a large bread tin or divide into two to fit two smaller bread tins.
-
Cover loosely with lightly greased plastic wrap and leave to stand in a warm area for 30-40 minutes or until well risen. Remove plastic wrap.
-
Brush top of dough with egg glaze if required and bake in a preheated oven
-
at 200°C for 40-50 minutes or until cooked and golden brown.
-
Remove from pan and cool on wire rack.
-
Place the dough ball into a large bowl, loosely cover with plastic wrap and leave to stand in a warm area for 20 minutes or until doubled in size.
-
Remove the risen dough from the bowl and knead again on a lightly floured surface.
STARTER RECIPES FROM SAGE
QUINOA, LINSEED AND CHIA BREAD
Makes 1 loaf
INGREDIENTS
1 tablespoon black chia seeds
1 tablespoon linseeds
2 teaspoons white quinoa
2 teaspoons red quinoa
330ml lukewarm water
1 ½ teaspoons salt
300g bakers flour
240g wholemeal plain flour
2 teaspoons white sugar
2 ½ teaspoons instant dried yeast
1 tablespoon olive oil
White and brown quinoa extra for crust
METHOD
-
Combine chia, linseed and quinoa in a small bowl. Add 125ml of the water and mix well; set aside for 20 minutes.
-
Assemble mixer using the dough hook. Add salt, flours, sugar, yeast, oil, remaining 250ml water and soaked seeds. Turn mixer to KNEAD/FOLD setting and mix for about 5 minutes. If necessary turn mixer off and scrape sides to lift any flour.
-
Turn dough out onto a lightly floured surface and knead to combine. Place dough ball into a lightly oiled bowl, cover and rest in a warm draught free place for 30-40 minutes or until dough has doubled in size. Turn dough out on bench surface and knock back (punch) the dough to remove excess air, using hands gently push the dough to make a rough rectangle, about 30cm× 20cm .
-
Bring one long edge of the dough into the centre then bring the other long edge in. Pinch seam together to seal. Brush with a little water and sprinkle generously with extra quinoa. Flip dough over so the seam is down and repeat with water and quinoa. Cover with a clean towel and allow to rise again for about 30 minutes until doubled in size.
-
Preheat oven to 190°C.
-
Once doubled in size, cut three shallow slits with a sharp knife on the top of the loaf.
-
Bake in oven for 30-35 minutes or until golden brown and hollow when tapped on top. Transfer to a wire rack to cool completely. Place in oven for 10 minutes again if serving hot.
STARTER RECIPES FROM SAGE
TURKISH GOZLEME
Makes 6
INGREDIENTS
Dough
525g bakers flour, sifted
2 teaspoons salt
2 tablespoons olive oil
2 tablespoons natural yogurt
375ml lukewarm water
Extra bakers flour, for kneading
Silverbeet and cheese filling
1 tablespoon olive oil
1 large brown onion, finely chopped
3 cloves garlic, chopped
Salt and pepper
150g feta cheese, crumbled
100g tasty cheese, grated
1 small bunch silverbeet, shredded
Meat filling
1 tablespoon olive oil
500g lamb mince
2 teaspoons cumin powder
1 teaspoon sweet paprika
185ml tomato passata
olive oil cooking spray
lemon wedges, to serve
METHOD
-
Spinachfilling: Heat oil in a large frying pan over medium heat. Add the onions and garlic and cook until softened; set aside to cool. Once cool combine with cheeses and salt and pepper. Rinse and dry spinach well and set aside.
-
Meatfilling: Heat oil in a medium frying pan. Cook lamb in batches until browned. Return all lamb to pan and add spices and passata. Cook for 10-15 minutes or until mixture is thick. Allow to cool.
-
To make dough: Assemble mixer using the dough hook Add flour and salt in mixer bowl. Turn mixer to KNEAD/FOLD setting and add oil, yogurt and water. Mix for 6 minutes.
TIP
Mixture is quite sticky so don't be tempted to add more flour.
-
Turn mixture out onto a well floured surface and lightly knead to combine. Divide dough into 6 equal portions and knead into small balls. Place balls onto a tray lined with a baking paper and dusted with a little flour; cover and rest for 20 minutes.
-
Preheat a large non-stick frying pan or flat plate on a BBQ on a medium heat. On a large piece of baking paper; roll one piece of dough to a 3mm thick rectangle.
-
For vegetable gozleme: place 55g shredded silverbeet onto one half of the dough. Top with one sixth of the cheese mixture.
-
For meat and vegetable gozleme: use one sixth of the meat filling, 26g silverbeet and one sixth of the cheese mixture.
-
Lift dough over filling to enclose and pinch to seal the edges. Repeat with remaining dough and filling and place onto separate sheets of baking paper.
-
Cooking one at a time. Spray the top with cooking spray oil and flip upside down onto another sheet of baking paper. Place gozleme and baking paper onto cooking surface and cook for 3-4 minutes or until golden. Spray top with oil and carefully flip over to cook other side.
-
Cut into wedges and serve with lemon wedges.
STARTER RECIPES FROM SAGE
BASIC PIZZA DOUGH
Makes enough for four 30cm thin crust pizzas or two 30cm thicker crust pizza
INGREDIENTS
3 teaspoons dry yeast
3 teaspoons sugar
1 tablespoon olive oil
250ml lukewarm water
450g bakers flour
3 teaspoons salt
METHOD
-
Add yeast, sugar, olive oil and water to a large bowl; stir until combined.
-
Assemble mixer using the dough hook. Add flour to mixer bowl. Turn mixer to KNEAD/FOLD setting; add yeast mixture and knead for 4-5 minutes until smooth and elastic.
-
Place dough ball into a lightly oiled bowl, cover and rest in a warm draught free place for 30 minutes or until dough has doubled in size. Turn dough out on a floured surface and knock back (punch) the dough to remove excess air, lightly knead.
-
For thin crust, divide dough into 4 x 170g dough balls and set aside until required.
-
For thicker crust, divide dough into 2 even dough balls and set aside until required.
PASTA DOUGH
Serves 4-6
INGREDIENTS
250g 'OO' Flour
Pinch salt
2 eggs
3 egg yolks
1 tablespoon olive oil
METHOD
-
Assemble mixer using the dough hook. Place flour and salt into mixer bowl. Make a well and add eggs, yolks and olive oil.
-
Turn mixer to KNEAD/FOLD setting and mix for about 4-5 minutes or until dough combines. If dough has not combined add 1-2 teaspoons water if needed.
-
Remove dough from bowl and cover with plastic wrap and allow to rest for 1-2 hours.
-
Use a pasta machine to make pasta.
STARTER RECIPES FROM SAGE
CINNAMON SCROLLS
Makes 12
INGREDIENTS
1 ½ teaspoons dried yeast
60ml warm milk
55g caster sugar
335g bread flour
12 teaspoon cinnamon
14 teaspoon salt
3 eggs, lightly beaten
125g butter, softened and cut into cubes
Cinnamon filling
2 tablespoons soft brown sugar
1 tablespoon caster sugar
1 ½ teaspoons cinnamon
25g butter, softened
METHOD
-
Preheat oven to 200°C. Grease a 12 hole 80ml capacity muffin tray.
-
Combine yeast, milk and 1 teaspoon of the sugar in a bowl; stir to combine. Allow to sit in a warm place for 5 minutes or until frothy.
-
Assemble mixer using the dough hook. Add flour, cinnamon, salt, eggs, remaining sugar and yeast mixture into the mixer bowl. Turn mixer to KNEAD/FOLD setting and mix until almost combined. Add the butter in a few cubes in at a time until mixed through (approx 3-4 min).
TIP
If some of the butter does not combine then stop the mixer and scrape butter onto dough then mix a little more.
- Turn dough out onto a well floured surface and lightly knead until combined. Place in an oiled bowl; cover with plastic wrap and allow to rest in a warm draught free place for about 45 minutes or until doubled in size.
- Meanwhile to make cinnamon sugar, combine the sugars and cinnamon and set aside.
- Once rested, place dough onto a floured surface and roll or press out to rectangle shape approximately 25cm x 45cm. Using your fingers or a spatula spread the softened butter over the dough. Sprinkle the cinnamon mixture over the dough leaving 1 tablespoon for the tops.
- Starting from the long side, roll the dough up to form a log.
TIP
If the dough is sticking as you are trying to roll it use a spatula or flat knife to lift it off bench. The dough should be very soft.
- Trim ends of roll then cut into 12 equal size portions. Place each scroll, cut side up, into the greased muffin pan. Sprinkle with remaining cinnamon sugar.
- Bake in oven for 20 minutes. Serve hot.


- Sage™ by Heston Blumenthal® Customer Service Centre
- Register your product and get more from your purchase
- What's on your mind?
- the Scraper Mixer Pro™
- bNtENtS
- WE RECoMMENd SafEty FIRST
- IMpoRtaNt SaFEgUaRdS
- REad aLL INSTRUCTIoNS BEFoRE USE aNd SaVE FoR FUtURE REFERENCE
- E RECoMMENd SaFEty FIRST
- WE RECOMMEND SAFETY FIRST WE RECOMMEND SAFETY FIRST
- IMPORTANT SAFEGUARDS FOR ALL ELECTRICAL APPLIANCES
- WARNING
- SAVE THESE INSTRUCTIONS
- About your scraper beater
- Attaching the bowl
- Attaching mixing and whisking tools
- Operating the mixer
- Planetary mixing action
- Count-up timer
- Count-down timer
- Pause mode
- Using the scraper beater
- Disassembling the mixer
- TROUBLESHOOTING
- Motor head safety cut-off
- Electronic protection cut-off (current overload)
- Thermo protection cut-off (temperature overload)
- CARE, CLEANING & STORAGE
- Motor head and mixer base
- Cleaning agents
- Bowl and attachments
- Dishwasher
- Storage
- BREAD - RECOMMENDATIONS
- Hints & tips for better bread-making
- Sponging yeast
- Warm area for rising
- BREAD - THE VITAL INGREDIENTS
- Vital ingredients for bread-making
- BAKING - RECOMMENDATIONS
- Hints & tips for better baking
- BAKING - THE VITAL INGREDIENTS
- Vital ingredients for cake & pastry making
- MEASURING & WEIGHING
- Measuring and weighing ingredients
- Dry measuring cups & spoons
- Liquid measuring cups
- Units of measurement
- Cups
- Tablespoons
- Teaspoons
- HEAT GUIDE
- STARTER RECIPES FROM SAGE
- LEMON SHORTBREAD
- INGREDIENTS
- Icing
- METHOD
- TIP
- STARTER RECIPES FROM SAGE STARTER RECIPES FROM SAGE
- GINGERBREAD
- CARAMEL CHIP PEANUT BUTTER COOKIES
- NOTE
- PASSIONFRUIT YO YO'S
- Filling
- REd VELVEt CUpCaKES
- RaSpBERRy CUpCaKES
- RICotta paNCaKES
- INqREdIENTs
- Cinnamon sugar butter
- BANANA CAKE WITH LEMON ICING
- LAMINGTONS
- Chocolate icing
- ORANGE SOUR CREAM CAKE
- GLAZED CITRUS POPPY SEED CAKE
- Glaze
- apRICot aNd aLMoNd tEa CaKE
- RaSpBERRy JaM RoLL
- NaNNa'S CaRRot CaKE
- pUMpKIN SULtaNa LoaF
- CLaSSIC SpoNgE CaKE WItH JaM aNd CREaM
- CHOCOLATE BROWNIE CHEESECAKE
- Base
- Cheesecake top
- PAVLOVA
- CHOCOLATE CAKE
- CHoCoLatE RoULadE
- pRoFItERoLES
- MaRSHMaLLoWS
- ICINg aNd FRoStINgS
- RoyaL ICINg
- LEMoN ICINg
- CHoCoLatE gaNaCHE
- BUttER CREaM ICINg
- CREaM CHEESE FRoStINg
- BaSIC WHItE BREad
- QUINOA, LINSEED AND CHIA BREAD
- TURKISH GOZLEME
- Dough
- Silverbeet and cheese filling
- Meat filling
- BASIC PIZZA DOUGH
- PASTA DOUGH
- CINNAMON SCROLLS
- Cinnamon filling
Brand : SAGE
Model : the Scraper Mixer Pro
Category : Hand blender