
Temporis IP300 - Telephone ALCATEL - Free user manual and instructions
Find the device manual for free Temporis IP300 ALCATEL in PDF.


| Product Type | IP Desk Phone |
| Brand | Alcatel |
| Model | Temporis IP300 |
| Dimensions (approx.) | 200 x 180 x 120 mm |
| Weight (approx.) | 0.8 kg |
| Power Supply | PoE (Power over Ethernet) or AC adapter (12V DC) |
| Display | Monochrome LCD with backlight |
| Keypad | Alphanumeric with function keys |
| VoIP Protocols | SIP (Session Initiation Protocol) |
| Call Functions | Call hold, transfer, conference, redial, speed dial |
| Audio Features | Full-duplex speakerphone, handset, headset support |
| Network Interfaces | 1x 10/100 Ethernet port |
| Number of Lines | Up to 2 SIP lines |
| Headset Jack | RJ9 (2.5mm) |
| Wall Mountable | Yes |
| Cleaning Instructions | Wipe with a soft dry cloth; do not use liquids or sprays |
| Safety Precautions | Use only supplied power adapter; avoid water; unplug during storms |
| Spare Parts Availability | Handset, base, power adapter available from Alcatel service centers |
| Repairability | Modular design; replaceable handset cord, network cable |
| General Information | Business-grade VoIP phone for unified communications |
Frequently Asked Questions - Temporis IP300 ALCATEL
User questions about Temporis IP300 ALCATEL
0 question about this device. Answer the ones you know or ask your own.
Ask a new question about this device
Download the instructions for your Telephone in PDF format for free! Find your manual Temporis IP300 - ALCATEL and take your electronic device back in hand. On this page are published all the documents necessary for the use of your device. Temporis IP300 by ALCATEL.
USER MANUAL Temporis IP300 ALCATEL
home & business phones
Business IP Range Administration and Provisioning Manual
Temporis IP100/ IP150/ IP151/ IP251G/IP300/
IP301G/ IP700G/ IP701G
Alcatel IP2015/ IP2115
Conference IP1850
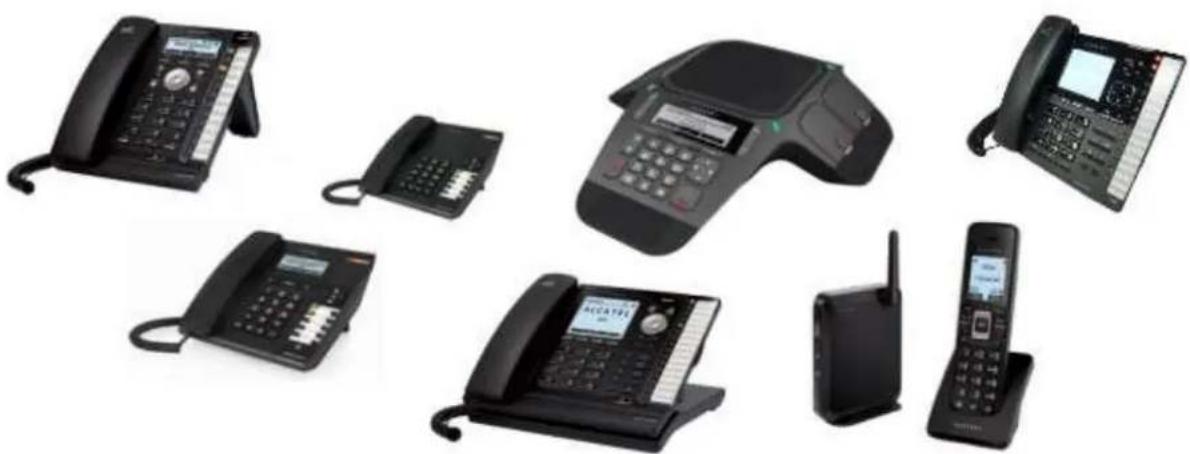
natural_image
Collection of various black office phones including landline, keypad, and mobile phone (no visible text or labels)Edition 2.2, Oct 2016
ALCATEL
home & business phones
Congratulations on your purchase of this Alcatel product. Before using it, please read Important Safety Information on page 246 of this manual. Please thoroughly read this manual for all the feature operations and troubleshooting information necessary to install and operate your new product. You can also visit our website at alcatel-business.com.
This manual provides instructions for using Temporis IP100/ IP150/ IP300/ IP700G, Alcatel IP2015, Conference IP1850 models with software version 1.1.1.A or newer, and IP151/IP251G/IP301G/IP701G, Alcatel IP2115 with software version 2.0.4.A or newer. Instructions are also applicable for the administration of IP315, IP370, IP715G and IP770G bundles with cordless accessories. See page 58 for instructions on checking the software version on the desktop phones, or page 75 to do the same on the cordless handsets.
Parts checklist
Your telephone package contains the following items. Save your sales receipt and original packaging in the event warranty service is necessary.
| TemporisIP100IP150IP151IP251G | TemporisIP150M | TemporisIP300IP301GIP700G | TemporisIP700G | AlcatelIP2015IP2115 | ConferenceIP1850 | |
| Quick User Guide | √ | √ | √ | √ | √ | √ |
| Handset and handset cord | √ | √ | √ | √ | ||
| Phone base/main unit | √ | √ | √ | √ | √ | √ |
| Foot stand | √ | √ | √ | √ | ||
| Wall mount accessory | √ | √ | √ | √ | ||
| Ethernet cable | √ | √ | √ | √ | √ | √ |
| PSU or power injector | √ | √ | √ | |||
| Cordless handset | √ | |||||
| Cordless microphones | √ | |||||
| Batteries or battery pack | √ | √ | ||||
| Charging cradle with PSU | √ |
ALCATEL
home & business phones
Table of contents
Parts checklist....2
Table of contents 3
Introduction 7
Audience 7
Related documents 7
Getting started 8
Temporis IP100 9
Quick reference guide 9
Programmable Keys.... 10
Temporis IP150 (M) 11
Quick reference guide 11
Programmable Keys 12
Temporis IP151 13
Quick reference guide 13
Programmable Keys 13
Temporis IP251G 14
Quick reference guide 14
Programmable Keys 15
Temporis IP300 16
Quick reference guide 16
Programmable Keys.... 17
Temporis IP301G 18
Quick reference guide 18
Programmable Keys 18
Temporis IP700G 19
Quick reference guide 19
Programmable Keys 20
Temporis IP701G 21
Quick reference guide 21
Programmable Keys 22
Alcatel IP2015/IP2115 23
Quick reference guide 23
Conference IP1850....25
Quick reference guide 25
Network Requirements.... 27
Installation....28
Temporis IP100/IP150/IP151 installation 28
Temporis IP251G/IP300/IP301G/IP701G installation 31
Temporis IP700G installation.... 33
Alcatel IP2015/IP2115 installation.... 35
Conference IP1850 installation 36
Configuring your device 39
Minimum configuration 39
Verifying the installation: idle Screen 39
Configuring Programmable keys 40
Functions available to programmable keys.... 40
LED behavior 41
Adding a Custom Logo.... 43
Idle screen logo behavior 43
Logo specifications.... 43
Uploading a custom logo 44
Custom logo user interactions 44
Customizing Softkeys 45
Custom Soft Key Configuration File Settings 47
Setting up Temporis IP100 phone 48
Using the phone "star codes" 48
ALCATEL
home & business phones
Find IP address 48
Static IP configuration 48
VLAN configuration 48
Enable VLAN 48
Disable VLAN 49
Setting up IP300/IP301G/IP700G/IP701G with IP70H accessory DECT headset ..... 50
Register a DECT headset 50
Deregister a DECT headset 50
Deregister a DECT headset without a deskset 51
Deskset functionality with an IP70H DECT headset 51
Setting up IP300/IP301G/IP700G/IP701G with IP15 accessory DECT handset .... 51
Register a DECT handset 51
Deregister a DECT handset 52
Deskset functionality with an IP15 DECT handset 52
Setting up IP2015/IP2115 with multiple IP15 handsets or IP70H wireless headsets..... 53
Managing additional IP15 handsets 53
Assigning sip accounts to IP15 handsets or IP70H headsets 54
IP2015/IP2115 functionality with IP15 DECT handsets 55
IP2015/IP2115 functionality with IP70H DECT headset.... 55
Using Menu in your desktop phone 56
Features 56
Status 58
Viewing Line status....59
Customizing your phone with User Settings menu 60
Using the Admin Settings menu....61
Network settings (IPv4) 63
Network settings (IPv4/IPv6) 65
Line Menu....68
Provisioning Menu 70
Security Menu 70
Using Menu in your IP15 cordless handset 73
User functionality submenus 73
Status 75
User Settings 76
Admin Settings....77
Network settings (IPv4) 78
Network settings (IPv4/IPv6) 80
Provisioning Menu 85
Using the WebUI 86
Saving Your Settings....88
Status 89
System 90
SIP Account Management 90
Dial Plan....107
Call Settings....109
User Preferences....113
Programmable Function Keys 118
Programmable Hard Keys 124
Memory Keys: Speed Dial 126
Signaling Settings....127
Ringer Settings....128
Paging Zone 130
Server applications 132
Hotline Settings....137
Handset settings....138
Account assignment....138
Handset name....139
Network....141
ALCATEL
home & business phones
Basic Network Settings (IPv4) 141
Basic Network Settings (IPv4/IPv6)....142
Advanced Network Settings....146
Contacts 150
Local Directory 150
Directory Import/Export 152
Directory Import using configuration files....153
Black List....154
Black List Import/Export....155
Black List Import using configuration files....155
LDAP Directory 156
Broadsoft Directory 160
Remote XML Phonebook 161
Call History 164
Servicing....165
Reboot 165
Time and Date....165
Custom Language 168
Custom Logo 169
Firmware Upgrade 170
Provisioning 173
Security....180
Passwords 180
Phone lock....181
PIN masking 182
Web Server 183
Trusted servers 184
Trusted IP 185
Certificates 186
Enhanced Certificate Management 187
TR069 189
System Logs 191
Provisioning Using Configuration Files....193
Resynchronization—Configuration File Checking....193
The Provisioning Process....193
Phone Restart....194
Configuration File Types 195
Data Files 195
Configuration File Guide....197
Guidelines for the MAC-Specific Configuration File 197
Securing Configuration Files with AES Encryption 197
Setting Up Provisioning 200
Soft Keys 201
Desktop phone soft keys....201
IP15 cordless handset soft keys....204
Appendix A: Configuration File Settings....206
"sip_account" Module: SIP Account Settings....207
"network" Module: Network Settings 212
"profile" Module: security settings....213
"provisioning" Module: Provisioning Settings 214
"time_date" Module: Time and Date Settings 216
"log" Module: Log Settings....217
"remoteDir" Module: Remote Directory Settings 218
"web" Module: Web Settings 219
"trusted_ip" Module: Trusted Server and Trusted IP Settings 220
"user_pref" Module: User Preference Settings....221
"call_settings" Module: Call Settings 223
"pfk" Module: Programmable Feature Key Settings....225
ALCATEL
home & business phones
"speed_dial" Module: Speed Dial Settings 228
"audio" Module: Audio Settings....229
"file" Module: Imported File Settings 230
"xml_app" Module: XML App Settings....232
"system_event" Module: Action URI Settings....233
"tr069" Module: TR-069 Settings 234
"tone" Module: Tone Definition Settings....235
"ringersetting" Module: distinctive ringing settings....237
"page_zone" Module: Paging Zone Settings....238
"softkey" Module: Custom Soft Key Settings 239
"hs_settings" Module: Handset management Settings 240
Appendix B: Time Zones 242
Maintenance....245
Important Safety Information 246
CE Declaration of conformity 247
CE Mark Warnings....247
WEEE Warning....247
GPL License Information 247
Introduction
This administration and provisioning guide contains detailed instructions for installing and configuring your Temporis IP100, Temporis IP150, Temporis IP151, Temporis IP251G, Temporis IP300, Temporis IP301G, Temporis IP700G, Temporis IP701G, all IP3xx and IP7xx bundles with cordless accessories, Alcatel IP2015, Alcatel IP2115 and Conference IP1850. Please read this guide before installing the telephone.
Audience
This guide is written for installers and system administrators. It assumes that you are familiar with networks and VoIP, both in theory and in practice. This guide also assumes that you have ordered your IP PBX service and selected which PBX features you want to implement. This guide does not reference specific IP PBX services except for features or parameters that have been designed for a specific service. Please consult your service provider for recommended switches, routers, and firewall and NAT traversal settings, and so on.
As the product range becomes certified for IP PBX services, we may make available interoperability guides for those specific services. These will recommend second-party devices and settings, along with deskset-specific configurations for optimal performance with those services. Contact your distributor or installer for the latest updates.
Related documents
Quick Start Guide contains a quick reference guide to the device external features and brief instructions on connecting it to a working IP PBX system. This document exists in different language versions.
Connection sheet contains connection instructions in multiple languages on a single document.
Documents are available from our website at alcatel-business.com.
ALCATEL
home & business phones
Getting started
Alcatel business IP range includes full-featured business phones designed to work with popular SIP telephone (IP PBX) services. Once you have ordered and configured your SIP service, the device enables you to make and receive calls as you would with any other business phone. The phones provide calling features like hold, transfer, conferencing, speakerphone, intercom, quick dial numbers and one-touch voicemail access.
Depending on the models, there are one or two network ports, known as LAN port and PC port, at the back of the desk set. The LAN port allows the phones to connect to the IP PBX via a router. The PC port is for another device such as a personal computer to connect to the Ethernet network through the desk set.
You can configure the terminal using its own menus, a browser-based interface called the WebUI, or an automatic provisioning process (see Provisioning Using Configuration Files on page 193).
The WebUI enables you to configure the device using a PC that is connected to the same Local Area Network. The WebUI resides on the phone, and is updated with any firmware updates.
Desktop phones have dual-function programmable keys to which quick-dial numbers, lines, or other functions like monitoring other extensions in the system can be assigned. Programmable keys have two-color LEDs to indicate call activity.
These telephones support caller ID with call waiting service and can store up to 200 Call Log entries. Local and network phonebooks like LDAP are supported.
DECT enabled models (IP300, IP301G, IP700G, IP701G, IP2015, IP2115, IP1850) additionally offer mobility.
We will briefly tour you around the different models.
ALCATEL
home & business phones
Temporis IP100
Temporis IP100 is an entry-level business phone. Its features include:
On hook dialing, headset, hold and mute
1 sip registration
2 active SIP sessions
3-way conferencing, N-way network conferencing
10 dual-function programmable keys, 5 with bicolor led and 2 pages
10 speed dial numbers (long press dial keypad)
Message waiting alert LED
Single 10/100 Mbps Ethernet ports
Power over Ethernet
100-entry Call Log and downloadable local phonebook accessible from WUI
Quick reference guide
The controls you will need to use to manage the phone and external features that are relevant to installation and configuration are described below.
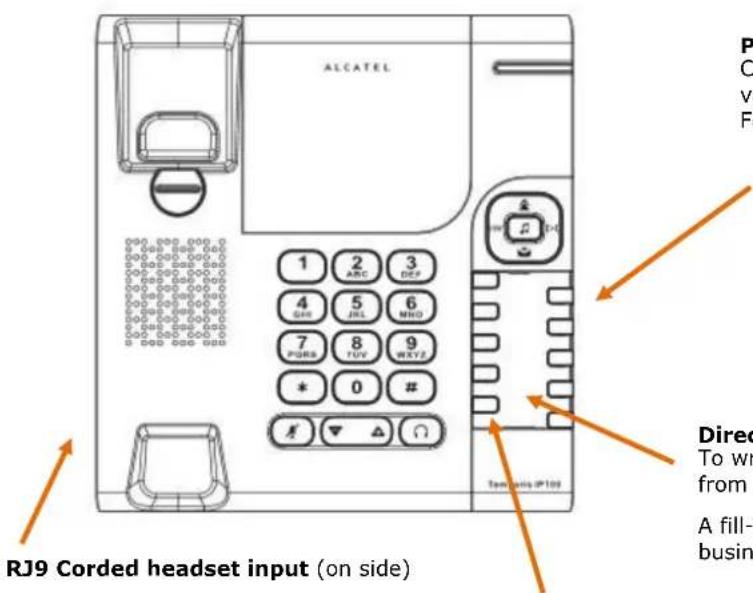
Programmable keys
Can be programmed to perform various functions or access various features.
For example:
- Press to access a line to make a call
- Press to dial a monitored extension or a quick-dial number
- Press to answer a ringing call on any line or monitored extension
Directory card
To write names on the directory card, pull out the directory card from under the plastic cover.
A fill-in printable template is available at extranet.alcatel-business.com
Access F11 To F20
Press F5 to switch to the second possible value of a programmable key.
Note: This is the default setting. You can configure F5 to perform other functions
Conference
Press to initiate a conference with a new call, or to set up a conference with two already established calls
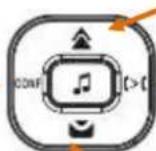
Redial
Press to redial last called number
Transfer
Press to initiate a call transfer towards a new call, or to bridge two already established calls
Voicemail
Press to call to your Voicemail
ALCATEL
home & business phones
The following table includes some useful star codes to help you quickly configure IP100. To invoke a command simply dial the sequence in on-hook mode.
| Purpose | Command | Remarks |
| IP address announcement | *123456# | |
| Static IP configuration | *782842#x*x*x*x#y*y*y*y#z*z*z*z# | x*x*x*x = IP address y*y*y=y = subnet mask z*z*z=z = default gateway |
| Switch VLAN off | * 7 8 2 8 4 3 # 0 # # | |
| Switch VLAN ON plus edit VID | * 7 8 2 8 4 3 # 1 # ???? # | ???? = VLAN ID |
Programmable Keys
The table below lists the default settings for the programmable keys. The key assignments on your phone may be different. Some keys may be programmed as Quick Dial keys, or access to other functions like Call forward, for example.
Keys are numbered from top left to bottom left, and then top right to bottom right. Note keys 11 to 20 are virtual, ie they are accessed when key 5 is configured as Access to F11-F20
| Key Number | Setting |
| 1 | Line 1* |
| 2 | Line 1 |
| 3 | Quick dial |
| 4 | Quick dial |
| 5 | Access to F11-F20 |
| 6-14 | Quick dial |
| 15 | Access to F11-F20 |
| 16-20 | Quick dial |
* You can assign more than one key to a certain type of function. For example, you can configure keys 1 and 2 to access Line 1. Label the keys appropriately for deskset users after configuration. A printable fill-in template is available for download at extranet.alcatel-business.com
To assign functions to programmable keys, please see Programmable Function Keys on page 118.
ALCATEL
home & business phones
Temporis IP150 (M)
Temporis IP150 is an entry level business phone. Its features include:
2.5-inch backlit Liquid Crystal Display
Speakerphone, Headset, Hold and Mute
Up to 2 SIP Registrations
Up to 6 active SIP sessions
3-way conferencing, N-way network conferencing
10 dual-function programmable keys, 5 with bicolor led
Customizable softkeys and logo
10 speed dial numbers (long press dial keypad)
Message Waiting alert LED
Dual 10/100 Mbps Ethernet ports with Power over Ethernet
100-entry Call Log, downloadable local and LDAP phonebooks
While Temporis IP150 supports PoE, Temporis IP150M does not and requires a power supply to work. Apart from this difference, they are exactly the same in terms of features, firmware and configuration.
Quick reference guide
The controls you will need to use to configure the phone manually are described below.
Voicemail
Press to access Voicemail menu
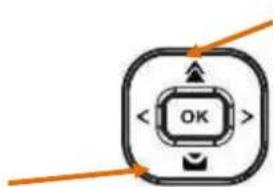
Redial
Press to access redial list
ALCATEL
home & business phones
The deskset external features that are relevant to installation and configuration are described below.
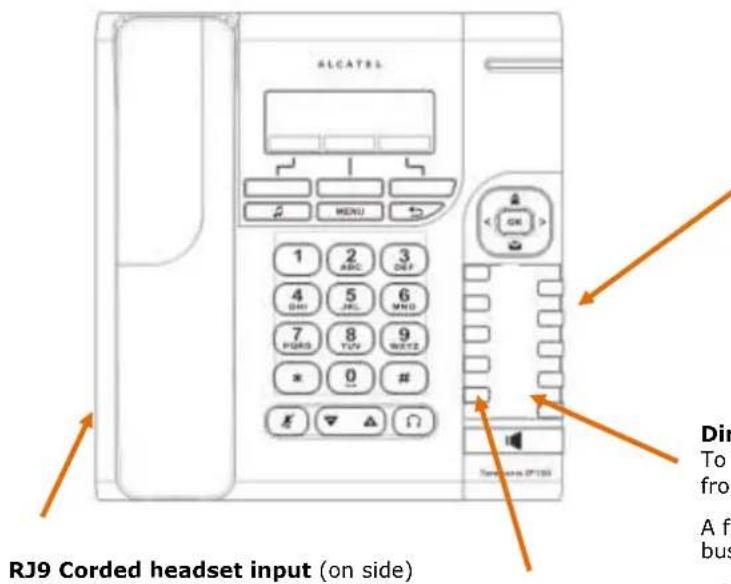
Programmable keys
Can be programmed to perform various functions or access various features.
For example:
- Press to access a line to make a call
- Press to dial a monitored extension or a quick-dial number
- Press to answer a ringing call on any line or monitored extension
Directory card
To write names on the directory card, pull out the directory card from under the plastic cover.
A fill-in printable template is available at extranet.alcatel-business.com
Access F11 To F20
Press F5 to switch to the second possible value of a programmable key.
Note: This is the default setting. You can configure F5 to perform other functions
Programmable Keys
The table below lists the default settings for the programmable keys. The key assignments on your phone may be different. Some keys may be programmed as Quick Dial keys, or access to other functions like Call forward, for example.
Keys are numbered from top left to bottom left, and then top right to bottom right. Note keys 11 to 20 are virtual, ie they are accessed when key 5 is configured as Access to F11-F20
| Key Number | Setting |
| 1 | Line 1* |
| 2 | Line 1 |
| 3 | Quick dial |
| 4 | Quick dial |
| 5 | Access to F11-F20 |
| 6-14 | Quick dial |
| 15 | Access to F11-F20 |
| 16-20 | Quick dial |
* You can assign more than one key to a certain type of function. For example, you can configure keys 1 and 2 to access Line 1, and keys 3 and 4 to access Line 2. Label the keys appropriately for deskset users after configuration. A printable fill-in template is available for download at extranet.alcatel-business.com
To assign functions to programmable keys, please see Programmable Function Keys on page 118
ALCATEL
home & business phones
Temporis IP151
Temporis IP151 is an entry level business phone. Its features include:
2.5-inch backlit Liquid Crystal Display
Speakerphone, Headset, Hold and Mute
Up to 2 SIP Registrations
Up to 6 active SIP sessions
3-way conferencing, N-way network conferencing
10 dual-function programmable keys, 5 with bicolor led
Customizable softkeys, hardkeys, logo, ringtone and language, XML browser, action urls
10 speed dial numbers (long press dial keypad)
Message Waiting alert LED
Dual 10/100 Mbps Ethernet ports with Power over Ethernet
IPv6 support
200-entry Call Log, 1000-entry downloadable local phonebook, LDAP
Quick reference guide
The controls you will need to use to configure the phone manually are the same as in IP150. Please refer to Temporis IP150 Quick reference guide chapter on page 11.
Programmable Keys
Usage and default values are the same as in IP150. Please refer to Temporis IP150 Programmable Keys chapter on page 12.
ALCATEL
home & business phones
Temporis IP251G
Temporis IP251G is an entry level business phone. Its features include:
2.5-inch backlit Liquid Crystal Display
Speakerphone, Headset, Hold and Mute
Up to 2 SIP Registrations
Up to 6 active SIP sessions
3-way conferencing, N-way network conferencing
2 programmable keys with bicolor led backlight
Customizable softkeys, hardkeys, logo, ringtone and language, XML browser, action urls
10 speed dial numbers (long press dial keypad)
Message Waiting alert LED
Dual 10/100/1000 Mbps Ethernet ports with Power over Ethernet
IPv6 support
200-entry Call Log, 1000-entry downloadable local phonebook, LDAP
Quick reference guide
The controls you will need to use to configure the phone manually are described below.
In idle mode, press to see
Network status, or press once and then long press to reboot the phone
Navigation key also provides shortcuts to the following functions in idle mode:
ALCATEL
home & business phones
Voicemail
Press to access Voicemail menu
natural_image
Circular mechanical component with directional arrows indicating rotation or flow (no text or symbols)Redial
Press to access redial list
The deskset external features that are relevant to installation and configuration are described below.
Programmable keys with backlight
Can be programmed to perform various functions or access various features.
For example:
Press to access a line to make a call
Press to dial a monitored extension or a quick-dial number
Press to answer a ringing call on any line or monitored extension
See also Programmable Keys on page 15.
2.5mm corded headset input (on side)
Programmable Keys
The table below lists the default settings for the programmable keys. The key assignments on your phone may be different. Some keys may be programmed as Quick Dial keys, or access to other functions like Call forward, for example.
| Key Number | Setting |
| 1 | Line 1* |
| 2 | Line 1 |
* You can assign more than one key to a certain type of function. For example, you can configure keys 1 and 2 to access Line 1, or one of the keys to access Line 2.
ALCATEL
home & business phones
Temporis IP300
Temporis IP300 is a mid-range business phone with cordless capabilities. Its features include:
2.5-inch backlit Liquid Crystal Display
Speakerphone, Headset, Hold and Mute
Up to 3 SIP Registrations
Up to 6 active SIP sessions
3-way conferencing, N-way network conferencing
IP70H DECT headset and IP15 DECT handset support
12 dual-function programmable keys with bicolor led
Customizable softkeys and logo
10 speed dial numbers (long press dial keypad)
Message Waiting alert LED
Dual 10/100 Mbps Ethernet ports with Power over Ethernet
200-entry Call Log, downloadable local and LDAP phonebooks
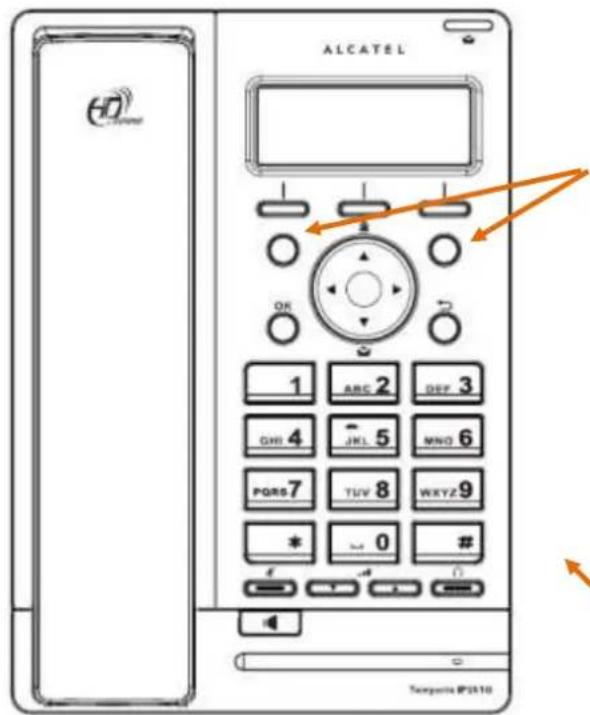
Quick reference guide
The controls you will need to use to configure the phone manually are described below.
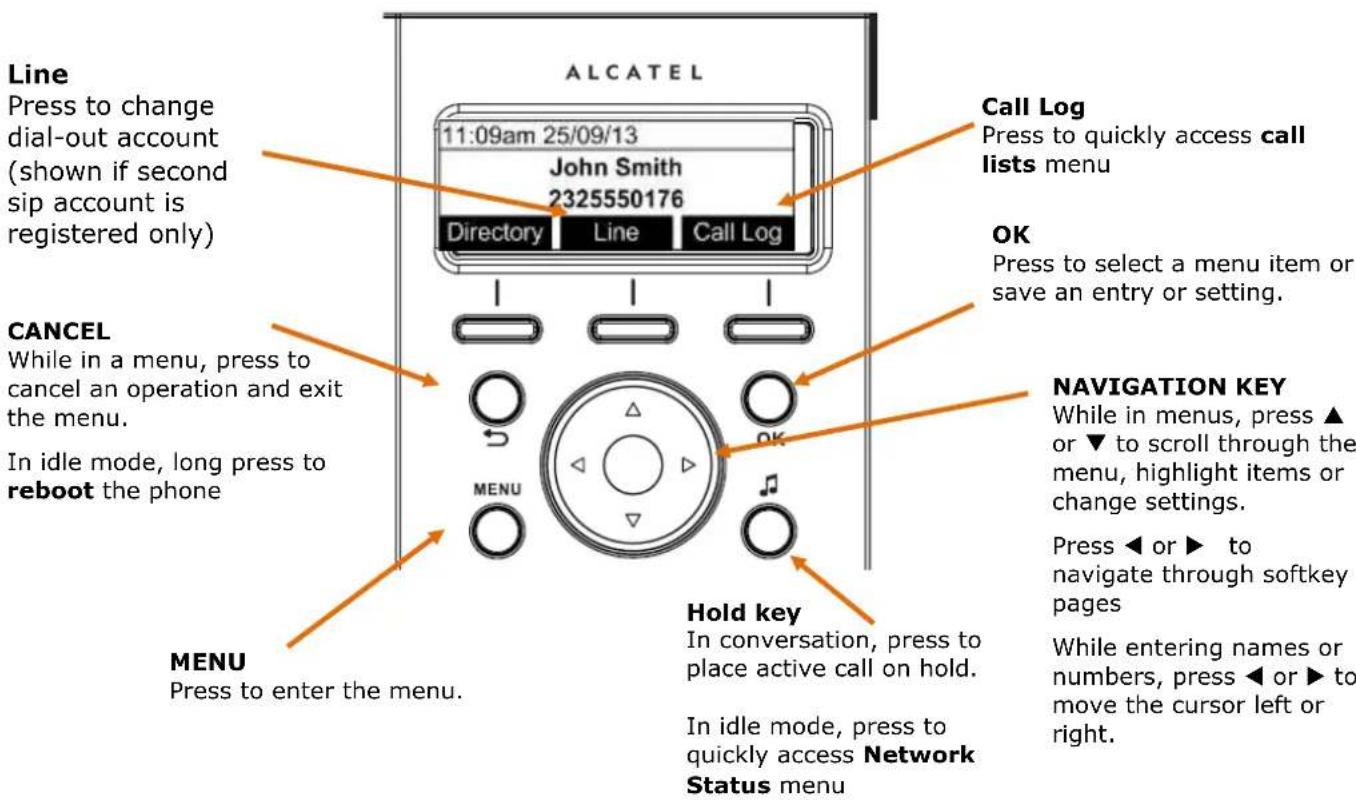
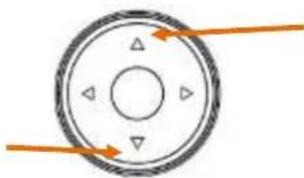
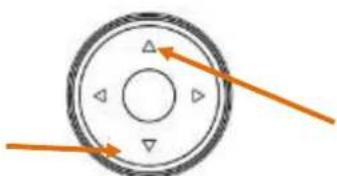
Navigation key also provides shortcuts to the following functions in idle mode:
Voicemail
Press to access Voicemail menu
natural_image
Circular mechanical component with directional arrows indicating rotation or force (no text or symbols)Redial
Press to access redial list
The deskset external features that are relevant to installation and configuration are described below.
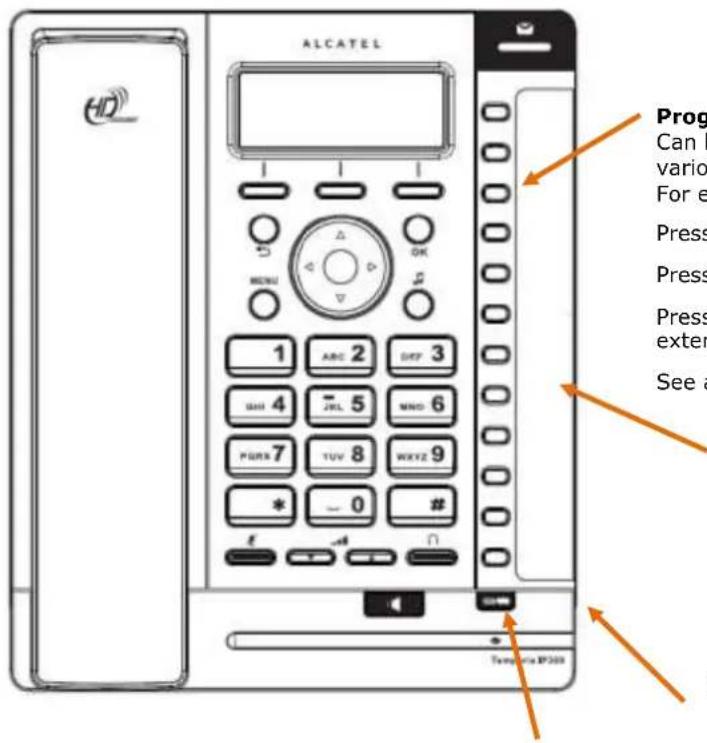
Programmable keys
Can be programmed to perform various functions or access various features.
For example:
Press to access a line to make a call
Press to dial a monitored extension or a quick-dial number
Press to answer a ringing call on any line or monitored extension
See also Programmable Keys on page 15.
Directory card
To write names on the directory card, pull out the directory card from under the plastic cover.
A fill-in printable template is available at extranet.alcatel-business.com
2.5mm corded headset input (on side)
Access F13 to F24
Press this key to switch to the second possible value of a programmable key.
Programmable Keys
The table below lists the default settings for the programmable keys. The key assignments on your phone may be different. Some keys may be programmed as Quick Dial keys, or access to other functions like Call forward, for example.
| Key Number | Setting |
| 1 | Line 1* |
| 2 | Line 1 |
| 3-12 | Quick dial |
* You can assign more than one key to a certain type of function. For example, you can configure keys 1 and 2 to access Line 1, and keys 3 and 4 to access Line 2. Label the keys appropriately for deskset users after configuration.
ALCATEL
home & business phones
Temporis IP301G
Temporis IP301G is a mid-range business phone with cordless capabilities. Its features include:
2.5-inch backlit Liquid Crystal Display
Speakerphone, Headset, Hold and Mute
Up to 3 SIP Registrations
Up to 6 active SIP sessions
3-way conferencing, N-way network conferencing
IP70H DECT headset and IP15 DECT handset support
12 dual-function programmable keys with bicolor led
Customizable softkeys, hardkeys, logo and ringtone, XML browser, action urls
10 speed dial numbers (long press dial keypad)
Message Waiting alert LED
Dual 10/100/1000 Mbps Ethernet ports with Power over Ethernet
IPv6 support
200-entry Call Log, 1000-entry downloadable local phonebook, LDAP
Quick reference guide
The controls you will need to use to configure the phone manually are the same as for IP300. Please check Temporis IP300 Quick reference guide on page 14.
Programmable Keys
Usage and default values are the same as in IP300. Please refer to Temporis IP300 Programmable Keys chapter on page 15.
ALCATEL
home & business phones
Temporis IP700G
Temporis IP700G is a feature business phone with cordless capabilities. Its features include:
3.5-inch backlit Liquid Crystal Display
Speakerphone, Headset, Hold and Mute
Up to 6 SIP Registrations
Up to 6 active SIP sessions
3-way conferencing, N-way network conferencing
IP70H DECT headset and IP15 DECT handset support
16 dual-function programmable keys with bicolor led
Customizable softkeys and logo
10 speed dial numbers (long press dial keypad)
Message Waiting alert LED
Dual 10/100/1000 Mbps Ethernet ports
Power over Ethernet enabled
200-entry Call Log, downloadable local and LDAP phonebooks
Quick reference guide
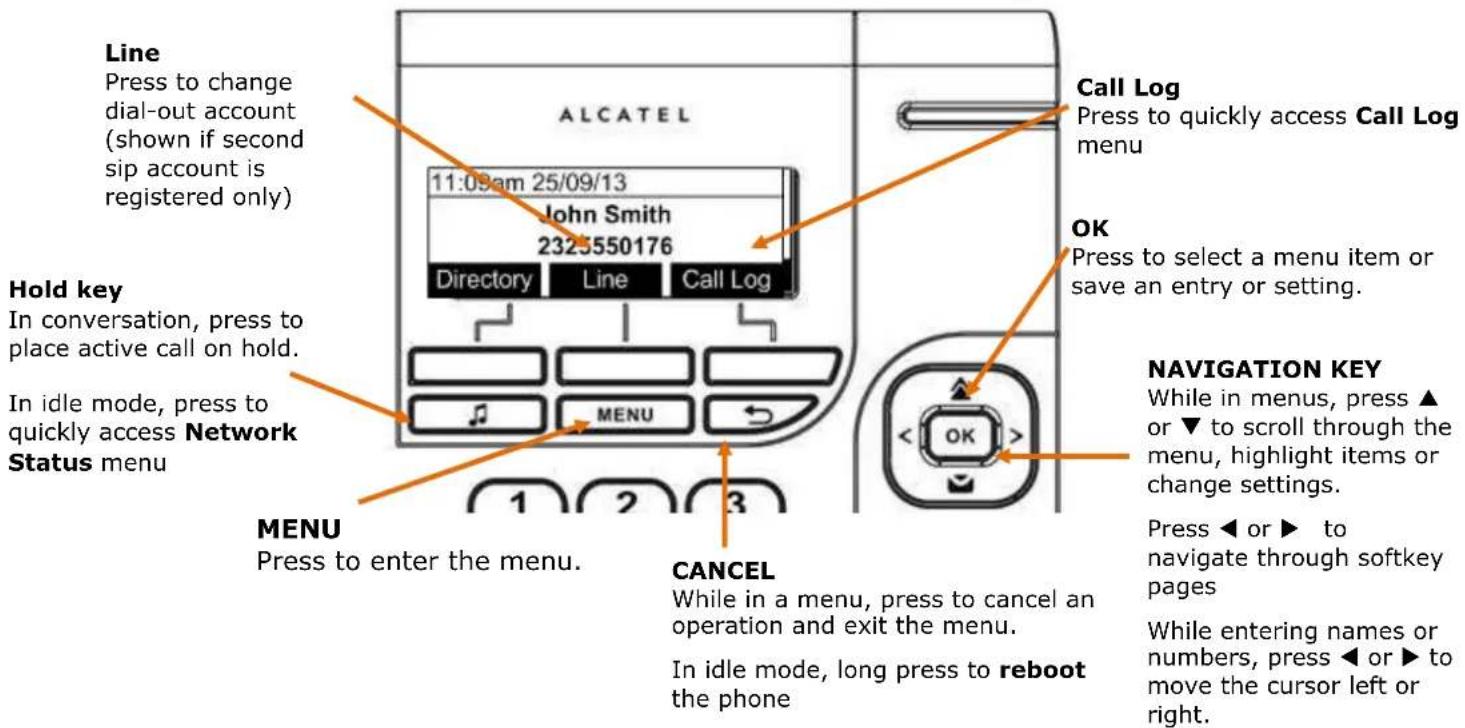
The controls you will need to use to configure the phone manually are described below.
Settings
Press to access Settings menu
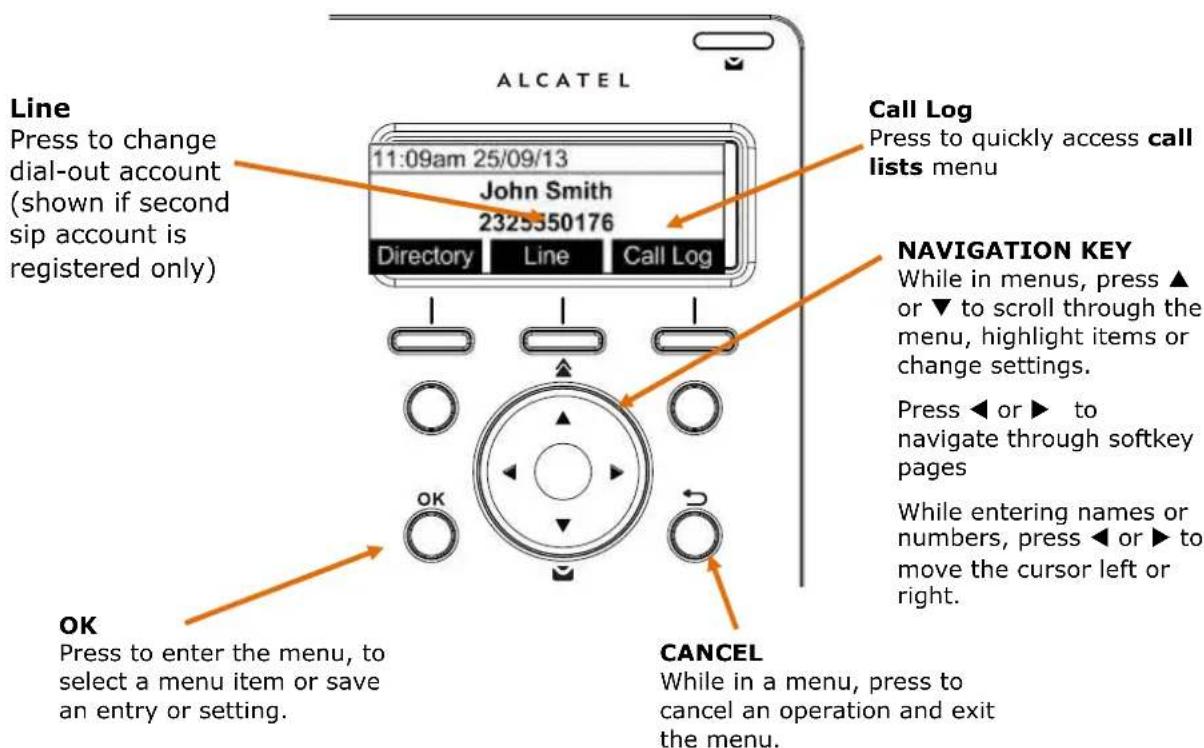
Line
Press to change dial-out account (shown if more than one sip account is registered only)
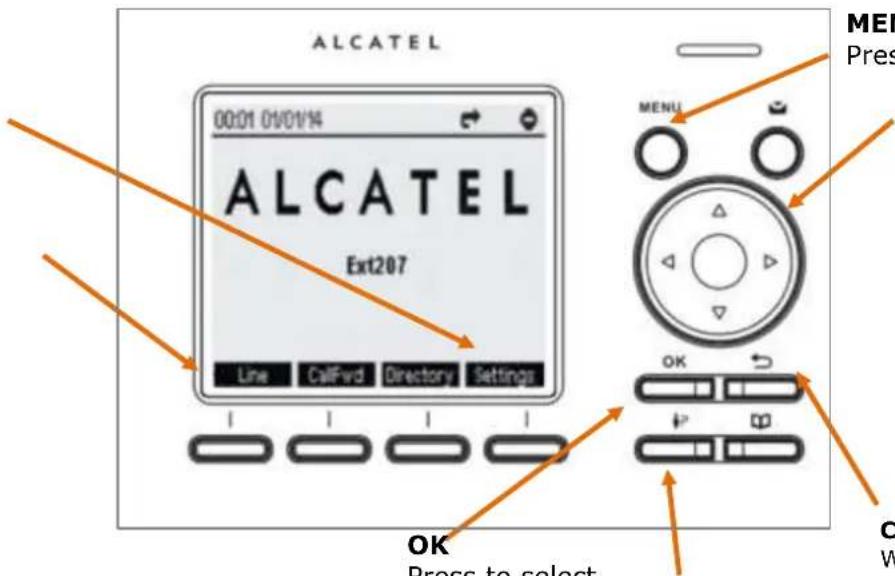
OK
Press to select a menu item or save an entry or setting.
Call Log
Press to quickly access call lists menu
MENU
Press to enter the menu.
NAVIGATION KEY
While in menus, press ▲ or ▼ to scroll through the menu, highlight items or change settings.
Press ◀ or ▶ to navigate through softkey pages
While entering names or numbers, press ◀ or ▶ to move the cursor left or right.
CANCEL
While in a menu, press to cancel an operation and exit the menu.
In idle mode, long press to reboot the phone

Hold key
In conversation, press to place active call on hold.
In idle mode, press to quickly access Network
Status menu
ALCATEL
home & business phones
The deskset external features that are relevant to installation and configuration are described below.
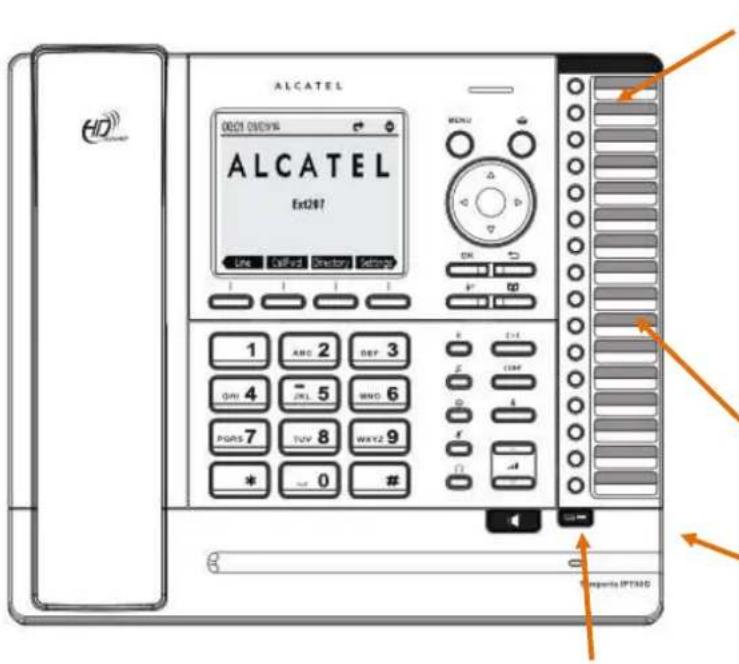
Programmable keys
Can be programmed to perform various functions or access various features.
For example:
Press to access a line to make a call
Press to dial a monitored extension or a quick-dial number
Press to answer a ringing call on any line or monitored extension
See also Programmable Keys on page 20.
Directory card
To write names on the directory card, pull out the directory card from under the plastic cover.
A fill-in printable template is available at extranet.alcatel-business.com
2.5mm corded headset input (on side)
Access F13 to F24
Press this key to switch to the second possible value of a programmable key.
Programmable Keys
The table below lists the default settings for the programmable keys. The key assignments on your phone may be different. Some keys may be programmed as Quick Dial keys, or access to other functions like Call forward, for example.
| Key Number | Setting |
| 1 | Line 1* |
| 2 | Line 1 |
| 3-16 | Quick dial |
* You can assign more than one key to a certain type of function. For example, you can configure keys 1 and 2 to access Line 1, and keys 3 and 4 to access Line 2. Label the keys appropriately for deskset users after configuration.
ALCATEL
home & business phones
Temporis IP701G
Temporis IP701G is a feature business phone with cordless capabilities. Its features include:
3.5-inch backlit Liquid Crystal Display
Speakerphone, Headset, Hold and Mute
Up to 6 SIP Registrations
Up to 6 active SIP sessions
3-way conferencing, N-way network conferencing
IP70H DECT headset and IP15 DECT handset support
16 dual-function programmable keys with bicolor led
Customizable softkeys, hardkeys, logo and ringtone, XML browser, action urls
10 speed dial numbers (long press dial keypad)
Message Waiting alert LED
Dual 10/100/1000 Mbps Ethernet ports with Power over Ethernet
IPv6 support
200-entry Call Log, 1000-entry downloadable local phonebook, LDAP
Quick reference guide
The controls you will need to use to configure the phone manually are described below.
Settings
Press to access Settings menu
Line
Press to change dial-out account (shown if more than one sip account is registered only)

Hold key
In conversation, press to place active call on hold.
In idle mode, press to quickly access Network Status menu
ALCATEL
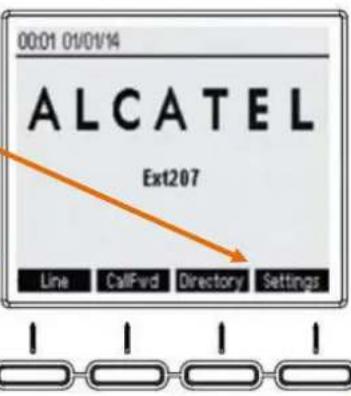
OK
Press to select a menu item or save an entry or setting.
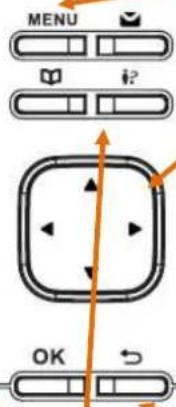
Call Log
Press to quickly access call lists menu
MENU
Press to enter the menu.
NAVIGATION KEY
While in menus, press ▲ or ▼ to scroll through the menu, highlight items or change settings.
Press ◀ or ▶ to navigate through softkey pages
While entering names or numbers, press ◀ or ▶ to move the cursor left or right.
CANCEL
While in a menu, press to cancel an operation and exit the menu.
In idle mode, long press to reboot the phone
ALCATEL
home & business phones
The deskset external features that are relevant to installation and configuration are described below.
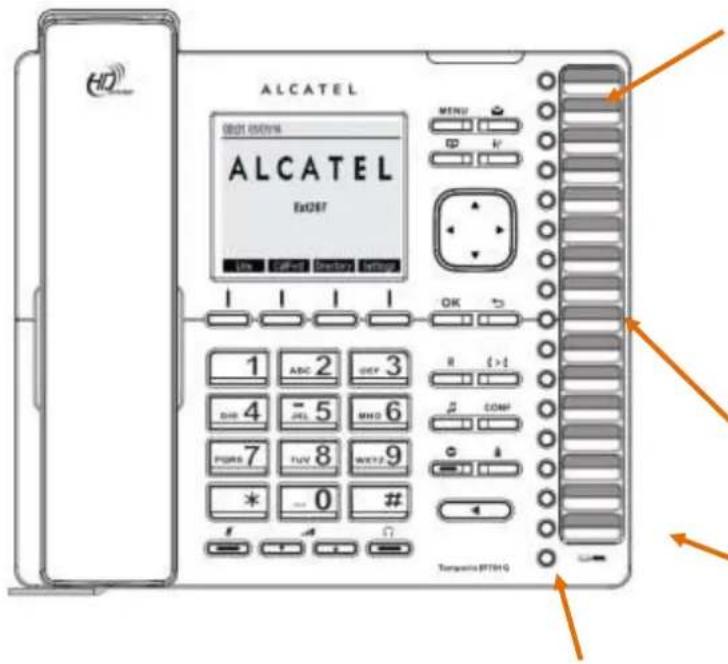
Programmable keys
Can be programmed to perform various functions or access various features.
For example:
Press to access a line to make a call
Press to dial a monitored extension or a quick-dial number
Press to answer a ringing call on any line or monitored extension
See also Programmable Keys on page 20.
Directory card
To write names on the directory card, pull out the directory card from under the plastic cover.
A fill-in printable template is available at extranet.alcatel-business.com
2.5mm corded headset input (on side)
Access F13 to F24
Press this key to switch to the second possible value of a programmable key.
Programmable Keys
The table below lists the default settings for the programmable keys. The key assignments on your phone may be different. Some keys may be programmed as Quick Dial keys, or access to other functions like Call forward, for example.
| Key Number | Setting |
| 1 | Line 1* |
| 2 | Line 1 |
| 3-16 | Quick dial |
* You can assign more than one key to a certain type of function. For example, you can configure keys 1 and 2 to access Line 1, and keys 3 and 4 to access Line 2. Label the keys appropriately for deskset users after configuration.
ALCATEL
home & business phones
Alcatel IP2015/IP2115
Alcatel IP2015/IP2115 are multiline multi-handset IP DECT systems. Basic package includes one base and one handset. IP2015/IP2115 features include:
Out-of-sight, wall mountable, PoE enabled base station
Up to 6 independent SIP Registrations
Up to 6 IP15 handsets supported per base, with over-the air sw upgrade (SUOTA)
Up to 4 concurrent wideband calls per base
3-way conferencing, N-way network conferencing
Shared and LDAP phonebooks
10/100 Mbps Ethernet port
IPv6 support (IP2115 only)
As for the IP15 handset:
1.9-inch backlit Liquid Crystal Display
Wideband audio, hands free
Headset jack and belt clip
10 speed dial numbers (long press dial keypad)
Message Waiting alert LED
Access to local, shared and LDAP phonebooks
Easy access to business functions
Quick reference guide
The controls you will need to use to configure the phone manually are described below.
Line
Press left softkey in idle mode to select dial-out account
NAVIGATION KEY
While in menus, press ▲ or ▼ to scroll through the menu, highlight items or change settings. While entering names or numbers, press ▲ or ▼ to move the cursor left or right.
Transfer
Press to start a call transfer
Talk
Press to answer or start a call
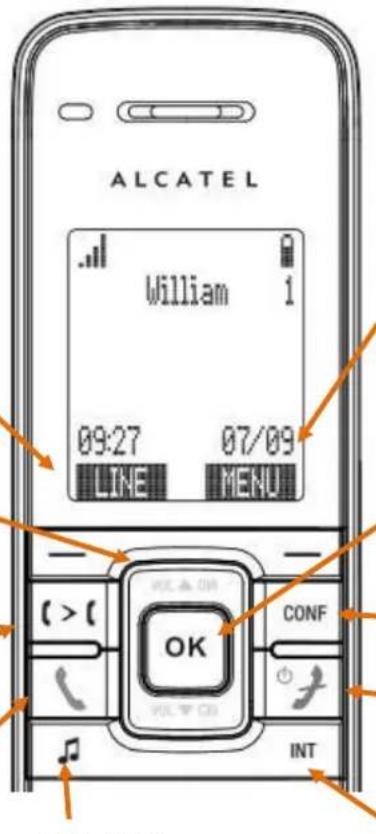
Call Hold
Press to put active call on hold
MENU
Press right softkey in idle mode to enter the menu.
OK
Press to select a menu item, display available options, toggle among two options or save an entry or
CONF
Press to start a 3 way call
Talk off/Power
Press to release a call. Or to switch on/off (long press)
Intercom
Press to start an internal call to other handsets
ALCATEL
home & business phones
Although there are often dedicated menu items, navigation key also provides shortcuts to the following functions:
CID/VOL -
In idle mode press to quickly access Call Logs menu
When in a call press to decrease received audio volume
At incoming call press to decrease ringer level
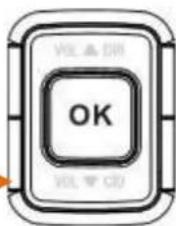
DIR/VOL +
In idle mode press to quickly access Contacts menu
When in a call press to increase received audio volume
At incoming call press to increase ringer level
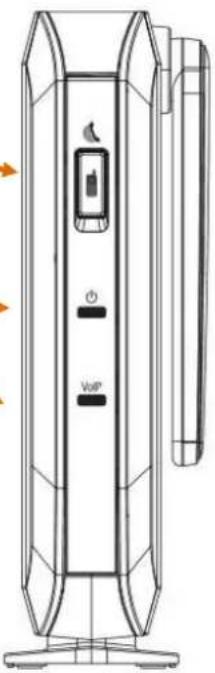
The elements of the base unit you need to consider are the following:
Paging/Registration button
Press to locate all registered handsets.
Long press to set the base unit into DECT registration mode
Power and VoIP LEDs
Status indication is as follows:
| Status | Power | VoIP |
| Connected to router and IP address assigned | ON | |
| IP address not available | Flash | |
| All accounts registered | ON | |
| At least one active account unregistered | OFF | |
| DECT registration mode | Flash | Flash |
natural_image
Line drawing of a cylindrical device with control panel and buttons, no text or symbols present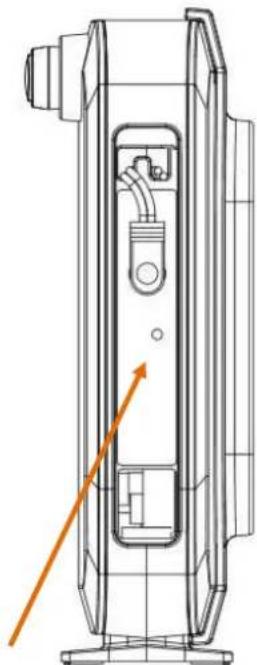
natural_image
Technical line drawing of a mechanical device with internal components and an orange arrow indicating direction (no text or symbols)RESET
Press with a paper clip or sharp object to restore the unit to its default settings.
ALCATEL
home & business phones
Conference IP1850
Conference IP1850 is an advanced audioconference device. Its features include:
Wideband, high power speaker
2 embedded microphones
4 detachable wireless microphones with built-in charging cradle
2.5-inch backlit Liquid Crystal Display
Up to 3 SIP Registrations
Up to 6 active SIP sessions
3-way conferencing, N-way network conferencing, hold, mute, transfer
USB connector for PC audio device mode
Customizable softkeys and logo
10 speed dial numbers (long press dial keypad)
Message Waiting alert LED
10/100 Mbps Ethernet ports
Power injector
200-entry Call Log, local and LDAP phonebooks
Quick reference guide
The controls you will need to use to configure the phone manually are described below.
Visual indicator (4)
Check the table on next page for different LED color and cadence meaning
Line
Press to change dial-out account (shown if more than one sip account is registered only)
PC SPK
Once connected to your PC via USB, press to use IP1850 as audio device with your favorite application: Skype, Lync, etc
HOLD
In conversation, press to place active call on hold.
CANCEL
While in a menu, press to cancel an operation and exit the menu.
MUTE
In conversation, press to disable all microphones. Press again to enable.
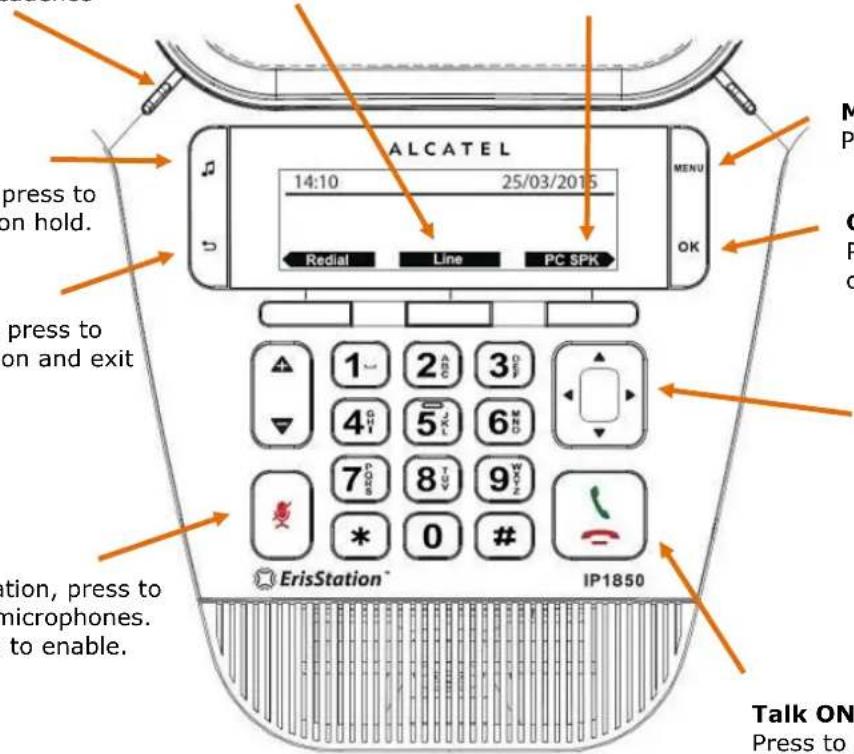
MENU
Press to enter the menu.
OK
Press to select a menu item or save an entry or setting.
NAVIGATION KEY
While in menus, press ▲ or ▼ to scroll through the menu, highlight items or change settings.
Press ◀ or ▶ to navigate through softkey pages
While entering names or numbers, press ◀ or ▶ to move the cursor left or right.
Talk ON/OFF
Press to launch or answer a call. Press again to release a call.
ALCATEL
home & business phones
On the wireless microphones you have the following elements:
MUTE
In conversation, press to temporarily deactivate (mute) all microphones. Press again to enable (unmute).
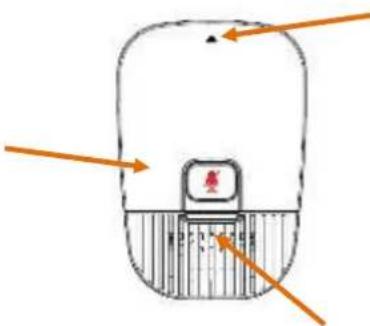
Remove and activate mic
Push gently on the arrow area to remove the microphone from its cradle.
Please note wireless mics are deactivated while on their cradle. For best user experience, if users are located at or farther than 1m from the main unit, it is recommended to activate and use these mics by detaching them from their cradle.
Visual indicator
Check the table below for color/ cadence meaning
Visual indicators description
| LED status | Main Unit | Wireless mics |
| Steady orange | Charging in progress | |
| Flashing orange | Network failure | Low battery |
| Steady green | Speakerphone in use | Mic in use or PC mode |
| Quick flashing green | Incoming call | Incoming call |
| Slow flashing green | A call is held | |
| Steady red | Mute activated | All mics muted |
| Slow flashing red | Mic in paging mode, out of range or not registered | |
| Quick flashing green & red | Registration mode |
Network Requirements
A switched network topology is recommended for your LAN (using standard 10/100 or 10/100/1000 Ethernet switches).
The office LAN infrastructure should use Cat.-5 (or better) cable for 10/100, and Cat.-6 for 10/100/1000.
The LAN connections to the devices(s) should all be wired. However, wireless connections to other devices (such as laptops) in your office will not impede performance.
All devices must reside on a single subnet. A DHCP server is recommended and must be on the same subnet as the devices so that IP addresses can be auto-assigned. In most cases, your network router will have a Dynamic Host Configuration Protocol (DHCP) server that will automatically assign IP addresses to clients. By default, the phone has DHCP enabled for automatic IP address assignment.
If no DHCP server is present, you can assign static IPs to devices. If you do not have a DHCP server or do not manually assign static IPs, you will not be able to access the WebUI and/or enable automatic time updates from an NTP server.
Unless you want to manually set the system clock and manually or locally upgrade software, an Internet connection to the LAN is required.
A DNS server is recommended to resolve the path to the Internet and to a server for firmware and configuration updates.
If necessary, the system administrator can also download upgrade files and use the WebUI to update the device firmware and/or configuration settings manually.
For users whose computers require a GigE Ethernet frame rate (a gigabit per second), use either IP700G phone or separate Ethernet connections for the deskset and the computer.
ALCATEL
home & business phones
Installation
This section assumes that your network infrastructure is established and that your hosted IP PBX service has been ordered and configured for your location.
Install the phone close to a router or network switch. You can power the phone using Power over Ethernet or the power adapter/injector (not supplied for all models, see part check list). If you are not using PoE, install the phone near a power outlet not controlled by a wall switch. The phone can be placed on a flat surface or vertically mounted on the wall.
For customer service or product information, visit our website at extranet.alcatel-business.com.
Avoid placing the deskset too close to:
Communication devices such as television sets, DVD players, or other cordless telephones. Excessive heat sources.
Noise sources such as a window with traffic outside, motors, microwave ovens, refrigerators, or fluorescent lighting.
Excessive dust sources such as a workshop or garage.
Excessive moisture.
Extremely low temperature.
Mechanical vibration or shock such as on top of a washing machine or work bench.
flowchart
graph LR
    A["Hosted IP PBX"] --> B["Router"]
    B --> C["LAN Switch*"]
    C --> D["Computer connected through PC port"]
    B -->|Required if sufficient router ports are not available| C
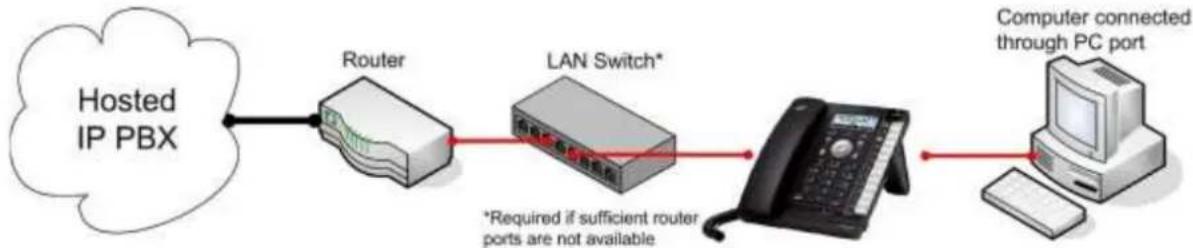
Figure 1: Temporis IP300 Installation Example
Temporis IP100/IP150/IP151 installation
To install the phone:
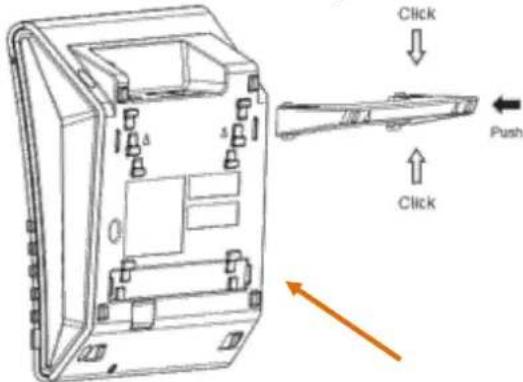
- If you plan to place the phone on a flat surface, you can use one of the two available positions depending on the work angle you wish to have, ie with or without the detachable foot stand. To assemble the stand line up the tabs on the stand (marked with triangles) with the slots on the rear of the phone as shown in the picture
Plug the end of the coiled handset cord into the Handset jack at the left side of the phone.
- Plug one end of the Ethernet cable into the Ethernet port at the back of the console, and plug the other end of the cable into your network router or switch.
ALCATEL
home & business phones
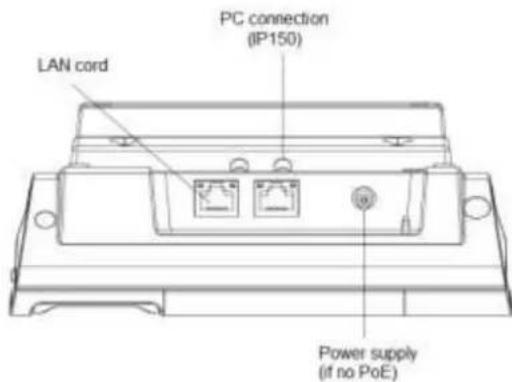
NOTE: You may need to use a network switch connected to your router if your router does not have sufficient ports for the number of phones you want to install. If you use a network switch, connect the phone to the switch instead of the router in the previous step.
- If the deskset is not using power from a PoE-capable network router or switch, or in any case for an IP150M:
a. Connect the power adapter to the deskset power jack.
b. Plug the power adapter into an electrical outlet not controlled by a wall switch.
IMPORTANT INFORMATION
- Use only original power adapters. Contact your distributor to order.
- The power adapter is intended to be correctly oriented in a vertical or floor mount position. The prongs are not designed to hold the plug in place if it is plugged into a ceiling, under-the-table or cabinet outlet.
If there is a networked computer and no extra Ethernet wall ports near the phone, then the phone and PC can share the same network connection.
To share a network connection with a PC (IP150/IP151 only):
- Plug a Cat.-5 Ethernet cable into the PC port on the phone.
- Plug the other end of the Cat.-5 Ethernet cable into your computer's network port.
If a GigE network is being used, a computer connected through the phone will be limited to 100 Mbits/s. If you require a GigE Ethernet rate, use separate Ethernet connections for the phone and the computer.
If a PC is connected to your network through a phone, any phone resets and power or network interruptions will disrupt the PC's connection to the network.
ALCATEL
home & business phones
To mount the phone on the wall:
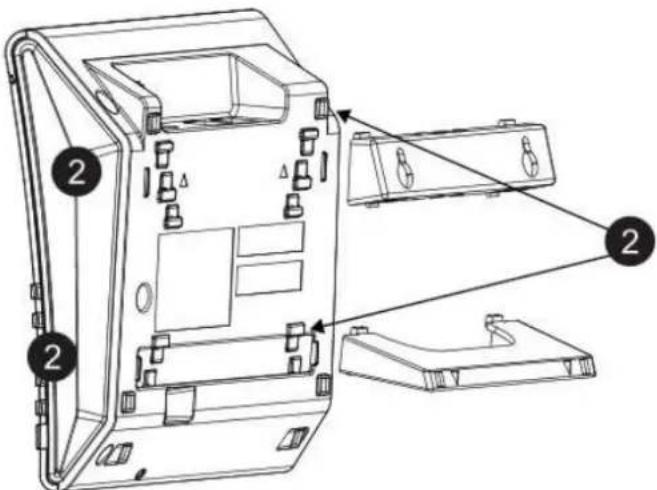
- Disassemble the foot stand
- Install wall mount fittings and foot stand as displayed:
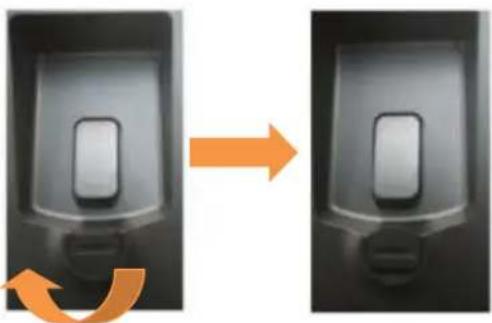
- Put the corded handset aside. Use a coin to rotate the handset tab 180 degrees. The protruding edge holds the corded handset when the phone is mounted on the wall.
natural_image
Two identical black plastic door covers with orange arrows indicating transformation or change, no text or symbols present.- Connect the network cable(s) and power adapter (if required).
- Hang the phone using holes on the wall mount fitting part.
Temporis IP251G/IP300/IP301G/IP701G installation
To install the phone:
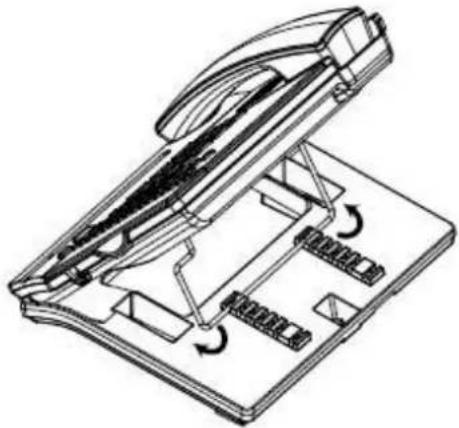
- If you plan to place the phone on a flat surface, you can use one of the two available positions depending on the work angle you wish to have. To assemble the stand line up the tabs on the stand (marked with lozenges) with the slots on the rear of the phone as shown in the picture
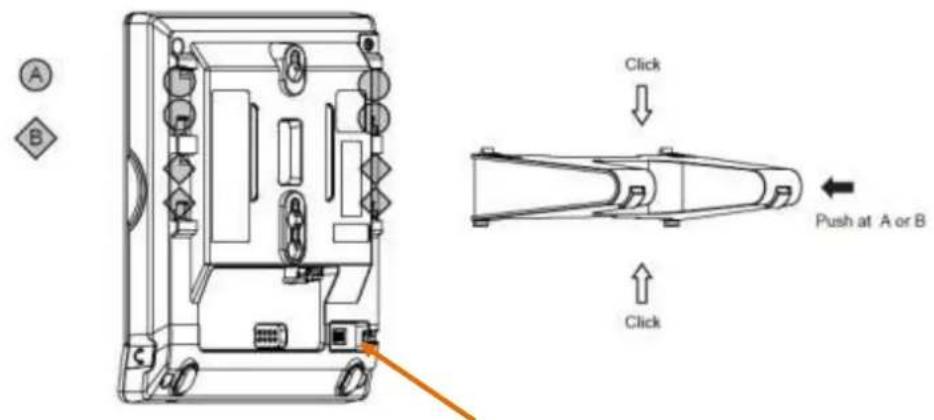
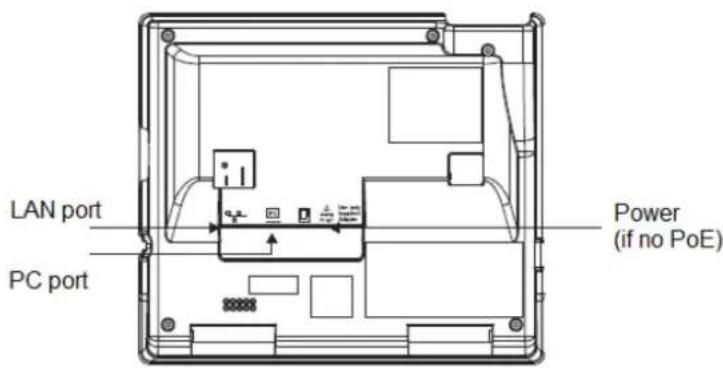
Plug the end of the coiled handset cord into the Handset jack at the back of the phone.
- Plug one end of the Ethernet cable into the Ethernet port at the back of the console, and plug the other end of the cable into your network router or switch.
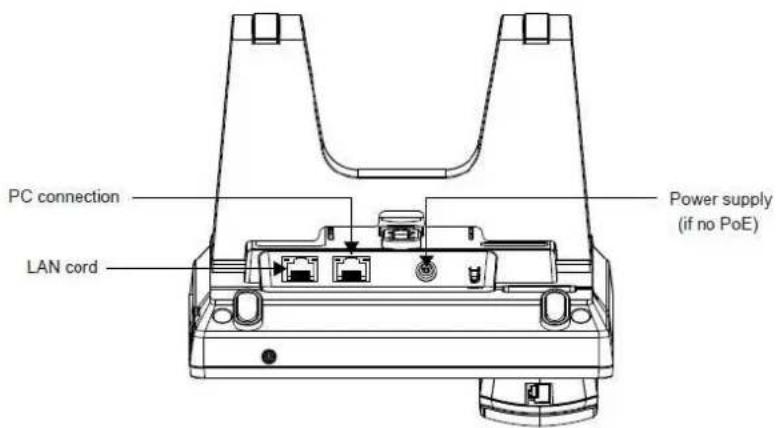
NOTE: You may need to use a network switch connected to your router if your router does not have sufficient ports for the number of phones you want to install. If you use a network switch, connect the phone to the switch instead of the router in the previous step.
- If the deskset is not using power from a PoE-capable network router or switch:
a. Connect the power adapter to the deskset power jack.
b. Plug the power adapter into an electrical outlet not controlled by a wall switch.
ALCATEL
home & business phones
IMPORTANT INFORMATION
- Use only original power adapters. Contact your distributor to order.
- The power adapter is intended to be correctly oriented in a vertical or floor mount position. The prongs are not designed to hold the plug in place if it is plugged into a ceiling, under-the-table or cabinet outlet.
If there is a networked computer and no extra Ethernet wall ports near the phone, then the phone and PC can share the same network connection.
To share a network connection with a PC:
- Plug a Cat.-5 Ethernet cable into the PC port on the phone.
- Plug the other end of the Cat.-5 Ethernet cable into your computer's network port.
For IP300, if a GigE network is being used, a computer connected through the phone will be limited to 100 Mbits/s. If you require a GigE Ethernet rate, use separate Ethernet connections for the phone and the computer. This remark is not applicable to IP251G, IP301G or IP701G, since all of them have a GigE switch.
If a PC is connected to your network through a phone, any phone resets and power or network interruptions will disrupt the PC's connection to the network.
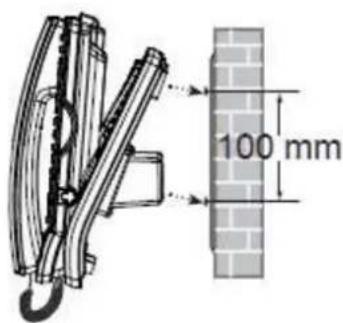
To mount the phone on the wall:
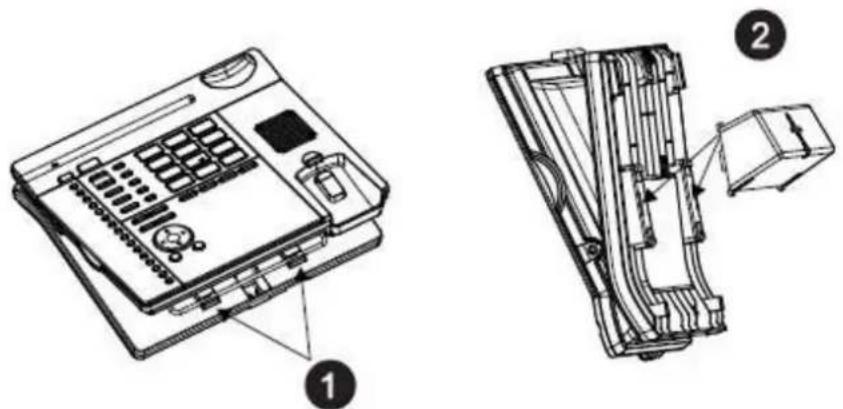
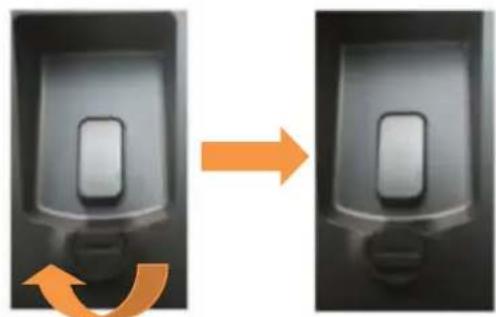
- Put the corded handset aside. Use a coin to rotate the handset tab 180 degrees. The protruding edge holds the corded handset when the phone is mounted on the wall.
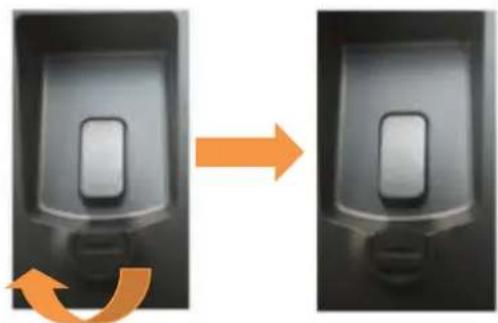
natural_image
Two identical black plastic door covers with orange arrows indicating rotation or change, no text or symbols present.- Connect the network cable(s) and power adapter (if required).
- Hang the phone on the wall using wall mount holes.
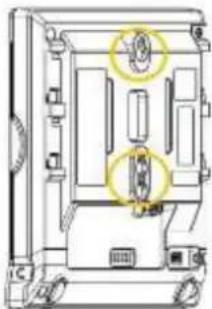
natural_image
Technical line drawing of a mechanical device with highlighted components (no text or symbols)ALCATEL
home & business phones
Temporis IP700G installation
To install the phone:
- If you plan to place the phone on a flat surface, you can use one of the multiple available positions depending on the work angle you wish to have. Simply adjust the foot stand with the slots on the rear of the phone as shown in the picture
natural_image
Technical line drawing of a mechanical device with internal components and directional arrows (no text or symbols)- Plug the end of the coiled handset cord into the Handset jack at the left hand side of the phone.

- Plug one end of the Ethernet cable into the Ethernet port at the back of the console, and plug the other end of the cable into your network router or switch.
NOTE: You may need to use a network switch connected to your router if your router does not have sufficient ports for the number of phones you want to install. If you use a network switch, connect the phone to the switch instead of the router in the previous step.
- If the desk set is not using power from a PoE-capable network router or switch:
ALCATEL
home & business phones
a. Connect the power adapter to the deskset power jack.
b. Plug the power adapter into an electrical outlet not controlled by a wall switch.
IMPORTANT INFORMATION
- Use only original power adapters. Contact your distributor to order.
- The power adapter is intended to be correctly oriented in a vertical or floor mount position. The prongs are not designed to hold the plug in place if it is plugged into a ceiling, under-the-table or cabinet outlet.
If there is a networked computer and no extra Ethernet wall ports near the phone, then the phone and PC can share the same network connection.
To share a network connection with a PC:
- Plug an Ethernet cable into the PC port on the phone.
- Plug the other end of the Ethernet cable into your computer's network port.
If a GigE network is being used, make sure Cat.-6 cables are used.
If a PC is connected to your network through a phone, any phone resets and power or network interruptions will disrupt the PC's connection to the network.
To mount the phone on the wall:
- Fold the foot stand as depicted
- Assemble the wall mount accessory
- Put the corded handset aside. Use a coin to rotate the handset tab 180 degrees. The protruding edge holds the corded handset when the phone is mounted on the wall.
- Connect the network cable(s) and power adapter (if required).
- Hang the phone on the wall using wall mount holes.
natural_image
Two identical black plastic door holders with orange arrows indicating rotation or change, no text or symbols present.ALCATEL
home & business phones
Alcatel IP2015/IP2115 installation
To install the base:
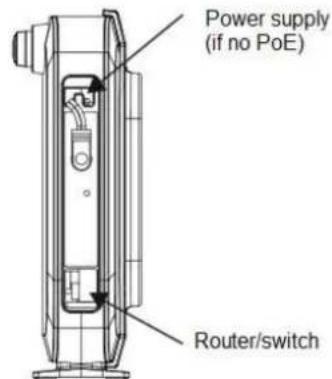
- Plug one end of the Ethernet cable into the Ethernet port at the side of the base, and plug the other end of the cable into your network router or switch.
NOTE: You may need to use a network switch connected to your router if your router does not have sufficient ports for the number of phones you want to install. If you use a network switch, connect the phone to the switch instead of the router in the previous step.
- If the base is not using power from a PoE-capable network router or switch:
a. Connect the power adapter to the base power jack.
b. Plug the power adapter into an electrical outlet not controlled by a wall switch.
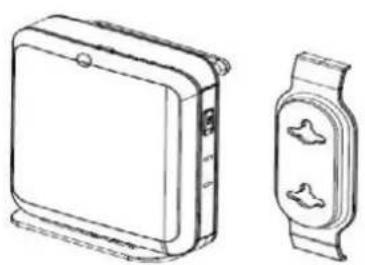
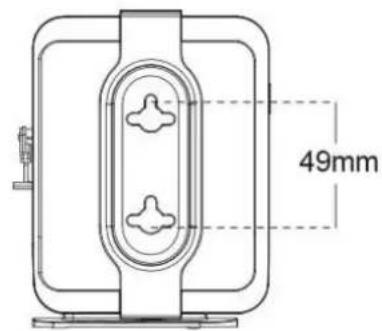
To mount the base station on the wall :
- Assemble the wall mount bracket as depicted.
natural_image
Line drawing of a portable electronic device and a smartwatch (no text or symbols)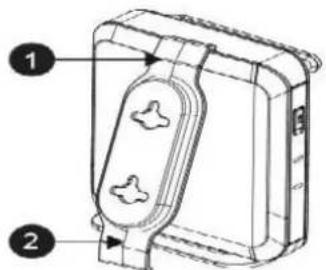
-
Connect the network cable and power adapter (if required).
-
Hang the phone on the wall using wall mount holes.
To install the handset:
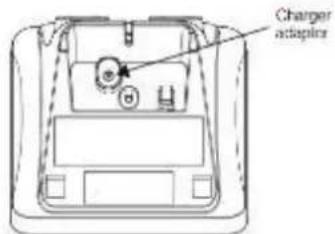
- Connect handset charging cradle to provided adapter. Plug the adaptor to the mains.
-
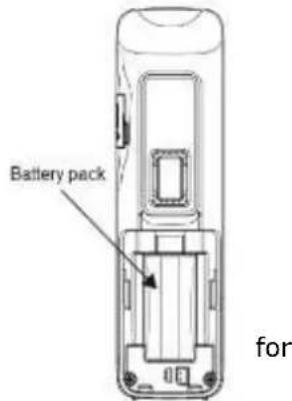
Insert and connect supplied battery pack into handset battery compartment.
-
Place the handset on the charger and fully charge the battery 15 hours
ALCATEL
home & business phones
IMPORTANT INFORMATION
- Use only supplied power adapters and battery pack.
- The power adapter is intended to be correctly oriented in a vertical or floor mount position. The prongs are not designed to hold the plug in place if it is plugged into a ceiling, under-the-table or cabinet outlet.
Your handset is already subscribed to the base. So if you are installing a system with only one handset you don't need to perform any association procedure.
If you acquire additional handsets you will need to follow some simple steps. See Setting up IP2015/IP2115 with multiple IP15 handsets on page 53.
Conference IP1850 installation
To install the main unit:
- Plug one end of the Cat-5 cable with yellow connectors to the LAN port of your IP1850. Connect the other end to the "IP1850" port on the supplied power adapter/injector.
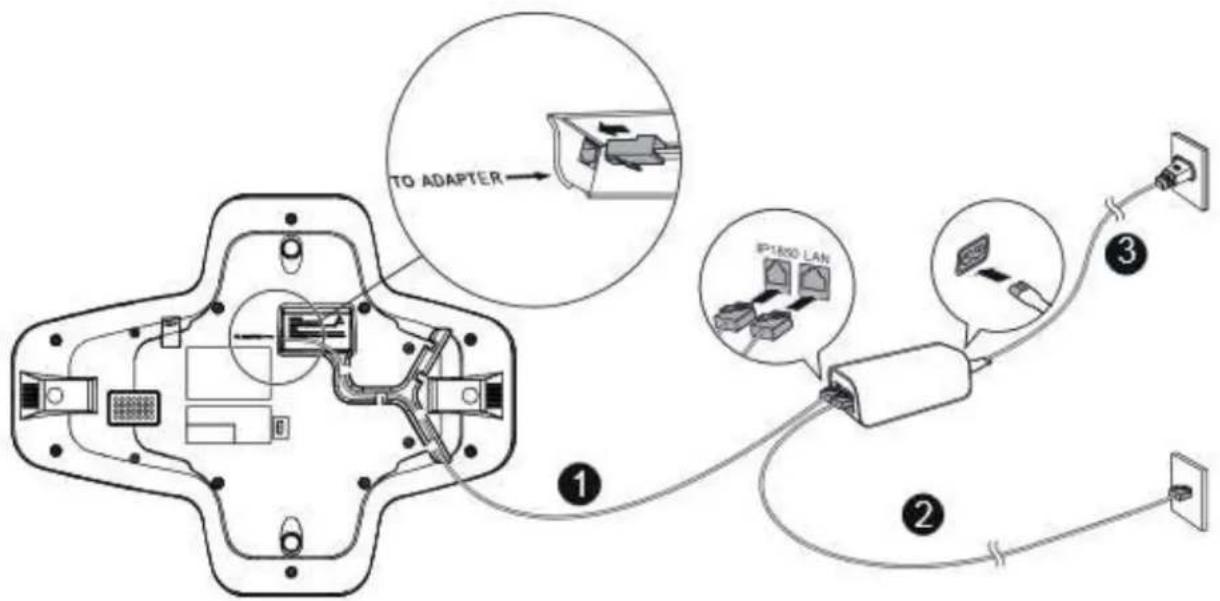
- Plug the second Ethernet cable into the "LAN" port on the power injector, and plug the other end into your network router or switch.
NOTE: You may need to use a network switch connected to your router if your router does not have sufficient ports for the number of phones you want to install. If you use a network switch, connect the phone to the switch instead of the router in the previous step.
- Connect the power cable onto the power injector, and plug the other end into an electrical outlet not controlled by a wall switch.
ALCATEL
home & business phones
To install the wireless microphones:
-
For each microphone, activate the battery by pulling away the plastic tag, or insert the battery into its compartment.
-
Place the microphones on the charging cradles
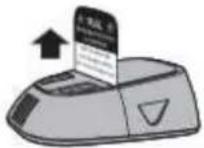
NOTE: If the microphone unit does not turn on when plastic tag is removed, take the battery out, reinsert and charge for 8 hours. Wireless mics are active while detached from main unit only. To get the best of your conference phone, if you are placed at or farther than 1m from the base please remove mic by pushing on the arrow at the top of the mic.
IMPORTANT INFORMATION
- Use only provided power adapter/injector.
- Use the batteries supplied in the package only. Use of any other type of battery presents a risk of explosion. Used batteries must be disposed of in compliance with current environmental protection regulations.
- The power plug is intended to be correctly oriented in a vertical or floor mount position. The prongs are not designed to hold the plug in place if it is plugged into a ceiling, under-the-table or cabinet outlet.
To connect IP1850 to your computer:
- Plug the micro USB end of the USB cable supplied in the package to the main unit USB connector as depicted below.
- Plug the other end into a USB port on your computer
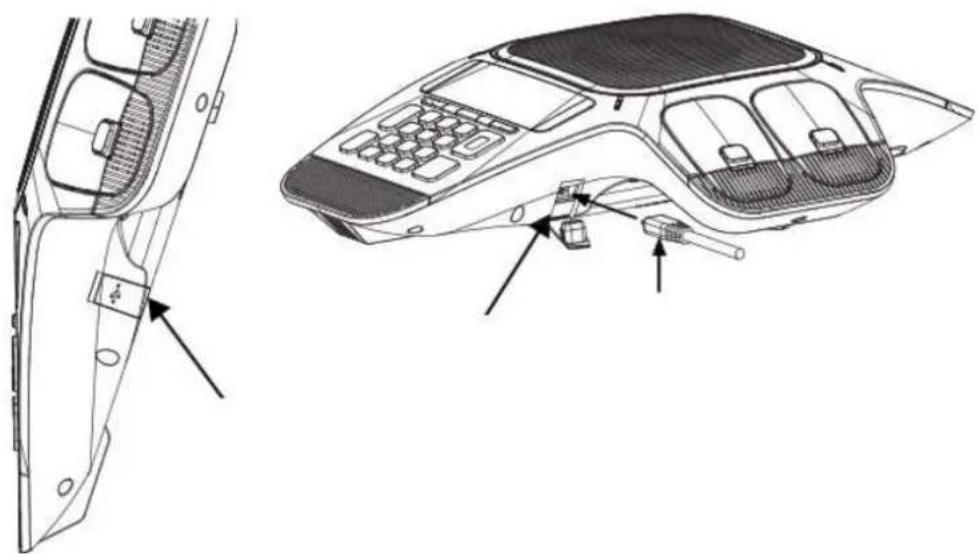
natural_image
Technical line drawing of a car interior panel with labeled components (no text or symbols present)ALCATEL
home & business phones
To associate a new wireless microphone:
Your IP1850 is shipped with all four wireless microphones already associated to the main unit. In the unlikely event you need to replace any of them, you will find herewith instructions to associate a new microphone.
-
On the main unit, go to Menu> 3.User settings >4.Wireless microphones >1.Register
-
Place an unregistered microphone on the cradle
-
IP1850 should indicate the success of the operation.
NOTE: Registration has to be done for one mic at a time. Moreover, you will not be able to register a new microphone if there are already 4 mics associated to the unit. To unregister microphones see next paragraph.
To disassociate the wireless microphones from the main unit:
-
On the main unit, go to Menu> 3.User settings >4.Wireless microphones >2.Deregister
-
All wireless mics will be unregistered from the base. To re-associate them see the previous paragraph.
To disassociate a wireless microphone without the main unit:
Should you need to delete association information from a wireless microphone without having access to its former main unit, this is the procedure:
-
Remove the battery from the wireless mic to power it off
-
Press and hold MUTE key while power on (reinsert battery)
-
Keep holding MUTE key for 10 seconds
-
Release MUTE key and short press it again within 5 seconds
ALCATEL
home & business phones
Configuring your device
You can configure your device using three methods:
From the phone itself, using the menus. The phone menus are best suited to configuring a few settings, perhaps after the initial setup has been done. For administrators, the settings available on the phone menus menu include network, account, and provisioning settings. See Using the Admin Settings menu on page 61. Most of the settings accessible on the phone itself are most useful for end users. Through the menu, they can customize the screen appearance, sounds, and manage calls. For more information, see the respective models Quick User Guides. This paragraph does not apply to Temporis IP100. See Setting up Temporis IP100 phone on page 48.
The Web User Interface, or WebUI, which you access using your Internet browser. See Using the WebUI on page 86. The browser-based interface is easy to navigate and best-suited to configuring a large variety of phone settings. The WebUI has every setting required for configuring a single phone. You can enter service provider account settings on the WebUI, configure the programmable keys, and set up provisioning, which will allow you to automatically and remotely update the phone after initial configuration.
Provisioning using configuration files. Working with configuration files is the best way to configuring multiple phones. There are several methods available to enable the phone to find the configuration file. For example, you can enable the phone, when it starts up or reboots, to check for the presence of a configuration file on a provisioning server. If the configuration file is new or has been modified in any way, the phone automatically downloads the file and applies the new settings. For more information, see Provisioning Using Configuration Files on page 193.
Minimum configuration
Assuming you have IP connectivity, the minimum configuration will be one sip account.
To configure a sip account using the phone menu, see chapter Line Menu on page 68. Not applicable to IP100 or IP2015/IP2115.
To configure one or more sip accounts using the web interface, see SIP Account Management on page 90.
If you prefer to use configuration files, see "sip_account" Module: SIP Account Settings on page 207.
Verifying the installation: idle Screen
The default idle screen appears after the phone is connected and configured for your SIP service. The idle screen indicates that you have no active or held calls. Idle screen aspect varies depending on the product.
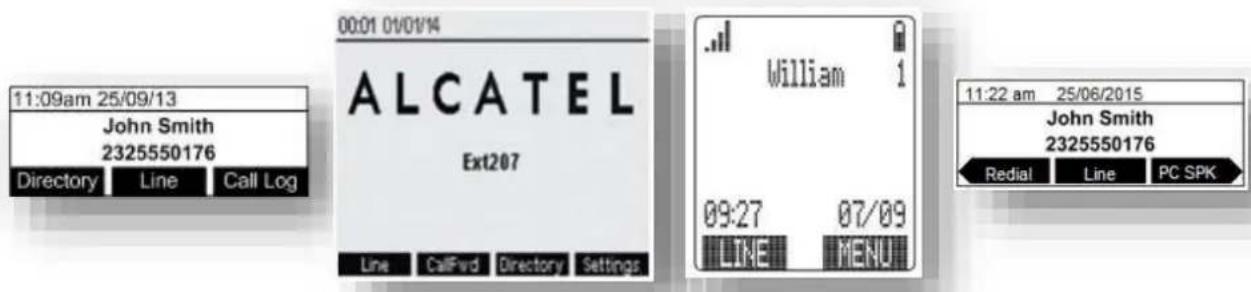
Figure 2: Idle screen for (left to right) IP150/IP151/IP251G/IP300/IP301G, IP700G/IP701G, IP15 and IP1850
ALCATEL
home & business phones
Note "Line" softkey will be shown only if you have configured and registered more than one sip account.
Configuring Programmable keys
Temporis IP100, IP150, IP151, IP251G, IP300, IP301G, IP700G and IP701G
models are equipped with programmable keys with a dual-color backlight (orange and green). Keys are numbered top to bottom, and then left to right when applicable.
In all models listed above there is a mechanism to access a second virtual key on each physical key. For IP300, IP301G, IP700G and IP701G this is done via "Access to second function" [icon] key, whereas in IP100 and IP150 F5/F15 can be assigned for this purpose if desired.
The number of programmable function keys and toggle mechanism for each model is shown in the table below.
| Model | Number of PFKs | Number of keys with backlight | Access to second function | Number of virtual keys |
| Temporis IP100 | 10 | 5 | F5/F15 (config) | 18 |
| Temporis IP150/IP151 | 10 | 5 | F5/F15 (config) | 18 |
| Temporis IP251G | 2 | 2 | N/A | 2 |
| Temporis IP300/IP301G | 12 | 12 | “Lower” key | 24 |
| Temporis IP700G/IP701G | 16 | 16 | “Lower” key | 32 |
You can assign functions to the programmable keys. You can select one option for each physical or virtual key. Keys can have identical functions. For example, you can assign several "Line" keys for Line 1 to enable users to manage multiple calls on Line 1. You can also assign multiple Quick Dial keys.
Depending on the feature, you may need to select also the line (account) for which it is applicable and some value.
The programmable key settings are available:
-from the phone menu: Main Menu > User Settings > Programmable keys. See Programmable Keys on page 15 and Customizing your phone with User Settings menu on page 60. Not applicable to Temporis IP100.
-from the WUI System>Programmable keys page. See Programmable Function Keys on page118 .
-as parameters in the configuration file. See "pfk" Module: Programmable Feature Key Settings on page 225.
Functions available to programmable keys
ALCATEL
home & business phones
A PFK can be assigned one of the following functions:
Line
Directory
Call History
Redial
Messages
Do not disturb
Quick Dial
BLF—Busy lamp field keys let you monitor activity at other phones. The key LED indicates call status.
Call Forward Unconditional
Call Forward Busy
Call Forward No Answer
Call Forward All
Park Call—Dials the access code to park your current call, or transfers the call to the parking extension. To program access codes, see Using the Admin Settings menu on page 61.
Retrieve Parked Call—Dials the access code to retrieve a parked call.
In-Call DTMF—Dials a string of numbers while you are on a call. For example, pressing the key might dial a conference access code.
Call Back—Dials the number of the last missed call.
Intercom/Page—If this feature is enabled, press the Intercom key to call one or a group of phones. You can configure Intercom calls to be automatically answered. See SIP Account Management on page 90.
Multicast page—When enabled as a multicast page key, the user can press the key to page other phones. Multicast paging differs from standard paging in that it is handled locally by the Deskset and does not require a subscription through the hosted server.
ACD—If enabled as an ACD (Automatic Call Distribution) key, the user can press the key to display the ACD State menu on the phone. The user can select an ACD state from the menu, and the key LED will indicate the selected state. See the User Guide for more information about using the ACD State menu. The ACD feature is compatible with Broadsoft's Broadworks Call Center Application.
Group Call Pickup—Dials the Group Call Pickup code, allowing you to answer a call ringing at another extension.
Direct Call Pickup—Dials the Direct Call Pickup code, allowing you to answer a call ringing at a specific extension. After pressing the button, you may need to enter the extension number manually.
LED behavior
For a PFK, LED behavior depends on the function assigned, according to the following table:
| Key Function | LED Activity | Description |
| Line | Flashing ORANGESteady GREENQuickly flashing GREENSlowly flashing GREEN | Account not registeredDialing or on a callRinging incoming callHeld call |
| Shared account | Steady ORANGESlowly flashing ORANGE | Shared account is on a callShared account is on hold |
ALCATEL
home & business phones
| Do Not Disturb | OffSteady ORANGE | DND is offDND is on |
| Call Forward | OffSteady ORANGE | Call forwarding is offCall forwarding is on |
| Page | Steady GREEN | Outgoing page in progress |
| Busy Lamp Field | OffSteady ORANGEQuickly flashing ORANGEFlashing ORANGE | Monitored phone is idleMonitored phone is on a call or has a held callThe monitored phone is ringingBLF registration error |
| Automatic Call Distribution | Quickly flashing GREENSteady GREENSlow Flash GREENSteady ORANGESlowly flashing ORANGEQuickly flashing ORANGE | ACD agent “wrap up” stateACD agent ready stateACD agent unavailable stateACD logged onACD logged offACD subscription error |
ALCATEL
home & business phones
Adding a Custom Logo
For Temporis IP150, IP151, IP251G, IP300, IP301G, IP700G, IP701G and
Conference IP1850 you can upload custom logos to be displayed on the phone idle screen and during bootup. Uploading logos is done using the configuration file. The parameters for uploading custom logos are described in Uploading a custom logo on page 44. The default logo for both bootup and idle mode is the ALCATEL logo.

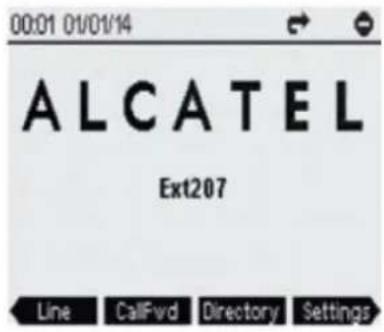
Idle screen logo behavior
The behavior described below is enabled by default and can be modified or disabled using the configuration files.
For Temporis IP150, IP151, IP251G, IP300, IP301G and Conference IP1850 you can enable the idle mode logo to appear instead of the idle screen after a specified period of inactivity. You can also enable the phone screen to cycle between the logo and the idle screen when the phone is in idle mode by setting both the user_pref.idle_to_logo_timeout and the user_pref formula_to_idle_timeout parameters.
For IP700G and IP701G there is no cycling; default or customized logo (or no logo) will be displayed on the idle screen.
See also "user_pref" Module: User Preference Settings on page 221 for more details about these parameters.
Logo specifications
The file type and dimensions for bootup and idle screen logos are listed in the table below.
| Model | File type | Dimensions (wxh) |
| Temporis IP150/IP151Temporis IP251GTemporis IP300/IP301GConference IP1850 | Monochrome bitmap (.bmp) | 158×57 pixels |
| Temporis IP700G/IP701G | Monochrome bitmap (.bmp) | 206×51 pixels |
ALCATEL
home & business phones
Positioning a custom logo on the screen is a matter of creating a logo with the maximum dimensions listed above, including any surrounding white space. There are no configuration file settings to specify the x-axis or y-axis position of the logo on the screen.
Uploading a custom logo
The file.bootup_logo and file.idle_logo parameters in the configuration file allow you to upload a custom bootup logo and custom idle logo. Place the logos on your server and enter the URL for each logo for the file.idle_logo and file.bootup_logo parameters.
If the downloaded logo is found to be invalid, the syslog will record one of the following errors:
- file not found
- invalid file format
- incorrect image size
• image is not in black and white
See "file" Module: Imported File Settings on page 230 for more details about these parameters.
Custom logo user interactions
For Temporis IP150, IP151, IP251G, IP300, IP301G and Conference IP1850 users, pressing any hard key will exit the idle logo and perform the key's function. For example, pressing MENU will show the Main Menu.
Pressing a soft key when the idle logo is showing will switch to the idle screen.
ALCATEL
home & business phones
Customizing Softkeys
For Temporis IP150, IP151, IP251G, IP300, IP301G, IP700g, IP701G and
Conference IP1850, configuration file allows you to select which soft keys should appear on the Idle screen, Active Call screen, Held Call screen and Live Dial screen. You can also specify the position of each soft key.
Some soft keys appear only under certain conditions. For example, the Line soft key on the Idle screen appears only if there is more than one registered SIP account. When a "conditional" soft key is not visible, the soft key's position is left empty.
Soft key levels with no soft keys will not be shown if there are multiple soft key levels (as indicated by the ◀ and ▶ icons). Any soft key level where all soft keys are invisible will be dynamically skipped when the user navigates through the available levels. On the Temporis IP150, IP151, IP251G, IP300, IP301G and IP1850, a soft key level consists of three soft keys (populated or blank) in a row. On IP700G and IP701G each level consists of four soft keys.
The table below shows the soft key options available for each screen. Each screen can have a maximum of nine soft keys.
NOTE: You cannot edit Soft Key text. The configuration file parameters allow you to only select and position the soft keys for each screen. Texts listed here correspond to English; each language has its own soft key list. Should you need this list for a particular language, please contact your support team. An exception is Pgm_dial softkey type. For more information please check "softkey" Module: Custom Soft Key Settings on page 239
| Screen | Available Soft Keys | Soft Key Text |
| Idle | Blank | DirectoryCall LogRedial |
| Directory | ||
| Call Log | ||
| Redial | ||
| Messages | MessageDNDCallFwdFwdAllCFNAFwdBusyIntercom | |
| Do Not Disturb | ||
| Call Forward | ||
| Call Forward All | ||
| Call Forward No Answer | ||
| Call Forward Busy | ||
| Intercom | ||
| Retrieve Parked Call | RetrieveCallBackGrpPickupDirPickup | |
| Call Return | ||
| Group Call Pickup | ||
| Direct Call Pickup |
home & business phones
| Line (visible with more than one account registered) | Line | |
| Settings | Settings | |
| Call Active | Blank | New |
| New | Park | |
| Park Call | End | |
| End | Hold | |
| Hold | Transfer | |
| Transfer | Conf | |
| Conf | XferCall | |
| XferLine (visible with more than one call) | ConfCall | |
| ConfLine (visible with more than one call) | HS_Pick | |
| hs_pick (visible on IPx01G when a HS is registered) | ||
| Call Held | Blank | End |
| End | New | |
| New | Park | |
| Park Call | Retrieve | |
| Retrieve Parked Call | GrpPickup | |
| Group Call Pickup | DirPickup | |
| Group Call Pickup | Resume | |
| Direct Call Pickup | Transfer | |
| Resume | Conf | |
| Transfer | XferCall | |
| Transfer | ConfCall | |
| Conf | HS_Pick | |
| Live Dial | Blank | Directory |
| Directory | Call Log | |
| Call Log |
ALCATEL
home & business phones
| Redial | Redial | |
| Messages | Message | |
| End | End | |
| Dial | Dial | |
| Input (alpha/numeric selection for text input mode) | 123 | |
| Cancel | Cancel | |
| Backspc | Backspc |
Custom Soft Key Configuration File Settings
The custom soft keys parameters are included in the "softkey" module. For more information, see "softkey" Module: Custom Soft Key Settings on page 239.
To modify a soft key parameter, enter values separated by commas. Soft keys appear on the phone screen in the same order as the soft key values you enter. For example, if you take IP150, IP151, IP251G, IP300, IP301G or IP1850, the parameter/value combination of softkey.idle = line,dir,settings will result in the Idle screen shown below:
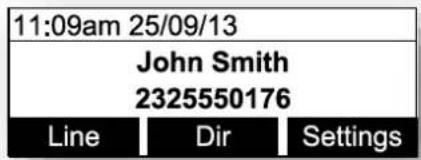
Note in the above example ◀ and ▶ icons are not displayed as the configured value yields only one softkey level.
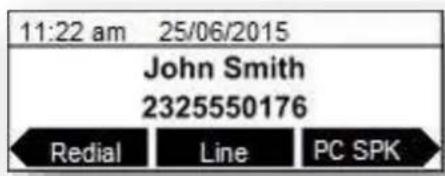
If for Conference IP1850 you take the default parameter/value combination softkey.idle = redial,line,pc_spk, call_log,blank ,dir the idle screen below would result:
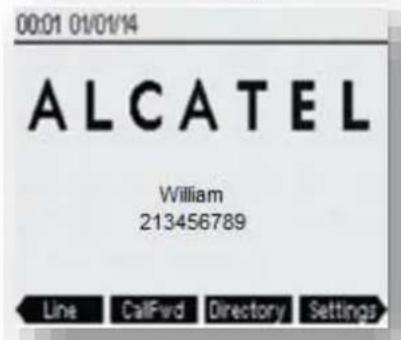
And this would be the idle screen for an IP700G or IP701G where softkey.idle = line, call_fwd, dir, settings, call_log, redial, message, dnd
Setting up Temporis IP100 phone
Temporis IP100 has specific management procedures due to its simpler user interface without a display.
You can configure the phone using one of three methods:
- From the phone itself, using the "star codes" to setup very few network related parameters. It is called "star codes" because it is a sequence of digits to be typed on the phone keypad starting by "*" (star) key.
- The Web User Interface, or WebUI, which you access using your Internet browser. See Using the WebUI on page 86. The browser-based interface is easy to navigate and best-suited to configuring a large variety of phone settings. The WebUI has every setting required for configuring a single phone. You can enter service provider account settings on the WebUI, configure the programmable keys, and set up provisioning, which will allow you to automatically and remotely update the phone after initial configuration.
The configuration file. Working with configuration files is the best way to configuring multiple phones. There are several methods available to enable the phone to find the configuration file. For example, you can enable the phone, when it starts up or reboots, to check for the presence of a configuration file on a provisioning server. If the configuration file is new or has been modified in any way, the phone automatically downloads the file and applies the new settings. For more information, see Provisioning Using Configuration Files on page 193.
Using the phone "star codes"
As there is no display on this phone, some "star codes" have been implemented to help make the installation and maintenance easier.
Find IP address
When the phone is in idle mode, type on the keyboard the following sequence:
* 1 2 3 4 5 6 #
The IP address of the phone will be announced digit after digit, on the telephone loudspeaker. For instance: one, nine, two, dot, one, six, eight, dot, one, zero, zero, dot, one, zero, zero.
Static IP configuration
When the phone is in idle mode, type on the keyboard the following sequence:
$$ * 7 8 2 8 4 2 # x * x * x * x # y * y * y * y # z * z * z * z # $$
Where x * x * x * x is the IPv4 address the phone will be assign to, y * y * y * y is the subnet mask and z * z * z * z is the default gateway IPv4 address.
The "*" character replaces the usual IPv4 bytes separator "." (dot).
Example: *782842#192*168*100*100#255*255*255*0#192*168*100*1#
A confirmation tone will be played on the telephone loudspeaker before the phone applies the new IP configuration. No reboot is needed.
VLAN configuration
Enable VLAN
When the phone is idle mode, type on the keyboard the following sequence:
ALCATEL
home & business phones
* 7 8 2 8 4 3 # 1 # x #. Where x is the Vlan ID.
A confirmation tone will be played on the telephone loudspeaker before the phone applies the new VLAN configuration. No reboot is needed.
Disable VLAN
When the phone is idle mode, type on the keyboard the following sequence:
*782843#0##
A confirmation tone will be played on the telephone loudspeaker before the phone applies the new VLAN configuration. No reboot is needed.
ALCATEL
home & business phones
Setting up IP300/IP301G/IP700G/IP701G with IP70H accessory DECT headset
Temporis IP300, IP301G, IP700G and IP701G models embed a DECT base which allows you to use compatible cordless accessories. You can register and use up to one IP70H accessory headset and one IP15 accessory handset.
Note MMI options are the same for IP30x and IP70xG despite the different display size. Thus pictures show IP300 or IP301G but can be used as reference for IP700G or IP701G as well.
Register a DECT headset
- When the phone is idle, press MENU.
- On the Main menu, press ▲ or ▼ to highlight 3.User Settings, then press OK. The User Settings menu appears.
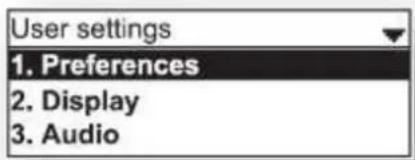
- On the User settings menu, press ▲ or ▼ to highlight 5.DECT headset, then press OK.
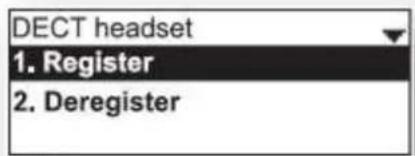
- Remove and replace the cordless headset from its charging base.
- With Register highlighted, press OK on the deskset. Registering.... appears while the deskset searches for the headset
When registration is complete, Registration succeeded will be displayed and ON/OFF light on the cordless headset turns solid blue.
Note: Registration can be terminated by pressing CANCEL on the deskset.
If the cordless headset is registered to another phone, it must be deregistered first. See "Deregistering a DECT headset". Same applies when the deskset already has one headset registered. It has to be deregistered to be replaced with a new one.
Deregister a DECT headset
- When the phone is idle, press MENU.
- On the Main menu, press ▲ or ▼ to highlight 3.User Settings, then press OK. The User Settings menu appears.
- On the User settings menu, press ▲ or ▼ to highlight 5.DECT headset, then press OK.
- With Deregister highlighted, press OK on the deskset. The deskset screen displays DECT headset is deregistered. The headset ON/OFF light flashes twice every five seconds to indicate it is not registered.
ALCATEL
home & business phones
Deregister a DECT headset without a deskset
You can use this method when you cannot use the deskset for standard deregistration. The deskset may be out of range or may have been removed from the system.
On the headset, press VOL+>ON/OFF>VOL->ON/OFF>VOL+>VOL->ON/OFF
Deskset functionality with an IP70H DECT headset
With IP70H registered to IP300, IP301G, IP700G or IP701G, users can:
- Take the line to place a call in headset mode, or predial and launch the call in headset mode, with IP70H ON/OFF button, or deskset 🔒 key
- Receive incoming calls and call waiting tone signalling on the headset
• Answer a call in headset mode, by pressing. IP70H ON/OFF button, or deskset key - Toggle between two calls by long pressing MUTE key on the headset
- Navigate through calls with the usual call selection methods on the deskset, while keeping audio on the cordless headset
- Switch to handset or hands free mode anytime during the call
For more instructions please see IP70H Quick User guide.
Setting up IP300/IP301G/IP700G/IP701G with IP15 accessory DECT handset
Temporis IP300, IP301G, IP700G and IP701G desksets embed a DECT base which allows you to use compatible DECT accessories. You can register and use up to one IP70H accessory headset and one IP15 accessory handset.
Note MMI options are the same for IP30x and IP70xG despite the different display size. Thus pictures show IP300 or IP301G but can be used as reference for IP700G or IP701G as well.
Register a DECT handset
-
When the phone is idle, press MENU.
-
On the Main menu, press ▲ or ▼ to highlight 3.User Settings, then press OK. The User Settings menu appears.
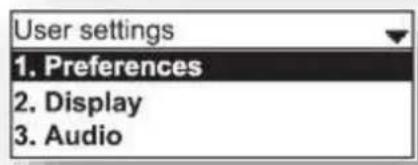
- On the User settings menu, press ▲ or ▼ to highlight 6.DECT handset, then press OK.
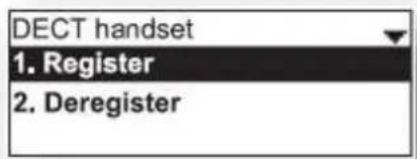
- Set your handset to registration mode using the menu (Menu>User settings>Registration)
ALCATEL
home & business phones
- With Register highlighted, press OK on the deskset. Registering.... appears while the deskset searches for the handset
When registration is complete, Registration succeeded will be displayed and the handset will display its idle screen.
If the handset you are registering to the deskset is equipped with an IP15 firmware version, then you will see a message prompting you to upgrade it for a better compatibility. Check with your technical support to get an IP10 firmware, and see section Firmware Upgrade on page 170 for handset upgrade over-the air instructions.
Note: Registration can be terminated by pressing CANCEL on the deskset.
If the deskset already has one handset registered it has to be deregistered to be replaced with a new one. See next section "Deregistering a DECT handset".
Deregister a DECT handset
-
When the phone is idle, press MENU.
-
On the Main menu, press ▲ or ▼ to highlight 3.User Settings, then press OK. The User Settings menu appears.
-
On the User settings menu, press ▲ or ▼ to highlight 6.DECT handset, then press OK.
-
With Deregister highlighted, press OK on the deskset. The deskset screen displays DECT handset is deregistered. The handset will show its unregistered status.
Deskset functionality with an IP15 DECT handset
With the accessory handset (IP15) registered to IP300, IP301G, IP700G or IP701G, users can:
- Select dialing line for a call with LINE softkey
• Use the handset's local directory, or deskset's directories (local, LDAP, black list) - Use deskset's call history and account related services (DND, Call forward, Anonymous calls)
- Answer incoming calls, waiting calls and perform hold, mute, transfer and conference
- Locate the handset from the deskset with an acoustic warning via "Locate" softkey. Check chapter about Status menu on page 58.
- Switch audio between IP15 and the deskset during a call (IP301G and IP701G only). A softkey on IP15 and deskset allows you to perform this toggling.
For more detailed instructions please see IP315 and IP15 Quick User guides.
Setting up IP2015/IP2115 with multiple IP15 handsets or IP70H wireless headsets
Alcatel IP2015/IP2115 IP DECT systems support up to six wireless devices (IP15 handsets or IP70H headsets), six independent sip accounts, and a maximum of four concurrent calls in wide band.
The basic package consists of one base and one IP15 handset. For this you will only need to set up the minimum configuration, i.e. IP connectivity and one sip account, to have your system up and running.
If you wish to use more than one handset and/or more than one account, you will need to perform some additional configuration steps, either using the WUI or configuration files. Basically you will be adding the new accounts, managing the new handsets or headsets, and assigning them to accounts.
To configure additional sip accounts using the web interface, see SIP Account Management on page 90.
If you prefer to use configuration files, see "sip_account" Module: SIP Account Settings on page 207.
Note IP70H headsets will not allow you to dial out, so whenever in next paragraphs any action involving dialing is mentioned it will not be applicable to them.
Managing additional IP15 handsets
To associate a new handset to the base:
If you are installing the basic IP2015/IP2115 package, your handset is already subscribed to the base. So if you are installing a system with only one handset you can skip this section.
If you acquire additional handsets you will need to follow these simple steps to associate them to your base.
- Press Registration button on the base for 4 seconds, then release. The two leds will blink in orange
- In your new IP15 handset, go to Menu>User Settings>Registration>Handset
- Select "BASE" softkey and press # key. Input system PIN is you are asked for it. Default is 0000
- Your handset should be subscribed and display idle screen with the assigned handset number (1 to 6)
To associate a headset to the base:
- Press Registration button on the base for 4 seconds, then release. The two leds will blink in orange
- Remove and replace your unregistered IP70H on its charging cradle (connected to the power supply). It must be flashing rapidly in red and blue
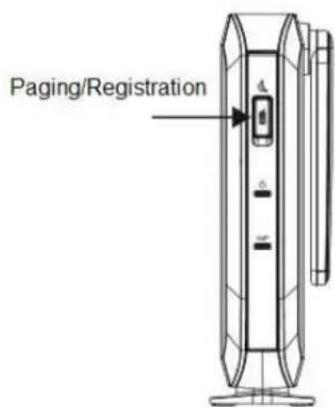
ALCATEL
home & business phones
- After a few seconds your headset should be subscribed and show only the red or blue lights, depending on battery charge status
Note: If the cordless headset is registered to another phone, it must be deregistered first. See "Deregistering a DECT headset".
To rename a handset/headset:
Handset name can be modified to suit your needs. This name will be shown on the handset idle screen, but also on the web UI or menus where you need to select a wireless device (to intercom, transfer, etc). Handset menu, IP2015/IP2115 web interface or configuration files can be used for this purpose. Note the handset has to be associated with the base. For IP70H headset only web UI or configuration files can be used.
To change the name displayed on the idle screen from handset menu:
-
On the target IP15 handset, go to Menu>User Settings>Phone rename
-
Edit the name and press Set
To change handset/headset name using WUI, see Handset name on page 139
To configure handset/headset name using provisioning files, see "hs_settings" Module: Handset management Settings on page 240
To disassociate a handset/headset from the base:
-
On one subscribed IP15 handset, go to Menu>User Settings>Registration>Handset>Deregistration
-
Enter system PIN. Default is 0000
-
Select the handset or headset you wish to unregister. If only one handset were registered, then it will be automatically unregistered without selecting anything
-
The handset will display the unregistered status screen. The headset will flash slowly in red and blue
To disassociate all handsets/headsets from the base:
-
Press and hold Paging/Registration key for 10secs
-
Release the key and then short press again
-
All devices will be unregistered from the base
Assigning sip accounts to IP15 handsets or IP70H headsets
By default all handsets/headsets can use all active accounts, and all of them will use sip account 1 to dial out.
You can modify this behavior by deciding which devices are allowed to use which accounts, and what the default dial out account for each of them will be. WUI and config files can be used for this purpose.
To assign handsets to accounts and default dial out account using the web interface, see Handset Settings, Account assignment on page 138
To assign handsets to accounts and default dial out account using configuration file parameters, see "hs_settings" Module: Handset management Settings on page 240
Moreover, you can select dialing line among assigned accounts on a per call basis. To do this, simply press LINE softkey on your IP15 handset and make your choice.
IP2015/IP2115 functionality with IP15 DECT handsets
With one or more handsets (IP15) registered to IP2015 base, users can:
- Select dialing line for a call with LINE softkey
- Use the handset's local directory, or the base's directories (local, LDAP, black list)
- Use the base's call history and account related services (DND, Call forward, Anonymous calls)
- Answer incoming calls, waiting calls and perform hold, mute, transfer and conference
- Locate the handsets from the base. Pressing Paging key will trigger an acoustic warning on all in-range handsets.
For more detailed instructions please see IP2015/IP2115 and IP15 Quick User guides.
IP2015/IP2115 functionality with IP70H DECT headset
With an IP70H headset (IP70H) registered to IP2015/IP2115 base, users can:
- Answer incoming calls and performing mute on them
• Answer intercom calls - Be the target of an internal or external transfer
- Receive paging calls from the base. Pressing Paging key will trigger an acoustic and visual warning on all in-range headsets.
For more detailed instructions please see IP2015/IP2115 and IP70H Quick User guides.
ALCATEL
home & business phones
Using Menu in your desktop phone
Your desktop phone Temporis IP150/IP151/IP251G/IP300/IP301G/IP700G/IP701G or Conference IP1850 menu have four main sub-menus:
Features—manage calls, view and add directory entries, view call history, access messages, and use the speed dial menu.
Status—view the deskset network status, account registration status, and product information.
User Settings—allows the user to set the language for the display, configure the appearance of the display, or customize the audio settings.
Admin Settings—configure network settings (enter static IP addresses, for example) and line settings.
This guide mainly contains instructions for using the Admin Settings menu and for accessing the Status menu, but we will also give an overview on Features and User Settings.
See Features chapter on page 56, or check your product Quick User Guide for more information about Features.
See Customizing your phone with User Settings menu chapter on page 60.
To use the phone menu:
- When the phone is idle, press MENU.
The main menu appears.
- Press ▼ or ▲ to highlight the desired sub-menu, and then press OK.
You can also press a corresponding dial pad key to select a numbered menu item. Press 2 for the Status menu, for example.
Press OK or an appropriate soft key to save changes.
Press ↩ to cancel an operation, exit the menu display or return to the idle screen.
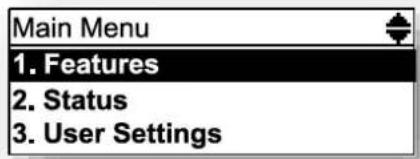
Features
The table below summarizes the different features available in this menu. Note "n" stands for the maximum number of sip accounts available for each model, i.e. 2 for IP150/IP151/IP251G, 3 for IP300 and IP1850, 4 for IP301G, 5 for IP700G and 6 for IP701G. For more details about usage please check the corresponding product Quick User Guide.
| Level 1 | Level 2 | Level 3 | Level 4 |
| 1. Call | 1.Do not disturb | Line 1...Line n | ON/OFF |
| 2.Call Forward | Line 1...Line n | CF Always (on/off, target)CF Busy (on/off, target)CF No Reply (on/off, target, timer) |
home & business phones
| 3.Block Anonymous | Line 1...Line n | ON/OFF | |
| 4.Dial Anonymous | Line 1...Line n | ON/OFF | |
| 5.Missed Call Alert | Yes/No | ||
| 6.Call waiting | Yes/No | ||
| 7.Auto-answerNote 1 | Line 1...Line n | Yes/No | |
| 2. Directory | 1.Local | Entries | Search, sort, add, delete, delete all, dial, edit, number type |
| x.LDAP (name displayed and availability depends on configuration) | Entries | Search, sort, dial, edit, number type, save to Local or black list | |
| y.Broadsoft (name and availability depends on configuration) | Entries | Search, sort, dial, edit, number type, save to Local or black list | |
| z. Black List | Entries | Search, sort, add, delete, delete all, dial, edit, number type | |
| y.Remote XML (name displayed and availability depends on configuration. Up to 3 instances possible)Note 1 | Entries | Sync, search, dial, number type | |
| 3. Call History | 1.All calls | Entries | View, Dial, Edit dial, save to Local or black list, Delete all |
| 2.Missed calls | Entries | ||
| 3.Received calls | Entries | ||
| 4.Dialed calls | Entries | ||
| 4. Message | Line 1...Line n | Call VM | |
| 5. Speed Dial | Key 0 to 9 | Add/Edit/Delete |
ALCATEL
home & business phones
Note 1: Item applicable to IP151, IP251G, IP301G, and IP701G only
Status
Use the status menu to verify network settings and begin troubleshooting if network problems or account registration issues affect phone operation.
You can also find the software version of the phone on the Product Info screen, available from the Status menu.
To view the Status menu:
-
When the phone is idle, press MENU.
-
On the Main menu, press ▲ or ▼ to highlight Status, then press OK. The Status menu appears.
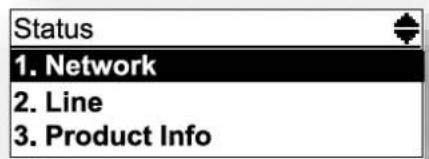
- On the Status menu, press ▲ or ▼ to highlight the desired menu, then press OK.
The available status menus are:
| Menu | Information listed |
| 1. Network | IP addressDHCP status (Enabled/Disabled)Subnet Mask IP addressGateway IP addressDNS server 1 IP addressDNS server 2 IP addressSNTP server URLMAC address |
| 2. Line | Lines and registration status. On the Line menu, highlight and select the desired line to view detailed line status information:Line status (Registered/Not registered/Disabled)Line display nameLine User IDServer addressServer Port numberProxy server addressProxy server port number |
| 3. Product Info | Model numberSerial numberMAC addressSoftware versionV-SeriesHardware version |
| 4. Cordless AccessoriesNote 2 | DECT handset (Registered/Not registered, Locate softkey)DECT headset (Registered/Not registered) |
ALCATEL
home & business phones
Note2: this item is applicable to IP300, IP301G, IP700G, IP701G only
Note
To view Network status you can also use the following shortcut. In idle mode, press key. On IP251G you can access the same shortcut by pressing ↩

Viewing Line status
When you select Line from the Status menu, the Line menu appears, listing the available lines along with icons indicating each line's current registration status.
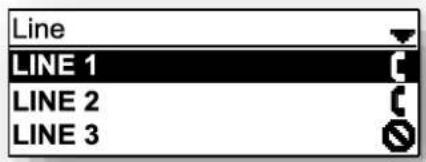
| Icon | Description |
 | Line registered |
 | Line not registered |
 | Line disabled |
To view complete status information for a line:
- On the Line menu, press ▲ or ▼ to highlight the desired line, then press OK. The full line status screen appears.
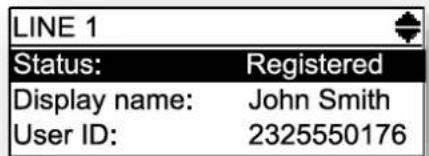
ALCATEL
home & business phones
Customizing your phone with User Settings menu
User Settings menu allows easy customization of some aspects of the phone, e.g. language, time and date, preferred ring tone, setting programmable keys or DECT accessories configuration.
To view the User Settings menu:
-
When the phone is idle, press MENU.
-
On the Main menu, press ▲ or ▼ to highlight User Settings, then press OK. The User Settings menu appears.
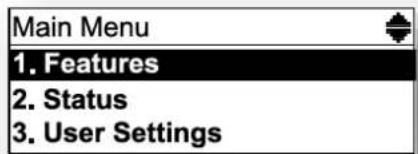
The available options appearing when you enter User Settings menu are as follows. Note "n" is the maximum number of sip accounts supported in your product (i.e. 2 for IP150, 3 for IP300/IP301G and IP1850, 5 for IP700G/IP701G) and "M" is the number of available PFK appearances (i.e. 20 for IP150, 2, for IP251G, 24 for IP300/IP301G, 36 for IP700G/IP701G):
| Level 1 | Level 2 | Level 3 |
| 1. Preferences | 1. Language | Language selection list |
| 2. Date and time | 12h/24hDate formatNTP/ManualTime zoneDST | |
| 3. Restart phone | ||
| 2. Display | Contrast (Level 1 to 7) | |
| Backlight state | ||
| Idle Backlight state | ||
| Backlight timeout (10 to 60sec) | ||
| 3. Audio | 1. Ring tone | Line 1 (Ringtone 1 to 10)...Line n (ringtone 1 to 10) |
| 2. Key tone | On/Off | |
| 3. Audio mode (for autoanswer) | 1. Speaker2. Headset |
ALCATEL
home & business phones
| 4. Program Keys | Key 1Key 2...Key m | Function key type selection list (May differ)1. Line2. Directory3. Call History4. Redial5. Messages6. Do not Disturb7. Call Forward All8. Call Fwd No answer9. Call Fwd Busy10. Quick Dial11. BLF12. ACD13. Intercom14. Multicast Page15. Park16. Retrieve Park17. In call DTMF18. Call Return19. Group Pickup20. Directed Pickup21. Prefix dialing N/A |
| 5. DECT headsetNote 3 | 1. Register | |
| 2. Deregister | ||
| 6. DECT handsetNote 3 | 1. Register | |
| 2. Deregister | ||
| 7. Edit passwordNote 4 |
Note 3: this item is applicable to IP300, IP301G, IP700g, IP701G only
Note 4: this item is applicable to IP151, IP251G, IP301G, IP701G only
Using the Admin Settings menu
To access the Admin Settings menu:
- When the phone is idle, press MENU. The Main menu appears.
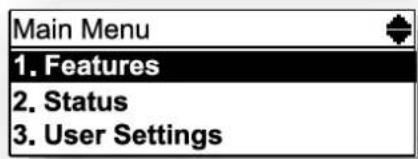
ALCATEL
home & business phones
- Press ▲ or ▼ to highlight Admin Settings, then press OK.
-or-
Press 4 (Admin Settings) on the dial pad.
- Use the dial pad to enter the admin password, the press OK. The default password is admin.
The Admin Settings are:
| Setting | Options |
| 1. Erreur ! Source u renvoi introuvable. | 1. DHCP (Enable, Disable)2. Set static IP3. VLAN ID4. Others |
| 2. Line Menu | 1. LINE 1...N. LINE N |
| 3. Provisioning Menu | 1. Server2. Login3. Password |
| 4. Reset to default | Press OK to display a screen that allows you to reset the phone to factory default settings. |
| 5. Restart phone | Press OK to display a screen that allows you to restart the phone. |
Network settings (IPv4)
This chapter is applicable for models Temporis IP150, IP300, IP700G, IP1850 Use the Network setting menu to configure network-related settings for the phone.
Note: After you confirm any of the network settings, the phone may restart.
To use the Network setting menu:
- From the Admin settings menu, press ▲ or ▼ to highlight Network setting, then press ENTER.
The Network setting menu appears.
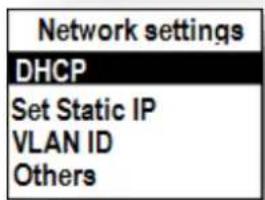
- Press ▲ or ▼ to highlight the desired option:
DHCP
Set static IP
VLAN ID
Others (DNS and NTP servers).
, then press OK key or ENTER softkey.
To enable or disable DHCP:
- From the Network setting menu, press ▲ or ▼ to highlight DHCP, then press ENTER.
- Press OK key to toggle between Enabled and Disabled, then press SET softkey.
DHCP is enabled by default, which means the base or desktop phone will get its IP address from the network. When DHCP is disabled, you must enter a static IP address.
Note: You must be familiar with TCP/IP principles and protocols to configure static IP settings.
To set static IP for the base or desktop phone:
- From the Network setting menu, press ▲ or ▼ to highlight Set static IP, then press OK or ENTER softkey.
If DHCP is disabled, the Set static IP menu appears. If DHCP is enabled, an error message appears briefly before returning you to the Network setting menu.
- On the Set static IP menu, enter the static IP address. Use the dial pad and "*" key to enter characters and dots.
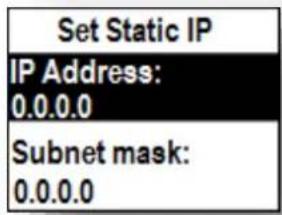
- Press ▼ and enter the Subnet Mask. Use BACKSP softkey, digit dial pad and "*" key to enter characters and dots.
- Press ▼ and enter the Gateway. Use BACKSP softkey, digit dial pad and "*" key to enter characters and dots.
- Press SAVE softkey.
To set the VLAN ID for the base or desktop phone:
- From the Network setting menu, press ▲ or ▼ to highlight VLAN ID, and then press OK.
- On the VLAN ID menu, press OK to toggle between Enable and Disable states for WAN VLAN.
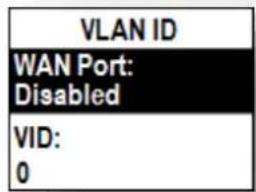
- Press ▼ and enter the WAN VID. Use the dial pad and the BACKSP soft key to enter characters. The valid range is 0 to 4095.
- Press ▼ and enter WAN Priority. Use the dial pad and the BACKSP soft key to enter characters.
- Press SAVE
To set other settings (DNS and NTP):
- From the Network setting menu, press ▲ or ▼ to highlight Others, then press OK. If DHCP is disabled, the Others menu appears. If DHCP is enabled, an error message appears briefly before returning you to the Network setting menu.
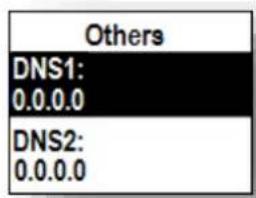
- Enter the IP address for the primary DNS server. Use BACKSP softkey, digit dial pad and "*" key to enter characters and dots.
- Press ▼ and enter the IP address for the secondary DNS server. The phone uses this server if the primary server does not respond. Use BACKSP softkey, digit dial pad and "*" key to enter characters and dots.
ALCATEL
home & business phones
- Press ▼ and enter the IP address or url for the NTP server. Use BACKSP softkey and dial pad to enter characters and dots.
- If the base or desktop phone does not use an NTP server, you must manually enter the time and date settings in User settings menu.
- Press Save
Network settings (IPv4/IPv6)
This chapter is applicable to models Temporis IP151, IP251G, IP301G and IP701G Use the Network setting menu to configure network-related settings for the phone.
Note: After you confirm any of the network settings, the phone may restart.
To use the Network setting menu:
- From the Admin settings menu, press ▲ or ▼ to highlight Network setting, then press ENTER.
The Network setting menu appears.
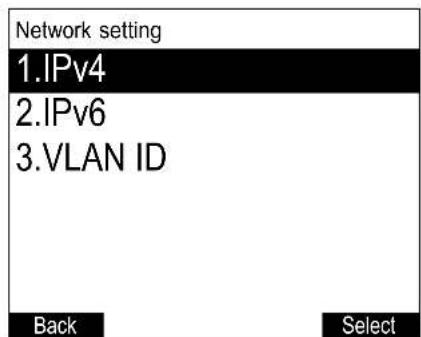
- Press ▲ or ▼ to highlight the desired option, and then press SELECT:
IPv4
□ Mode (DHCP, Static IP, PPPoE, Disabled)
□ Set static IP
□ Set static DNS
□ Set PPPoE (Point-to-Point Protocol over Ethernet)
IPv6
□ Mode (Disabled, Auto, Static IP)
□ Set static IP
□ Set static DNS
■ VLAN ID
ALCATEL
home & business phones
To set the network mode:
- From the Network setting menu, press ▲ or ▼ to highlight your network type (IPv4 or IPv6), and then press SELECT.
The selected network type screen appears (IPv4 menu shown below).
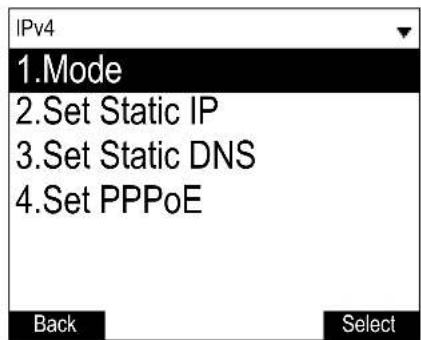
- With Mode selected, press SELECT. The Mode menu appears
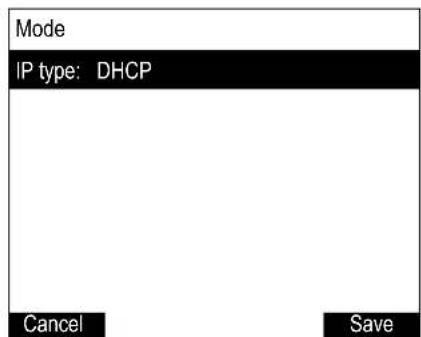
- Press ◀ or ▶ to select the network mode for your network type, and then press Save DHCP (IPv4) or Auto (IPv6) is enabled by default, which means the set will get its IP address from the network. When DHCP and Auto are disabled, you must enter a static addressIP for your phone

You must be familiar with TCP/IP principles and protocols to configure static IP settings.
To set static IP for your phone:
- From the Mode menu, press ◀ or ▶ to select Static IP, and then press SELECT.
If DHCP is disabled, the Set static IP menu appears. If DHCP is enabled, an error message appears briefly before returning you to the Network setting menu.
- On the Set static IP menu, enter the static IP address. Use the dial pad and the Add dot soft key to enter characters. Press ◀ or ▶ to advance to the next character.
ALCATEL
home & business phones
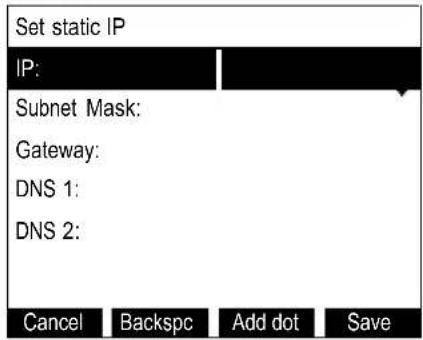
- Press ▼ and enter the Subnet Mask. Use the dial pad and the Add dot soft key to enter characters. Press ◀ or ▶ to advance to the next character
- Press ▼ and enter the Gateway. Use the dial pad and the Add dot soft key to enter characters. Press ◀ or ▶ to advance to the next character.
- Press ▼ and enter the IP address for the primary DNS server. Use the dial pad and the Add dot soft key to enter characters. Press ◀ or ▶ to advance to the next character
- Press ▼ and enter the IP address for the secondary DNS server. The phone this server if the primary server does not respond.
- Press Save softkey
To set static DNS:
- From the Network setting menu, press ▲ or ▼ to highlight IPv4 or IPv6 (whichever is in use in Static mode), and then press SELECT.
- Highlight Set static DNS and then press SELECT. The Set static DNS menu appears.
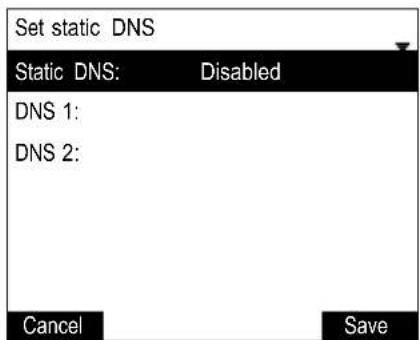
- On the Set static DNS menu, press ◀ or ▶ to set Static DNS to Enabled.
- Press ▼ and then enter the IP address for the primary DNS server.
- Press ▼ and then enter the IP address for the secondary DNS server.
- Press Save
To set PPPoE:
ALCATEL
home & business phones
-
From the Network setting menu, press □ or □ to highlight IPv4 (which must be in PPPoE mode), and then press SELECT.
-
Highlight Set PPPoE and then press SELECT. The Set PPPoE menu appears.
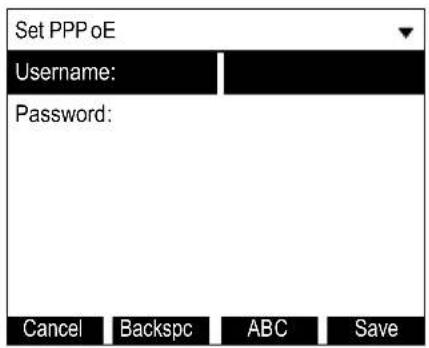
- On the Set PPPoE menu, enter the PPPoE account Username.
- Press ▼ and then press Edit if you are required to enter a PPPoE account.
- Enter a password, if you are required to enter a PPPoE password.
- Press Save
To set the VLAN ID:
- From the Network setting menu, press ▲ or ▼ to highlight VLAN ID, and then press zSELECT.
- On the VLAN ID menu, press ◀ or ▶ to enable or disable the WAN VLAN.
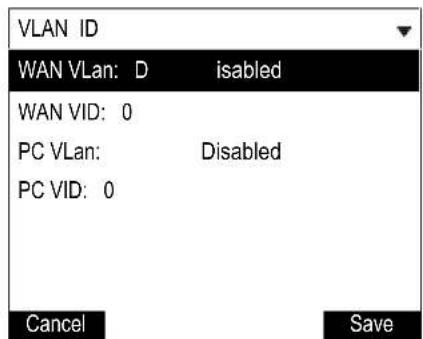
- Press ▼ and enter the WAN VID. Use the dial pad and the Backspc soft key to enter characters. The valid range is 0 to 4095.
- Press ▼ and then press ◀ or ▶ to enable or disable the PC port Vlan.
- Press ▼ and enter the PC port number. Use the dial pad and the Backspc soft key to enter characters. The valid range is 0 to 4095.
- Press Save
Line Menu
Use the Line menu to configure line-specific settings for the phone.
To use the Line setting menu:
- From the Admin Settings menu, press ▼ to highlight Line, and then press SELECT. The Line menu appears.
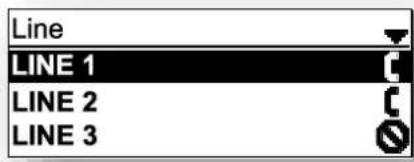
- Highlight the desired line, if necessary, by pressing ▼, and then press SELECT. The full configuration menu for that line appears.
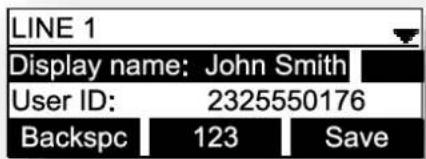
You can configure:
- Display name
- User ID
- Authorization ID
• Authorization Password
• SIP Registrar Server IP
• Registrar Server port - Proxy server IP
- Proxy server port
- Register (Yes or No)
• Answer page (Manual or Auto)
For more information about these settings, see SIP Account Management on page 90.
-
Edit the Line settings using the dial pad and the soft keys available for each setting:
-
Backspc—deletes a character
- 123—enables you to enter numbers, lower case letters, or upper case letters with the dial pad. Does not appear when the setting accepts numbers only.
- Save—saves and applies the new settings
- Edit—enables you to edit the setting (appears for the Password setting)
Press ◀ or ▶ to advance to the next character.
ALCATEL
home & business phones
Provisioning Menu
Use the Provisioning menu to manually configure auto-provisioning settings. For more information about auto-provisioning, see Provisioning on page 173 and Provisioning Using Configuration Files on page 193.
On the Provisioning menu you can configure:
- Server string—the URL of the provisioning server. The URL can include a complete path to the configuration file.
- Login ID—the username the phone will use to access the provisioning server.
- Login PW—the password the phone will use to access the provisioning server.
To use the Provisioning menu:
- From the Admin Settings menu, press ▼ to highlight Provisioning, and then press OK.
The Provisioning menu appears.
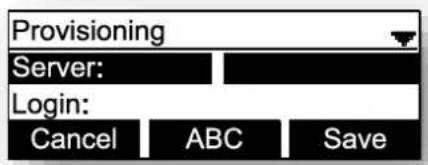
-
Enter the server URL using the dial pad keys:
-
Backspc—deletes a character
- 123—enables you to enter numbers, lower case letters, or upper case letters with the dial pad. Does not appear when the setting accepts numbers only.
- Save—prompts you to reboot the phone and apply the new settings
- Edit—enables you to edit the setting (appears for the Password setting)
The format of the URL must be RFC 1738 compliant, as follows:
"
"
"
-
Press ▼ to move to the next line and enter the Login ID for access to the provisioning server if it is not part of the server string.
-
Press ▼ to move to the next line and enter the Login password.
-
Press Save.
Security Menu
Security menu is available for models Temporis IP151, IP251G, IP301G and IP701G.
Here you can configure the phone lock feature, and enable or disable the Web server.
The Web server setting determines whether the embedded WebUI is available from the phone. When the Web server is disabled, the phone can be configured using the phone menus or via provisioning only.
The Phone Lock feature restricts certain hard keys and features unless the user enters a PIN code. There are three escalating modes of lockout:
- Restricted Config only locks out the menu and voicemail.
When Restricted Config is enabled, the following keys/features are restricted:
- MENU key
- Settings soft key
- Messages soft key
- Messages PFK
- MESSAGE key
- Restricted Call locks out all advanced calling features, including transfer, conference and hold, via hard keys, soft keys and PFKs. The phone operates only in single call, single account mode.
When Restricted Call is enabled, the following keys and features are restricted in addition to those restricted as part of Restricted Config:
○ HOLD key
○ SELECT key
- UP, DOWN, LEFT, RIGHT keys
- CALL HISTORY key
- DIRECTORY key
- REDIAL key
- FLASH key
○ DND key
○ TRANSFER key
- CONFERENCE key
- All soft keys not listed as part of Restricted Config
- LOWER key
○ All PFKs
- Outgoing Multicast
- Outgoing Server-side Paging
- Emergency Call Only locks out all outgoing calls except emergency calls. Emergency numbers must match the Emergency Dial Plan, as configured under "General Account Settings". Incoming calls are still allowed for all modes.
To use the Security menu:
- From the Admin Settings menu, press ▼ to highlight Security, and then press SELECT.
The Security menu appears
Security
-
Enabling Web Server
-
With Restriction Mode highlighted, press SELECT. The Restriction Mode menu appears.
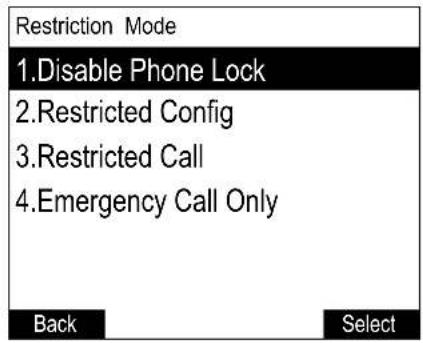
- Press ▲ or ▼ to highlight the desired restriction mode, and then press SELECT. The Security menu appears.
- Press ▲ or ▼ to highlight Enabling Web Server, and then press SELECT. The Enabling Web Server menu appears.
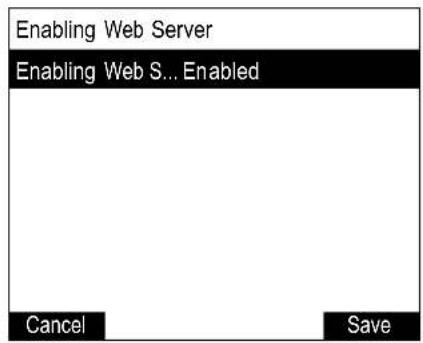
- Press ◀ or ▶ to select Enabled or Disabled.
- Press Save.
ALCATEL
home & business phones
Using Menu in your IP15 cordless handset
Your cordless handset IP15 menu has nine sub-menus:
Message-access voicemail for assigned accounts
Directory-access and manage contact directory
Call History-access and manage call lists
Intercom-launch internal calls to other handsets
Speed dial- manage your speed dial list
Features—manage calls
Status—view the deskset network status, account registration status, and product information.
User Settings—allows the user to set the language for the display, configure the appearance of the display, or customize the audio settings.
Admin Settings—configure network settings (enter static IP addresses, for example), provisioning settings, launch handset firmware upgrade, change DECT sytem PIN or enable secure browsing for example.
The first six submenus can be considered to be mainly functionality related, whereas the last three are more connected to administration.
This guide mainly contains instructions for using the Admin Settings menu and for accessing the Status menu, but we will also give an overview on the other submenus, which we will group in a User Functionality submenus chapter.
To use the phone menu:
- When the phone is idle, press MENU.
The main menu appears.
- Press ▼ or ▲ to highlight the desired sub-menu, and then press OK key, or ENTER soft key
Press OK or an appropriate soft key to save changes.
Press 7 or an appropriate soft key to cancel an operation, exit the menu display or return to the idle screen.
User functionality submenus
The table below summarizes the different functions available in the user functionality related submenus.
Depending on whether you are using your IP15 handset with an IP2015 base or with a Temporis IP300/Temporis IP700G desk set, some minor differences can be found. They are detailed in the table.
| Level 1 | Level 2 | Level 3 |
| Message(n is the number of available sip accounts on the product or | Line 1...Line n |
home & business phones
| assigned to the handset on IP2x15) | ||
| Directory | Local directory | Options: Search/Add new/Delete all/Review: Dial/Edit/Edit dial/Delete |
| Base directory | With IP2015/IP2115 base: Options: Search/Add new/Delete allReview: Dial/Edit/Edit dial/Delete | |
| With IP30x/IP70xG deskset: Options: SearchReview: Dial, Edit dial | ||
| LDAP (name depending on configuration) | Search, Dial, Edit dial, Save | |
| Broadsoft (name depending on configuration) | Search, Dial, Edit dial, Save | |
| Blacklist | With IP2015/IP2115 base: Options: Search/Add new/Delete allReview: Dial/Edit/Edit dial/Delete | |
| With IP30x/IP70xG deskset: Options: SearchReview: Dial, Edit dial | ||
| Call history | Missed calls | With IP2015/IP2115 base: Delete allReview: Delete/Dial/Edit dial /Save |
| With IP30x/IP70xG deskset: Review: Dial/Edit dial /Save | ||
| Received calls | With IP2015/IP2115 base: Delete allReview: Delete/Dial/Edit dial /Save | |
| With IP30x/IP70xG deskset: Review: Dial/Edit dial /Save | ||
| Dialed calls | With IP2015/IP2115 base: Delete allReview: Delete/Dial/Edit dial /Save | |
| With IP30x/IP70xG deskset: Review: Dial/Edit dial /Save | ||
| Intercom(with IP2x15 only; m is the number of registered handsets) | Handset 1 ...Handset m |
ALCATEL
home & business phones
| Speed dial | 1.2....0. | Add/Edit/Delete |
| Features | DND | Available or assigned accounts listDND statusOK to toggle, SET to save |
| Call Forward | Available or assigned accounts listCFW statusesOK to toggle, SET to save | |
| Block Anonymous | Available or assigned accounts listCFW statusesOK to toggle, SET to save | |
| Dial as anonymous | Available or assigned accounts listCFW statusesOK to toggle, SET to save | |
| Lift HS answer | Lift HS answer statusOK to toggle, SET to save | |
| Miss Call alert | Show alertHide alertSET to save | |
| Call Waiting | Show alertHide alertSET to save |
Status
Use the status menu to verify network settings and begin troubleshooting if network problems or account registration issues affect phone operation.
You can also find the software version of the phone on the Product Info screen, available from the Status menu.
To view the Status menu:
-
When the phone is idle, press MENU.
-
On the Main menu, press ▲ or ▼ to highlight Status, then press OK. The Status menu appears.
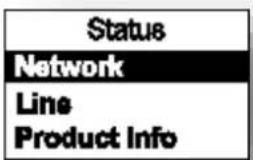
- On the Status menu, press ▲ or ▼ to highlight the desired menu, then press OK.
The available status menus are:
ALCATEL
home & business phones
| Menu | Information listed |
| Network | IP addressDHCP status (Enabled/Disabled)Subnet Mask IP addressGateway IP addressDNS server 1 IP addressDNS server 2 IP address |
| Line | Lines and registration status. On the Line menu, highlight and select the desired line to view detailed line status information:Line status (Registered/Not registered/Disabled)Line display nameLine User IDServer address |
| Product Info | HandsetModel numberSerial numberFW versionV-SeriesHW versionBaseFW versionV-SeriesHW version |
User Settings
User Settings menu allows easy customization of some aspects of the phone, e.g. language, time and date, preferred ring tone, or DECT handsets management.
To view the User Settings menu:
-
When the handset is idle, press MENU.
-
On the Main menu, press ▲ or ▼ to highlight User settings, then press OK or ENTER softkey. The User settings menu appears.
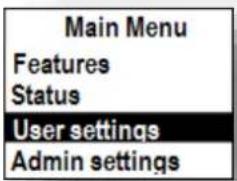
The available options appearing when you enter User Settings menu are as follows, where "n" is the maximum number of sip accounts supported in your product (i.e. 2 for IP150/IP151, 3 for IP300/IP301G and IP1850, 5 for IP700G/IP701G) and "M" is the number of available PFK appearances (i.e. 20 for IP150/IP151, 24 for IP300/IP301G, 36 for IP700G/IP701G):
| Language | EnglishFrançaisEspañolItalianoPortuguês | Select and SET/BACK |
ALCATEL
home & business phones
| DeutschNederlandsΕλληνικα | ||
| Set date/time | Date formatSet dateClock formatSet time | Edit or select and SET/BACK |
| Phone rename | Edit and SET/BACK | |
| Contrast (Level 1 to 8) | Select and SET/BACK | |
| Ringers | Ringer Volume | Select and SET/BACK |
| Ringer Tones | Line 1(Melody 1 to 10)...Line n(Melody 1 to 10) | |
| Low batt tone | On/Off | SET/BACK |
| Link lost tone | On/Off | SET/BACK |
| Key tone | On/Off | SET/BACK |
| Registration | Handset | Select Base or Deskset and launch or cancel |
| Deregistration | Enter PINSelect handset (if more than one) |
Admin Settings
To access the Admin settings menu:
-
When the handset is idle, press MENU. The Main menu appears.
-
Press ▲ or ▼ to highlight Admin Settings, then press OK.
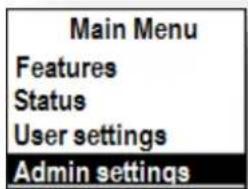
- Use the dial pad to enter the admin password, then press OK. The default password is admin.
Note: default text input mode on the handset is "Abc" as indicated at the top of the screen. To toggle between "Abc", "ABC" and "abc" modes please press "*" key.
Admin Settings are:
| Setting | Options |
ALCATEL
home & business phones
| Erreur ! Source du envoi introuvable.s | DHCP (Enable, Disable)Set static IPVLAN IDOthers |
| Secure browsing | EnabledDisabled(Toggle with OK and press SET or BACK. Requires reboot) |
| Provisioning Menu | Server stringLoginPassword(Edit and SAVE or BACK) |
| Edit PIN code | Enter old PIN:Enter new PIN:Repeat new PIN: |
| Firmware update | Checks for available updates installed in the base's memoryIf updates are available, YES or NO to proceed. |
Network settings (IPv4)
This chapter is applicable to IP15 when used in conjunction with an IPv4 model (Temporis IP300 or IP700G, Alcatel IP2015 base).
Use the Network setting menu to configure network-related settings for the phone.
Note: After you confirm any of the network settings, the phone may restart.
To use the Network setting menu:
- From the Admin settings menu, press ▲ or ▼ to highlight Network setting, then press ENTER.
The Network setting menu appears.
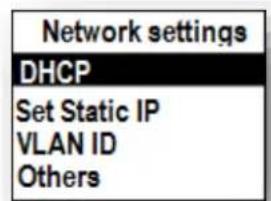
- Press ▲ or ▼ to highlight the desired option:
DHCP
ALCATEL
home & business phones
Set static IP
VLAN ID
Others (DNS and NTP servers).
, then press OK key or ENTER softkey.
To enable or disable DHCP:
- From the Network setting menu, press ▲ or ▼ to highlight DHCP, then press ENTER.
- Press OK key to toggle between Enabled and Disabled, then press SET softkey.
DHCP is enabled by default, which means the base or desktop phone will get its IP address from the network. When DHCP is disabled, you must enter a static IP address.
Note: You must be familiar with TCP/IP principles and protocols to configure static IP settings.
To set static IP for the base or desktop phone:
- From the Network setting menu, press ▲ or ▼ to highlight Set static IP, then press OK or ENTER softkey.
If DHCP is disabled, the Set static IP menu appears. If DHCP is enabled, an error message appears briefly before returning you to the Network setting menu.
- On the Set static IP menu, enter the static IP address. Use the dial pad and "*" key to enter characters and dots.
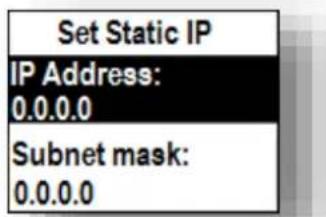
- Press ▼ and enter the Subnet Mask. Use BACKSP softkey, digit dial pad and "*" key to enter characters and dots.
- Press ▼ and enter the Gateway. Use BACKSP softkey, digit dial pad and "*" key to enter characters and dots.
- Press SAVE softkey.
To set the VLAN ID for the base or desktop phone:
- From the Network setting menu, press ▲ or ▼ to highlight VLAN ID, and then press OK.
- On the VLAN ID menu, press OK to toggle between Enable and Disable states for WAN VLAN.
ALCATEL
home & business phones
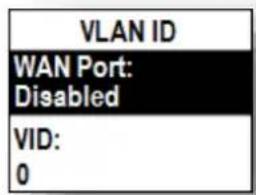
- Press ▼ and enter the WAN VID. Use the dial pad and the BACKSP soft key to enter characters. The valid range is 0 to 4095.
- Press ▼ and enter WAN Priority. Use the dial pad and the BACKSP soft key to enter characters.
- Press SAVE
To set other settings (DNS and NTP):
- From the Network setting menu, press ▲ or ▼ to highlight Others, then press OK. If DHCP is disabled, the Others menu appears. If DHCP is enabled, an error message appears briefly before returning you to the Network setting menu.
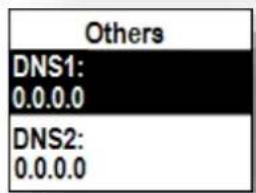
- Enter the IP address for the primary DNS server. Use BACKSP softkey, digit dial pad and "*" key to enter characters and dots.
- Press ▼ and enter the IP address for the secondary DNS server. The phone uses this server if the primary server does not respond. Use BACKSP softkey, digit dial pad and "*" key to enter characters and dots.
- Press ▼ and enter the IP address or url for the NTP server. Use BACKSP softkey and dial pad to enter characters and dots.
- If the base or desktop phone does not use an NTP server, you must manually enter the time and date settings in User settings menu.
- Press Save
Network settings (IPv4/IPv6)
This chapter is applicable to IP15 when used in conjunction with an IPv4/IPv6 model (Temporis IP301G or IP701G, Alcatel IP2115 base)
Use the Network setting menu to configure network-related settings for the phone.
Note: After you confirm any of the network settings, the phone may restart.
ALCATEL
home & business phones
To use the Network setting menu:
- From the Admin settings menu, press ▲ or ▼ to highlight Network setting, then press ENTER.
The Network setting menu appears.
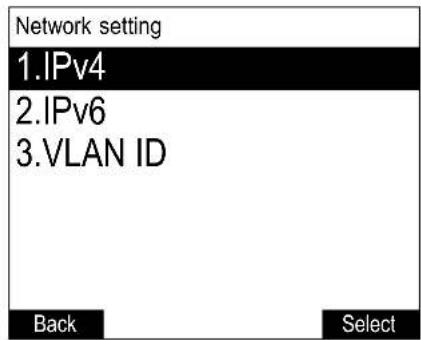
- Press ▲ or ▼ to highlight the desired option, and then press SELECT:
IPv4
□ Mode (DHCP, Static IP, PPPoE, Disabled)
□ Set static IP
□ Set static DNS
☐ Set PPPoE (Point-to-Point Protocol over Ethernet)
IPv6
□ Mode (Disabled, Auto, Static IP)
□ Set static IP
□ Set static DNS
■ VLAN ID
To set the network mode:
- From the Network setting menu, press ▲ or ▼ to highlight your network type (IPv4 or IPv6), and then press SELECT.
The selected network type screen appears (IPv4 menu shown below).
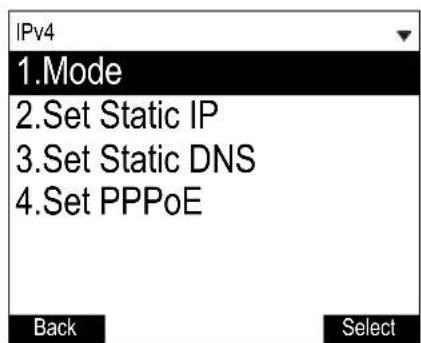
ALCATEL
home & business phones
- With Mode selected, press SELECT. The Mode menu appears.
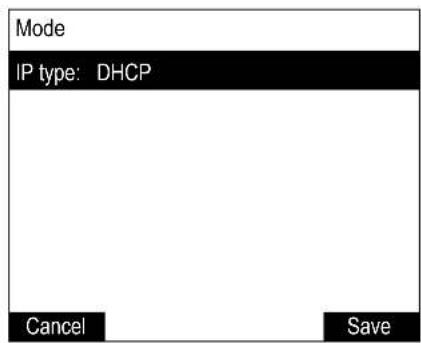
- Press ◀ or ▶ to select the network mode for your network type, and then press Save DHCP (IPv4) or Auto (IPv6) is enabled by default, which means the set will get its IP address from the network. When DHCP and Auto are disabled, you must enter a static IP address for your phone
NOTE: You must be familiar with TCP/IP principles and protocols to configure static IP settings.
To set static IP for your phone:
-
From the Mode menu, press ◀ or ▶ to select Static IP, and then press SELECT. If DHCP is disabled, the Set static IP menu appears. If DHCP is enabled, an error message appears briefly before returning you to the Network setting menu.
-
On the Set static IP menu, enter the static IP address. Use the dial pad and the Add dot soft key to enter characters. Press ◀ or ▶ to advance to the next character.
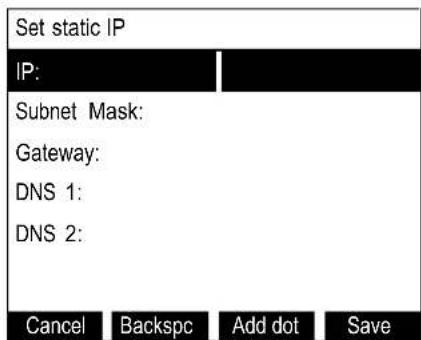
-
Press ▼ and enter the Subnet Mask. Use the dial pad and the Add dot softkey to enter characters. Press ◀ or ▶ to advance to the next character
-
Press ▼ and enter the Gateway. Use the dial pad and the Add dot soft key to enter characters. Press ◀ or ▶ to advance to the next character.
-
Press ▼ and enter the IP address for the primary DNS server. Use the dial pad and the Add dot soft key to enter characters. Press ◀ or ▶ to advance to the next character
ALCATEL
home & business phones
-
Press ▼ and enter the IP address for the secondary DNS server. The phone will use this server if the primary server does not respond.
-
Press Save softkey
To set static DNS:
-
From the Network setting menu, press ▲ or ▼ to highlight IPv4 or IPv6 (whichever is in use in Static mode), and then press SELECT.
-
Highlight Set static DNS and then press SELECT. The Set static DNS menu appears.
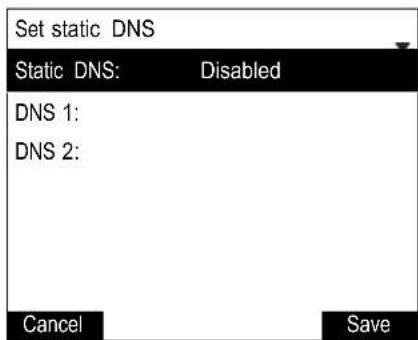
-
On the Set static DNS menu, press ◀ or ▶ to set Static DNS to Enabled.
-
Press ▼ and then enter the IP address for the primary DNS server.
-
Press ▼ and then enter the IP address for the secondary DNS server.
-
Press Save
To set PPPoE:
-
From the Network setting menu, press □ or □ to highlight IPv4 (which must be in PPPoE mode), and then press SELECT.
-
Highlight Set PPPoE and then press SELECT. The Set PPPoE menu appears.
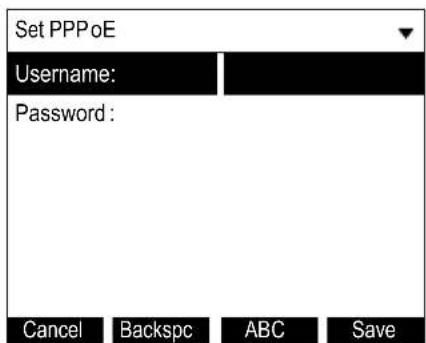
-
On the Set PPPoE menu, enter the PPPoE account Username.
-
Press ▼ and then press Edit if you are required to enter a PPPoE account.
-
Enter a password, if you are required to enter a PPPoE password.
-
Press Save
ALCATEL
home & business phones
To set the VLAN ID:
-
From the Network setting menu, press ▲ or ▼ to highlight VLAN ID, and then press zSELECT.
-
On the VLAN ID menu, press ◀ or ▶ to enable or disable the WAN Vlan.
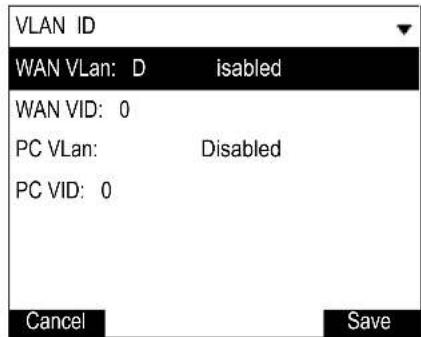
- Press ▼ and enter the WAN VID. Use the dial pad and the characters. The valid range is 0 to 4095.

to enter
-
Press ▼ and then press ◀ or ▶ to enable or disable the PC port Vlan.
-
Press ▼ and enter the PC port number. Use the dial pad and the Backspc soft key to enter characters. The valid range is 0 to 4095.
-
Press Save
ALCATEL
home & business phones
Provisioning Menu
Use the Provisioning menu to manually configure auto-provisioning settings. For more information about auto-provisioning, see Provisioning on page 173 and Provisioning Using Configuration Files on page 193.
On the Provisioning menu you can configure:
- Server string—the URL of the provisioning server. The URL can include a complete path to the configuration file.
- Login ID—the username the phone will use to access the provisioning server.
- Login PW—the password the phone will use to access the provisioning server.
To use the Provisioning menu:
- From the Admin settings menu, press ▼ to highlight Provisioning, and then press OK.
The Provisioning menu appears.
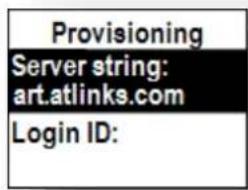
- Enter the server URL using the dial pad keys:
• BACKSP—deletes a character
- *—enables you to toggle between Abc, ABC, abc input modes. Does not appear when the setting accepts numbers only.
- SAVE—prompts you to reboot the phone and apply the new settings
- Edit—enables you to edit the setting (appears for the Password setting)
The format of the URL must be RFC 1738 compliant, as follows:
"
"
"
- Press ▼ to move to the next line and enter the Login ID for access to the provisioning server if it is not part of the server string.
- Press ▼ to move to the next line and enter the Login password.
- Press Save.
ALCATEL
home & business phones
Using the WebUI
The Web User Interface (WebUI or WUI) resides on your phone. You can access it using an Internet browser, either as a user or as an administrator.
After you log in to the WebUI, you can configure the phone on different pages. Note the different pages accessible by admin and user profiles, as listed in the following table. Note also not all pages are accessible to all products.
The WebUI also has a Status page, where you can view network status and general information about your phone. The information on this page matches the Status menu on the phone.
| Section | Page | admin | user |
| Status | System Status | ✓ | ✓ |
| Handset Status | ✓ | ||
| System | SIP Account Management | ✓ | |
| Call Settings | ✓ | ✓ | |
| Preferences | ✓ | ✓ | |
| Programmable Keys | ✓ | ✓ | |
| Speed Dial | ✓ | ✓ | |
| Signaling | ✓ | ||
| Ringer | ✓ | ||
| Handset management | ✓ | ||
| Paging Zones | ✓ | ||
| Hot line settings | ✓ | ||
| Server Applications | ✓ | ||
| Network | Basic Network Settings | ✓ | |
| Advanced Network Settings | ✓ | ||
| Contacts | Local Directory | ✓ | ✓ |
| Blacklist | ✓ | ✓ | |
| LDAP | ✓ |
ALCATEL
home & business phones
| • Broadsoft | √ | ||
| • Remote XML phonebook | √ | ||
| • Call History | √ | √ | |
| Servicing | • Reboot | √ | |
| • Time and Date | √ | ||
| • Custom Language | √ | ||
| • Firmware Upgrade | √ | ||
| • Provisioning | √ | ||
| • Security | √ | √ | |
| • Certificates | √ | ||
| • TR069 | √ | ||
| • System Logs | √ |
Note some pages and some parameters are model specific, hence depending on your model you may not see all of the pages listed above and all of the parameters described in the coming chapters.
To access the WebUI:
- Ensure that your computer is connected to the same network as your base or desktop phone. Your computer may already be connected to the network through the PC port on the back of your desk set.
- Find the IP address of your phone:
a. When the phone is idle, press MENU.
b. Press ▼ to highlight Status, and then press OK.
c. With Network highlighted, press OK.
The Network status screen appears.
Note: Instead of steps a, b, c, in most models you can use the shortcut to Network status (in idle mode press ☐)
d. On the Network status screen, note the IP Address.
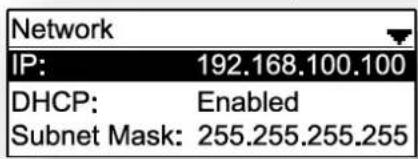
ALCATEL
home & business phones
e. For Temporis IP100, please see Find IP address on page 48
-
On your computer, open an Internet browser. (Depending on your browser, some of the pages presented here may look different and have different controls.)
-
Type the phone IP address in the browser address bar and press ENTER on your computer keyboard.

-
A login box appears. Under Username, enter admin. For the password, enter the default password, admin. You can change the password later on the Servicing > Security page. If you wish to login as a user, username and default password would be user/user.
-
On the login box, click OK.
The WebUI appears.
Click topics from the navigation bar along the top of the WebUI, and then click links to individual pages along the left. You view and change settings in two different types of fields: drop-down lists and entry fields into which you type information. For your security, the WebUI times out after 10 minutes, so if it is idle for that time, you must log in again.
The remaining procedures in this section assume that you are already logged into the WebUI.
NOTE: The settings tables in this section contain settings that appear in the WebUI and their equivalent tags in the configuration file template. Settings only available on the configuration files are also described. You can use the configuration file template to create custom configuration files. Configuration files can be hosted on a provisioning server and used for automatically configuring phones. For more information, see Provisioning Using Configuration Files on page 193.
Saving Your Settings
Each WebUI settings page has a Save button. Click Save to save any changes you have made on the page. During a configuration session, click Save before you move on to the next WebUI page.
ALCATEL
home & business phones
Status
The status page is equivalent to the Status menu on the phone UI. The information page shows different content depending on the model:
General information about your phone, including model, MAC address, and software version
Account Status information about your SIP account(s) registration
Network regarding your phone's network address and network connection
Cordless Status indicating whether a cordless headset and/or handset are registered to the deskset (For DECT enable models).
Handset Status information (registration and name) for the different handsets (IP2x15 model)
| STATUS | SYSTEM | NETWORK | CONTACTS | SERVICING |
| General | ||||
| Model: | Temporis IP308 | |||
| Serial Number: | 40000163 | |||
| MAC Address: | 74.65.01.16.22.04 | |||
| Boot Version: | 1.01 | |||
| Software Version: | 1.0.58 | |||
| V-Series: | 1.29.5-0-ENG | |||
| Hardware Version: | MW1.0 | |||
| Account Status | ||||
| Account 1: | Registered | |||
| Account 2: | Not Registered | |||
| Account 3: | Not Registered | |||
| Network | ||||
| LAN Part IP Address: | 192.168.1.208 | |||
| IP Type: | DHCP | |||
| Subnet Mask: | 255.255.255.0 | |||
| Link Status: | Connected | |||
| Gateway: | 192.168.1.1 | |||
| Primary DNS: | 192.168.1.1 | |||
| Secondary DNS: | 192.168.1.112 | |||
| MTP: | europe.pool.htp.org | |||
| Cordless Status | ||||
| Headset: | Not Registered | |||
| Handset: | Registered | |||
ALCATEL
home & business phones
System
SIP Account Management
On the SIP Account Management pages, you can enter the account settings for each line you have ordered from your service provider. There are one or more Account settings pages (one for each available line) with identical settings on each page. The number of pages depends on the model: one for IP100, two for IP150/IP151 and IP251G, three for IP300 and IP1850, four for IP301G, five for IP700G and six for IP701G, IP2015 and IP2115.
The sip account settings are also available as parameters in the configuration file. See "sip_account" Module: SIP Account Settings on page 207.
Note: x stands for sip account index
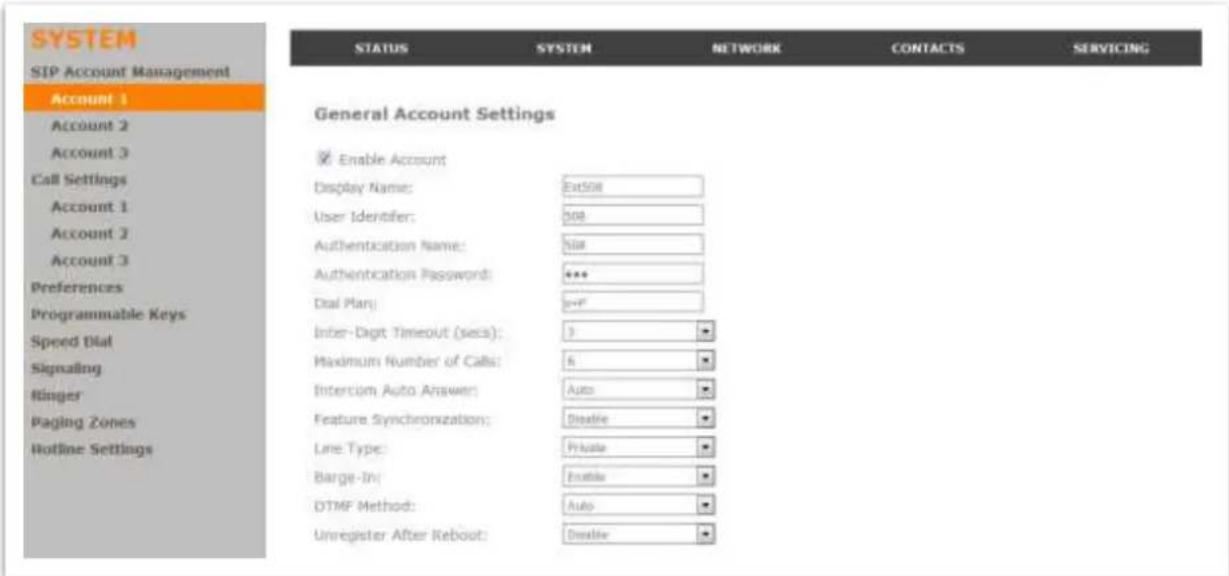
General Account Settings
| Setting | Description | Range | Default |
| Enable Account sip_account.x.sip_account_enable | Enable or disable the SIP account. Select to enable. | 0: Disable1: Enable | 0 |
| Account Labelsip_account.x.label | Enter the name that will appear on the phone display when account x is selected. | string | blank |
| Display Namesip_account.x.display_name | Enter the Display Name. The Display Name is the text portion of the caller ID that is displayed for outgoing calls using account x. If the Account Label is blank, the | string | blank |
ALCATEL
home & business phones
| Display Name appears on the phone display when account x is selected. | |||
| User identifier | Enter the User identifier supplied by your service provider. The User ID, also known as the Account ID, is usually the company's main number and is used as part of the caller ID displayed for outgoing calls. This field will only accept digits. | string | blank |
| Authentication name | Enter the authentication name (or authentication ID) supplied by your service provider. This is used for authentication with the service provider and in most cases is the same as the User ID. | string | blank |
| Authentication password | Enter the account authentication password, as supplied by your service provider. | string | blank |
| sip_account.x.authentication_access_password | |||
| Dial Plan | Enter the dial plan, with dialing strings separated by a | symbol. See Dial Plan on page 107. | string | x+P |
| sip_account.x.dial_plan | |||
| Call Restriction Dial Plan | Enter a call restriction dial plan, which prevents users from completing calls that match this dial plan on this account. | string | blank |
| sip_account.x.call_restrict_dial_plan | |||
| Emergency Dial Plan | Enter the Emergency Dial plan, which will apply to both restricted calls (when the phone lock feature is set to Emergency Call Only—see "Using the Security menu" on page 70 "Security" on page 181) and other calls when the Phone Lock feature is not in use. | string | blank |
| sip_account.x.emergency_dial_plan | |||
| Inter Digit Timeout (secs) | Sets the timeout before the dialed number is sent to the SIP server. To be more precise, it sets how long the phone waits after any "P" (pause) in the dial string or in the dial plan. | 1-10 seconds | 3 seconds |
| sip_account.x.inter_digit_timeout | |||
| Maximum Number of Calls | Select the maximum number of concurrent active calls allowed for that account. The maximum value depends on the product and | 1-10 | 6 |
| sip_account.x.maximum_call_number |
ALCATEL
home & business phones
| ranges from 2 on IP100 to 10 on IP701G. | |||
| Page/Intercom Auto Answer | Enables the deskset to automatically answer when an intercom request is received. This is usually the desired behavior for paging. | 0: Disable1: Enable | 0 |
| sip_account.x.auto_answer_enable | |||
| Page/Intercom Auto Answer during active calls | Enables the desk set to automatically answer when the intercom request is received during an active call | 0: Disable1: Enable | 0 |
| sip_account.x.auto_answer_during_active_call | |||
| Feature Synchronization | Enables the phone to synchronize with Broadworks Application Server. Changes to features such as DND, Call Forward All, Call Forward No Answer, and Call Forward Busy on the server side will also update the settings on the phone menu and WebUI. Similarly, changes using the phone or WebUI will update the settings on the server. | 0: Disable1: Enable | 0 |
| sip_account.x.feature_sync_enable | |||
| Server side control variant (not in WUI) | Set the server type that will control feature sync and FAC operation. | default, converse | default |
| sip_account.x.server_side_ctrl_variant | |||
| Line Type | Select the line type. A private line will be accessible only at the deskset you are configuring. | 0: Private1: Shared | 0 |
| sip_account.x.share_line_enable | |||
| Barge-in | Enables subscribers to shared lines to "barge in" on active calls on other shared lines. | 0: Disable1: Enable | 0 |
| sip_account.x.barge_in_enable | |||
| DTMF method | Select the default DTMF transmission method. You may need to adjust this if call quality problems are triggering unwanted DTMF tones or you have problems sending DTMF tones in general. | Auto, Event, Inband, SIP INFO | Auto |
| sip_account.x.dtmf_transport_method |
ALCATEL
home & business phones
| Unregister after reboot | Enables the phone to unregister the account(s) after rebooting—before the account(s) register again as the phone starts up. If other phones that share the same account(s) unregister unexpectedly in tandem with the rebooting deskset, disable this setting. | 0: Disable1: Enable | 0 |
| sip_account.x.unregister_after_reboot_enable | |||
| Call Rejection Response Code | Select the response code for call rejection. This code applies to the following call rejection cases:-User presses Reject for an incoming call (except when Call Forward Busy is enabled)-DND is enabled-Phone rejects a second incoming call with Call Waiting disabled-Phone rejects an anonymous call with Anonymous Call Rejection enabled-Phone rejects call when the maximum number of calls is reached | 480, 486, 603 | 486 |
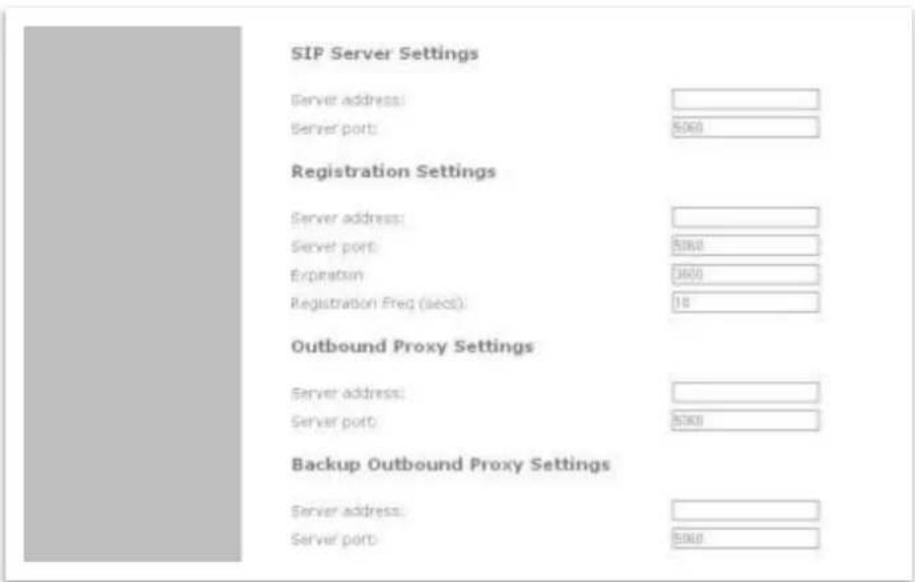
SIP Server Settings
ALCATEL
home & business phones
| Setting | Description | Range | Default |
| Server address | Enter the IP address or fqdn for the SIP server. | IP address or fqdn | blank |
| sip_account.x.primary_sip_server_address | |||
| Server port | Enter the port number that the SIP server will use. | 0-65535 | 5060 |
| sip_account.x.primary_sip_server_port |
Registration Settings
| Setting | Description | Range | Default |
| Server address | Enter the IP address or fqdn for the registrar server. | IP address or fqdn | blank |
| sip_account.x.primary_registration_server_address | |||
| Server port | Enter the port number that the registrar server will use. | 0-65535 | 5060 |
| sip_account.x.primary_registration_server_port | |||
| Expiration | Enter the desired registration expiry time in seconds. This is usually 3600 seconds (1 hour). | 0-65535 | 3600 |
| sip_account.x.primary_registration_expires | |||
| Registration Freq (secs) | Enter the desired registration retry time in seconds. If registration using the Primary Outbound Proxy fails, the Registration Freq setting determines the number of seconds before a registration attempt is made using the Backup Outbound Proxy. | 1-1800 | 10 |
| sip_account.x.registration_retry_time |
Outbound Proxy Settings
| Setting | Description | Range | Default |
| Server address | Enter the IP address or fqdn for the outbound proxy server. | IPaddressor fqdn | blank |
| sip_account.x.primary_outbound_proxy_server_address | |||
| Server port | Enter the port number that the outbound proxy server will use. | 0–65535 | 5060 |
| sip_account.x.primary_outbound_proxy_server_port |
ALCATEL
home & business phones
Backup Outbound Proxy Settings
| Setting | Description | Range | Default |
| Server address | Enter the IP address or fqdn for the backup outbound proxy server. | IP address or fqdn | blank |
| sip_account.x.backup_outbound_proxy_server_address | |||
| Server port | Enter the port number that the backup outbound proxy server will use. This is usually 5060. | 0–65535 | 5060 |
| sip_account.x.backup_outbound_proxy_server_port |
Caller Identity Settings
| Setting | Description | Range | Default |
| Caller ID Source Priority 1 | Select the desired caller ID source to be displayed on the incoming call screen: “From” field, RPID (Remote-Party ID) or PAI (P-Asserted Identity) header. | pai, from, rpid | pai |
| sip_account.x.cid_src_priority.1 | |||
| Caller ID Source Priority 2 | Select the lower-priority caller ID source. | pai, from, rpid | from |
| sip_account.x.cid_src_priority.2 | |||
| Codec priority 3 | Select the lowest-priority caller ID source. | pai, from, rpid | rpid |
| sip_account.x.cid_src_priority.3 |
ALCATEL
home & business phones
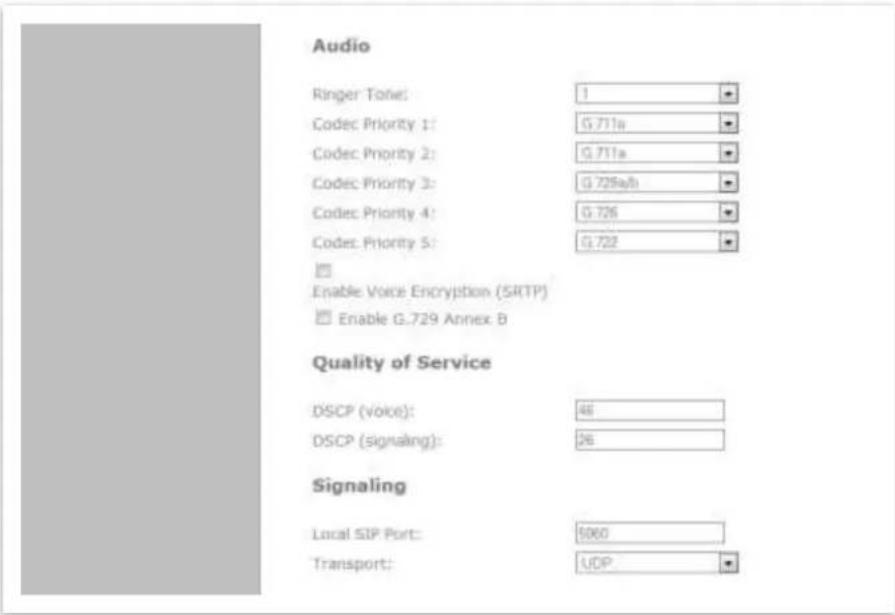
Audio Settings
| Setting | Description | Range | Default |
| Ringer Toneuser_pref.account.x.ringer | Sets the ringer tone for incoming calls on the account. | Tone 1-10 | Tone 1 |
| Codec Priority 1sip_account.x.codec_priority.1 | Select the codec to be used first during a call. | G.711a,G.711u, G.729,G.726, G.722, ilbc | G.711u |
| Codec priority 2sip_account.x.codec_priority.2 | Select the codec to be used second during a call in the event near-end and far-end cannot negotiate the first codec. | None, G.711a,G.711u, G.729,G.726, G.722, ilbc | G.711a |
| Codec priority 3sip_account.x.codec_priority.3 | Select the codec to be used third during a call if previous codecs fail. | None, G.711a,G.711u, G.729,G.726, G.722, ilbc | G.729 |
| Codec priority 4sip_account.x.codec_priority.4 | Select the codec to be used fourth during a call if previous codecs fail. | None, G.711a,G.711u, G.729,G.726, G.722, ilbc | G.726 |
ALCATEL
home & business phones
| Codec priority 5 | Select the codec to be used fifth during a call if previous codecs fail. | None, G.711a, G.711u, G.729, G.726, G.722, ilbc | G.722 |
| sip_account.x.codec_priority.5 | |||
| Enable voice encryption (SRTP) | Select to enable secure RTP for voice packets. | 0: disable1: enable | 0 |
| sip_account.x.voice_encryption_enable | |||
| Enable G.729 Annex B | When G.729a/b is enabled, select to enable G.729 Annex B, with voice activity detection (VAD) and bandwidth-conserving silence suppression. | 0: disable1: enable | 0 |
| sip_account.x.g729_annexb_enable | |||
| Preferred Packetization Time (ms) | Select the packetization interval time in ms. | 10, 20, 30, 40, 50, 60 | 20 |
| sip_account.x.preferred_ptime | |||
| DTMF Payload Type | Set the DTMF payload type for in-call DTMF from 96-127 | 96-127 | 101 |
| sip_account.x.dtmf_payload_type |
Quality of Service
| Setting | Description | Range | Default |
| DSCP (voice) | Enter the Differentiated Services Code Point (DSCP) value from the Quality of Service setting on your router or switch. | 0-63 | 46 |
| sip_account.x.dscp | |||
| DSCP (signalling) | Enter the Differentiated Services Code Point (DSCP) value from the Quality of Service setting on your router or switch. | 0-63 | 26 |
| sip_account.x.sip_dscp |
Signaling Settings
| Setting | Description | Range | Default |
| Local SIP port | Enter the local sip port | 0-65535 | |
| Acc1: | 5060 | ||
| Acc2: | 5070 | ||
| Acc3: | 5080 | ||
| sip_account.x.local_sip_port | etc |
ALCATEL
home & business phones
| Transport | Select the SIP transport protocol.TCP (Transmission Control Protocol) is the most reliable protocol and includes error checking and delivery validation.UDP (User Datagram Protocol) is generally faster but SIP data may be subject to network congestion.TLS (Transport Layer Security) transport requires security certificates to establish a secure connection between phone and server. Optional server authentication is supported via user-uploaded certificates. See Servicing > Certificates on the “file” Module:Imported File Settings on page 230.Consult your service provider. | tls, tcp, udp | udp |
| sip_account.x.transport_mode |
Voice
| Setting | Description | Range | Default |
| Min local RTP port | Enter the lower limit of the Real-time Transport Protocol (RTP) port range. RTP ports specify the minimum and maximum port values that the phone will use for RTP packets. | 0-65535 | 18000 |
| Audio.x.rtp.port_start | |||
| Max local RTP port | Enter the upper limit of the RTP port range. | 0-65535 | 19000 |
| Audio.x.rtp.port_end |
ALCATEL
home & business phones
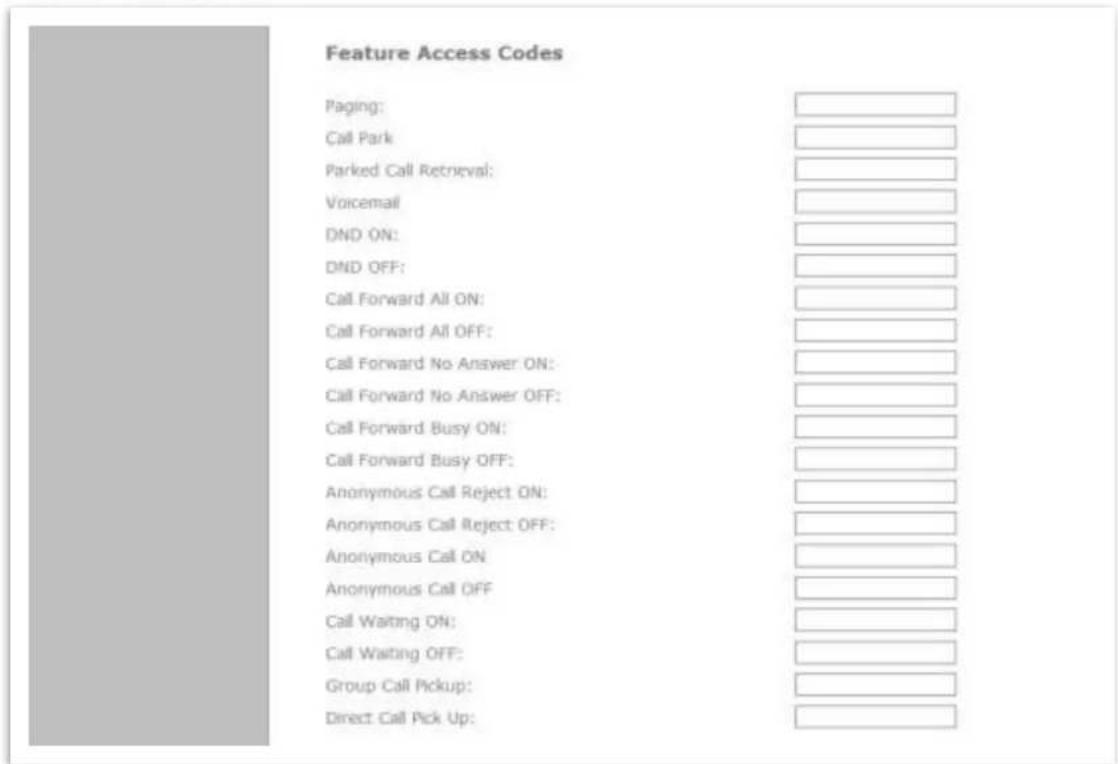
Feature Access Codes Settings
If your IP PBX or service provider uses feature access codes, then enter the applicable codes here. You can assign many of these features to programmable keys, which enables end users to press the keys to dial out the codes you enter here.
| Setting | Description | Assignable to PFK? |
| Paging | Enter the paging access code. | Yes |
| sip_account.x.access_code_page | ||
| Call Park | Enter the call park access code.Broadsoft provides a featureaccess code for the park feature.Asterisk/Metaswitch provides aparking lot extension number forthe park feature. Enter theparking lot extension numberhere. | Yes |
| sip_account.x.access_code_park_call |
ALCATEL
home & business phones
| Parked Call Retrievalsip_account.x.access_code_retrieve_parked_call | Enter the call park retrieval access code. Broadsoft and Asterisk/Metaswitch provide a feature access code for park retrieval. | Yes |
| Call Park variantsip_account.x.park_variant | Supported values are broadsoft and asterisk. The former dials out a feature code, while the latter launches a blind transfer to the park code uri | Yes |
| Voicemailsip_account.x.access_code_retrieve_voicemail | Enter the voicemail retrieval access code. The code is dialed when the user selects a line from the Features >Message menu. | Yes |
| DND ONSip_account.x.access_code_dnd_on | Enter the Do Not Disturb ON access code. | Yes |
| DND OFFsip_account.x.access_code_dnd_off | Enter the Do Not Disturb OFF access code. | Yes |
| Call Forward All ONSip_account.x.access_code_cfa_on | Enter the Call Forward All ON access code.As a Comverse feature, the code supports value substitution. For example, if an ON code is configured as *71%N#, %N will be replaced by another value before it is used as the INVITE target. | Yes |
| Call Forward All OFFsip_account.x.access_code_cfa_off | Enter the Call Forward All OFF access code. | Yes |
| Call Forward No Answer ONSip_account.x.access_code_cfna_on | Enter the Call Forward No Answer ON access code. | Yes |
| Call Forward No Answer OFFsip_account.x.access_code_cfna_off | Enter the Call Forward No Answer OFF access code. | Yes |
| Call Forward Busy ONSip_account.x.access_code_cfb_on | Enter the Call Forward Busy ON access code. | Yes |
| Call Forward Busy OFFsip_account.x.access_code_cfb_off | Enter the Call Forward Busy OFF access code | Yes |
ALCATEL
home & business phones
| Anonymous Call Reject ONsip_account.x.access_code_anonymous_call_block_on | Enter the Anonymous Call Reject ON access code. | No |
| Anonymous Call Reject OFFsip_account.x.access_code_anonymous_call_block_off | Enter the Anonymous Call Reject OFF access code. | No |
| Anonymous Call ONsip_account.x.access_code_outgoing_call_anonymous_on | Enter the Anonymous Call ON access code. | No |
| Anonymous Call OFFsip_account.x.access_code_outgoing_call_anonymous_off | Enter the Anonymous Call OFF access code. | No |
| Call Waiting ONSip_account.x.access_code_call_waiting_on | Enter the Call Waiting ON access code. | No |
| Call Waiting OFFsip_account.x.access_code_call_waiting_off | Enter the Call Waiting OFF access code. | No |
| Group Call Pick Upsip_account.x.access_code_group_call_pickup | Enter the Group Call Pickup code. Dialing the code enables the user to answer a call ringing at another deskset that is part of the same group. | Yes |
| Direct Call Pick Upsip_account.x.access_code_direct_call_pickup | Enter the Group Call Pickup code. Dialing the code enables the user to answer a call ringing at another deskset. | Yes |
| Hunt Group Sign ONSip_account.x.access_code_direct_call_pickup | Enter the Comverse Hunt Group ON code. Supports value substitution. | Yes |
| Hunt Group Sign OFFsip_account.x.access_code_direct_call_pickup | Enter the Comverse Hunt Group OFF code. Supports value substitution. | Yes |
| Secretarial Filtering ONSip_account.x.access_code_direct_call_pickup | Enter the Comverse Secretarial Filtering ON code. Supports value substitution. | Yes |
| Secretarial Filtering OFFsip_account.x.access_code_direct_call_pickup | Enter the Comverse Secretarial Filtering OFF code. Supports value substitution. | Yes |
ALCATEL
home & business phones
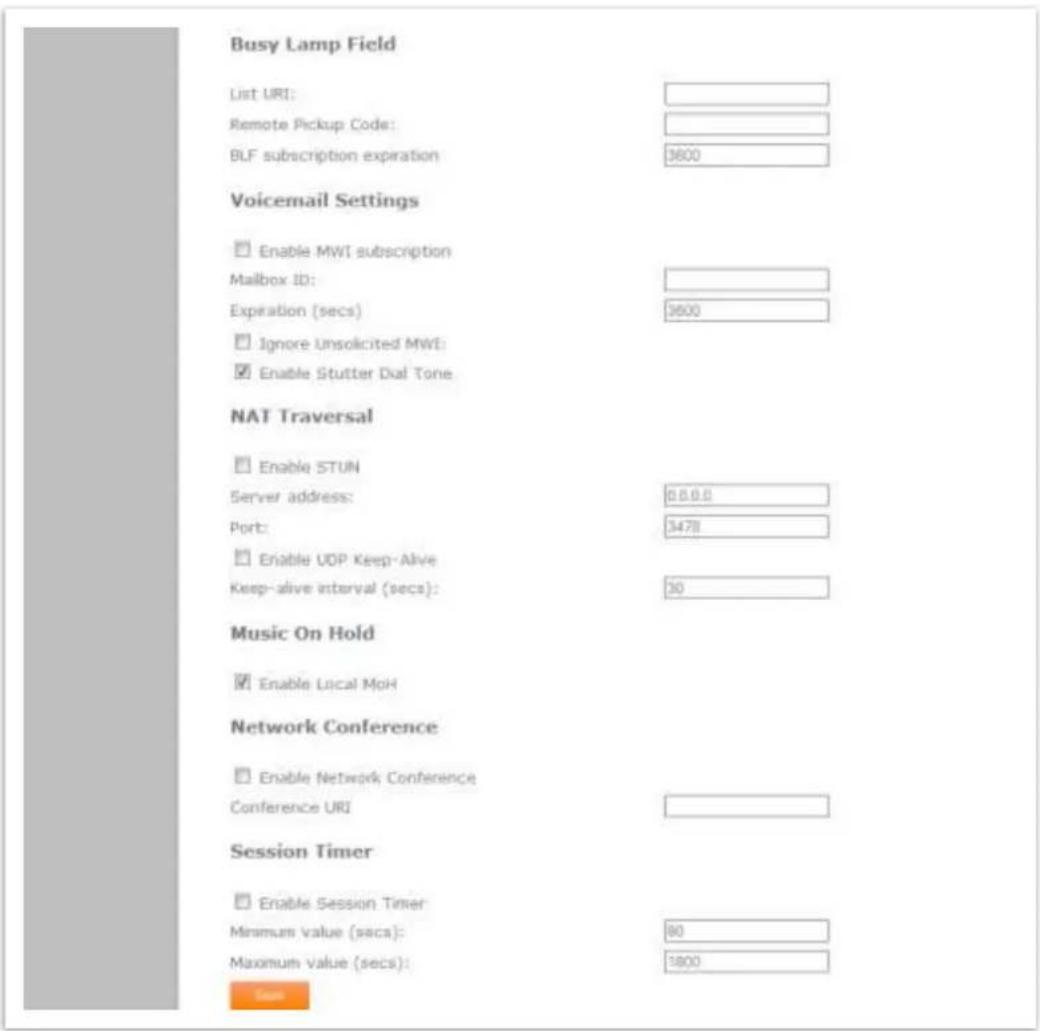
Busy Lamp Field Settings
| Setting | Description | Range | Default |
| List URI | Used for list-based BLFEnter the BLF list URI, as supplied by or set up with your service provider. For example, blf-list1@sipservice.com. This list contains a list of extensions that are eligible for BLF monitoring. You can assign keys for BLF monitoring on the Programmable Keys page. See page 118. | Sip URI | blank |
| sip_account.x.blf_list_uri |
ALCATEL
home & business phones
| If left blank, individual uri-based BLF subscription will be assumed | |||
| BLF Subscription Expiration | Enter desired BLF subscription duration in seconds.It is normally 3600 sec | 15-65535 | 3600 |
| sip_account.x.blfSubscription_expires | |||
| Remote Pickup Code | Enter the remote pickup code for the BLF list, as supplied by your service provider. | string | blank |
| sip_account.x.blf_remote_pickup_code |
Voicemail Settings
| Setting | Description | Range | Default |
| Enable MWI Subscription | When enabled, the account subscribes to the "message summary" event package. The account may use the User ID or the service provider's "Mailbox ID". | 0: disable1: enable | 0 |
| sip_account.x.mwi_enable | |||
| MWI Subscription Expiration | Enter desired "message summary" subscription duration in seconds.It is normally 3600 sec | 15-65535 | 3600 |
| sip_account.x.mwi Subscription expires | |||
| Mailbox ID | Enter the uri the phone should use to subscribe to "message summary" notifications.If left blank, the User ID is used for the MWI subscription. | SIP URI | blank |
| sip_account.x.mwi_uri | |||
| Ignore unsolicited MWI | When enabled, only notifications pertaining to the active "message summary" subscription will be considered as valid to compute MWI status.Disable this setting if:• MWI service does not involve a subscription to a voicemail server. That is, the server | 0: disable1: enable | 0 |
ALCATEL
home & business phones
| sip_account.x.mwi_ignore_unsolicited | supports unsolicited MWI notifications.·you want the Message Waiting LED to indicate new messages when the deskset receives unsolicited MWI notifications. | ||
| Enable Stutter Dial Tone | Enables or disables the stutter dial tone for that line (indicating message(s) waiting) when the phone goes off hook. | 0: disable1: enable | 1 |
| sip_account.x.stutter_dial_tone_enable |
NAT Traversal Settings
| Setting | Description | Range | Default |
| Enable STUNsip_account.x.nat_traversal_stun_enable | Enables or disables STUN mechanism to allow sip communications in NATted environments. | 0: disable1: enable | 0 |
| Server addresssip_account.x.nat_traversal_stun_server_address | Enter the stun server address or fqdn | IP address or fqdn | blank |
| Server portsip_account.x.nat_traversal_stun_server_port | Enter the port the STUN server is using. Normally it will be 3478 | 0-65535 | 3478 |
| Enable UDP Keep-Alivesip_account.x.nat_traversal_udp_keep_alive_enablesip_account.x.nat_traversal_stun_keep_alive_enable | Enables or disables UDP or STUN keepalive packets on this account. Keep-alive packets are used to maintain connections established through NAT | 0: disable1: enable | 0 |
| Keep-alive interval (secs)sip_account.x.nat_traversal_udp_keep_alive_intervalsip_account.x.nat_traversal_stun_keep_alive_interval | Enter the time in seconds between UDP ir STUN keepalive packets. | 0-65535 | 30 |
Music On Hold Settings
| Setting | Description | Range | Default |
| Enable Local MoH | Enables or disables a local tone played when the phone is put on hold by the remote party. | 0: disable1: enable | 1 |
| sip_account.x.music_on_hold_enable |
ALCATEL
home & business phones
| Please disable if you wish to use server provided Music on hold instead.The interval between tones can be controlled with “Call Hold Reminder tone”, in User Preferences section |
Network Conference Settings
| Setting | Description | Range | Default |
| Enable Network Conference | Enables or disables conferences being controlled and mixed by a conference server, also called Network Bridge. | 0: disable1: enable | 0 |
| sip_account.x.network_conference_enable | |||
| Conference URI | Enter the URI to direct the phone to the network bridge for each line. | SIP URI | blank |
| sip_account.x.network_bridge_uri |
Session Timer
| Setting | Description | Range | Default |
| Enable Session Timer | Enables or disables sip "timer" mechanism, which allows session monitoring | 0: disable1: enable | 0 |
| sip_account.x.sip_session_timer_enable | |||
| Minimum value (secs) | Enter the value of the "Min S-E" header, i.e., the minimum interval the phone is willing to use for monitoring the session | 90-65535 | 90 |
| sip_account.x.sip_session_timer_min | |||
| Maximum value (secs) | Enter the maximum interval the phone is willing to use for monitoring the session. | 90-65535 | 1800 |
| sip_account.x.sip_session_timer_max |
ALCATEL
home & business phones
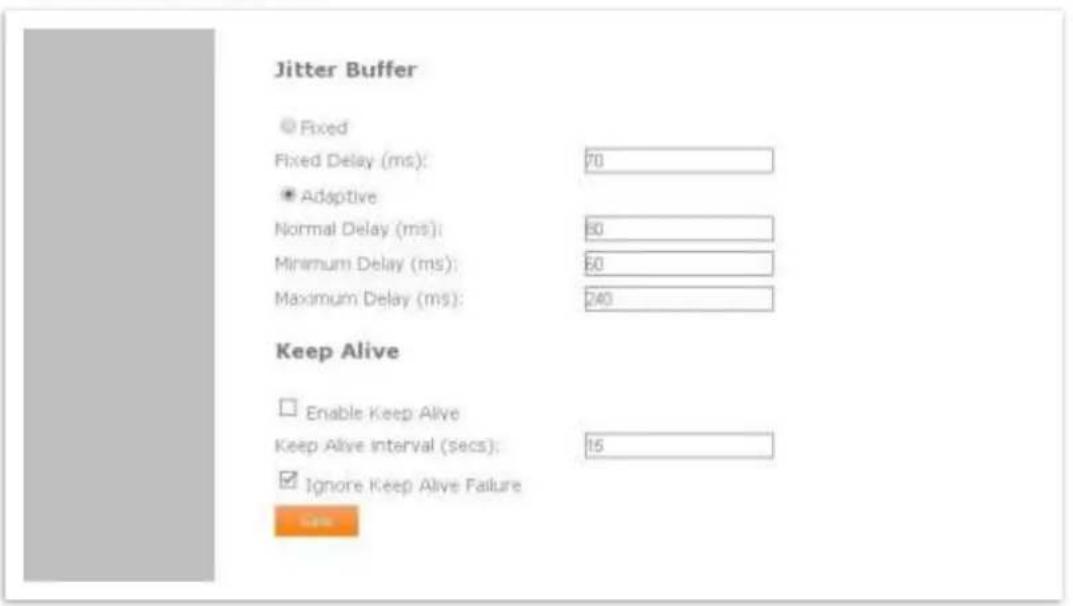
Jitter Buffer
| Setting | Description | Range | Default |
| Fixed/Adaptiveaudio.x.jitter.mode | Toggles between fixed and adaptive jitter buffer modes. | fixed,adaptive | adaptive |
| Fixed Delay (ms)audio.x.fixed_jitter.delay | If Fixed is selected, enter the fixed jitter delay | 30-500 | 70 |
| Normal Delay (ms)audio.x.adaptive_jitter.target_delaysip_account.x.normal_jitter | If Adaptive is selected, or for models not supporting mode selection, enter the normal or "target" delay. | 20-500 | 80 |
| Minimum Delay (ms)audio.x.adaptive_jitter.min_delay | Enter the minimum delay. | 20-250 | 60 |
| Maximum Delay (ms)audio.x.adaptive_jitter.max_delay | Enter the maximum delay. This time, in milliseconds, must be at least twice the minimum delay. | 180-500 | 240 |
Keep Alive
| Setting | Description | Range | Default |
| Enable Keep Alive | Enable SIP keep alive in service of NAT traversal and as a heartbeat mechanism to audit the SIP server health status.Once enabled, OPTIONS traffic | 0: disable1: enable | 0 |
ALCATEL
home & business phones
| should be sent whenever the account is registered. OPTIONS traffic will occur periodically according to the keep-alive interval. | |||
| Keep Alive Interval (secs) sip_account.x.keep_alive_interval | Set the interval at which the OPTIONS for the keep-alive mechanism are sent. | 90-65535 | 90 |
| Ignore Keep Alive Failure sip_account.x.keep_alive_ignore_failure | Enable the phone to ignore keep-alive failure, if the failure can trigger account re-registration and re-subscription (and active calls are dropped). | 90-65535 | 1800 |
Dial Plan
The dial plan consists of a series of dialing rules, or strings, that determine whether what the user has dialed is valid and when the phone should dial the number.
There are three different types of dial plans available: general, Call Restriction, and Emergency.
In the case of overlapping dial plan definitions between Emergency, Call Restriction, and the general dial plan, the following priority (high to low) applies:
- Emergency
- Call Restriction
- General
For example, in order to prevent a user from dialing extensions in the 9xx range while having 911 as the emergency number, use the following dial plans:
• Emergency dial plan = 911
- Call Restriction dial plan = 9xx
- General dial plan = xxx
A user who dials 920 will be unable to complete the call, and the message 920 is a restricted number will appear on the phone screen. A user who dials 911 will complete an emergency dial.
Numbers that are dialed when forwarding a call—when the user manually forwards a call, or a pre-configured number is dialed for Call Forward All, Call Forward-No Answer, or Call Forward Busy—always bypass the dial plan.
ALCATEL
home & business phones
Dialing rules must consist of the elements defined in the table below.
| Element | Description |
| x | Any dial pad key from 0 to 9, including # and *. |
| [0-9] | Any two numbers separated by a hyphen, where the second number is greater than the first. All numbers within the range or valid, excluding # and *. |
| x+ | An unlimited series of digits. |
| , | This represents the playing of a secondary dial tone (,) after the user enters the digit(s) specified or dials an external call prefix (,) before the comma. For instance, "9,xxxxxxx" means the secondary dial tone is played after the user dials 9 until any new digit is entered. "9,3xxxxxx" means only when the digit 3 is hit would thestop playing. |
| PX | This represents a pause of a defined time; X is the pause duration in seconds. For instance, "P3" would represent pause duration of 3 seconds. When "P" only is used, the pause time is the same as the Inter Digit Timeout. |
| (0:9) | This is a substitution rule where the first number is replaced by the second. For example, "(4:723)xxxx" would replace "46789" with "723-6789". If the substituted number (the first number) is empty, the second number is added to the number dialed. For example, in "(:1)xxxxxxxxxx", the digit 1 is appended to any 10-digit number dialed. |
| | | This separator is used to indicate the start of a new pattern. Can be used to add multiple dialing rules to one pattern edit box. |
A sample dial plan appears below.
![10 digit Numbers starting 01 to 07 [1-2]xx | 0[1-7]xxxxxxxxx | 112 Extensions 100 to 299 Emergency](/content/2026/06/1283607/images/5f35189c7df913510b853472d840297df837d5172912855e17344a49aa3ed578.jpg)
See also Prefix Dialing on page 122
ALCATEL
home & business phones
Call Settings
You can configure call settings for each line. Call Settings include Do Not Disturb and Call Forward settings. For some models Ringtone selection, Call completion, Auto answer and Customized ringtone upload are also included in this section.
When you have finished changing settings on this page, click Save to save them.
Call settings are also available as parameters in the configuration file. See "call_settings" Module: Call Settings on page 223.
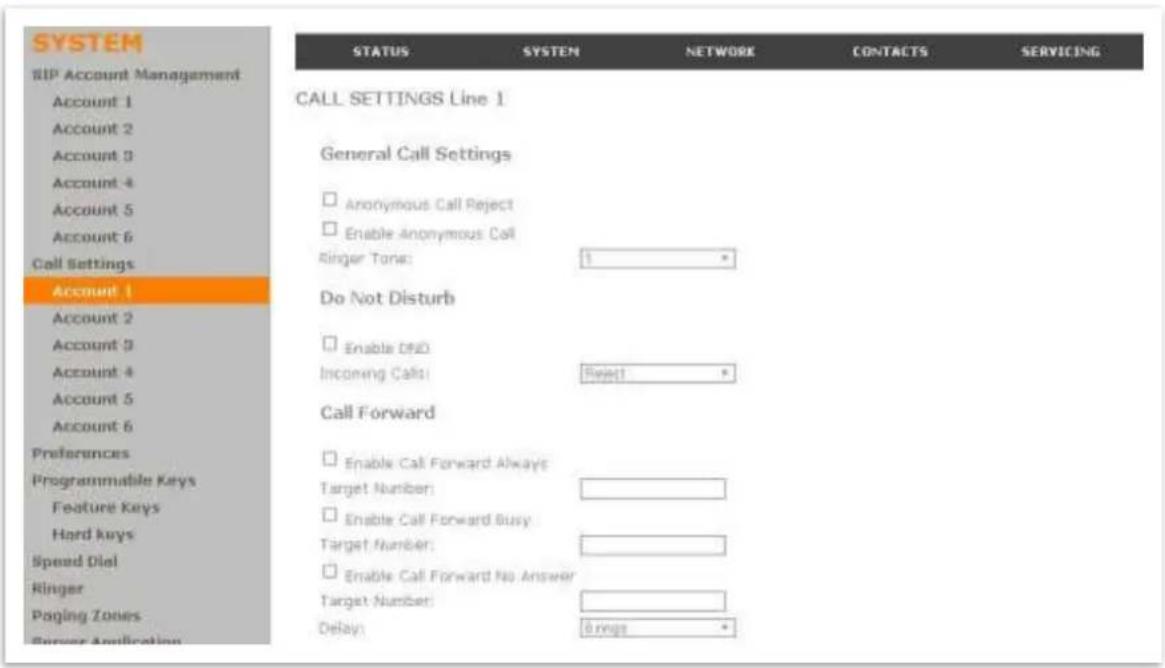
General Call Settings
| Setting | Description | Range | Default |
| Anonymous call reject | Enables or disables rejecting calls indicated as "Anonymous." | 0: disable1: enable | 0 |
| call_settings.account.x.block_anonymous_enable | |||
| Enable outgoing anonymous call | When enabled, the phone will ask the server to hide its identity in outgoing calls. The caller name and number are indicated as "Anonymous." | 0: disable1: enable | 0 |
| call_settings.account.x.outgoing_anonymous_enable | |||
| Ringer tone | 1-10 | 1 |
ALCATEL
home & business phones
| user_pref.account.x.ringer | Sets the ringer tone for incoming calls on the account. |
Do Not Disturb Settings
| Setting | Description | Range | Default |
| Enable Do Not Disturbcall_settings.account.x.dnd_enable | Turns Do Not Disturb on or off. | 0: disable1: enable | 0 |
| Incoming Calls | Selects whether the phone displays incoming call information while Do Not Disturb is on.When set to Show, the phone displays incoming call information while Do Not Disturb is on. When set to Reject, the phone rejects incoming calls without alerting the user. | show, reject | reject |
| call_settings.account.x.dnd_incoming_calls | The phone will not ring in either mode. |
Call Forward Settings
| Setting | Description | Range | Default |
| Enable Call Forward Alwayscall_settings.account.x.call_fwd_always_enable | Enables or disables call forwarding for all calls on that line. Select to enable. | 0: disable1: enable | 0 |
| Target Numbercall_settings.account.x.call_fwd_always_target | Enter a number to which all calls will be forwarded. | string | blank |
| Enable Call Forward Busycall_settings.account.x.call_fwd_busy_enable | Enables or disables forwarding incoming calls to the target number if the number of active calls has reached the maximum number of calls configured for account x. | 0: disable1: enable | 0 |
| Target Numbercall_settings.account.x.call_fwd_busy_target | Enter a number to which calls will be forwarded when the line is busy. | string | blank |
ALCATEL
home & business phones
| Enable Call Forward No Answer | Enables or disables call forwarding for unanswered calls on that line. | 0: disable1: enable | 0 |
| call_settings.account.x.cfna_enable | |||
| Target Number | Enter a number to which unanswered calls will be forwarded. | string | blank |
| call_settings.account.x.cfna_target | |||
| Delay | Select the number of rings before unanswered calls are forwarded. | 1-10 (rings) | 6 |
| call_settings.account.x.cfna_delay | |||
| Enable Missed calls alert | Enables or disables missed call indication on the phone screen | 0: disable1: enable | 1 |
| call_settings.missed_call_alert_enable |
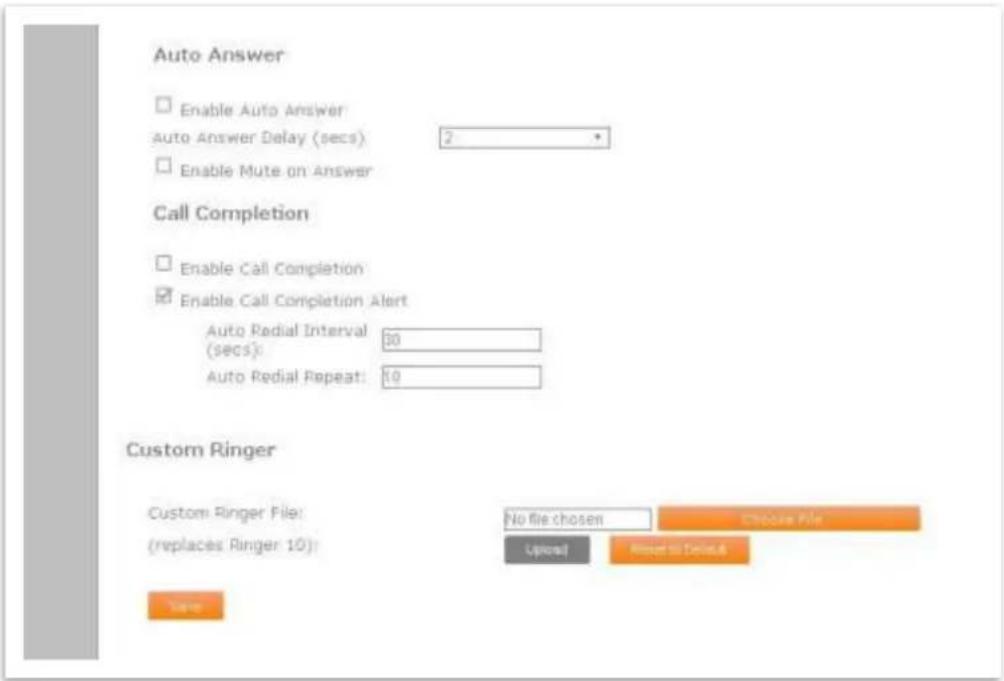
ALCATEL
home & business phones
Auto Answer
| Setting | Description | Range | Default |
| Enable Auto Answer | Enables or disables unconditional Auto Answer. Auto Answer allows a deskset or conference phone to automatically answer incoming calls to that account without user intervention. An auto answer tone will sound | 0: disable1: enable | 0 |
| call_settings.account.x.unconditional_auto_answer_enable | |||
| Auto Answer Delay | Sets the delay before the phone auto answers a call. Before the phone auto answers, the incoming call behaves identical to a normal call. Unless the user responds to the call (with reject, forward, answer, etc.), the phone answers the call after the delay expires.If Auto Answer Delay is set to zero, the incoming call is answered right away without triggering a ringer tone or ringer splash. However, the auto answer tone is still audible. | 0-30 | 2 |
| call_settings.account.x.unconditional_auto_answer_delay | |||
| Enable Mute on Answer | Enables or disables muting the mic upon auto answering.Enabling muting is useful if the auto answered call is for the purpose of a one-way announcement. The user can unmute the call any time after being auto answered. | 0: disable1: enable | 0 |
| call_settings.account.x.unconditional_auto_answer_mute_on_ans |
Call Completion
When the user calls a busy number, the Call Completion feature enables the phone to redial the busy number automatically. You can configure the redialing to take place after a set interval and for a set number of times.
Call completion settings must be configured for each account.
ALCATEL
home & business phones
| Setting | Description | Range | Default |
| Enable Call Completion | Enable or disable the call completion feature. Calls to busy numbers will prompt a "Retry later?" message on the phone screen. | 0: disable1: enable | 0 |
| call_settings.account.x.call_completion_enable | |||
| Enable Call Completion Alert | Enables or disables an audible alert (similar to a hold reminder alert tone) if the user is on another call when the auto redial interval expires. | 0: disable1: enable | 1 |
| call_settings.account.x.call_completion_enable | |||
| Auto Redial Interval (secs) | Sets the countdown timer until the user is prompted for the next dialing attempt. | 1-300 | 30 |
| call_settings.account.x.auto_redial_interval | |||
| Auto Redial Repeat | Sets how many auto redial attempts are made. | 1-30 | 10 |
| call_settings.account.x.auto_redial_repeat |
Custom Ringer
| Setting | Description | Range | Default |
| Custom ringer file | Upload a custom ringer audio file. This ringer replaces the factory default Ringer 10.The maximum file size is 300 k. The following WAV format is accepted:Audio sample rate: 16 kHzAudio sample size: 16 bitChannels: 1 (mono) | uri | blank |
| file.custom_ringer | Audio format: PCM, Signed 16bit, Little Endian |
User Preferences
On the User Preferences menu, you can configure some basic settings for the phone and set how the phone responds to calls. The User Preferences page is also available to phone users when they log on to the WebUI.
After changing any settings on this page, click Save to save them.
ALCATEL
home & business phones
The user preference settings are also available as parameters in the configuration file. See "user_pref" Module: User Preference Settings on page 221.
Note that, as in previous chapters, some of the settings are model dependent and may or may not appear on your phone's WUI.
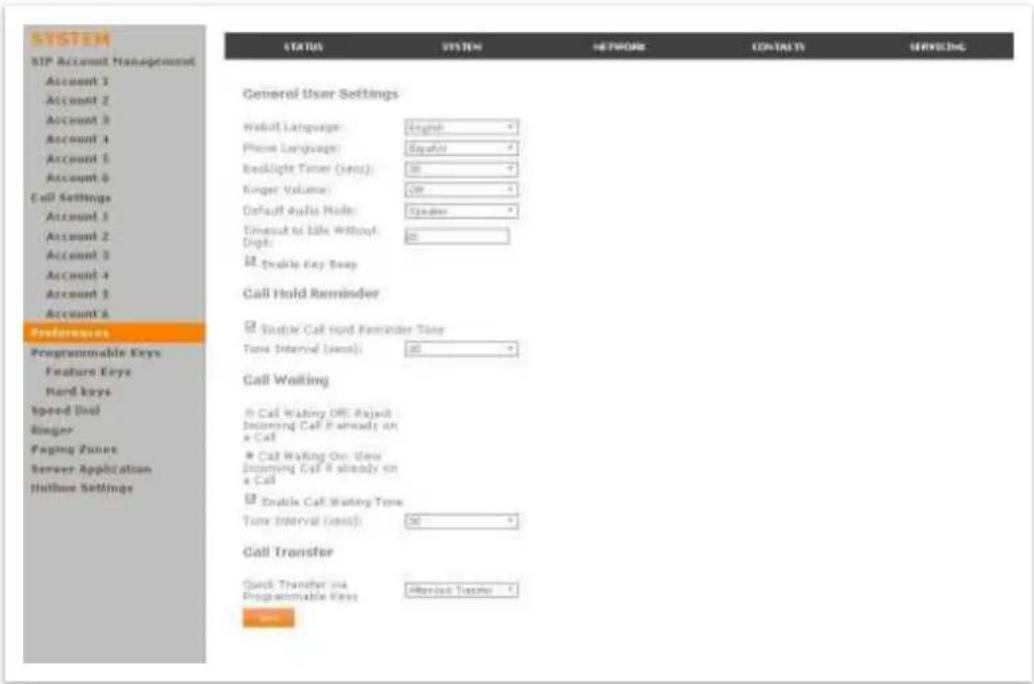
General User Settings
| Setting | Description | Range | Default |
| WebUI Language | Sets the language that appears on the WebUI. Other languages may be added later | en: Englishfr: Frenches: Spanishde: Germanit: Italianpt: Portuguesenl: Dutchru: Russianel: Greektr: Turkishpl: Polish | en |
| user_pref.web_language |
ALCATEL
home & business phones
| Phone Language | Sets the language that appears on the phone. Not applicable to IP2015/IP2115. Other languages may be added later | en: Englishfr: Frenches: Spanishde: Germanit: Italianpt: Portuguesenl: Dutchru: Russianel: Greektr: Turkishpl: Polish | en |
| user_pref.language | |||
| Backlight Timer (secs.) | Sets how long the screen backlight stays on after the last button press. | 10-60(seconds) | 30 |
| user_pref.backlight_timeout | |||
| Ringer Volume | Sets the ringer volume for incoming calls. You can also use theVOLUME▼ or▲ keys on the deskset. | 0-9(0 means off) | 5 |
| user_pref.ringer_volume | |||
| Default Audio Mode | Sets how calls are answered when you press a line key orAnswerApplies also to the Auto Answer mode. | speaker, headset | speaker |
| user_pref.audio_mode | |||
| Timeout to Idle Without Digit | Sets the timeout (in seconds) after the phone goes off hook and no digits are entered. After the timeout, the phone returns to idle mode. | 10-60 | 30 |
| user_pref.absent_timeout | |||
| Enable Key Beep | Enables or disables key-press beeps. | 0:disable1:enable | 1 |
| user_pref.key_beep_enable |
Call Hold Reminder Settings
| Setting | Description | Range | Default |
| Enable Call Hold Reminder Tone | Enables or disables the call hold reminder tone. This tone periodically warns the user that he has previously put a call on hold.Select to enable. | 0: disable1: enable | 1 |
| user_pref.hold_reminder.enable | |||
| Tone Interval (secs) | 30 |
ALCATEL
home & business phones
| user_pref.hold_reminder.interval | Sets the interval for the call hold reminder tone. | 10-300 (seconds) |
Call Waiting Settings
| Setting | Description | Range | Default |
| Enable Call Waiting Toneuser_pref.call_waiting.tone_enable | Enables or disables the call waiting tone. Select to enable. | 0: disable1: enable | 1 |
| Call Waiting Tone Interval (secs.)user_pref.call_waiting.tone_interval | Sets the interval in seconds for the call waiting reminder tone. | 10-60(seconds) | 30 |
| Call Waiting on/off | Accepts or rejects incoming call notification screen while the user is already on a call.Only one of the two radio buttons can be selected.If set to “enable”, the waiting call is presented to the userIf set to “reject”, the phone will send an error response to the server. | enable, reject | enable |
| user_pref.call_waiting.mode | Not applicable to IP2015/IP2115, where handsets handle this feature. |
Call Transfer Settings
| Setting | Description | Range | Default |
| Quick Transfer via Programmable Keys | Sets transfer options for Quick Dial and BLF Programmable keys during an active call. When a quick dial key or BLF key is pressed during an active call, the key will either:Start a new callPerform a blind transfer of the active call to the extension associated with the quick dial or BLF key. This enables one-button operation for Call Park, Park Retrieval, and Park Orbit monitoring.Perform an attended transfer of the active call to the extension associated with the quick dial or BLF key. | new_call, blind, attended | new_call |
| user_pref.quick_transfer |
ALCATEL
home & business phones
The above operations are server dependent. The server has to support all of the following with Call Park to make one-button operation possible:
• Monitoring a park orbit as an extension via BLF subscription (rfc4235)
- Remote BLF pickup via one of the two pickup options:
-New call via SIP INVITE
-Dialog based via SIP INVITE with REPLACE
- Parking an active call via blind transfer to a park orbit.
Other Settings
All settings in this section refer to desk top phones only, not to IP2015 IP DECT system.
| Setting | Description | Range | Default |
| LCD Contrast Level | Sets the contrast for the LCD display. | 1-7 | 4 |
| user_pref. lod_constrast | |||
| Backlight level (non idle) | Enables or disables the backlight for non idle mode, i.e, during user operation. | off, low, middle, high | high |
| user_pref. backlight | |||
| Backlight level (idle) | Enables or disables the backlight in idle state. | off, low, middle, high | off |
| user_pref. idle_backlight | |||
| Live dial to idle timeout (secs.) | Sets the timeout (in seconds) after which live dial interface will return to idle if there are no more dialled digits. | 10-60 (seconds) | 30 |
| user_pref. absent_timeout | |||
| Idle to logo timeout | Sets the timeout to switch from idle screen to the customized (or standard) logo display | 0-300(seconds)0 means no logo will be displayed | 30 |
| user_pref. idle_to_logo_timeout | |||
| Logo to idle timeout | Sets the timeout to switch from logo to idle screen | 1-300(seconds) | 60 |
| user_pref. logo_to_idle_timeout |
ALCATEL
home & business phones
| Specify the order and available language input options when in text input mode | numberuc_western: upper caselc_western: lower caseuc_ru: Russian upper caselc_ru: Russian lower caseuc_el: Greek upper caselc_el: Greek lower case | number,lc_western,uc_wester n | |
| user_pref.text_input_option | |||
| Handsfree volume | Sets speaker volume for handsfree calls. | 1-10 | 5 |
| user_pref.speaker_volume | |||
| Headset volume | Sets headset volume. | 1-10 | 5 |
| user_pref.headset_volume | |||
| Corded Handset volume | Sets handset volume. | 1-10 | 5 |
| user_pref.handset_volume | |||
| Enable Key beep | Enables or disables the beep played when a key is pressed. | 0: disable1: enable | 1 |
| user_pref.key_beep_enable |
Programmable Function Keys
Temporis IP100, IP150, IP151, IP251G, IP300, IP301G, IP700G and IP701G models are equipped with programmable keys with a dual-color backlight (orange and green). Keys are numbered top to bottom, and then left to right when applicable.
In all models listed above there is a mechanism to access a second virtual key on each physical key. For IP30x and IP70xG this is done via "Access to second function" key, whereas in IP100 and IP15x F5/F15 can be assigned for this purpose if desired.
The number of programmable function keys and toggle mechanism for each model is shown in the table below.
| Model | Number of PFKs | Number of keys with backlight | Access to second function | Number of virtual keys |
| Temporis IP100 | 10 | 5 | F5/F15 (config) | 18 |
| Temporis IP251G | 2 | 2 | N/A | 2 |
| Temporis IP15x | 10 | 5 | F5/F15 (config) | 18 |
| Temporis IP30x | 12 | 12 | “Lower” key | 24 |
ALCATEL
home & business phones
| Temporis IP70xG | 16 | 16 | "Lower" key | 32 |
You can assign functions to the programmable keys. You can select one option for each physical or virtual key. Keys can have identical functions. For example, you can assign several "Line" keys for Line 1 to enable users to manage multiple calls on Line 1. You can also assign multiple Quick Dial keys.
Depending on the feature, you may need to select also the line (account) for which it is applicable and some value.
The programmable key settings are also available:
-from the phone menu (except for Temporis IP100); see for example Programmable Keys on page 15 or Customizing your phone with User Settings menu on page 60.
-as parameters in the configuration file. See "pfk" Module: Programmable Feature Key Settings
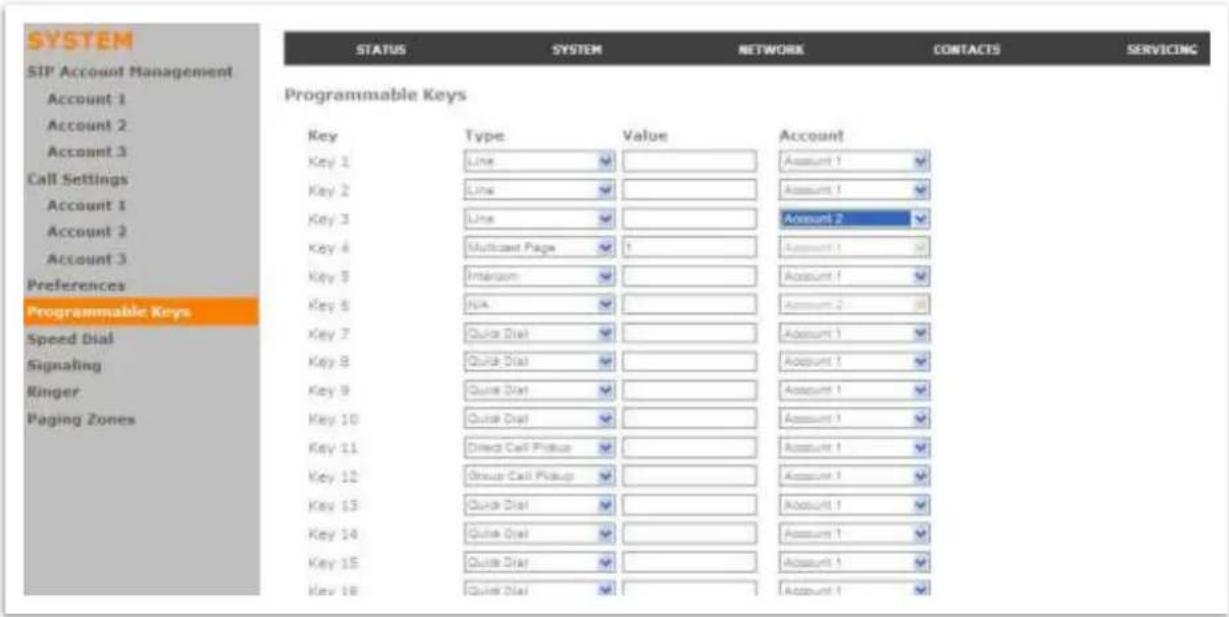
| Type | Description | Parameters |
| Line | Configures the key for accessing a line (or SIP account). Users can make or answer calls by pressing these keys. The key LED will change according to call activity.After selecting Line in the Type column, select the Line number in the Line column. | pfk.x.feature = linepfk.x.account = 1,2,...(x: 1-32, function key number; depends on model) |
| Directory | Configures the key to access the Directory menu. Users can then press the key to view the Directory menu. | pfk.x.feature = dir(x: 1-32, function key number; depends on model) |
ALCATEL
home & business phones
| Call History | Configures the key to access the Call History list. Users can then press the key to view the Call History list. | pfk.x.feature = call log(x: 1-32, function key number;depends on model) |
| Redial | Configures the key to access the Redial list.Users can then press the key to view the Redial list. | pfk.x.feature = redial(x: 1-32, function key number;depends on model) |
| Messages | Configures the key to access the Message menu. Users can then press the key to view the Message menu. | pfk.x.feature = messages(x: 1-32, function key number;depends on model) |
| Do Not Disturb | Configures the key to turn Do Not Disturb on or off. Select the line for which you want to set the feature.The key is lit orange when DND is on. | pfk.x.feature = dndpfk.x.account = 1,2,...(x: 1-32, function key number;depends on model) |
| Do Not Disturb All | Configures the key to turn Do Not Disturb on or off for all accounts. The key is lit orange when DND All is on (as are any other DND keys). If one or more accounts also has a dedicated DND key, turning DND off for a particular account will cause the DND All key to flash, indicating that not all accounts have DND set. | pfk.x.feature = dnd all |
| Call Forward All | Configures the key to turn Call Forward All on or off.In the Line column, select the line for which Call Forward All will apply.Before assigning the key, ensure that you configure Call Forward settings on the Call Settings page. | pfk.x.feature = cfwd allpfk.x.account = 1,2, ... (x: 1-32, function key number;depends on model) |
| Call Forward Busy | Configures the key to turn Call Forward Busy on or off.In the Line column, select the line for which Call Forward Busy will apply.Before assigning the key, ensure that you configure Call Forward settings on the Call Settings page. | pfk.x.feature = cfwd busypfk.x.account = 1,2 or 3(x: 1-32, function key number;depends on model) |
| Call Forward No Answer | Configures the key to turn Call Forward No Answer on or off.In the Line column, select the line for which Call Forward No Answer will apply.Before assigning the key, ensure that you configure Call Forward settings on the Call Settings page. | pfk.x.feature = cfwd no answerpfk.x.account = 1,2...3(x: 1-32, function key number) |
| Park Call | Enables the user to park a call. Pressing the key dials the Call Park feature access code | pfk.x.feature = park callpfk.x.account = 1,2... |
ALCATEL
home & business phones
| (FAC) configured on the Account Settings page.In the Line column, select the line (sip account) on which the feature access code will be dialed out.For example, choose Line 1 if you wish to use the Call Park FAC that you entered for account 1.For some service providers, you must also enter a park extension in the Value column. This value will be dialed along with the Call Park FAC. See alsosip_account.x.park_variant. | (x: 1-32, function key number;depends on model) | |
| Retrieve Park Call | Enables the user to retrieve a parked call. Pressing the key dials the Parked Call Retrieval feature access code (FAC) configured on the Account Settings page.In the Line column, select the line on which the feature access code will be dialed out.For example, choose Line 1 if you wish to use the Parked Call Retrieval FAC that you entered for account 1.For some service providers, you must also enter a park retrieval extension in the Value column. This value will be dialed along with the Parked Call Retrieval FAC. | pfk.x.feature = retrieveparked callpfk.x.account = 1,2... 3(x: 1-32, function key number;model-dependent) |
| Quick Dial | Configures the key to dial a number on the selected line. After selecting Quick Dial, enter the number to be dialed in the Value column. In the Line column, select the line on which the number will be dialed out. | pfk.x.feature = quick dialpfk.x.account = 1,2, ...pfk.x.quick_dial =(x: 1-32, function key number;depends on model) |
| BLF (Busy Lamp Field) | Configures the key to monitor another extension.In the Value column, enter the URI of the extension you want to monitor with this key. For example,6045552001@sipservice.com.If you are using list based BLF, the URI must be from the BLF list you set up with your service provider and entered under “Busy Lamp Field Settings” under SIP Account ManagementFor configuring BLF interoperability when using certain service platforms, see sip_account.x.blf_variant. | pfk.x.feature = busy lamp fieldpfk.x.account = 1,2, ...pfk.x.blf=(x: 1-32, function key number;depends on model) |
ALCATEL
home & business phones
| ACD (Automatic Call Distribution) | Configures the key to display the ACD State menu on the phone LCD. In the Account column, select the applicable account. The key LED will indicate the current ACD state.Shared Line accounts support ACD, but note that subscribers to a shared line will share a common ACD state. | pfk.x.feature = acdpfk.x.account = 1,2, ... (x: 1-32, function key number; depends on model) |
| Intercom/Page | Configures the key to call one or a group of phones. Pressing the key dials the Paging feature access code. You must enter the feature access code for Paging on the SIP Account Management page.You can configure pages to be automatically answered. See "Page Auto Answer" under SIP Account Management | pfk.x.feature = pagepfk.x.account = 1,2, ... (x: 1-32, function key number; depends on model) |
| Multicast Page | Configures the key to make outgoing multicast pages. In the Value column, enter a valid Paging Zone ID (ranging from 1 to 10). Multicast paging differs from standard paging in that it is handled locally by the Deskset and does not require a subscription through the hosted server. To use multicast paging, you must first set up paging zones on the WebUI. See Paging Zone on page 130. | pfk.x.feature = multicast pagepfk.x.multicast_zone = 1 to 10 (x: 1-32, function key number; depends on model) |
| In Call DTMF | Configures the key to dial a string of numbers while the end user is on a call. For example, pressing the key might dial a conference access code.After selecting In Call DTMF, enter the number to be dialed in the Value column. | pfk.x.feature = in call dtmfpfk.x.incall_dtmf = (x: 1-32, function key number; depends on model) |
| Call return | Configures the key to dial the number of the last missed call. | pfk.x.feature = callback (x: 1-32, function key number; depends on model) |
| Group Call Pickup | Enables the user to answer a call ringing at another extension. The call can be ringing at any extension in the phone's call pickup group. Pressing the key dials the Group Call Pickup feature access code (FAC) configured on the Account Settings page. | pfk.x.feature = group call pickuppfk.x.account = 1,2... (x: 1-32, function key number; depends on model) |
| Direct Call Pickup | Enables the user to answer a call ringing at a specific deskset. Pressing the key dials the Direct Call Pickup feature access code (FAC) configured on the Account Settings page. Depending on the server requirements, the user may then need to enter the number of the ringing extension. | pfk.x.feature = direct call pickuppfk.x.account = 1,2... (x: 1-32, function key number; depends on model) |
| Prefix Dialing | Configures the key for prefix dialing. Pressing a PFK assigned to Prefix Dialing will automatically go off-hook into Dial mode using | pfk.x.feature = prefix dialpfk.x.account = 1,2... pfk.x.prefix = |
ALCATEL
home & business phones
| the account configured for the PFK. The digits entered under Value are concatenated to any number that the user enters. The outgoing call will include the [Prefix] + [Dialing string]. The Prefix digits are hidden from the user. The prefix digits are visible during Dialing and Call Active states.Note that %N can be used for substitution of user-entered digits. For example, *71%N# will use [*71] + [user-entered digits] + [#] as the outgoing dialing string.The dial plan is enabled after the user enters one or more digits. Both prefix digits (hidden) and user-entered digits (visible) are used for dial plan matching.The timeout-to-dial element in the dial plan is suspended if the user navigates away from the dialing screen. | (x: 1-32, function key number; depends on model) | |
| XML App | Configures the key to open the XML browser. Pressing the key initiates an HTTP(s) GET request to the server. Enter the URI of the XML application to be executed. | pfk.x.feature = xml apppfk.x.account = 1,2...pfk.x.xml_uri =(x: 1-32, function key number; depends on model) |
| Flash | Configures the key as a Flash key.With one call active, pressing Flash puts the active call on hold and displays a new call screen with live dial.With two calls active, pressing Flash:puts the active call on hold and retrieves a held call, oranswers an incoming call. | pfk.x.feature = flashpfk.x.account = 1,2...x: 1-32, function key number; depends on model) |
| Call Handling Profile | Configures the key for Comverse call handling profile. Enter the string of the call handling profile that the PFK LED will indicate. | pfk.x.feature = chppfk.x.account = 1,2...pfk.x.call_handling_profile = pfk.x.call_handling_profile_set_code(x: 1-32, function key number; depends on model) |
| Hunt Group | Configures the key to turn Comverse hunt group on or off. Enter the hunt group extension number assigned for this key. | pfk.x.feature = hgpfk.x.account = 1,2...pfk.x.hunt_group =(x: 1-32, function key number; depends on model) |
| Secretarial Filtering | Configures the key to turn Comverse secretarial filtering on or off. Enter the manager's extension number assigned for this key. | pfk.x.feature = sfpfk.x.account = 1,2...pfk.x.secretarial_filtering =(x: 1-32, function key number; depends on model) |
ALCATEL
home & business phones
| Phone Lock | Configures the key to enable or disable the phone lock. For more information, see Security section | pfk.x.feature = lock_key |
| N/A | The programmable key has no function assigned | pfk.x.feature = unassigned pfk.x.account = 1,2...(x: 1-32, function key number; depends on model) |
Programmable Hard Keys
Temporis IP151, IP251G, IP301G and IP701G models are equipped with programmable hard keys. You can assign additional functions to those keys, which are listed on the Programmable Hard Keys page.
The functions that you assign to hard keys apply to each key in idle mode only
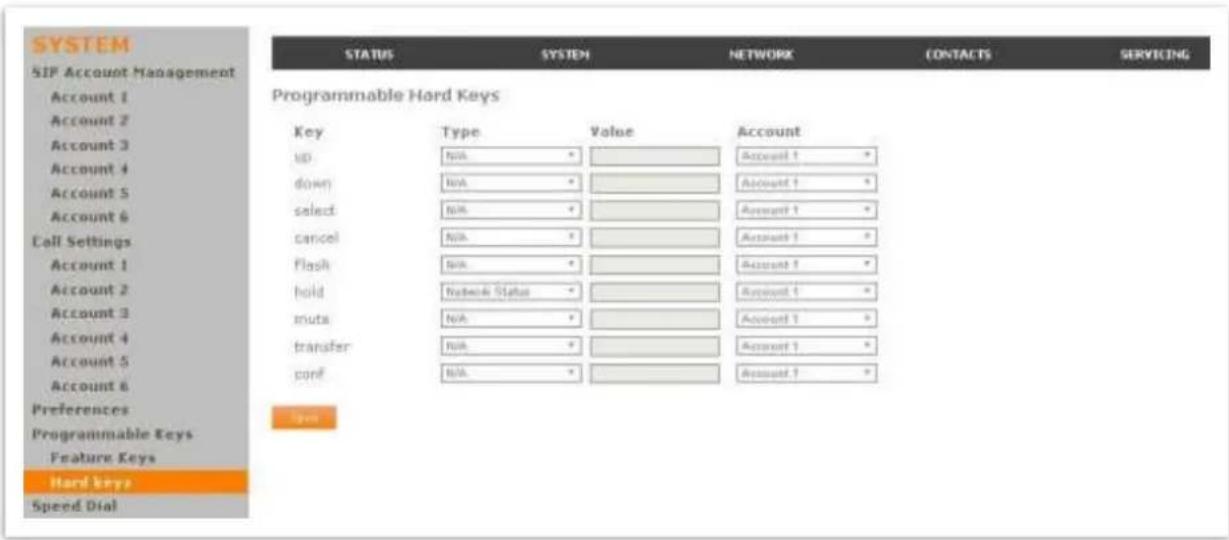
You can essentially assign the same functions as in the Programmable Feature Keys, with the following remarks:
-Line and BLF are not available for Hardkeys
-You can also assign the Network Status function to these keys.
| Type | Description | Parameters |
| Network Status | Configures the key to display the Network Status IPv4 orIPv6 selection screen when pressed. | pfk..feature = network status depends on the model and can be up, down, select, cancel, flash, hold, mute, transfer, conf |
ALCATEL
home & business phones
Please refer to Programmable Function Keys chapter and to "pfk" Module: Programmable Feature Key Settings for more details.
ALCATEL
home & business phones
Memory Keys: Speed Dial
Applicable to Temporis IP100, IP150, IP151, IP251G, IP300, IP301G, IP700G, IP701G and Conference IP1850.
On the Speed Dial page, you can enter up to 10 speed dial numbers. For each speed dial number you enter, you must assign the line on which the number will be dialed out.
To dial a speed dial number, press and hold the dial pad key that matches the speed dial entry number. When for entry 10, press 0).
Note: This menu duplicates the speed dial menu on the desktop phones (Menu > 1.Features > 5.Speed dial), i.e. entries that are entered and saved on the WebUI replace entries that were entered using the phone, and viceversa.
Note: You can also assign programmable function keys to be quick dial keys.
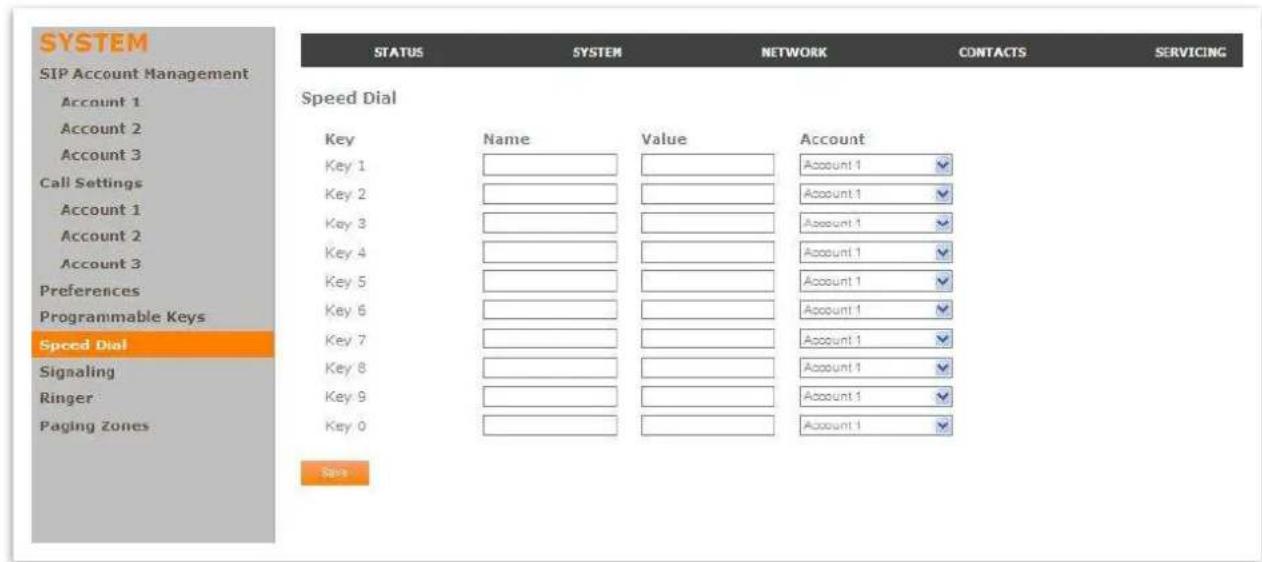
To enter speed dial numbers:
- In the Name column, enter the name associated with this speed-dial entry.
- In the Value column, enter a phone number for the desired key.
- In the Line column, select the line that this speed dial number will use.
- Click Save.
Speed Dial Keys
| Setting | Description | Range | Default |
| Name Value | A name associated to this memory key. | string | blank |
| speed_dial.x.name(x: 0-9) | |||
| Number Value | The phone number that the memory key dials when pressed and held. | SIP URI | blank |
ALCATEL
home & business phones
| speed_dial.x.number(x: 0-9) | |||
| Linespeed_dial.x.account(x: 0-9) | The SIP account (line) the phone will use to dial the number. | 1: Acc 1,2:Acc 2,etc | 1 |
Signaling Settings
Applicable to Temporis IP100, IP150, IP300, IP700G, IP2015 and Conference IP1850.
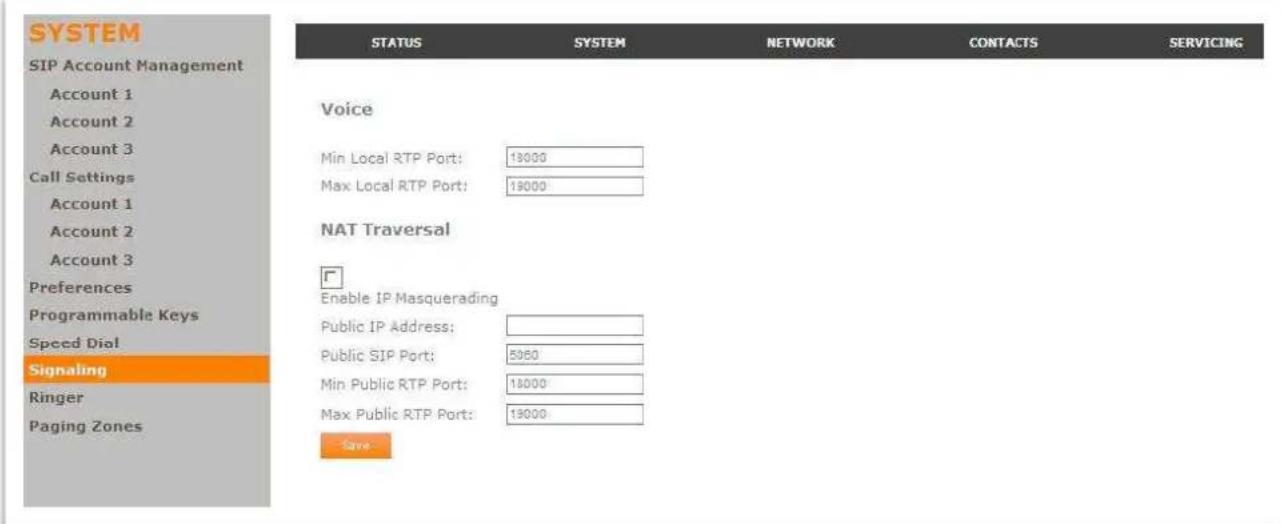
Voice Settings
| Setting | Description | Range | Default |
| Min Local RTP portnetwork.rtp.port_start | Real-time Transport Protocol (RTP) Ports are entered as a range. This range is usually specified by your service provider.Enter the lower limit of the RTP port range. | 0-65535 | 18000 |
| Max Local RTP portnetwork.rtp.port_end | Enter the upper limit of the RTP port range. | 0-65535 | 19000 |
NAT Traversal
| Setting | Description | Range | Default |
ALCATEL
home & business phones
| Enable IP Masqueradingnetwork.nat.masquerading_enable | Select to enable NAT traversal via IP masquerading. | 1: Enabled0: Disabled | 0 |
| Public IP addressnetwork.nat.public_ip_addr | Enter the external IP address of your router.Your router needs a static IP address for IP masquerading to work. | IP address | blank |
| Public SIP portnetwork.nat.public_sip_port | Enter the router port number being used for SIP. | 0-65535 | 5060 |
| Min Public RTP portnetwork.nat.public_rtp_port_start | Real-time Transport Protocol (RTP) Ports are entered as a range. This range is usually specified by your service provider.Enter the lower limit of the RTP port range. | 0-65535 | 18000 |
| Max Public RTP portnetwork.nat.public_rtp_port_end | Enter the upper limit of the RTP port range. | 0-65535 | 19000 |
Ringer Settings
Applicable to Temporis IP100, IP150, IP151, IP251G, IP300, IP301G, IP700G, IP701G and Conference IP1850.
The Ringer Settings enable you to provide a distinctive ringing feature via the custom Alert-Info header associated with an incoming call. This setting overrides the ringer tone you have set for the account. For example, you can set a unique ringer tone to alert the deskset user upon receiving any incoming calls tagged as "important" or "External" in the Alert-Info header.
The SIP Invite message contains an Alert-Info header that the phone checks in order to determine which ringer tone to play. The Alert-Info header format is as follows:
Alert-Info: http://www.notused.net;info=info_text
If the header contains the "info" parameter, the phone attempts to match it to the Internal Ringer Text. If there is a match, the Internal Ringer Tone will play. If there is no match, the default tone for the account will play.
The matching is done on a "first match" basis. In the case of duplicate text strings, the ringer tone associated with the first matched entry in the Internal Ringer Text list will play.
The server-side configuration must be done with your service provider. This is where the SIP Invite text ("Internal Ringer Text") will be derived.
The ringer settings are also available as parameters in the configuration file. See "ringersetting" Module: distinctive ringing settings on page 237.
ALCATEL
home & business phones
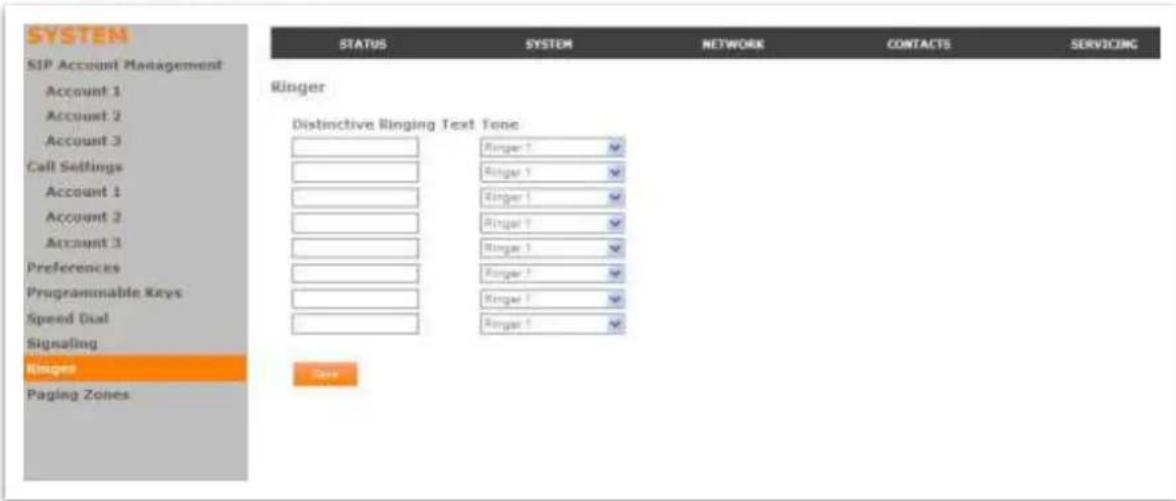
| Setting | Description | Range | Default |
| Distinctive Ringing Text | Enter the text that will match the "info" parameter and play the ringer tone.The matching of the "info" parameter and Internal Ringer Text is case sensitive. The maximum length of the Internal Ringer Text is 40 characters. | String, up to 40 characters | blank |
| ringersetting.x.ringer_text(x=1-8) | |||
| Tone | Select the desired ringer from the list. | Ringer 1 to - Ringer 10 (1-10) | 1 |
| ringersetting.x.ringer_type(x=1-8) |
Note: minimum content of the Alert-Info header to use this feature is:
Alert-Info: <>;info=info_text
Paging Zone
Applicable to Temporis IP100, IP150, IP151, IP251G, IP300, IP301G, IP700G, IP701G and Conference IP1850.
On the Paging Zone page, you can enter the multicast IP addresses that the phone will monitor. When a page is sent out using this multicast IP address, all phones that are programmed to monitor that IP address will receive the paging RTP stream and play the page on their speakerphone. You can also enable the phone to send out multicast pages using a particular multicast IP address.
You must first set up paging groups (each group consisting of a multicast paging IP address and assigned User IDs) on your SIP PBX. The desk set can monitor a maximum of 10 multicast IP addresses.
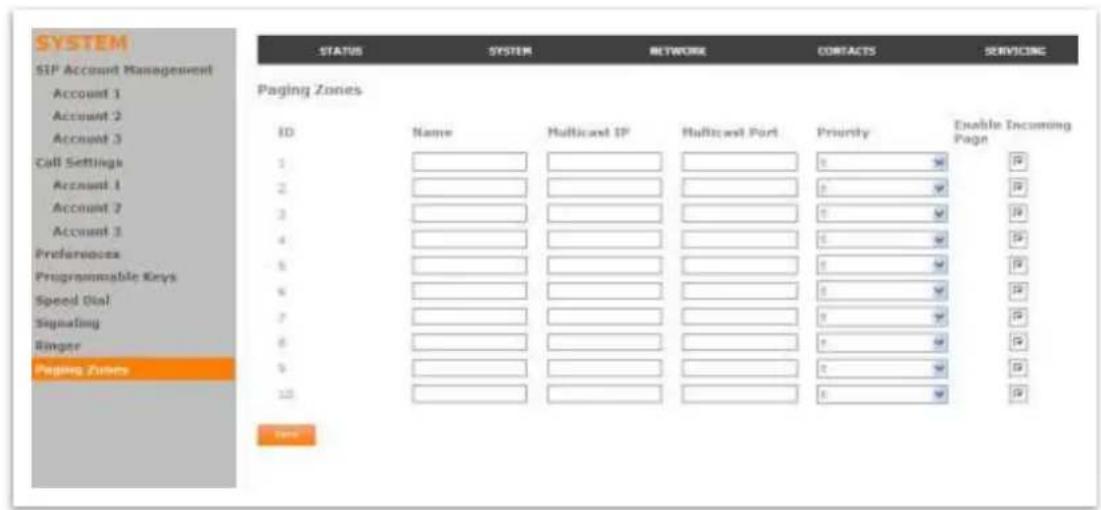
| Setting | Description | Range | Default |
| Name | Enter the name of the paging zone. Names can be a maximum of 15 characters. The paging zone name is displayed on the LCD during incoming and outgoing multicast pages. | String, up to 15 chars | blank |
| page_zone.x.name(x= page zone ID number, 1 to 10) | |||
| Multicast IP | Enter the paging zone multicast IP address. The IP address range for multicast addresses is 224.0.0.0-239.255.255.255. | IPv4 address, 224.0.0.0 to 239.255.255.255 | blank |
| page_zone.x.multicast_address(x= page zone ID number, 1 to 10) |
ALCATEL
home & business phones
| Multicast Port | Enter the multicast port used by the multicast IP address. The valid port range is 1 to 65535. | 0-65535 | blank |
| page_zone.x.multicast_port(x= page zone ID number, 1 to 10) | |||
| Priority | Select the paging zone priority from 1 to 10.Zones with a priority higher than another zone can interrupt the lower-priority zone's active page. | 1-10 | 5 |
| page_zone.x.priority(x= page zone ID number, 1 to 10) | |||
| Call priority threshold | This priority setting also ranges from 1 to 10. If the paging zone priority is higher or equal to the call priority, then a multicast page can interrupt an active, dialing, or incoming call. | 1-10 | 2 |
| page_zone.call_priority_threshold | |||
| Enable incoming page | Select to enable the deskset to receive incoming pages for that paging zone. If the "Enable Incoming Page" checkbox is not selected, the phone will not listen for the multicast, but will still be able to broadcast an outgoing page. | 0: disabled1: enabled | 1 |
| page_zone.x.accept_incoming_page(x= page zone ID number, 1 to 10) |
ALCATEL
home & business phones
Server applications
This feature applies to models IP151, IP251G, IP301G, and IP701G.
On the Server Application page, you can enter Action URIs to allow your desk set to interact with a server application by using an HTTP GET request. The action URI triggers a GET request when a specified event occurs. Action URIs allow an external application to take control of the display when an event occurs. These pre-defined events are listed under “Action URI” on the Server Application page.
Action URIs are typically used in conjunction with the XML Browser, which can be customized to deliver an appropriate user experience.
For more information about the XML Browser syntax please contact your Technical Support team.
Your desk set supports both push and pull server applications. Note that Action URI events are not "push" events as it is the phone that requests a URI when triggered by certain states. You can enable push server applications under "XML Push Settings".
Action URI Syntax
To access an XML application, the phone performs an HTTP GET on a URL.
An HTTP GET request may contain a variable name and variable value, which are separated by "=". Each variable value starts and ends with "\\" in the query part of the URL.
Action URI variables pass dynamic data to the server. The valid URL format is:
http://host[:port]/dir/file name?variable name=\\variable value\\
where:
host is the hostname or IP address of the server supporting the XML application port is the port number the phones are using for the HTTP request
At the time of the HTTP call, the variable value field is populated with the appropriate data. For example, the following URL passes the SIP Account User Identifier to the server:
http://10.50.10.140/script.pl?name=\SIPUSERNAME\\$
A GET request then passes along the following information:
http://10.50.10.140/script.pl?name=42512
Assuming that the User Identifier is 42512.
Variable names are defined by the particular XML application being called.
Variable values are predefined and depend on the status of the phone. If the variable has no meaning in the current status, then the phone sends an empty string.
ALCATEL
home & business phones
The table below lists all possible variable values. Note that variables applicable during an Incoming or Active Call (such as INCOMINGNAME and REMOTENUMBER) are initialized at the beginning and at the end of the call.
| Variable value | Description |
| SIPUSERNAME | SIP Account User Identifier |
| DISPLAYNAME | SIP Account Display Name |
| LOCALIP | Phone's local IP Address |
| INCOMINGNAME | Caller ID name of the current Incoming Call |
| REMOTENUMBER | Remote party phone number (Incoming or Outgoing) |
| REGISTRATIONSTATE | Registration state available from the Registration event. Values are:REGISTEREDDEREGISTEREDFAIL |
| MAC | The phone's MAC Address |
| MODEL | The phone's model number. |
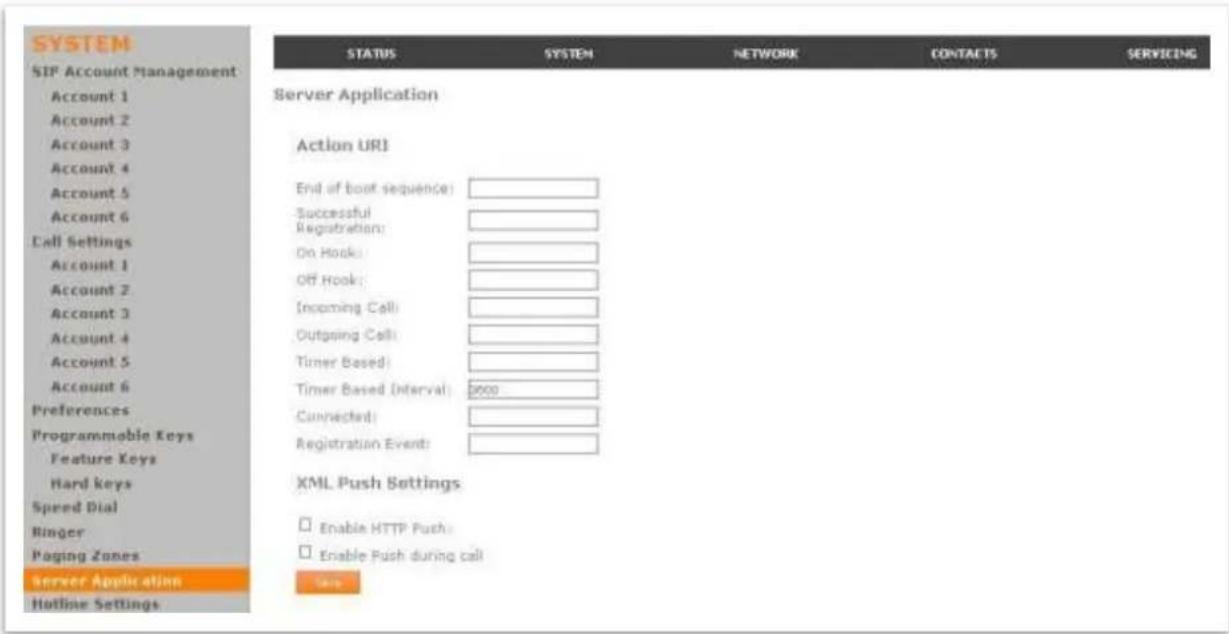
ALCATEL
home & business phones
Action URI
| Setting | Description | Range | Default |
| End of boot sequence | The End of boot sequence URI is triggered at the end of the phone boot sequence.Using the End of boot sequence URI, it is possible to develop self-provisioning on the phone. For example, an XML application can identify the phone and generate a MAC-specific file on the fly. | URI | Blank |
| system_event.startup.action_uri | |||
| Successful Registration | The Successful Registration URI is triggered the first time the phone registers successfully to a SIP Account. If the phone registers to multiple SIP Accounts, then the Successful Registration URI is triggered for each line. | URI | Blank |
| system_event.registered.action_uri | |||
| On Hook | The On Hook URI is triggered when the phone transitions from Active to Idle (or from Paging to Idle). For example, when:The user presses the End soft keyThe user hangs up the corded handset during a callA transfer is completed and the user returns to idleThe far end hangs upThe call was not answeredThe call fails. | URI | Blank |
| system_event.on_hook.action_uri |
ALCATEL
home & business phones
| Off Hook | Select the paging zone priority from 1 to 10. Zones with a priority higher than another zone can interrupt the lower-priority zone's active page.The Off Hook URI is triggered when the user goes to Dial mode by:Lifting the corded handset of the cradlePressing the SPEAKER or HEADSET hard keyPressing a Line PFKPressing the [New] soft key during a held call. Note that the Off Hook URI will NOT be triggered when calling a pre-defined number and going immediately to Dialing mode—this event triggers the Outgoing Call URI instead. | URI | Blank |
| Incoming Call | The Incoming Call URI is triggered for each Incoming Ring event or Call Waiting event. Using the Incoming Call URI, it is possible to display extra information on the phone for an Incoming Call. For example, the XML application that is called when there is an Incoming Call can do a database lookup and display information on the caller.Note that this Action URI will not be triggered if DND or Call Forward All is enabled or if Call Waiting is disabled (i.e., the call is rejected). | URI | Blank |
| Outgoing Call | The Outgoing Call URI is triggered each time a SIP INVITE message is sent (Dialing mode). For example, after:Pressing theialoftkey in Predial with populated numberUsing the dial pad to speed dial a callPressing a Quick Dial PFKDialing a Directory number by going off-hook. | URI | Blank |
ALCATEL
home & business phones
| Timer Basedsystem_event.poll.action_uri | The Timer Based URI will be triggered when the configured timeout expires. The timer starts at the end of the phone boot sequence. | URI | Blank |
| Timer Based Intervalsystem_event.poll.interval | Enter the interval before the Timer Based URI is triggered. | 1-65535 | 3600 |
| Connectedsystem_event.connected.action_uri | The Connected URI is triggered each time the phone is in an Active Call or is Paging. | URI | Blank |
| Registration Eventsystem_event.registration_event.action_uri | The Registration Event URI is triggered every time there is a registration state change. For example:RegisteredDeregisteredFail (Registration timed out, refused, or expired)The Registration Event URI is not triggered when the same event is repeated. | URI | Blank |
XML Push Settings
| Setting | Description | Range | Default |
| Enable HTTP Pushxml_app.http_push_enable | Select to enable HTTP push, which enables the phone to display XML objects that are "pushed" to the phone from the server via http/https POST or SIP NOTIFY. | 0:disable1:enable | 0 |
| Enable Push during callxml_app.push_during_call_enable | Select to enable the phone to display pushed XML objects during a call. Otherwise, the XML application is displayed after the call is over. | 0:disable1:enable | 0 |
ALCATEL
home & business phones
Hotline Settings
This feature is applicable to Temporis IP100, IP150, IP151, IP251G, IP300, IP301G, IP700G, IP701G.
Hotline settings enable your desk set to dial a pre-configured number after any off-hook action in idle mode—lifting the handset, pressing SPEAKER, pressing HEADSET, or pressing a PFK Line key. The hotline dialing is subject to a delay. When this delay is configured, it supersedes the inter-digit timeout used for regular calls.
Predial mode and dialing mode are not considered idle mode. Hotline dialing will not trigger if digits have been entered, or when the phone is dialing a number.
Hotline dialing will be cancelled if the user presses any keys, or if there are any incoming calls during the hotline dialing delay period.
The hotline number uses the phone's default dial plan
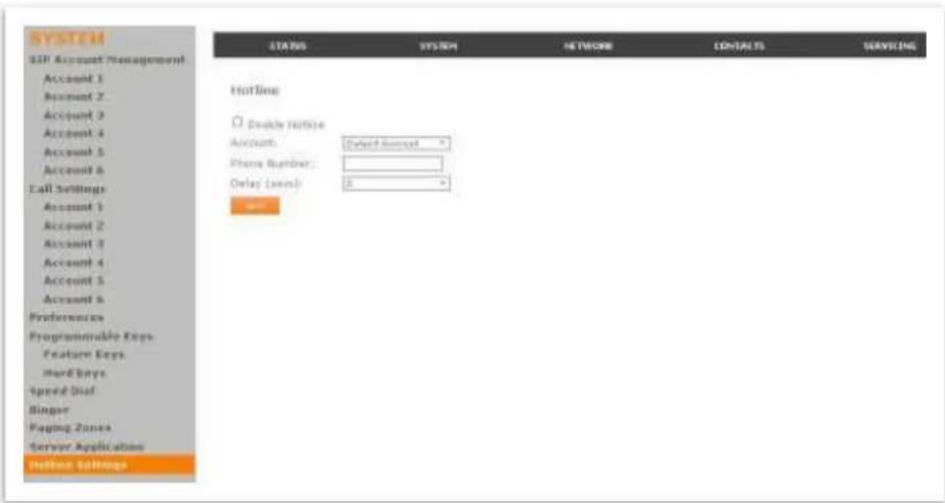
| Setting | Description | Range | Default |
| Enable Hotlinecall_settings.hotline_enable | Enables the Hotline feature | 0: disabled1: enabled | 0 |
| Accountcall_settings.hotline_account | Sets the account used for dialing the hotline number. | 0-60 stands for the default account | 0 |
| Phone Numbercall_settings.hotline_number | Sets the number to be dialed after the hotline delay. | string | blank |
| Delay (secs)call_settings.hotline_delay | Sets the hotline delay before the number is dialed. | 0-10 | 0 |
ALCATEL
home & business phones
Handset settings
This subsection of SYSTEM section is available for IP2015/IP2115 IP DECT only. It will allow you to configure which handsets are associated to which account(s), what will be the default dial out account for each handset, as well as the name a particular handset will display on its idle screen.
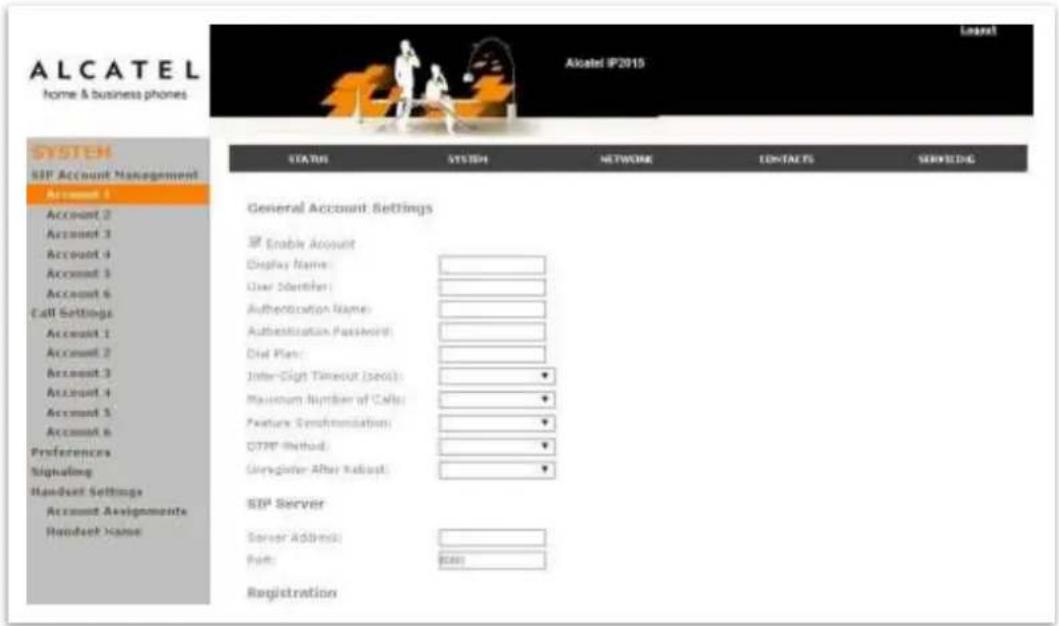
Account assignment
IP2015/IP2115 support up to six handsets and six sip accounts. Admins can decide which account or accounts are associated to a handset in particular, i.e.:
- whether an incoming call addressed to one account will be sent by the base to a handset or not, and
- whether a handset will be able to select that account to dial out
To do this, simply tick or untick the boxes on the handset vs accounts matrix shown on the WUI.
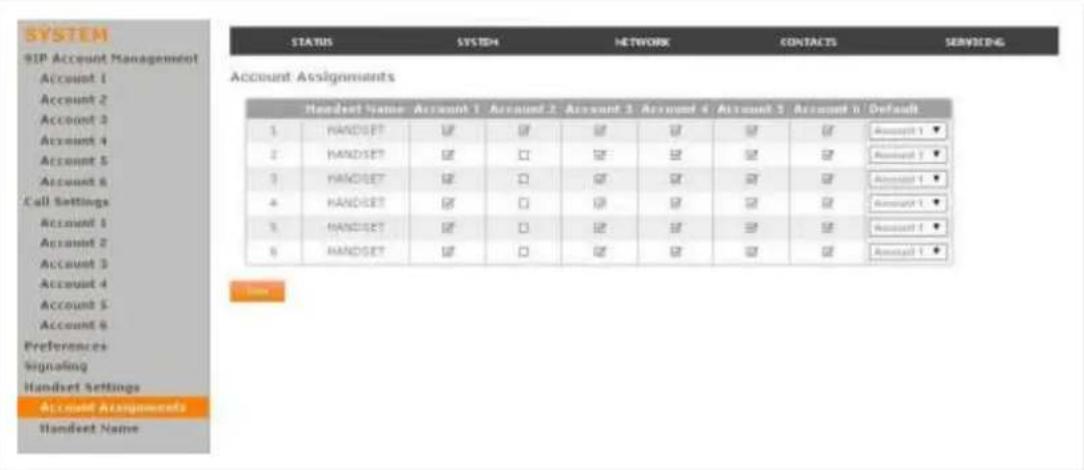
ALCATEL
home & business phones
Each line corresponds to one handset; you can identify each handset by its name and number. Handset number is shown at the top right corner on the idle screen. And each column corresponds to one account.
In the example above, only Handset1 can use Account2 to send and receive calls. The rest of accounts can be used by all handsets.
On top of that, you can select one default account per handset. This account will be used to dial out except if you manually select another one. Other exceptions are those cases where a dial out account is predefined: call log, speed dial and Contacts.
Again referring to the example above, all handsets will use Account1 to dial out by default.
Handset account assignment settings are also available as parameters in the configuration file. See "hs_settings" Module: Handset management Settings on page 240
| Setting | Description | Range | Default |
| Assigned accounts | Lists accounts assigned to a handset. | Comma separated account index list | 1,2,3,4,5,6 |
| hs_settings.x.assigned_account(x is handset number, from 1 to 6) | |||
| Default account | Account which will be used to dial out, except if there is a pre-assignment or user manually selects another one. | 1 to 6 | 1 |
| hs_settings.x.default_account(x is handset number, from 1 to 6) |
Handset name
Each handset can be assigned a name to be displayed on the idle screen.
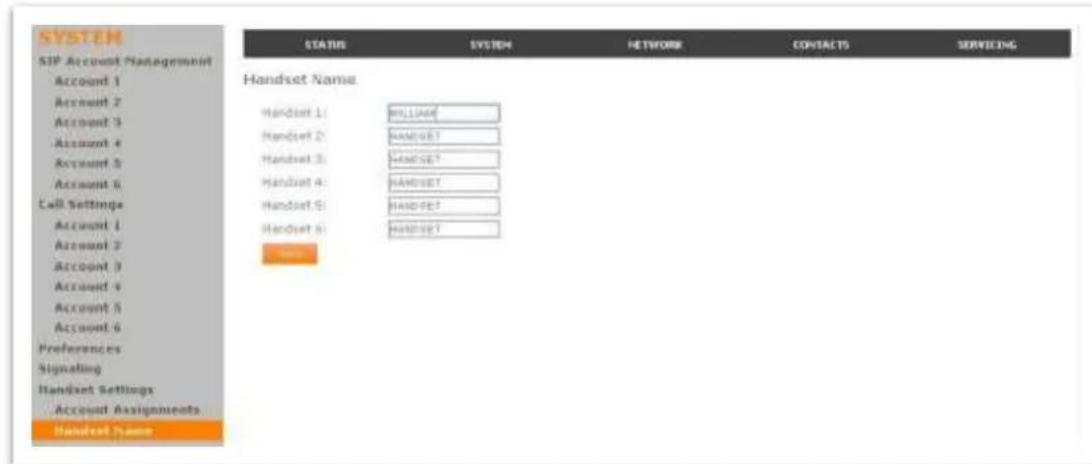
ALCATEL
home & business phones
This configuration can be done as well using the handset Phone rename submenu. See User Settings on page 76.
Handset name settings are also available as parameters in the configuration file See "hs_settings" Module: Handset management Settings on page 240
| Setting | Description | Range | Default |
| Handset namehs_settings.x.handset_name(x is handset number, from 1 to 6) | Name the handset will display on its idle screen | String (12 chars max) | HANDSET |
ALCATEL
home & business phones
Network
You can set up the phone for your network configuration on the Network settings pages. Your service provider may require you to configure your network to be compatible with its service, and the phone settings must match the network settings.
The network settings are grouped into Basic and Advanced. Depending on your model you will get different configuration options.
After entering information on these pages, please click Save to save it.
All these settings are available through configuration files. See "network" Module: Network Settings on page 212.
Basic Network Settings (IPv4)
Applicable to Temporis IP100, IP150, IP300, IP700G, Alcatel IP2015 and Conference IP1850
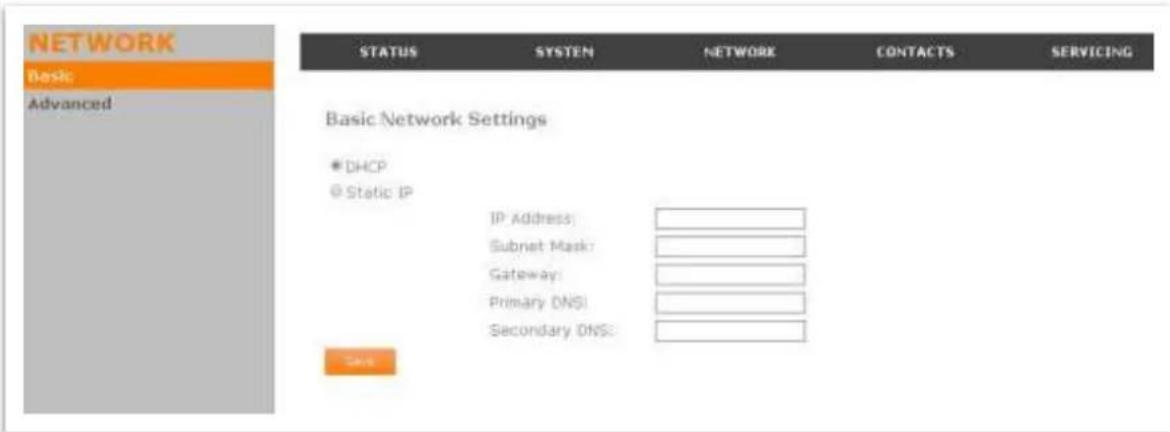
Note: If you disable DHCP on this page, you must configure static IP settings for the phone. You must be familiar with TCP/IP principles and protocols to configure static IP settings.
Basic Network Settings
| Setting | Description | Range | Default |
| Enable DHCPnetwork.ip.dhcp_enable | DHCP is selected (enabled) by default, which means the deskset will get its IP address from the network.When DHCP is disabled, you must enter a static IP address for the deskset. | 1: Enabled,0: Disabled | 1 |
| IP Addressnetwork.ip.static_ip_addr | If DHCP is disabled, enter a static IP address for the deskset. | IPv4 | blank |
ALCATEL
home & business phones
| Subnet Masknetwork.ip.subnet_mask | Enter the subnet mask. | IPv4 | blank |
| Gateway Addressnetwork.ip.gateway_addr | Enter the static IP address of the default gateway (in this case, your router). | IPv4 | blank |
| Primary DNS Servernetwork.ip.dns1 | If DHCP is disabled, enter IP addresses for the primary and secondary DNS servers. | IPv4 | blank |
| Secondary DNS Servernetwork.ip.dns2 |
Basic Network Settings (IPv4/IPv6)
Applicable to Temporis IP151, IP251G, IP301G, IP701G and Alcatel IP2115. IPv4 and IPv6 protocols are supported.
When both IPv4 and IPv6 are enabled and available, the following guidelines apply when determining which stack to use:
- For outgoing traffic, the IP address (or resolved IP) in the server field—either IPv4 or IPv6—will determine which stack to be used.
- In general, most operations can be associated with one of the servers listed on the "Basic Network Settings" page. However, for operations triggered by/dependent upon network status, the phone must determine which server to use. For example, a special case like the "Network down" icon on the Desk set screen can be ambiguous for server association. Because its primary purpose is to aid in troubleshooting SIP registration issues, this case will be associated with the SIP registration server.
- DNS entries with both IPv4 and IPv6 settings can be used to resolve FQDN entries. There are no preferences with the order of the DNS queries.
- Pcap should include traffic for both stacks.
- Dual stack operations should be transparent to PC port traffic.
Note:
PnP is not supported on IPv6 VPN is not supported in IPv6 or PPPoE
ALCATEL
home & business phones
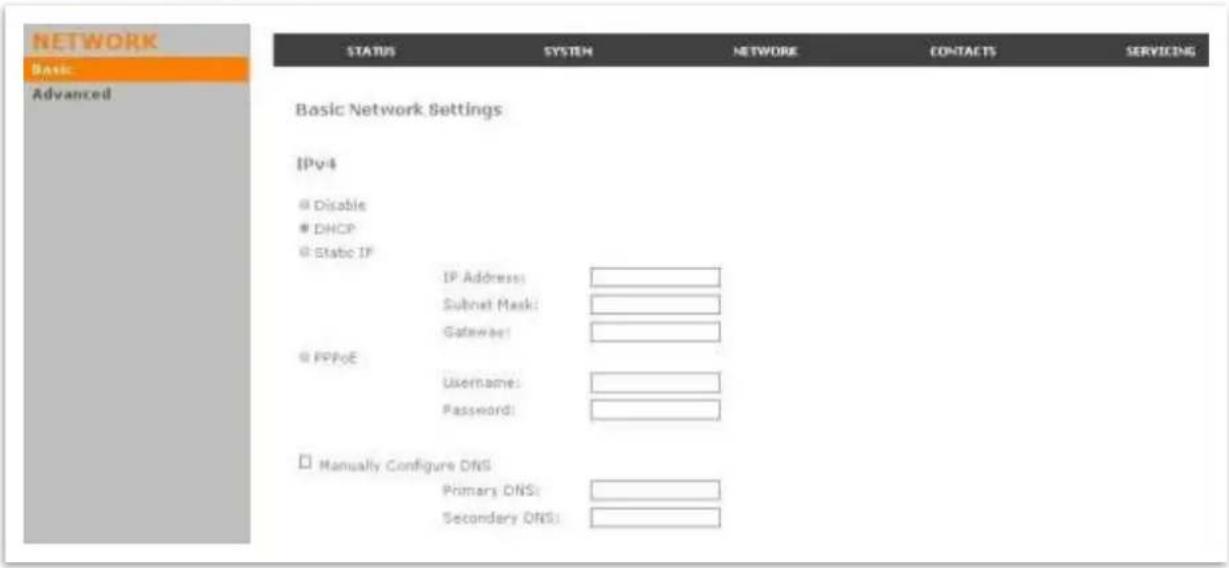
Note:
You must be familiar with TCP/IP principles and protocols to configure static IP settings
IPv4
| Setting | Description | Range | Default |
| Disable/DHCP/Static IP/PPPoE mode selection | You can toggle between DHCP, Static IP, PPPoE or disabling IPv4. | disable, dhcp, static, pppoe | dhcp |
| network.ip.mode | DHCP is selected (enabled) by default, which means the desk set will get its IP address from the network. Note you need to populate additional parameters when either Static IP or PPPoE are selected. | ||
| IP Address | If Static IP is enabled, enter a static IP address for the deskset. | IPv4 | blank |
| network.ip.static_ip_addr | |||
| Subnet Mask | Enter the subnet mask. | IPv4 | blank |
| network.ip.subnet_mask | |||
| Gateway Address | Enter the static IP address of the default gateway (in this case, your router). | IPv4 | blank |
| network.ip.gateway_addr |
ALCATEL
home & business phones
| PPPoE usernamenetwork.ip.pppoe.username | Enter your PPPoE account username. | string | blank |
| PPPoE passwordnetwork.ip.pppoe.access_password | Enter your PPPoE account password. | String | blank |
| Manually configure DNSnetwork.ip.manually_configure_dns | Select to enable manual DNS configuration | 0:disable1:enable | 0 |
| Primary DNSnetwork.ip.dns1 | If DHCP is disabled, or manual DNS configuration is enabled, enter IP addresses for the primary and secondary DNS servers. | IPv4 | blank |
| Secondary DNSnetwork.ip.dns2 |
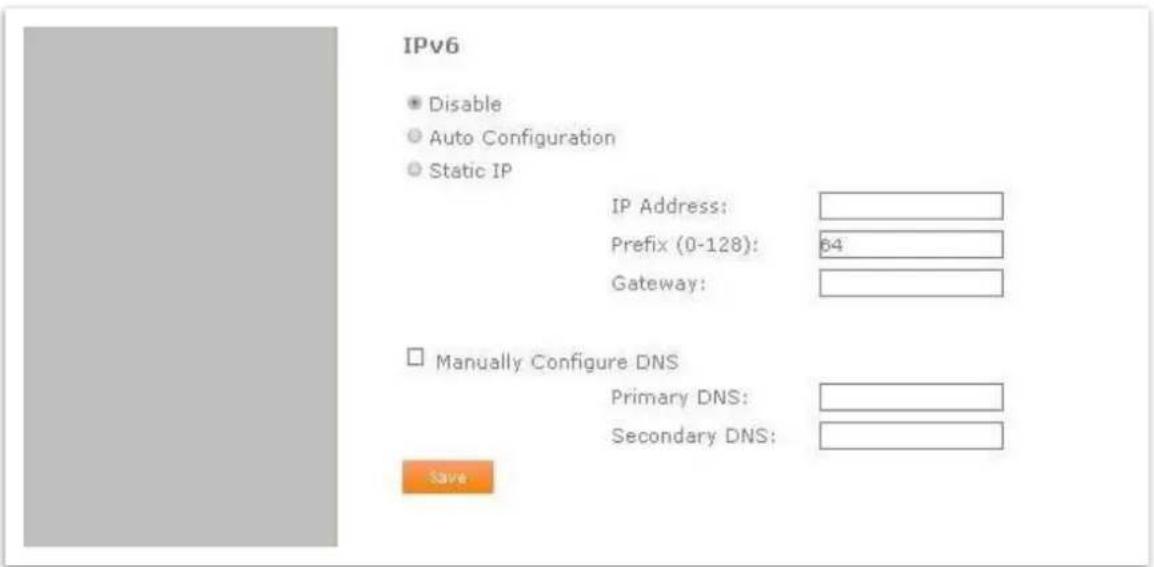
IPv6
| Setting | Description | Range | Default |
| Disable/ Autoconfiguration/ Static IP/ | You can toggle between Autoconfiguration, Static IP, or disabling IPv6. | disable, auto, static | disable |
| If Autoconfiguration is selected (enabled), the phonet will get its IP address, GW and DNS from the network. | |||
| network.ip6.mode |
ALCATEL
home & business phones
| Note you need to populate additional parameters when Static IP is selected. | |||
| IP Addressnetwork.ip6.static_ip_addr | If Static IP is enabled, enter a static IP address for the deskset.Note you will have to enter prefix, GW and DNS as well | IPv6 | blank |
| Prefix (0-128)network.ip6.prefix | Enter the IPv6 address prefix length (0 to 128 bits). | 0-128 | 64 |
| Gateway Addressnetwork.ip6.gateway_addr | Enter the address of the default gateway (in this case, your router). | IPv6 | blank |
| Manually configure DNSnetwork.ip6.manually_configure_dns | Select to enable manual DNS configuration | 0:disable1:enable | 0 |
| Primary DNSnetwork.ip6.dns1 | If Autoconfiguration is disabled, or manual DNS configuration is enabled, enter IP addresses for the primary and secondary DNS servers. | IPv6 | blank |
| Secondary DNSnetwork.ip6.dns2 |
ALCATEL
home & business phones
Advanced Network Settings
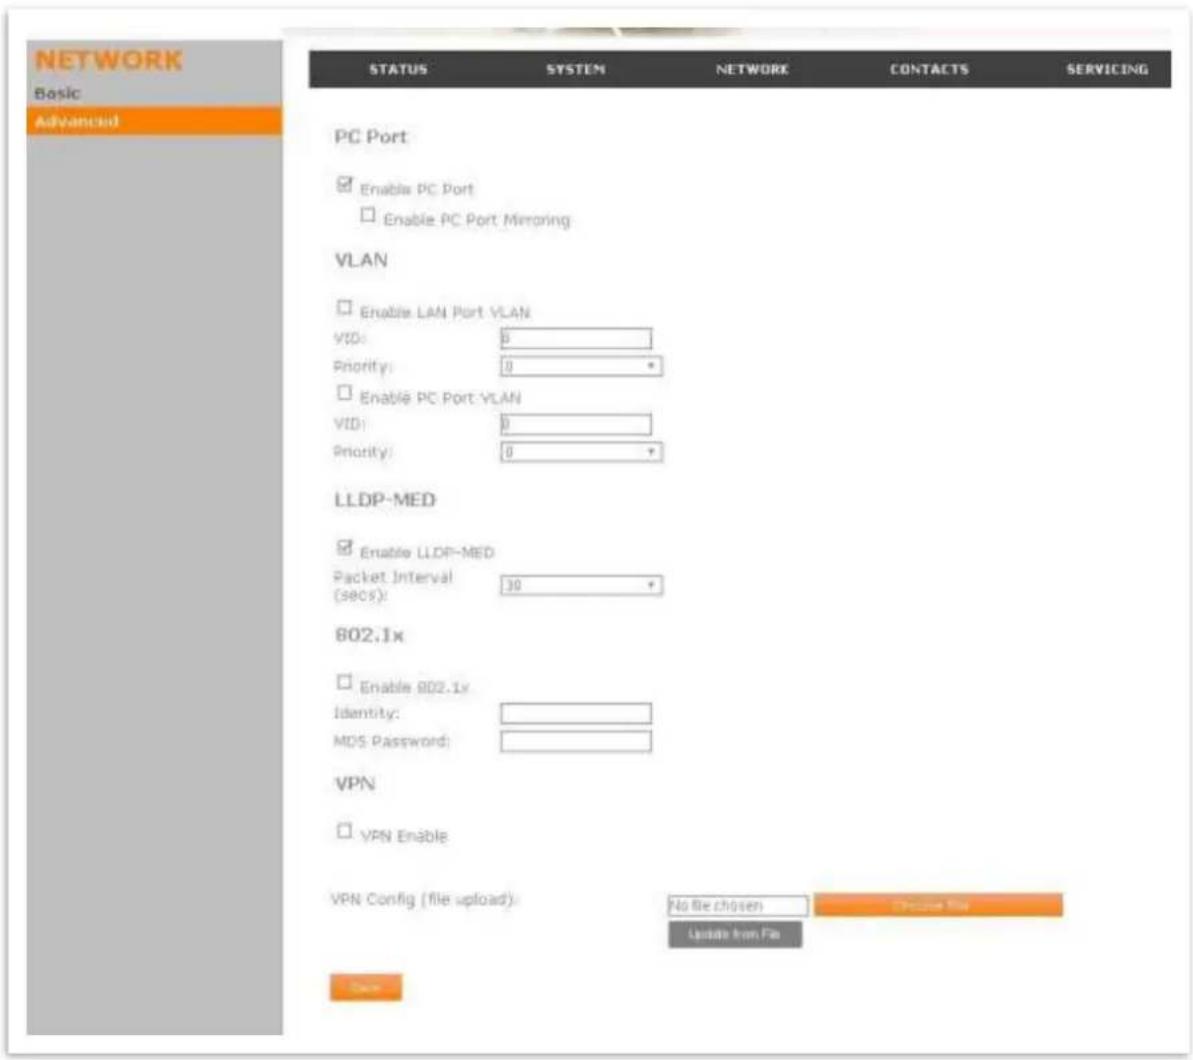
PC Port
You can set the availability of the desk set PC port for network connectivity. When the port is enabled for connectivity, you can set the port to port mirroring, thereby allowing you to use the port to monitor inbound and outbound network traffic and facilitate troubleshooting.
This set of features is applicable to Temporis IP151, IP251G, IP301G, and IP701G
| Setting | Description | Range | Default |
ALCATEL
home & business phones
| Enable PC portnetwork.pc_port.enable | Enable or disable the PC port to operate in hub/switch mode (depending on the Enable PC Port Mirroring setting). | 0:disable1:enable | 1 |
| Enable PC port mirroringnetwork.pc_port.mirroring.enable | When the PC port is enabled, select Enable PC Port Mirroring to set the port to operate in hub mode (network traffic on the WAN port is reflected in the PC port). When Port Mirroring is not selected, the port operates in switch mode. | 0:disable1:enable | 0 |
VLAN Settings
You can organize your network and optimize VoIP performance by creating a virtual LAN for phones and related devices.
| Setting | Description | Range | Default |
| Enable WAN VLANnetwork.vlan.wan.enable | Enable if the phone is part of a VLAN on your network. Select to enable. | 0: Disabled1: Enabled | 0 |
| VLAN IDnetwork.vlan.wan.id | Enter the VLAN ID (vlan 5, for example). | 0-4095 | 0 |
| Prioritynetwork.vlan.wan.priority | Select the VLAN priority that matches the Quality of Service (QoS) settings that you have set for that VLAN ID. Outbound packets will be marked and sent according to their priority.7 is the highest priority. Note: Configuring the Quality of Service (QoS) settings for your router or switch is a subject outside the scope of this document. | 0-7 | 0 |
| Enable PC Port VLANnetwork.vlan.pc.enable | Enable if the PC connected to your phone's PC port is part of a VLAN on your network. Select to enable. Not applicable to IP100, IP2015/IP2115 or IP1850 | 0:Disabled1: Enabled | 0 |
| VLAN ID | 0-4095 | 0 |
ALCATEL
home & business phones
| network.vlan.pc.id | Enter the PC Port VLAN ID (vlan 5, for example).Not applicable to IP100,IP2015/IP2115 or IP1850 | ||
| Priority | Select the VLAN priority that matches the Quality of Service (QoS) settings that you have set for that VLAN ID. Outbound packets will be marked and sent according to their priority. 7 is the highest priority. Not applicable to IP100, IP2015/IP2115 or IP1850Note: Configuring the QoS settings for your router or switch is a subject outside the scope of this document. | 0-7 | 0 |
| network.vlan.pc.priority |
LLDP-MED
| Setting | Description | Range | Default |
| Enable LLDP-MEDnetwork.1ldp_med.enable | Enables or disables LLDP-MED on the phone. Select (enable) if your switch is LLDP-MED capable.Link Layer Discovery Protocol for Media Endpoint Devices (LLDP-MED) is a standards-based discovery protocol supported on some network switches.It is required for auto-configuration with VLAN settings. | 0:Disabled1: Enabled | 1 |
| Packet Interval (secs)network.1ldp_med.interval | Enter here the interval in seconds between LLDP packets. | 1–30 | 30 |
802.1x
| Setting | Description | Range | Default |
| Enable 802.1xnetwork.eapol.enable | Enables the 802.1X authentication protocol. This provides the phone with secure access to the network when an 802.1X compliant authentication server is used.Consult your service provider. | 0:Disabled1: Enabled | 0 |
| Identitynetwork.eapol.identity | Enter the 802.1x EAPOL identity. | string | blank |
ALCATEL
home & business phones
| MD5 Passwordnetwork.eapol.password | MD5 password. | string | blank |
VPN
This feature is applicable to models Temporis IP151, IP251G, IP301G, IP701G, Alcatel IP2115.
You can operate your phone over a Virtual Private Network (VPN). VPN enables remote users and remote sites to connect to a main corporate network and SIP server with a high level of performance and security.
Configuring VPN using the WebUI consists of enabling VPN and uploading a VPN configuration file. The VPN configuration file (openvpn_client.tar) must contain the following files:
- client.conf
- a keys folder containing
- ca.crt
- client.crt
- client.key
The filename of the VPN client configuration file and certificates must match the names provided above. For more information about configuring VPN, visit our extranet or contact your Technical Support team.
| Setting | Description | Range | Default |
| VPN Enable | Enables or disables the phone to connect using the OpenVPN client.If VPN is enabled, but not connected, all SIP traffic will continue to route via the LAN IP.If VPN is enabled and connected, all SIP traffic will route via the VPN tunnel. The exception is the web server, which will still be accessible via the LAN IP. | 0:Disabled1: Enabled | 0 |
| network.vpn.enable | |||
| VPN Config (file upload) | Browse to and upload the VPN configuration file | blank | |
| file.vpn.advanced_config | openvpn_client.tar. |
Contacts
Local Directory
On the Local Directory page, you can manage your local directory entries. You can sort, edit, dial, delete, and add contact information. In some models, this page will be shown as "Shared Directory", since contacts will be made available to registered handsets too.
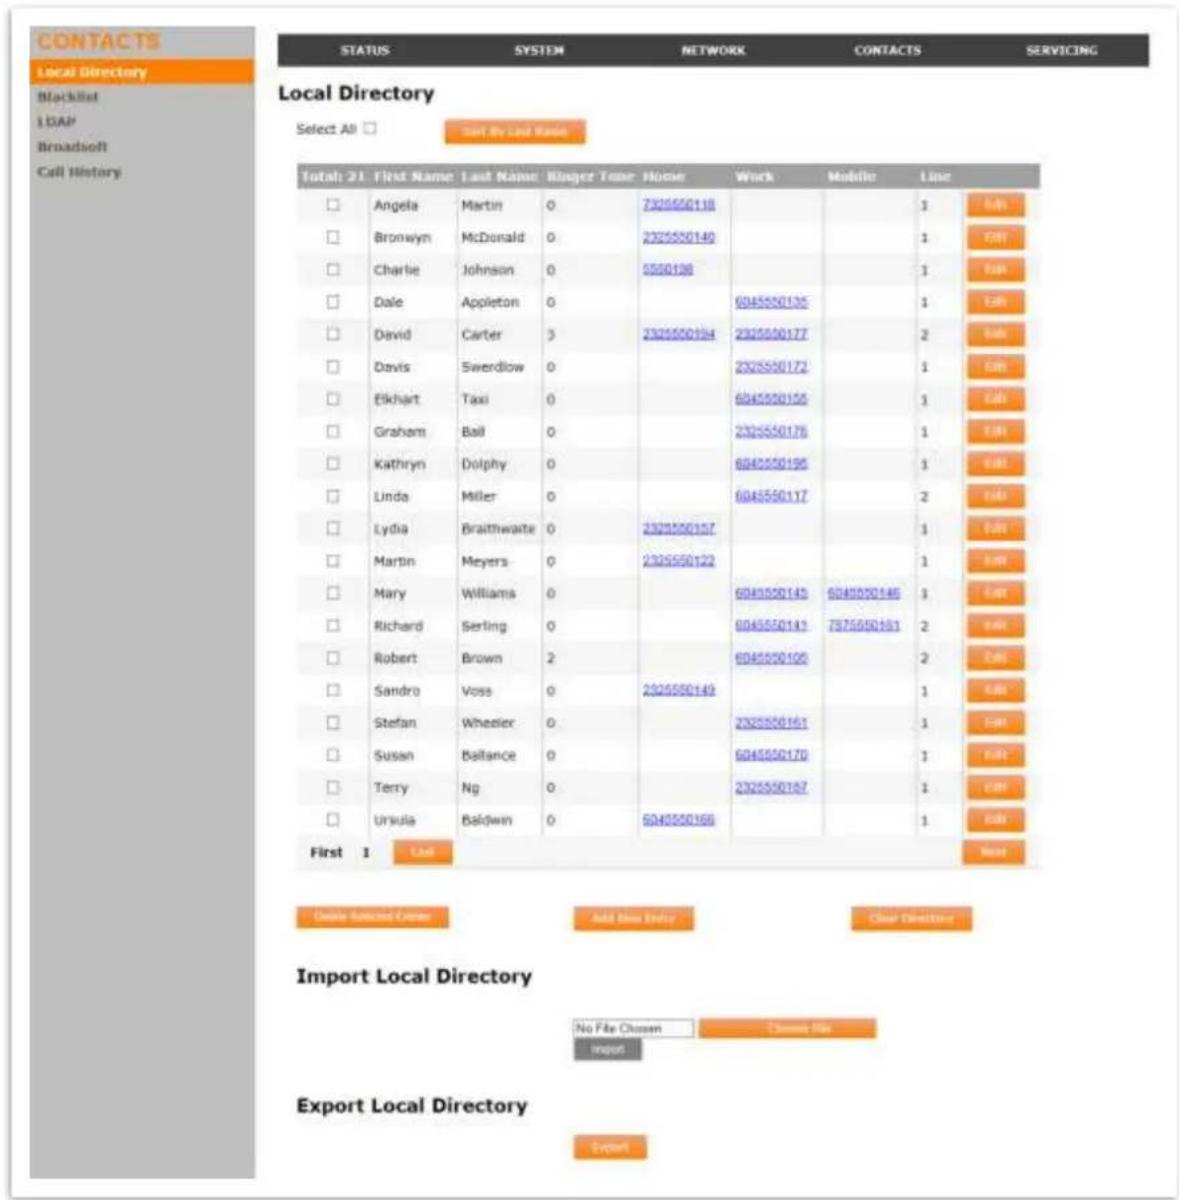
Maximum number of entries is model-dependent: up to 1000 for IP151, IP251G, IP301G, IP701G and IP2115, up to 200 entries for the rest of models, except6 for IP100 and IP150 which support up to 100.
In order to back up your contacts or import another local directory file, the page also allows you to export and import your phone's local directory.
The Local Directory lists entries on multiple pages, with 20 entries per page. Click Next, First, Last, or a page number to view the desired page of entries.
ALCATEL
home & business phones
You can click on an entry to dial out this number. This feature can be enabled/disabled using configuration files, and is enabled by default. See next subchapter, or go to "provisioning" Module: Provisioning Settings on page 214.
NOTE: You can also use the phone menu to manage local directory entries. For more information, see Quick User Guides.
The following table describes the buttons available on the Local Directory page.
| Click | To... |
| Sort by Last Name | Sort the list by last name. |
| Edit | Edit information for an entry |
| Last | View the last page of entries. |
| Next | View the next page of entries. |
| First | View the first page of entries. |
| Delete Selected Entries | Delete selected entries from the directory. Click Select All to select every entry on the page you are viewing. |
| Add New Entry | Add a new directory entry. |
| Clear Directory | Delete all Directory entries. |
| Choose file | Import a directory file. |
| Export | Export the directory. |
To add a new directory entry:
- Click Add New Entry.
The Add New Local Directory Entry page appears.
ALCATEL
home & business phones
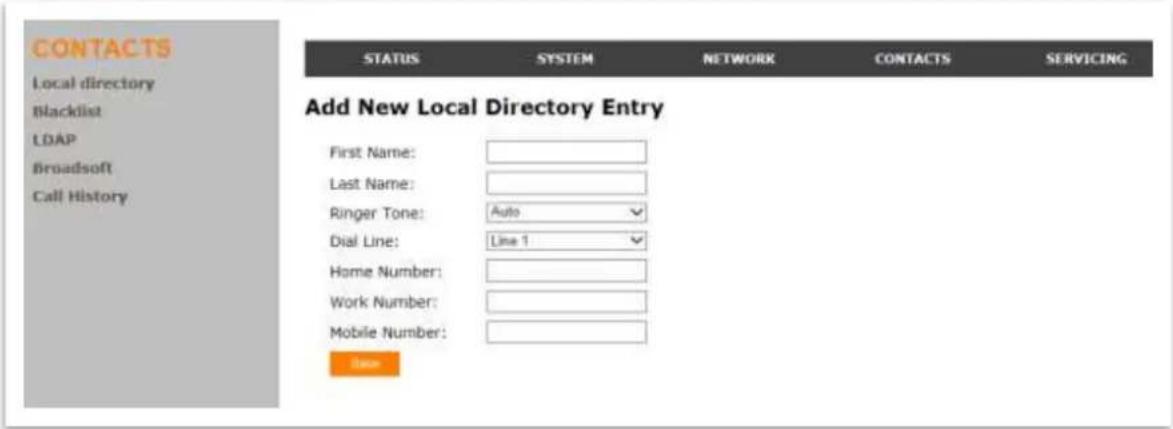
- Enter the required information as indicated in the following table. At minimum, a first and last name are required.
Create New Entry
| Setting | Description | Range | Default |
| Call Block (not on WUI) | Blocks incoming calls with caller ID matching the directory entry. | Enable, Disable | Disable |
| First Name | Enter the appropriate names in these fields. The maximum length of the first name and last name fields is 15 characters. | n/a | blank |
| Last Name | |||
| Ringer Tone | Sets a unique ringer tone for calls from this directory entry. | Auto, Tone 1–10 | Tone 1 |
| Dial Line | Sets the line used when you dial this directory entry. | Default Account, Account 1–3 | Line 1 |
| Home Number | Enter the appropriate names and numbers in these fields. | string | blank |
| Work Number | |||
| Mobile Number |
Directory Import/Export
The best way to create a directory file for import is to first export the directory from the phone. The directory can be exported as an .xml or .csv file (model dependent). After exporting the file, open it in an .xml or csv editor and add or modify entries.
ALCATEL
home & business phones
NOTE: When importing a .csv file, you can select whether the first line should be treated as a header and ignored for the import.
Importing a directory file adds the imported directory entries to existing entries. Therefore, it is possible to have duplicate entries after importing a directory file. If you are importing a "complete" directory file with the aim of replacing the entire current directory, use Select All and Delete Selected Entries to clear the directory before importing the file.
NOTE: Using the configuration file, you can set whether an imported directory file adds to or replaces existing entries. See next subchapter or "file" Module: Imported File Settings.
Directory files in .xml format have the following tags:
| Local Directory WebUI field | Directory file XML tag |
| First Name | |
| Last Name | |
| Home Number | |
| Work Number | |
| Mobile Number | |
| Line | |
| Call Block (not on WebUI) | |
| Ringer Tone |
Directory Import using configuration files
You can also upload your local directory via configuration files. Related parameters are as follows:
| Setting | Description | Range | Default |
| Contact Import url (append mode, not in WUI) | Sets the url from which the phone will try to fetch the directory file during provisioning process. The URL must point to an xml file formatted as described above. Contacts in the xml file will be appended to existing entries. | URI | blank |
| file.contact.directory.append |
ALCATEL
home & business phones
| Contact Import url (overwrite mode, not in WUI) | Sets the url from which the phone will try to fetch the directory file during provisioning process.The URL must point to an xml file formatted as described above. Contacts in the xml file will overwrite existing entries. | URI | blank |
| file.contact.directory.overwrite | |||
| Click-to-dial (Not in WUI) | Enables or disables the capability to dial a contact entry by clicking on it in the WUI. | 0:Disabled1: Enabled | 1 |
| provisioning.click_to_dial |
Black List
On the Black List page, you can manage those contacts whose incoming calls you would like to block.
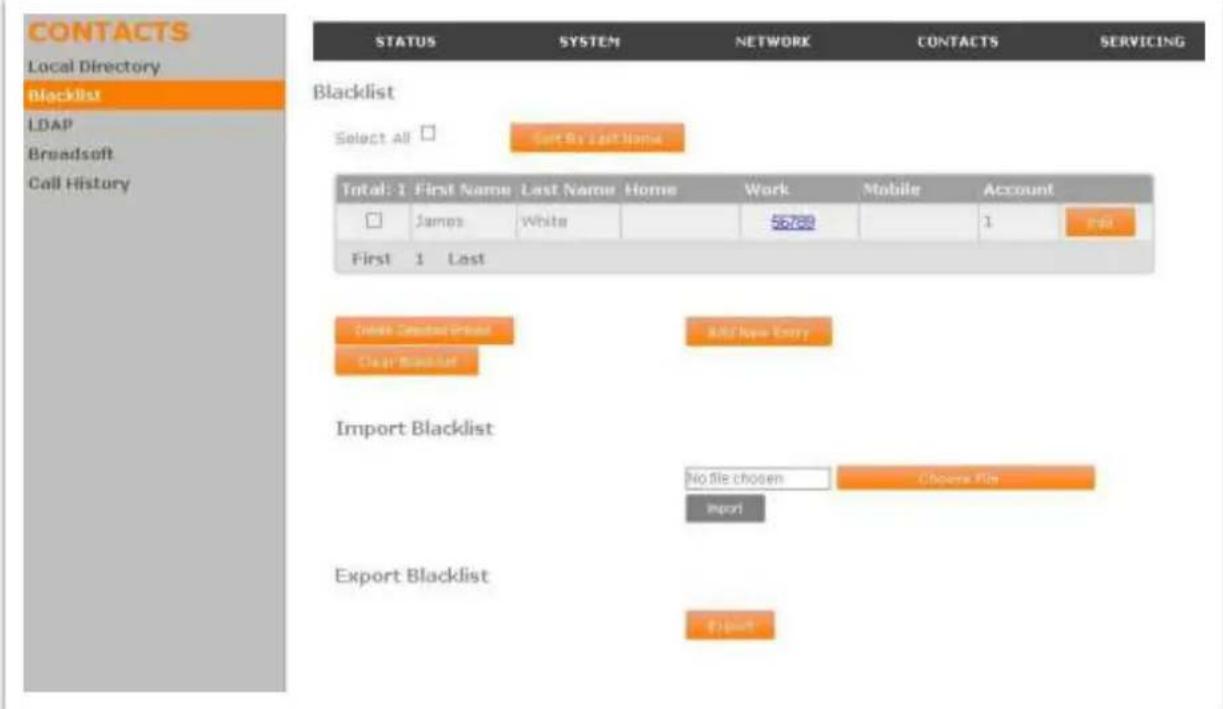
You can sort, edit, dial, delete, and add blacklist entries. Maximum number is the same as for Contacts. In order to back up your blocked contacts or import others, the page also allows you to export and import your phone's black list.
The blacklist lists entries on multiple pages, with 20 entries per page. The interface and modus operandi are similar to Local Directory, so we will only repeat relevant aspects here.
ALCATEL
home & business phones
Black List Import/Export
The best way to create a black list file for import is to first export the directory from the phone as an .xml or .csv file (model dependent). After exporting the file, open it in an .xml or .csv editor and add or modify entries.
You can import your modified directory file by clicking on "Import" after browsing and selecting it.
NOTE: When importing a .csv file, you can select whether the first line should be treated as a header and ignored for the import
Directory files in .xml format have the following tags:
| Black List WebUI field | Black List file XML tag |
| First Name | |
| Last Name | |
| Home Number | |
| Work Number | |
| Mobile Number | |
| Line |
NOTE: You can also use the phone menu to manage your Black List. For more information, see Quick User Guides.
Black List Import using configuration files
You can also upload your local black list via configuration files during provisioning. Related parameters are as follows:
| Setting | Description | Range | Default |
| Black List Import url (append mode, not in WUI) | Sets the url from which the phone will try to fetch the black list file during provisioning process.The URL must point to an xml file formatted as described above. | URI | blank |
ALCATEL
home & business phones
| file.contact.blacklist.append | Contacts in the xml file will be appended to existing entries. | ||
| Contact Import url (overwrite mode, not in WUI) | Sets the url from which the phone will try to fetch the black list file during provisioning process.The URL must point to an xml file formatted as described above. | URI | blank |
| file.contact.blacklist.overwrite | Contacts in the xml file will overwrite existing entries. |
Note: you can also check "file" Module: Imported File Settings on page 230.
LDAP Directory
The phones support remote Lightweight Directory Access Protocol (LDAP) directories. An LDAP directory is hosted on a remote server and may be the central directory for a large organization spread across several cities, offices, and departments. You can configure the phone to access the directory and allow users to search the directory for names and telephone numbers.
On the LDAP page, you can configure your phone to use a remote LDAP directory server.
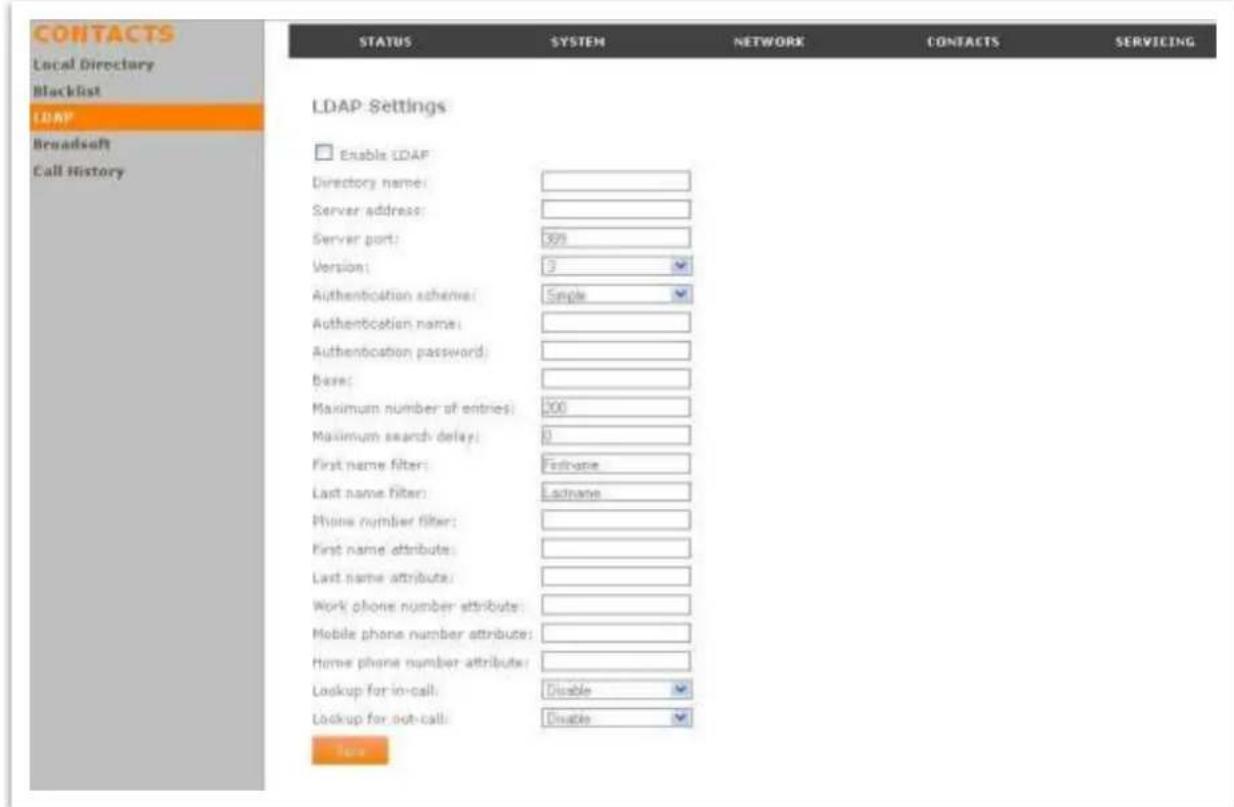
ALCATEL
home & business phones
The LDAP settings are also available as parameters in the configuration file. See "remoteDir" Module: Remote Directory Settings on page 218.
LDAP Settings
| Setting | Description | Range | Default |
| Enable LDAPremoteDir.ldap_enable | Select to enable or disable LDAP remote directory | 0: Disabled1: Enabled | 0 |
| Directory NameremoteDir.ldap_directory_name | Enter the name to be displayed to the user when accessing LDAP directory through phone menu or programmable key. | string | blank |
| Server addressremoteDir.ldap_server_address | Enter LDAP server IP address or fqdn. | string | blank |
| Server PortremoteDir.ldap_server_port | Enter remote LDAP server port. | 0-65535 | 389 |
| LDAP versionremoteDir.ldap_protocol_version | Select protocol version (v2 or v3) your LDAP server uses. | version_2, version_3 | version_3 |
| Authentication schemeremoteDir.ldap_authentication_type | Select scheme your LDAP server uses to authenticate users. | simple, ssl | simple |
| Authentication nameremoteDir.ldap_user_name | Enter name used to authenticate your phone as a user in front of the LDAP server. | string | blank |
| Authentication passwordremoteDir.ldap_password | Enter password to authenticate your phone as a user in front of the LDAP server. | string | blank |
ALCATEL
home & business phones
| Base | Enter base directory (distinguished name of the search base object) for LDAP searches.This sets where the search begins in the directory tree structure. Enter one of more attribute definitions or LDAP field names, separated by commas (no spaces). Your directory may include attributes like "cn" (common name) or "ou" (organizational unit) or "dc" (domain component).For example: ou=sales,dc=alcatel-business,dc=com | string | blank |
| remoteDir.ldap_base | |||
| Maximum number of entries | Enter maximum number of search results to be displayed. Limiting the number of hits can conserve network bandwidth. | 0-32000 | 200 |
| remoteDir.ldap_max_hits | |||
| Maximum search delay (seconds) | Enter timeout before displaying search results. | 0-500 | 0 |
| remoteDir.ldap_search_delay | |||
| First name filter | Enter the first name attributes for LDAP searching. The format of the search filter is compliant to the standard string representations of LDAP search filters (RFC 2254). | string | blank |
| remoteDir.ldap_firstname_filter | |||
| Last name filter | Enter the last name attributes for LDAP searching. The format of the search filter is compliant to the standard string representations of LDAP search filters (RFC 2254). | string | blank |
| remoteDir.ldap_lastname_filter | |||
| Phone number filter | Enter the number attributes for LDAP searching. The format of the search filter is compliant to the standard string representations of LDAP search filters (RFC 2254). | string | blank |
| remoteDir.ldap_number_filter | |||
| First name attribute | Sets the attribute for first name. What you enter here should match the first name attribute for entries on the LDAP server (gn for givenName, for example). This helps ensure that the phone displays LDAP entries in the same format as the Local Directory.. | string | blank |
| remoteDir.ldap_firstname_attribute | |||
| Last name attribute | Sets the attribute for last name. What you enter here should match | string | blank |
ALCATEL
home & business phones
| remoteDir.ldap_lastname_attribute | the last name attribute for entries on the LDAP server (sn for surname, for example). This helps ensure that the phone displays LDAP entries in the same format as the Local Directory. | ||
| Work phone number attribute | Sets the attribute for the work number. What you enter here should match the work number attribute for entries on the LDAP server (telephoneNumber, for example). This helps ensure that the phone displays LDAP entries in the same format as the Local Directory. | string | blank |
| remoteDir.ldap_work_number_attributes | |||
| Mobile phone number attribute | Sets the attribute for the mobile number. What you enter here should match the mobile number attribute for entries on the LDAP server (mobile, for example). This helps ensure that the phone displays LDAP entries in the same format as the Local Directory. | string | blank |
| remoteDir.ldap_mobile_number_attributes | |||
| Other phone number attribute | Sets the attribute for the other number. What you enter here should match the other number attribute for entries on the LDAP server (otherPhone, for example). This helps ensure that the phone displays LDAP entries in the same format as the Local Directory. | string | blank |
| remoteDir.ldap_other_number_attributes | |||
| Lookup for in-call | Enables or disables LDAP incoming call lookup. If enabled, the phone searches the LDAP directory for the incoming call number. If the number is found, the phone uses the LDAP entry for CallerID info. | 0: disabled1: enabled | 0 |
| remoteDir.ldap_incall_lookup_enable | |||
| Lookup for out-call | Select to enable or disable queries to the LDAP remote directory while dialing in order to dynamically suggest users matching dialled digits. | 0: disabled1: enabled | 0 |
| remoteDir.ldap_outcall_lookup_enable |
About LDAP Attribute filters
The LDAP filters on this page give you control over how directory entry search results are determined. For example, consider if gn is the firstname attribute and sn is the lastname attribute in the LDAP search base. The filter
ALCATEL
home & business phones
beginning of the user-entered string. If gn=% is used for a firstname filter, entering "da" returns records such as Daisy, Dale, David, etc.
The filter
The filter (|(gn=%)(sn=%)) returns firstname and lastname records that start with the user-entered string.
LDAP number filters give you the same control over number searches and matches. If for example, you have defined the number attributes telephoneNumber, mobile and otherPhone for Work, Mobile and Other numbers respectively, then the filter (|(telephoneNumber=*)(mobile=*)(otherPhone=*)) will display the correct directory information if the number (from an incoming call, or a dialed number) matches a number in any three of those fields.
The filter telephoneNumber=* will display the correct directory information if the incoming call number matches a number in the "Work" field only.
Broadsoft Directory
The phone supports access to the Broadsoft Phonebook. Users can search for and call contacts that are hosted on the Broadsoft Phonebook. On the Broadsoft Phonebook Settings page, you must enter the path and credentials to enable the phone to access the Broadsoft Phonebook. Check with your service provider for more details.
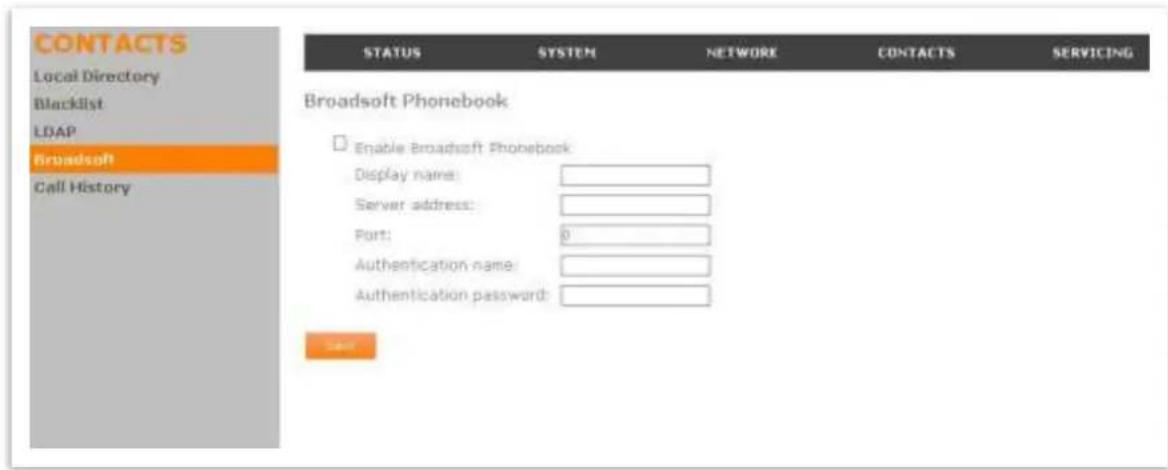
| Setting | Description | Range | Default |
| Enable Broadsoft Phonebook | Select to enable or disable Broadsoft remote directory | 0: Disabled1: Enabled | 0 |
| remoteDir.broadsoft_enable |
ALCATEL
home & business phones
| Broadsoft display name | Enter the name to be displayed to the user when accessing Broadsoft directory through phone menu or programmable key. | string | Blank |
| remoteDir.broadsoft_display_name | |||
| Server address | Enter Broadsoft directory server IP address or fqdn. | string | Blank |
| remoteDir.broadsoft_server | |||
| Server port | Enter Broadsoft directory server port | 0-65535 | 0 |
| remoteDir.broadsoft_port | |||
| Broadsoft authentication name | Enter user name for authentication in front of Broadsoft directory server. | string | Blank |
| remoteDir.broadsoft_user_name | |||
| Broadsoft authentication password | Enter password for authentication in front of Broadsoft directory server. | string | blank |
| remoteDir.broadsoft_password |
Remote XML Phonebook
This feature is applicable to models Temporis IP151, IP251G, IP301G, IP701G and Alcatel 2115. In those models it will be offered as one more option on the left side bar for Contacts WUI pages.
Up to three server-hosted Remote XML directories can be configured, with a total of 5000 entries supported. The 5000 entries can be shared across the three remote XML directories.
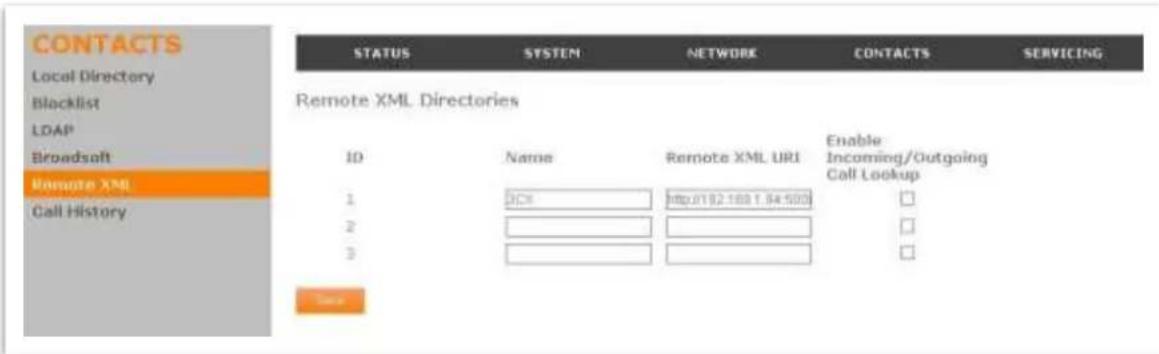
When the user selects a remote directory to view on his phone, the phone will sync with the directory server.
ALCATEL
home & business phones
Sync failed will be displayed if any of the following failure conditions is encountered:
• Server not reachable
- Remote XML directory file is not available
- Invalid XML directory file
Remote XML Directory Settings
| Setting | Description | Range | Default |
| Name | Sets the name of the directory as it will appear on the VSP736 Directory list.The following order applies to the Directory list when multiple server-based directories are enabled:1. Local2. Blacklist3. LDAP4. Broadsoft5. Remote XML directory 16. Remote XML directory 27. Remote XML directory 3Any Remote XML directories will move up the list if LDAP and/or Broadsoft directories are not enabled. | string | Blank |
| remoteDir.xml.x.namex=1,2 or 3 | |||
| Remote XML URI | Enter the location of the XML directory file, from which the phone will sync and retrieve directory entries. | URI | Blank |
| remoteDir.xml.x.urix=1,2 or 3 | |||
| Enable Incoming/Outgoing Call Lookup | Enables/disables the call lookup feature for incoming and outgoing calls. | 0:disabled1: enabled | 0 |
| remoteDir.xml.x.call_lookup_enablex=1,2 or 3 |
Remote XML Directory Format
The following shows a sample single-entry file which can be used in a remote XML directory.
Note that the tags are configurable to match different syntax requirements; default tags are the same as those defined for the Local Directory.
ALCATEL
home & business phones
<?xml version="1.0" encoding="utf-8"?>
<DIR_ENTRY>
<DIR_ENTRY_NAME_FIRST>John</DIR_ENTRY_NAME_FIRST>
<DIR_ENTRY_NAME_LAST>Smith</DIR_ENTRY_NAME_LAST>
<DIR_ENTRY_NUMBER_OTHER>3333</DIR_ENTRY_NUMBER_OTHER>
<DIR_ENTRY_NUMBER_WORK>1111</DIR_ENTRY_NUMBER_WORK>
<DIR_ENTRY_NUMBER_MOBILE>2222</DIR_ENTRY_NUMBER_MOBILE>
</DIR_ENTRY>
Should your pbx or service provider require different tag naming for their supported XML Phonebook, use the table below to see how to configure them.
| Setting | Description | Range | Default |
| Entry tagremoteDir.xml.x.contact_entry_tagx=1,2 or 3 | Sets the name of the tag used to describe each directory entry | string | DIR_ENTRY |
| First Name tagremoteDir.xml.x.first_name_tagx=1,2 or 3 | Sets the name of the tag used to describe the first name within an entry | string | DIR_ENTRY_NAME_FIRST |
| Last Name tagremoteDir.xml.x.last_name_tagx=1,2 or 3 | Sets the name of the tag used to describe the last name within an entry | string | DIR_ENTRY_NAME_LAST |
| Work Number tagremoteDir.xml.x.work_number_tagx=1,2 or 3 | Sets the name of the tag used to describe Work number within an entry | string | DIR_ENTRY_NUMBER_WORK |
| Mobile Number tagremoteDir.xml.x.mobile_number_tagx=1,2 or 3 | Sets the name of the tag used to describe Mobile phone number within an entry | string | DIR_ENTRY_NUMBER_MOBILE |
| Other Number tagremoteDir.xml.x.other_number_tagx=1,2 or 3 | Sets the name of the tag used to describe Other number within an entry | string | DIR_ENTRY_NUMBER_OTHER |
ALCATEL
home & business phones
Call History
On Call History page you can review your call log details. Missed, received and dialled calls are shown in separate tables.
You can also click-to-call entries in these lists. You can disable click-to-dial using configuration file parameter provisioning.click_to_dial. See "provisioning" Module: Provisioning Settings on page 214.
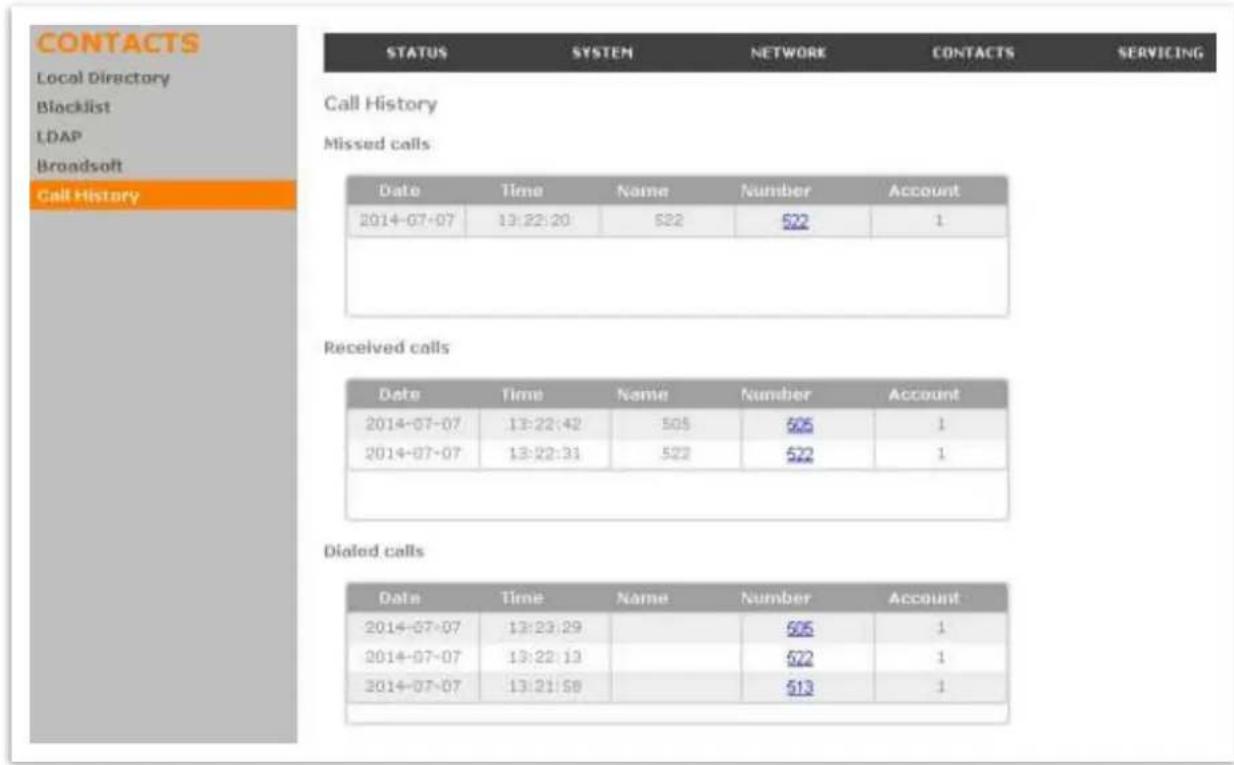
ALCATEL
home & business phones
Servicing
Reboot
Reboot page allows you to perform a remote restart of your phone by clicking on the "Reboot" button.
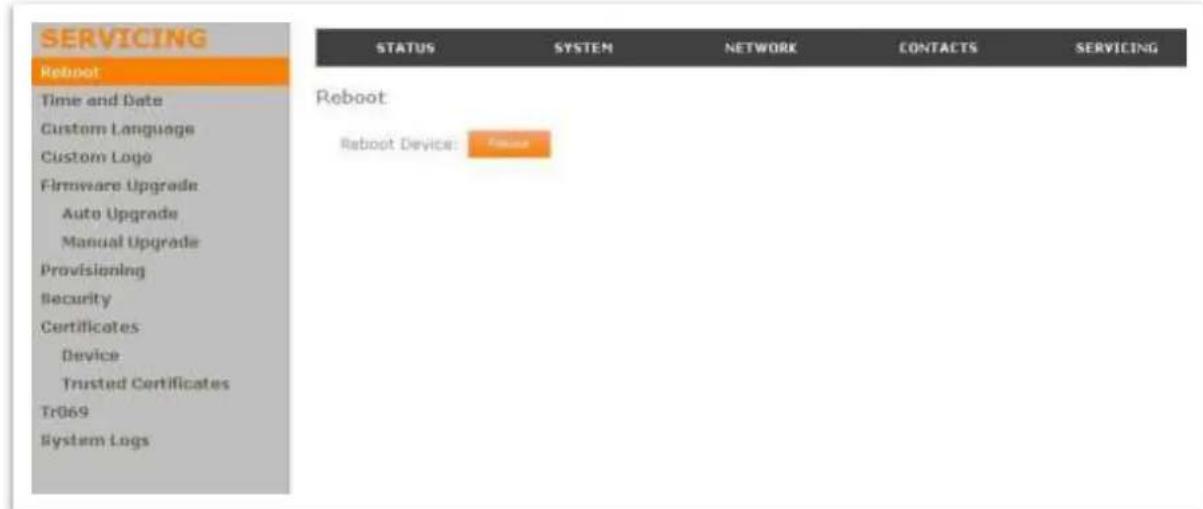
On all products (except IP2x15) restart can also be triggered via phone menu (Menu>>4.Admin settings>>5.Restart phone).
On Temporis IP150, IP151, IP300, IP301G, IP700G and IP701G you may also use the shortcut "Long press ↩ key"
Time and Date
On the Time and Date menu, you can manually set the time and date, and the time and date formats. You can also set the system time to follow a Network Time Protocol (NTP) Server (recommended) or you can set the time and date manually.
After changing any settings on this page, click Save to save them.
ALCATEL
home & business phones
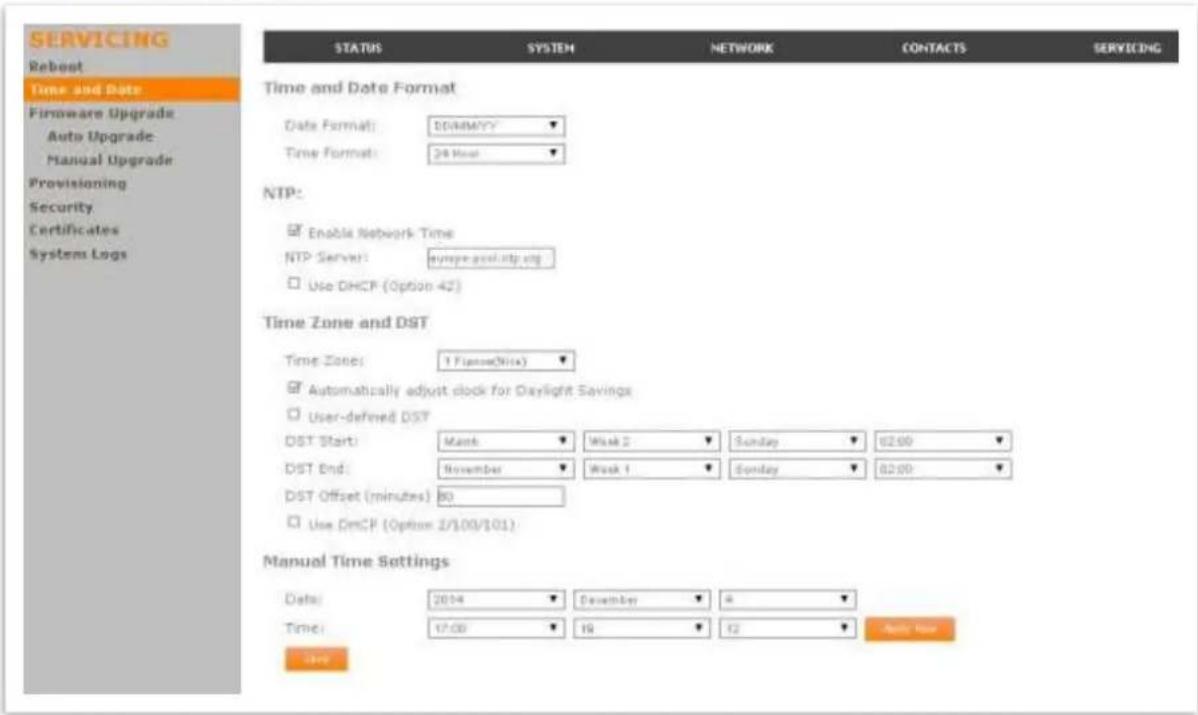
Time and Date Settings
| Setting | Description | Range | Default |
| Date Format | Sets the date format. | DD/MM/YY, MM/DD/YY, YY/MM/DD | DD/MM/YY |
| time_date.date_format | |||
| Time Format | Sets the clock format. | 1: 24 Hour | 1 |
| time_date.24hr_clock | 0: 12 Hour |
Network Time Settings
| Setting | Description | Range | Default |
| Enable Network Time time_date.ntp_server | Enables or disables getting time and date information for your phone from the Internet. | 1: Enabled0: Disabled | 1 |
| NTP Server time_date.ntp_server_addr | If Enable Network Time is selected, enter the URL of your preferred time server. | IPv4 or fqdn | europe.pool.ntp.org |
ALCATEL
home & business phones
| Use DHCP (Option 42) | With Enable Network Time is selected, tick this option to use DHCP to locate the time server. Option 42 specifies the NTP server available to the phone. When enabled, the phone obtains the time in the following priority: 1. Option 42 2. NTP Server 3. Manual time. | 1: Enabled0: Disabled | 0 |
| time_date.ntp_dhcp_option |
Time Zone and Daylight Savings Settings
| Setting | Description | Range | Default |
| Time Zonetime_date.selected_timezone | Select your time zone. | See Appendix | Europe/Paris |
| Automatically adjust clock for Daylight Savingstime_date.daylight_saving_auto_adjust | Select to adjust the clock for daylight savings time according to the NTP server and time zone setting. To disable daylight savings adjustment, leave this setting and User-defined Daylight Savings Time unchecked. | 1: Enabled0: Disabled | 1 |
| User-defined Daylight Savings Timetime_date.daylight_saving_user_defined | Select to set your own start and end dates and offset for Daylight Savings time.To disable daylight savings adjustment, leave this setting and Automatically adjust clock for Daylight Savings unchecked. | 1: Enabled0: Disabled | 0 |
| Daylight Savings Starttime_date.daylight_saving_start_monthtime_date.daylight_saving_start_weektime_date.daylight_saving_start_daytime_date.daylight_saving_start_hour | Set the start date and time for user-defined daylight savings: Month, week, day, and hour. | ||
| Daylight Savings Endtime_date.daylight_saving_end_monthtime_date.daylight_saving_end_weektime_date.daylight_saving_end_daytime_date.daylight_saving_end_hour | Set the end date and time for user-defined daylight savings: Month, week, day, and hour. |
ALCATEL
home & business phones
| Daylight Savings Offset (minutes) | Sets the daylight savings offset (in minutes) if you are in a region that observes daylight savings time. Selecting a setting other than Off immediately sets the clock ahead by the selected time. | 0, 30, 60 | 60 |
| time_date.daylight_saving_amount | |||
| Use DHCP (Option 2/100/101) | If Enable Network Time is selected, tick to use DHCP to determine the time zone offset. Options 2, 100 and 101 determine time zone information. | 1: Enabled0: Disabled | 0 |
| time_date.timezone_dhcp_option | |||
| NTP server update interval (secs)(Not in WUI) | Enter interval in seconds to refresh time information with NTP server | 0-4294967295 | 1000 |
| time_date.ntp_server_update_interval |
Manual Time Settings
| Setting | Description |
| Date | Select the current year, month, and day. |
| Time | Sets the current hour, minute, and second. |
Click Apply Now to start the phone using the manual time settings.
Custom Language
This feature is applicable to models Temporis IP151, IP251G, IP301G and IP701G. In those models it will be offered as one more option on the left side bar for Servicing WUI pages.
On the Export Translation page, you can export WebUI and/or phone language strings. After exporting language strings, you can use the resulting file as the basis for a custom language translation file (.tpk file).
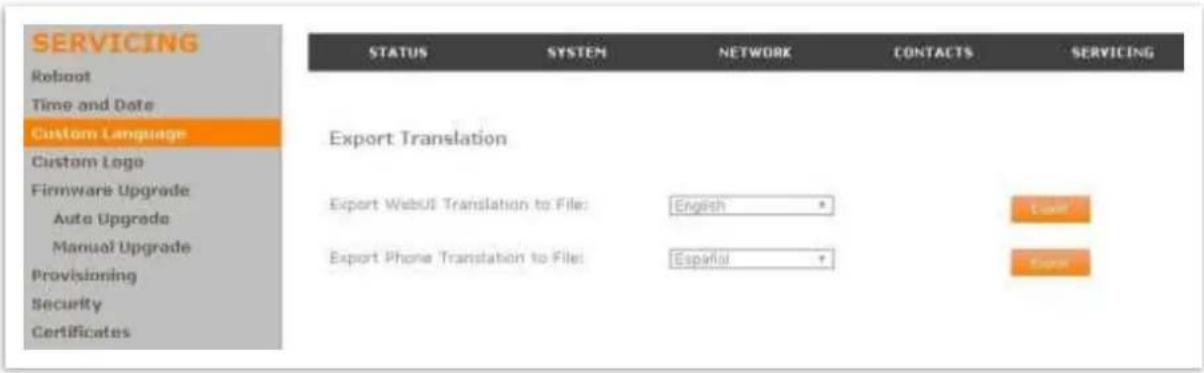
ALCATEL
home & business phones
You can import one custom language for use on the device user interface and the WebUI. The custom language adds to the existing languages available with the firmware. Separate translation files are required for the device user interface and the WebUI.
Importing a custom language can only be done using the configuration file. See "file Module: Imported File Parameters". For details on creating and formatting a translation file, see the Custom Language document at our extranet
The available languages for export are identical to the WebUI and Phone Language lists described in "User Preferences".
The filenames of the exported language files will be:
- WebUI:
- -webui.tpk - Device MMI:
- -phoneui.tpk
Custom Logo
This feature is applicable to models Temporis IP151, IP251G, IP301G and IP701G. In those models it will be offered as one more option on the left side bar for Servicing WUI pages.
You can use the WUI to upload a custom logo to be displayed on your phone's idle screen and during bootup. For more information about formatting a custom logo file, see "Adding a Custom Logo"
On this page, you can also reset the bootup and idle logos to factory defaults. The default logo for bootup and idle mode is the Alcatel logo.
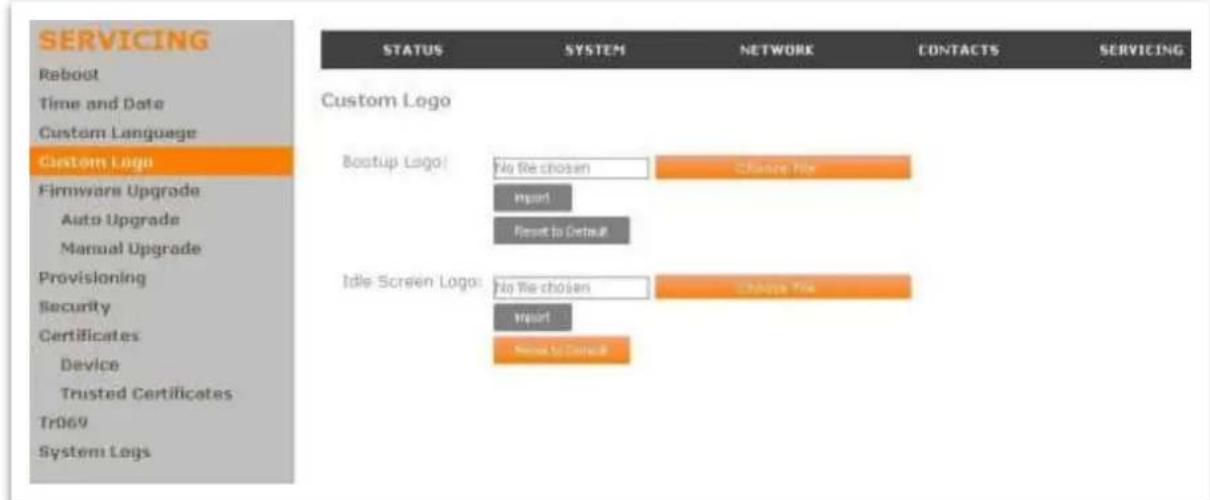
NOTE: All desktop and Conference phones support Custom logo via provisioning file as previously described in "Adding a Custom Logo"
ALCATEL
home & business phones
| Setting | Description | Range | Default |
| Bootup logo | Import a custom logo shown during bootup. For logo specifications, see “Adding a Custom Logo” | URI | blank |
| file.bootup_logo | |||
| Idle screen logo | Import a custom logo shown on the idle screen or screensaver. For logo specifications, see “Adding a Custom Logo” | URI | blank |
| file.idle_logo |
Firmware Upgrade
You can update the phone with new firmwares using the following methods:
Retrieving a firmware update file from a remote host computer and accessed via a URL. This central location may be arranged by you, an authorized distributor, or your SIP service provider. See Firmware Server Settings.
Using a file located on your computer or local network. No connection to the Internet is required. Consult your distributor for access to firmware update files. See Manual Firmware Update Settings.
For those models with an embedded DECT base, this is applicable to the desktop phone or base firmware and also to the cordless handsets IP15 firmware if you have any. Handset firmware will be stored in the desk set or base unit memory first, and then uploaded to the handset when requested. Note only one handset can be upgraded at a time.
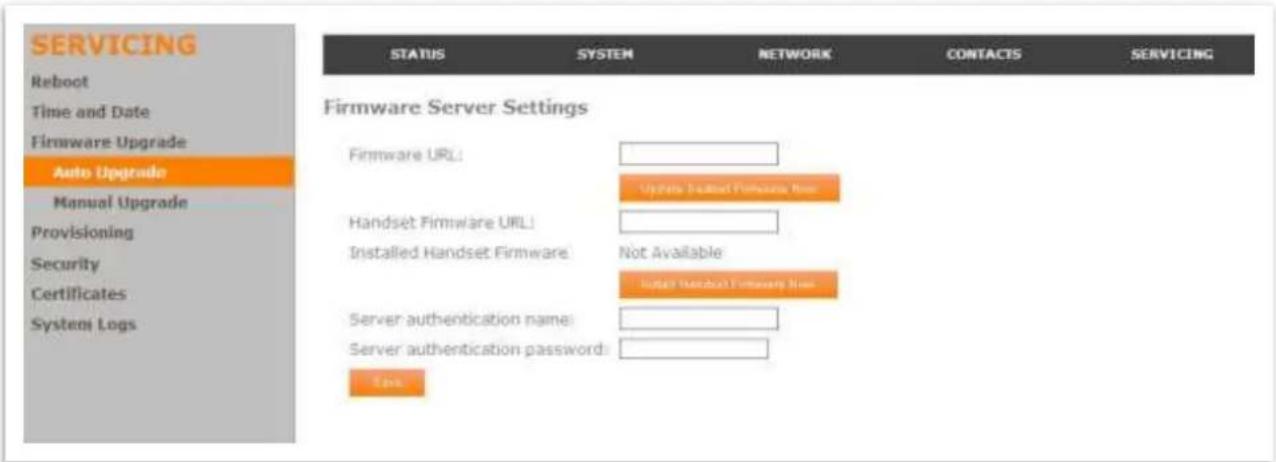
Firmware Server Settings
| Setting | Description | Range | Default |
ALCATEL
home & business phones
| Firmware URLprovisioning.firmware_url | The URL where the desk set or base firmware update file resides. This should be a full path, including the filename of the firmware file. | string | blank |
| Server authentication nameprovisioning.fw_server_username | Authentication username for the firmware server | string | blank |
| Server authentication passwordprovisioning.fw_server_password | Authentication password for the firmware server | string | blank |
| Handset Firmware URLprovisioning.handset_firmware_url | The URL where the cordless handset firmware update file resides. This should be a full path, including the filename of the firmware file. | string | blank |
To update the deskset or base unit firmware from a remote host:
- Enter the URL where the firmware update file resides. This should be a full path, including the filename of the firmware file.
- Click Upgrade firmware now.
Note: This URL will be saved when you click Save on the Admin Settings page, and will be used next time. You can also configure the phone to check for firmware updates at regular intervals or at reboot. See the Provisioning page.
To update the cordless handset(s) firmware from a remote host:
- Enter the URL where the IP15 handset firmware update file resides. This should be a full path, including the filename of the firmware file.
- Click Install Handset firmware now.
Note: This URL will be saved when you click Save on the Admin Settings page. You can also configure the phone to check for firmware updates at regular intervals or at reboot. See the Provisioning page.
- Launch the handset upgrade from the handset Admin Settings menu. Menu>Admin Settings>Firmware update.
Note: Default password is the same as for the WUI. Use "*" handset key to toggle text entry mode.
The handset will first check whether there are updates available and will ask for your confirmation to proceed. Once confirmed, upgrade will take place over the air (SUOTA)
- If you have more handsets to upgrade (IP2015), wait for the process to be completed and then repeat step 3 from the next handset, and so on.
Manual Firmware Update and Upload
On the Manual Firmware Update Settings page, you can prompt the phone to immediately download a new firmware file stored in your computer or local network.
For those models with an embedded DECT base, this is applicable to the desk set or base unit firmware and also to the cordless handsets IP15 firmware if you have any. Handset
ALCATEL
home & business phones
firmware will be stored in the deskset or base memory first, and then uploaded to the handset when requested.
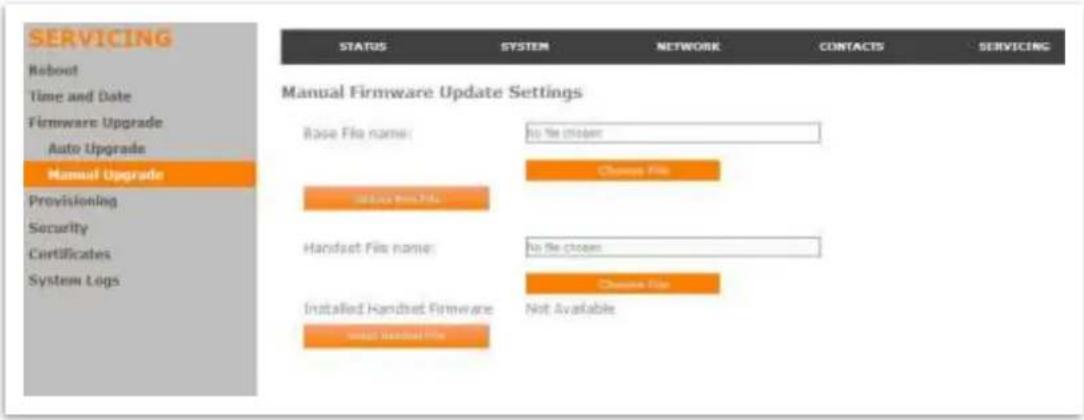
To update the deskset or base firmware using a file on your computer or local network:
- On the Manual Firmware Update page, click Choose File to locate and open the firmware update file.
- Click Update from File.
The device will update its firmware and restart.
To update the cordless handset IP15 firmware using a file on your computer or local network:
- On the Manual Firmware Update page, click Choose File to locate and open the handset firmware update file.
- Click Install Handset File.
The phone will load the handset firmware file into its memory.
- Launch the handset upgrade from the handset Admin Settings menu. Menu>Admin Settings>Firmware update.
Note: Default password is the same as for the WUI. Use "*" handset key to toggle text entry mode.
The handset will first check whether there are updates available and ask for your confirmation to proceed. Once confirmed, upgrade will take place over the air (SUOTA).
- If you have more handsets to upgrade (IP2015), wait for the process to be completed and then repeat step 3 from the next handset, and so on.
ALCATEL
home & business phones
Provisioning
Provisioning refers to the process of acquiring and applying new settings for the device using configuration files retrieved from a remote computer. After a phone or system is deployed, subsequent provisioning can update it with new settings; for example, if your service provider releases new features.
With automatic provisioning, you enable the device to get its settings automatically—the process occurs in the background as part of routine system operation. Automatic provisioning can apply to multiple phones simultaneously.
With manual provisioning, you update settings (configuration and/or firmware) yourself. Manual provisioning can only be performed on one device at a time.
On the Provisioning page, you can enter settings that will enable the device to receive automatic configuration and firmware updates. The Provisioning page also allows you to manually update configuration from a locally stored configuration file using an Import function. You can also export the device's configuration—either to back it up or to apply it to another device—to a file on your computer.
The provisioning process functions according to the Resynchronization settings and Provisioning Server Settings. The device checks for the provisioning URL from the following sources in the order listed below. If one of these sources is disabled, not available, or has not been configured, the phone proceeds to the next source until reaching the end of the list.
- DHCP Options—this setting is set on the WebUI and/or the configuration file. Before enabling the DHCP options on the Provisioning page, ensure that DHCP is enabled on the Network > Basic settings page. Otherwise, enabling DHCP for provisioning will not work.
- Preconfigured URL—this setting is set on the WebUI and/or the configuration file.
After changing any settings on this page, click Save to save them.
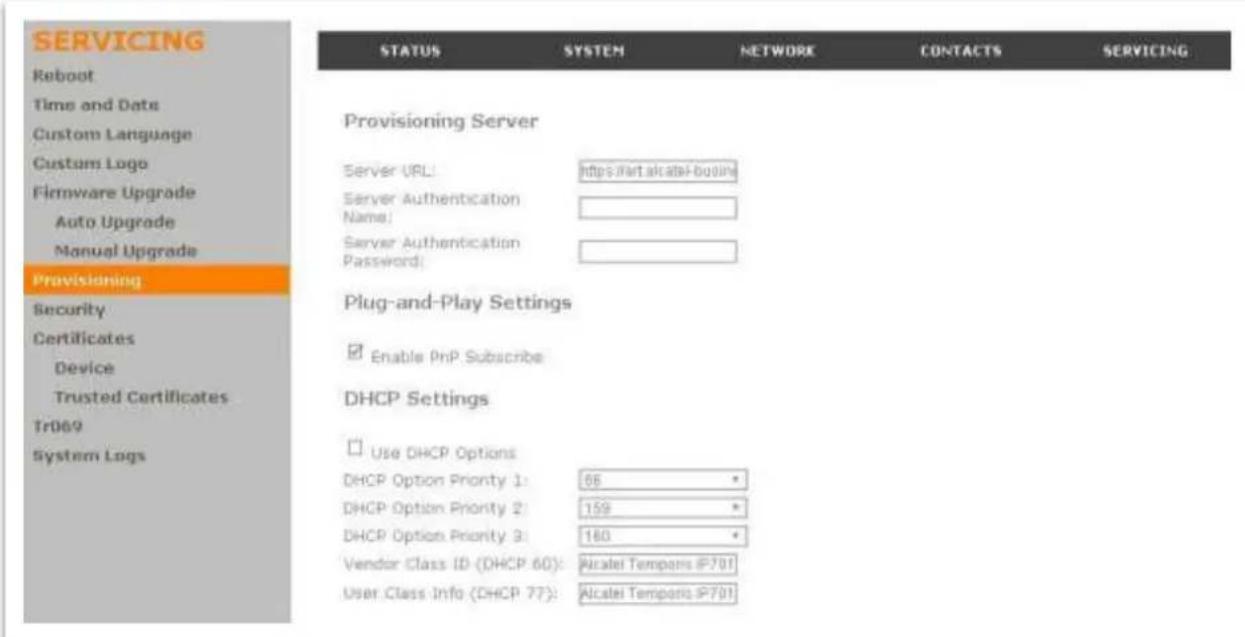
ALCATEL
home & business phones
Provisioning Settings
| Setting | Description | Range | Default |
| Provisioning server | URL of the provisioning file(s). The format of the URL must be RFC 1738 compliant, as follows:://:@:/""@" may be empty.""" can be omitted if you do not need to specify the port number. | URLftp, tftp, http, https | https://art.atlinks.com |
| Server authentication name | User name for access to the provisioning server | n/a | n/a |
| provisioning.server_username | |||
| Server authentication password | Password for access to the provisioning server | n/a | n/a |
| provisioning.server_password |
Plug-and-Play Settings
| Setting | Description | Range | Default |
| Enable PnP Subscribe | Enables the phone to use SIP SUBSCRIBE message for provisioning URL discovery. It takes the highest precedence among all provisioning options. pnp-->dhcp options-->fixed url. | 1:Enabled 0:Disabled | 1 |
| provisioning.pnp_enable | |||
| Response timeout for PnP | Time in seconds the device will be sending PnP SUBSCRIBE and waiting for a response before giving up. | 1-60 | 10 |
| pnp_response_timeout |
DHCP Settings
| Setting | Description | Range | Default |
| Use DHCP Optionsprovisioning.dhcp_option_enable | Enables the phone to use DHCP options to locate and retrieve the configuration file, starting with the highest priority option.When selected, the phone automatically attempts to get a provisioning server address, and then the configuration file. If DHCP options do not locate a configuration file, then the server provisioning string is checked.Note: Ensure that DHCP is also enabled on the Network > Basic settings page. | 1:Enabled0:Disabled | 1 |
| DHCP Option Priority 1provisioning.dhcp_option_priority_1 | If DHCP is enabled, sets the DHCP Option priority. Select the highest priority option. | 66, 159, 160 | 66 |
| DHCP Option Priority 2provisioning.dhcp_option_priority_2 | If DHCP is enabled, sets the DHCP Option priority. Select the second highest priority option. | 66, 159, 160 | 159 |
| DHCP Option Priority 3provisioning.dhcp_option_priority_3 | If DHCP is enabled, sets the DHCP Option priority. Select the third highest priority option. | 66, 159, 160 | 160 |
| Vendor Class Id (DHCP 60)network.vendor_class_id | DHCP Option 60 is available to send vendor-specific information to the DHCP Server.This way the server can make decisions regarding DHCP options or network parameters to assign to the device. | string | Model dependent, see below |
| User Class Info (DHCP 77)network.user_class | DHCP Option 77 is available to send vendor-specific information to the DHCP Server. | string | Model dependent, see below |
| Product name | DHCP Option 60/77 default value |
| Temporis IP100 | Alcatel Temporis IP100 |
| Temporis IP150 | Alcatel Temporis IP150 |
| Temporis IP151 | Alcatel Temporis IP151 |
| Temporis IP251 | Alcatel Temporis IP251G |
| Temporis IP300 | Alcatel Temporis IP300 |
| Temporis IP301G | Alcatel Temporis IP301G |
ALCATEL
home & business phones
| Temporis IP700G | Alcatel Temporis IP700G |
| Temporis IP701G | Alcatel Temporis IP701G |
| Alcatel IP2015 | Alcatel IP2015 |
| Alcatel IP2115 | Alcatel IP2115 |
| Conference IP1850 | Alcatel IP1850 |
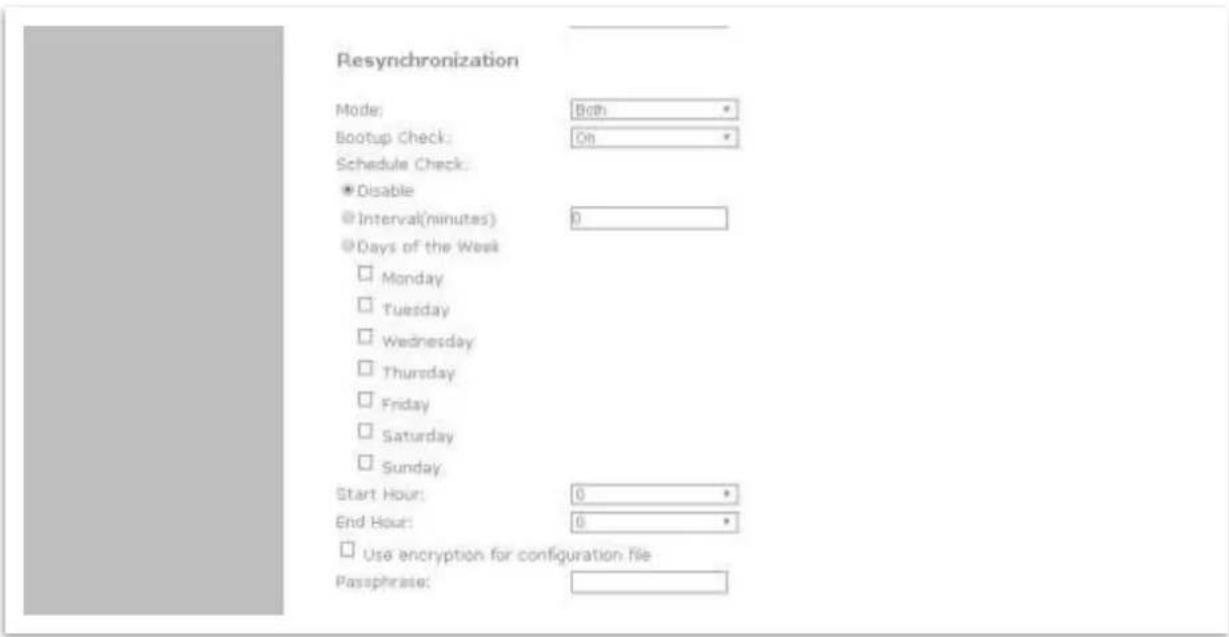
Resynchronization
| Setting | Description | Range | Default |
| Mode | Sets which files the phone checks for at regular intervals.It can check for configuration files, firmware update files (from the URL entered on the Admin Settings page), or both.Note: When checking for both config and firmware files, the firmware URL can be within the config file. This firmware URL takes take precedence over the url on the admin settings page. It will also update the URL on the admin settings page. This allows you to change the firmware URL automatically. | config_only:Configurationfirmware_only: Firmwareconfig_and_firmware: Both | config_and_firmware |
| provisioning.resync_mode |
ALCATEL
home & business phones
| Bootup Check | Sets the phone to check the provisioning URL for new configuration and/or firmware files upon boot up. The update is applied as part of the reboot process. | 1: On0: Off | 1 |
| provisioning.bootup_check_enable | |||
| Schedule check modeDisabled/Interval/ days of the week | Toggles among the 3 possible schedule checking modes. | disable,interval,weekday | disable |
| provisioning.schedule_mode | |||
| Interval (minutes) | Sets an interval, in minutes, for periodically checking for updates. | 0-655350 means no periodic resync will happen | 0 |
| provisioning.resync_time | |||
| Scheduled Weekdays for provisioning | Sets weekdays when checking should take place | List of comma delimited integers, 0 (Sun) to 6 (Sat) | blank |
| provisioning.weekdays | |||
| Start hour on the scheduled day(s) | Select the hour of the day on which the phone checks for updates. | 0-23 | 0 |
| provisioning.weekdays_start_hr | |||
| End hour on the scheduled day(s) | Select the hour of the day on which the phones stops checking for updates. | 0-23 | 0 |
| provisioning.weekdays_end_hr | |||
| Use encryption | Enables an AES-encrypted configuration file to be decrypted before being applied to the phone.Select if the configuration file has been secured using AES encryption.See Securing Configuration Files with AES Encryption. | 0: Disabled1: Enabled | 0 |
| provisioning.crypto_enable |
ALCATEL
home & business phones
| Passphraseprovisioning.crypto_passphrase | If the configuration file has been secured using AES encryption, enter the 16-bit key.See SecuringConfiguration Files with AES Encryption. | String | Blank |
| Remote Check Sync(Not in WUI)provisioning.remote_check_sync_enable | If enabled, the phone will react to a NOTIFY(check-sync) in order to launch automatic provisioning. | 0: Disabled1: Enabled | 1 |
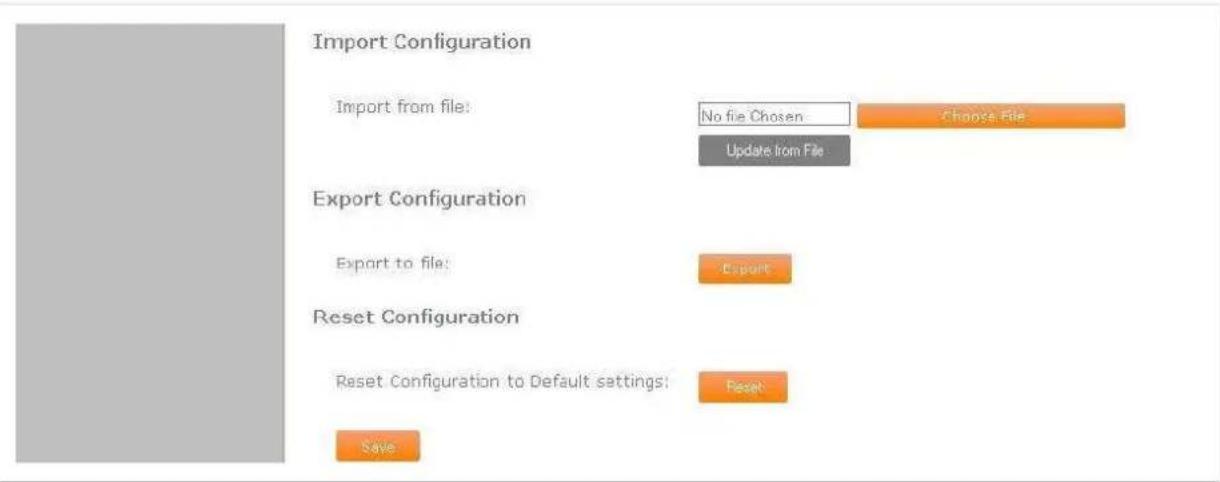
Import Configuration
You can configure the phone by importing a configuration file from your computer or your local network. For more information about configuration file types and configuration file formatting, see Provisioning Using Configuration Files on page 193.
To import a configuration file:
- Click Browse to locate and open the configuration file.
- Click Import.
The phone will update its configuration. If any of the updated settings require the phone to restart, the phone will restart immediately, without waiting for one minute of activity.
Manually importing a configuration file differs from the auto-provisioning process in that the phone does not check whether the file has been loaded before. The configuration file is processed whether or not it is different from the current version.
Export Configuration
ALCATEL
home & business phones
You can export all the settings you have configured on the WebUI and save them as a configuration file on your computer. You can then use this configuration file as a backup, or use it to update other phones.
To export the configuration file:
1. Click Export.
The format of the exported file is
Exporting a configuration file generates two header lines in the configuration file. These header lines provide the model number and software version in the following format:
#Model Number = xxxxxxx
#SW Version = xxxxxxx
You can use the exported file as a general configuration file, and duplicate the settings across multiple units. However, ensure that you edit the file to remove any unit-specific SIP account settings before applying the file to other units.
Please note passwords are NOT exported, for security reasons. Namespaces will be shown on the exported file, but with an empty value. Make sure to populate them again if you wish to reuse to propagate the settings to other units.
Reset Configuration
To reset the phone to its default configuration:
Under Reset Configuration, click Reset.
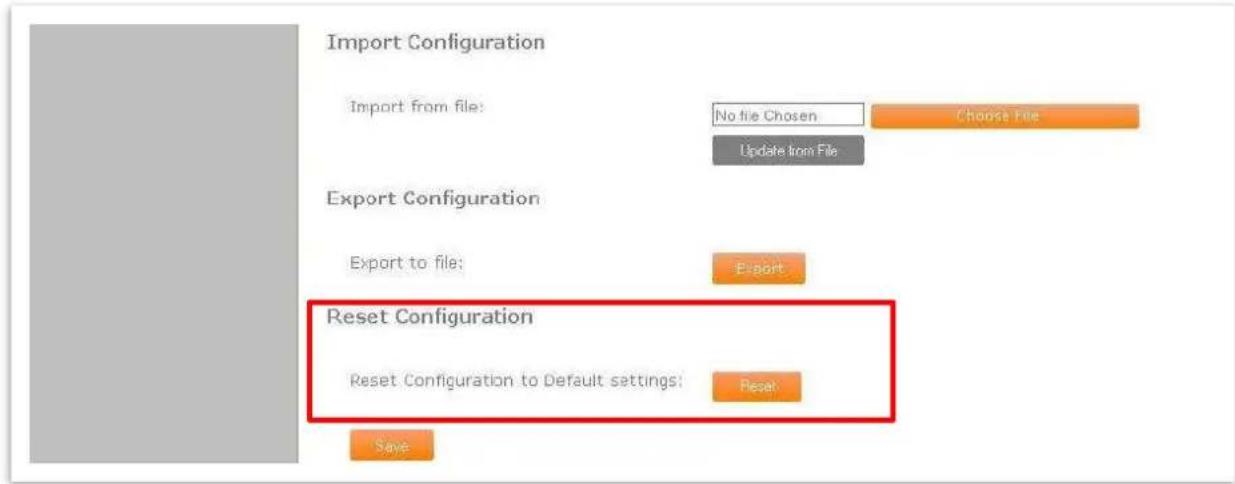
ALCATEL
home & business phones
Security
On the Security page you can reset the admin password, reset the user password, enter web server settings, and configure other security features like phone lock of IP filtering. After changing any settings on this page, press Save to save them.
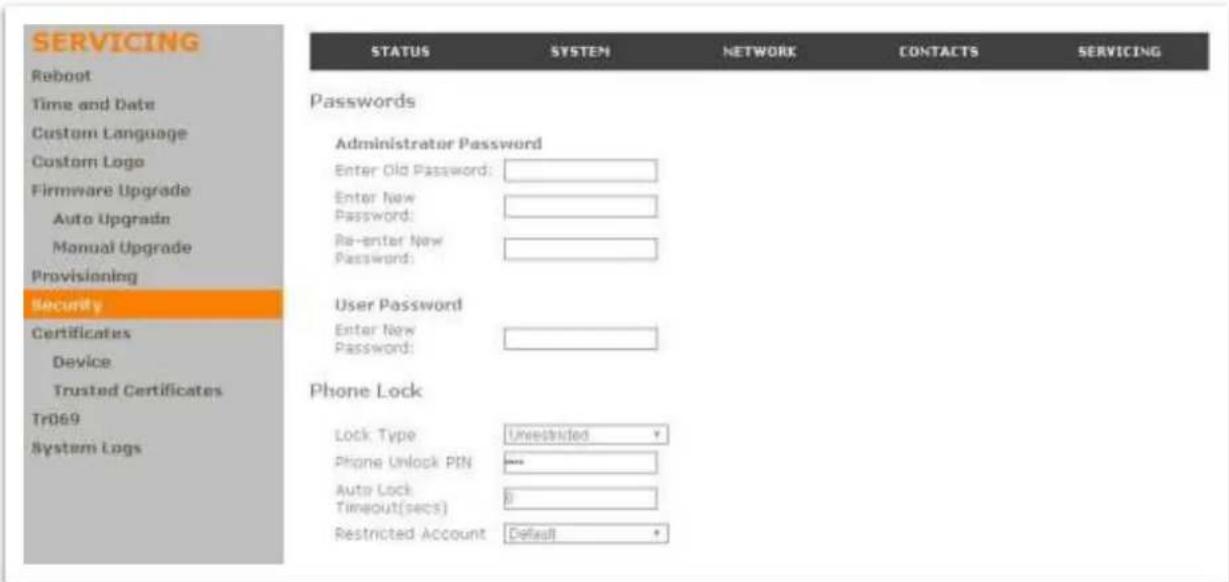
Passwords
Administrator Password
| Setting | Description | Range | Default |
| Admin password: Enter old passwordAdmin password: Enter new passwordAdmin password: Re-enter new passwordprofile.admin.password | Enter admin password.The password is case sensitive and can consist of both numbers and letters. | String | admin |
To change the admin password:
- Enter the old password (for a new phone, the default password is admin).
- Enter and re-enter a new password.
- Click Save.
ALCATEL
home & business phones
User Password
| Setting | Description | Range | Default |
| User password: Enter old passwordUser password: Enter new passwordUser password: Re-enter new passwordprofile.user.password | Enter user password.The password is case sensitive and can consist of both numbers and letters. | String | user |
To change the User password:
- Enter the old password (for a new phone, the default password is user).
- Enter and re-enter a new password. The password is case sensitive and can consist of both numbers and letters.
- Click Save.
Phone lock
This feature is applicable to Temporis IP151, IP251G, IP301G and IP701G.
The Phone Lock feature restricts certain hard keys and features unless the user enters a PIN code. For more information about the phone lock feature, see "Security Menu"
| Setting | Description | Range | Default |
| Lock Type | Unrestricted, Restricted Config, Restricted Call, Emergency Call Only. | disabled, restricted_config, restricted_call, emergency_call_only | disabled |
| phonelock.type | |||
| Phone Unlock PIN | Enter the PIN that the user enters to unlock the phone. | 4-15 digits | 1234 |
| phonelock.pin | |||
| Auto Lock Timeout (secs) | Enter a timeout period in seconds. When the phone becomes idle after being used in unlocked mode, the phone automatically locks after the timeout. | 0-3600 | 0 |
| phonelock.autolock_timeout | |||
| Restricted Account | 0...6 | 0 |
ALCATEL
home & business phones
| phone.lock.restricted_account | Select the account to be used when Phone Lock is active. | (0 stands for the default account) |
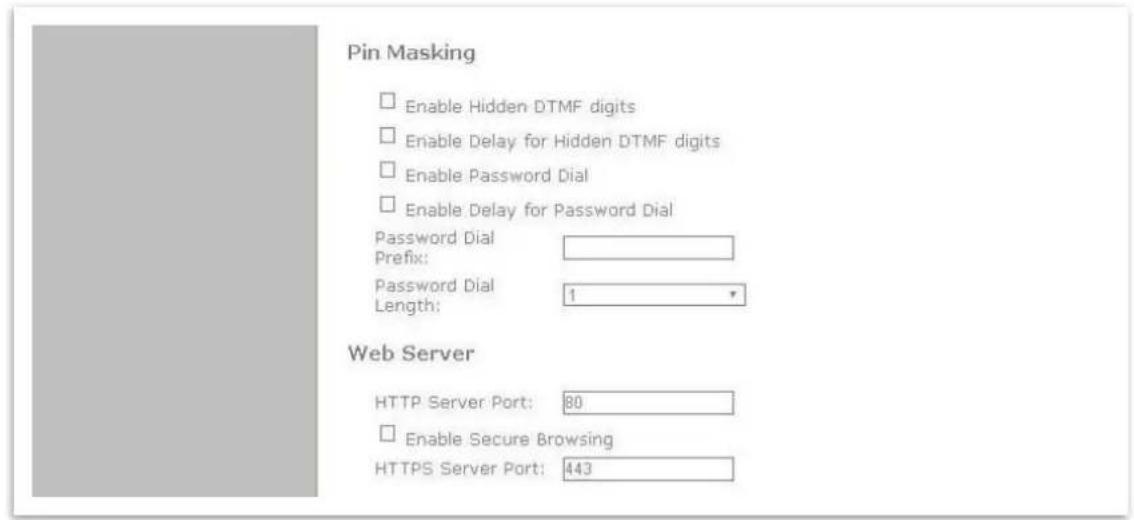
PIN masking
This feature is applicable to Temporis IP151, IP251G, IP301G and IP701G.
The PIN masking feature allows users to hide PIN numbers during call operation. The different types of PIN masking are:
- Hide DTMF digits—when Hide DTMF is enabled, PIN numbers entered during an Active Call are automatically masked.
- Password Dial—when Password Dial is enabled, PIN numbers entered as part of the dial string are hidden. For example, when entering numbers in Pre-Dial or Dial mode, PIN numbers are automatically masked.
- PIN numbers in a dial string are masked in Pre-Dial and Dial modes (including variants of these modes, such as Transfer Setup, Conference Setup, and Incoming Call Forward Setup).
NOTE: Masked PIN numbers are not saved in Redial entries. The masked numbers are stripped out of the dial string before being saved in the Call History
| Setting | Description | Range | Default |
| Enable Hidden DTMF Digits | Enable to mask all DTMF digits entered during an Active Call. | 0:disable1:enable | 0 |
| security.hide_dtmf_enable | Note that unlike Password Dial, there is no prefix parameter and no length parameter, so any DTMF string of any length is masked. |
ALCATEL
home & business phones
| Enable Delay for HiddenDTMF digitssecurity.hide_dtmf_delay_enable | Enable to add a one-second delay before DTMF digits are masked. By default, the digits are masked immediately. | 0:disable1:enable | 0 |
| Enable Password Dialsecurity.pwd_dial_enable | Enable to hide PIN numbers entered as part of the dial string. | 0:disable1:enable | 0 |
| Enable Delay for Password Dialsecurity.pwd_dial_delay_enable | Enable to add a one-second delay before PIN numbers are masked. By default, the PIN number is masked immediately | 0:disable1:enable | 0 |
| Password Dial Prefixsecurity.pwd_dial_prefix | Enter the prefix that serves as an indicator that the next x digits are masked (x being equal to the Password Dial Length). Only the first matched Prefix initiates PIN masking. If additional instances of the Password Dial Prefix appear elsewhere within the dial string, they are ignored. | string | blank |
| Password Dial Lengthsecurity.pwd_dial_length | Enter the PIN number length. All digits within this length are masked. Any digits beyond this length are not masked. For example, if the Password Prefix is 99 and the Password Dial Length is 3, then 9912345 will be rendered as 99***45 | 1-32 | 1 |
Web Server
Web Server Settings
| Setting | Description | Range | Default |
| HTTP Server portweb.http_port | Sets the port where the embedded HTTP server is accessible | 0-65535 | 80 |
| Enable Secure Browsingweb.https_enable | Sets the server to use the HTTPS protocol. | 1: Enabled0: Disabled | 0 |
| HTTPS Server portweb.https_port | Port used by the embedded HTTPS server. | 0-65535 | 443 |
To configure Web Server Settings:
ALCATEL
home & business phones
- Enter the HTTP Server port number. The default setting is 80.
- Enable or Disable Secure Browsing. When enabled, the HTTPS protocol is used, and you must select the HTTPS server port in the next step.
- Enter the HTTPS server port number. The default setting is 443.

natural_image
Blank gray image with no visible content, text, or symbolsTrusted Servers
□ Accept SIP account servers only
Trusted IP
□ Accept only allowed IP for incoming requests
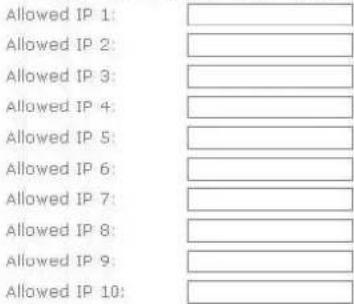

Trusted servers
This feature is applicable to Temporis IP151, IP251G, IP301G and IP701G.
The Trusted Servers setting provides a means of blocking unauthorized SIP traffic. When enabled, each account's Registration server, SIP server, Outbound Proxy server and Backup Outbound Proxy server will be used as sources for trusted SIP traffic. All unsolicited SIP traffic (for example, INVITE, NOTIFY, unsolicited MWI, OPTIONS) will be blocked unless it is from one of the trusted servers with the enabled accounts.
If additional trusted sources are required beyond what has been specified with the enabled accounts (for example, if IP dialing or other types of server traffic need to be secured), use the Trusted IP settings on the Security page.
| Setting | Description | Range | Default |
| Accept SIP account servers onlytrusted_ip.only_accept_sip_account_servers | Enable or disable using the account servers as sources for trusted SIP traffic. | 0:disable1:enable | 0 |
ALCATEL
home & business phones
Trusted IP
This feature is applicable to Temporis IP151, IP251G, IP301G and IP701G.
In addition to the Trusted Servers setting, incoming IP traffic can be filtered using an "Allowed IP" list of IP addresses. When this means is enabled, all unsolicited IP traffic will be blocked unless it is from one of the trusted IP addresses on the "Allowed IP" list.
You can enter the "Allowed IP" list in the 10 fields on the "Trusted IP" section. Entries on the "Allowed IP" list must be specified as IP addresses (IPv4 or IPv6). Three formats are supported for entries on the "Allowed IP" list:
-
IP range specified using CIDR notation (defined in rfc4632). IPv4 or IPv6 address followed by a prefix; for example, 192.168.0.1/24.
-
IP range specified with a pair of starting and ending IPv4 or IPv6 addresses, separated by '-' (for example, 192.168.0.1-192.168.5.6).
- No space before or after '-'
• Both starting IP & ending IP have to be with the same IP version
- Starting IP has to be smaller than the ending IP; otherwise, all traffic will be dropped.
- Single IP address in IPv4 or IPv6.
NOTE: To ensure WebUI access after configuring Trusted IP, you must include the IP of the Web Browser on the "Allowed IP" list
| Setting | Description | Range | Default |
| Accept only allowed IP for incoming requests | Enable or disable using the "Allowed IP" list to filter all IP traffic. | 0:disable1:enable | 0 |
| trusted_ip.only_accept_allowed_ip | |||
| Allowed IP 1-10 | Enter IP addresses or address ranges to be used as sources of authorized IP traffic. | IPv4 or IPv6, IP range in IPv4 or IPv6 | blank |
| trusted_ip.x.allow_ipx=1...10 |
ALCATEL
home & business phones
Certificates
This section applies to models Temporis IP100, IP150, IP300, IP700G, Alcatel IP2015 and Conference IP1850.
TLS (Transport Layer Security) transport requires security certificates to establish a secure connection between phone and server.
Your phone embeds a web server certificate for this purpose. You can also upload one using WUI and/or configuration files.
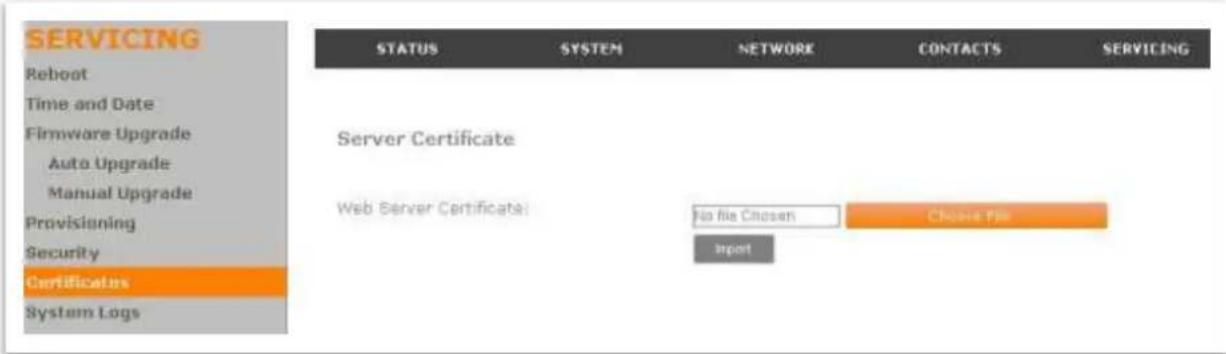
To upload a web server certificate:
- Under Server Certificate, click Choose File.
- Locate the certificate file and click Open.
- On the Certificates page, click Import.
In the configuration file, the web certificate is specified by the file.https_user.certificate parameter.
You can also upload other certificates for different applications on the phone:
| Setting | Description | Range | Default |
| Import Server Certificatefile.https_user.certificate | Enter url to download Server Certificate from | URI | blank |
| Import Provisioning Certificatefile.provisioning.trusted.certificate | Enter url to download Provisioning Certificate from | URI | blank |
| Only accept trusted Provisioning certificateprovisioning.check_trusted_certificate | When enabled, only trusted servers can be used for https provisioning | 0: Disabled1: Enabled | 0 |
| Import TLS transport Certificatefile.sips.trusted.certificate.x | Enter url to download TLS Certificate from | URI | blank |
| Only accept trusted TLS certificatesip_account.x.check_trusted_certificate | When enabled, account x using TLS will only accepted trusted servers | 0: Disabled1: Enabled | 0 |
ALCATEL
home & business phones
| Use first TLS Certificate for all accounts | When enabled, different certificates for different accounts will not be required for TLS transport | 0: Disabled1: Enabled | 0 |
| sip_account.use_first_trusted_certificate_for_all | |||
| Import LDAP Certificate | Enter url to download LDAP certificate from | URI | blank |
| file.ldap.trusted.certificate | |||
| Only accept trusted LDAP certificate | When enabled, only trusted servers can be used for LDAP | 0: Disabled1: Enabled | 0 |
| remoteDir.ldap_check_certificate | |||
| Import Broadsoft Certificate | Enter url to download Broadsoft directory Certificate from | URI | blank |
| file.broadsoft.trusted.certificate | |||
| Only accept trusted Broadsoft certificate | When enabled, only trusted servers can be used for Broadsoft directory | 0: Disabled1: Enabled | 0 |
| remoteDir.broadsoft_check_certificate |
Enhanced Certificate Management
This section applies to models Temporis IP151, IP251G, IP301G, IP701G and Alcatel IP2115.
For these devices, you can add two types of certificates using the WebUI or the provisioning file:
- Device—A single Device Certificate can be uploaded so that other parties can authenticate the phone in the following cases:
- When the phone acts as a web server for the user to manage configurations.
- When the phone acts as a client for applications where HTTP is supported.
- Trusted—Trusted Certificates are for server authentication with secured HTTP transaction in the following applications: SIP signaling, Provisioning, Firmware, LDAP directory service, and Broadsoft directory service. Up to 20 trusted certificates can be installed.
Device Certificate
Your phone has an embedded device certificate. Should you need to override it with a custom certificate, you can do so through the WUI or config file settings.
ALCATEL
home & business phones
The WUI will indicate whether the certificate in use is the Factory default or your custom one. You can always return to the default Factory certificate.
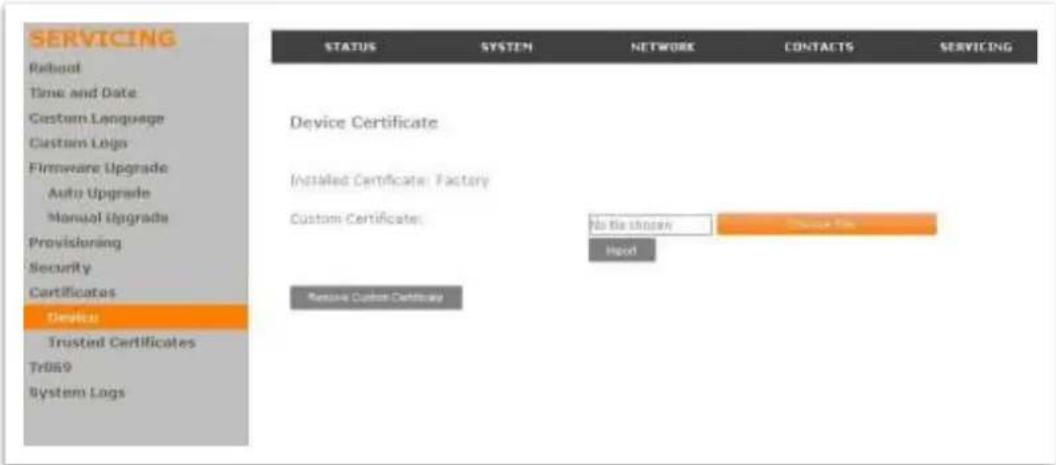
To upload a device certificate:
- On the Device Certificate page, click Choose File
- Locate the certificate file and click Open
- On the Device Certificate page, click Import.
Trusted Certificates
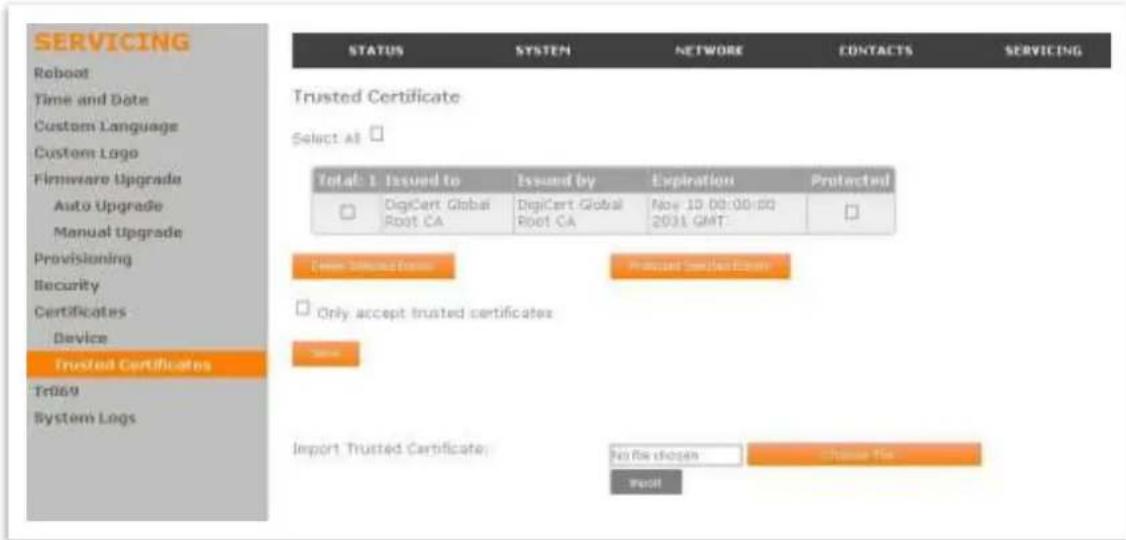
On the Trusted Certificate page, you can:
Import up to 20 trusted certificates.
Delete individual (or all) certificates.
Protect certificates by selecting them in the Protected column, and then clicking Protect Selected Entries. Protected certificates cannot be selected for deletion and are not removed during a reset to factory defaults.
Select Only accept trusted certificates to enable server authentication. Deselecting this option disables server authentication.
ALCATEL
home & business phones
Please check section "file" Module on page 230 for more details on other actions you can perform with certificates using configuration files.
TR069
This section applies to models Temporis IP151, IP251G, IP301G, IP701G and Alcatel IP2115.
The Broadband Forum's Technical Report 069 (TR-069) defines a protocol for remote management and secure auto-configuration of compatible devices. On the TR069 page, you can enable TR-069 and configure access to an auto-configuration server (ACS).
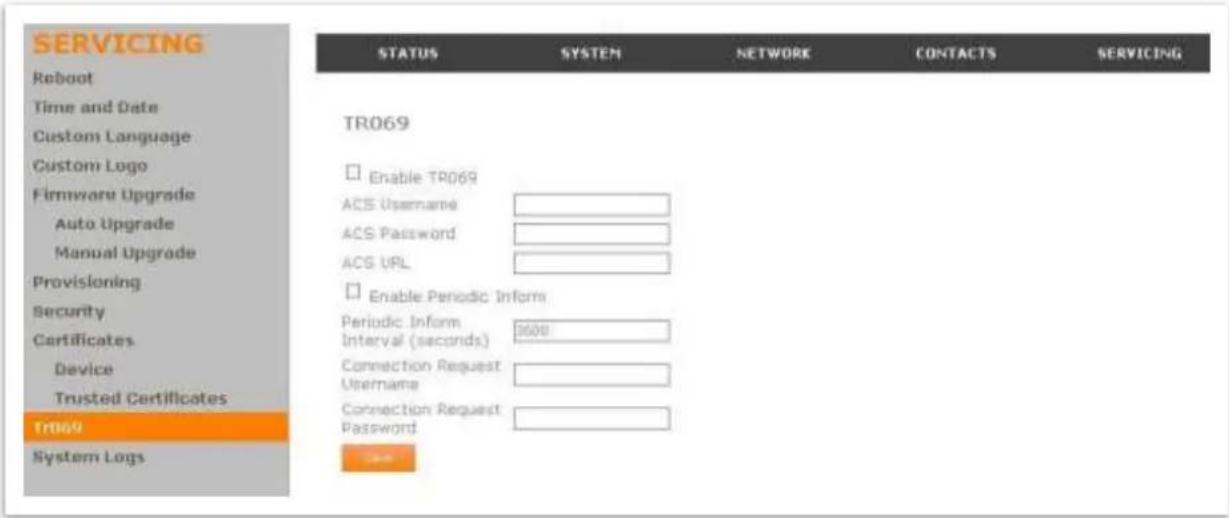
| Setting | Description | Range | Def |
| Enable TR069tr069.enable | Enable/Disable TR-069 subsystem. | 1:Enabled0:Disabled | 0 |
| ACS Username tr069.acs.username | User name used for ACS authentication | string | blank |
| ACS Password tr069.acs.password | Password used for ACS authentication. | string | blank |
| ACS URL tr069.acs.url | URL used to contact the ACS (for example, http://my.acs:9675/path/to/somewhere/). | URI | blank |
| Enable Period Inform tr069.periodic_inform.enable | Enable/Disable periodic inform method calls. | 1:Enabled0:Disabled | 0 |
ALCATEL
home & business phones
| Periodic Inform Interval (seconds) | Periodic inform method calls interval. | 1-65535 | 3600 |
| tr069.periodic_inform.interval | |||
| Connection Request Username | If the ACS wants to communicate with the device, it must offer the matching Connection Request user name. When the device sends the report to ACS for the first time, it contains information for this. | string | blank |
| tr069.connection_request.username | |||
| Connection Request Password | If the ACS wants to communicate with the device, it must offer the matching Connection Request password. When the device sends the report to ACS for the first time, it contains information for this. | string | blank |
| tr069.connection_request.access_password |
ALCATEL
home & business phones
System Logs
On the System Logs page, you can enter settings related to system logging activities. You can also generate and download network traces.
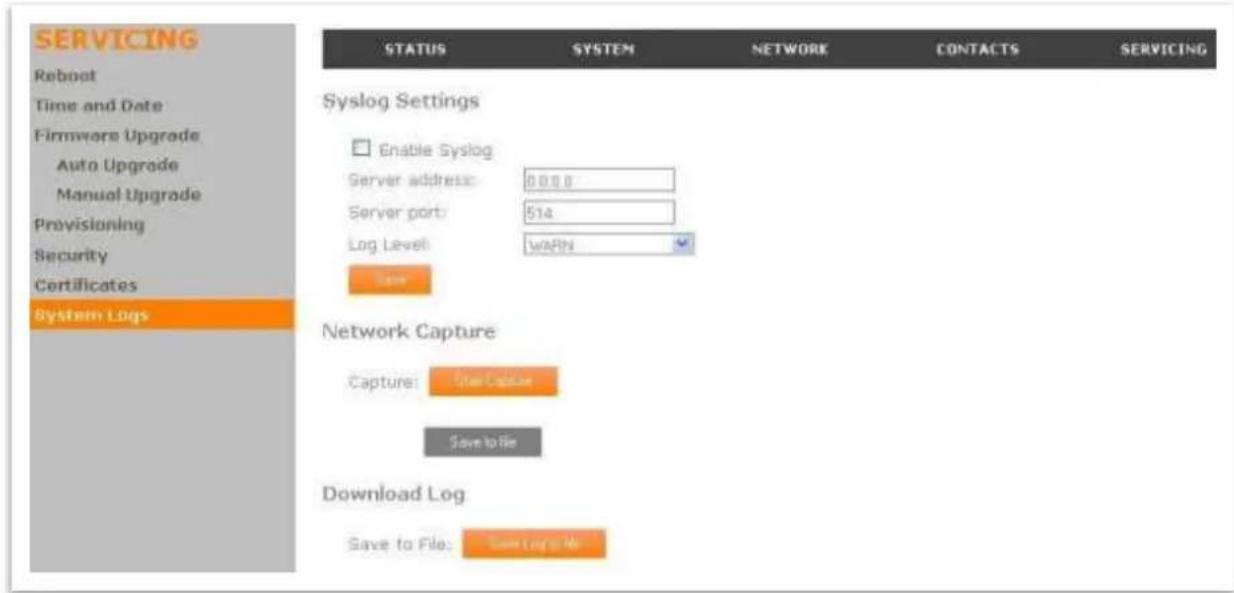
Syslog Settings
| Setting | Description | Range | Default |
| Enable Syslog | Enable log output to syslog server. | 1: Enabled0: Disabled | 0 |
| log.syslog_enable | |||
| Server Address | Syslog server IP address. | IPv4 | blank |
| log.syslog_server_address | |||
| Server port | Syslog server port. | 0-65535 | 514 |
| log.syslog_server_port | |||
| Log Level | Sets the level of logging. The higher the level, the larger the debug output. | 5: ALL4: DEBUG3: INFO2: WARNING1: ERROR0: CRITICAL | 2 |
| log.syslog_level |
After entering the Syslog Settings, click Save.
The logging levels are:
CRITICAL: Operating conditions to be reported or corrected immediately (for example, an internal component failure or file system error).
ERROR: Non-urgent failures—unexpected conditions that won't cause the device to malfunction.
WARNING: An indication that an error or critical condition can occur if action is not taken. INFO: Normal operational messages.
ALCATEL
home & business phones
DEBUG: Developer messages for troubleshooting/debugging purposes.
Network Capture
To generate a pcap trace press "Start Capture"
To stop tracing, press "Stop Capture"
To download your capture press "Save to file"
Download Log
To download a copy of the system logs press "Save log to file"
ALCATEL
home & business phones
Provisioning Using Configuration Files
Provisioning using configuration files is the quickest way to configure multiple phones. You can place configuration files on a provisioning server, where the phones can retrieve them and update their configuration automatically.
Configuration files have the extension .cfg and contain parameters that define various phone settings. To edit a configuration file, open it with a text editor such as Notepad.
Configuration files consist of settings that are grouped into modules. Most of the modules group their settings in the same way that settings are grouped on the WebUI. For example, the "time_date" module contains the same settings that are on the Time and Date WebUI page.
Using the WebUI, you can also import a configuration file and apply the configuration file settings to that phone. For more information, see Provisioning.
An alternative method to configure your phones supported on models IP151, IP251G, IP301G and IP701G is using xml config objects. For more information refer to the XML Framework document.
Resynchronization—Configuration File Checking
You can select a number of options to set when the phone checks for new configuration files. This process of checking for configuration files is called Resynchronization.
Resynchronization options are available on the WebUI Provisioning page, but you can also include them in a configuration file.
The resynchronization options are:
Mode—sets the phone to check for a configuration file only, a firmware update file only, or both types of file.
Bootup: configuration file checking at reboot is enabled or not
Remote check-sync—enables you to start a resynchronization remotely using your hosted server's web portal. If the update includes settings that require the phone to reboot, the phone will reboot after one minute of inactivity. The Remote check-sync settings are available only in the configuration file, not the WebUI.
Repeatedly, at a defined interval from 0 (disabled) to 65535 minutes (45 days).
The Provisioning Process
The phone's automatic provisioning process is as follows:
-
Find configuration server location. The phone will try to fetch its configuration information from a PNP-fetched url, or from the URLs indicated in the DHCP options (if enabled), following the priority set for opts 66, 159, 160. If the download is not successful, then it will try the fixed url set at "Provisioning server string"
-
Download the configuration files.
The phone fetches the following two files:
General file:
MAC-specific file:
, where
ALCATEL
home & business phones
| Product name | |
| Temporis IP100 | Temporis_IP100 |
| Temporis IP150 | Temporis_IP150 |
| Temporis IP300 | Temporis_IP300 |
| Temporis IP700G | Temporis_IP700G |
| Alcatel IP2015 | IP2015 |
| Conference IP1850 | IP1850 |
Thus, for example for Temporis IP300 the files would be Temporis_IP300.cfg and Temporis_IP300_
Note: if the url the phone obtains for provisioning file location is a full path including file name, then only this one file download will be attempted.
-
Check updates. The phone maintains a list of the last loaded provisioning files and their digital signature. The phone compares its current configuration against the files it finds on the provisioning server.
-
If any of the changed settings require the phone to restart, the phone restarts.
During provisioning, the phone reads the configuration file and validates each module and setting are validated. The phone considers a setting valid if it is:
a valid data type
formatted as a valid setting
within a valid data range
part of a module that passes an integrity check. That is, the module's settings are consistent and logical. For example, in the "network" module, if DHCP is disabled, but no static IP address is specified, the module will fail the integrity check and none of the settings will apply.
Invalid modules or invalid settings are skipped and logged as ERRORs in the system log, but will not interrupt the provisioning process. The system log will include the module parameters that have not been applied. A recognized module with unrecognized settings will cause all other settings in that module to be skipped.
A successful configuration or firmware update is reported as an INFO message in the system log.
See Appendix A: Configuration File Settings for the options and value ranges available for each configuration file setting.
Phone Restart
If the phone needs to restart after an auto-update, the restart happens only after the phone has been idle for one minute.
To prevent users from delaying the update process, or to avoid phone restarts that might interfere with incoming calls, either set the "repeatedly" resynchronization interval to a suitable period, or upload any new configuration file(s) to your provisioning server after
ALCATEL
home & business phones
work hours so that the phones will download the file(s) when there is little or no call activity.
When you update the phone by importing a configuration file using the WebUI, the phone restarts immediately after applying any new settings that require a restart, regardless of whether the phone is idle.
Configuration File Types
The phone is able to retrieve and download two types of configuration file. Depending on your requirements, you may want to make both types of configuration file available on your provisioning server.
The two configuration file types are a general configuration file and a MAC-specific configuration file. The types differ in name only. The formatting of the files' content is identical.
The general configuration file contains settings that are required by all phones in the system.
The MAC-specific configuration file is a file that only a single phone can retrieve. The MAC-specific configuration file name contains a phone's MAC address and can only be retrieved by the phone with a matching MAC address.
The filename formats for both files are:
General file:
Both the general and MAC-specific files can contain any of the available configuration settings. A setting can appear in the general configuration file or the unit configuration file, or both files, or neither file. If a setting appears in both files, the setting that is read last is the one that applies.
When the phone fetches both a general and a MAC-specific configuration file, the general file is processed first. You can configure a setting for most of your phones in the general file, and then overwrite that setting for just a few phones using the MAC-specific file.
Data Files
The configuration file can also include links to data files other than firmware for product customization.
Link to firmware file is included in the "provisioning" module, and described in Firmware Upgrade section.
Other allowed data types include the following:
Directory (contacts, blacklist) in xml format Certificates (server, provisioning, LDAP, Broadsoft) in pem format Audio profile in xml format Customized boot up and idle screen logo files in .bmp format
Links to data files are in the configuration file's "file" module. This is where you enter any URLs to the data files you require.
NOTE: The audio profile file is already in place and should only be customized for localization purposes, according to internationally accepted guidelines.
None of these settings are exported when you export a configuration file from the phone. However, you can export a Directory or Blacklist .xml file using the WebUI. After modifying the .xml file, you can use the configuration file "file" module to have the phone import the new file. For a complete list of data file parameters, see chapter
"audio" Module: Audio Settings
ALCATEL
home & business phones
The audio settings include jitter buffer parameters and RTP port settings. These configuration items affect only models in Group C, and each account is configured independently
| Setting | Description | Applic. | Range | Default |
| audio.x.jitter_mode | Select the desired mode for the jitter buffer: fixed (static) or adaptive. This setting depends on your network environment and conditions. | Group C | fixed,adaptive | adaptive |
| audio.x.fixed_jitter.delay | Name associated to this memory key.When in fixed jitter buffer mode,set the delay (in ms) desirable to provide good audio quality with the minimal possible delay | Group C | 30-500 | 70 |
| audio.x.adaptive_jitter.min_delay | When in adaptive jitter buffer mode,set the minimum delay (in ms) desirable to maintain data packet capture and audio quality. | Group C | 20-250 | 60 |
| audio.x.adaptive_jitter.target_delay | When in adaptive jitter buffer mode,set the target delay (in ms) desirable to provide good audio quality with the minimal possible delay. | Group C | 20-500 | 80 |
| audio.x.adaptive_jitter.max_delay | When in adaptive jitter buffer mode,set the maximum delay (in ms) desirable to maintain data packet capture and audio quality. | Group C | 180-500 | 240 |
| audio.x.rtp.port_start | Sets the Local RTP port range start. | Group C | 1-65535 | 18000 |
| audio.x.rtp.port_end | Sets the Local RTP port range end. | Group C | 1-65535 | 19000 |
ALCATEL
home & business phones
| audio.x.rtcp_xr.enable | Enables or disables reporting of RTCP XR via SIP to a collector server.RTP ControlProtocol Extended Reports (RTCP XR) are used for voice quality assessment and diagnostics. | Group C | 0:disabled1:enabled | 0 |
"file" Module: Imported File Settings on page 230.
Configuration File Guide
All configuration settings are initially stored in a configuration template file. Copy, rename, and edit the template file to create a general configuration file and the MAC-specific configuration files you will need. You can store the general configuration file and the MAC-specific files on your provisioning server.
Do not modify the header line that includes the model and firmware version.
Note empty parameters will not overwrite values stored in the phone. To delete the content of a parameter use the value %NULL.
To save yourself time and effort, consider which settings will be common to all (or the majority of) phones. Such settings might include Call settings, language, and programmable feature key settings. You can then edit those settings in the configuration template and save it as the general configuration file. The remaining settings will make up the MAC-specific configuration file, which you will have to copy and edit for each phone.
Guidelines for the MAC-Specific Configuration File
The phone downloads the MAC-specific configuration file after the Main configuration file. You must create a unit-specific configuration file for each phone in your system. The file name must contain the phone's MAC address, which is printed on a label on the back of the phone, or available on the MENU > Status > Product Info screen. For example, an IP2015 DECT base with the MAC address of 74:65:D1:16:12:34 would download the IP2015_7465D1161234.cfg file.
The MAC-specific configuration file contains settings intended exclusively for that phone. Such settings will include SIP account settings such as display name, user ID, authentication ID, and voicemail mailbox ID.
Securing Configuration Files with AES Encryption
You can encrypt your configuration files to prevent unauthorized users modifying the configuration files. The system encrypts files using the AES 256 algorithm. After encrypting a file and placing it on your provisioning server, you can enable the phone to decrypt the file after fetching it from the server.
To decrypt a configuration file you will need a 16-character AES key that you specified when you encrypted the file. The key (or passphrase) is limited to 16 characters and supports special characters \~^`%!&-_+=|.@*;;,?()[]{}<>/# as well as spaces.
Note: The encryption of configuration files is supported only for the auto provisioning process. Encrypt files only if you intend to store them on a provisioning server. Do not encrypt files that you intend to manually import to the phone. You cannot enable decryption for manually imported configuration files.
ALCATEL
home & business phones
To encrypt a configuration file:
You can use for example an open source tool such as Openssl, which can be downloaded from the Openssl project site. If this is the case, proceed as follows.
-
(Optional) Place your configuration file in the same folder as the openssl.exe file. If the configuration file is not in the same folder as the openssl.exe file, you can enter a relative pathname for the [infile] in the next step.
-
On the openssl command line, type:
enc -aes-256-cbc -pass pass:[passphrase123456] -in [infile] -out [outfile] -nosalt -p
Elements in brackets are examples—do not enter the brackets. Enter a 16-character passphrase and the unencrypted configuration file filename (the "infile") and a name for the encrypted file ("outfile") that will result.
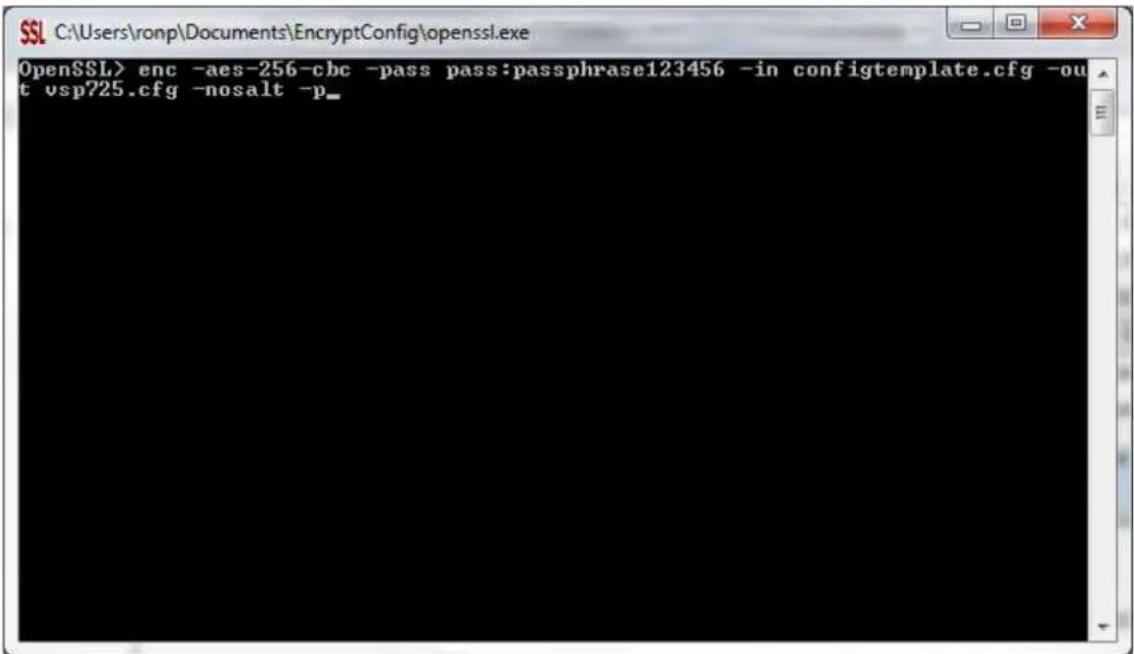
To enable configuration file decryption via WUI:
-
On the WebUI, click Servicing > Provisioning.
-
On the Provisioning page under Resynchronization, select Use Encryption for configuration file.
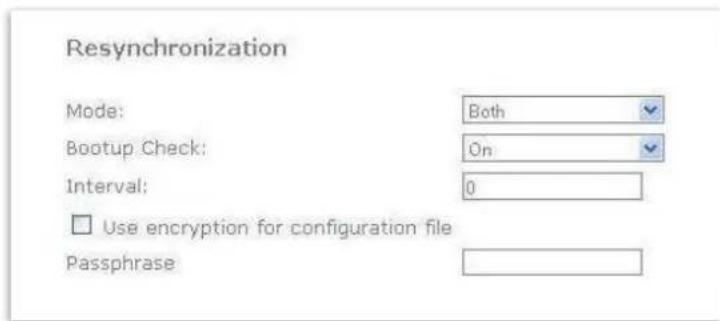
ALCATEL
home & business phones
- Enter the 16-character passphrase that you created when you encrypted the configuration file.
- Click Save.
Note: You must ensure that configuration files are encrypted when enabling AES Encryption. Decrypting an unencrypted file will result in a garbage file that is not processed. This will also be logged as an error in the system log.
ALCATEL
home & business phones
Setting Up Provisioning
Set up your provisioning server and folders for provisioning files. The general and unit configuration files should be in the same folder. Note the IP address, username and password for access to the folder on the provisioning server.
The Provisioning Server Settings will enable the phone to find the general configuration file. In most cases, default settings will make automatic provisioning possible out of the box without any further action on the phone.
The phone will try first to use PnP SUBSCRIBE to fetch configuration file location information. This mechanism is used by several PBXs in the market.
Secondly it will try to retrieve configuration files location from the different DHCP options, according to their priority. Options 66, 159 and 160 are supported, and either http, https or tftp urls are accepted here.
If the phone does not succeed to find its configuration files in the urls provided in those options, then the Server provisioning string will be used. The default value for this server again allows plug and play automatic provisioning. Check with your distributor to find out how to benefit from APRT service.
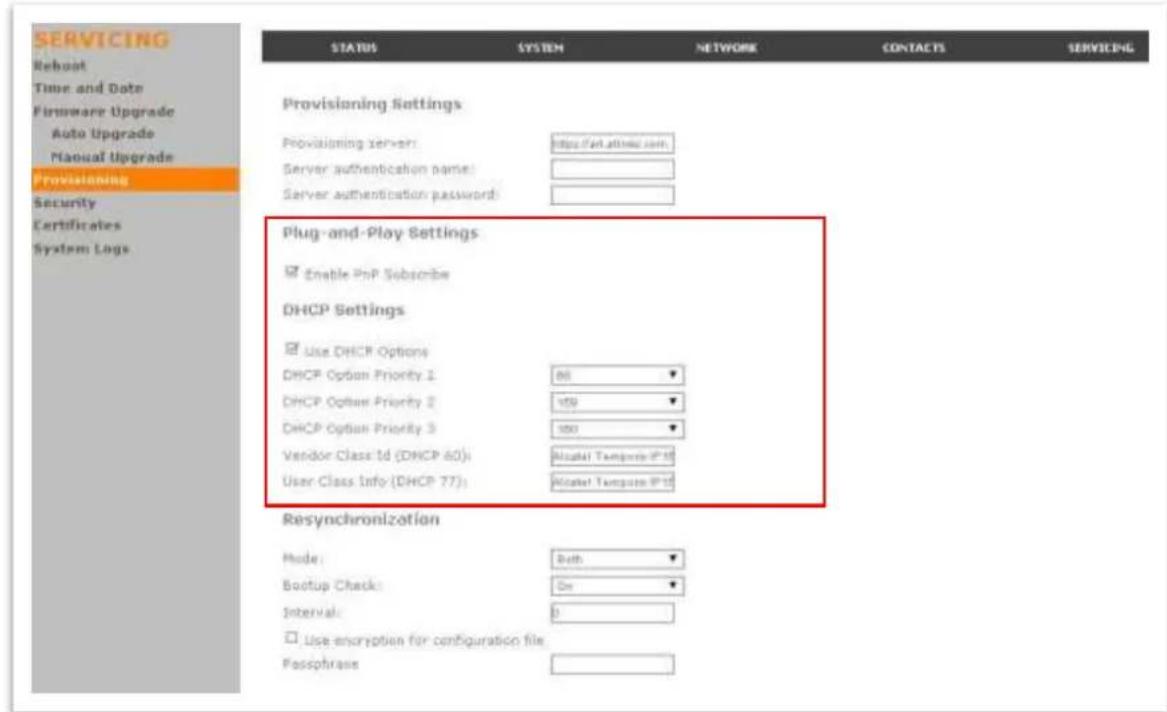
If none of these default settings suit your environment, you may have to fill in the server type and address (including a full path to the general configuration file), port, username and password.
Note you can modify Provisioning Server Settings via configuration files; so you could use default settings to perform a first provisioning which rewrites these values to suit your production needs.
Please note also you can decide which of these methods will be used or not in next provisioning sequences and customize them. PnP and DHCP options can be disabled, and DHCP options priority can be changed, both using the WUI and configuration files. Check the appendix for more details.
ALCATEL
home & business phones
Soft Keys
Desktop phone soft keys
The table below provides an alphabetical list of the labels that appear above the desktop phones soft keys.
| Label | Description |
| abc/ABC/123αβγ/ABΓa6r/ABΓ | Selects the format for text input |
| Add | Displays the new directory group editor |
| AddCall | Add a call to a network conference |
| Add dot | Enters dot in IP editing field |
| Answer | Answers an incoming call |
| Back | Shows the previous screen |
| Backspc | Moves cursor back to correct entries in text editing fields |
| Blind | Starts the blind transfer process for the active call |
| Bridge | Joins the two active calls in a conference and returns to idle screen |
| Call Log | Displays Call History menu |
| Callback | Dials the last missed caller |
| CallFwd | Displays Call forward menu |
| Cancel | Quits the current page without saving any settings |
| CFNA | Displays Call Forward on No answer menu for the default account |
| cfwdB | Displays Call Forward on Busy menu for the default account |
| Clear | Delete |
| Conf. | Opens the live dialing editor to enter or insert digits for the conference target. Also finally sets up the conference. |
| ConfCall | Displays a list of held calls as a target for conferencing with the active call. Once selected remember to press Conf. again to set up the conference |
| Del. All | Deletes all records in a list |
ALCATEL
home & business phones
| Delete | 1) Deletes current entry 2) Deletes assignment 3) Deletes Directory group |
| Dial | Sends and dials currently displayed/highlighted digits |
| Dir | Changes the speed dial directory source |
| Directory | Opens the list of available directories |
| DirPickup | Launches a directed pickup on the default account |
| DND | Displays DND menu |
| Done | Confirm |
| Edit | Go to entry/group editor |
| EditDial | Edits a number stored in a list before dialing |
| End | 1) Closes the current page 2) Ends the current call |
| Exit | Exits the current screen and returns to the previous menu |
| Filter | Sorts the directory by all entries, blocked, or non-blocked numbers |
| FirstNme | Sorts the directory by first name |
| Forward | Opens the predial editor to begin forwarding a call |
| FwdAll | Displays Call Forward All menu for the default account |
| Insert | Inserts a number from the directory/call history to a live dialing screen |
| Intercom | Launch an intercom call to a target extension |
| LastNme | Sorts the directory by last name |
| Line | Switches between registered lines |
| MultiPage | Launches a Multicast page |
| New | Press to predial a new call during a call currently put on hold |
| No | Returns to the previous screen |
| OK | Confirm |
| Page | Launch an intercom call to a target extension |
| Paging | Launches a Multicast page |
| Park | Park an active call |
| PC SPK | For Conference IP1850, switch to PC audio device mode. Requires USB connection. |
ALCATEL
home & business phones
| Priv Hold | For Broadsoft environments, put a call on a shared line in private hold mode |
| Redial | Access the dialed calls list |
| Reject | Rejects an incoming call |
| Resume | Resumes a call put on hold |
| Save | 1) Saves current setting 2) Begins save process |
| Search | Opens the Directory search editor |
| Select | Selects a highlighted option |
| Settings | Opens the User settings menu |
| Silence | 1) Silences ringer 2) Stops current call screening 3) Silences chime tone |
| Split | Breaks a conference or call transfer in progress into multiple calls |
| Status | Access the status submenu |
| Transfer | Opens the live dialing editor to enter or insert digits of the transfer target. |
| Transf | Completes a transfer. |
| Type | Switches between the Directory number types within an entry |
| View | Displays a database/list |
| XferCall | Displays a list of held calls as a transfer target for the active call. Once a call selected, remember to press Transf to complete the transfer |
| Yes | Confirm |
IP15 cordless handset soft keys
The table below provides an alphabetical list of the labels that appear above IP15 cordless handset soft keys.
| Label | Description |
| ADD | Add an entry |
| ANSWER | Answers an incoming call |
| BACK | Shows the previous screen |
| BACKSP | Backspace in text editing fields |
| BASE | Selects IP2015 as the target for a handset registration (vs DESKSET) |
| BLIND | Starts the blind transfer process for the active call |
| CANCEL | Quits the current page without saving any settings |
| CLEAR | Delete |
| CONF. | Confirms a conference should be set up with the two active calls |
| DEL | 1) Deletes current entry 2) Deletes assignment |
| DEL ALL | Deletes all records in a list |
| DELETE | 1) Deletes current entry 2) Deletes assignment |
| DESKSET | Selects a desk set as the target for a handset registration (vs BASE) |
| DIAL | Sends and dials currently displayed/highlighted digits via a new call |
| EDIT | Modify content |
| END | Finalize a call, hang up |
| ENTER | Access a submenu |
| INSERT | Chain dialing of a directory number during a call |
| INT | Intercom |
| LINE | Enters into the line submenu |
| MENU | Enters into main menu |
| NEXT | Toggles to the next call or step in a sequential process |
| NO | Previous screen |
ALCATEL
home & business phones
| OFF | Turns ringer vol. bar empty |
| OK | Returns to previous screen |
| OPTION | Enters into the action list of a directory folder |
| REJECT | Rejects an incoming call |
| RESUME | Resumes a SIP session put on hold |
| REVIEW | Enters into a database/list |
| SAVE | Save a setting or a directory entry |
| SEARCH | Begins Dir searching |
| SELECT | Selects an option |
| SET | Save a setting |
| SILENCE | Silence ringer |
| STOP | Stop paging of the BS to HS |
| TRANS. | Confirms a call transfer. |
| TYPE | Toggles among the Directory number types within an entry |
| UNLOCK | Shows the keypad unlock prompt |
| VIEW | See content |
| YES | Confirm |
ALCATEL
home & business phones
Appendix A: Configuration File Settings
This section lists the available options for all the settings within the configuration file. Most settings in the configuration file have an equivalent in the WebUI (see the settings tables in Using the WebUI on page 86). Some parameters are not available on the WUI, and in others the syntax is different as already documented in previous sections.
The settings are divided into modules. Each module loosely corresponds to a page on the WebUI. You may wish to reorganize the modules within the configuration file itself. The configuration file settings can be listed in any order, and the configuration file will still be valid.
The modules included in the configuration file are:
"sip_account Module: SIP Account Settings" on page 207
"hs_settings Module: Handset Settings" on page 240
"network Module: Network Settings" on page 212
"provisioning Module: Provisioning Settings" on page 214
"time_date Module: Time and Date Settings" on page 216
"remoteDir Module: Remote Directory Settings" on page 218
"web Module: Web Settings" on page 219
"trusted_ip Module: Trusted Server and Trusted IP Settings" on page 220
"call_settings Module: Call Settings" on page 223
"pfk Module: Programmable Feature Key Settings" on page 225
"speed_dial Module: Speed Dial Settings" on page 228
"audio Module: Audio Settings" on page 229
"ringersetting Module: Distinctive Ringer Settings" on page 237
"file Module: Imported File Settings" on page 230
"xml_app Module: XML App Settings" on page 232
"system_event Module: Action URI Settings" on page 233
"tr069 Module: TR-069 Settings" on page 234
"softkey Module: Custom Soft Key Settings" on page 239.
Parameters may not be applicable to all models. Use "Applicability" column to check if a parameter is valid for your phone.
All: applicable to all models
Group B: Temporis IP100, IP150, IP300, IP700G; Alcatel IP2015; Conference IP1850
Group C: Temporis IP151, IP251G, IP301G, IP701G; Alcatel IP2115
Group D: Temporis IP151, IP251G, IP301G, IP701G
ALCATEL
home & business phones
"sip\_account" Module: SIP Account Settings
The SIP Account settings enable you to set up individual accounts for each user. You can add up to three accounts for each phone. Each account requires you to configure the same settings. The SIP account settings for each account would be identified by their own account number, from 1 to 2.
For example, for account 1 you would set:
sip_account.1.sip_account_enable = 1
sip_account.1.display_name = 1001
sip_account.1.user_id = 2325551001
and so on.
For account 2, you would set:
sip_account.2.sip_account_enable = 1
sip_account.2.display_name = 1002
sip_account.2.user_id = 2325551002
and so on.
The SIP account settings follow the format: sip_account.x.[element], where x is an account number ranging from 1 to 2.
All these settings are exported when you manually export the configuration from the phone, although password content will not; just the name space.
| Setting | Description | Applica b. | Range | Default |
| sip_account.x.sip_account_enable | All | 0, 1 | 0 | |
| sip_account.x.label | All | Text string | Blank | |
| sip_account.x.display_name | All | Text string | Blank | |
| sip_account.x.user_id | All | Text string | Blank | |
| sip_account.x.authentication_name | All | Text string | Blank | |
| sip_account.x.authentication_access_password | AllNote 1 | Text string | Blank | |
| sip_account.x.dial_plan | See Dial Plan section | All | Text string | x+P |
| sip_account.x.call_restrict_dial_plan | Group C | Text string | Blank | |
| sip_account.x.emergency_dial_plan | Group C | Text string | Blank | |
| sip_account.x.inter_digit_timeout | All | 1-10 | 3 | |
| sip_account.x.maximum_call_number | All | 1# | 6 |
ALCATEL
home & business phones
| (model dep) | ||||
| sip_account.x.shared_line_enable | All | 0, 1 | 0 | |
| sip_account.x.barge_in_enable | All | 0, 1 | 0 | |
| sip_account.x.auto_answer_enable | All | 0, 1 | 0 | |
| sip_account.x.auto_answer_during_active_call | All | 0, 1 | 0 | |
| sip_account.x.cid_src_priority.1 | Group C | pai, rpid, from | pai | |
| sip_account.x.cid_src_priority.2 | Group C | pai, rpid, from | rpid | |
| sip_account.x.cid_src_priority.3 | Group C | pai, rpid, from | from | |
| sip_account.x.feature_sync_enable | All | 0, 1 | 0 | |
| sip_account.x.server_side_ctrl_variant | Group C | default, converse | default | |
| sip_account.x.music_on_hold_enable | All | 0, 1 | 1 | |
| sip_account.x.mwi_enable | All | 0, 1 | 0 | |
| sip_account.x.mwi_ignore_unsolicited | All | 0, 1 | 0 | |
| sip_account.x.mwi_uri | All | sip uri | Blank | |
| sip_account.x.mwi Subscription_expires | All | OB | 3600 | |
| sip_account.x.stutter_dial_tone_enable | All | 0, 1 | 1 | |
| sip_account.x.voice_encryption_enable | All | 0, 1 | 0 | |
| sip_account.x.primary_sip_server_port | All | OB | 5060 | |
| sip_account.x.primary_sip_server_address | All | IPv4 or fqdn | Blank | |
| sip_account.x.primary_outbound_proxy_server_port | All | OB | 5060 | |
| sip_account.x.primary_outbound_proxy_server_address | All | IPv4 or fqdn | Blank | |
| sip_account.x.primary_registration_server_port | All | OB | 5060 | |
| sip_account.x.primary_registration_server_address | All | IPv4 or fqdn | Blank | |
| sip_account.x.primary_registration_expires | All | OB | 3600 | |
| sip_account.x.use_register_route_header | Group C | 0, 1 | 1 |
ALCATEL
home & business phones
| sip_account.x.access_code_page | All | Text string | Blank | |
| sip_account.x.access_code_park_call | All | Text string | Blank | |
| sip_account.x.access_code_retrieve_parked_call | All | Text string | Blank | |
| sip_account.x.access_code_retrieve voicemail | All | Text string | Blank | |
| sip_account.x.access_code_dnd_on | All | Text string | Blank | |
| sip_account.x.access_code_dnd_off | All | Text string | Blank | |
| sip_account.x.access_code_cfa_on | All | Text string | Blank | |
| sip_account.x.access_code_cfa_off | All | Text string | Blank | |
| sip_account.x.access_code_cfna_on | All | Text string | Blank | |
| sip_account.x.access_code_cfna_off | All | Text string | Blank | |
| sip_account.x.access_code_cfb_on | All | Text string | Blank | |
| sip_account.x.access_code_cfb_off | All | Text string | Blank | |
| sip_account.x.access_code_anonymous_call_block_on | All | Text string | Blank | |
| sip_account.x.access_code_anonymous_call_block_off | All | Text string | Blank | |
| sip_account.x.access_code_outgoing_call_anonymous_on | All | Text string | Blank | |
| sip_account.x.access_code_outgoing_call_anonymous_off | All | Text string | Blank | |
| sip_account.x.access_code_call_waiting_on | All | Text string | Blank | |
| sip_account.x.access_code_call_waiting_off | All | Text string | Blank | |
| sip_account.x.access_code_group_call_pickup | All | Text string | Blank | |
| sip_account.x.access_code_direct_call_pickup | All | Text string | Blank | |
| sip_account.x.access_code_hg_on | Group D | Text string | Blank |
ALCATEL
home & business phones
| sip_account.x.access_code_hg_off | Group D | Text string | Blank | |
| sip_account.x.access_code_sf_on | Group D | Text string | Blank | |
| sip_account.x.access_code_sf_off | Group D | Text string | Blank | |
| sip_account.x.blf_list_uri | All | Sip uri | Blank | |
| sip_account.x.blf_remote_pickup_code | All | Text string | Blank | |
| sip_account.x.blf_subscription_expires | All | 1565535 | 3600 | |
| sip_account.x.nat_traversal_stun_enable | All | 0, 1 | 0 | |
| sip_account.x.nat_traversal_stun_server_port | All | 0-65535 | 3478 | |
| sip_account.x.nat_traversal_stun_server_address | All | IPv4 or fqdn | Blank | |
| sip_account.x.nat_traversal_stun_keep_alive_enable | Group C | 0, 1 | 1 | |
| sip_account.x.nat_traversal_stun_keep_alive_interval | Group C | 05 | 30 | |
| sip_account.x.nat_traversal_udp_keep_alive_enable | Group B | 0, 1 | 0 | |
| sip_account.x.nat_traversal_udp_keep_alive_interval | Group B | 05 | 30 | |
| sip_account.x.keep_alive_enable | Group C | 0, 1 | 0 | |
| sip_account.x.keep_alive_interval | Group C | 1-3600 | 15 | |
| sip_account.x.keep_alive_ignore_failure | Group C | 0, 1 | 1 | |
| sip_account.x.network_conference_enable | All | 0, 1 | 0 | |
| sip_account.x.network_bridge_uri | All | sip uri | Blank | |
| sip_account.x.sip_session_timer_enable | All | 0, 1 | 0 | |
| sip_account.x.sip_session_timer_min | All | 9065535 | 90 | |
| sip_account.x.sip_session_timer_max | All | 05 | 1800 | |
| sip_account.x.dtmf_transport_method | Sets the transport method for DTMF signalling. | All | Auto, rfc2832, in-band, info-method | auto |
| sip_account.x.dtmf_payload_type | Group C | 96-127 | 101 | |
| sip_account.x.codec_priority.y | All | G.711a, G.711u, G.729, G.726, G.722, |
ALCATEL
home & business phones
| y = 1 to 7 for Group C | ilbc(Group C) | |||
| sip_account.x.blf_variant | All | default,avaya,extended_blf,metaswitch,freeswitch | default | |
| sip_account.x.unregister_after_reboot_enable | Unregisterafterrebootenable | All | 0, 1 | 0 |
| sip_account.x.transport_mode | SignallingTransportMode | All | ``udp'',``tcp'',``tla'' | ``udp'' |
| sip_account.x.backup_outbound_proxy_server_port | All | 0-65535 | 5060 | |
| sip_account.x.backup_outbound_proxy_server_address | All | IPv4 orfqdn | Blank | |
| sip_account.x.registration_retry_time | All | 1# | 10 | |
| sip_account.x.local_sip_port | Local SIPport | All | 0-65535 | Line 1:5060Line 2:5070etc |
| sip_account.x.dscp | VoiceQuality ofServiceLayer 3 -DSCP | All | 6-bitvalue | 46 |
| sip_account.x.sip_dscp | SignallingQuality ofServiceLayer 3 -DSCP | All | 6-bitvalue | 26 |
| sip_account.x.check_trusted_certificate | SeeCertificates section | All | 0,1 | 0 |
| sip_account.use_first_trusted_certificate_for_all | SeeCertificates section | 0,1 | 0 | |
| sip_account.x.normal_jitter | Group B | 0-255 | 80 | |
| sip_account.x.g729_annexb_enable | All | 0, 1 | 0 | |
| sip_account.x.park_variant | All | broadsoft,asterisk | broadsoft | |
| sip_account.x.preferred_ptime | All | 10, 20,30, 40,50, 60 | 20 | |
| sip_account.x.call_rejection_response_code | All | 480, 486,603 | 486 |
ALCATEL
home & business phones
"network" Module: Network Settings
The network settings follow the format: network.[element].
These settings can be exported when you manually export the configuration from the phone, except for the settings shaded in gray in the table.
| Setting | Description | Applicab. | Range | Default |
| network.ip.dhcp_enable | Indicates whether DHCP is enabled | Group B | 0, 1 | 1 |
| network.ip.mode | ipv4 mode | Group C | disable, dhcp, static, pppoe | dhcp |
| network.ip.dns1 | Primary DNS server address | All | IPv4 | blank |
| network.ip.dns2 | Secondary DNS server address | All | IPv4 | blank |
| network.ip.static_ip_addr | Static IP address | All | IPv4 | blank |
| network.ip.subnet_mask | Subnet mask | All | IPv4 | blank |
| network.ip.gateway_addr | Gateway IP address | All | IPv4 | blank |
| network.ip.manually_configure_DNS | Group C | 0, 1 | 0 | |
| network.ip.pppoe.username | Group C | String | blank | |
| network.ip.pppoe.access_password | Group C | String | blank | |
| network.ip.pppoe.service_name | Group C | String | blank | |
| network.ip6.mode | Group C | disable, static, auto | disable | |
| network.ip6.prefix | Group C | 0-128 | 64 | |
| network.ip6.gateway_addr | Group C | ipv6 | blank | |
| network.ip6.manually_configure_dns | Group C | 0, 1 | 0 | |
| network.ip6.dns1 | Group C | ipv6 | blank | |
| network.ip6.dns2 | Group C | ipv6 | blank | |
| network.ip.dns_cache_clear_timeout | Time in minutes to refresh dns lookup table for the sip application. '0' to remove all caching and perform a dns lookup for every outgoing request and response (ttl=0 emulation) | Group B | 0-1440 | 60 |
| network.nat.masquerading_enable | Enable IP masquerading | Group B | 0, 1 | 0 |
ALCATEL
home & business phones
| network.nat.public_ip_addr | Public IP address | Group B | Ipv4 | blank |
| network.nat.public_sip_port | Public SIP port | Group B | 0-65535 | 5060 |
| network.nat.public_rtp_port_start | Public RTP port start | Group B | 0-65535 | 18000 |
| network.nat.public_rtp_port_end | Public RTP port end | Group B | 0-65535 | 19000 |
| network.vlan.wan.enable | Enable vlan on WAN port | All | 0, 1 | 0 |
| network.vlan.wan.id | WAN port VID | All | 0-4095 | 0 |
| network.vlan.wan.priority | WAN vlan port priority | All | 0-7 | 0 |
| network.vlan.pc.enable | Enable vlan on PC port | All | 0, 1 | 0 |
| network.vlan.pc.id | PC port VID | All | 0-4095 | 0 |
| network.vlan.pc.priority | PC vlan port priority | All | 0-7 | 0 |
| network.rtp.port_start | Local RTP port range start | Group B | 0-65535 | 18000 |
| network.rtp.port_end | Local RTP port range end | Group B | 0-65535 | 19000 |
| network.lldp_med.enable | LLDP-MED enable | All | 0, 1 | 1 |
| network.lldp_med.interval | LLDP-MED packet interval (seconds) | All | 1-30 | 30 |
| network.capol.enable | 802-1x EAPOL enable | All | 0, 1 | 0 |
| network.capol.identity | 802-1x EAPOL identity | All | string | blank |
| network.eapol.access_password | 802-1x EAPOL MD5 password | All | string | blank |
| network.vendor_class_id | Vendor Class ID (DHCP option 60) | All | string | Model dependent |
| network.user_class | User Class (DHCP option 77) | All | string | Model dependent |
| network.pc_port.enable | Group D | 0, 1 | 1 | |
| network.pc_port.mirroring.enable | Group D | 0, 1 | 0 | |
| network.vpn.enable | Group C | 0, 1 | 0 |
"profile" Module: security settings
The profile settings follow the format: profile.[element].
ALCATEL
home & business phones
These settings are not exported when you manually export the configuration from the phone; only their namespaces are.
| Setting | Description | Range | Default |
| profile.admin.access_password | Password for admin | string | admin |
| profile.user.access_password | Password for user | string | user |
"provisioning" Module: Provisioning Settings
The provisioning settings follow the format: provisioning.[element].
All these settings are exported when you manually export the configuration from the phone.
| Setting | Description | Applic. | Range | Default |
| provisioning.bootup_check_enable | Enable bootup check | All | 0, 1 | 1 |
| provisioning.crypto_enable | Enable cryptography | All | 0, 1 | 0 |
| provisioning.crypto_passphrase | Passphrase to decode encrypted config file | All | string | Blank |
| provisioning.dhcp_option_enable | Enable DHCP option | All | 0, 1 | 1 |
| provisioning.dhcp_option_priority_1 | DHCP option priority 1 | All | 0, 66, 159, 160 | 66 |
| provisioning.dhcp_option_priority_2 | DHCP option priority 2 | All | 0, 66, 159, 160 | 159 |
| provisioning.dhcp_option_priority_3 | DHCP option priority 3 | All | 0, 66, 159, 160 | 160 |
| provisioning.firmware_url | Firmware URL | All | string | Blank |
| provisioning.handset_firmware_url | URL for DECT handset Firmware | All DECT enabled | string | Blank |
| provisioning.fw_server_username | Authentication username for firmware download | All | String | Blank |
| provisioning.fw_server_access_password | Authentication password for firmware download.Value not exported | All | string | Blank |
| provisioning.resync_mode | Resync mode | All | config_only,firmware_only, | config_and_firmware |
ALCATEL
home & business phones
| config_and_firmware | ||||
| provisioning.resync_time | Minutes between checks for new firmware and/or configuration file | All | 08 | 0 |
| provisioning.schedule_mode | All | disable, interval, weekday | disable | |
| provisioning.weekdays | Days for which provisioning should take place. | All | List of comma delimited integers, 0 to 6 | blank |
| provisioning.weekdays_start_hr | All | 0-23 | 0 | |
| provisioning.weekdays_end_hr | All | 0-23 | 0 | |
| provisioning.server_address | Server address for configuration download | All | string | https://art.atlinks.com |
| provisioning.server_username | Authentication username for configuration download | All | string | blank |
| provisioning.server_access_password | Authentication password for configuration downloadValue not exported | All | string | blank |
| provisioning.check_trusted_certificate | Require trusted certificate for https provisioning | All | 0,1 | 0 |
| provisioning.click_to_dial | Enable click-to-dial from WUI contacts page | All | 0,1 | 1 |
| provisioning.remote_check_sync_enable | Enable provisioning start via NOTIFY check-sync | All | 0,1 | 1 |
| provisioning.pnp_enable | Enable pnp discovery mechanism for configuration file fetch url | All | 0, 1 | 1 |
| provisioninp.pnp_response_timeout | Time in seconds PnP subscription will be attempted before giving up | All | 1-60 | 10 |
ALCATEL
home & business phones
"time_date" Module: Time and Date Settings
The time and date settings follow the format: time_date.[element].
All these settings are exported when you manually export the configuration from the phone.
| Setting | Description | Applicab. | Range | Default |
| time_date.date_format | Format for displaying the date | All | DD/MM/YY, MM/DD/YY, YY/MM/DD | DD/MM/YY |
| time_date.24hr_clock | Enable 24-hour clock format | All | 0, 1 | 1 |
| time_date.ntp_dhcp_option | Enable NTP server DHCP option (opt 42) | All | 0, 1 | 0 |
| time_date.ntp_server | Enable NTP server | All | 0, 1 | 1 |
| time_date.ntp_server_addr | Address of NTP server | All | IPv4 or fqdn | europe.pool.ntp.org |
| time_date.ntp_server_update_interval | Delay between NTP server updates, in seconds | All | 0 - 4294967295 | 1000 |
| time_date.timezone_dhcp_option | Enable time zone DHCP option (2/100/101) | All | 0, 1 | 0 |
| time_date.selected_timezone | Set time zone | All | Please see Appendix B | Europe/Paris |
| time_date.daylight_saving_auto_adjust | All | 0,1 | 1 | |
| time_date.daylight_saving_user_defined | All | 0, 1 | 0 | |
| time_date.daylight_saving_start_month | All | January - December | March | |
| time_date.daylight_saving_start_week | All | 1-5 | 2 | |
| time_date.daylight_saving_start_day | All | "Sunday", "Monday", "Tuesday", "Wednesday", "Thursday", "Friday", "Saturday" | Sunday |
ALCATEL
home & business phones
| time_date.daylight_saving_start_hour | All | 00:00 - 23:00 | 02:00 | |
| time_date.daylight_saving_end_month | All | "January", "February", "March", "April", "May", "June", "July", "August", "September", "October", "November", "December" | November | |
| time_date.daylight_saving_end_week | All | 1-5 | 1 | |
| time_date.daylight_saving_end_day | All | "Sunday", "Monday", "Tuesday", "Wednesday", "Thursday", "Friday", "Saturday" | Sunday | |
| time_date.daylight_saving_end_hour | All | 00:00 - 23:00 | 02:00 | |
| time_date.daylight_saving_amount | DST offset in minutes | All | 05 | 60 |
"log" Module: Log Settings
The log settings control system logging activities.
The log settings follow the format: log.element.
These settings can be exported when you manually export the configuration from the phone.
| Setting | Description | Applicab. | Range | Default |
| log.syslog_enable | Enable log output to syslog server | All | 0, 1 | 0 |
| log.syslog_level | Log level. The higher the level, the larger the debug output.5-all4-debug3-info2-warning | All | 0-5 | 2 |
ALCATEL
home & business phones
| 1-error0-critical | ||||
| log.syslog_server_address | Syslog server IP address | All | IPv4 | blank |
| log.syslog_server_port | Syslog server port | All | 0-65535 | 514 |
"remoteDir" Module: Remote Directory Settings
The remote directory settings follow the format: remoteDir.element.
All these settings are exported when you manually export the configuration from the phone.
| Setting | Description | Applic. | Range | Default |
| remoteDir.ldap_enable | Enable/disable LDAP | All | 0,1 | 0 |
| remoteDir.ldap_directory_name | LDAP directory name | All | String | Blank |
| remoteDir.ldap_number_filter | LDAP number filter | All | String | Blank |
| remoteDir.ldap_firstname_filter | LDAP first name filter | All | String | Blank |
| remoteDir.ldap_lastname_filter | LDAP last name filter | All | String | Blank |
| remoteDir.ldap_server_address | LDAP server address | All | IPv4 or fqdn | blank |
| remoteDir.ldap_port | LDAP server port | All | 0-65535 | 389 |
| remoteDir.ldap_authentication_type | LDAP authentication type | All | simple, ssl | simple |
| remoteDir.ldap_base | LDAP base | All | String | Blank |
| remoteDir.ldap_user_name | LDAP user name | All | String | Blank |
| remoteDir.ldap_access_password | LDAP password | All | String | Blank |
| remoteDir.ldap_max_hits | LDAP maximum hits | All | 0-65535 | 200 |
| remoteDir.ldap_firstname_attribute | LDAP first name attribute | All | String | Blank |
| remoteDir.ldap_lastname_attribute | LDAP last name attribute | All | String | Blank |
ALCATEL
home & business phones
| remoteDir.ldap_work_number_attributes | LDAP work number attributes | All | String | Blank |
| remoteDir.ldap_mobile_number_attributes | LDAP mobile number attributes | All | String | Blank |
| remoteDir.ldap_other_number_attributes | LDAP home number attributes | All | String | Blank |
| remoteDir.ldap_protocol_version | LDAP protocol version | All | version_2, version_3 | version_3 |
| remoteDir.ldap_search_delay | LDAP search delay | All | 0-500 | 0 |
| remoteDir.ldap_incall_lookup_enable | LDAP incoming call lookup | All | 0,1 | 0 |
| remoteDir.ldap_outcall_lookup_enable | LDAP outgoing call lookup | All | 0,1 | 0 |
| remoteDir.ldap_check_certificate | Require certificate for ssl LDAP | All | 0,1 | 0 |
| remoteDir.broadsoft_enable | Enable/disable Broadsoft directory | All | 0,1 | 0 |
| remoteDir.broadsoft_display_name | Broadsoft display name | All | String | Blank |
| remoteDir.broadsoft_server | Broadsoft server | All | IPv4 or fqdn | Blank |
| remoteDir.broadsoft_port | Broadsoft server port | All | 0-65535 | 0 |
| remoteDir.broadsoft_user_name | Broadsoft user name | All | String | Blank |
| remoteDir.broadsoft_access_password | Broadsoft password | All | String | Blank |
| remoteDir.broadsoft_dir_type | All | Group, GroupCommon, Enterprise, EnterpriseCommon, Personal | Group | |
| remoteDir.broadsoft_check_certificate | Require certificate for ssl Broadsoft | All | 0,1 | 0 |
"web" Module: Web Settings
The web settings control the web server IP, port, and security settings.
The web settings follow the format: web.element.
ALCATEL
home & business phones
These settings can be exported when you manually export the configuration from the phone, except for the settings shaded in gray in the table.
| Setting | Description | Applicab | Range | Default |
| web.http_port | Sets the http port for the embedded web server | All | 0-65535 | 80 |
| web.https_port | Sets the https port when https is enabled | All | 0-65535 | 443 |
| web.https_enable | Sets embedded web server to use the https protocol. | All | 0, 1 | 0 |
| web.server_enable | Enables or disables the embedded web server | Group C | 0, 1 | 1 |
| web.activeuri_enable | Enables or disable the phone's capability to respond to CTI commands through active uris. For more information check with your customer support team. | Group D | 0, 1 | 0 |
"trusted\_ip" Module: Trusted Server and Trusted IP Settings
The trusted_ip settings provide enhanced security for your phone. When enabled, these settings can filter network traffic and reject any traffic from unauthorized sources.
The trusted_ip settings follow the format: trusted_servers.[element].These settings can be exported when you manually export the configuration from the phone.
| Setting | Description | Applic. | Range | Default |
| trusted_ip.only_accept_sip_account_servers | Enables or disables using each enabled account's Registration server, SIP server, Outbound Proxy server and Backup Outbound Proxy server as sources for trusted SIP traffic. | Group C | 0:disabled1:enabled | 0 |
| trusted_ip.only_accept_allo wed_ip | Enables or disables using the Allowed IP list to filter network traffic. When enabled, all unsolicited IP traffic will be blocked unless it is from one of the trusted IP addresses on the "Allowed IP" list. | Group C | 0:disabled1:enabled | 0 |
| trusted_ip.x.allow_ip | Enter an IP address or address range for one instance of the '' Allowed IP'' list. x ranges from 1 to 10. See '' Trusted IP'' | Group C | Text string (IPv4 or IPv6, IP range in IPv4 or IPv6) | Blank |
ALCATEL
home & business phones
| on page 185 for more information. |
"user\_pref" Module: User Preference Settings
The user settings are accessible to the phone user. These settings are useful for initial setup. You may wish to remove these settings from auto-provisioning update files so that users do not have their own settings overwritten.
The user preference settings follow the format: user_pref.element.
All these settings are exported when you manually export the configuration from the phone.
| Setting | Description | Applic. | Range | Default |
| user_pref.language | Phone User Interface language | All | en, es, fr, de, it, pt, nl, ru, el, tk, pl | en |
| user_pref.web_language | WUI language | All | en, es, fr, de, it, pt, nl, ru, el, tk, pl | en |
| user_pref.lcd_contrast | LCD contrast | All | 1-7 | 4 |
| user_pref.backlight | Backlight level in non idle mode | All | off, low, medium, high off/on for IP15x | on or high |
| user_pref.idle_backlight | Idle backlight level | All | off, low, medium, high off/on for IP15x | off |
| user_pref.backlight_timeout | Backlight timeout in seconds | All | 10-60 | 30 |
| user_pref.idle_to_logo_timeout | Sets the delay (in seconds) before the logo replaces the idle screen | All | 0 (disabled)-300 | 30 |
| user_preflogo_to_idle_timeout | Sets the delay (in seconds) before the idle screen replaces the logo. This parameter enables the LCD to cycle between the idle screen and the logo | All | 1-300 | 60 |
| user_pref.absent_timeout | Timeout(sec.) after which live dial will return to idle | All | 10-60 | 30 |
ALCATEL
home & business phones
| without additional dialing digits | ||||
| user_pref.text_input_option | Specify the order & available language input option in user edit mode | All | number, uc_western, lc_western, uc_ru, lc_ru, uc_el, lc_el | number, uc_western, lc_western |
| user_pref.account.x.ringer | Ringer tone for account x, where x is model dependent | All | 1-10 | 1 |
| user_pref.account.x.diversion_display | Enables or disables the display of diversioninfo (if available) for calls forwarded to account x. | Group C | 0, 1 | 1 |
| user_pref.blf_indication_option | Configures the BLF LED behavior for different service providers. Two options are available, main difference is IDLE (off vs. steady green) and error | All | 1, 2 | 1 |
| user_pref.ringer_volume | Ringer volume | All | 0-9 (0 is off) | 5 |
| user_pref.speaker_volume | Speaker volume | All | 0-9 (0 is off) | 5 |
| user_pref.headset_volume | Cordless headset volume | All | 0-9 (0 is off) | 5 |
| user_pref.handset_volume | Corded handset volume | All | 0-9 (0 is off) | 5 |
| user_pref.audio_mode | Default audio mode | All | speaker, heads et | speaker |
| user_pref.key_beep_enable | Enable/disable key beeps | All | 0, 1 | 1 |
| user_pref.hold_reminder.enable | Enable/disable hold reminder | All | 0, 1 | 1 |
| user_pref.hold_reminder.interval | Hold reminder interval in seconds | All | 10-300 | 30 |
| user_pref.call_waiting.mode | Call waiting mode | All | enable, reject | enable |
| user_pref.call_waiting.tone_enable | Enable/disable call waiting tone | All | 0, 1 | 1 |
| user_pref.call_waiting.tone_interval | Call waiting tone interval in seconds | All | 10-60 | 30 |
| user_pref.call_terminated.busy_tone_enable | Enable/disable playing busy tone | All | 0, 1 | 1 |
ALCATEL
home & business phones
| when remote party terminates a call | ||||
| user_pref.notify.led.missed_call.enable | Sets how the Message Waiting LED operates. When enabled, the LED turns on for missed calls and new messages. When disabled, the LED turns on for new messages only.Note: This setting is not available on the phone menu or WebUI. | All | 0, 1 | 1 |
| user_pref.quick_transfer | Sets how Quick Dial and BLF Programmable keys shall behave during an active call | Group D | new_call, blind, attended | new_call |
"call\_settings" Module: Call Settings
The call settings configure data related to a user's call preferences.
All the call settings (except one) follow the format: call_settings.account.x.[element] where x is an account number ranging from 1 to 2.
| Setting | Description | Applic. | Range | Default |
| call_settings.account.x.block_anonymous_enable | Enable/disable anonymous call blocking | All | 0, 1 | 0 |
| call_settings.account.x.outgoing_anonymous_enable | Enable/disable outgoing anonymous calls | All | 0, 1 | 0 |
| call_settings.account.x.dnd_enable | Enable/disable Do Not Disturb le | All | 0, 1 | 0 |
| call_settings.account.x.dnd_inco ming_calls | Show or reject incoming calls if DND is on | All | show, reject | reject |
| call_settings.account.x.call_fwd always_enable | Enable/disable call forward always | All | 0, 1 | 0 |
| call_settings.account.x.call_fwd always_target | Target number for call forward always | All | String | Blank |
| call_settings.account.x.call_fwd busy_enable | Enable/disable call forward busy | All | 0, 1 | 0 |
| call_settings.account.x.call_fwd busy_target | Target number for call forward busy | All | String | Blank |
| call_settings.account.x.cfna_enable | Enable/disable call forward no answer | All | 0, 1 | 0 |
| call_settings.account.x.cfna_target | Target number for call forward no answer | All | String | Blank |
ALCATEL
home & business phones
| call_settings.account.x.cfna_delay | Delay (in # of rings) before call is forwarded | All | 1-10 | 6 |
| call_settings.missed_call_alert_enable | Enable/disable missed call alert | All | 0, 1 | 1 |
| call_settings.hotline_enable | Enables or disables the hotline feature. | All | 0, 1 | 1 |
| call_settings.hotline_account | Sets the account used for dialing the hotline number. | All | 0 to max accounts | 0 (def account) |
| call_settings.hotline_number | Sets the number dialed by the hotline feature. | All | string | blank |
| call_settings.hotline_delay | Sets the delay (in seconds) between the phone going off hook and the hotline number being dialed. | All | 0-10 | 0 |
| call_settings.account.x.call_completion_enable | Enables or disables the Call Completion for Busy Subscribers (CCBS) feature. The feature notifies users when a previously busy number is available and asks them whether they wish to call the number back. | Group C | 0, 1 | 0 |
| call_settings.account.x.call_completion_alert_enable | Enables or disables an audible alert (similar to a hold reminder alert tone) if the user is on another call when the auto redial interval expires. | Group C | 0, 1 | 1 |
| call_settings.account.x.auto_red_ial_repeat | Sets how many auto redial attempts are made. | Group C | 1-30 | 10 |
| call_settings.account.x.auto_red_ial_interval | Sets the countdown timer (in seconds) until the user is prompted for the next dialing attempt. | Group C | 1-300 | 30 |
| call_settings.account.x.unconditional-auto_answer_enable | Enables or disables unconditional Auto Answer. Auto Answer allows a deskset or conference phone to automatically answer incoming calls to that account without user intervention. An auto answer tone will sound. | Group C | 0, 1 | 0 |
| call_settings.account.x.unconditional-auto_answer_delay | Sets the delay before the phone auto answers a call. | Group C | 0-30 | 2 |
| call_settings.account.x.unconditional-auto_answer_mute_on_ans | Enables or disables muting the mic upon auto answering | Group C | 0, 1 | 0 |
ALCATEL
home & business phones
"pfk" Module: Programmable Feature Key Settings
The programmable feature key (PFK) settings store the data associated with each programmable feature key.
The programmable feature key settings follow the format: pfk.x.[element], where x is the programmable feature key ID, ranging from 1 to 32.
| Setting | Description | Applic. | Range | Default |
| pfk.x.feature | Assigns a feature to the PFK | Group B | unassigned,line, dir,call log,redial, messages,dnd, dndall, cfwdall, cfwdbusy, cfwdno answer,quick dial,busy lampfield, acd,page,multicastpage, parkcall, retrieveparkedcall, incall dumf,callback,group callpickup,direct callpickup,prefix_dialNote:TemporisIP100 andIP150 pfks6 to 10 and16 to 20have noLEDs, hence somefunctionsare notallowed.For more detailscontact yourtechnicalsupport. | Model dependent.See each model's quick reference guide in Getting Started chapter,on page 8 |
| pfk.x.feature | Assigns a feature to the PFK | Group C | unassigned,line, dir,call log,redial, messages,dnd, dndall, cfwdall, cfwdbusy, cfwd |
home & business phones
| no answer, quick dial, busy lamp field, acd, page, multicast page, park call, retrieve parked call, in call dtmf, callback, group call pickup, direct call pickup, prefix_dial, chp, hg, sf, lock_key, flash, xml appNote:Temporis IP151 pfks 6 to 10 and 16 to 20 have no LEDs, hence some functions are not allowed. For more details contact your technical support. | ||||
| pfk.[hardkey].feature | The programmable hard key settings follow the format:pfk.[hardkey].[element].The values fordepend on the model. For example, for IP701G these are:up, down, cancel, mute, select, hold, flash, transfer, conf | Group D | unassigned, dir, call log, redial, messages, dnd, dnd all, cfwd all, cfwd busy, cfwd no answer, retrieve parked call, quick dial, page, multicast page, callback, group call pickup, direct call pickup, prefix dial, lock_key, xml app, network status |
ALCATEL
home & business phones
| pfk.x.account | SIP account used for the assigned feature (if applicable) | All | 1-max accounts (model dependent) | 1 |
| pfk.[hardkey].account | Group C | |||
| pfk.x.quick_dial | Quick dial string to use if quick dial is assigned to PFK | All | string | Blank |
| pfk.[hardkey].quickdial | Group D | |||
| pfk.x.blf | BLF string to use if Busy Lamp Field is assigned to PFK | All | string | Blank |
| pfk.x.incall_dtmf | DTMF string if in-call dtmf is assigned to pfk. | All | DTMF digits | Blank |
| pfk.x.page_destination | If required by your service provider, enter a page destination number.The target number for the outgoing page will be formed by concatenating Paging feature access code of the selected account and the PFK page destination value. | All | string | Blank |
| pfk.[hardkey].page_destination | Same as above | Group C | string | Blank |
| pfk.x.park_destination | If required by your service provider and sip_account.x.park_variant setting, enter a value for the park ''orbit'' or extension. | All | string | Blank |
| pfk.x.park_retrieval_source | Description: If required by your service provider and sip_account.x.park_variant setting, enter a value for the park ''orbit'' or extension. | All | string | Blank |
| pfk.[hardkey].park_retrieval_source | same as above | Group D | string | Blank |
| pfk.x.prefix | Enter a prefix to be dialed (hidden from the user) when the key is pressed. The prefix is added to any user-entered digits. %N can be used for substitution of user-entered digits. For example, *71%N# uses | All | String | blank |
ALCATEL
home & business phones
| [*71] + [user-entered digits] + [#] as the outgoing dialing string. | ||||
| pfk.[hardkey].prefix | Same as above | Group D | String | blank |
| pfk.x.multicast_zone | Sets the multicast paging zone if multicast page is assigned to PFK x. | All | 1-10 | Bank |
| pfk.[hardkey].multicast_zone | Same as above | Group D | 1-10 | blank |
| pfk.x.call_handling_profile | If pfk.x.feature is chp, enter the string of the call handling profile that the pfk LED will indicate. | Group D | string | Blank |
| pfk.x.call_handling_profile_set_code | If pfk.x.feature is chp, enter the call handling profile FAC and profile index number to activate the profile. | Group D | string | Blank |
| pfk.x.direct_pickup | If pfk.x.feature is direct call pickup, enter the Direct Call Pickup feature access code (FAC). | Group D | string | Blank |
| pfk.[hardkey].direct_pickup | Same as above | Group D | string | Blank |
| pfk.x.hunt_group | If pfk.x.feature value is hg, enter the hunt group extension number assigned for this pfk. | Group D | string | Blank |
| pfk.x.secretarial_filtering | If pfk.x.feature value is sf, enter the manager's extension number assigned for this pfk | Group D | string | Blank |
| pfk.x.xml_uri | If pfk.x.feature is xml app, enter the URI to fetch the XML application to be executed. | Group D | URI | Blank |
| pfk.[hardkey].xml_uri | Same as above | Group D | URI | Blank |
"speed\_dial" Module: Speed Dial Settings
The memory key settings configure the dial pad keys for speed dialing pre-programmed phone numbers. When configured, the phone user can press and hold a dial pad key to dial a programmed phone number.
The memory key settings follow the format speed_dial.x.[element], where x is the dial pad key, ranging from 1 to 0 (with 0 being the "0" key in your dial pad).
ALCATEL
home & business phones
| Setting | Description | Applic. | Range | Default |
| speed_dial.x.number | Phone number that the memory key will dial when pressed and held. | All | String | blank |
| speed_dial.x.name | Name associated to this memory key. | All | String | blank |
| speed_dial.x.account | SIP account (line) used for dialing when memory key x is pressed and held. | All | 1-2 | 1 |
"audio" Module: Audio Settings
The audio settings include jitter buffer parameters and RTP port settings. These configuration items affect only models in Group C, and each account is configured independently
| Setting | Description | Applic. | Range | Default |
| audio.x.jitter_mode | Select the desired mode for the jitter buffer: fixed (static) or adaptive. This setting depends on your network environment and conditions. | Group C | fixed,adaptive | adaptive |
| audio.x.fixed_jitter.delay | Name associated to this memory key.When in fixed jitter buffer mode, set the delay (in ms) desirable to provide good audio quality with the minimal possible delay | Group C | 30-500 | 70 |
| audio.x.adaptive_jitter.min_delay | When in adaptive jitter buffer mode, set the minimum delay (in ms) desirable to maintain data packet capture and audio quality. | Group C | 20-250 | 60 |
| audio.x.adaptive_jitter.target_delay | When in adaptive jitter buffer mode, set the target delay (in ms) desirable to provide good audio quality with the minimal possible delay. | Group C | 20-500 | 80 |
ALCATEL
home & business phones
| audio.x.adaptive_jitter.max_delay | When in adaptive jitter buffer mode, set the maximum delay (in ms) desirable to maintain data packet capture and audio quality. | Group C | 180-500 | 240 |
| audio.x.rtp.port_start | Sets the Local RTP port range start. | Group C | 1-65535 | 18000 |
| audio.x.rtp.port_end | Sets the Local RTP port range end. | Group C | 1-65535 | 19000 |
| audio.x.rtcp_xr.enable | Enables or disables reporting of RTCP XR via SIP to a collector server.RTP Control Protocol Extended Reports (RTCP XR) are used for voice quality assessment and diagnostics. | Group C | 0:disabled1:enabled | 0 |
"file" Module: Imported File Settings
The "file" parameters enable the provisioning file to import additional configuration files of various types, including:
Audio profile
Contact lists
Security certificates
And others
File parameter values are URLs that direct the phone to the location of the file to be imported.
None of these settings are exported when you manually export the configuration from the phone. Default value is blank for all of them.
| Setting | Applic. | Description |
| file.audio_profile | All | URL of Audio Profile to be imported. |
| file.contact.directory.append | All | URL of xml contact directory to be appended to existing contacts. |
| file.contact.directory.overwrite | All | URL of xml contact directory to be imported which will overwrite any existing contacts. |
| file.contact.blacklist.append | All | URL of xml contact blacklist to be appended to existing black list. |
ALCATEL
home & business phones
| file.contact.blacklist.overwrite | All | URL of xml contact blacklist to be imported and will overwrite existing black list. |
| file.bootup_logo | All | URL of custom logo shown during bootup. For logo specifications, see Logo specifications on page 43 |
| file.idle_logo | All | URL of custom logo shown on the idle screen. For logo specifications see Logo specifications on page 43 |
| file.sips.trusted.certificate.x | Group B | URL of SIPS certificate to be imported for TLS transport on account x. |
| file.https_user.certificate | Group B | URL of HTTPS certificate to be imported. |
| file.provisioning.trusted.certificate | Group B | URL of certificate to be imported for secure provisioning |
| file.ldap.trusted.certificate | Group B | URL of certificate to be imported for secure LDAP |
| file.broadsoft.trusted.certificate | Group B | URL of certificate to be imported for secure Broadsoft directory |
| file.certificate.x.url | Group C | URL to upload a trusted certificate file in pem or crt. It will be given index x and marked as unprotected. x ranges from 1 to 20. |
| file.protected_certificate.x.url | Group C | URL to upload a trusted certificate file in pem or crt. It will be given index x and marked as protected. x ranges from 1 to 20. |
| file.certificate.trusted.url | Group C | URL to upload a trusted certificate file in pem or crt. It will be given the first available index and marked as unprotected. |
| file.protected_certificate.trusted.url | Group C | URL to upload a trusted certificate file in pem or crt. It will be given the first available index and marked as protected. |
| file.protected_certificate.custom_device.url | Group C | URL to upload a custom device certificate to override the factory installed device certificate. |
| file.action | Group C | Enables you to delete certain certificates.removecertificate_customdevice:remove the custom device certificate and resume the use of the factory installed device certificate |
ALCATEL
home & business phones
| removecertificate_allnonprotected: remove all non-protected trusted certificatesremovecertificate_all: remove the custom device certificate and all protected or non-protected trusted certificatesEnables you to delete a custom language from the WebUI, the deskset screens, or both.Values:removecertificate_customdevice,removecertificate_allnonprotected,removecertificate_allremovecustomlanguage_all,removecustomlanguage_webui,removecustomlanguage_desksetui | ||
| file.language.deskset.url | Group D | URL of the Deskset UI Custom Language file to be imported |
| file.language.webui.url | Group D | URL of Web UI Custom Language file to be imported. |
| file.vpn.advanced_config | Group C | URL of OpenVPN client configuration file. For more information, see ''VPN'' on page 149. |
| file.custom_ringer | Group D | Enter URI to WAV file for a custom ringer. The custom ringer replaces Ringtone 10 on Ringer tone menu. For more information about file format, see ''Custom Ringer'' on page 113. |
"xml\_app" Module: XML App Settings
Phones in model Group C (Temporis IP151, IP251G, IP301G and IP701G) support both push and pull server applications. The XML app settings allow you to enable "push" events and how they interact with the phone during calls.
| Setting | Description | Applic. | Range | Default |
| xml_app.http_push_enable | Enable or disable HTTP push, which enables the phone to display XML objects that are ''pushed'' to the phone from the server via http/https POST or SIP NOTIFY. | Group D | 0:disabled1:enabled | 0 |
ALCATEL
home & business phones
| xml_app.push_during_call_enable | Enable or disable the phone to display pushed XML objects during a call.Otherwise, the XML application is displayed after the call is over. | Group D | 0:disabled1:enabled | 0 |
For more information about the XML Browser interface please check with your customer support.
"system\_event" Module: Action URI Settings
Phones in model Group D (Temporis IP151, IP251G, IP301G and IP701G) support interaction with a server application by using an HTTP GET request. The action URI triggers a GET request when a specified event occurs. Action URIs allow an external application to take control of the display when an event occurs. For more information, see "Server Application" on page 132
| Setting | Description | Applic. | Range | Default |
| system_event.startup.action_uri | Enter URI for GET request triggered at end of phone bootup. | Group D | String | Blank |
| system_event.registered.action_uri | Enter URI for GET request triggered at end of line registration. | Group D | String | Blank |
| system_event.on_hook.action_uri | Enter URI for GET request triggered when phone goes from active to idle | Group D | String | Blank |
| system_event.off_hook.action_uri | Enter URI for GET request triggered when phone goes into dial mode. | Group D | String | Blank |
| system_event.incoming_call.action_uri | Enter URI for GET request triggered for incoming calls or call waiting events. | Group D | String | Blank |
| system_event.outgoing_call.action_uri | Enter URI for GET request triggered when phone sends SIP INVITE message. | Group D | String | Blank |
ALCATEL
home & business phones
| system_event.poll.action_uri | Enter URI for periodical GET request | Group D | String | Blank |
| system_event.poll.interval | Enter interval (in seconds) between poll.action_uri requests | Group D | 1-65535 | 3600 |
| system_event.connected.action_uri | Enter URI for GET request triggered when phone has active call or is paging. | Group D | String | Blank |
| system_event.registration_event.action_uri | Enter URI for GET request triggered when the registration state changes. | Group D | String | Blank |
For more information about the XML Browser interface please check with your technical support.
"tr069" Module: TR-069 Settings
Phones in model Group C (Temporis IP151, IP251G, IP301G, IP701G and Alcatel IP2115) support TR-069.
The Broadband Forum's Technical Report 069 (TR-069) defines a protocol for remote management and secure auto-configuration of compatible devices. The TR-069 settings allow you to enable TR-069 and configure access to an auto-configuration server (ACS).
| Setting | Description | Applic. | Range | Default |
| tr069.enable | Enable/disable the TR-069 subsystem. | Group C | 0:disabled1:enabled | 0 |
| tr069.acs.url | Enter the URL to the auto configuration server (ACS). | Group C | string | blank |
| tr069.acs.username | Enter user name for ACS authentication | Group C | string | blank |
| tr069.acs.access_password | Enter password for ACS authentication. | Group C | string | blank |
| tr069.periodic_inform.enable | Enable/disable the phone sending Inform messages to the server | Group C | 0:disabled1:enabled | 0 |
| tr069.periodic_inform.interval | Set the interval (in seconds) between | Group C | 1-65535 | 3600 |
ALCATEL
home & business phones
| sending Inform messages. |
"tone" Module: Tone Definition Settings
The Tone Definition settings configure data for various tones for the purpose of localization. The Audio Manager component uses the data from this model to populate the mcu on bootup.
The tone definition settings follow the format: tone.element.x, where x is the index of the elements, ranging from 1 to 5.
Each definition (or tone element) must be a string of 12 elements separated by a space:
"<num of freq> <freq1> <amp1> <freq2> <amp2> <freq3> <amp3> <freq4> <amp4> <on duration> <off duration> <repeat count>"
Where:
<num of freq>: 04
<freq1>: 05
<amp1>: -3276832767 /-30-6
<freq2>: 0-65535
<amp2>: -32768-32767 /-30-6
<freq3>: 0-65535
<amp3>: -32768-32767 /-30-6
<freq4>: 0-65535
<amp4>: -32768-32767 /-30-6
<on duration>: 0-2^32
<off duration>: 0-2^32
<repeat count>: 0-65535
All these settings are exported when you manually export the configuration from the phone.
| Setting | Applicability | Default |
| tone.call_waiting_tone.num_of_elements | All | 1 |
| tone.call_waiting_tone.element.1 | Group B | 1 440 -120 0 0 0 0 0 0 500 0 1 |
| tone.call_waiting_tone.element.1 | Group C | 1 440 -22 0 0 0 0 0 0 500 0 1 |
| tone.call_waiting_tone.element.[2-5] | All | blank |
| tone.call_waiting_tone.num_of_repeat_all | Group C | 0 |
| tone.hold_reminder.num_of_elements | All | 1 |
| tone.hold_reminder.element.1 | Group B | 1 770 -120 0 0 0 0 0 0 300 0 1 |
| tone.hold_reminder.element.1 | Group C | 1 770 -22 0 0 0 0 0 0 300 0 1 |
| tone.hold_reminder.element.[2-5] | All | blank |
ALCATEL
home & business phones
| tone.hold_reminder.num_of_repeat_all | Group C | 0 |
| tone.inside_dial_tone.num_of_elements | All | 1 |
| tone.inside_dial_tone.element.1 | Group B | 2 440 -180 350 -180 0 0 0 04294967295 0 65535 |
| tone.inside_dial_tone.element.1 | Group C | 2 440 -22 350 -22 0 0 0 065535 0 65535 |
| tone.inside_dial_tone.element.[2-5] | All | blank |
| tone.inside_dial_tone.num_of_repeat_all | Group C | 0 |
| tone.stutter_dial_tone.num_of_elements | All | 2 |
| tone.stutter_dial_tone.element.1 | Group B | 2 440 -180 350 -180 0 0 0 0100 100 10 |
| tone.stutter_dial_tone.element.2 | Group B | 2 440 -180 350 -180 0 0 0 04294967295 0 65535 |
| tone.stutter_dial_tone.element.1 | Group C | 2 440 -22 350 -22 0 0 0 0 100100 10 |
| tone.stutter_dial_tone.element.2 | Group C | 2 440 -22 350 -22 0 0 0 065535 0 65535 |
| tone.stutter_dial_tone.element.[3-5] | All | blank |
| tone.stutter_dial_tone.num_of_repeat_all | Group C | 0 |
| tone.busy_tone.num_of_elements | All | 1 |
| tone.busy_tone.element.1 | Group B | 2 480 -180 620 -180 0 0 0 0500 500 65535 |
| tone.busy_tone.element.1 | Group C | 2 480 -22 620 -22 0 0 0 0 500500 65535 |
| tone.busy_tone.element.[2-5] | All | blank |
| tone.busy_tone.num_of_repeat_all | Group C | 0 |
| tone.ring_back_tone.num_of_elements | All | 1 |
| tone.ring_back_tone.element.1 | Group B | 2 440 -180 480 -180 0 0 0 02000 4000 65535 |
| tone.ring_back_tone.element.1 | Group C | 2 440 -22 480 -22 0 0 0 02000 4000 65535 |
| tone.ring_back_tone.element.[2-5] | All | blank |
| tone.ring_back_tone.num_of_repeat_all | Group C | 0 |
| tone.congestion_tone.num_of_elements | Group C | 3 |
| tone.congestion_tone.element.1 | Group C | 1 950 -22 0 0 0 0 0 0 330 0 1 |
ALCATEL
home & business phones
| tone.congestion_tone.element.2 | Group C | 1 1400 -22 0 0 0 0 0 0 330 0 1 |
| tone.congestion_tone.element.3 | Group C | 1 1800 -22 0 0 0 0 0 0 330 1000 |
| tone.congestion_tone.element.[4-5] | Group C | blank |
| tone.congestion_tone.num_of_repeat_all | Group C | 65535 |
| tone.ring_back_tone.element.[2-5] | blank | |
| tone.dial_tone.num_of_elements | Group C | 1 |
| tone.dial_tone.element.1 | Group C | 2 440 -22 350 -22 0 0 0 0 65535 0 65535 |
| tone.dial_tone.element.[2-5] | Group C | blank |
| tone.dial_tone.num_of_repeat_all | Group C | 0 |
| tone.auto_answer_tone.num_of_elements | Group C | 1 |
| tone.auto_answer_tone.element.1 | Group C | 2 500 -22 800 -22 0 0 0 0 1000 0 1 |
| tone.auto_answer tone.element.[2-5] | Group C | blank |
| tone.auto_answer tone.num_of_repeat_all | Group C | 0 |
"ringersetting" Module: distinctive ringing settings
The distinctive ringing settings follow the format: ringersetting.[element].
All these settings are exported when you manually export the configuration from the phone.
| Setting | Description | Range | Default |
| ringersetting.x.ringer_text | Content of the ''info'' field in the Alert-info header to match for distinctive ringing for element ''x''.SeeRinger Settingssection | Text string | blank |
| ringersetting.x.ringer_type | Ringer tone to use when there is a match with ringer_text | 1-10 | 1 |
"page\_zone" Module: Paging Zone Settings
The paging zone settings allow you to define a maximum of 10 paging zones that the deskset can use for multicast paging.
The paging zone parameters (except for page_zone.call_priority_threshold) follow the format page_zone.x.[element], where x is the paging zone ID number, ranging from 1 to 10.
| Setting | Description | Applic. | Range | Default |
| page_zone.x.name | Sets the paging zone name, which appears on deskset LCD for outgoing and incoming multicast pages. A maximum of 15 characters is allowed. | All | Text string | blank |
| page_zone.x.multicast_address | Enter the multicast IP address that the deskset will monitor. The range of valid IP addresses is. | All | IPv4, 224.0.0.0 to 239.255.255.255 | blank |
| page_zone.x.multicast_port | Enter the multicast port associated with the multicast IP. The range of valid ports is 1 to 65535. | All | 1-65535 | blank |
| page_zone.x.accept_incoming_page | Enables or disables the deskset from receiving incoming multicast pages for that paging zone. If disabled, the deskset can make outgoing multicast pages only. | All | 0 (disabled), 1 (enabled) | 1 |
| page_zone.x.priority | Set the paging zone priority from 1 to 10. Zones with a priority higher than another zone can interrupt the lower-priority zone's active page. | All | 1-10 | 5 |
| page_zone.call_priority_threshold | Set the call_priority_threshold. If the paging zone priority (page_zone.x.priority) is higher or equal to the call priority, then a multicast page can interrupt an active, dialing, or incoming call. | All | 1-10 | 2 |
"softkey" Module: Custom Soft Key Settings
The custom soft key settings allow you to select which soft keys can appear on the Idle screen, the Call Active screen, the Call Held screen and the Live Dial screen. You can also specify the position of each soft key.
Softkeys appear on the phone screen in the same order as the softkey values you enter. Enter soft key values separated by commas.
You can specify a maximum of nine soft keys (three levels) for each parameter.
The soft key parameters follow the format softkey.[element].
For more information, see Customizing Softkeys on page 45.
| Setting | Description | App | Values | Default |
| softkey.idle | Specifies the soft keys visible on the idle screen. | All(see remarks) | Group B:blank, dir , call_log, redial, message, dnd, cfwd, cfna, cfwd_all, cfwd_busy, intercom, retrieve, callback, grp_pickup, dir_pickup, line, settings, pgm_dial_1, pgm_dial_2, pgm_dial_3Group C:blank, dir , call_log, redial, message, dnd, cfwd, cfna, cfwd_all, cfwd_busy, intercom, retrieve, callback, grp_pickup, dir_pickup, line, settings | Model dependent. |
| softkey.call_active | Specifies the soft keys visible on the active call screen. | All(see remarks) | Group B:blank, new, park_call, end, hold, transfer, conf, xferline, confline, pgm_dial_1, pgm_dial_2, pgm_dial_3Group C:blank, new, park_call, end, hold, pri_hold, transfer, conf, flash, hs_pick | Model dependent. |
| softkey.call_held | Specifies the soft keys visible on the held call screen. | All(see remarks) | Group B:blank, new, park_call, retrieve, grp_pickup, dir_pickup, end, resume, transfer, conf, xferline, confline, pgm_dial_1, pgm_dial_2, pgm_dial_3Group C:blank, new, retrieve, grp_pickup, dir_pickup, | Model dependent. |
ALCATEL
home & business phones
| end, resume, transfer, conf,,hs_pick | ||||
| softkey.live_dial | Specifies the soft keys visible on the live dial screen. | All (see remarks) | Group B:blank, dir, call_log, redial, message, end, dial, input, cancel, backspc, pgm_dial_1, pgm_dial_2, pgm_dial_3Group C:blank, dir, call_log, redial, message, end, dial, input, cancel, backspc | Model dependent. |
| softkey.program_dial.x.label | Sets the label that will be shown on the pgm_dial_x softkey | Group B | string | blank |
| softkey.program_dial.x.number | Sets the number that will be dialed when the pgm_dial_x softkey is pressed | Group B | string | blank |
| softkey.program_dial.x.account | Account that will be used to dial out pgm_dial_x | Group B | 1 to max accounts | 1 |
"hs\_settings" Module: Handset management Settings
Handset management settings allow you to select which accounts are assigned to each handset to make and receive calls, default account that will be used to dial out for a particular handset, or handset name.
For more information, see Handset settings on page 138
| Setting | Description | Values | Default |
| hs_settings.x.assigned_account | Lists accounts assigned to a handset. | Comma separated account index list | 1,2,3,4,5,6 |
| hs_settings.x.default_account | Account which will be used to dial out.Exceptions are pre-assignment cases (call log, contacts, speed dial) or user manually selecting a different account. | 1 to 6 | 1 |
| hs_settings.x.handset_name | Name the handset will show on its idle screen | String, up to 12 chars | HANDSET |
ALCATEL
home & business phones
Appendix B: Time Zones
| Time Zone | String in config file | |
| -11 | Samoa | Pacific/Pago_Pago |
| -10 | United States-Hawaii-Aleuan | Pacific/Honolulu |
| -10 | United States-Alaska-Aleuan | America/Adak |
| -9 | United States-Alaska Time | America/Anchorage |
| -8 | Canada(Vancouver,Whitehorse) | America/Vancouver |
| -8 | Mexico(Tijuana,Mexicali) | America/Tijuana |
| -8 | United States-Pacic Time | America/Los_Angeles |
| -7 | Canada(Edmonton,Calgary) | America/Edmonton |
| -7 | Mexico(Mazatlan,Chihuahua) | America/Chihuahua |
| -7 | United States-Mountain Time | America/Denver |
| -7 | United States-MST no DST | America/Phoenix |
| -6 | Canada-Manitoba(Winnipeg) | America/Winnipeg |
| -6 | Chile(Easter Islands) | Pacific/Easter |
| -6 | Mexico(Mexico City,Acapulco) | America/Mexico_City |
| -6 | United States-Central Time | America/Chicago |
| -5 | Bahamas(Nassau) | America/Nassau |
| -5 | Canada(Montreal,Oawa,Quebec) | America/Montreal |
| -5 | Caicos | America/Grand_Turk |
| -5 | Cuba(Havana) | America/Havana |
| -5 | United States-Eastern Time | America/New_York |
| -4:30 | Venezuela(Caracas) | America/Caracas |
| -4 | Canada(Halifax,Saint John) | America/Halifax |
| -4 | Chile(Sanago) | America/Santiago |
| -4 | Paraguay(Asuncion) | America/Asuncion |
| -4 | United Kingdom-Bermuda(Bermuda) | Atlantic/Bermuda |
| -4 | United Kingdom(Falkland Islands) | Atlantic/Stanley |
| -4 | Trinidad&Tobago | America/Port_of_Spain |
| -3:30 | Canada-New Foundland(St.Johns) | America/St_Johns |
| -3 | Denmark-Greenland(Nuuk) | America/Godthab |
| -3 | Argenna(Buenos Aires) | America/Argentina/Buenos_Aires |
| -3 | Brazil(no DST) | America/Fortaleza |
| -3 | Brazil(DST) | America/Sao_Paulo |
| -2 | Brazil(no DST) | America/Noronha |
| -1 | Portugal(Azores) | Atlantic/Azores |
| 0 | GMT | GMT |
| 0 | Greenland | America/Danmarkshavn |
| 0 | Denmark-Faroe Islands(Torshaven) | Atlantic/Faroe |
| 0 | Ireland(Dublin) | Europe/Dublin |
| 0 | Portugal(Lisboa,Porto,Funchal) | Europe/Lisbon |
| 0 | Spain-Canary Islands(Las Palmas) | Atlantic/Canary |
| 0 | United Kingdom(London) | Europe/London |
| 0 | Morocco | Africa/Casablanca |
| 1 | Albania(Tirane) | Europe/Tirane |
| 1 | Austria(Vienna) | Europe/Vienna |
ALCATEL
home & business phones
| 1 | Belgium(Brussels) | Europe/Brussels |
| 1 | Croaa(Zagreb) | Europe/Zagreb |
| 1 | Czech Republic(Prague) | Europe/Prague |
| 1 | Denmark(Kopenhagen) | Europe/Copenhagen |
| 1 | France(Nice) | Europe/Paris |
| 1 | Germany(Berlin) | Europe/Berlin |
| 1 | Hungary(Budapest) | Europe/Budapest |
| 1 | Italy(Rome) | Europe/Rome |
| 1 | Luxembourg(Luxembourg) | Europe/Luxembourg |
| 1 | Makedonia(Skopje) | Europe/Skopje |
| 1 | Netherlands(Amsterdam) | Europe/Amsterdam |
| 1 | Namibia(Windhoek) | Africa/Windhoek |
| 2 | Estonia(Tallinn) | Europe/Tallinn |
| 2 | Finland(Helsinki) | Europe/Helsinki |
| 2 | Gaza Strip(Gaza) | Asia/Gaza |
| 2 | Greece(Athens) | Europe/Athens |
| 2 | Israel(Tel Aviv) | Asia/Jerusalem |
| 2 | Jordan(Amman) | Asia/Amman |
| 2 | Latvia(Riga) | Europe/Riga |
| 2 | Lebanon(Beirut) | Asia/Beirut |
| 2 | Moldova(Kishinev) | Europe/Chisinau |
| 2 | Russia(Kaliningrad) | Europe/Kaliningrad |
| 2 | Romania(Bucharest) | Europe/Bucharest |
| 2 | Syria(Damascus) | Asia/Damascus |
| 2 | Turkey(Ankara) | Europe/Istanbul |
| 2 | Ukraine(Kyiv,Odessa) | Europe/Kiev |
| 3 | East Africa Time | Africa/Djibouti |
| 3 | Iraq(Baghdad) | Asia/Baghdad |
| 3 | Russia(Moscow) | Europe/Moscow |
| +3:30 | Iran(Teheran) | Asia/Tehran |
| 4 | Armenia(Yerevan) | Asia/Yerevan |
| 4 | Azerbaijan(Baku) | Asia/Baku |
| 4 | Georgia(Tbilisi) | Asia/Tbilisi |
| 4 | Kazakhstan(Aqtau) | Asia/Aqtau |
| 4 | Russia(Samara) | Europe/Samara |
| 5 | Kazakhstan(Aqtobe) | Asia/Aqtobe |
| 5 | Kyrgyzstan(Bishkek) | Asia/Bishkek |
| 5 | Pakistan(Islamabad) | Asia/Karachi |
| 5 | Russia(Chelyabinsk) | Asia/Yekaterinburg |
| +5:30 | India(Calcua) | Asia/Kolkata |
| 6 | Kazakhstan(Astana,Almaty) | Asia/Almaty |
| 6 | Russia(Novosibirsk,Omsk) | Asia/Novosibirsk |
| 7 | Russia(Krasnoyarsk) | Asia/Krasnoyarsk |
| 7 | Thailand(Bangkok) | Asia/Bangkok |
| 8 | China(Beijing) | Asia/Shanghai |
| 8 | Singapore(Singapore) | Asia/Singapore |
| 8 | Australia(Perth) | Australia/Perth |
| 9 | Korea(Seoul) | Asia/Seoul |
| 9 | Japan(Tokyo) | Asia/Tokyo |
ALCATEL
home & business phones
| +9:30 | Australia(Adelaide) | Australia/Adelaide |
| +9:30 | Australia(Darwin) | Australia/Darwin |
| 10 | Australia(Sydney,Melbourne,Canberra) | Australia/Sydney |
| 10 | Australia(Brisbane) | Australia/Brisbane |
| 10 | Australia(Hobart) | Australia/Hobart |
| 10 | Russia(Vladivostok) | Asia/Vladivostok |
| +10:30 | Australia(Lord Howe Islands) | Australia/Lord_Howe |
| 11 | New Caledonia(Noumea) | Pacific/Noumea |
| 12 | New Zeland(Wellington,Auckland) | Pacific/Auckland |
| +12:45 | New Zeland(Chatham Islands) | Pacific/Chatham |
| 13 | Tonga(Nukualofa) | Pacific/Tongatapu |
ALCATEL
home & business phones
Maintenance
Taking care of your telephone
Your telephone contains sophisticated electronic parts, so you must treat it with care. Avoid rough treatment.
Place the corded handset down gently.
Save the original packing materials to protect your telephone base if you ever need to ship it.
Avoid water
You can damage your telephone if it gets wet. Do not use the corded handset in the rain, or handle it with wet hands. Do not install the telephone near a sink, bathtub or shower.
Electrical storms
Electrical storms can sometimes cause power surges harmful to electronic equipment. For your own safety, take caution when using electric appliances during storms.
Cleaning your telephone
Your telephone has a durable plastic casing that should retain its luster for many years. Clean it only with a soft cloth slightly dampened with water or a mild soap.
Do not use excess water or cleaning solvents of any kind.
Remember that electrical appliances can cause serious injury if used when you are wet or standing in water. If the telephone should fall into water, DO NOT RETRIEVE IT UNTIL YOU UNPLUG THE POWER CORD AND NETWORK CABLE FROM THE WALL, then pull the unit out by the unplugged cords.
ALCATEL
home & business phones
Important Safety Information

This symbol is to alert you to important operating or servicing instructions that may appear in this user's manual. Always follow basic safety precautions when using this product to reduce the risk of injury, fire, or electric shock.
Read and understand all instructions in the user's manual. Observe all markings on the product.
Avoid using a telephone during a thunderstorm. There may be a slight chance of electric shock from lightning.
Do not use the telephone to report a gas leak in the vicinity of the leak. Under certain circumstances, a spark may be created when the adapter is plugged into the power outlet, or when the handset is replaced in its cradle. This is a common event associated with the closing of any electrical circuit. The user should not plug the phone into a power outlet, and should not put a charged handset into the cradle, if the phone is located in an environment containing concentrations of flammable or flame-supporting gases, unless there is adequate ventilation. A spark in such an environment could create a fire or explosion. Such environments might include: medical use of oxygen without adequate ventilation; industrial gases (cleaning solvents; gasoline vapors; etc.); a leak of natural gas; etc.
Do not use this product near water, or when you are wet. For example, do not use it in a wet basement or shower, or next to a swimming pool, bathtub, kitchen sink, or laundry tub. Do not use liquids or aerosol sprays for cleaning. If the product comes in contact with any liquid, unplug any line or power cord immediately. Do not plug the product back in until it has dried thoroughly.
Install this product in a protected location where no one can trip over any line or power cords. Protect cords from damage or abrasion.
If this product does not operate normally, see the Troubleshooting section in your product's manual. If you cannot solve the problem, or if the product is damaged, refer to the Limited warranty. Do not open this product except as directed in your user's manual. Opening the product or reassembling it incorrectly may expose you to hazardous voltages or other risks.
This power adapter is intended to be correctly oriented in a vertical or floor mount position. The prongs are not designed to hold the plug in place if it is plugged into a ceiling, an under-the-table or cabinet outlet.

Caution: Use only the original power adapter for this product. To obtain it, check with your authorized distributor or reseller.
SAVE THESE INSTRUCTIONS
ALCATEL
home & business phones
CE Declaration of conformity

Hereby, it's declared that this phone is in conformity with the essential requirements and other relevant provisions of the CE. You can download full declaration from www.alcatel-business.com
CE Mark Warnings
Temporis IP100/IP150/IP151/IP251G
This is a Class B device, in a domestic environment; this product may cause radio interference, in which case the user may be required to take adequate measures.
Temporis IP300/IP301G/IP700G/IP701G, Alcatel IP2015/IP2115, Conference IP1850
This is a Class A device, in a domestic environment; this product may cause radio interference, in which case the user may be required to take adequate measures.
WEEE Warning

To avoid the potential effects on the environment and human health as a result of the presence of hazardous substances in electrical and electronic equipment, end users of electrical and electronic equipment should understand the meaning of the crossed-out wheeled bin symbol. Do not dispose of WEEE as unsorted municipal waste and have to collect such WEEE separately.
GPL License Information
Portions of the software associated with this product are open source, and fall within the scope of the GNU General Public License (GPL).
- Business IP Range Administration and Provisioning Manual
- ALCATEL
- Parts checklist
- Table of contents
- home & business phones
- Introduction
- Audience
- Related documents
- Getting started
- Temporis IP100
- Quick reference guide
- Programmable keys
- Directory card
- Access F11 To F20
- Conference
- Redial
- Transfer
- Voicemail
- Temporis IP150 (M)
- ▼ ▲ Ω
- Temporis IP151
- Temporis IP251G
- Programmable keys with backlight
- Temporis IP300
- Access F13 to F24
- Temporis IP301G
- Temporis IP700G
- Settings
- Line
- OK
- Call Log
- MENU
- NAVIGATION KEY
- CANCEL
- Hold key
- Temporis IP701G
- Alcatel IP2015/IP2115
- Talk
- Call Hold
- CONF
- Talk off/Power
- Intercom
- CID/VOL -
- DIR/VOL +
- Paging/Registration button
- Power and VoIP LEDs
- RESET
- Conference IP1850
- Visual indicator (4)
- PC SPK
- HOLD
- MUTE
- Talk ON/OFF
- Remove and activate mic
- Visual indicator
- Network Requirements
- Installation
- Temporis IP100/IP150/IP151 installation
- To install the phone:
- IMPORTANT INFORMATION
- To share a network connection with a PC (IP150/IP151 only):
- To mount the phone on the wall:
- Temporis IP251G/IP300/IP301G/IP701G installation
- To share a network connection with a PC:
- Temporis IP700G installation
- Alcatel IP2015/IP2115 installation
- To install the base:
- To mount the base station on the wall :
- To install the handset:
- Conference IP1850 installation
- To install the main unit:
- To install the wireless microphones:
- To connect IP1850 to your computer:
- To associate a new wireless microphone:
- To disassociate the wireless microphones from the main unit:
- To disassociate a wireless microphone without the main unit:
- Configuring your device
- Minimum configuration
- Verifying the installation: idle Screen
- Configuring Programmable keys
- Functions available to programmable keys
- LED behavior
- Adding a Custom Logo
- Idle screen logo behavior
- Logo specifications
- Uploading a custom logo
- Custom logo user interactions
- Customizing Softkeys
- Custom Soft Key Configuration File Settings
- Setting up Temporis IP100 phone
- Using the phone "star codes"
- Find IP address
- Static IP configuration
- VLAN configuration
- Enable VLAN
- Disable VLAN
- Setting up IP300/IP301G/IP700G/IP701G with IP70H accessory DECT headset
- Register a DECT headset
- Deregister a DECT headset
- Deregister a DECT headset without a deskset
- Deskset functionality with an IP70H DECT headset
- Setting up IP300/IP301G/IP700G/IP701G with IP15 accessory DECT handset
- Register a DECT handset
- Deregister a DECT handset
- Deskset functionality with an IP15 DECT handset
- Setting up IP2015/IP2115 with multiple IP15 handsets or IP70H wireless headsets
- Managing additional IP15 handsets
- To associate a new handset to the base:
- To associate a headset to the base:
- To rename a handset/headset:
- To disassociate a handset/headset from the base:
- To disassociate all handsets/headsets from the base:
- Assigning sip accounts to IP15 handsets or IP70H headsets
- IP2015/IP2115 functionality with IP15 DECT handsets
- IP2015/IP2115 functionality with IP70H DECT headset
- Using Menu in your desktop phone
- To use the phone menu:
- Features
- Status
- To view the Status menu:
- Note
- Viewing Line status
- To view complete status information for a line:
- Customizing your phone with User Settings menu
- To view the User Settings menu:
- Using the Admin Settings menu
- To access the Admin Settings menu:
- Network settings (IPv4)
- To use the Network setting menu:
- To enable or disable DHCP:
- To set static IP for the base or desktop phone:
- To set the VLAN ID for the base or desktop phone:
- To set other settings (DNS and NTP):
- Network settings (IPv4/IPv6)
- To set the network mode:
- To set static IP for your phone:
- To set static DNS:
- To set PPPoE:
- To set the VLAN ID:
- Line Menu
- To use the Line setting menu:
- Provisioning Menu
- To use the Provisioning menu:
- Security Menu
- Using Menu in your IP15 cordless handset
- User functionality submenus
- User Settings
- Admin Settings
- Using the WebUI
- To access the WebUI:
- Saving Your Settings
- System
- SIP Account Management
- Feature Access Codes Settings
- Dial Plan
- Call Settings
- Call Completion
- User Preferences
- Other Settings
- Programmable Function Keys
- Programmable Hard Keys
- To enter speed dial numbers:
- Signaling Settings
- Ringer Settings
- Paging Zone
- Server applications
- Action URI Syntax
- Hotline Settings
- Handset settings
- Account assignment
- Handset name
- Network
- Basic Network Settings (IPv4)
- Basic Network Settings (IPv4/IPv6)
- Note:
- Advanced Network Settings
- PC Port
- VLAN Settings
- VPN
- Contacts
- Local Directory
- To add a new directory entry:
- Directory Import/Export
- Directory Import using configuration files
- Black List
- Black List Import/Export
- Black List Import using configuration files
- LDAP Directory
- About LDAP Attribute filters
- Broadsoft Directory
- Remote XML Phonebook
- Remote XML Directory Format
- Call History
- Servicing
- Reboot
- Time and Date
- Custom Language
- Custom Logo
- Firmware Upgrade
- To update the deskset or base unit firmware from a remote host:
- To update the cordless handset(s) firmware from a remote host:
- Manual Firmware Update and Upload
- To update the deskset or base firmware using a file on your computer or local network:
- To update the cordless handset IP15 firmware using a file on your computer or local network:
- Provisioning
- Import Configuration
- To import a configuration file:
- Export Configuration
- To export the configuration file:
- Click Export.
- Reset Configuration
- To reset the phone to its default configuration:
- Security
- Passwords
- To change the admin password:
- To change the User password:
- Phone lock
- PIN masking
- Web Server
- To configure Web Server Settings:
- Trusted Servers
- Trusted IP
- Certificates
- To upload a web server certificate:
- Enhanced Certificate Management
- Device Certificate
- Trusted Certificates
- TR069
- System Logs
- Network Capture
- Download Log
- Provisioning Using Configuration Files
- Resynchronization—Configuration File Checking
- The Provisioning Process
- Phone Restart
- Configuration File Types
- Data Files
- Configuration File Guide
- Guidelines for the MAC-Specific Configuration File
- Securing Configuration Files with AES Encryption
- To encrypt a configuration file:
- To enable configuration file decryption via WUI:
- Setting Up Provisioning
- Soft Keys
- Desktop phone soft keys
- IP15 cordless handset soft keys
- Appendix A: Configuration File Settings
- "sip\_account" Module: SIP Account Settings
- "network" Module: Network Settings
- "provisioning" Module: Provisioning Settings
- "log" Module: Log Settings
- "remoteDir" Module: Remote Directory Settings
- "web" Module: Web Settings
- "trusted\_ip" Module: Trusted Server and Trusted IP Settings
- "user\_pref" Module: User Preference Settings
- "call\_settings" Module: Call Settings
- "pfk" Module: Programmable Feature Key Settings
- "speed\_dial" Module: Speed Dial Settings
- "audio" Module: Audio Settings
- "file" Module: Imported File Settings
- "xml\_app" Module: XML App Settings
- "system\_event" Module: Action URI Settings
- "tr069" Module: TR-069 Settings
- "tone" Module: Tone Definition Settings
- Where:
- "ringersetting" Module: distinctive ringing settings
- "page\_zone" Module: Paging Zone Settings
- "softkey" Module: Custom Soft Key Settings
- "hs\_settings" Module: Handset management Settings
- Maintenance
- Taking care of your telephone
- Avoid water
- Electrical storms
- Cleaning your telephone
- Important Safety Information
- SAVE THESE INSTRUCTIONS
- CE Declaration of conformity
- CE Mark Warnings
- Temporis IP100/IP150/IP151/IP251G
- Temporis IP300/IP301G/IP700G/IP701G, Alcatel IP2015/IP2115, Conference IP1850
- WEEE Warning
- GPL License Information
Brand : ALCATEL
Model : Temporis IP300
Category : Telephone