CZ505E - Car radio CLARION - Free user manual and instructions
Find the device manual for free CZ505E CLARION in PDF.


| Product Type | Car Stereo |
| Brand | Clarion |
| Model | CZ505E |
| Form Factor | 1-DIN |
| Dimensions (W x H x D) | 178 x 50 x 160 mm |
| Power Supply | 12V DC (negative ground) |
| Maximum Power Output | 4 x 50 Watts |
| Playback Formats | CD, CD-R, CD-RW, MP3, WMA |
| Tuner Bands | FM/AM |
| FM Frequency Range | 87.5 - 108 MHz |
| AM Frequency Range | 531 - 1602 kHz |
| Audio Inputs | AUX (front 3.5mm), USB (front) |
| Preamp Outputs | 2-channel (front/rear) |
| Equalizer | 3-band (Bass, Mid, Treble) |
| Display | Backlit LCD |
| Remote Control | Included |
| Clock Function | Yes |
| Security Code | Anti-theft code (refer to manual) |
| Weight | Approx. 1.2 kg |
| Cleaning Instructions | Use a dry soft cloth; avoid solvents |
| Repairability | Contact authorized service center |
Frequently Asked Questions - CZ505E CLARION
User questions about CZ505E CLARION
0 question about this device. Answer the ones you know or ask your own.
Ask a new question about this device
Download the instructions for your Car radio in PDF format for free! Find your manual CZ505E - CLARION and take your electronic device back in hand. On this page are published all the documents necessary for the use of your device. CZ505E by CLARION.
USER MANUAL CZ505E CLARION
Owner's manual & Installation manual
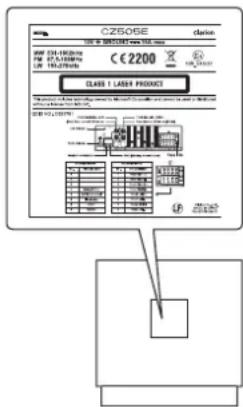
This appliance contains a laser system and is classified as a "CLASS 1 LASER PRODUCT". To use this model properly, read this Owner's Manual carefully and keep this manual for your future reference. In case of any trouble with this player, please contact your nearest "AUTHORIZED service station". To prevent direct exposure to the laser beam, do not try to open the enclosure.
!CAUTION
USE OF CONTROLS OR ADJUSTMENTS OR PERFORMANCE OF PROCEDURES OTHER THAN THOSE SPECIFIED IN THE OWNER'S MANUAL MAY RESULT IN HAZARDOUS RADIATION EXPOSURE.
Thank you for purchasing this Clarion product.
- Please fully read this owner's manual before operating this equipment.
- Check the contents of the enclosed warranty card and store it in a safe place with this manual.
Contents 3
- FEATURES 4
Expanding Systems....4
- PRECAUTIONS....4
About the Registered Marks,etc....4
Front Panel / Generalities 4
USB Port 4
Remove the DCP 5
Attach the DCP 5
Storing the DCP in the DCP Case....5
- CONTROLS....5
Operational Panel 5
Names of Buttons 5
- CAUTIONS ON HANDLING....6
Handling Discs 6
- OPERATIONS ...... 6
Basic Operations....6
System Setup 7
Audio Setup....7
Radio Operations....7
Radio Data System Operations 8
DAB Operations 9
CD/MP3/WMA Operations 9
USB Operations 10
iPod & iPhone Operations....10
Bluetooth Operations....12
AUX Operations 12
- TROUBLE SHOOTING....12
- ERROR DISPLAYS....13
- SPECIFICATIONS....13
- INSTALLATION / WIRE CONNECTION GUIDE ...... 14
1. FEATURES
■ Built-In Bluetooth® Handsfree (HFP) and Audio Streaming (A2DP & AVRCP)
■ Compatible with iPod® / iPhone® via USB
■ 4ch RCA Output with HPF/LPF and BEAT-EQ with 3 Band Parametric Equalizer
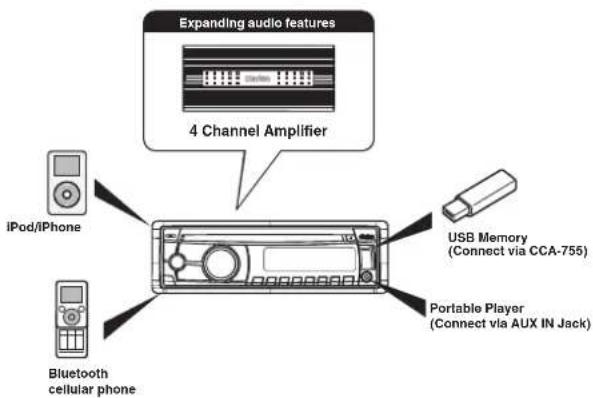
Expanding Systems
Note:
• The items listed outside of the frames are the commercial products generally sold.
• CCA-755: Sold by separately.
2. PRECAUTIONS
WARNING
For your safety, the driver should not operate the controls while driving. Also, while driving, keep the volume to a level at which external sounds can be heard.
- When the interior of the car is very cold and the player is used soon after switching on the heater, moisture may form on the disc or the optical parts of the player and proper playback may not be possible. If moisture forms on the disc, wipe it off with a soft cloth. If moisture forms on the optical parts of the player, do not use the player for about one hour. The condensation will disappear naturally allowing normal operation.
- Driving on extremely bumpy or rough roads can cause the disc to skip during playback.
- This unit uses precision parts and components for its operation. In the event that trouble arises, never open the case, disassemble the unit, or lubricate the rotating parts. Contact your Clarion dealer or service center.
About the Registered Marks,etc.
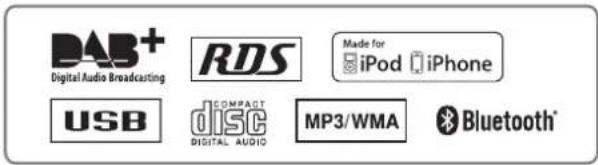
- "Made for iPod," and "Made for iPhone" mean that an electronic accessory has been designed to connect specifically to iPod, or iPhone, respectively, and has been certified by the developer to meet Apple performance standards. Apple is not responsible for the operation of this device or its compliance with safety and regulatory standards. Please note that the use of this accessory with iPod or iPhone may affect wireless performance. iPhone and iPod are trademarks of Apple Inc., registered in the U.S. and other countries.
- The Bluetooth word mark and logos are owned by the Bluetooth SIG, Inc. and any use of such marks by Clarion Co., Ltd. is under license. Other trademarks and trade names are those of their respective owners.
Front Panel / Generalities
For a longer service life, be sure to read the following cautions.
- Do not allow any liquids on the unit from drinks, umbrellas, etc. Doing so may damage the internal circuitry.
- Do not disassemble or modify the unit in any way. Doing so may result in damage.
- Do not let cigarettes burn the display. Doing so may damage or deform the body.
- If a problem should occur, have the unit inspected at your store of purchase.
Cleaning the body
- Use a soft, dry cloth and gently wipe off the any dirt or dust.
- For tough dirt, apply some neutral detergent diluted in water to a soft cloth, wipe off the dirt gently, then wipe again with a dry cloth.
- Do not use benzene, thinner, car cleaner, etc., as these substances may damage the body or cause the paint to peel. Also, leaving rubber or plastic products in contact with the body for long periods of time may cause stains.
USB Port
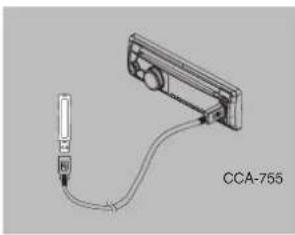
- The USB memory stick may stick out when inserted so it may cause danger during driving. When connecting a USB memory stick to the main unit please use a USB extension cable (CCA-755).
- The USB memory stick must be recognized as "USB mass storage class" to work properly. Some models may not operate correctly. When the memorized data is lost or damaged by any chance, Clarion shall not be liable for any damage.
When using a USB memory stick, we recommend that you backup your data stored on it before using a personal computer etc. - Data files may be broken when using USB memory sticks in the following situation: When disconnecting the USB memory stick or turning the power off during reading data. When affected static electricity or electric noise.
Connect/disconnect the USB memory stick when it is not accessed
• Connecting with the computer is not covered.
Remove the DCP
The control panel can be detached to prevent theft. When detaching the control panel, keep it in the safety place and prevent scratches. We recommend taking the DCP (DETACHABLE CONTROL PANEL) with you when leaving the car.
- Press the [SRC] button (1 sec.) to turn off the power.
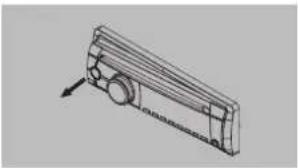
- Deeply push in [OPEN] button to unlock the DCP.
- Hold the side popped out, remove the DCP.
Attach the DCP
- Hold the DCP and ensure that the panel faces towards you. Set the right side of the DCP into the DCP bracket.
- Press the left side of the DCP until it locks.
natural_image
Technical line drawing of a mechanical component with no visible text or symbols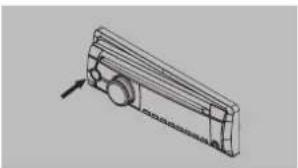
natural_image
Technical line drawing of a mechanical component with a cylindrical shaft and flange (no text or symbols)Storing the DCP in the DCP Case
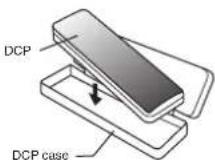
Hold the DCP, as shown in the figure below, and put it into the supplied DCP case.
Note:
If the DCP is dirty, wipe off the dirt with a soft, dry cloth only.
CAUTION
- The DCP can easily be damaged by shocks. After removing it, be carefully not to drop it or subject it to strong shocks.
- Once the [OPEN] button is pressed and DCP is unlocked, car vibrations can cause the DCP to fall.
- The connector for the main unit and DCP is extremely important. Be careful not to damage it by pressing on it with fingemails, screwdrivers, etc.
3. CONTROLS
Operational Panel
![[MIC] [BAND / C [MENU / ♦] (PS/AS) [Disc Slot] [USB connetor] [OPEN] [SRC / dd] [VOLUME] [DISP] [1~6] [TA] AUX Jack](/content/2026/06/1282542/images/ae22910a6aa99e31f45c66f0fd708d34a8114595d2e96af1ef990df997f081c6.jpg)
Names of Buttons
[ SRC / d ] Button
- Power/Toggle the audio source
[BAND / E] Button
• RADIO mode: Select tuner band
• BT mode: Dial/Answer
[MENU / 3] Button
• MP3/WMA mode: Search function
- CD mode: No function
• RADIO mode: PTY select
• BT mode: Terminate call
- AUX mode: No function
- iPod mode: iPod menu
- USB mode: Search function
• DAB+ mode: No function
[≡] Button
- Press to eject disc.
[...] Buttons
• Previous / next track
- Search (long press)
[] Button
- Unlock the front panel.
[PS / AS] Button
- Scan play / Preset scan
• Auto memory store (long press)
• Band Scan (DAB+ Mode)
[ ] Button
• Sound effect setting
[VOLUME] Knob
- Adjust volume level / Confirm (press)
[TA] Button
• Traffic announcement
[1-6] Buttons
•[1] Button: Scan play / Preset station 1.
•[2] Button: Repeat play / Preset station 2.
•[3] Button: Random play / Preset station 3.
• [4] Button: Play / Pause / Top play (long press) / Preset station 4.
•[5] Button: Previous folder / Preset station
- 10 tracks down (long press)
•[6] Button: Next folder/Preset station 6.10 tracks up (long press)
[ DISP ] Button
- Display switch
• System setup (long press)
[MIC] Hole
- Internal microphone
4. CAUTIONS ON HANDLING
Handling Discs
Handling
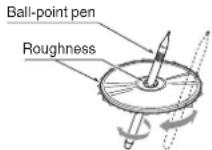
- New discs may have some roughness around the edges. If such discs are used, the player may not work or the sound may skip. Use a pen or similar tool to remove any roughness from the edge of the disc.
- Never stick labels on the surface of the disc or mark the surface with a pencil or pen.
- Never play a disc with any cellophane tape or other glue on it or with peeling off marks. If you try to play such a disc, you may not be able to get it back out of the player or it may damage the player.
- Do not use discs that have large scratches, are misshapen, cracked, etc. Use of such discs may cause misoperation or damage.
• To remove a disc from its storage case, press down on the center of the case and lift the disc out, holding it carefully by the edges. - Do not use commercially available disc protection sheets or discs equipped with stabilizers, etc. These may damage the disc or cause breakdown of the internal mechanism.
Storage
- Do not expose discs to direct sunlight or any heat source.
- Do not expose discs to excess humidity or dust.
- Do not expose discs to direct heat from heaters.
Cleaning
- To remove fingermarks and dust, use a soft cloth and wipe in a straight line from the center of the disc to the outer edge.
- Do not use any solvents, such as commercially available cleaners, anti-static spray, or thinner to clean discs.
• After using special disc cleaner, let the disc dry off well before playing it.
On Discs
- Never turn off the power and remove the unit from the car with a disc loaded.
CAUTION
For your safety, the driver should not insert or eject a disc while driving.
5. OPERATIONS
Basic Operations
Note:
- Refer to the diagrams in "3. CONTROLS" when reading this chapter.
CAUTION
When the unit is turned on, starting and stopping the engine with its volume raised to the maximum level may harm your hearing.
Be careful about adjusting the volume.
Power on / off
Notes:
- Start the engine before using this unit.
- Be careful about using this unit for a long time without running the engine. If you drain the car's battery too far, you may not be able to start the engine and this can reduce the service life of the battery.
- Start the engine. The power button / knob illumination on the unit will light up.

Engine ON position
-
Press the [SRC / ⏻] button on the front panel to turn on the power under standby mode. The unit goes back to the last status after power on.
-
Press and hold the [SRC / ⏻] button on the front panel to turn off the power.
CT (Clock Time) display
- The displayed clock data is based on the CT (clock time) data in the RDS signal.
Volume adjustment
Turn the [VOLUME] knob on the front panel. The adjustable range of volume is 0 to 40.
CAUTION
While driving, keep the volume level at which external sounds can still be heard.
Playing source selection
Press [SRC / ⏻] button on the front panel repeatedly to choose desired playing source.
Notes:
- Playing source selection means selecting which mode, such as DISC mode, RADIO mode, AUX mode and BT mode.
Display system time
Press the [DISP] button on the front panel to switch the display information from clock, station information (RADIO mode), or track information (CD mode).
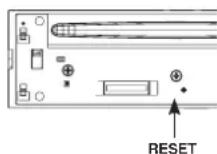
RESET
If you have below problems, pls press [RESET] button.
- Unit can not power on
- Nothing happens when buttons are pressed - Display is not accurate
Note:
* When the [RESET] button is pressed, preset radio stations, audio setting, etc. stored in memory are kept.
System Setup System Setup
In any mode, press and hold [DISP] button to enter system setup. Press [◀◀] or [▶◀◀] button to select options, rotate the [VOLUME] knob to adjust.
AF: ON/OFF (RADIO mode)
Rotate the [VOLUME] knob to choose AF ON or OFF.
REG: ON/OFF (RADIO mode)
Rotate the [VOLUME] knob to choose REG ON or OFF.
DX/LO (RADIO mode only)
Rotate the [VOLUME] knob to choose radio local or distant at radio mode.
• LO: Only stations with strong signal can be received.
- DX: Stations with strong and weak signals can be received.
AUX SENS (AUX mode)
Rotate the [VOLUME] knob to choose AUX Input sensitivity LOW, MID or HIGH at AUX mode.
SELECT (BT mode)
This "SELECT" menu is intended to automatically paired by selecting a mobile phone was stored.
This unit can store eight mobile phones. The mobile phone will be stored in paired order to the unit. The mobile phone can be stored up to eight. The ninth mobile phone can not be stored. If you want to store a ninth mobile phone, please delete unwanted mobile phone from "DELETE" menu.
-
Rotate the [VOLUME] knob to choose the pair mobile phone name from the pairing list.
-
Press and hold the [VOLUME] knob to confirm.
DELETE (BT mode)
-
Rotate the [VOLUME] knob to choose the paired mobile phone name from the pairing list.
-
Press and hold the [VOLUME] knob to confirm.
MIC GAIN (BT mode)
Rotate the [VOLUME] knob to choose Mic gain: -LOW, MID or HIGH.
You can change the gain of MIC when a telephone partner cannot hear your voice.
MIC SEL (BT mode)
Rotate the [VOLUME] knob to choose Microphone EXTERNAL or INTERNAL.
AUTO ANS (BT mode)
To answer incoming calls automatically. Rotate the [VOLUME] knob to choose AUTO ANS ON or OFF.
AUTO CON: ON/OFF (BT mode)
Automatically connects the mobile phone was last connected.
Rotate the [VOLUME] knob to choose AUTO CON ON or OFF.
DISCON (BT mode)
Disconnect currently connected mobile phone.
-
Rotate the [VOLUME] knob, mobile phone displays are currently connected
-
Press and hold the [VOLUME] knob to disconnect.
PIN CODE
Rotate and press the [VOLUME] knob to choose a 4-digit password. Press the [VOLUME] knob more than 1 seconds to confirm. The PIN CODE default setting is "0000"
SCRN SVR: ON/OFF
Rotate the [VOLUME] knob to choose SCRN SVR (screen saver) ON or OFF.
SCROLL: ON/OFF
For track information that is longer than the display panel: When SCROLL is ON, the LCD will display ID3 TAG information cyclely, e.g: TRACK->FOLDER->FILE->ALBUM->TITLE->ARTIST->TRACK->... When SCROLL is OFF, the LCD will display one of the ID3 TAG information, the default is TRACK, but user can adjust it to other ID3 TAG information by press [DISP] button.
REAR/S-W
Rotate the [VOLUME] knob to choose REAR or SUB-WOOFER.
DIMMER: ON/OFF
Rotate the [VOLUME] knob to choose DIMMER ON or OFF.
- ON: LCD dimmer is active when small light of vehicle is turned ON.
• OFF: LCD always maximum brightness regardless of the vehicle small light.
BEEP: ON/OFF
Rotate the [VOLUME] knob to choose button beep sound ON or OFF.
DAB LBND (DAB Mode only)
Rotate the [VOLUME] knob to choose L Band ON or OFF.
DAB FMLK (DAB Mode only)
Rotate the [VOLUME] knob to choose DAB linking DAB-ALL, DAB-FM, DAB-DAB or OFF.
RESET
- Press and hold the [VOLUME] knob to reset.
- Settings will be set to the default value.
- The unit will be turned off automatically.
Note:
- When the [RESET] is selected and you press and hold the [VOLUME] knob, radio station frequencies, titles, and other data stored in memory are cleared.
Audio Setup
Press the [▶] button to enter sound effect setting mode. First press shows current EQ. Rotate the [VOLUME] knob to changes BEAT EQ in this order: OFF -> B-BOOST -> IMPACT -> EXCITE -> CUSTOM
Rotate the [VOLUME] knob to changes CUSTOM, and press the [VOLUME] knob, the press (← or [→button to select it including: BAS-G -> BAS-F -> BAS-Q -> MID-G > MID-F -> MID-Q -> TRE-G -> TRE-F, rotate the [VOLUME] knob to select a value. BAS-G / MID-G / TRE-G: (-7)-(+7) BAS-F: 60 / 80 / 100 / 200 BAS-Q: 1.0 / 1.25 / 1.5 / 2.0 MID-F: 500 / 1K / 1.5K / 2.5K MID-Q: 0.5 / 0.75 / 1.0 / 1.25
TRE-F: 10.0K / 12.5K / 15.0K / 17.5K
Press the [▶] button, then press [▶] or [▶] button to select USER preset including: BALANCE -> FADER -> M-B EX -> LPF(low pass filter) -> S-W VOL (Subwoofer Volume), rotate the [VOLUME] knob to select a value.
BALANCE: LEFT 1-7->CENTER->RIGHT 1-7 FADER: FRONT 1-7->CENTER->REAR 1-7 LOUD: ON/OFF
LPF: THROUGH 80 / 120 / 150 SUBW VOL: (-6)-(+6)
Radio Operations
Select tuner as playing source
Press [SRC / ⏻] button once or more to enter RADIO mode.
Selecting the radio band
Press the [BAND] button on the panel to select one radio band among FM1, FM2, FM3, MW and LW.
Manual tuning
During manual tuning, the frequency will be changed in steps. Press the [←] or [→] button on the panel to select a higher / lower station.
Radio Operations
Auto tuning
Press and hold the [ ] or [ ] button on the panel to seek a higher / lower station.
To stop searching, repeat the operation above or press other buttons having radio functions.
Note:
When a station is received, searching stops and the station is played.
Preset scan
Preset scan receives the stations stored in preset memory in order. This function is useful when searching for a desired station in memory.
-
Press the [PS/AS] button.
-
When a desired station is tuned in, press the [PS/AS] button again to continue receiving that station.
Note:
- Be careful not to press and hold the [PS/AS] button for 1 second or longer, otherwise the auto store function is engaged and the unit starts storing stations.
Auto store
Only stations with sufficient signal strength will be detected and stored in the memory. Press and hold the [PS/AS] button (1 sec.) to start automatic station search.
To stop auto store, press other buttons having radio functions.
Notes:
-
After auto store, the previous stored stations will be overwritten.
-
The unit has 5 bands, such as FM1, FM2, FM3, MW and LW. FM3, MW and LW can store by AS function. Each band can store 6 stations, CZ505E can store 30 stations in total.
Manual store
When one expected radio station has been detected, press and hold number button 1-6 to store it in the memory.
Recall the stored stations
Press one numeric button among 1 to 6 on the panel to select the corresponding stored station.
Local seeking
When LOCAL seeking is ON, only those radio stations with strong radio signal could be received.
Select LOCAL function, press and hold the [DISP] button on the front panel, then press [▶▶] button repeatedly until LO or DX displays on the screen, and rotate the [VOLUME] knob to select Local or Distant mode.
Note:
The number of radio stations that can be received will decrease after the local seeking mode is ON.
Radio Data System Operations
Radio Data System
This unit has a built-in "Radio Data System" decoder system that supports broadcast stations transmitting "Radio Data System" data. When using the "Radio Data System" function, always set the radio to FM mode.
AF function
The AF function switches to a different frequency on the same network in order to maintain optimum reception.
* The factory default setting is "ON". 1. Set to system setup by long pressing [DIOP] button
[ DISP ] button. 2. Press the [←] or [→] button to select "AF".
- Rotate the knob to select "ON" or "OFF".
"AF" indicator appears in the display and AF function turns on.
- OFF: "AF" indicator disappears in the display and AF function turns off.
When the REG function is ON, the optimum regional station can be received. When this function is OFF, if the regional station area switches as you drive, a regional station for that region is received.
* The factory default setting is "ON".
Radio Data System Operations
Notes:
- This function is disabled when a national station such as BBC R2 is being received.
- The REG function ON/OFF setting is valid when the AF function is ON.
-
Set to system setup by long pressing [DISP] button.
-
Press the [◀◀] or [▶] button to select "REG".
-
Rotate the [VOLUME] knob to select "ON" or "OFF".
Manually tuning a regional station in the same network
This function is valid when the AF function is ON and the REG function is OFF.
Note:
This function can be used when a regional broadcast of the same network is received.
TA (Traffic Announcement)
In the TA standby mode, when a traffic announcement broadcast starts, the traffic announcement broadcast is received as top priority regardless of the function mode so you can listen to it. Traffic programme (TP) automatic tuning is also available.
* This function can only be used when "TP" appears in the display. When "TP" appears, this means that the "Radio Data System" broadcast station being received has traffic announcement programmes.
Setting the TA standby mode
If you press the [TA] button, "TA" lights in the display and the unit is set into the TA standby mode until a traffic announcement is broadcast. When a traffic announcement broadcast starts, "TRAF INF" appears in the display. If you press the [TA] button while a traffic announcement broadcast is being received, the traffic announcement broadcast reception is cancelled and the unit goes into the TA standby mode.
Cancelling the TA standby mode As "TA" appears in the display, press the [TA] button. The "TA" in the display goes off and the TA standby mode is cancelled.
PTY (Programme Type)
This function enables you to listen to a broadcast of the selected programme type even if the unit is on a function mode other than radio.
* Some countries do not yet have PTY broadcast.
* In the TA standby mode, a TP station has priority over a PTY broadcast station.
Selecting PTY
Press [MENU] button, then rotate the [VOLUME] knob to select PTY type, press the [VOLUME] knob, the unit begin searching.
DAB Operations
Select tuner as playing source
Press [SRC / d] button once or more to enter DAB mode.
Radio performs a scan for available services after initial power ON (or Reset).
Selecting a Service (Radio Station)
•Manualselecting
A service can be selected from the scan list. Press the [ ]
button on the panel to change to a higher / lower service.
Press the Volume button to select the desired service
- Manual store
When one expected service has been detected, press and hold button [1-6] to store it in the memory.
DAB Operations
Recall the stored stations
Press one numeric button among 1 to 6 on the panel to select the corresponding stored service.
Auto Scan
Auto Scan receives all available services in the local area. This function is useful when searching for new services in a different location.
-
Press the [PS/AS] button for more than one second. (Radio will perform a scan for available services.)
-
Select a new service from the scan list.
REG (Regional programme) TA (Traffic Announcement) PTY (Programme Type)
These functions are the same as Radio Data System. Refer to page 6.
DAB-DAB Linking
Select whether to automatically search for an alternative DAB service if the current DAB signal reception is bad.
DAB-FM Linking
Select whether to temporarily switch the receiver output to RDS if DAB signal reception is bad.
NB: Only available in certain countries.
CD/MP3/WMA Operations
This unit can playback MP3/WMA files
Notes:
- If you play a WMA file with active DRM (Digital Rights Management), there will be no audio. (The WMA indicator blinks.)
To disable DRM
(Digital Rights Management)
When using Windows Media Player 9/10/11, click on Tools -> Options -> Copy Music tab, then under Copy Settings, unclick the
DAB-All Linking
Select whether to automatically search for an alternative DAB service if the current DAB signal reception is bad or select whether to temporarily switch the receiver output to RDS if DAB signal reception is bad. NB: Only available in certain countries.
Preset Scan
Preset scan receives the stations stored in preset memory in order. This function is useful when searching for a desired station in memory.
-
Press the [PS/AS] button (less than one second).
-
When a desired station is tuned in, press the [PS/AS] button again to continue receiving that station.
check box for copy protect music. Then, reconstruct files. Personally constructed WMA files are used at your own responsibility.
Precautions when creating MP3/WMA file
Usable sampling rates and bit rates 1. MP3: Sampling rate 8 kHz-48 kHz, Bit rate 8 kbps-320 kbps / VBR
- WMA: Bit rate 8 kbps-320 kbps
CD/MP3/WMA Operations
File extensions
- Always add a file extension ".MP3", ".WMA" to MP3, WMA file by using single byte letters. If you add a file extension other than specified or forget to add the file extension, the file cannot be played.
- Files without MP3/WMA data will not play. The files will be played soundlessly if you attempt to play files without MP3/WMA data.
* When VBR files are played, the play time display may differ the play location.
* When MP3/WMA files are played, a little no sound part is caused between tunes.
Logical format (File system)
-
When writing MP3/WMA file on a CD-R disc or CD-RW disc, please select "ISO9660 level 1, 2 or Joliet" or Apple ISO as the writing software format. Normal play may not be possible if the disc is recorded on another format.
-
The folder name and file name can be displayed as the title during MP3/WMA play but the title must be within 32 single byte alphabetical letters and numerals (including an extension).
- Do not affix a name to a file inside a folder having the same name.
Folder structure
A disc with a folder having more than 8 hierarchical levels will be impossible.
Number of files or folders
- Up to 999 files can be recognized per folder.
Up to 3000 files can be played. - Tracks are played in the order that they were recorded onto a disc. (Tracks may not always be played in the order displayed on the PC.)
- Some noise may occur depending on the type of encoder software used while recording.
Eject function
Just pressing the [▲] button, ejects the disc even if the power to the unit was not turned on.
Notes:
- If you force a CD into before auto reloading, this can damage the CD.
- If a CD (12 cm) is left ejected for 15 seconds, the CD is automatically reloaded (Auto reload).
Listening to a disc already loaded in the unit
Press the [SRC / 0] button to select the CD/MP3/WMA mode. When the unit enters the CD/MP3/WMA mode, play starts automatically.
Loading a CD
Insert a CD into the center of the CD SLOT with facing up. The CD plays automatically after loading.
Notes:
- Never insert foreign objects into the CD SLOT.
- If the CD is not inserted easily, there may be another CD in the mechanism or the unit may require service.
- Discs without the disc or mark and CD-ROMs cannot be played by this unit.
- Some CD-R/CD-RW disc may not be usable.
Pausing play
- Press the [4] button to pause play. " PAUSE" appears in the display.
- To resume CD play, press the [4] button again.
Displaying CD titles
This unit can display title data for MP3/WMA disc.
When SCROLL is OFF, each time you press the [ DISP ] button to change the title display.
MP3/WMA disc
Track (displayed on the second line) > Folder -> File title -> Album (displayed and scrolled on the first line) -> Play Lists -> Artist -> Albums -> Songs -> Genres -> Composers
CD/MP3/WMA Operations
TITLE ^* appears in the display.
Selecting a track
Track-up
-
Press the [▶] button to move ahead to the beginning of the next track.
-
Each time you press the [▶] button, the track advances ahead to the beginning of the next track.
-
For MP3/WMA disc, press and hold the [6] button (1 sec.) to move ahead to +10 tracks.
Track-down
-
Press the [←] button to move back to the beginning of the current track.
-
Press the [←] button twice to move back to the beginning of the previous track.
-
For MP3/WMA disc, press and hold the [5] button (1 sec.) to move back to -10 tracks.
Fast-forward/Fast-reverse
Fast-forward
Press and hold the [▶] button.
Fast-reverse
Press and hold the [◀◀] button. * For MP3/WMA discs, it takes some time until the start of searching and between tracks. In addition, some errors may occur in the play time.
Folder Select
This function allows you to select a folder containing MP3/WMA files and start playing from the first track in the folder.
-
Press the [5] or [6] button. Press the [6] button to move the next folder. Press the [5] button to move the previous folder.
-
To select a track, press the [←] or [→] button.
Search Function
-
Press the [MENU] button to enter FOLD SCH mode. Press the [VOLUME] button to enter the folder list search mode.
-
Tum the [VOLUME] knob to select a folder.
- Press the [VOLUME] button to enter the file
list search mode. And then the track list appears in the display.
-
Turnthe[VOLUME] knob to select a track.
-
Press the [VOLUME] knob to play. * When play back MP3 / WMA file, this function is performed in the current folder.
Top function
The top function resets the CD player to the first track of the disc. Press and hold the [4] button (1 sec.) to play the first track (track No. 1) on the disc.
* In case of MP3/WMA, the first track of the current folder will be played.
Other various play functions
Scan play
This function allows you to locate and play the first 10 seconds of all the tracks recorded on a disc.
Press the [1] button to perform scan play.
This function allows you to play the current track repeatedly or play a track currently being played in the MP3/WMA folder repeatedly.
CD:
-
Press the [2] button once or more until "RPT ON" appears on the LCD to perform repeat play.
-
Press [2] button again to cancel repeat playback, "RPT OFF" appears on the LCD.
MP3/WMA:
-
Press the [2] button once or more until "TRACK RPT" appears on the display to perform repeat play, and "RPT" segment lights on.
-
For MP3/WMA files, press [2] button repeatedly until "FOLD RPT" appears on the display for folder repeat play.
-
Press [2] button repeatedly until "RPT OFF" appears on the display to cancel repeat playback, and "RPT" segment goes off.
Random play
This function allows you to play all tracks recorded on a disc in a random order. Press the [3] button to perform random play. Random function activates when jumping to another track.
USB Operations
Connect
-
Push the cap of the USB connector to the right. Insert a USB cable (CCA-755) into the USB connector. Insert a USB device into the USB cable. When connecting a USB device, the unit will read the files automatically.
-
To remove the USB device, you should first select another source or turn off the power, in order to avoid damaging the USB device. Then take off the USB device. Push the cap to the left.
-
Operation is same as MP3/WMA operation.
natural_image
Diagram of a cable or connector with a labeled component 'CCA-755' (no other text or symbols)iPod & iPhone Operations
Connect
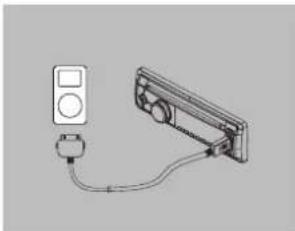
Connect an iPod or iPhone to the USB connector via cable.
When connecting a device, the unit will read the files automatically. The track information display on the screen once playback start.
MENU
In the S-CTRL OFF mode, press [MENU] button, rotate the [VOLUME] knob select "MUSIC" or "VIDEO".
Select "MUSIC", press the [VOLUME] knob, then rotate the [VOLUME] knob to show PLAY LISTS / ARTISTS / ALBUMS / GENRES / SONGS / COMPOSERS, press and rotate the [VOLUME] knob to select a desired option, then press the [VOLUME] knob to confirm. Select "VIDEO", press the [VOLUME] knob, then rotate the [VOLUME] knob to show MOVIES / MUSIC VIDEOS / TV SHOWS/ VIDEO PODCASTS / RENTALS, press and rotate the [VOLUME] knob to select a desired option, then press the [VOLUME] knob to confirm
NOTE:
- VIDEO MENU item is different by the model of connected iPod and language setting.
natural_image
Technical line drawing of a mechanical clamp or connector with a control panel and cable (no text or symbols)Repeat play
This function allows you to play the current track repeatedly or play all tracks in your iPod/ iPhone repeatedly.
-
Press the [2] button once or more until "RPT ON" appears on the LCD to perform repeat play.
-
Press [2] button repeatedly until "RPT OFF" appears on the LCD to cancel repeat playback.
iPod & iPhone Operations
Random play
This function allows you to play all tracks
recorded on a disc in a random order.
- Press [3] button repeatedly until "ALBUM RDM" appears on the LCD for album random play.
- Press the [3] button once or more until "SONG RDM" appears on the LCD to perform random play.
- Press [3] button repeatedly until "RDM OFF" appears on the LCD to cancel random playback.
Setting iPod simple control mode
Use this function if you wish to operate through your iPod connected to this unit via the USB cable.
* The factory default setting is "OFF".
1. Press and hold [DISP] button to enter system setup
2. Press [◀] or [▶] button to select
"S-CTRL"
3. Rotate the [VOLUME] knob to select
"ON" or "OFF
- ON: Operations are made through your iPod.
- OFF: Operations cannot be made through your iPod.
Notes:
- When performing iPod operations using simple control mode, make the operations slowly. If repetitive operations are performed too quickly, unforeseen errors may occur.
- When performing iPod operations using simple control mode, please do not operate the iPod and the unit at the same time, otherwise there may be unexpected event happened.
- Some iPod models do not support this function. Consult your nearest Clarion dealer or website to confirm which models do not support this function.
iPod menu alphabet search
This function searches the subfolders for desired alphabetical letters.
- Press the [MENU] button to select the iPod menu mode.
- Press the [VOLUME] knob to switch between categories.
MUSIC: PLAYLIST, ARTISTS, ALBUMS, GENRES, SONGS, COMPOSERS VIDEO: MOVIES, MUSIC VIDEOS, TV SHOWS VIDEO PODCASTS, RENTALS - Press the [VOLUME] knob. (The contents
of the category are displayed.) - Press and hold the [DISP] button (1 sec.).
- Rotate the [VOLUME] knob to select the desired letter to search.
- Press the [DISP] button again to next perform search.
- Press the [VOLUME] knob to confirm.
Bluetooth Operations
The Bluetooth allows you to utilize your car's built-in audio system for wireless mobile phone or music handsfree communication. Some Bluetooth mobile phones have the audio features, and some portable audio players support Bluetooth feature. This system can play audio data stored in a Bluetooth audio device. The car stereo with Bluetooth will be able to retrieve phonebook contacts, received call, dialed call, missed call, incoming calls, outgoing call and listen to music.
Note:
- Do not leave the microphone of Bluetooth handsfree in the places with wind passing such as air outlet of the air conditioner, etc. This may cause a malfunction.
- If left in places subject to direct sun, high temperature can cause distortion or discoloration which may result in a malfunction.
- This system will not operate or may operate improperly with some Bluetooth audio players.
• Clarion cannot guarantee the compatibility of all mobile phones together with unit. - Audio playback will be set to the same volume level as set during telephone call. This might cause problems, if extreme volume level is set during telephone call.
Handsfree Operations
Pairing
- Turn on Bluetooth function of your mobile phone.
- Enter mobile phone's Bluetooth setup menu.
- Search for new Bluetooth devices.
- Select CZ505E from the pairing list on the mobile phone.
- Enter "0000" as the password. (The password default setting is "0000".)
- After pairing successfully, the unit will enter Bluetooth mode automatically and "CONNECTED" will appear on the LCD.
- The unit can connect three units.
Making a call
Operation from Bluetooth menu Press the [SRC / ⏻] button to switch the source to "BLUETOOTH". Press [MENU / ⏻] button to select a way to make outgoing call:
- Dial Number
- Press the [MENU / ≅] button.
- Rotate the [VOLUME] knob on the front panel to switch: "DIAL NUM".
-
Press the [VOLUME] knob to confirm the selection.
-
Rotate the [VOLUME] knob to select a number, press the knob to confirm and ready to input the next digit. Repeat the above until all numbers inputted.
-
Press the [BAND / L] to dial.
-
Press [MENU / ≅] to terminate call.
- Dialled/Missed/Received You can search any Dialled/Missed/Received /User pbk.
-
Rotate the [VOLUME] knob to select "DIALLED", "MISSED", "RECEIVED".
-
Press the [VOLUME] knob to enter the selected call history.
-
Rotate the [VOLUME] knob to scroll the contacts.
-
When the contact name or mobile phone no. is displayed, press the [BAND / IC] button to call the mobile phone no. of that contact.
* Press the [MENU / ≅] button to end the call.
- Call from Phonebook User can search the contact name in the phonebook and make call. 1. Rotate the [VOLUME] knob to select "USER PBK".
-
Press the [VOLUME] knob to enter the selected phonebook.
-
Rotate the [VOLUME] knob to scroll the contacts.
-
The phone number and the name to scroll display. When the contact name is displayed, press the [BAND / ⊥] button to call the mobile phone no. of that contact.
* Press the [MENU / ☑] button to end the call.
- Answering a call You can answer an incoming call by pressing the [BAND / ☐] button.
* Press the [MENU / ☐] button to reject an incoming call.
Bluetooth Operations
Audio Streaming Operations What is audio streaming?
Audio streaming is a technique for transferring audio data such that it can be processed as a steady and continuous stream. Users can stream music from their external audio player to their car stereo wirelessly and listen to the tracks through the car's speakers. Please consult your nearest Clarion dealer for more information on the product of wireless audio streaming transmitter offered.
A CAUTION
Please avoid operating your connected mobile phone while audio streaming as this may cause noise or choppy sound on the song playback. Audio streaming may or may not resume after telephone interrupt as this is dependent on mobile phone.
System will always return to Radio mode if audio streaming is disconnected.
Note:
Be sure to read the "Pairing" section before proceeding.
Play / Pause a track
- Push the [4] button to pause audio playback.
- To resume audio playback, push the [4] knob again.
AUX Operations
Press [SRC / ⏻] button on the panel to select "AUX".
AUX is just for audio content with 3.5mm Jack connector plugged into audio-in socket on the front panel.
AUX Input sensitivity setting
- Press and hold the [DISP] button (1 sec.).
Selecting a track
Track-up
1. Press the [▶] button to move to the beginning of the next track.
2. Each time the [▶▶] button is pressed, playback proceeds to another track in the advancing direction.
Track-down
1. Press the [◀] button to move to the beginning of the previous track.
2. Each time the [←] button is pressed, playback proceeds to previous track in the reverse direction.
Note:
Playing order will depend on Bluetooth audio player. When [↔] button is pressed, some A2DP devices will restart the current track depends on the duration of playback. During music streaming playback, "A2DP and HFP" will be shown on the display. When A2DP device is disconnected,
" DISCONNECT ^1 will be shown on the display and return to previously selected audio source. Some Bluetoothaudio players may not have play / pause synchronized with this unit. Please make sure both device and main unit are in the same play / pause status in BT MUSIC mode.
- Press [→] or [→] button to select "AUX SENS".
- If the output level of the connected external audio player is "HIGH", rotate [VOLUME] knob and choose "MID" or "LOW". And if the output level is "LOW", choose "MID" or "HIGH".
6. TROUBLE SHOOTING
GENERAL
| Problem Cause Measure | ||
| Unit can not power on. | Unit fuse blown. | Replace with new fuse of correct rating. |
| Car battery fuse blown. | Replace with new fuse of correct rating. | |
| Unit can not power on. Nothing happens when buttons are pressed. Display is not accurate. | The microprocessor has malfunctioned due to noise, etc. | Turn off the power and remove the DCP. Press the [RESET] button with a thin rod.Note:When the [RESET] button is pressed, turn off the ACC power.* * When the [RESET] button is pressed, preset radio stations, titles, etc. stored in memory are kept. |
| No/low audio output. | Improper audio output connection. | Check wiring and correct. |
| Volume set too low. | Increase volume level. | |
| Speakers damaged. | Replace speakers. | |
| Heavily biased volume balance. | Adjust the channel balance to center position. | |
| Speaker wiring is in contact with metal part of car. | Insulate all speaker wiring connections. | |
| Poor sound quality or distortion. | Non-standard disc used. | Use a standard disc. |
| Speaker power rating does not match unit. | Replace speakers. | |
| Wrong connections. | Check wiring and correct. | |
| Speaker is shorted. | Check wiring and correct. | |
| Unit resets itself when engine is off. | Incorrect connection between ACC and Battery. | Check wiring and correct. |
DISC Player
| Problem | Cause | Measure |
| Disc cannot be loaded. | Another disc is already loaded | Elect the disc before loading the new one. |
| There is an object installed inside the unit. | Remove the object inside the unit. | |
| Sound skips or is noisy. | Compact disc is dirty. | Clean the compact disc with a soft cloth. |
| Compact disc is heavily scratched or warped. | Replace with a compact disc with no scratches. | |
| Sound is bad when power is first turned on. | Condensation may form on the internal lens when the car is parked in a humid place. | Let dry for about 1 hour with power on. |
USB Devices
| Problem Cause Measure | ||
| USB device cannot be inserted. | The USB device has been inserted with wrong direction. | Reversing the connection direction of the USB device, try it again. |
| The USB connector is broken. | Replace with a new USB device. | |
| USB device is not recognized. | The USB device is damaged. | Connect the USB device and reconnect. If the device is still not recognized, try replacing with a different USB device. |
| Connectors are loose. | ||
| No sound heard with the display "No File" shown. | No MP3/WMA file is stored in the USB device. | Store these files properly in the USB device. |
| Sound skips or is noisy. | MP3/WMA files are not encoded properly. | Use MP3/WMA files encoded properly. |
Bluetooth
| Problem Cause | Measure | |
| Cannot pair the Bluetooth enabled device with the car audio system. | The device does not support the profiles required for the system. | Use another device to connect. |
| The Bluetooth function of the device is not enabled. | Refer to the user manual of the device for how to enable the function. | |
| The audio quality is poor after connection with a Bluetooth-enabled device. | The internal microphone gain is not set correctly. | Adjust the gain of the internal microphone in System Setup. |
| The external microphone is not set correctly nor properly positioned. | Adjust the gain and position of the external microphone.For example, stick the microphone onto the dashboard so it is close to the driver. | |
DAB
| Display | Cause | Measure |
| DAB is not received | The selected service might not be broadcasting. | Select a service currently broadcasting |
7. ERROR DISPLAYS
If an error occurs, one of the following displays is displayed. Take the measures described below to solve the problem.
| Display | Cause | Measure |
| ERROR 3 | Disc is inserted incorrectly. | Eject the disc then reload it properly. |
| The disc format is not supported. | Try another disc. | |
| Unreadable files on USB. | Check files. | |
| ERROR 5 | This is a failure of deck's mechanism. | Consult your store of purchase. |
If an error display other than the ones described above appears, press the [RESET] button. If the problem persists, turn off the power and consult your store of purchase.
- When the [RESET] button is pressed, preset radio stations, titles, etc. stored in memory are kept.
8. SPECIFICATIONS
FM Tuner
Frequency range: 87.5-108.0MHz
Usable sensitivity: 8dBu
Frequency response: 30Hz-15kHz
Stereo separation: 30dB(1kHz)
Signal/noise ratio: >55dB
MW Tuner
Frequency range: 531-1602kHz
Usable sensitivity (S/N=20dB): 30dBμ
LW Tuner
Frequency range: 153-279kHz
Usable sensitivity (S/N=20dB): 30dBμ
CD Player
System: Disc digital audio system
Frequency response: 20Hz-20kHz
Signal/noise ratio: >80dB
Total harmonic distortion: Less than 0.1% (1kHz)
Channel separation: >60dB
MP3/WMA mode
MP3 sampling rate: 8 kHz to 48 kHz
MP3 bit rate: 8 kbps to 320 kbps / VBR
WMA bit rate: 8 kbps to 320 kbps
Logical format: ISO9660 level 1.2
Joliet Romeo file system
USB
Specification: USB 1.0/2.0
playable audio format:
MP3(.mp3): MPEG 1/2/Audio Layer-3
WMA(.wma): Ver 7/8/9.1/9.2
Bluetooth
Specification: Bluetooth Ver. 2.1+EDR
Profile: HFP (Hands-free Profile)
PBAP(Phone Book Access Profile)
A2DP (Advanced Audio Distribution Profile)
AVRCP (AV Remote Control Profile)
Send/Receive Sensitivity: Class 2
Audio Amplifier
Maximum power output:
180W (45W x 4)
Speaker impedance: 4Ω (4 to 8Ω allowable)
Input
Audio input sensitivity:
High: 320mV (a) 1V output
Mid: 650mV (at 1V output)
Low: 1.3V (at 1V output)
(input impedance 10 k Ω or greater)
Aux-In level: ≤2V
DAB Specification
Digital radio selection (DAB)
Receiving frequencies
Band III: 174.928 to 239.200 MHz
L - Band: 1452.960 to 1490.624 MHz
General
Power supply voltage:
14.4VDC (10.8 to 15.6V allowable),
negative ground
Pre-Amp output voltage:
2.0V (CD play mode: 1kHz, 0dB, 10k Ωload)
Fuse: 15A
Dimensions of the Main Unit:
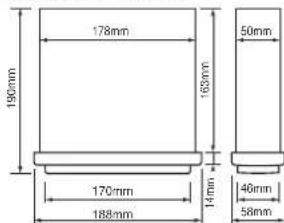
188mm Width × 58mm Height × 180mm Depth
Weight of the Main Unit: 1.35kg
Notes:
- Specifications and design are subject to change without notice for further improvement.
9. INSTALLATION / WIRE CONNECTION GUIDE
CONTENTS
1) Before Starting 14
2) Package Contents 14
2) Package Contents 14
3) General Cautions 14
4) Cautions on Installation 14
5) Installing the Source Unit 14
6) Removing the Source Unit 15
7) Wiring and Connections 16
8) Connecting the accessories 16
1) Before Starting
- This set is exclusively for use in cars with a negative ground 12 V power supply.
- Read these instructions carefully
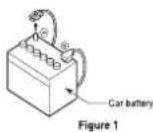
- Be sure to disconnect the battery terminal before starting. This is to prevent short circuits during installation. (Figure 1)
2) Package Contents
Source unit 1
Front panel 1
Trim ring 1
Mounting bracket 1
DAB Glass mount antenna with fitting
instructions....1
Special screw (M4×42) 1
Rubber cap 1
Screws M5x6 mm 4
L-key 2
Wire connector 1
DCP case....1
Owner's manual 1
Warranty card ....1
Special screw (Front panel lock) ..... 1
3) General Cautions
-
Do not open the case. There are no user serviceable parts inside. If you drop anything into the unit during installation, consult your dealer or an authorized Clarion service center.
-
Use a soft, dry cloth to clean the case. Never use a rough cloth, thinner, benzine, or alcohol etc. For tough dirt, apply a little cold or warm water to a soft cloth and wipe off the dirt gently.
4) Cautions on Installation
- Prepare all articles necessary for installing the source unit before starting.
- Install the unit within 30^ of the horizontal plane. (Figure 2)
- If you have to do any work on the car body, such as drilling holes, consult
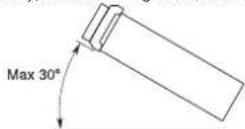
Figure 2
your car dealer beforehand.
4. Use the enclosed screws for installation.
Using other screws can cause damage.
(Figure 3)
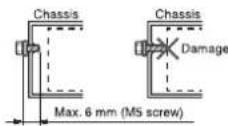
Figure 3
5) Installing the Source Unit
- Place the mounting bracket into the instrument panel, use a screwdriver to bend each stopper of the mounting bracket inward, then secure the stopper.
- Wire as shown in Section 7).
- Insert the source unit into the mounting bracket until it locks.
- Take care of the top and bottom of the trim ring and mount it so that all the hooks are locked.
Notes:
- Some car models require special mounting kits for proper installation.
Consult your Clarion dealer for details. - Fasten the front stopper securely to prevent the source unit from coming loose.
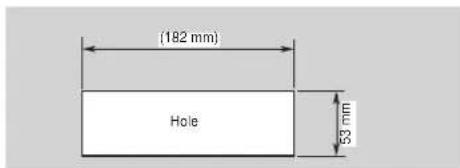
- Console opening dimensions
Notes of installation
- Before installation, please make sure proper connections are conducted and the unit operates normally. Improper connection may result in damage to the unit.
- Use only accessories designed and manufactured for this unit as other unauthorized accessories may result in damage to the unit.
- Before installation, please fasten all power cables.
- DO NOT install the unit in the place where close to hot area to prevent damage to electrical components such as the laser head.
- Install the unit horizontally. Installing the unit more than 30 degree vertically may result in worse performance.
- To prevent electric spark, connect the positive pole first and then the negative pole.
- DO NOT block the cooling fan exit to ensure sufficient heating dissipation of this unit, or it may result in damage to this unit.
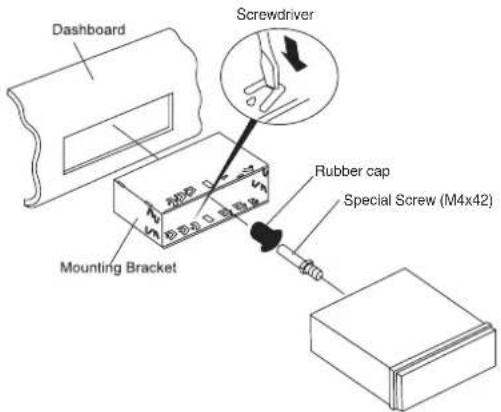
Unit Installation
Method A
- Insert mounting bracket into dash board, choose appropriate mounting tab according to the gap width, bending the mounting tab outwards with a screwdriver to fix the mounting bracket in place.
- Screw in 1 piece of M4×42 to the hole of the unit back and put on a rubber cap over the screw. (see picture below)
- Slide the unit into the bracket until you hear a click sound.
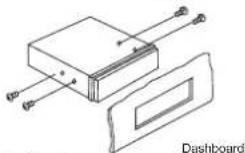
Method B
M5x6
Mounting Frame
- Insert this unit directly to the opening of the dashboard.
- Place M5×6 cylindrical screw through the holes of the mounting frame located inside the opening to holes of the unit and fasten the screws to left & right.
Trim Ring Installation
Attach the trim ring around the front panel.
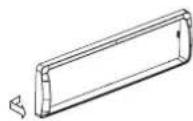
Disassemble trim ring
- Push the trim ring to right and pull out the
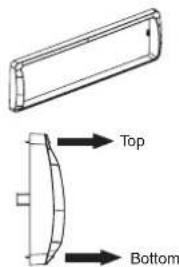
6) Removing the Source Unit
right part.
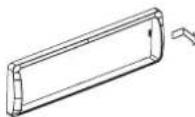
2. Push the trim ring to left and pull out the left part.
Disassemble the unit
- Switch off the power.
- Remove the panel.
- Remove the trim ring.
- Insert the removal keys straight back until they lock, then pull the unit out.
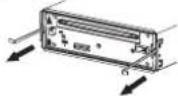
5. Disconnect all the wires.
7) Wiring and Connections
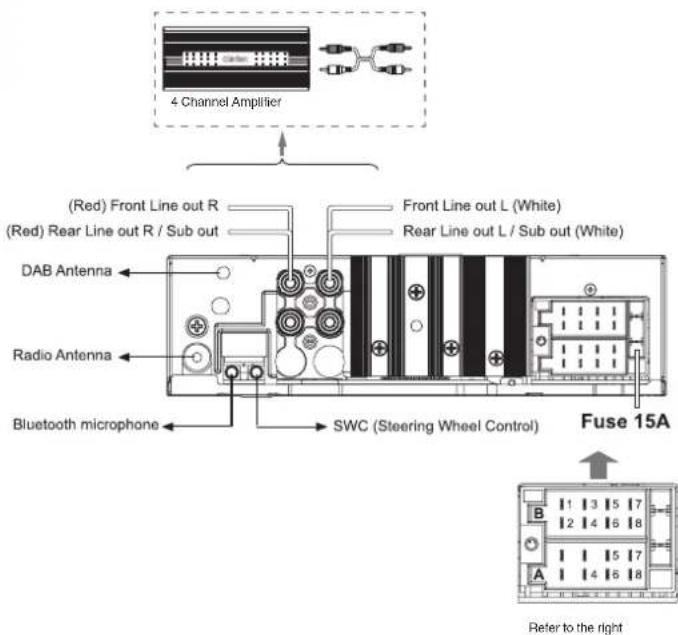
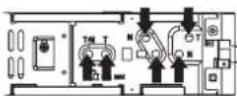
| A Compartment | |
| No. | Pin Definition |
| 1 | |
| 2 | |
| 3 | |
| 4 | Battery 12V (+) |
| 5 | ANT/Amp Control |
| 6 | Illumination |
| 7 | ACC + |
| 8 | Ground |
| B Compartment | |
| No. | Pin Definition |
| 1 | Rear Right (+) |
| 2 | Rear Right (-) |
| 3 | Front Right (+) |
| 4 | Front Right (-) |
| 5 | Front Left (+) |
| 6 | Front Left (-) |
| 7 | Rear Left (+) |
| 8 | Rear Left (-) |
8) Connecting the accessories
- Connecting to the external amplifier
External amplifiers can be connected to the 4 channel RCA output connections. Ensure that the connectors are not grounded or shorted to prevent damage to the unit.
C€2200
Declaration of conformity
We Clarion declare that this model CZ505E is following the provision of Directive 1999/5/EC with the essential requirements and the other relevant regulations.
This product only supports the following models:
iPhone 5S iPod touch (5th Generation) iPhone 5C iPod touch (4th Generation)
iPhone 5 iPod Classic iPhone 4S iPod Nano (7th Generation) iPhone 4 iPod Nano (6th Generation)
iPod Nano (5th Generation)
"Made for iPod" and "Made for iPhone" mean that an electronic accessory has been designed to connect specifically to iPod, or iPhone, respectively, and has been certified by the developer to meet Apple performance stands. Apple is not responsible for the operation of this device or its compliance with safety and regulatory stands. Please note that the use of this accessory with iPod or iPhone may affect wireless performance. iPhone and iPod are trademarks of Apple Inc., Registered in the U.S. and other countries.
The Bluetooth word mark and logos are owned by the Bluetooth SIG, Inc. and any use of such marks by Clarion Co., Ltd is under license. Other trademarks and trade names are those of their respective owners. The images used on this carton may differ from the actual product.
Le nom commercial et le logo Bluetooth appartiennent à Bluetooth SIG, Inc. Clarion Co., Ltd utilise ces marques sous licence. Les autres marques et noms commerciaux sont la propriété de leurs détenteurs respectifs. Les images utilisées dans cette brochure peuvent être différentes du produit proprement dit. Die Bluetooth-Wortmarke und das entsprechende Logo sind Eigentum von Bluetooth SIG, Inc. Die Verwendung dieser Zeichen durch Clarion Co., Ltd unterliegt der Lizenz. Andere Marken und Handelsnamen sind Eigentum der jeweiligen Inhaber. Die Abbildungen auf dieser Verpackung können vom tatsächlichen Produkt abweichen.
All Rights Reserved. Copyright © 2012: Clarion Co., Ltd.
- !CAUTION
- FEATURES
- PRECAUTIONS
- WARNING
- About the Registered Marks,etc.
- Front Panel / Generalities
- Cleaning the body
- USB Port
- Remove the DCP
- Attach the DCP
- Storing the DCP in the DCP Case
- Note:
- CAUTION
- CONTROLS
- Names of Buttons
- [ SRC / d ] Button
- [BAND / E] Button
- [MENU / 3] Button
- [≡] Button
- [...] Buttons
- [] Button
- [PS / AS] Button
- [ ] Button
- [VOLUME] Knob
- [TA] Button
- [1-6] Buttons
- [ DISP ] Button
- [MIC] Hole
- CAUTIONS ON HANDLING
- Handling Discs
- Handling
- Storage
- Cleaning
- On Discs
- OPERATIONS
- Basic Operations
- Power on / off
- Notes:
- CT (Clock Time) display
- Volume adjustment
- Playing source selection
- Display system time
- RESET
- System Setup System Setup
- AF: ON/OFF (RADIO mode)
- REG: ON/OFF (RADIO mode)
- DX/LO (RADIO mode only)
- AUX SENS (AUX mode)
- SELECT (BT mode)
- DELETE (BT mode)
- MIC GAIN (BT mode)
- MIC SEL (BT mode)
- AUTO ANS (BT mode)
- AUTO CON: ON/OFF (BT mode)
- DISCON (BT mode)
- PIN CODE
- SCRN SVR: ON/OFF
- SCROLL: ON/OFF
- REAR/S-W
- DIMMER: ON/OFF
- BEEP: ON/OFF
- DAB LBND (DAB Mode only)
- DAB FMLK (DAB Mode only)
- Audio Setup
- Radio Operations
- Select tuner as playing source
- Selecting the radio band
- Manual tuning
- Auto tuning
- Preset scan
- Auto store
- Manual store
- Recall the stored stations
- Local seeking
- Radio Data System Operations
- Radio Data System
- AF function
- Manually tuning a regional station in the same network
- TA (Traffic Announcement)
- PTY (Programme Type)
- Selecting PTY
- DAB Operations
- Selecting a Service (Radio Station)
- •Manualselecting
- - Manual store
- Auto Scan
- REG (Regional programme) TA (Traffic Announcement) PTY (Programme Type)
- DAB-DAB Linking
- DAB-FM Linking
- CD/MP3/WMA Operations
- This unit can playback MP3/WMA files
- To disable DRM
- (Digital Rights Management)
- DAB-All Linking
- Precautions when creating MP3/WMA file
- File extensions
- Logical format (File system)
- Folder structure
- Number of files or folders
- Eject function
- Listening to a disc already loaded in the unit
- Loading a CD
- Pausing play
- Displaying CD titles
- MP3/WMA disc
- Selecting a track
- Track-up
- Track-down
- Fast-forward/Fast-reverse
- Fast-forward
- Folder Select
- Search Function
- Top function
- Other various play functions
- Scan play
- CD:
- MP3/WMA:
- Random play
- USB Operations
- Connect
- iPod & iPhone Operations
- MENU
- Repeat play
- Setting iPod simple control mode
- iPod menu alphabet search
- Bluetooth Operations
- Handsfree Operations
- Pairing
- Making a call
- Audio Streaming Operations What is audio streaming?
- A CAUTION
- Play / Pause a track
- AUX Operations
- AUX Input sensitivity setting
- TROUBLE SHOOTING
- ERROR DISPLAYS
- SPECIFICATIONS
- FM Tuner
- MW Tuner
- LW Tuner
- CD Player
- MP3/WMA mode
- USB
- Bluetooth
- Audio Amplifier
- Input
- DAB Specification
- General
- INSTALLATION / WIRE CONNECTION GUIDE
- CONTENTS
- 1) Before Starting
- 2) Package Contents
- 3) General Cautions
- 4) Cautions on Installation
- 5) Installing the Source Unit
- - Console opening dimensions
- Notes of installation
- Unit Installation
- Method A
- Method B
- Trim Ring Installation
- Disassemble trim ring
- 6) Removing the Source Unit
- Disassemble the unit
- 8) Connecting the accessories
- C€2200
- Declaration of conformity
Brand : CLARION
Model : CZ505E
Category : Car radio