
WIFI2HD2 - Audio/video extension StarTech.com - Free user manual and instructions
Find the device manual for free WIFI2HD2 StarTech.com in PDF.


| Product Type | WiFi to HDMI Wireless Video Extender with Audio |
| Brand | StarTech.com |
| Model | WIFI2HD2 |
| Dimensions | 133.0mm x 71.0mm x 27.0mm |
| Weight | 140 g |
| Power Supply | 5V DC, 900 mA, center positive |
| Video Output | HDMI (female) |
| Audio Output | HDMI digital out and 3.5mm mini-jack |
| Maximum Resolution | 1080p (1920x1080) |
| Supported Resolutions | 1600x1200, 1280x1024, 1280x768, 1024x768, 800x600; Widescreen: 1920x1080, 1680x1050, 1440x900, 1366x768, 1280x800, 1280x720 |
| Wireless Standard | IEEE 802.11n Draft 3.0, IEEE 802.11g |
| Wireless Frequency | 2.4 GHz and 5 GHz ISM bands |
| Data Transfer Rate | Up to 300 Mbps (Wireless N) |
| Wireless Modes | Access Point (AP) and Client (STA) |
| USB Ports | 2 x USB Type A (for peripherals) |
| Ethernet Port | 1 x RJ45 (for wired connection) |
| Enclosure Material | Plastic |
| Compatible Operating Systems | Windows 8, 7, Vista, XP (32/64-bit) |
| System Requirements | 2nd Gen Intel Core or better, 2GB DDR2-800 RAM, 802.11n/g network, HDMI display |
| Media Streaming | UPnP Digital Media Renderer (DMR) support |
| Software | PC2TV application for streaming |
| Care and Cleaning | Disconnect power before cleaning; use a soft, dry cloth; avoid liquids and abrasives. |
| Safety | Use only the provided power adapter; do not expose to water or extreme temperatures. |
| Spare Parts and Repairability | No user-serviceable parts inside; contact StarTech.com support for repairs or replacements. |
| Warranty | Two years limited warranty |
Frequently Asked Questions - WIFI2HD2 StarTech.com
User questions about WIFI2HD2 StarTech.com
0 question about this device. Answer the ones you know or ask your own.
Ask a new question about this device
Download the instructions for your Audio/video extension in PDF format for free! Find your manual WIFI2HD2 - StarTech.com and take your electronic device back in hand. On this page are published all the documents necessary for the use of your device. WIFI2HD2 by StarTech.com.
USER MANUAL WIFI2HD2 StarTech.com
WiFi to HDMI® Wireless Video Extender with Audio
WIFI2HD2

natural_image
Black StarTech.com electronic device with ports and indicator lights (no readable text beyond branding)*actual product may vary from photos
For the most up-to-date information, please visit: www.startech.com
FCC Compliance Statement
This equipment has been tested and found to comply with the limits for a Class B digital device, pursuant to part 15 of the FCC Rules. These limits are designed to provide reasonable protection against harmful interference in a residential installation. This equipment generates, uses and can radiate radio frequency energy and, if not installed and used in accordance with the instructions, may cause harmful interference to radio communications. However, there is no guarantee that interference will not occur in a particular installation. If this equipment does cause harmful interference to radio or television reception, which can be determined by turning the equipment off and on, the user is encouraged to try to correct the interference by one or more of the following measures:
• Reorient or relocate the receiving antenna.
• Increase the separation between the equipment and receiver.
- Connect the equipment into an outlet on a circuit different from that to which the receiver is connected.
- Consult the dealer or an experienced radio/TV technician for help.
Use of Trademarks, Registered Trademarks, and other Protected Names and Symbols
This manual may make reference to trademarks, registered trademarks, and other protected names and/or symbols of third-party companies not related in any way to StarTech.com. Where they occur these references are for illustrative purposes only and do not represent an endorsement of a product or service by StarTech.com, or an endorsement of the product(s) to which this manual applies by the third-party company in question. Regardless of any direct acknowledgement elsewhere in the body of this document, StarTech.com hereby acknowledges that all trademarks, registered trademarks, service marks, and other protected names and/or symbols contained in this manual and related documents are the property of their respective holders.
Table of Contents
Introduction .... 1
Packaging Contents....1
System Requirements ....1
Front View....2
Rear View....2
Installation 3
Software and Driver Installation....3
Hardware Installation....4
Wireless Network Configuration ....5
How to Use 6
Advanced Settings 8
Web Interface Configuration....9
UPnP Media Streaming....11
Troubleshooting 12
UPnP Supported Formats 18
Specifications 21
Technical Support 22
Warranty Information 22
Introduction
Packaging Contents
• 1 x WiFi to HDMI Converter
• 1 x Universal Power Adapter
• 3 x Power Adapter Plugs (NA/ UK/ EU)
• 1 x Installation CD
• 1 x Instruction Manual
System Requirements
• CPU: 2nd Gen Intel ^® Core ^TM or better
• RAM: 2GB DDR2-800 or better
• IEEE 802.11N or G wireless network
• HDMI enabled display device (i.e. monitor, projector, HDTV, etc.) with HDMI cable
• Available AC electrical outlet
• Microsoft® Windows® 8, 7, Vista, XP (32/64-bit)
Front View

Rear View

Installation
Software and Driver Installation
- Insert the included installation CD into the computer's CD/DVD drive.
- If AutoPlay runs, choose the option to browse/open the folder. Otherwise you can access the files on the CD by going into My Computer and double-clicking the CD/DVD drive.
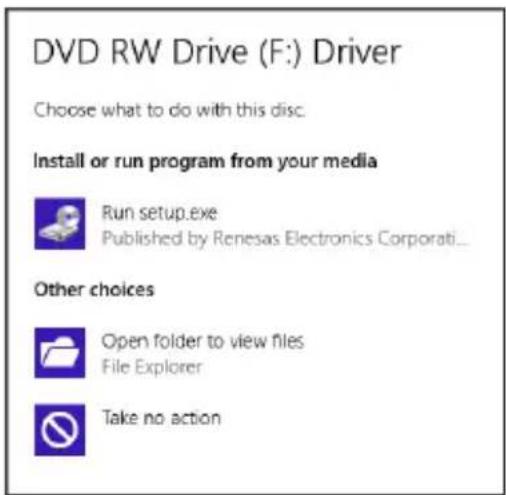
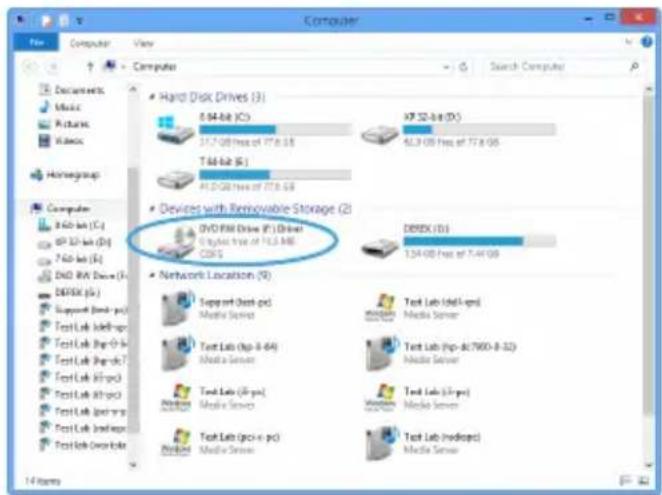
*photos/screenshots for reference only
- Run the PC2TV application to begin the driver/software installation wizard.
- Proceed through the installation wizard until the benchmark application runs.
- The Benchmark application will test the capabilities/performance of the computer system to run the video extender software. It will provide a rating out of 5 stars (see below for description). Click the "Analysis" button to begin.
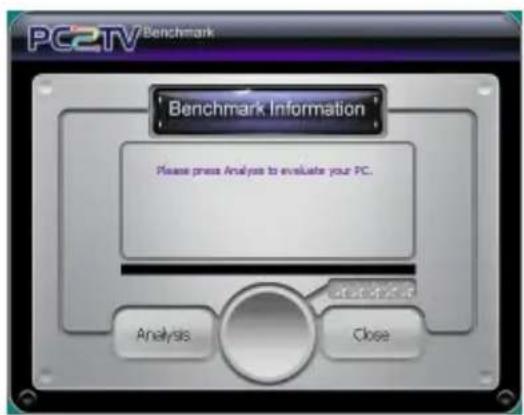
Rating Description
1 Star CPU and graphics performance are below minimum recommended levels.
2 Star Music and Photo viewing and web surfing are acceptable. Video playback at a very low screen resolution may be possible.
3 Star Good Music playback and Photo viewing quality. Video playback may still lag.
4 Star Video playback should be smooth.
5 Star Best performance for video playback and all features.
- After the benchmark is complete, reboot the computer.
- After the computer has rebooted, there will be an icon for PC2TV that will launch the software for the video extender.
Hardware Installation
- Connect a male/male HDMI cable from the rear panel of the video extender to the remote display.
- Connect the included power adapter from an electrical outlet to the video extender.
OPTIONAL: Connect a USB peripheral, such as keyboard/mouse, to the USB hub port on the wireless video extender.
- Turn on the remote display.
- Turn on the video extender by pressing the power button on the front panel.
- Wait at least 60 seconds for the remote display to show the ready screen from the video extender.
- You can now connect to the video extender over WiFi. (SSID: WIFI2HD2)

Wireless Network Configuration
The video extender can operate in two wireless modes: Wireless Access Point mode (AP) or Client Mode (STA).
- AP Mode (default): The video extender will act as a wireless access point (i.e. wireless router) for other wireless enabled computers. This mode is useful if there is no existing wireless network where the video extender will be used, or you do not wish to have the video extender on your main network.
- Client Mode: The video extender will act as a regular wireless client and connect to an existing wireless network. This mode is useful if there is an existing wireless access point (i.e. wireless router) already setup or if the computers need Internet access at the same time.
NOTE: The wireless AP must have DHCP enabled.
To set the video extender into Client mode:
-
By default, the wireless video extender will be set to AP Mode. Check your computer's wireless network settings for the network called "WIFI2HD2".
-
Connect to the WIFI2HD2 network. No encryption/security should be enabled yet.
-
Once connected, run the PC2TV application from the desktop icon.

- Open the "Setting" menu and then click on the Configuration button.

- From the Configuration window, click on the "STA Mode" tab then click the "Enable" option. Enter the required information for connecting to your existing wireless network (i.e. SSID, encryption type and network key). Click the SAVE button once complete.
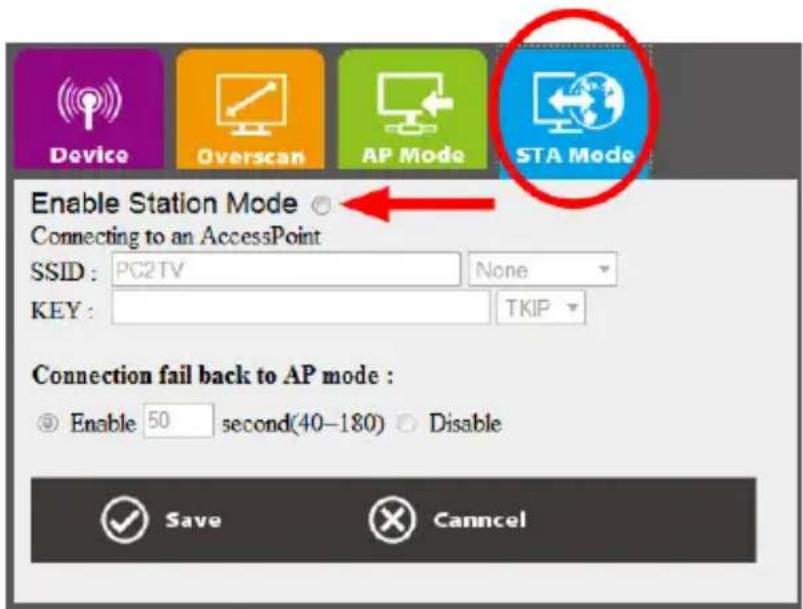
NOTE: Client/STA mode does not support static IP addresses. The wireless AP must have DHCP enabled.
OPTIONAL: If connecting multiple wireless video adapters to this network, be sure to set a unique Device Name for each one for easy identification under the "Device" tab.
- Restart the wireless video adapter by unplugging and reconnecting the power.
How to Use
NOTE: It is recommended to turn off the screensaver on your computer when using this product
- Double-click the PC2TV icon from the desktop.

-
At this point, a security alert may pop up on your system, please check to allow the device to communicate on both Private and Public networks.
-
Once the PC2TV application is ready to connect to the wireless video extender, the "Play" button will appear.

flowchart
graph LR
    A["SEARCHING..."] --> B["PLAY"]
    style A fill:#f9f,stroke:#333
    style B fill:#bbf,stroke:#333
- Clicking the "Play" button will automatically begin streaming the computer desktop to the remote display.

flowchart
graph LR
    A["PC"] -->|WiFi Signal| B["Video Window"]
    B --> C["Red Arrow"]
    style A fill:#f9f,stroke:#333
    style B fill:#bbf,stroke:#333
    style C fill:#dfd,stroke:#333
NOTE: Additional users may connect to the wireless video extender at any time. This will cause the currently connected user to be automatically disconnected.
- To stop the video streaming, click "Play" once more on the PC2TV application.
Advanced Settings
Advanced Settings can be accessed by clicking on the "Setting" button at the bottom of the PC2TV application window. Click the "Apply" button to set changes.
- Device List: Displays the name of the detected wireless video extender(s). If multiple are listed, double-click the one you wish to connect to.
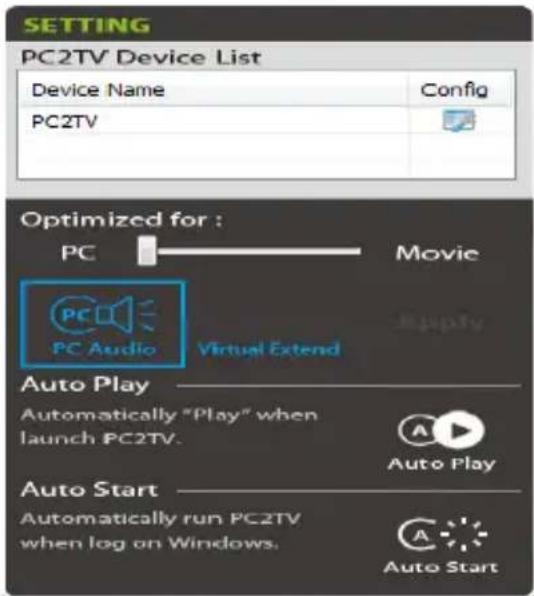
- Optimized For: Optimizes the streaming video based on what you will be doing on the host computer. By default, this is set for "PC", which should be used when running regular applications, such as web browsers or spreadsheets. Setting the slider bar in the middle should be used when viewing video/movies. If video performance is still not ideal, the slider can be set all the way to "Movie".
- PC Audio: By default, when connected to the wireless video extender, audio on the host computer is disabled. Audio will instead be streamed to the wireless video extender only. By enabling this option, audio on the host computer will be restored, while still being streamed to the wireless video adapter.
- Virtual Extend: Click the icon above the text to create an extended desktop screen that will be streamed to the extender instead of the main desktop screen. Click the text "Virtual Extend" if problems arise while streaming the extended desktop. NOTE: Compatible with Windows 7/8 only
- Auto Play: Automatically starts video streaming once the PC2TV application is launched and the device is detected. Click the icon to enable/disable.
- Auto Start: Automatically starts the PC2TV application on Windows startup. Click the icon to enable/disable.
Web Interface Configuration
The web interface for the wireless display adapter can be accessed by clicking the Configuration button in the PC2TV Advanced Setting window.
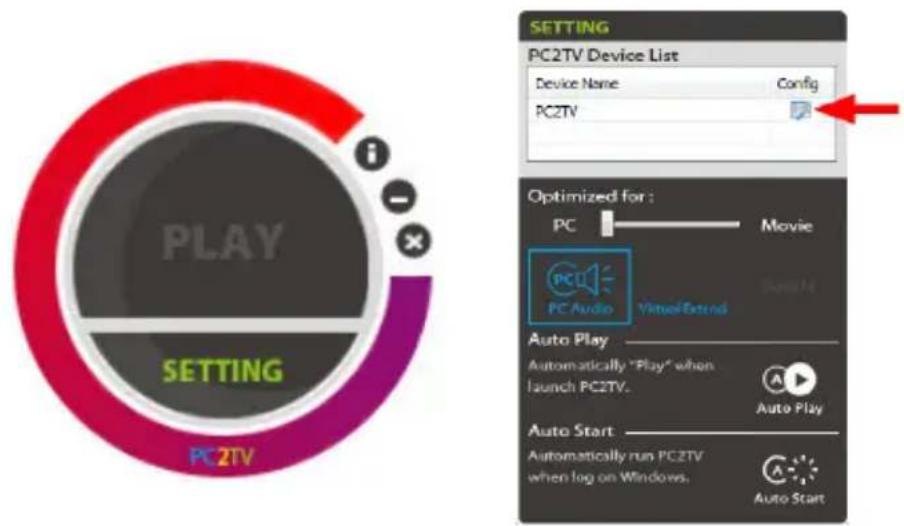
The web interface is divided into several sections that control different settings for the wireless display adapter.

Device: Set the name/identifier for the wireless video extender, for easy identification if multiple extenders are present.
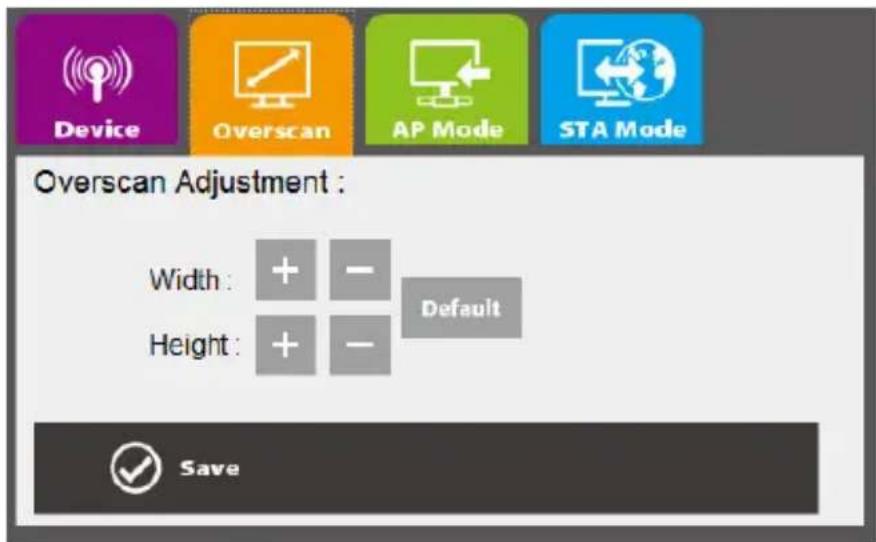
Overscan: Adjust the overall width and height of the streaming image to better fit on the remote display.
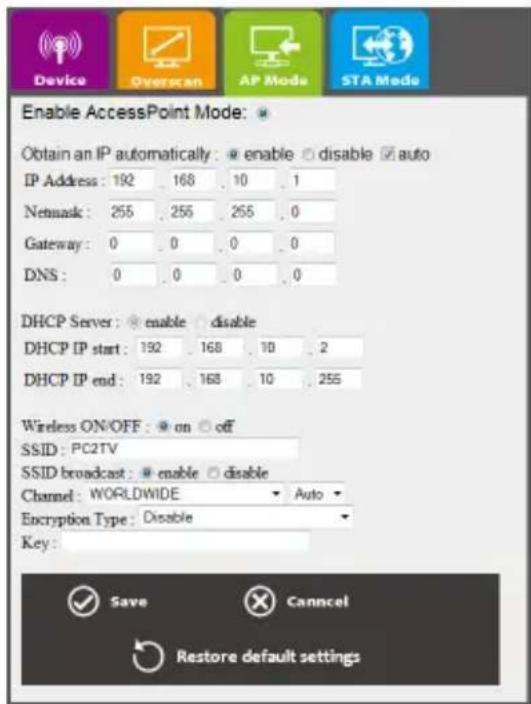

AP Mode/ STA Mode: Select between AP Mode and Client Mode (STA Mode) and set any network settings required for each.
UPnP Media Streaming
The WIFI2HD2 device is designed to be a UPnP-DMR (Digital Media Renderer) so you are able to stream contents from a PC (Windows 7/8 Media Sharing), Mac, smart phone, and Tablet-PC to your TV through this device.
Usage of UPnP in Windows 7/8
Before streaming a file to the DMR of WIFI2HD2 device using Windows 7/8, you have to connect the device with your PC and then turn on the media streaming first.
Note: Every time the device is disconnected with the PC, you will need to perform these steps again before streaming a file to the DMR through Windows 7/8.
- Click the "Share Media" icon under "PC2TV" from "All Programs" -> "VideoHome".

- Click "Turn on media streaming" to allow media streaming from your PC. The WIFI2HD2 device's default DMR name is "WIFI2HD2".

-
After you've turned on media sharing, open the folder with the media file(s) you wish to play.
-
Right-click on the file and select "Play to", then select the WIFI2HD2 device.

Troubleshooting
The WIFI2HD2 software (PC2TV) must first be “allowed” in any system firewalls before the device can function. Steps to “allow” the software in Windows Firewall are listed below. For additional support, or support for different firewalls, please contact the respective firewall developer.
-
Open Windows Firewall by selecting: Windows 8: Control Panel – System and Security – Windows Firewall from the Windows 8 Metro. Windows 7/Vista: Start: – Control Panel – System and Security – Windows Firewall for Windows 7/Vista/XP.
-
In the left hand Panel of the Windows Firewall select "Allow a Program or feature through Windows Firewall".
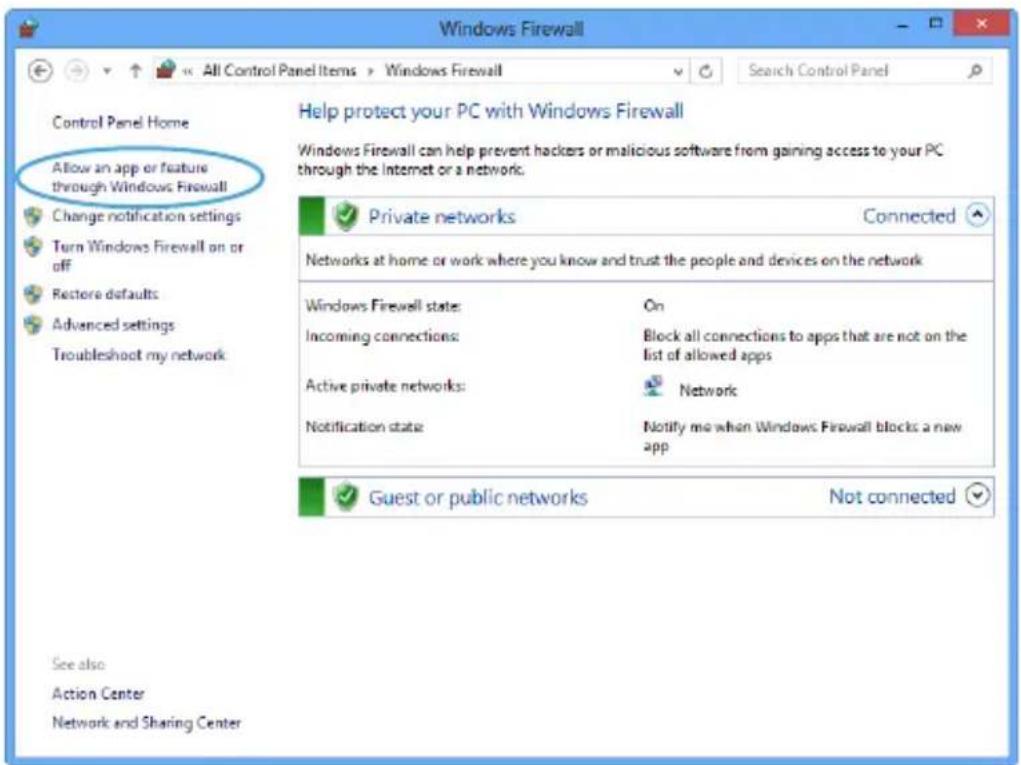
- Search for PC2TV under the heading "Allowed Programs and features":. If this program is listed please skip to step 5. If the program is not listed click the "Allow another program..." button.

- Locate and select PC2TV in the list of programs, and click the "Add" button.

- Ensure that a check mark is placed in the box next to "PC2TV", and under the "Home/Work (Private)", and "Public" sections for PC2TV. Then click "OK".

- Your Windows Firewall is now configured to allow PC2TV.
NetDispLib error pops up when launching the PC2TV application.
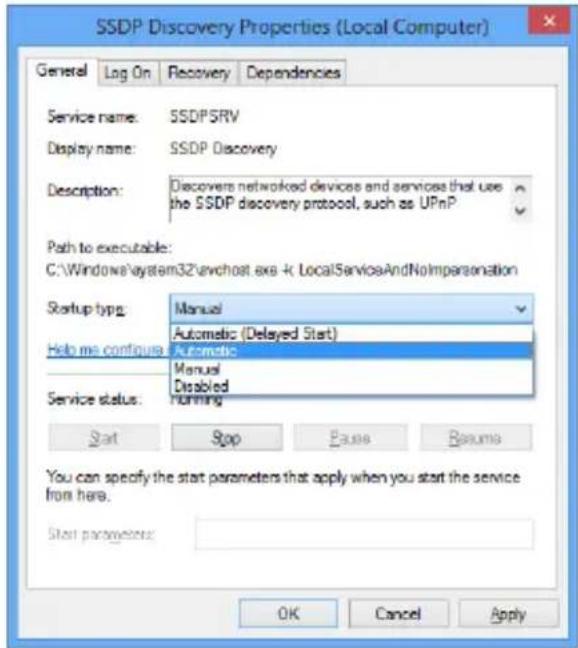
The SSDP Discovery service may be disabled, or failed to start.
-
To check the SSDP Discovery service, from the main desktop, right-click on Computer, then select "Manage". In the new Computer Management window, select "Service" under the "Service and Applications" heading.
-
Locate SSDP Discovery in the list of services and make sure that it is set to start Automatically. Then make sure that the service is started.
- Go into the Firewall (by selecting: Windows 8: Control Panel – System and Security – Windows Firewall from the Windows 8 Metro. Windows 7/Vista: Start: – Control Panel – System and Security) and allow for Network Discovery for both Private and Public networks. This setting can be found via “Control Panel”, “Windows Firewall”, then “Allowed Programs”.

Poor quality video playback/ choppy video
Make sure the optimization for the PC2TV application is set appropriately in the Advanced Setting menu. For video playback, the slider bar should set in the middle, and all the way to "Movie" if problems are still encountered. Click the "Apply" button to confirm the setting.
AP Mode: If the "Channel" setting in the web interface is set for Auto, select a permanent channel.

PC Video / Resolution Settings
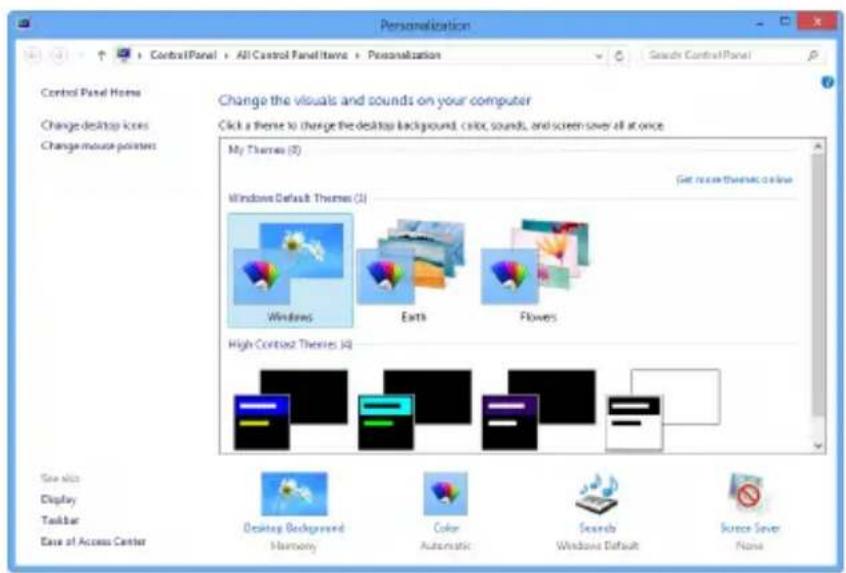
- Windows Vista/ 7: If using an Aero® theme, change the desktop theme to one under the "Basic and High Contrast" section.
- Change the screen resolution size to a lower setting. Also make sure the resolution is one of the supported sizes.
- Update the drivers for the computer's video card.
Cannot Achieve 1080p Video Resolution
1080p video resolution is only supported on Intel® Family Graphics Chipsets. If using a different type of Graphics Card default video resolution will be limited to 720p. In a dual graphics card configuration (i.e. Intel and AMD, or Intel and NVidia), the non-Intel graphics card can be disabled in the Device Manager to achieve 1080p resolution.
For assistance with disabling graphics adapters, please contact your systems manufacturer.
No Sound
The audio devices on your PC.
- Open the "Sound" properties window from the "Control Panel".
- The "Speakers" on the "Playback" tab should be "WonderMedia SmartStream Audio".
- If your PC speakers are currently selected instead, select the WonderMedia speakers and click "OK" or "Apply" to save the setting.
- Close your media player and restart it.
The PC2TV application cannot connect/find the wireless video extender.
- Double check that computer is connected to the proper wireless network. The default SSID of the wireless video extender is "WIFI2HD2".
- Check that the Windows Firewall is not blocking the application. Set the PC2TV application as an allowed program if necessary.
- If any third-party firewall or anti-virus software is installed, check that the PC2TV application is not being blocked by either. Temporarily disable both to confirm if this is the case.
Unable to connect to the wireless video extender AP.
Reset the AP Mode settings:
- Turn off the wireless video extender.
- Connect the computer to the extender with an RJ45 Ethernet cable.
-
Power on the wireless video extender.
-
Launch the PC2TV application, go into Settings and then go into the configuration screen.
-
Click on the AP Mode tab and click on the "Restore Default Settings" button.
-
Once default settings restored, disconnect the RJ45 Ethernet cable and restart the extender.
PC2TV application does not work when connected with RJ45 Ethernet cable.
Make sure to connect the RJ45 Ethernet cable before powering on the wireless video extender.
NOTE: Network Administrators will be required to install the product in a corporate office to allow the service to work with all security software (i.e. Windows Firewall).
UPnP won't connect / respond
- Please download a Hotfix from Microsoft. Hotfix Download Link: http://support.microsoft.com/kb/2619260/en-us ("Play To" feature does not work when two network adapters are on different subnets or when you enable Wi-Fi Direct concurrent mode in Windows 7).

UPnP Supported Formats
The following tables show the formats that are supported for each content type, including the associated file extension and MIME (Multipurpose Internet Mail Extensions) type.
- Supported Picture Formats
| Format File Extension | MIME type | |
| GIF | gif image/gif | |
| PNG | png image/png | |
| BMP | bmp image/bmp | |
| JPEG | Jpg / jpeg image/jpeg | |
* Due to limited memory buffer, the largest supported picture is 16MB for JPEG format, and 5MP for GIF, PNG and BMP formats.
2. Supported Audio Formats
Note: The WIFI2HD2 device only supports 2-channel audio content
| Format File Extension | MIME type | |
| LPCM | pcm, wav, l16 audio/L16 | |
| MPEG-1 Layer 3 | mp3 audio/mpeg | |
| WMA | wma audio/x-ms-wma | |
| WAV | wav audio/wav | |
| MPEG-4 | mp4 | audio/mp4 |
| AAC | aac | audio/vnd.dlna.adts |
| OGG | ogg, oga, ogv | audio/ogg |
| 3GP | 3gp, 3g2 | audio/3gpp |
3.Supported Video Formats
The bit-rate of a video is recommended to be less than 15Mbps to avoid performance issues. In MPEG-4, Microsoft MPEG-4 V1/2/3 are exceptions.
| Format File Extension | MIME type | |
| WMV | mpe, mpeg, mpg video/mpeg | |
| AVI | avi | video/avivideo/x-ms-avivideo/x-msvideo |
| MPEG-1 | mpg, mpeg video/MP1S | |
| MPEG-2 | mpg, mpeg video/MP2P | |
| MPEG-TS | m2t, tts | video/vnd.dlna.mpeg-tts |
| MPEG-4 | mp4, mp4v,mpeg4, m4v | video/mp4video/x-divxvideo/divx |
| 3GP | 3gp, 3gpp | video/3gpp |
| 3GP2 | 3g2, 3gpp2 | vidoe/3gpp2 |
| MOV mov video/quicktime | ||
| MPEG mpe, mpeg, mpg video/x-mpeg | ||
| MPEG-2 mpe, mpeg, mpg video/mpeg2 | ||
| WMV wmv video/x-ms-wmv | ||
| DVR-MS dvr, dvr-ms video/x-ms-dvr | ||
| ASF .asf .wma .wmv | video/x-ms-asf | |
Windows Media Player Media Sharing Supported Formats
The following tables show the formats supported using the WMP "Play to" function.
1. Supported Picture Formats
| Format* | File Extension | MIME type |
| JPEG | jpg | image/jpeg |
| PNG | png | image/png |
2. Supported Audio Formats
| Format File Extension | MIME type | |
| WMA | wma audio/x-ms-wma | |
| MPEG-1 Layer 3 | mp3 audio/mpeg | |
| WAV | wav | audio/wav |
| LPCM | N/A | audio/L16 |
3. Supported Video Formats
| Format File Extension | MIME type | |
| WMA | wmv video/x-ms-wmv | |
| MPEG-2 | mpeg, mpg video/mpeg | |
| MPEG-1 | mpeg, mpg | video/mpeg |
| AVI | avi | video/avi |
| DVR-MS dvr-ms video/x-ms-dvr | ||
If the above troubleshooting steps do not resolve the issue, try resetting the unit to its default configuration.
- With the unit powered on and connected to your display, you can reset the WIFI2HD2 device to factory default by pressing the "RST" button located beside the RJ-45 port on the unit for 10 seconds until your display screen goes black.

Specifications
| Video Signal HDMI | |
| External Connectors | 1 x HDMI female1 x 3.5mm Audio mini-jack female2 x USB type A female1 x RJ45 Ethernet female1 x DC Power |
| LEDs 1 x Power | |
| Maximum Resolution 1080p (1920x1080) | |
| Supported Video Resolutions | Standard: 1600x1200, 1280x1024, 1280x768, 1024x768, 800x600Widescreen: 1920x1080, 1680x1050, 1440x900, 1366x768, 1280x800, 1280x720 |
| Maximum Data Transfer Rate Wireless N: 300 Mbps (Dual-band) | |
| Audio Support Yes (HDMI Digital out and 3.5mm) | |
| Supported Standards IEEE 802.11n Draft 3.0, IEEE 802.11g, | |
| Wireless Operating Frequency | 5 GHz ISM Bands (5.15-5.85 GHz)2.4 GHz ISM Bands (2.412~2.484 GHz) |
| Power Adapter 5V DC, 900 mA, center positive | |
| Enclosure Material Plastic | |
| Dimensions 133.0mm x 71.0mm x 27.0mm | |
| Weight 140g | |
| Compatible Operating Systems Windows 8, 7, Vista, XP (32/64-bit) | |
Technical Support
StarTech.com's lifetime technical support is an integral part of our commitment to provide industry-leading solutions. If you ever need help with your product, visit www.startech.com/support and access our comprehensive selection of online tools, documentation, and downloads.
For the latest drivers/software, please visit www.startech.com/downloads
Warranty Information
This product is backed by a two year warranty.
In addition, StarTech.com warrants its products against defects in materials and workmanship for the periods noted, following the initial date of purchase. During this period, the products may be returned for repair, or replacement with equivalent products at our discretion. The warranty covers parts and labor costs only. StarTech.com does not warrant its products from defects or damages arising from misuse, abuse, alteration, or normal wear and tear.
Limitation of Liability
In no event shall the liability of StarTech.com Ltd. and StarTech.com USA LLP (or their officers, directors, employees or agents) for any damages (whether direct or indirect, special, punitive, incidental, consequential, or otherwise), loss of profits, loss of business, or any pecuniary loss, arising out of or related to the use of the product exceed the actual price paid for the product. Some states do not allow the exclusion or limitation of incidental or consequential damages. If such laws apply, the limitations or exclusions contained in this statement may not apply to you.
Hard-to-find made easy. At StarTech.com, that isn't a slogan. It's a promise.
StarTech.com is your one-stop source for every connectivity part you need. From the latest technology to legacy products — and all the parts that bridge the old and new — we can help you find the parts that connect your solutions.
We make it easy to locate the parts, and we quickly deliver them wherever they need to go. Just talk to one of our tech advisors or visit our website. You'll be connected to the products you need in no time.
Visit www.startech.com for complete information on all StarTech.com products and to access exclusive resources and time-saving tools.
StarTech.com is an ISO 9001 Registered manufacturer of connectivity and technology parts. StarTech.com was founded in 1985 and has operations in the United States, Canada, the United Kingdom and Taiwan servicing a worldwide market.




- WiFi to HDMI® Wireless Video Extender with Audio
- FCC Compliance Statement
- Use of Trademarks, Registered Trademarks, and other Protected Names and Symbols
- Table of Contents
- Introduction .... 1
- Installation 3
- How to Use 6
- Troubleshooting 12
- UPnP Supported Formats 18
- Specifications 21
- Technical Support 22
- Warranty Information 22
- Introduction
- Packaging Contents
- System Requirements
- Front View
- Rear View
- Installation
- Software and Driver Installation
- Rating Description
- Hardware Installation
- Wireless Network Configuration
- To set the video extender into Client mode:
- How to Use
- Advanced Settings
- Web Interface Configuration
- UPnP Media Streaming
- Usage of UPnP in Windows 7/8
- Troubleshooting
- NetDispLib error pops up when launching the PC2TV application.
- Poor quality video playback/ choppy video
- PC Video / Resolution Settings
- Cannot Achieve 1080p Video Resolution
- No Sound
- The PC2TV application cannot connect/find the wireless video extender.
- Unable to connect to the wireless video extender AP.
- PC2TV application does not work when connected with RJ45 Ethernet cable.
- UPnP won't connect / respond
- UPnP Supported Formats
- Supported Audio Formats
- 3.Supported Video Formats
- Windows Media Player Media Sharing Supported Formats
- Supported Picture Formats
- Supported Video Formats
- Technical Support
- Warranty Information
- Limitation of Liability
Brand : StarTech.com
Model : WIFI2HD2
Category : Audio/video extension