
Design Mincer 41400 - Chopper Gastroback - Free user manual and instructions
Find the device manual for free Design Mincer 41400 Gastroback in PDF.


| Product Type | Meat Grinder / Mincer |
| Brand | Gastroback |
| Model | Design Mincer 41400 |
| Dimensions (approx) | 20 x 15 x 30 cm |
| Weight | 3.5 kg |
| Power Consumption | 500 W |
| Voltage | 220-240 V, 50/60 Hz |
| Material | Stainless steel and plastic |
| Capacity | Up to 1.5 kg/min |
| Functions | Mincing, grinding, sausage stuffing |
| Speed Settings | 2 speeds + reverse |
| Grinding Plates | Fine, medium, coarse (included) |
| Sausage Stuffing Tubes | Included (various sizes) |
| Safety Features | Overload protection, safety lock, non-slip feet |
| Cleaning | Removable parts are dishwasher-safe |
| Maintenance | Wipe motor housing with damp cloth; do not immerse |
| Warranty | 2 years |
| Repairability | Spare parts available from manufacturer |
| Accessories Included | Pusher, grinding plates, sausage tubes, wrench |
| Certifications | CE, RoHS |
Frequently Asked Questions - Design Mincer 41400 Gastroback
User questions about Design Mincer 41400 Gastroback
0 question about this device. Answer the ones you know or ask your own.
Ask a new question about this device
Download the instructions for your Chopper in PDF format for free! Find your manual Design Mincer 41400 - Gastroback and take your electronic device back in hand. On this page are published all the documents necessary for the use of your device. Design Mincer 41400 by Gastroback.
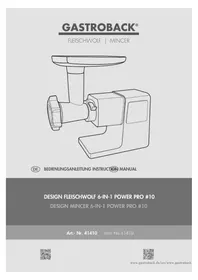
USER MANUAL Design Mincer 41400 Gastroback
Carefully read all provided instructions before you start running the appliance and pay regard to the warnings mentioned in these instructions.
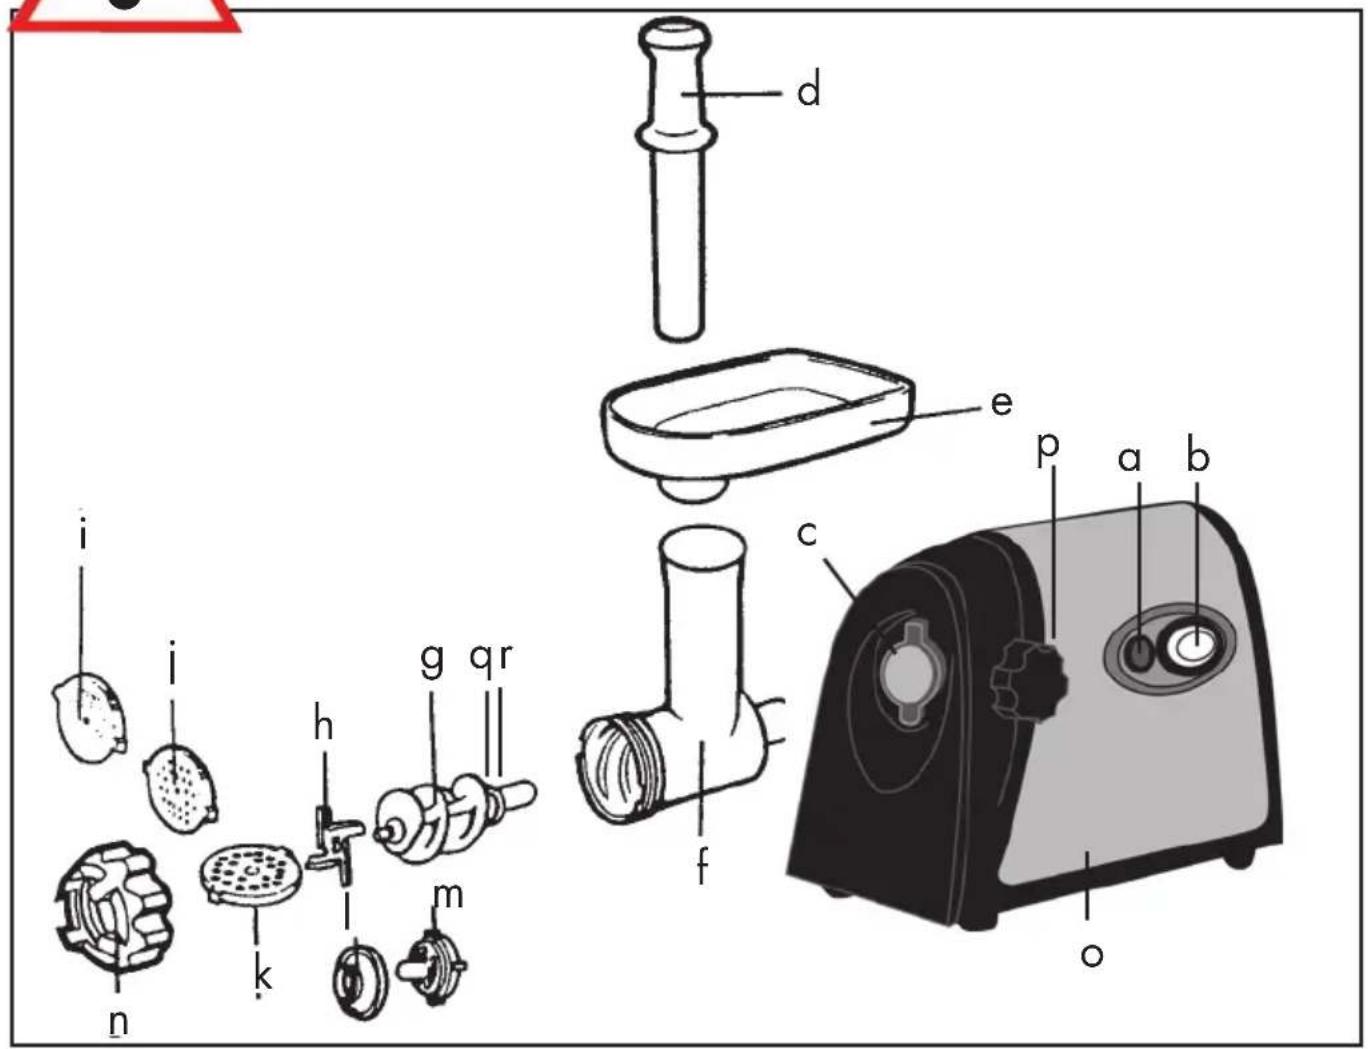
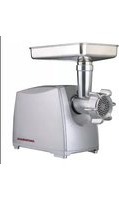
Designation of the parts
a) O / I = ON/OFF switch
b) Reverse
c) Opening for the drive shaft
d) Feedstick
e) Feed pan
f) W orm housing
g) W orm
h) Crossed-blade knife
i) Mincer plate - 3 mm
j) Mincer plate - 5 mm
k) Mincer plate - 7 mm
I) Chopper attachment A
m) Chopper attachment B
Feed pan
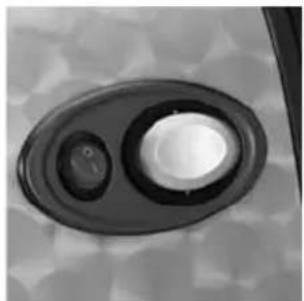
Operator panel
Directions for Use
Congratulations on the purchase of your new Gastroback Mincer and hope that it will soon convince you of its many advantages.
You will soon find that the Gastroback Mincer is an exceptionally efficient and robust appliance for processing meat and vegetables.
Safety and Operating Instructions Gastroback recommends safety first
We at Gastroback are very safety conscious. We design and manufacture consumer products with the safety of you, our valued customer foremost in mind. In addition, we ask that you exercise a degree of care when using any electrical appliance and adhere to the following precautions. Carefully read all instructions before operating and save for future reference.
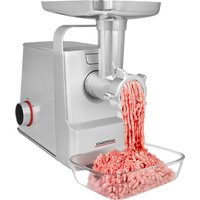
The mincer is used for mincing meat (uncooked or cooked) and soft vegetables. Please prepare the ingredients before filling them into the feed funnel. Using the feedstick you press the food slowly into the worm which pushes it against the spinning crossed-blades knife.
The knife and the wor m are driven by a 800 watt motor. The finished mince discharges through the mincer plate. The appliance has an overload protection which prevents the motor form overheating.
The appliance is maintenance-free, ver y insusceptible and easy to use. All par ts that come into direct contact with the food are easily to remove and easy to clean. No extra tools are necessary for assembling or disassembling the appliance.
Important safeguards for your Gastr oback Design Mincer
Please read all the advice and instructions with care and keep the manual. Only use the appliance as stated and only for thus use. Any non-appropriate use and misusage can cause damages and heavy personal injuries through voltage, fire and moving units. Only proceed the appliance as described in the directions and for the intended purpose.
- Reparation and technical maintenance of the appliance or line cord are just allowed to be accomplished by an authorised specialist reparation shop.
- Only use the appliance indoors.
- Do not use the appliance in moving vehicles or boats. Do not use the appliance outdoors.
- Only use units, spare parts and supplies which are provided and recommended by the manufacturer. Damaged or improper units may break in use, damage the appliance or cause injury.
- Never try to take the appliance to pieces or open it.
- Never leave children unsupervised when the appliance or units of the appliance are in reach.
- Never let children play with the appliance or units of the appliance. Children and invalid people have to be super vised using the appliance.
- Never leave the mincer unattended, when connected to the power supply. Keep the appliance well out of reach of children. Store the appliance and units out of reach of children.
- The work space has to be easily accessible, solid, even, dry and of sufficient size. The mincer should only be set up on a firm level work surface. Never situate the appliance close to the edge of the working area. Ensure that the power supply cable does not hang down from the work surface as it could be easily pulled, particularly by small children, thereby causing serious accidents.
- Never cover the air box on the back of the appliance. The air has to able to circulate.
- Never immerse the motor block in water! Shor t-circuit danger! Do not put any cloth or napkins underneath the appliance to avoid endangering by fire and electric shocks.
- Never situate the appliance close to a strong heat source or a hot surface (for example: heater, stove or grill).
- Ensure that the switch and cable do not come into contact with water! Should this inadvertently happen, all parts must be completely dry before the appliance is used again.
- Never let water or other liquids run into the motor housing.
- Never clean the line cord or the appliance in the dishwasher, poor liquids over the appliance or douse or dip it in water or other liquids. In case that water or other liquids ran into the appliance while operating turn OFF the appliance immediately, pull the plug and dry the appliance with a clean cloth ('Care and cleaning').
- Do not use the appliance in moist and wet areas.
- Check the power supply cable regularly for wear and damage.
- The mincer must only be connected to a 230 V power supply.
- Always disconnect the power supply cable from the mains before assembling, dismantling and cleaning the appliance or before exchanging mincing plates.
• Always uncoil the line cord completely before installing the appliance.
- Place the appliance close to a power point and connect it directly without using any extension cords to avoid additional risks of injury through fire or voltage.
- Only install the appliance in proper for m secure grounding receptacle with adequate electric power supply (alternating current; 230/240 V, 50 Hz) and ground fault circuit interrupter. The maximum power consumption of the appliance is 800 Watt. You should also install a fuse with a release current of maximum 30mA. If necessary ask your electrician for help.
- Never pull, rip, bend, clamp, squish or knot the line cord. Pay attention to the line cord not hanging of the table. Attend to nobody getting caught in loops of the line cord or pulling the appliance of the work space. When pulling the plug always catch hold of the enclosure of the plug.
- Carry the appliance with both hands by the motor block – never by the filling pan or the mincer.
- The mincer must only be used to process meat and vegetables. Do not mince hard par ts such as bones. Do not mince hard-fibre foods such as ginger, etc. Do not let the motor run longer then necessar y to prevent overheating. After tur ning OFF the appliance the motor needs about 6 sec. to stop moving.
- Clean the appliance straight after use and rinse off leftover food. Remove such dir t immediately and operate according to the instructions 'Care and cleaning' before storing the appliance. Do not let food desiccate on the appliance.
- Never clean or operate the appliance or units of the appliance with abrasive or hard sharp-edged items. Never put the appliance or parts of the appliance in the dishwasher for cleaning! This will cause discoloration and corrosion.
- Do not use the appliance if it is damaged or units of the appliance are damaged. Do not use the appliance if it does not function properly or if it was excessively loaded. The appliance is likely damaged if the appliance or units of the appliance show cracks, exorbitant wearing down, alterations or leaks. It is also likely damaged if the drive wheel of the motor housing moves slowly. Take the appliance for technical maintenance and repair to an authorised specialised reparation shop.
- Never use force assembling or disassembling the appliance. The single parts should be easily put together. Only operate the mincer after it has been carefully assembled. Never use the crossed-blade knife and mincer plate in combination with the chopper attachments. Only use either the crossed-blade knife with the mince plate or the chopper attachments at once.
- For the case that the wor m housing or the closing ring loosen while operating tur n OFF the appliance immediately and pull the plug. Operate according to the instructions 'T rouble shooting' before turning the appliance ON again.
- Always turn the appliance off, wait for the motor to stop moving and then pull the plug before disassembling the mincer.
- Never push the food into the feeding funnel with your fingers. Always use the feedstick for this purpose! The mincer can not mince hard or stingily ingredients (for example: bones, nuts, ginger). If you use hard ingredients like onions or carrots, you have to steam them before adding them to the meet otherwise they can block the motor. If the motor is blocked turn OFF the appliance immediately and operate according to the instructions 'T rouble shooting'.
- Before the mincer is used for the first time, all parts – with the exception of the motor block – must be thoroughly cleaned in warm soapy water.
- To ensure that the mincer does not seize, never operate it under excessive pressure.
- Instantly switch off the mincer if the worm or knife get blocked by a hard object and wait for approx. 6 seconds to be certain that the motor is no longer running. Switch ON the mincer after it has been cleaned.
- Never use force operating the appliance to avoid damage of the units of the appliance.
- Never hold your face or other body parts over the feed funnel when the motor is running because little pieces of food could be thrown out of the feed funnel.
• Take care handling the crossed-blade knife because it is very sharp. - Never put foreign substance or hard objects into the feed funnel.
- Never repair the mincer yourself. If you discover or suspect a fault, send the mincer immediately to your local service workshop for competent examination and repair.
- Store and use the appliance in a clean, frost free environment where it is protected from dampness, moistness and immoderate and extraordinary burden (such as: downfall, beat, overheating, moisture in the motor block).
- The mincer is intended for use in the household only!
Assembling
Before first usage: Rinse all the units of the appliance that come into contact with food with water and clean them with dishwashing detergent. Operate according to the instructions 'Care and cleaning'.
WARNING: Ensure that the appliance is switched 'OFF' at the power outlet and the power cord is unplugged.
-
Place the mincer on a flat, dry surface such as a bench top.
-
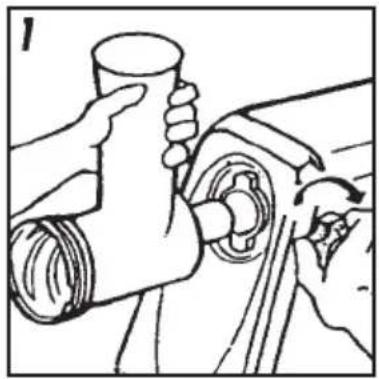
Loosen the screw plug on the left side of the mincer turning it anticlockwise. Firmly secure the worm housing in the opening for the drive shaft. The opening of the wor m housing should be upright.
Hold the worm housing with one hand and insert the screw plug into the side hole of the motor block. Turn the screw clockwise (see. fig. 1) for tightening. Do not use force and be careful to not overwind the screw thread.
WARNING: The blades of the crossed-blade knife are very sharp. Pay attention when you handle the crossed-blade knife.
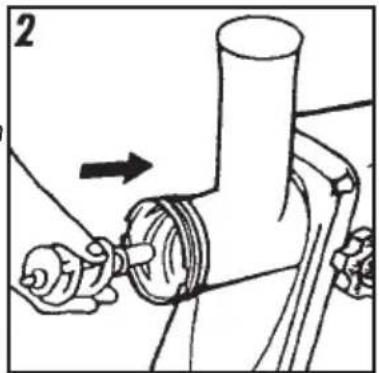
- Insert the wor m with the longer, narrower end into the worm housing and turn slightly until it is securely seated in the wor m housing (see fig. 2). The sealing ring and then the grommet should be placed at the narrow end of the wor m. Make sure that the wor m is placed completely in the inside of the worm housing. If necessary turn the worm a little bit to make it fit.
WARNING: Never use the crossed-blade knife and the mincer plate together with the chopper attachment. How to work with the chopper attachment is explained within the recipe.
- Mount the knife on the wor m in the illustrated manner: The rounded side of the knife must face the wor m, the smooth side is in contact with the mincer plate (see fig. 3). Meat will not be minced if the knife is mounted the wrong way round.
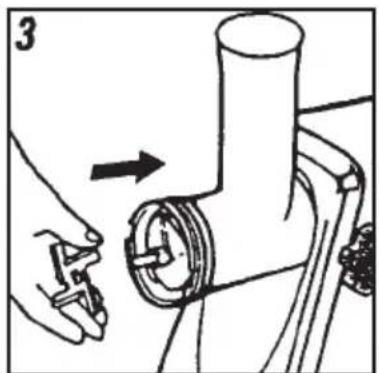
IMPORTANT: If the tools overlap the edges of the worm housing the worm is not placed all the way inside of the wor m housing. Turn the worm a little bit to make it fit inside but do not use force.
- Mount the mincer plate on the knife. The two arresting pins must lock precisely into the corresponding recesses (see fig. 4).
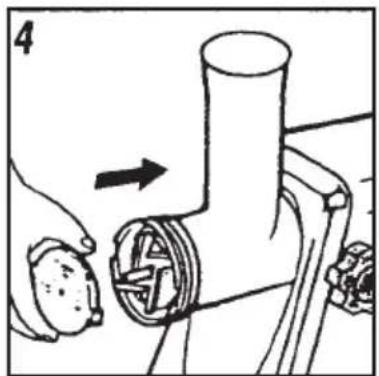
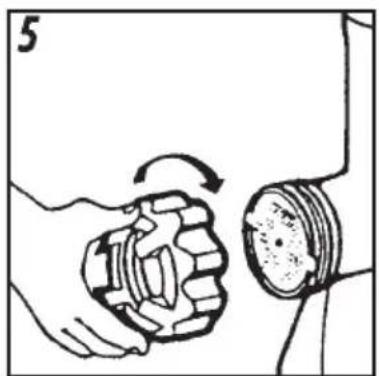
- Firmly screw on the closing ring. Do not over -tighten (see fig. 5).
WARNING: Do not use any tools, for tightening the screw and pay attention not to cant the screw. If the screw cants the screw thread gets damaged. If the screw does not turn easily put some sunflower oil (or other edible oil) on the screw.
-
Press the feed pan firmly onto the mincer.
-
Place the mincer on a firm base.
The mincer is now ready for operation.
Operating - Mincing meat
The mincer operates absolutely dependently and clean. If any problems should occur while operating act upon instructions 'Trouble shooting'.
WARNING: For the case that liquid runs over the mincer while operating tur n the mincer OFF immediately and pull the plug. Clean and dr y the appliance according to the instructions 'Care and cleaning'.
TIP: If you use special mince-recipes you can mix the ingredients (for example steamed onions or spices) with the meat before mincing. This way the ingredients get mixed really well.
IMPORTANT: The mincer can not mince hard or stingily ingredients (for example: bones, nuts, ginger). If you use hard ingredients like onions or carrots, you have to steam them before adding them to the meet. Place a dry towel beside the mincer to dry off overrunning liquids.
-
Cut the meat into small pieces that will fit in the feed funnel and remove hard parts like bones, shells or stems.
-
Assemble the appliance as described and place a plate or dish in front of the wor m housing.
WARNING: Always make sure that the mincer is turned OFF before plugging in the power supply.
- Plug the power supply cable into a mains socket and switch on the mincer.
WARNING: Never hold your face or other body parts over the feed funnel when the motor is running because little pieces of food could be thrown out of the feed funnel. Never push the food into the feed funnel with your fingers or put foreign substances (hair towels, cutlery) into the feed funnel. Always use the feedstick for this purpose!
-
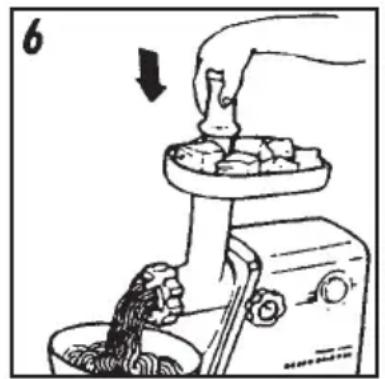
Slowly feed the meat pieces into the feed funnel and push down with the feedstick (see fig. 6). Do not apply excessive force when pushing down the feedstick. Use only the feedstick to press down the meat. Never use the fingers!
-
Switch off the mincer after use and disconnect the power supply cable from the mains socket.
The mincer will easily continuously mince up to 30 kg of meat (raw, cooked, different kinds of meat). 5 kg of raw meat are minced in 15 minutes max.
IMPORTANT: Operate in a slow and constant pace. Do not try to rush the procedure by pushing down the meat with force. This way the wor m might gets blocked and stops operating. Only use the feedstick to slowly push down food through the feed funnel. If no meet is coming
out the worm housing event though there is still meat in the feed funnel turn the mincer OFF and work according to the instructions 'Trouble shooting guide'.
- As soon as the last bit is minced turn the appliance OFF and pull the plug.
- Clean and disassemble the appliance right after use and make sure that no leftover food desiccate on the appliance. Work according to the instructions 'Care and cleaning'.
Sausage filler - Chopper attachments
Ingredients for the filling:
100 g mutton, once or twice minced with the mincer
1 1/2 tablespoon olive oil
1 1/2 tablespoon fine chopped onions
1/3 teaspoon grounded pimento
1/2 teaspoon salt
1 1/2 tablespoon flour
Ingredients for the wrapping:
at least 450 g fatless meet of mutton, calf or beef the most 150-200 g flour*
1 teaspoon grounded pimento
1 teaspoon grounded nutmeg
1 pinch of chillipowder
1 pinch of pepper
*The consistency of the wrap is better if you use less flour and more meet.
- Prepare the filling: Steam the onions. Mince the meet once or twice with the mincer and then mix the ingredients.
- Prepare the wrapping: Mince the meet for the wrapping 3 times in total. For the first mincing procedure use the mincer plate - 7 mm then use the mincer plate - 5mm. After mixing all the ingredients for the wrapping mince it one more time with the 5 mm mincer plate.
- Unscrew the closing ring and take out the mincer plate and crossed-blade knife. Operate according to the instructions 'disassembling' the appliance.
WARNING: Do not cut yourself removing the crossed-blade knife
- Assemble the appliance this time with the chopper attachments.
IMPORTANT: Never assemble the appliance with the chopper attachment AND the
crossed-blade knife with the mincer plate
a. Assemble the worm housing in the opening of the drive shaft. Place the worm inside the worm housing (operate according to the instructions 'Assembling' the appliance. see fig. 1 and 2).
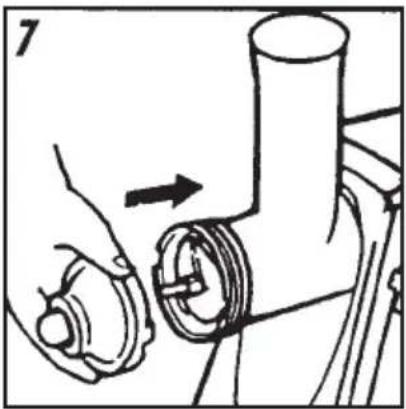
b. Place the chopper attachment A on the axis of the wor m. The slim end has to face the front (see fig. 7). T urn the chopper attachment a little bit while pushing it into the wor m housing.
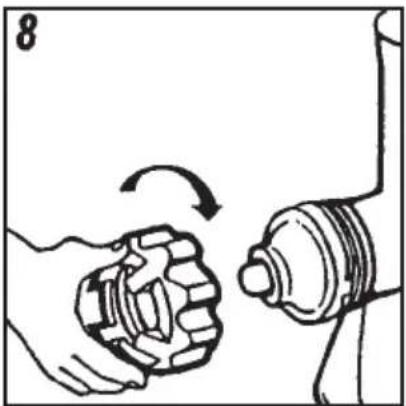
c. Place the chopper attachment B on top of the chopper attachment A. The wide opening of the chopper attachment B should be facing the chopper attachment A. The chopper attachment B has a gap on the outside edge which should slide over the guiding pin on the inside of the worm housing (see fig. 8).
d. Attach the closing ring to the worm housing and screw it on tight with your hands.
-
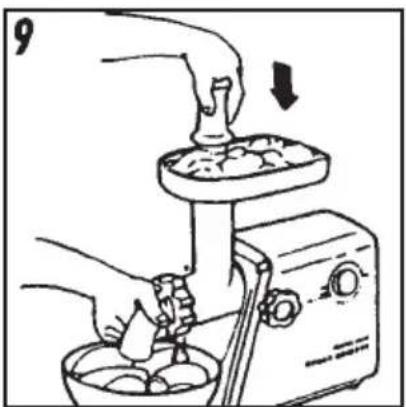
Process the wrapping mixture in the mincer with the attached chopper attachments (see fig. 9). The finished product will be one long wrapping. Cut the wrapping into convenient seize.
-
Freeze the wrapping shortly.
-
Fill the wrapping with the filling mixture.
-
Fry the wraps with some olive oil until it has the favored browning.
Care and cleaning
WARNING: Never hold your face or other body parts over the feed funnel when the motor is running because little pieces of food could be thrown out of the feed funnel. Never put foreign substance or hard objects into the feed funnel.
Before the mincer is used for the first time, all parts – with the exception of the motor block – must be thoroughly cleaned in warm soapy water.
Disassembling
WARNING: To avoid injury and damages of the appliance turn the applianceOFF and then wait for approx. 6 seconds to be certain that the motor is no longer running. Always pull the plug before you start disassembling or cleaning the appliance.
- Switch off the mincer and disconnect the power supply cable from the mains. Check that the motor has completely stopped.
- Detach the worm housing from the motor block.
- Unscrew the closing ring turning it counterclockwise.
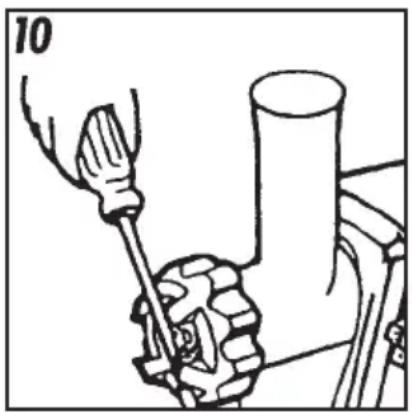
TIP: If the closing ring is screwed on to tight you can use a screwdriver as shown in the picture 10.
- Remove the mincer plate. If necessary y insert a knife or screwdriver between the mincer plate and the worm housing to pry out the mincer plate.
- Remove the crossed-blade knife and pull out the wor m or if you used the chopper attachment remove them.
TIP: If the tools are stucked knock the mincer carefully on a stable cutting board. The mincer plate should be facing up.
ATTENTION: Be careful not to damage your bench top, the cutting board or the mincer.
- Remove meat residues.
Operate as described:
ATTENTION: Never put the appliance or parts of the appliance in the dishwasher or use abrasives for cleaning! This will cause discoloration and corrosion.
- Wash all parts thoroughly in hot soapy water. Do not use aggressive detergents. The parts are not suitable for dishwasher. Soak parts with desiccated food leftovers a few minutes in warm soapy water and use a nylon cleaning brush or cleaning sponge for cleaning. Rinse all parts with running water and dry them accurately.
WARNING: Ensure that the switch and cable do not come into contact with water! Should this inadvertently happen, all parts must be completely dry before the appliance is used again. Never let water or other liquids run into the motor housing. Never clean the line cord or the appliance in the dishwasher, poor liquids over the appliance or douse or dip it in water or other liquids. In case that water or other liquids ran into the appliance while oper-
ating turn OFF the appliance immediately, pull the plug and dry the appliance with a clean cloth.
- The motor block must only be wiped clean with a moist cloth. Do not clean the motor block under flowing water, nor should it be immersed in water! Do not use alcohol, benzine, etc.!
- Grease the mincer plate and knife with salad oil to prevent air corrosion.
Storage
Always clean the appliance before storing.
ATTENTION: Store and use the appliance in a clean, frost free environment where it is protected from dampness, moistness and immoderate and extraordinary y burden (such as: downfall, beat, overheating, moisture in the motor block). Never lay heavy or hard objects on top of the appliance.
- Always assemble the appliance for storing. This way the parts are protected and can not get lost.
ATTENTION: Never pull, rip, bend, clamp, squish or knot the line cord.
Trouble shooting guide Possible problem Easy solution
| The mince is not fine enough. | Use a smaller mince plate and/or mince the ingredients more then once. |
| There are still ingredients in the feed funnel but no mince is coming out of the mincer. | The mincer is blocked. Turn the appliance OFF immediately and operate according to the instructions 'Clear a blocking'. |
| The motor stops running while operating. | The overload protection might got activated. Turn the appliance OFF immediately and operate according to the instructions 'Clear a blocking'. |
| After cleaning the motor does not get started again when turning the appliance ON. | Is the power cord plugged in?The motor might be blocked with some hard substance (for example a bone). Turn the appliance OFF immediately and pull the plug.Disassemble and clean the appliance. Operate according to the instructions 'Care and cleaning'.If the problem is not solved after the cleaning, take the appliance for technical maintenance and repair to an authorised specialised reparation shop. |
Possible problem Easy solution
| The mincer blocks up permanently while operating. | To ensure that the mincer does not seize, never operate it under excessive pressure. Operate in a slow and constant pace. Do not try to rush the procedure by pushing down the meat with force.For mincing hard ingredients really fine start with the mincer plate with the bigger holes. Mincing the second time use the finer mincer plate. |
| The worm housing moves or loosened while operating. | The screw plug loosened. Turn the appliance OFF immediately. Press the worm housing with one hand against the motor housing using the other hand to tighten the screw plug turning it clockwise. |
| The mince leaks out at the side of the closing ring. | The closing ring is not screwed on tight enough. Turn the appliance OFF immediately and then pull the plug. Tighten the closing ring but do not overwind the winding. If the problem still occurs disassemble and clean the appliance. |
Clear a blocking
If the worm housing is blocked no mince comes out of the mincer while operating or the motor stops moving automatically because of the overload protection.
ATTENTION: If a blocking occurs turn OFF the appliance immediately. Clear the problem before turning on the motor again.
- Turn the appliance OFF and then take the feedstick out of the feed funnel.
- If the motor stopped running because the overload protection turned itself on you have to turn the appliance OFF to undo the overload protection.
- Press the reverse button and hold it down for one or two seconds. The wor m is moving backwards and this loosens the blocking.
ATTENTION: If the motor does not start moving backwards immediately turn OFF the appliance and pull the plug. Disassemble and clean the appliance.
Waste disposal
The appliance has to be deposed by the definition of the regional waste disposal of electricalscrap.
If necessary get information of the regional waste management enterprise.
Warranty
We guarantee that all our products are free of defects at the time of purchase.
Any demonstrable manufacturing or material defects will be to the exclusion of any further claim and within 2 years after purchasing the appliance free of charge repaired or substituted.
There is no Warranty claim of the purchaser if the damage or defect of the appliance is caused by inappropriate treatment, over loading or installation mistakes.
The Warranty claim expires if there is any technical interference of a third party without an written agreement.
The purchaser has to present the sales slip in assertion-of-claims and has to bear all charges of costs and risk of the transport.
The warranty becomes invalid and GASTROBACK does not assume liability if:
-
The user did not follow the instructions or the user did not use the appliance as stated and only for thus use (improper use, misusage).
-
The appliance was connected to a power supply with improper current.
-
The mincer got opened by an unauthorised person.
-
Other then original spare-parts got used.
-
The appliance was in commercial use. Used up parts from commercial use are no warranty claim.
The mincer is intended for use in the household only!
GASTROBACK GmbH

- DESIGNATION OF THE PARTS
- DIRECTIONS FOR USE
- SAFETY AND OPERATING INSTRUCTIONS GASTROBACK RECOMMENDS SAFETY FIRST
- IMPORTANT SAFEGUARDS FOR YOUR GASTR OBACK DESIGN MINCER
- ASSEMBLING
- OPERATING - MINCING MEAT
- SAUSAGE FILLER - CHOPPER ATTACHMENTS
- INGREDIENTS FOR THE FILLING
- INGREDIENTS FOR THE WRAPPING
- CARE AND CLEANING
- DISASSEMBLING
- ATTENTION: NEVER PUT THE APPLIANCE OR PARTS OF THE APPLIANCE IN THE DISHWASHER OR USE ABRASIVES FOR CLEANING! THIS WILL CAUSE DISCOLORATION AND CORROSION
- STORAGE
- TROUBLE SHOOTING GUIDE POSSIBLE PROBLEM EASY SOLUTION
- CLEAR A BLOCKING
- WASTE DISPOSAL
- WARRANTY
- GASTROBACK GMBH
Brand : Gastroback
Model : Design Mincer 41400
Category : Chopper