PC3LE8 - MIDI Keyboard Kurzweil - Free user manual and instructions
Find the device manual for free PC3LE8 Kurzweil in PDF.


| Product Type | MIDI Keyboard Controller / Synthesizer Workstation |
| Model | PC3LE8 |
| Brand | Kurzweil |
| Keyboard | 88-key, fully weighted hammer action with aftertouch |
| Sound Engine | Kurzweil Triple Strike Grand Piano, VA-1 synthesis, KB3 tonewheel organ |
| Polyphony | 128 voices |
| Multitimbral Parts | 16 (MIDI) + 2 (aux) + 1 (master) |
| Display | 240x64 pixel backlit LCD |
| Effects | Built-in reverb, chorus, EQ, and insert effects |
| Connectivity | MIDI In/Out/Thru, USB to Host, USB to Device, 2x 1/4" line out, 1/4" headphone, 2x pedal inputs, V-Mod B3 tonewheel |
| Storage | Flash ROM for user samples and setups |
| Dimensions (W x D x H) | 56 x 15.6 x 5.5 inches (1422 x 396 x 140 mm) |
| Weight | 48.5 lbs (22 kg) |
| Power Supply | Internal power supply, 100-240V AC, 50/60 Hz |
| Power Consumption | 50W |
| User Manual | Free PDF download available |
| Maintenance | Clean with a soft, dry cloth; avoid liquids and solvents |
| Safety | Use only provided power cable; keep away from water and heat sources |
| Repairability | Authorized service centers; replaceable key contacts and power supply |
Frequently Asked Questions - PC3LE8 Kurzweil
User questions about PC3LE8 Kurzweil
0 question about this device. Answer the ones you know or ask your own.
Ask a new question about this device
Download the instructions for your MIDI Keyboard in PDF format for free! Find your manual PC3LE8 - Kurzweil and take your electronic device back in hand. On this page are published all the documents necessary for the use of your device. PC3LE8 by Kurzweil.
USER MANUAL PC3LE8 Kurzweil
About this Manual....6
Installation/Requirements 6
Before You Begin 6
An Important Note About SoundEditor 6
Overview 7
2. Starting Up....8
Getting Connected 8
MIDI Setup 9
3. SoundEditor Menus 11
Configuring Preferences.... 14
4. Parameter Selection in SoundEditor 15
Selecting and Adjusting Parameters 15
5. Program Banks Window....19
Program Banks Window.... 19
Modes Toolbar 20
Program Name Display 21
Selecting Program Categories.... 21
Program Toolbar (Editing and File Storage) 22
Bank Selection and Sorting Options.... 23
Search Options.... 24
FOUND Button 25
Individual Program Options 26
MIDI Channel Display.... 27
MIDI Channel Toolbar 28
Modes Toolbar - MIDI Button 28
Modes Toolbar – MASTER Button 29
Modes Toolbar - EFFECT Button 30
Modes Toolbar - EQ+COMP Button 32
6. Editor Organization.... 33
SoundEditor Editor Structure.... 33
7. Program Editing 34
Program Common Window 34
Program Common Toolbar (Editing and File Storage) 35
Window Views 35
IMPORT and REMOVE Buttons.... 37
IMPORT Button 37
REMOVE Button 38
Selecting Songs in the Common Settings View.... 39
Selecting FX Chains in the Prog FX (Program Effect) View 40
Layers Overview Panel 41
Layers Window 44
Layers Toolbar 45
Layers Name Box.... 46
MUTE and SOLO Buttons 46
Keyboard Zone 47
'Views' Toolbar 48
Algorithm Panel 54
Selecting and Configuring Algorithms 54
Selecting an Alternate Input (Cascade Mode) 56
EDIT ALG WIRING Button 57
Editing an Algorithm 58
FX Edit Window....60
FX Edit Toolbar 61
FX Overview Panel....64
SELECT Button....64
MORE Button 65
FUN Button....65
KB3 Mode Edit Window....66
KB3 Mode Toolbar 67
'Views' Toolbar 68
8. Channel Mixer Window....74
Single Mixer Channel 75
Selecting Mixer Programs 76
RECEIVE and SEND Buttons....76
9. Setup Window 77
Setup Toolbar 78
Individual Setup Options 79
10. Setup Editing....80
Setup Window 80
Edit Window 81
Setup Edit Toolbar 82
Zone Parameter Groups.... 84
11. Additional Controls 90
V-Piano 90
Playing the PC3 from the Computer Keyboard 91
CC Sliders 92
12. Appendix A - File Extensions 93
13. Appendix B - MIDI Setup Options.... 94
MIDI In Controller 94
Virtual MIDI Port 95
1. Introduction
Welcome to SoundEditor! SoundEditor is a full-featured Editor/Librarian and Sound Development tool for the Kurzweil PC3.
While the PC3 is fully editable from its front panel controls, SoundEditor greatly expands the editing experience by displaying every PC3 parameter in a series of logical, easy-to-use graphical interfaces. SoundEditor allows you to create, edit, organize, and store PC3 Programs, Setups, Songs and Effects.
Through a standard MIDI connection (DIN or USB), SoundEditor can receive and transmit individual Programs, Setups or Effects, or entire banks to the PC3. All Program, Setup and Effect parameters can be displayed and edited. Programs can be assigned to any of 20 Categories to assist in organizing, sorting and creating custom program banks. SoundEditor can also be used as a teaching tool to learn the inner details of the factory Programs.
This manual, both a user guide and handy reference, is designed to get you up and running quickly.
We hope you enjoy using SoundEditor for your Kurzweil PC3!
Acknowledgements
SoundTower Software gratefully acknowledges the contributions of the following individuals for their support and assistance during the development of this product:
Hal Chamberlin
Ricardo Garcia
Philip Hartman
Greg Kist
Mark Lanos
Mike Raffa
John Richmond
Francisco J. Rodriguez
Paul Rumberg
Helmut Schiltz
Michael Shonle
Jeff St.Pierre
Tim Thompson
John Teele
Dave Weiser
Support
Online support for this product is available at: http://www.soundtower.com/kurzweil
About this Manual
Throughout the manual, screen shots of the SoundEditor application are shown for illustrative purposes. These views are based on SoundEditor for the Macintosh, although similar views will be observed if you are using SoundEditor on a PC. When any significant variation in the appearance or operation of SoundEditor occurs between the Mac and PC platforms, the differences will be described.
Throughout this document you will see icons that provide additional information:

- This icon indicates an important note concerning the operation
- This icon indicates a helpful or productive tip.
Installation/Requirements
No special software installation is required. SoundEditor is a standalone program designed to run on Windows XP or Vista, or a Macintosh (OSX 10.3 or higher).
The SoundEditor application requires:
- 20 MB Hard Drive space
- 256 MB RAM (min.)
- 1024 x 768 minimum screen resolution (1400 x 900 recommended)
- MIDI interface or USB connection
Before You Begin
To get the most out of this program you should be familiar with the operation of the PC3. The PC3 is complex musical instrument with an amazing array of programmable features. The PC3 Musician's Guide is the principal resource for descriptions of the instrument and its operation; this document is recommended reading for all PC3 users. Although SoundEditor can be an invaluable resource to aid in the understanding the PC3, it is not a substitute for reading the Kurzweil documentation.
An Important Note About SoundEditor
While using SoundEditor, the PC3 must not be in Edit Mode. Failure to observe this precaution can result in unreliable editing and improper operation, including the possibility of locking up the PC3 (should this happen, you'll need to cycle the power to reset the PC3).
Overview
This User Guide will take you through the steps to configure SoundEditor to work with your PC3. The Starting Up section should be followed first to get the hardware properly connected and running with the SoundEditor application. From there you can freely explore, audition and edit Programs or Setups, or create new Programs, Setups, or Effects.
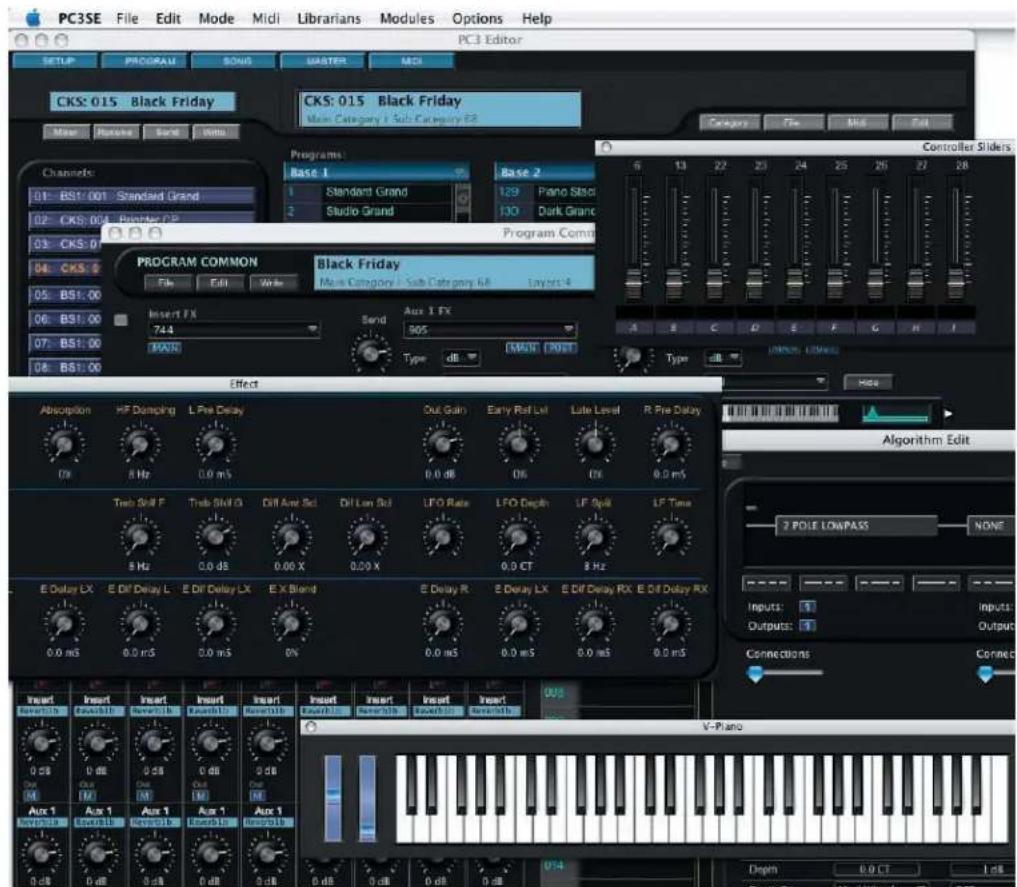
The PC3 is an incredibly deep and complex instrument with many programming options. SoundEditor has been designed to make the programming and editing process as simple and easy to use as possible while providing all of the functional control needed to adjust every PC3 parameter. A few of SoundEditor's editing windows are shown below.
2. Starting Up
Getting Connected
This chapter describes the steps to connect and configure SoundEditor on your computer.
Set up the PC3 according to the PC3 Musician's Guide (Chapter 2). Connect the PC3 to the computer using either USB or the MIDI IN and MIDI Out DIN connectors, but not both. SoundEditor will work with either connection.
By default, SoundEditor will check to see if a USB connection is in place when the program starts. If no connection exists, it will default to the MIDI DIN connectors.
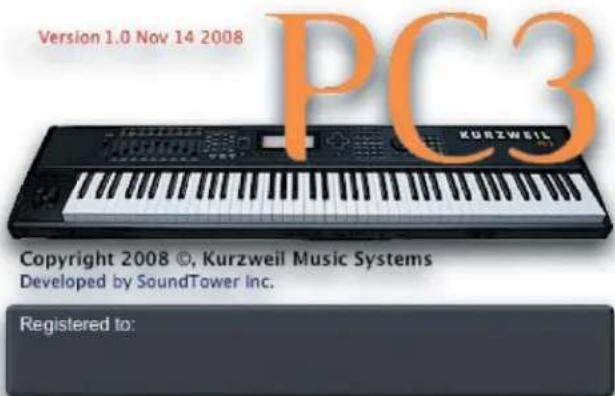
After insuring that the connections between the PC3 and your computer are in place, power up the PC3, then launch SoundEditor. As the SoundEditor program starts, a splash screen similar to the one below will appear briefly:
By default, SoundEditor will check to see if a USB connection is in place when the program starts. If no connection exists, it will default to the MIDI DIN connectors.
You do not have to specify the type of connection in advance.
A few seconds later, the splash screen will be replaced by SoundEditor's 'PC3 Editor' window. By default, this window will display the Program Bank view as shown below, but you can chose between 'Program Bank' or 'Setup Bank' as the startup view (see Configuring Preferences, page 19)
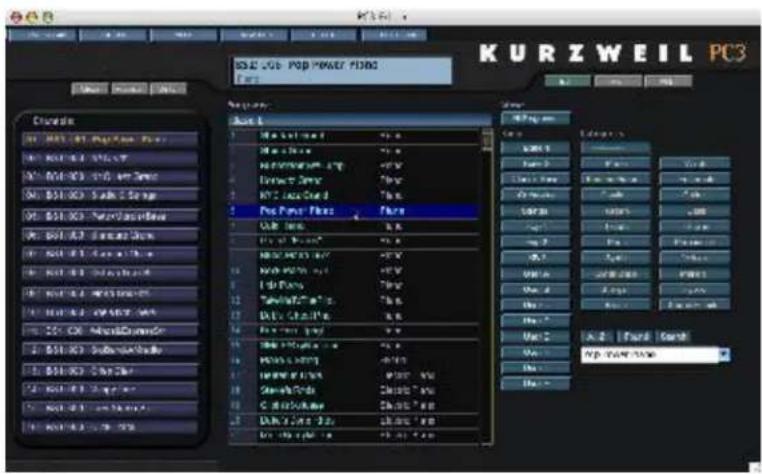

The first time you launch SoundEditor, some of the information fields may be blank.
MIDI Setup
If you are working with SoundEditor for the first time, you'll need to configure the program for MIDI communication with the PC3. Once you do this, SoundEditor will remember the configuration until you change it.
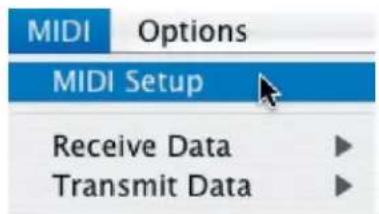
Click on the MIDI menu and select 'MIDI Setup':
The MIDI Setup window will appear, displaying the available MIDI Port connection options on your computer:
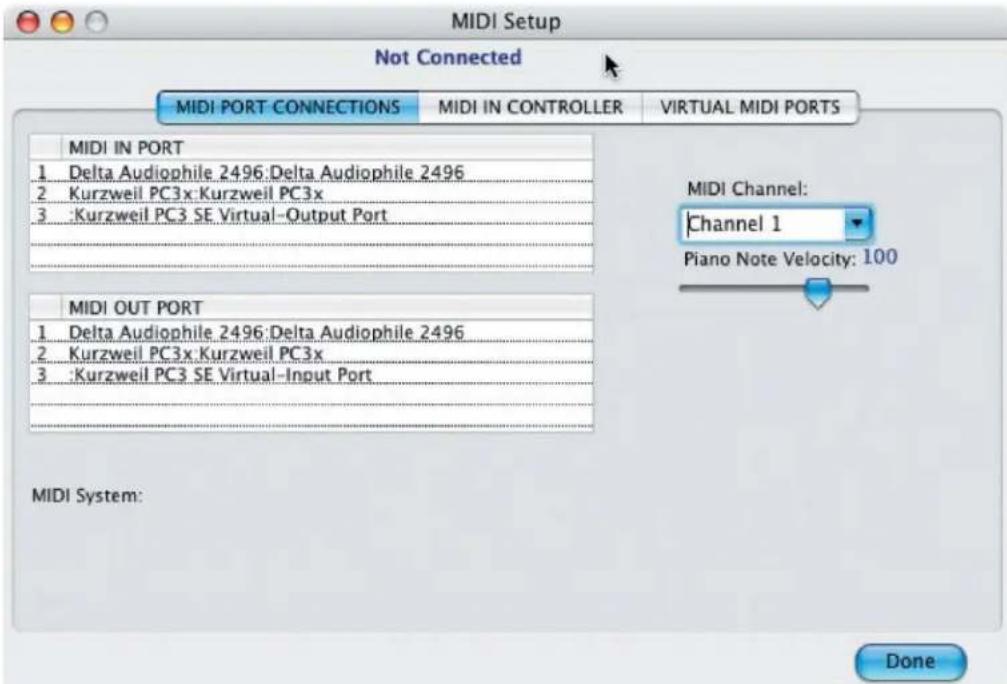

- Your MIDI Setup window will likely show different MIDI Input and MIDI Output Port information.
- The Virtual MIDI Ports' tab only appears in the Macintosh version of SoundEditor.
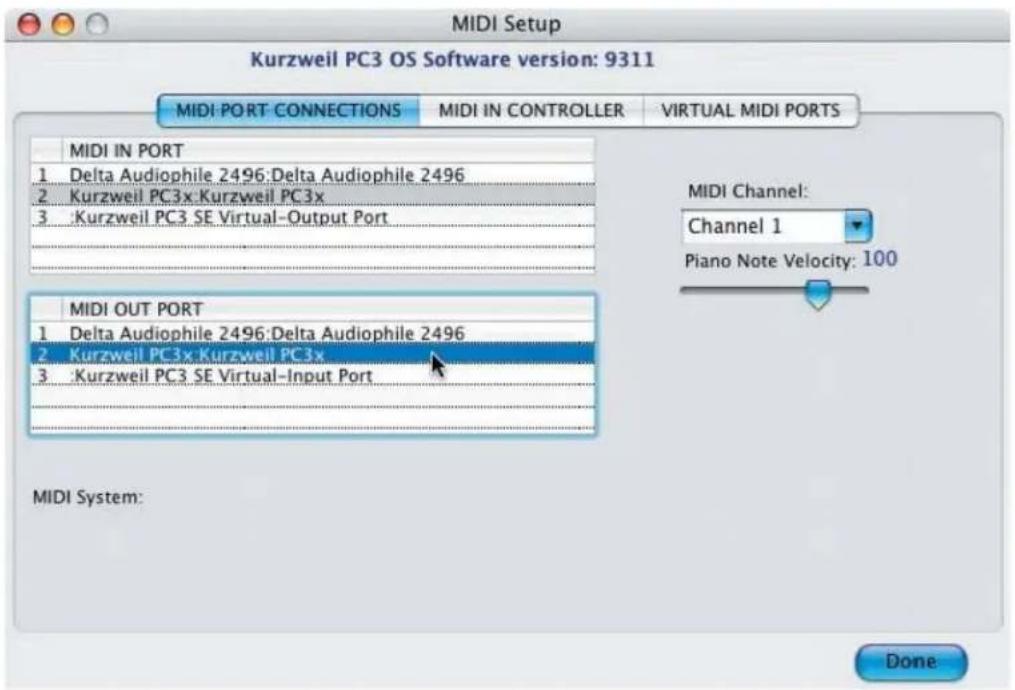
In the MIDI Setup window, select the MIDI IN and OUT ports that the PC3 is connected to, and set the MIDI Channel to match the MIDI channel on the PC3. Once the proper ports and MIDI channel are selected, you should see the current PC3 software version at the top of the MIDI Setup window as shown. This confirms that SoundEditor is communicating with the PC3.
After making the appropriate MIDI connections, click on the DONE button to dismiss the window. You can safely ignore the MIDI In Controller and Virtual MIDI Ports tabs for now. Information on the use and configuration of the MIDI In Controller and Virtual Ports is provided in Appendix B.
3. SoundEditor Menus
The menus in SoundEditor allow you to select various windows and views, file storage options, editing commands, MIDI configurations, and much more. A description of the menus in SoundEditor appears below:
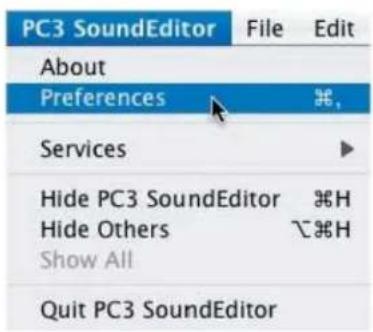
PC3SE (PC3 SoundEditor):
The PC3SE menu is where you select Preferences, get information About, and Hide or Quit the SoundEditor application.
Information on configuring Preferences appears later in this chapter.
FILE:
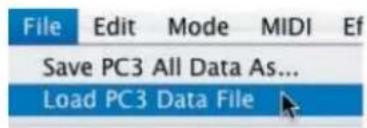
The FILE menu allows you to Load or Save PC3 Data files. PC3 Data Files include all of the data currently loaded in the SoundEditor application (all Programs, Setups, FX Chains and User Algorithms), and thus represents the complete state of soundEditor. PC3 Data files have the '.kp3' extension.
EDIT:
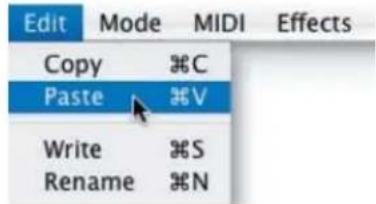
The EDIT menu provides controls for Copy and Paste, as well as Write and Rename operations.
MODE:
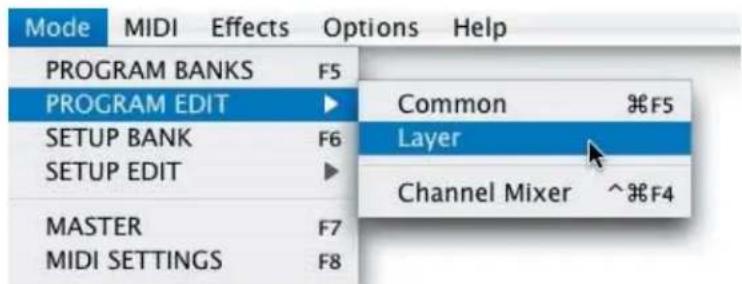
The MODE menu allows you to select the PC3 Mode you would like to work in:
Program Banks or Program Edit, Setup Bank or Setup Edit, Master or MIDI. Menu items that display a right-facing arrow indicate that a flyout submenu is available for additional selections. Some items from this menu duplicate Toolbar buttons found in the Editor window (Program Banks, Setup Banks, Master and MIDI).
For information on Program Banks, see Chapter 5.
For information on Program Editing, see Chapter 7.
For information on Setup Banks, see Chapter 9.
For information on Setup Editing, see Chapter 10.
See also information on Master operations, page 35.
See also information on MIDI Settings, page 34.
MIDI:
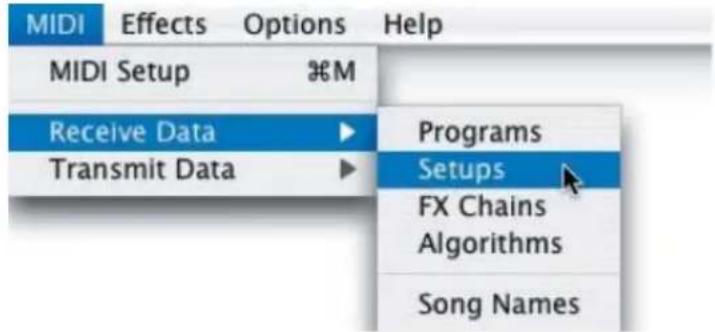
The MIDI menu allows you to access the MIDI Setup window to configure MIDI operations, as well as Receive and Transmit various types of PC3 data.
For information on MIDI Setup, see Appendix B.
EFFECTS:
| Effects | Options | Help |
| Master Effects | F3 | |
| EQ + Compressor | F4 | |
The EFFECTS menu allows you to access the Master Effects and EQ + Compressor functions. Selecting items from this menu is the same as clicking on the MASTER and EQ+COMP toolbar buttons found in the Editor window.
Information on the Master Effects and EQ + Compressor functions begins on page 30.
OPTIONS:
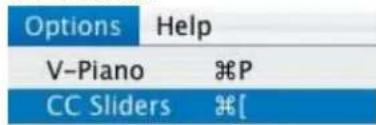
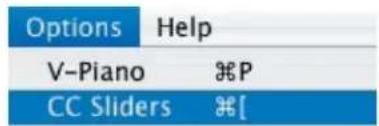
The OPTIONS menu allows you to display a virtual keyboard (V-Piano) and virtual CC Sliders control window that you can use to remotely play and adjust PC3 Programs. You can also play the PC3 from the computer keyboard.
For information on the V-Piano and CC Sliders, see Chapter 11.
HELP:

The HELP menu allows you to access additional assistance.
Configuring Preferences
SoundEditor offers several options for specifying the startup condition and program operation. These options are found under the PC3SE/PREFERENCES menu.
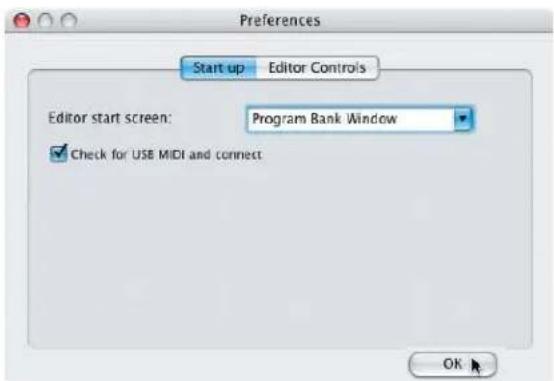
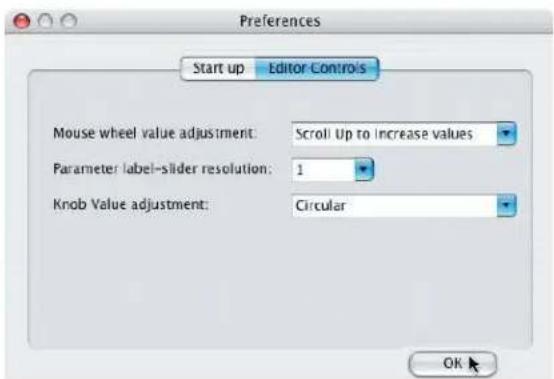
When PREFERENCES is selected, the Preferences Window appears as shown below. This window allows you to specify how you wish to work with SoundEditor. Two preference tabs are provided here: 'Start Up' and 'Editor Controls'.
When the 'Start Up' tab is selected, you can choose the screen that will first appear when you launch SoundEditor, and also whether or not the program will test for a USB MIDI connection when the program starts:
When the 'Editor Controls' tab is chosen, you can choose how the Mouse scroll wheel will function in SoundEditor, and set the parameter label slide resolution and type of knob value adjustment:
4. Parameter Selection in SoundEditor
SoundEditor relies on different methods to select and adjust parameter values in edit screens. These methods include selecting from drop-down menus, moving sliders, rotating knobs, dragging to increment/decrement values, etc. In this chapter, we will describe the various ways to select and manipulate PC3 parameter values in SoundEditor.
The methods described here apply to all SoundEditor windows.
Selecting and Adjusting Parameters
In any window, any parameter selection with a downward facing arrow indicates that there are usually two or more choices available for that parameter or function. If just two are available, clicking on the parameter toggles between the two choices:
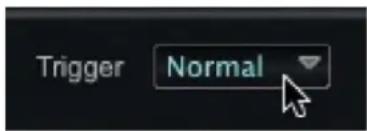
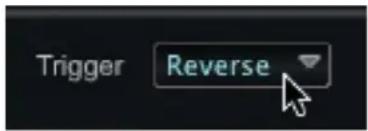
If three or more choices are available, clicking on a parameter will produce a contextual menu. When you encounter this type of selection method, simply move the cursor down through the menu and click to make a selection.
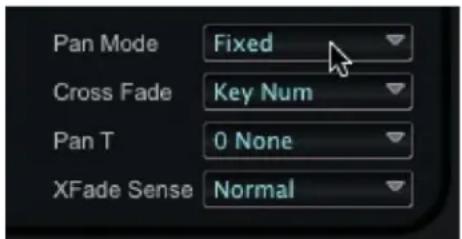
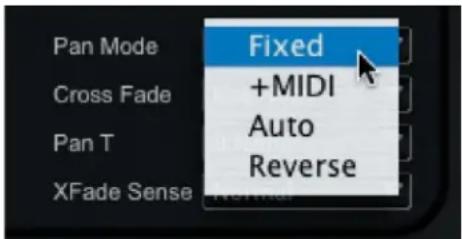
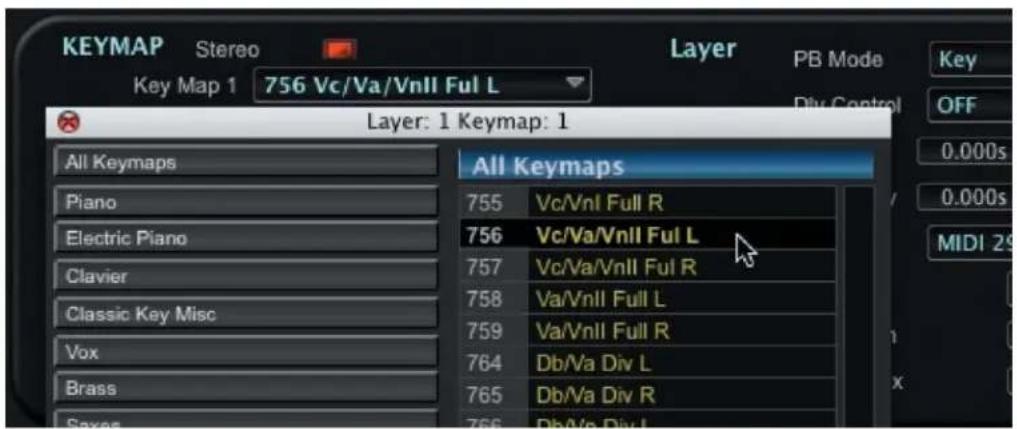
Occasionally, a given parameter may have more options than can fit into a simple pop-up window. Such is the case with the Keymap parameters in the Layers Edit window. Since the PC3 offers hundreds of keymaps to chose from, SoundEditor displays a dedicated Keymap selection window as shown below. Buttons to the right of the Keymap window allow you to select from groups of keymaps, and a scroll bar is used to move through the available choices in each group of keymaps on the left. After making a selection in this type of window, clicking on the red CLOSE button in the title bar will exit the window.

PERFORMANCE TIP: Any list in SoundEditor can be navigated using either the scroll bars or the scrollable mouse wheel. For efficiently navigating through long lists, try combining both methods: use the scroll bars to quickly navigate to the general area where the desired item is located, then use the mouse wheel to pinpoint the exact item.
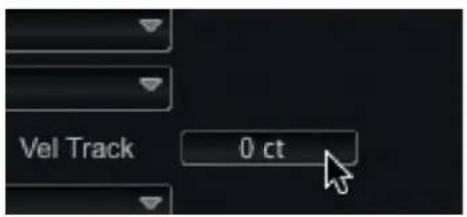
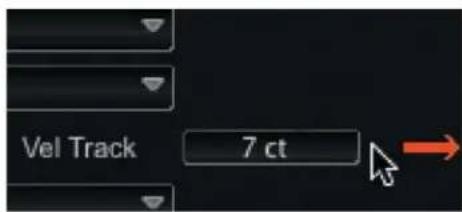
If a parameter consists of a numerical value, you adjust the value by clicking inside the value field and dragging the cursor to the right to increase the value, or dragging to the left to decrease the value:
Slider controls are adjusted simply by clicking and dragging the slider in the direction you wish to go. Knobs, however, are adjusted by clicking on the desired knob and dragging the cursor around the knob in a rotary fashion:
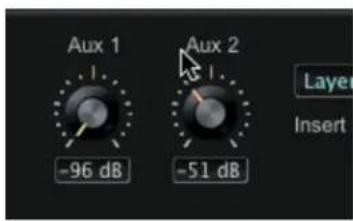
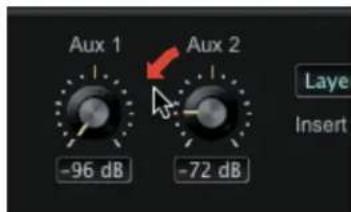
NOTE: An alternate method of knob control ('VERTICAL') is available in SoundEditor's 'Preferences' pane. When VERTICAL control is selected, clicking on a knob and moving the cursor up or down will rotate the knob to the left or the right. In either CIRCULAR or VERTICAL mode you can also use the mouse wheel to make fine knob adjustments.
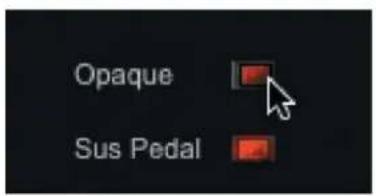
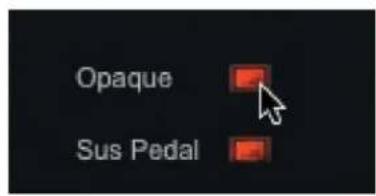
LED controls are simply toggled ON or OFF by clicking on them. The LED will appear lit when ON, and dimmed when OFF:
To adjust the keyboard zone of a Layer, click and drag on either of the orange bars that appear immediately below the keyboard image. Dragging the cursor to the left or right will change the range, and the note number fields will reflect the new values:
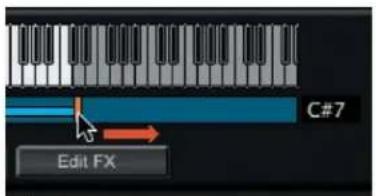
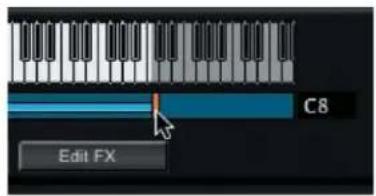
An alternate method is available that allows you to adjust the note range from the PC3 keyboard. For more information, see 'Keyboard Zone' page 47.
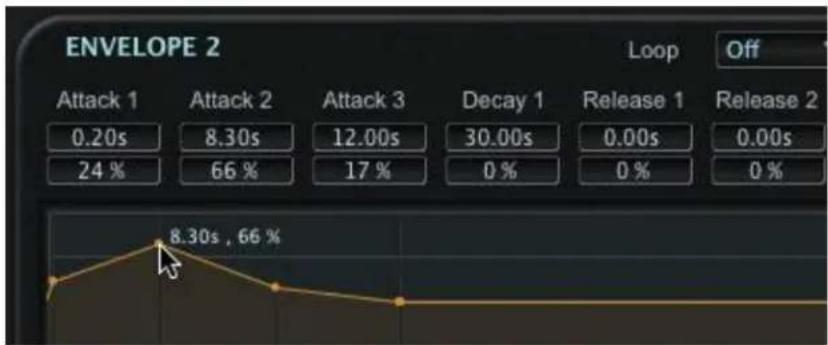
In the Layer Edit window, Envelope parameters (Attack, Decay and Release) can be changed by clicking inside the desired parameter value field and dragging the cursor left or right (described previously), by clicking on a parameter field and entering a value, or by grabbing and dragging the associated parameter handle in the envelope display as shown:
line
| Event | Timeframe Label | |-------|-----------------| | Attack 1 | 0.20s | | Attack 2 | 8.30s | | Attack 3 | 12.00s | | Decay 1 | 30.00s | | Release 1 | 0.00s | | Release 2 | 0.00s | | Return | 0% | | Peak 1 | 8.30s, 66% |The 'grab and drag' method only applies to envelopes that have handles.
The overall shape of an envelope can be expanded, contracted, raised or lowered using the adjustment sliders that appear on the bottom and right side of the Envelope displays (applies to the Amp Envelope and Envelopes 1 & 2):
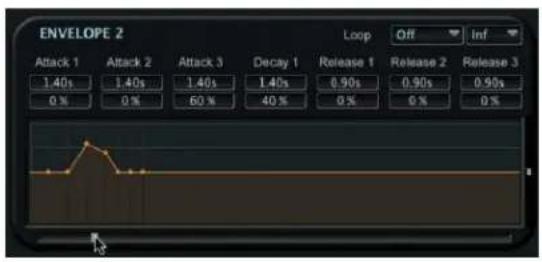
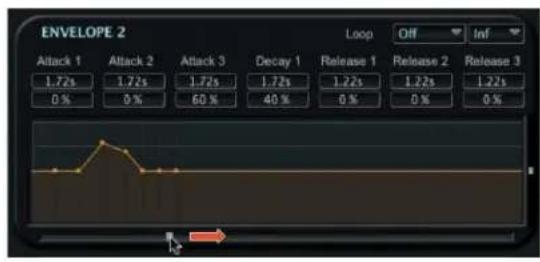
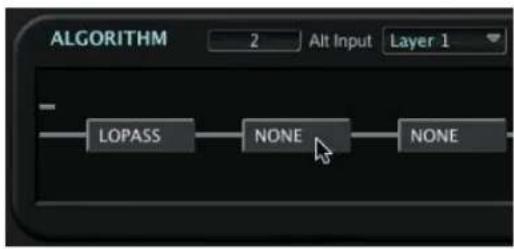
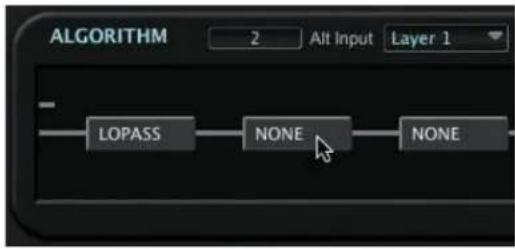
In the Algorithm section of the Layer Edit window, DSP functions are chosen by clicking on the desired DSP block and selecting from the contextual menu:
flowchart
graph LR
    A[" "] --> B["LOPASS"]
    B --> C["NONE"]
    C --> D["NONE"]
flowchart
graph LR
    A[" "] --> B["LOPASS"]
    B --> C["NONE"]
    C --> D["NONE"]
5. Program Banks Window
This chapter will describe the Program Banks window and cover the navigation and parameter selections available.
Program Banks Window
When you launch SoundEditor for the first time, the program starts by displaying the Program Banks Window view (you can also choose to start-up with the Setup view as described in the Configuring Preferences section on page 20).
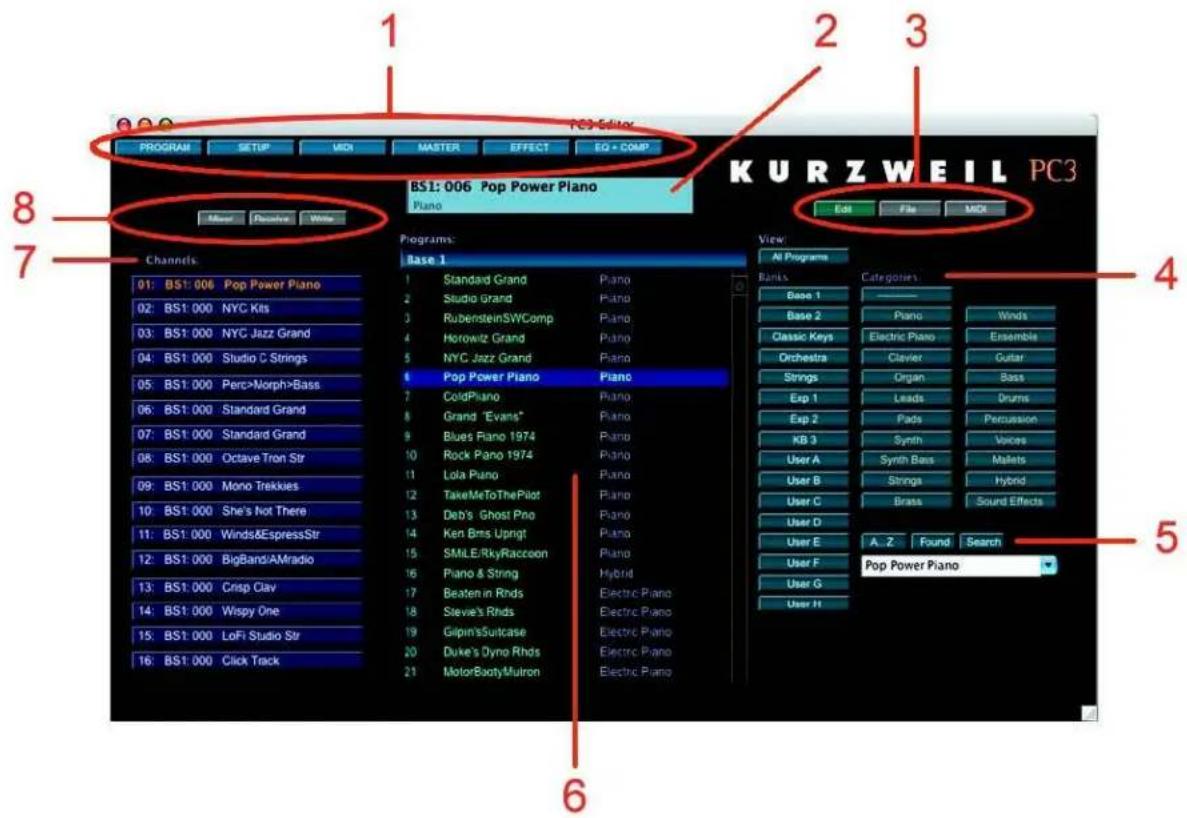
While using SoundEditor, the PC3 must not be in Edit Mode. Failure to observe this precaution can result in unreliable editing and improper operation.
Modes Toolbar
The Modes Toolbar allows you to select editing views in SoundEditor, and provides you with displays to view and adjust PC3 global parameters.

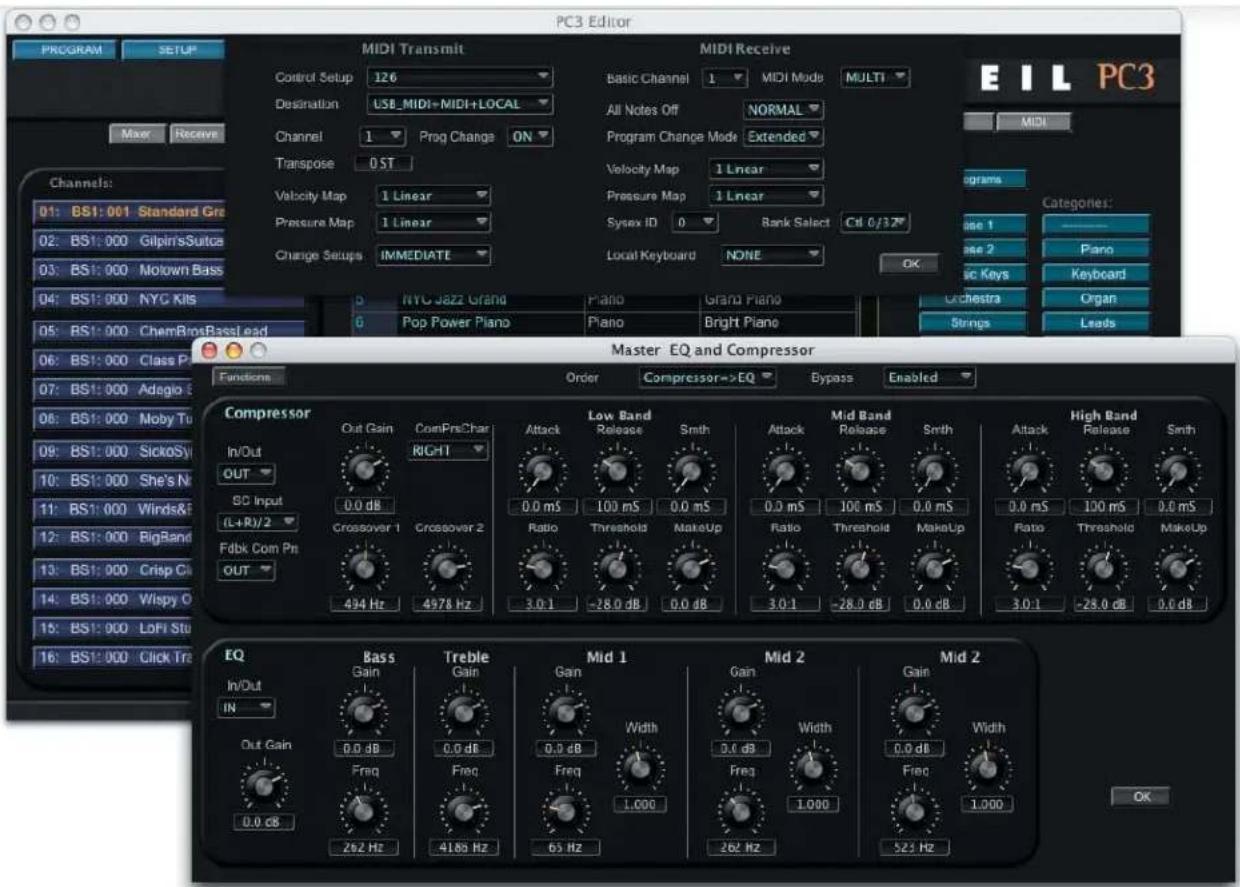
Pressing the PROGRAM or SETUP buttons changes the editing view inside the PC3 Editor window. Pressing either of these buttons is the same as selecting these same options from the MODE menu. Pressing the MIDI or MASTER buttons will produce a drop-down window where you can change the MIDI or Master global parameters. Pressing the EFFECT or EQ+COMP buttons will produce a window displaying the controls to adjust the global Effect or EQ/Compressor parameters. The figure below shows examples of both the MIDI drop-down window and the EQ+COMP window. Detailed information on all Toolbar Modes appears later in this chapter.
Program Name Display
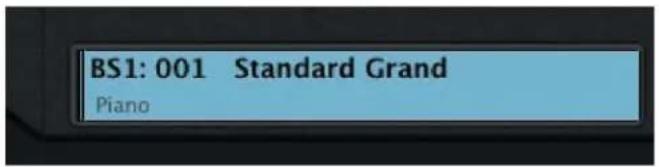
The Program Name Display shows the name of the currently selected Program (in the example here, 'Standard Grand'), the location of the Program (bank Base 1, location 001), and the category of the Program ('Piano'):
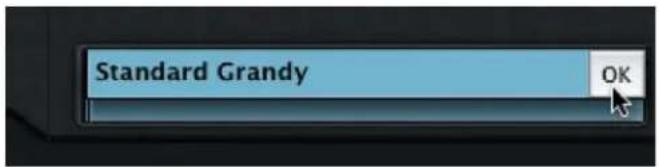
The Program name can be changed by clicking inside the display and typing a new name up to 16 characters in length. Clicking on the OK button will write the new name to SoundEditor and to the PC3:
When you change the Program name, the new name is automatically written to the PC3.
Selecting Program Categories
There are two ways to assign a category to a Program. This can be done from the Program Name Display, or from the Program Bank list.
To assign a category from the Program Name Display, click in the Category section of the display (the lower left of the Display window). This will produce a contextual menu of categories to select from:
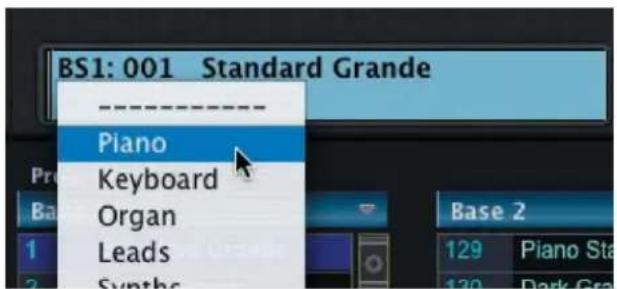
You can also select a category from the Program Bank list by right-clicking in the Category field. This will produce the same contextual menu as shown above. Either method will immediately update the PC3 with the new Category assignments.
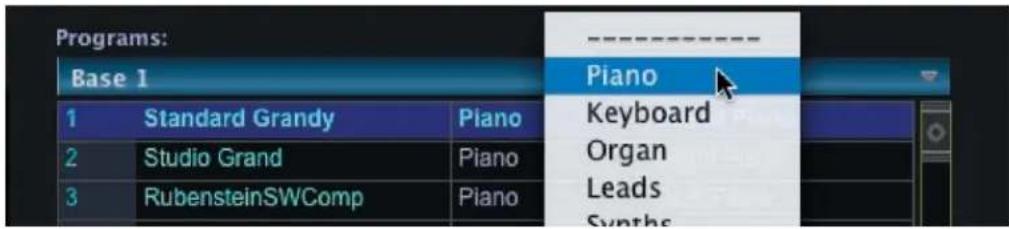
NOTE FOR MAC USERS: If your mouse does not have a right-click button, you can also use the CTRL key combined with a single click to produce the contextual menu shown here.
Program Toolbar (Editing and File Storage)
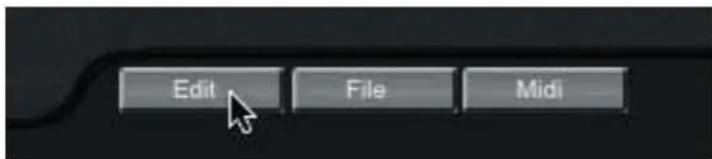
The Program Toolbar allows you to access the Edit, File & MIDI functions associated with the Program Window. A description of each Toolbar button function follows.
EDIT:
Pressing the EDIT button opens the Program Common window, allowing you to edit the current Program. Program Editing is covered in Chapter 7.
FILE:
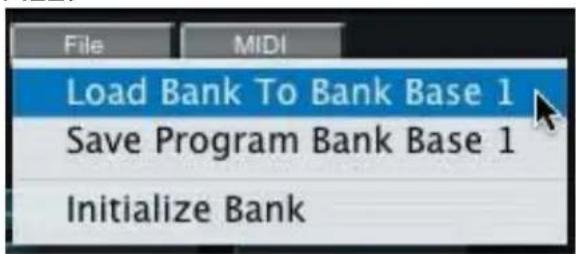
The FILE function allows you to Load a new Program Bank to the current Bank, Save the current Program Bank, or Initialize the current bank. Selecting either Load or Save will result in a dialog box asking you to either select a file (to Load) or name a file (to Save).
For a list of the file extensions associated with Program Banks and other files, see Appendix A.
MIDI:
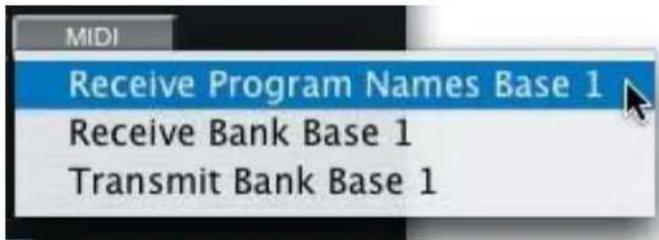
The MIDI function allows you to Receive or Transmit the current bank. The 'Receive Program Names' option does not include layers (only Program Common settings), but is much faster.
Bank Selection and Sorting Options
The buttons on the right side of the Program Window allow you to select how PC3 Programs will appear in the Program List window.
Pressing the ALL PROGRAMS button will display every PC3 program from every Bank in SoundEditor, organized numerically from memory locations 1 to 2048. Locations that do not contain Programs will be empty.
When a Bank button is selected, the Program list window will display all 128 Programs in that Bank. The selected Bank name will be displayed in the Program list title bar:
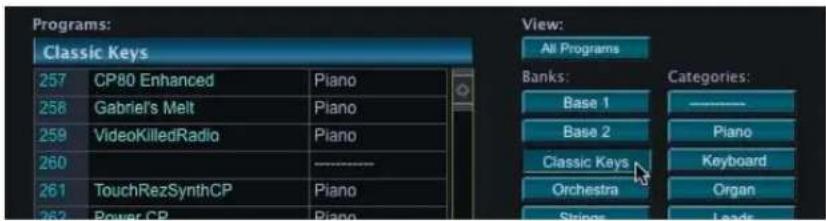
When a Category button is selected, the Program list window will display every Program in every Bank that has been assigned to that Category:
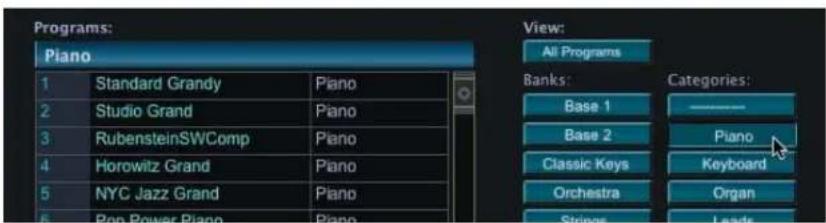
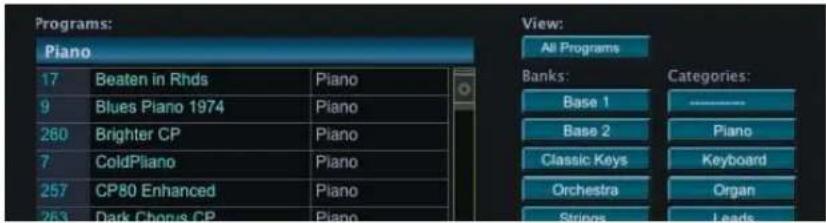
To sort any list alphabetically, press the A-Z button:
Search Options
The SEARCH button in the lower right corner of the Program Banks Window allows you to quickly identify and locate a Program from any Bank.
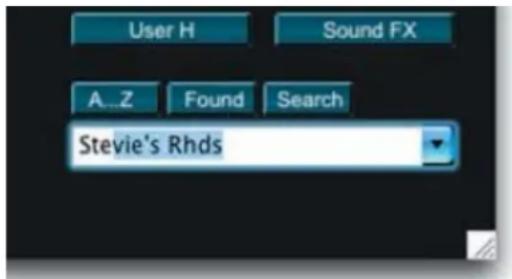
When you locate the desired Program, pressing Return or Enter on the computer keyboard will send the appropriate MIDI Program Change command to the PC3. The newly selected Program then will appear in SoundEditor's Program display, along with the Bank, memory location, and category information:

Another way to locate a Program is to use the Search drop-down list. Clicking on the right arrow in the search name field produces a scrollable list displaying the name of every Program in every Bank in SoundEditor:
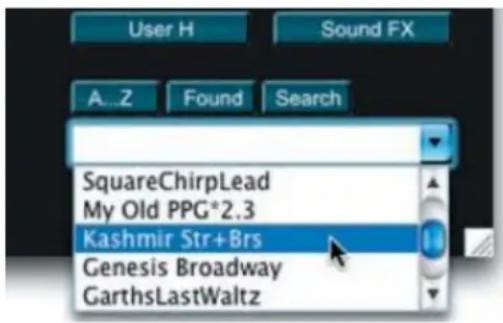
To make a choice here, simply scroll through the list and click on the desired Program. SoundEditor will send the appropriate MIDI Program Change command to the PC3, and the newly selected Program will appear in SoundEditor's Program display, where it can be edited or modified.
To dismiss the search name field, click on the SEARCH button a second time.
When you click on the SEARCH button, a name field appears that allows you to enter the name of a Program to search for. Place the cursor in the name field and begin typing the name of the desired Program. SoundEditor will display the PC3 Programs that match the letters you type.
FOUND Button
The FOUND button is used to remove empty memory locations that appear in a listing of PC3 Programs. For example, clicking on the ALL PROGRAMS button will produce a list of all memory locations in all banks (2048 locations total). Some locations may be empty, resulting in a large Program 'gaps' as you scroll through the list. Clicking on the FOUND button eliminates these gaps by removing all empty locations from the list.
An example is shown below. The view on the left shows a series of empty memory slots starting at location 962. The view on the right shows the same list after clicking on the FOUND button; the empty memory slots are eliminated from the list.
| Programs: | |
| Base 1 | |
| 951 | GM Standard Kit |
| 952 | GM Room Kit |
| 953 | GM Power Kit |
| 954 | GM Elec Kit |
| 955 | GM Synth Kit |
| 956 | GM Jazz Kit |
| 957 | GM Brush Kit |
| 958 | GM Orch Kit |
| 959 | VAST1-3Ch/Perc |
| 960 | VAST1-3 Ch/Perc2 |
| 961 | Fisher's VAST B3 |
| 962 | |
| 963 | |
| 964 | |
| 965 | |
| 966 | |
| 967 | |
| 968 | |
| 969 | |
| 970 | |
| 971 | |
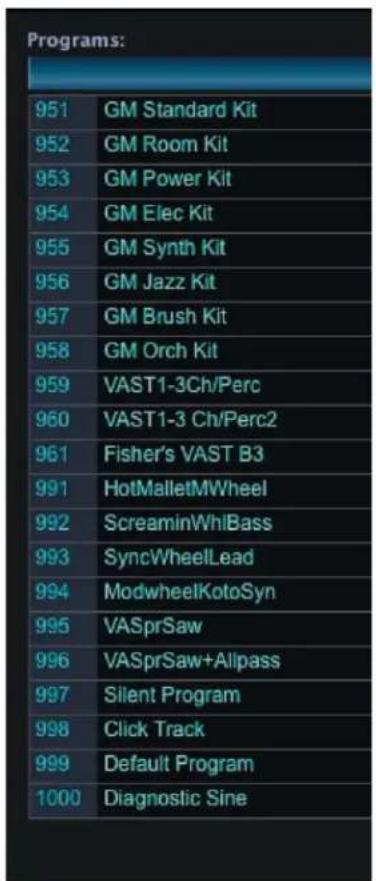
Clicking the FOUND button only eliminates the empty memory slots from a list; it does not re-order Program locations in SoundEditor (notice the jump from location 961 to 991 in the example above).
Individual Program Options
Right-clicking on any Program in the Program List Window will produce a contextual menu displaying the options for the selected Program:
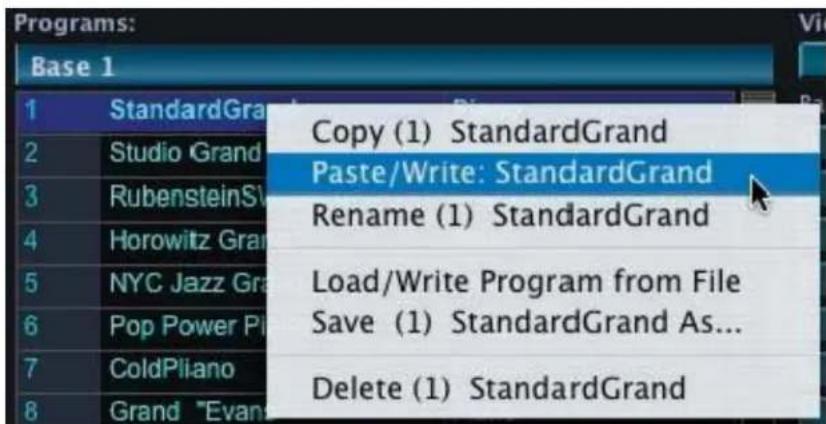
When the 'Copy' option is chosen, SoundEditor will copy the selected Program and all layers.
Selecting the 'Paste' option will allow you to paste the previously copied Program to the current location. When pasted, the Program is automatically written to the PC3 at the current location. Note
that the 'Paste' option is only available if a Program has already been copied. If no Program has been copied previously, the 'Paste' option does not appear.
Selecting the 'Rename' option will allow you to rename the selected Program in the Program Display field at the top of the Editor window.
When the 'Load/Write Program from File' option is selected, a 'Load Program Data' window will appear. You will need to navigate to and select a Program to load. Note that valid Program files have a '.3pr' extension in the file name. Make a selection and click OPEN. The selected Program will be loaded into SoundEditor and automatically written to the PC3.
When the 'Save' option is selected, a 'Save Program Data' window will appear. The name of the PC3 Program will appear in the 'Save As' name field, but you have the option to change it prior to saving. Make any desired changes and then select the destination location where the file will be stored. Click SAVE to save the file.
The 'Delete' option is used to delete the selected Program in SoundEditor. It does not delete the Program on the PC3. When 'Delete' is selected, you will be prompted with a dialog box asking you to confirm this operation. In the dialog box, click YES to proceed, or click the CANCEL button to cancel the operation.
MIDI Channel Display
The left side of the Program Window contains the MIDI Channel Display and related controls. The MIDI Channel Display shows the PC3 Programs that are assigned to each of the sixteen MIDI channels.
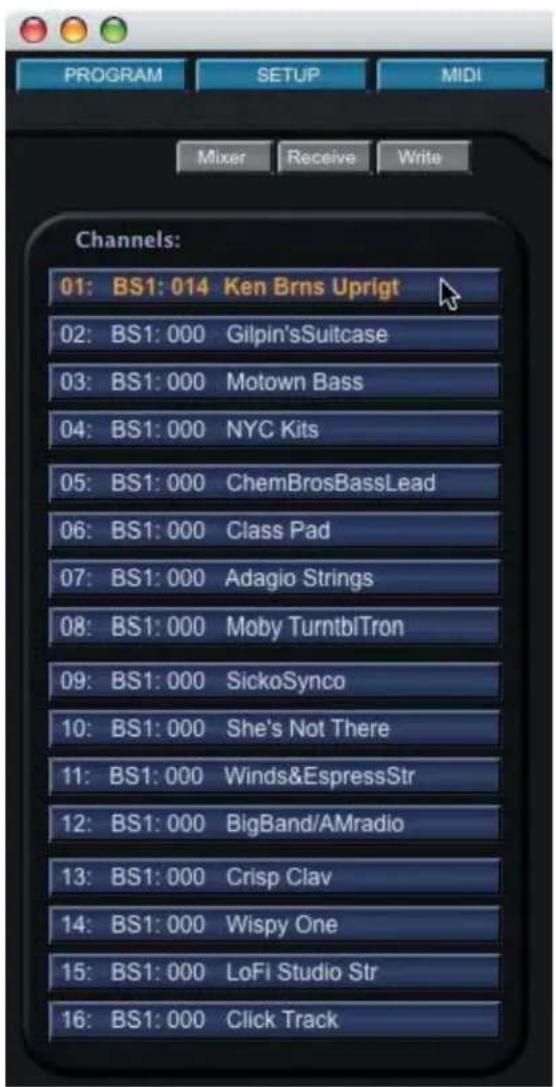
MIDI Channel Toolbar
The toolbar above the MIDI Channel Display allows you to view the Channel Mixer window and access related file transfer commands for the MIDI Channel assignments:
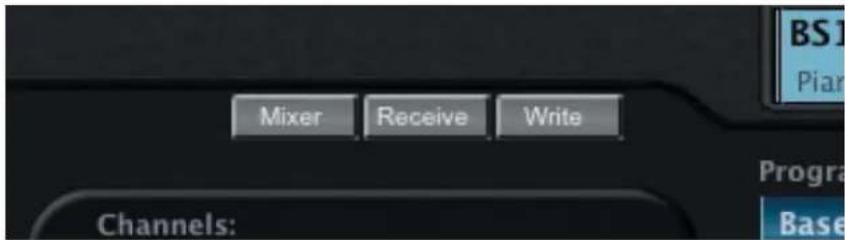
Clicking on the MIXER button opens the Channel Mixer Window (see Chapter 8). Clicking the RECEIVE button fills the MIDI Channel Display with the Programs assigned to the PC3's sixteen MIDI
Channels.
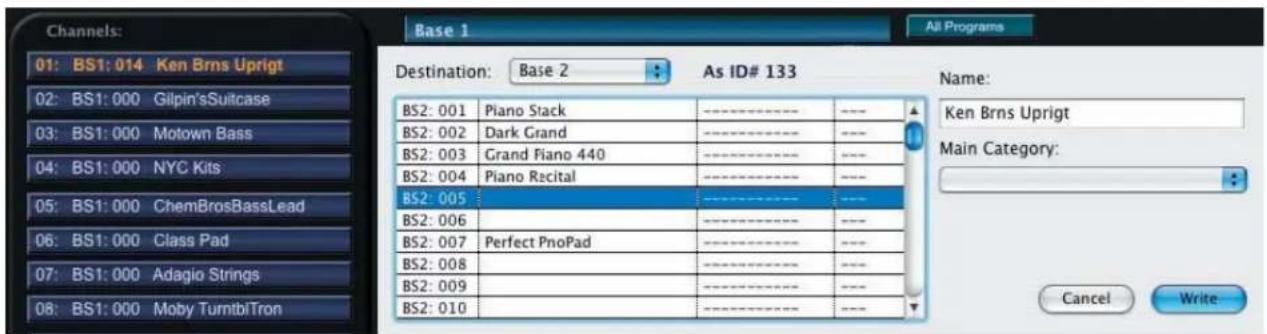
The WRITE button allows you to select a memory location where the currently selected program will be written. Clicking the WRITE button produces a window like the one shown below, allowing you change the name of the Program, select or change the category assignment, and chose the new memory location:
Modes Toolbar - MIDI Button
The MIDI button in the Modes Toolbar corresponds to the physical MIDI button on the PC3, allowing you to adjust the parameters for the PC3's MIDI operation.
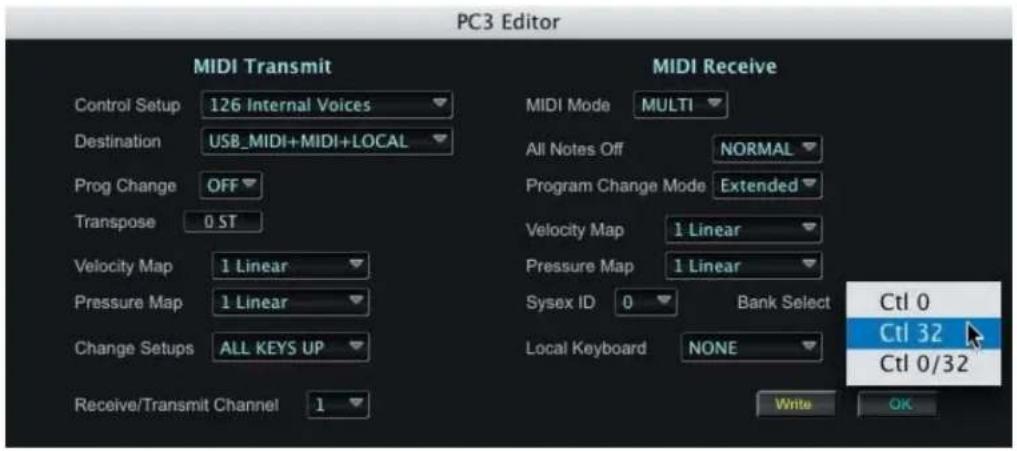
Clicking on SoundEditor's MIDI button (or pressing the F8 key) produces a drop-down window displaying the MIDI Settings parameters. Here you can configure the parameters for transmitting and receiving MIDI, including the selection of the PC3 control setup, transposition, velocity and pressure mapping, and other related MIDI functions.
Note that for any changes to take effect, they must be written to the PC3 using the WRITE button. After writing the changes, click on the OK button to exit, or click on OK at any time to simply abandon any changes and exit the window.
Modes Toolbar – MASTER Button
The MASTER button in the Modes Toolbar corresponds to the physical MASTER button on the PC3, which allows you to access the Master Mode parameters that control the entire PC3.
Clicking on SoundEditor's MASTER button (or pressing the F7 key) produces a drop-down window displaying the all of the Master mode parameters as shown below. Here you can adjust global settings for tuning, transposition, velocity and aftertouch sensitivity, as well as access the GM mode and set the sample rate for the PC3's digital output:
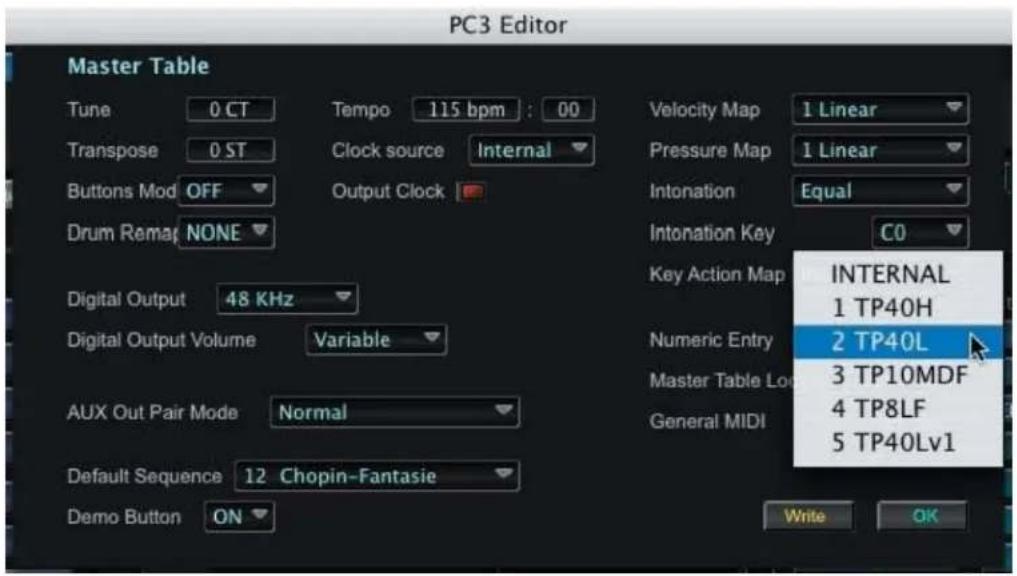
In the Master drop-down, clicking in the Intonation field produces a scrollable Intonation Select window that allows you to select a master tuning preference. Clicking the MIDI button in this window allows you to update the list with intonation data from the PC3. To make a selection,
scroll through the list and click on the desired intonation. Clicking the SELECT NONE button selects no intonation. When finished, click OK to exit and dismiss this window.
In the Master drop-down, clicking in the Intonation field produces a scrollable Intonation Select window that allows you to select a master tuning preference. Clicking the MIDI button in this window allows you to update the list with intonation data from the PC3. To make a selection, scroll through the list and click on the desired intonation. Clicking the SELECT NONE button selects no intonation. When finished, click OK to exit and dismiss this window.
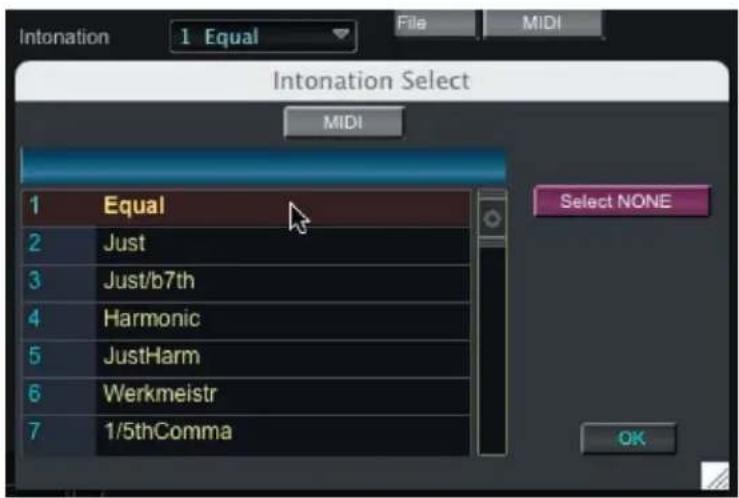
In order to take effect, any changes made to Master Mode settings must be written to the PC3 using the WRITE button in the lower right of the Master drop-down. After writing the changes, click on the OK button to exit, or click on OK at any time to simply abandon any changes and exit the window.

! Clicking the WRITE button here is the same as selecting the soft SAVE button in MASTER Mode on the PC3 - both store the changes made to the Master Mode settings.
Modes Toolbar - EFFECT Button
The EFFECT button in the Modes Toolbar corresponds to the physical EFFECT button on the PC3, which allows you to access the parameters that define the behavior of the PC3 on-board effects.
Clicking on SoundEditor's EFFECT button produces a window displaying the all of the Effects mode parameters as shown below. Here you can modify existing preset effects and create new ones.
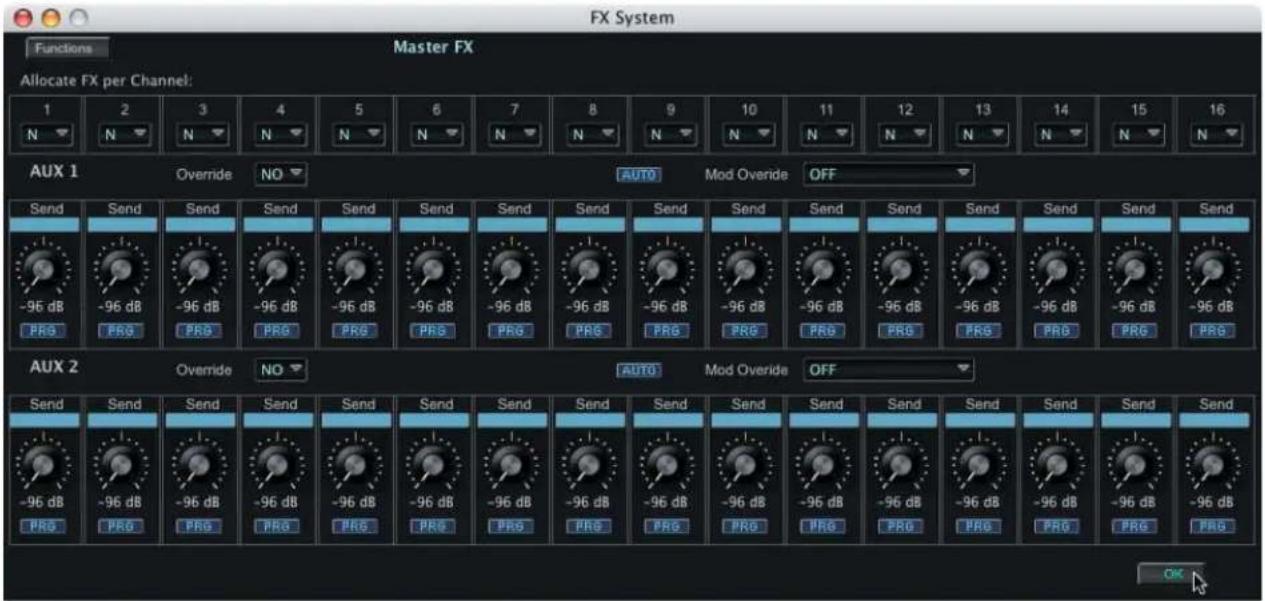
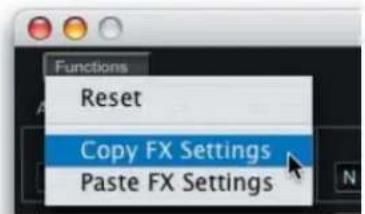
The FUNCTION button in upper left corner of the FX Window allows you to reset all effects parameters or copy the existing ones. The 'Paste' menu option only appears after completing a 'Copy' operation:
Modes Toolbar - EQ+COMP Button
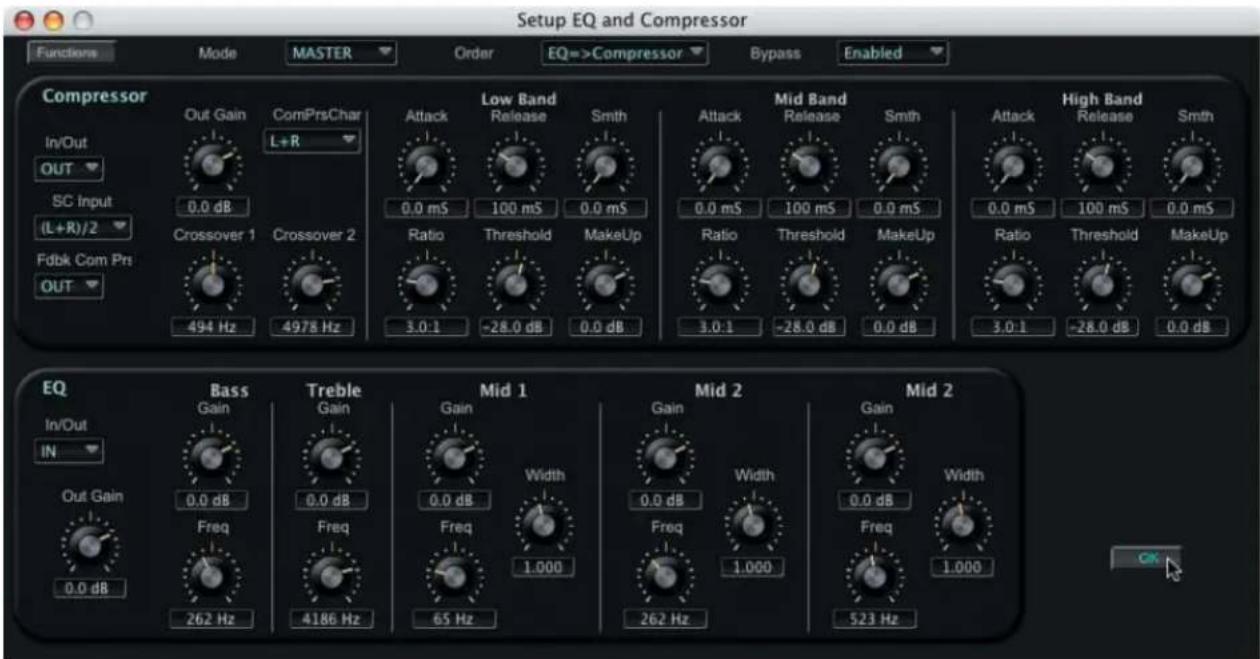
Clicking the EQ+COMP button produces a window that displays the Master Equalization (EQ) and Compressor settings. Although the EQ and Compressor effects are technically part of the PC3's Effects Mode, SoundEditor provides a dedicated window to display all of the EQ and Compressor controls and parameter values:
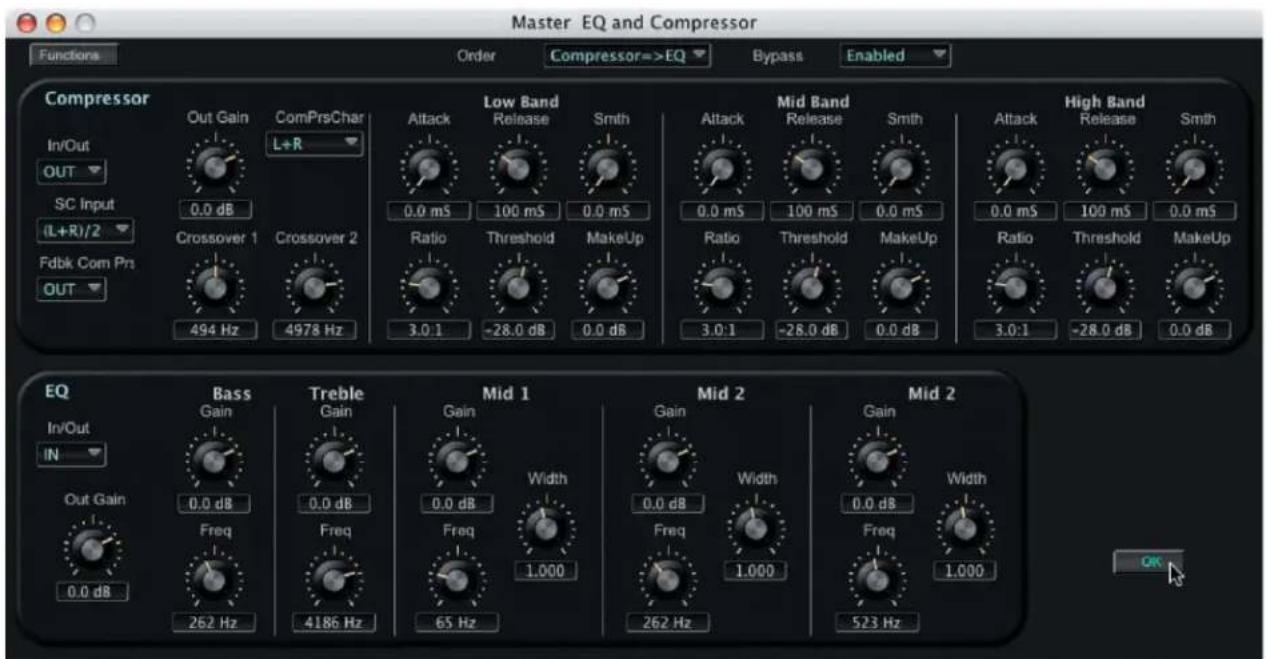
On the PC3, the EQ and Compressor parameters are accessed by pressing the soft MASTER button in EFFECTS Mode.
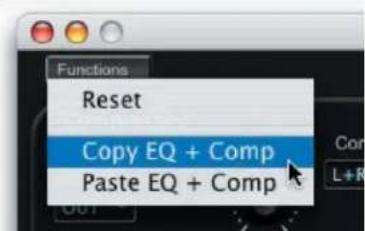
The FUNCTION button in upper left corner of the FX Window allows you to reset all effects parameters or copy the existing ones. Note that the 'Paste' option only appears in the menu after first completing a 'Copy' operation:
6. Editor Organization
This chapter will describe the organization of SoundEditor's Program editing windows.
SoundEditor Editor Structure
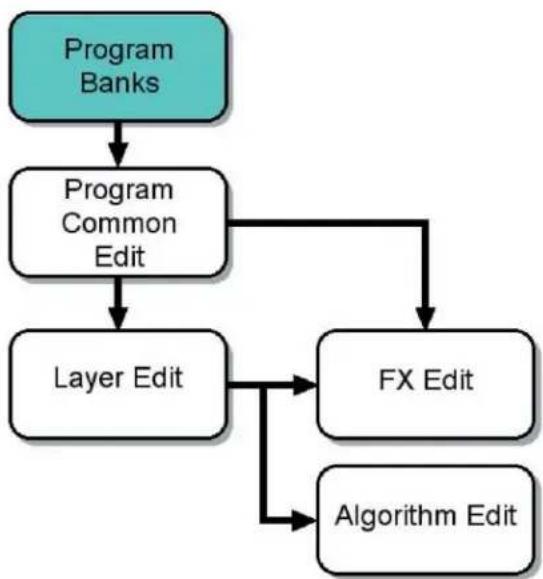
flowchart
graph TD
    A["Program Banks"] --> B["Program Common Edit"]
    B --> C["Layer Edit"]
    B --> D["FX Edit"]
    C --> E["Algorithm Edit"]
    D --> E
While using SoundEditor, the PC3 must not be in Edit Mode. Failure to observe this precaution can result in unreliable editing and improper operation.
7. Program Editing
This chapter will describe the various windows and views for editing Programs.
Program Common Window
The Program Common Window, shown below, is the main window for editing most PC3 Programs (the exceptions are KB3 mode Programs, which are cover later in this chapter). Thorough the Program Common Window, you can access to all editing options that make up a Program, including Layers, Algorithms, Keymaps, and Effects:
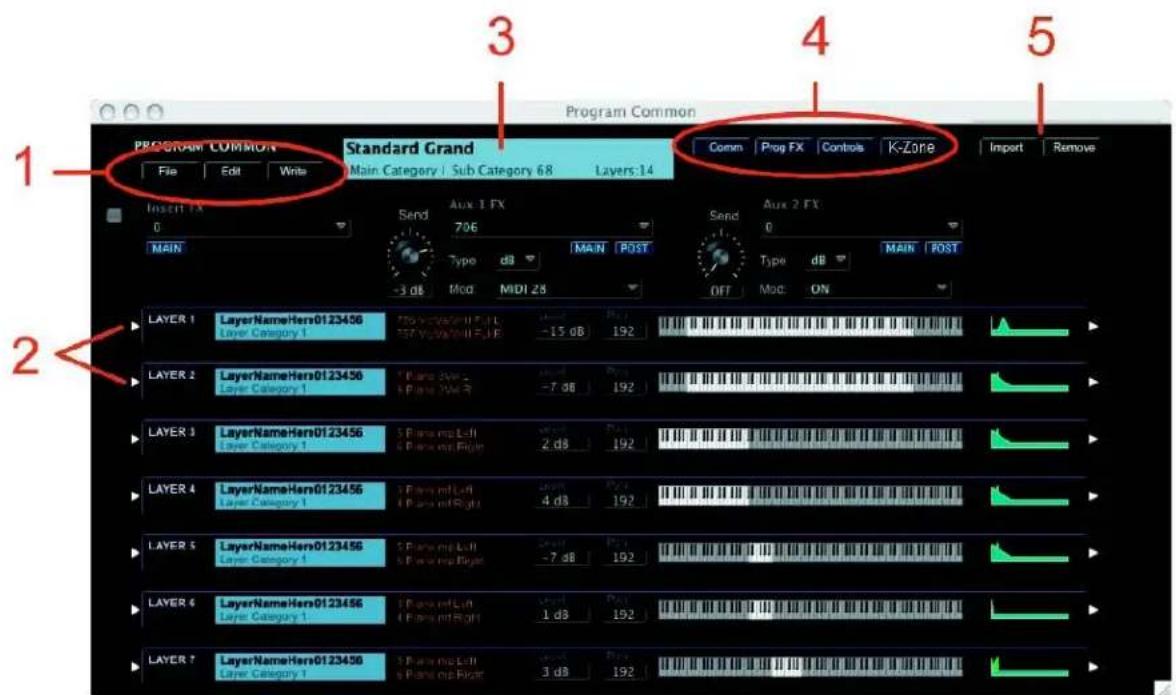
The main components of the Program Common window are:
- Program Common Toolbar to access Editing and Program File Storage options (File, Edit & Write)
- Layer Overview panels
- The currently selected program (Name/memory location/no. layers)
- Toolbar to select the type of information that is displayed in the upper part of the Program Common window (Program Common settings, FX settings, Control Slider and Keyboard Zone assignments)
- Layer IMPORT and Layer REMOVE buttons
Program Common Toolbar (Editing and File Storage)
The Program Common Toolbar allows you to access the File, Edit & Write functions associated with the Program Common window. A description of each Toolbar function follows.
FILE:
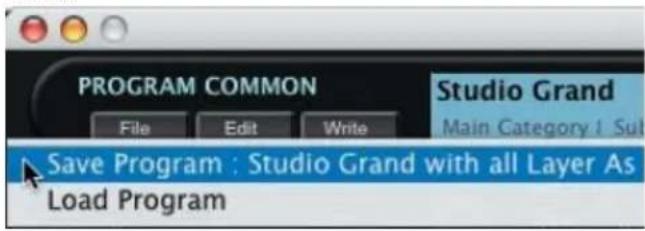
The FILE function allows you to Save the current Program (with all Layers), or Load a new Program. Selecting either the 'Save' or 'Load' option will result in a dialog box asking you to either name a file (to Save) or select a file (to Load).
For a list of file extensions associated with Programs and other files, see Appendix A.
EDIT:
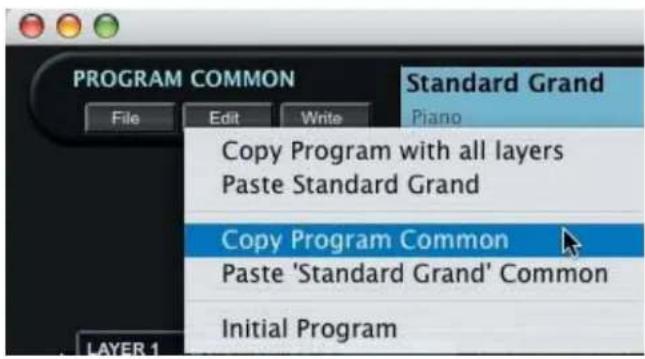
The EDIT function allows you to Copy the current Program (with or without layers), Paste a previously copied Program, or Initialize the current Program. Note that the 'Paste' option is only available after a 'Copy' operation has been performed, otherwise the 'Paste' option does not appear.
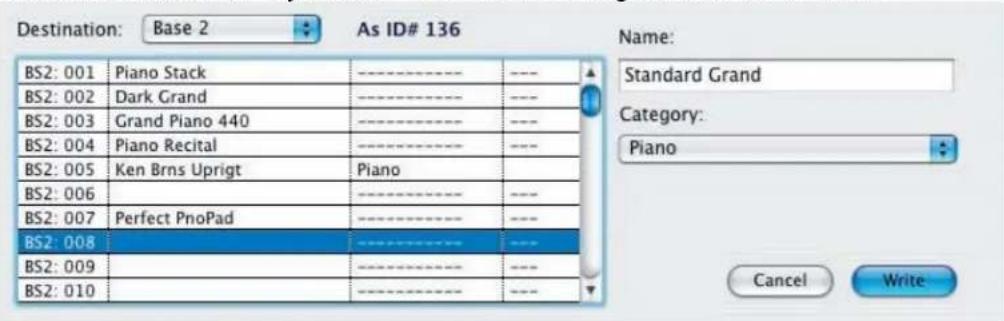
WRITE:
Clicking on WRITE button produces a window allowing you to write the current Program to the PC3. In this window you can change the name of the Program, assign a category if desired, and select the memory location where the Program will be written:
Window Views
The four blue Toolbar buttons immediately below the Program Common window title bar are used to select the view that appears in the upper portion of the Program Common window. The
four views are: Program Common parameters, Effects (FX) parameters, Control Slider Assignments or the Layer Keyboard Zones.

Clicking the COMM button displays the Program Common parameters, including Pitch Bend, Portamento, Output Gain/Pan, etc.:
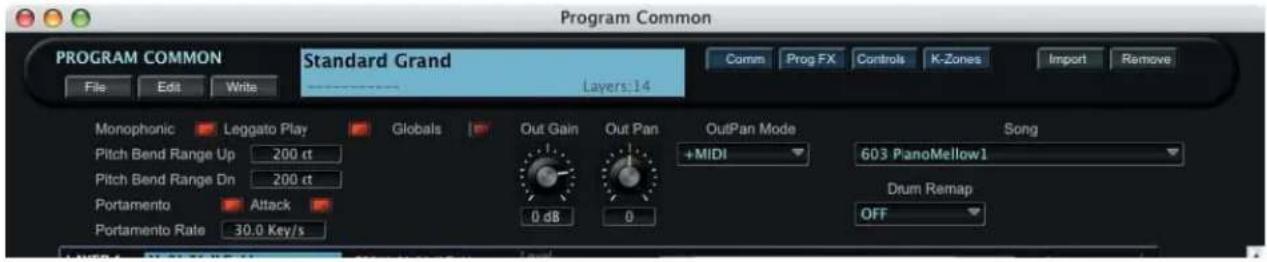
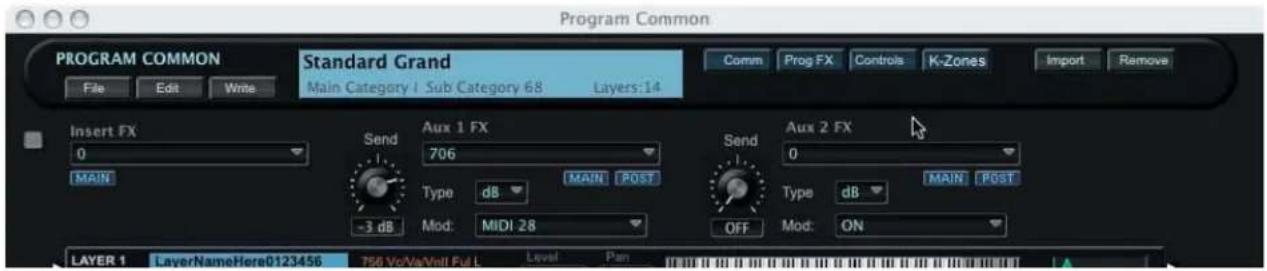
Clicking the PROG FX button displays Program Common Effects parameters, including the Insert and Auxiliary Effect assignments and Send levels:
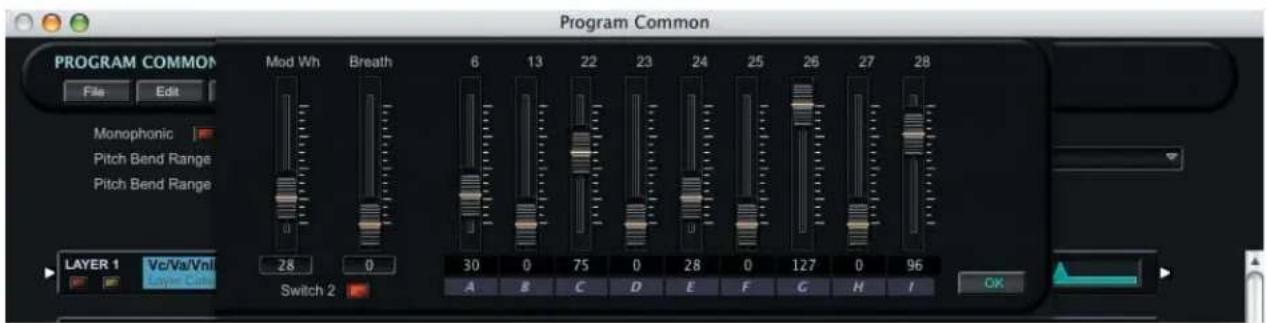
Clicking the CONTROLS button produces a drop-down panel that displays the Program Common Slider Control values:
Clicking the K-ZONES button produces a drop-down panel that displays the keyboard zones for each layer in the Program. Each zone can be edited here:
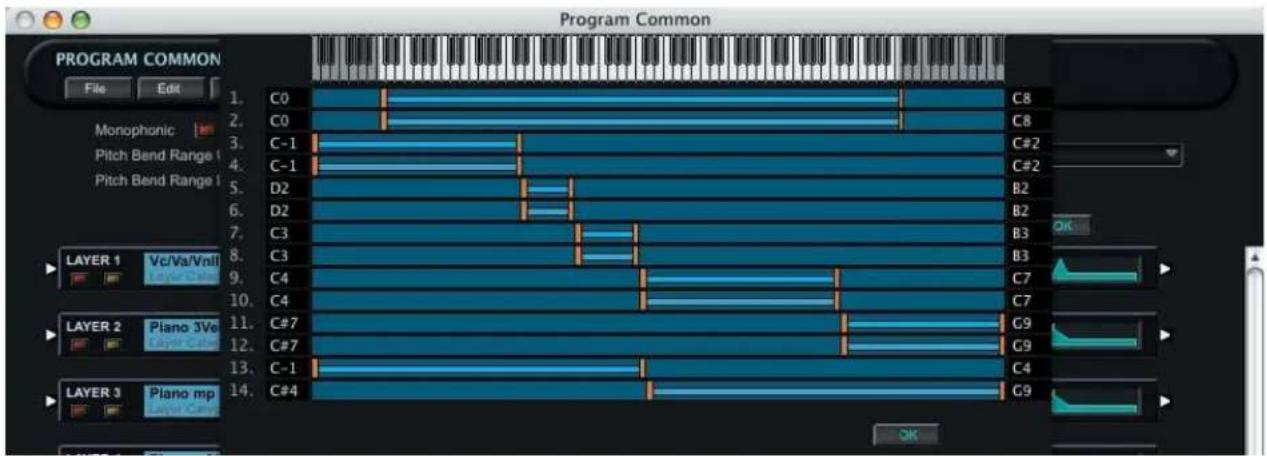
Clicking the OK button in either the CONTROLS or K-ZONES drop-down panel removes the panel from view.
IMPORT and REMOVE Buttons
To the right of the Window Settings Toolbar are two buttons, labeled 'IMPORT' and 'REMOVE', that are used to add to or remove Layers in the current Program.
IMPORT Button
IMPORT allows you to add a new Layer to the existing Program by copying a Layer from another Program.
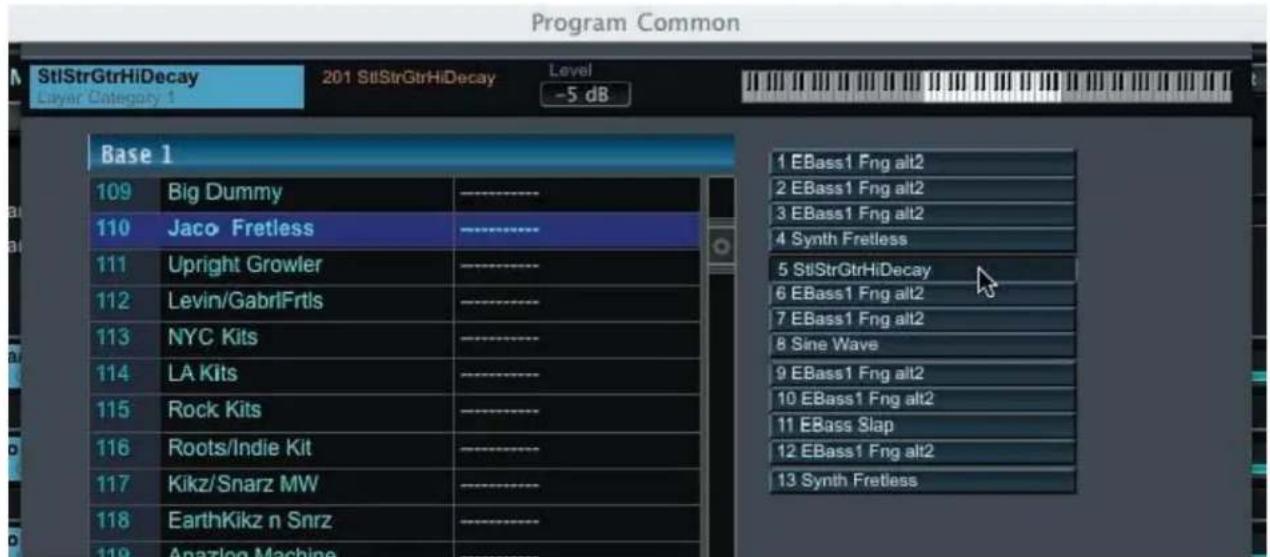
When you click on the IMPORT button, a drop-down window appears like the one shown below. To make a selection, first choose a Program ('Jaco Fretless' in this example). A list of the Layers from the chosen Program will appear on the right side. Select a Layer ('StlStrGtrHiDecay' in this example), and the Layer Overview will be displayed appear above the title bar. Clicking the OK button will confirm the selection and paste that Layer into the current Program.
REMOVE Button
REMOVE allows you to delete a Layer from the existing Program.
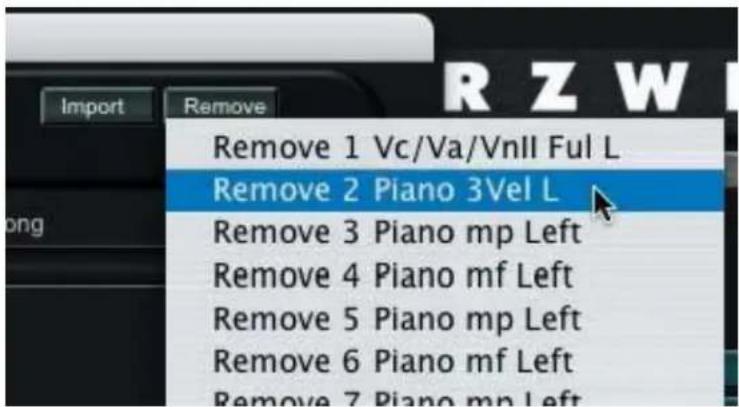
When you click on the REMOVE button, a contextual menu appears displaying the names of the Layers in the current Program. Click on the desired Layer to be removed.
Selecting Songs in the Common Settings View
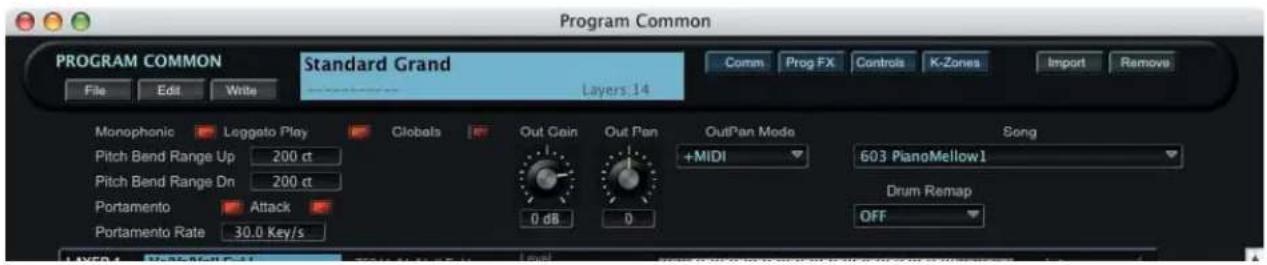
The Common Settings View includes a 'Song' selection parameter (located on the far right) that allows you to select the demo song that will be played when the PC3's PLAY/PAUSE button is pressed:
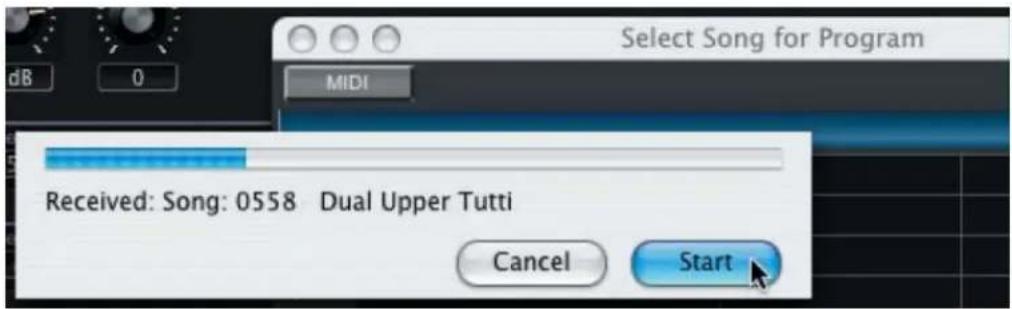
Clicking in the 'Song' selection parameter field produces a 'Select Song for Program' window. If the window is empty, click the MIDI button in the window and then press START to receive the complete list of available songs from the PC3:
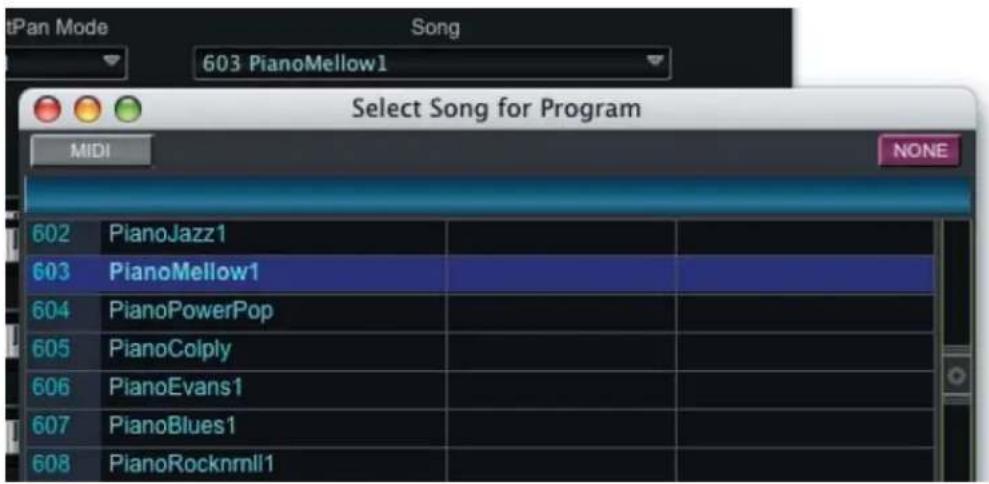
When the receive process is complete, scroll through the resulting list and click on name to make a selection. The song name and location will appear in the Song parameter field:
Selecting FX Chains in the Prog FX (Program Effect) View
The Prog FX View includes three effects assignment parameter fields, labelled 'Insert FX', 'Aux 1 FX', and 'Aux 2 FX' respectively. These fields allow you to assign a specific effect (or chain of effects) as an insert or auxiliary effect.
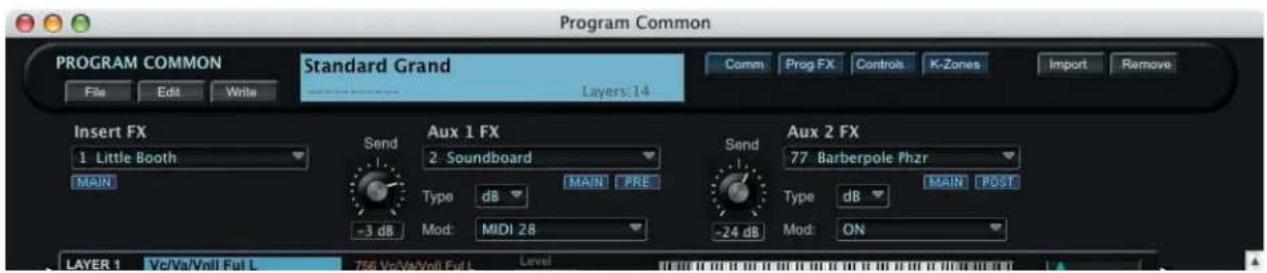
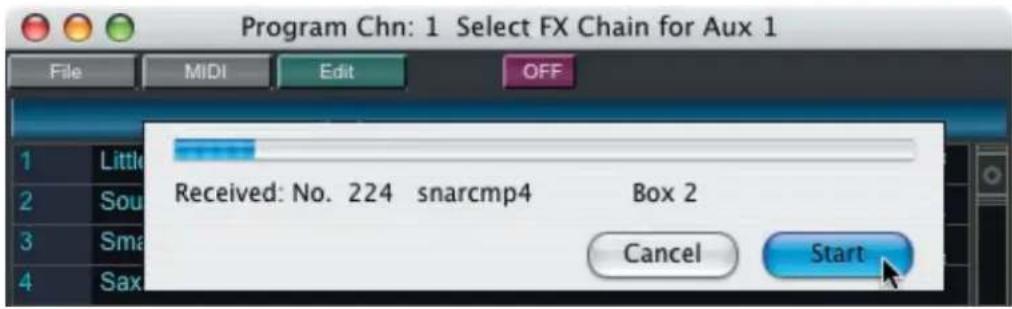
Clicking in any one of the 'FX' selection parameter fields produces a 'Select FX Chain' window. If the window is empty when it appears, click the MIDI button followed by the START button to receive the complete list of available effects from the PC3:
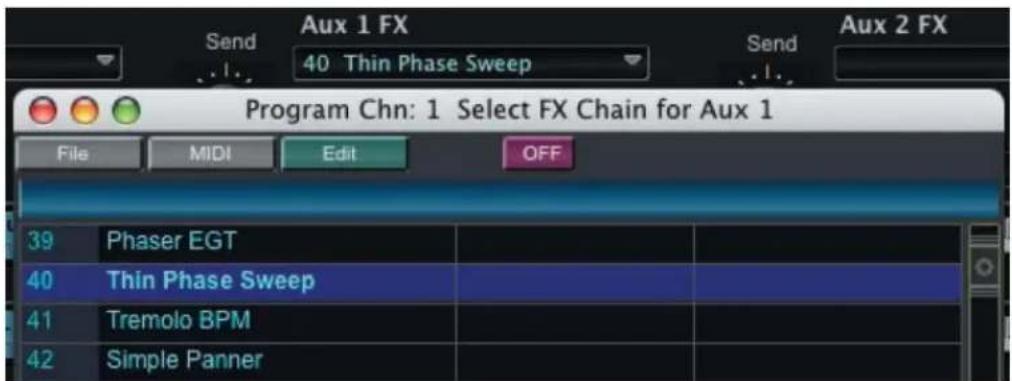
When the data transfer process is complete, scroll through the resulting list and click on name to make a selection. The effect name will appear in the FX parameter field:
Any effect in the ‘Select FX Chain’ window can also be edited to create your own custom effects chains. To edit an effects chain, click on the EDIT button. Editing FX Chains is covered as a separate topic later in this Chapter.
Layers Overview Panel
The Program Common window displays an overview of every Layer (up to 32) that makes up a Program. The Layers Overview Panel provides basic information about each layer:

The MUTE (red) and SOLO (yellow) buttons in the Layers Overview panel can be used to mute any of the layers, or solo the current layer. The other controls shown in the Layers Overview panel are non-functional.
Clicking on a Layers Overview panel will bring up the Layers Edit Window for that Layer, where all layer parameters can be altered. The Layers Edit Window is covered in the next section.
Right-clicking on any Layers Overview panel produces a contextual menu that allows you to copy, paste, add, remove and initialize Layers:
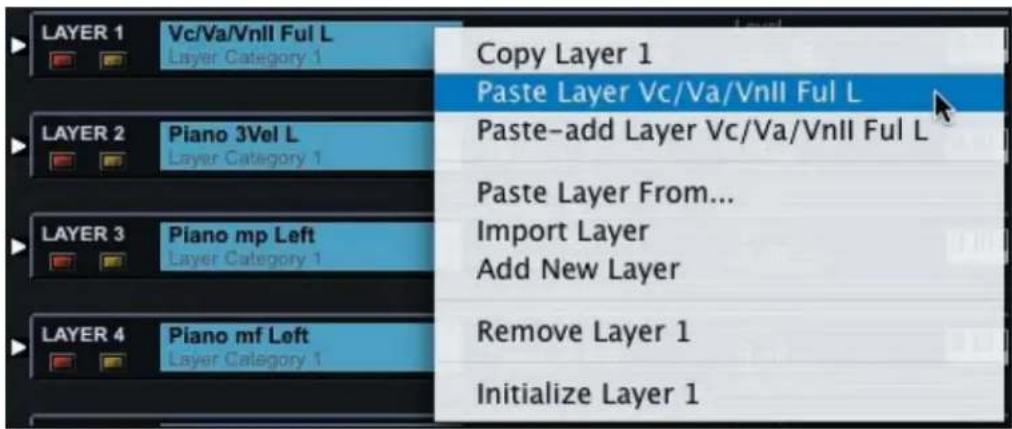
In this menu:
The 'Copy Layer' command copies the currently selected Layer.
The ‘Paste Layer’ command pastes a previously copied Layer to the current Layer. This command only appears in the menu after completing a ‘Copy Layer’ operation.
The ‘Paste - Add Layer’ command adds a new Layer to the Program and pastes the copied Layer there.
Selecting the ‘Paste Layer From’ and ‘Import Layer’ commands produces a drop-down list that allows you to select a Layer from another Program (see description below).
The 'Add New Layer' command adds a new Layer to the current Program.
The 'Remove Layer' command deletes the currently selected Layer.
The 'Initialize Layer' command resets the parameters of the current Layer to initial values.
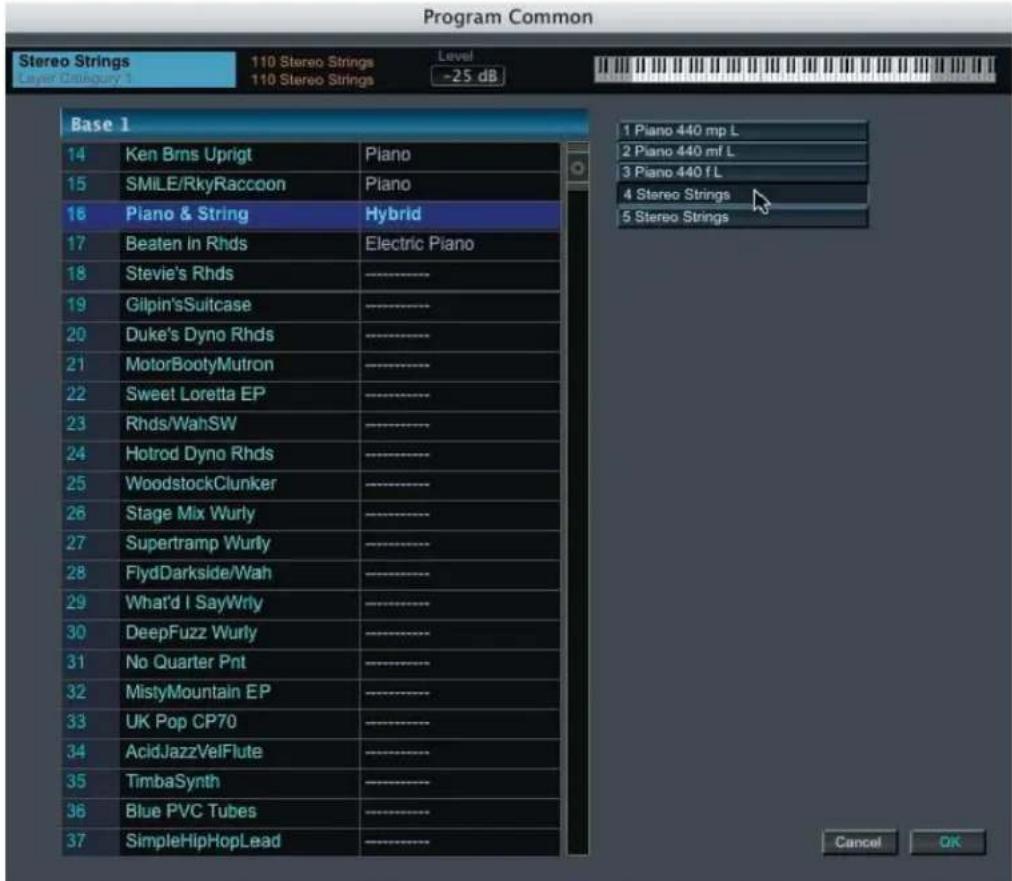
When the 'Paste Layer From...' or 'Import Layer' menu commands are selected, a drop-down appears (example shown below) that allows you to select a Layer from another Program. To make a selection, first choose a Program ('Piano & String' in this example). A list of the Layers in that Program will appear in the right side of the drop-down.
Select a Layer from this list ('Stereo Strings' in this example), and the overview of that Layer will be displayed below the window title bar. Clicking the OK button will confirm the selection and paste that Layer into the current Program.
The 'Paste Layer From...' option replaces the current Layer with the new Layer.
The 'Import Layer' option adds an additional Layer to the current Program.
Layers Window
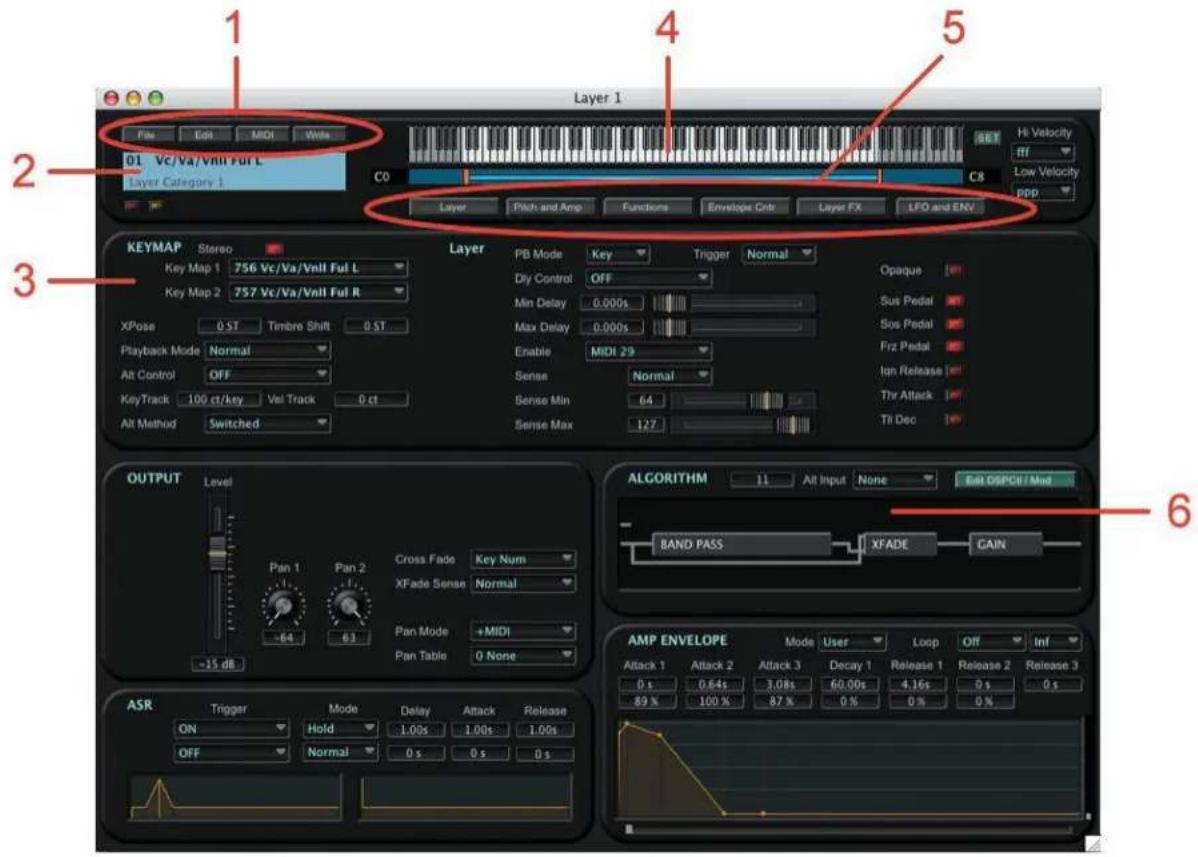
The Layers Window allows you to access all of the parameters that make up one Layer of a PC3 Program. The Layers Window is shown below:
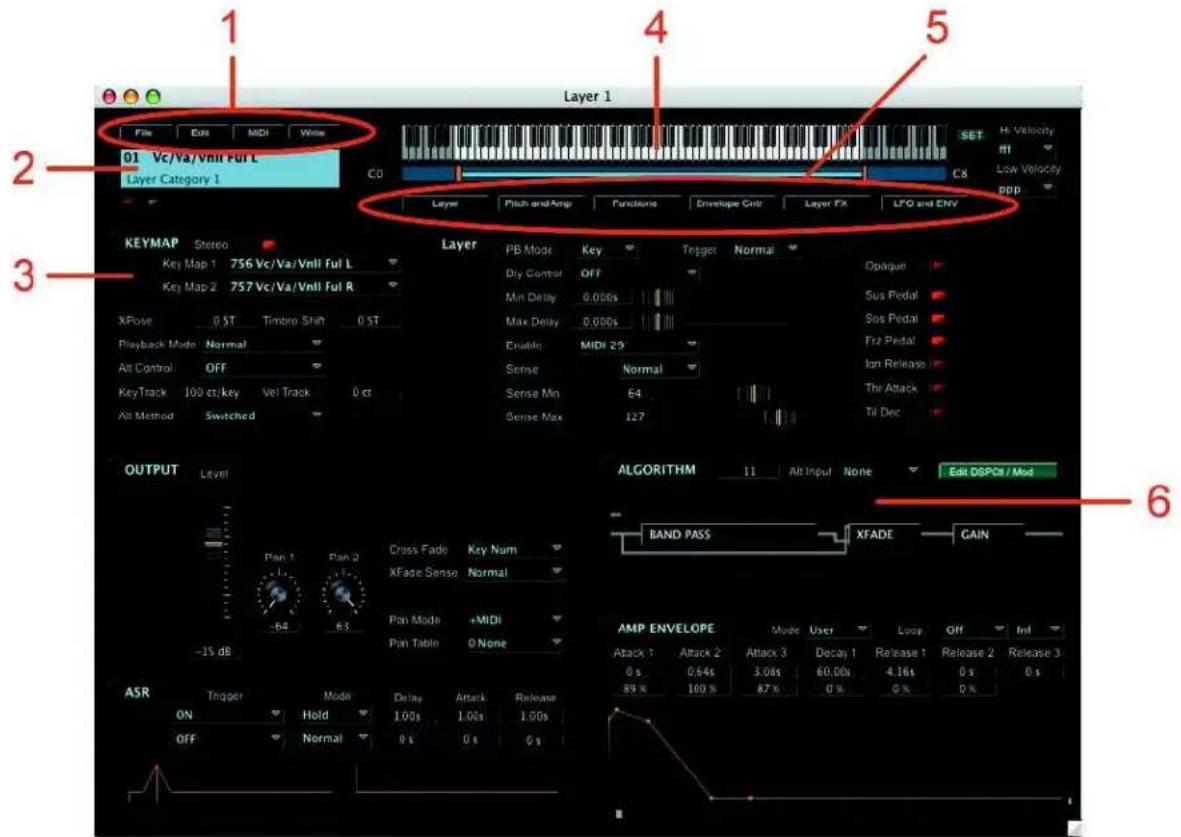
Key components of the Layers window are:
- Toolbar to access Layer file storage options
- The Layer Name display area with Layer MUTE and SOLO buttons
- The Keymap panel, displaying Keymaps and related parameters
- Display of the active keyboard range (zone) of the Layer
- 'Views' Toolbar to select parameter views in the Layers Window
- The Algorithm panel
Layers Toolbar
The Layers Toolbar allows you to access the File, Edit, MIDI & Write functions associated with the Layers window. A description of each Toolbar function follows.
FILE:
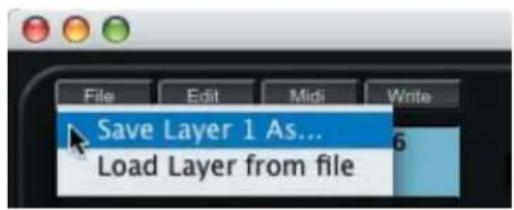
The FILE function allows you to Save the current Layer or Load a Layer. Selecting either Save or Load will result in a dialog box asking you to either name a file (to Save) or select a file (to Load).
For a list of file extensions associated with Layers and other files, see Appendix A.
EDIT:
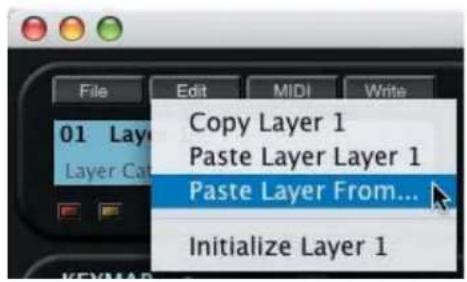
The EDIT function allows you to Copy the current Layer or Paste a previously copied Layer. You can also choose to Paste a Layer from another Program (as described on page 48), or Initialize the current layer.
MIDI:
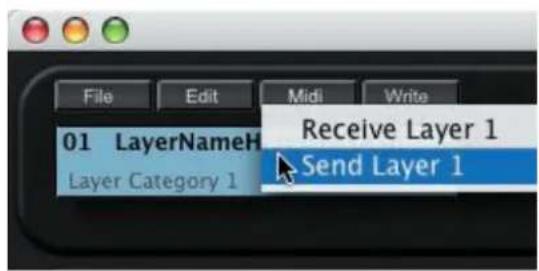
The MIDI function allows you to Receive or Send the current layer. These options allow you to re-synchronize the edit status between SoundEditor and the PC3 if MIDI communication should be interrupted, or if you make changes on the PC3.
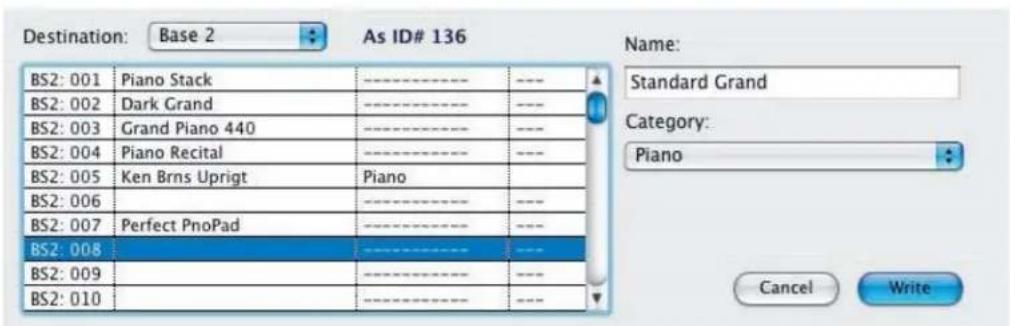
WRITE:
Clicking on WRITE button produces a window allowing you to write the current Program to the PC3. In this window you can change the name of the Program, assign a category if desired, and select the memory location where the Program will be written. The WRITE button in the Layers Toolbar duplicates the function of the WRITE button in the Program Common Window, and is provided here for convenience:
Layers Name Box
The Layer Name box displays the current Layer Name. The Layer Name defaults to the name of the Keymap used by that Layer. To change the name of the current Layer, simply click inside the Layer Name Box and type a new name (the cursor can be placed anywhere in the name). Up to 16 characters can be specified. When you are finished, click the OK button to accept and enter the new name.
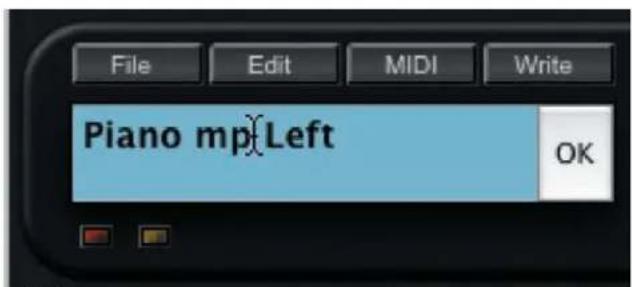
In order to save the name change in a Layer you must write the Program to the PC3 using the WRITE button.
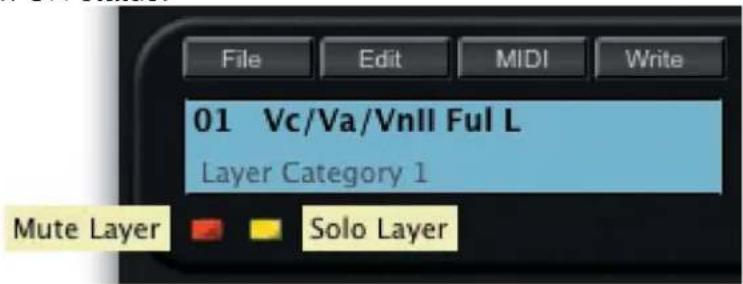
MUTE and SOLO Buttons
The red and yellow buttons beneath the Layer Name box allow you to mute and solo the current Layer. These buttons toggle the respective function ON and OFF. A lit button indicates an ON status:
Keyboard Zone
The effective range of the keyboard (AKA the Zone) is displayed at the top of the Layer Edit window.
There are two ways to adjust the keyboard range of a Layer: by clicking and dragging on the orange bars that appear immediately below the keyboard display, or by clicking on the SET button and using the PC3 keyboard.
The ‘click & drag’ method allows you to simply grab the orange bar and drag the cursor to the left or right to change the range on either end of the keyboard display. The upper and lower note number fields will reflect the change as you move the bar:
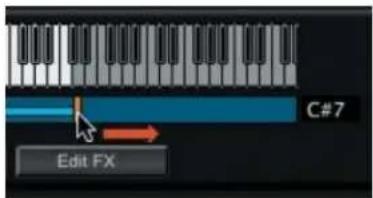
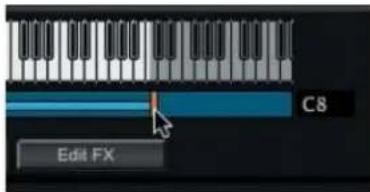
The SET button, located in the upper right corner of the Layers Edit window, allows you to use the PC3 to set the low note and high note limits:
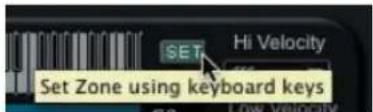
When you click on the SET button, a ‘keyboard zone’ window appears (shown below). When the window is displayed, SoundEditor starts ‘listening’ to the PC3 and waiting for the first of two notes to set the Hi/Lo range. Pressing a key on the PC3 will set the low note, then a second key-press will set the high note. If you make a mistake, you can simply press the correct keys on the PC3. SoundEditor accepts two-note groups to set the range - the first note always sets the low limit, and the second always sets the high limit. As long as the keyboard zone window is displayed, SoundEditor will accept two-note groups to set the range.

Click on the OK button to accept the new range and dismiss the window, or CANCEL to exit without changes.
'Views' Toolbar
Within the Layers window, you have the option of displaying different parameter groups for editing. The 'Views' Toolbar buttons located beneath the keyboard display are used to select and view the desired parameter group.

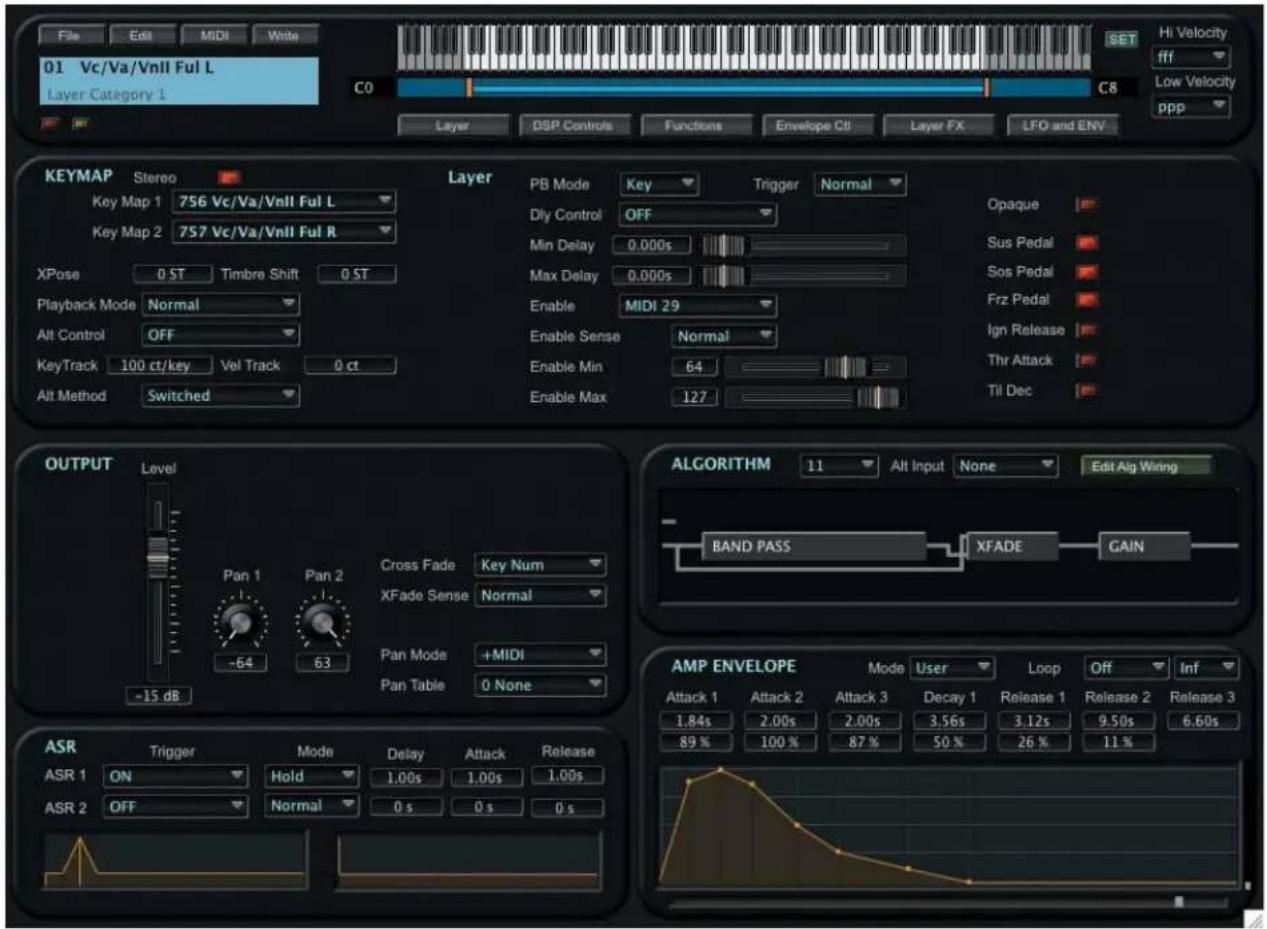
Clicking the LAYER button displays the Layer parameters in the Keymap panel:
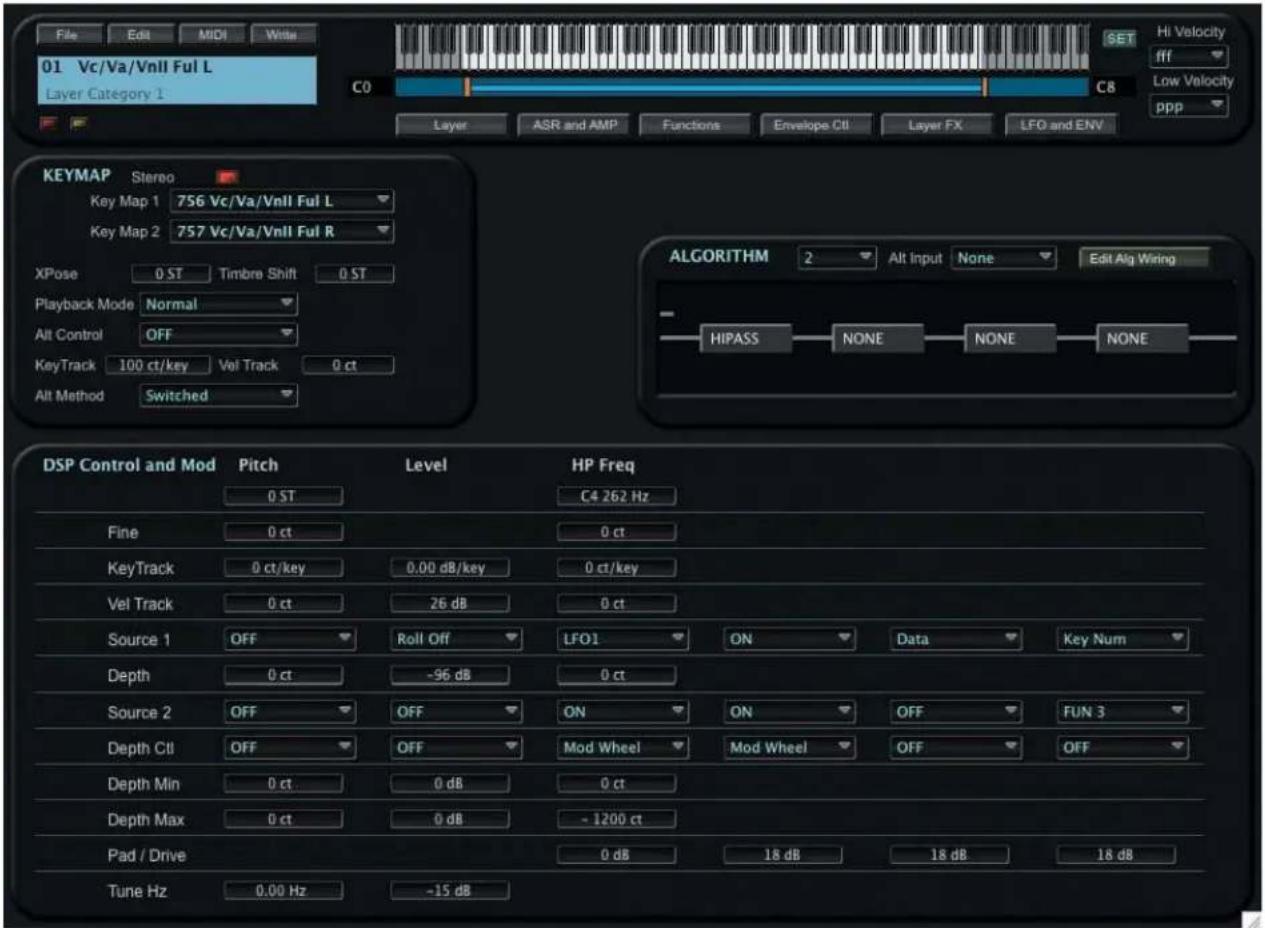
Clicking the DSP Control button changes the window view to display the Algorithm and the DSP Control values, which include the Pitch and Level (Amplifier) parameters, and the Algorithm parameters for each DSP function:
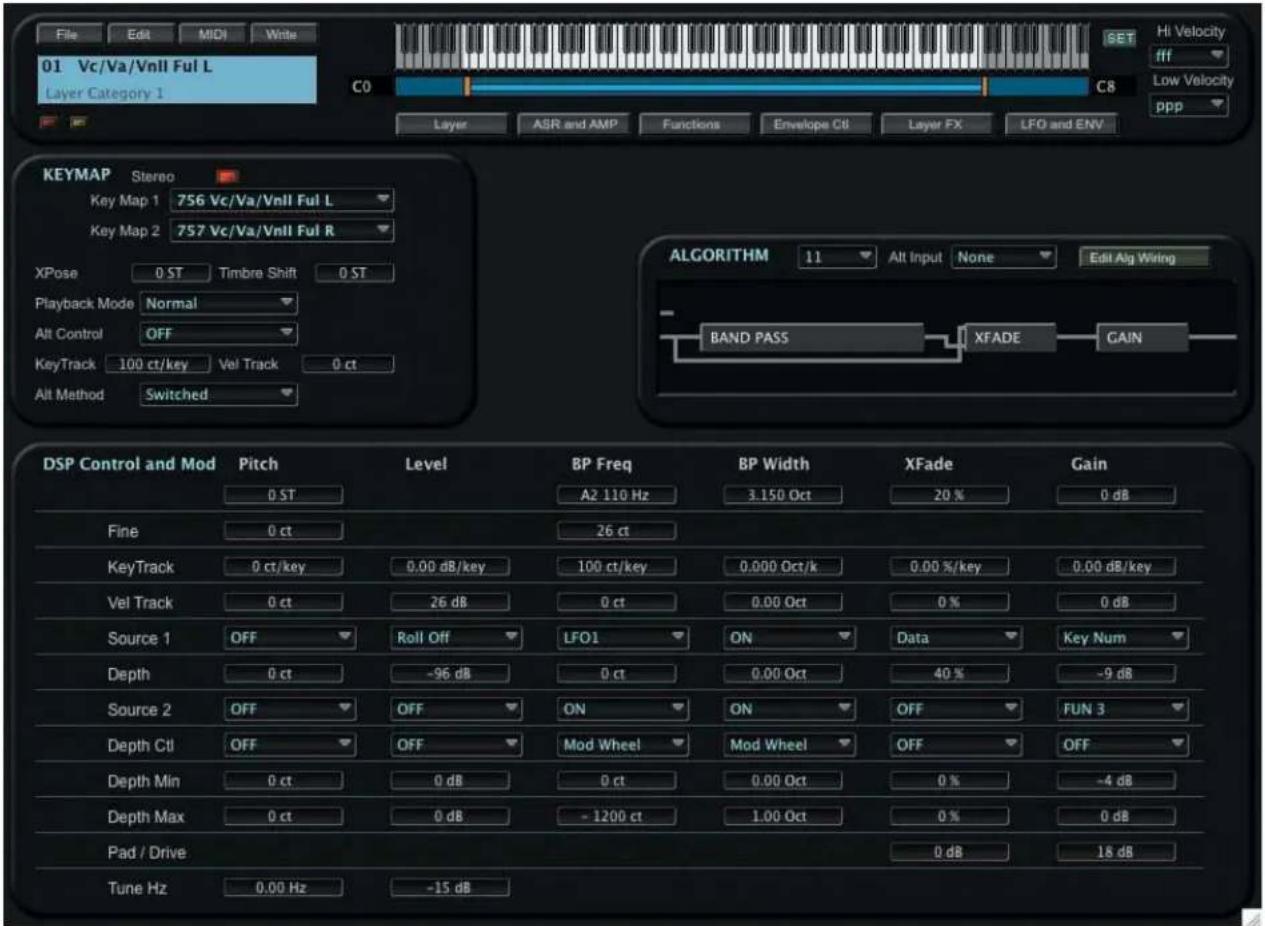
Note that when the Algorithm and DSP Control Parameters are displayed, the label on the DSP Control button switches to "ASR and AMP", allowing you to revert to the ASR and Amplifier parameter display:

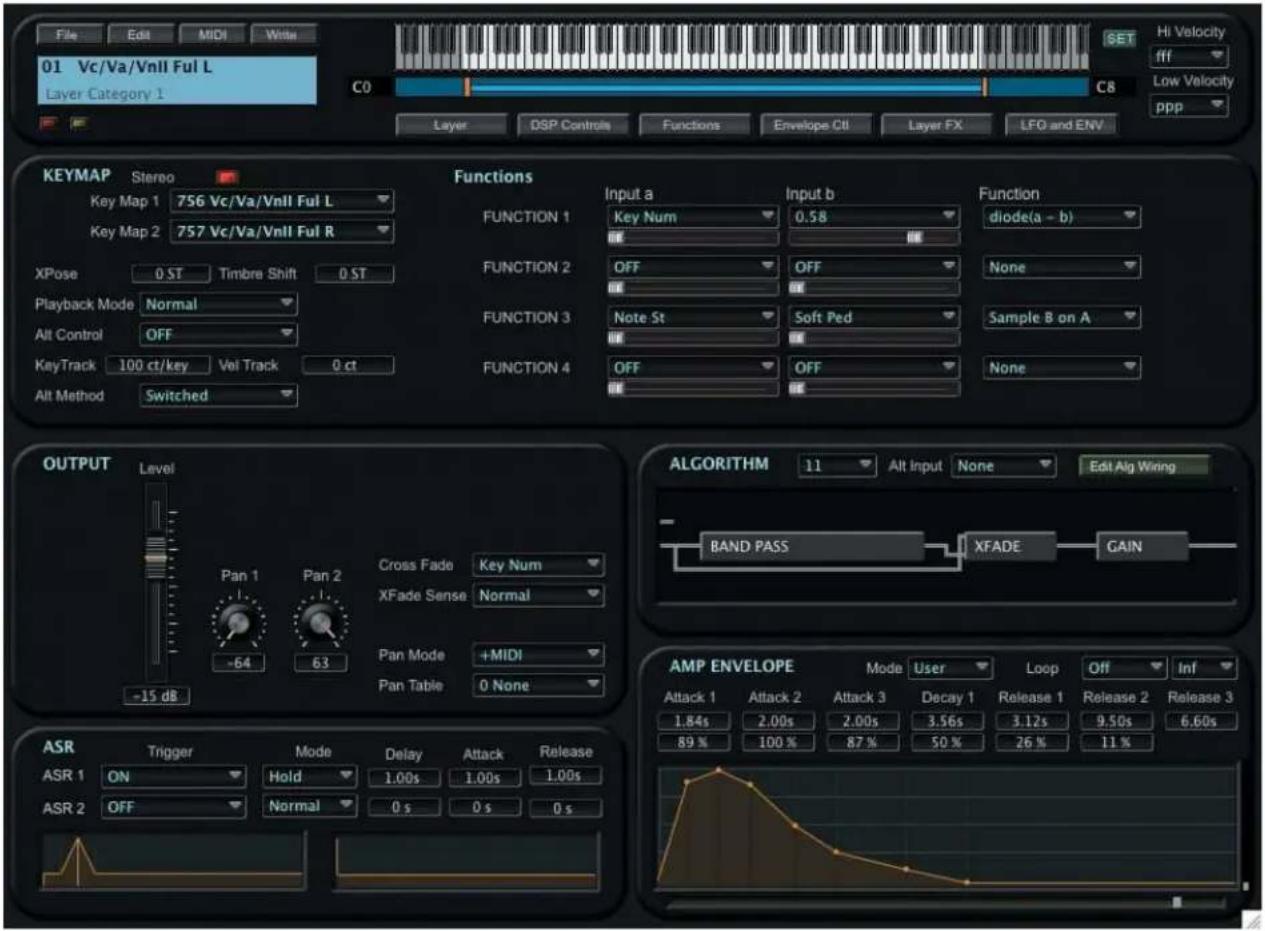
Clicking on the FUNCTIONS button changes the view in the Keymap panel to display the Function parameters:
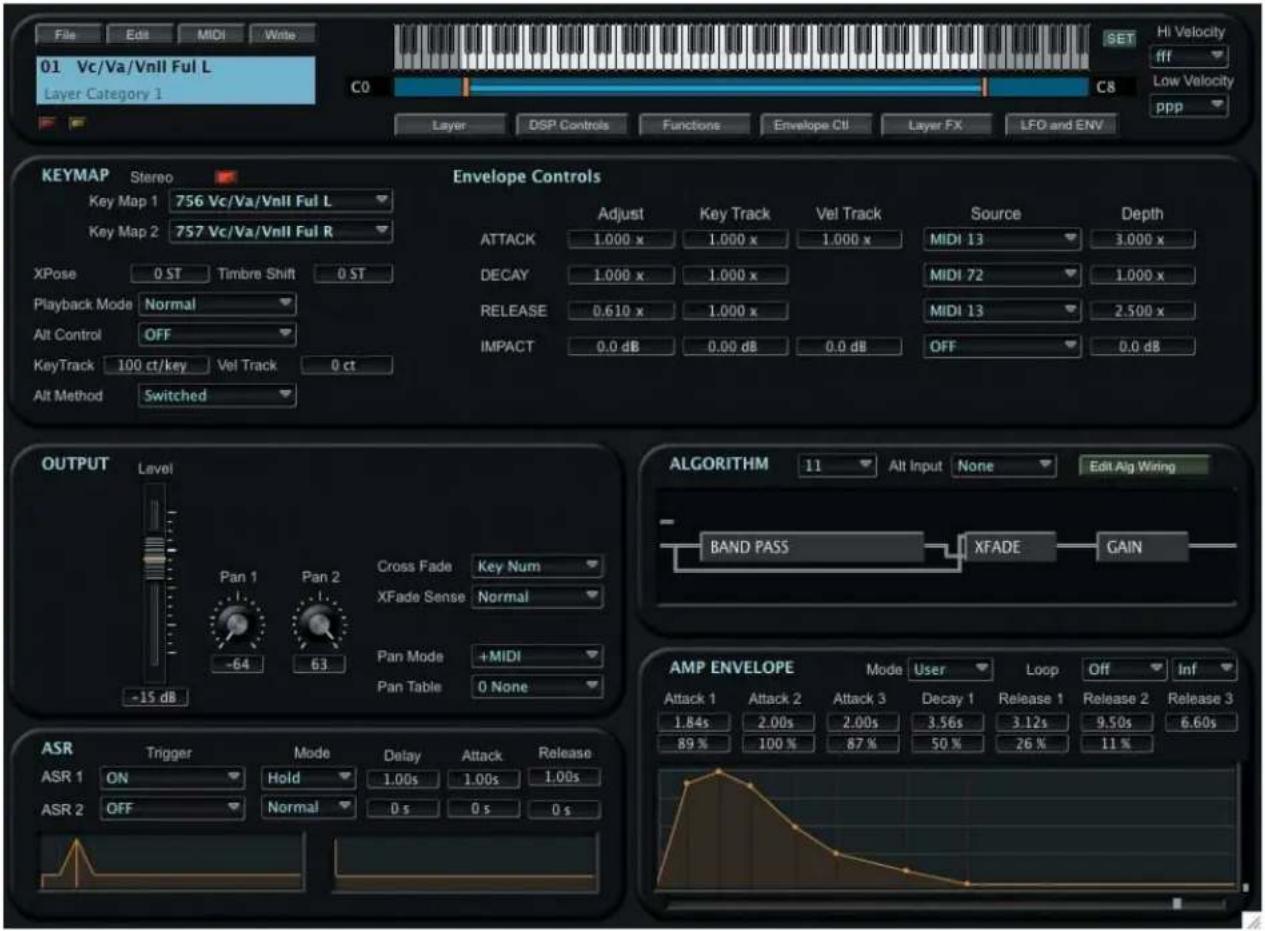
Clicking the ENVELOPE CTL button changes the view in the Keymap panel to display the Envelope Control parameters:
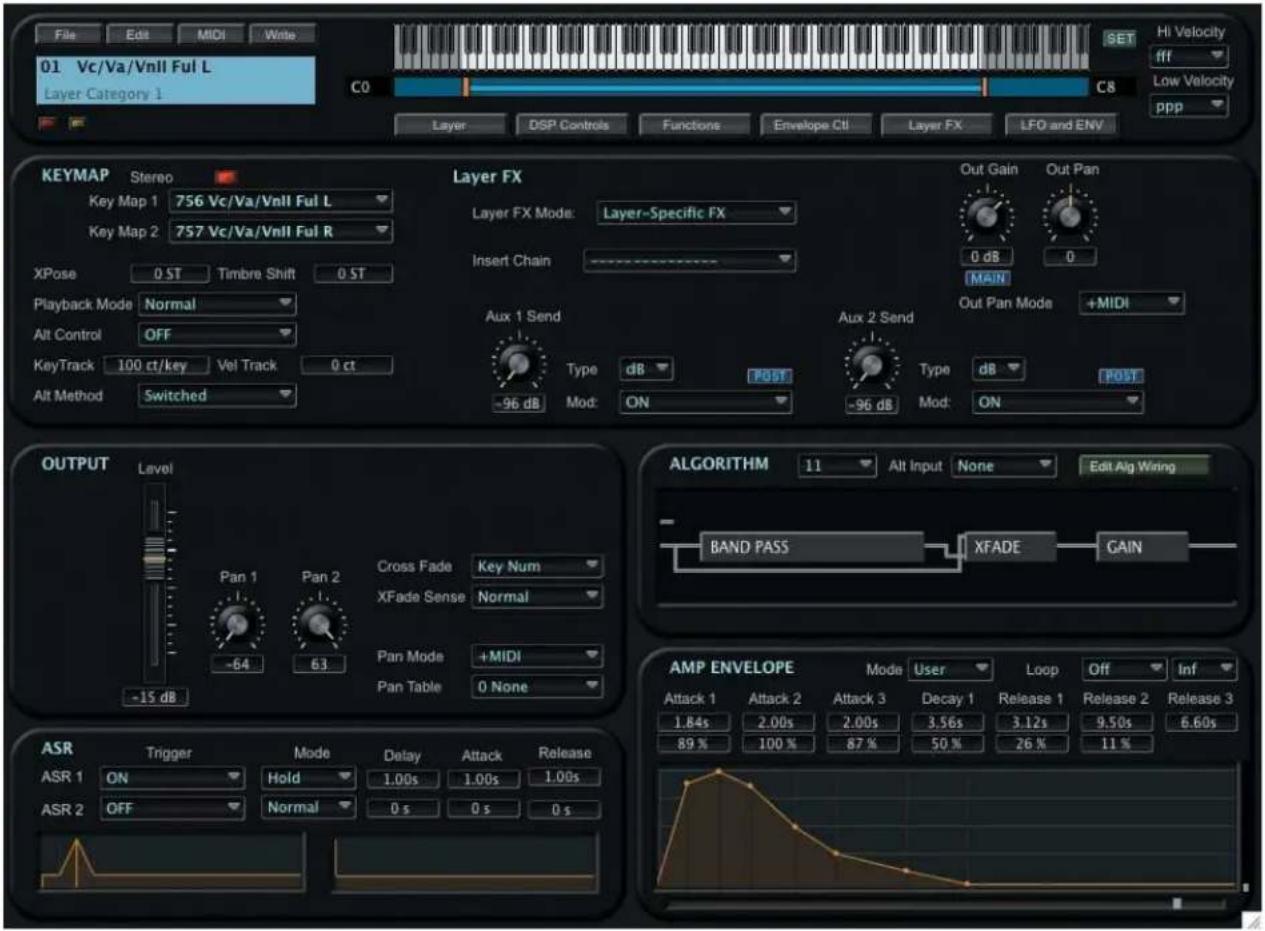
Clicking the LAYER FX button changes the view in the Keymap panel to display the Effects parameters:
Clicking the LFO and ENV button changes the window view to display the LFO and Envelope parameters:
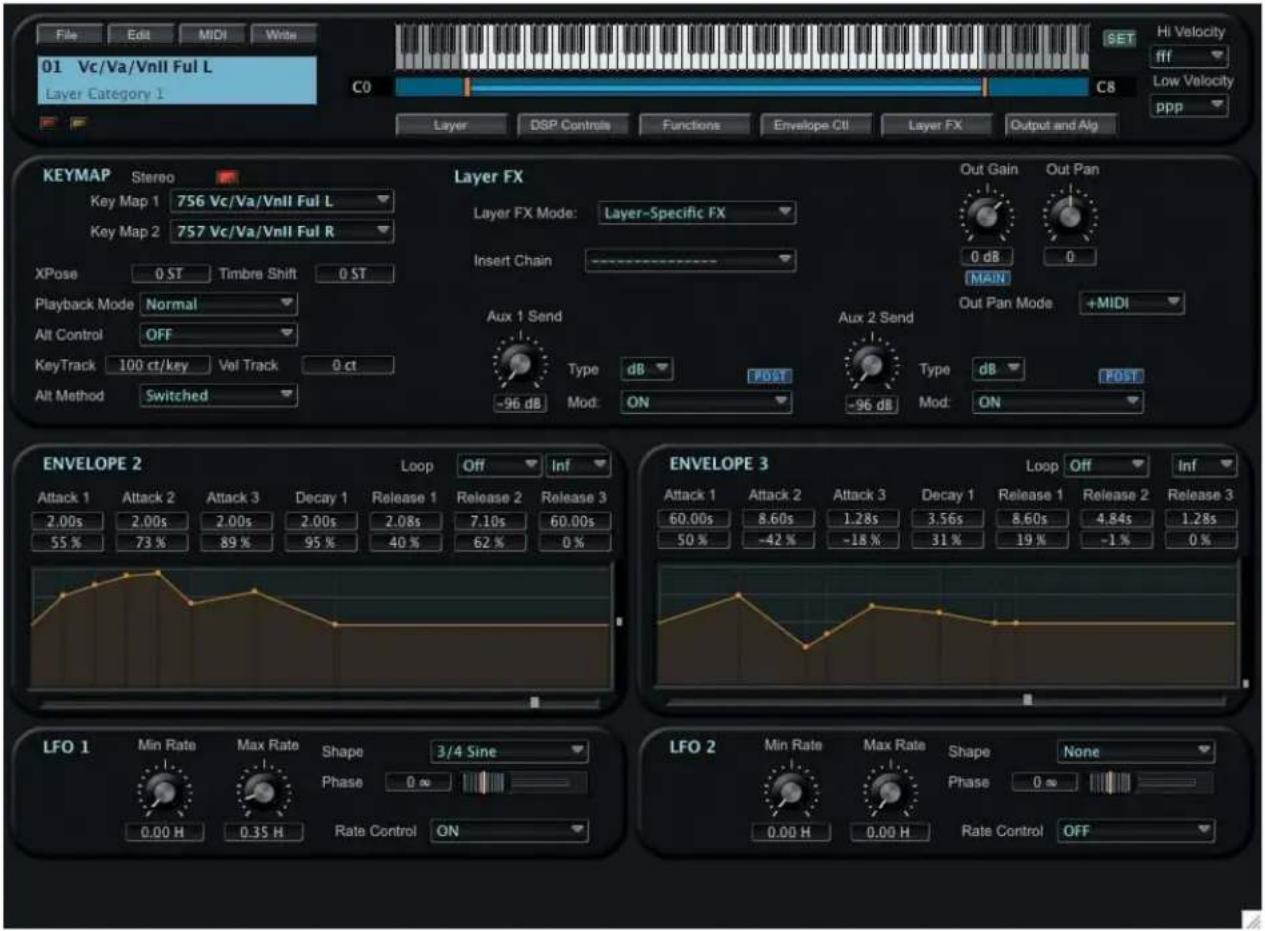
Note that when the LFO and Envelope parameters are displayed, the label on the LFO and ENV button switches to "Output and Alg", allowing you to revert to the Output and Algorithm display:

Algorithm Panel
The Algorithm Panel in the Layers Edit Window allows you to view and edit the algorithm for the selected Layer. From this panel you can select a different algorithm, edit the current algorithm, create a new algorithm, or select an alternate input for the algorithm ('Cascade Mode'):
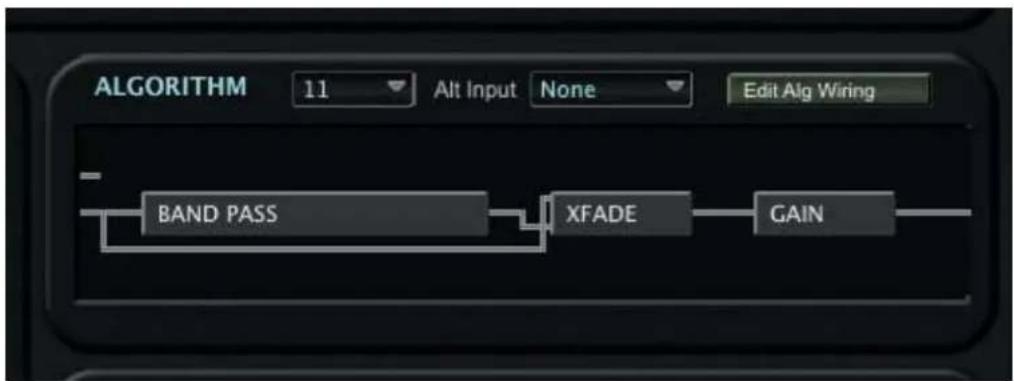
flowchart
graph LR
    A["BAND PASS"] --> B["XFADE"]
    B --> C["GAIN"]
Selecting and Configuring Algorithms
To select a different algorithm, click in the algorithm number field next to the 'ALGORITHM' panel label. An Algorithm Bank window will appear, presenting a scrollable list of the available algorithms:
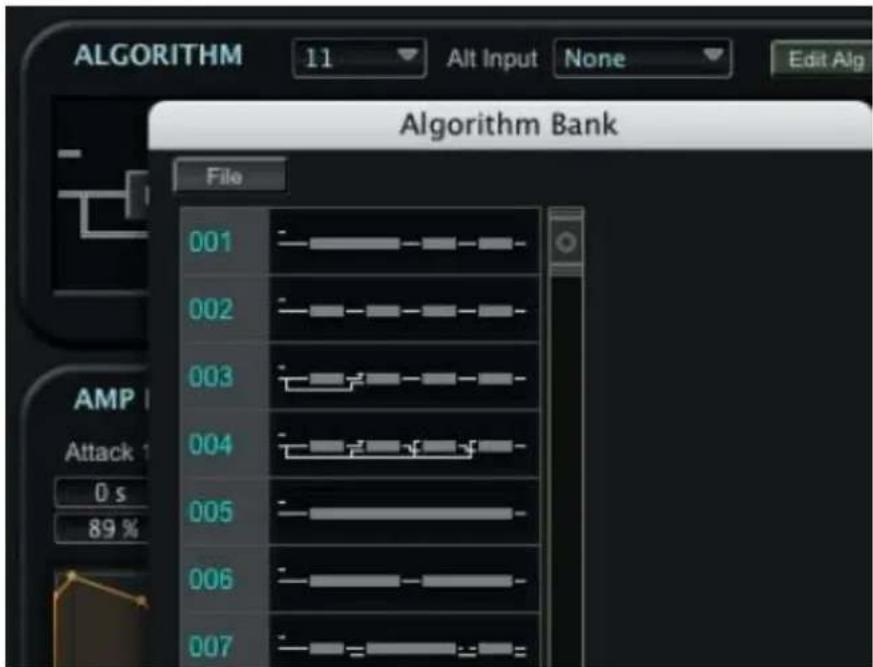
Clicking on the Algorithm Bank FILE button allows you to save the current algorithm bank or load a new algorithm bank. Selecting either the Load or Save option will result in a dialog box asking you to either select a file (to Load) or name a file (to Save).
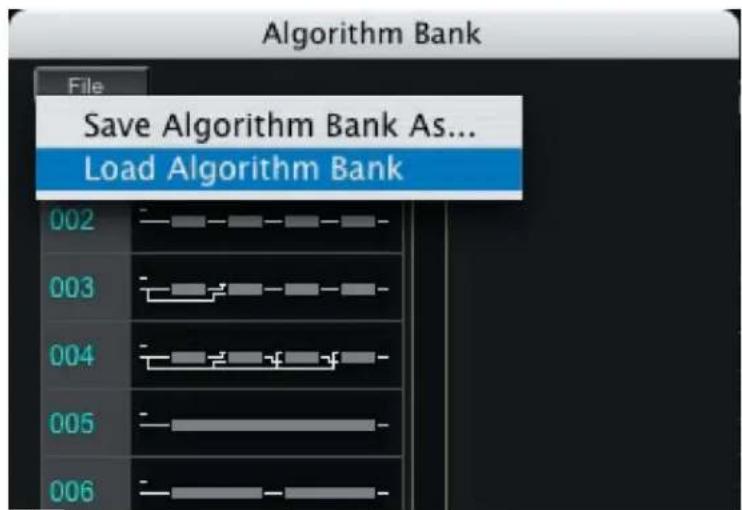
Algorithm Banks have a ‘.3ab’ file extension. For a list of the file extensions associated with Algorithm Banks and other files, see Appendix A.
When a new algorithm is selected from the Algorithm Bank list, one or more DSP function blocks may appear with a "None" label, indicating that they serve no function.
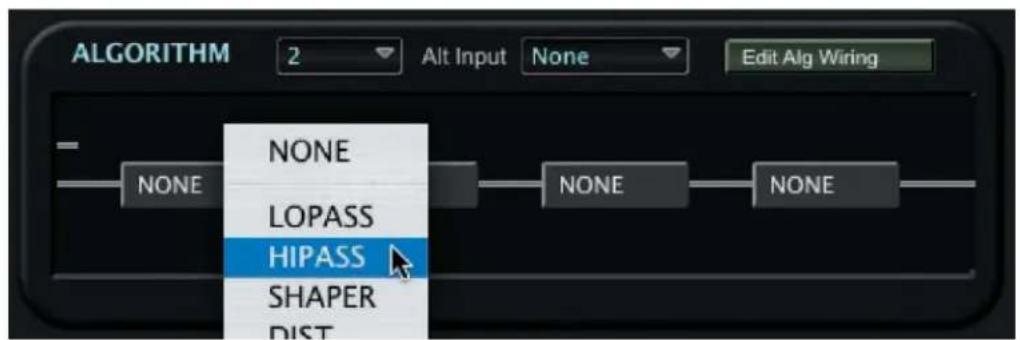
When you select a DSP function, the Layers Edit window automatically switches to the DSP Controls view, allowing you to specify the parameters for the DSP functions:
Selecting an Alternate Input (Cascade Mode)
To select an alternate input for the algorithm, click in the Alt Input parameter field in the Algorithm Panel. A contextual menu appears allowing you to select an algorithm from another layer:
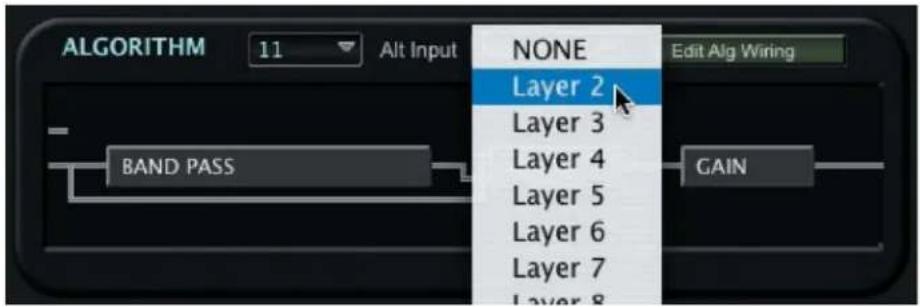

The Alternate Input parameter allows you to select any other layer to go through the current layer's DSP. This can be configured so that layers can be cascaded one into the into the next - up to 32 layers. The Alternate Input parameter greatly expands the number SP functions that can be strung together to create new sound processing possibilities.
EDIT ALG WIRING Button
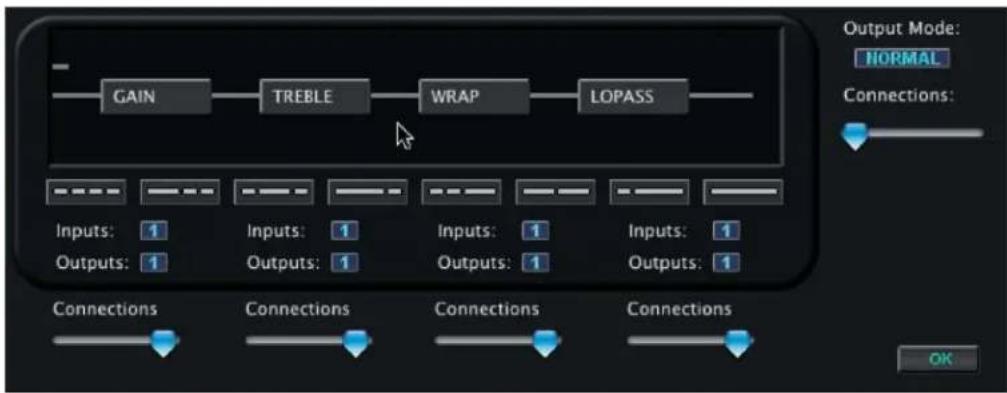
Clicking on the EDIT ALG WIRING button in the Algorithm Panel produces an Algorithm Wiring Display where you can make changes to the current algorithm, or create new algorithms. The Algorithm Wiring Display allows you to select the number and arrangement of DSP function blocks, the input/output configurations of each block, and the connections between blocks:
flowchart
graph LR
    A["Input"] --> B["GAIN"]
    B --> C["TREBLE"]
    C --> D["WRAP"]
    D --> E["LOPASS"]
    F["Inputs"] --> G["1"]
    H["Outputs"] --> I["1"]
    J["Inputs"] --> K["1"]
    L["Outputs"] --> M["1"]
    N["Inputs"] --> O["1"]
    P["Outputs"] --> Q["1"]
    R["Connections"] --> S["OK"]
    T["Connections"] --> U["OK"]
    V["Connections"] --> W["OK"]
Editing an Algorithm
To understand how the various controls are used in the Algorithm Wiring Display, let's go through the steps to edit an algorithm.
Using the figure on the previous page as a starting point, we'll begin by changing the number of DSP elements in the Algorithm from four to three. This is done using the 'wiring diagram' buttons. Here we select a wiring diagram of three DSP's (for illustration purposes, the mouse cursor has been changed to RED in these examples):
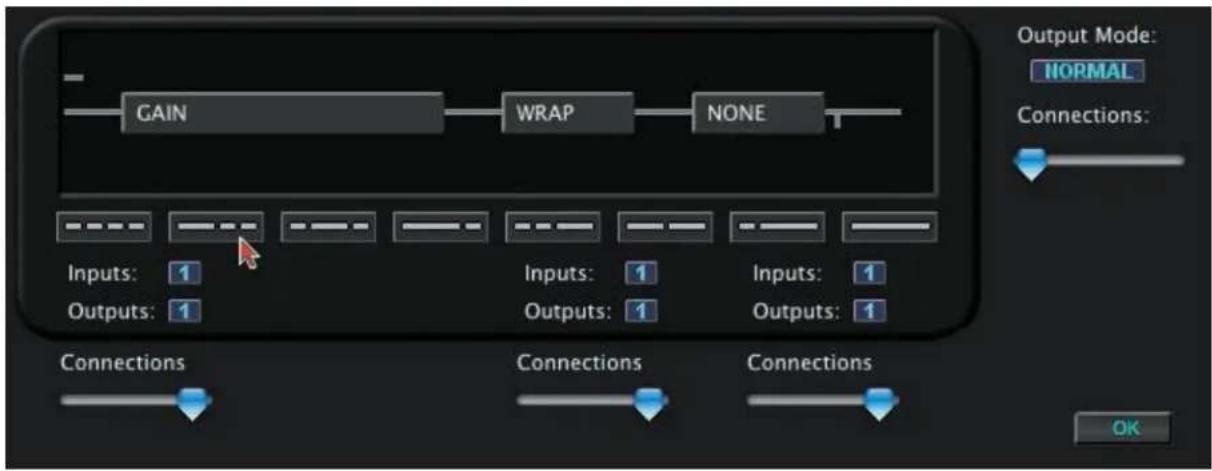
Next, we'll change the number of Outputs from the first DSP element from one to two:
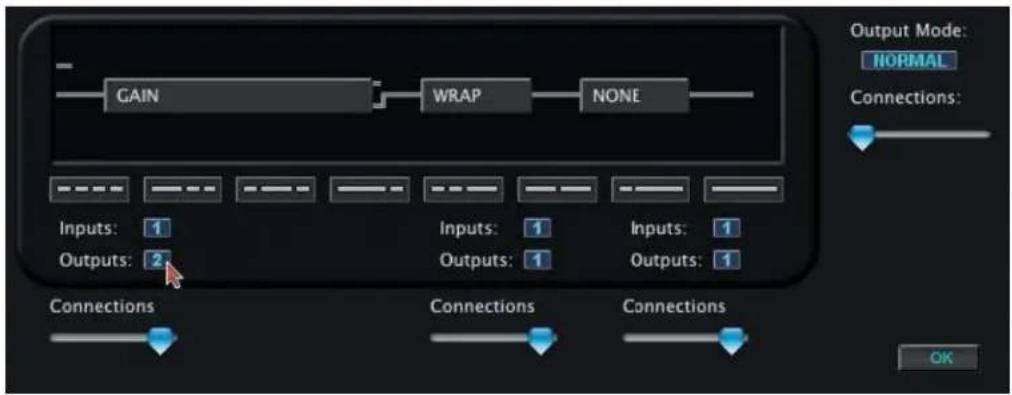
Now, we'll change the routing of the DSP functions using the Connection sliders:
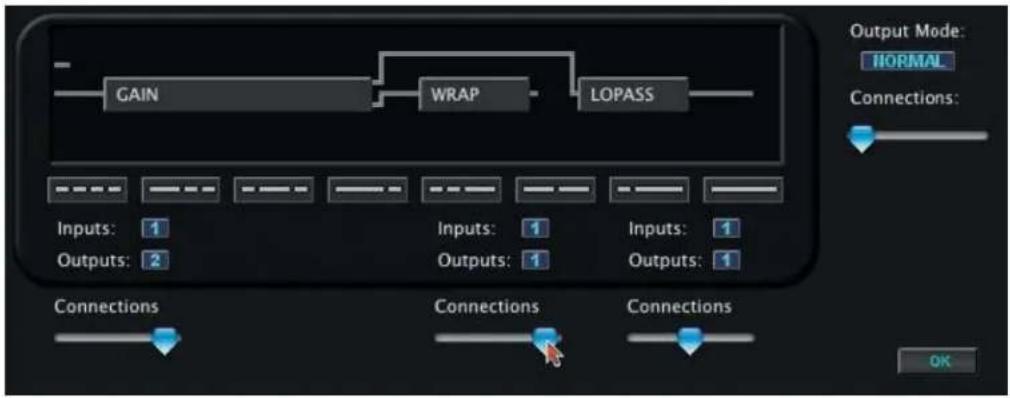
Next, we'll configure the Algorithm for two outputs, and configure the Output connection routing:
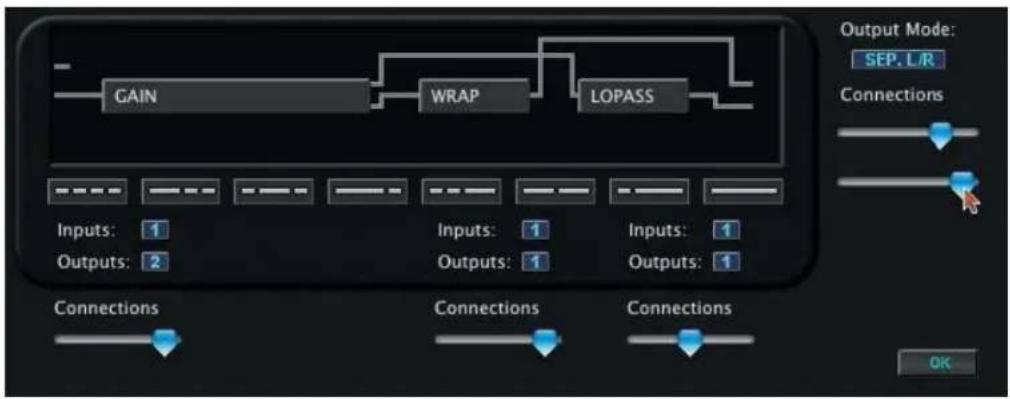
flowchart
graph TD
    A["Gain"] --> B["WRAP"]
    B --> C["LOPASS"]
    D["Inputs: 1"] --> E["Outputs: 2"]
    F["Inputs: 1"] --> G["Outputs: 1"]
    H["Inputs: 1"] --> I["Outputs: 1"]
    J["Connections"] --> K["Connections"] --> L["Connections"] --> M["OK"]
    N["Output Mode: SEP.L/R"] --> O["Connections"]
Now that the new algorithm is complete, we click on the OK button to finish. A 'SAVE AS' dialog box appears, allowing us to save the new algorithm:
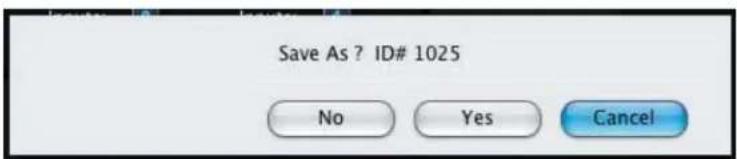
Clicking YES results in a 'Write' dialog box, allowing us to save the new algorithm as the ID (object) number of our choosing (#1040 selected here):
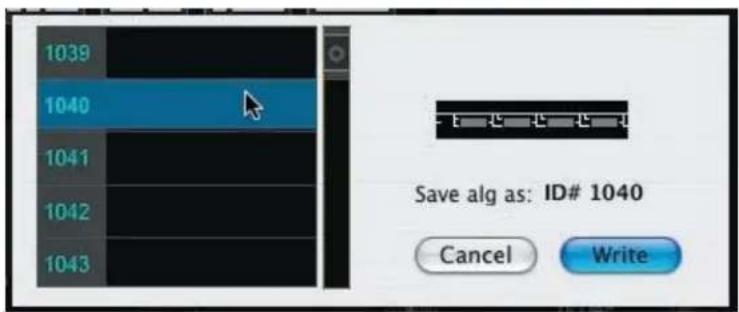
Clicking the WRITE button writes the new algorithm to the PC3 and dismisses the Algorithm Wiring Display.
FX Edit Window
The FX Edit window (also called 'Effects Chain') allows you to edit and modify the Program Common Effects. Up to 16 effects can be connected in series to create complex chains of signal processing. The Effects Chain window is shown below.
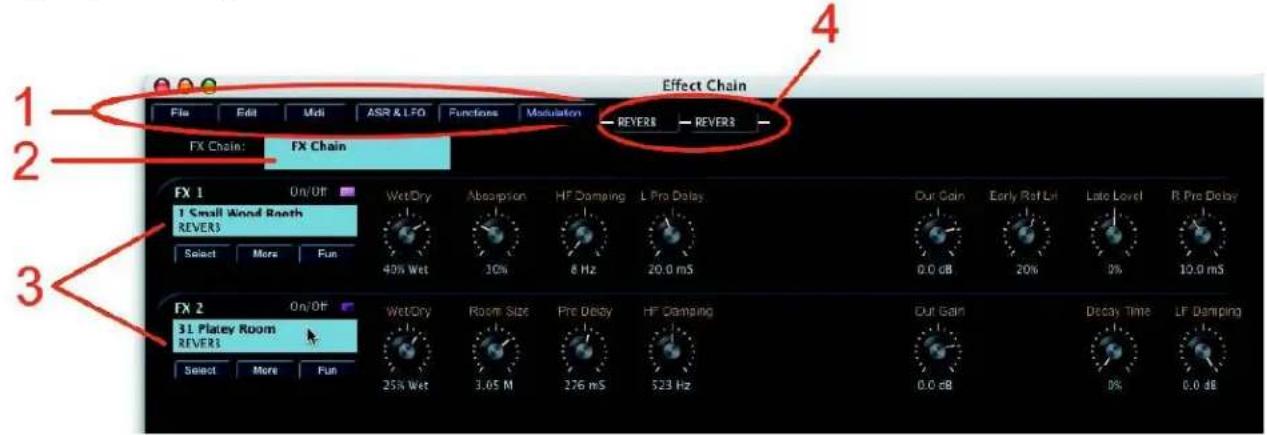
The main components of the Effects Chain window are:
- Toolbar to access file storage and data transfer functions.
- Name of the current Effects Chain
- FX Overview panels.
- Block diagram displaying the Effect types in the chain
FX Edit Toolbar
The FX Edit Toolbar allows you to access the File, Edit & Receive functions associated with the FX Edit window, as well as the ASR& LFO, Functions and Modulation options.
A description of each Toolbar button follows. A description of each Toolbar button follows.

FILE:
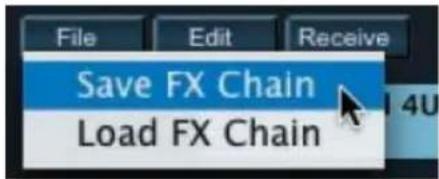
The FILE function allows you to Save the current FX Chain or Load a new FX Chain. Selecting either Save or Load will result in a dialog box asking you to either name a file (to Save) or select a file (to Load).
For a list of file extensions associated with FX Chains and other files, see Appendix A.
EDIT:
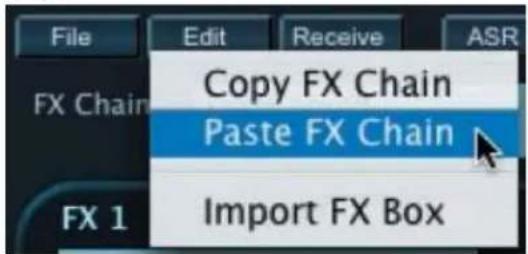
The EDIT function allows you to Copy the current FX Chain or Paste a previously copied FX Chain. You can also choose to Import an FX Box.
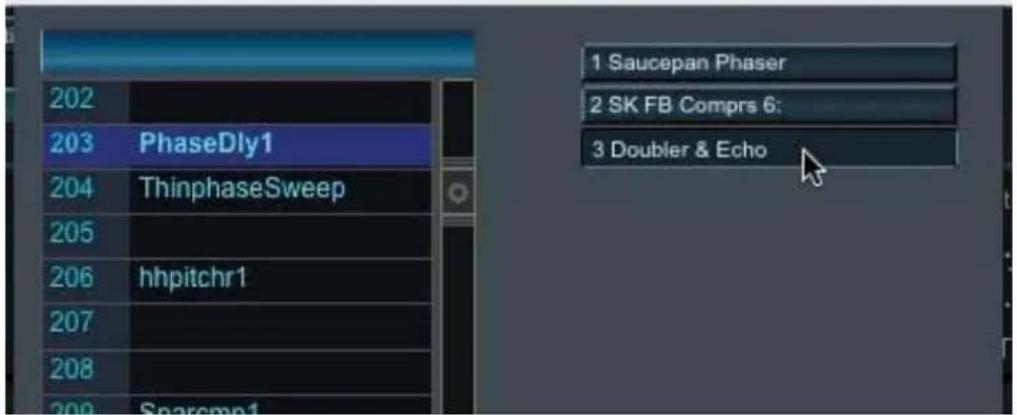
The FX IMPORT option allows you to replace the existing FX Box by copying an FX Box from another Chain.
When you select the IMPORT FX BOX option, a drop-down window appears like the one shown below. To make a selection, first choose a Program ('PhaseDly1' in this example). A list of the FX Boxes from the chosen FX Chain will appear on the right side. Select an FX Box ('Doubler & Echo' in this example), and the new box will replace the current one. Click the OK button to dismiss the window.
Effect Chain
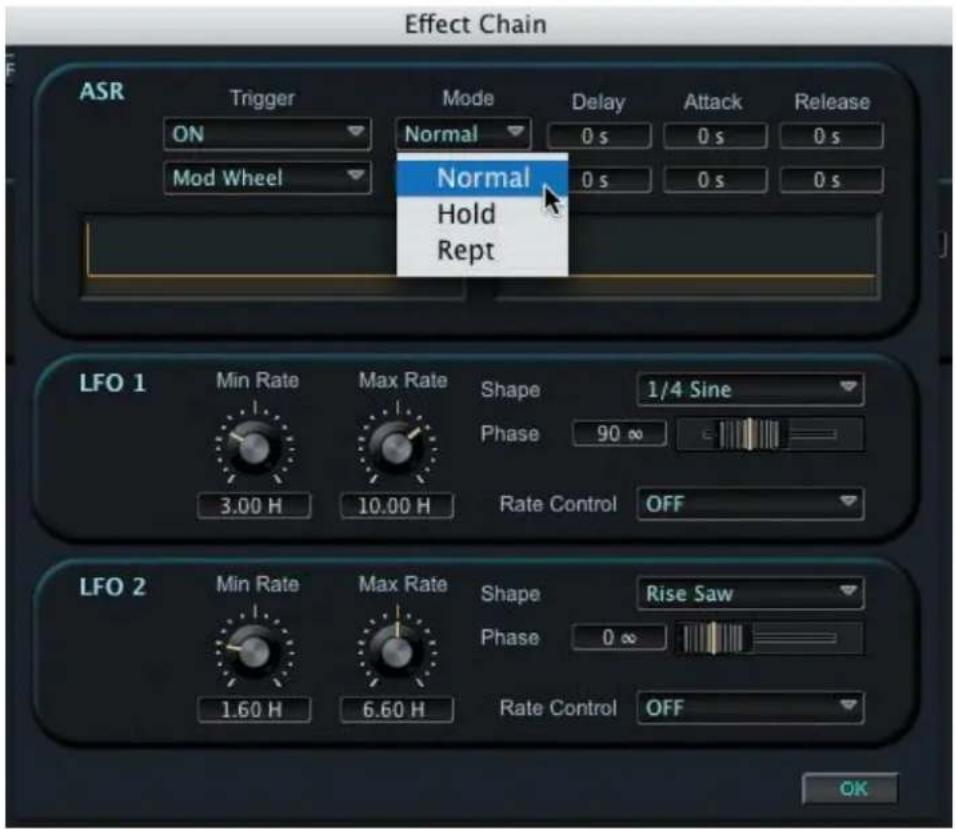
ASR & LFO:
Clicking on the ASR & LFO button produces a drop-down window where you can adjust the ASR envelope and LFO parameters that affect the current FX Chain:
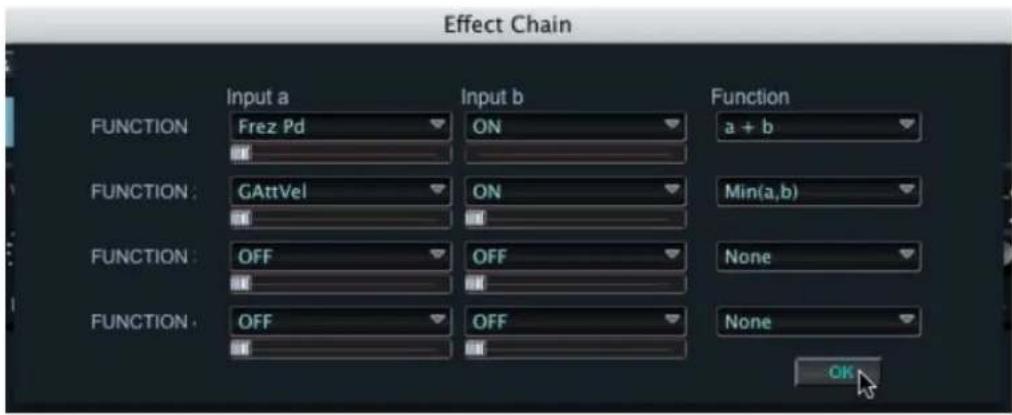
FUNCTION:
Clicking on the FUNCTION button produces a drop-down window where you can adjust the Functions that apply to the current FX Chain:
MODULATION:
Clicking on the FX MODULATION button...

FX Overview Panel
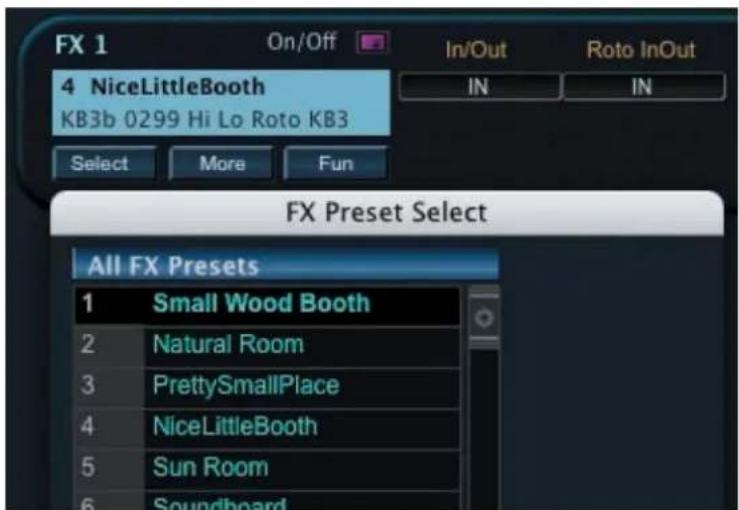
The FX Overview Panel provides basic information about each Effect in the FX Chain. The Overview panel displays the current Effect, and provides a Toolbar with three buttons to select different Effects (the SELECT button), display the complete settings of the current Effect (the MORE button), and access Effect Functions (the FUN button). The panel also contains an ON/OFF button and controls (knobs) to adjust basic Effect settings. The number and arrangement of the knobs will vary according to the selected Effect.

SELECT Button
Clicking on the SELECT button produces a window that allows you to choose from a list of FX Presets:
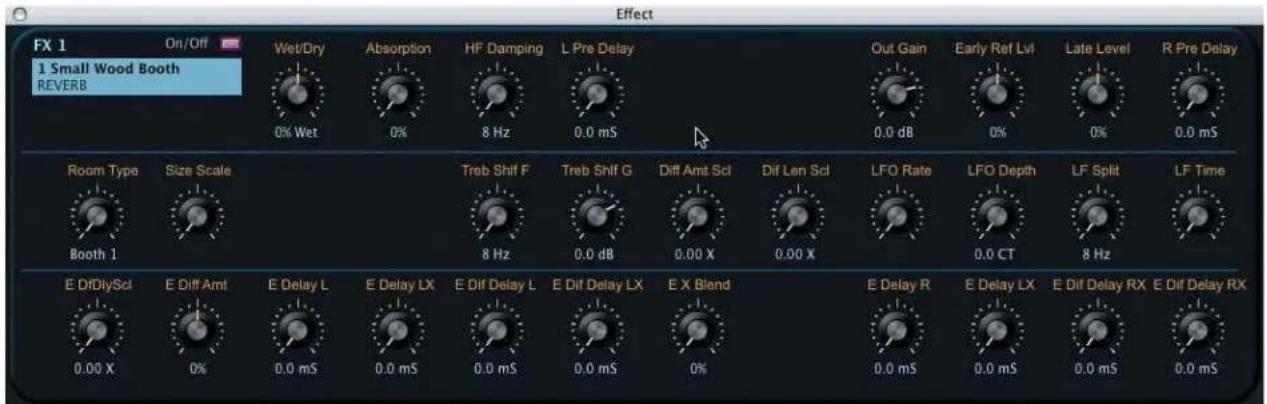
MORE Button
Clicking on the MORE button results in a new window that displays every parameter setting associated with the selected FX Box:
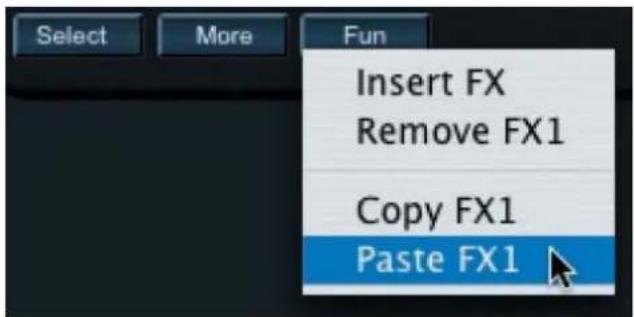
FUN Button
Clicking on the FUN button results in a contextual menu that allows you to Insert (Add) or Remove an FX block, Copy the current FX block, or Paste a previously copied FX block to the selected FX block:
Here, the selected FX can be 'fine-tuned' using the available controls. When done, clicking on the CLOSE button in the upper right corner will dismiss the window.
KB3 Mode Edit Window
The KB3 Mode Edit Window allows you to access all of the parameters that make up a KB3 Mode Program. The KB3 Mode Edit window is shown below.
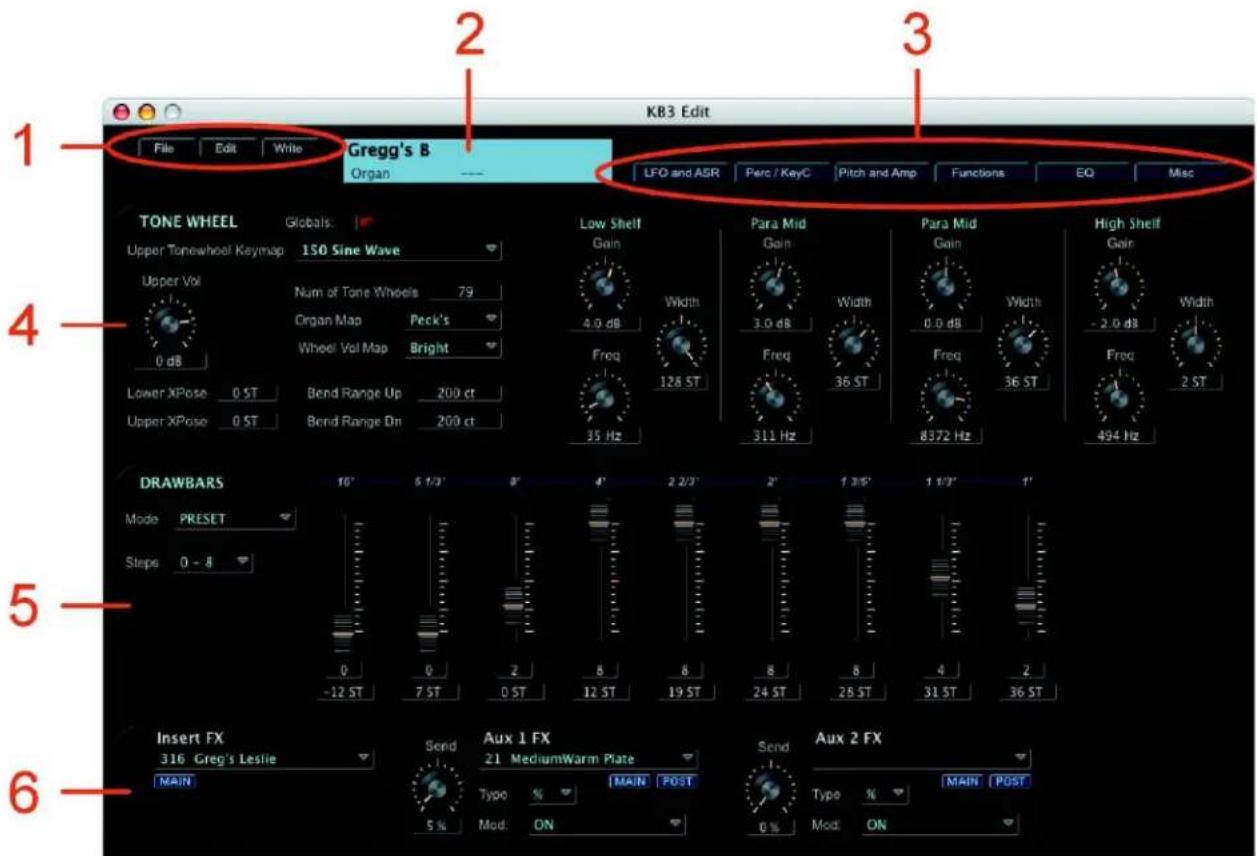
Key components of the KB3 Mode edit window are:
- Toolbar to access KB3 Mode file storage options.
- The KB3 Name display area.
- 'Views' Toolbar to select parameter views in the KB3 Mode Edit Window
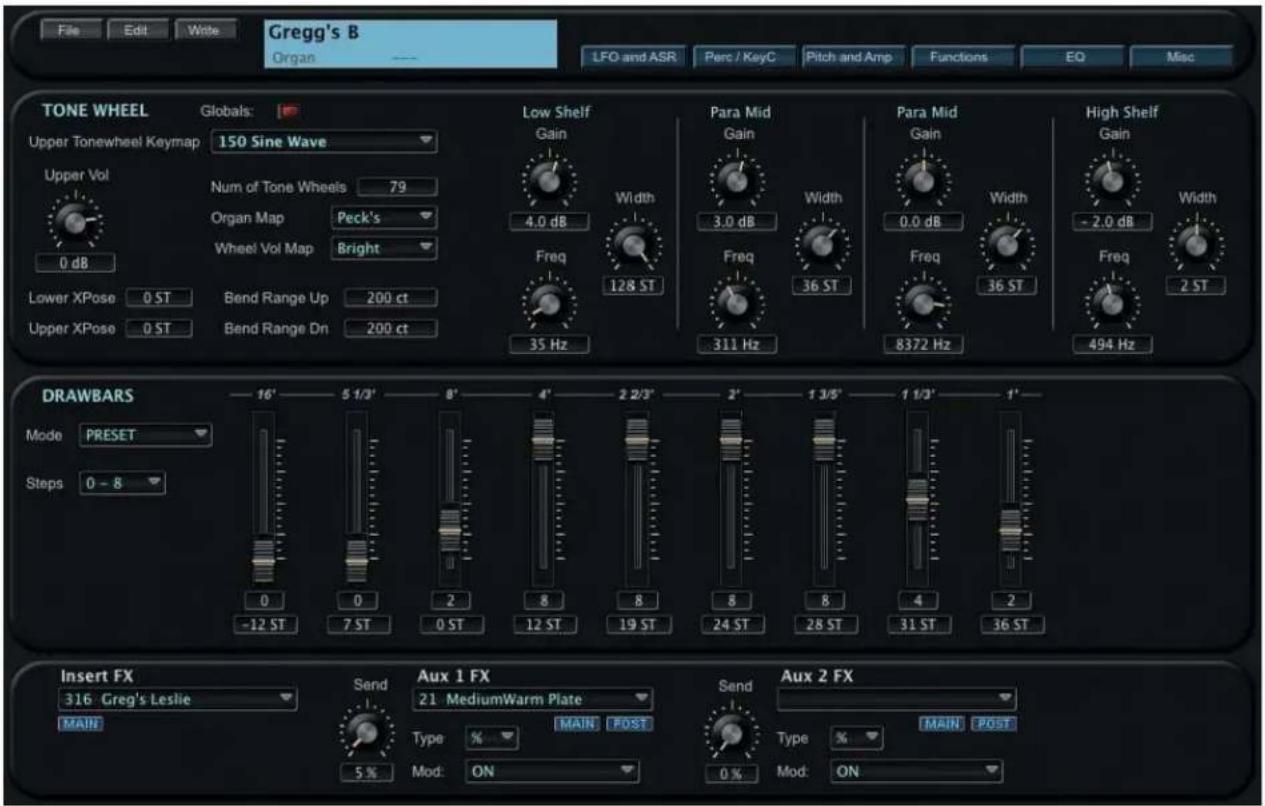
- Upper Panel, displaying Tone Wheel and related KB3 parameters (the parameter view is based on the selections in the 'Views' Toolbar).
- Middle panel, alternately displaying Drawbars or LFO/ASR parameters (the paremeter view is based on the selection in the 'Views' Toolbar).
- Bottom panel, displaying the Insert and Aux FX parameter assignments.
KB3 Mode Toolbar
The KB3 Mode Toolbar allows you to access the File, Edit and Write functions associated with the KB3 Mode edit window. A description of each Toolbar function appears below.
FILE:
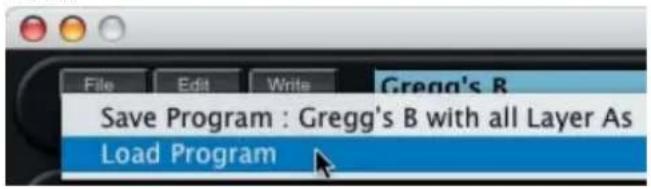
Programs have a '.kb3' file extension.
The FILE function allows you to Save the current KB3 Mode Program or Load a new KB3 Mode Program. Selecting either the 'Save' or 'Load' options will result in a dialog box asking you to either name a file (to Save) or select a file (to Load). KB3 Mode
EDIT:
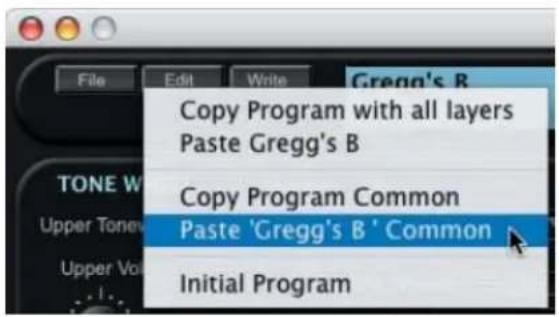
The EDIT function allows you to Copy the current KB3 Mode Program or Paste a previously copied KB3 Mode Program. You can also choose to Copy the Program Common parameters, Paste previously copied Program Common parameters, or Initialize the current KB3 Mode Program.
WRITE:
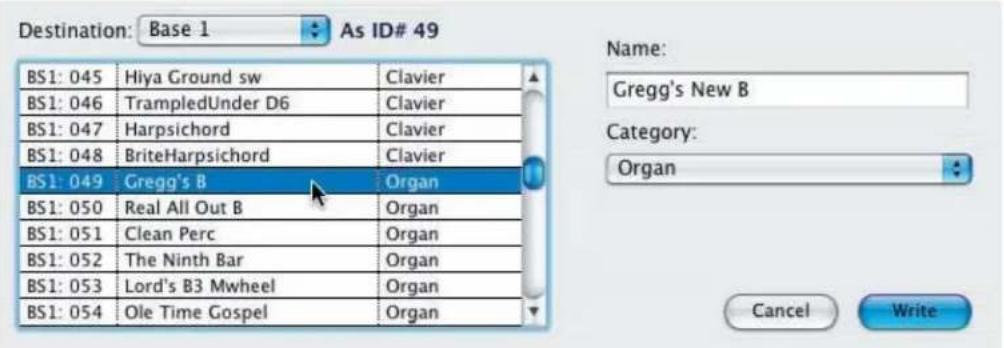
Clicking on WRITE button produces a window allowing you to write the current KB3 Mode Program to the PC3. In this window you can change the name of the Program, assign a category if desired, and select the memory location where the Program will be written:
'Views' Toolbar
Within the KB3 Mode Edit window, you have the option of displaying different para-meter groups for editing. The buttons in the Views Toolbar are used to select and view the desired parameter group:

Clicking the LFO AND ASR button switches the view in the middle panel from the Drawbars display to a view of the LFO and ASR envelope parameters:
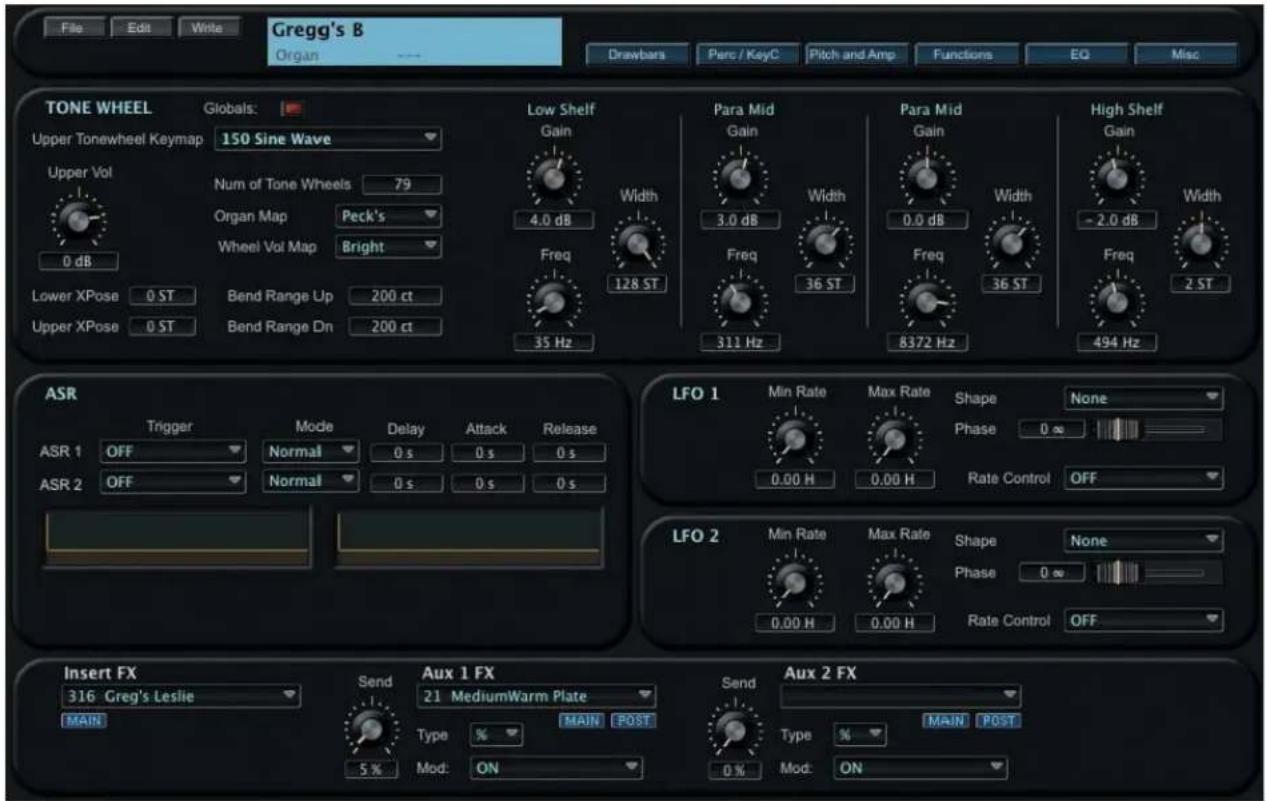
Note that when the LFO and ASR parameters are displayed, the label on the LFO and ASR button switches to "Drawbars", allowing you to revert to the Drawbars parameters display:
Clicking the Perc/KeyC button produces a down-down panel allowing you to configure and adjust Percussive and Key Click parameters:
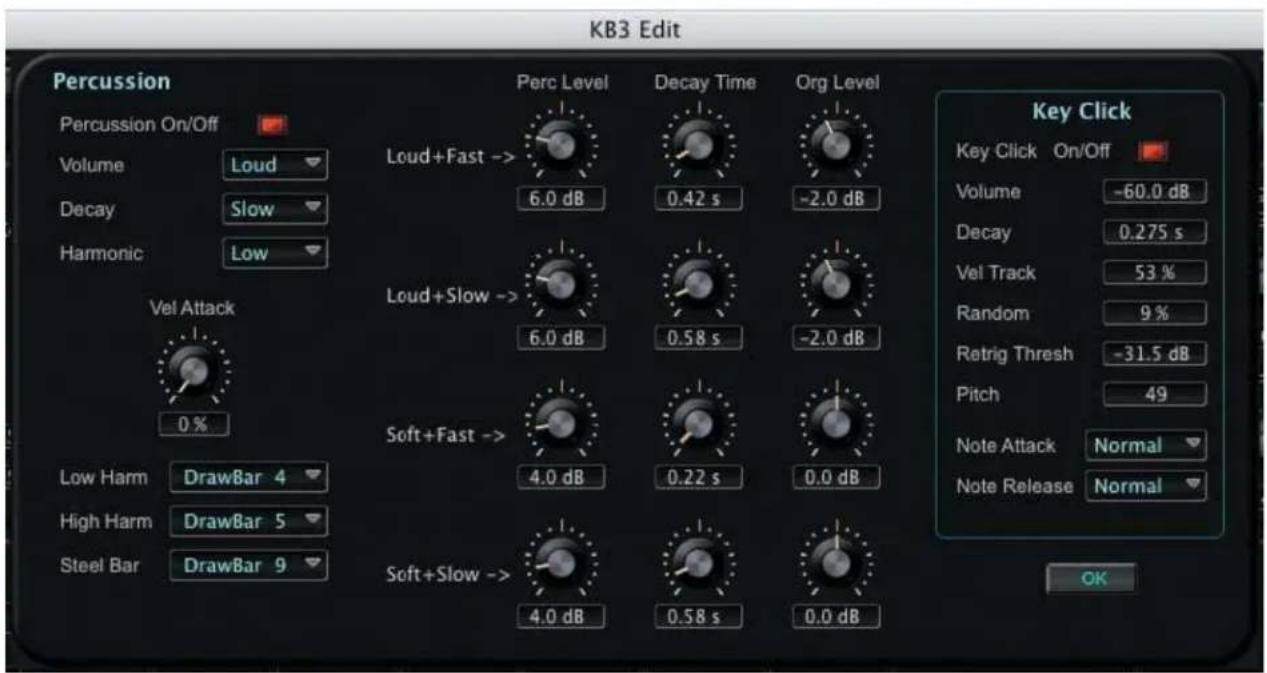
After making changes, click on the OK button to dismiss the window.
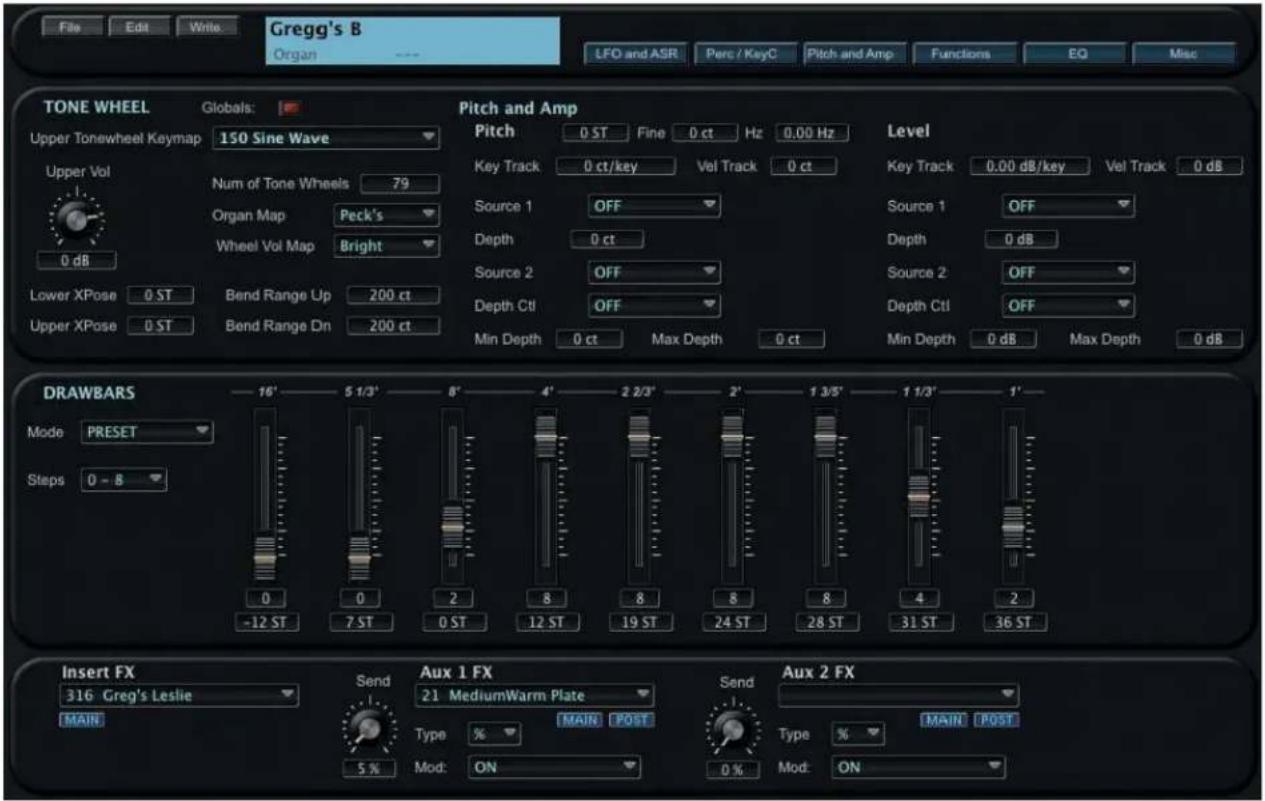
Clicking the Pitch and Amp button displays the Pitch and Amplifier parameters in the Tone Wheel (top) panel:
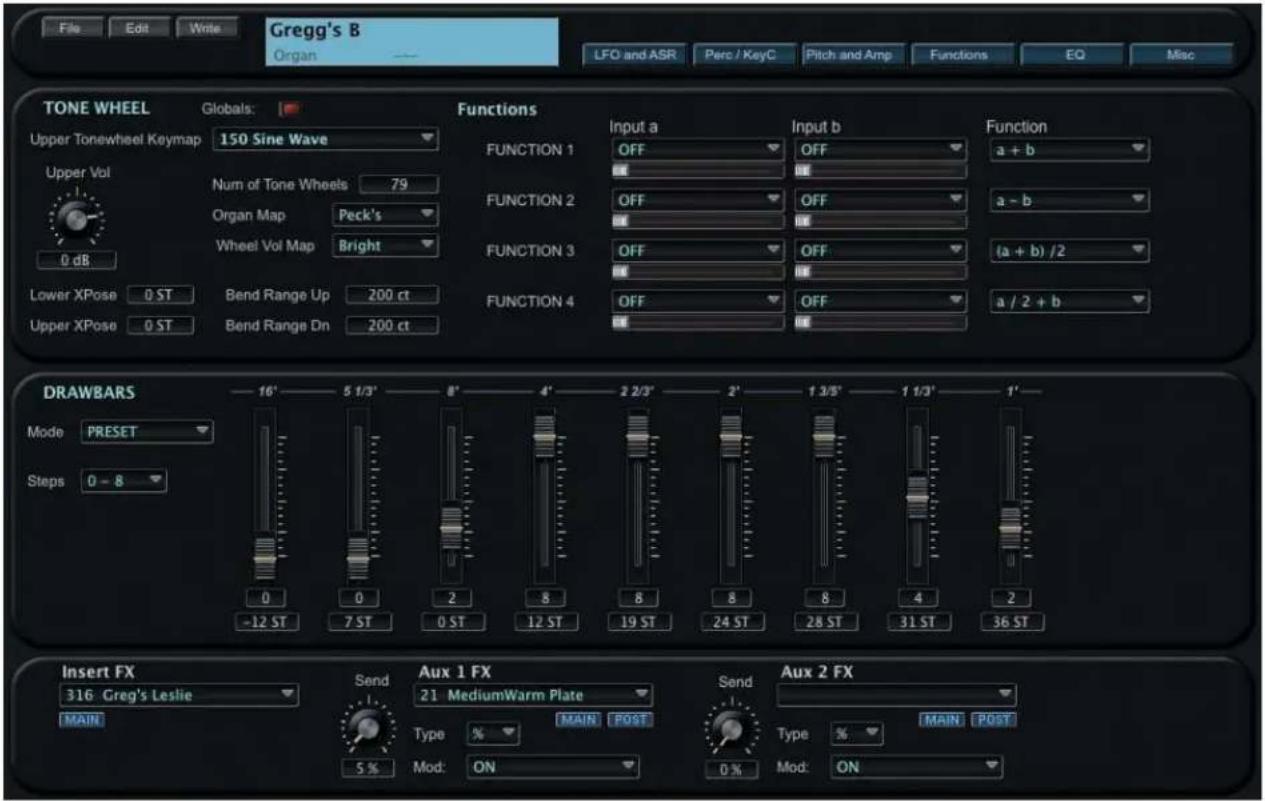
Clicking the Functions button displays the Function parameters in the Tone Wheel (top) panel:
Clicking the EQ button displays the Equalization parameters in the Tone Wheel (top) panel:
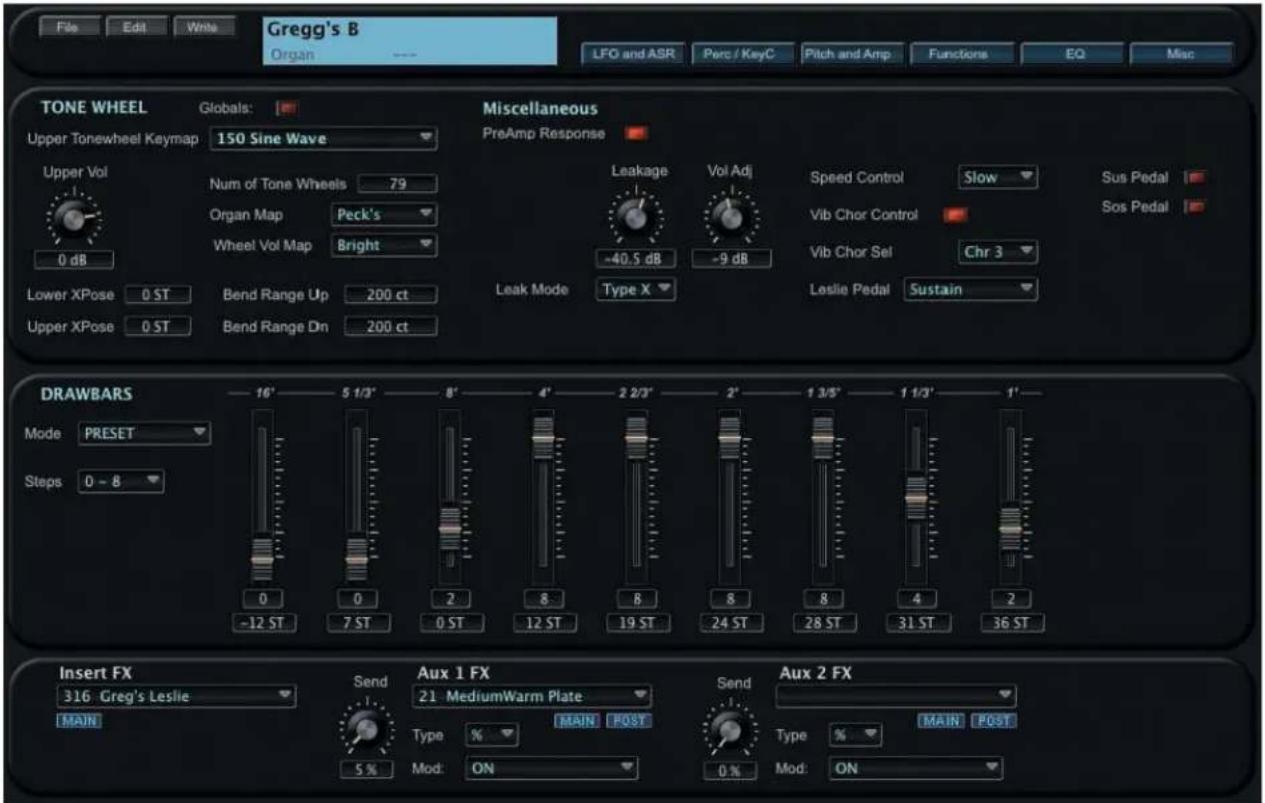
Clicking the Misc button displays miscellaneous parameters in the Tone Wheel (top) panel. These include leakage and volume parameters, and Leslie speaker settings:
8. Channel Mixer Window
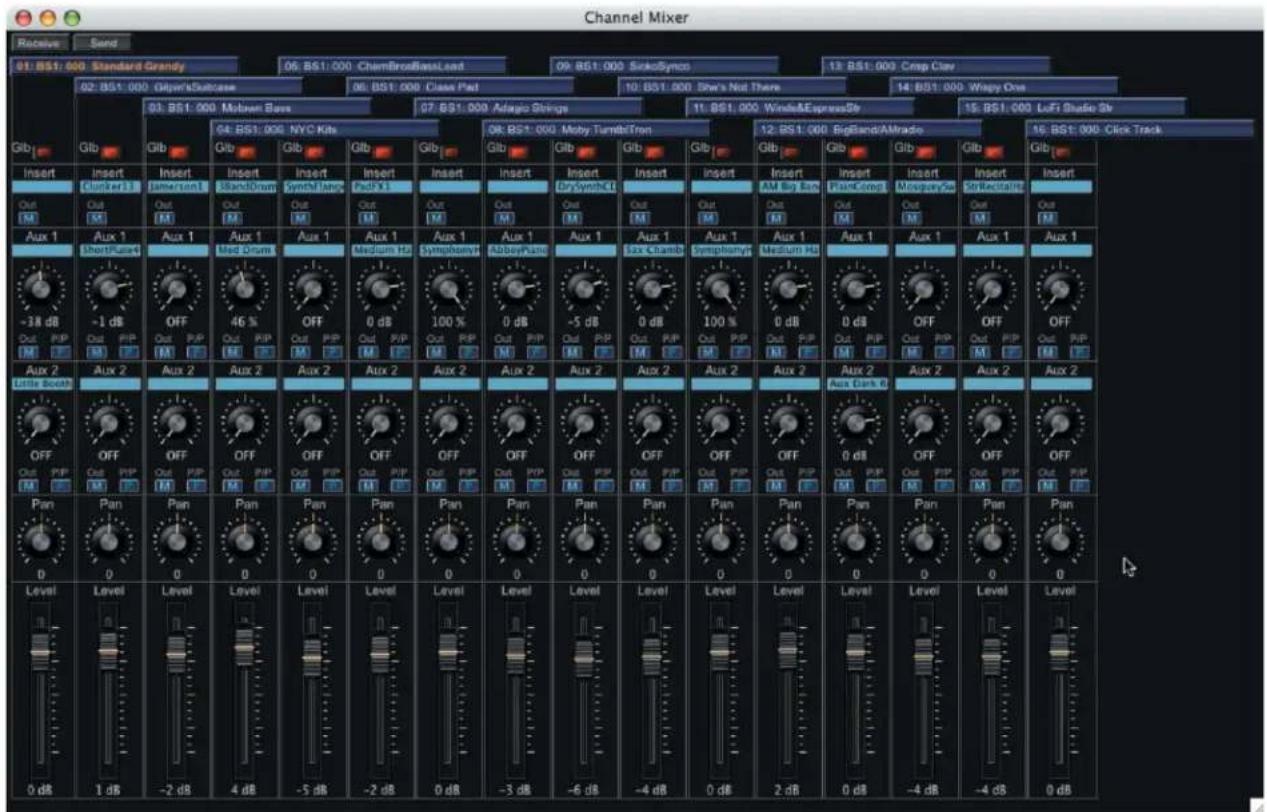
The Channels Mixer window allows you to control the mix parameters of the Programs assigned to the 16 MIDI Channels. The Channels Mixer window is structured like a conventional multi-channel mixer, with fader controls for Levels, rotary controls for Pan, Insert and Auxiliary Effects, and switches for Muting functions. The Channel Mixer Window is shown below.
While using SoundEditor, the PC3 must not be in Edit Mode. Failure to observe this precaution can result in unreliable editing and improper operation.
Single Mixer Channel
SoundEditor's Channel Mixer features 16 identical channels, one for each MIDI channel. The figure below shows the components that make up a single mixer channel.
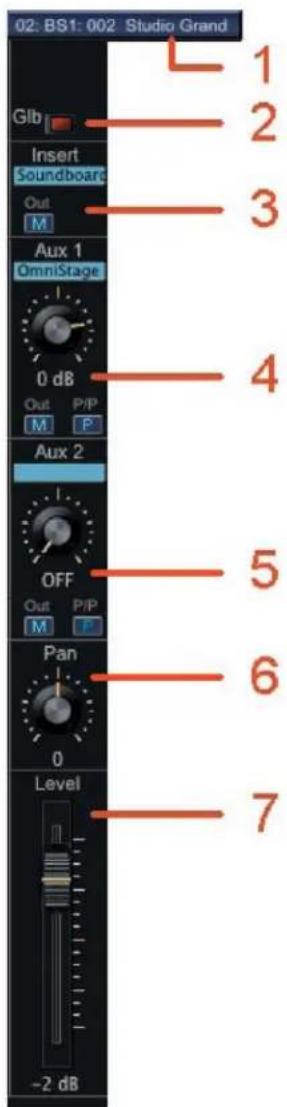
- The MIDI Channel and PC3 Program assignment
- Global switch
- Insert Effect and Main/Secondary Output switch
- Auxiliary 1 Send with Pre/Post control and Main/Secondary Output switch. Then the Pre/Post button is lit, 'Pre' is selected
- Auxiliary 2 Send with Pre/Post control and Main/Secondary Output switch. When the Pre/Post button is lit, 'Pre' is selected
- Pan (Panorama) control
- Level fader

The parameter values displayed in a Mixer Channel reflect the Common and FX values for the Program that is assigned to that channel.
Clicking on the Aux1 or Aux2 fields opens the FX Chains window, allowing you to select a new effect.
Selecting Mixer Programs
Although the PC3 Program assignments are already established when you display the Mixer Window, you can change them from the Mixer without having to return to the MIDI Channel Display:
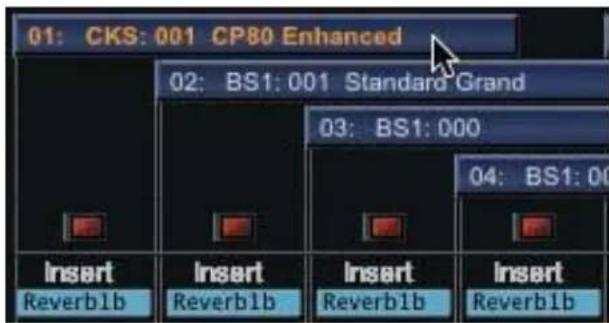
Click on the desired MIDI Channel/Program Assignment bar in the Mixer.
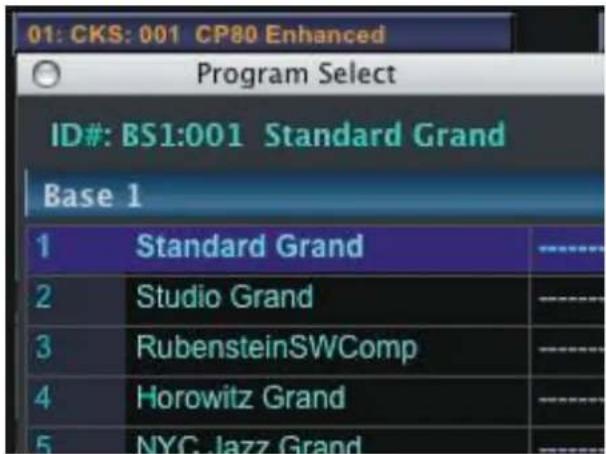
A Program Select window will appear. In the Program Select window you can freely switch banks, change the sort order, or use the Search function to locate and select a new Program.
RECEIVE and SEND Buttons
The RECEIVE and SEND buttons in the upper left corner of the Mixer window allow you to synchronize Mixer settings between SoundEditor and the PC3 if MIDI communications are interrupted:
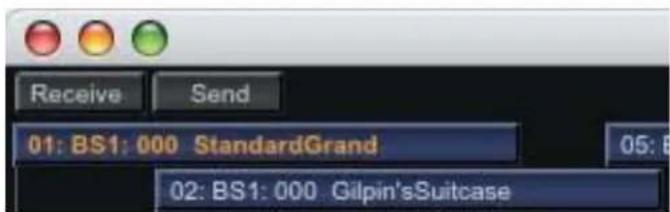
9. Setup Window
The Setup Window allows you to select, view and edit PC3 Setups. The Setup Window is shown below.
The main components of the Setup window are:
- 'Mode' Toolbar buttons, used to access the Program, Setup, MIDI, Master, Effect and EQ+Comp functions.
- The currently selected PC3 Setup
- The Setup Bank list
- Toolbar to access Setup functions (Edit, File and MIDI)
- The Programs included in the current Setup.
While using SoundEditor, the PC3 must not be in Edit Mode. Failure to observe this precaution can result in unreliable editing and improper operation.
Setup Toolbar
The Setup Toolbar allows you to access the Edit, File, Edit & MIDI functions associated with the Setup window. A description of each Toolbar function follows.
EDIT:
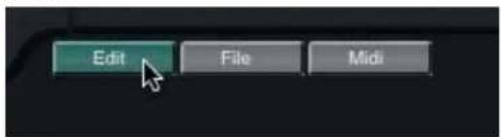
EDIT allows you to edit the currently selected Setup. Setup Editing is covered in Chapter 10.
FILE:
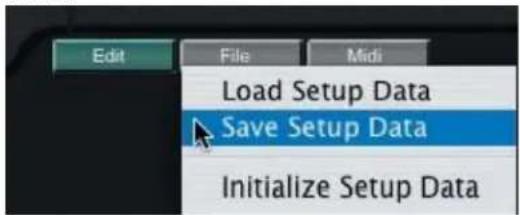
The FILE function allows you to Load, Save or Initialize Setups. Selecting the Load or Save option will result in a dialog box asking you to either select a file (to LOAD) or name a file (to SAVE).
For a list of file extensions associated with Setups and other files, see Appendix A.
MIDI:
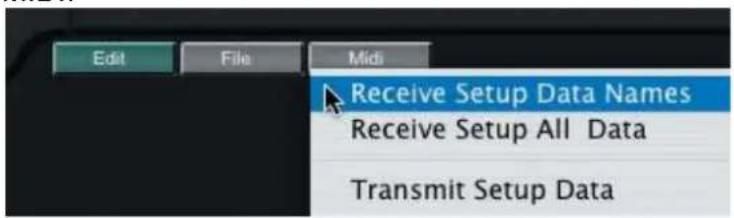
The MIDI function allows you receive a bank of Setups from the PC3 (either Setup Names or Setup All Data), or transmit the current Setup Data to the PC3.
Individual Setup Options
Right-clicking on any Setup in the Setup List Window will produce a contextual menu displaying the options for the selected Setup:
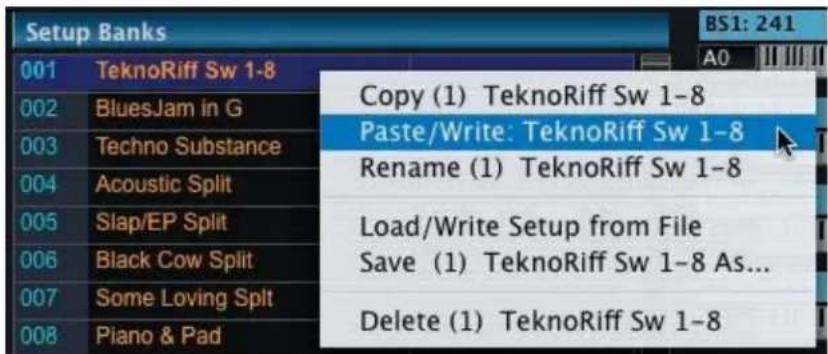
When the 'Copy' option is chosen, SoundEditor will copy the selected Setup.
Selecting the 'Paste/Write' option will allow you to paste the previously copied Setup to the current location. When pasted, the Setup is automatically written to the PC3
at the current location. Note that the 'Paste/Write' option is only available if a Setup has already been copied. If no Setup has been copied previously, the 'Paste/Write' option does not appear.
Selecting the 'Rename' option will allow you to rename the selected Setup in the Setup Display field at the top of the Editor window.
When the 'Load/Write Setup from File' option is selected, a 'Load Setup Data' window will appear. You will need to navigate to and select a Setup to load. Note that valid Setup files have a '.3ss' extension in the file name. Make a selection and click OPEN. The selected Setup will be loaded into SoundEditor and automatically written to the PC3.
When the 'Save...' option is selected, a 'Save Setup Data' window will appear. The name of the PC3 Setup will appear in the 'Save As' name field, but you have the option to change it prior to saving. Make any desired changes and then select the destination location where the file will be stored. Click SAVE to save the file.
The 'Delete' option is used to delete the selected Setup in SoundEditor. It does not delete the Setup on the PC3. When 'Delete' is selected, you will be prompted with a dialog box asking you to confirm this operation. In the dialog box, click YES to proceed, or click CANCEL to cancel the operation.
10. Setup Editing
This chapter will describe the various windows and views for editing PC3 Setups.
Setup Window
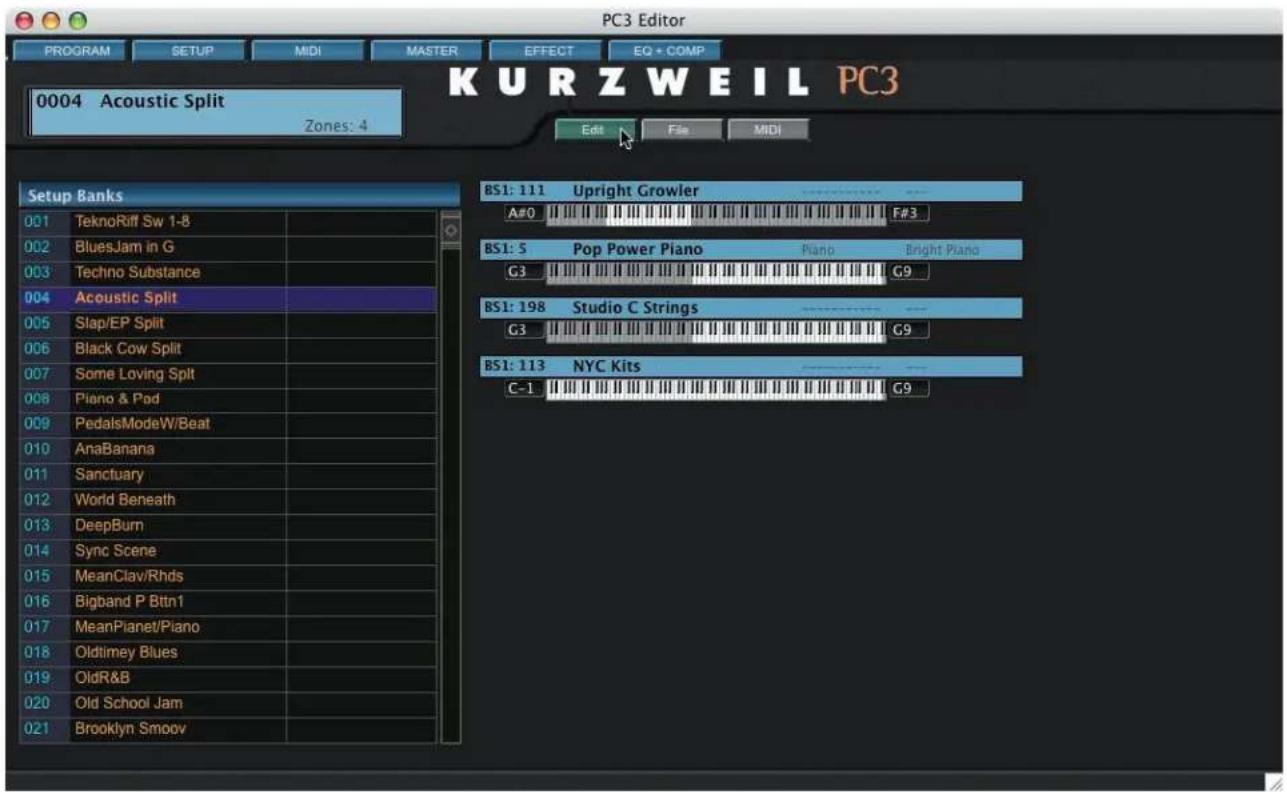
When you select a Setup from the Setup Bank list, the Setup Window displays the PC3 Programs assigned to the chosen Setup along with the keyboard region (zone) that each Program occupies.
Edit Window
Clicking on the EDIT button in the Setup window produces a Setup Edit window like the one shown below.
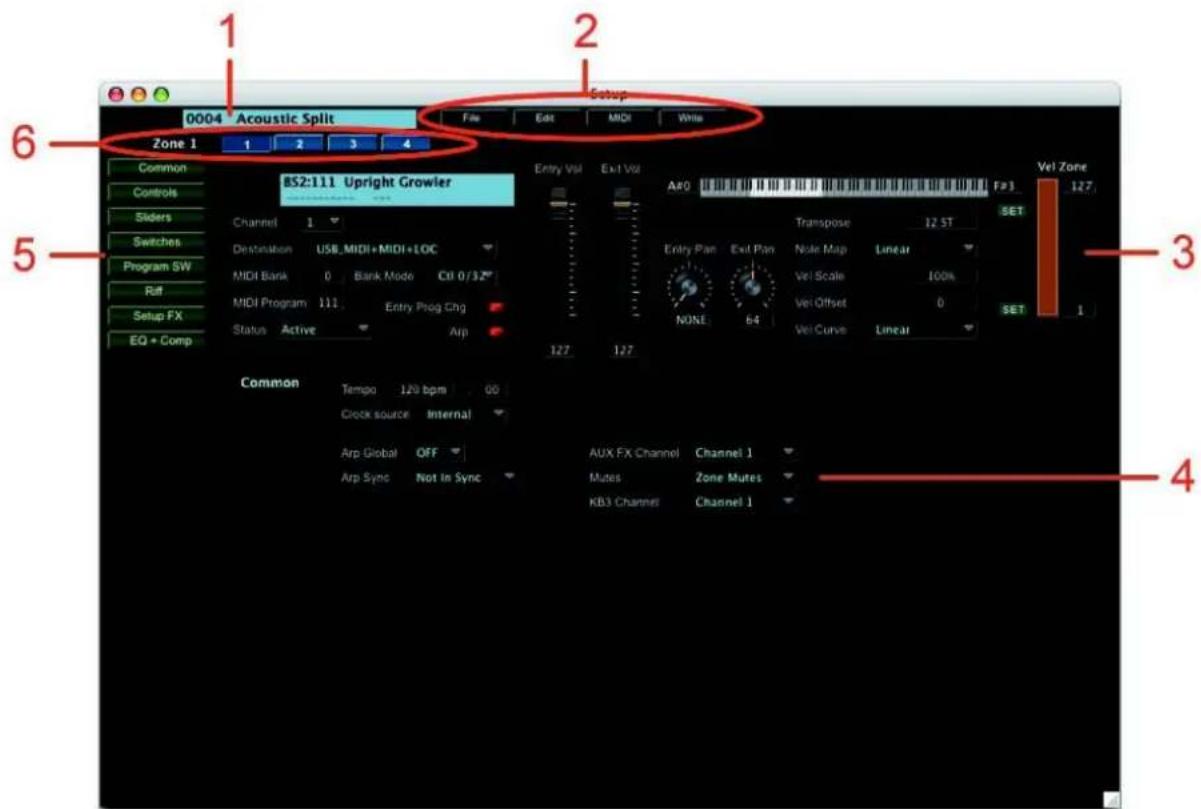
The main components of the Setup Edit window are:
- The currently selected PC3 Setup
- Toolbar to access Setup Edit functions (File, Edit, MIDI and Write)
- The Program parameters for the selected zone (Zone 1 shown)
- Display area for Zone Parameter Groups ('Common' group parameters shown)
- Buttons to select the Zone Parameter Group for editing: Common, Controls, Sliders, Switches, Program Switches, Riff, Setup FX and EQ+Comp.
- Buttons to select the desired Zone for editing (only four Zone buttons are shown, but up to 16 Zone buttons may appear here).
Setup Edit Toolbar
The Setup Edit Toolbar allows you to access the File, Edit, MIDI and Write functions associated with the Setup Edit window. A description of each Toolbar function follows.
FILE:
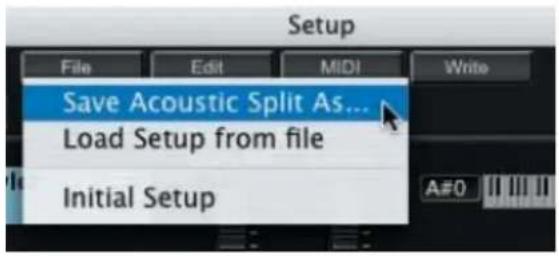
The FILE function allows you to Load, Save or Initialize Setups. Selecting the Load or Save option will result in a dialog box asking you to either select a file (to LOAD) or name a file (to SAVE).
For a list of file extensions associated with Setups and other files, see Appendix A.
EDIT:
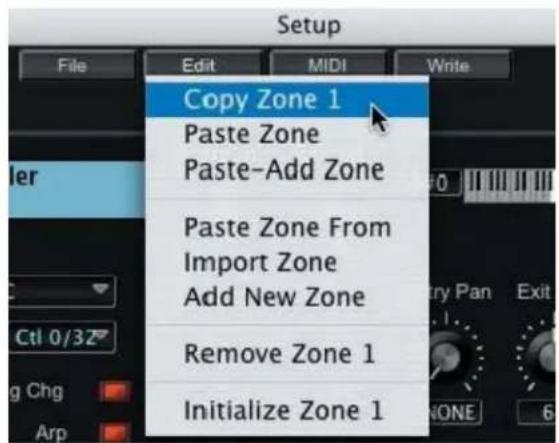
The EDIT function allows you to copy, paste, add, remove and initialize Setup Zones.
The 'Copy Zone' command copies the currently selected Zone.
The ‘Paste Zone’ command pastes a previously copied Zone to the current Zone. This command only appears in the menu after completing a ‘Copy Zone’ operation.
The 'Paste - Add Zone' command adds a new Zone to the Setup and pastes the copied Zone there.
Selecting the 'Paste Zone From' and 'Import Zone' commands produces a new window that allows you to select a Zone from another Setup (see description on the next page).
The 'Add New Zone' command adds a new Zone to the current Setup.
The 'Remove Zone' command deletes the currently selected Zone.
The 'Initialize Zone' command resets the parameters of the current Zone to initial values.
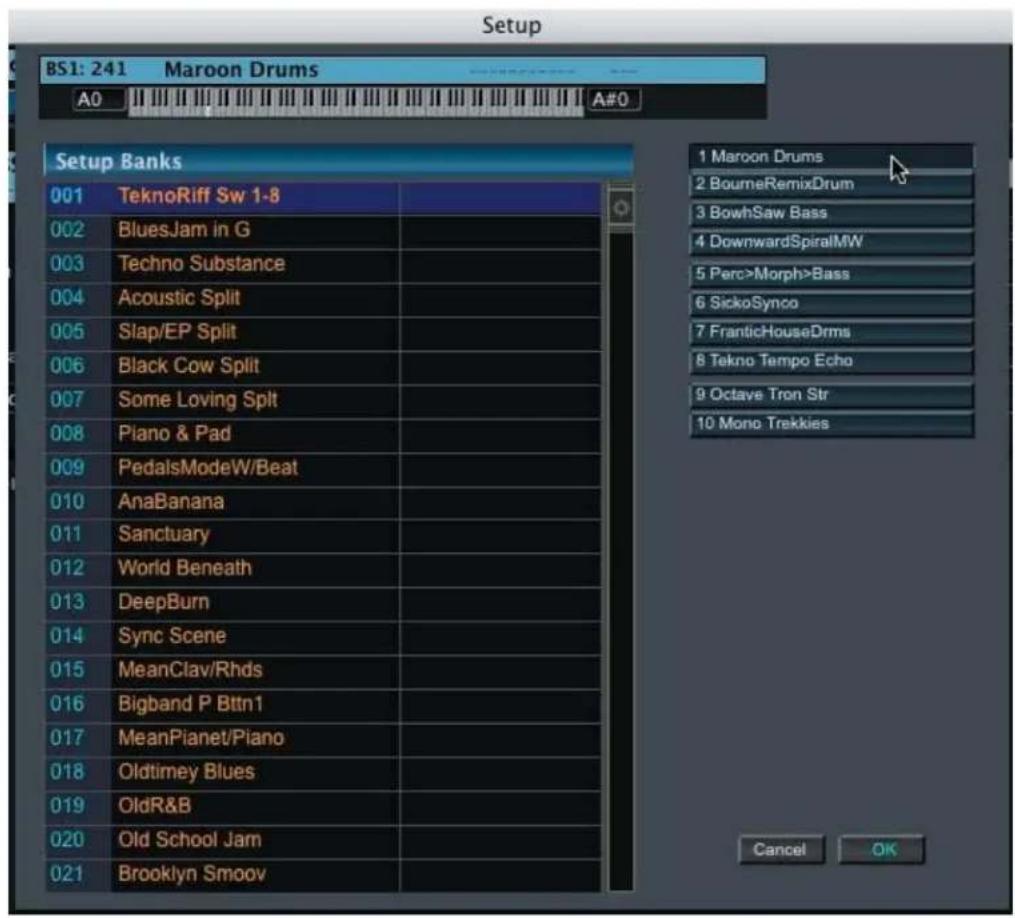
When either the 'Paste Zone From' or 'Import Zone' commands are selected, a window appears that allows you to select a Zone from another Setup. To make a selection, first choose a Setup ('TechnoRiff' in this example). A list of the Zones from the chosen Setup will appear on the right side. Select a Zone ('Maroon Drums' in this example), and that Zone will be displayed
appear below the window title bar. Clicking the OK button will confirm the selection and allow you to paste that Zone into the current Setup.
MIDI:
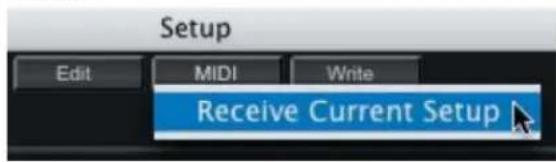
The MIDI function allows you to receive the current Setup from the PC3. This command allows you to resynchronize SoundEditor with the PC3 if you make changes to the Setup from the PC3 panel controls, or if communication is temporarily disrupted between
SoundEditor and the PC3.
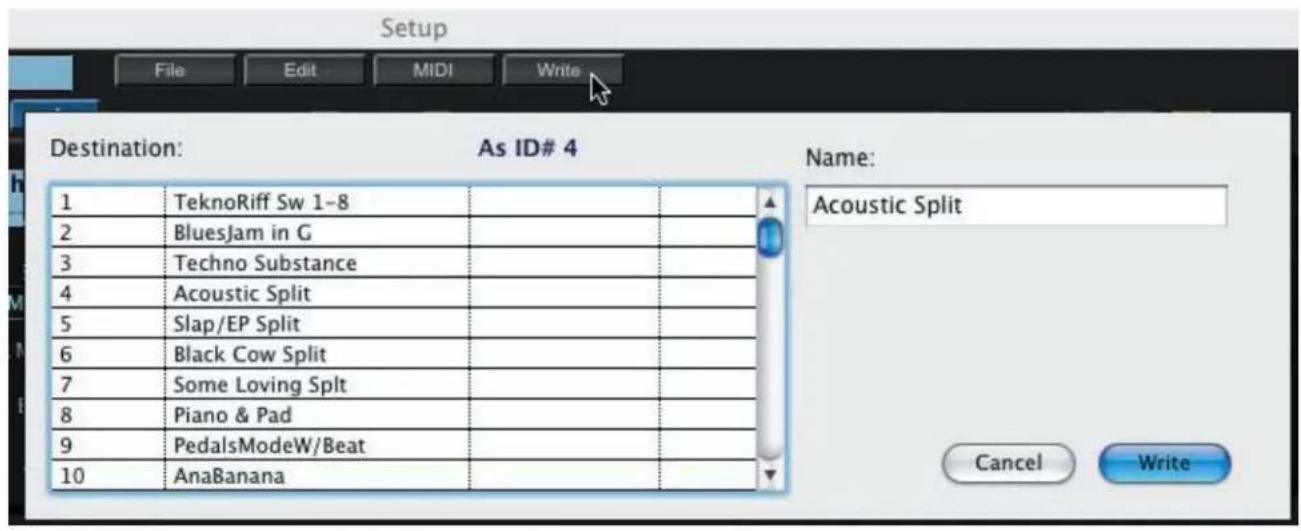
WRITE:
The WRITE function allows you to write the currently selected Setup to the PC3. Clicking on the WRITE button produces a window where you can change the name of the Setup and select the memory location where the Setup will be written:
Zone Parameter Groups
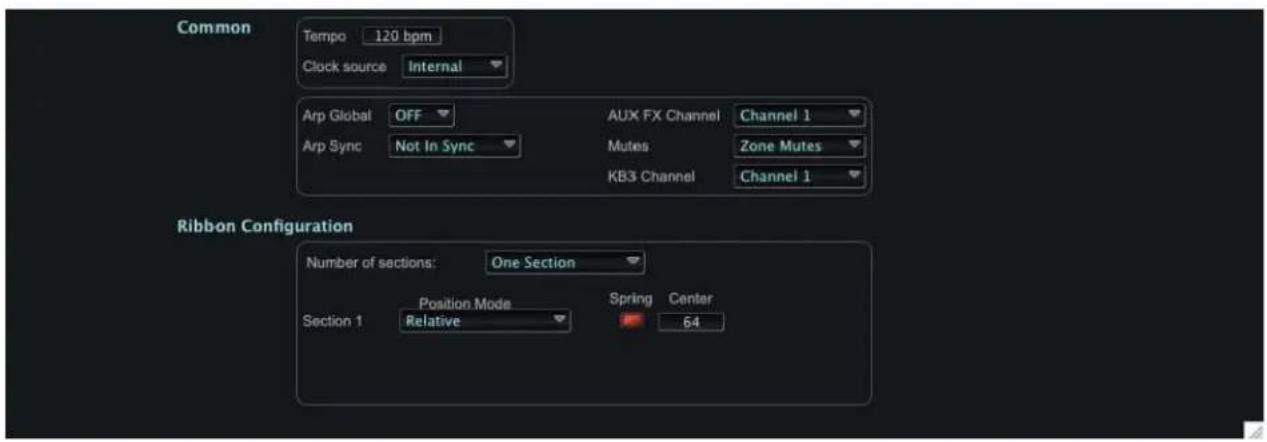
The area in the lower part of the Setup Edit window displays the Zone Parameter Group information. The view you see here depends on the Zone Parameter Group button selection on the left side of the window.
When ‘Common’ is selected, the lower part of the Setup Edit window displays the Common parameters, including tempo, clock source, arpeggiator global and sync, the Ribbon Configuration, and other parameters shared by all Zones:
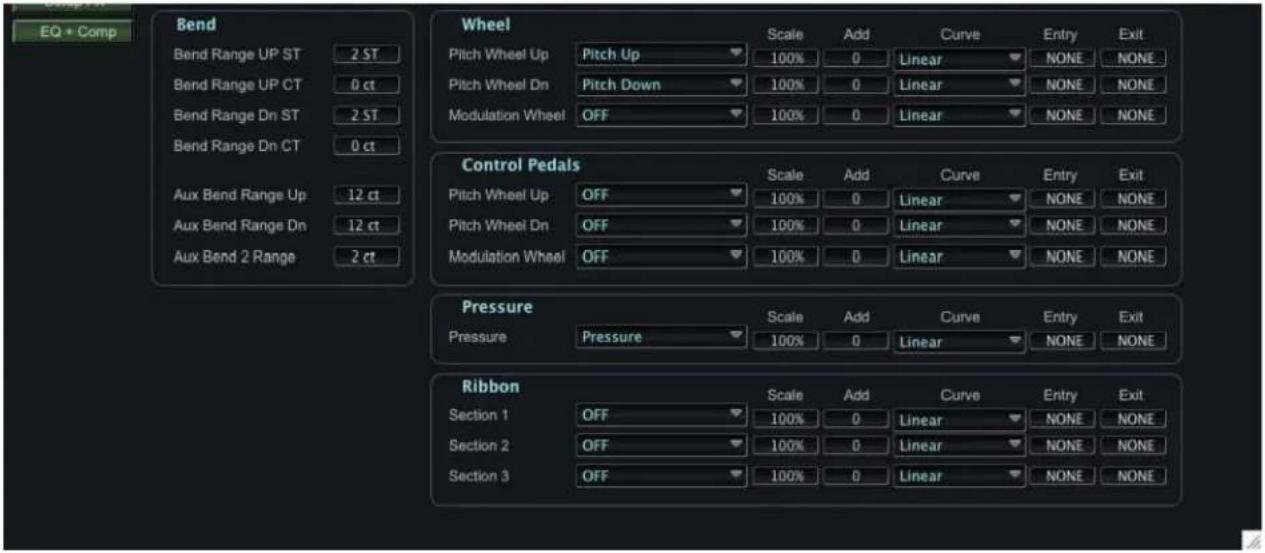
When ‘Controls’ is selected, the Setup Edit window displays the Control parameters associated with Pitch Bend, Mod Wheel, Control Pedals, Pressure and Ribbon functions:
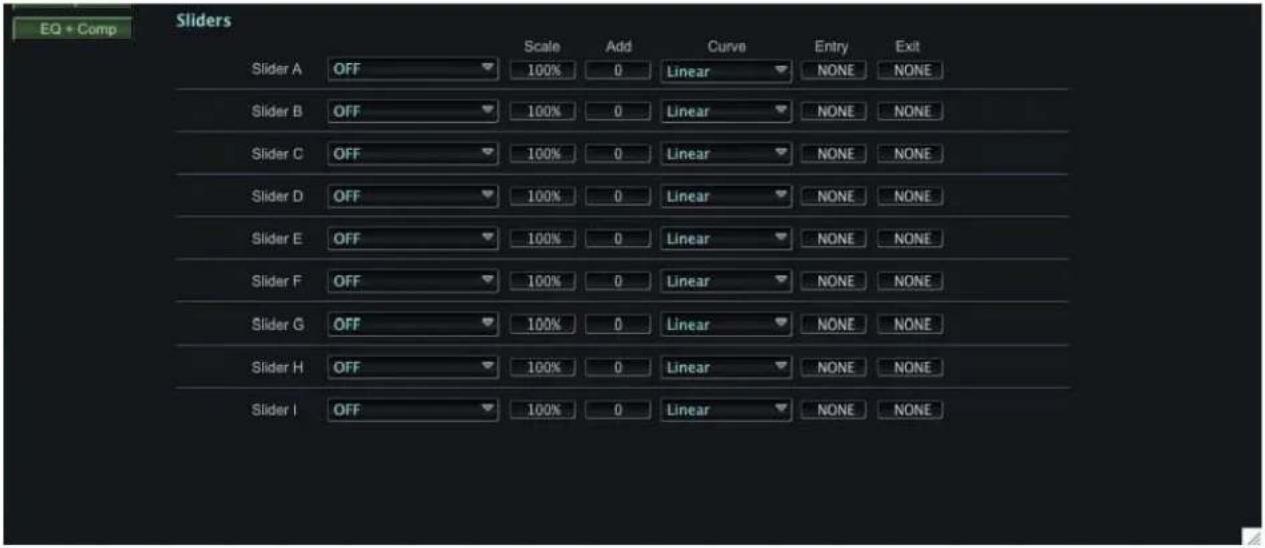
When 'Sliders' is selected, the Setup Edit window displays the Slider assignments for Sliders A - I:
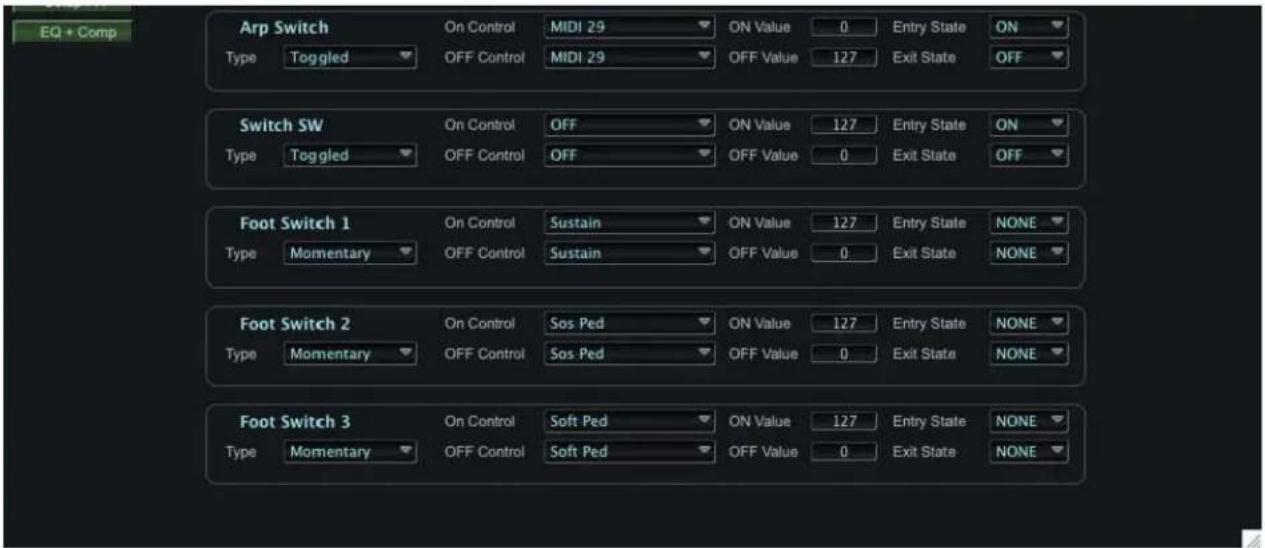
When 'Switches' is selected, the Setup Edit window displays the Switch assignments for the ARP and SW keyboard switches, and Footswitch 1,2 & 3:
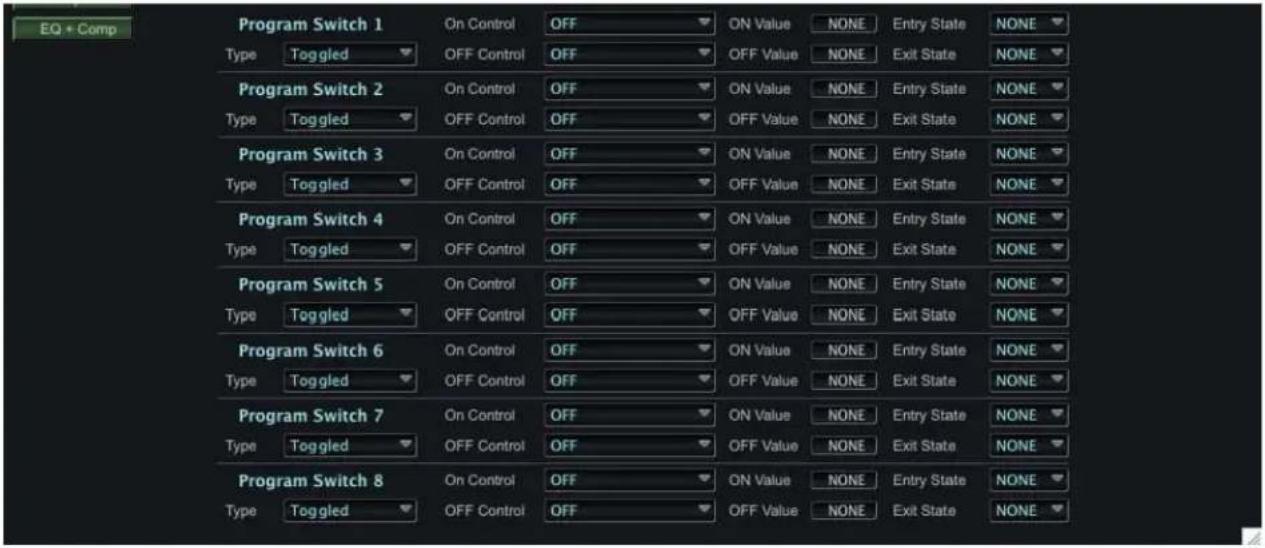
When 'Program SW' is selected, the Setup Edit window displays the Program Switch assignments for switches 1-8:
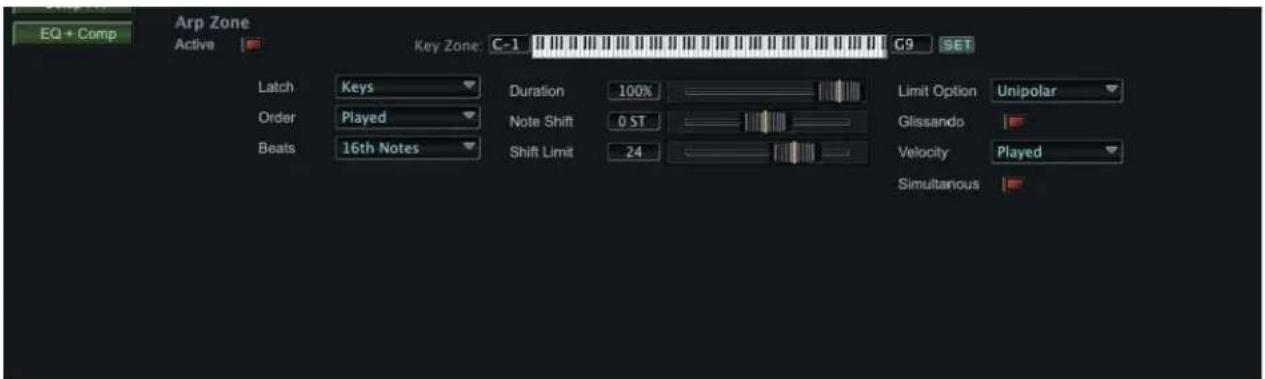
When 'Arpeggiator' is selected, the Setup Edit window displays the Arpeggiator parameters:
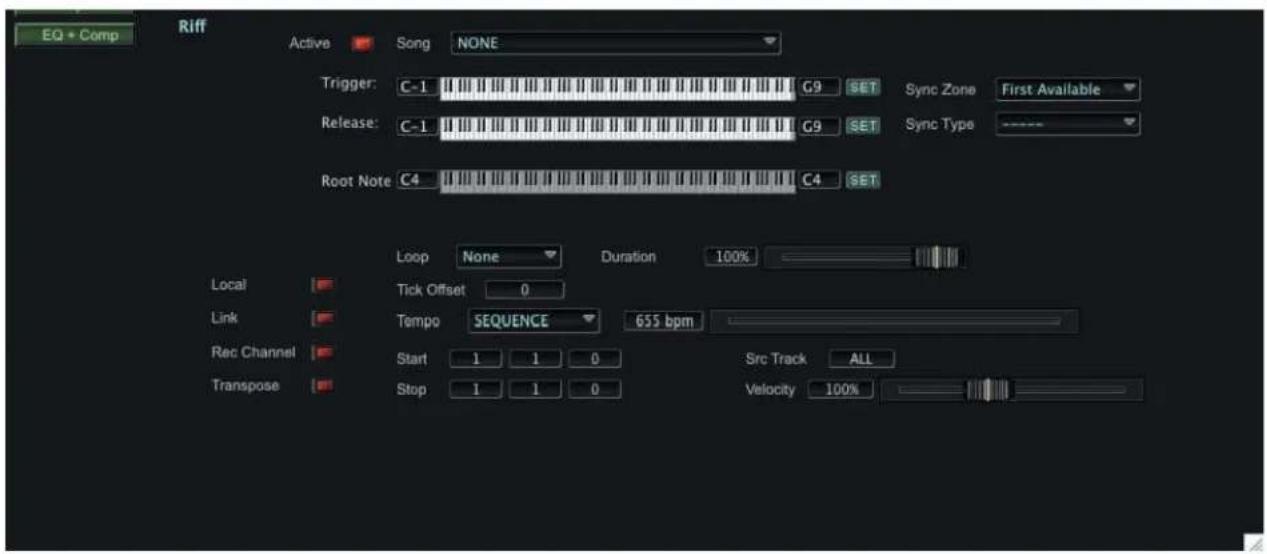
When 'Riff' is selected, the Setup Edit window displays the information associated with Riffs, including the Song selection, transposition, and other related parameters:
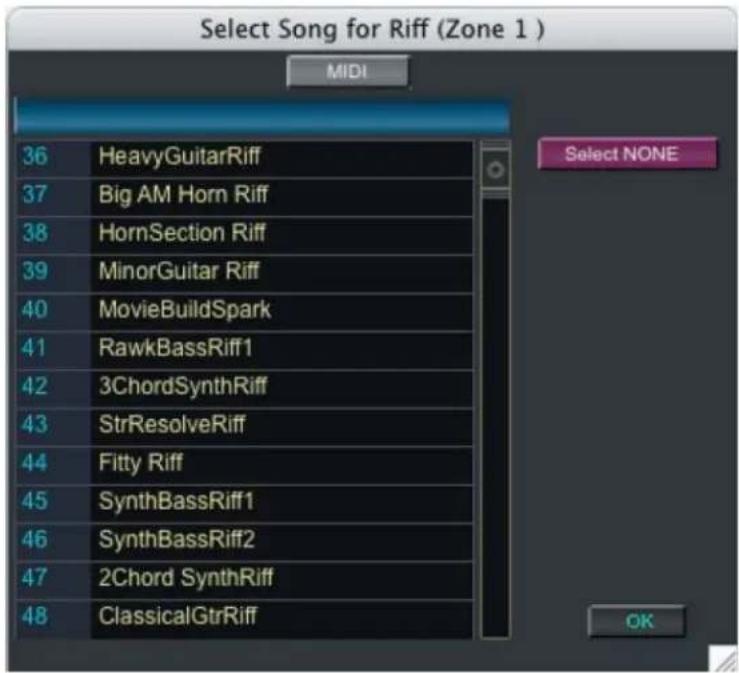
In the 'Riffs' view, clicking on the Song selection field produces a window displaying a scrollable list of the available Songs (example shown below). Clicking on the MIDI button allows you to update the list with all PC3 factory and user songs. To select a riff, scroll through the list and click on the desired title. Clicking the SELECT NONE button selects no riff. When finished, click OK to exit and dismiss this window.
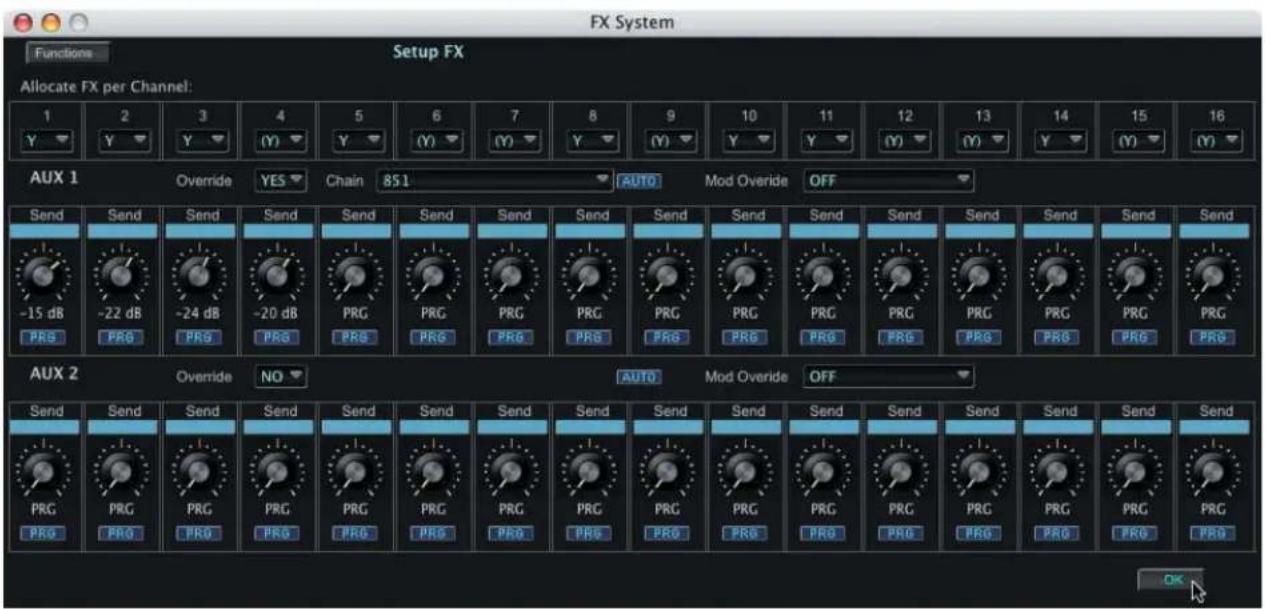
When 'Setup FX' is selected, a window appears that displays all of the Effects parameters, where you can modify existing preset effects or create new ones.
When 'EQ + Comp' is selected, a window appears that displays the Effects Equalization (EQ) and Compressor settings.
11. Additional Controls
SoundEditor offers additional remote controllers functions for the PC3: a Virtual Piano (V-Piano), Control Change Sliders (CC Sliders), and the ability to play the PC3 from the computer keyboard. These functions allow you to remotely control the PC3's keyboard and assignable controllers from within SoundEditor (handy if the PC3 is located more than an arm's reach away from the computer). These functions are located in the Options menu:
V-Piano
The V-Piano provides a way to play the PC3 remotely using the mouse. When you press a key on the virtual keyboard, the corresponding MIDI 'Note On' message will be sent to the PC3. The note information will be displayed in red on the bottom left side of the keyboard, along with the MIDI channel and velocity information:

The 'Vel' Up/Down control on the far right of the V-Piano keyboard adjusts the note velocity (values from 1 to 127). The Midi channel is changed by clicking on the label just above the Velocity label and choosing from the popup contextual menu.
The virtual Pitch Bend and Mod Wheels can be used to control Pitch and Modulation functions as you play.
Playing the PC3 from the Computer Keyboard
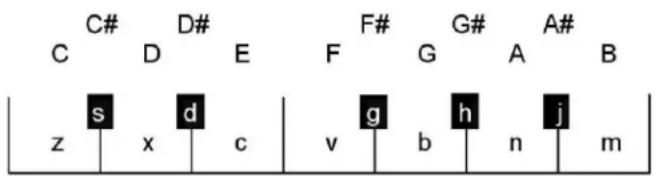
You can also play notes on the PC3 using the computer keyboard. The middle and bottom rows of computer keys act as a single octave of keys mapped like a piano keyboard. You can use these keys to remotely play notes on the PC3. The computer key assignments are:
Notes:
Keyboard:
Two computer keys are programmed to adjust octaves (increment/decrement):
“p” – Octave up (one octave for each key press)
“o” – Octave down (one octave for each key press)
You can switch octaves over a range of -2 to +8 (ten octaves total). When the octave switching keys are pressed, a pop-up window briefly appears showing the change.

You can sustain a note by pressing down a “note” key and while it is depressed, press an “octave” key. A MIDI Note ON command will be sent without a corresponding MIDI Note OFF, causing a sustained, or ‘stuck’ note. To release the note, press the Space Bar. The Space Bar will send an ‘All Notes Off’ command that shuts off all MIDI notes.
Two computer keys are programmed to adjust note velocity (increment/decrement):
“i” – Note velocity increases (+5 for each key press)
“u” – Note velocity decrease (-5 for each key press)
Note velocities can be set from 0 to 125 in increments of 5. A note velocity of 0 is the equivalent of no note played. When the velocity switching keys are pressed, a pop-up window briefly appears showing the change.

Changing the velocity values using the computer keyboard is the same as changing no Note Velocity' in MIDI Setup Window.
The ability to play notes using the computer keyboard works in all SoundEditor windows, allowing you to audition sounds at anytime. Note, however, that the CAPS LOCK key must not be engaged (ON), as only the lower case letters will send MIDI note data.

You can use the CAPS LOCK key to temporarily turn off remote playing if desired.
CC Sliders
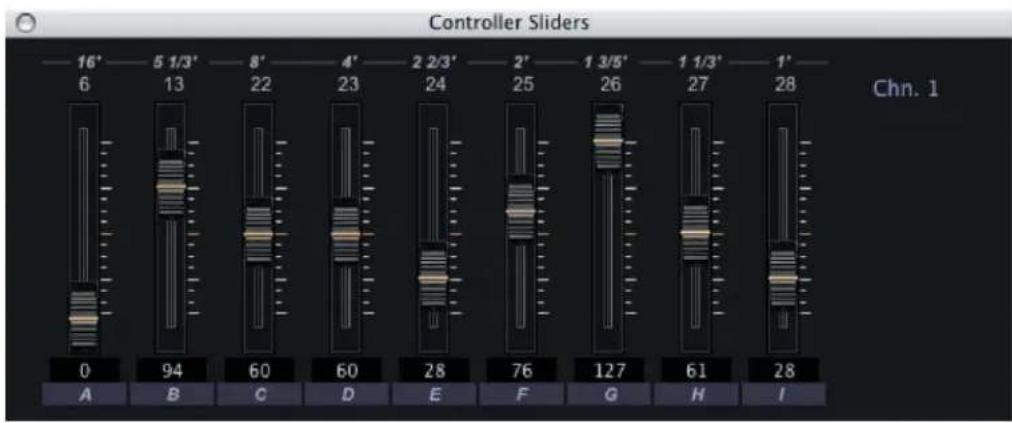
CC Sliders allow you to virtually adjust the PC3's 9 Assignable Controllers. To make adjustments from this window, use the mouse to move a slider up or down (the scroll wheel can also be used here). MIDI Continuous Controller (CC) number assignments are displayed at the top of the slider, while the actual control values appear at the bottom:
bar
| Position | Mode A | Mode B | Mode C | Mode D | Mode E | Mode F | Mode G | Mode H | Mode I | |--------|--------|--------|--------|--------|--------|--------|--------|--------|--------| | 0 | 6 | | | | | | | | | | 16' | | | | | | | | | | | 5 | | | | | | | | | | | 1/3' | 13 | | | | | | | | | | 8' | | | | | | | | | | | 4' | | | | | | | | | | | 2 | | | | | | | | | | | 2/3' | | | | | | | | | | | 2' | | | | | | | | | | | 1 | | | | | | | | | | | 3/5' | | | | | | | | | | | 1 | | | | | | | | | | | 1/3' | | | | | | | | | | | 1' | | | | | | | | | | | 28 | | | | | | | 127 | 61 | 28 | Chn. 1To change the MIDI channel that the CC Sliders control, click on the 'Chn #' label. A contextual menu will appear, allowing you to select a different MIDI Channel:
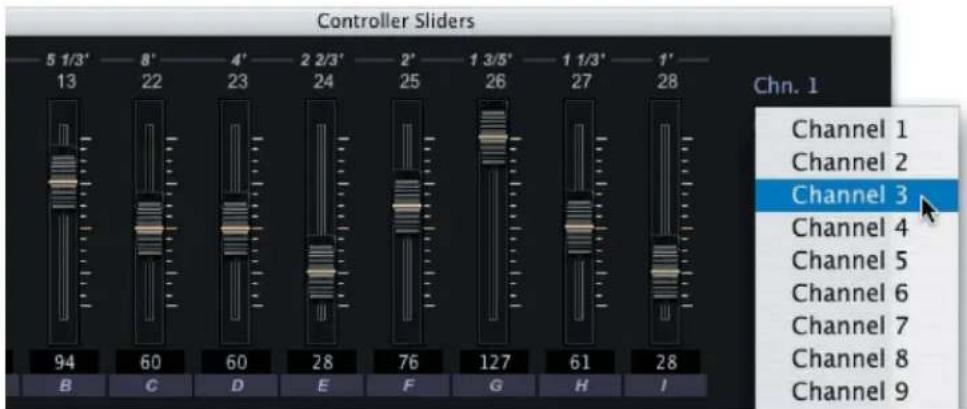
bar
| Channel | Value | | ------- | ----- | | Channel 1 | 94 | | Channel 2 | 60 | | Channel 3 | 127 | | Channel 4 | 61 | | Channel 5 | 28 | | Channel 6 | 76 | | Channel 7 | 127 | | Channel 8 | 28 | | Channel 9 | 61 |CC Sliders are part of a Setup configuration, and are programmed in the Setup Editor. For more on the configuration and programming of the CC Sliders, see page 84.
12. Appendix A - File Extensions
The SoundEditor program uses a variety of file types to store PC3 data. Here is the list of SoundEditor File.
Extensions for the Kurzweil PC3:
All PC3 Data = ".kp3"
Setup Bank Data = ".3sd"
Setup Data = ".3ss"
Program Bank Data = ".3pb"
Program Data = ".3pr"
KB3 Mode Program Data = ".kb3"
Algorithm Bank Data = ".3ab"
Algorithm Data = ".3ag"
FX Chain Bank Data = ".3xb"
FX Chain Data = ".3fx"
Effect Data = ".3ef"
13. Appendix B - MIDI Setup Options
The MIDI Setup menu provides tabs for configuring the MIDI Port Connections. MIDI In Controller and Virtual MIDI Ports (the Virtual MIDI tab only appears in the Macintosh version of SoundEditor). MIDI Port Configurations are covered in the MIDI Setup section page 9. This Appendix provides details on configuring and using the MIDI IN Controller and Virtual MIDI Port functions.
MIDI In Controller
Only a few simple steps are required to configure the MIDI In Controller function:
- Select the MIDI port that the controller is connected to.
- Make sure that the 'Activate MIDI Controller Port' checkbox is checked.
-
Set the MIDI Controller to the same MIDI channel as the PC3.
-
Test the setup. If the controller can send MIDI Note On messages, you can test the setup by playing a few notes. Otherwise, try sending an easily discernible MIDI message, such a Program Change command.
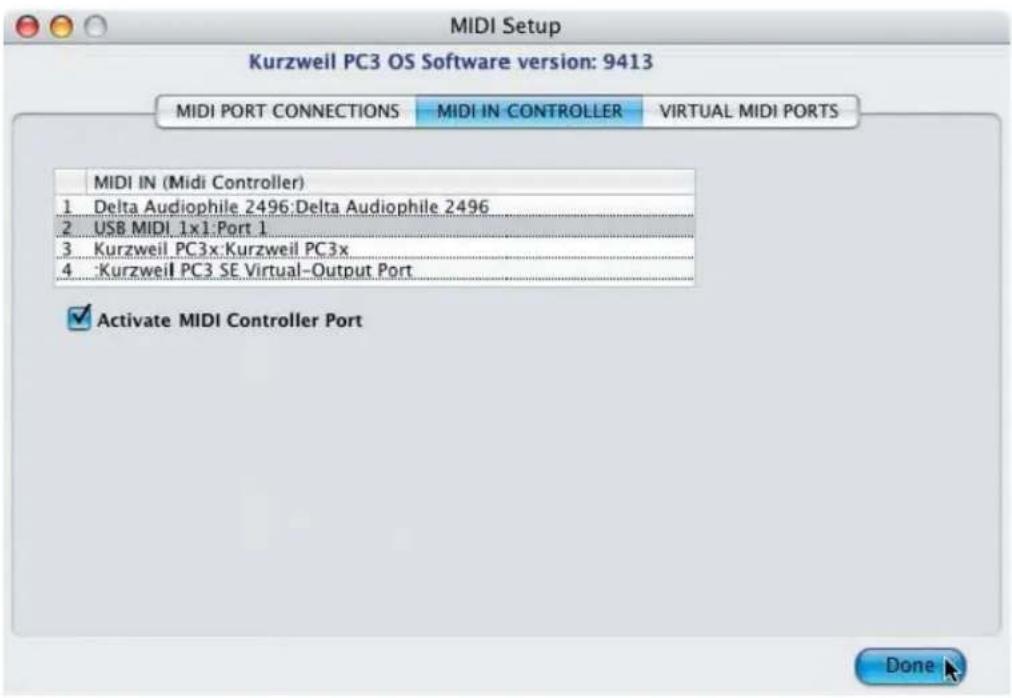
Virtual MIDI Port
The Macintosh version of SoundEditor includes a Virtual MIDI Interface that allows you to connect the SoundEditor application between your MIDI Sequencer (Logic, ProTools, Cubase, etc.) and the PC3.
Under the MIDI PORT CONNECTIONS tab in the MIDI Setup window, you'll notice MIDI In and MIDI Out ports labeled 'Kurzweil PC3 SE Virtual Output' and 'Kurzweil PC3 SE Virtual Input' respectively. These ports are established by the SoundEditor application to provide a virtual MIDI bridge between it, your MIDI Sequencer and the PC3:
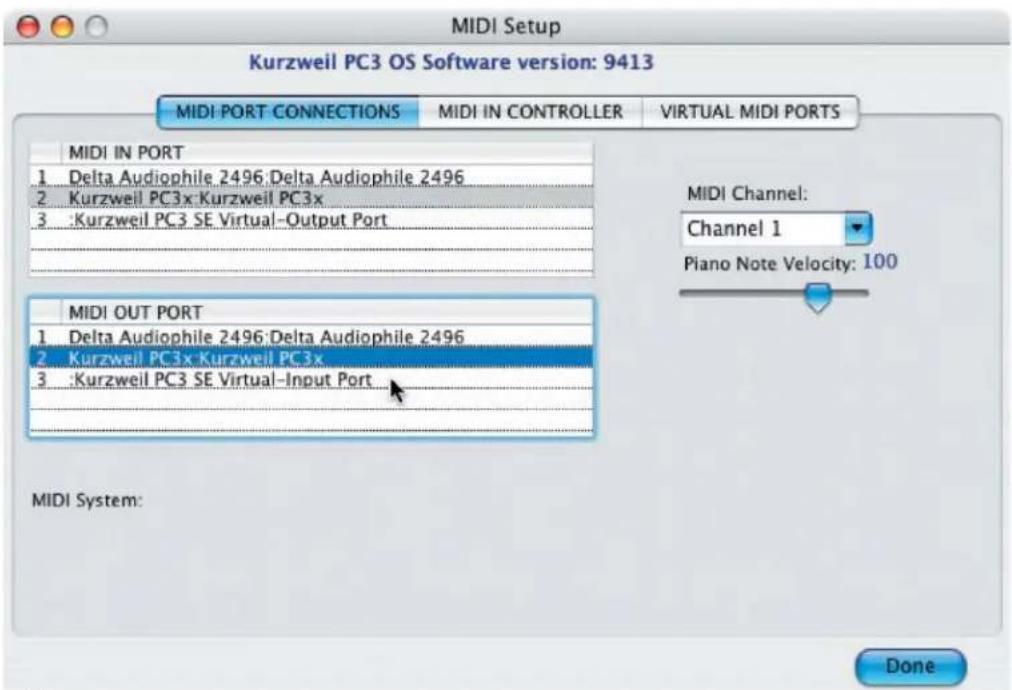
NOTE: The Virtual ports should never be selected - they are shown here for illustrative purposes only. The Virtual ports are always active and are designed to be used exclusively by the MIDI applications that will be communicating with SoundEditor.
The Virtual MIDI Port function allows SoundEditor to interact with the PC3 while continuing to pass MIDI data to your MIDI Sequencer.

flowchart
graph LR
    PC3 -->|V MDI| SoundEditor
    SoundEditor -->|V Input| MIDI_Sequencer
    SoundEditor -->|V Output| MIDI_Sequencer
To configure your sequencer for this setup, select "Kurzweil PC3 SE Virtual Output Port" as your MIDI Input port and "Kurzweil PC3 SE Virtual Input Port" as your MIDI Output port. With this setup, the sequencer will receive MIDI data from the Virtual Output and transmit MIDI data to the Virtual Input.
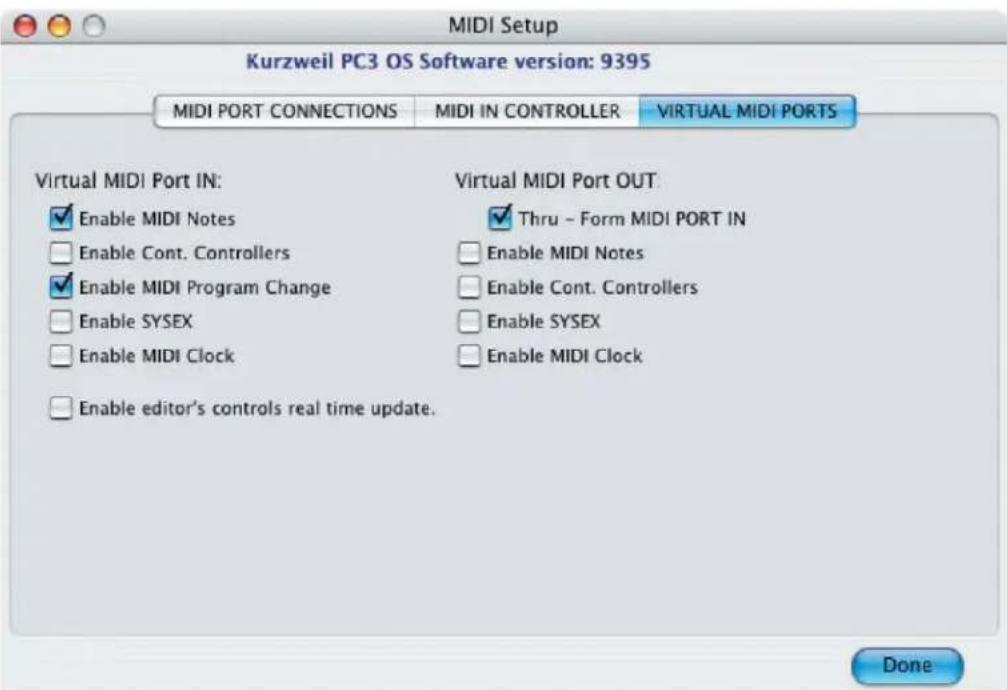
Under the VIRTUAL MIDI PORT tab in the MIDI Setup window you will find filters that you can use to determine what will be recorded to, and played back from, your MIDI Sequencer. Here, you can enable or disable MIDI Notes, MIDI CC's, Program Change commands, SysEx Data and MIDI clock.
- Starting Up....8
- SoundEditor Menus 11
- Parameter Selection in SoundEditor 15
- Program Banks Window....19
- Editor Organization.... 33
- Program Editing 34
- Channel Mixer Window....74
- Setup Window 77
- Setup Editing....80
- Additional Controls 90
- Appendix A - File Extensions 93
- Appendix B - MIDI Setup Options.... 94
- Introduction
- Acknowledgements
- Support
- About this Manual
- Installation/Requirements
- Before You Begin
- An Important Note About SoundEditor
- Overview
- Starting Up
- Getting Connected
- MIDI Setup
- SoundEditor Menus
- FILE:
- EDIT:
- MODE:
- MIDI:
- EFFECTS:
- OPTIONS:
- HELP:
- Configuring Preferences
- Parameter Selection in SoundEditor
- Selecting and Adjusting Parameters
- Program Banks Window
- Program Banks Window
- Modes Toolbar
- Program Name Display
- Selecting Program Categories
- Program Toolbar (Editing and File Storage)
- Bank Selection and Sorting Options
- Search Options
- FOUND Button
- Individual Program Options
- MIDI Channel Display
- MIDI Channel Toolbar
- Modes Toolbar - MIDI Button
- Modes Toolbar – MASTER Button
- Modes Toolbar - EFFECT Button
- Modes Toolbar - EQ+COMP Button
- Editor Organization
- SoundEditor Editor Structure
- Program Editing
- Program Common Window
- Program Common Toolbar (Editing and File Storage)
- WRITE:
- Window Views
- IMPORT and REMOVE Buttons
- IMPORT Button
- REMOVE Button
- Selecting Songs in the Common Settings View
- Selecting FX Chains in the Prog FX (Program Effect) View
- Layers Overview Panel
- Layers Window
- Layers Toolbar
- Layers Name Box
- MUTE and SOLO Buttons
- Keyboard Zone
- 'Views' Toolbar
- Algorithm Panel
- Selecting and Configuring Algorithms
- Selecting an Alternate Input (Cascade Mode)
- EDIT ALG WIRING Button
- Editing an Algorithm
- FX Edit Window
- FX Edit Toolbar
- ASR & LFO:
- FUNCTION:
- MODULATION:
- FX Overview Panel
- SELECT Button
- MORE Button
- FUN Button
- KB3 Mode Edit Window
- KB3 Mode Toolbar
- Channel Mixer Window
- Single Mixer Channel
- Selecting Mixer Programs
- RECEIVE and SEND Buttons
- Setup Window
- Setup Toolbar
- Individual Setup Options
- Setup Editing
- Setup Window
- Edit Window
- Setup Edit Toolbar
- Zone Parameter Groups
- Additional Controls
- V-Piano
- Playing the PC3 from the Computer Keyboard
- CC Sliders
- Appendix A - File Extensions
- Appendix B - MIDI Setup Options
- MIDI In Controller
- Virtual MIDI Port
Brand : Kurzweil
Model : PC3LE8
Category : MIDI Keyboard