Geyser RGB - Effect machine Chauvet - Free user manual and instructions
Find the device manual for free Geyser RGB Chauvet in PDF.


| Product Type | Effect Machine |
| Brand | Chauvet |
| Model | Geyser RGB |
| Dimensions (L x W x H) | 15.5 x 10 x 8.5 in (39.3 x 25.4 x 21.6 cm) |
| Weight | 15 lb (6.8 kg) |
| Power Consumption | 1200 W |
| Input Voltage | 100-240 V, 50/60 Hz |
| Fuse | F 10 A, 250 V |
| DMX Channels | 4 |
| Control | DMX, Manual, Wireless Remote (included) |
| Fluid Tank Capacity | 2.5 L (0.66 gal) |
| Output (CFM) | 28,000 CFM |
| Heat-Up Time | 3 min |
| Color LEDs | RGB, individually controllable |
| Safety Features | Auto shut-off, thermal cut-off, fuse protection |
| Maintenance & Cleaning | Periodically clean fluid tank and fan blades; use distilled water for cleaning |
| Spare Parts Available | Fuse, remote control, fluid tank, fan assembly |
| Repairability | Modular design; user-serviceable parts include fuse and remote; advanced repairs by qualified technicians |
Frequently Asked Questions - Geyser RGB Chauvet
User questions about Geyser RGB Chauvet
0 question about this device. Answer the ones you know or ask your own.
Ask a new question about this device
Download the instructions for your Effect machine in PDF format for free! Find your manual Geyser RGB - Chauvet and take your electronic device back in hand. On this page are published all the documents necessary for the use of your device. Geyser RGB by Chauvet.
USER MANUAL Geyser RGB Chauvet
CHAVET ®
It's Green Thinking.
TABLE OF CONTENTS
1. Before You Begin....3
What Is Included....3
Unpacking Instructions .... 3
Claims 3
Text Conventions ...... 3
Symbols....3
Disclaimer....3
Product at a Glance....4
Safety Notes 4
2. Introduction .... 5
Overview......5
Dimensions....6
3. Setup....7
AC Power 7
Fuse Replacement 7
Mounting 8
Orientation....8
Rigging 8
Tank Inversion for Inverted Mounting....10
4. Operation ....11
Control Panel Operation....11
Menu Map....11
Configuration (DMX)....11
Starting Address....11
DMX Channel Modes, Assignments, and Values 12
8-Channel....12
Configuration (Standalone) 13
Wireless Remote Control.... 13
Programmable Color Selection.... 13
5. Technical Information....14
Fogger Maintenance 14
Storage 14
6. Technical Specifications....15
Returns....16
Contact Us....16
1. BEFORE YOU BEGIN
What Is
Included
- Geyser™ RGB
- Geyser™ RGB Wireless Remote Control
-
Geyser™ RGB Wired Remote Receiver
-
Power Cord
- Warranty Card
- Quick Reference Guide
Unpacking Instructions
Carefully unpack the product immediately and check the container to make sure all the parts are in the package and are in good condition.
Claims
If the box or the contents (the product and included accessories) appear damaged from shipping, or show signs of mishandling, notify the carrier immediately, not CHAUVET®. Failure to report damage to the carrier immediately may invalidate your claim. In addition, keep the box and contents for inspection.
For other issues, such as missing components or parts, damage not related to shipping, or concealed damage, file a claim with CHAUVET® within 7 days of delivery.
Text Conventions
| Convention Meaning | |
| 1–512 | A range of values |
| 50/60 | A set of values of which only one can be chosen |
| Settings | A menu option not to be modified |
| Menu > Settings | A sequence of menu options to be followed |
| A key to be pressed on the product's control panel | |
| ON | A value to be entered or selected |
Symbols
| Symbol Meaning | |
 | Critical installation, configuration, or operation information. Not following these instructions may make the product not work, cause damage to the product, or cause harm to the operator. |
 | Important installation or configuration information. The product may not function correctly if this information is not used. |
 | Useful information. |
Disclaimer
The information and specifications contained in this User Manual are subject to change without notice. CHAUVET® assumes no responsibility or liability for any errors or omissions, and reserves the right to revise or recreate this manual at any time. Download the latest version from www.chauvetlighting.com.
© Copyright 2013 CHAUVET®. All rights reserved.
Electronically published by CHAUVET® in the United States of America.
| Author | Date | Editor | Date |
| A. Leon | 09/18/13 | D. Couppe | 09/18/13 |
Product at a Glance
| Use on Dimmer | X | Auto Programs | P |
| Outdoor Use | X | Fixed voltage (120 V or 230 V) | P |
| Sound-Active | X | Replaceable Fuse | P |
| DMX | P | User-Serviceable | X |
| Master/Slave | X |
Safety Notes
These notes include important information about the mounting, usage, and maintenance of this product; read before using the product.

• Always connect the product to a grounded circuit to avoid the risk of electrocution.
• Always disconnect the product from the power source before cleaning or replacing the fuse.
- Avoid direct eye exposure to the light source while the product is on.
• Make sure the power cord is not crimped or damaged.
• Never disconnect the product from power by pulling or tugging on the cord.
- If mounting the product overhead, always secure to a fastening device using a safety cable.
• Make sure there are no flammable materials close to the product when operating.
- Do not touch the product's housing when operating because it may be very hot.
- Do not mount the product on a flammable surface (linoleum, carpet, wood, paper, carton, plastic, etc.)
- The product's nozzle is very hot during operation and it remains hot for a long time after operation has stopped.
- The fog exits the nozzle at a very high temperature. Keep a minimum distance of 6.5 ft (2 m) from the nozzle to the nearest object.
• Do not use the product as a space heater.
- Do not drink or become in contact with the fog fluid. If you do, call your local emergency service (911 in the US) for help.
• Do not add perfume, alcohol, gasoline, or any other flammables to the fog fluid.

• Always make sure that the voltage of the outlet to which you are connecting the product is within the range stated on the decal or panel of the product.
- The product is for indoor use only! (IP20) To prevent risk of fire or shock, do not expose the product to rain or moisture.
- Always install the product in a location with adequate ventilation, at least 20 in (50 cm) from adjacent surfaces.
- Be sure that no ventilation slots on the product's housing are blocked.
- Make sure there is adequate fog fluid in the machine to prevent pump and heater damage.
• Never connect the product to a dimmer.
• Make sure to replace the fuse with another of the same type and rating.
- Never carry the product by the power cord or any moving part. Always use the handles.
- The maximum ambient temperature (Ta) is 104 °F (40 °C). Do not operate the product at higher temperatures.
• In the event of a serious operating problem, stop using the product immediately.
- Never try to repair the product. Repairs carried out by unskilled people can lead to damage or malfunction. Contact the nearest authorized technical assistance center.
• This product is not intended for permanent installation.
• Use only CHAUVET® water-based fog fluid.
- Drain the tank before transporting the product.

- Keep this User Manual for future use. If you sell the product to another user, be sure to give this document to the next owner.

- Fog Cleaner Quart (FCQ) was specifically developed by CHAUVET® to clean your Geyser™ RGB. Make sure you use FCQ regularly to increase the life of your fogger.
2. INTRODUCTION
Overview

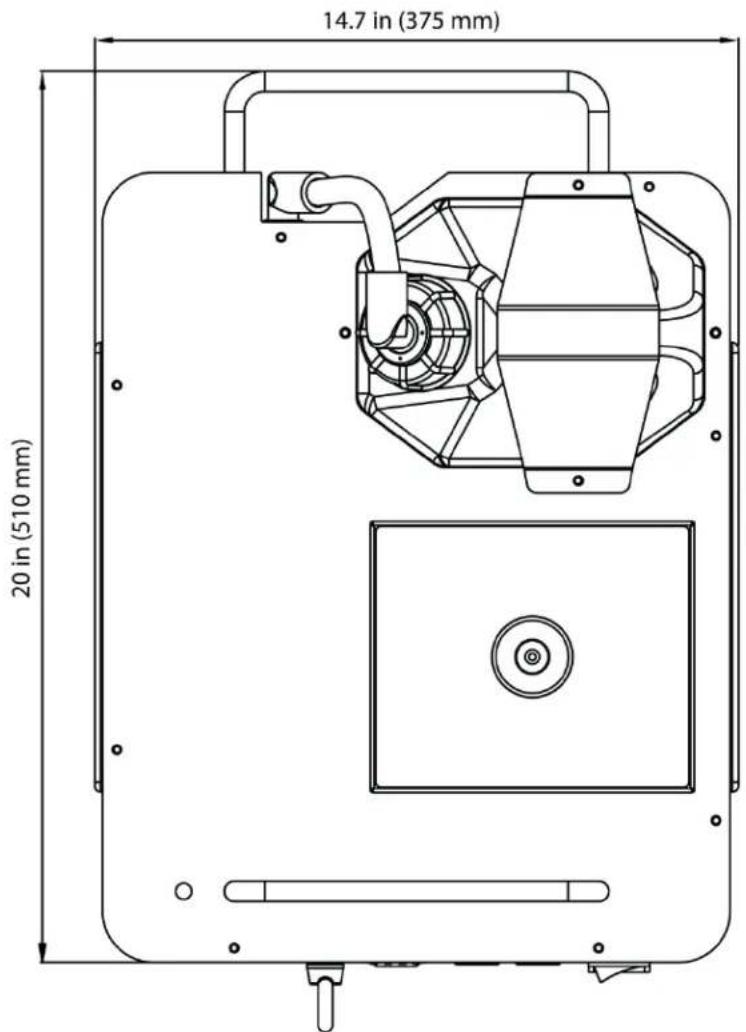
Dimensions

3. SETUP
AC Power
The Geyser ™ RGB has a fixed voltage power supply and it can work with an input voltage of either 120 V, 60 Hz or 230 V, 50 Hz, depending on the specific model.
To determine the product's power requirements (circuit breaker, power outlet, and wiring), use the current value listed on the label affixed to the product's panel, or refer to the product's specifications chart. The listed current rating indicates the product's average current draw under normal conditions.

Always connect the product to a protected circuit (circuit breaker or fuse). Make sure the product has an appropriate electrical ground to avoid the risk of electrocution or fire.

Never connect the product to a rheostat (variable resistor) or dimmer circuit, even if the rheostat or dimmer channel serves only as a 0–100% switch.
Fuse Replacement

Disconnect the product from power before replacing the fuse.
- Disconnect the product from power.
- Wedge the tip of a flat-head screwdriver into the slot of the fuse holder.
- Pry the fuse holder out of the housing.
- Remove the blown fuse from the holder.
- Replace with a fuse of the exact same type and rating.
- Insert the fuse holder back in place and reconnect power.


A spare fuse is not included; however, the safety cap has room for a spare.

Always replace a blown fuse with another of the same type and rating.
Mounting
Before mounting the product, read and follow the safety recommendations indicated in the Safety Notes.
Orientation
Primarily, the Geyser ™ RGB is to be floor mounted in a vertical fog jet orientation. The Geyser ™ RGB may also be mounted in a floor mounting/horizontal fog jet orientation or in an overhead mounting/downward fog jet orientation, but follow instructions closely to avoid tank spills.

When mounting the Geyser ™ RGB in any inverted position, remove the fluid tank from the holder and set it upright on an adjacent surface.
Rigging
- Before deciding on a location, always make sure there is easy access to the product for maintenance and fluid replenishment.
- Make sure that the structure or surface onto which you are mounting the product can support the product's weight (see the Technical Specifications).
- When mounting the product overhead, always use a safety cable. Mount the product securely to a rigging point, such as an elevated platform or a truss.
- When rigging the product onto a truss, you should use mounting clamps of appropriate weight capacity. Three M12 holes are on the bottom of the product, which are appropriate for this purpose.
- The rubber feet also serve as floor supports. When mounting the product on the floor, make sure that the product and cables are away from people and vehicles.
Floor Mounting
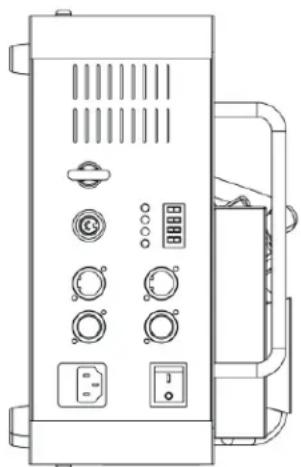
Floor Mounting Horizontal Fog Jet

Floor Mounting – Vertical Fog Jet
Fluid Tank Position


To avoid spillage with any mounting, always position the fluid tank with the tank's cap in the uppermost position above the tank's fluid line.
Alternate Inverted
Truss Mounting


With inverted mounting, avoid spillage of the fog fluid by setting the fluid tank in an upright position. Be sure to use a safety cable for both the Geyser™ RGB and the fluid tank when rigging in this manner.

M12-sized bolts fit the threaded mounting holes on the bottom of the Geyser™ RGB. This sized mounting hole works with the CLP-15 and the CLP-15N clamps from CHAUVET®.
Tank Inversion for Inverted Mounting
- Remove the screws and the bottle lock to take out the tank.
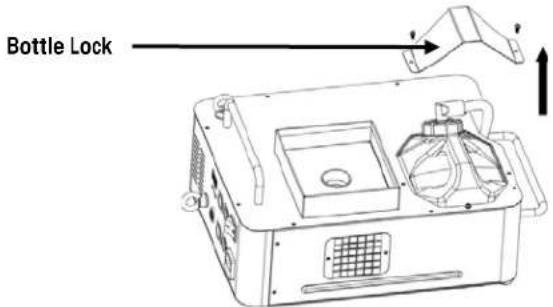
- Turn the fog machine upside down and remove the screws to take off the removable plate.

- Attach the removable plate to the opposite side and secure the tank with the bottle lock.

4. OPERATION
Control Panel Operation To access the control panel functions, use the four buttons located underneath the display.
| Button | Function |
| Selects an operation mode or to backs out of the current menu option | |
| p () | Scrolls up the list of options or selects a higher value |
| q () | Scrolls down the list of options or selects a lower value |
| Activates a menu option or a selected value |
Menu Map
| Mode | Programming Steps | Description | |
| DMX Mode Addr 1–512 | Selects the DMX starting address | ||
| Color Program | CH-1–CH-4 | oFF | Color program off (default) |
| Co 1–Co 9 | Selects preset colors | ||
| rAnd | Selects random color program | ||
| Fluid Sensor orL | on | Selects fluid sensor to on or off | |
| oFF | |||

The Geyser™ RGB Wireless Remote Control buttons 1–4 trigger the options set in the color programs CH-1–CH-4, respectively.
Configuration Set the product in DMX mode to control with a DMX controller.
(DMX)
- Connect the product to a suitable power outlet.
- Turn the product on.
- Connect a DMX cable from the DMX output of the DMX controller to the DMX input socket on the product.
Starting Address
When selecting a starting DMX address, always consider the number of DMX channels the selected DMX mode uses. If you choose a starting address that is too high, you could restrict the access to some of the product's channels.
The Geyser ™ RGB uses up to 8 DMX channels in its 8-Channel mode, which defines the highest configurable address to 505.
If unfamiliar with DMX, download the DMX Primer from www.chauvetlighting.com.
To select the starting address, do the following:
- Press
- Press
. - Use
or to select the starting address.

HEAT shows on the display when you first turn the product on and intermittently during the heat-up time of the fog fluid; however, you can configure the product during this time.
DMX Channel Modes, Assignments, and Values
| 8-Channel | Channel | Function Value Setting | ||
| 1 Fog | 000 Ü 009 | No function | ||
| 010 Ü 255 | Fog on | |||
| 2 Red | 000 Ü 009 | No function | ||
| 010 Ü 255 | 0–100% | |||
| 3 Green | 000 Ü 009 | No function | ||
| 010 Ü 255 | 0–100% | |||
| 4 Blue | 000 Ü 009 | No function | ||
| 010 Ü 255 | 0–100% | |||
| 5 Color Mixing | 000 Ü 009 | No function | ||
| 010 Ü 255 | Color mixing | |||
| 6 Auto Speed | 000 Ü 009 | No function | ||
| 010 Ü 255 | Speed, slow to fast | |||
| 7 Strobe | 000 Ü 009 | No function | ||
| 010 Ü 255 | Strobe, slow to fast | |||
| 8 Dimmer | 000 Ü 009 | No function | ||
| 010 Ü 255 | 0–100% |
Configuration (Standalone)
Set the product to Automatic mode to control without a DMX controller.
- Connect the product to a suitable power outlet.
- Turn the product on.

Never connect a product that is operating in any standalone mode to a DMX string connected to a DMX controller. Products in standalone mode may transmit DMX signals that could interfere with the DMX signals from the controller.
Wireless Remote Control
To trigger fog output and activate the color program using the wireless remote control, do the following:
- Plug the wireless receiver into the Remote Control Receiver port on the side of the Geyser™ RGB.
- On the wireless transmitter, press the button assigned to the color program (1–4). The Geyser™ RGB emits fog and activates the color program for as long as you hold down the button.
Note: If the color program is set to oFF for any trigger button, only fog output is triggered when that button is pressed.

There is no need to set the DIP switches on the remote control's receiver. These DIP switches are reserved for future use.
Programmable Color Selection
To select either the preset color program or one preset color to illuminate the fog using the wireless remote control, follow the instructions below:
- Press
- Press
. - Use
or to select rAnd (for random colors) or Co 1–Co 9 (to choose one of nine preset colors).
Note: Select oFF to turn off the color program for that button.
- Press
. - Repeat steps 1–4 to configure the other buttons.
5. TECHNICAL INFORMATION
Fogger Maintenance
Do not allow the fogger to become clogged. After every 40 hours of continuous operation, use CHAUVET® Fog Cleaner Quart (FCQ) through the system to prevent the accumulation of particulate matter in the heating element.
The recommended cleaning procedure is as follows.
- Empty all fog fluid from the machine.
- Add cleaning solution to tank.
- Plug unit in and allow it to warm up.
- Run the unit in a well-ventilated area until the tank is almost empty. Do not allow the pump to run dry.
- Refill with fog fluid. Run the machine briefly to clear any cleaning solution from the pump and heater.

Fog Cleaner Quart (FCQ) was specifically developed by CHAUVET® to clean your Geyser™ RGB. Make sure you use FCQ regularly to increase the life of your fogger.
Storage
Before storing the product, run FCQ through the system as described in the cleaning procedure above. This will help to prevent any particles from condensing inside the pump or heater.
Test-run your Geyser™ RGB on a monthly basis to achieve the best performance.
6. TECHNICAL SPECIFICATIONS
| Dimensions and Weight | Length | Width | Height | Weight |
| 20 in (510 mm) | 14.7 in (375 mm) | 9.8 in (250 mm) | 21 lb (9.6 kg) | |
| Note: Dimensions in inches rounded to the nearest decimal digit. | ||||
| Power | Power Supply Type | Range | Voltage Selection | |
| Model-specific | 120 VAC, 60 Hz or 230 VAC, 50 Hz | Fixed | ||
| Parameter | 120 V, 60 Hz | 230 V, 50 Hz | ||
| Consumption | 1500 W | 1500 W | ||
| Operating/Inrush current | 11.6 A/11.6 A | 6.2 A/6.2 A | ||
| Fuse | F 15 A, 250 V | F 8 A, 250 V | ||
| Power I/O | US/Worldwide | UK/Europe | ||
| Power input connector | IEC | IEC | ||
| Power Cord plug | Edison (US) | Local plug | ||
| Light Source | Type | Power | Lifespan | |
| LED | 3 W | 50,000 hours | ||
| Color | Quantity | Current | ||
| Red | 7 | 800 mA | ||
| Green | 7 | 800 mA | ||
| Blue | 7 | 800 mA | ||
| Photo Optic | Parameter | |||
| Illuminance @ 2 m | 4870 lx | |||
| Operation/Capacity/ Consumption | Heat-up Time | Tank Capacity | Fluid Consumption | |
| 4 min | 0.7 gal (2.5 l) | 8 min/1 l | ||
| Misc. | Output | |||
| 17,000 cfm | ||||
| Thermal | Maximum External Temp. | Cooling System | ||
| 104 °F (40 °C) | Convection | |||
| DMX | I/O Connectors | Connector Type | Channel Range | |
| 3- and 5-pin XLR | Sockets | 8 | ||
| Ordering | Product Name | Item Code | UPC Number | |
| GeyserTM RGB | 05070561 | 781462209094 | ||
| GeyserTM RGB 220 V | 05070567 | 781462209155 | ||

RoHS


To return a product or request support:
• In the U.S., contact CHAUVET® World Headquarters.
• In the UK or Ireland, contact CHAUVET® Europe Ltd.
- In any other country, DO NOT contact CHAUVET®. Contact your distributor. See www.chauvetlighting.com for distributors outside the U.S., United Kingdom, or Ireland.

If you live outside the U.S., United Kingdom, or Ireland, contact your distributor of record and follow their instructions on how to return CHAUVET® products to them. Visit our website for contact details.
Returns
Call the corresponding CHAUVET® Technical Support office and request a Return Merchandise Authorization (RMA) number before shipping the product Be prepared to provide the model number, serial number, and a brief description of the cause for the return.
You must send the merchandise prepaid, in its original box, and with its original packing and accessories. CHAUVET® will not issue call tags.
Clearly label the package with the RMA number. CHAUVET® will refuse any product returned without an RMA number.

Write the RMA number on a properly affixed label. DO NOT write the RMA number directly on the box.
Before sending the product, clearly write the following information on a piece of paper and place it inside the box:
- Your name
- Your address
- Your phone number
- RMA number
• A brief description of the problem
Be sure to pack the product properly. Any shipping damage resulting from inadequate packaging will be your responsibility. FedEx packing or double-boxing are recommended.

CHAUVET® reserves the right to use its own discretion to repair or replace returned product(s).
Contact Us
World Headquarters
CHAUVET®
General Information
Address: 5200 NW 108th Avenue
Sunrise, FL 33351
Voice: (954) 577-4455
Fax: (954) 929-5560
Toll free: (800) 762-1084
Technical Support
Voice: (954) 577-4455 (Press 4)
Fax: (954) 756-8015
Email: tech@chauvetlighting.com
World Wide Web
www.chauvetlighting.com
United Kingdom & Ireland
CHAUVET® Europe Ltd.
General Information
Address: Unit 1C
Brookhill Road Industrial Estate
Pinxton, Nottingham, UK
NG16 6NT
Voice: +44 (0)1773 511115
Fax: +44 (0)1773 511110
Technical Support
Email: uktech@chauvetlighting.com
World Wide Web
www.chauvetlighting.co.uk

- TABLE OF CONTENTS
- BEFORE YOU BEGIN....3
- INTRODUCTION .... 5
- SETUP....7
- OPERATION ....11
- TECHNICAL INFORMATION....14
- TECHNICAL SPECIFICATIONS....15
- BEFORE YOU BEGIN
- WHAT IS
- INCLUDED
- UNPACKING INSTRUCTIONS
- CLAIMS
- DISCLAIMER
- PRODUCT AT A GLANCE
- SAFETY NOTES
- INTRODUCTION
- OVERVIEW
- SETUP
- AC POWER
- FUSE REPLACEMENT
- MOUNTING
- ORIENTATION
- RIGGING
- FLOOR MOUNTING
- FLUID TANK POSITION
- TANK INVERSION FOR INVERTED MOUNTING
- OPERATION
- MENU MAP
- (DMX)
- STARTING ADDRESS
- CONFIGURATION (STANDALONE)
- WIRELESS REMOTE CONTROL
- PROGRAMMABLE COLOR SELECTION
- TECHNICAL INFORMATION
- FOGGER MAINTENANCE
- STORAGE
- TECHNICAL SPECIFICATIONS
- RETURNS
- CONTACT US
Brand : Chauvet
Model : Geyser RGB
Category : Effect machine