
STAJ200 - Media player SEAGATE - Free user manual and instructions
Find the device manual for free STAJ200 SEAGATE in PDF.


| Brand | Seagate |
| Model | STAJ200 |
| Product Type | Media Player with Internal Hard Drive |
| Storage Capacity | 2 TB (2000 GB) |
| Dimensions (W x D x H) | 120 x 80 x 20 mm |
| Weight | 150 g |
| Power Supply | USB powered (5V, 1A) or optional AC adapter |
| Video Output | HDMI 1.4, Composite AV |
| Audio Output | HDMI, Optical S/PDIF, Analog stereo |
| Supported Video Formats | AVI, MKV, MP4, MOV, WMV, DivX, Xvid |
| Supported Audio Formats | MP3, WMA, AAC, FLAC, OGG, WAV |
| Supported Photo Formats | JPEG, BMP, PNG, GIF |
| Connectivity | USB 2.0 (host), USB 2.0 (device), SD card slot |
| File System Support | FAT32, NTFS, HFS+ |
| Remote Control | Infrared remote included |
| Operating Temperature | 5°C to 35°C |
| Maintenance | Clean with a soft, dry cloth. Do not use liquid or aerosol cleaners. |
| Safety | Keep away from water and heat sources. Do not disassemble. |
| Spare Parts and Repairability | No user-serviceable parts inside. Contact Seagate support for service. |
Frequently Asked Questions - STAJ200 SEAGATE
User questions about STAJ200 SEAGATE
0 question about this device. Answer the ones you know or ask your own.
Ask a new question about this device
Download the instructions for your Media player in PDF format for free! Find your manual STAJ200 - SEAGATE and take your electronic device back in hand. On this page are published all the documents necessary for the use of your device. STAJ200 by SEAGATE.
USER MANUAL STAJ200 SEAGATE
Media Player User Guide
For FreeAgent® Theater+™ and FreeAgent GoFlex™ TV
Media Player User Guide
© 2010 Seagate Technology LLC. All rights reserved. Seagate, Seagate Technology, the Wave logo, and FreeAgent are trademarks or registered trademarks of Seagate Technology LLC, or one of its affiliates. All other trademarks or registered trademarks are the property of their respective owners. When referring to hard drive capacity, one gigabyte, or GB, equals one billion bytes and one terabyte, or TB, equals one thousand billion bytes when referring to hard drive capacity. In addition, some of the listed capacity is used for formatting and other functions, and thus will not be available for data storage. Quantitative usage examples for various applications are for illustrative purposes. Actual quantities will vary based on various factors including file size, file format, features, and application software. Seagate reserves the right to change, without notice, product offerings or specifications.
Dolby and the double-D symbol are registered trademarks of Dolby Laboratories. Manufactured under license from Dolby Laboratories.
HDMI, the HDMI Logo and High-Definition Multimedia Interface are trademarks or registered trademarks of HDMI Licensing LLC.
Macrovision: This product incorporates copyright protection technology that is protected by U.S. patents and other intellectual property rights. Use of this copyright protection technology must be authorized by Macrovision, and is intended for home and other limited viewing uses only unless otherwise authorized by Macrovision. Reverse engineering or disassembly is prohibited.
The name "Macrovision" is protected by trademark.
DTS 2.0+ Digital Out: Manufactured under license under U.S. Patent #'s: 5,451,942; 5,956,674; 5,974,380; 5,978,762; 6,487,535 & other U.S. and worldwide patents issued & pending. DTS and DTS 2.0 + Digital Out are registered trademarks and the DTS logos and Symbol are trademarks of DTS, Inc.
Seagate Technology LLC
920 Disc Drive
Scotts Valley CA 95066 U.S.A.
Contents
1. About Your Media Player 6
This is Your Media Player 6
What You Can Do With Your Media Player 7
Your Media Player Components 8
What Else You Need 8
2. Getting Started .... 10
Powering On For the First Time 10
Connecting a FreeAgent Drive or External USB Drive 11
Navigating the Media Player Screens and Menus 11
Adding a WiFi Adapter 15
Checking the Network Settings 16
Sharing Media Files Over Your Network 16
Next Steps 16
Finding More Help 17
3. Watching Movies .... 18
Before You Begin 18
Playing a Movie 19
Finding a Movie to Watch 20
Controlling a Movie's DVD Features 21
Playing a Personal Video from a Digital Camcorder 21
Playing Movies in Slow Motion 22
4. Viewing Photos and Pictures .... 23
Before You Begin 23
Viewing Pictures 23
Viewing Pictures in a Slideshow 24
Finding Pictures 25
Viewing Pictures from a Digital Camera 27
5. Listening to Music .... 28
Before You Begin 28
Playing Music 28
Setting Up Continuous Play and Shuffling 29
Finding Music 29
Checking Which Song is Currently Playing 31
6. Accessing Online Media Content 32
Accessing an Internet Service 32
Activating a Paramount® Account (US Only) 33
Managing Your Netflix® Account (US Only) 33
7. Syncing Your Media Files .... 34
Installing Seagate Media 34
Understanding How Media Sync Works 36
Synchronizing Your Media Files (Windows) 37
Synchronizing Your Media Files (Macintosh) 41
8. Managing Your Media Player and Connected Devices ..... 43
Understanding the Media Player's LEDs 43
Connecting a Keyboard to the Media Player 43
Updating the Media Player Firmware 44
Updating the Seagate Media Software 45
Creating Shortcuts to Shared Folders 46
Managing FreeAgent Drives with Seagate Media 48
Removing a FreeAgent Drive 52
Disconnecting a USB Drive, Camera, or Camcorder 53
Disconnecting the Media Player 53
Resetting the Media Player to Its Original Settings 53
9. Customizing Your Media Player Settings ..... 55
Customizing the Video Settings 55
Setting the Media Player for TVs in Other Countries 56
Customizing the Audio Settings 57
Changing the Menu Language 58
Changing the Media Player Screensaver 58
Turning Off a FreeAgent Drive LED 59
Adjusting the Date and Time 59
Changing the Media Player's Network Settings 60
Setting a Language for Information Screens 62
Viewing DivX® Account Information 62
10. Solving Problems ...... 64
General Troubleshooting Tips 64
Common Problems and Solutions 64
Updating the Media Player Firmware 67
Recovering After a Firmware Update Failure 67
Resetting the Media Player Manually 67
Finding More Help 67
Index 68
1. About Your Media Player
This User Guide is for Seagate FreeAgent® Theater+™ and FreeAgent GoFlex™ TV media players. Unless otherwise noted, all the information in this guide applies to both media players.
This chapter provides an overview of your media player, describes its main features and components, and lists the other things you need to set up a simple home theater system.
This is Your Media Player
Before you begin, familiarize yourself with the features of your new media player.
FreeAgent Theater+ Media Player

Figure 1: FreeAgent Theater+ Media Player - Front View

Figure 2: FreeAgent Theater+ Media Player - Rear View
FreeAgent GoFlex TV Media Player

Figure 3: FreeAgent GoFlex TV Media Player—Front View

Figure 4: FreeAgent GoFlex TV Media Player—Rear View
What You Can Do With Your Media Player
Your media player is an easy-to-use home theater solution that lets you enjoy your digital movies, pictures, and music on your TV.
With your media player, you can:
- Move your digital movies, pictures, and music files from your computer to your TV using a Seagate FreeAgent drive or other external USB drive.
- Enjoy your photographs and personal videos while they're still stored on your digital camera or camcorder.
- Access photos, movies, and news media online through supported Web-based media service sites.
- Share movies, pictures, and music from all your computers over your wired or wireless home network.
- Browse and search your media files from a single location.
- Use the Seagate Media software to ensure that you always have even your most recent movie, picture, and music files organized and available on your media player.
Your Media Player Components
These components are included with your media player:
• FreeAgent Theater+ or FreeAgent GoFlex TV media player
- Remote control with 2 AAA batteries
• Composite audio/video cable
- Component video cable
- Ethernet cable
- AC power adapter
- Installation CD, including Seagate Media software for Windows or Macintosh
- Seagate FreeAgent Go™ drive with USB cable (included in FreeAgent Theater+ media player and drive bundle only)
What Else You Need
In addition to the media player components listed in the previous section, you also need:
• Television with available HDMI, component, or composite connectors
• Video, music, and/or picture files in supported formats (see page 64 for a complete list)
- Computer running Windows XP or later, or Mac OS X or later, for Seagate Media, software that synchronizes and organizes media files on your drives
• (Optional) FreeAgent Go drive (Theater+) or FreeAgent GoFlex drive (GoFlex TV)
- (Optional) External USB storage device (such as a flash drive or thumb drive) containing video, music, and/or picture files
- (Optional) Home network, such as a Local Area Network (LAN) or Wireless LAN (WLAN), for sharing media files and accessing the Web-based services supported by the media player (see page 32)
• (Optional) Digital camera or camcorder containing pictures or videos - (Optional) USB or wireless USB keyboard to use instead of the on-screen keyboard
• (Optional) Media server, for sharing media files over your network
2. Getting Started
This chapter explains how to set up your media player after you've completed the steps in the printed Quick Start Guide, and describes how the screens, menus, and remote control work.
Follow the instructions in this chapter to:
- Power on your media player for the first time (see next section).
- Connect a FreeAgent drive or external USB drive (see page 11).
- Learn to navigate the media player screens and menus (see page 11).
- Add a WiFi adapter to the media player (see page 15).
- Adjust the network settings on the media player (see page 16).
- Sharing media files over the network (see page 16).
• See what your next steps are (see page 16).
• Find more help (see page 17).
Powering On For the First Time
Your first step is to set up your media player by connecting it to a TV, your local wired or wireless network, and a power source. (See the printed Quick Start Guide included in the box for complete instructions.)
When you first connect your media player to a power source, the media player's LED flashes amber. When the media player is ready to use, the LED stops flashing. (A solid amber LED means that the media player is turned off. To learn more, see “Understanding the Media Player’s LEDs” on page 43.)
To continue setting up your media player:
- Turn on your TV.
- Press Power ⏻ on the media player remote.
The initial setup screen opens.
- Select a language for the on-screen menus, then press OK.
TIP: You can change the menu language at any time. See “Changing the Menu Language” on page 58.
- Set the date and time, then press OK.
The Home screen opens. Now you're ready to start using your media player.
Connecting a FreeAgent Drive or External USB Drive
If you haven't done so already, insert a FreeAgent drive containing your movie, picture, and music files into your media player, as shown in the printed Quick Start Guide.
Alternatively, you can connect an external USB drive (such as a flash drive or thumb drive) containing your media files to the USB connector on the media player.
TIP: You can use the included Seagate Media software to organize the media files on your computer and transfer them to a FreeAgent or external USB drive. See Chapter 7 "Syncing Your Media Files" on page 34 to get started.
You can also connect a digital camera or camcorder to the USB connector on the media player. (For help viewing photos and videos from your digital camera or camcorder, see "Playing a Personal Video from a Digital Camcorder" on page 21 or "Viewing Pictures from a Digital Camera" on page 27.)
When you connect a new device to your media player, the Home screen opens and the device appears as an icon on the Home screen. Your media player automatically searches the device and creates an index of all the video, picture, and music files it finds. This may take a few moments, depending on how many files you have on the device; an 'Indexing' message appears at the bottom of the screen while the media player builds the index.
You can start browsing and enjoying your media files right away, even if the index isn't complete yet. See the chapters on watching movies (page 18), viewing pictures (page 23), and listening to music (page 28) for help getting started.
Navigating the Media Player Screens and Menus
The user interface (UI) of your media player is easy to navigate using the included remote control. This section describes the main screens, how to use the remote, and how to find the screens you're looking for.
Note: In this User Guide, all instructions refer to the remote. For instance, "Press Menu, select Pictures, then press OK" means to press the Menu button on the remote, use the arrow buttons to select Pictures on the on-screen menu, then press the OK button on the remote.
Getting to Know the Main Screens and Menus
This section introduces the main media player screens and menus:
• "The Home Screen" on page 12
• "The Main Menu" on page 13
• "The Screen Menus" on page 13
The Home Screen
To go to the Home screen from any other screen, press Home 📂 on the remote.

Figure 5: Media Player Home Screen
The Home screen is divided into three parts:
- Links to the main screens (Movies, Pictures, Music, Internet, and Browse)
- Shortcuts to popular Internet services
- Shortcuts to the devices that are connected to your media player either directly or over your network
The Main Menu
Shortcuts to the main screens are also available on the Main Menu (shown in Figure 6), which opens across the top of the screen when you press Menu on the remote. You can open the Main Menu from any screen.

Figure 6: Main Menu
The Screen Menus
Depending on what screen is open when you press Menu, special menu options may also appear below the Main Menu. For instance, if you press Menu while a picture is open, options for viewing your pictures appear below the Main Menu, similar to the example shown in Figure 7.
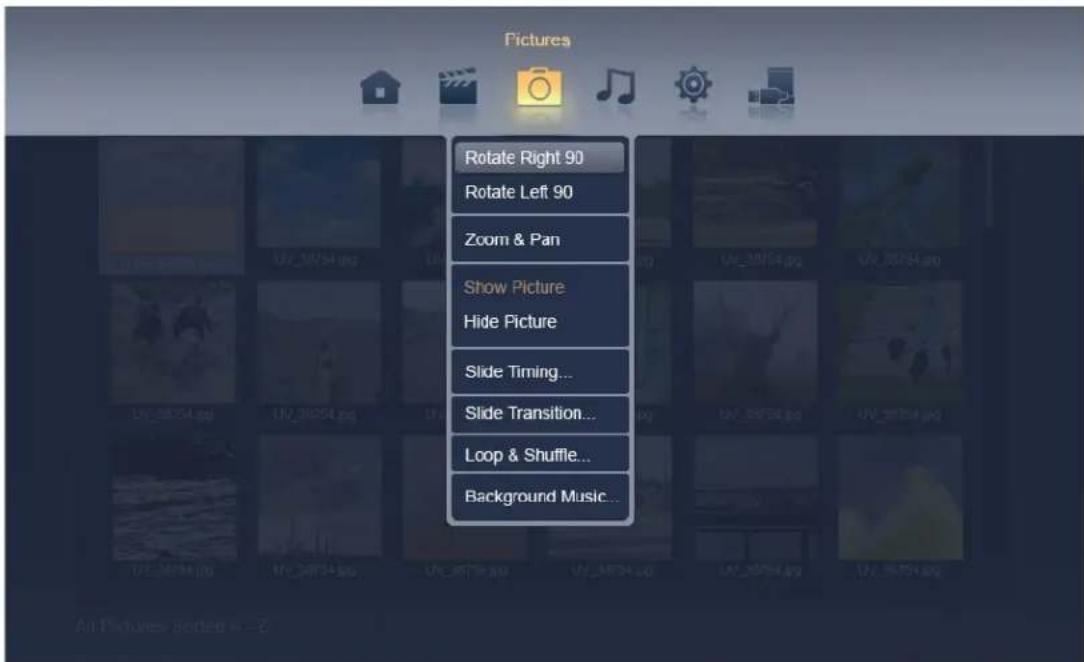
Figure 7: Picture Menu (Example Only)
Following Many Paths to the Same Screen
The media player UI includes many ways of getting to the same screen. As you use the UI, you will find the paths that work best for you.
For instance, you can open the Browse screen three ways:
• On the Home screen, select Browse, then press OK.
- On the Home screen, select the device you want to browse from the shortcut icons, then press OK.
• On any screen, press Menu, select Browse, then press OK.
Using the Remote
The only way to navigate the media player screens is with the included remote. This section describes the functions of all of its buttons.

Figure 8: Media Player Remote
Quick Navigation Tips
In general, navigate your media player's screens and menus by:
- Using the arrow buttons on the remote to move through the menus and screens.
- Pressing OK on the remote to complete a selected action or open a selected screen.
- Pressing Menu on the remote to display the Main Menu on any screen, and pressing Menu again to close it.
Remote Control Buttons
This section describes the basic function of each button on the remote. More information about special button functions are described in the chapters on movies, pictures, and music.
| Power—Turn the media player on and off. | Home—Return to the Home screen from any other screen. | ||
| Arrow Buttons—Navigate left, right, up, and down through the menus and screens. | Menu Menu—Display the menu for the current screen. | ||
| OK | OK—Confirm a menu selection. | i | Information—Get information about a playing movie. |
| Back—Move back to the previous screen. | ▶ II | Play / Pause—Play or pause a movie, song, or picture slideshow. | |
| Reverse—Reverse the current playback. Press repeatedly to select faster reverse speeds. | ▶ | Fast Forward—Fast forward the current play-back. Press repeatedly to select faster forward speeds. | |
| Skip Back—Return to the previous file when playing music or viewing pictures or to the previous chapter in a movie. (See “Jumping Ahead or Back in a Movie” on page 19 for more information.) | ▶ | Skip Forward—Go to the next file when playing music or viewing pictures or to the next chapter in a movie. (See “Jumping Ahead or Back in a Movie” on page 19 for more information.) | |
| Mute—Press to mute the sound; press again to unmute. | ■ | Stop—Stop playback. | |
| Volume + - | Volume—Increase or decrease volume. | Zoom + - | Zoom—Zoom in or out when viewing pictures or movies. Press repeatedly to select higher zoom levels. |
Adding a WiFi Adapter
If your network is wireless, you can connect a Seagate WiFi adapter to your media player so that you can wirelessly access media files stored on your computer and other network storage devices.
Note: If your network is not wireless, you can use an Ethernet cable to connect your media player to your network switch or router, as described in the printed Quick Start Guide.
For more information, or to purchase a Seagate WiFi adapter, go to www.seagate.com.
Checking the Network Settings
If you have connected your media player to a wired LAN, the network settings on your media player don't need to be adjusted. The default network setting (dynamic IP address) is highly recommended.
If you want to manually set a static IP address for the media player, follow the instructions in "Setting a Static IP Address" on page 60.
If you want your media player to connect to a wireless network, you need a Seagate WiFi adapter (see page 15). Once the WiFi adapter is installed, follow the instructions in “Adding Your Media Player to a WLAN” on page 61 to connect your media player to your network.
Sharing Media Files Over Your Network
If your media player is connected to a network, you can set up shared folders on your computers that the media player can access over the network. Any media files saved in a shared folder can be opened by anyone with permission on your network—including your media player.
To create a shared folder on your computer, follow your operating system's instructions. Once a shared folder is created, its movie, picture, and music files are included in the index of available media files the same way they would be if the folder was directly connected to your media player (see "Connecting a FreeAgent Drive or External USB Drive" on page 11).
You can create a shortcut to a shared folder if you want quick access to its contents. See "Creating Shortcuts to Shared Folders" on page 46.
Next Steps
Now that your media player is set up and you understand how to navigate its screens and menus, it's time to start enjoying your home theater. The remainder of this User Guide describes how to:
• Watch movies and personal videos (see page 18).
- Look at digital pictures (see page 23).
- Listen to music (see page 28).
- Access Web-based media content (see page 32).
- Sync your media files between your computer(s) and your FreeAgent drive or external USB drive (see page 34).
- Manage your media player and FreeAgent drive (see page 43).
- Customize your media player settings (see page 55).
- Solve any media player problems you might encounter (see page 64).
Finding More Help
Seagate Support provides a broad range of resources (including FAQs, a knowledge base and a community forum) to help you solve any problem you might have while using your media player. Go to www.seagate.com/support, then click Support and Downloads.
3. Watching Movies
You can use your media player to watch personal videos and digitized DVDs stored on:
- A FreeAgent drive installed in the media player
- An external USB drive connected to the media player's USB port
- A digital camera or camcorder connected to the media player's USB port
- A shared folder or media server on your network
Your media player automatically searches the drives and devices connected to your media player and creates an index of all the video, picture, and music files it finds. The movies are listed on the Movie screen (see “Playing a Movie” on page 19).
Before You Begin
Before you begin, ensure that the movies you want to watch are in a supported format, and that if you want to view movie subtitles, they are in a supported format, too.
Supported Movie Formats
Your media player supports movies in these formats:
.ASF .FLV .M2TS .MOV .MPEG-4 .RMVB .VOB
| .AVI H.264 .M4V | .MP4 | .MPG .TP | .WMV | |||
| .DAT | .IFO | .MinusVR | .MPEG | .MTS | .TRP | .XVID |
| .DivX® | .ISO .MKV | .MPEG-2 .RM | .TS | |||
Supported Movie Subtitle Formats
Your media player supports subtitles in these formats:
.SMI/SAMI .SRT .SUB
If a movie has subtitles, make them viewable by ensuring that the movie file and subtitle file have identical names. Also, ensure that the movie file and subtitle file are stored in the same folder.
Playing a Movie
To select and play a movie:
- On the Home screen, select Movies, then press OK.
OR
On any screen, press Menu, select Movies, then press OK.
The Movies screen opens. The Movie screen lists all the movies discovered on all the devices connected to your media player, sorted from A to Z.
- Use the arrow buttons to scroll through the list, or press Menu to quickly sort the movie files to suit your needs.
Press Menu, then select View List or View Thumbnails, then press OK to change your view of the movies, if required.
Press Menu to quickly sort the movies to suit your needs. Select Sort A–Z, Sort Z–A, Sort by Newest, or Sort by Oldest, then press OK to reorganize the movie list.
You can also choose to view only digitized DVDs by selecting Show DVDs, then pressing OK.
TIP: See "Finding a Movie to Watch" on page 20 for more ways to find what you're looking for.
- Select the movie you want, then press Play/Pause (▶ II) to start the movie.
The movie begins.
TIP: While a movie is playing, press Information i to display the movie title and progress bar. Press i again to hide the information.
- Use the remote to control playback just as you would on a DVD player. (See "Using the Remote" on page 14 for more information.)
Jumping Ahead or Back in a Movie
To jump a playing movie ahead in 20-minute increments, press the right arrow button. To move the movie backwards in 20-minute increments, press the left arrow button.
Adjusting Subtitle Size and Position
If you are playing an .MKV file with subtitles, press Pause, then use the arrow buttons to adjust the size and placement of the subtitles.
Finding a Movie to Watch
To find a movie to watch, you can search your media files three ways:
- By browsing through the full list of movies (see page 19).
- By browsing through your movie files as they are stored on the drives and devices connected to your media player (see page 20).
- By searching the index compiled by your media player (see page 20).
Browsing for Movies by Device
You can find a movie to watch by browsing through each device connected to your media player. (To search all your movie files simultaneously, see “Searching for a Specific Movie” on page 20.)
To browse for movies:
- On the Home screen, select Browse, then press OK.
The Browse screen opens. - Press Menu, select Show Movies, then press OK.
- Select the device you want to browse, then press OK.
- Navigate through your files and folders to find what you're looking for.
- Select the movie you want, then press Play/Pause (▶ II) or OK to begin.
Searching for a Specific Movie
To search for a specific movie:
- On the Home screen, select Movies, then press OK.
OR
On any screen, press Menu, select Movies, then press OK.
The Movies screen opens.
-
Press Menu.
-
Select Search, then press OK.
The Search screen opens.
- Using the on-screen keyboard, enter the title of the movie you're looking for. (Select a letter then press OK to enter it.) The full movie title is not required; a partial title also works.
TIP: Connect a USB keyboard to your media player to make searching faster. See page 43 for more information.
- Select Done, then press OK.
Your media player lists all movies with matching titles. If no movies appear in the list, no title matched the word(s) you entered.
- Select the movie you want, then press Play/Pause (▶ II) or OK to start the movie. Or, start a new search.
Controlling a Movie's DVD Features
If you are watching a digital DVD, you can turn the movie's subtitles on and off or listen to the movie's dialog in another language, if those features are available.
Viewing Subtitles
To turn on a movie's subtitles:
- Press Menu.
The movie pauses and the Movies menu opens.
-
Select Subtitle....
-
Select the language you want, then press OK.
-
Press Menu to close the Movies menu and resume the movie.
To turn off a movie's subtitles, repeat steps 1 and 2, select Off, then press OK.
Listening to the Movie in Another Language
To select a different language for the movie dialog:
- Press Menu.
The movie pauses and the Movies menu opens.
-
Select Audio....
-
Select the language you want, then press OK.
-
Press Menu to close the Movies menu and resume the movie.
Playing a Personal Video from a Digital Camcorder
If you have a digital camcorder (or camera), you may be able to view your personal videos by connecting your camera to your media player.
To view a personal video:
-
Connect your camcorder to your media player using a USB cable.
-
Power on your camcorder.
The camcorder appears as a device in the shortcuts list on the Home screen, and the media player indexes its contents. (If your camcorder doesn't appear in the list of devices, it's incompatible for use with the media player.)
- On the Home screen, select your camcorder, then press OK.
- Navigate to the video you want to watch, then press Play/Pause (▶ II) or OK to start the video. (If a file on your camcorder won't open, it's in an incompatible format.)
Playing Movies in Slow Motion
Your media player can play movies and personal videos in slow motion, both forwards and backwards. You can vary the speed of the slow motion from 1/2- to 1/16-speed.
- While the movie is playing, press Play/Pause (▶ II) to pause the video.
- Press Fast Forward (▶) for play in slow forward motion, or press Reverse (◀) for play in slow reverse motion.
Each time you press Fast Forward (▶) or Reverse (◀), playback slows down more, from 1/2 to 1/4 to 1/8 to 1/16 of regular speed.
- Press Play/Pause (▶ II) again to resume playback at normal speed.
4. Viewing Photos and Pictures
You can use your media player to view digital photos and pictures stored on:
- A FreeAgent drive installed in the media player
- An external USB drive connected to the media player's USB port
- A digital camera connected to the media player's USB port
- A shared folder or media server on your network
Your media player automatically searches the drives and devices connected to your media player and creates an index of all the video, picture, and music files it finds. Pictures are indexed in their folders, which are listed on the Pictures screen (see “Viewing Pictures” on page 23).
Before You Begin
Before you begin, ensure that the pictures you want to view are in a supported file format.
Your media player supports photographs and pictures in these formats:
.BMP .GIF .JPG/JPEG .PNG .TIFF
Viewing Pictures
You can use your media player to view individual pictures or move through a folder of pictures at your own pace.
To view pictures:
- On the Home screen, select Pictures, then press OK.
OR
On any screen, press Menu, select Pictures, then press OK.
The Pictures screen opens. The Pictures screen lists all the picture folders discovered on all the devices connected to your media player, sorted from A to Z.
- Use the arrow buttons to scroll through the list.
Press Menu to quickly sort the folders to suit your needs. Select Sort A–Z, Sort Z–A, Sort by Newest, or Sort by Oldest, then press OK to reorganize the folder list.
TIP: See "Finding Pictures" on page 25 for more ways to find what you're looking for.
- Select a folder, then press OK to view the pictures it contains.
Press Menu, then select View List or View Thumbnails, then press OK to change your view of the pictures, if required.
- Use the arrow buttons to scroll through the list.
Press Menu to sort the pictures, if required. Select Sort A–Z, Sort Z–A, Sort by Newest, or Sort by Oldest, then press OK to reorganize the picture list.
- Select a photo, then press OK to view it.
Use the left and right arrow buttons to move from picture to picture.
TIP: To view pictures in a folder as a slideshow, see page 24.
-
If a picture is not right side up, press Menu, then select Rotate Right 90° or Rotate Left 90°. Press OK to rotate the picture.
-
To enlarge the picture, press Zoom +, then use the arrow buttons to move the picture side to side or up and down. Press Zoom - to shrink the picture again.
-
Press Back ↩ to return to the Pictures screen at any time.
Viewing all Folders Containing Pictures
You can also view all folders that contain pictures, as follows:
-
On the Home screen, select Pictures, then press OK.
-
Press Menu and then select Show Folders.
-
Navigate through the folders to find what you're looking for.
Listening to Music While Looking at Pictures
You don't have to turn off your music before you can look at your pictures. The music you're listening to continues to play even if you change to the Picture screen and begin looking at pictures.
To see what music is playing at any time, see “Checking Which Song is Currently Playing” on page 31.
Viewing Pictures in a Slideshow
Your media player can play your photos in a slideshow. You can customize the slideshow by adjusting the timing and transition between pictures, or setting the slideshow to play as a continuous or shuffle loop. You can also add music to the slideshow.
To view your pictures as a slideshow:
-
Navigate to the picture folder you want (see "Viewing Pictures" on page 23), then press OK.
-
Press Play/Pause (▶ II) to start a slideshow of all pictures in the folder.
-
To customize the slideshow, press Menu.
-
To adjust the timing between pictures, select Slide Timing..., then press OK. Select the interval you want (from 2 seconds to 2 minutes), then press OK to resume the slideshow.
- To adjust the style of transition between pictures, select Slide Transition..., then press OK. Select the transition style you want, then press OK to resume the slideshow.
• To start a continuous slideshow, select Continuous Play, then press OK. -
To play the pictures in random order and in a continuous slideshow, select Shuffle Loop, then press OK.
-
Press Back ↩ to stop the slideshow and return to the Pictures screen.
Adding Music to a Slideshow
To add music to a slideshow:
- Navigate to and start music on your media player (see page 28).
- Navigate to and start the slideshow (see page 24).
OR
- On your computer, create a slideshow folder that contains a music playlist and the pictures you want in your slideshow.
- Put the slideshow folder onto a portable drive, safely disconnect the drive from your computer, and connect it to your media player.
- Browse to or search for the folder on your media player (see "Finding Pictures" on page 25), then select the folder.
- Press Play/Pause (▶ II) to start both the music and the slideshow.
- Press Back ↩ to stop the slideshow and return to the Pictures screen.
Finding Pictures
To find the pictures you're looking for, you can search your media files three ways:
- By browsing through the list of picture folders (see page 23).
- By browsing through your picture files as they are stored on the drives and devices connected to your media player (see page 26).
- By searching the index compiled by your media player (see page 26).
Browsing for Pictures by Device
You can find the pictures you're looking for by browsing through each device connected to your media player. (To search all your picture files simultaneously, see "Searching for a Specific Picture" on page 26.)
To browse for pictures:
- On the Home screen, select Browse, then press OK.
The Browse screen opens. - Press Menu, select Show Pictures, then press OK.
- Select the device you want to browse, then press OK.
- Navigate through your files and folders to find what you're looking for.
- Select the picture you want, then press OK to view it.
Searching for a Specific Picture
To search for a specific picture:
- On the Home screen, select Pictures, then press OK.
OR
On any screen, press Menu, select Pictures, then press OK.
The Pictures screen opens.
- Press Menu.
- Select Search, then press OK.
The Search screen opens.
- Using the on-screen keyboard, enter the file name of the picture you're looking for. (Select a letter then press OK to enter it.) The full file name is not required; a partial name also works.
TIP: Connect a USB keyboard to your media player to make searching faster. See page 43 for more information.
- Select Done, then press OK.
Your media player lists all pictures with matching file names. If no pictures appear in the list, no file name matched the word(s) you entered.
- Select the picture you want, then press OK to view it. Or, start a new search.
Viewing Pictures from a Digital Camera
If you have a digital camera, you may be able to view your pictures by connecting your camera to the media player.
To view pictures from a camera:
- Connect your camera to your media player using a USB cable.
- Power on your camera.
The camera appears as a device in the shortcuts list on the Home screen, and the media player indexes its contents. (If your camera doesn't appear in the list of devices, it's incompatible for use with the media player.)
- On the Home screen, select your camera, then press OK.
- Navigate to the pictures you want to see, then press OK to open an individual picture, or press Play/Pause (▶ II) to start a slideshow. (If a file on your camera won't open, it's in an incompatible format.)
5. Listening to Music
You can use your media player to listen to music stored on:
- A FreeAgent drive installed in the media player
- An external USB drive connected to the media player's USB port
- A shared folder or media server on your network
Your media player automatically searches the drives and devices connected to your media player and creates an index of all the video, picture, and music files it finds. The music files are listed on the Music screen (see "Playing Music" on page 28).
Before You Begin
Before you begin, ensure that the music you want to listen to is in a supported format.
Supported Audio File Formats
Your media player supports these songs in these formats:
.AAC .MP3 .RA .WAV
.ASF .MP4 .RM .WMA
.FLAC.OGG.RMVB
Supported Playlist Formats
Your media player supports playlists in these formats:
.M3U
.PLS
Playing Music
To select and play music:
- On the Home screen, select Music, then press OK.
OR
On any screen, press Menu, select Music, then press OK.
The Music screen opens. The Music screen lists all the music files discovered on all the devices connected to your media player, sorted from A to Z.
View your music in thumbnail format instead of in a list by selecting View Thumbnails, then pressing OK.
- Use the arrow buttons to scroll through the list, or press Menu to quickly sort the music files to suit your needs.
Select Sort A-Z, Sort Z-A, Sort by Newest, or Sort by Oldest, then press OK to reorganize the music list.
Select Show Albums, Show Artists, Show Genres, Show Years, or Show Playlists, then press OK to list your music by a category other than song title.
TIP: See "Finding Music" on page 29 for more ways to find what you're looking for.
- Select the song you want, then press Play/Pause (▶ II) or OK to start the song.
- Use the remote to control playback just as you would on a CD or digital music player. (See "Using the Remote" on page 14 for more information.)
- Press the Volume buttons on the remote to adjust the sound.
Setting Up Continuous Play and Shuffling
While music is playing, you can set your media player to play your songs in a continuous loop, shuffle your songs into random order, or repeat the same song over and over.
To customize playback:
- Navigate to the music you want to hear (see "Playing Music" on page 28).
- Press Play/Pause (▶ II) or OK to start the music.
-
To customize the playback, press Menu.
-
To play all songs continuously in the order in which they're listed on your media player, select Continuous Play, then press OK.
• To play all songs continuously in random order, select Shuffle Loop, then press OK.
• To repeat the same song, select Repeat One, then press OK.
Finding Music
To find the music you're looking for, you can search your media files three ways:
- By browsing through the full list of songs on the Music screen (see page 28).
- By browsing through your music files as they are stored on the drives and devices connected to your media player (see page 30).
- By searching the index compiled by your media player (see page 30).
Browsing for Music by Device
You can find music to listen to by browsing through each device connected to your media player. (To search all your music files simultaneously, see “Searching for a Specific Song” on page 30.)
To browse for music:
- On the Home screen, select Browse, then press OK.
The Browse screen opens. - Press Menu, select Show Music, then press OK.
- Select the device you want to browse, then press OK.
- Navigate through your files and folders to find what you're looking for.
- Select the song you want, then press Play/Pause (▶ II) or OK to listen to the music.
Searching for a Specific Song
To search for a specific song:
- On the Home screen, select Music, then press OK.
OR
On any screen, press Menu, select Music, then press OK.
Your music list appears.
- Press Menu.
- Select Search, then press OK.
The Search screen opens.
- Using the on-screen keyboard, enter the title of the song you're looking for. (Select a letter then press OK to enter it.) The full song title is not required; a partial name also works. You can't search for an artist or album.
TIP: Connect a USB keyboard to your media player to make searching faster. See page 43 for more information.
- Select Done, then press OK.
Your media player lists all songs with matching titles. If no songs appear in the list, no title matched the word(s) you entered.
- Select the song you want, then Play/Pause (▶ II) or OK to listen to the music. Or, start a new search.
Displaying Album Cover Art
Your media player will use album cover art in thumbnail view on the Music screen if the image is in the proper place.
To ensure display album cover art in thumbnail view:
- On your computer, find the album art.
- Drag the image into the music album folder.
- Drag the music folder onto an external device and carry it to the media player.
The album cover appears in thumbnail view on the Music screen.
Checking Which Song is Currently Playing
If you are playing music while looking at pictures or accessing an Internet service, you can find the title of the song that's currently playing.
To check which song is currently playing:
- From any screen, press Menu, select Music, then press OK.
- Select Now Playing, then press OK.
The name of the song displays.
6. Accessing Online Media Content
You can use your media player to access online media content such as videos, photos, and news services.
Only supported Internet services are available on your media player; however, Seagate adds to its list of supported services regularly. Check the Internet screen often to see what's new.
Accessing an Internet Service
Your media player must have Internet access to connect to any of the Web-based services.
To access a supported Internet service:
- On the Home screen, select Internet, then press OK.
The Internet screen opens, listing shortcuts to all supported services.
- Select the service you want, then press OK.
The service opens.
- Follow the on-screen instructions to find what you're looking for.
Note: For help using a particular Internet service, please refer to its online documentation.
- To exit an Internet service, press Home.
Using the Home Screen Shortcuts
Shortcuts to the six most popular Internet services appear on the Home screen (see "Navigating the Media Player Screens and Menus" on page 11). A shortcut to the complete list of services is also provided.
To access an Internet service using the shortcut list:
- On the Home screen, select the Internet service you want from the shortcut list, then press OK.
OR
- If the service you want doesn't appear on the Home screen, select See More ▶, then press OK to see the full list of supported services on the Internet screen.
Select the service you want from the Internet shortcut list, then press OK.
Activating a Paramount® Account (US Only)
You can view movies from Paramount Pictures using your media player. However, you must create and activate a Paramount account first. (You need a computer with Internet access to create and activate the account.)
To create and activate a Paramount account:
- On the Home screen, press Menu, select Settings, then press OK.
- Press Menu, select System Setup, then press OK.
OR
Use the left and right arrows on the remote to scroll through the Settings screens until you find the System screen.
- On the System screen, scroll down to find and select Paramount, then press OK.
Follow the on-screen instructions to create and register a Paramount account.
Managing Your Netflix® Account (US Only)
You can view movies and TV shows from Netflix on your media player if you have a Netflix account. (Refer to the Netflix Web site for more information.)
If you no longer want to access Netflix from your media player, you can deactivate your account using a special code provided by the media player. (You need a computer with Internet access to deactivate your Netflix account.)
To find the Netflix deactivation code:
- On the Home screen, press Menu, select Settings, then press OK.
- Press Menu, select System Setup, then press OK.
OR
Use the left and right arrows on the remote to scroll through the Settings screens until you find the System screen.
- On the System screen, select Netflix Deactivate.
- Press OK to deactivate your account.
7. Syncing Your Media Files
The CD that came with your media player includes the Seagate Media application, which you can use to synchronize media files between your computer and the drives you connect to your media player.
TIP: On computers running Windows, you can also use Seagate Media to manage the drives connected to your media player. See “Managing FreeAgent Drives with Seagate Media” on page 48 to learn how.
This chapter explains how to install Seagate Media and use its Media Sync feature to synchronize your movie, picture, and music files between devices.
Installing Seagate Media
This section describes how to install Seagate Media on your operating system:
- For Windows, see the next section.
• For Macintosh, see page 35.
Installing on Windows
To install Seagate Media on a computer running Windows:
- Insert the Installation CD into your computer.
A registration window opens.
- Follow the online instructions to register your media player, or click Cancel to postpone the registration and continue installing the software.
The Choose Language window opens.
- Click the language in which you want to install the application.
The main menu opens.
- Click Install Seagate Media.
The InstallShield Wizard Welcome window opens.
- Follow the on-screen instructions to install the software.
6. Click Finish to complete the installation.
A Seagate Media icon appears on your desktop and Seagate Media opens automatically.

Figure 9: Seagate Media for Windows: Initial Media Sync Screen
Installing on Macintosh
To install Seagate Media on a computer running Macintosh:
- Insert the Installation CD into your computer.
A Seagate Media folder containing the installer opens.
-
Drag the installer to the Applications folder on your hard disk.
-
In the Applications folder, double-click Seagate Media to install and open the application. The Seagate Media window opens.

Figure 10: Seagate Media for Macintosh
A registration window also opens.
- Follow the online instructions register your media player, or click Cancel to postpone the registration.
Note: To register your media player later, in the Seagate Media Help menu, select Product Registration.
Understanding How Media Sync Works
The Media Sync feature of Seagate Media makes it easy to keep the media files on your FreeAgent drive and other external USB drive synchronized with the media files on your computer(s).
Media Sync recognizes media files in supported formats on your computer and automatically sorts them into movie, picture, and movie folders on the connected drive.
Media Sync's Automatic Sync feature continuously tracks changes in your media folders and files, and automatically updates your drive whenever you connect it to your computer.
Note: FreeAgent drives may have come with software that includes a sync feature. However, only the Seagate Media application is designed to find media files on your computer, organize them, and sync them with the files on your external drives.
How Do I Get Started?
First, set up Media Sync using either the default or custom settings.
Then, connect your drive to your computer; Media Sync automatically finds your movie, picture, and music folders and files, organizes them, and copies them to your drive.
Every time you connect the drive to your computer, your media files are automatically synchronized so that you always have your most recent files on your media player. (You can also choose to sync your files manually instead of automatically.)
Follow the instructions for your operating system to start using Media Sync:
- For Windows, see the next section.
• For Macintosh, see page 41.
Synchronizing Your Media Files (Windows)
Follow the instructions in this section to synchronize files on computers running Windows:
- "Selecting Your Sync Settings" on page 37
- "Starting a Sync Manually" on page 39
- "Checking the Media Sync Status of Your Computers" on page 40
- "Changing Your Media Sync Settings" on page 40
- "Disabling Automatic Sync" on page 40
- "Deleting Your Custom Media Sync Settings" on page 40
Selecting Your Sync Settings
You can set up Media Sync using either the default settings (referred to as simple sync) or custom settings (custom sync). This table compares your options:
| Use Simple Sync to... Use Custom Sync to... | |
| Sync media files in all supported formats in the My Documents (XP) or Personal (Vista) folder only | Select the folders you want to sync from any drive on your computer |
| Sync all media file formats Select the media file formats | you want to sync |
| Sync automatically when a drive is connected Choose | either automatic or manual sync |
You don't need to prepare your drive in any way—simply connect it to your computer. Media Sync automatically creates the folders it needs during the sync process.
Setting Up Simple Sync
To set up a simple sync:
- Connect a FreeAgent drive or other external USB drive to your computer.
- Open Seagate Media, then click Media Sync.
The Media Sync window opens.
- Click Simple Sync.
The Simple Sync Confirmation window opens and the initial sync job begins automatically. The initial sync job may take some time depending on how many media files you have.
Customizing Your Sync Settings
To set up a custom sync:
- Connect a FreeAgent drive or other external USB drive to your computer.
- Open Seagate Media, then click Media Sync.
The Media Sync window opens.
- Click Custom Sync.
The Folder Selection window opens.
- Select the folders you want to be synchronized, then click Next.
The File Types window opens. - Select the media file formats you want to sync, then click Next.
The Media Sync Rules window opens. - Select one of these options:
• Automatic Sync (syncs files automatically when the drive is connected to the computer)
• Manual Sync (syncs files only when you start the sync)
- Click Finish.
The Media Sync settings window opens. If you selected Auto Sync, the initial sync job begins automatically. The initial sync job may take some time depending on how many media files you have.
If you selected Manual Sync, see "Starting a Sync Manually" on page 39 to start the initial sync job.
Starting a Sync Manually
To start a sync manually:
- Connect a FreeAgent drive or other external USB drive to your computer.
- Open Seagate Media, then click Media Sync.
The Media Sync window opens.

Figure 11: Seagate Media for Windows: Media Sync Screen
3. Click Sync Now.
The sync job starts. The job may take some time depending on how many files need to be updated.
TIP: You can also start a manual sync by clicking the Seagate Media icon in the system tray and selecting Sync Now.

Figure 12: Seagate Media for Windows: System Tray Menu
Checking the Media Sync Status of Your Computers
If you have a LAN or WLAN, you can check which of your computers are set up to sync files, when their last sync was completed, and whether or not they are set to sync automatically.
To check the Media Sync status of your computers:
- In Seagate Media, click Media Sync.
The Media Sync window opens.
- Click Check Sync Status.
The Sync Status window opens, showing current status information.
- Click OK to return to the Media Sync window.
Changing Your Media Sync Settings
To change Media Sync settings:
- In Seagate Media, click Media Sync.
The Media Sync window opens.
-
Click Edit Sync Settings.
-
Change your settings as required, then click OK to return to the Media Sync window.
Disabling Automatic Sync
To switch from automatic to manual syncs:
- In Seagate Media, click Media Sync.
The Media Sync window opens.
- Under Automatic Sync, click Off, then click OK to return to the Media Sync window.
Automatic Sync is disabled. Remember to manually start syncs to keep the files on your media player current.
Deleting Your Custom Media Sync Settings
You can delete all the custom settings you have in Media Sync and return to the initial Media Sync window (see Figure 9 on page 35). You might want to do this if you have moved your media folders and files to new locations, or added files in many new formats.
Note: Deleting your Media Sync settings doesn't affect your media files.
To delete your custom Media Sync settings:
- In the Media Sync window, click Delete Sync Settings.
The Delete Sync Settings Confirmation window opens.
2. Click Delete.
The original Media Sync window opens (see Figure 9 on page 35).
- To set up Media Sync again, follow the instructions in "Selecting Your Sync Settings" on page 37.
Synchronizing Your Media Files (Macintosh)
Follow the instructions in this section to synchronize files on computers running Macintosh.
Selecting Your Sync Settings
You can set up Media Sync using either the default settings or custom settings. This table compares your options:
| Use the Default Settings to... | Use Customized Settings to... |
| Sync all media files in supported formats in your Movies, Pictures, and Music folders | Select the folders you want to sync from any drive on your computer |
| Sync all media file formats Select the media file formats | you want to sync |
| Sync automatically when a drive is connected Choose either automatic or manual sync | |
You don't need to prepare your drive in any way—simply connect it to your computer. Media Sync automatically creates the folders it needs during the sync process.
Setting Up Media Sync with Default Settings
To set up Media Sync using the default settings:
-
Connect a FreeAgent drive or other external USB drive to your computer.
-
Open Seagate Media, then select the drive you want to sync.
-
Select Use my Movies, Pictures and Music folders, then click Sync Now to begin the initial sync job.
The initial sync job may take some time depending on how many media files you have.
Customizing Your Sync Settings
To set up a custom sync:
- Connect a FreeAgent drive or other external USB drive to your computer. Ensure that it appears in the drive list in Seagate Media. (For help, see Chapter 10 "Solving Problems" on page 64.)
- Open Seagate Media, then select the drive you want to sync.
-
Click the Add + button, find and select the folders you want to sync, then click Add to Sync.
-
In the Sync Only These Files list, select the media types you want to synchronize, then click Sync Now to begin the initial sync job.
The initial sync job may take some time depending on how many media files you have.
Disabling Automatic Sync
To switch from automatic to manual syncs:
- Open Seagate Media.
- Deselect Automatic Sync.
Automatic Sync is disabled. Remember to manually start syncs to keep the files on your media player current.
8. Managing Your Media Player and Connected Devices
This chapter explains how to manage and maintain your media player and its included software. It also explains how to use Seagate Media to manage the drives you connect to it.
Follow the instructions in this chapter to:
- Understand the status LEDs on your media player (see next section).
- Connect a USB or wireless USB keyboard to your media player (see page 43).
- Update the media player firmware (see page 44).
- Update the Seagate Media software (see page 45).
• Create shortcuts to shared files on your network (see page 46).
- Manage your drives with Seagate Media (see page 48).
- Remove a FreeAgent drive from the media player (see page 52).
- Disconnect a USB drive, camera, or camcorder (see page 53).
- Disconnect the media player (see page 53).
- Reset the media player to its factory default settings (see page 53).
Understanding the Media Player's LEDs
This table describes how the LED on your media player indicates status. The LED is on the front of the media player (see illustrations on page 6 and 7).
| When the LED is... The media player is... | |
| Blinking amber Starting up | |
| Solid amber Off/Ready for use | |
| Solid white On | |
Connecting a Keyboard to the Media Player
You can use a USB or wireless USB keyboard instead of the on-screen keyboard when you're searching for media files or entering other information. Connect your USB keyboard, or the USB receiver that came with your wireless keyboard, to the USB port on the media player.
Updating the Media Player Firmware
Follow the instructions in this section to update the firmware on your media player. For the best experience with your media player, update its firmware whenever a new version becomes available. Go to Seagate Support at www.seagate.com/support to check for firmware updates.
Checking the Current Firmware Version
To see what firmware is currently running on the media player:
- On the Home screen, press Menu, select Settings, then press OK.
- Press Menu, select System Setup, then press OK.
OR
Use the left and right arrows on the remote to scroll through the Settings screens until you find the System screen.
- Select Version Information, then press OK.
The firmware version number displays.
Updating the Firmware
You can update the media player firmware online (if your media player is connected to the Internet) or by using an external USB drive that contains downloaded firmware.
Updating the Firmware Online
To complete an online update, your media player must be connected to the Internet.
To update the firmware online:
- On the Home screen, press Menu, select Settings, then press OK.
- Press Menu, select Firmware Update, then press OK.
OR
Use the left and right arrows on the remote to scroll through the Settings screens until you find the Firmware Update screen.
- Select Online, then press OK.
The media player checks the Seagate Web site for updates and displays a prompt if an update is available.
- Follow the on-screen instructions to complete the firmware update.
Updating the Firmware When the Media Player is Not Online
Follow these instructions to update the firmware if your media player is not connected to the Internet. You will need an external USB drive and a computer that is connected to the Internet.
To update the firmware:
- On your computer, go to Seagate Support at www.seagate.com/support.
- Follow the on-screen instructions to download the new media player firmware to your computer.
- Copy the new firmware to a external USB drive, then properly disconnect the USB drive from your computer.
Note: Put the firmware file in the top-most level (or root level) of the USB drive. Don't put the firmware file into a folder.
- Plug the USB drive into the USB port on your media player.
The media player recognizes the new firmware file and automatically installs it.
Updating the Seagate Media Software
Seagate Media (see page 34) automatically notifies you when a software update is available. If a notification appears, follow the on-screen instructions to complete the update.
You can also manually check to see if an update is available, or you can turn off the software update feature. To manually check for an update or turn off the software update feature:
-
Connect a FreeAgent drive or other external USB drive to your computer.
-
Open Seagate Media.
-
Select the drive, then click Settings.
-
Click Check for Software Update.
The Software Update window appears.
- To turn on automatic software updates, select Check for updates automatically.
To turn off automatic software updates, deselect Check for updates automatically.
- To check for an update immediately, click Check Now.
The Software Update window tells you whether Seagate Media is up to date or not. If updated software is available, you can download it from this window. Follow the on-screen instructions to complete the update.
Creating Shortcuts to Shared Folders
If your media player is connected to a network, you can set up shared folders on your computers that the media player can connect to over the network (see “Sharing Media Files Over Your Network” on page 16).
You can create a shortcut to a shared folder if you want quick access to its contents. You will need:
- The IP address of the computer on which you've created the shared folder
- (Optional) Your network user name and password—required only if users have to sign on to your network to access it
- (Optional) The label, domain, and host name of the computer on which you've created the shared folder—required only if you're connecting to a shared folder with restricted access
Creating a Shortcut
Follow the instructions in this section to create a shortcut to a shared folder that requires no user name, password, or other optional information.
To create a shortcut to the shared folder:
- On the Home screen, select Network from the list of device shortcuts (see Figure 5 on page 12), then press OK.
-
Select My_Shortcuts, then press OK.
-
Press Information i.
-
Select Add, then press OK.
The Add Shortcut screen opens.
TIP: Use the left and right arrows to navigate this screen.
-
In the IP address boxes, use the up and down arrows to enter the IP address of the computer on which you created the shared folder.
-
Select OK, then press OK.
-
When prompted, press OK again to save the new shortcut.
Creating a Shortcut to a Folder with Restricted Access
Follow the instructions in this section to create a shortcut to a shared folder on a network that requires user names and passwords, or to a shared folder with restricted access.
To create a shortcut to the shared folder:
-
On the Home screen, select Network from the list of device shortcuts (see Figure 5 on page 12), then press OK.
-
Select My_Shortcuts, then press OK.
-
Press Information i.
- Select Add, then press OK.
The Add Shortcut screen opens.
TIP: Use the left and right arrows to navigate this screen.
- Select Net User ID, then press OK. Use the on-screen keyboard to enter your user name, select Done, then press OK.
TIP: Connect a USB keyboard to your media player to type faster. See page 43 for more information. - Select Net Password, then press OK. Use the on-screen keyboard to enter your network password, select Done, then press OK.
- In the IP address boxes, use the up and down arrows to enter the IP address of the computer on which you created the shared folder.
- (Optional) Select Detail to add more information about this network connection, including a domain and host name.
- Select OK, then press OK.
- When prompted, press OK again to save the new shortcut.
Modifying or Deleting Shortcuts
You can modify or delete a shortcut to a shared folder if you transfer a folder to a new location or no longer want to make the contents of the folder available to others on the network.
To modify or delete a shared folder:
- On the Home screen, select Network from the list of device shortcuts (see Figure 5 on page 12), then press OK.
- Select My_Shortcuts, then press OK.
- Press Information i.
- Select Modify, then press OK. Change the details of the connection as required, select OK, then press OK.
OR
Select Delete, then press OK.
- When prompted, press OK again to save the new information or delete the shortcut.
Managing FreeAgent Drives with Seagate Media
The CD that came with your media player includes the Seagate Media software. On computers running Windows, you can use Seagate Media to manage your FreeAgent drives. (The tasks in this section don't apply to computers running Mac operating systems.)
TIP: You can also use Seagate Media to synchronize media files between your Windows or Macintosh computer and the drives you connect to your media player. See Chapter 7 "Syncing Your Media Files" on page 34 to learn how.
Getting Started
If you haven't already, install Seagate Media. (See "Installing Seagate Media" on page 34 for help.)
Connect a FreeAgent drive or external USB drive to your computer, open Seagate Media, then click My Drives in the top left corner.
The My Drives window opens. All supported drives connected to your computer are listed. Click any drive to see more details about its contents, including how much storage space is still available.

Figure 13: Seagate Media: My Drives Window
Follow the instructions in the rest of this section to:
- Manage drive settings (see page 48)
• Test a drive (see page 50) - Check drive status (see page 51)
• Find drive information (see page 51) - Register a drive (see page 52)
- Disable pop-up messages from Seagate Media (see page 52)
Managing Drive Settings
You can use Seagate Media to adjust the power settings on a FreeAgent drive or disable the drive's LEDs.
Adjusting Power Settings
You can set your drives to go into power-save mode when they're not being used. Because drives in power-save mode are inactive, it may take a little more time than usual to access your files while the drive becomes active again. You can customize the setting to control when the drive enters power-save mode.
To adjust the power setting for a drive:
- Open the My Drives window (see page 48), select the drive you want, then click Settings.
The Settings window opens.
- Click Adjust Power Setting.
The Adjust Power Setting window opens.
- From the drop-down menu, select a time interval after which the drive enters power-save mode. Or, click Default to return to the drive's default power setting.
TIP: Select a longer time interval if you use the drive frequently, so your work isn't interrupted by delays when you open or save files. Select a shorter time interval if you use your drive less frequently, so your drive doesn't consume more energy than it needs.
- Click Apply.
The setting change is confirmed.
- Click OK to return to the My Drives window.
Disabling Drive LEDs
If the LED on your FreeAgent drive is distracting, you can use Seagate Media to turn it off. To disable the LED on a drive:
- Open the My Drives window (see page 48), select the drive you want, then click Settings. The Settings window opens.
- Click Adjust Drive Lights.
The Drive Lights window opens.
- Click Turn lights off, then click Apply.
The LED is disabled.
Re-enabling the Drive LED
The drive LED is re-enabled automatically if the drive loses power or if the drive is disconnected and reconnected.
You can manually re-enable the LED at any time by following the steps in the previous section and clicking Display status and activity lights in the last step.
Testing a Drive
You can use Seagate Media to check the health of your FreeAgent drive. (Testing a drive doesn't affect your files.)
To test a drive:
- Open the My Drives window (see page 48), select the drive you want, then click Settings. The Settings window opens.
- Click Test My Drive.
The Test My Drive window opens.
- Click Test.
A progress bar appears. When the test is complete, the results display. If Seagate Media finds a problem with the drive, the drive's serial number is listed along with instructions on how to find more help.
- Click OK to return to the My Drives window.
Checking Drive Status
When you install Seagate Media, a status icon appears in your system tray and becomes active whenever you connect a FreeAgent drive or external USB drive to your computer.

Figure 14: Seagate Media: Status Icon
Roll your cursor over the icon to quickly check the status of your drive. The color of the icon shows drive status:
| Icon Color Status | |||
| Blue Drive connected | |||
| Green Drive connected; sync idle | |||
| Gray | No | drive | connected |
| Yellow Sync in progress | |||
| Red Sync failed | Note: When a sync fails, the status icon stays red until a sync is completed successfully. | ||
Finding Drive Information
To find detailed information about your drive:
- Open the My Drives window (see page 48), select the drive you want, then click Drive Info.
The Drive Information window opens, displaying this information:
- Serial Number
- Firmware version
• Volume (the name of your drive) - Capacity
- Free Space
• File System (the Windows file system used by your drive)
- Click OK to close the Drive Information window.
Registering a Drive
If your computer is connected to the Internet, you can use Seagate Media to register FreeAgent drives.
To register a drive:
- Open the My Drives window (see page 48), select the drive you want, then click Settings.
The Settings window opens.
- In the Settings window, click Register My Drive.
The Seagate Product Registration page opens.
- Follow the online instructions to complete the registration.
Disabling Pop-up Messages from Seagate Media
By default, Seagate Media displays pop-up messages with tips and information about special promotions. You can choose to disable the pop-up messages if you want.
Note: Software update messages will not be disabled.
To disable pop-up messages:
- Open the My Drives window (see page 48), select the drive you want, then click Settings.
The Settings window opens.
- Click Change Seagate Advisor Setting.
The Change Seagate Advisor Setting window opens.
- Deselect Show Seagate Advisor messages.
Pop-up messages are disabled.
- Click OK to return to the My Drives window.
Finding Help
For more help using Seagate Media, click the blue Help ? button.
Removing a FreeAgent Drive
To remove a FreeAgent drive from your media player:
- Turn off the media player by pressing Power ⏻ on the remote.
Caution: You may damage the contents of the drive if you do not turn off the media player before you remove the drive.
- Carefully slide the drive from the media player.
Disconnecting a USB Drive, Camera, or Camcorder
To disconnect an external USB device from your media player:
- Stop and close all active movie, photo, or music files on the media player.
- Turn off your camera or camcorder (if applicable).
- Carefully unplug the device from the media player's USB port.
Disconnecting the Media Player
To disconnect the media player from your TV and/or network:
- Turn off the media player by pressing Power ⏻ on the remote.
- Disconnect the cables from the TV and/or the network connector.
- Unplug the power cable.
To reconnect the media player, refer to the printed Quick Start Guide that came in the box.
Resetting the Media Player to Its Original Settings
If necessary, you can reset the media player back to its factory default settings.
Note: All custom settings are lost when you reset the media player.
You can reset the media player two ways:
• Using the media player screens
- Pressing the manual reset button
Resetting the Media Player On-Screen
To reset the media player to its factory default settings:
- On the Home screen, press Menu, select Settings, then press OK.
- Press Menu, select System Setup, then press OK.
OR
Use the left and right arrows on the remote to scroll through the Settings screens until you find the System screen.
-
On the System screen, select Factory Default, then press OK.
-
Select OK, then press OK.
The Initial Setup screen opens.
- Select the menu language you want, then press OK.
- Press Back ↩ to return to the Home screen.
Resetting the Media Player Manually
To reset the media player to its factory default settings:
-
Find the reset button on the media player.
-
FreeAgent Theater+—The reset button is on the right end of the rear of the media player, as shown in Figure 2.
-
FreeAgent GoFlex TV—The reset button is on the right side of the media player, near the back.
-
To restore factory default settings, press and hold the reset button for 2–3 seconds.
9. Customizing Your Media Player Settings
Your media player is ready for use as soon as you plug it in. However, you can customize its settings for your specific TV. For example, you can change the language of the on-screen menus, change the aspect ratio of the picture to wide screen, or set up a night mode for the sound.
Follow the instructions in these sections to customize your media player settings:
- "Customizing the Video Settings" on page 55
- “Setting the Media Player for TVs in Other Countries” on page 56
- "Customizing the Audio Settings" on page 57
- "Changing the Menu Language" on page 58
- “Changing the Media Player Screensaver” on page 58
- "Turning Off a FreeAgent Drive LED" on page 59
- “Adjusting the Date and Time” on page 59
- "Changing the Media Player's Network Settings" on page 60
- "Setting a Language for Information Screens" on page 62
- "Viewing DivX® Account Information" on page 62
Note: You can reset the media player to its original default settings, if necessary. See “Resetting the Media Player to Its Original Settings” on page 53 for instructions.
Customizing the Video Settings
To customize your media player's video settings:
- On the Home screen, press Menu, select Settings, then press OK.
- Press Menu, select Video Setup, then press OK.
OR
Use the left and right arrows on the remote to scroll through the Settings screens until you find the Video screen.
- Adjust the settings as required, following the information in "Adjusting the Aspect Ratio" on page 56 and "Adjusting the Brightness and Contrast" on page 56.
Adjusting the Aspect Ratio
To adjust the aspect ratio:
- On the Video screen, select Aspect Ratio, then press OK.
-
Select one of these options:
-
Pan Scan—Displays in standard definition broadcast television format (4:3 aspect ratio). A standard DVD in 4:3 appears on a 16:9 screen with a black bar on the left and right sides of the screen.
- Letter Box—Displays a wide screen film on a 16:9 screen while maintaining the film's original aspect ratio.
• 16:9—Provides the same viewing area as a movie theater screen.
Note: Standard definition TVs display in a 4:3 aspect ratio; high definition TVs display in a 16:9 aspect ratio.
- Press OK.
Adjusting the Brightness and Contrast
To adjust the picture brightness:
- On the Video screen, select Brightness, then press OK.
- Use the up and down arrows on the remote to adjust the setting, then press OK.
To adjust the picture contrast:
- On the Video screen, select Contrast, then press OK.
- Use the up and down arrows on the remote to adjust the setting, then press OK.
Setting the Media Player for TVs in Other Countries
North American and European TVs have different picture resolution standards. If you have moved your media player from one geographical area to the other, or if the current picture resolution does not work well with your TV, adjust the TV System setting.
To set the media player for the resolution your TV:
- On the Video screen, select TV System, then press OK.
- Use the up and down arrows on the remote to select the setting you want.
This table shows which resolutions are supported by which connectors:
| Composite Connector | Component/HDMI Connector | ||
| 480i (NTSC) | 480i | 480p | (NTSC) |
| 576i (PAL) | 576i | 576p | (PAL) |
| 720i | 720p | ||
| 1080i | 1080p | ||
Note: NTSC (480p, 60 Hz)—Standard North American television resolution PAL (576p, 50 Hz)—Standard European television resolution
- Press OK to change the setting.
Customizing the Audio Settings
To customize your media player's audio settings:
- On the Home screen, press Menu, select Settings, then press OK.
- Press Menu, select Audio Setup, then press OK.
OR
Use the left and right arrows on the remote to scroll through the Settings screens until you find the Video screen.
- Adjust the settings as required, following the information in "Ensuring Softer Sound at Night" on page 57 and "Adjusting the Digital Output Settings" on page 58.
Ensuring Softer Sound at Night
When Night Mode is enabled, the intensity of bass sounds are automatically lowered so that others are not disturbed when you use the media player.
When Comfort mode is enabled, high and low volume levels of all media and TV channels are automatically moderated so that the volume becomes neither too loud nor too soft when you change from one media format to another.
To ensure that sound is softer and controlled at night:
- On the Audio screen, select Night Mode, then press OK.
- Select On to turn on Night Mode, or Comfort to turn on Comfort mode, then press OK.
Adjusting the Digital Output Settings
To adjust the digital output settings to meet the needs of your audio equipment:
- On the Audio screen, select Digital Output, then press OK.
- Select the setting you want:
• S/PDIF LPCM—Converts multi-channel audio into stereo.
- S/PDIF RAW—Plays digital audio without decoding.
- HDMI LPCM 2CH—Converts multiple audio channels into only a left and a right channel. Use this setting when only two speakers are available.
- HDMI LPCM Multi CH—Supports multiple audio channels. Use this setting for surround sound when multiple speakers are available.
- HDMI RAW—Is not decoded by the media player. When you use this setting, you must connect the media player to a receiver with decoding capabilities.
Changing the Menu Language
To change the menu language used by your media player:
- On the Home screen, press Menu, select Settings, then press OK.
- Press Menu, select System Setup, then press OK.
OR
Use the left and right arrows on the remote to scroll through the Settings screens until you find the System screen.
- On the System screen, select Menu Language, then press OK.
- Select the language you want, then press OK.
The menu language changes.
Changing the Media Player Screensaver
After five minutes of inactivity on your media player, a screen saver opens. If you want, you can use a slideshow of your own pictures as the screensaver, instead of the default Seagate logo.
Note: The screensaver runs for 60 minutes. After 60 minutes, the media player turns itself off.
To use a picture slideshow as the screensaver:
-
On the Home screen, press Menu, select Settings, then press OK.
-
Press Menu, select System Setup, then press OK.
OR
Use the left and right arrows on the remote to scroll through the Settings screens until you find the System screen.
- On the System screen, select Screensaver, then press OK.
- Select Slideshow, then press OK.
Turning Off a FreeAgent Drive LED
If you have a FreeAgent drive in your media player and find the flashing of its LED distracting, you can disable the LED.
To turn off the drive LED:
- On the Home screen, press Menu, select Settings, then press OK.
- Press Menu, select System Setup, then press OK.
OR
Use the left and right arrows on the remote to scroll through the Settings screens until you find the System screen.
- On the System screen, select FreeAgent Go LED, then press OK.
- Select Off, then press OK.
Adjusting the Date and Time
To manually set the date and time for your media player:
- On the Home screen, press Menu, select Settings, then press OK.
- Press Menu, select System Setup, then press OK.
OR
Use the left and right arrows on the remote to scroll through the Settings screens until you find the System screen.
- On the System screen, select Time, then press OK.
- Use the arrow buttons to set the date and time, then press OK.
Changing the Media Player's Network Settings
You may need to adjust your media player's network settings if you change from a wired LAN to a WLAN, or if you change the configuration of your WLAN.
This section explains how to:
- Set a static IP address for your media player (see page 60).
- Change from a static IP address to dynamic IP address (see page 60).
- Add the media player to your WLAN (see page 61).
Find the media player's MAC ID and IP address (see page 62).
Setting a Static IP Address
Note: Only advanced network users should set a static IP address for the media player.
If you have connected your media player to a wired LAN, the network settings on your media player don't need to be adjusted. The default network setting (automatic DHCP IP) is highly recommended.
However, if you are an advanced network user and want to manually set a static IP address for the media player, follow these instructions.
To set a static IP address:
- On the Home screen, press Menu, select Settings, then press OK.
- Press Menu, select Network Setup, then press OK.
OR
Use the left and right arrows on the remote to scroll through the Settings screens until you find the Network screen. - Select Wired Setup, then press OK.
- Select Static IP (MANUAL), then press OK.
- Set the IP address as required, then press OK.
- Press OK again to save the new network settings.
The new IP address appears on the Network screen.
Changing from a Static IP to Dynamic IP Address
To change from static to dynamic IP address:
- On the Home screen, press Menu, select Settings, then press OK.
- Press Menu, select Network Setup, then press OK.
OR
Use the left and right arrows on the remote to scroll through the Settings screens until you find the Network screen.
- Select Wired Setup, then press OK.
- Select Dynamic IP (AUTO), then press OK.
- Press OK, then press OK again to save the new network settings.
The new IP address appears on the Network screen.
Adding Your Media Player to a WLAN
Follow the instructions in this section to add your media player to a WLAN, or update the media player's wireless network settings to match your WLAN.
Your media player can save connection settings for up to three wireless networks.
You will need:
• SSID (or network name) of the WLAN(s)
• Security keywords or codes for the WLANs
- Connection type—access point (recommended), peer-to-peer, or wireless N router.
To change your media player's wireless network settings:
- On the Home screen, press Menu, select Settings, then press OK.
- Press Menu, select Network Setup, then press OK.
OR
Use the left and right arrows on the remote to scroll through the Settings screens until you find the Network screen.
- Select Wireless Setup, then press OK.
- Select Connection1 to set up the first connection, then press OK.
Alternatively, select Connection2 or Connection3 if you are setting up more than one wireless network profile.
- Select the connection mode for the WLAN, then press OK.
- Follow the on-screen instructions to enter the WLAN information.
- Press OK to save the new network settings.
Finding the Media Player's MAC Address and IP Address
To view the MAC address and IP address assigned to your media player:
- On the Home screen, press Menu, select Settings, then press OK.
- Press Menu, select System Setup, then press OK.
OR
Use the left and right arrows on the remote to scroll through the Settings screens until you find the System screen.
- On the System screen, select MAC Address, then press OK.
The MAC address assigned to your media player is displayed.
- Press Back
- On the System screen, select IP Address, then press OK.
Setting a Language for Information Screens
You can press Information i to see more details about the movie you're watching. If the information appears in the wrong language for you, follow these instructions to change it.
To set a language for information screens:
- On the Home screen, press Menu, select Settings, then press OK.
- Press Menu, select System Setup, then press OK.
OR
Use the left and right arrows on the remote to scroll through the Settings screens until you find the System screen.
- On the System screen, select Text Encoding, then press OK.
- Select the language you want, then press OK.
Viewing DivX® Account Information
Your media player is an official DivX Certified product with the DivX Home Theater Profile. It plays all versions of DivX video (including DivX 6) with standard playback of DivX media files.
.MOV and .AVI files can be played on your media player if they are run through the DivX Converter application. The DivX Converter is available at www.DivX.com.
Registering or Deactivating Your DivX Account
If you have a DivX Video on Demand account, you can see your registration code and deactivation code on your media player. You need these codes to enable or disable your DivX account.
Finding the Registration Code
To find the DivX registration code:
- On the Home screen, press Menu, select Settings, then press OK.
- Press Menu, select System Setup, then press OK.
OR
Use the left and right arrows on the remote to scroll through the Settings screens until you find the System screen.
- On the System screen, select DivX Register, then press OK.
Follow the on-screen instructions to register your DivX account.
Finding the Deactivation Code
To find the DivX deactivation code:
- On the Home screen, press Menu, select Settings, then press OK.
- Press Menu, select System Setup, then press OK.
OR
Use the left and right arrows on the remote to scroll through the Settings screens until you find the System screen.
- On the System screen, select DivX Deactivate, then press OK.
Follow the on-screen instructions to deactivate your DivX account.
10. Solving Problems
This chapter provides solutions to the most common problems you may encounter while setting up and using your media player.
General Troubleshooting Tips
If you have problems setting up or using your media player, check these things first:
- Are the remote batteries dead?
• Is something blocking the remote signal receiver on the front of the media player? - Are all the media player's cables connected properly? Are your media player and TV plugged into an active power source? Are any of the cables damaged or faulty?
- Is the volume on your TV turned down or muted? Is the volume on your media player turned down or muted?
• Is the TV set to the wrong input type?
- Is your network down or disabled? Have the network settings changed?
• Is your Internet service disrupted or disabled?
- Is your FreeAgent drive fully inserted into the media player? If you have another device connected to the media player to the USB port, is it properly connected (and powered on, if needed)?
- Are there movie, picture, or music files on your connected device?
Common Problems and Solutions
This section provides solutions to some common problems you may encounter while using your media player.
Subtitles don't appear on my movie.
The subtitle format may not be supported by your media player. Your media player supports subtitles in these formats:
.SMI/SAMI.SRT.SUB
Make sure that the movie file and subtitle file have identical names. Also, ensure that the movie file and subtitle file are stored in the same folder.
The subtitles on my movie are too small/in the wrong place.
If you are playing an .MKV file with subtitles, press Pause, then use the arrow buttons to adjust the size and placement of the subtitles.
The media player doesn't recognize my external USB drive.
Your USB drive may not be formatted correctly. Only FAT, FAT32, NTFS and Mac HFS+ formatted external USB storage devices are supported by the media player.
The media player doesn't recognize my digital camera or camcorder.
Your digital camera or camcorder may not be compatible with the media player. If your camera or camcorder doesn't appear in the list of devices on your Home screen when you connect it to the media player, it's incompatible for use.
One of my media files won't open.
The file format may not be supported by your media player. Check to see if the file's extension is listed here:
Supported photo and picture file formats:
.BMP .GIF .JPG/JPEG .PNG .TIFF
Supported movie file formats:
.ASF .FLV .M2TS .MOV .MPEG-4 .RMVB .VOB
| .AVI | H.264 | .M4V | .MP4 | .MPG | .TP | .WMV |
| .DAT | .IFO | .MinusVR | .MPEG | .MTS | .TRP | .XVID |
| .DivX® | .ISO | .MKV .MPEG-2 .RM | .TS | |||
Supported audio file formats:
| .AAC | .MP3 | .RA | .WAV |
| .ASF .MP4 | .RM | .WMA | |
| .FLAC | .OGG | .RMVB |
Supported music playlist file formats:
.M3U .PLS
The subtitles on my movie don't appear.
Check to see if the movie file and subtitle file have identical names. Also, ensure that the movie file and subtitle file are stored in the same folder.
If the subtitles still don't appear, the file format of the subtitles may not be supported by your media player. Your media player supports subtitles in these formats:
.SMI/SAMI.SRT.SUB
The information screens on my movies are in the wrong language.
If the wrong language appears when you press Information i to see more details about a movie or song, ensure that the text encoding language is set to the language you want. See "Setting a Language for Information Screens" on page 62 to learn how.
My media player language is not English, but I need to search for a file with an English name.
If the menu language of your media player is not English but you want to enter English words in your search, on the on-screen keyboard select the key labeled English, then type the English words.
YouTube videos won't play.
If you have trouble getting videos to play on the YouTube service, make sure your media player is set to the correct time. See “Adjusting the Date and Time” on page 59 to learn how.
I moved my media player to another country and the picture quality is bad.
North American and European TVs have different picture resolution standards. If you have moved your media player from one geographic area to the other, you can reset the device to the default settings for your new location. (See “Setting the Media Player for TVs in Other Countries” on page 56 for more information.)
To switch the device to NTSC (American) or PAL (European) standard default settings:
-
Find the RESET button on the media player. (See "Resetting the Media Player Manually" on page 54 for help.)
-
Press and hold the reset button for 10 seconds.
If your media player was originally set to NTSC, it switches to default PAL settings. If your media player was originally set to PAL, it switches to default NTSC settings.
The thumbnail view of my song doesn't show the album art.
For album art to display as a thumbnail, the image has to be stored in the album folder. See "Displaying Album Cover Art" on page 31 for more information.
The thumbnail view of my movie doesn't show the right picture.
For a DVD image to display as a thumbnail, the image has to be stored in the right place. In the DVD's folder, put the image in the same folder as the Audio_TS and Video_TS sub-folders.
Updating the Media Player Firmware
For complete instructions, see page 44.
Recovering After a Firmware Update Failure
If a power failure or power surge happens while you're updating the firmware on your media player, the update fails.
To recover after an update failure, you need an external USB drive (also known as a flash drive or thumb drive) and a computer that is connected to the Internet.
TIP: For best results, read all the steps in this section before you start.
To recover after a firmware update failure:
- If you haven't already, go to the Seagate Support at www.seagate.com/support.
- Follow the on-screen instructions to download the new firmware to your computer.
-
Copy the new firmware to the USB drive, then properly disconnect the drive from your computer.
-
Unplug the media player's power cord.
- Connect your USB drive to the media player.
- Turn on your TV.
- Press and hold the media player's RESET button. Don't release the RESET button.
- Plug in the media player's power cord.
- When the Seagate logo appears on the TV, release the RESET button.
The Updating screen opens. Don't use your media player until the update is complete.
Resetting the Media Player Manually
As a last resort, try resetting the media player to its factory default settings. See “Resetting the Media Player Manually” on page 54 for complete instructions.
Finding More Help
Seagate Support provides a broad range of resources (including FAQs, a knowledge base and a community forum) to help you solve any problem you might have while using your media player. Go to the Seagate Web site at www.seagate.com.
Index
A
activating a Paramount account 33
album cover art 31, 66
Arrow buttons 14, 15
aspect ratio setting 56
audio settings 57
adjusting digital output settings 58
Comfort setting 57
Night Mode setting 57
automatic sync, disabling
Macintosh 42
Windows 40
B
Back button 14, 15
Backward Skip button 14
brightness setting 56
Browse
shortcut 13
browsing files
browsing movie files 20
browsing music files 30
browsing picture files 26
C
camcorders
playing videos from 21
problem-solving 65
cameras
problem-solving 65
viewing pictures from 27
capacity of FreeAgent drives 51
Comfort setting 57
component connectors, picture resolutions 57
composite connectors, picture resolutions 57
connecting a drive 11
connecting a USB keyboard 43
Continuous Play setting
music 29
picture slideshows 25
contrast setting 56
currently playing music 31
Custom Sync setting (Windows) 37, 38
Customized Sync setting (Macintosh) 41
customizing sync settings 38
customizing the media player 55–63
D
Date setting 10, 59
deactivating a DivX account 62
deactivating a Netflix account 33
Default Sync setting (Macintosh) 41
devices
browsing for movies 20
browsing for music 30
browsing for pictures 26
shortcuts to 12
troubleshooting 65
digital camcorders
playing videos from a camcorder 21
troubleshooting 65
digital cameras
troubleshooting 65
viewing pictures from 27
digital output settings 58
digitized DVDs 21
images in thumbnails 66
disconnecting a device from the media player 53
disconnecting the media player 53
DivX 62
drives
adjusting power settings 49
checking drive status 51
disabling drive LEDs 50, 59
drive capacity 51
file systems on FreeAgent drives 51
finding drive information 51
firmware version 51
free space 51
managing with Seagate Media 48–52
registering a drive 52
removing a FreeAgent drive 52
serial number 51
solving problems 65
supported FreeAgent drives 8
supported USB drives 8
testing a drive 50
volume name 51
dynamic IP address 60
E
enlarging pictures 24
F
Fast Forward button 14, 15
fast forwarding a movie 19
firmware
finding the current version 44
firmware version on FreeAgent drives 51
looking for updates 44
recovering after an upgrade failure 67
updating online 44
updating when not online 45
flash drives 8
Forward Skip button 14
FreeAgent drives 8
connecting 11
removing 52
FreeAgent GoFlex TV
features 7
illustrations 7
overview 6
See also media player
FreeAgent Theater+
features 6
illustrations 6
overview 6
See also media player
H
HDMI connectors, picture resolutions 57
HDMI LPCM 2CH setting 58
HDMI LPCM Multi CH setting 58
HDMI RAW setting 58
help 17, 64–67
Home button 14, 15
Home screen
illustration 12
Main Menu 13
opening for the first time 11
shortcuts 12, 32
|
indexing media files 11
Information button 14, 15, 19, 46, 47, 62
installing Seagate Media
on Macintosh 35
on Windows 34
Internet services 32
activating a Paramount account 33
deactivating a Netflix account 33
shortcut 13
shortcuts 12
troubleshooting YouTube 66
IP address of the media player 62
K
keyboards, connecting 43
L
LAN
connecting your media player 16
dynamic IP address 60
static IP address 60
switching to a WLAN 60
language
for file searches 66
for information screen 62
for menus 58
for movies 21
for the media player 10
LEDs
disabling drive LEDs 50
disabling the FreeAgent drive LED 59
understanding what the colors mean 43
listening to music. See music
M
MAC address of the media player 62
Macintosh
installing Seagate Media 35
syncing media files 41–42
Main Menu 13
illustration 13
Pictures menu 13
manually starting a sync 39
media files
browsing movie files 20
browsing music files 30
browsing picture files 26
indexing 11
movie formats 18
movie subtitle formats 18
movie thumbnails 66
music file formats 28
music thumbnails 66
picture formats 23
playlist formats 28
preparing to sync media files 36
searching for a movie 20
searching for a picture 26
searching for a song 30
supported file types 65
syncing 34–42
syncing on Macintosh 41–42
syncing on Windows 37-41
media player
accessing shared folders 16
adjusting network settings 16
adjusting the date and time 59
audio settings 57
changing from static to dynamic IP address 60
changing resolution for other countries 56
changing the screensaver 58
choosing a language 10
components list 8
connecting a drive 11
connecting a keyboard 43
connecting to a LAN 60
connecting to a WLAN 61
creating shortcuts to shared folders 46
customizing the settings 55–63
Date setting 59
disabling the drive LED 59
disconnecting 53
disconnecting a device 53
DivX account information 62
finding more help 17
firmware version 44
fixing picture quality 66
Home screen shortcuts 32
indexing media files 11
IP address 62
language settings 62
listening to music 28–31
looking for firmware updates 44
MAC address 62
managing drives with Seagate Media 48–52
menu language 58
movies and videos 18–22
music 28–31
navigating the screens 11
Netflix accounts, deactivating 33
network settings 60
NTSC resolution setting 56
other requirements 8
overview 6
PAL resolution setting 56
Paramount accounts 33
powering on 10
removing a FreeAgent drive 52
reset button 67
resetting the media player manually 67
resetting to original settings 53
screensaver, changing 58
setting static IP address 60
setting the date and time 10
sharing folders 46
starting the set-up 10
subtitles 64, 65
supported movie formats 18
supported music formats 28
supported picture formats 23
supported playlist formats 28
supported subtitle formats 18
television connectors 8
Text Encoding setting 62
Time setting 59
turning off the drive LED 59
TV System setting 56
understanding the LEDs 43
updating Seagate Media 45
updating the firmware 45
updating the firmware online 44
USB keyboards 43
using the remote 11
video settings 55
viewing photos and pictures 23–27
watching movies and videos 18–22
WiFi adapter 15
media server 9
Media Sync software
changing sync settings 40
checking Media Sync status 40
Custom Sync setting (Windows) 37
Customized Sync setting (Macintosh) 41
customizing sync settings 38
Default Sync setting (Macintosh) 41
deleting custom settings 40
disabling automatic sync (Macintosh) 42
disabling automatic sync (Windows) 40
for Macintosh 41–42
for Windows 37-41
introduction 36
manually starting a sync 39
setting up Simple Sync 38
simple sync setting (Windows) 37
Menu button 14, 15
menus, changing the language 58
movies 18–22
adjusting subtitle size and position 19
browsing for a movie 20
controlling DVD features 21
fast forwarding a movie 19
finding a movie 20
finding information about a movie 19
Information button 19
jumping ahead or back 19
picture quality 66
playing a movie 19
playing in slow motion 22
playing videos from your camcorder 21
reversing a movie 19
searching for a movie 20
selecting a language 21
shortcut 13
slow motion 22
sorting the movie list 19
subtitles 19
supported formats 18
supported subtitle formats 18
thumbnail view 66
viewing subtitles 21
viewing thumbnails 19
music 28–31
browsing for a song 30
checking the current song 31
displaying album cover art 31
finding a song 29
listening while viewing pictures 24
playing music 28
playing music continuously 29
searching for a song 30
shortcut 13
shuffling songs 29
sorting the music list 28
supported file formats 28
supported playlist formats 28
thumbnail view 66
viewing thumbnails 28
Mute button 14, 15
My_Shortcuts folder 46, 47
N
navigating the media player screens 11, 14
navigation
quick navigation tips 15
remote buttons 14
Netflix accounts, deactivating 33
network
accessing shared folders 16
adjusting network settings 16
changing network settings 60
connecting to a LAN 16
connecting to a WLAN 16, 61
creating shortcuts to shared folders 46
IP address of media player 62
MAC address of media player 62
static IP address of media player 60
WiFi adapter, adding 15
Night Mode setting 57
NTSC resolution setting 56
0
OK button 14, 15
online media content 32
operating systems, Seagate Media 8
P
PAL resolution setting 56
Paramount accounts, activating 33
personal videos 21
photos. See pictures
pictures 23–27
adding music to a slideshow 25
browsing for a picture 26
enlarging 24
finding a picture 25
listening to music while viewing 24
rotating 24
searching for a picture 26
shortcut 13
sorting the picture folders 23
sorting the picture list 24
supported file formats 23
viewing 23
viewing as a list 24
viewing as thumbnails 23, 24
viewing folders 24
viewing from your camera 27
viewing in a slideshow 24
zooming 24
Pictures menu 13
Play/Pause button 14, 15
pop-up messages in Seagate Media 52
Power button 14, 15
power settings on your drives, adjusting 49
powering on 10
problem-solving 64–67
cameras and camcorders 65
drive not recognized 65
fixing subtitle problems 64, 65
general 64
movie picture quality 66
recovering after an upgrade failure 67
YouTube issues 66
R
registering a DivX account 62
registering a drive 52
remote
button descriptions 15
buttons 14
Home button 12
illustration 14
navigating the screens 11
removing a FreeAgent drive 52
Repeat One setting for music 29
reset button 67
resetting the media player 53
resetting the media player manually 67
Reverse button 14, 15
reversing a movie 19
rotating pictures 24
S
S/PDIF LPCM setting 58
S/PDIF RAW setting 58
screens
finding many paths to a screen 14
navigation 14
screensaver, changing 58
Seagate Media
adjusting power settings 49
changing sync settings 40
checking drive status 51
checking Media Sync status 40
Custom Sync setting 37
Customized Sync setting (Macintosh) 41
customizing sync settings 38
Default Sync setting (Macintosh) 41
deleting custom settings 40
disabling automatic sync (Macintosh) 42
disabling automatic sync (Windows) 40
disabling drive LEDs 50
disabling pop-up messages 52
finding drive information 51
Help button 52
installing on Macintosh 35
installing on Windows 34
managing drives 48–52
manually starting a sync 39
Media Sync for Macintosh 41–42
Media Sync for Windows 37-41
opening the My Drives window 48
registering a drive 52
setting up Simple Sync 38
simple sync setting (Windows) 37
status icons 51
supported operating systems 8
syncing media files 34–42
testing a drive 50
updating the software 45
Seagate Web site 15
Seagate Support 17
searching files
searching for a movie 20
searching for a picture 26
searching for a song 30
serial numbers on FreeAgent drives 51
services from the Internet 32
setting up the media player 10
settings
shortcut 13
shared folders 16
creating shortcuts 46
sharing files and folders on the network 16
shortcuts 12
Internet services 32
Main Menu 13
shared folders 46
Shuffle Loop setting for music 29
Shuffle Loop setting for slideshows 25
shuffling music 29
Simple Sync setting (Windows) 38
simple sync setting (Windows) 37
Skip Back button 15
Skip Forward button 15
Slide Timing setting 25
Slide Transition setting 25
slideshow of pictures 24
adding music 25
slow motion 22
songs. See music
sorting media files
sorting the movie list 19
sorting the music list 28
sorting the picture folders 23
sorting the picture list 24
static IP address
changing to dynamic IP address 60
setting 60
Stop button 14, 15
subtitles 19
solving problems 64, 65
viewing 21
support 17
syncing media files 34–42
changing sync settings 40
checking Media Sync status 40
Custom Sync setting 37
Customized Sync setting (Macintosh) 41
customizing sync settings 38
Default Sync setting (Macintosh) 41
deleting custom Media Sync settings 40
disabling automatic sync (Macintosh) 42
disabling automatic sync (Windows) 40
getting started 36
manually starting a sync 39
setting up Simple Sync 38
simple sync setting (Windows) 37
syncing on Macintosh 41–42
syncing on Windows 37–41
T
television connectors 8
supported picture resolutions 57
testing a drive with Seagate Media 50
Text Encoding setting 62
thumb drives 8
thumbnails
movies 19
music 31
pictures 24
Time setting 10, 59
troubleshooting 64–67
cameras and camcorders 65
drive not recognized 65
fixing subtitle problems 64, 65
general 64
movie picture quality 66
recovering after an upgrade failure 67
YouTube issues 66
TV System setting 56
U
updating the firmware
recovering after an upgrade failure 67
updating online 44
updating when not online 45
USB drives 8
connecting 11
USB keyboards
connecting 43
v
video settings 55
adjusting brightness and contrast 56
adjusting the aspect ratio 56
videos. See movies
Volume buttons 14, 15
W
watching movies. See movies
Web-based services 32
shortcuts 12
WiFi adapter 15
Windows
installing Seagate Media 34
syncing media files 37–41
wired LAN. See LAN
wireless keyboards, connecting 43
wireless LAN. See WLAN
WLAN
connecting the media player 61
connecting your media player 16
switching from a LAN to a WLAN 60
WiFi adapter 15
Y
YouTube, troubleshooting 66
Z
Zoom buttons 14, 15
zooming pictures 24


- MEDIA PLAYER USER GUIDE
- CONTENTS
- ABOUT YOUR MEDIA PLAYER 6
- GETTING STARTED .... 10
- WATCHING MOVIES .... 18
- VIEWING PHOTOS AND PICTURES .... 23
- LISTENING TO MUSIC .... 28
- ACCESSING ONLINE MEDIA CONTENT 32
- SYNCING YOUR MEDIA FILES .... 34
- MANAGING YOUR MEDIA PLAYER AND CONNECTED DEVICES ..... 43
- CUSTOMIZING YOUR MEDIA PLAYER SETTINGS ..... 55
- SOLVING PROBLEMS ...... 64
- ABOUT YOUR MEDIA PLAYER
- THIS IS YOUR MEDIA PLAYER
- FREEAGENT THEATER+ MEDIA PLAYER
- FREEAGENT GOFLEX TV MEDIA PLAYER
- WHAT YOU CAN DO WITH YOUR MEDIA PLAYER
- YOUR MEDIA PLAYER COMPONENTS
- WHAT ELSE YOU NEED
- GETTING STARTED
- POWERING ON FOR THE FIRST TIME
- CONNECTING A FREEAGENT DRIVE OR EXTERNAL USB DRIVE
- NAVIGATING THE MEDIA PLAYER SCREENS AND MENUS
- GETTING TO KNOW THE MAIN SCREENS AND MENUS
- THE HOME SCREEN
- THE MAIN MENU
- THE SCREEN MENUS
- FOLLOWING MANY PATHS TO THE SAME SCREEN
- USING THE REMOTE
- QUICK NAVIGATION TIPS
- REMOTE CONTROL BUTTONS
- ADDING A WIFI ADAPTER
- CHECKING THE NETWORK SETTINGS
- SHARING MEDIA FILES OVER YOUR NETWORK
- NEXT STEPS
- FINDING MORE HELP
- WATCHING MOVIES
- BEFORE YOU BEGIN
- SUPPORTED MOVIE FORMATS
- SUPPORTED MOVIE SUBTITLE FORMATS
- PLAYING A MOVIE
- JUMPING AHEAD OR BACK IN A MOVIE
- ADJUSTING SUBTITLE SIZE AND POSITION
- FINDING A MOVIE TO WATCH
- BROWSING FOR MOVIES BY DEVICE
- SEARCHING FOR A SPECIFIC MOVIE
- CONTROLLING A MOVIE'S DVD FEATURES
- VIEWING SUBTITLES
- LISTENING TO THE MOVIE IN ANOTHER LANGUAGE
- PLAYING A PERSONAL VIDEO FROM A DIGITAL CAMCORDER
- PLAYING MOVIES IN SLOW MOTION
- VIEWING PHOTOS AND PICTURES
- VIEWING PICTURES
- VIEWING ALL FOLDERS CONTAINING PICTURES
- LISTENING TO MUSIC WHILE LOOKING AT PICTURES
- VIEWING PICTURES IN A SLIDESHOW
- ADDING MUSIC TO A SLIDESHOW
- FINDING PICTURES
- BROWSING FOR PICTURES BY DEVICE
- SEARCHING FOR A SPECIFIC PICTURE
- VIEWING PICTURES FROM A DIGITAL CAMERA
- LISTENING TO MUSIC
- SUPPORTED AUDIO FILE FORMATS
- SUPPORTED PLAYLIST FORMATS
- PLAYING MUSIC
- SETTING UP CONTINUOUS PLAY AND SHUFFLING
- FINDING MUSIC
- BROWSING FOR MUSIC BY DEVICE
- SEARCHING FOR A SPECIFIC SONG
- DISPLAYING ALBUM COVER ART
- CHECKING WHICH SONG IS CURRENTLY PLAYING
- ACCESSING ONLINE MEDIA CONTENT
- ACCESSING AN INTERNET SERVICE
- USING THE HOME SCREEN SHORTCUTS
- ACTIVATING A PARAMOUNT® ACCOUNT (US ONLY)
- MANAGING YOUR NETFLIX® ACCOUNT (US ONLY)
- SYNCING YOUR MEDIA FILES
- INSTALLING SEAGATE MEDIA
- INSTALLING ON WINDOWS
- CLICK FINISH TO COMPLETE THE INSTALLATION
- INSTALLING ON MACINTOSH
- UNDERSTANDING HOW MEDIA SYNC WORKS
- HOW DO I GET STARTED
- SYNCHRONIZING YOUR MEDIA FILES (WINDOWS)
- SELECTING YOUR SYNC SETTINGS
- SETTING UP SIMPLE SYNC
- CUSTOMIZING YOUR SYNC SETTINGS
- STARTING A SYNC MANUALLY
- CLICK SYNC NOW
- CHECKING THE MEDIA SYNC STATUS OF YOUR COMPUTERS
- CHANGING YOUR MEDIA SYNC SETTINGS
- DISABLING AUTOMATIC SYNC
- DELETING YOUR CUSTOM MEDIA SYNC SETTINGS
- CLICK DELETE
- SYNCHRONIZING YOUR MEDIA FILES (MACINTOSH)
- SETTING UP MEDIA SYNC WITH DEFAULT SETTINGS
- MANAGING YOUR MEDIA PLAYER AND CONNECTED DEVICES
- UNDERSTANDING THE MEDIA PLAYER'S LEDS
- CONNECTING A KEYBOARD TO THE MEDIA PLAYER
- UPDATING THE MEDIA PLAYER FIRMWARE
- CHECKING THE CURRENT FIRMWARE VERSION
- UPDATING THE FIRMWARE
- UPDATING THE FIRMWARE ONLINE
- UPDATING THE FIRMWARE WHEN THE MEDIA PLAYER IS NOT ONLINE
- UPDATING THE SEAGATE MEDIA SOFTWARE
- CREATING SHORTCUTS TO SHARED FOLDERS
- CREATING A SHORTCUT
- CREATING A SHORTCUT TO A FOLDER WITH RESTRICTED ACCESS
- MODIFYING OR DELETING SHORTCUTS
- MANAGING FREEAGENT DRIVES WITH SEAGATE MEDIA
- MANAGING DRIVE SETTINGS
- ADJUSTING POWER SETTINGS
- DISABLING DRIVE LEDS
- RE-ENABLING THE DRIVE LED
- TESTING A DRIVE
- CHECKING DRIVE STATUS
- FINDING DRIVE INFORMATION
- REGISTERING A DRIVE
- DISABLING POP-UP MESSAGES FROM SEAGATE MEDIA
- FINDING HELP
- REMOVING A FREEAGENT DRIVE
- DISCONNECTING A USB DRIVE, CAMERA, OR CAMCORDER
- DISCONNECTING THE MEDIA PLAYER
- RESETTING THE MEDIA PLAYER TO ITS ORIGINAL SETTINGS
- RESETTING THE MEDIA PLAYER ON-SCREEN
- RESETTING THE MEDIA PLAYER MANUALLY
- CUSTOMIZING YOUR MEDIA PLAYER SETTINGS
- CUSTOMIZING THE VIDEO SETTINGS
- ADJUSTING THE ASPECT RATIO
- ADJUSTING THE BRIGHTNESS AND CONTRAST
- SETTING THE MEDIA PLAYER FOR TVS IN OTHER COUNTRIES
- CUSTOMIZING THE AUDIO SETTINGS
- ENSURING SOFTER SOUND AT NIGHT
- ADJUSTING THE DIGITAL OUTPUT SETTINGS
- CHANGING THE MENU LANGUAGE
- CHANGING THE MEDIA PLAYER SCREENSAVER
- TURNING OFF A FREEAGENT DRIVE LED
- ADJUSTING THE DATE AND TIME
- CHANGING THE MEDIA PLAYER'S NETWORK SETTINGS
- SETTING A STATIC IP ADDRESS
- CHANGING FROM A STATIC IP TO DYNAMIC IP ADDRESS
- ADDING YOUR MEDIA PLAYER TO A WLAN
- FINDING THE MEDIA PLAYER'S MAC ADDRESS AND IP ADDRESS
- SETTING A LANGUAGE FOR INFORMATION SCREENS
- VIEWING DIVX® ACCOUNT INFORMATION
- REGISTERING OR DEACTIVATING YOUR DIVX ACCOUNT
- FINDING THE REGISTRATION CODE
- FINDING THE DEACTIVATION CODE
- SOLVING PROBLEMS
- GENERAL TROUBLESHOOTING TIPS
- COMMON PROBLEMS AND SOLUTIONS
- SUBTITLES DON'T APPEAR ON MY MOVIE
- THE SUBTITLES ON MY MOVIE ARE TOO SMALL/IN THE WRONG PLACE
- THE MEDIA PLAYER DOESN'T RECOGNIZE MY EXTERNAL USB DRIVE
- THE MEDIA PLAYER DOESN'T RECOGNIZE MY DIGITAL CAMERA OR CAMCORDER
- ONE OF MY MEDIA FILES WON'T OPEN
- THE SUBTITLES ON MY MOVIE DON'T APPEAR
- THE INFORMATION SCREENS ON MY MOVIES ARE IN THE WRONG LANGUAGE
- MY MEDIA PLAYER LANGUAGE IS NOT ENGLISH, BUT I NEED TO SEARCH FOR A FILE WITH AN ENGLISH NAME
- YOUTUBE VIDEOS WON'T PLAY
- I MOVED MY MEDIA PLAYER TO ANOTHER COUNTRY AND THE PICTURE QUALITY IS BAD
- THE THUMBNAIL VIEW OF MY SONG DOESN'T SHOW THE ALBUM ART
- THE THUMBNAIL VIEW OF MY MOVIE DOESN'T SHOW THE RIGHT PICTURE
- RECOVERING AFTER A FIRMWARE UPDATE FAILURE
- INDEX
- A
- B
- C
- D
- E
- F
- FIRMWARE
- H
- K
- L
- LAN
- LANGUAGE
- LEDS
- M
- MACINTOSH
- MEDIA FILES
- MEDIA PLAYER
- N
- 0
- P
- R
- S
- T
- U
- V
- W
- WLAN
- Y
- Z
Brand : SEAGATE
Model : STAJ200
Category : Media player