SA7003/ZIL - Cd player/recorder MARANTZ - Free user manual and instructions
Find the device manual for free SA7003/ZIL MARANTZ in PDF.


| Product Type | CD Player/Recorder |
| Brand | Marantz |
| Model | SA7003/ZIL |
| Disc Compatibility | CD, CD-R, CD-RW |
| Audio Formats Supported | CD-DA, MP3, WMA |
| Recording Capability | CD-R and CD-RW recording |
| Output Power (Headphone) | 15 mW into 32 Ω |
| Frequency Response | 20 Hz - 20 kHz ±0.5 dB |
| Signal-to-Noise Ratio | 100 dB |
| Total Harmonic Distortion | 0.002% |
| Dynamic Range | 96 dB |
| Power Supply | AC 230V, 50 Hz |
| Power Consumption | 30 W (standby 0.5 W) |
| Dimensions (W x H x D) | 440 x 107 x 299 mm |
| Weight | 6.3 kg |
| Remote Control | Included (RC004S) |
| Output Connections | Analog RCA, Coaxial digital, Optical digital, Headphone |
| Cleaning | Use a soft dry cloth; do not use solvents |
| Laser Safety | Class 1 laser product |
| Spare Parts Availability | Authorized Marantz service centers |
Frequently Asked Questions - SA7003/ZIL MARANTZ
User questions about SA7003/ZIL MARANTZ
0 question about this device. Answer the ones you know or ask your own.
Ask a new question about this device
Download the instructions for your Cd player/recorder in PDF format for free! Find your manual SA7003/ZIL - MARANTZ and take your electronic device back in hand. On this page are published all the documents necessary for the use of your device. SA7003/ZIL by MARANTZ.
USER MANUAL SA7003/ZIL MARANTZ
natural_image
Pure electrical circuit lines without any symbolsmarantz®
Super Audio CD player
SA8003
SA7003
User Guide
ENGLISHFRANÇAISE
ENGLISH
WARRANTY
For warranty information, contact your local Marantz distributor.
RETAIN YOUR PURCHASE RECEIPT
Your purchase receipt is your permanent record of a valuable purchase. It should be kept in a safe place to be referred to as necessary for insurance purposes or when corresponding with Marantz.
IMPORTANT
When seeking warranty service, it is the responsibility of the consumer to establish proof and date of purchase. Your purchase receipt or invoice is adequate for such proof.
FOR U.K. ONLY
This undertaking is in addition to a consumer's statutory rights and does not affect those rights in any way.
FRANÇAIS
GARANTIE
The SA8003/SA7003 is in conformity with the EMC directive and low-voltage directive.
€ Français
- Do not expose the equipment to rain, moisture, dripping or splashing.
- Do not remove the cover from the equipment.
- Do not insert anything into the equipment through the ventilation holes.
- Do not handle the mains cord with wet hands.
- Do not cover the ventilation with any items such as tablecloths, newspapers, curtains, etc.
- No naked flame sources, such as lighted candles, should be placed on the equipment.
- When disposing of used batteries, please comply with governmental regulations or environmental public instruction's rules that apply in your country or area.
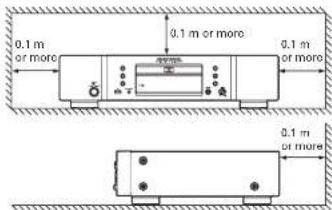
- Make a space of about 0.1 meter around the unit.
- No objects filled with liquids, such as vases, shall be placed on the equipment.
- When the switch is in the OFF position, the equipment is not completely switched off from MAINS.
- The equipment shall be installed near the power supply so that the power supply is easily accessible.
- Do not expose the unit and batteries to excessive heat such as direct sunlight, fire or the like.
Français
AVERTISSEMENTS
Thank you for selecting the Marantz Super Audio CD Player for your Audio system.
This Player incorporates a number of features designed to enhance the listening of your favorite audio sources.
Please read these operating instructions carefully. We recommend that you read the entire user guide before you attempt to connect or operate the player.
After you have reviewed the contents of this manual, we suggest that you make all system connections before you attempt to operate the unit.
CHECKING THE ACCESSORIES
After opening the cover of the packing box, check that the following accessories are included.
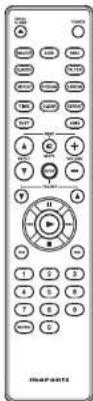
- Remote controller
- Size "AAA" batteries x 2

- AC Power cord
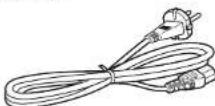
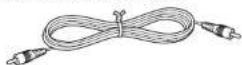
• Audio connecting cord
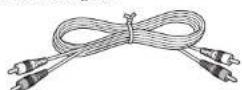
- Remote control connecting cord
- User Guide
A NOTE ABOUT RECYCLING

This product's packaging materials are recyclable and can be reused. This product and the accessories packed together are the applicable product to the WEEE directive except batteries.
Please dispose of any materials in accordance with your local recycling regulations.
When discarding the unit, comply with your local rules or regulations.
Batteries should never be thrown away or incinerated but disposed of in accordance with your local regulations concerning chemical wastes.
ENGLISH
CONTENTS
FEATURES 2
SA8003/SA7003 COMMON FEATURES 2
SA8003 FEATURES 2
APPLICABLE DISCS TO THE UNIT 2
BEFORE USING ....3
USAGE OF REMOTE CONTROLLER 4
NAMES AND FUNCTIONS ....5
FRONT PANEL 5
DISPLAY 6
REMOTE CONTROLLER 7
REAR PANEL B
BASIC CONNECTIONS 9
CONNECTING TO AN AMPLIFIER 9
USB MEDIA/iPod CONNECTION
(ISA8003 ONLY) 9
CONNECTING THE POWER SUPPLY 9
CONNECTING TO A DIGITAL AUDIO
COMPONENT 11
REMOTE CONTROL CONNECTION 12
TIMER PLAY 12
TO CHECK THE PROGRAMMED TRACKS ..... 15
SEARCHING YOUR FAVORITE TRACKS
(AMS (AUTOMATIC MUSIC SCAN) PLAY) ..... 15
SWITCHING SOUND MODE
(SUPER AUDIO CD) 15
SETTING THE DIGITAL OUTPUT 16
TROUBLESHOOTING....23
OTHERS 25
SPECIFICATIONS & DIMENSIONAL
DRAWINGS 27
NOTES ABOUT THE DISCS 28
ABOUT USB MEDIA 28
ENGLISH
FEATURES
SA8003/SA7003 COMMON FEATURES
This unit can play back the outstanding sound performance of Super Audio CDs. This unit has the following major features.
- Low-noise low-distortion filter circuit and high-speed HDAMSA2-type output amplifier with the differential input type HDAM
- Playback of CD-R/CD-RW discs
- Playback of CD-R/CD-RW/CD-ROM discs containing WMA and MP3 files
SA8003 FEATURES
The SA8003 has been upgraded from SA7003 as in the following.
- Toroidal transformer
The SA8003 features a toroidal transformer that produces less vibration and magnetic leakage flux compared to conventional power transformers. The materials and manufacturing process of the ring-shaped core are strictly controlled to reduce vibration, while the short-ring attached to the perimeter of the transformer reduce magnetic leakage flux.
• Large-capacitance block capacitor
A large capacitance 3300 μF capacitor carefully selected for its acoustic characteristics is incorporated into the power supply circuit.
• Audiophile-grade film capacitors and electrolytic capacitors
The SA8003 features the same audiophile-grade film capacitors and electrolytic capacitors specifically used in top-range models.
• Double-layered chassis
• High-grade machined analog audio output connectors
- Playback of USB audio (MP3/WMA/WAV)/iPod
This unit can play back MP3, WMA, WAV, and AAC files by connecting an USB device or iPod to its USB connector.
• Copper-plated chassis
APPLICABLE DISCS TO THE UNIT
- Super Audio CD

SUPERAUDIO CD
The Super Audio standard is based on Direct Stream Digital (DSDI) technology. This new direct-stream digital format comprises a 1-bit system that has a digital sampling frequency that is 64 times higher than that of conventional audio CD. The results are spectacular a frequency response of over 100kHz and a 120 dB dynamic range over the entire audible spectrum. Mixed with as many of the original frequencies as possible, the audio information audible for human ears sounds much more natural. All audible frequencies are, after all, embedded in the frequency range as emitted by the sound source. A better reproduction does not exist! For the first time your ears will relive reality.
There are three types of Super Audio CDs.
- Single-layer Disc
- Dual-layer Disc
- Hybrid-layer Disc
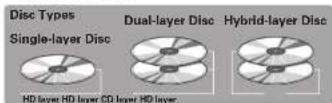
And each type may contain two areas of recorded information.
• High quality stereo area
• High quality multi-channel area**
- Single Layer Disc
It can contain both high quality stereo area and high quality multi-channel area** information.
- Dual Layer Disc
It can contain both high quality stereo area and high quality multi-channel area** information. And a double amount of information can be stored on the disc thanks to the second layer.
- Hybrid Layer Disc
Not only does this disc contain both high sound quality stereo area and high sound quality multi-channel area** information, it also has a CD layer in the second layer, so it can be played on a CD player.
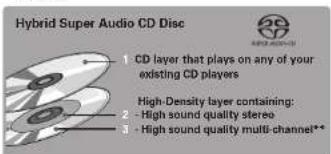
The number of tracks recorded may vary per layer. It will be shown on the display window of the unit.
**This unit is a stereo-only player, and so it cannot play high-quality multi-channel audio areas. (It does not recognize multi-channel areas.)
- Audio CD (CDDA)

Audio CDs contain music tracks only.
3. CD-R / CD-RW
This unit can play back the CD-RW (ReWritable) discs as well as ordinary Audio CD and CD-R (Recordable) discs.
- The CD-R and CD-RW discs should contain properly-recorded TOC information so that they can be played back. In CD recorders, the task of writing TOC information is referred to as finalizing the disc. Discs that are not finalized cannot be properly recognized as an Audio CD and played back by regular CD players and Super Audio CD players. For details, please read the instruction manual provided with a CD recorder.
* TOC stands for Table Of Contents and contains information such as the total number of tracks and total playing time of the disc.
- As the playback of a CD-RW disc necessitates partial change of the player setup, it may ask longer time for reading the TOC information than when an Audio CD or CD-R disc is played.
BEFORE USING
This section must be read before any connection is made to the mains supply.
EQUIPMENT MAINS WORKING SETTING
Your Marantz product complies with the household power and safety requirements in your area. This product can be powered by 230 V AC only.
COPYRIGHT
Recording and playback of any material may require consent. For further information refer to the following:
— Copyright Act 1956
— Dramatic and Musical Performers Act 1958
— Performers Protection Acts 1963 and 1972
— any subsequent statutory enactments and orders
INAPPROPRIATE PLACES FOR INSTALLATION
To keep your player in perfect working order for the longest possible time, avoid installing the player in the following locations.
• Wherever it will be exposed to direct sunlight
- Wherever it will be close to a heater or other heat-radiating appliance
- Wherever the humidity is high or ventilation is poor
• Wherever it is very dusty
• Wherever it will be subject to vibration
- On top of a rickety stand or in an unstable location which is tilted at an angle
- On top of an amplifier or other component which dissipates a great deal of heat
- In an audio rack with little space at the top and bottom or other location where the heat dissipation will be obstructed
To ensure proper heat dissipation, install the player while leaving clearances between the player and wall or other components, as shown in the figure below.
dO NOT PLACE OBJECTS ON TOP
- Refrain from placing any objects on top of the player.
CAUTIONS ON HANDLING MAINS CORd
Do not touch the mains cord with wet hands.
- When disconnecting the mains cord, always make sure that you take hold of the plug. Yanking out or bending the cord can damage it and/or cause electric shocks or a fire.
- Get into the habit of disconnecting the power plug before leaving home.
do NOT ATTEMPT REPAIRS YOURSELF
- Retrain from lubricating the player: doing so can cause malfunctioning.
- Only qualified engineers with specialized expertise are authorized to repair the pick-up and parts inside the player.
PRECAUTIONS
- In winter, droplets of water form on the insides of the windows of a heated room: this is called condensation. This CD player uses an optical lens, so the condensation may form in the following cases.
In a room immediately after the heating has been turned on
- In a room where the humidity level is high - When the player has been suddenly brought from a cold location into a warm room
Since, in cases like this, the track numbers may not be read and the player is prevented from operating properly, wait about 30 minutes, and then operate the player.
- This player may cause interference on a tuner or TV set. If this is the case, place it further away from the tuner or TV set.
- Compact discs have much less noise than analog records and hardly any noise is heard before play starts. Bear in mind, therefore, that if the volume control on the amplifier is set too high, you will risk damaging other audio components.
- This audio player is for the exclusive playing of Audio CDs (Compact Discs) and MP3/WMA compressed data files.
It cannot play CD-ROMs used with personal computers, game CDs, video CDs, DVDs (video/audiol or DTS-CDs.
• We do not recommend the use of lens cleaners.
ENGLISH
BEFORE USING
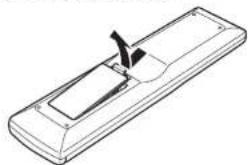
Before using the remote controller for the first time, load the batteries in the remote controller. The batteries provided are used to verify the operations of the remote controller only..
- Remove the battery cover.
natural_image
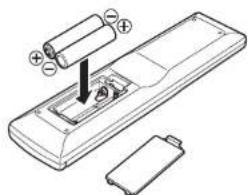
Line drawing of a remote control casing with a handle and internal compartments (no text or symbols)- Insert the batteries with correct ⊕/⊖ orientation.
natural_image
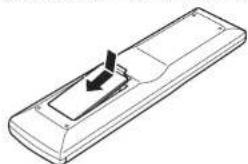
Diagram of a remote control casing with battery and battery cells, showing internal components (no text or labels)- Close the battery cover until it clicks shut.
natural_image
Line drawing of a remote control casing with an arrow indicating direction (no text or symbols)CAUTIONS ON HANDLING BATTERIES
Misuse of the batteries can result in electrolyte leakage, rupturing, corrosion, etc.
Bear in mind the following points when using batteries.
- Remove the batteries from the remote control unit if the unit is not going to be used for a prolonged period (a month or more).
- Do not use an old battery together with a new one.
- Insert the batteries while ensuring that their and poles are properly aligned with the corresponding markings on the remote control unit.
- Batteries with the same shape may have different voltages. Do not use different types of batteries together.
- If electrolyte has leaked, thoroughly wipe the inside of the battery compartment, and then insert new batteries.
- When batteries which are no longer required are to be discarded, follow the directions (regulations) laid down by the local authorities in the area concerned for their disposal.
OPERATIONAL RANGE
Operate the unit with the remote controller within the range of the illustration below.
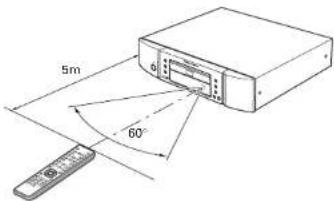
Precautions
- Do not allow direct sunlight, an inverter fluorescent light or other strong source of light to shine onto the player's infrared signal reception window (remote sensor). Otherwise, the operation of the remote control unit may be disabled.
- Bear in mind that operating the remote control unit may cause other devices operated by infrared rays to be operated by mistake.
- The remote control unit cannot be operated if the space between the controller and the player's remote sensor is obstructed.
- Do not place any objects on top of the remote control unit. Doing so may cause one or more buttons to be held down which will cause the batteries to run down.
NAMES AND FUNCTIONS
FRONT PANEL
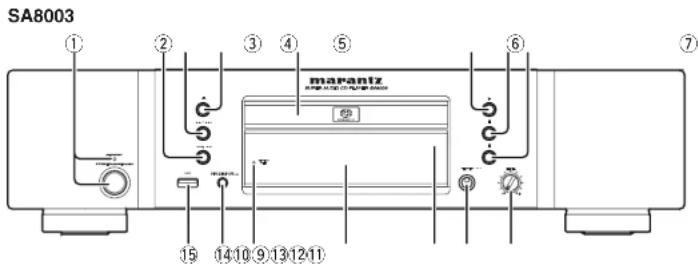
① POWER ON/STANDBY switch STANDBY indicator
This switch is used to turn the power ON and OFF (see page 10).
② |◀◀/◀◀ (Track Skip/Search) button
See page 10.
③ ▶▶/▶▶| (Search/Track Skip) button
See page 10.
④ ▲ (Open/Close) button
See page 10.
⑤ Disc tray
The disk to be played is placed on the tray (see page 10).
⑥ ▶ (Play) button
See page 10.
⑦ ■ (Stop) button
See page 10.
⑧ II (Pause) button
See page 10.
⑨ LEVEL (headphones level) control
This is used to adjust the headphones volume level. The level increases when turned clockwise.
⑩ PHONES (headphones) jack
The headphones are connected to this jack. Use headphones that come with a standard plug.
⑪ Remote sensor
This sensor senses the infrared control signals sent from the remote control unit.
⑫ FL display
See page 6.
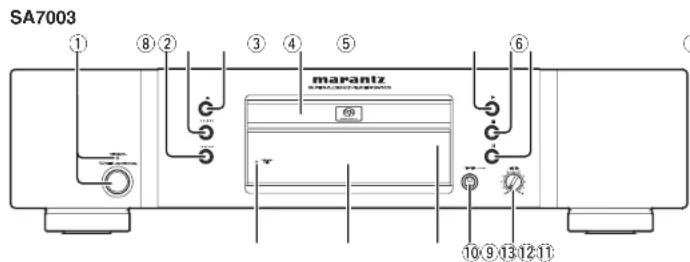
⑬ DISPLAY OFF indicator
See page 7.
⑭ DISC MEDIA / USB button (SA8003 only)
See page 17.
⑮ USB connector (SA8003 only)
See page 17.
ENGLISH
NAMES AND FUNCTIONS
dISPLAY
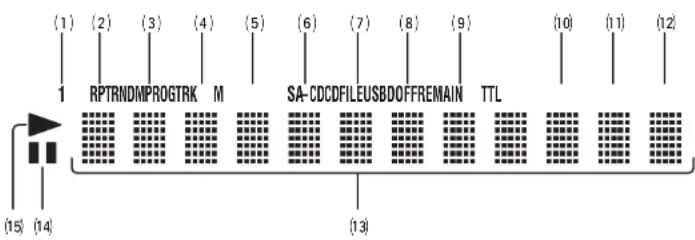
(1) 1 (repeat) indicator
This indicator lights up during repeat play of one track.
(2) RPT (repeat) indicator
This indicator lights up during repeat play.
(3) RNDM (random) indicator
This indicator lights up during random play.
(4) PROG (program) indicator
This indicator lights up during program play.
(5) TRK (track) indicator
This indicator lights up above the display of the track number currently being played.
(6) SA-CD indicator
This indicator indicates the type of disc on the disc tray (Super Audio CDI.
(7) CD indicator
This indicator indicates the type of disc on the disc tray (CD).
(10) D OFF (digital output OFF) indicator
(8) M FILE indicator
This indicator indicates the type of disc on the disc tray (WMA/MP3).
(9) USB indicator
This indicator lights up during operation in the USB/iPod mode.
This indicator lights up when the digital output setting of the audio CD signal is set to OFF (see page 16).
(11) REMAIN (remaining time) indicator
This indicator lights up above the remaining playback time of a track, when it is displayed.
(12) TTL (total time) indicator
This indicator lights up above the total remaining time or the total program time, when it is displayed.
(13) Main display area
This area displays the time display and text information of the disc to be played, as well as the setting menu items, etc.
(14) II (pause) indicator
This indicator lights up when play is paused.
(15) ▶ (play) indicator
This indicator lights up during disc play.
(15) ▶ (play) indicator
This indicator lights up during disc play.
REMOTE CONTROLLER
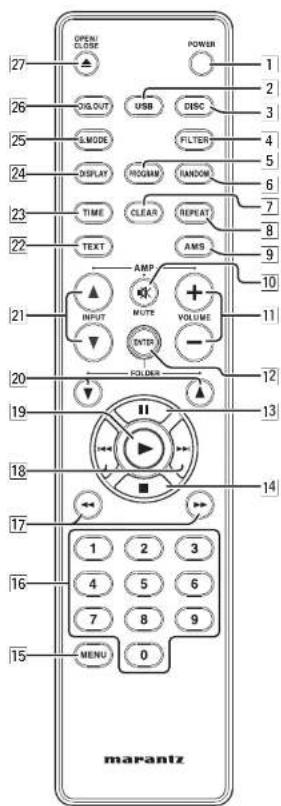
1 POWER button
Switches the power of the unit ON and OFF (see page 10).
2 USB button (SA8003 only)
Press this button when using a USB connection (see page 17).
3 DISC button (SA8003 only)
Press this button when using a disc media.
4 FILTER button
This button cannot be used on this unit.
5 PROGRAM button
See page 14.
6 RANDOM button
See page 14.
7 CLEAR button
See page 15.
8| REPEAT button
See page 14.
9 AMS (Automatic Music Scan) button
See page 15.
10 MUTE button
This button can activate the mute function of devices compatible with Marantz pre-main amplifiers
11 VOLUME button
This button can be used to adjust the volume of devices compatible with Marantz amplifiers that come with a remote controller.
12 ENTER button
This button is used to enter settings done via MENU or decide files for USB file search.
13 II (pause) button
See page 10.
14 ■ (stop) button
See page 10.
15 MENU (menu setting) button
Press this button when conducting Timer Play, SA-CD, USB setup or iPod setup.
16 0-9 (numeric) buttons
See page 10.
17 ◀◀, ▶▶ (search) buttons
See page 10.
18 |◀◀, ▶▶| (track skip) buttons
See page 10.
[19] ▶ (play) button
See page 10.
20 FOLDER ▲/▼ buttons (SA8003 only)
These buttons are used for USB folder search and iPod album selection.
21 INPUT ▲/▼ buttons
These buttons are used to switch the input when using one of the supported Marantz amplifiers. However, this function may not work with some of the older models.
NAMES AND FUNCTIONS
22 TEXT button
Press this button when switching the main display area from time display to text display when using a data disc containing MP3, WMA files, etc., or during USB/iPod use (see page 20).
However, this feature does not support the display of Super Audio CD or Audio CD TEXT.
23 TIME button
Press this button when switching the main display area from text display to time display (see page 14).
24 DISPLAY button
Press this button when switching the display ON and OFF.
The display becomes dimmer each time the button is pressed. When the button is pressed for the third time, the display turns off and the DISPLAY OFF indicator lights up. The last setting is retained even if the power is turned off.
25 S.MODE (sound mode) button
See page 15.
26 DIG.OUT (digital out on/off) button
Press this button when switching the digital output of an audio CD signal on/off (see page 16).
27 ▲ (OPEN/CLOSE) button
See page 10.
ENGLISH
NAMES AND FUNCTIONS
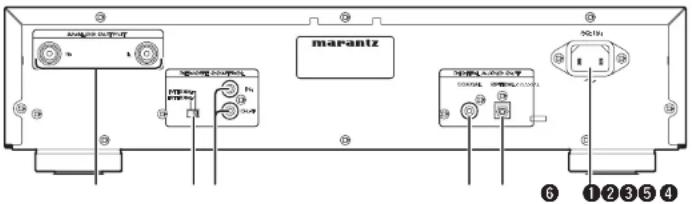
REAR PANEL
SA8003
SA7003
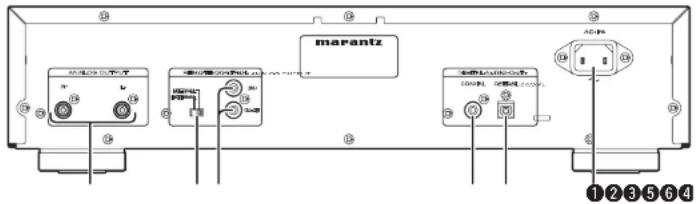
① Power cord connector socket
Use the supplied power cord to connect the unit to a standard household power supply outlet.
Connect the player so that the power cord can be removed easily as a precaution against possible accidents.
⑤ EXTERNAL / INTERNAL (external/internal) switch
The switch is set to INTERNAL at factory shipping, enabling use of the player's built-in remote sensor. When connecting the remote control connector of this player to a Marantz unit using the supplied connecting cable, set this switch to EXTERNAL (see page 12).
② DIGITAL AUDIO OUT OPTICAL (optical digital output) connector
This optical output connector performs digital output of the music signal of the audio CD during playback (see page 11).
⑥ ANALOG OUT (analog output) connector
This connector outputs the music signal during playback (see page 9).
③ DIGITAL AUDIO OUT COAXIAL (coaxial digital output) connector
This coaxial digital output connector performs digital output of the music CD of the audio CD during playback (see page 11).
④ REMOTE CONTROL IN / OUT (remote control IN and OUT) connectors
These connectors are used to connect the player to a Marantz audio component equipped with remote control connectors using the supplied remote control connecting cable (see page 12).
BASIC CONNECTIONS
This CD player is connected to an amplifier, CD recorder and other components for use. To ensure that the components are connected properly, refer to the instruction manuals that come with the components to be connected.
Before connecting the components, be absolutely sure to turn off their power.
CONNECTING TO AN AMPLIFIER
Use the audio connecting cord to connect the player with a stereo amplifier or AV amplifier.
When making the connections, insert the plugs securely into the connectors. Failure to insert the plugs securely may result in noise.
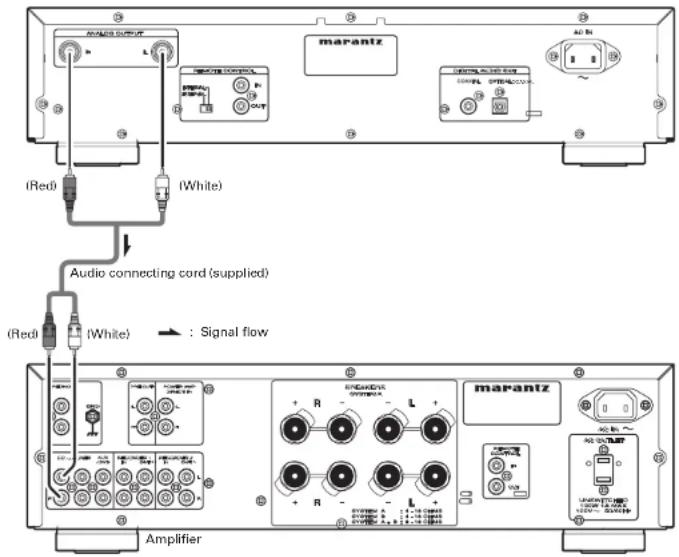
Caution:
Do not connect the player to the PHONO input connectors on the amplifier.
USB MEDIA/iPod CONNECTION (SA8003 ONLY)
Connect the SAB003 to USB media/iPod.
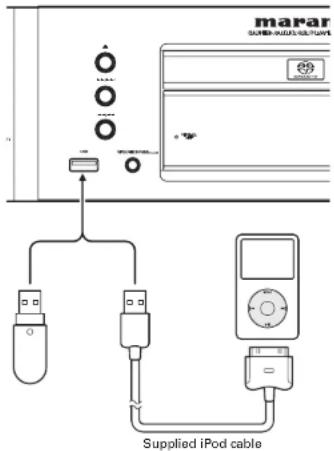
Caution:
- Connect the USB media/iPod while in power off or when the input source is something other than USB. Connecting/disconnecting USB memory when the input source is USB and the power is on may damage the USB memory.
- When using an USB device, do not use an USB extension cable.
CONNECTING THE POWER SUPPLY
- Plug the power cable into AC IN jack on the back panel.
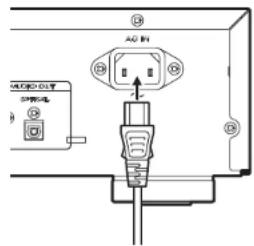
- Plug the power cable into an AC outlet.
- Turn on the power switch of the audio unit (amplifier, etc.) that is connected with this unit. Set the selector on the connected unit to this unit.
ENGLISH
BASIC OPERATION
NORMAL PLAYBACK
SUPER AUdIO Cd PLAYER PLAYBACK
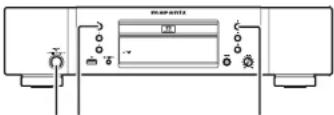
1.4.2.3.
- Keep pressing the POWER Switch for about a second to turn on the system.
Display
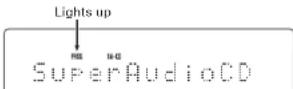
The display cycles from TOC Reading → No Disc (when no disc is loaded) → Super Audio CD (when the start sound mode setting is Super Audio CD).
- Press the ▲ button.
The disc tray comes out. Place the disc with label side up on the tray.
To play a single (8cm) CD, place the disc with the indentation at the center of the tray.
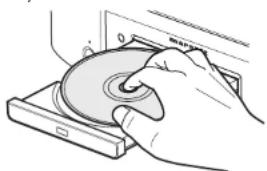
natural_image
Hand inserting a CD into a device (no text or symbols visible)- Press ▲ button.
Caution:
Do not close the disc tray by pressing it in with your hand, as this will damage it.
- Press ▶ button.
Disc type is automatically detected and playback is started. Track number and track elapsed time (minute, second) appear on the display.
- For Super Audio CD/CD hybrid-layer discs (see page 2), the layer that is set in the start sound mode (see page 16) is played. To change the layer, use the S.MODE button (see page 15).
(Exp.:Track 6, Elapsed time 2 min 8 sec)
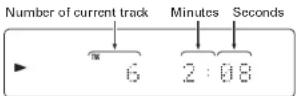
Playback automatically stops at the end of the final track.
TO STOP PLAYBACK
Press ■ button.
TO EJECT DISC
Press ▲ button to open the disc tray and take the disc off. Press the button again to close the tray. Disc tray must be closed when the unit is not be used.
TO PAUSE PLAYBACK
Press II button.
PAUSE indicator will light and playback is paused at the point that the button is pressed. To restart playback, press II button again or press▶ button.
PLAYING YOUR FAVORITE TRACKS OF A dISC
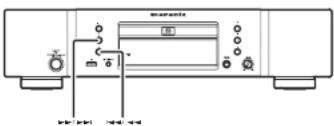
natural_image
Line drawing of a CD-ROM device with buttons and front panel (no text or symbols)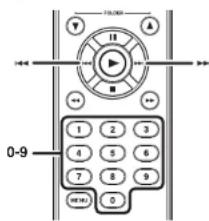
SPECIFY TRACK NUMBER TO PLAY (dIRECT SEARCH)
Specify track number with numerical buttons (0-9) on the remote controller. (example)
3rd track : Press 3.
12th track : Press 1 and then press 2 (within approximately 1.5 seconds).
IF A WRONG NUMBER IS PRESSED
If a track number that is not in the disc is specified, "No Track" will be shown on the main display. Press correct number again.
SKIPPING TO THE PREVIOUS OR NEXT TRACK (TRACK SKIP)
TO LISTEN TO A TRACK POSTERIOR TO THE CURRENT TRACK
Press the ▶▶ button on the remote controller or the unit the same number of times as the number of tracks you want to advance.
TO LISTEN TO A TRACK PRIOR TO THE CURRENT TRACK
If the ◀ button is pressed on the unit or the remote controller while playing a track, playback starts again from the start of the current track. Continue to press the ◀ button for the same number of times as the number of tracks you want to return.
PLAYING YOUR FAVORITE PARTS OF A dISC (SEARCH)
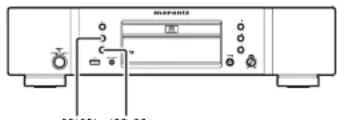
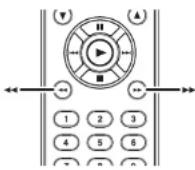
The search is started by holding down the ◀◀, ▶▶I buttons on the player or the ◀◀, ▶▶ buttons on the remote control unit during playback.
The search speed can be changed by pressing the ◀◀, ▶▶I buttons on the player or the ◀◀, ▶▶buttons on the remote control unit.
The search speed changes in 4 steps: 1 2 3 · 4 1 .
4 is the fastest search speed.
When the specific part you wish to hear is near, press the ▶ button.
Note:
No sound is output during the search operation.
ENGLISH
AdvANCED CONNECTIONS
CONNECTING TO A DIGITAL AUDIO COMPONENT
The player has one digital optical output connector and one digital coaxial output connector.
You can enjoy digital recording when the player is connected to a CD recorder or other digital recording component.
Caution:
Signals come of the Digital Audio Output (Optical and Coaxial) terminals only at the time of audio CD playback. There are no signals when other media are being played back.
CONNECTING THE OPTICAL OUTPUT CONNECTOR
Use an optical digital connecting cable available on the market. Insert the plug firmly in until it clicks into place. Do not bend or bundle the optical digital connecting cable.
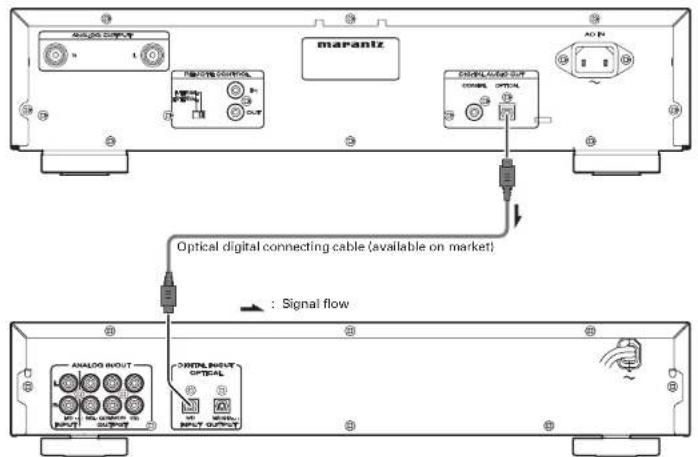
CD recorder, MD deck, AV amplifier, etc.
CONNECTING THE COAXIAL OUTPUT CONNECTOR
Use a coaxial digital connecting cable available on the market.
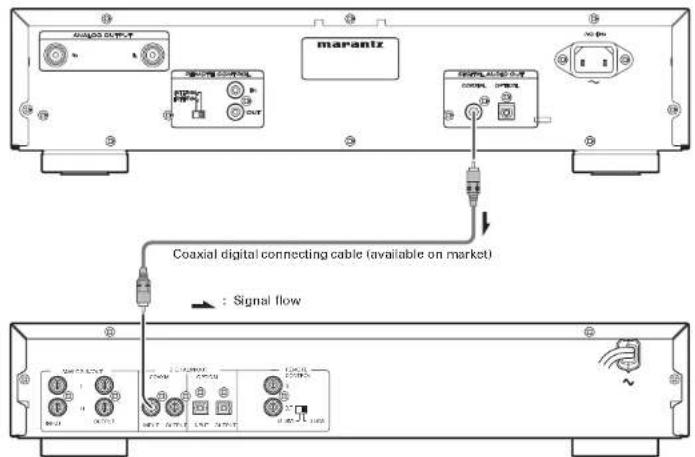
CD recorder, MD deck, AV amplifier, etc.
ENGLISH
AdvANCED CONNECTIONS
REMOTE CONTROL CONNECTION
Connecting this player to additional Marantz audio equipment using the supplied remote control cable enables remote control of the connected equipment as a single audio system.
- When connecting equipment incorporating a remote sensor, connect the remote control out" connector of the equipment to the "remote control in" jack of the CD player.
When doing this, set this player's switch to "EXTERNAL." This will stop its remote control IR receiver from operating and the player can now be controlled via the remote control IR receiver of the attached equipment.
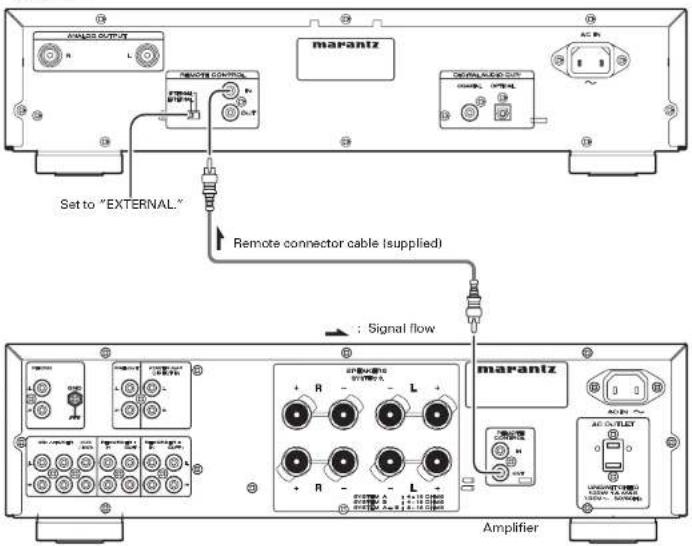
TIMER PLAY
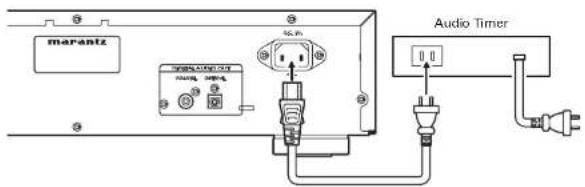
This unit can perform timer play by cooperating with your audio timer.
Connect this unit's power cord to the audio timer's power socket and the timer's power cord to power outlet.
- For connection to audio timer and its operation, please refer to the instruction manual of your audio timer.
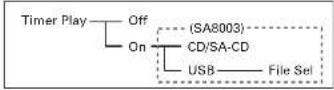
TIMER PLAY SETTING
Time Play is set in the following hierarchical logic.
SA7003
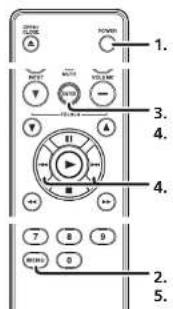
- Keep pressing the POWER Switch for about a second to turn on the system.
- Press the MENU button on the remote control unit.
- Display "TIMER PLAY=>" in the display area and then press ENTER button on the remote control unit.
- Display "2 ON" with the ◀◀, ▶▶I buttons, and then press ENTER button on the remote control unit.
- Press the MENU button on the remote control unit to complete the setting.
- Insert the disc to be played.
- Set the audio timer.
SA8003
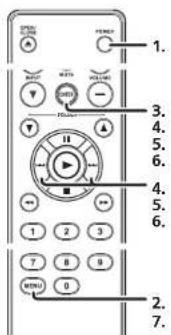
- Keep pressing the POWER Switch for about a second to turn on the system.
- Press the MENU button on the remote control unit.
- Display "TIMER PLAY=>" in the display area and then press ENTER button on the remote control unit.
- Display "2 ON" with the ◀◀, ▶▶I buttons, and then press ENTER button on the remote control unit.
- To play a CD/SA-CD disc with timer play, display "1 CD/SACD" with the ◀◀, ▶▶I buttons and then press ENTER button on the remote control unit.
- For USB playback with timer play, display "2 USB" with the ◀◀, ▶▶! buttons, and then press ENTER button on the remote control unit.
If USB is selected, the track to be played during timer play can be selected. For the selection method, refer to USB selection method. - Press the MENU button on the remote control unit to complete the setting.
-
If CD/SA-CD is selected, insert the disc to be played.
-
Set the audio timer.
Caution:
Insert a USB medium in advance when selecting USB for Timer Play.
ADVANCED CONNECTIONS
ENGLISH
TO CHANGE TIME dISPLAY
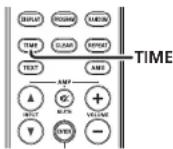
Press the TIME button on the remote control. Each time TIME button is pressed, display will change in the following order.
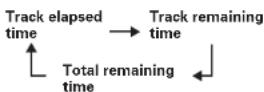
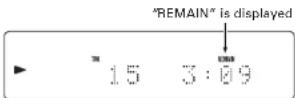
- Track remaining time
(The remaining playing time from the playing point to the end of the current track)
• Total remaining time
(The remaining playing time from the playing point to the end of the last track)
"REMAIN TTL" is displayed
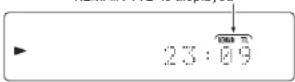
Track information does not appear when "Total remaining time" is displayed.
REPEATED dISC PLAY (REPEATPLAY)
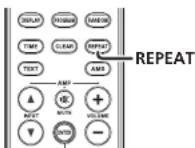
Each time the REPEAT button on the remote control is pressed, the repeat mode cycles in the following order.
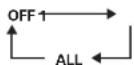
ONE TRACK REPEAT
Press REPEAT button on the remote two times.
"1", "RPT" indicators will light and the track will be played repeatedly.
TO EXIT FROM ONE TRACK REPEAT
Press the REPEAT button on the remote control twice. "1" "RPT" indicator will disappear, repeat mode will be off and it returns to normal play mode.
ALL TRACK REPEAT
When "Repeat" mode is off, press the REPEAT button on the remote control twice. The "RPT" indicator will light up and all track repeat play begins.
TO RETURN TO NORMAL PLAY
Press the REPEAT button on the remote control once. "RPT" indicator will disappear, repeat mode will be off and it returns to normal play mode.
Note:
Random Play and AMS Play cannot be conducted when the unit is in Repeat Mode.
PLAYING TRACKS IN A RANdOM SEQUENCE (RANdOM PLAY)
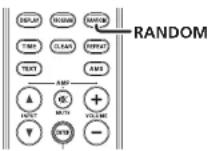
When the RANDOM button on the remote control is pressed in stop mode, and then the ▶ button is pressed, the unit shuffles the track order automatically and plays all tracks randomly in the shuffled order.
The display's "RNDM" (random) indicator will light-up.
Note:
Repeat Play and AMS Play cannot be conducted when the unit is in Random Mode.
- If the ▶▶ button on the main unit, or the ▶▶ button on the remote control are pressed during Random Play, the player jumps to the next track of the shuffled order.
- To search through the current track during random play, press and continue holding the ◀◀/◀◀, ▶▶/▶▶1 buttons on the main unit or press the ◀◀, ▶▶ buttons on the remote control.
TO EXIT FROM RANDOM PLAY AND RETURN TO NORMAL PLAY
Press the ■ button, and then press the RANDOM button while playback is stopped.
The RNDM (random) indicator goes off, and random play is released.
PLAYING TRACKS IN A SPECIFIC SEQUENCE (PROGRAM PLAY)
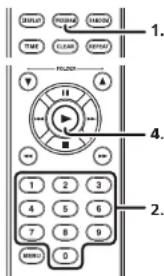
You can arrange and play tracks in a specific sequence. Up to 24 tracks to be played can be programmed.
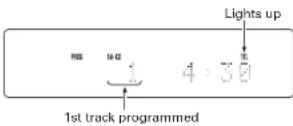
- Press PROGRAM button on the remote in stop mode. "PROG" indicator will blink and it goes to program mode.
- Choose a track to be programmed with numeric buttons on the remote.
(Example: The 15th track is chosen and it's length is 4min30sec)
- With the sequence described in step 2 above, program another track. Repeat that sequence to program all the tracks you want. You can program up to 30 tracks.
(Example: The 7th track is chosen and total length of 7th and 15th is 7min50sec)
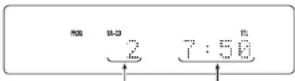
Total programmed number
Total playing time of programmed tracks
- Press ▶ button to starts playback in programmed order.
Note:
Repeat Play, Random Play, and AMS Play cannot be conducted while the unit is in PROGRAM mode (i.e. when the PROG indicator is lit).
TO CHECK THE PROGRAMMEd TRACKS
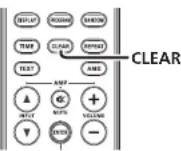
TO DELETE A PROGRAMMED TRACK
- Press CLEAR button in stop mode when program has been made (When"PROG" indicator is lighting up).
- Every time press CLEAR button, the programmed tracks are deleted in order from the last track programmed.
TO CLEAR WHOLE PROGRAM
Press ■ STOP button two times while in program play. In the stop mode, press ■ STOP button once. Program can also be cleared by pressing ▲ OPEN/CLOSE button to open the disc tray.
TO Add TRACKS TO PROGRAM
Tracks can be added to the end of program when program is remaining ("PROG" indicator is lighting up) and in stop mode.
PLEASE BE CAREFUL ABOUT THE FOLLOWING MATTERS
- When programming 1st through 9th tracks in a disc that has over 10 tracks by using numeric buttons. For instance, programming the 3rd track after programming the 1st track, press 3 button more than approximately 1.5 seconds after 1 button is pressed. When a program is finalized, the time is updated.
- Likewise, when programming a track at 10th or after. For example, to program 13th track, press 3 button within approximately 1.5 seconds after 1 button is pressed.
- When programming a track in a disc that has less than 9 tracks. For instance, to program the 5th track after 4th track has been programmed, press 5 button more than approximately 0.5 second after 4 button is pressed.
SEARCHING YOUR FAVORITE TRACKS (AMS (AUTOMATIC MUSIC SCAN) PLAY)
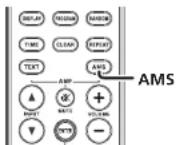
This feature is convenient for searching where your favorite track is.
If the AMS button is pressed while a track is stopped, the PLAY indicator"▶" flashes, and the first ten seconds of each track on the disk will be played starting from the first track.
Also, if the AMS button is pressed during playback, the PLAY indicator"▶" flashes, and the program jumps to the next track after approximately 10 seconds elapses on the display time.
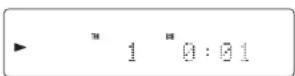
Once you find a song that you want to listen to press the AMS button again or press the ▶ button. The PLAY indicator lights up and normal playback resumes from the current track.
Note:
AMS Play cannot be conducted while the unit is in PROGRAM mode.
SWITCHING SOUND MOdE (SUPER AUdIO Cd)
Please set Start Sound Mode to "SA-CD" (see page 16).
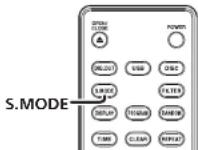
- Press S.MODE button in stop mode (not playing).
The currently selected layer or area is shown on the display. (CD or Super Audio CD)
If S.MODE button is pressed again, a playable layer or area will be shown, and the layer or area will be switched to new one.
- When layer or area is switched, TOC will be read again.
- The sound mode cannot be changed for Audio CDs and discs with only a Super Audio CD area.
• The sound mode on hybrid layer discs will be changed in the following order.
Super Audio CD stereo area

- Press the S.MODE button during playback.
The currently selected layer or area is shown on the display. (CD or Super Audio CD)
If S.MODE button is pressed again, the playback is stopped, and the layer or area will be switched to new one.
When you want to listen at that area, press ▶ button again. The playback will be started.
ENGLISH
SWITCHING "START SOUND MODE"
The Start Sound Mode can be switched over in the following hierarchical scheme.
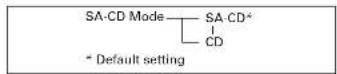
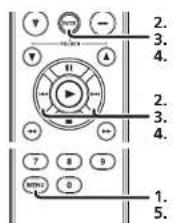
- Press the MENU button on the remote control.
- Use the ◀◀,▶▶! buttons to display "SA-CD Mode=>" and press ENTER button on the remote control.
- To load the SA-CD layer, use the ◀◀, ▶▶I buttons to display "1 SA-CD" and press ENTER button on the remote control.
- To load the CD layer, use the ◀◀, ▶▶ button to display "2 CD" and press ENTER button on the remote control.
- Press the MENU button on the remote control unit to complete the setting.
WHEN START SOUND MODE IS SWITCHED TO Cd
- At this time, if a Super Audio CD hybrid layer disk is inserted, the CD layer is read.
- Sound Mode cannot be switched even if the S.MODE button on the remote control is pressed.
- If a disk with only a Super Audio CD area is inserted, the Super Audio CD layer is read.
WHEN START SOUND MODE IS SWITCHED TO SA-Cd (DEFAULT MODE)
- At this time, if a Super Audio CD hybrid layer disk is inserted, the Super Audio CD layer is read.
- Switch to the CD layer by pressing the S.MODE button on the remote control.
- Switch back to the Super Audio CD layer by pressing the S.MODE button on the remote control once again.
SETTING THE DIGITAL OUTPUT
The settings can be made using the remote control
The settings are retained even if the power is turned off so that you can always hear tracks played the way you want.
Use the same procedures to change the settings again.
The settings can be changed when the track is stopped
dURING THE PLAYBACK OF THE Cd LAYER OF AN AUdIO Cd OR SUPER AUdIO Cd
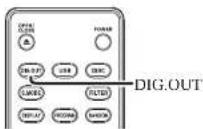
The digital output function is turned ON and OFF by pressing the DIG.OUT button while the track is stopped. When digital output is turned off, the "D OFF" indicator lights up on the display.
- When digital output is not used, turn off the digital output to enjoy better sound quality.
Note:
Digital signals are only output when playing Audio CDs.
They are not output when playing other media.
The "digital output off" has a memory retention function where the settings remain stored and unchanged even when the disk is changed or the power is turned off.
- Connect the USB medium to the USB port on the front panel.
- Keep pressing the POWER Switch for about a second to turn on the system.
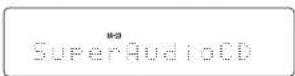
The display cycles from "TOC Reading" → "No Disk" (when no disk is loaded) → "SuperAudioCD" (when the Start Sound Mode setting is Super Audio CD).
- Press the DISC MEDIA/USB button on the front panel, or the USB button on the remote control.
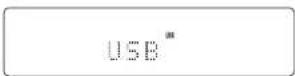
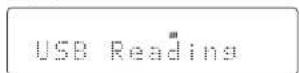
- While the unit searches for USB media, the display will read as follows.
When the unit finishes getting the USB medium file information, the display changes to the following.
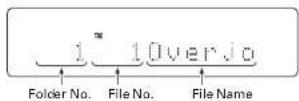
Note:
When no USB medium is connected, the display cycles from "USB Reading" → "USB",
- Press the ▶ button.
Selected file information within the menu and time information are displayed.
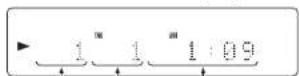
Folder No. File No. Time Information
When there are more than 1000 songs, the display changes to appear as follows.
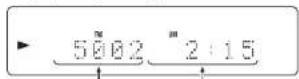
File Volume
Time Information
TO STOP PLAYBACK
Press the ■ button.
TO PAUSE PLAYBACK
Press the Ⅱ button
Pause indicator will light and playback is paused at the point that the button is pressed.
To resume playback, press the ■ button again or press the ▶ button.
Tip
- When playing USB media/iPod files, the unit can play up to 65.535 files, 700 folders, and a maximum of 8 levels.
- The iPod's equalizer cannot be operated from the Marantz player. We recommend that you turn "off" the iPod's equalizer before connecting the iPod to the main unit.
- Some operations may differ depending on the iPod model.
USING "REPEAT PLAY" MODE
You can repeatedly play a single song or all songs.
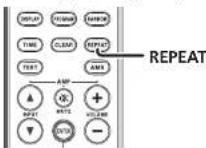
Each time the REPEAT button on the remote control is pressed, Repeat Play mode cycles in the following order.
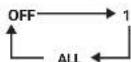
Press the ▶ button to begin playback in the selected repeat mode (see page 14).
PLAYING TRACKS IN A RANDOM SEQUENCE (RANDOM PLAY)
You can randomly play songs.
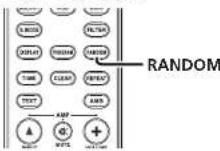
Press the RANDOM button on the remote control while the player is stopped to turn random mode ON or OFF.
Press the ▶ button when random mode is turned ON to start Random Play (see page 14).
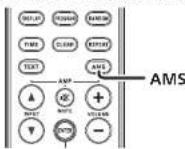
SEARCHING YOUR FAVORITE TRACKS (AMS (AUTOMATED MUSIC SCAN) PLAY)
You can play the first 10 seconds of each track starting from the first track.
Press the AMS button on the remote control to automatically begin AMS play (seepage 15).
ENGLISH
CHOOSING FILES FROM A DIFFERENT FOLDER
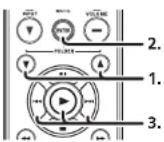
- Press the FOLDER ▲/▼ button to display the current folder's name and number. Search for the folder that contains your desired track.
- When the name of the folder that contains your desired track is displayed, press the ENTER button on the remote control. The title of the first track in the folder will be displayed.
- Use the ◀◀, ▶▶ buttons to select your desired track. Press PLAY button to register the selection and play.
PLAYING YOUR FAVORITE TRACKS
natural_image
Line drawing of a portable electronic device with control knobs and indicator lights (no text or symbols)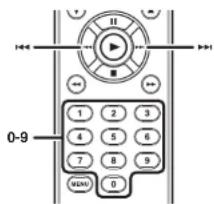
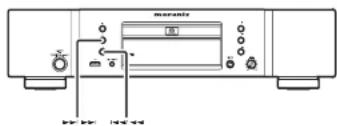
SPECIFY RACK NUMBER TO PLAY (DIRECT SEARCH)
Specify track number with numerical buttons (0-9) on the remote. (example)
3rd track : Press "3".
12th track : Press "1" and then press 2" (within approximately 1.5 seconds).
IF A WRONG NUMBER IS PRESSED
If a track number that is not in the folder is specified, the screen will return to its previous display. Press correct number again.
SKIPPING TO THE PREVIOUS OR NEXT TRACK (TRACK SKIP)
TO LISTEN TO A TRACK POSTERIOR THE CURRENT TRACK
Press the ▶▶ button on the main unit or the remote control the same number of times as the number of tracks you want to advance.
TO LISTEN TO A TRACK PRIOR TO THE CURRENT TRACK
Press the ◀ button on the main unit or remote control once and the current track will start playing again from the beginning.
Continue to press the ◀ button on the main unit or the remote control the same number of times as the number of tracks you want to return.
PLAYING YOUR FAVORITE PARTS OF A TRACK (SEARCH)
natural_image
Line drawing of a portable electronic device with ports and indicator lights (no text or symbols)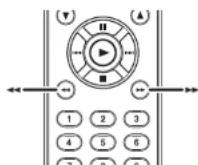
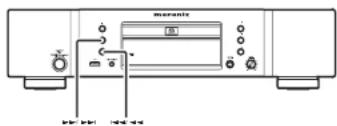
While playing a track, press and continue holding the I◄◄, ►►I buttons on the main unit or press the
◀◀, ▶▶ buttons on the remote control to begin track search.
You can change the search speed by pressing the ◀◀, ▶▶I buttons on the main unit or the remote control ◀◀, ▶▶I buttons again.
For USB media, the player has 4 levels of search speed with 4 being the fastest. It changes from 1 → 2 → 3 → 4 → 1.
For iPods, there is only 1 level of search speed. Release the ▶ button when the point you want to listen to gets close.
Note:
Sounds do not come out during search operations.
Sounds do not come out during search operations.
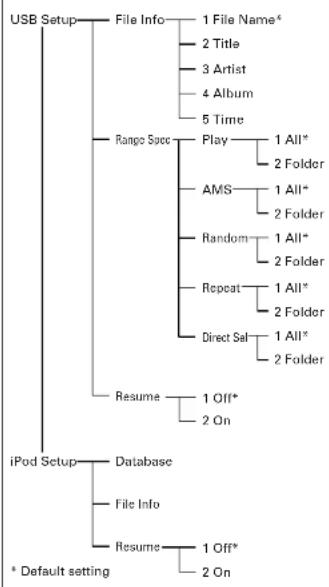
flowchart
graph TD
    A["USB Setup"] --> B["File Info"]
    B --> C["1 File Name*"]
    B --> D["2 Title"]
    B --> E["3 Artist"]
    B --> F["4 Album"]
    B --> G["5 Time"]
    A --> H["Range Spec"]
    H --> I["Play"]
    I --> J["1 All*"]
    I --> K["2 Folder"]
    H --> L["AMS"]
    L --> M["1 All*"]
    L --> N["2 Folder"]
    H --> O["Random"]
    O --> P["1 All*"]
    O --> Q["2 Folder"]
    H --> R["Repeat"]
    R --> S["1 All*"]
    R --> T["2 Folder"]
    H --> U["Direct Sel"]
    U --> V["1 All*"]
    U --> W["2 Folder"]
    A --> X["Resume"]
    X --> Y["1 Off*"]
    X --> Z["2 On"]
    A --> AA["iPod Setup"]
    AA --> AB["Database"]
    AB --> AC["File Info"]
    AB --> AD["Resume"]
    AD --> AE["1 Off*"]
    AD --> AF["2 On"]
    A --> AG["* Default setting"]
PLAYING TRACKS FROM WHERE THEY WERE PREVIOUSLY STOPPED (RESUME PLAY)
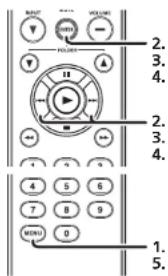
- Press the MENU button on the remote control.
- Use the ◀◀, ▶▶! buttons to display "USB Setup=>" or "iPod Setup" and press ENTER button on the remote control.
- Use the ◀◀, ▶▶ buttons to display "Resume=>" and press ENTER button on the remote control.
- To enable Resume Play, use the ◀◀, ▶▶ button to display "2 On" and press ENTER button on the remote control.
To disable Resume Play, use the ◀◀, ▶▶I buttons to display "1 Off" and press ENTER button on the remote control.
- Press the MENU button on the remote control unit to complete the setting.
Note:
- Resume Play only works when an identical USB medium is inserted. If another USB medium is inserted, the unit will start playing from the first file.
- The unit may not play your desired track if files have been added to or deleted from the identical USB medium.
- In the case of the iPod, tracks will resume play starting from the beginning of the track.
PLAYING YOUR FAVORITE TRACKS
You can specify whether tracks you want to hear are selected using track numbers within a folder or selected directly from all tracks on the USB medium.
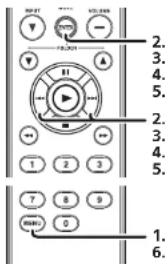
- Press the MENU button on the remote control.
- Use the ◀◀, ▶▶1 buttons to display "USB Setup=>" and press ENTER button on the remote control.
- Use the I◄◄, ►►I buttons to display "Range Spec=>" and press ENTER button on the remote control.
- Use the ◀◀,▶▶! buttons to display "Direct Sel=>" and press ENTER button on the remote control.
- To select tracks using track numbers within a folder, use the ◀◀, ▶▶! buttons to display "2 Folder" and press ENTER button on the remote control.
To select tracks from all tracks on the USB medium, use the ◀◀, ▶▶ buttons to display "1 All" and press ENTER button on the remote control.
- Press the MENU button on the remote control unit to complete the setting.
REPEAT PLAY
You can specify whether to "repeat play" tracks within a folder or to "repeat play" all tracks on the USB medium.
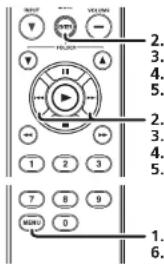
- Press the MENU button on the remote control.
- Use the ◀◀, ▶▶ buttons to display "USB Setup=>" and press ENTER button on the remote control.
- Use the ◀◀,▶▶ buttons to display "Range Spec=>" and press ENTER button on the remote control.
- Use the ◀◀, ▶▶I buttons to display "Repeat=>" and press ENTER button on the remote control.
- To "repeat play" tracks within a folder, use the ◀◀, ▶▶I buttons to display "2 Folder" and press ENTER button on the remote control.
To "repeat play" all tracks on the USB medium, use the ◀◀, ▶▶I buttons to display" 1 All" and press ENTER button on the remote control.
- Press the MENU button on the remote control unit to complete the setting.
ENGLISH
You can specify whether to "random play" tracks within a folder or to "random play" all tracks on the USB medium.
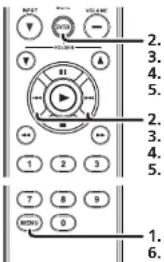
- Press the MENU button on the remote control.
- Use the ◀◀, ▶▶! buttons to display "USB Setup=>" and press ENTER button on the remote control.
- Use the I◄◄, ►►I buttons to display "Range Spec=>" and press ENTER button on the remote control.
- Use the ◀◀, ▶▶▶ buttons to display "Random=>" and press ENTER button on the remote control.
- To "random play" tracks within a folder, use the ◀◀, ▶▶! buttons to display "2 Folder" and press ENTER button on the remote control.
To "random play" all tracks on the USB medium, use the ◀◀, ▶▶▶ buttons to display "1 All" and press ENTER button on the remote control. - Press the MENU button on the remote control unit to complete the setting.
SEARCHING YOUR FAVORITE TRACKS (AMS (AUTOMATED MUSIC SCAN) PLAY)
You can specify whether to "AMS play" tracks within a folder or to "AMS play" all tracks on the USB medium.
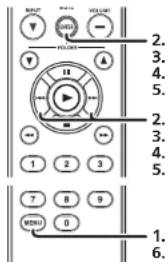
- Press the MENU button on the remote control.
- Use the ◀◀, ▶▶! buttons to display "USB Setup=>" and press ENTER button on the remote control.
- Use the I◄◄, ►►I buttons to display "Range Spec=>" and press ENTER button on the remote control.
- Use the ◀◀, ▶▶ buttons to display "AMS=>" and press ENTER button on the remote control.
- To "AMS play" tracks within a folder, use the ◀◀, ▶▶! buttons to display "2 Folder" and press ENTER button on the remote control.
To "AMS play" all tracks on the USB medium, use the ◀◀, ▶▶! buttons to display "1 ALL" and press ENTER button on the remote control. - Press the MENU button on the remote control unit to complete the setting.
FILE INFORMATION DISPLAY SELECTION
You can view MP3 tags and other file information when playing a USB medium.
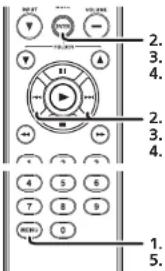
- Press the MENU button on the remote control.
- Use the ◀◀, ▶▶1 buttons to display "USB Setup=>" and press ENTER button on the remote control.
- Use the ◀◀, ▶▶I buttons to display "File Info=>" and press ENTER button on the remote control.
-
To view file names, use the ◀◀, ▶▶I buttons to display "1 File Name" and press ENTER button on the remote control. To view track titles, use the ◀◀, ▶▶I buttons to display "2 Title" and press ENTER button on the remote control.
To view artist names, use the ◀◀◀, ▶▶▶ buttons to display "3 Artist" and press ENTER button on the remote control.
To view album names, use the ◀◀, ▶▶ buttons to display "4 Album" and press ENTER button on the remote control.
To always view time information without viewing file information, use the ◀◀, ▶▶▶▶ buttons to display "5 Time" and press ENTER button on the remote control. -
Press the MENU button on the remote control unit to complete the setting.
-
Press the TEXT button on the remote control during normal playback to view selected file information.
- Press the TEXT button again to view the track title. If "track title" was the selected file information option, then the artist name will be displayed.
• Each time the TEXT button on the remote control is pressed, the display changes in the following order: Track Title → Artist Name → Album Name → Track Title.
The iPod works in the following hierarchical logic.
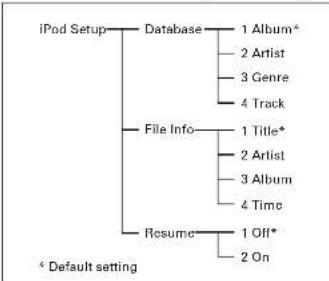
flowchart
graph TD
    A["iPod Setup"] --> B["Database"]
    B --> C["1 Album*"]
    B --> D["2 Artist"]
    B --> E["3 Genre"]
    B --> F["4 Track"]
    A --> G["File Info"]
    G --> H["1 Title*"]
    G --> I["2 Artist"]
    G --> J["3 Album"]
    G --> K["4 Time"]
    A --> L["Resume"]
    L --> M["1 Off*"]
    L --> N["2 On"]
    A * Default setting
iPod DATABASE SELECTION
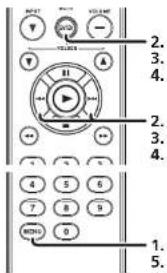
- Press the MENU button on the remote control.
- Use the |◀, ▶▶| buttons to display "iPod Setup=>" and press ENTER button on the remote control.
- Use the ◀◀, ▶▶! buttons to display "Database=>" and press ENTER button on the remote control.
- To select albums by album name, use the ◀◀, ▶▶ buttons to display "1 Album" and press ENTER button on the remote control.
To select albums by artist name, or if you would like to play all tracks for a selected artist, use the ◀◀, ▶▶1 buttons to display "2 Artist" and press ENTER button on the remote control.
To select artists by genre, use the ◀◀, ▶▶I buttons to display "3 Genre" and press ENTER button on the remote control.
To play tracks without using the database, use the ◀◀, ▶▶ buttons to display "4 Track" and press ENTER button on the remote control.
5. Press the MENU button on the remote control unit to complete the setting.
Note:
Please refer to your iPod instructions for information on how to use with each database.
SELECTING TRACKS BY ANOTHER ARTIST
flowchart
graph TD
    A["Start"] --> B["OK"]
    B --> C["Clear"]
    C --> D["Enter"]
    D --> E["Folder"]
    E --> F["End"]
When the iPod database is set to "Artist"
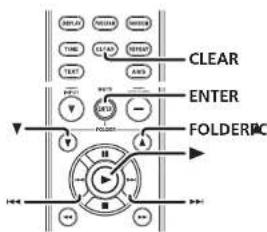
- Press the FOLDER ▲/▼ button and either "ALL" or the current artist will be displayed. Press the CLEAR button on the remote control and the currently selected artist will be cancelled.
- Press the FOLDER ▲/▼ button and search for your desired artist.
- When your desired artist is displayed, press ENTER button on the remote control and either "All Album", album name, or track title will be displayed.
(Selecting from All Album)
- When selecting from "All Album", press ENTER button on the remote control and the title of the first track by the artist will be displayed.
- Use the ◀◀, ▶▶ buttons to select your desired track. Press PLAY button to register the selection and play.
(Selecting from Album)
- When selecting from "Album", press the FOLDER ▲/▼ button on the remote control and the names of albums by the artist will be displayed.
-
Press the FOLDER ▲/▼ button and search for your desired album.
-
When your desired album is displayed, press ENTER button on the remote control and the title of the first track from the album will be displayed.
- Use the ◀◀, ▶▶ buttons to select your desired track. Press PLAY button to register the selection and play.
Tip:
You can also use the remote controls numeric keys 0-9 to select albums and tracks. Please refer to your iPod instructions for information on how to use with each database.
SELECTING TRACKS FROM A DIFFERENT
GENRE
When the iPod database is set to "Genre"
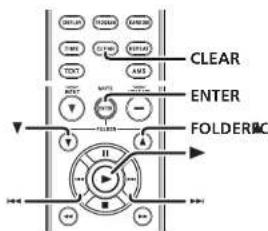
- Press the FOLDER ▲/▼ button and either "ALL" or the name of the album currently playing will be displayed.
- Press the CLEAR button on the remote control to cancel the currently selected artist or genre. If artist is canceled, "ALL" will be displayed.
- Press the FOLDER ▲/▼ button and search for your desired genre.
- When your desired genre is displayed, press ENTER button on the remote control and either "All Artist" or artist name will be displayed.
ENGLISH
(Selecting from All Artist)
- When selecting from "All Artist", press ENTER button on the remote control and the title of the first track within the genre will be displayed.
- Use the ◀◀, ▶▶1 buttons to select your desired track. Press PLAY button to register the selection and play.
(Selecting from Artist)
- When selecting from "Artist", press the FOLDER ▲/▼ button on the remote control and search for your desired artist.
- When your desired artist is displayed, press ENTER button on the remote control and either "All Album", album name, or track title will be displayed.
- Push ENTER button again and the title of the first track by the artist will be displayed.
- Use the ◀◀, ▶▶ buttons to select your desired track. Press PLAY button to register selection and play.
(Selecting from the Album)
- When selecting from "Album", press the FOLDER ▲/▼ button on the remote control and the names of albums by the artist will be displayed.
- Press the FOLDER ▲/▼ button and search for your desired album.
- When your desired album is displayed, press ENTER button on the remote control and the title of the first track from the album will be displayed.
- Use the ◀◀, ▶▶▶ buttons to select your desired track. Press PLAY button to register selection and play.
SELECTING TRACKS FROM A DIFFERENT ALBUM
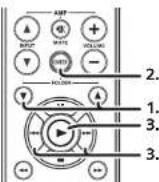
When the iPod database is set to "Album"
- Press the FOLDER ▲/▼ button on the remote control to display the name of the current album. Press the FOLDER ▲/▼ button and search for your desired album.
- When your desired album is displayed, press ENTER button on the remote control and the title of the first track from the album will be displayed.
- Use the ◀◀, ▶▶ buttons to select your desired track. Press PLAY button to register selection and play.
Tip:
You can also use the remote controls numeric keys 0-9 to select albums and tracks.
FILE INFORMATION DISPLAY SELECTION
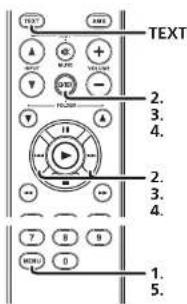
You can view file information when playing iPod files.
- Press the MENU button on the remote control.
- Use the ◀◀, ▶▶I buttons to display "iPod Setup=>" and press ENTER button on the remote control.
- Use the ◀◀, ▶▶I buttons to display "File Info=>" and press ENTER button on the remote control.
- To view track titles, use the ◀◀,▶▶ buttons to display "1 Title" and press ENTER button on the remote control.
To view artist names, use the ◀◀◀, ▶▶▶ buttons to display "2 Artist" and press ENTER button on the remote control.
To view album names, use the ◀◀, ▶▶ buttons to display "3 Album" and press ENTER button on the remote control.
To always view time information without viewing file information, use the ◀◀, ▶▶ button to display "4 Time" and press ENTER button on the remote control.
-
Press the MENU button on the remote control unit to complete the setting.
-
Press the TEXT button on the remote control during normal playback to view selected file information.
- Press the TEXT button again to view the track title. If "track title" was the selected file information option, then the artist name will be displayed.
• Each time the TEXT button on the remote control is pressed, the displayed information changes in the following order: Track Title→Artist Name→Album Name→Track Title.
ENGLISH
TROUBLESHOOTING
If you think that something is wrong with your player, first check the points listed below. Incorrect operation can sometimes be taken for trouble and malfunctions. If the trouble persists even after the following points have been checked, consult your dealer or nearest Marantz sales office or service center.
| Problem Cause Corrective action | ||
| The disc fails to rotate. | The power cord is pulled out of the socket. | Insert the power cord plug into the socket. (→ Page 9) |
| Power to this unit is not ON. | Turn the power to this unit ON. (→ Page 10) | |
| The disc is not placed in the correct position on the disc tray. | Place the disc in the disc tray correctly. (→ Page 10) | |
| The disc is placed in upside down. (The disc is placed inwith the label facing down). | Place the disc in the disc tray correctly. (→ Page 10) | |
| The disc stops rotating in mid-operation. | The disc is dirty. Clean the disc | 's surface. (→ Page 28) |
| The disc is scratched. | The disc may be unable to be played if it has a lot of scratches. | |
| The disc is warped. | The disc may be unable to be played if it is badly warped. | |
| The disc is rotating but no sound is heard. | The amplifier and speakers are not connected correctly. | Connect the cables correctly. (See the instruction manual for the amplifier.) |
| The amplifier power is not ON. | Turn ON the power to the amplifier. (See the instruction manual for the amplifier.) | |
| The amplifier's function or selector switch is not set to "CD" or "AUX" or such (to whatever you have connected this unit to). | Switch the amplifier's function or selector switch to "CD" or "AUX" or such (to whatever you have connected this unit to). (See the instruction manual for the amplifier.) | |
| The amplifier's volume control is set at the minimum level. | Adjust the amplifier volume. (See the instruction manual for the amplifier.) | |
| Problem Cause | Corrective action | |
| Remote control operation is not possible. | The distance between this unit and the remote control is too great. | Move closer to this unit, and operate the remote control within the operating range. (→ Page 4) |
| There is an obstacle between this unit and the remote control. | Remove the obstacle. (→ Page 4) | |
| The remote controls batteries are dead. | Replace all batteries with new ones ( → Page 4) | |
| A strong light is hitting the units sensor window. | Do not let strong light hit the sensor window. (→ page 4) | |
| The switch on the back of the REMOTE CONTROL is on EXTERNAL. | When using this unit independently, set the switch to INTERNAL. ( → Page 12) | |
| CD-R/CD-RW disc cannot be played. | The disc is placed in upside down. | Place the disc in the tray correctly. (→ Page 10) |
| The information recorded is not in an audio ICD-DAI format. Or the MP3/VWA file was not properly recorded. | Record correct information that is compatible with to this unit. ( → Page 28) |
ENGLISH
TROUBLESHOOTING
USB/iPod(SA8003)
| Problem Cause Corrective action | ||
| "OverCurrent" appears on the display. | The voltage able to be supplied from this unit via the USB has been exceeded. | The USB media is not supported.Please use a USB device with an operating current that is less than 500 mA. |
| "FAT Error" or "Cluster Err" appear on the display. | An unsupported file system is being used. USB memory below 128 MB cannot be supported. | Please use a USB device formatted with a compatible file system (FAT32 or FAT) and that has at least 256 MB of memory. |
| "No File" appears on the display. | No file able to be played on this unit exists. | Check supported formats. (→ Page 25, 261) |
| "DRM Stream" appears on the display. | This is a file subject to digital rights management. | Cannot play on this unit because of unsupported DRM. (→ Page 251) |
| The sound of the USB being connected is not heard. | The amplifier and speakers are not connected properly. | Connect the cables correctly.(→See the instruction manual for the amplifier.) |
| The amplifier power is not ON. | Turn the amplifier power ON.(→See the instruction manual for the amplifier.) | |
| The amplifier's function or selector switch is not set to "CD" or "AUX" or such (to whatever you have connected this unit to). | Switch the amplifier's function or selector switch to "CD" or "AUX" or such (to whatever you have connected this unit to).(→See the instruction manual for the amplifier.) | |
| The amplifier's volume control is set at the minimum level. | Adjust the amplifier volume.(→See the instruction manual for the amplifier.) | |
| The sound of the iPod being connected is not heard. | 3rd generation or earlier iPods are unsupported. | Refer to "ABOUT iPod PLAYBACK".(→ Page 261) |
| The amplifier and speakers are not connected correctly. | Connect the cables correctly.(→See the instruction manual for the amplifier.) | |
| The amplifier power is not ON. | Turn ON the power to the amplifier.(→ See the instruction manual for the amplifier.) | |
| The amplifier's function or selector switch is not set to "CD" or "AUX" or such (to whatever you have connected this unit to). | Switch the amplifier's function or selector switch to "CD" or "AUX" or such (to whatever you have connected this unit to).(See the instruction manual for the amplifier.) | |
| The amplifier's volume control is set at the minimum level. | Adjust the amplifier volume.(See the instruction manual for the amplifier.) | |
| Reading of USB device takes time. | When connecting a high-capacity USB device, it will take time to real depending on its capacity. Several minutes may be required for reading when using a high-capacity device. | Wait until reading is completed. |
OTHERS
ABOUT WMA PLAYBACK
• Windows Media is a trademark of the Microsoft Corporation in the US and other countries.
- WMA is an abbreviation for "Windows Media Audio" and is an audio compression technology developed by the Microsoft Corporation. WMA data may be encoded using Windows Media Player Ver. 7, 7.1, Windows Media Player for Windows XP, or Windows Media Player 9 Series.
- Use discs recorded con forming to the ISO 9660 Level 1/Level 2 CD-ROM file system and extended format (Joliet, Romeol.
• Multi-session recording is not supported.
- WMA files having DRM copy protection cannot be played.
- Encode WMA files using applications that have received Microsoft Corporation certification. If an uncertified application is used, it may not operate normally.
WMA FILES
| Standard | Conforming to Microsoft Windows Media Audio 9.2The following are unsupportedWMA9 Series ProfessionalWMA9 Series VoiceWMA9 Series LosslessWMA with Video |
| Extension | wma |
| Bit rate [kbps] | CBR: 48~320VBR: Peak 384 (display corresponds to average bit rate value) |
| Sampling frequency [kHz] | 32/41.1/48 |
| Channels | 2ch (Stereo) |
| Textual information | Title: 128 ByteComposer (Name of artist): 128 ByteName of album: 128 Byte |
ABOUT WINDOWS MEDIA dRM
Windows Media Digital Rights Management (DRM) referred to below as WMDRMI is a platform to prevent playback on computers, digital audio players, network devices and the like in order to securely distribute digital content.
Content protected by WMDRM may be played back only when connected to a media server that has WMDRM functionality.
This system does no comply with any contets protected by WMDRM.
ABOUT MP3 PLAY BACK
- Use discs recorded conforming to the ISO 9660 Level 1/Level 2 CD-ROM file system and extended format (Joliet, Romeo).
- MPEG1 Audio Layer-3 files recorded at sampling frequencies of 32 kHz, 44.1 kHz, or 48 kHz are supported. For files recorded with a frequency other than this, "No File" will be displayed, and these files cannot be played.
- Variable Bit Rate (VBR) is not supported when playback is possible, the time display in the display window will speed up and slow down).
- Multi-session recording is not supported.
- For audio quality, a recording rate of 128 kbps or higher is recommended.
MP3 FILES
| Standard | MPEG-1 Audio Layer3 |
| Extension | .mp3 |
| Bit rate [kbps] | For MPEG-1 Audio Layer3, 32/40/46/56/64/80/96/112/128/160/192/224/256/320 |
| Sampling frequency [kHz] | For MPEG-1 Audio Layer3, 32/44.1/48 |
| Channels | 2 ch (Stereo) |
| Emphasis | OFF |
| Textual information | [ID3v2 (v2.2/v2.3/v2.4)]Title: 128 ByteName of artist: 128 ByteName of album: 128 ByteComment: 128 Byte[ID3v1 (v1.0/v1.1)]Title: 30 ByteName of artist: 30 ByteName of album: 30 ByteComment: 30 Byte |
ENGLISH
OTHERS
ABOUT AAC PLAYBACK
- AAC is an abbreviation for "Advanced Audio Coding". It is the basic format related to the audio compression technology used in MPEG-2 and MPEG-4.
- Playing of AAC files that have the extension ".m4a" encoded using iTunes® is supported with this device. However, files may be unable to be played due to having DRM copy protection (copyright protection) or because of the version of iTunes they have been encoded with.
- iTunes is a trademark of Apple Inc. that is registered in the US and other countries.
| • This applies to files created with iTunes. | |
| Standard | MPEG-4/AAC LC (Low Complexity)MPEG-2/AAC LC (Low Complexity) |
| Extension | .m4a |
| Bit rate [kbps] | 8-320 |
| Sampling frequency [kHz] | 32/44.1/48 |
| Channels | 2 ch (Starsa) |
| Textual information | [MPEG-4 header iTunes content information]Name (Title): 128 ByteName of artist: 128 ByteName of album: 128 ByteComment: 128 Byte |
ABOUT iPod PLAYBACK
- If a 5th generation or later iPod, iPod nano, iPod classic or iPod touch is connected, it can be played with even higher sound quality because the audio from the iPod is transmitted digitally (ILPCM).
- Some operations may differ depending on the iPod model.
- If the iPod's software is old, it may not operate properly. Please be sure to use up-to-date iPod software.
- The TEXT display is alphanumeric only. If non-alphanumeric characters have been recorded in the iPod, the characters will be displayed as"+".
- The iPod is a device licensed for the private duplication and playback of uncopyrighted material or material for which duplication and playback are legally permitted. Violation of copyright is legally prohibited.
- The iPod equalizer cannot be operated from the SAB003. Before connecting an iPod to this unit, it is recommended that the iPod equalizer be set to "OFF".
- Please note that we offer no compensation if problems occur in the iPod data when using this unit with an iPod.
iPod is a trademark of Apple Inc. registered in the US and other countries.
ABOUT WAV PLAYBACK
| Standard | RIFF Waveform Audio Format |
| Format | Linear PCM |
| Extension | wav |
| Sampling frequency [kHz] | Linear PCM: PCM 32/44 1/48Those other than the above, not supported. |
| Number of bits [bit] | Linear PCM: 16 |
| Channels | 2 ch (Stereo) |
| Textual information | None |
ENGLISH
OTHERS
SPECIFICATIONS & DIMENSIONAL DRAWINGS
| Super Audio CD | Audio CD | |
| Audio CharacteristicsAnalog outputChannelsFrequency rangeFrequency characteristicsDynamic rangeS/N Ratio (A-weighted)THD (1kHz)wow & flutterOutput levelUnbalancedDigital outputoutput level (inch JACK)output level (optical) | 2channels2Hz — 100kHz2Hz — 50kHz (13dB)112dB110dB0.0020%Precision of quartz2.3V RMS stereo— | 2channels2Hz — 20kHz2Hz — 20kHz100dB110dB0.0020%Precision of quartz2.3V RMS stereo0.5Vp (75Ω)-19dBm |
| Optical Readout SystemLaserWave length | AlGaAs650nm | AlGaAs780nm |
| Signal formatSampling frequency | 1-bit DSD2.8224MHz | 16-bit linear PCM44.1kHz |
POWER SUPPLY
Power Supply ...... AC 230V 50Hz
Power Consumption 25W
Power consumption in standby mode ..... 0.5W
CABINET, ETC.
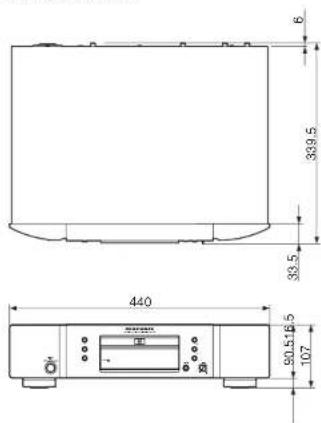
Dimensions (Width × Height × Depth)
(SA8003) 440 × 108.5 × 343.5mm
(SA7003) 440 × 107 × 339.5mm
Net weight
(SA8003) 7.8kg
(SA7003) 5.9kg
Operating temperatures ....+5°C \~ +35°C
Operating humidity .....5 \~ 90% (without dew)
ACCESSORIES
- Remote control unit ....1
Net weight 110g
• AAA (R03) Batteries 2 - AC Power cord ....1
• Audio cable ....1 - Remote control connecting cord ....1
- User 's Guide ....1
Specifications subject to change without prior notice.
dIMENSIONS (UNIT: MM)
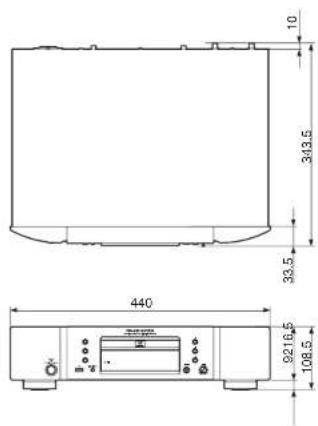
SA7003SA8003
CLASS 1 LASER PRODUCT
LUOKAN 1 LASERLAITE
KLASS 1 LASERAPPARAT
ENGLISH
OTHERS
NOTES ABOUT THE dISCS
* Handle the discs carefully so as not to scratch their surfaces.
* Keep the surfaces of the discs clean at all times.
When cleaning the surfaces of discs, always be sure to use the special cleaner and wipe the surfaces in the directions shown in the figure below.
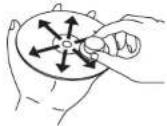
- Wipe the surface radially from the center.
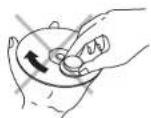
- Do not wipe the surface in the circumferential direction.
* Do not attach pieces of paper or stickers to the label surfaces of the discs.
When a disc has a piece of plastic tape or rental CD label with paste protruding from the edge or when a disc still bears traces of sticky tape or adhesive labels, do not attempt to play it. If such a disc is played on the CD player, you may find that you cannot remove it or that some other kind malfunctioning may occur.
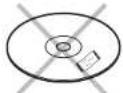
* Do not use discs which come in special shapes.
Do not attempt to play heart-shaped or octagonal discs or discs with any other special shapes. You may find that you cannot remove them or that some other kind of malfunctioning may occur in the player.


* Use discs which satisfy the CD standards such as those with the "CD logo", "I or " mark on their disc label surfaces.
No guarantees are made for playback if discs which do not satisfy the appropriate CD standards are used.
Similarly, no guarantees are made for their sound quality even if it is possible to play such discs.
* To protect your discs from damage, avoid placing them in the following locations.
- Where they will be exposed to direct sunlight or where they will be close to a heater or other heat radiating appliance
- Where the humidity level is high or it is very dusty
- Near a window or other such location where they may be exposed to rain
* Get into the habit of putting the discs back in their cases after use.
ABOUT PLAYING COPY-CONTROLLED CdS
Some copy-controlled CDs may not conform to official CD standards. They are special discs and may not play on the unit.
PLAYING Cd-R/Cd-RW dISCS
This unit can play back the CD-RW (ReWritable) discs as well as ordinary Audio CD and CD-R (Recordable) discs.
- The CD-R and CD-RW discs should contain properly-recorded TOC* information so that they can be played back. In CD recorders, the task of writing TOC information is referred to as finalizing the disc. Discs that are not finalized cannot be properly recognized as an Audio CD and played back by regular CD players and Super Audio CD players. For details, please read the instruction manual provided with a CD recorder.
TOC stands for Table Of Contents and contains information such as the total number of tracks and total playing time of the disc. - This unit can play CD format, video CD format, and CD-R/CD-RW discs which contain WMA/MP3 music data. However, some discs may have problems such as unable to play, noise or sound distortion.
- This device is exclusively a playback device. It cannot record CD-R/CD-RW discs.
- As the playback of a CD-RW disc necessitates partial change of the player setup, it may take longer time for reading the TOC information than when an Audio CD or CD-R disc is played.
- Depending on the application settings and environment, discs recorded with a personal computer may not be able to be played. Please record with the correct format. (For details, please inquire at your application sales agent.)
- Discs recorded with the packet writing system cannot be played.
- Mixed mode CD/enhanced CD and DTS CD discs cannot be played.
- CD-G, video CD and DVD discs cannot be played.
ABOUT dUALdISC PLAYBACK
- "DualDisc" contains DVD-standard-compliant video and audio on one side and audio for playing on a CD player on the other side, respectively.
- Since the non-DVD audio side does not conform to common CD physical standards, it may not be able to be played.
- In regard to details such as "DualDisc specifications and standards, please inquire at your selling agent or distributor
ABOUT USB MEdIA
- Music tiles cannot be played by connecting this unit to a personal computer with a USB cable. This is a device that belongs to a class of USB mass storage such as USB memory (FAT16, FAT32 format supported), which this unit supports.
- There are cases where playback of all USB memory or supplying electrical power cannot be guaranteed. In addition, please note that we cannot assume any responsibility in the unlikely event of loss of USB memory files.
ENGLISH
OTHERS
The section describes the care and maintenance tasks that must be performed to optimize the operation of your Marantz equipment.
CLEANING OF EQUIPMENT EXTERNAL SURFACES
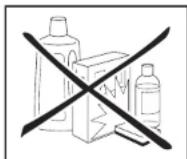
The exterior finish of your unit will last indefinitely with proper care and cleaning. Never use scouring pads, steel wool, scourging powders or harsh chemical agents (e.g., lye solution), alcohol, thinner, benzine, insecticide or other volatile substances as these wil mar the finish of the equipment. Likewise, never use cloths containing chemical substances. If the equipment get dirty, wipe the external surfaces with a soft, lint-free cloth.
If the equipment becomes heavily soiled:
- dilute some washing up liquid in water, in a ratio of one part detergent to six parts water.
- dip a soft, lint free in the solution and wring ta it is damp.
- wipe the equipment with the damp cloth.
- dry the equipment by wiping it with a dry cloth.
REPAIRS
Only the most competent and qualified service technicians should be allowed to service the factory-trained warranty station personnel have the knowledge and special facilities needed for repair and calibration of this precision equipment. After the warranty period has expired, repairs will be performed for a charge if the equipment can be returned to normal operation.
In the event of difficulty, refer to your dealer or write directly to the nearest location to you that is listed on the Marantz Authorized Service Station list. If writing, please include the model and serial number of the equipment together with a full description of what you think is abnormal about the equipment's behaviour.
www.marantz.com
You can find your nearest authorized distributor or dealer on our website.
marantz®
is a registered trademark.
- marantz®
- ENGLISH
- WARRANTY
- RETAIN YOUR PURCHASE RECEIPT
- IMPORTANT
- FOR U.K. ONLY
- FRANÇAIS
- GARANTIE
- AVERTISSEMENTS
- CHECKING THE ACCESSORIES
- A NOTE ABOUT RECYCLING
- CONTENTS
- FEATURES 2
- BEFORE USING ....3
- NAMES AND FUNCTIONS ....5
- BASIC CONNECTIONS 9
- TROUBLESHOOTING....23
- OTHERS 25
- FEATURES
- SA8003/SA7003 COMMON FEATURES
- SA8003 FEATURES
- APPLICABLE DISCS TO THE UNIT
- CD-R / CD-RW
- BEFORE USING
- EQUIPMENT MAINS WORKING SETTING
- COPYRIGHT
- INAPPROPRIATE PLACES FOR INSTALLATION
- dO NOT PLACE OBJECTS ON TOP
- CAUTIONS ON HANDLING MAINS CORd
- do NOT ATTEMPT REPAIRS YOURSELF
- PRECAUTIONS
- CAUTIONS ON HANDLING BATTERIES
- OPERATIONAL RANGE
- NAMES AND FUNCTIONS
- dISPLAY
- D OFF (digital output OFF) indicator
- REMOTE CONTROLLER
- POWER button
- USB button (SA8003 only)
- DISC button (SA8003 only)
- FILTER button
- PROGRAM button
- RANDOM button
- CLEAR button
- 8| REPEAT button
- AMS (Automatic Music Scan) button
- MUTE button
- VOLUME button
- ENTER button
- II (pause) button
- ■ (stop) button
- MENU (menu setting) button
- 0-9 (numeric) buttons
- ◀◀, ▶▶ (search) buttons
- |◀◀, ▶▶| (track skip) buttons
- [19] ▶ (play) button
- FOLDER ▲/▼ buttons (SA8003 only)
- INPUT ▲/▼ buttons
- TEXT button
- TIME button
- DISPLAY button
- S.MODE (sound mode) button
- DIG.OUT (digital out on/off) button
- ▲ (OPEN/CLOSE) button
- REAR PANEL
- ① Power cord connector socket
- ⑤ EXTERNAL / INTERNAL (external/internal) switch
- ② DIGITAL AUDIO OUT OPTICAL (optical digital output) connector
- ⑥ ANALOG OUT (analog output) connector
- ③ DIGITAL AUDIO OUT COAXIAL (coaxial digital output) connector
- ④ REMOTE CONTROL IN / OUT (remote control IN and OUT) connectors
- BASIC CONNECTIONS
- CONNECTING TO AN AMPLIFIER
- Caution:
- USB MEDIA/iPod CONNECTION (SA8003 ONLY)
- CONNECTING THE POWER SUPPLY
- BASIC OPERATION
- NORMAL PLAYBACK
- TO STOP PLAYBACK
- TO EJECT DISC
- TO PAUSE PLAYBACK
- PLAYING YOUR FAVORITE TRACKS OF A dISC
- SPECIFY TRACK NUMBER TO PLAY (dIRECT SEARCH)
- IF A WRONG NUMBER IS PRESSED
- SKIPPING TO THE PREVIOUS OR NEXT TRACK (TRACK SKIP)
- TO LISTEN TO A TRACK POSTERIOR TO THE CURRENT TRACK
- TO LISTEN TO A TRACK PRIOR TO THE CURRENT TRACK
- PLAYING YOUR FAVORITE PARTS OF A dISC (SEARCH)
- Note:
- AdvANCED CONNECTIONS
- CONNECTING TO A DIGITAL AUDIO COMPONENT
- CONNECTING THE OPTICAL OUTPUT CONNECTOR
- CONNECTING THE COAXIAL OUTPUT CONNECTOR
- REMOTE CONTROL CONNECTION
- TIMER PLAY
- TIMER PLAY SETTING
- - Track remaining time
- • Total remaining time
- ONE TRACK REPEAT
- TO EXIT FROM ONE TRACK REPEAT
- ALL TRACK REPEAT
- TO RETURN TO NORMAL PLAY
- TO EXIT FROM RANDOM PLAY AND RETURN TO NORMAL PLAY
- TO CHECK THE PROGRAMMEd TRACKS
- TO DELETE A PROGRAMMED TRACK
- TO CLEAR WHOLE PROGRAM
- TO Add TRACKS TO PROGRAM
- PLEASE BE CAREFUL ABOUT THE FOLLOWING MATTERS
- SEARCHING YOUR FAVORITE TRACKS (AMS (AUTOMATIC MUSIC SCAN) PLAY)
- SWITCHING SOUND MOdE (SUPER AUdIO Cd)
- SWITCHING "START SOUND MODE"
- WHEN START SOUND MODE IS SWITCHED TO Cd
- WHEN START SOUND MODE IS SWITCHED TO SA-Cd (DEFAULT MODE)
- SETTING THE DIGITAL OUTPUT
- dURING THE PLAYBACK OF THE Cd LAYER OF AN AUdIO Cd OR SUPER AUdIO Cd
- Tip
- USING "REPEAT PLAY" MODE
- PLAYING TRACKS IN A RANDOM SEQUENCE (RANDOM PLAY)
- SEARCHING YOUR FAVORITE TRACKS (AMS (AUTOMATED MUSIC SCAN) PLAY)
- CHOOSING FILES FROM A DIFFERENT FOLDER
- SPECIFY RACK NUMBER TO PLAY (DIRECT SEARCH)
- TO LISTEN TO A TRACK POSTERIOR THE CURRENT TRACK
- PLAYING TRACKS FROM WHERE THEY WERE PREVIOUSLY STOPPED (RESUME PLAY)
- PLAYING YOUR FAVORITE TRACKS
- REPEAT PLAY
- FILE INFORMATION DISPLAY SELECTION
- (Selecting from All Album)
- (Selecting from Album)
- Tip:
- (Selecting from All Artist)
- (Selecting from Artist)
- (Selecting from the Album)
- SELECTING TRACKS FROM A DIFFERENT ALBUM
- TROUBLESHOOTING
- OTHERS
- ABOUT WMA PLAYBACK
- ABOUT WINDOWS MEDIA dRM
- ABOUT MP3 PLAY BACK
- ABOUT AAC PLAYBACK
- ABOUT iPod PLAYBACK
- POWER SUPPLY
- CABINET, ETC.
- ACCESSORIES
- NOTES ABOUT THE dISCS
- ABOUT PLAYING COPY-CONTROLLED CdS
- PLAYING Cd-R/Cd-RW dISCS
- ABOUT dUALdISC PLAYBACK
- ABOUT USB MEdIA
- CLEANING OF EQUIPMENT EXTERNAL SURFACES
- REPAIRS
Brand : MARANTZ
Model : SA7003/ZIL
Category : Cd player/recorder