
PagePro 1350W - Printer KONICA MINOLTA - Free user manual and instructions
Find the device manual for free PagePro 1350W KONICA MINOLTA in PDF.


| Product Type | Monochrome Laser Printer |
| Brand | Konica Minolta |
| Model | PagePro 1350W |
| Print Technology | Laser |
| Print Resolution | Up to 1200 x 1200 dpi |
| Print Speed | Up to 20 ppm (A4) |
| Duplex Printing | Manual (optional automatic) |
| Paper Input Capacity | 150 sheets (standard tray) |
| Paper Output Capacity | 100 sheets (face-down) |
| Monthly Duty Cycle | Up to 15,000 pages |
| Connectivity | USB 2.0, Parallel (optional) |
| Dimensions (W x D x H) | 380 x 360 x 240 mm |
| Weight | Approx. 7 kg |
| Power Consumption | Print: 550W, Standby: 80W, Sleep: <5W |
| Noise Level | Print: 50 dB(A), Standby: 27 dB(A) |
| Supported Media Sizes | A4, A5, B5, Letter, Legal, Envelopes |
| Media Types | Plain paper, recycled, transparency, labels, cardstock |
| Toner Cartridge Yield | Standard: 1,500 pages, High-capacity: 2,500 pages |
| Maintenance | Replace toner, clean corona wire, clean fuser roller |
| Safety Features | Fusing cover safety switch, temperature protection |
| Repairability | Replaceable drum and fuser unit; serviceable by technician |
| Supported Operating Systems | Windows, Mac OS, Linux (CUPS) |
| How to Clean | Use soft dry cloth; clean interior with recommended cleaner |
Frequently Asked Questions - PagePro 1350W KONICA MINOLTA
User questions about PagePro 1350W KONICA MINOLTA
0 question about this device. Answer the ones you know or ask your own.
Ask a new question about this device
Download the instructions for your Printer in PDF format for free! Find your manual PagePro 1350W - KONICA MINOLTA and take your electronic device back in hand. On this page are published all the documents necessary for the use of your device. PagePro 1350W by KONICA MINOLTA.
USER MANUAL PagePro 1350W KONICA MINOLTA
PagePro™1300W/1350W User's Guide
4136-7747-02A
Contents
1 Introduction .... 1
Getting Acquainted with Your Printer 2
Printer Parts 2
Front View 2
Rear View 2
About the Indicator Functions 3
Indicator Functions 3
Continuing a Print Job after an Error Message 3
Cancelling a Print Job 3
Status Message 4
2 Software Installation 7
Installing the USB Device Driver 8
Installing the USB Device Driver under Windows Me and 98 8
Installing the Printer Driver 9
Installing from the CD-ROM 9
3 Working with the Printer Driver 11
Displaying Printer Driver Settings 12
Displaying Settings under Windows XP 12
Displaying Settings under Windows 2000/Me/98 12
Using the Printer Driver 13
Common Buttons 13
OK 13
Cancel 13
Apply 13
Help 13
Easy Set 13
Page Layout 13
Printer Figure 13
Setup Tab 14
Paper Tab 14
Quality Tab 14
Device Options Setting Tab 14
4 Working with the Status Display ....15
Working with the Status Display 16
Introduction 16
Environment 16
Opening the Status Display and Showing the Supplies Status 16
Altering the Size of the Status Display Window 16
Using the Status Display 16
Recognizing Status Display Alerts 17
Recovering from a Status Display Alert 17
Closing the Status Display 18
5 Using Media ....19
About Media 20
What sizes/weights of media can I use? 20
What type and amount of media can I load? 21
Media Storage 21
Media Not Suitable for Printing 22
What Is the guaranteed imageable (printable) area? 23
Page Margins 23
Loading Media 24
How do I refill Tray 1? 24
Printing on Media 25
How do I load and print custom media? 25
How do I load and print envelopes? 25
How do I load and print labels? 27
How do I load and print postcards? 28
How do I load and print thick stock? 29
How do I load and print transparencies? 30
Manual Duplexing 31
How do I manually duplex? 31
6 Replacing Consumables 33
Replacing the Toner Cartridge 35
Replacing the Drum Cartridge 40
7 Maintaining the Printer 45
Cleaning the Printer 46
Exterior 46
Pick-up Roller 47
8 Troubleshooting 49
Indicator Messages 50
Error Messages 50
Service Messages 51
Clearing Jams 52
Solving Problems-Printing Quality 55
A Appendix 59
Safety Specifications 60
Technical Specifications 60
Printer 60
Parallel Interface Connectors and Cable 62
USB Interface Connectors and Cable 62
Consumables Life Expectancies Chart 62
Our Concern for Environmental Protection 63
What is an ENERGY STAR product? 63
CE Marking (Declaration of Conformity) 63
For European Users 63
CISPR 22 and Local Rules 63
Acoustic Noise 64
Safety Information 64
Warning and Precaution Symbols 64
Meaning of Symbols 64
WARNING 65
CAUTION 67
Working Safely with your Laser Printer 68
Notes on your Safety and Operating Safety 68
Laser Safety 70
Internal Laser Radiation 70
Laser Safety Label 71
For United States Users 71
For Users in All Countries 72
For Denmark Users 72
For Norway Users 72
For Finland, Sweden Users 72
Introduction
1
Getting Acquainted with Your Printer
Printer Parts
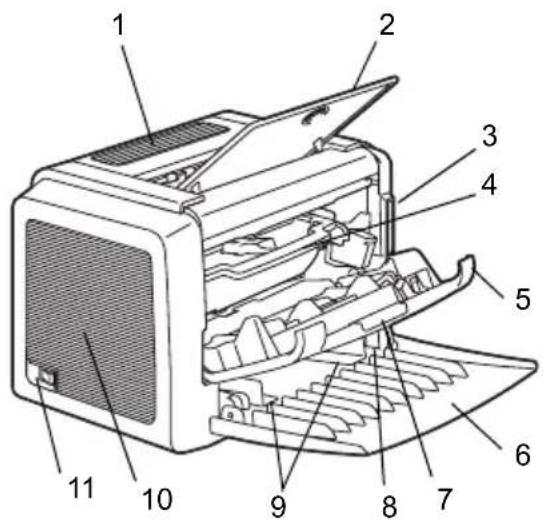
The following drawings illustrate the parts of your printer referred to throughout this guide, so please take some time to become familiar with them.
Front View
1—Top cover
2—Output tray
3—Control panel
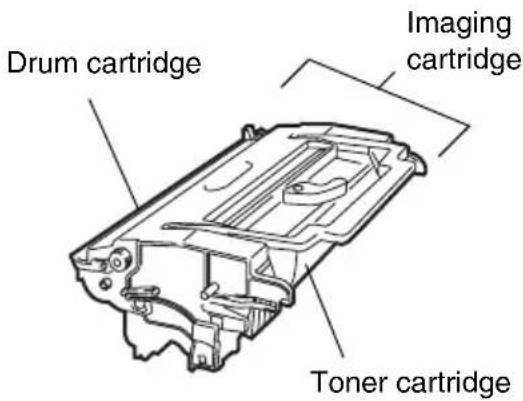
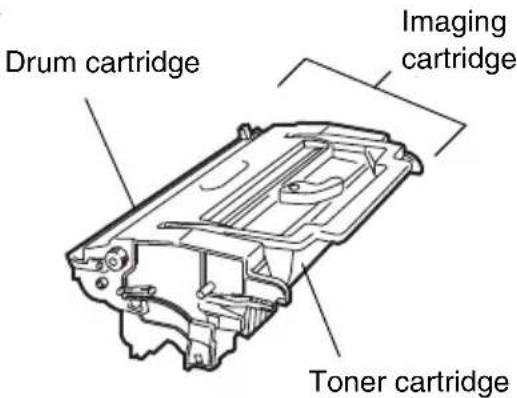
4—Imaging cartridge
(Toner cartridge plus Drum cartridge)
5—Front cover
6—Tray 1
7—Front cover grip
8—Paper guide stopper
9—Paper guides
10—Ventilation grilles
11—Power switch
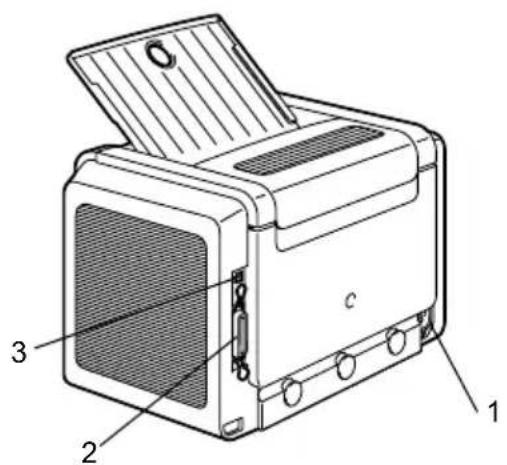
Rear View
1—AC power connection
2—Parallel port
3—USB port
About the Indicator Functions
Indicator Functions
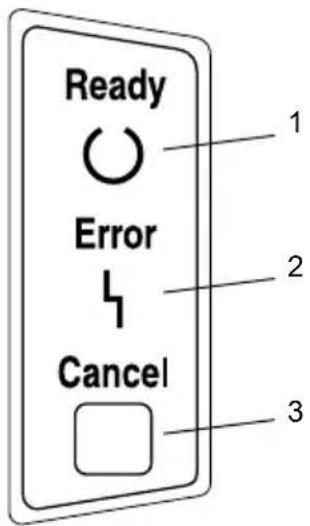
The control panel has two indicators and one button. The control panel indicators provide information on the status of the printer.
1—Ready indicator
2—Error indicator
3—Cancel button
The Cancel button allows you to:
■ Continue a print job after an error message
■ Cancel a print job
Continuing a Print Job after an Error Message
You can continue the print job after correcting the following types of errors:
■ When the print job is too complex and the memory capacity of the printer is inadequate
■ When there is no more paper in the tray
■ When paper of a different format than that set in the printer driver was fed into the printer
1 Check that one of the above errors has occurred.
2 Perform the remedial action according to the error.
3 Press the Cancel button to operate the media feed. The print job continues.
For details on the error messages, refer to chapter 8, "Troubleshooting" on page 49.
Cancelling a Print Job
You can cancel a print job that is currently being processed.
1 While data is being processed or printed (the green "Ready" indicator is blinking), hold down the Cancel button for more than 5 seconds.
2 Release the Cancel button after both indicators light up. The current print job has now been cancelled.
The indicators may show five types of signals:
■ Off
On
■ Slow blinking—1 blink every 2 seconds
■ Blinking—1 blink per second
■ Rapid blinking—2 blinks per second
Status Message
Status messages indicate the current condition of the printer. The printer status also can be checked on the Status Display. (Refer to the “Working with the Status Display” on page 16.)
| Ready indicator (green) | Error indicator (orange) | Condition Action | |
| Off Off Power | off None | ||
| On Off Ready | to print None | ||
| Rapid blinking | Off Warming up | None | |
| Blinking Off Processing data | None | ||
| Printing | |||
| On On Initializing (power on) | None | ||
| Canceling a print job | |||
| Slow blinking | Off Power save | mode None | |
| On Slow blinking | Toner near | empty Prepare the new | toner cartridge. |
| On Blinking Toner | empty Replace the toner | place the toner | cartridge. |
| On Rapid blinking | Toner cartridge end Replace the toner cartridge. | ||
| No toner cartridge is installed. | Install the toner cartridge. | ||
| The installed toner cartridge is an unapproved type. | Install a KONICA MINOLTA toner cartridge. | ||
Note
If a toner cartridge for a different region, an unapproved toner cartridge, or a toner cartridge that is at the end of its life is used, cleaning will be performed after each page is printed, which will reduce the printing speed.
Software Installation
2
Installing the USB Device Driver
When connecting the printer to your computer with a USB cable, install the USB device driver according to the following instructions before installing the printer driver.
Note
In Windows 2000/XP, you do not have to install the USB device driver. When the “Found New Hardware” wizard dialog box appears, cancel it.
Installing the USB Device Driver under Windows Me and 98
1 Turn on your computer.
2 Turn on the printer.
3 When Windows and the printer are both ready, insert the CD-ROM, included with your printer, into your computer's CD-ROM drive.
4 Connect the printer to the computer with the USB cable. The Add New Hardware Wizard dialog box appears.
Follow the instructions on the screen.

Browse the printer driver CD-ROM and navigate to: ers\English\Win9x" (for Windows Me and 98).
5 Click Finish. This completes the installation of the USB device driver.
6 When the Add New Hardware Wizard dialog box appears after clicking Finish, click Cancel.
Installing the Printer Driver
Note
Do not use the “Found New Hardware” or “Add New Hardware” wizard to install the PagePro 1300W/PagePro 1350W driver and utilities.
Installing from the CD-ROM
1 Insert the CD-ROM in the CD-ROM drive of your computer. The CD-ROM installer automatically starts.
If not, browse with the Windows Explorer to the CD-ROM and double-click on setup.exe.
2 Follow the instructions on the screen.

For a USB connection, select "USBxxx" as the printer port. For a Parallel connection, select "LPTx" as the printer port.
Working with the Printer Driver
3
Displaying Printer Driver Settings
Displaying Settings under Windows XP
1 From the Start menu, click Control Panel.
2 In Pick a category, click Printers and Other Hardware.
3 In Pick a task..., click View installed printers or fax printers.
4 In the Printers and Faxes directory, select the KONICA MINOLTA PagePro 1300W/PagePro 1350W printer icon.
5 To display the printer driver settings, from the File menu, click Printing Preferences....
Displaying Settings under Windows 2000/Me/98
1 From the Start menu, point to Settings, and then click Printers to display the Printers directory.
2 Select the KONICA MINOLTA PagePro 1300W/PagePro 1350W printer icon.
3 Display the printer driver settings:
■ Windows 2000—From the File menu, click Printing Preferences....
■ Windows Me/98—From the File menu, click Properties, and then click the Printer Properties tab.
Using the Printer Driver

Refer to the printer drivers online help for information on all of the functions.
Common Buttons
The buttons described below appear on each tab.
OK
Click to exit the Properties dialog box, saving any changes made.
Cancel
Click to exit the Properties dialog box without saving any changes made.
Apply
Click to save all changes without exiting the Properties dialog box.
Help
Click to view online help.
Easy Set
To save the current settings, click Save.... Afterward, the saved settings can be selected from the drop-down list.
Select Default from the drop-down list to reset the functions of the tab to their original values.
Page Layout
Check this option button to display a sample of the page layout in the figure area.
Printer Figure
Check this option button to display an image of the printer in the figure area.
Setup Tab
The Setup tab allows you to
■ Print several pages of a document on the same page (n-up printing)
■ Provide a watermark on printed documents
■ Design custom watermarks
■ Specify manual duplex printing
■ Specify the paper source
■ Define the type of media
■ Print using a form overlay
■ Create/edit a form overlay
Paper Tab
The Paper tab allows you to
■ Specify the size of the original document
■ Define custom media sizes
■ Fit printed documents to a specified media size
■ Select the output media size
■ Scale (enlarge/reduce) documents
■ Adjust the printing position
■ Specify the number of copies
- Turn on/off the printer’s sorting function
■ Turn on/off the Proof Print function
■ Specify the orientation of the media
■ Rotate the print image 180° to the media orientation
Quality Tab
The Quality tab allows you to
■ Specify the resolution
■ Adjust the contrast and brightness of the printed document
■ Turn on/off Toner Save mode
Device Options Setting Tab
The Device Options Setting tab allows you to
■ View version and copyright information about the printer driver
Working with the Status Display
4
Working with the Status Display
Introduction
The Status Monitor shows information about the current status of the computer's local printer.
Environment
The Status Display can be used with Windows XP, 2000, Me, and 98 connected via a parallel cable or USB cable.
Opening the Status Display and Showing the Supplies Status
Use one of the following steps to open the Status Display.
■ Windows XP—Choose Start, All Programs, then KONICA MINOLTA PagePro 1300W/PagePro 1350W Utilities, and then KONICA MINOLTA PagePro 1300W/PagePro 1350W Status.
■ Windows Me/2000/98—From the Start menu, choose Programs, then KONICA MINOLTA PagePro 1300W/PagePro 1350W Utilities, and then KONICA MINOLTA PagePro 1300W/PagePro 1350W Status.
Altering the Size of the Status Display Window
■ From the Display menu, choose Status (Reduce) to decrease the size of the window, or
■ From the Display menu, choose Status (Expand) to increase the size of the window.
Using the Status Display
■ When the background of the right-hand printer graphic is green, the printer is in standby mode or a job is printing normally.
■ When the background of the right-hand printer graphic is red, there is an error and the job has been interrupted. The status of the printer and the error message are shown in the dialog boxes on the left.
The function areas include:
■ Printer status—Displays text messages that describe the current operational status of the printer.
■ How to recover—Provides you with explanations of what you need to do in order to correct problems and recover from error conditions.
■ Warning status—Displays text messages that alerts you of such conditions as low toner.
■ Printer status figure—Shows a graphic representation of the printer and indicates where the problem is.
■ Printing status—Displays the status of the current print job.
■ Select popup message—Allows you to choose which message(s) you want to bring to the foreground when that particular condition occurs with the printer.
■ Maintenance—Allows you to specify the Midnight Mode functions and Auto Continue functions.
■ Supplies status—Displays consumables usage statuses (percentage remaining) of the toner cartridge.
Refer to the online help for information on all of its functions.
Recognizing Status Display Alerts
When the Status Display detects a printing problem, several actions occur at the same time, depending on your settings. First, the icon changes from green to yellow or red, depending on the severity of the printer problem.
Refer to the online help for further information on these settings.
Recovering from a Status Display Alert
When the Status Display notifies you of a printing problem, double-click on its icon to open the Status Display. The Status Display identifies which printer has an error and what type of error has occurred.
Refer to the online help for further information on these settings.
Closing the Status Display
To close the Status Display from the File menu, choose Exit.

If you click the X button in the upper-right corner of the Status Display window to close the window, the Status Display remains available at the bottom right of the taskbar. Double-click the icon to open it again.
Using Media
5
What sizes/weights of media can I use?
| Media | Media Size Weights | ||
| Millimeters Inches | |||
| A4 | 210.0 × 297.0 | 8.2 × 11.7 | 60–90 g/m2(16–24 lb) |
| B5 (JIS) | 182.0 × 257.0 | 7.2 × 10.1 | |
| A5 | 148.0 × 210.0 | 5.9 × 8.3 | |
| Legal | 215.9 × 355.6 | 8.5 × 14.0 | |
| Letter | 215.9 × 279.4 | 8.5 × 11.0 | |
| Statement | 140.0 × 216.0 | 5.5 × 8.5 | |
| Executive | 184.0 × 267.0 | 7.25 × 10.5 | |
| Folio | 210 × 330.0 | 8.25 × 13.0 | |
| Letter Plus 216 × 322 8.5 × 12.69 | |||
| UK Quarto | 203 × 254 | 8 × 10 | |
| Foolscap | 203 × 330 | 8 × 13 | |
| G. Letter | 203 × 267.0 | 8 × 10.5 | |
| G. Legal | 216 × 330 | 8 1/2 × 13 | |
| Chinese 16 | 185.0 × 260.0 | 7.3 × 10.2 | |
| Chinese 32 | 130.0 × 185.0 | 5.1 × 7.3 | |
| 16K | 195 × 270 | 7 3/4 × 10 3/4 | |
| B5 (ISO) | 176.0 × 250.0 | 6.6 × 9.8 | |
| Envelope #10 | 105 × 241 | 4.125 × 9.5 | |
| Envelope C5 | 162.0 × 229.0 | 6.4 × 9.0 | |
| Envelope DL | 110.0 × 220.0 | 4.3 × 8.7 | N/A |
| Envelope Monarch | 98.0 × 191.0 | 3.875 × 7.5 | 60–90 g/m2(16–24 lb) |
| Envelope C6 | 114.0 × 162.0 | 4.5 × 6.4 | |
| Envelope Cho #3 | 120 × 235 | 4 3/4 × 9 1/4 | |
| Envelope Cho #4 | 90 × 205 | 3 1/2 × 8 | |
| Japanese Postcard | 100.0 × 148.0 | 3.9 × 5.8 | N/A |
| Double Postcard | 148 × 200 | 5 3/4 × 7 3/4 | |
| Thick stock | 91–163g/m2(25–43 lb) | ||
What type and amount of media can I load?
| Media Source/Maximum Amount Input Capacity | ||
| Media Type Tray 1 | ||
| Plain Paper | 60–90 g/m2(16–24 lb) | 150 sheets |
| Special Media | Envelopes 10 sheets | |
| Label sheets 10 sheets | ||
| Letter head 10 sheets | ||
| Postcards (Japanese Size) 50 sheets (first face) | ||
| 20 sheets (second face) | ||
| Thick paper 91–163 g/m2(24–90 lb) | 10 sheets | |
| Transparencies 5 sheets | ||
Note
Do not allow media to go above the fill limit mark inside the tray or the media may not be fed correctly.
Media Storage
Keep media on a flat, level surface in its original wrapper until it is time to load it.
If media has been removed from its wrapper, place it in its original packaging and store in a cool, dark place.
When storing media, avoid
■ Moisture, excess humidity
Keep media between 30% to 65% relative humidity. Toner does not adhere well to moist or wet paper
On the other hand, media that has been stored for a long time without staying in its packaging may dry up too much and also cause jamming.
■ Direct sunlight
■ Excess heat (up to 35^ C/ 95^ F)
■ Dust
■ Leaning against other objects or placed in an upright position
Before purchasing a large quantity or special media, do a trial printing with the same media and check the print quality.
Media Not Suitable for Printing
Note
Do not use the media types listed below. These could cause poor print quality, media jams, or damage to the printer. Also, using them will void your warranty.
■ Coated with a processed surface (such as carbon paper, digitally gloss-coated media, colored paper that has been treated)
■ Carbon backed
■ Iron-on transfer media (heat-sensitive paper, heat-pressure paper, heat-press transfer paper)
■ Cold water transfer paper
■ Pressure sensitive
■ Special media designed specifically for inkjet printers (superfine paper, glossy paper, glossy film, postcards, etc.)
■ Media that has already been printed with
— An inkjet printer
- A monochrome or color laser printer or copier
- A heat-transfer printer
— Another printer or fax machine
■ Wet (or damp)
■ Layered
■ Adhesive
■ Folded, creased, curled, embossed, warped, or wrinkled
■ Perforated, three-hole punched, or torn
■ Too slick, too coarse, too textured
■ Different in texture (roughness) on the front and back
■ Too thin or too thick
■ Stuck together because of static electricity
■ Composed of foil or gilt; too luminous
■ Heat sensitive or cannot withstand the fusing temperature (205°C/401°F)
Irregularly shaped (not rectangular or not cut at right angles)
■ Attached with glue, tape, paper clips, staples, ribbons, hooks, or buttons
Acidic
■ Any other media that is not approved
Use media that is
■ Suitable for plain-paper laser printers, such as standard paper
What Is the guaranteed imageable (printable) area?
Each media size has a specific imageable area, the maximum area on which the printer can print clearly and without distortion.
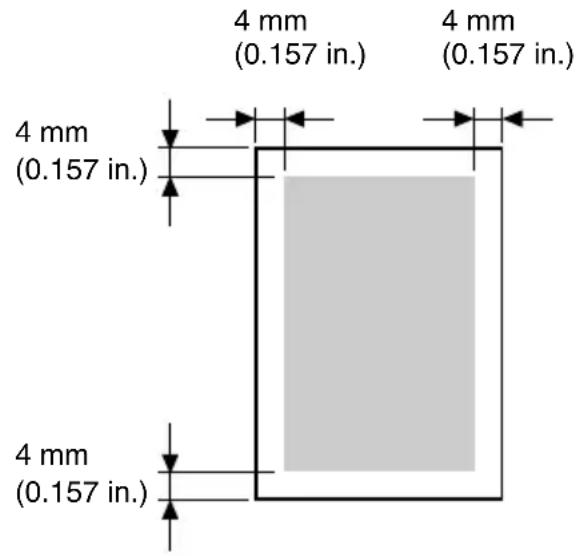
Page Margins
Margins are set through your application. Some applications allow you to set custom page sizes and margins while others have only standard page sizes and margins from which to choose. If you choose a standard format, you may lose part of your image (due to imageable area constraints). If you can custom-size your page in your application, use those sizes given for the imageable area for optimum results.
Loading Media
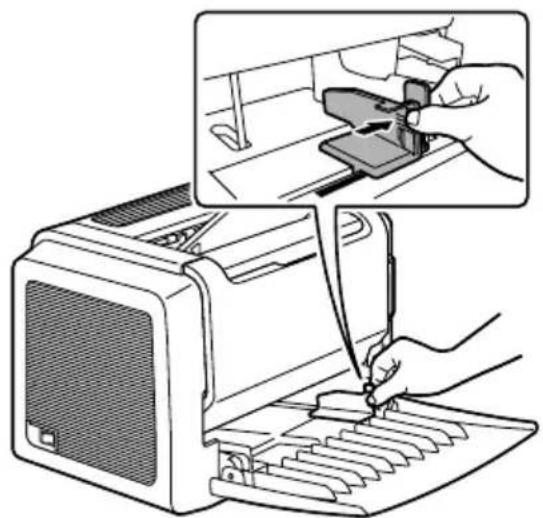
How do I refill Tray 1?

Refill the tray only when it is completely empty.
1 Squeeze the right paper guide and open the paper guides.
natural_image
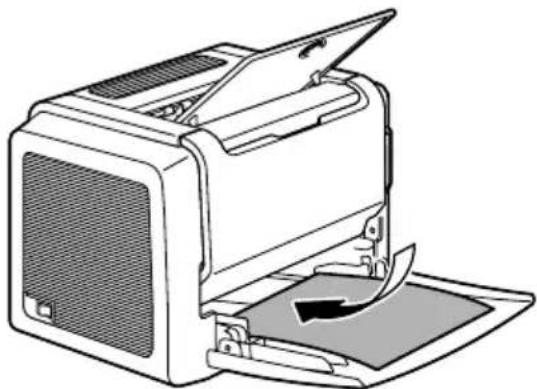
Illustration of a hand using a computer to press or install a keyboard, with an inset showing the same device (no text or symbols present)2 Load the media lengthwise and printing-side up in the tray.
A maximum of 150 sheets (75 g/m ^2 [20 lb] plain paper) can be loaded. If media is loaded past the media limit mark, it may not be fed correctly.
Load letterhead with the side to be printed facing up and the preprinted letterhead at the top (facing the printer).
natural_image
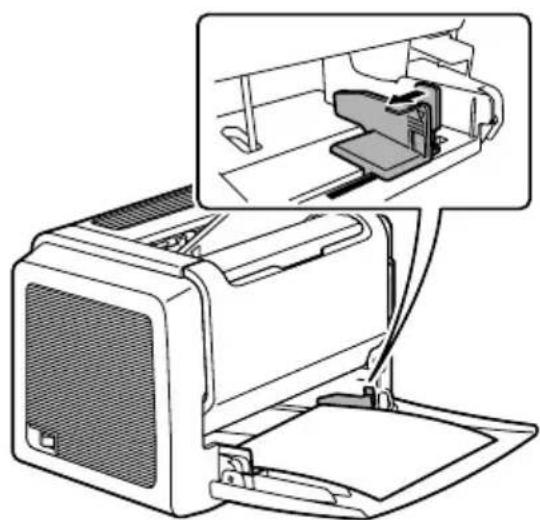
Line drawing of a printer with an open lid and paper tray, showing internal components (no text or symbols)3 Squeeze the right paper guide and adjust the paper guides so that both the left and right sides of the media are secure.
natural_image
Line drawing of a printer with an inset showing internal components (no text or symbols)Printing on Media
How do I load and print custom media?
Do not use custom media that does not have approved dimensions
■ Width: 76 mm (3 in.) up to 216 mm (8.5 in.)
■ Length: 127 mm (5 in.) up to 356 mm (14 in.)
1 In the printer driver (Setup tab/Media Type option), select plain paper.
2 Set the media size (Paper tab/Original Document Size/Edit Custom...)
3 Load the custom media lengthwise and printing-side up in Tray 1.
4 Adjust the paper guides to the width of the custom media.
Note
Improperly adjusted guides may cause poor print quality, media jams, or printer damage.
5 Print the custom media.
How do I load and print envelopes?

Before printing on envelopes, we recommend printing a test page. If the print result is not oriented as desired, select Rotated (Paper tab/Orientation option).
Do not use envelopes that have
■ Sticky flaps
■ Tape seals, metal objects, paper clips, fasteners, or peel-off strips for sealing
■ Transparent windows
■ Rough surface
■ Material that will melt, vaporize, or emit dangerous fumes
■ Been presealed
Use envelopes that are
■ Common office envelopes with diagonal joints, sharp folds and edges, and ordinary gummed flaps
■ Approved for laser printing
Dry
1 In the printer driver (Setup tab/Media Type option), select Envelope.
2 Select the size of the envelope (Paper tab/Original Document Size option).
3 Place the envelopes on a flat surface, and flatten them by pressing down the corners.
4 Flex the envelope stack (including the edges) to remove any stiffness.
5 Correct any bent corners, and tap the envelopes on a flat surface to align them.
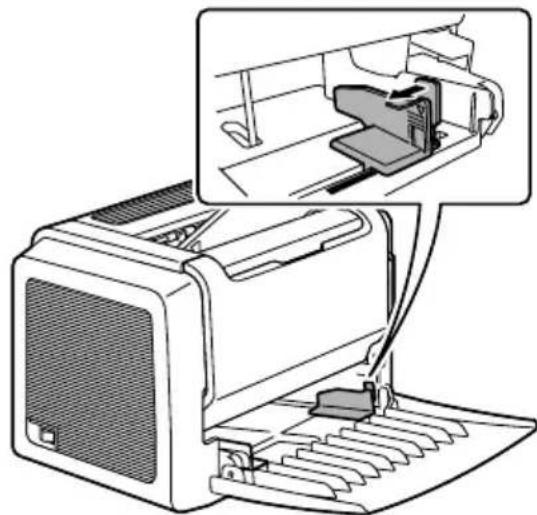
6 Squeeze the right paper guide and open the paper guides.
natural_image
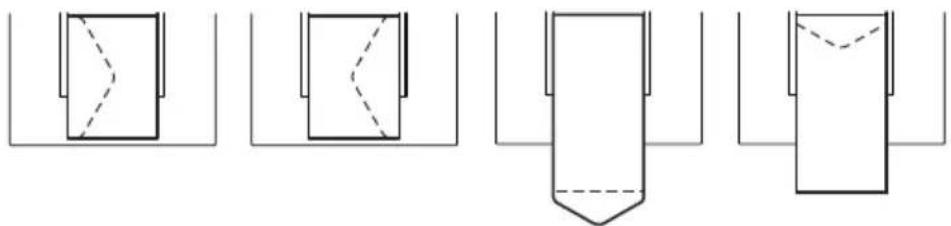
Diagram of a printer with an inset showing internal components (no text or symbols)7 Load the envelopes lengthwise and the printing-side up as shown in the illustrations.
natural_image
Pure schematic diagram of five different mechanical or structural components without any text, numbers, or symbols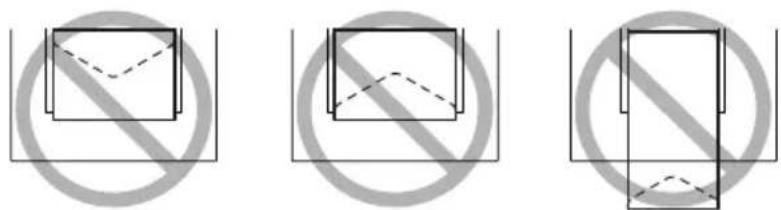
natural_image
Three diagrams showing a rectangle with diagonal lines and a circle, all without any text or symbols.Note
Print envelopes on the front address side only. Some parts of the envelope consist of three layers of paper—the front, back, and flap. Anything printed in these layered regions may be lost or faded.
8 Recheck the paper guides to make sure they are adjusted to the width of the envelopes.
Note
Improperly adjusted guides may cause poor print quality, media jams, or printer damage.
9 Print the envelopes.
10 Open the flap of each envelope immediately (before it cools) after the envelope is delivered to the output tray.

Because the envelopes pass through heated rollers, the gummed area on the flaps may seal. Using envelopes with emulsion-based glue avoids this problem.
How do I load and print labels?
A label consists of a face sheet (the printing surface), adhesive, and a carrier sheet:
■ The face sheet must follow the plain paper specification.
■ The face sheet surface must cover the entire carrier sheet, and no adhesive should come through on the surface.
You can print continuously with label paper. However, this could affect the media feed, depending on the media quality and printing environment. If problems occur, stop the continuous print and print one sheet at a time.
Format label data within your application. Try printing your data on a plain sheet of paper first to check placement. Check your application documentation for other information on printing labels.
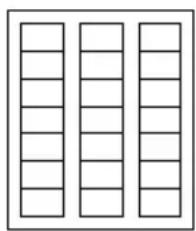
Do not use label sheets that
■ Have labels that easily peel off Labels may stick to the fuser, causing them to peel off and media jams to occur.
Are precut
Do not use
natural_image
Three vertical columns of empty rectangular boxes, no text or symbols present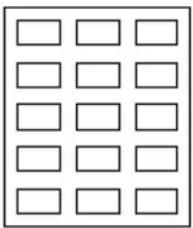
natural_image
Grid of empty rectangular boxes arranged in 4x4 pattern (no text or symbols)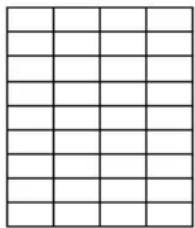
natural_image
Blank grid pattern with no text, numbers, or symbolsOK to use

natural_image
Empty white square with a thin black border (no text or symbols)Full page labels (uncut)
Use label sheets that are
■ Recommended for laser printers
1 In the printer driver (Setup tab/Media Type option), select Thick Paper.
2 Select the size of the label (Paper tab/Original Document Size option).
3 Load the label media lengthwise and printing-side up in Tray 1.
4 Adjust the paper guides to the width of the label media.
Note
Improperly adjusted guides may cause poor print quality, media jams, or printer damage.
5 Print the labels.
How do I load and print postcards?
Do not use postcards that are
Coated
■ Warped or bent
■ Designed for inkjet printers
■ Multicolored
■ Preprinted or multicolored (may result in printer jamming)
Use postcards that are
■ Postcards (100 × 148 mm/3.9 × 5.8 in.) recommended for laser printers
1 In the printer driver (Setup tab/Media Type option), select Postcard.
2 Select the size of the postcard (Paper tab/Original Document Size option).
3 Place the postcards on a flat surface, and flatten them by pressing down the corners.
4 Remove any media in Tray 1.
5 Load the postcard media lengthwise and printing-side up in Tray 1.
6 Adjust the paper guides to the width of the postcards.
Note
Improperly adjusted guides may cause poor print quality, media jams, or printer damage.
7 Print the postcards.
How do I load and print thick stock?
Test all thick stock to ensure acceptable performance and to ensure that the image does not shift.
Do not use thick stock that is
■ Mixed with any other media in the media trays (as this will cause printer jamming)
Note
Do not mix thick stock with any other media in the same tray, as this will cause printer jamming.
1 In the printer driver (Setup tab/Media Type option), select Thick Paper.
2 Select the size of the stock (Paper tab/Original Document Size option).
3 Load the thick stock media lengthwise and printing-side up in Tray 1.
4 Adjust the paper guides to the width of the thick stock.
Note
Improperly adjusted guides may cause poor print quality, media jams, or printer damage.
5 Print the thick stock.
How do I load and print transparencies?
Note
Using unsupported transparency media such as coated color transparencies will result in damaging the printer and in voiding your warranty.
Remove transparency media as soon as possible from the output tray to avoid static buildup.
If you touch the face of transparencies with your bare hands, print quality may be affected. Do not handle transparency media too much.
You can print continuously with transparencies. However, this could affect the media feed, depending on the media quality, static buildup, and printing environment. If you have problems loading a large number of transparencies at a time, try loading only 1–10 sheets.
Do not use transparencies that
■ Are coated, such as transparencies designed for color printers or copiers
■ Have static electricity that will cause them to stick together
Use transparencies that are
■ Monochrome, uncoated transparencies (also known as OHP film)
1 In the printer driver (Setup tab/Media Type option) select Transparency.
2 Select the size of the transparency (Paper tab/Original Document Size option).
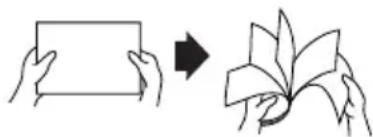
3 Fan a few transparencies.

Fanning a large number build up static elec- v.
natural_image
Illustration showing a hand holding a blank sheet and then folding out a leaf (no text or symbols)4 Load the transparency media lengthwise and printing-side up in Tray 1.
5 Adjust the paper guides to the width of the transparencies.
Note
Improperly adjusted guides may cause poor print quality, media jams, or printer damage.
6 Print the transparencies.
7 Immediately remove the printed transparencies from the output tray.
Manual Duplexing
Select paper with high opacity for duplex (2-sided) printing. For best results, print a small quantity to make sure the opacity is acceptable.
How do I manually duplex?

Media jams may occur if the printed sheet(s) reinserted are not entirely flat.
1 In the printer driver (Setup tab/Duplex/Booklet option), select the appropriate setting from Short Edge Binding, Long Edge Binding, Booklet Left Binding, or Booklet Right Binding.
2 From the print dialog box of your software, select the necessary settings and print all pages.
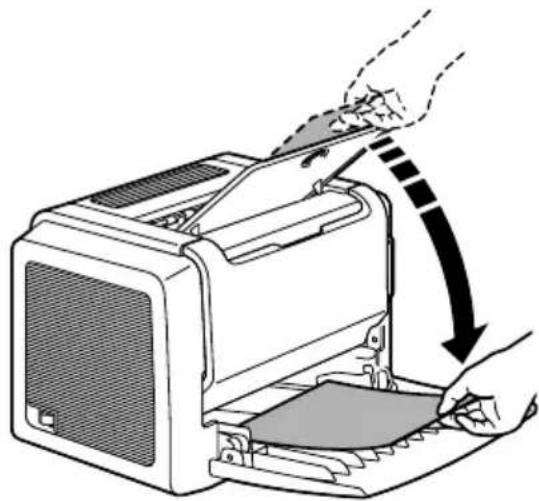
3 Remove the single-sided print-outs from the output tray, and then insert them into Tray 1 with the same orientation that they were fed out.
natural_image
Illustration of a printer being inserted into a paper holder, showing the printer's handle and paper holder (no text or symbols present)4 Click Proceed on the screen of your PC or press the Cancel button.
Replacing Consumables
6
When replacing a toner cartridge, refer to the following table. For optimum print quality and performance, use only approved KONICA MINOLTA toner cartridges for your specific printer type, as listed in the table below. If you open the front cover, you can find your printer type and the toner cartridge part numbers on the consumables reorder label inside the front cover of your printer.
For PagePro 1300W
| Printer Type | Printer Part Number | Toner Cartridge Type Toner Cartridge | Part Number |
| EU 525021 | 6-200 | Standard-Capacity Toner Cartridge 1710566-002 | |
| 5250216-400 | High-Capacity Toner Cartridge 1710567-002 | ||
| AP, GC 52 | 50216-350 | Standard-Capacity Toner Cartridge 1710566-003 | |
| 5250216-600 | High-Capacity Toner Cartridge 1710567-003 | ||
| JP 525021 | 6-300 Standard-C | capacity Toner Cartridge 1710566-004 | |
| High-Capacity Toner Cartridge 1710567-004 |
For PagePro 1350W
| Printer Type | Printer Part Number | Toner Cartridge Type Toner Cartridge | Part Number |
| AM 525021 | 17-100 Standard-Capacity Toner Cartridge 1710566-001 | ||
| High-Capacity Toner Cartridge 1710567-001 | |||
| EU 525021 | 17-2005250217-400 | Standard-Capacity Toner Cartridge 1710566-002 | |
| High-Capacity Toner Cartridge 1710567-002 | |||
| AP, GC 52 | 50217-3505250217-600 | Standard-Capacity Toner Cartridge 1710566-003 | |
| High-Capacity Toner Cartridge 1710567-003 | |||
| JP 525021 | 7-300 Standard-Capacity Toner Cartridge 1710566-004 | ||
| High-Capacity Toner Cartridge 1710567-004 |
Note
If the toner cartridge for a different region or an unapproved toner cartridge or a toner cartridge that is at the end of its life is used, cleaning will be performed after each page printed, which will reduce the printing speed.
Replacing the Toner Cartridge
When it is time to replace the toner cartridge, "Toner Low" displays in the Status Display. The supplies status indication in the Status Display is only a reference. Printing can continue even though the warning appears. However, printing gradually fades out, so replace the toner cartridge as soon as possible.

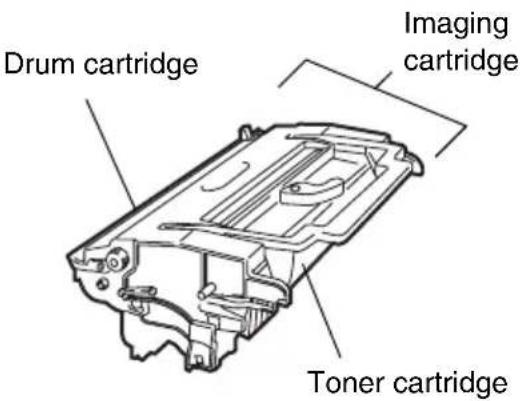
In this manual, a toner cartridge attached to a drum cartridge is referred to as an imaging cartridge.
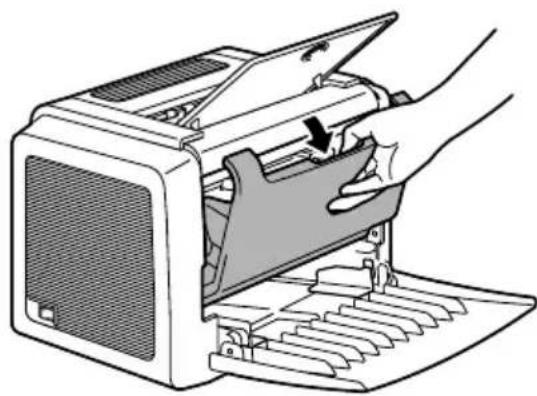
1 Grab the front cover grip and open the front cover.
natural_image
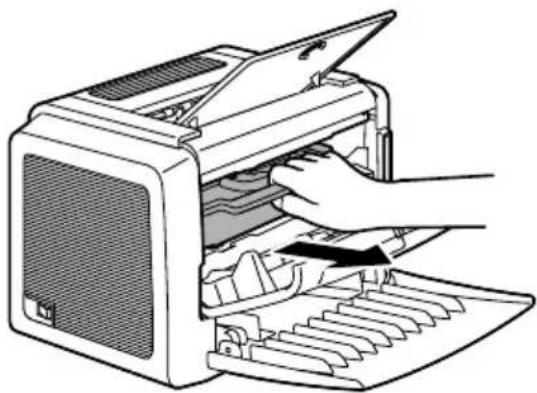
Illustration of a hand inserting a device into a computer case (no text or symbols visible)2 Pull the handle of the imaging cartridge toward you, and then pull out the imaging cartridge.
Note
Do not expose the imaging cartridge to light for a long period of time. If the drum cartridge is exposed to light, decreased image quality may result.
natural_image
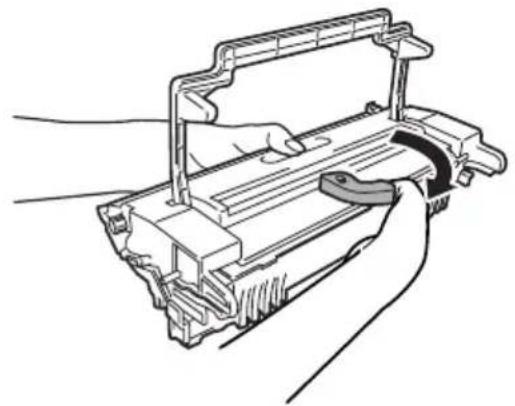
Illustration of a hand inserting a printer into a rack, showing internal structure (no text or symbols)3 Move the lever on the toner cartridge in the direction of the arrow.
natural_image
Line drawing of a hand holding a mechanical component with a handle (no text or symbols)4 Using both hands, separate the toner cartridge and drum cartridge.
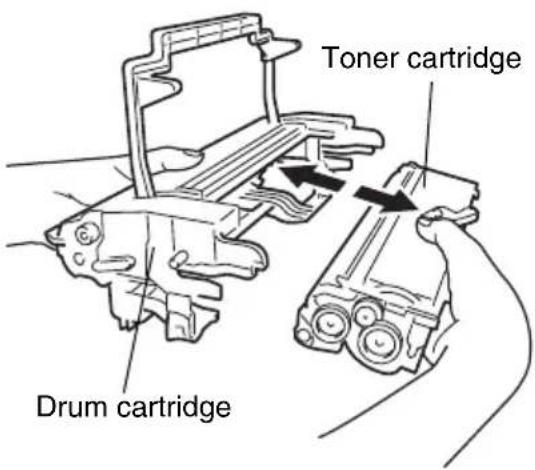
Note
When separating the toner cartridge and drum cartridge, keep them level.
Do not touch the OPC drum under the flap of the drum cartridge, otherwise decreased image quality may result.
Do not touch any metal parts of the drum cartridge and toner cartridge, otherwise damage from static electricity may result.
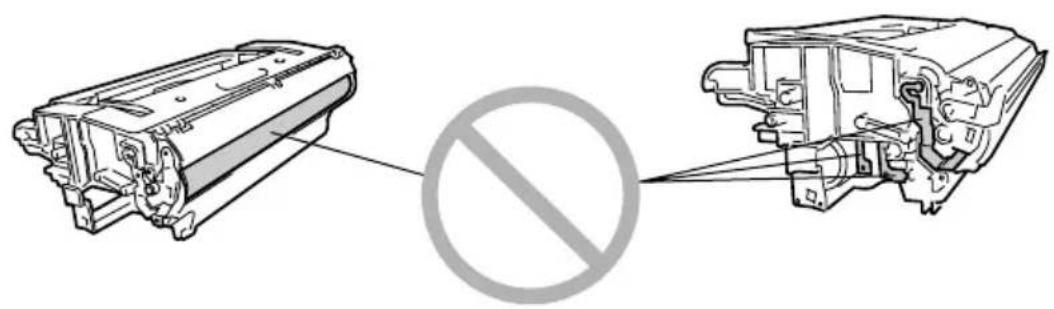
natural_image
Diagram showing a mechanical component with a prohibition symbol between two views (no text or labels present)5 Remove a new toner cartridge from its box.

Do not throw away the box. It may be used to pack the used toner car-ve.
6 Holding it firmly with both hands, rock the toner cartridge left and right, to distribute the toner evenly.
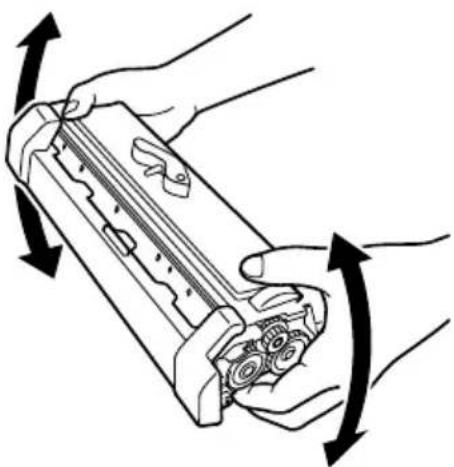
natural_image
Illustration of hands holding a device with directional arrows indicating rotation (no text or symbols)7 Remove the protective cover from the toner cartridge.
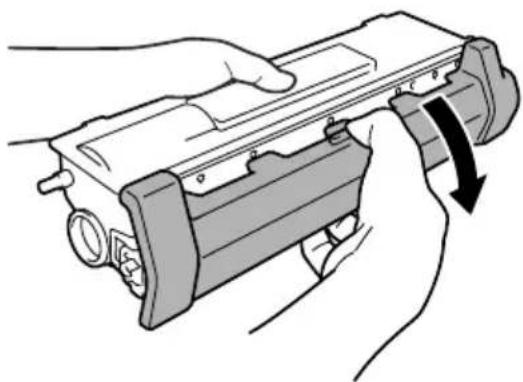
natural_image
Illustration of hands holding a mechanical device with a curved arrow indicating rotation (no text or symbols)Note
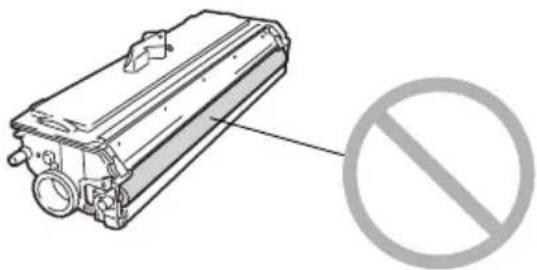
Do not touch the developing roller of the toner cartridge, otherwise decreased image quality may result.
natural_image
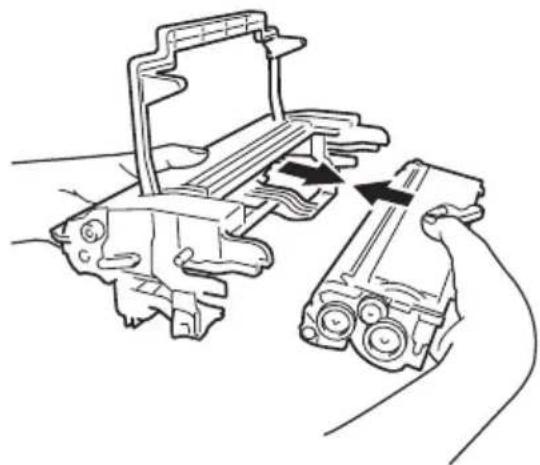
Diagram of a device with a prohibition symbol (no text or labels present)8 Holding both the toner cartridge and the drum cartridge in your hands, align the colored guide on the drum cartridge with the matching colored projection on the toner cartridge to fit the two cartridges together.
natural_image
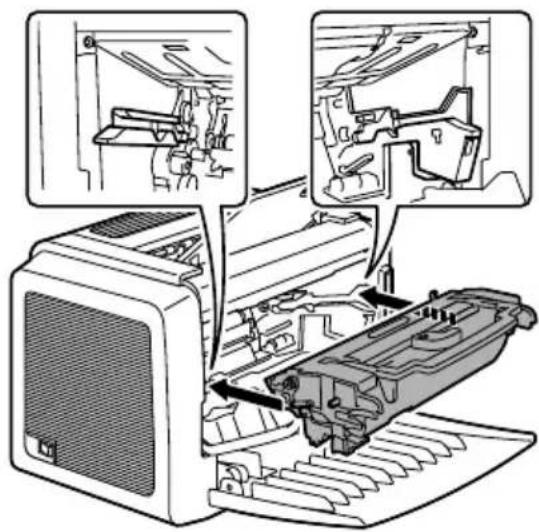
Diagram of a mechanical assembly with two components and directional arrows indicating movement (no text or symbols)9 Align the imaging cartridge with the guides in the printer, and then insert the cartridge.
Note
Do not insert the imaging cartridge at an angle or with extreme force, otherwise the printer may be damaged.
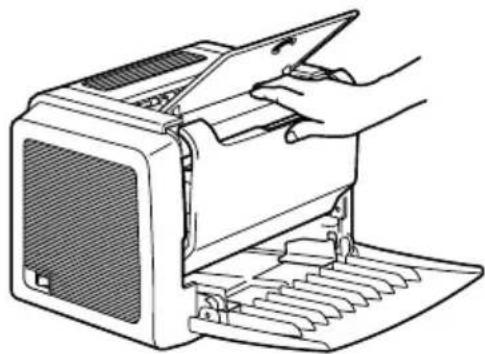
10 Press on the front cover grip and close the front cover.
natural_image
Line drawing of a hand inserting a card into a computer monitor (no text or symbols)11 Place the used toner cartridge into the box that came with the new toner cartridge.
Replacing the Drum Cartridge
When the printed documents become faint or blurred, the drum cartridge may be at the end of its life.
The drum cartridge has a capacity of about 16,000 (one-page jobs) to 20,000 (continuous printing) letter/A4 pages (at an average of 5% or less toner coverage).
Select the Print menu in the Status Display, print out the Configuration page (Print Config Page), and then check the total number of printouts.
Note
The OPC drum is extremely sensitive to bright light, direct sunlight, and touch. Always leave the drum cartridge in its protective package until you're ready to install it.


In this manual, a toner cartridge attached to a drum cartridge is an imaging cartridge.
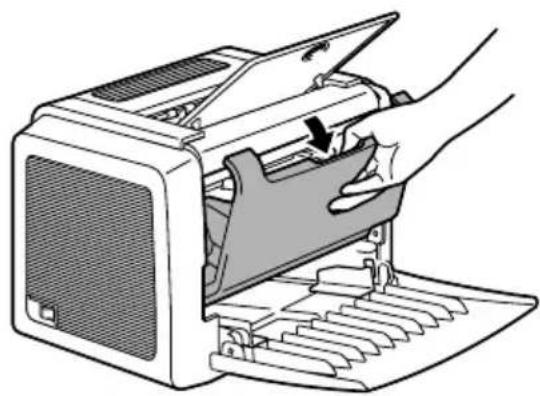
1
Grab the front cover grip and open the front cover.
natural_image
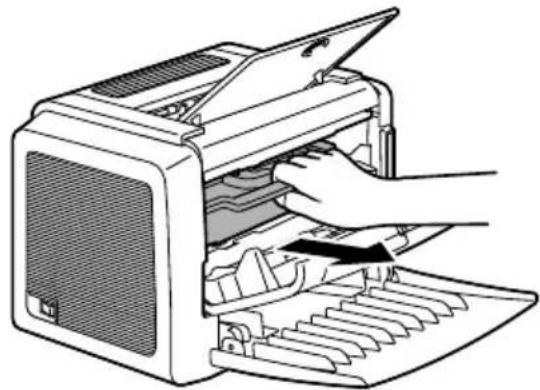
Illustration of a hand inserting a device into a computer case (no text or symbols visible)2 Pull the handle of the imaging cartridge toward you, and then pull out the imaging cartridge.
natural_image
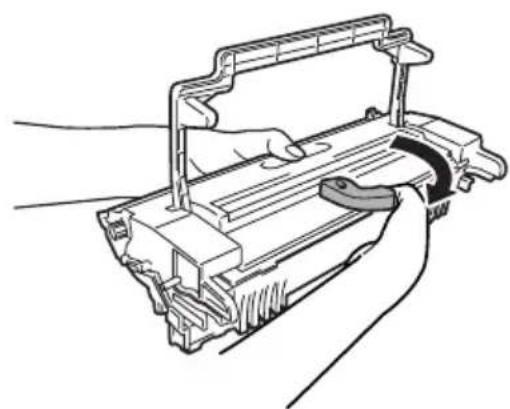
Illustration of a hand inserting a printer into an open device (no text or symbols visible)3 Move the lever on the toner cartridge in the direction of the arrow.
natural_image
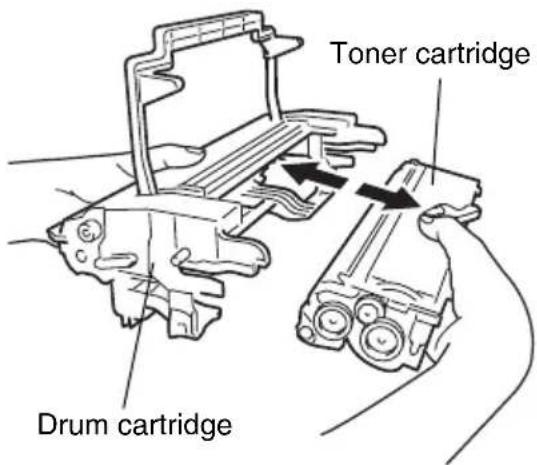
Line drawing of a hand holding a mechanical device with a handle and internal components (no text or symbols)4 Using both hands, separate the toner cartridge and drum cartridge.
Note
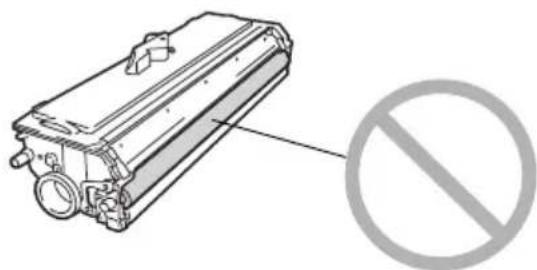
When separating the toner cartridge and drum cartridge, keep them level.
Do not touch the developing roller of the toner cartridge, otherwise decreased image quality may result.
natural_image
Technical line drawing of a mechanical component with a prohibition symbol (no text or labels present)5 Remove a new drum cartridge from its box.

Do not throw away the box. It will be used to pack the used drum cartridge.
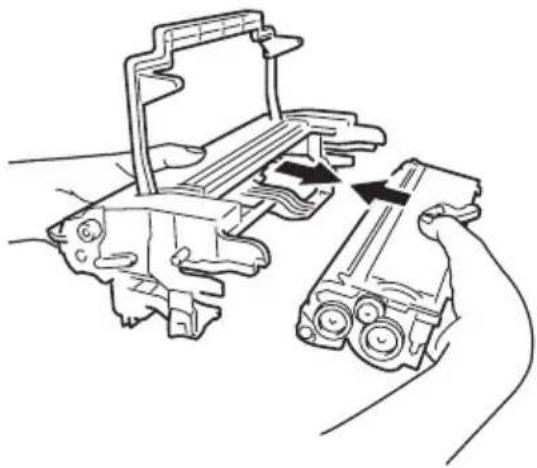
6 Holding both the toner cartridge and the drum cartridge in your hands, align the colored guide on the drum cartridge with the matching colored projection on the toner cartridge to fit the two cartridges together.
natural_image
Technical line drawing of a mechanical assembly with two components, one being inserted and the other being inserted into a cable (no text or symbols present)Note
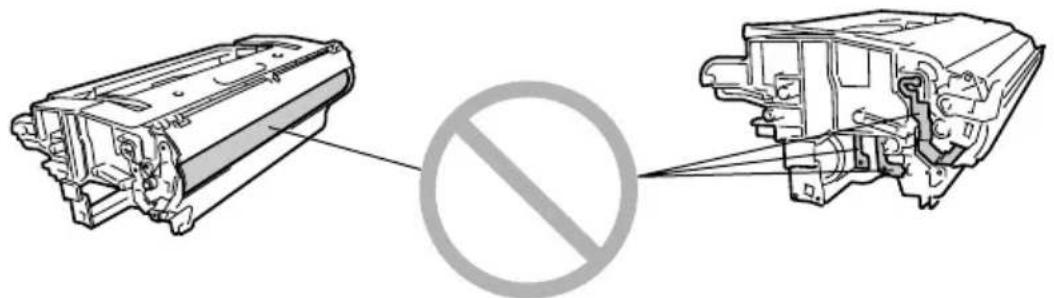
Do not touch the OPC drum under the flap of the drum cartridge, otherwise decreased image quality way result.
Do not touch any metal parts of the drum cartridge and toner cartridge, otherwise damage from static electricity may result.
natural_image
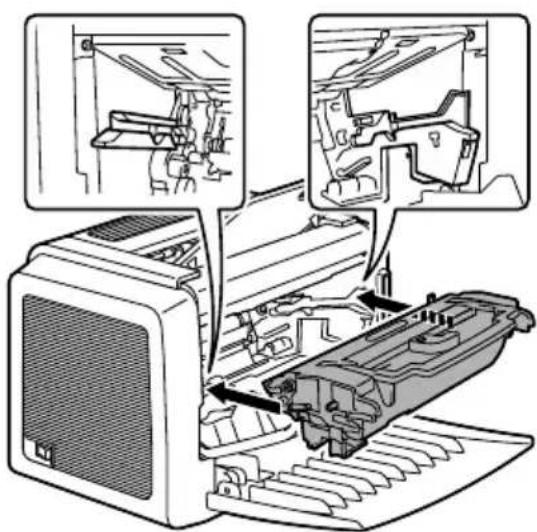
Diagram showing a mechanical component with a prohibition symbol between two views (no text or labels present)7 Align the imaging cartridge with the guides in the printer, and then insert the cartridge.
Note
Do not insert the imaging cartridge at an angle or with extreme force, otherwise the printer may be damaged.
natural_image
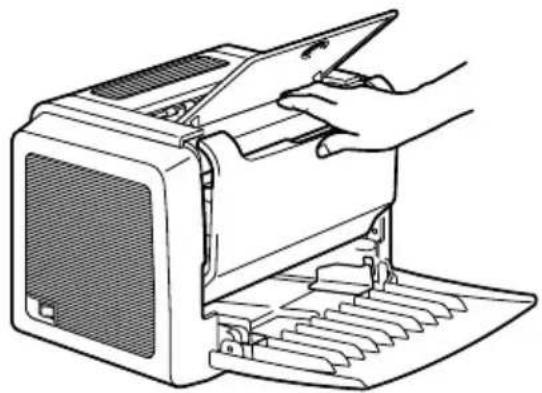
Diagram of a car air conditioner unit with internal components and three close-up views (no text or labels)8 Press on the front cover grip and close the front cover.
natural_image
Line drawing of a hand operating a desktop computer with a keyboard and scroll (no text or symbols)9 Place the used drum cartridge into the box that came with the new drum cartridge.
Maintaining the Printer
7
Cleaning the Printer
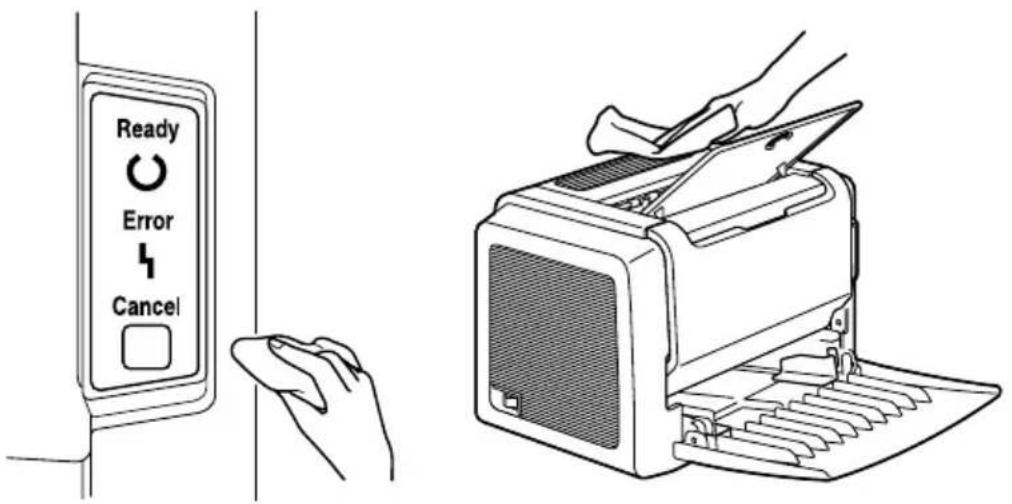
Exterior
Note
Never spray cleaning solutions directly on the printer's surface; the spray could penetrate through the air vents of the printer and damage the internal circuits.

CAUTION
Do not spill water or detergent into the printer; otherwise the printer will be damaged and an electric shock may occur.
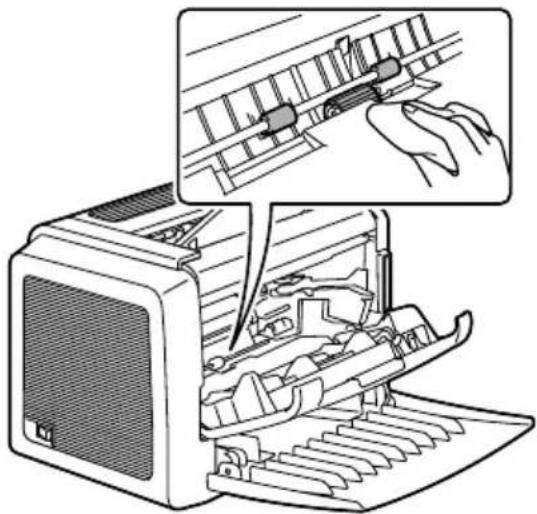
Pick-up Roller
1 Turn off the printer, unplug the power cord, and disconnect all interface cables before cleaning.
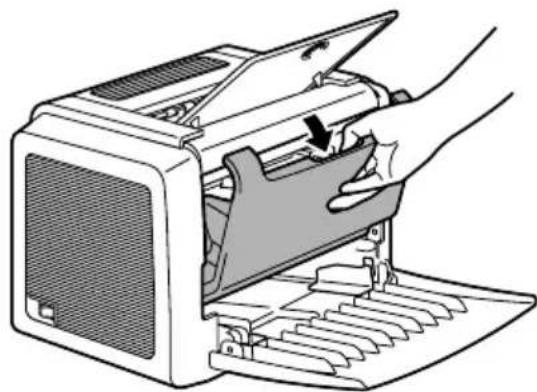
2 Grab the front cover grip and open the front cover.
natural_image
Illustration of a hand inserting a device into a computer case (no text or symbols visible)3 Pull the handle of the imaging cartridge toward you, and then pull out the imaging cartridge.
Note
Do not expose the imaging cartridge to light for a long period of time. If the drum cartridge is exposed to light, decreased image quality may result.
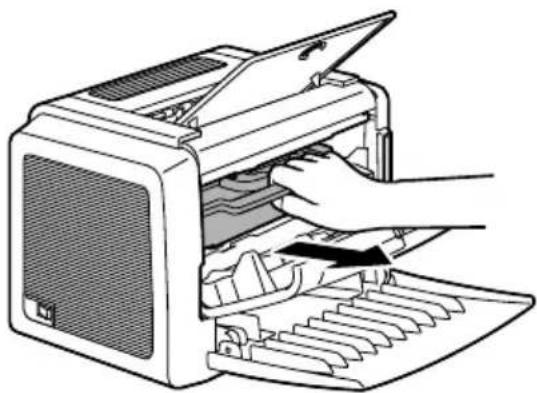
natural_image
Illustration of a hand inserting a printer into a rack (no text or symbols visible)
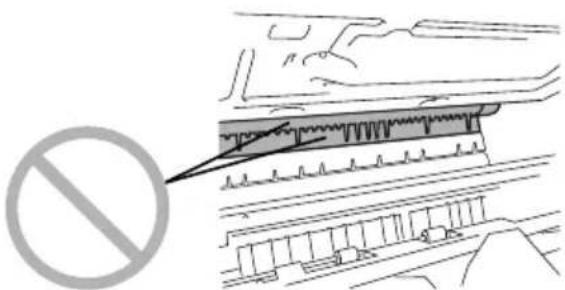
CAUTION
The fusing unit is extremely hot. Touching any part near the fusing unit may result in burns.

Do not touch the image transfer roller inside the printer, otherwise decreased image quality may result.
natural_image
Diagram showing a construction or excavation site with a no-smoking symbol (no text or labels present)4 Wipe the pick-up roller with a soft, dry cloth.
natural_image
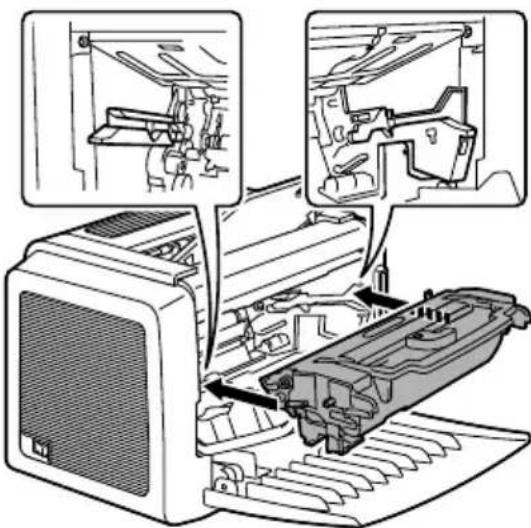
Diagram of a computer monitor with internal components and a magnified inset showing a hand adjusting the tray (no text or symbols present)5 Align the imaging cartridge with the guides in the printer, and then insert the cartridge.
Note
Do not insert the imaging cartridge at an angle or with extreme force, otherwise the printer may be damaged.
6 Press on the front cover grip and close the front cover.
natural_image
Line drawing of a hand operating a desktop computer with a keyboard (no text or symbols)Troubleshooting
8
Indicator Messages
The control panel indicators (Ready, Error) provide information about your printer and help you locate each problem.
Error Messages
These messages indicate errors which you must correct before a print job can continue or the printer status returned to "Ready".
| Ready indicator (green) | Error indicator (orange) | Condition Action | |
| Blinking Blinking Commu | nication Error. Check the printcable. | ||
| Video Under-run Turn off | the printer.After a few seconds,turn on the printer.Change to a lowerresolution. | ||
| Rapid blinking alter-nately | No media in the trayspecified in the printerdriver. | Load the appropriatetype of media intoTray 1. | |
| Media size errorIf the “Auto Continue”option has been acti-vated in the Status Dis-play, the sheet alreadyfed in, is automaticallyejected after a predeter-mined time. | Load the appropriatesize media into Tray 1. | ||
| Waiting for the ManualDuplex. | Load the second sideof the media. (Refer tothe “Manual Duplex-ing” on page 31.) | ||
| Waiting for a proof print P | Press the Cancel button if the proof print isacceptable. If it is notacceptable, hold downthe Cancel button formore than 5 secondsto cancel the currentjob. | ||
| Off Slow blinking | linking | Paper empty Load media | into Tray1. |
| Off Blinking | Media jam | clear the jam, close | the front cover, and then continue with the print job. |
| Off On Front | cover or top | cover is open. | Close the front cover or top cover. |
Service Messages
This message indicates a more serious fault that can only be corrected by a customer service engineer.
| Ready indicator (green) | Error indicator (orange) | Condition Action | |
| Off Rapid blinking | Fatal error Turn the printer | off, then on again. If the problem persists, contact your vendor or authorized service provider. | |
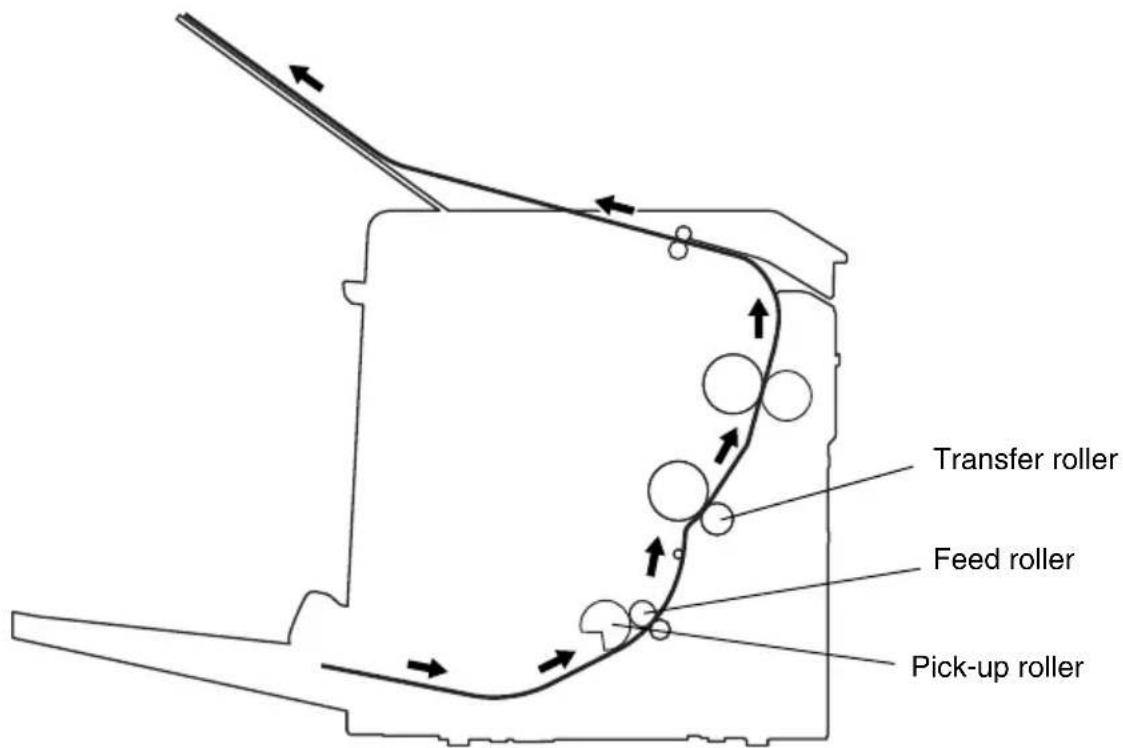
Clearing Jams
Understanding the printer's media path will help you locate media jams.
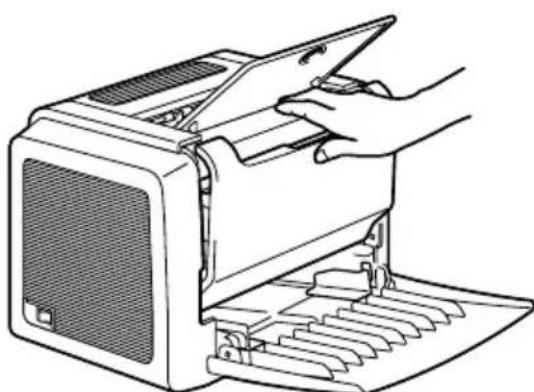
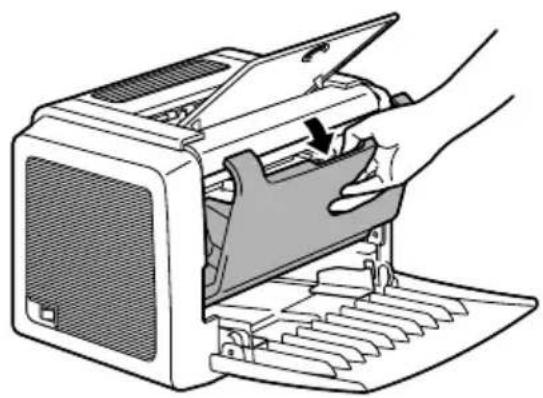
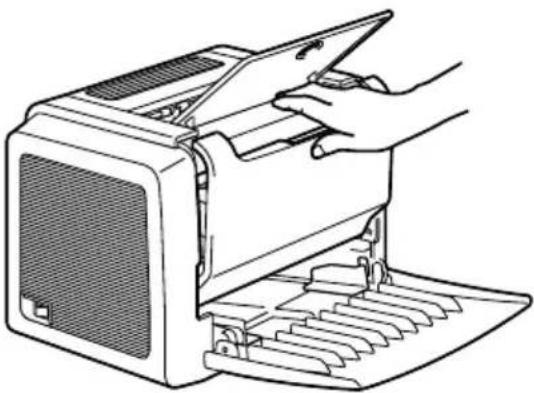
1 Grab the front cover grip and open the front cover.
natural_image
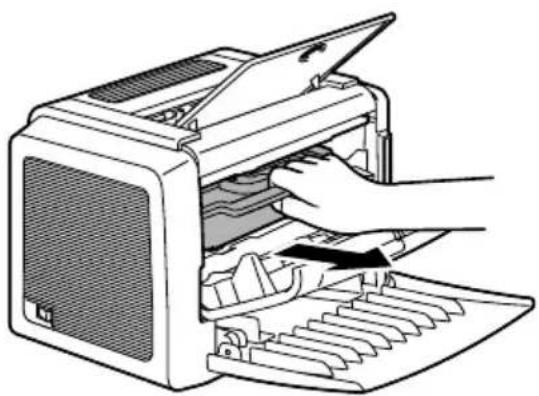
Illustration of a hand inserting a device into a computer case (no text or symbols visible)2 Pull the handle of the imaging cartridge toward you, and then pull out the imaging cartridge.
Note
Do not expose the imaging cartridge to light for a long period of time, otherwise decreased image quality may result.
natural_image
Illustration of a hand operating a printer into a rack with a handle (no text or symbols visible)3 Pull out the jammed media along the feeding direction.
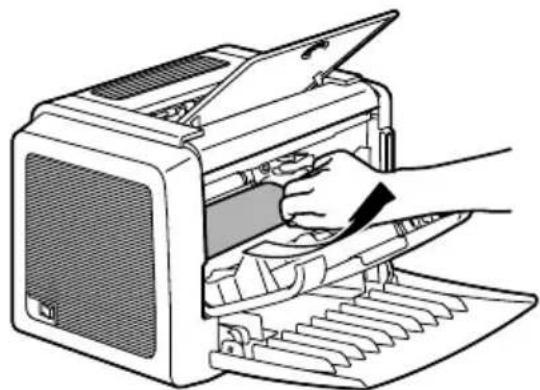
natural_image
Illustration of a hand inserting a printer into an open scanner (no text or symbols visible)Note
If media is jammed in the fusing unit, pull the media downward to remove it.
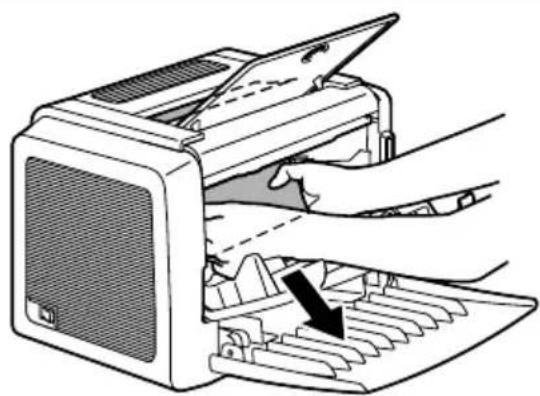
natural_image
Illustration of hands operating a computer with a keyboard and an open lid (no text or symbols)
CAUTION
The fusing unit is extremely hot. Touching any part near the fusing unit may result in burns.

Do not touch the image transfer roller inside the printer, otherwise decreased image quality may result.
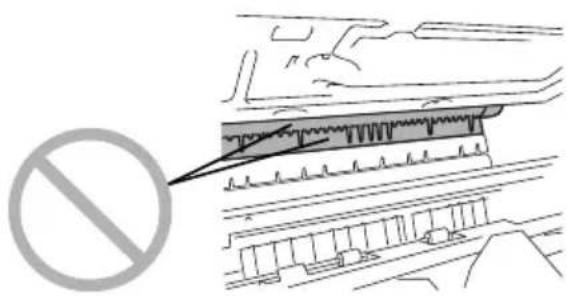
natural_image
Diagram showing a construction or excavation site with a no-smoking symbol (no text or labels present)4 Align the imaging cartridge with the guides in the printer, and then insert the cartridge.
Note
Do not insert the imaging cartridge at an angle or with extreme force, otherwise the printer may be damaged.
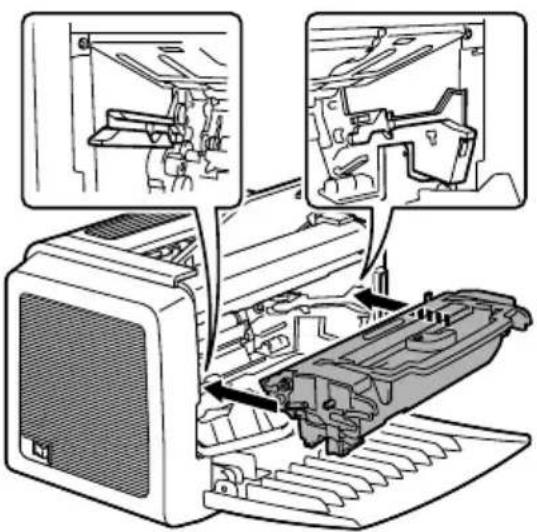
5 Press on the front cover grip and close the front cover.
natural_image
Line drawing of a hand operating a desktop computer with a scroll, showing the open lid and rack (no text or symbols)Solving Problems-Printing Quality
| Symptom Cause Solution | ||
Blank page The toner cartridge may be defective.  | Remove the toner cartridge and check it for damage. Replace the toner cartridge, if necessary. | |
Black page The toner cartridge may be defective.  | Remove the toner cartridge and check it for damage. Replace the toner cartridge, if necessary. | |
| Your printer may require servicing. | Contact your local vendor, or refer to the General Information Guide. | |
Print too light The toner cartridge may running out of toner. 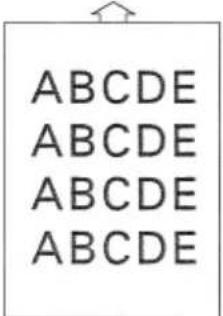 | Remove the toner cartridge and shake it left and right a few times to distribute remaining toner. If the problem persists, replace the toner cartridge. | |
| The toner cartridge may be defective. | Remove the toner cartridge and check it for damage. Replace the toner cartridge, if necessary. | |
| The “Contrast” and “Brightness” of an image is not set correctly in the printer driver. | In the printer driver, select the Quality tab and adjust the Contrast and Brightness and try printing again. | |
| Symptom Cause | Use Solution | |
Print too dark 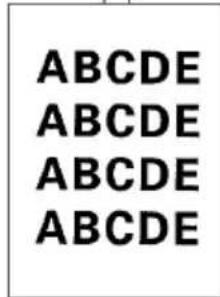 | The toner cartridge may be defective. | Remove the toner cartridge and check it for damage. Replace the toner cartridge, if necessary. |
| The “Contrast” and “Brightness” of an image is not set correctly in the printer driver. | In the printer driver, select theQualitytab and adjust theContrastand Brightnessand try printing again. | |
Blurred background 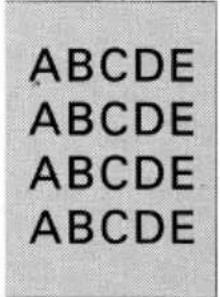 | The toner cartridge may be defective. | Remove the toner cartridge and check it for damage. Replace the toner cartridge, if necessary. |
Uneven print density 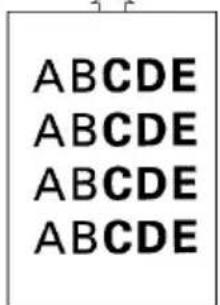 | The toner may be unevenly distributed inside the toner cartridge. | Remove the toner cartridge and shake it left and right a few times to distribute remaining toner. |
| The toner cartridge may be defective. | Remove the toner cartridge and check it for damage. Replace the toner cartridge, if necessary. | |
| The image transfer roller may be defective. | Contact your local vendor. | |
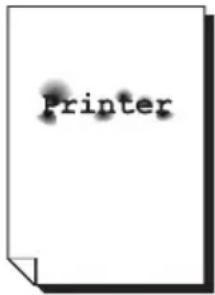
Irregularities The 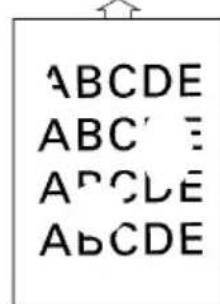 | The media may have absorbed some moisture due to high humidity or because of direct contact with water. | Since toner will not adhere well to wet media, replace the media you are using with dry media and try printing again. |
White or black lines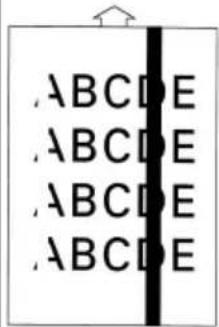 | The toner cartridge may be defective. | Remove the toner cartridge and check it for damage.Replace the toner cartridge, if necessary. |
Dark lines on the edges. | The transfer roller is dirty. Contact your local vendor. | |
Toner smudges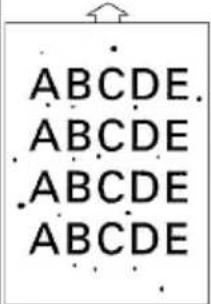 | The toner may be unevenly distributed inside the toner cartridge. | Remove the toner cartridge and shake it left and right a few times to distribute remaining toner. |
| The toner cartridge may be defective. | Remove the toner cartridge and check it for damage.Replace the toner cartridge, if necessary. | |
| Smudges on the media indicate a dirty feed roller. | Contact your local vendor. | |
| There is insufficient fusing or the image comes off when rubbed. | The media is moist from humidity. | Remove the moist media and replace it with new, dry media. |
| Media with specifications not covered by the printer warranty is being used. | Use media that is covered by the printer warranty. | |
 | The media type may be incorrectly set. | When printing envelopes, labels, thick stock, and transparencies, the appropriate media type must be specified in the printer driver. |
Appendix
A
Safety Specifications
| Printer | ||
| Safety standards U | S. model UL 60950 | CSA C22.2 No. 60950 |
| European model E | EU Directive 73/23/EEC EU Directive 93/68/EEC EN 60950 (IEC 60950) | |
| China model GB 4 | 943 | |
| EMC standards U.S. | model FCC part 1 | 5 subpart B class B ICES-003 |
| European model E | EU Directive 89/336/EEC EN 55022 (CISPR Pub. 22) class B EN 61000-3-2 EN 61000-3-3 | |
| China model GB 9 | 254 class B, GB 17625.1 | |
| Australian model AS/NZS 3548 class B | ||
Technical Specifications
Printer
| Type Desktop laser beam printer | |
| Print system Electrostatic dry powder imaging system | |
| Exposure system Laser diode + polygon mirror scanning | |
| Developing system Electrophotographic printing system | |
| Resolution 1200dpi × 1200dpi (at half speed),600dpi × 600dpi or 1200dpi × 600dpi | |
| Print speed 600dpi | × 600dpi or 1200dpi × 600dpiPagePro 1300W:16 pages per minute for A417 pages per minute for letterPagePro 1350W:20 pages per minute for A421 pages per minute for letter1200dpi × 1200dpi10 pages per minute for A4 or letter |
| First print 1200dpi × 600 dpi | Within 13 seconds (A4/Letter)1200dpi × 1200 dpiWithin 22 seconds (A4/Letter) |
| Warm-up time 21 seconds or less at startup | |
| Media sizes • Paper—Letter | Legal, Executive, G Letter,Statement, Folio, Letter Plus, UK Quarto,Foolscap, G Legal, 16K, A4, A5, B5 JIS, Chinese 16K, Chinese 32K, custom paper sizesEnvelopes—#10, Monarch, DL, C5, C6, B5 (ISO), Choukei-3Gou and Choukei-4GouPostcard, Double Postcard |
| Paper/Media | Plain paper (60 to 90g/m2; 16 to 24 lb.)Recycled paper (60 to 90g/m2; 16 to 24 lb.)TransparenciesEnvelopesThick paper (90 to 163g/m2; 24 to 43 lb.)P o s t c a r dLetterheadLabel sheet |
| Paper feeding • Tray 1 | |
| Input capacity • Tray 1: 150 | sheets |
| Output capacity • Output tray | 100 sheets |
| Operating temperature 10° | to 35°C (50° to 95°F) |
| Operating humidity 15 to 85% | |
| Power supply 110-127 V, 50-60 Hz | 220-240 V, 50-60 Hz |
| Power consumption 120 V: | 900 W220-240 V: 900 W |
| Amperage 120 V: 8.0 A or less | 220-240 V: 4.5 A or less |
| Acoustic Noise Printing: 54 | dB or lessStandby: 35 dB or less |
| External dimensions (with Tray1 and the output tray closed) | Height: 283 mm (11.1 in.)Width: 387 mm (15.2 in.)Depth: 291 mm (11.5 in.) |
| Weight | Printer: approximately 6kg (13.2 lb.)Drum cartridge: approximately 0.3kg (0.7 lb.)Toner cartridge: approximately 0.5kg (1.1 lb.) |
| Interface IEEE 1284 compliant type B (Compatible/Nibble/ECP) USB Revision 1.1 compliant | |
| CPU Naltec N1 chip | |
| Standard memory 8 MB | |
Parallel Interface Connectors and Cable
| Connectors Printer: Parallel | 36-pin connectorComputer: EIA 25-pin connector |
| Cable type Shielded | Each signal and earth pair should be twisted |
| Pin assignments IEEE 1284 | compliant type B connector |
USB Interface Connectors and Cable
| Connectors Printer: Series B | B plugComputer: Series A plug |
| Cable type Require twisted | data conductors or a shielded |
| Pin assignments 1: V | BUS2: D+3: D-4: GND Shell: Shield |
Consumables Life Expectancies Chart
| Item Average Life Expectancy (in Simplex Pages) | |
| Toner Cartridge At 5% coverage, using A4-size mediaStarter Cartridge = 1,500 printingReplacement Cartridge = 3,000 continuous printing or 2,400 intermittent printing.6,000 continuous printing or 4,800 intermittent printing. | |
| Drum cartridge 16,000 intermittent printing(for example, one-page jobs)20,000 continuous printing |
Our Concern for Environmental Protection

As an ENERGY STAR® Partner, we have determined that this machine meets the ENERGY STAR Guidelines for energy efficiency.
What is an ENERGY STAR product?
An ENERGY STAR product has a special feature that allows it to automatically switch to a “low-power mode” after a period of inactivity. An ENERGY STAR product uses energy more efficiently, saves you money on utility bills and helps protect the environment.
CE Marking (Declaration of Conformity)
For European Users
This product complies with the following EU directives: 89/336/EEC, 73/23/EEC, and 93/68/EEC directives.
This declaration is valid for the areas of the European Union (EU) only.
This device must be used with a shielded parallel interface cable and shielded USB interface cable. The use of non-shielded cables is likely to result in interference with radio communications and is prohibited under 89/336/EEC rules.
CISPR 22 and Local Rules
This device must be used with a shielded parallel interface cable and shielded USB interface cable.
The use of non-shielded cables is likely to result in interference with radio communications and is prohibited under CISPR 22 and local rules.
Acoustic Noise
Machine Noise Regulation 3 GSGV, 18.01.1991: The sound pressure level at the operator position according to EN27779 is equal to or less than 70dB (A).
Safety Information
This section contains detailed instructions on the operation and maintenance of this machine. To achieve optimum utility of this device, all operators should carefully read and follow the instructions in this manual.
Please read the next section before using this device. It contains important information related to user safety and preventing equipment problems.
Make sure you observe all of the precautions listed in this manual.
■ Note that some parts of the contents of this section may not correspond with the purchased product.
Warning and Precaution Symbols
| ⚠ WARNING | Ignoring this warning could cause serious injury or even death. |
| ⚠ CAUTION | Ignoring this caution could cause injury or damage to property. |
Meaning of Symbols

A triangle indicates a danger against which you should take precaution.

This symbol warns against cause burn.

A diagonal line indicates a prohibited course of action.

This symbol warns against dismantling the device.

A black circle indicates an imperative course of action.

This symbol indicates you must unplug the device.
 | ·Do not modify this product, as a fire, electrical shock, or breakdown could result. If the product employs a laser, the laser beam source could cause blindness.·Do not attempt to remove the covers and panels which have been fixed to the product. Some products have a high-voltage part or a laser beam source inside that could cause an electrical shock or blindness. |
 | ·Only use the power cord supplied in the package. Failure to use this cord could result in a fire or electrical shock.·Use only the specified power source voltage. Failure to do that could result in a fire or electrical shock.·Do not use a multiple outlet adapter to connect any other appliances or machines. Use of a power outlet for more than the marked current value could result in a fire or electrical shock. |
 | ·Do not unplug and plug in the power cord with a wet hand, as an electrical shock could result. |
 | ·Plug the power cord all the way into the power outlet. Failure to do this could result in a fire or electrical shock. |
  | ·Do not scratch, abrade, place a heavy object on, heat, twist, bend, pull on, or damage the power cord. Use of a damaged power cord (exposed core wire, broken wire, etc.) could result in a fire or breakdown. Should any of these conditions be found, immediately turn OFF the power switch, unplug the power cord from the power outlet, and then call your authorized service representative.·In principle, do not use an extension cord. Use of an extension cord could cause a fire or electrical shock. Contact your authorized service representative if an extension cord is required.·Do not place a flower vase or other container that contains water, metal clips or other small metallic objects on this product. Spilled water or metallic objects dropped inside the product could result in a fire, electrical shock, or break-down.·Should a piece of metal, water, or any other similar foreign matter get inside the product, immediately turn OFF the power switch, unplug the power cord from the power outlet, and then call your authorized service representative. |
 | ·If this product becomes inordinately hot or emits smoke, or unusual odor or noise, immediately turn OFF the power switch, unplug the power cord from the power outlet, and then call your authorized service representative. If you keep on using it as is, a fire or electrical shock could result.·If this product has been dropped or its cover damaged, immediately turn OFF the power switch, unplug the power cord from the power outlet, and then call your authorized service representative. If you keep on using it as is, a fire or electrical shock could result. |
 | ·Do not throw the toner cartridge or toner into an open flame. The hot toner may scatter and cause burns or other damage. |
 | ·Connect the power cord to an electrical outlet that is equipped with a grounding terminal. |

- Do not use flammable sprays, liquids, or gases near this product, as a fire could result.
- Do not leave a toner unit or drum unit in a place within easy reach of children.
Licking or ingesting any of these things could injure your health. - Do not let any object plug the ventilation holes of this product. Heat could accumulate inside the product, resulting in a fire or malfunction.
- Do not install this product at a site that is exposed to direct sunlight, or near an air conditioner or heating apparatus. The resultant temperature changes inside the product could cause a malfunction, fire, or electrical shock.
- Do not place the product in a dusty place, or a site exposed to soot or steam, near a kitchen table, bath, or a humidifier. A fire, electrical shock, or breakdown could result.
- Do not place this product on an unstable or tilted bench, or in a location subject to a lot of vibration and shock. It could drop or fall, causing personal injury or mechanical breakdown.
- After installing this product, mount it on a secure base. If the unit moves or falls, it may cause personal injury.
- Do not store toner units and PC drum units near a floppy disk or watch that are susceptible to magnetism. They could cause these products to malfunction.
- Do not place any objects around the power plug as the power plug may be difficult to pull out when an emergency occurs.
- Do not touch the electrical contacts that are located inside the top cover and underneath the cartridge as an electrostatic discharge may damage the printer.
- The inside of this product has areas subject to high temperature, which may cause burns. When checking the inside of the unit for malfunctions such as a paper misfeed, do not touch the locations (around the fusing unit, etc.) which are indicated by a “Caution! Hot Surface” caution label.


- The socket-outlet shall be installed near the machine and shall be easily accessible as the power plug may be difficult to pull out when an emergency occurs.
- Always use this product in a well ventilated location. Operating the product in a poorly ventilated room for an extended period of time could injure your health. Ventilate the room at regular intervals.
- Whenever moving this product, be sure to disconnect the power cord and other cables. Failure to do this could damage the cord or cable, resulting in a fire, electrical shock, or breakdown.
- When moving this product, always hold it by the locations specified in the user manual or other documents. If the unit falls it may cause severe personal injury. The product may also be damaged or malfunction.
- Remove the power plug from the outlet more than one time a year and clean the area between the plug terminals. Dust that accumulates between the plug terminals may cause a fire.
- When unplugging the power cord, be sure to hold onto the plug. Pulling on the power cord could damage the cord, resulting in a fire or electrical shock.
Working Safely with your Laser Printer
Notes on your Safety and Operating Safety
Working improperly with the printer can result in health hazards, electric shocks and even fires. Before you unpack the laser printer, you should make yourself familiar with this information on your safety and operating safety.

CAUTION
Observe the following information:
■ Make sure that the power cord is correctly plugged into the socket and that the socket is at all times visible and readily accessible.
■ Do not pull on the cord to pull the power plug out of the socket as this may damage the cord. The result could be an electric shock or a fire.
■ Remove the power plug from the socket if the machine will not be in use for an extended period of time.
- Do not remove the power cord from the socket with wet hands as this may result in an electric shock.
- Do not move the unit unless the power cord has been removed from the socket. Otherwise you may damage the cord. The result could be a short-circuit or a fire.
- Do not place any heavy objects on the power cord. Do not pull or kink the cord as this can result in damage to the cord. The result could be an electric shock or a fire.
■ Make sure that the machine is not standing on a cord to another machine as this can result in damage to that cord. The result could be a fire or improper functioning of the unit in question.
■ Make sure that the power supply to the unit has the correct voltage. Otherwise the result could be a fire or an electric shock.
■ Switch off the unit immediately and unplug the power cord if the power supply cord is damaged. Failure to do so could result in a fire or an electric shock. Inform your customer support technical specialist.
■ Use only extension cords that are designed for at least the maximum power rating of the machine. Extension cords with lower ratings can result in the unit overheating and can even lead to a fire.
■ Perform only the procedures that are described in this manual. Using the machine improperly can result in a fire or an electric shock.
■ Do not place any heavy objects on the machine.
■ Do not open any covers on the machine while printing is in progress.
■ Do not switch off the unit while printing is in progress.
■ Do not place any magnetic objects near the machine.
■ Do not use any flammable sprays, liquids or gases in the vicinity of the machine. - Do not remove any safety devices and do not alter the construction of the machine. The unit is equipped with high-voltage components. Using the machine improperly can result in a fire or an electric shock.
- Do not insert any paper clips, staples or other small metal objects into openings on the machine. The result could be an electric shock or a fire. If metal pieces are fed into the machine, switch it off immediately, disconnect the power cord and inform your customer support technical specialist.
■ Do not place coffee cups, drinks bottles or other containers with liquids in them on the machine. If liquid enters the machine the result could be an electric shock or a fire. If liquid does get into the machine, switch it off immediately, disconnect the power cord and inform your customer support technical specialist.
If the machine becomes unusually hot, or if you notice smoke or an unusual odor coming from the machine, switch it off immediately and
remove the power cord from the socket. Inform your customer support technical specialist.
Laser Safety
This printer is a page printer which operated by means of a laser. There is no possibility of danger from the laser, provided the printer is operated according to the instructions in this manual.
Since radiation emitted by the laser is completely confined within protective housings and external covers, the laser beam cannot escape from the machine during any phase of user operation.
Internal Laser Radiation
Maximum average radiation power:
36.903μW at the laser aperture of the print head unit.
Wavelength: 770-800 nm
This product employs a Class 3b laser diode that emits an invisible laser beam.
The laser diode and the scanning polygon mirror are incorporated in the print head unit.
The print head unit is NOT A FIELD SERVICEABLE ITEM.
Therefore, the print head unit should not be opened under any circumstances.

WARNING!
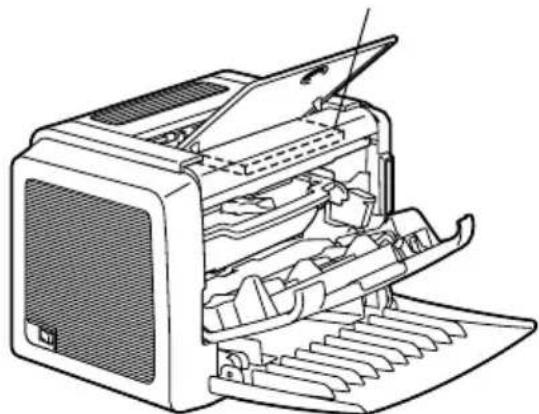
The print head unit is NOT A FIELD SERVICE ITEM. Therefore, the print head unit should not be opened under any circumstances.
Laser aperture of the print head unit.
natural_image
Line drawing of an open industrial machine with internal components and a handle (no text or symbols)Laser Safety Label
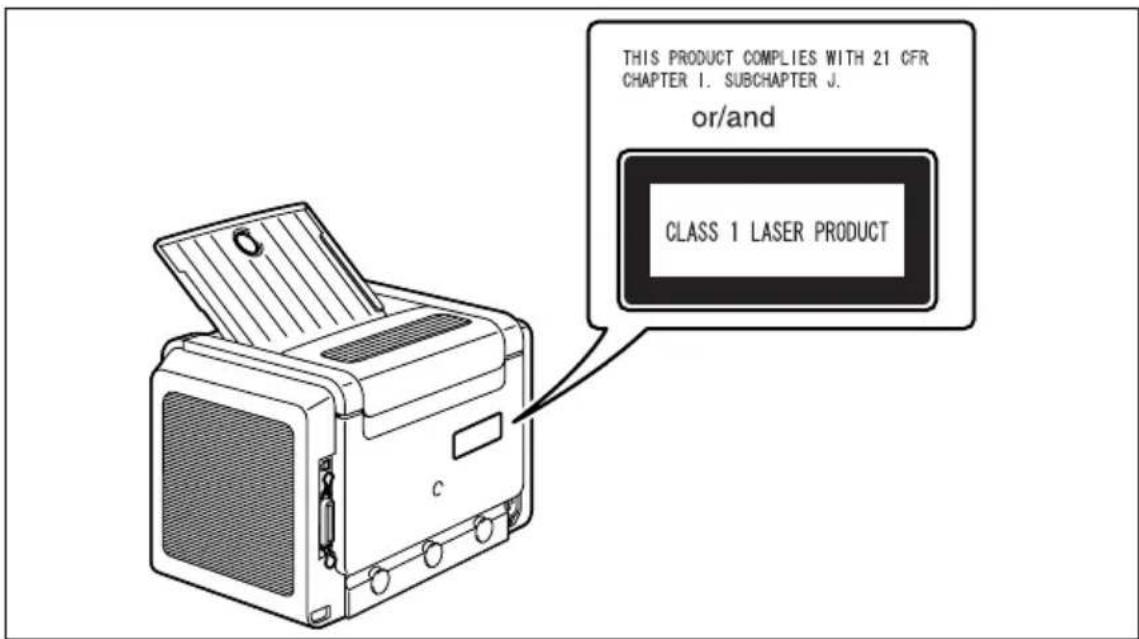
A laser safety label is attached to the outside of the machine as shown below.
For United States Users
CDRH Regulations
This printer is certified as a Class 1 laser product under the Regulation Performance Standard according to the Food, Drug, and Cosmetic Act of 1990. Compliance is mandatory for laser products marketed in the United States, and is reported to the Center for Devices and Radiological Health (CDRH) of the U.S. Food and Drug Administration (FDA) of the Department of Health and Human Services (DHHS). This means that the product does not produce hazardous laser radiation.
The label shown above indicated compliance with the CDRH regulations and must be attached to laser products marketed in the United States.
CAUTION
Use of controls, adjustments, or performance of procedures other than those specified in this manual may result in hazardous radiation exposure.
This is a semiconductor laser. The maximum power of the laser diode is 15 mW, and the wavelength is 770–800 nm.
For Users in All Countries
CAUTION
Use of controls, adjustments or performance of procedures other than those specified in this manual may result in hazardous radiation exposure.
This machine is certified as a Class 1 laser product. This means that the machine does not produce hazardous laser radiation.
This is a semiconductor laser. The maximum power of the laser diode is 15 mW and the wavelength is 770-800 nm.
For Denmark Users
ADVARSEL
For Finland, Sweden Users
LOUKAN 1 LASERLAITE
KLASS 1 LASER APPARAT
VAROITUS!
During printer operation, a small quantity of ozone is released. This amount is not large enough to harm anyone adversely. However, be sure the room where the machine is being used has adequate ventilation, especially if you are printing a high volume of materials, or if the machine is being used continuously over a long period.
Index
C
CE Marking 63
Cleaning
Exterior 46
Take-up Roller 47
D
Drum cartridge
Replacing 40
Duplex 31
I
Indicator 3
Error messages 50
Service messages 51
Status message 4
Installing
USB Device driver 8, 9
Interference-causing equipment
standard 63
L
Laser
CDRH 71
Internal laser radiation 70
Laser safety 70
Laser safety label 71
Loading
Media 21, 24
M
Manual Duplexing 31
Media
Clearing jams 52
Loading 21, 24
Size 20
Storage 21
Type 21
Weight 20
P
Page margins 23
Paper tab 14
Printable area 23
Printer
Parts 2
Printer driver 13
Paper tab 14
Quality tab 14
Setting 12
Setup tab 14
Printing
Envelope 25
Label 27
Postcard 28
Thick stock 29
Transparency 30
Q
Quality tab 14
S
Safety information 64
Setup tab 14
Status display
Closing 18
Opening 16
Using 16
T
Toner cartridge
Replacing 35
Troubles shooting 49
Clearing jams 52
U
USB
USB Device driver 8, 9
- PagePro™1300W/1350W User's Guide
- Contents
- Getting Acquainted with Your Printer 2
- About the Indicator Functions 3
- Installing the USB Device Driver 8
- Installing the Printer Driver 9
- Displaying Printer Driver Settings 12
- Using the Printer Driver 13
- Working with the Status Display ....15
- Working with the Status Display 16
- Recognizing Status Display Alerts 17
- Recovering from a Status Display Alert 17
- Closing the Status Display 18
- Using Media ....19
- About Media 20
- Loading Media 24
- Printing on Media 25
- Manual Duplexing 31
- Introduction
- 1
- Getting Acquainted with Your Printer
- Printer Parts
- Front View
- Rear View
- About the Indicator Functions
- Indicator Functions
- Continuing a Print Job after an Error Message
- Cancelling a Print Job
- Status Message
- Note
- Software Installation
- 2
- Installing the USB Device Driver
- Installing the USB Device Driver under Windows Me and 98
- Installing the Printer Driver
- Installing from the CD-ROM
- Working with the Printer Driver
- 3
- Displaying Printer Driver Settings
- Displaying Settings under Windows XP
- Displaying Settings under Windows 2000/Me/98
- Using the Printer Driver
- Common Buttons
- OK
- Cancel
- Apply
- Help
- Easy Set
- Page Layout
- Printer Figure
- Setup Tab
- Paper Tab
- Quality Tab
- Device Options Setting Tab
- Working with the Status Display
- 4
- Environment
- Opening the Status Display and Showing the Supplies Status
- Altering the Size of the Status Display Window
- Using the Status Display
- Recognizing Status Display Alerts
- Recovering from a Status Display Alert
- Closing the Status Display
- Using Media
- 5
- What type and amount of media can I load?
- Media Storage
- When storing media, avoid
- Media Not Suitable for Printing
- Use media that is
- What Is the guaranteed imageable (printable) area?
- Page Margins
- Loading Media
- How do I refill Tray 1?
- Printing on Media
- How do I load and print custom media?
- Do not use custom media that does not have approved dimensions
- How do I load and print envelopes?
- Do not use envelopes that have
- Use envelopes that are
- How do I load and print labels?
- Do not use label sheets that
- Use label sheets that are
- How do I load and print postcards?
- Do not use postcards that are
- Use postcards that are
- How do I load and print thick stock?
- Do not use thick stock that is
- How do I load and print transparencies?
- Do not use transparencies that
- Use transparencies that are
- Manual Duplexing
- How do I manually duplex?
- Replacing Consumables
- 6
- Replacing the Toner Cartridge
- Replacing the Drum Cartridge
- Maintaining the Printer
- 7
- Cleaning the Printer
- Exterior
- CAUTION
- Pick-up Roller
- Troubleshooting
- 8
- Indicator Messages
- Error Messages
- Service Messages
- Clearing Jams
- Solving Problems-Printing Quality
- Appendix
- A
- Safety Specifications
- Technical Specifications
- Our Concern for Environmental Protection
- What is an ENERGY STAR product?
- CE Marking (Declaration of Conformity)
- For European Users
- CISPR 22 and Local Rules
- Acoustic Noise
- Safety Information
- Warning and Precaution Symbols
- Meaning of Symbols
- Working Safely with your Laser Printer
- Notes on your Safety and Operating Safety
- Observe the following information:
- Laser Safety
- Internal Laser Radiation
- WARNING!
- Laser Safety Label
- For United States Users
- CDRH Regulations
- For Users in All Countries
- For Denmark Users
- ADVARSEL
- For Finland, Sweden Users
- VAROITUS!
- Index
- C
- D
- I
- L
- M
- P
- Q
- S
- T
- U
Brand : KONICA MINOLTA
Model : PagePro 1350W
Category : Printer