
DE410 IP PRO - Telephone GIGASET - Free user manual and instructions
Find the device manual for free DE410 IP PRO GIGASET in PDF.


| Product Type | IP Phone for Business |
| Brand | Gigaset |
| Model | DE410 IP PRO |
| Display | Graphic LCD with backlight |
| Network Connectivity | Ethernet 10/100 Mbps |
| Power over Ethernet (PoE) | IEEE 802.3af PoE Class 1 |
| Power Adapter (Optional) | 5V DC, 1A |
| Audio Codecs | G.711, G.722, G.729 |
| Lines | Up to 6 SIP accounts |
| Handset | Wideband, noise-canceling |
| Headset Jack | RJ9 (handset) and 3.5mm |
| Dimensions (W x D x H) | 200 x 180 x 100 mm |
| Weight | 0.8 kg (without handset) |
| Mounting | Desk or wall mountable |
| Care and Cleaning | Wipe with a soft, dry cloth; no solvents |
| Safety | CE, RoHS compliant |
| Spare Parts | Handset, handset cord, base stand (order separately) |
| Repairability | Modular design; replace handset, cord, base board |
| Warranty | 2 years (varies by region) |
| Supported Protocols | SIP (RFC 3261), DHCP, DNS, TFTP |
Frequently Asked Questions - DE410 IP PRO GIGASET
User questions about DE410 IP PRO GIGASET
0 question about this device. Answer the ones you know or ask your own.
Ask a new question about this device
Download the instructions for your Telephone in PDF format for free! Find your manual DE410 IP PRO - GIGASET and take your electronic device back in hand. On this page are published all the documents necessary for the use of your device. DE410 IP PRO by GIGASET.
USER MANUAL DE410 IP PRO GIGASET
Gigaset DE410 IP PRO – More than just a telephone
Your Gigaset DE410 IP PRO is an IP phone designed for professional use.
◆Easy to set up
Use automatic configuration or the default settings for approx. 200 preconfigured VoIP providers.
◆Web user interfaces for telephony and configuration
Operate and configure your telephone from your PC with ease.
◆High Definition Sound Performance – HDSP
Make phone calls with brilliant sound quality.
◆Phone functions for the professional user
Use the call divert, conference call, automatic ringback, call reject and Do Not Disturb (DND) functions.
◆Multiple directories
Manage your personal directory with up to 200 entries. Use an LDAP directory or online directories on the Internet.
◆Network connection
Connect your telephone to the local network via Ethernet. Connect a PC using your telephone as a 100 MBit Ethernet switch.
◆Protect the environment
Reduce environmental pollution with the power-saving power adapter.
◆Individual settings
Load your own ring tones.
Assign functions or frequently used numbers to the keys.
Further information about your phone can be found at www.gigaset.com/pro
Phone overview
Keys

1 Mute key Activate/deactivate microphone (mute) → page 34
2 Headset key Make call via headset → page 32
3 Speaker key Activate/deactivate speaker → page 34
4 Volume key Depending on the operating mode: Adjust the volume of the speaker, receiver, headset or ringer → page 33
5 Display keys Activate display functions → page 22
6 Message Centre Open call and message lists → page 51
7 Do Not Disturb key Do Not Disturb (DND) function → page 34
8 Navigation key Scroll through lists and entries. In idle status: → page 24
Open redial list. → page 40
√ Confirm or start action, select entry → page 24
Open directory → page 43
9 End call/back key End/reject call; cancel function; → page 25
go back one menu level (press briefly); → page 24
return to idle status (press and hold)
10 Consultation key Initiate/end consultation call, put participant on hold → page 36
11 Conference key Initiate conference call → page 37
12 Transfer key Transfer call to another party → page 38
13 Function keys Programmable keys → page 96
Understanding Light Emitting Diodes (LEDs)
| Flashes | Incoming call. | → page 32 | |
| Lights up | Call is being made via the speaker. | → page 34 | |
| Lights up | Call is being made via the headset. | → page 32 | |
| Lights up | The microphone is muted. | → page 34 | |
| Flashes | New message in the Message Centre. | → page 51 | |
| Lights up | "Do Not Disturb" function is activated. | → page 34 | |
| Flashes | Incoming call on the number programmed to this key. | → page 30 | |
| Lights up | Call is being made on the number programmed to this key. |
Understanding the display

Understanding the display symbols
| New message in the Message Centre. | → page 51 | |
| The microphone is muted. | → page 34 | |
| Call is being made via the speaker. Flashing: Incoming call. | → page 29 | |
| Headset connected | → page 17 | |
| Ringer deactivated. | → page 53 | |
| "Do Not Disturb" function is activated. | → page 34 | |
| Telephone in conference call. | → page 37 | |
| Secure connection. | → page 33 | |
| HDSP | HDSP quality connection. | → page 33 |
| New messages on the network mailbox. | The number is displayed to the right. | |
| Missed calls. |
Other icons may appear depending on the function. These are displayed alongside the corresponding description.
Contents
Gigaset DE410 IP PRO – More than just a telephone .... 1
Phone overview 2
Keys 2
Understanding Light Emitting Diodes (LEDs) 3
Understanding the display 3
Following safety precautions 6
Using the phone in different scenarios 7
First steps 9
Check the package contents 9
Setting up and connecting the device 10
Wall mounting 16
Connecting a headset 17
Setting up the device (for the first time) 18
Proceeding 21
Using the phone 22
Operating via the keypad and display menu 22
Menu tree 27
Operating via the PC 28
Making calls 29
Calling 29
Receiving incoming calls 32
Ending a call 33
Using functions when making a telephone call 33
Making a call to multiple participants 35
Setting up call divert (CD) 39
Using the call lists 40
Viewing entries 40
Dialling a number from a list 42
Copying an entry from the call list to the directory 42
Deleting an entry or list 43
Using directories 43
Using the local directory 43
Using an LDAP directory 46
Using online directories 47
Managing messages 50
Managing voice mails on the network mailbox 50
Accessing messages via the Message Centre 51
Configuring basic settings 52
Setting the date and time 52
Setting the ringer 53
Activating/deactivating advisory tones 55
Renaming or deleting ring tones 55
Setting the display 56
Setting the language 57
Resetting the device to the default settings 58
Configuring settings for the local network 59
LAN settings 60
Web configurator - configuring the phone on a PC 66
Starting the Web configurator 66
Understanding the Web configurator menu tree 68
Running the setup assistant 69
Configuring phone settings via the Web configurator 74
Network and connectors 74
Telephony 84
Messaging 92
Services 93
Function keys 96
System settings 97
Checking the status of the phone 107
Appendix 109
Caring for your telephone 109
Contact with liquid 109
Using insert strips 109
Using Gigaset QuickSync – additional functions for the PC interface ..... 109
Specifications 110
Service (Customer Care) 111
Questions and answers 111
Authorisation 111
Protecting our environment 112
Using free software 113
Accessories 120
Glossary 121
Index 134
Following safety precautions
Warning
Be sure to read this user guide and the safety precautions before using your telephone.

Use only the power adapter supplied, as indicated on the underside of the telephone.

Using your telephone may affect nearby medical equipment. Be aware of the technical conditions in your particular environment, e.g., doctor's surgery.

Do not install the phone in a bathroom or shower room. The phone is not splashproof.

Do not use your phone in environments where there is a risk of explosion, e.g., auto paint shops.

If you give your phone to a third party, make sure you also give them the user guide.

Remove faulty telephones from use or have them repaired by our Service team, as they could interfere with other wireless services.
Please note
The Ethernet cable supplied is intended for connecting a PC. To connect the telephone to the local network use shielded cables exclusively.
Using the phone in different scenarios
Using your phone in a professional environment with phone system and server structure
If you use your Gigaset DE410 IP PRO in a corporate network with a telephone infrastructure, your phone incorporates functions and data from the phone system and servers. In a corporate environment, the VoIP accounts and most of the settings are configured centrally by the phone system.
![graph TD A["Computer"] -->|1| B["Phone"] B --> C["DSL connection"] C --> D["Internet"] D --> E["ISDN, S2M"] C --> F["4"] F --> G["7"] G --> H["FAX"] I["Computer"] -->|2| J["Phone"] J --> K["DSL connection"] K --> L["7"] L --> M["6"] M --> N["Internet"] style A fill:#f9f,stroke:#333 style I fill:#ccf…](/content/2026/06/1278715/images/9a4519fa81251f6a359797b78a7410cc40b016fb8f3e412b6118bbd9e92e5751.jpg)
1 Gigaset IP telephone
2 Gigaset IP telephone with integrated switch (Gigaset DE410 IP PRO).
Your PC is connected directly to the phone, providing you with an additional LAN connection in your network.
3 DECT bases for connection to DECT handsets
4 Ethernet switch
Supports Quality of Service (QoS), 100 Mbit or Gigabit Ethernet and PoE (Power over Ethernet).
5 Phone system (e.g., Gigaset T500 PRO)
Forms Internet telephony, ISDN or S2M connections. Analogue devices can be connected. A network connection is established using Ethernet.
6 Acts as a gateway to the Internet for the connected devices. Routes VoIP calls from the phone system to the Internet.
7 File, e-mail and workgroup servers, or NAS systems, can be seamlessly integrated into the phone system architecture. As a result:
- Invitations to conference calls can be organised via the phone system
- The phone system can be backed up to a server or the system can be started via the network
– Online directories (LDAP) can be managed centrally
Using your phone in a simplified environment without a phone system
You can also use your Gigaset DE410 IP PRO without a phone system.
![graph LR A["Computer"] -->|1| B["Telephone"] B --> C["2"] C --> D["SIP provider"] D --> E["ISDN, S2M"] F["Internet"] --> D G["Internet Connection"] --> C](/content/2026/06/1278715/images/1a19ce0afb2070751e963009438ab9b91b43ca61ee6d013db338aea026d1db66.jpg)
1 Gigaset IP telephone with integrated switch (Gigaset DE410 IP PRO).
Your PC is connected directly to the phone, providing you with an additional LAN connection in your network.
2 Acts as a gateway to the Internet for the connected devices. Routes VoIP calls from the phone to the Internet.
3 The SIP provider transfers calls from the Internet and establishes a connection with the standard telephone network.
In this scenario, you must manually configure the VoIP accounts for your phone. You can create up to 6 VoIP accounts on your phone.
Check the package contents

Telephone: Gigaset DE410 IP PRO
Receiver with cable for connection to the phone

Ethernet cable for connecting a PC

Wall bracket
and
Tool for fixing the handset retainer when mounting the device on the wall.

Insert strips for labelling
the function keys (with protective film)
Optional:
Power adapter for connecting the phone to the mains power supply (if required) with three different plug-in modules (Europe, Great Britain, USA)
The device is powered by PoE (Power over Ethernet) if it is connected to a switch with PoE-functionality ( → page 14).
Firmware update
Whenever there are new or improved functions for your Gigaset, firmware updates are made available for you to download to your phone (page 105). If this results in operational changes to your phone, a new version of this user guide or the necessary amendments are published on the Internet at www.gigaset.com/pro.
Select the product to open the relevant product page for your telephone, where you will find a link to the user guide.
To find out what version of firmware is currently loaded on your phone, see page 107.
Setting up and connecting the device
The phone is designed for use in dry rooms in a temperature range of ±0°C to +45°C .
▶ Set up the phone at a central point where a connection to the local network is available.
Warning
◆Never expose the Gigaset DE410 IP PRO to the following: heat sources, direct sunlight or other electrical appliances.
◆Protect your Gigaset from moisture, dust, corrosive liquids and fumes.
Please note
You can also mount your Gigaset DE410 IP PRO on the wall ( → page 16).
Connecting the receiver
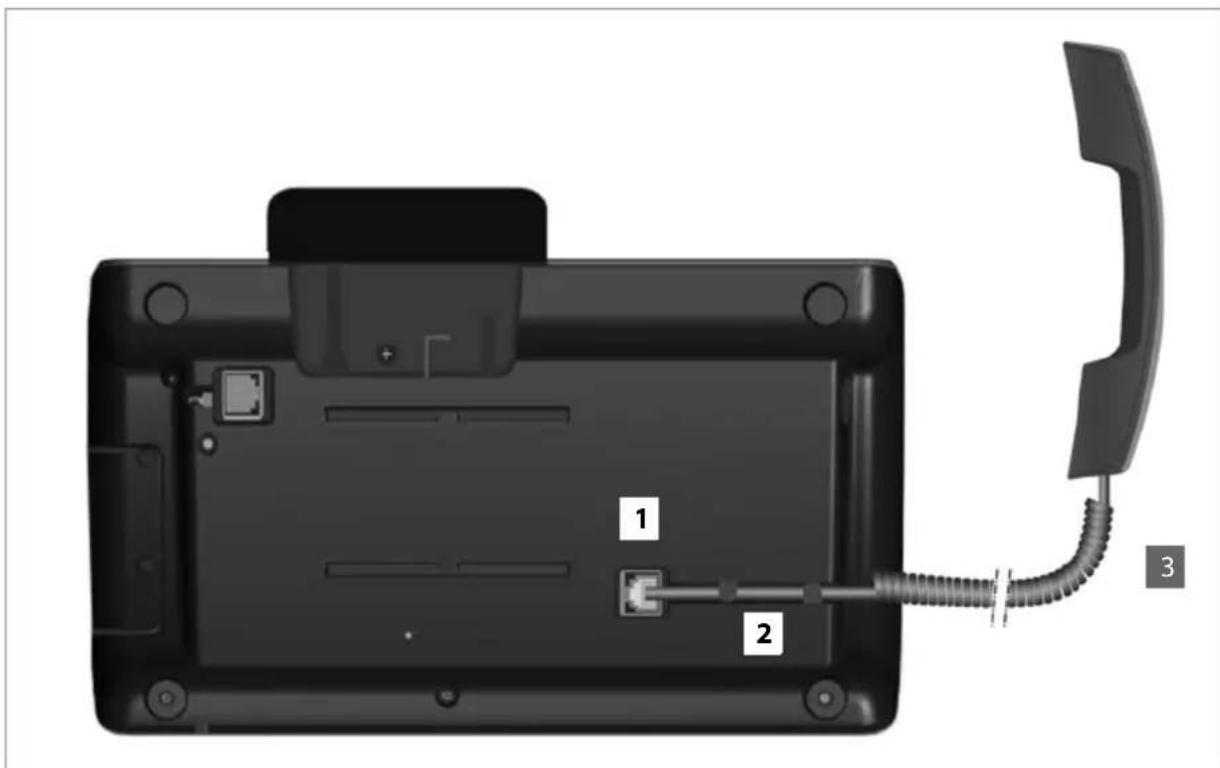
1 Insert the connector, which can be found on the longer straight end of the connection cable, into the connection port on the bottom of the phone.
2 Place the straight part of the cable in the cable recess provided.
3 Insert the other jack on the connection cable into the port on the receiver.
Connecting the network cable
To make calls via VoIP, your phone must have Internet access. This connection is established in the local network via a gateway.
You connect your phone to the same local network as the gateway. See the Using the phone in different scenarios section on page 7 for an overview of the different options.
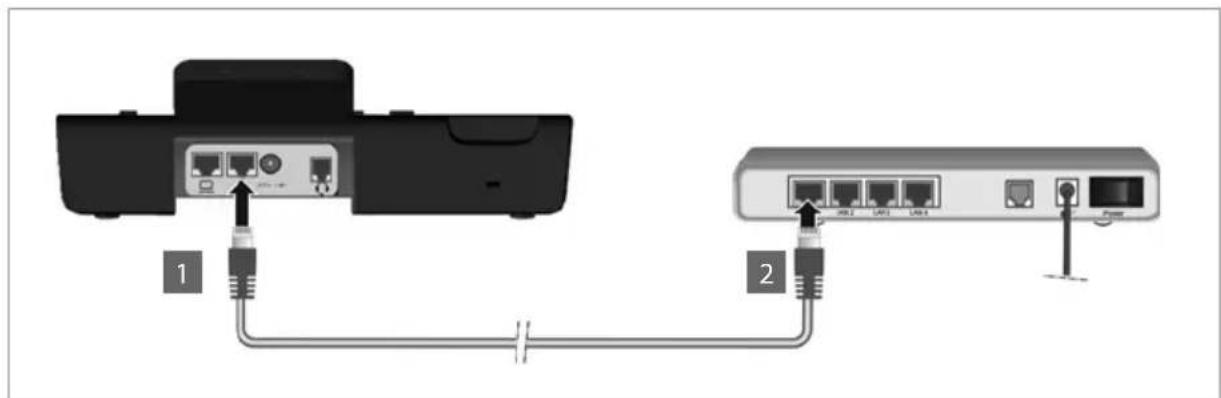
1 Attach one end of the Ethernet cable to the right-hand LAN port on the rear of the phone.

2 Attach the other end of the Ethernet cable to a LAN port on your network Ethernet switch or on the router itself.
Please exclusively use a shielded cable for the connection.
Warning
If you connect your Gigaset DE410 IP PRO to a PoE-capable Ethernet switch (PoE class IEEE802.3af), it will be supplied with power via PoE (Power over Ethernet). The PoE network must not exceed the premises boundaries.
Connecting the PC
Your phone has an integrated two-port switch. This allows you to connect your PC to the local network via the phone and avoid using additional connection ports on the switch or router.
The Ethernet cable supplied is intended for this connection. Do not use this cable to connect the telephone to the local network ( → page 12).
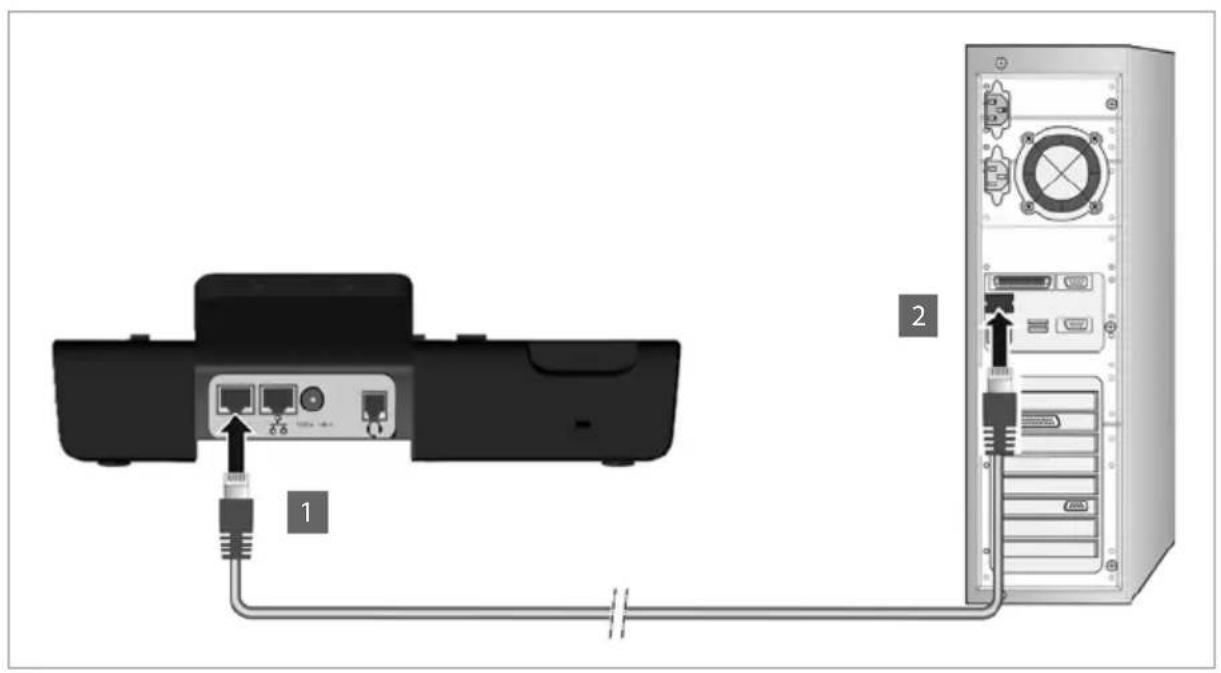
1 Connect an Ethernet cable to the left-hand LAN port on the rear of the phone.
2 Connect the other end of the Ethernet cable to a LAN port on the PC.

Please note
You can operate and configure your Gigaset DE410 IP PRO using this or any other PC within the local network. For more information please see the chapter Web configurator – configuring the phone on a PC, → page 66.
Connecting a device to the mains power supply (if required)
Your Gigaset DE410 IP PRO is supplied with sufficient power by PoE (Power over Ethernet) and does not need to be connected to the mains power supply. Prerequisite: The device is connected to an Ethernet switch with PoE functionality (PoE class IEEE802.3af)
(→ page 12).
To connect your device to the mains power supply, if required, a power adapter is supplied with three different plug-in modules for Europe, Great Britain and the USA. First attach the appropriate plug-in module to the power supply unit.

1 Slide the required plug-in module into the recess on the underside of the power supply unit until it clicks into place.
2 To remove the plug-in module again, press on the button marked Push and pull the plug-in module out of the power supply unit.
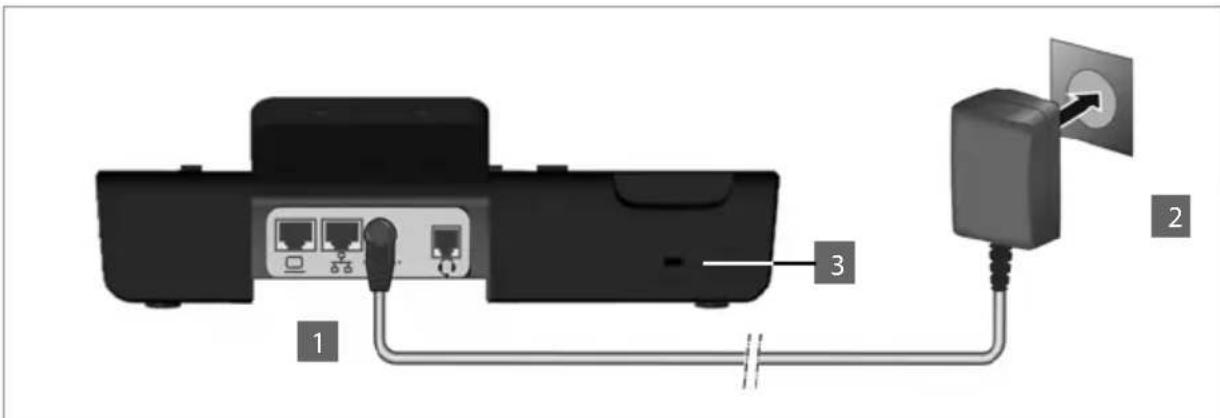
12V= - - +
1 Connect the power adapter to the port on the rear of the phone.
2 Then insert the plug into the mains socket.
Warning
Use only the power adapter supplied.
Please note
You can safeguard your device against theft by fitting a Kensington lock. The corresponding hole can be found on the rear of the device (3).
Connecting extension modules (optional)
You can increase the number of programmable keys using extension modules (max. two; can be ordered as accessories → page 120). Each module includes 14 additional programmable keys. The function keys can be programmed using the Web configurator (→ page 96).
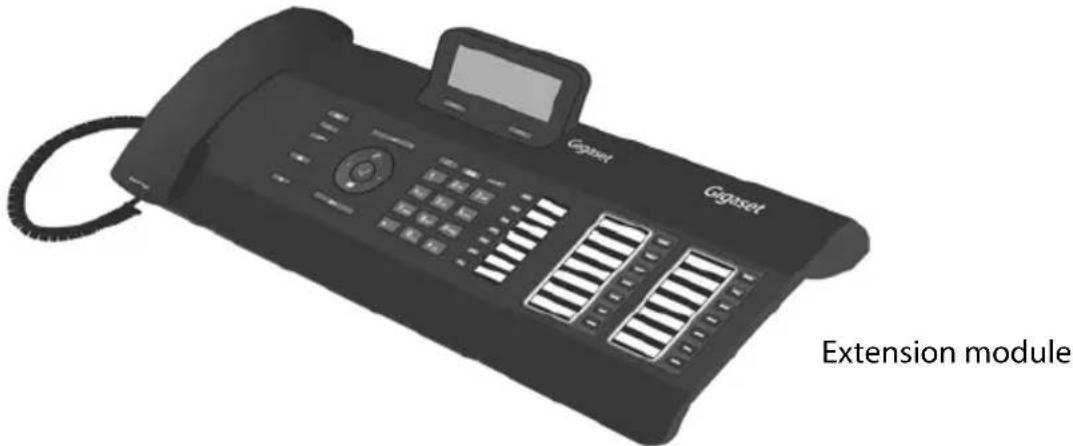
The package contains:
◆One extension module
◆One connection frame with four fastening screws
◆One connection cable
◆Insert strips
Extension module Gigaset DE410 IP PRO
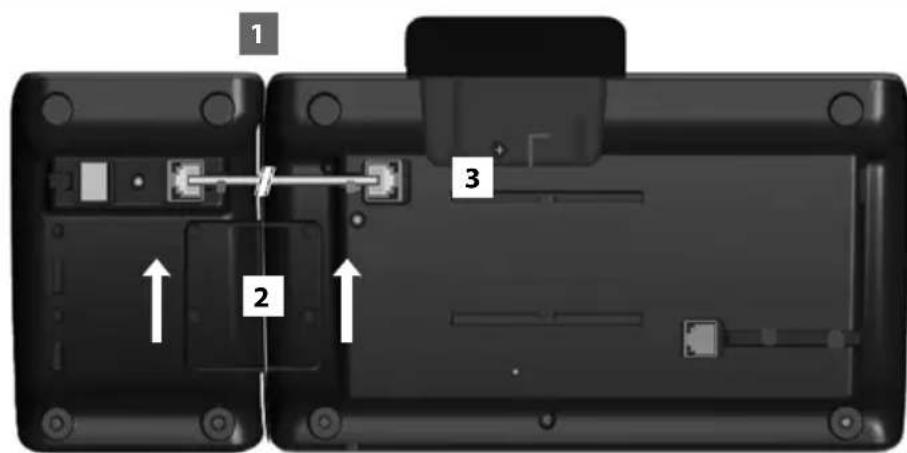
1 Position the extension module to the right of the phone (on left when viewed from below), so that the module and phone are the same height and meet in the centre.
2 Insert the clasps on the connection frame into the respective notches on the phone and module and push the connection frame upwards until it clicks into place. Secure the connection frame with the screws provided.
3 Establish the connections using the cable supplied.
Please Note
If the extension module does not work after installation, restart your device (disconnect it from the mains power supply and reconnect it).
Wall mounting
It is also possible to mount the Gigaset DE410 IP PRO on the wall using the supplied wall bracket.
▶ Unplug the cables from the phone before you begin.
1

▶ Drill two dowel holes and insert dowels. You can use the wall bracket as a drilling template.
2
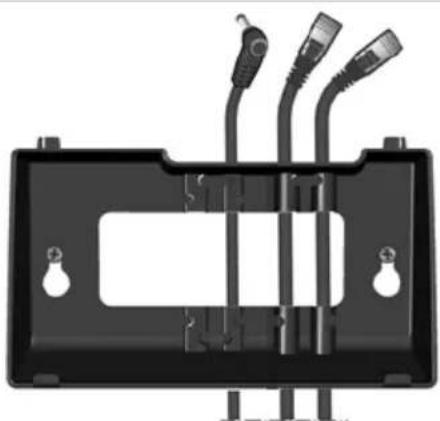
Thread the cables through the cable guides on the back of the bracket and screw it to the wall.
3

Remove the handset retainer from the cradle using the tool provided, and replace it with the ridge pointing upwards.
4

- Attach the phone to the wall bracket by first hooking it onto the hooks at the bottom and then tilting the top back towards the wall and pushing it downwards. - Reconnect the cables.
Connecting a headset
You can connect a headset via the RJ9 connector of your Gigaset DE410 IP PRO.

▶ Connect the cable for the headset to the RJ9 connector on the phone.

Setting up the device (for the first time)
Your device will start automatically as soon as it is connected to the mains power supply. Please be aware that the device is powered by PoE (Power over Ethernet). This means that it is supplied with power as soon as it is connected to an Ethernet switch with PoE-functionality.
The first time you use the device, an installation wizard will start automatically and guide you through the necessary installation steps.
Configuring language and time zone settings

▶ Use the navigation key to select the required language. To do this, press up or down on the navigation key ⏻. Further information about the navigation key can be found on → page 24.
▶ Press the display key under OK to confirm your selection. You can also use the OK function on the navigation key (by pressing √ in the centre of the key).

▶ Use the navigation key to select the required time zone.
▶ Press the display key under OK to confirm your selection.
▶
When you have made your selection, press the end key ← to return to the last entry screen. You can correct your selection if necessary.
Please note
The date and time are automatically set by a time server. You can select a time server using the Web configurator or deactivate this function ( → page 98).
Establishing a connection to the local network
Your phone must be connected to the local network before it can connect to the Internet and before you can operate it from a PC.
The device checks to see if a network connection already exists. The network connection is automatically established if the phone has automatically been assigned an IP address from a DHCP server in the network. If this is the case, the following screen will not appear and you can skip to → page 20.
Please note
The following network configuration is the default setting on your device: LAN with IP protocol version 4 (IPv4) and DHCP.
If your phone has no network connection, you will need to configure the network manually. Depending on the type of network, you will need the following information about the configuration:
◆ If the network uses IP protocol version 4 (IPv4) with a static IP address, you will need: The device IP address, the network subnet mask, the IP addresses of the standard gateway and DNS server.
◆If the network uses IP protocol version 6 (IPv6):
IP addresses automatically: select IPv6 as Network Type. The connection is then established automatically.
IP addresses statically: the device IP address, the address prefix length and the DNS server IP address.
If there is still no network connection, you will then be asked whether you wish to configure the connection manually.
▶ Select Yes if you have the required information.
▶ Select No if you want to use the display menu to configure the network at a later date (→ page 59).

If you selected Yes, you can configure the network immediately.
Depending on your selection, additional screens may be displayed so you can enter the required information.
More detailed information on LAN configuration can be found on → page 59.
▶ Once you have configured all settings, press the display key under Back. Your settings are saved.
Your device is now connected to the local network and can be configured for Internet telephony.
Configuring Internet telephony
Before you can use the Internet to phone anyone over the Internet, the fixed line network or the mobile phone network, you need the services of a VoIP provider.
Prerequisite:
- You have a phone system in your network that provides VoIP accounts for your device, or
- You have registered with a VoIP provider (e.g., via your PC) and set up a VoIP account.
The device searches the network for a provisioning file and checks whether VoIP accounts already exist. If the telephone has existing VoIP accounts, these accounts are configured automatically. You can now make calls with your phone via the Internet.
If the telephone has no existing VoIP accounts, you must configure them manually. The Web configurator's installation wizard will help you with this (→ page 69).
Proceeding
Now you have successfully set up your phone, you can adapt it to your personal requirements. Use the following guide to quickly locate the most important topics.
If you are unfamiliar with menu-driven devices such as other Gigaset telephones, you should first read the section entitled Using the phone on page 22.
Information on ... ... is located here.
Operating the phone via the keypad and display menu page 22
Operating the phone via the PC page 28
Making calls page 29
Setting up and using directories page 43
Setting ring tones page 53
Setting up VoIP accounts page 69
Loading your own sounds page 104
If you have any questions about using your phone, please contact our Customer Care team ( → page 111).
You have a range of options for operating and configuring your Gigaset DE410 IP PRO in a way that is convenient for you.
◆The keypad and display allow quick and clear access to your phone's features.
◆ The Web user interface provides access from a PC and helps you easily configure your phone (→ page 28).
The option you choose will depend on the situation.
Operating via the keypad and display menu
Display and display keys
The display gives you quick access to all the functions on your phone, particularly the menu functions.
In idle status, icons on the display indicate the status of your phone ( → page 3). In addition, the time is displayed.
Use the display keys to activate the phone's functions and to navigate through the menu. Different functions are available depending on the operating situation. These functions are displayed at the bottom of the screen.
Example

Some important display keys:
Options Open a menu for further functions.
OK Confirm selection.
< C1 Delete key: Delete one character at a time from right to left.
Back Skip back one menu level or cancel the operation.
Save Save entry.
→ Copy the displayed entry to the directory.
Writing and editing text
A text editor is provided for entering text via the keypad.


Enter the text.
Each key between 0 and 9 wxyz is assigned several letters and digits.
Press the relevant key a certain number of times to enter a particular character.
For example k = 2 x the 5jk key.
The characters available are shown in the editor field. The highlighted character is inserted to the left of the cursor.
Deleting/correcting characters

Press the display key. The character to the left of the cursor is deleted. Press and hold to delete the word to the left of the cursor.
Entry mode
A range of entry modes are available depending on the operating situation. The current mode is displayed on the right-hand side of the editor field.
Abc Letters, first letter upper case, others lower case, e.g., for entering names.
abc Lower case only, e.g., for entering e-mail addresses.
123 Digits only for entering numbers.
Switching entry mode

Press the hash key. The text entry mode will change.
Moving the cursor

Press the navigation key briefly: moves the cursor one character at a time. Press and hold the navigation key: moves the cursor word by word.

Press the navigation key: moves the cursor line by line. The cursor stays in a horizontal position.
Entering special characters

Press the star key. The table of special characters is displayed.


Select the required character.
Insert
Press the display key. The selected character is inserted at the cursor position.
Navigation key

The navigation key enables you to access important telephone functions quickly. You can use it to scroll through lists and directories with ease.
In idle status

Open redial list

Open main menu
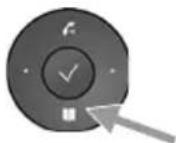
Open directory
In menus and lists

Depending on the operating situation:
OK, Yes, Save, Select or Change.
Copy a number that has been entered or is shown in the display into the directory.

Press briefly: Navigate to the line above/below.
Press and hold: Scroll up/down the list one line at a time.
In input fields

Move the cursor up/down line by line

Press briefly: Move the cursor to the left/right one character at a time.
Press and hold: Move the cursor to the left/right quickly.
Understanding the navigation key
The following illustrations demonstrate how to use the navigation key:
√
Press the centre of the navigation key.


Press down/up/left/right on the navigation key.
Using the menus
Your telephone's functions are accessed using a menu that has a number of levels.
Opening the main menu
▶ When the phone is in idle status, press the centre of the navigation key √.

The display menu functions are shown as a list with the respective icons.
The selected function is highlighted via inverse display.
Accessing a function or opening the corresponding submenu
▶ Navigate to the required entry using the navigation key ⏻ and press the OK display key or the √ navigation key.
Back to the previous level
▶ Press the Back display key or briefly press the end key ←.
The current operation is cancelled and you will return to the previous menu level.
You can revert to idle status from the main menu.
Reverting to idle status
You can revert to idle status from anywhere in the display menu as follows:
▶ Press and hold the end key ←.
Or:
▶ Do not press any key: After 3 minutes the display will automatically revert to idle status.
Settings that have not been saved by selecting the display keys OK, Yes, Save or Change or the navigation key √ are lost.
Scrolling through lists

If it is not possible to view all of the functions/list entries at the same time (list is too long), arrows appear on the right-hand side. The arrows indicate the direction in which you need to scroll to view the rest of the entries in the list.
Understanding the operating steps
The operating steps used to navigate through the display menu are shown in abbreviated form.
For example, setting the ringer volume
√ → Settings → Audio Settings → Ringer Settings → Volume
means:
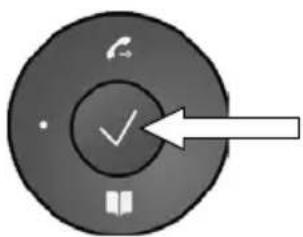

▶ Press the centre of the navigation key to open the main menu.
▶ Navigate up/down using the navigation key ⏻ until the Settings submenu is selected.
▶ Press the display key OK to confirm your selection.
![graph TD A["Settings"] --> B["Date / Time"] B --> C["Audio Settings"] C --> D["Display"] D --> E["Back"] F["Continue to navigate through the menu using the navigation and display key until you reach the Volume submenu."] --> G["Audio Settings"] G --> H["Ringer Settings"] H --> I["Advisory Tones"] H…](/content/2026/06/1278715/images/35d069844e630e05032893b3b04d6fb9e796e913330623d6abfb3d2771411fa8.jpg)
Menu tree
The following menu tree shows all the components of the display menu.
![graph TD A["Select Services"] --> B["Next Call anonymous"] B --> C["→ page 35"] A --> D["All Calls anonymous"] D --> E["→ page 35"] A --> F["Call Divert → page 39"] F --> G["→ page 35"] A --> H["Call Waiting → page 35"] H --> I["→ page 32"] A --> J["Active Ringbacks"] J --> K["→ page 32"] L["Voice M…](/content/2026/06/1278715/images/8124ab2f9f9d4efdd2d1a1db019f5b4ac7b2c33e890ff4ffa02eba43a5be6ff0.jpg)
Operating via the PC
You can operate the main functions of your phone from your PC by using the Web configurator.
Starting the Web configurator
To start the Web configurator, you need the IP address of your phone. You will find this via the display menu of the telephone in the LAN settings for the device:
√ → Settings → Local Network (→ page 60).
Please note
The IP address for your device can sometimes change, depending on the settings of the DHCP server in your network.
Accessing the Web configurator:
▶ Open the Internet browser on your PC.
▶ Enter the IP address in the address field:
Example:
http://168.192.250.10
The login screen appears.
▶ Select the appropriate language.
▶ Select User as the user type and enter the corresponding password. The default setting for the password is user, but this can be changed.
▶ Click on OK.
In User mode the following functions are available:
◆ Manage your contacts in the local directory and dial numbers directly (→ page 101)
◆ View your call lists (→ page 103)
◆ Forward incoming calls to another phone number (→ page 89)
◆ Block individual phone numbers and/or all anonymous calls (→ page 91)
◆Decide on the assignment of the directory key and programme the function keys (→ page 96)
◆ Download ring tones from the PC to your phone (→ page 104)
◆ Select different ring tones for your VoIP connections (→ page 89)
◆ Change the password for the user login (→ page 99)
◆ Configure settings for your phone display (→ page 100)
All Web configurator functions – user and administrator mode – are described in the chapter Web configurator – configuring the phone on a PC on page 66.
Calling
You make your calls using the default account if you do not make another selection. The first account that is created is used as the default account. You can change this using the Web configurator ( → page 85).
Selecting VoIP account
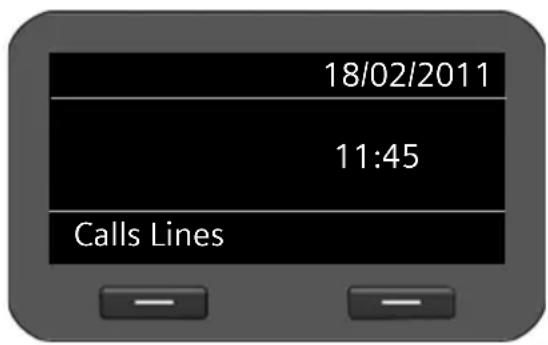
If there are several VoIP accounts available on your device, you can select the account you wish to use for the call.
Lines Press the display key.
Select the required account.
OK Press the display key to confirm the selection.
Entering a number using the keypad
You make a call using the phone's receiver, speaker kit or a connected headset
(→ page 63).

Enter the phone number.

Lift the receiver.
Or

Lift the receiver.

Enter the phone number.
Dial Press the display key.
The number is dialled.
The duration of the call is shown while the call is in progress.
Instead of putting the receiver to your ear:
Press the speaker key to make a call via the speaker.
Press the headset key to make a call via the headset.
You can also switch at any time during the call. Throughout the whole of this section, the
icon can always represent either □ or ○.
When entering the phone number:
< C Press the display key to delete incorrectly entered figures to the left of the cursor.
→ ☐ Press the display key to copy entered phone numbers to the local directory (→ page 43).
← Press the end key to cancel dialling.
Dialling a number from the directory
You can save up to 200 entries in the local directory. You can create directory entries and manage them quickly and easily using the Web configurator ( → page 101) or the phone's display menu ( → page 43).
To dial a number proceed as follows:

Open the directory using the navigation key ⏻.
Or use the display menu

→ Contacts → Directory


Scroll through the list to the required name.

Lift the receiver. The default number is dialled ( → page 45).
Please note
You can also dial a phone number from the directory via the Web configurator ( → page 101).
Dialling a number using a function key
You can assign phone numbers to up to 7 function keys; you then only need to press a key once to dial the number. You can increase the number of function keys by connecting extension modules. Use the Web configurator to assign numbers to the function keys ( → page 96).

Press the function key.
The number assigned to the function key is dialled.
Dialling a number from the call lists
The following calls are saved:
◆Outgoing calls (redial list)
◆Accepted calls
Missed calls
The last 60 numbers are stored in each of the call lists. The name will appear on the display if you have saved the number in the directory.
You can browse through the entries and dial directly from within the record.
If there are new entries in the missed calls list, the Message Centre key ☑ flashes and the ☑ icon is displayed.
To save numbers from a list in the directory, see ( → page 40).
Viewing call lists and dialling numbers
Open the required call list:
→ Open the redial list using the navigation key Ⓞ.
Open the list of missed calls in the Message Centre.
Or use the Calls display key

Call Press display key to show the call lists.
Select list:
All Calls
Outg. Calls
Accept. Calls
Missed Calls
OK Press the display key to open the selected call list.
The last (most recent) call or dialled phone number is shown on the display.

Select another entry if necessary.
Lift the receiver. The number is dialled.
Please note
You can also access the call lists using the Web configurator ( → page 103).
Initiating ringback
You can initiate a ringback if the number you have called is busy. Prerequisite: This function is supported by your phone system or your provider.
Ringback Press the display key to initiate a ringback.
Ringback is initiated as soon as the line is free again.
Deactivating ringback
You can deactivate the ringback for all of the VoIP accounts configured on your phone or just for certain VoIP accounts.
√ → Select Services → Active Ringbacks
Accounts for which ringback is permitted are marked with a tick.
Select the required entry.
Change Press the display key to remove a tick and to deactivate the ringback.
Receiving incoming calls
You hear the ringer and the speaker key □flashes.
If the call is received on one of the phone numbers programmed on a function key, this function key — flashes.
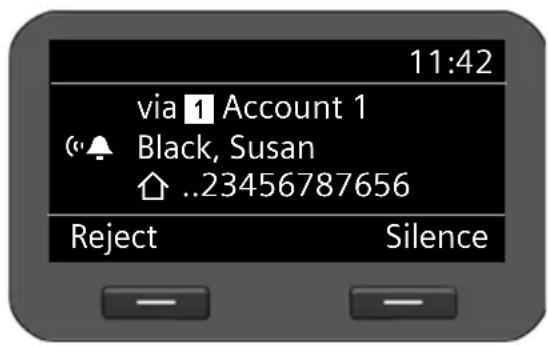
The display shows the caller's number (where calling line identification is permitted
→ page 35) and their name, if they are saved in the directory.
The account that the call is received on is also shown.
Lift the receiver. You can speak to the caller.
Please note
When you receive a call, the phone first of all searches for a corresponding entry in the local directory. If the number doesn't appear there, the other directories are searched (if configured) (→ page 93).
Deactivating the ringer
Silence Press the display key to deactivate the ringer. You can then decide whether to accept or reject the call.
Rejecting a call
Reject Press the display key or the end key ← to reject the call.
Ending a call

Put down the receiver or press the end key ←.
Using functions when making a telephone call
Display when establishing a connection or during a call
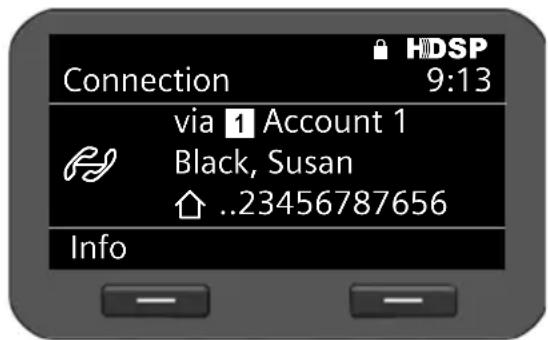
The display shows
◆The VoIP account you are using to make the call.
◆The caller's number (where calling line identification is permitted → page 35) and their name, if they are saved in the directory.

Connection icon. This indicates the status of the connection.

Establishing a connection

Connection interrupted

Connection established

Conference call

indicates a connection with the highest voice quality.

indicates that it is an encrypted connection.
09:13 shows the duration of the call.

Press the display key to view technical information about the phone. This function is helpful when calling the Service Hotline, for example.
Adjusting the volume
You can adjust the volume of the receiver, speaker kit or headset during a call. You can adjust the volume of the ringer while the phone is ringing.

To decrease the volume press the left side of the key and to increase the volume press the right side of the key. Each time you press the key, the volume will increase or decrease by one level.

There are five volume settings available. The current setting is shown.
The last setting is saved when you change the ringer volume.
Use the display menu to permanently configure the ringer melody and volume ( → page 53).
Muting
You can deactivate the microphone for the receiver, the speaker kit and the headset. The other party can then no longer hear you.
Press the mute key during the phone call.
Press the key again to reactivate the microphone.
The ☒ key is lit up while the function is activated and the ✗ icon is displayed.
Activating/deactivating speaker mode
Activating via the receiver during a call:
Press the speaker key and put down the receiver.
The ☐ key is lit up while the function is activated and the ⏻ icon is displayed.
In speaker mode, you hear the caller via the speaker.
Deactivating speaker mode during a call:
Lift the receiver. Continue the call via the receiver.
Please note
You should tell your caller if you have activated the speaker.
Do not disturb
You can activate the Do Not Disturb (DND) function if you do not want to receive any calls and you do not want the phone to ring.
You can still make calls when this function is activated.
Press the Do Not Disturb key.
Press the same key again to deactivate the function.
The ☐ key is lit up while the function is activated and the ⏻ icon is displayed.
Please note
◆ You can permanently deactivate the ringer for anonymous calls (→ page 54).
◆You can use the Web configurator to create a blacklist of unwanted names and numbers (→ page 91). Once you activate the blacklist function, calls from these numbers will not be put through.
Anonymous calling – withholding caller ID
You can make anonymous calls (CLIR = Calling Line Identification Restriction). Your phone number will not be displayed when making outgoing calls. You are calling anonymously.
Prerequisite: Anonymous calls are only possible via VoIP connections through providers that support the "anonymous calling" function. You may have to ask your VoIP provider to activate this function.
Making an anonymous call
Select:
√ → Select Services → Next Call anonymous
Then proceed as normal:
Enter the phone number. Lift the receiver.
The number is dialled. Your number is not transferred.
Activating/deactivating "anonymous calling" for all calls
You can permanently activate/deactivate the anonymous call function for all of the VoIP accounts configured on your phone or just for certain accounts.
√ → Select Services → All Calls anonymous
Accounts for which anonymous calling is permitted are marked with a tick.
Select the required entry.
Change Press the display key to tick the box.
Press the display key again to remove the tick.
Making a call to multiple participants
Initiating a consultation call
During a call, you want to consult a second participant.
Press the consultation call key during the call.
The call is placed on hold. You can make another call to a second participant. Once the call has ended, press the consultation key again. You are reconnected to the first participant.
Accepting/rejecting call waiting
You hear the call waiting tone during a phone call.

The display shows the caller's number (where calling line identification is permitted → page 35) and their name, if they are saved in the directory.
The display also shows the subscriber number used to receive the call and indicates whether this is a ringback.
Accepting a call:
Accept Press the display key to accept the call.

You are connected to the waiting participant. The first participant hears music on hold. The number is displayed and the ⬆... icon identifies it as the waiting participant.
Select the connection.
Remove Press the display key to end the selected connection.
Rejecting a call:
Reject Press the display key to reject the waiting call.
Activating/deactivating call waiting
You can deactivate call waiting during a call for all of the accounts configured on your phone or just for certain accounts.
√ → Select Services → Call Waiting
Accounts for which call waiting is permitted are marked with a tick. Callers via other accounts hear the busy tone.
Select the required entry.
Change Press the display key to tick the box.
Press the display key again to remove the tick.
Call swapping
You are speaking to one participant and a second is on hold; this may be because you have accepted a waiting call or have placed one caller on hold.
Press the consultation key to swap from one caller to the other.
Initiating a consultation call with a third participant:
Add Part.
Press the display key. Both participants are placed on hold.

Enter the phone number for the third participant.
Dial Press the display key. The number is dialled.
To speak to one of the participants on hold again after you have finished the ringback:
Select the relevant participant.
Press the consultation key.
Initiating a conference
You are speaking to one participant while another is on hold.

Select the participant who is on hold.

Press the conference key to add the waiting participant to a conference.
Or
You are speaking to one or more participants and you wish to add an additional participant.

Press the conference key.

Enter the phone number for the additional participant.

Press the display key. The number is dialled.
As soon as the participant answers, they are automatically connected to the conference call.

The participants in the conference are listed on the display.
Removing a participant from the conference call:

Select the participant.
Remove
Press the display key to end the conference for the highlighted participant.
Add Part.
Press the display key to begin a consultation call with another participant. In contrast to conference key 🐘. The conference participants are put on hold.
Please note
Only participants who share the same VoIP account can participate in a conference call.
Transferring a call to another number
You are speaking to one participant and you want to transfer the call to a third participant.
Transfer without consultation:

Press the transfer key. The call is placed on hold.

Enter the phone number for the participant to whom you want to transfer the call.

Press the transfer key again. The call is transferred to the number you have dialled. Your connection to the participant is ended.
Transfer with consultation:
Use this function to ensure that the connection is actually established.

Press the transfer key. The call is placed on hold.

Enter the phone number for the participant to whom you want to transfer the call.

Press the display key. The number is dialled.
When you call the third participant you can wait for them to answer and speak to them, for instance to tell them you are forwarding a call. Then press the transfer key → .
Transfer to participants on hold:
You are speaking to one participant and there are others on hold. You can transfer the current call to one of the participants on hold.

Select one of the participants on hold.

Press the transfer key. The chosen participant is connected to the person you are currently speaking to.
Setting up call divert (CD)
When you divert a call, the call is forwarded to another connection. Your call divert settings can be specific to a particular connection (i.e., settings for each configured VoIP account). Prerequisite: The VoIP provider supports call divert.
√ → Select Services → Call Divert
The list contains the accounts configured on your telephone.
Select the required account.
OK Press the display key to confirm the selection.
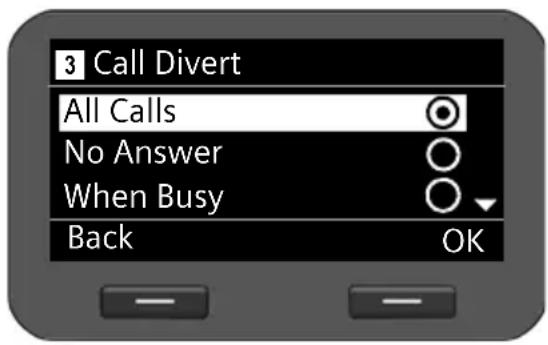
Select when the call divert is to apply.
OK Press the display key to confirm the selection.
All Calls All calls are diverted.
No Answer Calls are diverted if no one accepts the call within several rings.
When Busy Calls are diverted if your line is busy.
Off No calls are diverted.

Enter the phone number to which the call should be diverted.
Save Press the display key to save the settings for this account.
Note
Please refer also to:
Setting up call divert using the web configurator ( → page 89).
◆ Assigning a call divert to a function key (→ page 97)
The following call lists are available:
All Calls All outgoing, accepted and missed calls.
Outg. Calls Last dialled numbers (redial list).
Accept. Calls Calls that were accepted.
Missed Calls Calls that were not answered.
If the list contains entries that you have not yet viewed, the display shows the x icon and the number of new entries. You can also access the list via the Message Centre ( → page 51).
A maximum of 60 entries is saved in the lists. The next entry overwrites the oldest one. You can access all of the lists via the display menu.
Please note
You can also manage the call lists via the Web configurator ( → page 103).
Viewing entries
You can open a list when the telephone is in idle status.
Calls Press the display key to show the call lists.


Select list.

Press the display key to open the selected list.

The calls are displayed in chronological order, from the most recent through to the oldest.
The number of the selected entry and the total number of entries in the list (e.g., 1/30) is displayed in the top right corner.
An icon is shown in front of each entry to indicate whether it is an outgoing (→) , accepted () or missed (×) call.
Information on the entry:
◆ Phone number of the caller/called party. If the number is saved in the directory, the name is displayed instead.
◆VolP account on which the call was made/received.
◆ Date and time of the call. Outgoing calls also include the duration of the connection.
The information displayed is determined by the information transferred by the caller and whether or not the caller appears in the directory.
If the caller has activated CLIP (Calling Line Identification Presentation), the caller's phone number is identified. The caller can then be identified by this number if he or she is already saved in the directory. Prerequisite: The feature is activated for the VoIP account.
Displaying detailed information
View
Press the display key. The information available is displayed, with the phone number as a minimum.
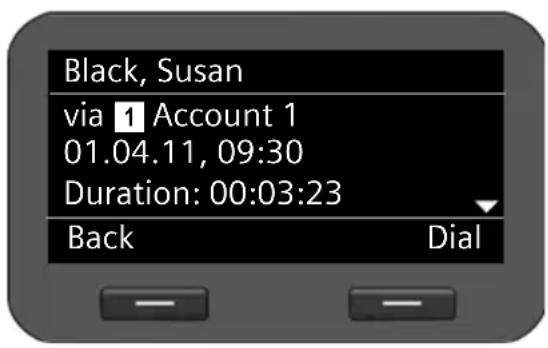
If the number is saved in the directory, the directory entry is displayed ( → page 43).
Please note
When you receive a call, the phone first of all searches for a corresponding entry in the local directory. If the number doesn't appear there, the other directories are searched (if configured) (→ page 93).
Dialling a number from a list
You have the following options for dialling a phone number from a list:

Scroll through the list to the required name.
Lift the receiver.
The number is dialled.
Or

Scroll through the list to the required name.
View Press the display key to show the entry.
Select the number if multiple numbers are available
Lift the receiver.
Or
Dial Press the display key.
The number is dialled.
Copying an entry from the call list to the directory
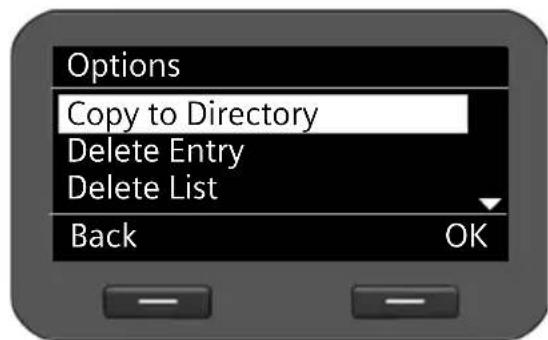
Scroll through the list to the required name.
Options Press the display key.
Select the Copy to Directory entry.
OK Press the display key to confirm the action.

The directory is opened.
You can create a new entry in the directory or edit an existing one.
See directory → page 44.
Deleting an entry or list
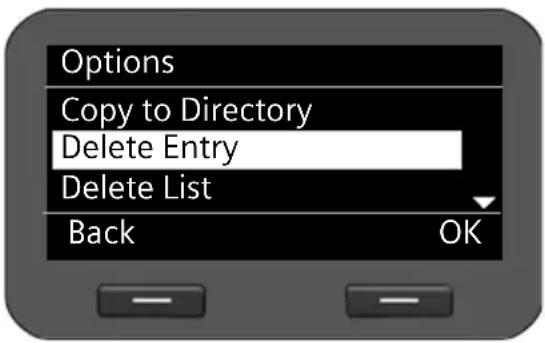
Options Press the display key.
Select the required action: Delete Entry or Delete List
OK Press the display key to confirm the action.
You must confirm the action again.
Using directories
The options are:
◆Local directory
◆ LDAP directory → page 46
◆ Personal or public online directory → page 47
Please note
◆ The local directory can also be accessed via the Web configurator (→ page 101).
◆ The default directory is the local directory. This is the directory that you can open with the ■■ key and the directory to which entries are saved using the "Copy to Directory" function.
- You can set a different directory as the default directory via the Web configurator (→ page 96).
Using the local directory
You can save a total of 200 entries in the local directory.
Please note
You can handle the local directory also via the Web configurator ( → page 101).
Directory entries

A directory entry contains the following information:
◆First name, surname
◆Up to six phone numbers
An icon in front of a phone number indicates whether it is a home (☐), office (☐) or mobile number (☐).
Opening the directory
Open the directory in idle status with the ■■ key (navigation key ⏻)
Or use the display menu
√ → Contacts → Directory
Displaying an entry


Scroll through the list to the required name.

Press the display key. The entry is shown as in the figure on page 43.
Creating a new entry
Options Press the display key.
OK Press the display key to start the New Entry action.
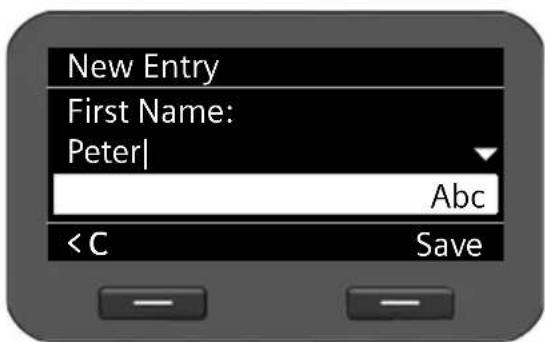
An entry consists of:
- First Name and Name,
- 2 x Phone (Home),
- 2 x Phone (Mobile),
- 2 x Phone (Office).
Enter the name and the phone numbers.
For information on entering text
→ page 23.
○ Scroll from line to line.
Save Save the directory entry if you have entered all the data.
Editing entries

Deleting a directory entry or the entire directory
Deleting a selected entry from the list:  Scroll to the required entry. Options Press the display key  Select Delete Entry. OK Confirm the selection. Or View → Delete Press the display keys in sequence. Yes Confirm the deletion. Deleting the entire list: Options Press the display key  Select Delete List. Yes Confirm the deletion.Dialling a number from the directory
○ Scroll to the required entry. Lift the receiver. The default number of the directory entry is dialled ( → page 45).Using an LDAP directory
If your corporate network provides a directory via an LDAP server, you can access this on your phone (LDAP = Lightweight Directory Access Protocol). Prerequisite: You have set up this function via the Web configurator (→ page 95). You can give the LDAP directory a name in the Web configurator. This will then appear in the display in place of LDAP Directory.Opening an LDAP directory
You can open the LDAP directory in idle status via the display menu  → Contacts → LDAP Directory Or  Press and hold (navigation key ⏻).Searching for and displaying an entry
  Enter the name (or first few letters). For information on entering text → page 23 The search will automatically start as soon as you stop inputting characters. All matching entries are displayed. The search field is displayed again if no matching entries are found. You can start a new search.   Scroll to the required entry. View Press the display key. The entry will be displayed.Dialling from the LDAP directory
 Display the entry.  Select the number.  Lift the receiver. The number is dialled.Using online directories
Online directories are available on the Internet. You can: ◆ Use public online directories that are available on the Internet, such as KlickTel or the Yellow Pages and ◆Create a personal online directory if your provider permits this. Select which public online directory you want to use via the Web configurator (→ page 93). ◆White Pages a public directory provided on the Internet ◆Yellow Pages yellow pages provided on the Internet ◆Private NetDirectory Some providers offer users the option of creating and managing a personal online directory on the Internet. You can use the personal online directory on your phone.Prerequisite:
\- You enter the data for the provider of your personal online directory in the Web configurator (→ page 93) \- You must create and manage your personal online directory using your PC's Web browser.Opening a online directory
You can open a online directory in idle status via the display menu √ → Contacts → Name of directory Select the required public or private online directory. The directory name depends on the settings for the directory in the Web configurator. It can be the name the provider uses for their directory or a name you have chosen yourself.Searching for an entry in the online directory
You can search for a phone number or a name. Searching for a number   Enter the surname and city of the subscriber you are looking for. For information on entering text, → page 23  Scroll from line to line. Search Press the display key to start the search. If several entries are found for the city, a list is displayed so that you can narrow down the location search.  Select city. OK Start search. Please note: The City field is not available in the private directory.  Searching for a name   The search results are displayed as a list. The first entry found is displayed with the name and available address information. The number of the displayed entry is shown in the top right corner along with the total number of entries found. If more than 99 entries are found, a message including the number of results found is displayed. You can then refine the search or request for the entire list to be displayed.Refining a search:
Refine Press the display key. Specify your search request in the various fields. Surname, First Name, Category / Name, City or Street. Search Press the display key to restart the search.Displaying entry details:
Scroll to the required entry. View Press the display key. The entry contains the available phone numbers.Dialling a number:
Select the number. Lift the receiver.Transferring a number to the local directory
 You can transfer entries from a online directory to your local directory. → ☐ Press the display key. You can create a new entry in the directory or edit an existing one. See directory → page 44. You can access your voice mails on network mailboxes via the display menu. The Message Centre also allows you to access voice mails and missed calls at the press of a key ( → page 51).Managing voice mails on the network mailbox
Some VoIP providers offer answering machines on the Internet – network mailboxes. Each network mailbox accepts incoming calls on the corresponding VoIP phone number. You should therefore set up a network mailbox for each of your VoIP accounts in order to record all calls ( → page 92). If there are new messages on the network mailbox, these are indicated by the 🔊 icon. The number of messages is displayed to the right. You can also access your network mailbox via the Message Centre (→ page 51). The 🔒 key flashes if a new message has been received on the network mailbox and the 🔒 icon is displayed.Playing voice mails
Play recorded messages via the display menu: √ → Voice Mail Play recorded messages via the Message Centre: → Voice Mail  A list of available network mailboxes arranged in order of VoIP accounts is displayed. Scroll through the list to the required network mailbox. OK Press the display key to connect to the network mailbox.  The messages available in the network mailbox are listed with the sender's number or, if available, the sender's name. Scroll through the list to the message you want. OK Press the display key to display the message. Delete Press the display key to delete the message.Accessing messages via the Message Centre
The Message Centre gives you quick access to newly-received messages at the press of a key. It provides centralised access to the following messages: ◆ Voice mails (→ page 50) ◆ Missed calls (→ page 40) The message key ☑ flashes if a new entry is received for one of these message types. A new entry is classed as anything that has been received since the corresponding list was last opened. You use the Web configurator to specify which message types can be accessed via the Message Centre ( → page 92).Opening the Message Centre
You open the Message Centre with the ☑ key.  Toggle between the display of o o Voice Mail and × Missed Calls. The number of stored new and old messages or missed calls is shown.Select
Press the display key to display the voice mail or missed calls list. Voice mails → page 50, missed calls → page 40.Configuring basic settings
Your telephone is preconfigured, but you can change the settings to suit your individual requirements.Setting the date and time
The time is displayed, for example, on the idle display as well as for incoming calls. The date and time must therefore be set accurately.Please note
The address of a time server on the Internet or the local network is saved on your phone. The date and time are taken from this time server provided that the phone is connected to the network and synchronisation with the time server is activated. Manual settings are overwritten in this case. The settings for the time server should be made via the Web configurator ( → page 98). You use the display menu to manually set the date and time: √ → Settings → Date / Time Date format:
Select the date format: dd.mm.yyyy: day, month, year mm.dd.yyyy: month, day, year Date:
Enter the day, month and year in eight-digit format, e.g., for 14 January 2011: For the date format dd.mm.yyyy: 14012011 For the date format mm.dd.yyyy: 01142011 Time format:
 Select the time format: On: 24-hour format Off: 12-hour format Time:
 Enter the time in four-digit format, e.g., 0715 for 07:15. Time display for this setting in 24-hour format: 07:15 Time display for this setting in 12-hour format: 07:15 AM Save Press the display key to save your settings.Setting the ringer
You can set the volume and melody of the ringer and completely silence the ringer for anonymous calls.Setting the volume
The volume of the ringer for incoming calls can be adjusted over five levels.Setting the volume in idle status
√ → Settings → Audio Settings → Ringer Settings → Volume   Select the required volume. The volume is adjusted immediately. You can test the setting by playing back the ringer with the melody set at the selected volume level.  Press the display key to save the settings.Setting the volume while the phone is ringing
You can adjust the volume while the phone is ringing using the ➕+ key. Each time you press the key, the volume will increase or decrease by one level. The last setting is saved.Selecting a ringer melody
You can choose various ringer settings from the resource directory ( → page 104) and configure different ringer settings for each VoIP account. √ → Settings → Audio Settings → Ringer Settings → Melodies  Each configured VoIP account is listed. Select the VoIP account you want to set the ringer for. Select All Calls if you want to set the same melody for all accounts. OK Press the display key to confirm the selection.  All of the melodies from the resource directory are displayed. At the top right-hand corner of the screen, you can see which VoIP account you are editing or All Calls. Choose the melody. The selected melody is played at the set volume. Select Press the display key to confirm the selection.Note
The same melody is set for all accounts by default. If you select another melody for any account, All Calls is automatically set to Individual.Silencing the ringer for anonymous calls
You can silence the ringer for external calls where the caller has withheld their number. √ → Settings → Audio Settings → Ringer Settings → All Calls anonymous  If this function is activated, the phone will not ring if an anonymous call is received. The call is still shown on the display. Select the desired option. Select Press the display key to confirm the selection. The change is made immediately.Activating/deactivating advisory tones
Your phone uses advisory tones to tell you about different activities and statuses. The following advisory tones can be activated/deactivated independently of each other: ◆ Key Tones: Each key press is signalled acoustically. ◆ Confirmations: After completing an entry/setting and when a new entry appears in the network mailbox or call list, when you make an incorrect entry or when you scroll to the top of a menu. √ → Settings → Audio Settings → Advisory Tones   Select Key Tones or Confirmations. Change Press the display key to activate or deactivate the selected function.Renaming or deleting ring tones
You can rename or delete ring tones which have been loaded via the Web configurator ( → page 104). √ → Settings → Audio Settings → Audio-Pool  All available ring tones are listed. You can only change those which you loaded yourself. Select the desired ring tone. Options Press the display key to revise the ring tone.   Select the required brightness level. Your setting is activated immediately so that you can check it and correct it if necessary. Save Press the display key to save the settings.Setting the contrast
The contrast of the display can be set to one of six levels. √ → Settings → Display → Contrast  Select the required contrast level 1-6. Your setting is activated immediately so that you can check it and correct it if necessary. Save Press the display key to save the settings.Setting the language
You can view the display texts in different languages. √ → Settings → Language  The current language is indicated by a Ⓞ. Select the required language. Select Press the display key to activate the selected language. The language is changed.Configuring basic settings
Resetting the device to the default settings
If you give your device to a third party or change workstation, you can delete your individual settings and data by resetting the device to the factory settings. All system settings are reset to the default settings. User-specific data is deleted. This means that network configurations, VoIP accounts, directories, call lists, data in the resource directory and all of your individual settings are deleted or reset to the factory settings. You need the administrator password before you can use this function (→ page 99). √ → Settings → Reset Enter the administrator password. OK Press the display key. The password is verified. If the password is correct, you must now confirm the operation. Yes Press the display key. The device is reset to the factory settings.Resetting via device button
You can also reset the device by using the reset button on the underside of the device.  The reset button is located behind the small opening labelled Reset. Use a pointed item, e.g., a paper clip. ◆Reset: Press and hold the button for at least 5 seconds to return all settings to the factory settings. ◆Reboot: Press the button for longer than 1 second but less than 5 seconds to reboot the device. This does not affect the configuration settings.Configuring settings for the local network
All of the settings for connecting your phone to the local network must be correct to enable communication with other devices in the network and phone calls via the Internet. Your phone can be connected to the local network using an Ethernet cable. When you first set up the phone, the device will automatically try to connect to the local network ( → page 19). This will work, if: - You have connected the device to the network using an Ethernet cable (→ page 12) - The gateway automatically assigns network IP addresses using DHCP - The network uses IP protocol version 4 (IPv4). The phone is then automatically assigned an IP address and is connected to the local network. You can then continue configuring your phone via the Web configurator at a PC ( → page 66). If the network connection is not established automatically, you will initially not be able to access the Web configurator. If this is the case, you will have to establish the network connection manually via the display menu: If your device is assigned a static IP address, your network administrator must tell you the IP address of your device. You then assign this address to your phone (→ page 60). If your network uses IPv6, you have to set your phone to Internet protocol version 6 (IPv6) (→ page 62). The connection is established if the address is assigned automatically. If a static IP address should be assigned to your phone, your network administrator must inform you of this. You then assign this to your phone. Whether you configure the network settings when you initially set up the phone ( → page 19) or you start configuration via the display menu – the settings are the same.Warning
The connection may be interrupted if you change the configuration for a functioning network connection. You will then no longer be able to access the local network or the Web configurator and you will no longer be able to make calls via the Internet.LAN settings
You start network configuration via the display menu: √ → Settings → Local NetworkPlease note:
To get access to network configuration you need to enter the administrator password. The default setting is admin.Selecting the network type
 Select Network Type. OK Press the display key to confirm the selection. Select the IP protocol that is used in your network (IPv4 or IPv6). Select Press the display key to confirm the selection. You may be asked to configure additional settings depending on your selection. IPv4 configuration → below, IPv6 configuration → page 62 Back Press the display key to return to the Local Network menu from where you select the next network configuration step.IPv4 configuration
 Select IP Address Type. OK Press the display key to confirm the selection. Select Dynamic if your device receives the IP address via a DHCP server. Select Static if your device receives a fixed IP address. Select Press the display key to confirm the selection. If the Dynamic setting is selected, all further settings are automatically configured. They are displayed and cannot be changed.  If you have selected Static as the address type, you must now create the following settings: - IP Address - Subnet Mask - Standard Gateway – Pref. DNS Server and - Altern. DNS ServerIP Address
Enter an IP address for your phone. This IP address allows your phone to be reached by other subscribers in your local network (e.g., PC). The IP address comprises four individual groups of numbers with decimal values from 0 to 255 that are separated by a dot, e.g., 192.168.2.1. Please note: - The IP address must be included in the address block used by the router for the local network. The valid address block is defined by the router's IP address and the subnet mask (see example). - The IP address must be unique in the local network, which means that it must not be used by another device connected to the router. - The static IP address must not belong to the address block that is reserved for the router's DHCP server. Check the settings on the router or ask your network administrator.Example:
Router IP address: 192.168.2.1 Network subnet mask 255.255.255.0 DHCP server address block 192.168.2.101 - 92.168.2.255 Possible IP addresses for the phone 192.168.2.2 - 192.168.2.100Subnet Mask:
The subnet mask specifies how many parts of an IP address the network prefix must comprise. For example, 255.255.255.0 means that the first three parts of the IP address must be the same for all devices in the network, while the last part is specific to each device. In subnet mask 255.255.0.0, only the first two parts are reserved for the network prefix. Enter the subnet mask that is used by your network.Standard Gateway
Enter the IP address for the standard gateway through which the local network is connected to the Internet. This is generally the local (private) IP address for your router (e.g., 192.168.2.1). Your phone requires this information to be able to access the Internet.Pref. DNS Server:
Enter the IP address for the preferred DNS server. DNS (Domain Name System) allows you to assign public IP addresses to symbolic names. The DNS server is required to convert the DNS name into the IP address when a connection is being established to a server. You can specify the IP address for your router/gateway here. This forwards address requests from the phone to its DNS server. There is no default setting for a DNS server.Altern. DNS Server:
Enter the IP address for the alternate DNS server that should be used in situations where the preferred DNS server cannot be reached. ▶ Once all the settings are complete, press the display key Back to save the configuration settings.IPv6 configuration
  Select IP Address Type.  Press the display key to confirm the selection.  Select Auto-Configuration if your device receives the IP address via a DHCP server. Select Static if your device receives a fixed IP address. If the Auto-Configuration setting is selected, all further settings are automatically configured. They are displayed here and cannot be changed.  If you have selected Static as the address type, you must now create the following settings: - IP Address - Prefix Length and - Pref. DNS Server - Altern. DNS Server Ask your network administrator for your network settings.IP Address
Enter an IP address for your phone. This IP address allows your phone to be reached by other subscribers in your local network (e.g., PC). The IP address comprises 128 bits and is represented by eight blocks of hexadecimal figures from 0 to FFFFFFF that are separated by a colon, e.g., 2001:b021:189:0:205:5dff:fe6b:87. The IP address comprises a prefix and an interface identifier. The length of the prefix (usually 64 bits) is determined by the Prefix Length value.Prefix Length
The prefix length stipulates how many bits of the IP address are used for the network prefix. Enter the prefix length that is used in your network.Pref. DNS Server:
Enter the IP address for the preferred DNS server. DNS (Domain Name System) allows you to assign public IP addresses to symbolic names. The DNS server is required to convert the DNS name into the IP address when a connection is being established to a server. You can specify the IP address for your router/gateway here. This forwards address requests from the phone to its DNS server. There is no default setting for a DNS server.Altern. DNS Server:
Enter the IP address for the alternate DNS server that should be used in situations where the preferred DNS server cannot be reached. ▶ Once all the settings are complete, press the display key Back to save the configuration settings.VLAN tagging
A local network can be divided into logical subnetworks, so-called VLANs (Virtual Local Area Network, standard IEEE 802.1Q). Multiple VLANs share a physical network and its components, e.g., switches. Data packets of a VLAN are not forwarded to another VLAN. VLANs are often used to separate the data traffic of different services (Internet telephony, Internet TV, ...) and to define different priorities for the data traffic. You can operate your phone and a PC connected to your phone's PC port in two different VLANs. You enter the VLAN identifiers (VLAN tag) here, which you get from your network operator.Warning
◆If you operate the PC and the phone in different VLANs, you can no longer access the phone's Web configurator directly from the PC. If you enter an incorrect value here, you must reset the phone to its default settings (→ page 58). After this you must re-establish phone access to the local network. √ → Settings → Local Network    Select VLAN Settings. OK Press the display key to confirm the selection. Select the required setting: No If you do not use VLAN (default).LAN Port only
If you operate the phone and the PC within the same VLAN.LAN and PC Port
If you operate the phone and the PC within different VLANs. OK Press the display key to confirm the selection. Enter the VLAN Identifier and confirm with OK. Value range: 1 – 4094 Define the priority for the different services and confirm with OK. Values: 1 – 7 OK Press the display key to confirm the settings.Priorities
Data packets from VLANs can be prioritised. The priority determines whether the data traffic from a VLAN is given preferential treatment by the network components. For the LAN port you can define the priority for voice and data separately. In the case of a local network with a lot of data traffic, you can achieve better-quality phone connections by giving a high priority to voice data. LAN port: For Voice VLAN Priority and Data VLAN Priority, select the priorities you want for the transfer of voice and data. PC port: ▶ For VLAN Priority, select the priority you want for the transfer of PC data. Range of values and their Class of Service assignments (according to IEEE 802.1p): 0 No priority (Best Effort) 1 Background services, e.g., News Ticker (Background) 2 Not defined 3 General data services (Excellent Effort) 4 Control services, e.g., routing (Controlled Load) 5 V i d e o 6 Voice data (Voice) 7 Top priority for network control software (Network Control) ▶ Once all the settings are complete, press the display key Back to save the configuration settings.Please note
Further options for optimising the voice quality are available in the Web configurator under QoS settings (Quality of Service) → page 81.Web configurator – configuring the phone on a PC
The Web configurator provides you with a user interface that you can use to operate and configure your Gigaset DE410 IP PRO on the PC. The setup assistant makes it easier for you to set your device up for the first time. Prerequisite: Your phone is connected to the local network. In most cases, this connection is established automatically as soon as you connect the device with a network cable ( → page 12). If this is not the case, you establish the connection to the local network via the display menu when you set the device up for the first time ( → page 19).Please note
The Web configurator supports the following browsers: – Mozilla Firefox, version 3.6 or higher - Internet Explorer, version 7 or higher – Apple Safari, version 5 or higherStarting the Web configurator
You will need the IP address for your phone. You will find this via the phone's display menu, in the LAN settings: √ → Settings → Local Network (→ page 60).Please note
The IP address can sometimes change, depending on the settings of the DHCP server in your network.Accessing the Web configurator:
▶ Launch the Internet browser on your PC. ▶ Enter the IP address in the browser's address field: Example: http://168.192.250.10 The login screen appears. ▶ Select the appropriate language. ▶ Select the desired user type and enter the corresponding password: User If you want to operate your phone on the PC. Default password: user Administrator If you want to configure your phone. Default password: admin ▶ Click on OK. The Web configurator will now start. In the following all functions of the Web configurator are described. Please note that in User mode not all functions are available.Please note
For your security, you should change the default passwords ( → page 99).Launching the Web configurator
In administrator mode: If you have not set up a VoIP account yet, the setup assistant screen will appear (→ page 69). If you have already set up a VoIP connection, select the function that you wish to use. ◆ Use the Settings tab to set or change individual functions on your phone (→ page 74). ◆ Open the Status tab to obtain information about the status of your phone (→ page 107).Understanding the Web configurator menu tree
The following illustration shows the Web configurator menu tree. Functions that are available in user mode are marked by an asterisk (*). Running the setup assistant
Only available in administrator mode. This assistant helps you to configure your phone. It will guide you through all the important steps involved in: - Configuring your phone connections - Configuring your e-mail account  Afterwards, you will be able to change all the settings that you create using the setup assistant in the Settings tab (→ page 74). When you have completed the fields on a screen, click on Next >. If you want to go back a screen to change something, click on < Back. Use Cancel to close the setup assistant. ▶ Make sure that you have the registration data for your VoIP provider to hand before you begin the configuration. ▶ Click on Next > to begin the configuration.Configuring a VoIP account
You have the following options for configuring a VoIP account: Auto Configuration Configuration is completed without you needing to enter any information. Your VoIP provider must permit this for your account. Profile Download Your provider's default settings are used. You only have to enter your personal registration data. Manual configuration You create all the settings yourself.Automatic configuration
 ▶ Select Yes if your provider permits automatic configuration for your account and click on Next >. The automatic configuration is now carried out. This may take a few minutes. Once the process is complete, the → Completing configuration screen will appear.Configuration via provider profile
If your provider does not enable automatic configuration, your Gigaset DE410 IP PRO offers a range of provider profiles that make it easy for you to configure your VoIP accounts. Each profile contains the most important configuration settings for the provider concerned. ▶ Click on No if automatic configuration is not permitted and then click on Next >. The Profile Download screen will appear. ▶ Click on Next > to start the configuration. ▶ Select your Country and click on Next >. ▶ Select your Provider and click on Next >. The most important configuration settings will now be loaded. ▶ Click on Next >. The next step is for you to enter → Personal provider data.Configuration without provider profile
If your provider is not on the list, select Other Provider. ▶ Select the required settings for your VoIP account on the following screens. Your provider will supply you with this data.General provider data
Domain
Specify the last part of your SIP address (URI). Example: For the SIP address 987654321@provider.com you would enter provider.com.Proxy Server Address
The SIP proxy is your VoIP provider's gateway server. Enter the IP address or the DNS name of your SIP proxy server. Example: myprovider.com.Proxy Server Port
Enter the number of the communication port that the SIP proxy uses to send and receive signalling data (SIP port). Port 5060 is used by most VoIP providers.Registration Server
Enter the IP address or the DNS name of your registrar server. The registrar is needed when the phone is registered. It assigns your SIP address (username@domain) to the public IP address/port number your phone uses to log in. With most VoIP providers, the registrar server is identical to the SIP server. Example: reg.myprovider.de.Registration Server Port
Enter the communication port used on the registrar. Port 5060 is used in most cases.Registration Refresh Time [sec]
Enter the time intervals at which the phone should repeat the registration with the VoIP server (SIP proxy) (a request will be sent to establish a session). The repeat is required so that the phone's entry in the tables of the SIP proxy is retained and the phone can therefore be reached. The repeat will be carried out for all activated VoIP phone numbers. The default is 120 seconds. If you enter 0 seconds, the registration will not be repeated periodically. ▶ Click on Next >.Network provider data
The phone needs to know its public address in order to receive caller voice data. The SIP protocol recognises the following options: ◆ The phone requests the public address from a STUN server on the Internet (Simple Transversal of UDP over NAT). STUN can only be used with asymmetric NATs and non-blocking firewalls. ◆ The phone does not direct the connection request to the SIP proxy but to an outbound proxy on the Internet that supplies the data packets with the public address. The STUN server and outbound proxy are used alternately to work around the NAT/fire-wall in the router/gateway. ▶ Enter the required data for the STUN server or outbound proxy:STUN enabled
Click on Yes if you want your phone to use STUN as soon as it is used on a router with asymmetric NAT.STUN Server Address
Enter the DNS name or the IP address of the STUN server on the Internet. If you have selected Yes in the STUN enabled field, then you must complete this field.STUN Server Port
Enter the number of the communication port on the STUN server. The default port is 3478.STUN Refresh Time [sec]
Enter the time intervals (seconds) at which the phone should repeat the registration with the STUN server. The repeat is required so that the phone's entry in the tables of the STUN server is retained. The repeat will be carried out for all activated VoIP phone numbers. Ask your VoIP provider for the STUN refresh time if necessary. The default setting is 30 seconds.NAT Refresh Time [sec]
Specify the intervals at which you want the phone to update its entry in the NAT routing table. Specify an interval in seconds that is a little shorter than the NAT session timeout. As a rule you should not change the default value for the NAT update. The default setting is 20 seconds.Outbound Proxy Mode
Specify when the outbound proxy should be used. Always All signalling and voice data sent by the phone is sent to the outbound proxy.Automatically
Data sent by the phone is only sent to the outbound proxy when the phone is connected to a router with symmetric NAT or a blocking firewall. If the phone is behind an asymmetric NAT, the STUN server is used. If you have set STUN enabled to No, or if you have not entered a STUN server, the outbound proxy will be used in all cases. Never The outbound proxy is not used. If you leave the Outbound Server Address field empty, the phone does not respond to the selected mode and operates as if Never were selected.Outbound Server Address
Enter the DNS name or the IP address of your provider's outbound proxy. With many providers, the outbound proxy is identical to the SIP proxy.Outbound Proxy Port
Enter the number of the communication port used by the outbound proxy. The default port is 5060.Automatic Negotiation of DTMF Transmission
DTMF signalling is required, for example, for querying and controlling certain network mailboxes via digit codes or for remote operation of the local voice mail. Select whether the setting should be made automatically. If you select No, you must determine the setting for the DTMF transfer yourself.Send Settings for DTMF Transmission
To send DTMF signals via VoIP, you must define how the key codes are to be converted to DTMF signals and sent: Audio As audible information in the voice channel, i.e., it is not known which key has been pressed. RFC 2833 As a value (= key pressed) in an RTP packet. SIP Info As an "SIP Info" message. The value (= key pressed) is sent as an SIP data packet. Ask your VoIP provider which type of DTMF transmission it supports. ▶ Click on Next >.Personal provider data
In both cases of manual configuration, with and without a provider profile, you now enter the personal registration data that you have received from your VoIP provider. ▶ Enter the following data: - Authentication Name - Authentication Password -Username - Display Name You can also enter a name of your choice for this phone connection. This is advisable if you use multiple VoIP accounts. ▶ Enter a Connection Name. ▶ Click on Next > to finish configuring the VoIP account.Completing configuration
The data for the configured VoIP account is displayed. ▶ To change the settings, click on < Back. ▶ If you want to configure another VoIP account, check the relevant box. In this case, the Web configurator will return to the start screen when you press Next > ( → Configuring a VoIP account). ▶ Click on Finish to end the setup assistant. ▶ Click on Next > to configure another VoIP account.Closing the assistant
You have now successfully configured your phone using the Web configurator. The following data is displayed once again: – The number of VoIP accounts configured - The name of the default account for outgoing calls ▶ Click on Finish to close the assistant and apply the settings. ▶ Click on < Back if you want to make changes to your settings.Configuring phone settings via the Web configurator
The Settings menu of the Web configurator allows you to change settings that you have already made using the phone's display menu or the assistant, or that were the default settings when the phone was delivered. You also have further configuration options. The menu offers the following functions: ◆ Network and Connections (→ page 74) Configure the settings for the local network, server and phone system, set up other VoIP accounts and create the security settings. ♦ Telephony (→ page 84) Edit your configured VoIP accounts, optimise the quality of the voice connections, configure phone functions such as call divert and dialling plans and set up blacklists and voice mail services. ♦ Messaging (→ page 92) Configure the Message Centre (MWI) for your device. ◆ Services (→ page 93) Create settings for using directories. ◆ Function Keys (→ page 96) Assign frequently used functions to the programmable keys on your phone. ◆ System (→ page 97) Change the basic settings on your phone, e.g., date/time or display settings. You can also restart the system or add new firmware.Network and connectors
Only available in administrator mode. All of the settings for connecting your phone to the local network must be correct to enable communication with other devices in the network and phone calls via the Internet. If you use the Web configurator, your phone is already connected to the local network. You can use the Network and Connections menu to change and extend these settings. You can also configure additional VoIP accounts and create settings for phone connections: ◆ LAN settings (→ page 75) ◆ Server and phone systems (→ page 80) ◆ QoS settings (Quality of Service (→ page 81) ◆ VoIP settings(→ page 82) ◆ Security settings (→ page 83)LAN settings
Warning
If an error occurs when you are changing the LAN settings, the PC connection to the phone may be cancelled and you will no longer have access to the Web configurator. If this happens, you must re-establish phone access to the local network via the display menu (→ page 60). Settings → Network and Connections → LAN SettingsAssigning the network address
Network Type
▶ Select the IP protocol that is used in your network (IPv4 or IPv6). You may be asked to configure additional settings depending on your selection.IPv4 configuration
▶ Select Dynamic if your device receives the IP address via a DHCP server. ▶ Select Static if your device receives a fixed IP address. If the Dynamic setting is selected, all further settings are configured automatically. They are displayed and cannot be changed. If you selected Static as the address type, you must create the following settings: IP Address
Enter an IP address for your phone. This IP address allows your phone to be reached by other subscribers in your local network (e.g., PC). The IP address comprises four individual groups of numbers with decimal values from 0 to 255 that are separated by a dot, e.g., 192.168.2.1.Configuring phone settings via the Web configurator
Please note:
- The IP address must be included in the address block used by the router/gateway for the local network. The valid address block is defined by the IP address for the router/gateway and the subnet mask (see example). - The IP address must be unique across the network, which means that it must not be used by another device connected to the router/gateway. - The fixed IP address must not belong to the address block that is reserved for the DHCP server for the router/gateway. Check the settings on the router or ask your network administrator.Example:
Router IP address: 192.168.2.1 Network subnet mask 255.255.255.0 DHCP server address block 192.168.2.101 - 192.168.2.255 Possible IP addresses for the phone 192.168.2.2 - 192.168.2.100Subnet Mask
The subnet mask specifies how many parts of an IP address the network prefix must comprise. For example, 255.255.255.0 means that the first three parts of an IP address must be the same for all devices in the network, while the last part is specific to each device. In subnet mask 255.255.0.0, only the first two parts are reserved for the network prefix. Enter the subnet mask that is used by your network.Standard Gateway
Enter the IP address for the standard gateway through which the local network is connected to the Internet. This is generally the local (private) IP address for your router/gateway (e.g., 192.168.2.1). Your phone requires this information to be able to access the Internet.Preferred DNS Server
Enter the IP address for the preferred DNS server. DNS (Domain Name System) allows you to assign public IP addresses to symbolic names. The DNS server is required to convert the DNS name into the IP address when a connection is being established to a server. You can specify the IP address for your router/gateway here. This forwards address requests from the phone to its DNS server. There is no default setting for a DNS server.Alternate DNS Server
Enter the IP address for the alternate DNS server that should be used in situations where the preferred DNS server cannot be reached.IPv6 configuration
IP Address Type
▶ Select Auto Configuration if your device receives the IP address via a DHCP server. ▶ Select Static if your device receives a fixed IP address. If Auto Configuration is selected, all further settings are made automatically. They are displayed here and cannot be changed. If you selected Static as the address type, you must create the following settings: IP Address
Enter an IP address for your phone. This IP address allows your phone to be reached by other subscribers in your local network (e.g., PC). The IP address comprises 128 bits and is represented by eight blocks of hexadecimal figures from 0 to FFFFFFF that are separated by a colon, e.g., 2001:b021:189:0:205:5dff:fe6b:87. The IP address comprises a prefix and an interface identifier. The length of the prefix (usually 64 bits) is determined by the Prefix Length value.Prefix Length
The prefix length stipulates how many bits of the IP address are used for the network prefix. Enter the prefix length that is used in your network.Preferred DNS Server
Enter the IP address for the preferred DNS server. DNS (Domain Name System) allows you to assign public IP addresses to symbolic names. The DNS server is required to convert the DNS name into the IP address when a connection is being established to a server. You can specify the IP address for your router/gateway here. This forwards address requests from the phone to its DNS server. There is no default setting for a DNS server.Alternate DNS Server
Enter the IP address for the alternate DNS server that should be used in situations where the preferred DNS server cannot be reached.Configuring phone settings via the Web configurator
VLAN tagging
A local network can be divided into logical subnetworks, so-called VLANs (Virtual Local Area Network, standard IEEE 802.1Q). Multiple VLANs share a physical network and its components, e.g., switches. Data packets of a VLAN are not forwarded to another VLAN. VLANs are often used to separate the data traffic of different services (Internet telephony, Internet TV, ...) and to define different priorities for the data traffic. You can operate your phone and a PC connected to your phone's PC port in two different VLANs. You enter the VLAN identifiers (VLAN tag) here. You get them from your network operator.Warning
If you operate the PC and the phone in different VLANs you cannot longer access the phones's Web configurator directly from the PC.▶ Select
No If you don't use VLAN (default). LAN Port only If you operate the phone and the PC within the same VLAN. LAN and PC Port If you operate your phone and the PC within different VLANs.  ▶ Enter the VLAN tag of your virtual network in the VLAN Identifier (1..4094) field. If you have selected LAN and PC Port enter the different VLAN identifiers under VLAN LAN Port and VLAN PC Port. Value range: 1 - 4094Warning
If you enter an incorrect value here, you must reset the phone to its default settings (→ page 58). After this you must re-establish phone access to the local network (→ page 60). On the menus Voice Priority and Data Priority, select the priorities you want for the transfer of voice and data of the LAN port. ▶ If you selected LAN and PC Port additionally select the VLAN Priority for PC data transfer.VLAN priority
Data packets from VLANs can be prioritised. The priority determines whether the data traffic from a VLAN is given preferential treatment by the network components. You can define the priority for voice and data separately. In the case of a local network with a lot of data traffic, you can achieve better-quality phone connections by giving a high priority to voice data. Range of values and their Class of Service assignments (according to IEEE 802.1p): 0 No priority (Best Effort) 1 Background services, e.g., News Ticker (Background) 2 Not defined 3 General data services (Excellent Effort) 4 Control services, e.g., routing (Controlled Load) 5 V i d e o 6 Voice data (Voice) 7 Top priority for network control software (Network Control)Please note
Further options for optimising the voice quality are available under QoS settings (Quality of Service) → page 81.Saving settings
▶ Click on Save to save your settings on the LAN Settings screen.Server and phone systems
If you operate a separate HTTP server or a phone system in your local network, use this screen to configure access to your phone. Settings → Network and Connections → Server and Phone SystemsConfigure HTTP proxy
▶ Select whether you want to release a separate proxy server in the network for your phone. ▶ If Yes, enter the IP address for the proxy server in the Proxy Server Address field. The Proxy Server Port is preset to 80. Change this if your server uses a different port.Own HTTP server settings
▶ If you operate your own HTTP server, enter the communication data.HTTP Port
Enter the number for the port to be used for communication by the HTTP server. The default setting is 80HTTPS Port
Enter the number for the port to be used for secure connections by the HTTP server. The default setting is 443HTTP Connection Type
Select which connections can be established: HTTP Unsecured connection HTTPS Secure connection HTTP + HTTPS Both secure and unsecured connectionsAutomatic logout [min]
Enter the time (minutes) after which an HTTP connection should automatically end if no entries are made.Phone systems
If your phone is connected to a phone system, select what type of phone system it is.Connected with phone system (sample selection)
Gigaset T500/300 The phone is connected to a Gigaset T500 PRO or a Gigaset T300 PRO. These are the recommended phone systems to achieve an optimum support of the telephone features. Standard The phone is connected to any phone system.Asterisk
...Call Manager
Select whether you want to accept calls that are transferred via the Call Manager of the phone system, directly. You have the following options: - via Headset - via Handsfree or - not at all (No)Saving settings
▶ Click on Save to save your settings on the Server and Phone Systems screen.QoS settings (Quality of Service)
On this screen you can optimise the voice quality of your IP telephone. The voice quality depends on the priority of the voice data in the IP network. Prioritising the VoIP data packets is done using the QoS protocol DiffServ (Differentiated Services). DiffServ defines a number of classes for the quality of service and, within these classes, various priority levels for which specific prioritisation procedures are defined. You can specify different QoS values for SIP and RTP packets. SIP packets (Session Initiation Protocol) contain the signalling data, while RTP (Real-time Transport Protocol) is used for the voice transfer. Settings → Network and Connections → QoS Settings  ▶ Enter your chosen QoS values in the SIP ToS/Diffserv (0..63) and RTP ToS/Diffserv (0..63) fields. Value range: 0 - 63. Common values for VoIP (default setting): SIP 34 High service class for fast switching of the data flow (Expedited Flow) RTP 46 Highest service class for fast forwarding of data packets (Expedited Forwarding)Warning
Do not change these values without consulting your network operator first. A higher value does not necessarily mean a higher priority. The value determines the service class, not the priority. The prioritisation procedure used in each case meets the requirements of this class and is not necessarily suitable for transferring voice data. Detailed information on the Diffserv protocol can be found in RFC 2474 and RFC 3168.Saving settings
▶ Click on Save to save your settings on the QoS Settings screen.VoIP settings
On this screen you configure the ports for establishing VoIP connections. Settings → Network and Connections → VoIP Settings "Listen ports" for VoIP connections  ▶ Select the ports on which your phone expects incoming VoIP connections.Use random ports
▶ Select Yes if the phone should use any available ports for the SIP port and RTP port instead of fixed ports. The use of random ports is advisable if you want multiple phones to be operated on the same router/gateway with NAT. The phones must then use different ports so that the NAT for the router/gateway is only able to forward incoming calls and voice data to one (the intended) phone. ▶ If you click on No, the phone uses the ports specified in SIP port and RTP port.SIP port
Specify the local communication port that the phone should use to send and receive signalling data. Specify a number between 1024 and 49152. The default port number for SIP signalling is 5060.RTP port
Specify the local communication port that the phone should use to receive voice data. Enter an even number between 1024 and 49152. The port number must not be the same as the port number in the SIP port field. If you enter an odd number, the next lowest even number will be selected automatically (e.g., if you enter 5003, then 5002 is set automatically). The default port number for voice transmission is 5004.ICE enabled
Choose whether or not to use ICE (Interactive Connectivity Establishment). ICE is similar to STUN ( → page 71), a Session Initiation Protocol (SIP) method for overcoming NAT firewalls.Saving settings
▶ Click on Save to save your settings on the VoIP Settings screen.Security settings
This screen is where you create security settings for your phone. Settings → Network and Connections → Security SettingsRemote management
▶ Select whether you want to Allow access from other networks to the WEB configurator (Yes) or not (No). If you permit Remote Management, this increases the risk of unauthorised access to your device settings. ▶ Select the network protocol to be used for the communication: - TLS (Transport Level Security) - UDP (User Datagram Protocol) - UDP (Transmission Control Protocol)Security settings
On this screen you can download server certificates onto your phone, delete downloaded certificates and specify how invalid certificates should be handled. Server certificates allow a server to be digitally identified via SSL (Secure Sockets Layer). Operating a server with SSL requires a server certificate both for one-way authentication (server to the client) and for two-way authentication (between client and server). A server certificate has to be downloaded onto your device so that the device can carry out authentication. The Server Certificates and CA Certificates lists contain all downloaded certificates. ▶ Select a certificate from one of the lists. ▶ Click on Remove to delete the certificate from the list. ▶ Click on Details to display information about the certificate.Import a local certificate
In order for a certificate to be downloaded to your phone, it must be available in your network. - Click on Browse to search for the file on your PC or in your network. Select the required file. ▶ Click on Upload to download the file onto the device.Invalid Certificates
The list contains all invalid certificates. ▶ Select a certificate from the list. ▶ Click on Accept to accept the certificate anyway. ▶ Click on Reject to reject the certificate.Secure Real Time Protocol (SRTP)
The Secure Real-time Transport Protocol (SRTP) allows voice data transferred with the Real-time Transport Protocol (RTP) to be encrypted. ▶ Activate or deactivate the Secure Real Time Protocol (SRTP). ▶ Select whether you want to Accept Non-SRTP Call or not. If this function is activated, you also accept incoming calls from a number that does not use SRTP. ▶ Select SRTP Security Type Encryption and Authentication - The data is encrypted and the device must authenticate itself to the SIP gateway. Authentication The device must authenticate itself to the SIP gateway but the data is not encrypted. Encryption The data is encrypted but the device does not have to authenticate itself to the SIP gateway. In the Pre-Shared Key for SRTP field, enter the password for the encryption/authentication via SRTP.Saving settings
▶ Click on Save to save your settings on the Security Settings screen.Telephony
The Telephony menu provides the following setting options: - Connections (→ page 85) This is where you can configure your VoIP connections and establish new connections. ◆ Audio (Voice quality) (→ page 87) On this screen you can optimise the voice quality of your VoIP connections. ◆ Ring tones (→ page 89) This is where you select different ring tones for your VoIP connections (only available in user mode). ◆ Call divert (→ page 89) On this screen you can define options for call divert and activate or deactivate this function. ◆ Dialling plans (→ page 90) The Dialling Plans screen is where you can define the use of area codes and VoIP connections for outgoing phone calls and enter the international and local area code for your phone connection. Do not disturb (DND) (→ page 91) You can use the blacklists to block incoming calls from selected numbers and also to block all anonymous calls. ◆ Voice mail services (→ page 92) On this screen you can configure your network mailbox.Connections
Only available in administrator mode. You can establish up to 6 telephony connections (VoIP accounts) for your phone.Settings → Telephony → Connections
On this screen you can - Set up a new connection via Auto Configuration – See the status of the configured connections - Activate or deactivate individual connections - Define which of the connections are used by default for outgoing calls - Change the configuration of connections or establish new connections – Delete existing connections.Setting up a new connection via Auto Configuration
▶ If you want to set up a new connection and your provider allows automatic configuration for the account, click on Start. When the process is complete, the connection is displayed in the list. Connections for the Gigaset DE410 IP PRO
The following information is shown for each configured connection: Name/ Name or number of the VoIP connection / Name of the VoIP provider Provider Status Status of the connection. The following statuses are possible: Registered The connection is registered with the provider. Not registered The connection is not registered with the provider. Registration failed An error occurred during registration. Server not accessible The registrar server specified during configuration is not available. Disabled The connection is deactivated.Activating/deactivating connections
Only activated connections can be used for Internet telephony. ▶ To use a configured connection, select Active.Specifying a default line for outgoing calls
▶ Select Default Send Account for the connection that you want to use as the default line for your phone calls. Only one can be selected.Establishing new connections or editing existing ones
▶ Click on Edit in the row of a configured connection to change its configuration. ▶ Click on Edit in a row without a configured connection to establish a new connection. Only one connection can be configured at a time for mobile phones.Configuring the connections
To do this you need the relevant information about your provider for Internet telephony. In the Connection Name or Number field enter a name of your choice or the phone number for this connection. ▶ Click on Start Profile Download to load a provider profile. An assistant opens to guide you through the next steps. ▶ Select your Country and in the next step your Provider. ▶ If your provider is not in the list, select Other Provider. ▶ Click on Finish. The selected provider profile is loaded.Entering personal provider data
Now enter your personal login data that you received from your VoIP provider. ▶ Enter the following data: - Authentication Name - Authentication Password -Username - Display NameAdvanced settings
You can find further parameters for configuring your VoIP connection under Advanced Settings. ▶ Click on Show next to Advanced Settings. You will find detailed information on configuring a VoIP account in the section entitled Configuring a VoIP account on page 69.Counting missed and accepted calls
Missed and accepted calls for this VoIP account are recorded in the call lists for the phone if this function is activated ( → page 40). ▶ Open the Advanced Settings area. ▶ Select Yes for Missed/accepted calls count if you want to deactivate this function. The default setting is No.Settings for ringer
For each connection, you can define the ring tone. ▶ Open the Advanced Settings area. ▶ Select a Melody. ▶ Click on Test to play back the selected melody.Saving settings
▶ Click on Save to save your settings for the connection.Deleting a connection
▶ Click on Delete connection to delete the displayed connection.Audio (Voice quality)
Only available in administrator mode. The voice quality of your VoIP calls is determined by the codec used for the transmission. To increase the quality, more data must be transmitted. Depending on the bandwidth of your Internet connection, this can then lead to problems with the volume of data – especially if two VoIP calls are made simultaneously – so that the transmission no longer takes place smoothly. The following settings allow you to adjust your Gigaset to your individual Internet connection.Settings → Telephony → Audio
You can set the following parameters for the voice quality: Packed time for RTP packages
▶ Select the interval for sending RTP packets (20 or 30 ms). RTP (Real-time Transport Protocol) is a protocol for the continuous transmission of audiovisual data (streams) via IP-based networks.Voice quality
▶ Select the voice quality that matches the bandwidth of your DSL connection. - Optimised for high bandwidth - Optimised for low bandwidth - Select Own Codec preference if you want to determine the codecs yourself. Both parties involved in a phone connection (caller/sender and recipient) must use the same voice codec. The voice codec is negotiated between the sender and the recipient when establishing a connection. You can influence the voice quality by selecting (bearing in mind the bandwidth of your Internet connection) the voice codecs your phone is to use, and specifying the order in which the codecs are to be suggested when a VoIP connection is established. ▶ Select the required codecs and define the sequence in which they should be used. The following voice codecs are supported by your phone: G.722 The broadband voice codec G.722 works at the same bit rate as G.711 (64 kbit/s per voice connection) but at a higher sampling rate (16 kHz) and therefore provides excellent sound quality. G.711 a law/G.711 μ law Excellent voice quality (comparable with ISDN). The necessary bandwidth is 64 kbit/s per voice connection. G.726 Good voice quality (inferior to that with G.711 but better than with G.729). Your phone supports G.726 with a transmission rate of 32 kbit/s per voice connection. iLbc Average voice quality. This codec works with 30-ms or 20-ms blocks. The data rate is 13.33 kbit/s (30-ms blocks) or 15.2 kbit/s (20-ms blocks). G.729A Average voice quality. The necessary bandwidth is less than or equal to 8 kbit/s per voice connection.Silence suppression
Silence suppression means that no data packets are sent during a pause in speaking. This means a lower data volume but call participants may interpret it as an interruption to the connection. ▶ Select No if you do not want silence suppression. The default setting is Yes.Saving settings
▶ Click on Save to save your settings on the screen.Ring tones
Only available in user mode. In administrator mode you set the ring tones when configuring the connection ( → page 87). You can set an individual ring tone for each configured VoIP connection. Settings → Telephony → Invalid proxy server address. An entry exists for each VoIP connection. ▶ Select a Melody form the list. ▶ Click on Test to play back the selected melody.Saving settings
▶ Click on Save to save your settings on the screen.Please note
You can upload further ring tones from the PC to your telephone ( → page 104).Call divert
For each configured VoIP account you can automatically forward incoming calls to another phone number. Settings → Telephony → Call Divert  ▶ Specify for each VoIP account in which cases a call should be diverted. None No call divert All Call divert for all incoming calls No Answer Call divert if you do not answer the call In the Waiting time for no answer (value range: 1 - 600 sec) field enter the time in seconds after which call divert is to be activated. When Busy Call divert if you are currently speaking to another participant ▶ Enter the Phone Number to which calls are to be forwarded. ▶ Click on Save to save your settings on the screen.Configuring phone settings via the Web configurator
Dialling plans
Only available in administrator mode. You can use dialling plans to define which phone numbers should be called using which configured VoIP account and whether an area code should be dialled first.Settings → Telephony → Dialling Plans
 ▶ Enter the Phone Number that the dialling plan is to apply to. ▶ Select Use Area Codes if you want to call this number with an area code. ▶ Select the connection that should be used to call this phone number. ▶ Enter a name for this dialling plan in the Comment field. ▶ Click on Add to add the rule to the list. ▶ Click on Delete to delete a rule from the list. ▶ Select Active if you want to activate the rule.Area codes
Save the complete area code (with international code) for the area in which you are using the phone. In general, you must always dial the area code for VoIP calls – even for local calls. To avoid having to dial the area code for local calls, your phone prefixes all VoIP calls in the local area with the area code entered, i.e., all numbers that do not begin with 0 – even when dialling numbers from the directory and other lists. Exceptions: Numbers for which you have defined dialling plans here.  ▶ Select your Country. The fields under International show the Prefix and the Code Number for the selected country. Below Local, enter the Prefix of your phone and the Code Number for your location. Enter the full area code for the city that you are calling from. Otherwise errors may occur with phone connections or during data exchange (e.g., between a fixed line network and a mobile network).Access code
The prefix is automatically added to numbers during dialling. ▶ Define when it should be used: \- None (if you do not use an access code) – With numbers from Directory & Call lists \- With All numbersSaving settings
▶ Click on Save to save your settings on the Dialling Plans screen.Do not disturb (DND)
Block individual phone numbers and/or all anonymous calls. You will then be unavailable for these calls; your phone will not ring. Settings → Telephony → Do Not Disturb  ▶ Select Yes to activate the Do Not Disturb function. ▶ Enter the Name and Phone Number for the call. ▶ Click on Add to save the entry to the do not disturb list. ▶ Click on Delete to delete an entry. ▶ Click on Delete all to delete all entries. ▶ Click on Block anonymous caller to block all anonymous calls. ▶ Click on Save to save your settings on this screen.Configuring phone settings via the Web configurator
Voice mail services
Only available in administrator mode. Some VoIP providers offer answering machines on the network – network mailboxes. These accept incoming calls on the corresponding VoIP phone number. You can access voice mails on the network mailbox via the display menu (→ page 50) or the Message Centre (→ page 51). To record all calls, set up a network mailbox for each of your VoIP accounts. Settings → Telephony → Voice Mail Services  ▶ Enter the Mailbox Number for the VoIP connection and activate the network mailbox. ▶ Click on Save to save the settings.Messaging
Only available in administrator mode. The Messaging menu provides the option to configure the behaviour of the Message Centre key (MWI = Message Waiting Indication).MWI light
The Message Centre allows you to access your voice mails, missed calls, e-mails and missed alarms at the press of a key (☑) (→ page 51). This key flashes if a new message has been received. You can switch the flashing on or off for every message type. (MWI = Message Waiting Indication) Settings → Messaging → MWI Light  ▶ Select the message type for which the receipt of a new message should be indicated by a flashing Message Centre key. \- Missed Calls - Voice Mail ▶ Select whether the MWI notification (the receipt of a new message) should also be indicated by a beep (beep) or only by flashing (silent). ▶ Click on Save to save the settings.Services
Only available in administrator mode. The Services menu offers the following functions: ◆ Assigning an online directory (→ page 93) ◆ Assigning an LDAP directory (→ page 95)Online directory
If you want to use an online directory ( → page 47), select the provider on this screen who supplies the directory on the Internet. Also specify which service you want to use. Settings → Services → Online Directory The available provider directories are displayed.  ▶ Select the providers whose online directories you want to use by selecting the check boxes under Select. ▶ If you select the Automatic look-up option, when a call comes in the online service automatically looks up the name of the caller in the online directory. This function must be available for the provider directory.Configuring an additional provider
To use the online services of another provider, enter the access data under Settings for additional provider: - Provider Name - Server Address -Username - P a s s w o r dConfiguring phone settings via the Web configurator
▶ Select the service(s) you want to use: - White Pages public directory supplied on the Internet by the provider entered above - Yellow Pages yellow pages supplied on the Internet by the provider entered above - Private NetDirectory directory managed by yourself, if enabled by your provider You can enable one, two or all three services.  ▶ Enter a name for each of the selected services in the Name of directory field. This is the name under which the directory will be displayed on your device (→ page 47). ▶ Choose whether to allow Automatic look-up in each case.Saving settings
▶ Click on Save to save your settings on the Online Directory screen.LDAP directory
If your corporate network provides a directory via an LDAP server, you can access this on your phone (LDAP = Lightweight Directory Access Protocol). You can set up the function on this screen. You will need information about the configuration of the LDAP server to do this.Settings → Services → LDAP
▶ Enter a name in the Name of directory field. This is the name under which the directory will be displayed on your device (→ page 46). ▶ Enter all the data for your LDAP server and the directory: LDAP Name Filter LDAP Number Filter LDAP filters can be used to specify criteria for searches for specific objects in the directory, e.g., all users whose first name starts with "A" or all users whose post code begins with a specific number and who have not set the display name attribute etc. LDAP Name Attributes Defines which information should be delivered as the search result for the search by name, e.g., surname only, surname and first name etc. LDAP Number AttributesDefines which information should be delivered as the search result for the search by number, e.g., fixed line network number only, mobile phone number and IP phone number etc. LDAP Display Name Format for displaying names. Server Address IP address for the LDAP server in your network. Server Port Port number that is used to provide the LDAP service. The default setting is 389 LDAP Search Base Range in the hierarchical LDAP database where the search begins. All areas have defined designations. Username Access ID for the LDAP server. Password Password for the access ID to the LDAP server. Max. Hits Maximum number of search results to be displayed. The default setting is 50 ▶ Select Yes for LDAP lookup for incoming calls if a search should be made for a caller in the LDAP directory instead of in the local directory.Saving settings
▶ Click on Save to save your settings on this screen.Function keys
On this screen you decide on the assignment of the directory key and programme the function keys. Settings → Function KeysAssigning the directory key
You can use the directory key 📁 (navigation key ⏻) to open the local directory by default (→ page 43). You can change this setting. ▶ Select which directory you want to access with the Directory Key: - Local Directory (local directory → page 43) - LDAP (corporate directory → page 46) - Online (page 47)ctory ( This entry is only shown if an online directory is configured ( → page 93). In this case the service name is displayed here.Programmable keys
Your Gigaset DE410 IP PRO allows you to assign frequently used functions or phone numbers to up to 7 keys so that you can access them with one key press. You can increase the number of function keys by connecting extension modules ( → page 15). All available function keys are shown with the Phone Number and Key setting. ▶ Click on Edit to assign a phone number or function to a Key. The window for programming the selected key will open.  ▶ Select the required function from the Function Select list. Line Assigns a specific connection to the function key. You can use the key to make a call via this connection or to answer an incoming call for this connection. The key flashes if a call comes in and lights up if the line is busy. ▶ Select the required connection. All configured connections are displayed for you to choose from ( → page 85).Park + Orbit
This function key is used to "park" a call. The participant hears the hold music. This function key allows you to transfer calls within a group, which share a common line. It will be configured on all extensions for the group. The "Park + Orbit" keys on all extensions flash if a call has been "parked" on an extension. The call can be picked up on any extension by pressing the key. ▶ Enter the Phone Number of the shared line that is configured on the phone system as identifier. Please note: This function is only available if your Gigaset DE410 IP PRO is connected to a phone system supporting Park + Orbit, e.g. Gigaset T500.Speed Dial
Assigns the speed dial for a phone number to the function key. ▶ Enter the phone number that is to be dialled using this function key. BLF A function key that is configured as BLF (Busy Lamp Field) indicates the status of a shared line. It will be configured on all extensions for the group. The keys will flash on all extensions if a call comes in and light up if the line on any extension is busy. No actions are possible for this key. ▶ Enter the Phone Number of the shared line that is configured on the phone system as identifier.Call Divert
Assigns a call divert to the function key. ▶ Enter the connection for which you want the call divert to apply and enter the Phone Number to which the calls are to be diverted. The call divert set up here applies to all calls. To configure different call-divert rules, use the screen Settings → Telephony → Call Divert (→ page 89). None Nothing assigned ▶ Click on Save to accept the key assignment. You will now be returned to the Function Keys screen, where you can programme more keys.Saving settings
▶ Click on Save to save the settings on this screen.System settings
You can create the following settings in the System menu: ◆Define the date and time or time server ◆ Change the security passwords for administrator and user identification (→ page 99) ◆ Display – set brightness for the display as well as date and time format (→ page 100) ◆ Edit your local directory (→ page 101) ◆ Edit your call lists (→ page 103) ◆ Load ring tones (→ page 104) ◆ Restart the device and restore factory settings (→ page 104) ◆ Save and restore telephone data (→ page 105) ◆ Perform and configure a firmware update (→ page 105)Configuring phone settings via the Web configurator
Date and time
Only available in administrator mode. On this screen you can specify a time server or enter the date and time manually. Settings → System → Date and TimeDefining the time server
▶ Select Yes for Automatic adjustment of system time with time server.  ▶ Enter the IP address for the required time server in the Time Server field. The most recent synchronisation carried out with the time server is shown.Entering the date and time manually
▶ Select No for Automatic adjustment of system time with time server..  ▶ Enter the Date and Time: \- Time format: ss:mm \- Date format: dd.mm.yyyy If you have changed the date format in the System → Display menu, enter the date here as well in the mm.dd.yyyy format (→ page 100).Setting the time zone
▶ Select your Time Zone from the list. ▶ Activate the Automatically adjust clock to summer time changes option if necessary.Saving settings
▶ Click on Save to save the settings on this screen.Security
Access to the Web configurator is password-protected for security purposes.Default settings: User name Password
Administrator admin User userSettings → System → Security
On this screen you can change the passwords for administrator identification and user identification. For security reasons, you should always do this after getting started with your device and then at regular intervals.  ▶ Enter the old password. ▶ Enter a new password in the field below and repeat it in the Confirm New Password field.Saving settings
▶ Click on Save to save the settings on this screen.Display
On this screen you can configure a range of settings for your phone display. Settings → System → DisplaySetting the display brightness and contrast
You can set the display brightness to one of four levels and the contrast to one of six. These measures help to optimise the power consumption of your device. ▶ Select the Brightness of the display: 1, 2 or 3 ▶ Select the Contrast: 1 - 6Defining the format for the display screen
▶ Select your required setting: Device Language Language for the display screens Web Interface Language Language for the Web configurator Tone Scheme Different countries have different conventions for ringer settings, e.g., for the dialling tone, the busy tone etc. Select the country of the ringer schedule you want to use. Date Format The format that the date is shown in: dd.mm.yyyy e.g., 03.12.2011 for 3 December 2011 mm.dd.yyyy e.g., 02.17.2011 for 17 February 2011 24-hour clock Select the format for the time display: On time is displayed in 24-hour format: e.g., 18:15 Off time is displayed in 12-hour format: e.g., 6:15 PM Sort Criteria Directory Select whether your local directory should be sorted by first names or surnames.Saving settings
▶ Click on Save to save the settings on this screen.Local contacts
This screen is for managing your local directory. All functions described here are also available via the phone's display menu (→ page 43). Settings → System → Local Contacts  The entries in your local directory are displayed in alphabetical order with the contact name and the number you have defined as the default number.Dialling a number from the directory
Click on the phone symbol 📋 next to the number. The number is dialled via the phone's handsfree function. ▶ Click on to end the call or to interrupt the dialling.Searching for an entry
In the search field in the top right, enter a name or part of a name and click on the magnifier symbol Q. All entries beginning with the entered string are displayed.Creating a new entry
▶ Click on the button to create a new entry.  ▶ Enter the First name and Surname as well as the numbers for the contact. You can enter two private, business and/or mobile numbers each. ▶ If you have entered multiple numbers, select one of them as the Default Number. ▶ Click on to save the entry.Displaying an entry
▶ Click on the arrow ▶ in front of the name to display the entry in full.  ▶ Click on the arrow ▼ in the top left to hide the contact details and return to the list.Editing the entry
▶ Click on to edit the entry.Deleting the entry
▶ First click on and then on to delete the entry.All calls
This screen is for managing your call lists. All features described here are also available via the phone's display menu (→ page 40).  Date/Time Time of the call/conference call. Use ▼ □▲ to sort the list in ascending/descending order according to date. Line VoIP account used to make the call. → Outgoing call made by you ← Accepted call <※ Missed call Caller Name, if known, and number of the caller. \- Call participant. End the call/conference call with this participant. Duration Time spent connected to this participant. ✗ Delete entry.Loading ringer tones
You can download ringer tones from the PC to the device's resource directory. The data on the PC must be in the following format:| Format | Size |
| WAV CCITT u-Law 8k mono max. 40 | KB |
Rebooting and resetting to factory settings
Only available in administrator mode. You may have to reboot your phone in certain operational situations, for instance to save changes you have made. Settings → System → Reboot and Reset  ▶ Click on OK next to Reboot to reboot the system. All phone settings can be reset to the Factory settings. This deletes all settings, lists and directory entries! ▶ Click on OK next to Start factory reset to reset the phone to the default settings.Please note
You can also use the display menu or the reset button on the device's underside to reset the device (→ page 58).Saving and restoring telephone data
Only available in administrator mode. You can save data from your phone onto your PC and, if necessary, restore it back onto the phone. Settings → System → Save and Restore Transferring data from phone to PC
▶ Select which data you want to save: - Directory - Invalid proxy server address. – Phone settings (Configfile) (configuration file) ▶ Click Save to save the selected data to the PC and choose a storage location.Transferring data from PC to phone
▶ Use the Browse button to select the file you want from your PC's file system, or enter the complete path name of the file in the Transfer data from PC to device field. ▶ Click on Restore.Updating firmware
Only available in administrator mode. Firmware updates are available from the Gigaset website www.gigaset.com/pro so you can ensure your phone is always up to date. You can find the current version of your firmware on the Device status screen (page 107). You can update your phone automatically or manually. Your provider for Internet telephony can also deliver updates for the phone firmware and/or for the profile of your VoIP account. Any PC connected to the phone will not be able to access the local network and the Internet during the firmware update. Settings → System → Firmware UpdateUpdating firmware automatically
 ▶ Select Yes for Automatic check for software updates and/or Automatic check for profile updates. ▶ Enter the Web address for the automatic update search in the Data server field. ▶ Click on Update firmware to start the search and to load the new firmware.Updating manually
▶ Download the new firmware from the Internet onto your PC and then open the firmware update screen.  ▶ Select No for Automatic check for software updates and/or Automatic check for profile updates. ▶ Click on Browse and select the file from the file system on your PC. ▶ Click on Load to start the update process. When the firmware update is started, the device first checks whether the prerequisites are in place for successfully downloading the firmware. A successful update is indicated by an advisory message.Saving settings
▶ Click on Save to save your settings on the screen. Only available in administrator mode. You will find information about the status of the phone and diagnostic information in the Status menu.Device
Status → Device This screen shows general information about your phone.IP Configuration
IP Address The phone's current IP address within the local network. MAC Address LAN The phone's device address.Software
Firmware Version Version of the firmware currently loaded on the phone. You can download updates of the firmware to your phone (→ page 105).VoIP status
List of all configured VoIP connections with the Name, Status and which connection is configured as the Default Send Account.Date and time
Current Time and Date in the device and the date of the last synchronisation with the time server.System Log
Status → System Log System events e.g., system start, assigning an IP address etc., are recorded in the system log. This screen shows the system log. The events are displayed with the Date, Time and Message. This information may be useful in the event of problems involving Customer Care. ▶ Click on Reload to update the display. ▶ Click on Delete all entries to delete the entries.SIP protocol
Status → SIP Protocol SIP logging stores information about the set-up and disconnection of phone connections and about registering your phone. This information is useful for diagnosing errors and can be of use to Customer Care for problem solving. ▶ Click on Reload to update the display. ▶ Click on Delete all entries to delete the entries.PCAP logging
Status → PCAP Logging On this screen you can create a PCAP log file and save it for analysis at a later stage. PCAP (Packet Capture) analyses the data traffic in the network at the phone-Ethernet interface. This recording is carried out for diagnostic purposes and should only be made if requested by service personnel. ▶ Click on Start. Every incoming or outgoing data packet to or from your phone is recorded. ▶ Click on Stop to stop recording. ▶ To save the PCAP file (pcapdump.pcap), click on Store and select a directory in the file system on your PC where the file should be stored.Please note
◆ The information is recorded in a ring buffer that has limited storage capacity. If the buffer is full, the first packets will be overwritten and lost. You should therefore attempt to record scenarios that are as short as possible. - This logging uses a lot of memory and CPU power and can negatively affect how the phone behaves (e.g., slowing the display screen, distorting the ringer etc.)Caring for your telephone
Wipe the unit with a damp cloth or an antistatic cloth. Do not use solvents or microfibre cloths. Never use a dry cloth; this can cause static.Contact with liquid ⚠!
If the device comes into contact with liquid: 1 Unplug the power supply. 2 Allow the liquid to drain from the device. 3 Pat all parts dry. Place the device (the keypad facing down) in a dry, warm place for at least 72 hours (not in a microwave, oven etc.). 4 Do not switch on the device again until it is completely dry. When it has fully dried out, you will normally be able to use it again. In rare cases, contact with chemical substances can cause changes to the telephone's exterior. Due to the wide variety of chemical products available on the market, it was not possible to test all substances.Using insert strips
The phone is supplied with insert strips for the function keys. If you require more blank insert strips for the function keys, they are available as a PDF file at www.gigaset.com/pro.Using Gigaset QuickSync – additional functions for the PC interface
You can synchronise your handset directory with Outlook. The Gigaset QuickSync program must be installed on your computer to do so. This program is available on the Internet at www.gigaset.com/pro. Specifications| LAN 2 port LAN switch: 10 Mbit, 100 | Mbit |
| Headset connections corded | |
| Power supply 100–240 V, ~50/60 Hz | |
| Power over Ethernet PoE, IEEE 802.3 | af, class 3 |
| Power consumption (standby) 4.6 W | |
| Environmental conditions in operation | ±0°C to +45°C,10% to 95% relative humidity |
| Language codecs G.711 μ-law/a-law | G.722, G.726, G.729AB, iLbc |
| Quality of Service (QoS) RSVP/DiffServ (RFC2474, RFC2475) | |
| VoIP protocols SIP (RFC3261, RFC2543), RTP | |
| VoIP security SRTP (RFC3711), TLS (RFC2246), SIPS | |
| Internet protocols IPv4 (RFC0791), IPv6(RFC2460) | |
| Further protocols STUN, ICE, TCP, DHCP |
Questions and answers
If you have any queries about the use of your telephone, visit our website at www.gigaset.com/pro for assistance.Authorisation
This device, in combination with an external modem, is intended for connection to your telecommunications network (LAN IEEE 802.3) This device is intended for use within the European Economic Area and Switzerland. If used in other countries, it must first be approved nationally in the country in question. Country-specific requirements have been taken into consideration. We, Gigaset Communications GmbH, declare that this device meets the essential requirements and other relevant regulations laid down in Directive 1999/5/EC. A copy of the 1999/5/EC Declaration of Conformity is available at this Internet address: www.gigaset.com/docs CE 0682Our environmental mission statement
We, Gigaset Communications GmbH, bear social responsibility and are actively committed to a better world. Our ideas, technologies and actions serve people, society and the environment. The aim of our global activity is to secure sustainable life resources for humanity. We are committed to taking responsibility for our products throughout their entire life cycle. The environmental impact of products, including their manufacture, procurement, distribution, use, service and disposal, is evaluated early on, during product and process design. Further information on environmentally friendly products and processes is available on the Internet at www.gigaset.com.Environmental management system
 Gigaset Communications GmbH is certified according to the international standards EN 14001 and ISO 9001. ISO 14001 (Environment): Certified since September 2007 by TüV SÜD Management Service GmbH. ISO 9001 (Quality): Certified since 17/02/1994 by TüV Süd Management Service GmbH.Disposal
All electrical and electronic products should be disposed of separately from the municipal waste stream via designated collection facilities appointed by the government or the local authorities.  This crossed-out wheeled bin symbol on the product means the product is covered by the European Directive 2002/96/EC. The correct disposal and separate collection of your old appliance will help prevent potential negative consequences for the environment and human health. It is a precondition for reuse and recycling of used electrical and electronic equipment. For more detailed information about disposal of your old appliance, please contact your local council refuse centre or the original supplier of the product.Using free software
GNU GPL, GNU LGPL, BSD licence, OpenSSL licence
The Gigaset DE410 IP PRO includes free software that is licensed under the GNU General Public Licence. This free software was developed by a third party and is protected by copyright. The software is provided free of charge. You are authorised to use this free software in accordance with the above-mentioned licence conditions. In the event of contradictions between these licence conditions and the Gigaset Communications GmbH licence conditions that apply to the software, the above-mentioned licence conditions shall take precedence for the free software. The GNU General Public Licence (GPL) is supplied with this product. The licences can be read in the following chapters. In addition, you can download the licence conditions from the Internet: ◆ The GPL is available on the Internet at: www.fsf.org/licensing/licenses/gpl.txt ◆ Unauthorised translations of the GPL are available on the Internet at: www.gnu.org/licenses/translations.html ◆ The source text, including copyright notices for the free software, is available on the Internet at: www.gigaset.com/opensource For more information and Internet links to the source text of the free software, see the Online Support pages on the Internet at: www.gigaset.com/uk/service or www.gigaset.com/customercare Use of the free software included with this product, that goes beyond the program sequence intended by Gigaset Communications GmbH, shall be at the user's own risk and no claim based on liability for defects can be made against Gigaset Communications GmbH. The GNU General Public Licence contains references to the liability for defects of the authors or other holders of rights to the free software. You shall have no right to assert a claim against Gigaset Communications GmbH based on liability for defects if a defect in the product was or could have been caused by changes you have made to the programs or their configuration. Furthermore, you shall have no right to assert a claim against Gigaset Communications GmbH based on liability for defects if the free software violates the copyright of third parties. Gigaset Communications GmbH shall provide no technical support for the software, including the free software included within it, if it has been changed.Open source software licences
GNU General Public Licence (GPL)
Version 2, June 1991 Copyright (C) 1989, 1991 Free Software Foundation, Inc. 59 Temple Place, Suite 330, Boston, MA 02111-1307 USA Everyone is permitted to copy and distribute verbatim copies of this licence document, but changing it is not allowed.Preamble
The licences for most software are designed to take away your freedom to share and change it. By contrast, the GNU General Public Licence is intended to guarantee your freedom to share and change free software – to make sure the software is free for all its users. This General Public Licence applies to most of the Free Software Foundation's software and to any other program where the authors commit to using it. (Some other Free Software Foundation software is covered by the GNU Lesser General Public Licence instead.) You can apply it to your programs, too. When we speak of free software, we are referring to freedom, not price. Our General Public Licences are designed to make sure that you have the freedom to distribute copies of free software (and charge for this service if you wish), that you receive source code or can get it if you want it, that you can change the software or use pieces of it in new free programs, and that you know you can do these things. To protect your rights, we need to impose restrictions that forbid anyone to deny you these rights or to ask you to surrender the rights. These restrictions translate into certain responsibilities for you if you distribute copies of the software, or if you modify it. For example, if you distribute copies of such a program, whether gratis or for a fee, you must give the recipients all the rights that you have. You must make sure that they, too, receive or can get the source code. And you must show them these terms so they know their rights. We protect your rights with two steps: (1) copyright the software, and (2) offer you this licence which gives you legal permission to copy, distribute and/or modify the software. Also, for each author's protection and ours, we want to make certain that everyone understands that there is no warranty for this free software. If the software is modified by someone else and passed on, we want its recipients to know that what they have is not the original, so that any problems introduced by others will not reflect on the original authors' reputations. Finally, any free program is threatened constantly by software patents. We wish to avoid the danger that redistributors of a free program will individually obtain patent licences, in effect making the program proprietary. To prevent this, we have made it clear that any patent must be licensed for everyone's free use or not licensed at all. The precise terms and conditions for copying, distribution and modification follow.GNU GENERAL PUBLIC LICENCE
TERMS AND CONDITIONS FOR COPYING, DISTRIBUTION AND MODIFICATION
0. This Licence applies to any program or other work which contains a notice placed by the copyright holder saying it may be distributed under the terms of this General Public Licence. The "Program", below, refers to any such program or work, and a "work based on the Program" means either the Program or any derivative work under copyright law: that is to say, a work containing the Program or a portion of it, either verbatim or with modifications and/or translated into another language. (Hereinafter, translation is included without limitation in the term "modification".) Each licensee is addressed as "you". Activities other than copying, distribution and modification are not covered by this Licence; they are outside its scope. The act of running the Program is not restricted, and the output from the Program is covered only if its contents constitute a work based on the Program (independent of having been made by running the Program). Whether that is true depends on what the Program does. 1. You may copy and distribute verbatim copies of the Program's source code as you receive it, in any medium, provided that you conspicuously and appropriately publish on each copy an appropriate copyright notice and disclaimer of warranty, keep intact all the notices that refer to this Licence and to the absence of any warranty, and give any other recipients of the Program a copy of this Licence along with the Program. You may charge a fee for the physical act of transferring a copy, and you may, at your discretion, offer warranty protection in exchange for a fee. 2. You may modify your copy or copies of the Program or any portion of it, thus forming a work based on the Program, and copy and distribute such modifications or work under the terms of Section 1 above, provided that you also meet all of these conditions: a) You must cause the modified files to carry prominent notices stating that you changed the files and the date of any change. b) You must cause any work that you distribute or publish, that in whole or in part contains or is derived from the Program or any part thereof, to be licensed as a whole at no charge to all third parties under the terms of this Licence. c) If the modified program normally reads commands interactively when run, you must cause it, when running is commenced for such interactive use in the most ordinary way, to print or display an announcement including an appropriate copyright notice and a notice that there is no warranty (or else, saying that you provide a warranty) and that users may redistribute the program under these conditions, and telling the user how to view a copy of this Licence. (Exception: if the Program itself is interactive but does not normally print such an announcement, your work based on the Program is not required to print an announcement.) These requirements apply to the modified work as a whole. If identifiable sections of that work are not derived from the Program, and can be reasonably considered independent and separate works in themselves, then this Licence, and its terms, do not apply to those sections when you distribute them as separate works. But when you distribute the same sections as part of a whole which is a work based on the Program, the distribution of the whole must be on the terms of this Licence, in which the permissions for other licensees extend to the entire whole, and thus to each and every part regardless of who wrote it.Protecting our environment
Thus, it is not the intent of this section to claim rights or contest your rights to work written entirely by you; rather, the intent is to exercise the right to control the distribution of derivative or collective works based on the Program. In addition, mere aggregation of another work not based on the Program with the Program (or with a work based on the Program) on a volume of a storage or distribution medium does not bring the other work under the scope of this Licence. 3. You may copy and distribute the Program (or a work based on it, under Section 2) in object code or executable form under the terms of Sections 1 and 2 above, provided that you also do one of the following: a) Accompany it with the complete corresponding machine-readable source code, which must be distributed under the terms of Sections 1 and 2 above on a medium customarily used for software interchange; or, b) Accompany it with a written offer, valid for at least three years, to give any third party, for a charge no more than your cost of physically performing source distribution, a complete machine-readable copy of the corresponding source code, to be distributed under the terms of Sections 1 and 2 above on a medium customarily used for software interchange; or, c) Accompany it with the information you received as to the offer to distribute corresponding source code. (This alternative is allowed only for non-commercial distribution and only if you received the program in object code or executable form with such an offer, in accordance with sub-section b above.) The source code for a work means the preferred form of the work for making modifications to it. For an executable work, complete source code means all the source code for all modules it contains, plus any associated interface definition files, plus the scripts used to control compilation and installation of the executable. However, as a special exception, the source code distributed need not include anything that is normally distributed (in either source or binary form) with the major components (compiler, kernel and so on) of the operating system on which the executable runs, unless that component itself accompanies the executable. If distribution of executable or object code is made by offering access to copy from a designated place, then offering equivalent access to copy the source code from the same place counts as distribution of the source code, even though third parties are not compelled to copy the source along with the object code. 4. You may not copy, modify, sub-license or distribute the Program except as expressly provided under this Licence. Any attempt otherwise to copy, modify, sub-license or distribute the Program is void, and will automatically terminate your rights under this Licence. However, parties who have received copies, or rights, from you under this Licence will not have their licences terminated so long as such parties remain in full compliance. 5. You are not required to accept this Licence, since you have not signed it. However, nothing else grants you permission to modify or distribute the Program or its derivative works. These actions are prohibited by law if you do not accept this Licence. Therefore, by modifying or distributing the Program (or any work based on the Program), you indicate your acceptance of this Licence to do so, and all its terms and conditions for copying, distributing or modifying the Program or works based on it. 6. Each time you redistribute the Program (or any work based on the Program), the recipient automatically receives a licence from the original licensor to copy, distribute or modify the Program subject to these terms and conditions. You may not impose any further restrictions on the recipients' exercise of the rights granted herein. You are not responsible for enforcing compliance by third parties to this Licence. 7. If, as a consequence of a court judgment or allegation of patent infringement or for any other reason (not limited to patent issues), conditions are imposed on you (whether by court order, agreement or otherwise) that contradict the conditions of this Licence, they do not excuse you from the conditions of this Licence. If you cannot distribute so as to satisfy simultaneously your obligations under this Licence and any other pertinent obligations, then as a consequence you may not distribute the Program at all. For example, if a patent licence would not permit royalty-free redistribution of the Program by all those who receive copies directly or indirectly through you, then the only way you could satisfy both it and this Licence would be to refrain entirely from distribution of the Program. If any portion of this section is held invalid or unenforceable under any particular circumstance, the remainder of the section is intended to apply and the section as a whole is intended to apply in other circumstances. It is not the purpose of this section to induce you to infringe any patents or other property right claims or to contest validity of any such claims; this section has the sole purpose of protecting the integrity of the free software distribution system, which is implemented by public licence practices. Many people have made generous contributions to the wide range of software distributed through that system in reliance on consistent application of that system; it is up to the author/donor to decide if he or she is willing to distribute software through any other system and a licensee cannot impose that choice. This section is intended to make thoroughly clear what is believed to be a consequence of the rest of this Licence. 8. If the distribution and/or use of the Program are restricted in certain countries either by patents or by copyrighted interfaces, the original copyright holder who places the Program under this Licence may add an explicit geographical distribution limitation excluding those countries, so that distribution is permitted only in or among countries not thus excluded. In such a case, this Licence incorporates the limitation as if written in the body of this Licence.Protecting our environment
9. The Free Software Foundation may publish revised and/or new versions of the General Public Licence from time to time. Such new versions will be similar in spirit to the present version, but may differ in detail to address new problems or concerns. Each version is given a distinguishing version number. If the Program specifies a version number of this Licence which applies to it and "any later version", you have the option of following the terms and conditions either of that version or of any later version published by the Free Software Foundation. If the Program does not specify a version number of this Licence, you may choose any version ever published by the Free Software Foundation. 10. If you wish to incorporate parts of the Program into other free programs for which the distribution conditions are different, write to the author to ask for permission. For software which is copyrighted by the Free Software Foundation, write to the Free Software Foundation; we sometimes make exceptions for this. Our decision will be guided by the two goals of preserving the free status of all derivatives of our free software and of promoting the sharing and reuse of software generally.NO WARRANTY
11. BECAUSE THE PROGRAM IS LICENSED FREE OF CHARGE, THERE IS NO WARRANTY FOR THE PROGRAM, TO THE EXTENT PERMITTED BY APPLICABLE LAW. EXCEPT WHEN OTHERWISE STATED IN WRITING THE COPYRIGHT HOLDERS AND/OR OTHER PARTIES PROVIDE THE PROGRAM "AS IS" WITHOUT WARRANTY OF ANY KIND, EITHER EXPRESSED OR IMPLIED, INCLUDING, BUT NOT LIMITED TO, THE IMPLIED WARRANTIES OF MERCHANTABILITY AND FITNESS FOR A PARTICULAR PURPOSE. THE ENTIRE RISK AS TO THE QUALITY AND PERFORMANCE OF THE PROGRAM IS WITH YOU. SHOULD THE PROGRAM PROVE DEFECTIVE, YOU ASSUME THE COST OF ALL NECESSARY SERVICING, REPAIR OR CORRECTION. 12. IN NO EVENT UNLESS REQUIRED BY APPLICABLE LAW OR AGREED TO IN WRITING WILL ANY COPYRIGHT HOLDER, OR ANY OTHER PARTY WHO MAY MODIFY AND/OR REDISTRIBUTE THE PROGRAM AS PERMITTED ABOVE, BE LIABLE TO YOU FOR DAMAGES, INCLUDING ANY GENERAL, SPECIAL, INCIDENTAL OR CONSEQUENTIAL DAMAGES ARISING OUT OF THE USE OR INABILITY TO USE THE PROGRAM (INCLUDING BUT NOT LIMITED TO LOSS OF DATA OR DATA BEING RENDERED INACCURATE OR LOSSES SUSTAINED BY YOU OR THIRD PARTIES OR A FAILURE OF THE PROGRAM TO OPERATE WITH ANY OTHER PROGRAMS), EVEN IF SUCH HOLDER OR OTHER PARTY HAS BEEN ADVISED OF THE POSSIBILITY OF SUCH DAMAGES. END OF TERMS AND CONDITIONSHow to apply these terms to your new programs
If you develop a new program, and you want it to be of the greatest possible use to the public, the best way to achieve this is to make it free software which everyone can redistribute and change under these terms. To do so, attach the following notices to the program. It is safest to attach them to the start of each source file to most effectively convey the exclusion of warranty; and each file should have at least the "copyright" line and a pointer to where the full notice is found.A
ADSL
Asymmetric Digital Subscriber Line Special form of DSL.ALG
Application Layer Gateway NAT control mechanism of a router. Many routers with integrated NAT use ALG. ALG lets the data packets in a VoIP connection pass and adds the public IP address of the secure private network. The router's ALG should be deactivated if the VoIP provider offers a STUN server or an outbound proxy. See also: Firewall, NAT, Outbound proxy, STUN.Authentication
Restriction of access to a network/service by using an ID and password to log in.Automatic redial
Several attempts to call are made automatically when the line is busy. The number is adjustable.B
Block dialling
Enter the complete phone number, and correct it if necessary. Then pick up the receiver or press the speaker key to dial the phone number.Broadband Internet access
See DSL.Buddy
Subscriber with whom you exchange brief messages on the Internet in real time (chatting). See also: Instant messaging.C
Call divert
CD
Automatic diversion (CD) of a call to a different telephone number. There are three kinds of call divert: – CDU, Call Divert Unconditional – CDB, Call Divert Busy – CDNR, Call Divert No ReplyCall swap
Call swap allows you to switch between two callers or between a conference and an individual caller without allowing the waiting caller to listen to the call.Call waiting
= CW. VoIP provider feature. A beep during a call indicates that another caller is waiting. You can accept or reject the second call. You can activate/deactivate the feature.CD
Call divert See Call divert.Chatting
Form of communication on the Internet. During a chat, brief messages are exchanged between the communicating parties in real time. Chatting in this sense is understood to be a written form of communication.Client
Application that requests a service from a server.CLIP
Calling Line Identification Presentation Telephony feature. The number of the caller is transferred to the called party's phone display (if the caller activates this feature). The called party's phone must be compatible with CLIP and the feature must be enabled on the phone port.Codec
Coder/decoder Codec is a procedure that digitalises and compresses analogue voice before it is sent via the Internet, and decodes – i.e., translates into analogue voice – digital data when voice packets are received. There are different codecs, with differing degrees of compression, for instance. Both parties involved in the telephone connection (caller/sender and recipient) must use the same codec. This is negotiated between the sender and the recipient when establishing a connection. The choice of codec is a compromise between voice quality, transmission speed and the necessary bandwidth. A high level of compression, for example, means that the bandwidth required for each voice connection is low. However, it also means that the time needed to compress/decompress the data is greater, which increases execution time for data in the network and thus impairs voice quality. The time required increases the delay between the sender speaking and the recipient hearing what has been said.COLP/COLR
Connected Line Identification Presentation/Restriction Feature provided by a VoIP connection for outgoing calls. COLP displays the phone number accepting the call on the calling party's display unit. The number of the party accepting the call is different to the dialled number, e.g., if the call is diverted or transferred. The called party can use COLR (Connected Line Identification Restriction) to prevent the number from appearing on the calling party's display.Consultation call
You are on a call. With a consultation call, you interrupt the conversation briefly to establish a second connection to another participant. If you end the connection to this participant immediately, then this was a consultation call. If you switch to and fro between the first and second participants, it is called call swapping.CW
Call waiting See Call waiting.D
DHCP
Dynamic Host Configuration Protocol Internet protocol that regulates the automatic assignment of IP addresses to network subscribers. The protocol is made available in the network by a server. A DHCP server can, for example, be a router. The phone contains a DHCP client. A router that contains a DHCP server can assign the IP addresses for the phone automatically from a defined address block. This dynamic assignment means that several network subscribers can share one IP address, although they use it alternately and not simultaneously. With some routers you can specify that the IP address for the phone is never changed.Displayed name
VoIP provider feature. You can specify any name that is to be shown to the other party during a call instead of your phone number.DMZ (Demilitarised Zone)
DMZ describes a part of a network that is outside the firewall. A DMZ is set up, as it were, between a network you want to protect (e.g., a LAN) and a non-secure network (e.g., the Internet). A DMZ permits unrestricted access from the Internet to only one or a few network components, while the other network components remain secure behind the firewall.DNS
Domain Name System Hierarchical system that permits the assignment of IP addresses to domain names that are easier to remember. This assignment has to be managed by a local DNS server in each (W)LAN. The local DNS server determines the IP address, if necessary by enquiring about superordinate DNS servers and other local DNS servers on the Internet. You can specify the IP address of the primary/secondary DNS server. See also: DynDNS.Domain name
Name of one (several) Web server(s) on the Internet (e.g., www.gigaset.com). The domain name is assigned to the relevant IP address by DNS.DSCP
Differentiated Service Code Point See Quality of Service (QoS).Glossary
DSL
Digital Subscriber Line Data transfer technology which allows Internet access over conventional phone lines. Prerequisites: DSL modem and the appropriate service offered by the Internet provider.DSLAM
Digital Subscriber Line Access Multiplexer The DSLAM is a switch cabinet in an exchange at which all subscriber connectors converge.DTMF
Dual Tone Multi-Frequency Another description for dual tone multi-frequency dialling (DTMF).Dynamic IP Address
A dynamic IP address is assigned to a network component automatically via DHCP. The dynamic IP address for a network component can change every time it registers or at certain time intervals. See also: Fixed IP address.DynDNS
Dynamic DNS DNS is used to assign domain names and IP addresses. For dynamic IP addresses this service is now enhanced with Dynamic DNS. This permits the use of a network component with a dynamic IP address as a server on the Internet. DynDNS ensures that a service can always be addressed on the Internet under the same domain name regardless of the current IP address.E
ECT
Explicit Call Transfer Participant A calls participant B. The participant puts the connection on hold and calls participant C. Rather than connect everyone in a three-party conference, A now transfers participant B to C and hangs up.EEPROM
Electrically Erasable Programmable Read-Only Memory Memory building block in your phone with fixed data (e.g., default and customised settings) and data saved automatically (e.g., call list entries).Ethernet network
Wired LAN. Ethernet uses a base band cable for data transmission with a transmission rate of 10 or 100 Mbps or 1 Gbps.F
Firewall
You can use a firewall to protect your network against unauthorised external access. This involves combining various measures and technologies (hardware and/or software) to control the flow of data between a private network you wish to protect and an unprotected network (e.g., the Internet). See also: NAT.Firmware
Device software in which basic information is saved for the functioning of a device. To correct errors or update the device software, a new version of the firmware can be loaded into the device's memory (firmware update).Fixed IP address
A fixed IP address is assigned to a network component manually during network configuration. Unlike a dynamic IP address, a fixed IP address never changes.Flat rate
System of billing for an Internet connection. The Internet service provider charges a set monthly fee. There are no additional charges for the duration of the connection or number of connections.Fragmentation
Data packets that are too big are split into smaller packets (fragments) before they are transferred. They are put together again when they reach the recipient (defragmented).Full duplex
Data transmission is a mode in which data can be sent and received at the same time.G
G.711 a law, G.711 μ law
Standard for a codec. G.711 delivers a very good voice quality that corresponds to that in the ISDN fixed line. As there is little compression, the necessary bandwidth is around 64 kbit/s per voice connection, but the delay caused by coding/decoding is only approx. 0.125 ms. "a law" describes the European standard and "μ law" describes the North American/Japanese equivalent.G.722
Standard for a codec. G.722 is a broadband language codec with a bandwidth of 50 Hz to 7 kHz, a net transmission rate of 64 kbit/s per language connection and integrated speech pause recognition and comfort noise generation (silence suppression). G.722 delivers very good voice quality. A higher sampling rate provides clearer and better voice quality than other codecs and enables a speech tone in High Definition Sound Performance (HDSP).G.726
Standard for a codec. G.726 delivers a good voice quality. It is inferior to the quality with codec G.711 but better than with G.729.G.729A/B
Standard for a codec. The voice quality is more likely to be lower with G.729A/B. As a result of the high level of compression, the necessary bandwidth is only around 8 kbit/s per voice connection, but the delay is around 15 ms.Gateway
Connects two different networks, e.g., a router as an Internet gateway. For phone calls from VoIP to the telephone network, a gateway has to be connected to the IP network and the telephone network (gateway/VoIP provider). It forwards calls from VoIP to the telephone network as required.Gateway provider
See SIP provider.Global IP address
See IP address.GSM
Global System for Mobile Communication Originally, a European standard for mobile networks. GSM can now be described as a worldwide standard. However, in the USA and Japan, national standards were previously more frequently supported.H
Headset
Combination of microphone and headphone. A headset makes using speaker mode more convenient. Headsets that can be connected to the telephone via a cable are available.HTTP proxy
Server via which network subscribers can process their Internet traffic.Hub
Connects several network subscribers in one infrastructure network. All data sent to the hub by one network subscriber is forwarded to all network subscribers. See also: Gateway, Router.|
IEEE
Institute of Electrical and Electronics Engineers International body that defines standards in electronics and electrical engineering, concerned in particular with the standardisation of LAN technology, transmission protocols, data transfer rate and wiring.Infrastructure network
Network with central structure: All network subscribers communicate via a central router.Instant messaging
Service that uses a client program to allow chatting in real time, i.e., to send brief messages to other subscribers on the Internet.Internet
Global WAN. A series of protocols known as TCP/IP have been defined for exchanging data. All network subscribers are identifiable by an IP address. DNS assigns a domain name to the IP address. Important services on the Internet include the World Wide Web (WWW), e-mail, file transfer and discussion forums.Internet service provider
Enables access to the Internet for a fee.Internet telephony
Voice over IP.IP (Internet Protocol)
TCP/IP protocol on the Internet. IP is responsible for the addressing of subscribers in a network using IP addresses, and routes data from a sender to the recipient. IP determines the paths (routing) along which the data packets travel. There are standard IPv4 and IPv6 protocols; the essential difference is the structure of the IP addresses.IP address
A unique address for a network component within a network based on the TCP/IP protocols (e.g., LAN, Internet). On the Internet, domain names are usually assigned instead of IP addresses. DNS assigns the corresponding IP address to the domain name. The IPv4 IP address has four parts (decimal numbers between 0 and 255) separated by full stops (e.g., 230.94.233.2). The IP address is made up of the network number and the number of the network subscriber (e.g., phone). Depending on the subnet mask, the first, second or third part makes up the network number and the rest of the IP address addresses the network component. The network number of all the components in any one network must be identical. IP addresses can be assigned automatically with DHCP (dynamic IP addresses) or manually (static IP addresses). See also: DHCP.IP pool range
Range of IP addresses that the DHCP server can use to assign dynamic IP addresses.L
LAN
Local Area Network Network with a restricted physical range. A LAN can be wireless (WLAN) and/or wired (Ethernet).LDAP
Lightweight Directory Access Protocol Service for managing directories across a network. LDAP is used to store and access information about individuals who are part of an organisation (e.g., employees).Glossary
Local IP address
The local or private IP address is the address for a network component in the local network (LAN). The network operator can assign any address he or she wants. Devices that act as a link from a local network to the Internet (gateway or router) have a public and a private IP address. See also IP address.Local SIP port
See SIP port/Local SIP port.M
MAC address
Media Access Control address Hardware address by means of which each network device (e.g., network card, switch, phone) can be uniquely identified worldwide. It consists of six parts (hexadecimal numbers) separated by a "-" (e.g., 00-90-65-44-00-3A). The MAC address is assigned by the manufacturer and cannot be changed.Mbps
Million bits per second Unit of the transmission speed in a network.MRU
Maximum Receive Unit Defines the maximum user data volume within a data packet.MTU
Maximum Transmission Unit Defines the maximum length of a data packet that can be carried over the network at a time.Music on hold
Music is played while you are making a consultation call or call swapping. The waiting participant hears music while on hold.N
NAT
Network Address Translation Method for converting (private) IP addresses to one or more (public) IP addresses. With NAT, the IP addresses of network subscribers (e.g., VoIP phones) in a LAN can be hidden behind a joint IP address for the router in the Internet. VoIP telephones behind a NAT router cannot be reached by VoIP servers (on account of the private IP address). To "bypass" NAT it is possible to either use ALG in the router, STUN in the VoIP telephone or an outbound proxy for the VoIP provider. If an outbound proxy is made available you must allow for this in the VoIP settings for your phone.Network
Group of devices. Devices can be connected in either wired or wireless mode. Networks can also differ in range and structure: – Range: Local networks (LAN) or wide-area networks (WAN) – Structure: Infrastructure network or ad hoc networkNetwork subscriber
Devices and PCs that are connected to each other in a network, e.g., servers, PCs and phones.0
Outbound proxy
Alternative NAT control mechanism to STUN and ALG. Outbound proxies are implemented by the VoIP provider in firewall/NAT environments as an alternative to a SIP proxy server. They control data traffic through the firewall. Outbound proxy and STUN servers should not be used simultaneously. See also: STUN and NAT.P
PIN
Personal Identification Number Protects against unauthorised use. When the PIN is activated, a number combination has to be entered to access a protected area.Port
Data is exchanged between two applications in a network across a port.Port forwarding
The Internet gateway (e.g., your router) forwards data packets from the Internet to the port that the data is intended for. This allows servers in the LAN to offer services on the Internet without you needing a public IP address.Port number
Indicates a specific application of a network subscriber. Depending on the setting in the LAN, the port number is permanently assigned or else it is newly assigned with each access. The combination of IP address/port number identifies the recipient or sender of a data packet within a network.Prepare dialling
See Block dialling.Private IP address
See Public IP address.Protocol
Describes the agreements for communicating within a network. It contains rules for opening, administering and closing a connection, about data formats, time frames and possible error handling.Proxy/Proxy server
Computer program that controls the exchange of data between client and server in computer networks. If the phone sends a query to the VoIP server, the proxy acts as a server towards the phone and as a client towards the server. A proxy is addressed via the IP address/domain name and port.Public IP address
The public IP address is the address for a network component on the Internet. It is assigned by the Internet service provider. Devices that act as a link from a local network to the Internet (gateway, router) have a public and a local IP address. See also: IP address, NAT.Q
Quality of Service (QoS)
Describes the Quality of Service in communication networks. Differentiations are made between various Quality of Service classes. QoS influences the flow of data packets on the Internet, e.g., by prioritising data packets, reserving bandwidth and optimising data packets. In VoIP networks, QoS influences the voice quality. If the whole infrastructure (router, network server etc.) has QoS, the voice quality is better, i.e., fewer delays, less echoing, less crackling.R
RAM
Random Access Memory Memory in which you have reading and storage rights. Items such as melodies and screen pictures are saved in the RAM after you have loaded them onto the phone via the Web configurator.Registrar
The registrar manages the network subscribers' current IP addresses. When you register with your VoIP provider, your current IP address is saved on the registrar. This means you can also be reached when on the move.ROM
Read Only Memory A type of memory that can only be read.Router
Routes data packets within a network and between different networks via the quickest route. Can connect Ethernet networks and WLAN. Can be the gateway to the Internet.Routing
Routing is the transfer of data packets to another subscriber in your network. On their way to the recipient, the data packets are sent from one router to the next until they reach their destination. If data packets were not forwarded in this way, a network like the Internet would not be possible. Routing connects the individual networks to this global system. A router is a part of this system; it transfers data packets both within a local network and from one network to the next. Transfer of data from one network to another is performed on the basis of a common protocol.RSS feed
Really Simple Syndication (also Rich Site Summary) Provision of data in RSS format. RSS is an Internet service that summarises an Internet page in a short paragraph and includes a link to the original page. Users can subscribe to an RSS feed and receive automatically updated information.RTCP
Real-Time Control Protocol Is used to control the RTP protocol. The RTCP protocol is a control protocol and therefore knows which of the transferred RTP sessions belong together.RTCP port
(Local) port by means of which voice data packets are sent and received for VoIP.RTP
Real-Time Transport Protocol Global standard for transferring audio and video data. Often used in conjunction with UDP. In this case, RTP packets are embedded in UDP packets.S
Server
Makes a service available to other network subscribers (clients). The term can indicate a computer/PC or an application. A server is addressed via the IP address/domain name and port.SIP (Session Initiation Protocol)
Signalling protocol independent of voice communication. Used for establishing and ending a call. It is also possible to define parameters for voice transmission.SIP address
See URI.SIP port/Local SIP port
(Local) port by means of which SIP signalling data is sent and received for VoIP.SIP provider
See VoIP provider.SIP proxy server
IP address of your VoIP provider's gateway server.Static IP address
See Fixed IP address.STUN
Simple Transversal of UDP over NAT NAT control mechanism. STUN is a data protocol for VoIP telephones. STUN replaces the private IP address in the VoIP telephone data packets with the public address of the secure private network. To control data transfer, a STUN server is also required on the Internet. STUN cannot be implemented with symmetric NATs. See also: ALG, Firewall, NAT, Outbound proxy.Subnet
Segment of a network.Subnet mask
IP addresses consist of a fixed line network number and a variable subscriber number. The network number is identical for all network subscribers. The size of the network number part is determined in the subnet mask. In the subnet mask 255.255.255.0, for example, the first three parts of the IP address are the network number and the last part is the subscriber number.Symmetric NAT
A symmetric NAT assigns different external IP addresses and port numbers to the same internal IP addresses and port numbers – depending on the external target address.T
TCP
Transmission Control Protocol Transport protocol. Session-based transmission protocol: it sets up, monitors and terminates a connection between sender and recipient for transporting data.TLS
Transport Layer Security Protocol for encrypting data transmissions on the Internet. TLS is a superordinate transport protocol.Transmission rate
Speed at which data is transmitted in the WAN or LAN. The transmission rate is measured in data units per unit of time (Mbit/s).Transport protocol
Controls data transport between two communication partners (applications). See also: UDP, TCP, TLS.U
UDP
User Datagram Protocol Transport protocol. Unlike TCP, UDP is a non session-based protocol. UDP does not establish a fixed connection. The recipient is solely responsible for making sure the data is received. The sender is not notified about whether it is received or not.URI
Uniform Resource Identifier Character sequence for identifying resources (e.g., e-mail recipient, www.gigaset.com, files). On the Internet, URIs are used as a unique identification for resources. URIs are also described as SIP addresses. URIs can be entered in the phone as a number. By dialling a URI, you can call an Internet subscriber with VoIP equipment.URL
Universal Resource Locator Globally unique address of a domain on the Internet. A URL is a subtype of the URI. URLs identify a resource by its location on the Internet. For historical reasons the term is often used as a synonym for URI.User ID
See User identification.User identification
Name/number combination for access, e.g., to your VoIP account.V
Voice codec
See Codec.VoIP
Voice over Internet Protocol Calls are no longer established and transmitted via the telephone network, but via the Internet (or other IP networks).VoIP provider
A VoIP, SIP or gateway provider is an Internet service provider that provides a gateway for Internet telephony. As the phone works with the SIP standard, your provider must support the SIP standard. The provider routes calls from VoIP to the telephone network (analogue, ISDN and mobile) and vice versa.W
WAN
Wide Area Network Wide-area network that is unrestricted in terms of area (e.g., Internet).Numerics
24-hour format.... 100A
Accepting a call using function key 32 Acknowledge tones 55 Adjusting the volume. 33 Advisory tone confirmation....55 key press....55 Advisory tones activating/deactivating....55 Anonymous calling.... 35 Area codes 90 Audio quality 87 Authorisation....111 Automatic configuration of VoIP accounts 70B
Backlight brightness....56 deactivating....56 BLF (Busy Lamp Field) 97C
Call accepting via receiver .... 32 anonymous....35 in call list 40 incoming.... 32 missed 40 outgoing.... 29 rejecting 32 transferring....38 Call divert ....39, 89, 97 no answer....39 when busy....39 Call duration.... 29 Call list .... 40 all calls.... 40 deleting.... 43 deleting an entry.... 43 dialling a number .... 31, 42 in Web configurator....103 missed calls....40 opening.... 31 outgoing calls 40 redial 31 saved information.... 41 transferring entry to directory..... 42 Call Manager 81 Call recording 92 Call records 92 Call swap 36 Call transfer.... 38 blind.... 38 secure. 38 Call waiting 35 accepting call.... 36 activating/deactivating.... 36 rejecting call.... 36 Caller name on display .... 32 picture on display.... 32 Caller picture 32 Calling Line Identification....35,41 withholding for all calls.... 35 withholding once 35 Caring for your telephone....111 Certificate import 83 Characters correcting .... 23 upper, lower case .... 23 CLIP (Calling Line Identification Presentation).... 41 CLIR (Calling Line Identification Restriction).... 35 Codec G.711 μ law.... 88 G.711 a law.... 88 G.722 88 G.726 88 G.729 88 Codec preference 88 Conference call 37 adding callers on hold.... 37 adding new participants.... 37 Conference key 2,37 Confirmation tone 55Connecting
extension module....15 network cable 12 PC 13 power adapter....14 receiver 11 Connecting the network cable ..... 12 Connection frame for extension module 15 Consultation call 35 Consultation key 2,35 Contact with liquid 109 Contents 9 Contrast 57Correcting
incorrectly entered characters..... 23 incorrectly entered digit ..... 29D
Date
setting via display menu....52 Date format....100 Deactivating the microphone 34 Default number in directory entry ..... 45 Deleting a digit 29 Determining prefix length .....77 DHCP 59Diagnostic information
PCAP logging....108 SIP logging 107 system log....107Dialling a number
cancelling 29 from call list (display).... 31 from call list (Web configurator) ..... 103 from directory (display)....30 via function key....30 Dialling plans 90 area codes....90Dialling see Dialling a number
DiffServ (Differentiated Services) ..... 81 Directories....43Directory
accessing via key....96 transferring from PC to phone.....105 transferring to PC 105 Directory entry.... 43 changing default number......45 deleting....45 displaying....44, 48 editing....44, 45Directory key
programming....96 Directory, LDAP 46, 95 dialling a number 46 searching for an entry 46 Directory, local....43 deleting.... 45 entry....43 opening.... 44 Directory, net 47 displaying entry details 49 opening.... 47 personal 47 public....47 refining search.... 49 search results....49 searching for a name 48 searching for a number.... 48 transferring entry to directory..... 49 Display....22,100 backlight 56 brightness....100 Calling Line Identification.... 32 display formats 100 during call.... 33 idle 52 in idle status....22 menu tree.... 27 returning to idle status 25 setting contrast.... 57 setting the language 57 settings 56 time-controlled deactivation ..... 100 Display functions....22, 100 Display icons 3 Display in idle status.... 22 returning.... 25 Display keys 2, 22 Display menu 27 illustration in the user guide ..... 26 Disposal....112 DND (Do Not Disturb) see Do Not DisturbDNS server
alternate 61,63,76,77 preferred.... 61, 63, 76, 77 Do Not Disturb....34 Do Not Disturb (DND) 91 Do Not Disturb key 2,34 DSL router....7Index
DTMF transfer....72E
E-mail server....7 Encryption.... 84 End key 2,29 Ending call by hanging up....33 with end call key....33 Entering special characters....23 Entering standard gateway .....61 Entering text.... 23 Entry mode 23 Environment....112, 113 Error tone 55 Ethernet....7,59 Ethernet cable 13 Extension module.... 15 connection frame.... 15F
Factory settings....58, 104 restoring....104 File server ....7 Firmware update .... 105 automatic.... 106 manual.... 106 Firmware version 107 Free software 113 Function keys ....2 additional ....15 programming....96 selecting functions....96G
Getting started.... 18 Gigaset QuickSync 109 Gigaset T500....80 GNU General Public Licence (GPL) ..... 114H
Headset adjusting the volume....33 calling via....29 Headset key 2 HTTP server operating 80|
ICE (Interactive Connectivity Establishment)....82 Idle status (display) 25 Insert strips....109 Installation wizard.... 18 Internet telephony configuring....20,69 IP address 59 auto-configuration....62, 77 dynamic....60, 75 finding....28, 66 IPv4....61, 75 IPv6....62, 77 prefix....62, 77 static....59, 60, 62, 75, 77 IP protocol....59, 60, 75 IPv4....59 IPv6....59K
Kensington lock.... 14 Key conference....2, 37 consultation....2, 35 display....2 Do Not Disturb....2, 34 end....2 headset....2 Message Centre....2, 31, 51 mute....2, 34 navigation....2, 24 programmable....2 speaker....2, 34 transfer....2, 38 volume....2, 33L
LAN port 13 LAN settings....60,75 Language for the display .... 100 for the Web configurator .... 100LDAP
display name 95 name attributes....95 name filter....95 number attributes....95 number filter 95 password....95 search area 95 server address 95 server port 95 user name....95 LDAP (Lightweight Directory Access Protocol)....46, 95 LDAP contacts in display....46, 95 LEDs see Light Emitting Diodes Licence, GPL .... 114 Light Emitting Diodes ....3 List accepted calls .... 40 all calls....40 missed calls. 40 redial 40 scrolling through. 25 Local contacts .... 101 in display menu.... 43 Local directory creating entry via Web configurator . 101 in Web configurator.... 101 Looking after your telephone ..... 109M
Main menu 25 Making calls 29 Medical equipment 6 Memory keys 30 Menu 25 navigation....25 settings 74 start tone. 55 using 25 Menu tree display....27 Web configurator....68 Message Centre....31,51 icons....51 opening....51 opening message list.... 51 Message Centre key 2,51 Messages voice....50, 92 Missed call in call list.... 40 in Message Centre .... 51 Move cursor 23 Mute key 2,34 Mute see Muting Muting .... 34 MWI (Message Waiting Indication)... 50, 92N
NAS system....7 NAT....71 refresh time....72 Navigation key....2, 24 Network setting up for the first time..... 19 setting up via display menu..... 59 setting up via Web configurator..... 74 wired..... 59 Network configuration default setting.... 19 Network mailbox....50, 92 new message....50 Network provider data.... 71 Network type 60, 62 Number dialling from call list.... 42 dialling from LDAP directory.... 46 dialling from the directory.... 101 entering via keypad.... 29 searching for in directory.... 101 selecting from the directory.... 45 showing on display.... 32 transferring to local directory.... 290
On hold 35 Online directory....93 selecting provider....93 Online directory see Directory, online Open listening 34 Operating the telephone via display menu.... 22 Outbound proxy ....71 mode....72 port....72Index
Outbound server address 72P
Password for Web configurator ..... 99 PC, connecting....13 PCAP log file 108 Phone factory settings .... 104 rebooting .... 104 Phone system....7 operating in the network ....80 type ....80 PoE (Power over Ethernet) .....7, 14 Power adapter....6 connecting....14 Prefix of the IP address....62, 77 Priority of voice data....65,79 Programmable keys 96 Protection against theft....14 Provider profile 70 Provisioning file....20 Proxy server address .... 70 port.... 71Q
QoS (Quality of Service)....81 Questions and answers 111R
Reboot....58,104 Receiver adjusting the volume....33 connecting....11 Redial list....31,40 Registration server .... 71 port.... 71 Remote management 83 Reset....58 Restarting 104 Restoring the default settings 58 Ringback.... 32 activating/deactivating function .... 32 Ringer....53 adjusting the volume while phone is ringing....33 deactivating....32 deleting ring tone.... 55 loading ring tone 104 renaming ring tone 55 setting melody 54 silencing for anonymous calls.... 54 volume for appointments.... 53 volume for incoming calls 53 RTP (Realtime Transport Protocol) ..... 81S
Safety precautions ....6 Security settings 83 server certificates 83 Server certificates 83 Setting language for Web configurator ..... 28, 66 Setting the language .... 57 setting up for the first time.... 18 Setting up the device via the display.... 18 Settings creating via Web configurator..... 74 Settings via display menu advisory tones....55 date and time....52 display backlight....56 display contrast....57 display language....57 ringers....53 Setup assistant.... 69 closing.... 73 Shared line defining for function key ..... 96 Silence suppression 88 Silences 88 SIP address 70 SIP logging 107 SIP provider ....8 Speaker activating/deactivating.... 34 Speaker key 2, 29, 34 Speaker mode adjusting the volume....33 Specifications....33, 110 Speed dial 97 SRTP (Secure Real-time Transport Protocol) 84 SRTP security type 84 Standard gateway....61,76 Standard VoIP account. 29 Status....107STUN
refresh time 71 STUN server 71 address 71 port....71 Subnet mask....61,76 Switch....7 System log....107 System settings 97 date/time 98 security 99T
Telephone settings in display menu....52 in Web configurator.... 74 Telephony 84 Text editor 23 Time setting 53 Time server 52 Time zone setting 18 Tone scheme 100 Transfer key 2,38 Troubleshooting 111U
Usage scenario professional environment with phone system....7 without phone system....8 User identification Web configurator 28 User interface display....22V
vCard 43 VLAN (Virtual Local Area Network) ..... 63 VLAN priority 65,79 VLAN tagging.... 63 Voice mail 50,92 in Message Centre 51 playing....50 Voice quality....81, 88VoIP account
automatic configuration.... 70 configuration via provider profile. . . . 70 DTMF transfer 72 entering login data.... 86 entering registration data.... 73 manual configuration 70 personal provider data .....73, 86 selecting 29 setting up 69 standard 29 VoIP status 107 Volume for ringer 53 Volume key 2,33W
Web configurator 66 accessing....28,66 changing password 99 login screen 28,66 menu structure 68 selecting language....28, 66 settings 74 setup assistant.... 69 starting 28,66 user identification.... 28 when busy 39 Workgroup server 7Issued by
Gigaset Communications GmbH Frankenstraße 2a, D-46395 Bocholt © Gigaset Communications GmbH 2011 All rights reserved. Subject to availability. Rights of modification reserved. www.gigaset.com A31008-M2219-L101-1-7619
- GIGASET DE410 IP PRO – MORE THAN JUST A TELEPHONE
- PHONE OVERVIEW
- UNDERSTANDING LIGHT EMITTING DIODES (LEDS)
- UNDERSTANDING THE DISPLAY
- UNDERSTANDING THE DISPLAY SYMBOLS
- CONTENTS
- GIGASET DE410 IP PRO – MORE THAN JUST A TELEPHONE .... 1
- PHONE OVERVIEW 2
- FOLLOWING SAFETY PRECAUTIONS 6
- USING THE PHONE IN DIFFERENT SCENARIOS 7
- FIRST STEPS 9
- USING THE PHONE 22
- MAKING CALLS 29
- USING THE CALL LISTS 40
- USING DIRECTORIES 43
- MANAGING MESSAGES 50
- CONFIGURING BASIC SETTINGS 52
- CONFIGURING SETTINGS FOR THE LOCAL NETWORK 59
- WEB CONFIGURATOR - CONFIGURING THE PHONE ON A PC 66
- CONFIGURING PHONE SETTINGS VIA THE WEB CONFIGURATOR 74
- CHECKING THE STATUS OF THE PHONE 107
- APPENDIX 109
- SERVICE (CUSTOMER CARE) 111
- PROTECTING OUR ENVIRONMENT 112
- ACCESSORIES 120
- GLOSSARY 121
- INDEX 134
- FOLLOWING SAFETY PRECAUTIONS
- WARNING
- PLEASE NOTE
- USING THE PHONE IN DIFFERENT SCENARIOS
- USING YOUR PHONE IN A PROFESSIONAL ENVIRONMENT WITH PHONE SYSTEM AND SERVER STRUCTURE
- USING YOUR PHONE IN A SIMPLIFIED ENVIRONMENT WITHOUT A PHONE SYSTEM
- CHECK THE PACKAGE CONTENTS
- OPTIONAL
- FIRMWARE UPDATE
- SETTING UP AND CONNECTING THE DEVICE
- CONNECTING THE RECEIVER
- CONNECTING THE NETWORK CABLE
- CONNECTING THE PC
- CONNECTING A DEVICE TO THE MAINS POWER SUPPLY (IF REQUIRED)
- CONNECTING EXTENSION MODULES (OPTIONAL)
- WALL MOUNTING
- CONNECTING A HEADSET
- SETTING UP THE DEVICE (FOR THE FIRST TIME)
- CONFIGURING LANGUAGE AND TIME ZONE SETTINGS
- ESTABLISHING A CONNECTION TO THE LOCAL NETWORK
- CONFIGURING INTERNET TELEPHONY
- PREREQUISITE
- PROCEEDING
- OPERATING VIA THE KEYPAD AND DISPLAY MENU
- DISPLAY AND DISPLAY KEYS
- WRITING AND EDITING TEXT
- DELETING/CORRECTING CHARACTERS
- ENTRY MODE
- SWITCHING ENTRY MODE
- MOVING THE CURSOR
- ENTERING SPECIAL CHARACTERS
- NAVIGATION KEY
- IN IDLE STATUS
- IN MENUS AND LISTS
- IN INPUT FIELDS
- UNDERSTANDING THE NAVIGATION KEY
- USING THE MENUS
- OPENING THE MAIN MENU
- ACCESSING A FUNCTION OR OPENING THE CORRESPONDING SUBMENU
- BACK TO THE PREVIOUS LEVEL
- REVERTING TO IDLE STATUS
- SCROLLING THROUGH LISTS
- UNDERSTANDING THE OPERATING STEPS
- FOR EXAMPLE, SETTING THE RINGER VOLUME
- MENU TREE
- OPERATING VIA THE PC
- STARTING THE WEB CONFIGURATOR
- ACCESSING THE WEB CONFIGURATOR
- CALLING
- SELECTING VOIP ACCOUNT
- ENTERING A NUMBER USING THE KEYPAD
- INSTEAD OF PUTTING THE RECEIVER TO YOUR EAR
- WHEN ENTERING THE PHONE NUMBER
- DIALLING A NUMBER FROM THE DIRECTORY
- DIALLING A NUMBER USING A FUNCTION KEY
- DIALLING A NUMBER FROM THE CALL LISTS
- VIEWING CALL LISTS AND DIALLING NUMBERS
- INITIATING RINGBACK
- DEACTIVATING RINGBACK
- RECEIVING INCOMING CALLS
- DEACTIVATING THE RINGER
- REJECTING A CALL
- ENDING A CALL
- USING FUNCTIONS WHEN MAKING A TELEPHONE CALL
- DISPLAY WHEN ESTABLISHING A CONNECTION OR DURING A CALL
- ADJUSTING THE VOLUME
- MUTING
- ACTIVATING/DEACTIVATING SPEAKER MODE
- DO NOT DISTURB
- ANONYMOUS CALLING – WITHHOLDING CALLER ID
- MAKING AN ANONYMOUS CALL
- ACTIVATING/DEACTIVATING "ANONYMOUS CALLING" FOR ALL CALLS
- MAKING A CALL TO MULTIPLE PARTICIPANTS
- INITIATING A CONSULTATION CALL
- ACCEPTING/REJECTING CALL WAITING
- ACCEPTING A CALL
- ACTIVATING/DEACTIVATING CALL WAITING
- CALL SWAPPING
- INITIATING A CONSULTATION CALL WITH A THIRD PARTICIPANT
- INITIATING A CONFERENCE
- TRANSFERRING A CALL TO ANOTHER NUMBER
- TRANSFER WITHOUT CONSULTATION
- TRANSFER WITH CONSULTATION
- TRANSFER TO PARTICIPANTS ON HOLD
- SETTING UP CALL DIVERT (CD)
- NOTE
- VIEWING ENTRIES
- INFORMATION ON THE ENTRY
- DISPLAYING DETAILED INFORMATION
- VIEW
- DIALLING A NUMBER FROM A LIST
- COPYING AN ENTRY FROM THE CALL LIST TO THE DIRECTORY
- DELETING AN ENTRY OR LIST
- USING DIRECTORIES
- USING THE LOCAL DIRECTORY
- DIRECTORY ENTRIES
- OPENING THE DIRECTORY
- DISPLAYING AN ENTRY
- CREATING A NEW ENTRY
- EDITING ENTRIES
- CHANGING THE DEFAULT NUMBER
- DELETING A DIRECTORY ENTRY OR THE ENTIRE DIRECTORY
- USING AN LDAP DIRECTORY
- OPENING AN LDAP DIRECTORY
- SEARCHING FOR AND DISPLAYING AN ENTRY
- DIALLING FROM THE LDAP DIRECTORY
- USING ONLINE DIRECTORIES
- OPENING A ONLINE DIRECTORY
- SEARCHING FOR AN ENTRY IN THE ONLINE DIRECTORY
- NAME SEARCH
- SEARCH RESULTS
- REFINING A SEARCH
- DISPLAYING ENTRY DETAILS
- DIALLING A NUMBER
- TRANSFERRING A NUMBER TO THE LOCAL DIRECTORY
- MANAGING VOICE MAILS ON THE NETWORK MAILBOX
- PLAYING VOICE MAILS
- ACCESSING MESSAGES VIA THE MESSAGE CENTRE
- OPENING THE MESSAGE CENTRE
- SELECT
- CONFIGURING BASIC SETTINGS
- SETTING THE DATE AND TIME
- DATE FORMAT
- DATE
- TIME FORMAT
- TIME
- SETTING THE RINGER
- SETTING THE VOLUME
- SETTING THE VOLUME IN IDLE STATUS
- SETTING THE VOLUME WHILE THE PHONE IS RINGING
- SELECTING A RINGER MELODY
- SILENCING THE RINGER FOR ANONYMOUS CALLS
- ACTIVATING/DEACTIVATING ADVISORY TONES
- RENAMING OR DELETING RING TONES
- RENAMING RING TONE
- DELETING RING TONES
- SETTING THE DISPLAY
- SETTING THE BACKLIGHT
- SETTING THE CONTRAST
- SETTING THE LANGUAGE
- RESETTING THE DEVICE TO THE DEFAULT SETTINGS
- RESETTING VIA DEVICE BUTTON
- CONFIGURING SETTINGS FOR THE LOCAL NETWORK
- LAN SETTINGS
- SELECTING THE NETWORK TYPE
- IPV4 CONFIGURATION
- IP ADDRESS
- EXAMPLE
- SUBNET MASK
- STANDARD GATEWAY
- PREF. DNS SERVER
- ALTERN. DNS SERVER
- IPV6 CONFIGURATION
- PREFIX LENGTH
- VLAN TAGGING
- LAN PORT ONLY
- LAN AND PC PORT
- PRIORITIES
- WEB CONFIGURATOR – CONFIGURING THE PHONE ON A PC
- LAUNCHING THE WEB CONFIGURATOR
- UNDERSTANDING THE WEB CONFIGURATOR MENU TREE
- RUNNING THE SETUP ASSISTANT
- CONFIGURING A VOIP ACCOUNT
- AUTOMATIC CONFIGURATION
- CONFIGURATION VIA PROVIDER PROFILE
- CONFIGURATION WITHOUT PROVIDER PROFILE
- GENERAL PROVIDER DATA
- DOMAIN
- PROXY SERVER ADDRESS
- PROXY SERVER PORT
- REGISTRATION SERVER
- REGISTRATION SERVER PORT
- REGISTRATION REFRESH TIME [SEC]
- NETWORK PROVIDER DATA
- STUN ENABLED
- STUN SERVER ADDRESS
- STUN SERVER PORT
- STUN REFRESH TIME [SEC]
- NAT REFRESH TIME [SEC]
- OUTBOUND PROXY MODE
- AUTOMATICALLY
- OUTBOUND SERVER ADDRESS
- OUTBOUND PROXY PORT
- AUTOMATIC NEGOTIATION OF DTMF TRANSMISSION
- SEND SETTINGS FOR DTMF TRANSMISSION
- PERSONAL PROVIDER DATA
- COMPLETING CONFIGURATION
- CLOSING THE ASSISTANT
- CONFIGURING PHONE SETTINGS VIA THE WEB CONFIGURATOR
- NETWORK AND CONNECTORS
- ASSIGNING THE NETWORK ADDRESS
- NETWORK TYPE
- PREFERRED DNS SERVER
- ALTERNATE DNS SERVER
- IP ADDRESS TYPE
- VLAN PRIORITY
- SAVING SETTINGS
- SERVER AND PHONE SYSTEMS
- CONFIGURE HTTP PROXY
- OWN HTTP SERVER SETTINGS
- HTTP PORT
- HTTPS PORT
- HTTP CONNECTION TYPE
- AUTOMATIC LOGOUT [MIN]
- PHONE SYSTEMS
- CONNECTED WITH PHONE SYSTEM (SAMPLE SELECTION)
- ASTERISK
- CALL MANAGER
- QOS SETTINGS (QUALITY OF SERVICE)
- VOIP SETTINGS
- USE RANDOM PORTS
- SIP PORT
- RTP PORT
- ICE ENABLED
- SECURITY SETTINGS
- REMOTE MANAGEMENT
- IMPORT A LOCAL CERTIFICATE
- INVALID CERTIFICATES
- SECURE REAL TIME PROTOCOL (SRTP)
- TELEPHONY
- CONNECTIONS
- SETTINGS → TELEPHONY → CONNECTIONS
- SETTING UP A NEW CONNECTION VIA AUTO CONFIGURATION
- CONNECTIONS FOR THE GIGASET DE410 IP PRO
- ACTIVATING/DEACTIVATING CONNECTIONS
- SPECIFYING A DEFAULT LINE FOR OUTGOING CALLS
- ESTABLISHING NEW CONNECTIONS OR EDITING EXISTING ONES
- CONFIGURING THE CONNECTIONS
- ENTERING PERSONAL PROVIDER DATA
- ADVANCED SETTINGS
- COUNTING MISSED AND ACCEPTED CALLS
- SETTINGS FOR RINGER
- DELETING A CONNECTION
- AUDIO (VOICE QUALITY)
- SETTINGS → TELEPHONY → AUDIO
- PACKED TIME FOR RTP PACKAGES
- VOICE QUALITY
- SILENCE SUPPRESSION
- RING TONES
- CALL DIVERT
- DIALLING PLANS
- SETTINGS → TELEPHONY → DIALLING PLANS
- AREA CODES
- ACCESS CODE
- DO NOT DISTURB (DND)
- VOICE MAIL SERVICES
- MESSAGING
- MWI LIGHT
- SERVICES
- ONLINE DIRECTORY
- CONFIGURING AN ADDITIONAL PROVIDER
- LDAP DIRECTORY
- SETTINGS → SERVICES → LDAP
- FUNCTION KEYS
- ASSIGNING THE DIRECTORY KEY
- PROGRAMMABLE KEYS
- PARK + ORBIT
- SPEED DIAL
- SYSTEM SETTINGS
- DATE AND TIME
- DEFINING THE TIME SERVER
- ENTERING THE DATE AND TIME MANUALLY
- SETTING THE TIME ZONE
- SECURITY
- DEFAULT SETTINGS: USER NAME PASSWORD
- SETTINGS → SYSTEM → SECURITY
- DISPLAY
- SETTING THE DISPLAY BRIGHTNESS AND CONTRAST
- DEFINING THE FORMAT FOR THE DISPLAY SCREEN
- LOCAL CONTACTS
- SEARCHING FOR AN ENTRY
- EDITING THE ENTRY
- DELETING THE ENTRY
- ALL CALLS
- LOADING RINGER TONES
- REBOOTING AND RESETTING TO FACTORY SETTINGS
- SAVING AND RESTORING TELEPHONE DATA
- TRANSFERRING DATA FROM PHONE TO PC
- TRANSFERRING DATA FROM PC TO PHONE
- UPDATING FIRMWARE
- UPDATING FIRMWARE AUTOMATICALLY
- UPDATING MANUALLY
- DEVICE
- IP CONFIGURATION
- SOFTWARE
- VOIP STATUS
- SYSTEM LOG
- SIP PROTOCOL
- PCAP LOGGING
- CARING FOR YOUR TELEPHONE
- CONTACT WITH LIQUID ⚠
- USING INSERT STRIPS
- USING GIGASET QUICKSYNC – ADDITIONAL FUNCTIONS FOR THE PC INTERFACE
- QUESTIONS AND ANSWERS
- AUTHORISATION
- OUR ENVIRONMENTAL MISSION STATEMENT
- ENVIRONMENTAL MANAGEMENT SYSTEM
- DISPOSAL
- USING FREE SOFTWARE
- GNU GPL, GNU LGPL, BSD LICENCE, OPENSSL LICENCE
- OPEN SOURCE SOFTWARE LICENCES
- GNU GENERAL PUBLIC LICENCE (GPL)
- PREAMBLE
- GNU GENERAL PUBLIC LICENCE
- TERMS AND CONDITIONS FOR COPYING, DISTRIBUTION AND MODIFICATION
- PROTECTING OUR ENVIRONMENT
- NO WARRANTY
- HOW TO APPLY THESE TERMS TO YOUR NEW PROGRAMS
- A
- ADSL
- ALG
- AUTHENTICATION
- AUTOMATIC REDIAL
- B
- BLOCK DIALLING
- BROADBAND INTERNET ACCESS
- BUDDY
- C
- CD
- CALL SWAP
- CALL WAITING
- CHATTING
- CLIENT
- CLIP
- CODEC
- COLP/COLR
- CONSULTATION CALL
- CW
- D
- DHCP
- DISPLAYED NAME
- DMZ (DEMILITARISED ZONE)
- DNS
- DOMAIN NAME
- DSCP
- GLOSSARY
- DSL
- DSLAM
- DTMF
- DYNAMIC IP ADDRESS
- DYNDNS
- E
- ECT
- EEPROM
- ETHERNET NETWORK
- F
- FIREWALL
- FIRMWARE
- FIXED IP ADDRESS
- FLAT RATE
- FRAGMENTATION
- FULL DUPLEX
- G
- G.711 A LAW, G.711 Μ LAW
- G.722
- G.726
- G.729A/B
- GATEWAY
- GATEWAY PROVIDER
- GLOBAL IP ADDRESS
- GSM
- H
- HEADSET
- HTTP PROXY
- HUB
- IEEE
- INFRASTRUCTURE NETWORK
- INSTANT MESSAGING
- INTERNET
- INTERNET SERVICE PROVIDER
- INTERNET TELEPHONY
- IP (INTERNET PROTOCOL)
- IP POOL RANGE
- L
- LAN
- LDAP
- LOCAL IP ADDRESS
- LOCAL SIP PORT
- M
- MAC ADDRESS
- MBPS
- MRU
- MTU
- MUSIC ON HOLD
- N
- NAT
- NETWORK
- NETWORK SUBSCRIBER
- 0
- OUTBOUND PROXY
- P
- PIN
- PORT
- PORT FORWARDING
- PORT NUMBER
- PREPARE DIALLING
- PRIVATE IP ADDRESS
- PROTOCOL
- PROXY/PROXY SERVER
- PUBLIC IP ADDRESS
- Q
- QUALITY OF SERVICE (QOS)
- R
- RAM
- REGISTRAR
- ROM
- ROUTER
- ROUTING
- RSS FEED
- RTCP
- RTCP PORT
- RTP
- S
- SERVER
- SIP (SESSION INITIATION PROTOCOL)
- SIP ADDRESS
- SIP PORT/LOCAL SIP PORT
- SIP PROVIDER
- SIP PROXY SERVER
- STATIC IP ADDRESS
- STUN
- SUBNET
- SYMMETRIC NAT
- T
- TCP
- TLS
- TRANSMISSION RATE
- TRANSPORT PROTOCOL
- U
- UDP
- URI
- URL
- USER ID
- USER IDENTIFICATION
- V
- VOICE CODEC
- VOIP
- VOIP PROVIDER
- W
- WAN
- NUMERICS
- CONNECTING
- CORRECTING
- DIAGNOSTIC INFORMATION
- DIALLING SEE DIALLING A NUMBER
- DIRECTORY
- DIRECTORY KEY
- DNS SERVER
- INDEX
- K
- VOIP ACCOUNT
- ISSUED BY
Brand : GIGASET
Model : DE410 IP PRO
Category : Telephone