
DXZ838RMP - Car stereo CLARION - Free user manual and instructions
Find the device manual for free DXZ838RMP CLARION in PDF.


| Product Type | Car Stereo with CD/MP3/AAC/WMA Playback |
| Brand | Clarion |
| Model | DXZ838RMP |
| Dimensions (W x H x D) | 7 x 2 x 6 inches (178 x 50 x 152 mm) |
| Weight | Approx. 1.5 lbs (0.68 kg) |
| Power Supply | 12V DC (negative ground) |
| Power Output | 4 x 50W Max Power |
| Audio Formats Supported | CD-DA, CD-R, CD-RW, MP3, WMA, AAC |
| RDS Features | Radio Data System with PS, AF, TA, PTY |
| Tuner Frequencies | FM: 87.5-108 MHz, AM: 531-1602 kHz |
| Display | Multi-color OEL Display with 3-line text |
| Equalizer | 3-Band Parametric EQ with 7 Presets |
| Audio Features | Magnabass, Loudness, Balance, Fader, Subwoofer Level |
| Inputs | Front USB, Front AUX (3.5mm), CD Slot, Tuner Antenna |
| Outputs | 4-Channel RCA Preouts (2V), Subwoofer Preout |
| Remote Control | IR Remote Control Included |
| Security | Detachable Faceplate with Carry Case |
| Mounting | DIN Size, Sleeve or ISO Mount |
| Maintenance | Clean faceplate and CD lens with soft dry cloth; avoid liquids |
| Spare Parts | Contact Clarion authorized service centers for replacement faceplate, remote, or installation kit |
Frequently Asked Questions - DXZ838RMP CLARION
User questions about DXZ838RMP CLARION
0 question about this device. Answer the ones you know or ask your own.
Ask a new question about this device
Download the instructions for your Car stereo in PDF format for free! Find your manual DXZ838RMP - CLARION and take your electronic device back in hand. On this page are published all the documents necessary for the use of your device. DXZ838RMP by CLARION.
USER MANUAL DXZ838RMP CLARION
Thank you for purchasing this Clarion product.
* Please read this owner's manual in its entirety before operating this equipment.
* After reading this manual, be sure to keep it in a handy place (e.g., glove compartment).
* Check the contents of the enclosed warranty card and keep it carefully with this manual.
* This manual includes the operating procedures of the CD changer, MD changer, DAB and TV tuner connected via the CeNET cable. The CD changer, MD changer and TV tuner have their own manuals, but no explanations for operating them are described.
CAUTIONS:
This appliance contains a laser system and is classified as a “CLASS 1 LASER PRODUCT”. To use this model properly, read this Owner’s Manual carefully and keep this manual for your future reference. In case of any trouble with this player, please contact your nearest “AUTHORIZED service station”. To prevent direct exposure to the laser beam, do not try to open the enclosure.
!CAUTION
USE OF CONTROLS OR ADJUSTMENTS OR PERFORMANCE OF PROCEDURES OTHER THAN THOSE SPECIFIED IN THE OWNER'S MANUAL MAY RESULT IN HAZARDOUS RADIATION EXPOSURE.
ADVARSEL.
Display Items
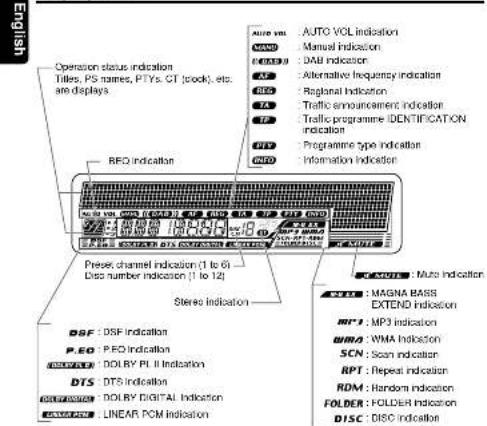
LCD Screen
In extreme cold, the screen movement may slow down and the screen may darken, but this is normal. The screen will recover when it returns to normal temperature.
Contents
- PRECAUTIONS 3 Stopping Concrete 3 Handling Compact Discs 4
- CONTROLS 5
- NOMENCLATURE 6 Names of the Buttons and Their Functions 6 Major Button Operations When External Equipment is Connected to The Unit 7 Display Items 8 LCD Screen 8
- DCP 9
- REMOTE CONTROL 10 Inserting the Batteries 10 Functions of Remote Control Unit Buttons 11
- OPERATIONS 12 Basic Operations 12 Radio Operations 15 RDS Operations 16 CDMP3/WMA Operations 80 Operations Common to Earn More 24
- OPERATIONS OF ACCESSORIES 29
CLYMD Changer Operations 29
TV Operations 31
Digital High/DVD Operations 32 DVD Deck Operations 35 - IN CASE OF DIFFICULTY 36
- ERROR DISPLAYS 38
- SPECIFICATIONS 317
1. PRECAUTIONS
- This unit is applicable for on-road 4 wheel vehicle purpose only. Use for tractor, fork truck, bulldozer, off road vehicle, 2 or 3 wheel motor bicycle, marine boat or other special purpose vehicle is not appropriate.
- When the inside of the car is very cold and the player is used soon after switching on the heater moisture may form on the disc or the optical parts of the player and proper play-back may not be possible. If moisture forms on the disc, wipe it off with a soft cloth. If moisture forms on the optical parts of the player, do not use the player for about one hour. The condensation will disappear naturally allowing normal operation.
- Driving on extremely bumpy roads which cause severe vibration may cause the sound to skip
INFORMATION FOR USERS:
CHANGES OR MODIFICATIONS TO THIS PRODUCT NOT APPROVED BY THE MANUFACTURER WILL VOID THE WARRANTY.
Sloping Console
This unit uses sloping console to make large screen displays possible. When you use the sloping console, be sure to close it.
CAUTION
BE CAREFUL NOT TO GET YOUR FINGERS CAUGHT WHEN OPENING AND CLOSING THE SLOPING CONSOLE.
- For safety's sake, always close the SLOPING CONSOLE before leaving this unit unused for a prolonged period or switching OFF the ignition key.
If you switch OFF the ignition key with the SLOPING CONSOLE filter, the SLOPING CONSOLE does not close. - Before the SLOPING CONSOLE doses, there may be a braking sound from the safety mechanism. This is normal.
English
- If you move the SLOPING CONSOLE by hand, this may create play. To correct this play, with the power on for the unit, press the [▲] button to close the SLOPING CONSOLE.
- After a disc is ejected, the SLOFING CON SOLE automatically returns to the tilted or closed state. If there is any obstruction when
- If you move the SLOPING CONSOLE by hand, this may create play. To correct this play, with the power on for the unit, press the [▲] button to close the SLOPING CONSOLE.
- After a disc is ejected, the SLOFING CON SOLE automatically returns to the tilted or closed state. If there is any obstruction when
- If you move the SLOPING CONSOLE by hand, this may create play. To correct this play, with the power on for the unit press the [▲] button to close the SLOPING CONSOLE.
- After a disc is ejected, the SLOPING CONSOLE automatically returns to the filled or closed state. If there is any obstruction when
the SLOPING CONSOLE tries to close, the safety mechanism is triggered and the SLOPING CONSOLE returns to the open state. If this happens, remove the obstruction, then press the [▲] button.
5. To avoid scratching the compact disk, keep the 12 or 8 cm CD level when inserting or removing them.
Handling Compact Discs
Use only compact discs bearing the 100% mark.
Do not play heart-shaped, octagonal, or other specially shaped compact discs.
Some CDs record as in CO-P/CD-RW mode may not be usable.
Handling
- Compared to ordinary music CDs, CD-R and CD-RW discs are both easily affected by high temperature and humidity and some of CD-R and CD-RW discs may not be played. Therefore, do not leave them for a long time in the car.
- New discs may have some roughness around the edges. If such discs are used, the player may not work or the sound may skip. Use a bell-point pan or the like to remove any roughness from the edge of the disc.
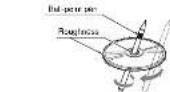
Never stick labels on the surface of the compact disc or mark the surface with a pencil or pen.
- Never play a compact disc with any calo- phone tape or other glue on it or with posting off marks. If you try to play such a compact disc, you may not be able to get it back out of the CD player or it may damage the CD player.
- Do not use compact discs that have large scratches, are mischappen, cracked, etc. Use of such discs may cause misoperation or damage.
• To remove a compact disc from its storage case, press down on the center of the case and fill the disc out, holding it carefully by the edges. - Do not use commercially available CD protection sheets or discs equipped with stabilizers, etc. These may damage the disc or cause breakdown of the internal mechanism.
Storage
- Do not expose compact discs to direct sun light or any heat source.
- Do not expose compact discs to excess humidity or dust
- Do not expose compact discs to direct heat from heaters.
Cleaning
- To remove lingermasks and dust, use a soft cloth and wipe in a straight line from the center of the compact disc to the circumference.
- Do not use any solvents, such as commercially available cleansers, anti-static spray, or thinner to clean compact disc.
• After using special compact disc cleaner, let the compact disc dry off well before playing it
Author: The book has been a series of words, and the text is being written as a character.
Character: The book has been a series of words, and the text is being written as a character.
Name: The name of the author's author, and the name of the author's author, who is in English.
Author: The author's author, and the name of the author's author, who is in English.
Author: The author's author, and the name of the author's author, who is in English.

3. NOMENCLATURE
- Be sure to read this chapter referring to the front diagrams of chapter "2. CONTROLS" on page 5 (untold)
Names of the Buttons and Their Functions
|RELEASE
- Deeply push in the button to unlock the DCP.
[ROTARY] knob
- Adjust the volume by turning the knock clock when or counterclockwise.
• Use the knob to perform various settings
[BEQ] button
- Use the button to select one of the 4 types of sound characteristics already stored in
[TA] button
- Use the button to set the TA Traffic An-
nouncement; standby made.
[COLOR] button
- Button's color change to multicolor
[AF] button
- Press the button to turn on or all the AF (Al
- When the button is pressed and held
Regional function can select ON or OFF.
[1] button
- Switch the display indication (Main display, Clock display)
IT button
• Use the button to input a title in the CD
mode.
- Press and hold the button for 1 second or longer to enter the order mode.
[1] A1 balloon
[FA] Button
- Perforin street scan while in the radio mode. When the button is pressed and held, auto store is performed.
[UP]. [DN] buttons
- Select the folder while in the MP3/WMA mode
[DIRECT] buttons
- Store a station into memory or recall in di-
rectly while in the radio mode
[PLAY LIST] button
- Press and hold for 1 second or longer to turn on or off the play list mode. (MP3/WMA also only)
[RDM] button
• Perform random play while in the CD mode.
• Press and holds the button for + second or longer in perform ladders random play activity in
the MP3WMA mode
[RPT] button
- Repeat play while in the CD mode.
- Press and hold the button for 1 second or
longer to perform folder repeat play while in
the MP-3WMA Hube
[SCN] button
+ Perform scan play for 10 seconds of cash
track while in the CD mode.
- Press said holds the baller for 1 seconds of langer to perform loudwear play while in the
MPS4WMA mode.
[▶Mutton
• Use the button to set the PTY iProgramme
Typ; standby mode or PTY items.
• Play or pause a CD while in the CD mode
[◀], [▶] buttons
- Select a station while in the radio mode or
select a track when listening to a CD. These
buttons are used to make various seconds.
• Press should hold the finish for 1 second longer. In polish the first forward last backward.
[BND] button
- Switch the band, or seek tuning or manual
tuning while in the radio mode.
• Play a first task while in the CD home.
[A-M] button
- Use the button to settle to the audio mode
(025) 143-144, (025) 144, (025) 145, (025) 146, (025) 147, (025) 148, (025) 149, (025) 150, (025) 151, (025) 152, (025) 153, (025) 154, (025) 155, (025) 156, (025) 157, (025) 158, (025) 159, (025) 160, (025) 161, (025) 162, (025) 163, (025) 164, (025) 165, (025) 166, (025) 167, (025) 168, (025) 169, (025) 170, (025) 171, (025) 172, (025) 173, (025) 174, (025) 175, (025) 176, (025) 177, (025) 178, (025) 179, (025) 180, (025) 181, (025) 182, (025) 183, (025) 184, (025) 185, (025) 186, (025) 187, (025) 188, (025) 189, (025) 190, (025) 191, (025) 192, (025) 193, (025) 194, (025) 195, (025) 196, (025) 197, (025) 198, (025) 199, (025) 200, (025) 201, (025) 202, (025) 203, (025) 204, (025) 205, (025) 206, (025) 207, (025) 208, (025) 209, (025) 210, (025) 211, (025) 212, (025) 213, (025) 214, (025) 215, (025) 216, (025) 217, (025) 218, (025) 219, (025) 220, (025) 221, (025) 222, (025)
(1) 2017年1月1日
[FNC] Button
Press the button to turn on the power. Press and hold the button for 1 euro
Iiner is turn off the answer.
- Switch the operation mode among the Radio
mode, etc.
[▲] bullon
+ Press to eject a CD loaded in the unit
- Press to open the CD slot and insert a CD
[CD SLOT]
+ CD insertion slot.
Major Button Operations When External Equipment is Connected to This Unit
●When the CD/MD/DVD changer is connected
For details, see the section CD/MD
Changan Operations . For the 05th
Used with 120 DVD cameras
[D] button
- When the button is pressed and held.
setches the disc tiles or track tiles while in
the MD charger mode.
When the button is pressed and held,
Switches the Laser lines of track lines, cts
Write in the CD change mode.
[1] button
• Use the button to input a title in the CD
change per mode.
- Use the button to scroll the time during CD-text play with MP characters play cards.
play of MD charge play mode.
[UP], [DN] Buttons
1. Senchler 026
[ROM] BUTTON
- Perform random play. Also perform disc ran-
tate: July 2014 (the plan to be proposed)
PART
[AP-T] button
prassed and hold disc repeat play is per
formec
[BND] button
- Move the next also in increasing order
[SCN] button
• Perform again play for 10 seconds of each
track. Disc scan play is performed when the
button is pressed and held.
[▶Button
• Play or pause a CD, MD or DVD.
[◀], [▶] buttons
- Select a track when listening to a disc.
• Press and hold the button for 1 seconds or
longer to switch the fast-forward last-
Deckage.
● When the DTS/DOLBY DIGITAL is connected (DVH923)
[BEQ] button
- Press the button to turn on the DSF
• Press the button to turn on the PLU while the
[4] [1] buttons
- Pass the button to change the PSE mode
while the DSF made is on.
- Press the button to change
White
● When the TV/DAB is connected
√ For details, see the section TV Opera-
tions* or 'DAB Operations
[P:A] button
• Perform preset scan while in the TV mode.
When the button is pressed and held, auto
store is performed. (This function is only TV
[Unreadable]
[AF] button
+ Press the button to turn on or off the AF (A)
ternative Frequency) function in the DAB
mode. (This function is only DAB tuner.)
▶Milton
• Use the button to set the PTY iProgramme
Type) standby mode or PTY items in the CAR
mode.
- Switch the TV picture mode or VTR (external)
picture
[TA] button
,Use the function to set the T4 1,3 and
The benefit, mostly made in the EME mode. (This injection is only C48 hneu)
INDEOPLI
[ DIRECT] buttons
- Store a student into memory of Health directly.
[▼], [▼] buttons
• delta a shall
[BND] Button
• Switch to a line
- When the button is pressed and held, switch each button as required.
which is only of that class,
4. DCP
The control panel can be detached to prevent theft. When detaching the control panel, store it in the DCP (DETACHABLE CONTROL PANEL) case to prevent scratches.
We recommend taking the DCP with you when leaving the car.
Removing the DCP
- With the SLOPING CONSOLE closed, turn off the power.
- Press the [RELEASE] button deeply to open the DCP.
![[RELEASE] button](/content/2026/06/1277496/images/d7f5c377247e5996304f2074f6682dafde4d16b0df9131d8e66df733f2b6915e.jpg)
- Pull the DCP toward you and remove it.
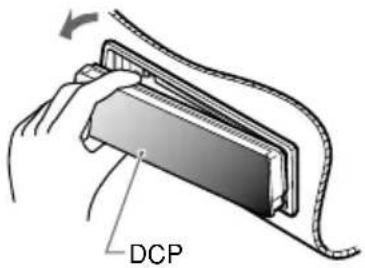
CAUTION
• Always close the SLOPING CONSOLE before removing the DCP.
- If you remove the DCP with the SLOPING CONSOLE open, the sloping console closes immediately. Be careful not to get your fingers caught.
Attaching the DCP
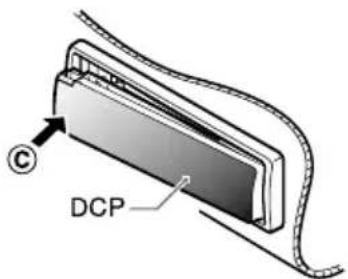
- Insert the DCP so that the Ⓐ section on the right side of the DCP catches on the hook Ⓑ on the unit.
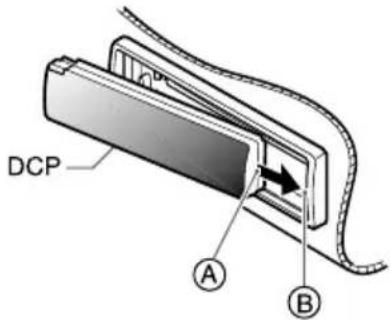
- Press the left side © of the DCP carefully to fit it in place.
CAUTION
- The DCP can easily be damaged by shocks. After removing it, be careful not to drop it or subject it to strong shocks.
- If the [RELEASE] button is pressed and the DCP is not locked into place, it may fall out from vibration of the car. This can break the DCP, so after removing it, either install it on the unit or put it in its DCP case.
- The connector connecting the unit and the DCP is an extremely important part. Be careful not to damage it by pressing on it with fingernails, screwdrivers, etc.
Note:
- If the DCP is dirty, wipe off the dirt with a soft, dry cloth only.
5. REMOTE CONTROL
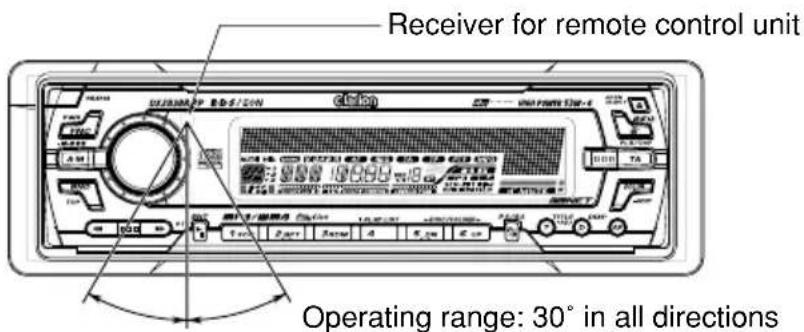
Remote control unit
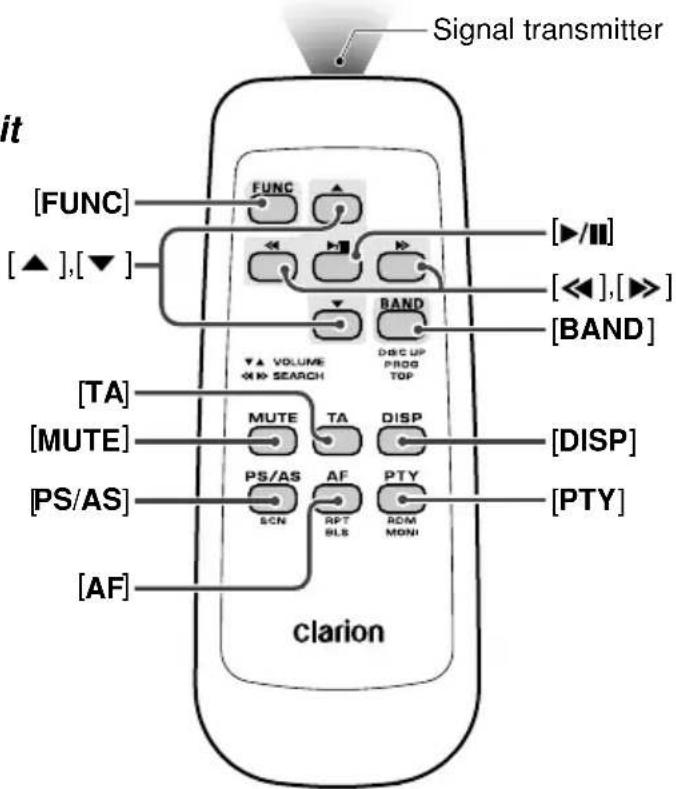
flowchart
graph TD
    A["Signal transmitter"] --> B["clarion"]
    B --> C["[FUNC"]]
    B --> D["[TA"]]
    B --> E["[MUTE"]]
    B --> F["[PS/AS"]]
    B --> G["[AF"]]
    B --> H["[CAPC"]]
    B --> I["TRANSCAN"]
    B --> J["TRANSCAN"]
    B --> K["TRANSCAN"]
    B --> L["TRANSCAN"]
    B --> M["TRANSCAN"]
    B --> N["TRANSCAN"]
    B --> O["TRANSCAN"]
    B --> P["TRANSCAN"]
    B --> Q["TRANSCAN"]
    B --> R["TRANSCAN"]
    B --> S["TRANSCAN"]
    B --> T["TRANSCAN"]
    B --> U["TRANSCAN"]
    B --> V["TRANSCAN"]
    B --> W["TRANSCAN"]
    B --> X["TRANSCAN"]
    B --> Y["TRANSCAN"]
    B --> Z["TRANSCAN"]
    B --> AA["TRANSCAN"]
    B --> AB["TRANSCAN"]
    B --> AC["TRANSCAN"]
    B --> AD["TRANSCAN"]
    B --> AE["TRANSCAN"]
    B --> AF["TRANSCAN"]
    B --> AG["TRANSCAN"]
    B --> AH["TRANSCAN"]
    B --> AI["TRANSCAN"]
    B --> AJ["TRANSCAN"]
    B --> AK["TRANSCAN"]
Inserting the Batteries
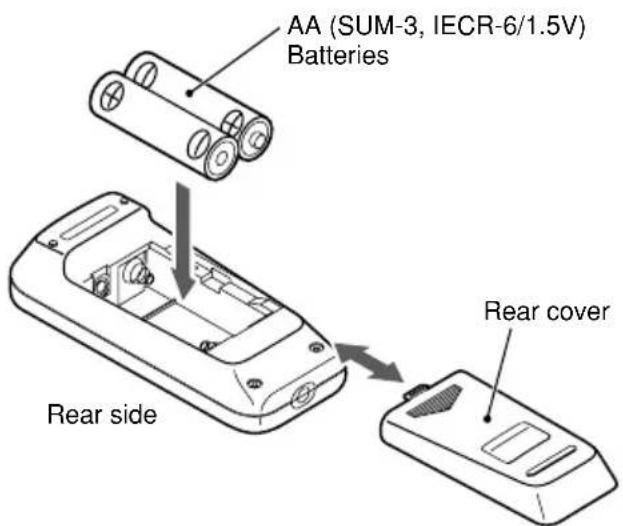
- Turn the remote control unit over, then slide the rear cover in the direction of the arrow.
- Insert the AA (SUM-3, IECR-6/1.5V) batteries that came with the remote control unit facing in the directions shown in the figure, then close the rear cover.
Notes:
Using batteries improperly can cause them to explode. Take note of the following points:
- When replacing batteries, replace both batteries with new ones.
- Do not short-circuit, disassemble or heat batteries.
- Do not dispose of batteries into fire or flames.
- Dispose of spent batteries properly.
Functions of Remote Control Unit Buttons
| ModeButton | Radio (RDS) /DAB | CD/MP3/WMA | CD/MD changer DVD changer | TV |
| [FUNC] | Switches among radio, DAB, CD/MP3/WMA, DVD deck, CD/MD changer, DVD changer and TV. | |||
| [BAND] | Switches reception band. | Plays the first track.Top play. | Moves the next disc in increasing order. | Switches reception band. |
| [▲], [▼] | Increases and decreases volume (in all modes). | |||
| [◄◄], [►►] | Moves preset channels up and down. | Moves tracks up and down.When pressed and held for 1 second or longer:Fast-forward/fast-backward. | Moves preset channels up and down. | |
| [►/II] | No function. | Switches between playback and pause. | No function. | |
| [MUTE] | Turns mute on and off. | |||
| [TA] | TA on and off. | |||
| [DISP] | Switches among main display, clock (CT) display. | |||
| [PS/AS] | Preset scan.When pressed and held for 2 seconds or longer: Auto store. | Scan play.Press and hold the button for 1 second or longer to perform folder scan play while in the MP3/WMA mode. | Scan play.When pressed and held for 1 second or longer: Disc scan play. | Preset scan.When pressed and held for 2 seconds or longer: Auto store. |
| [AF] | AF function on and off.When pressed and held for 1 second or longer: REG function on and off | Repeat play.Press and hold the button for 1 second or longer to perform folder repeat play while in the MP3/WMA mode. | Repeat play.When pressed and held for 1 second or longer: Disc repeat play. | No function. |
| [PTY] | PTY mode on and off. | Random play.Press and hold the button for 1 second or longer to perform folder random play while in the MP3/WMA mode. | Random play.When pressed and held for 1 second or longer: Disc random play. | Switches between TV and VTR. |
* Some of the corresponding buttons on the main unit and remote control unit have different functions.
6. OPERATIONS
Basic Operations
Note: Be sure to read this chapter referring to the front diagrams of chapter "2. CONTROLS" on page 5 (unfold).
CAUTION
Be sure to lower the volume before switching off the unit power or the ignition key. The unit remembers its last volume setting. If you switch the power off with the volume up, when you switch the power back on, the sudden loud volume may hurt your hearing and damage the unit.
Turning on/off the power
Note:
- Be careful about using this unit for a long time without running the engine. If you drain the car's battery too far, you may not be able to start the engine and this can reduce the service life of the battery.
- Press the [FNC] button.
- The illumination and display on the unit light up. The unit automatically remembers its last operation mode and will automatically switch to display that mode.
- Press and hold the [FNC] button for 1 second or longer to turn off the power for the unit.
Note:
- System check
The first time this unit is turned on after the wire connections are completed, it must be checked what equipment is connected. When the power is turned on, "SYSTEM CHCK" and "Push POWER" appear in the display alternately, so press the [FNC] button. The system check starts within the unit. When the system check is complete, press the [FNC] button again.
Selecting a mode
-
Press the [FNC] button to change the operation mode.
-
Each time you press the [FNC] button, the operation mode changes in the following order:
Radio mode → DAB mode → CD/MP3/WMA mode → DVD Deck mode → CD changer mode → MD changer mode → DVD changer mode → TV mode → AUX mode → Radio mode...
*External equipment not connected with CeNET is not displayed.
Adjusting the volume
Turning the [ROTARY] knob clockwise increases the volume; turning it counterclockwise decreases the volume.
*The volume level is from 0 (minimum) to 33 (maximum).
Switching the display
Press the [D] button to select the desired display. Each time you press the [D] button, the display switches in the following order:
Main display → Clock (CT) display →
Main display
*Once selected, the preferred display becomes the display default. When a function adjustment such as volume is made, the screen will momentarily switch to that function's display, then revert back to the preferred display several seconds after the adjustment.
*For information on how to enter a title, refer to the subsection "Entering titles" in section "Operations Common to Each Mode".
* When CT data is not received, "CT—:—" appears in the display.
Setting the Beat EQ
This unit are provided with 4 types of sound tone effects stored in memory. Select the one you prefer.
* The factory default setting is "USER CUSTOM".
Each time you press the [BEQ] button, the tone effect changes in the following order:
"BASS BOOST" → "IMPACT" → "EXCITE" →
"USER CUSTOM" → "TONE BYPASS" →
"BASS BOOST" ...
• BASS BOOST : bass emphasized
- IMPACT : bass and treble emphasized
- EXCITE : bass and treble emphasized mid de-emphasized
- USER CUSTOM : user custom
• TONE BYPASS : no sound effect
Adjusting the tone
Press the [A-M] button and select the item to adjust. Each time you press the [A-M] button, the item changes in the following order:
●When the BEQ (BASS BOOST, IMPACT, EXCITE) is set
"SW-VOL" → "BASS BOOST" (IMPACT, EXCITE) → "BALANCE" → "FADER" → Function mode...
- When the BEQ (USER CUSTOM) is set "SW-VOL" → "BASS" → "MID" → "TREBLE" → "BALANCE" → "FADER" → Function mode...
- When the TONE BYPASS is set "SW-VOL" → "BALANCE" → "FADER" → Function mode...
*Pressing the [BEQ] button for 1 second or longer while in "USER CUSTOM" sets flat, and displays a "BEQ FLAT" message.
Note:
- When the separately-sold digital sound processor (DVH923) is used, the bass and treble tone adjustments cannot be selected.
Adjusting the subwoofer output volume
You can adjust the volume output from the unit's subwoofer output terminal.
- Press the [A-M] button and select "SW-VOL".
-
Turning the [ROTARY] knob clockwise increases the output volume; turning it counterclockwise decreases the output volume.
* The factory default setting is "0". (Setting range: -6 to 6) -
When the adjustment is complete, press the [A-M] button several times until the function mode is reached.
Adjusting the bass
The bass gain, bass F (center frequency) and bass Q can be adjusted as follows.
- Press the [A-M] button and select "BASS ◀GAIN►".
-
Press the [◀◀] or [▶▶] button and select from “BASS ◀GAIN▶” → “BASS ◀F 50▶” → “BASS ◀Q 1▶” → “BASS ◀GAIN▶”.
-
Turn the [ROTARY] knob clockwise or counterclockwise as needed and adjust the gain, the F (center frequency) and the Q.
BASS GAIN : -6 to 8 (The factory default setting is "0")
BASS F : 50Hz/80Hz/120Hz (The factory default setting is "50")
BASS Q : 1/1.25/1.5/2 (The factory default setting is "1") -
When the adjustment is complete, press the [A-M] button several times until the function mode is reached.
Adjusting the MID
The MID gain, MID F (center frequency) and MID Q can be adjusted as follows.
- Press the [A-M] button and select "MID ◀GAIN►".
-
Press the [◀◀] or [▶▶] button and select from “MID ◀GAIN▶” → “MID ◀F 1k▶” → “MID ◀Q 2▶” → “MID ◀GAIN▶”.
-
Turn the [ROTARY] knob clockwise or counterclockwise as needed and adjust the gain, the F (center frequency) and the Q.
MID GAIN : -6 to 6 (The factory default setting is "0")
MID F : 700Hz/1KHz/2KHz (The factory default setting is "1k")
MID Q : 1.5/2 (The factory default setting is "2")
- When the adjustment is complete, press the [A-M] button several times until the function mode is reached.
Adjusting the TREBLE
The treble gain and treble F (center frequency) can be adjusted as follows.
-
Press the [A-M] button and select "TREB ◀GAIN►".
-
Press the [◀◀] or [▶▶] button and select from “TREB ◀GAIN▶” → “TREB ◀F 12K▶” → “TREB ◀GAIN▶”.
-
Turn the [ROTARY] knob clockwise or counterclockwise as needed and adjust the gain and the F (center frequency).
TREB GAIN : -6 to 6 (The factory default setting is "0")
TREB F : 8KHz/12KHz (The Factory default setting is "12K")
- When the adjustment is complete, press the [A-M] button several times until the function mode is reached.
Adjusting the balance
- Press the [A-M] button and select "BALANCE".
- Turning the [ROTARY] knob clockwise emphasizes the sound from the right speaker; turning it counterclockwise emphasizes the sound from the left speaker.
* The factory default setting is "0". (Adjustment range: L13 to R13) - When the adjustment is complete, press the [A-M] button several times until the function mode is reached.
Adjusting the fader
- Press the [A-M] button and select "FADER".
- Turning the [ROTARY] knob clockwise emphasizes the sound from the front speakers; turning it counterclockwise emphasizes the sound from the rear speakers.
* The factory default setting is "0". (Adjustment range: F12 to R12)
- When the adjustment is complete, press the [A-M] button several times until the function mode is reached.
Adjusting the Beat EQ
- Press the [BEQ] button and select the Beat EQ mode (1 to 3) to adjust.
- Press the [A-M] button and select "BASS BOOST" or "IMPACT" or "EXCITE".
- Turning the [ROTARY] knob clockwise adjusts in the + direction; turning it counterclockwise adjusts in the - direction.
* When BASS BOOST is selected, you can adjust the bass in the range of -3 to 3.
* When IMPACT and EXCITE is selected, you can adjust the bass and treble in the range of -3 to 3.
- When the adjustment is complete, press the [A-M] button several times until the function mode is reached.
Adjusting MAGNA BASS EXTEND
The MAGNA BASS EXTEND does not adjust the low sound area like the normal sound adjustment function, but emphasizes the deep bass sound area to provide you with a dynamic sound.
*The factory default setting is off.
- Press and hold the [A-M] button for 1 second or longer to turn on the MAGNA BASS EXTEND effect.
"M-B EX" lights in the display. - Press and hold the [A-M] button for 1 second or longer to turn off the MAGNA BASS EXTEND effect.
"M-B EX" goes off from the display.
CT (Clock Time) function
The CT function receives CT data sent from an RDS station and displays the time. Press the [D] button to switch to the CT display.
* If a CT data is not being received, "CT—:—" appears in the display.
Note:
- CT data is not transmitted in some countries and by some broadcast stations. Also, in some areas, the CT may not display accurately.
Listening to the radio
- Press the [FNC] button and select the radio mode. The frequency or PS appears in the display.
*PS: Programme service name
- Press the [BND] button and select the radio band. Each time the button is pressed, the radio reception band changes in the following order:
FM1 → FM2 → FM3 → AM (MW/LW) → FM1...
- Press the [◀] or [▶] button to tune in the desired station.
Tuning
There are 3 types of tuning mode available, seek tuning, manual tuning and preset tuning.
Seek tuning
There are 2 types of seek tuning: DX SEEK and LOCAL SEEK.
DX SEEK can automatically tune in to receivable broadcast stations; LOCAL SEEK can tune in to only broadcast stations with a good reception sensitivity.
-
Press the [BND] button and select the desired band (FM or AM (MW, LW)).
-
Tune into a station.
* If "MANU" is lit in the display, press and hold the [BND] button for 1 second or longer. "MANU" in the display goes off and seek tuning is now available.
* If "TA" is lit in the display, TP stations are automatically sought.
●DX SEEK
Press the [◀◀] or [▶▶] button to automatically seek a station.
When the [▶] button is pressed, the station is sought in the direction of higher frequencies; if the [◀] button is pressed, the station is sought in the direction of lower frequencies.
* When seek tuning starts, "DX SEEK" appears in the display.
●LOCAL SEEK
If you press and hold the [◀◀] or [▶▶] button for 1 second or longer, local seek tuning is carried out. Broadcast stations with good reception sensitivity are selected.
* When local seeking starts, "LO SEEK" appears in the display.
Manual tuning
There are 2 ways available: Quick tuning and step tuning.
When you are in the step tuning mode, the frequency changes one step at a time. In the quick tuning mode, you can quickly tune the desired frequency.
- Press the [BND] button and select the desired band (FM or AM (MW/LW)).
* If "MANU" is not lit in the display, press and hold the [BND] button for 1 second or longer. "MANU" is lit in the display and manual tuning is now available.
- Tune into a station.
●Quick tuning:
Press and hold the [◀◀] or [▶▶] button for 1 second or longer to tune in a station.
- Step tuning:
Press the [◀◀] or [▶▶] button to manually tune in a station.
Recalling a preset station
A total of 24 preset positions (6-FM1, 6-FM2, 6-FM3, 6-AM) exist to store individual radio stations in memory. Pressing the corresponding [DIRECT] button recalls the stored radio frequency automatically.
- Press the [BND] button and select the desired band (FM or AM (MW/LW)).
- Press the corresponding [DIRECT] button to recall the stored station.
* Press and hold one of the [DIRECT] buttons for 2 seconds or longer to store that station into preset memory.
Manual memory
- Select the desired station with seek tuning, manual tuning or preset tuning.
- Press and hold one of the [DIRECT] buttons for 2 seconds or longer to store the current station into preset memory.
Auto store
Auto store is a function for storing up to 6 stations that are automatically tuned in sequentially. If 6 receivable stations cannot be received, a previously stored station remains unoverwritten at the memory position.
- Press the [BND] button and select the desired band (FM or AM (MW/LW)).
- Press and hold the [P/A] button for 2 seconds or longer. The stations with good reception are stored automatically to the preset channels.
*If auto store is performed in the FM bands, the stations are stored in FM3 even if FM1 or FM2 was chosen for storing stations.
Preset scan
Preset scan receives the stations stored in pre-set memory in order. This function is useful when searching for a desired station in memory.
- Press the [P/A] button.
- When a desired station is tuned in, press the [P/A] button again to continue receiving that station.
Note:
- Be careful not to press and hold the [P/A] button for 2 seconds or longer, otherwise the auto store function is engaged and the unit starts storing stations.
RDS (Radio Data System)
This unit has a built-in RDS decoder system that supports broadcast stations transmitting RDS data.
This system can display the name of the broadcast station being received (PS) and can automatically switch to the broadcast station with the best reception as you move long distances (AF switching).
Also, if a traffic announcement or programme type is broadcast from an RDS station, no matter what mode you are in, this broadcast is received.
Additionally, if EON information is received, this information enables automatic switching of other preset stations on the same network and interruption of the station being received with traffic information from other stations (TP). This function is not available in some areas.
When using the RDS function, always set the radio to FM mode.
• AF : Alternative Frequency
• PS : Programme Service Name
- PTY : Programme Type
• EON : Enhanced Other Network
- TP : Traffic Programme
*RDS interrupt does not function during AM radio reception or in TV mode.
*When set receives RDS signal, and can read PS data, PS appears in the display.
AF function
The AF function switches to a different frequency on the same network in order to maintain optimum reception.
* The factory default setting is "ON".
●Switching OFF the AF function
Press the [AF] button. "AF" in the display goes off and the AF function turns off.
●Switching ON the AF function
Press the [AF] button. "AF" in the display lights and the AF function turns on.
*If the reception of the current broadcast station deteriorates, "PI SEARCH" appears in the display and the radio searches for the same programme on another frequency.
●AF function between RDS and DAB
When the same programme is broadcast by both RDS and DAB, and this function is ON, the unit switches to receiving the broadcast with the better reception automatically.
*This function only operates when the DAH913 or DAH923 DAB unit, sold separately, is connected.
* This factory default setting is "ON".
- Press and hold the [T] button for 1 second or longer to switch to the adjustment selection display.
- Press the [◀◀] or [▶▶] button to select "LINK ACT".
- Turn the [ROTARY] knob clockwise for "ON" or counterclockwise for "OFF".
● ON:
AF switching between DAB and RDS enabled.
● OFF:
AF switching between DAB and RDS disabled.
- Press the [T] button to return to the previous mode.
REG (Regional programme) function
When the REG function is ON, the optimum regional station can be received. When this function is OFF, if the regional station area switches as you drive, a regional station for that region is received.
* The factory default setting is "OFF".
Notes:
- This function is disabled when a national station such as BBC R2 is being received.
- The REG function ON/OFF setting is valid when the AF function is ON.
●Switching the REG function ON
Press and hold the [AF] button for 1 second or longer.
"REG" in the display lights and the REG function turns on.
●Switching the REG function OFF
Press and hold the [AF] button for 1 second or longer.
"REG" in the display goes off and the REG function turns off.
Manually tuning a regional station in the same network
- This function is valid when the AF function is ON and the REG function is OFF.
Note:
- This function can be used when a regional broadcast of the same network is received.
- Press any one of the [DIRECT] buttons to call out the regional station.
- If the reception condition of the called out station is bad, press the [DIRECT] button of the same number. The unit receives a local station on the same network.
TA (Traffic Announcement)
In the TA standby mode, when a traffic announcement broadcast starts, the traffic announcement broadcast is received as top priority regardless of the function mode so you can listen to it. Traffic programme (TP) automatic tuning is also possible.
* This function can only be used when "TP" is lit in the display. When "TP" is lit, this means that the RDS broadcast station being received has traffic announcement programmes.
●Setting the TA standby mode
If you press the [TA] button when only "TP" is lit in the display, "TP" and "TA" light in the display and the unit is set into the TA standby mode until a traffic announcement is broadcast. When a traffic announcement broadcast starts, "TRA INFO" appears in the display. If you press the [TA] button while a traffic announcement broadcast is being received, the traffic announcement broadcast reception is cancelled and the unit goes into the TA standby mode.
●Cancelling the TA standby mode
As "TP" and "TA" lit in the display, press the [TA] button. The "TA" in the display goes off and the TA standby mode is cancelled.
* If "TP" is not lit, pressing the [TA] button searches for a TP station.
●Searching for a TP station
When "TP" is not lit, if you press the [TA] button, "TA" in the display lights and the unit automatically receives a TP station.
Note:
- If a TP station is not received, the unit continues the search operation. Pressing [TA] button again goes off "TA" in the display and stops TP station searching.
Auto store function for TP stations
You can automatically store up to 6 TP stations into preset memory. If the number of TP can be received less than 6, broadcast stations already stored in memory and left without being overwritten.
As “TA” lit in the display, press and hold the [P/A] button for 2 seconds or longer. The TP stations with the good reception sensitivity are stored into preset memory.
*Even if you select FM1 or FM2, a TP station is stored into memory for FM3.
PTY
This function enables you to listen to a broadcast of the selected programme type even if the unit is on a function mode other than radio.
*Some countries do not yet have PTY broadcast.
*In the TA standby mode, a TP station has priority over a PTY broadcast station.
●Setting the PTY standby mode
When you press the [▶II] button, "PTY" lights in the display and the PTY standby mode is turned on. When the selected PTY broadcast starts, the PTY item name appears in the display.
●Cancelling the PTY standby mode
When you press and hold the [▶button for 2 second or longer, "PTY" goes off in the display and PTY standby mode is cancelled.
●Cancelling a PTY interrupt broadcast
Press the [▶ button during the PTY interrupt broadcast, the PTY interrupt is cancelled and the unit returns to PTY standby mode.
Selecting PTY
-
When you press the [ ] button, the unit goes into PTY select mode.
-
Press any one of the [DIRECT] buttons. Alternatively, turn the [ROTARY] knob clockwise or counterclockwise to select the desired PTY.
*Below are the factory default settings stored for the [DIRECT] buttons.
| Preset number | PTY item | |
| ENGLISH Contents | ||
| 1 News | News | |
| 2 Info | Information | |
| 3 Pop | M Pop Music | |
| 4 Sport | Sport | |
| 5 Classics | Serious Classical Music | |
| 6 Easy | M | Easy Listening Music |
- The PTY select mode is cancelled automatically 7 seconds after a PTY is selected.
PTY seek
-
When you press the [] button, the PTY select mode is turned on.
-
Select PTY.
-
Press the [◀◀] or [▶▶] button. If you press the [▶▶] button, the unit seeks a PTY broadcast moving up the frequencies; if you press the [◀◀] button, it seeks moving down the frequencies.
*If no station with the selected PTY broadcast can be received, the unit returns to the previous mode.
PTY preset memory
-
When you press the [] button, the PTY select mode is turned on.
-
Turn the [ROTARY] knob clockwise or counterclockwise to select the desired PTY. The 29 types of PTY below can be selected.
-
If you press and hold any one of the [DIRECT] buttons for 2 seconds or longer, the selected PTY is stored into that preset channel memory.
| PTY item | ||||
| ENGLISH DEUTSCH | SVENSKA FRANCAIS | Contents | ||
| News | Nachrich | Nyheter | Infos | News |
| Affairs | Aktuell | Aktuellt | Magazine | Today's events |
| Info | Service | Info | Services | Information |
| Sport | Sport | Sport | Sport | Sports |
| Educate | Bildung | Utbildn | Educatif | Education |
| Drama | Hör + Lit | Teater | Fiction | Drama |
| Culture | Kultur | Kultur | Culture | Culture |
| Science | Wissen | Vetenskp | Sciences | Science |
| Varied | Unterh | Underh | Divers | Variety |
| Pop M | Pop | Pop | M Pop | Pop music |
| ENGLISH DEUTSCH | SVENSKA FRANCA | AIS Contents | ||
| Rock M Rock Rock | M Rock Rock music | |||
| Easy M | U-Musik | Lättlyss | Chansons | Easy music |
| Light M | L-Musik | L klass | M CI Lég | Light music |
| Classics | E-Musik | Klassisk | Classiq | Classics |
| Other M | -- Musik | Övrig m | Autre M | Other music |
| Weather | Wetter | Väder | Météo | Weather |
| Finance | Wirtsch | Ekonomi | Economie | Finance |
| Children | Kinder | För barn | Enfants | For children |
| Social | Soziales | Socialt | Société | Social |
| Religion | Religion | Andligt | Religion | Religion |
| Phone In | Anruf | Telefon | Forum | Phone in |
| Travel | Reise | Resor | Voyages | Travel |
| Leisure | Freizeit | Fritid | Loisirs | Leisure |
| Jazz | Jazz | Jazz | Jazz | Jazz |
| Country | Country | Country | Country | Country |
| Nation M | Landes M | Nation m | Ch pays | Nation music |
| Oldies | Oldies | Oldies | Rétro | Oldies |
| Folk M | Folklore | Folkm | Folklore | Folk music |
| Document | Feature | Dokument | Document | Documentaries |
Emergency broadcast
If an emergency broadcast is received, all the function mode operations are stopped.
"ALARM" appears in the display and the emergency broadcast can be heard.
● Cancelling an emergency broadcast
If you press the [AF] button, emergency broadcast reception is cancelled.
Switching the PTY display language
You can select one of 4 languages (English, German, Swedish or French) for the PTY displayed in the display.
* The factory default setting is "ENGLISH".
-
Press and hold the [T] button for 1 second or longer to switch to the adjustment selection display.
-
Press the [◀] or [▶] button and select "LANGUAGE".
-
Press the [▶] button.
-
Turn the [ROTARY] knob clockwise or counterclockwise to select the desired language.
-
Press the [▶III] button.
-
Press the [T] button to return to the previous mode.
Volume setting of TA, emergency broadcast (ALARM) and PTY
The volume for TA, ALARM and PTY interrupts can be set during TA, ALARM or PTY interrupt.
* The factory default setting is "15".
During a TA, ALARM or PTY interrupt, turn the [ROTARY] knob clockwise or counterclockwise to set the volume to the desired level (0 to 33).
* When the TA, ALARM or PTY interrupt ends, the volume returns to the level it had before the interrupt.
MP3/WMA
What is MP3?
MP3 is an audio compression method and classified into audio layer 3 of MPEG standards.
This audio compression method has penetrated into PC users and become a standard format.
This MP3 features the original audio data compression to about 10 percent of its initial size with a high sound quality. This means that about 10 music CDs can be recorded on a CD-R disc or CD-RW disc to allow a long listening time without having to change CDs.
What is WMA?
WMA is the abbreviation of Windows Media Audio, an audio file format developed by Microsoft Corporation.
Notes:
- If you play a file with DRM (Digital Rights Management) for WMA remaining ON, no audio is output.
- Windows Media™, and the Windows ® logo are trademarks, or registered trademarks of Microsoft Corporation in the United States and/or other countries.
●To disable DRM (Digital Rights Management):
- When using Windows Media Player 7, click on TOOLS → OPTIONS → CD AUDIO; there, uncheck the ENABLE PERSONAL RIGHTS MANAGEMENT check box, then construct files.
- When using Windows Media Player for Windows XP 8, click on TOOLS → OPTIONS → COPY MUSIC tab, then under COPY SETTINGS, unclick the check box for PROTECT CONTENT. Thereafter, reconstruct files.
Personally constructed WMA files are used at your own responsibility.
Precautions when creating MP3/WMA disc
● Usable sampling rates and bit rates:
-
MP3: Sampling rate 8 kHz-48 kHz, Bit rate: 8 kbps-320 kbps / VBR
-
WMA: Bit rate 48 kbps-192 kbps
● File extensions
-
Always add a file extension ".MP3" or ".WMA" to MP3 or WMA file by using single byte letters. If you add a file extension other than specified or forget to add the file extension, the file cannot be played.
-
Files without MP3/WMA data will not play. The indication “—:—” appears in the play time display if you attempt to play files without MP3/WMA data.
● Logical format (File system)
-
When writing MP3/WMA file on a CD-R disc or CD-RW disc, please select "ISO9660 level 1, 2, 3 or JOLIET or Romeo" as the writing software format. Normal play may not be possible if the disc is recorded on another format.
-
The folder name and file name can be displayed as the title during MP3/WMA play but the title must be within 128 single byte alphabetical letters and numerals (including an extension).
-
Do not affix a name to a file inside a folder having the same name.
- Folder structure
- A disc with a folder having more than 8 hierarchical levels will be impossible.
● Number of files or folders
-
Up to 255 files can be recognized per folder. Up to 500 files can be played.
-
Tracks are played in the order that they were recorded onto a disc. (Tracks might not always be played in the order displayed on the PC.)
-
Some noise may occur depending on the type of encoder software used while recording.
Multisession function
When a disc contains both normal CD type tracks and MP3/WMA type tracks mixedly, you can select which type of the recorded tracks to play.
- Default value is "CD".
Each time you press and hold the [BND] button for about 1 second, the mixed mode is switched between CD type or MP3/WMA type. The following indication appears in the title display when switching the track type to be played.
● Display when CD type track is selected:
M-SESS CD

● Display when MP3/WMA type track is selected:
M-SESS MP3
- Types of recording that can be played are as follows.
| SettingDisc | Set to CD | Set to MP3/WMA |
| Mixed with CD and MP3/WMA type tracks | Play CD | Play MP3/WMA |
| CD type track only | Play CD Play | CD |
| MP3/WMA type track only | Play MP3/WMA | Play MP3/WMA |
- After making these settings, remove the disc and then reinsert it.
- When a mixed mode CD is loaded and CD is set, the track to be played first is MP3/WMA file data and no sound is heard.
Disc-In-Play function
As long as the ignition key is turned to the ON or ACC position, this function allows you to turn the power to the unit and start playing the disc automatically when the disc is inserted even if the power is not turned on.
CAUTION
- Do not try to put your hand or fingers in the disc insertion slot. Also never insert foreign objects into the slot.
- Do not insert discs where adhesive comes out from cellophane tape or a rental CD label, or discs with marks where cellophane tape or rental CD labels were removed. It may be impossible to extract these discs from the unit and they may cause the unit to break down.
Backup Eject function
Just pressing the [▲] button ejects the disc even if the power to the unit was not turned on.
- Press the [▲] button. Remove the disc after it is ejected.
Listening to a disc already loaded in the unit
Press the [FNC] button to select the CD/MP3/WMA mode.
When the unit enters the CD/MP3/WMA mode, play starts automatically.
If there is no disc loaded, the indication "NO DISC" appears in the title display.
* The mode changes each time the [FNC] button is pressed. (Modes are not displayed for equipment that is not connected.)
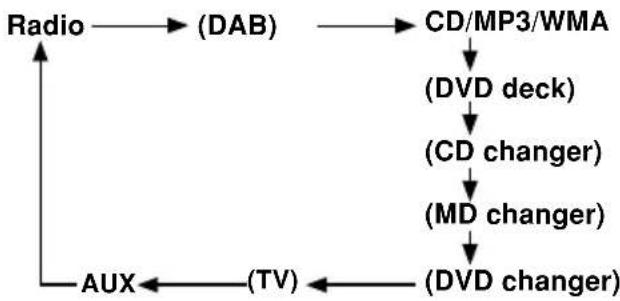
flowchart
graph TD
    A["Radio"] --> B["(DAB)"]
    B --> C["CD/MP3/WMA"]
    C --> D["(DVD deck)"]
    D --> E["(CD changer)"]
    E --> F["(MD changer)"]
    F --> G["(DVD changer)"]
    G --> H["(TV)"]
    H --> I["AUX"]
Loading a CD
- Press the [▲] button. The SLOPING CONSOLE opens.
- Insert a CD into the center of the CD SLOT with the label side facing up. The CD plays automatically after loading.
Notes:
- Never insert foreign objects into the CD SLOT.
- If the CD is not inserted easily, there may be another CD in the mechanism or the unit may require service.
- Discs not bearing the DISC or QISC or mark and CD-ROMs cannot be played by this unit.
- Some CDs recorded in CD-R/CD-RW mode may not be usable.
Loading 8 cm compact discs
*No adapter is required to play an 8 cm CD.
* Insert the 8 cm CD into the center of the insertion slot.
CAUTION
Be careful not to catch your hand or fingers while closing the SLOPING CONSOLE.
Notes:
- If the SLOPING CONSOLE does not open fully, gently open with your hand.
• After loading a CD, always close the SLOPING CONSOLE.
Pausing play
- Press the [▶ button to pause play. "PAUSE" appears in the display.
- To resume CD play, press the [▶ button again.
CD/MP3/WMA Operations
Displaying CD titles
This unit can display title data for CD-text/MP3/WMA disc and user titles input with this unit.
-
Press the [D] button to display the title.
-
Each time you press and hold the [D] button for 1 second or longer, the title display changes in the following order:
- CD-TEXT disc
User title (disc) → CD-text title (disc) → Artist name → CD-text title (track) → User title (disc)...
●MP3/WMA disc
Folder → File → Album TAG → Artist TAG → Title TAG → Folder...
Notes:
- If the CD playing is not a CD-text CD or no user title has been input, "NO TITLE" appears in the display.
- If MP3/WMA disc is not input TAG, "NO TAG" appears in the display.
- For MP3, supports ID3 Tags V2.3 / 2.2 / 1.1 / 1.0.
- Tag displays give priority to V2.3 / 2.2
- In the case of album Tags for WMA, the information written into the extension header is displayed.
- Only ASCII characters can be displayed in Tags.
Selecting a track
●Track-up
- Press the [▶▶] button to move ahead to the beginning of the next track.
- Each time you press the [▶] button, the track advances ahead to the beginning of the next track.
●Track-down
- Press the [◀◀] button to move back to the beginning of the current track.
- Press the [◀] button twice to move to the beginning of the previous track.
Fast-forward/fast-backward
●Fast-forward
Press and hold the [▶▶] button for 1 second or longer.
●Fast-backward
Press and hold the [◀] button for 1 second or longer.
*For MP3/WMA discs, it takes some time until the start of searching and between tracks. In addition, the playing time may have a margin of error.
Folder Select
This function allows you to select a folder containing MP3/WMA files and start playing from the first track in the folder.
- Press [DN] or [UP] button.
Pressing [DN] button to move the previous play list.
Pressing [UP] button to move the next play list.
1
Root folder
2
3
4
5
* Press [UP] button while in the final folder to shift to the first folder.
*Folder without an MP3/WMA file is not selectable.
- To select a track, press the [◀◀] or [▶▶] of button.
Top function
The top function resets the CD player to the first track of the disc. Press the [BND] button to play the first track (track No. 1) on the disc.
*In case of MP3/WMA, the first track of a folder being played will be returned.
Scan play
This function allows you to locate and play the first 10 seconds of all the tracks recorded on a disc.
- Press the [SCN] button to perform scan play. The indication "SCN" lights up in the display, and "TRK SCAN" (or "-SCAN" when searching for a track in the MP3/WMA file) appears in the title display for about 2 seconds, then scan play starts.
*Scan play starts from the next track after the track currently being played.
- To cancel scan play, press the [SCN] button again.
The play status indication such as "SCN" disappears from the display and the current track is played.
Folder scan play
This function allows you to locate and play the first 10 seconds of the first track of all the folders on an MP3/WMA disc.
- Press and hold the [SCN] button for about 1 second to folder scan play.
The indications "FOLDER" and "SCN" light up in the display and "SCAN" appears for about 2 seconds in the title display, and then folder scan play starts.
*Folder scan play starts from the next track after the track currently being played.
- To cancel folder scan play, press the [SCN] button again.
The play status indications such as "FOLDER" and "SCN" disappear from the display and the current track is played.
Repeat play
This function allows you to play the current track repeatedly.
- Press the [RPT] button to perform repeat play.
The indication "RPT" lights up in the display and "TRK REPEAT"(or "J-REPEAT" when performing repeated play for a track in the MP3/WMA file) appears for about 2 seconds in the title display, and then repeat play starts.
- To cancel repeat play, press the [RPT] button again.
The play status display such as "RPT" disappears from the display and normal play resumes from the track currently being played.
Folder repeat play
This function allows you to play a track currently being played in the MP3/WMA folder repeatedly.
- Press and hold the [RPT] button for about 1 second to perform folder repeat play.
The indications "FOLDER" and "RPT" light up in the display and "-REPEAT" appears for about 2 seconds in the title display, and then folder repeat play starts.
- To cancel folder repeat play, press the [RPT] button again.
The play status indications such "FOLDER" and "RPT" disappear from the display and normal play resumes from the track currently being played.
Random play
This function allows you to play all tracks recorded on a disc in a random order.
- Press the [RDM] button to perform random play.
The indication "RDM" lights up in the display and "TRK RANDOM" (or "J-RANDOM" when performing random play for tracks on a MP3/WMA disc) appears in the title display for about 2 seconds, and then random play starts. The tracks on the disc are then played in a random order.
- To cancel random play, press the [RDM] button again.
The play status indication such as "RDM" disappears from the display and normal play resumes from the track currently being played.
Folder random play
This function allows you to play all the tracks of all the folders recorded on an MP3/WMA disc in a random order.
- Press and hold the [RDM] button for about 1 second to perform folder random play.
The indications "FOLDER" and "RDM" light up in the display and "-RANDOM" appear in the title display for about 2 seconds, and then folder random play starts.
- To cancel folder random play, press the [RDM] button again.
The play status indications such as "FOLDER" and "RDM" disappear from the display and normal play resumes from the track currently being played.
Play list mode
This function allows you to play tracks, up to latest 5 time stamps, by reading the play list information written on the disc.
- Press and hold the [PLAY LIST] button for 1 second or longer to turn on or off the play list mode.
*Play list play is possible only when there is a file whose extension is ".M3U" or ".ASX" on the CD-R/RW.
*Up to 5 play lists can be recognized, and up to 255 files can be recognized per play list.
-
Press the [◀] or [▶] buttons to change the track.
-
Press [DN] button to move to the previous play list.
Press [UP] button to move to the next play list.
Notes:
- The SCN/RPT/RDM functions cannot be used while in the play list mode.
- The title display changes from folder name to play list name.
Making a play list
- Write desired tracks to a CD-R/RW, etc. Be sure to use alphanumeric/ASCII characters for all file names.
- Make a play list by using a multimedia player, etc. and save the data. The file format must be M3U or ASX.
- Again, write this play list to the CD-R/RW, etc.
Notes:
- When writing to a CD-R/RW, etc., be sure to use alphanumeric/ASCII characters.
- Up to 5 layers can be recognized as a list. For written play lists, latest 5 lists are recognized in the order in which they are written.
- When writing to a CD-R/RW, etc., turn off the Disc At Once function.
- When adding a play list, it is recommended to write it in the "Root" folder.
Operations Common to Each Mode
LCD type
You can setting LCD type NEGA or POSI.
* The factory default setting is "LCD NEGA".
- Press and hold the [T] button for 1 second or longer to switch to the adjustment selection display.
- Press the [◀] or [▶] button and select "LCD TYPE".
- Turn the [ROTARY] knob clockwise to "LCD POSI" and counterclockwise to "LCD NEGA".
Turning the screen saver function on or off
This unit is provided with the screen saver function which allows you to show various kinds of patterns and characters in the Operation Status indication area of the display in a random order. You can turn on and off this function.
If the button operation is performed with the screen saver function on, the operation display corresponding to the button operation is shown for about 30 seconds and the display returns to the screen saver display.
* The factory default setting is "SS RANDOM".
- Press and hold the [T] button for 1 second or longer to switch to the adjustment selection display.
- Press the [◀] or [▶] button and select "SCRN SVR E"
- Press the [] button.
- Turn the [ROTARY] knob clockwise or counterclockwise to select the setting. Each time you turn the [ROTARY] knob, the setting changes in the following order: SS OFF → SS PTN1 → SS PTN2 → SS PTN3 → SS MESSAGE → SS RANDOM
- Press the [ ] button to store the setting.
Entering MESSAGE INFORMATION
Message up to 30 characters long can be stored in memory and displayed for any mode.
* The factory default setting is "Welcome to Clarion".
- Press and hold the [T] button for 1 second or longer to switch to the adjustment selection display.
-
Press the [◀] or [▶] button and select "MSG INPUT E"
-
Press the [] button.
- Press the [◀◀] or [▶▶] button to move the cursor.
- Press the [D] button to select a character. Each time you press the [D] button, the character changes in the following orders: Capital letters → Small letters → Numbers/ Symbols → Umlaut → Capital letters...
- Turn the [ROTARY] knob to select the desired character.
- Repeat step 4 to 6 to enter up to 30 characters for message.
- Press and hold the [ ] button for 2 seconds or longer to store the message in memory and cancel input message.
Message display
When the unit is powered on or off, a message is displayed. The user can turn this message display ON or OFF.
* The factory default setting is "ON".
- Press and hold the [T] button for 1 second or longer to switch to the adjustment selection display.
- Press the [◀◀] or [▶▶] button to select "MESSAGE".
- Turn the [ROTARY] knob clockwise or counterclockwise to set the message display "ON" or "OFF".
- Press the [T] button to return to the previous mode.
Setting the method for title scroll
Set how to scroll in CD-TEXT, MP3/WMA Title or MD.
* The factory default setting is "ON".
- Press and hold the [T] button for 1 second or longer to switch to the adjustment selection display.
- Press the [◀] or [▶] button and select "AUTO SCROLL".
- Turn the [ROTARY] knob clockwise or counterclockwise and select "ON" or "OFF".
● ON:
To scroll automatically.
● OFF:
To scroll just 1 time when the title was changed or the title key was pressed.
- Press the [T] button to return to the previous mode.
Dimmer level
- Press the [T] button for 1 second or longer to enter ADJ mode.
- Press the [◀] or [▶] button to select the "DIMMER LV".
- Turn the [ROTARY] knob clockwise or counterclockwise to adjust Dimmer level.
- Press the [T] button to return to the previous mode.
*Adjustment range is off to LV5.
*Factory default setting is LV3.
Dimmer in control
You can setting the dimmer in control AUTO or ILLUMI.
* The factory default setting is "DIM-IN AUTO".
- Press and hold the [T] button for 1 second or longer to switch to the adjustment selection display.
- Press the [◀◀] or [▶▶] button to select "DIMMER IN".
- Turn the [ROTARY] knob clockwise or counterclockwise and select "DIM-IN AUTO" or "DIM-IN ILLM".
- Press the [T] button to return to the previous mode.
Selecting the CONTRAST mode
* The factory default setting is "8".
- Press and hold the button [T] for 1 second or longer to switch to the adjustment selection display.
- Press the [◀] or [▶] button to select "CONTRAST".
- Turn the [ROTARY] knob to select from 1-18.
- Press the [T] button to return to the previous mode.
Anti-theft indicator
The red Anti-theft indicator is a function for preventing theft. When the DCP is removed from the unit, this indicator blinks.
* The factory default setting is "OFF".
-
Press and hold the [T] button for 1 second or longer to switch to the adjustment selection display.
-
Press the [◀◀] or [▶▶] button and select "BLINK LED".
- Turn the [ROTARY] knob clockwise to set this function "ON" or turn it counterclockwise to switch this function "OFF".
- Press the [T] button to return to the previous mode.
Setting the Subwoofer
* The factory default setting is "SUB-W ON".
- Press and hold the [T] button for 1 second or longer to switch to the adjustment selection display.
- Press the [◀] or [▶] button and select "SUB-WOOFER".
- Turn the [ROTARY] knob clockwise or counterclockwise and select "ON" or "OFF".
- Press the [T] button to return to the previous mode.
Setting LOW PASS FILTER
* The factory default setting is "THRGH".
- Press and hold the [T] button for 1 second or longer to switch to the adjustment selection display.
- Press the [◀◀] or [▶▶] button and select "SUB-W LPF".
- Turn the [ROTARY] knob clockwise or counterclockwise to select the setting. Each time you turn the [ROTARY] knob, the setting changes in the following order:
$$ \text { THRGH } \rightarrow \text { LPF 50 } \rightarrow \text { LPF 80 } \rightarrow \text { LPF 120 } $$
- Press the [T] button to return to the previous mode.
AUX function
This system has an external input jack so you can listen to sounds and music from external devices when connected to this unit.
Selecting AUX/TEL
You can listen to sounds and music from external devices or your telephone calls from the speakers when connected to this unit.
When TEL INT or External device is connected to this unit, you can select TEL mode or AUX mode.
* The factory default setting is "AUX".
- Press and hold the [T] button for 1 second or longer to switch to the adjustment selection display.
- Press the [◀◀] or [▶▶] button and select "AUX/TEL".
- Turn the [ROTARY] knob clockwise or counterclockwise as needed and select from "AUX" or "TEL".
● AUX :
AUX/TEL input cable is for external Audio input.
- TEL :
AUX/TEL input cable is for cellular phone audio input.
- Press the [T] button to return to the previous mode.
Selecting AUX IN sensitivity
Make the following settings to select the sensitivity when sounds from external devices connected to this unit are difficult to hear even after adjusting the volume.
* The factory default setting is "AUX LOW".
-
Press and hold the [T] button for 1 second or longer to switch to the adjustment selection display.
-
Press the [◀] or [▶] button and select "AUX SENS".
-
Turn the [ROTARY] knob clockwise or counterclockwise as needed and select from "AUX HIGH", "AUX MID" or "AUX LOW".
-
Press the [T] button to return to the previous mode.
Setting the car speaker output for the cellular phone
* The factory default setting is "RIGHT".
*To output the telephone calls, set the cellular phone interrupt to ON.
* The factory default setting is "RIGHT". * To output the telephone calls, set the cellular phone interrupt to ON.
-
Press and hold the [T] button for 1 second or longer to switch to the adjustment selection display.
-
Press the [◀] or [▶] button to select "TEL SPEAKER".
-
Turn the [ROTARY] knob clockwise to select "RIGHT" or counterclockwise to select "LEFT".
● RIGHT:
Telephone calls can be heard on the front right speaker connected to this unit.
● LEFT:
Telephone calls can be heard on the front left speaker connected to this unit.
- Press the [T] button to return to the previous mode.
Cellular phone interrupt setting
If you connect this unit and your cellular phone with a separately sold cable, you can listen to your telephone calls on your car speakers.
* The factory default setting is "OFF".
- Press and hold the [T] button for 1 second or longer to switch to the adjustment selection display.
- Press the [◀◀] or [▶▶] button to select "TEL-SWITCH".
- Turn the [ROTARY] knob clockwise or counterclockwise to select the setting. Each time you turn the [ROTARY] knob, the setting changes in the following order:
OFF → ON → MUTE → OFF...
● OFF:
This unit continues normal operation even when the cellular phone is used.
Note:
- If connecting a hands-free kit, please ensure the setting is ON to receive the telephone audio through the system.
● ON:
You can listen to your telephone calls from the speakers connected to this unit.
*When listening to your calls on your car speakers, you can adjust the volume by turning the [ROTARY] knob.
● MUTE:
The sound from this unit is muted during telephone calls.
- Press the [T] button to return to the previous mode.
Setting the button illumination
Press the [COLOR] button to select a color type. Each time you press the [COLOR] button, the type changes in the following orders:
COLOR SCAN → Indigo Blue → Surf Blue → Silky White → Aqua Green → Fresh Green → Leaf Green → Moon Yellow → Warm Amber → Pale Orange → Passion Red → Vivid Pink → Dark Violet → USER COLOR 1 → USER COLOR 2 → USER COLOR 3...
●Setting COLOR SCAN mode
As selecting "COLOR SCAN", the color automatically changes.
* The factory default setting is "COLOR SCAN".
*After 3 second the color change to the other.
- Setting USER mode
The factory default setting is "R▶8 G▶8 B▶8".
As selecting "USER COLOR 1, 2, 3", press and hold the [COLOR] button 1 second or longer "R▶8 G▶8 B▶8" appears in the display.
- Press the [◀◀] or [▶▶] button to move the cursor.
- Turn the [ROTARY] knob to select from 0 to 8.
- Press and hold the [ ] button for 2 seconds or longer to store the color in memory and cancel setting mode.
| COLOR | R | G | B |
| Indigo Blue | 0 | 0 | 8 |
| Surf Blue | 0 | 4 | 8 |
| Silky White | 6 | 8 | 8 |
| Aqua Green | 0 | 8 | 2 |
| Fresh Green | 0 | 8 | 0 |
| Leaf Green | 3 | 8 | 0 |
| Moon Yellow | 8 | 6 | 0 |
| Warm Amber | 8 | 3 | 0 |
| Pale Orange | 8 | 2 | 0 |
| Passion Red | 8 | 0 | 0 |
| Vivid Pink | 8 | 0 | 3 |
| Dark Violet | 3 | 0 | 8 |
| USER COLOR 1 | 8 | 8 | 8 |
| USER COLOR 2 | 8 | 8 | 8 |
| USER COLOR 3 | 8 | 8 | 8 |
Setting auto volume
- Press and hold the [T] button for 1 second or longer and enter "ADJ" mode
- Press the [◀] or [▶] button to select the"CALIBRATE E
- Press the [▶■] button and "START E" is displayed.
- Keep driving speed 50km/h and press the [▶] button.
- "CALIBRATION" is flush for 2 seconds in display.
-
If calibration is successful display indicate "SUCCESSFUL", or if calibration is not successful display indicate "FAILED".
-
If you failed, repeat steps 3 to 6.
Note:
- When installing this device or transferring it into another vehicle, for the sake of safety, always have this work done by the store of purchase or your nearest Clarion dealer. Installation requires specialized techniques and experience.
Setting auto volume sensitivity
- Press and hold the [T] button for 1 second or longer and enter "ADJ" mode
- Press the [◀◀] or [▶▶] button to select the "A-VOL SENS"
- Turn the [ROTARY] knob clockwise or counterclockwise to make the adjustment.
The adjustment steps are below 6 steps, Off
→ Low → M-L → Mid → M-H → High.
Entering titles
Titles up to 8 characters long can be stored in memory and displayed for CD, CD changer and TV stations. The number of titles that can be entered for each mode are as follows.
| Mode Number of titles | |
| CD mode 50 titles | |
| TV mode 20 titles | |
| TUNER mode 30 titles |
| CD changer mode Number of titles | |
| DCZ625 connected 100 titles | |
| CDC655Tz connected | 100 titles |
| CDC1255z connected | 50 titles |
- Press the [FNC] button to select the mode you want to enter a title (CD, CD changer or TV).
- Select and play a CD in the CD changer or tune in to a TV station for which you want to enter the title.
- Press the [D] button and display the main.
- Press the [T] button.
- Press the [◀◀] or [▶▶] button to move the cursor.
- Press the [D] button to select a character. Each time you press the [D] button, the character changes in the following order:
Capital letters → Small letters → Numbers/Symbols → Umlaut → Capital letters...
-
Turn the [ROTARY] knob to select the desired character.
-
Repeat steps 5 to 7 to enter up to 8 characters for the title.
- Press and hold the [] button for 2 seconds or longer to store the title into memory and cancel title input mode.
Clearing titles
- Select and play a CD in the CD changer or tune in to a TV station for which you want to clear the title.
- Press the [D] button and display the main.
- Press the [T] button and switch the display to the title input display.
- Press the [BND] button.
- Press and hold the [ ] button for 2 second or longer to clear the title and cancel title input mode.
7. OPERATIONS OF ACCESSORIES
CD/MD Changer Operations
CD/MD changer functions
When an optional CD/MD changer is connected through the CeNET cable, this unit controls all CD/MD changer functions. This unit can control a total of 2 changers. (CD/MD)
Press the [FNC] button and select the CD(MD) changer mode to start play. If 2 CD(MD) changers are connected, press the [FNC] button to select the CD(MD) changer for play.
* If "NO MAGAZINE" appears in the display, insert the magazine into the CD changer. "LOADING" appears in the display while the player loads (checks) the magazine.
* If "NO DISC" appears in the display, eject the magazine and insert discs into each slot. Then, reinsert the magazine back into the CD changer.
* If "NO DISC" appears in the display, load MDs into the MD changer.
Note:
- Some CDs recorded in CD-R/CD-RW mode may not be usable.
CAUTION
CD-ROM discs cannot be played from every CD changer, it's depended on the model.
Pausing play
- Press the [ ] button to pause play. "PAUSE" appears in the display.
- To resume play, press the [button again.
Displaying CD titles
This unit can display title data for CD-text CDs and user titles input with this unit.
* Title data for CD-text CDs can be displayed with this unit only when it is connected to CDC655Tz.
●When connected to CDC655z or CDC1255z.
Press the [D] button to display the title.
●When connected to DCZ625 or CDC655Tz
- Press the [D] button to display the title.
- Each time you press and hold the [D] button for 1 second or longer, the title display changes in the following order:
User title (disc) → CD-text title (disc) → Artist name → CD-text title (track) → User title (disc)...
Notes:
- If the CD playing is not a CD-text CD or no user title has been input, "NO TITLE" appears in the display.
- If a CD-text CD is not input its disc title or a track title, "NO TITLE" appears in the display.
Switching disc titles and track titles (MD)
This unit can display disc titles and track titles already entered on MDs.
*Titles cannot be entered for MDs with this unit.
- Press [D] button to display the title. The disc title or track title is displayed.
- Each time you press and hold the [D] button for 1 second or longer, the display toggles between the disc title and the track title.
Note:
- If an MD is not input its disc title or a track title, "NO TITLE" appears in the display.
Procedure to scroll a title
Set "AUTO SCROLL" to "ON" or "OFF".
(The factory default setting is "ON". Refer to the subsection "Turning the screen saver function on or off" in section "Operation Common to Each Mode".)
- When set to "ON"
The title is automatically kept scrolling.
●When set to "OFF"
Press the [T] button to scroll the title.
Selecting a CD
[DN] or [UP] button correspond to a disc load in the magazine.
Press the [DN] or [UP] button to select the desired disc.
* If a CD is not loaded in a slot of magazine, "NO DISC" appears in the display.
Selecting a MD
[DN] or [UP] button correspond to a MD load in the MD changer. Press the [DN] or [UP] button to select the desired disc.
* If a MD is not loaded in a slot of MD changer, "NO DISC" appears in the display.
Selecting a track
●Track-up
- Press the [▶] button to move ahead to the beginning of the next track.
- Each time you press the [▶] button, the track advances ahead to the beginning of the next track.
●Track-down
- Press the [◀◀] button to move back to the beginning of the current track.
- Press the [◀] button twice to move to the beginning of the previous track.
Fast-forward/fast-backward
●Fast-forward
Press and hold the [▶▶] button for 1 second or longer.
●Fast-backward
Press and hold the [◀] button for 1 second or longer.
Scan play
Scan play locates and plays the first 10 seconds of each track on a disc automatically. This function continues on the disc until it is cancelled.
*The scan play is useful when you want to select a desired track.
1. Press the [SCN] button to start track scanning. "SCN" lights in the display.
2. To cancel the scan play, press the [SCN] button again. "SCN" goes off from the display and the current track continues to play.
Disc scan play
Disc scan play locates and plays the first 10 seconds of the first track on each disc in the currently selected CD (MD) changer. This function continues automatically until it is cancelled.
*Disc scan play is useful when you want to select a desired CD (MD).
1. Press and hold the [SCN] button for 1 second or longer. "DISC" and "SCN" light in the display and disc scan play starts.
2. To cancel disc scan play, press the [SCN] button again. "DISC" and "SCN" go off from the display and the current track continues to play.
Repeat play
Repeat play continuously plays the current track. This function continues automatically until it is cancelled.
- Press the [RPT] button. "RPT" lights in the display and the current track is repeated.
- To cancel repeat play, press the [RPT] button again. "RPT" goes off from the display and normal play resumes.
Disc repeat play
After all the tracks on the current disc have been played, disc repeat play automatically replays the current disc over from the first track. This function continues automatically until it is cancelled.
- Press and hold the [RPT] button for 1 second or longer. "DISC" and "RPT" light in the display and disc repeat play starts.
- To cancel disc repeat play, press and hold the [RPT] button again. "DISC" and "RPT" go off from the display and normal play resumes on the current track.
Random play
Random play selects and plays individual tracks on the disc in no particular order. This function continues automatically until it is cancelled.
- Press the [RDM] button. "RDM" lights in the display and random play begins.
- To cancel random play, press the [RDM] button again. "RDM" goes off from the display and normal play resumes.
Disc random play
The disc random play selects and plays individual tracks or discs automatically in no particular order. This function continues automatically until it is cancelled.
- Press and hold the [RDM] button for 1 second or longer. "DISC" and "RDM" light in the display and disc random play starts.
- To cancel disc random play, press and hold the [RDM] button again. "DISC" and "RDM" go off from the display and normal play resumes from the current track.
TV tuner functions
When an optional TV tuner is connected through the CeNET cable, this unit controls all TV tuner functions. To watch TV requires a TV tuner and monitor.
Watching a TV
- Press the [FNC] button and select the TV mode.
- Press the [BND] button to select the desired TV band (TV1 or TV2). Each time the button is pressed, the input selection toggles between TV1 and TV2.
- Press the [◀] or [▶] button to tune in the desired TV station.
Watching a video
The TV tuner has a VTR input terminal to which 1 external device can be connected. Connect a 12 V video cassette player (VCP) or video cassette recorder (VCR) to the TV tuner input terminal.
- Press the [] button to select VTR.
- To return to the TV broadcast, press the [ ] button.
Tuning
There are 3 types of tuning mode available, Seek tuning, manual tuning and preset tuning.
Seek tuning
- Press the [BND] button and select the desired TV band (TV1 or TV2).
* If "MANU" is lit in the display, press and hold the [BND] button for 1 second or longer. "MANU" in the display goes off and seek tuning is now available. - Press the [◀◀] or [▶▶] button to automatically seek a station. Press the [▶▶] button to automatically tune up the frequency band to the next available TV station; press the [◀◀] button to automatically tune down.
Manual tuning
There are 2 ways available: Quick tuning and step tuning.
When you are in the step tuning mode, the frequency changes one step at a time. In the quick tuning mode, you can quickly tune the desired frequency.
-
Press the [BND] button and select the desired band (TV1 or TV2).
* If "MANU" is not lit in the display, press and hold the [BND] button for 1 second or longer. "MANU" lights in the display and manual tuning is now available. -
Tune into a station.
●Quick tuning:
Press and hold the [◀◀] or [▶▶] button for 1 second or longer to tune in a station.
- Step tuning:
Press the [◀◀] or [▶▶] button to manually tune in a station.
Recalling a preset station
A total of 12 TV stations can be stored (6-TV1 and 6-TV2). This allows you to select your favorite TV stations and store them in memory for later recall.
- Press the [BND] button and select the desired TV band (TV1 or TV2).
- To recall a stored TV station, press the desired [DIRECT] button to select that station.
* Press and hold one of the [DIRECT] buttons for 2 seconds or longer to store the current station into preset memory.
Manual memory
- Select the desired station with seek tuning, manual tuning or preset tuning.
- Press and hold one of [DIRECT] buttons for 2 seconds or longer to store the current station into preset memory.
Auto store
Auto store selects 6 TV stations automatically and stores each one into preset memory.
If there are not 6 stations with good reception, stations previously stored in memory remain and only the strong stations are stored into memory.
- Press the [BND] button and select the desired TV band (TV1 or TV2).
TV Operations
- Press and hold the [P/A] button for 2 seconds or longer. The stations with good reception are stored automatically to the preset channels.
Preset scan
Preset scan allows the user to view each preset position before it automatically advances to the next preset. This function is useful for searching for a desired TV station in memory.
-
Press the [P/A] button.
-
When the desired station is found, press the [P/A] button again to remain tuned to that station.
Note:
- Do not press and hold the [P/A] button for 2 seconds or longer. Doing so will trigger the auto store function and start storing stations into memory.
Setting the TV area
When you select the TV area (TV reception area), the TV tuner area setting changes.
- Press and hold the [T] button for 1 second or longer to switch to the adjustment selection display.
- Press the [◀◀] or [▶▶] button to select "TV AREA".
- Press the [] button.
- Turn the [ROTARY] knob clockwise or counterclockwise to select the reception area.
- Press the [] button.
- Press the [T] button to return to the previous mode.
Setting the TV diver
You can change the reception setting for the TV antenna connected to the TV tuner.
- Press and hold the [T] button for 1 second or longer to switch to the adjustment selection display.
- Press the [◀◀] or [▶▶] button to select "TV DIVER".
- Turn the [ROTARY] knob clockwise to set to "ON" or counterclockwise to set to "OFF".
● ON:
Sets reception emphasizing the visual.
● OFF:
Sets the diver setting to OFF.
- Press the [T] button to return to the previous mode.
Digital Radio/DAB Operations
DAB control function
When a CeNET cable is used to connect a DAB (DAH913 or DAH923) (sold separately), all functions can be operated.
Listening to the DAB station
- Press the [FNC] button to select the DAB mode.
- When the unit receives a DAB station, the display changes in the following order:
Frequency channel → service label
Switching displays
Press the [D] button to select the desired display.
Each time you press the [D] button, the display switches in the following order:
Main display → Clock (CT) display → Main display
Notes:
- The number of programmes and broadcasting times depend on the DAB stations.
- When the strength of DAB signals is weak, audio output is muted.
Seek tuning
- Press the [FNC] button to select the DAB mode.
- Press and hold the [◀◀] or [▶▶] button for 1 second or longer.
- "DAB" lights up in the display when the main unit receives a DAB station.
* The main unit stops the seek tuning when it cannot find a DAB station. The display returns to the previous mode.
Manual tuning
- Press the [FNC] button to select the DAB mode.
- Press and hold the [BND] button for 1 second or longer. "MANU" lights up in the display.
- Press the [◀◀] or [▶▶] button to select a station.
*If no operation is performed for more than 7 seconds, manual tuning is cancelled and the display returns to the previous mode.
Switching programmes
- Press the [FNC] button to receive a DAB station.
- Press the [◀◀] or [▶▶] button to switch programmes in the DAB station.
Note:
- The programme name may be the same depending on DAB programmes.
Programme scan
This function scans through each receivable programme in a DAB station being received for 10 seconds sequentially. This is useful when you want to search for a desired programme.
- Press the [FNC] button to receive a DAB station.
- Perform the following operation depending on the connected model.
Press the [P/A] button. "S-SCAN" lights up and the unit starts scanning each programme for 10 seconds sequentially. Each time the main unit scans, the programme name is shown in the display.
- To stop programme scan when a desired programme is tuned in.
Press the [P/A] button.
Manual memory
The main unit has a manual memory function for DAB programmes. Up to 18 programmes (6 programmes each) can be preset in the preset buttons.
[M1], [M2] and [M3]
- Press the [FNC] button to select the DAB mode.
- Press the [BND] button to select any one shown above.
- Press the [◀◀] or [▶▶] button to select a desired programme.
- Press and hold one of the [DIRECT] buttons (1 to 6) for 2 seconds or longer to store the programme.
Note:
- The interrupt programme (PTY or INFO) cannot be written into a manual memory.
Recalling a preset programme
- Press the [FNC] button to select the DAB mode.
- Press the [BND] button. Each time you press the [BND] button, the display changes in the following order:
$$ [ \mathrm{M} 1 ] \rightarrow [ \mathrm{M} 2 ] \rightarrow [ \mathrm{M} 3 ] \rightarrow [ \mathrm{M} 1 ]... $$
- Press one of the [DIRECT] buttons to recall a preset programme.
Note:
- Press and hold the [DIRECT] button for 2 seconds or longer to store the programme currently being received. (Manual memory)
AF function
The AF function switches to a different frequency on the same network in order to maintain optimum reception.
*The factory default setting is "ON"
*If the reception of the current broadcast station deteriorates, "SEARCH" appears in the display and the radio searches for the same programme on another frequency.
* For details on "AF function", refer to the section "RDS operations" of each owner's manual.
●Switching OFF the AF function
●Switching ON the AF function
●AF function between RDS and DAB
When the same programme is broadcast by both RDS and DAB, and this function is ON, the main unit switches to receiving the broadcast with the better reception automatically.
TA (Traffic Announcement)
In the TA standby mode, when a traffic announcement broadcast starts, the traffic announcement broadcast is received as top priority regardless of the function mode. Traffic programme (TP) automatic tuning is also possible.
* This function can only be used when "TP" is lit in the display. When "TP" is lit, this means that the DAB or RDS broadcast station being received has traffic announcement programmes.
* For details on "TA", refer to the section "RDS operations" of each owner's manual.
●Setting the TA standby mode
●Cancelling the TA standby mode
●Searching for a TP station
Notes:
- If a TP station is not received, the main unit stops the search operation.
- "TP" may be lit in the display when a TP broadcast is transmitted from an RDS station. In this case, press the [TA] button to perform TP seek tuning. Press the [TA] button again to return to the previous mode.
INFO (Announcement)
In the INFO standby mode, when the selected announcement programme starts, the main unit switches to the selected announcement programme automatically.
●Setting the INFO standby mode
If you press and hold the [TA] button for 1 second or longer, "INFO" lights in the display and the main unit is set into the INFO standby mode until the selected announcement is broadcast. When the selected announcement broadcast starts, the announcement item appears in the display. If you press and hold the [TA] button for 1 second or longer while the selected announcement broadcast is being received, the selected announcement broadcast reception is cancelled and the main unit goes into the INFO standby mode.
●Cancelling INFO standby mode
To cancel the INFO standby mode, press and hold the [TA] button for 1 second or longer.
●Information select
This is a function for selecting INFORMATION ON or OFF in the Information interrupt mode. You can set ON up to 6 information items.
You can select any of the 6 items below:
| INFORMATION item | |
| ENGLISH Contents | |
| Travel Transport flash | |
| Warning Warning / Service | |
| News News flash | |
| Weather Area weather flash | |
| Event Event announcement | |
| Special Special event |
-
Perform the following operation depending on the connected model. Press and hold the [T] button for 1 second or longer.
-
Press the [◀] or [▶] button to select "INFO SEL", then press the [▶III] button to enter "INFO SEL" mode.
-
Press the [◀◀] or [▶▶] button to select an information item. You can select any of 6 items:
Travel → Warning → News → Weather → Event → Special → Travel → ...
- Perform the following operation depending on the connected model.
Turn the [ROTARY] knob clockwise or counterclock wise to set the information item for ON or OFF.
- Press the [T] button to return to the previous display.
PTY
This function enables you to listen to the selected programme type, irrespective of the function mode.
* One common PTY can be selected for DAB or RDS.
* Of DAB PTY and RDS PTY, the PTY which is received earlier takes priority over the other.
* PTY broadcasts are not yet available in all countries.
* In the INFO standby mode, INFO stations have priority over PTY stations.
* In the TA standby mode, TP stations have priority over PTY stations.
* For details on "PTY", refer to the section "RDS operations" of each owner's manual.
●Setting the PTY standby mode
●Cancelling the PTY standby mode
●Cancelling a PTY interrupt broadcast
- Selecting PTY
●PTY seek
●PTY preset memory
Emergency broadcast
When an emergency broadcast is received, all the function mode operations are stopped.
"ALARM" appears in the display and the emergency broadcast can be heard.
* For details on "Emergency broadcast", refer to the section "RDS operations" of each owner's manual.
●Cancelling an emergency broadcast
Switching the PTY and INFO display language
You can select one of 4 languages (English, German, Swedish or French) for the PTY and INFO shown in the display.
* The factory default setting is "ENGLISH".
* For details on “Switching the PTY and INFO display language”, refer to the section “RDS operations” of each owner’s manual.
Volume setting of TA, INFO, emergency broadcast (ALARM) and PTY
The volume for TA, INFO, ALARM and PTY interrupts can be set during TA, INFO, ALARM and PTY interrupt. Perform the following operation depending on the connected model.
* The factory default setting is "15".
During a TA, INFO, ALARM or PTY interrupt, turn the [ROTARY] knob clockwise or counterclockwise to set the volume to a desired level (0 to 33).
*When the TA, INFO, ALARM or PTY interrupt ends, the volume returns to the level it had before the interrupt.
Operation
●Play/Still operation
Press the [▶ button to select the desired mode (play, still (pause)).
Each time the button is pressed, the mode changes cyclically.
●Chapter up/down operation (FF/FB operation)
Press the [▶] button for 1 second or shorter to increment chapters.
Hold down the [▶] button for 1 second or longer to fast forward.
Press the [◀◀] button for 1 second or shorter to decrement chapters.
Hold down the [◀] button for 1 second or longer to fast backward.
8. IN CASE OF DIFFICULTY
| Problem | Cause Measure | ||
| General | Power does not turn on.(No sound is produced.) | Fuse is blown. | Replace with a fuse of the same amperage. If the fuse blows again, consult your store of purchase. |
| Incorrect wiring. | Consult your store of purchase. | ||
| No sound output when operating the unit with amplifiers or power antenna attached. | Power antenna lead is shorted to ground or excessive current is required for remote-on the amplifiers or power antenna. | 1. Turn the unit off.2. Remove all wires attached to the power antenna lead. Check each wire for a possible short to ground using an ohm meter.3. Turn the unit back on.4. Reconnect each amplifier remote wire to the power antenna lead one by one. If the amplifiers turn off before all wires are attached, use an external relay to provide remote-on voltage (excessive current required). | |
| Nothing happens when buttons are pressed.Display is not accurate. | The microprocessor has malfunctioned due to noise, etc. | Turn off the power, then press the [RELEASE] button and remove the DCP. Press the reset button for about 2 seconds with a thin rod. 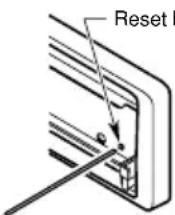 | |
| DCP or main unit connectors are dirty. | Wipe the dirt off with a soft cloth moistened with cleaning alcohol. | ||
| No sound heard. | The speaker protection circuit is operating. | 1. Turn down sound volume. Function can also be restored by turning the power off and on again. (Speaker volume is reduced automatically when the speaker protection circuit operates).2. If the sound is muted again, consult our service department. | |
| CD/MP3/WMA | No sound heard. | MP3/WMA files are absent in a disc. | Write MP3/WMA files onto the disc properly. |
| Files are not recognized as an MP3/WMA file. | Use MP3/WMA files encoded properly. | ||
| File system is not correct. | Use ISO9660 level 1, 2, 3 or JOLIET or Romeo file system. | ||
| Sound skips or is noisy. | Disc is dirty. | Clean the disc with a soft cloth. | |
| Disc is heavily scratched or warped. | Replace with a disc with no scratches. | ||
| Sound is cut or skipped. Noise is generated or noise is mixed with sound. | MP3/WMA files are not encoded properly. | Use MP3/WMA files encoded properly. | |
| CD/MP3/WMA | Sound is bad directly after power is turned on. | Water droplets may form on the internal lens when the car is parked in a humid place. | Let dry for about 1 hour with the power on. |
| Wrong filename | File system is not correct. | Use ISO9660 level 1, 2, 3 or JOLIET or Romeo file system. | |
| Play list play is not performed. | File name or extension is not correct. | Use alphanumeric/ASCII characters for MP3/WMA file name.Use “.M3U” or “.ASX” for the file extension of a play list. |
9. ERROR DISPLAYS
If an error occurs, one of the following displays is displayed.
Take the measures described below to eliminate the problem.
| CauseError Display Measure | |||
| CD changer CD/MP3/WMA | ERROR 2 | A DISC is caught inside the CD deck and is not ejected. | This is a failure of CD deck's mechanism and consult your store of purchase. |
| ERROR 3 | A DISC cannot be played due to scratches, etc. | Replace with a non-scratched, non-warped-disc. | |
| ERROR 6 | A DISC is loaded upside-down inside the CD deck and does not play. | Eject the disc then reload it properly. | |
| ERROR 2 | A DISC inside the CD changer is not loaded. | This is a failure of CD changer's mechanism and consult your store of purchase. | |
| ERROR 3 | A DISC inside the CD changer cannot be played due to scratches, etc. | Replace with a non-scratched, non-warped disc. | |
| ERROR 6 | A DISC inside the CD changer cannot be played because it is loaded upside-down. | Eject the disc then reload it properly. | |
| MD changer | ERROR H | Displayed when the temperature in the MD changer is too high and playback has been stopped automatically. | Lower the surrounding temperature and wait for a while to cool off MD changer. |
| ERROR 2 | An MD inside the MD changer is not loaded. | This is a failure of MD changer's mechanism and consult your store of purchase. | |
| ERROR 3 | An MD inside the MD changer cannot be played due to scratches, etc. | Replace with a non-scratched, non-warped disc. | |
| ERROR 6 | An MD inside the MD changer cannot be played because it is loaded upside-down. | Eject the disc then reload it properly. | |
| Displayed when a non-recorded MD is loaded in the MD changer. | Load a pre-recorded MD in the MD changer. | ||
| DVD changer | ERROR 2 | A DISC inside the DVD changer cannot be played. | This is a failure of DVD mechanism and consult your store of purchase. |
| ERROR 3 | A DISC cannot be played due to scratches, etc. | Retry or replace with a non-scratched, non-warped-disc. | |
| ERROR 6 | A DISC inside the DVD changer cannot be played because it is loaded upside-down. | Eject the disc then reload it properly | |
| ERROR P | Parental level error. | Set the correct Parental level. | |
| ERROR R | Region code error. | Eject the disc and replace correct region code disc. | |
If an error display other than the ones described above appears, press the reset button. If the problem persists, turn off the power and consult your store of purchase.
10. SPECIFICATIONS
Radio section
Tuning System: PLL synthesizer tuner
Receiving Frequencies:
FM : 87.5 to 108 MHz (0.05 MHz steps)
MW : 531 to 1602 kHz (9 kHz steps)
LW : 153 to 279 kHz (3 kHz steps)
CD player section
System: Compact disc digital audio system
Frequency Response: 5 Hz to 20 kHz (± 1 dB)
Signal to Noise Ratio: 100 dB (1 kHz) IHF-A
Dynamic Range: 95 dB (1 kHz)
Distortion: 0.01%
General
D/A converter:
24 bit, 128x oversampling, advanced multibit
Output Power: 4 × 31 W (DIN 45324, +B=14.4V)
Power Supply Voltage:
14.4 V DC (10.8 to 15.6 V allowable), negative ground
Power Consumption: Less than 15 A
Speaker Impedance: 4 Ω (4 to 8 Ω allowable)
Auto Antenna Rated Current: 500 mA or less
Weight:
Main unit: 1.6 kg
Remote control unit: 30 g (including battery)
Dimensions:
Main unit :
- Specifications and design are subject to change without notice for further improvement.
10. CARACTÉRISTIQUES TECHNIQUES
Section radio
178 (L) × 50 (H) × 155 (P) mm
Télécommande:
44 (L) × 110 (H) × 27 (P) mm
Remarque:
- CAUTIONS:
- !CAUTION
- ADVARSEL.
- Contents
- PRECAUTIONS
- INFORMATION FOR USERS:
- Sloping Console
- CAUTION
- English
- Handling Compact Discs
- Handling
- Storage
- Cleaning
- NOMENCLATURE
- Names of the Buttons and Their Functions
- |RELEASE
- [BEQ] button
- [TA] button
- [COLOR] button
- [AF] button
- [1] button
- IT button
- mode.
- [FA] Button
- [UP]. [DN] buttons
- [DIRECT] buttons
- [PLAY LIST] button
- [RDM] button
- [RPT] button
- [SCN] button
- [▶Mutton
- [◀], [▶] buttons
- [BND] button
- [A-M] button
- [FNC] Button
- [▲] bullon
- [CD SLOT]
- Major Button Operations When External Equipment is Connected to This Unit
- ●When the CD/MD/DVD changer is connected
- [D] button
- [UP], [DN] Buttons
- Senchler 026
- PART
- [▶Button
- ● When the DTS/DOLBY DIGITAL is connected (DVH923)
- [4] [1] buttons
- White
- ● When the TV/DAB is connected
- [P:A] button
- [Unreadable]
- ▶Milton
- picture
- [ DIRECT] buttons
- DCP
- Removing the DCP
- Attaching the DCP
- Note:
- REMOTE CONTROL
- Inserting the Batteries
- Notes:
- OPERATIONS
- Basic Operations
- Turning on/off the power
- Selecting a mode
- Adjusting the volume
- Switching the display
- Main display
- Setting the Beat EQ
- "BASS BOOST" ...
- Adjusting the tone
- Adjusting the subwoofer output volume
- Adjusting the bass
- Adjusting the MID
- Adjusting the TREBLE
- Adjusting the balance
- Adjusting the fader
- Adjusting the Beat EQ
- Adjusting MAGNA BASS EXTEND
- CT (Clock Time) function
- Listening to the radio
- Tuning
- Seek tuning
- ●DX SEEK
- ●LOCAL SEEK
- Manual tuning
- ●Quick tuning:
- - Step tuning:
- Recalling a preset station
- Manual memory
- Auto store
- Preset scan
- RDS (Radio Data System)
- AF function
- ●Switching OFF the AF function
- ●Switching ON the AF function
- ●AF function between RDS and DAB
- REG (Regional programme) function
- ●Switching the REG function ON
- ●Switching the REG function OFF
- Manually tuning a regional station in the same network
- TA (Traffic Announcement)
- ●Setting the TA standby mode
- ●Cancelling the TA standby mode
- ●Searching for a TP station
- Auto store function for TP stations
- PTY
- ●Setting the PTY standby mode
- ●Cancelling the PTY standby mode
- ●Cancelling a PTY interrupt broadcast
- Selecting PTY
- PTY seek
- PTY preset memory
- Emergency broadcast
- ● Cancelling an emergency broadcast
- Switching the PTY display language
- Volume setting of TA, emergency broadcast (ALARM) and PTY
- MP3/WMA
- What is MP3?
- What is WMA?
- ●To disable DRM (Digital Rights Management):
- Precautions when creating MP3/WMA disc
- ● Usable sampling rates and bit rates:
- ● File extensions
- ● Logical format (File system)
- - Folder structure
- ● Number of files or folders
- Multisession function
- - Default value is "CD".
- ● Display when CD type track is selected:
- Disc-In-Play function
- Backup Eject function
- Listening to a disc already loaded in the unit
- Loading a CD
- Loading 8 cm compact discs
- Be careful not to catch your hand or fingers while closing the SLOPING CONSOLE.
- Pausing play
- CD/MP3/WMA Operations
- Displaying CD titles
- - CD-TEXT disc
- ●MP3/WMA disc
- Selecting a track
- ●Track-up
- ●Track-down
- Fast-forward/fast-backward
- ●Fast-forward
- ●Fast-backward
- Folder Select
- Top function
- Scan play
- Folder scan play
- Repeat play
- Folder repeat play
- Random play
- Folder random play
- Play list mode
- Making a play list
- Operations Common to Each Mode
- LCD type
- Turning the screen saver function on or off
- Entering MESSAGE INFORMATION
- Message display
- Setting the method for title scroll
- Dimmer level
- Dimmer in control
- Selecting the CONTRAST mode
- Anti-theft indicator
- Setting the Subwoofer
- Setting LOW PASS FILTER
- AUX function
- Selecting AUX/TEL
- Selecting AUX IN sensitivity
- Setting the car speaker output for the cellular phone
- ● LEFT:
- Cellular phone interrupt setting
- ● OFF:
- ● ON:
- ● MUTE:
- Setting the button illumination
- ●Setting COLOR SCAN mode
- - Setting USER mode
- Setting auto volume
- Setting auto volume sensitivity
- Entering titles
- Clearing titles
- OPERATIONS OF ACCESSORIES
- CD/MD Changer Operations
- CD/MD changer functions
- Switching disc titles and track titles (MD)
- Procedure to scroll a title
- Selecting a CD
- Selecting a MD
- Disc scan play
- Disc repeat play
- Disc random play
- TV tuner functions
- Watching a TV
- Watching a video
- TV Operations
- Setting the TV area
- Setting the TV diver
- Digital Radio/DAB Operations
- DAB control function
- Listening to the DAB station
- Switching displays
- Switching programmes
- Programme scan
- Recalling a preset programme
- INFO (Announcement)
- ●Setting the INFO standby mode
- ●Cancelling INFO standby mode
- ●Information select
- Switching the PTY and INFO display language
- Volume setting of TA, INFO, emergency broadcast (ALARM) and PTY
- Operation
- IN CASE OF DIFFICULTY
- ERROR DISPLAYS
- SPECIFICATIONS
- Radio section
- CD player section
- General
- CARACTÉRISTIQUES TECHNIQUES
- Section radio
- Remarque:
Brand : CLARION
Model : DXZ838RMP
Category : Car stereo