
EAP150 - Access Point ENGENIUS - Free user manual and instructions
Find the device manual for free EAP150 ENGENIUS in PDF.


| Product Type | Indoor Access Point |
| Wireless Standard | 802.11ac Wave 2 |
| Frequency Bands | 2.4 GHz, 5 GHz |
| Max Data Rate | 867 Mbps (5 GHz) + 300 Mbps (2.4 GHz) |
| MIMO | 2x2 |
| Antenna Type | Internal omni-directional |
| Ethernet Ports | 1 x Gigabit PoE (802.3af) |
| Power Supply | PoE (802.3af) or 12V DC adapter |
| Power Consumption | 12.95 W (max) |
| Dimensions (W x D x H) | 160 x 160 x 42 mm |
| Weight | 250 g |
| Mounting | Wall / Ceiling (brackets included) |
| Operating Temperature | 0°C to 40°C |
| Management | Web GUI, SNMP, ezMaster |
| Security | WPA2-PSK, 802.1X, WPA3 (firmware update) |
| LED Indicators | Power, LAN, WLAN |
| Certifications | FCC, CE, RoHS |
| Warranty | 2 years limited |
Frequently Asked Questions - EAP150 ENGENIUS
User questions about EAP150 ENGENIUS
0 question about this device. Answer the ones you know or ask your own.
Ask a new question about this device
Download the instructions for your Access Point in PDF format for free! Find your manual EAP150 - ENGENIUS and take your electronic device back in hand. On this page are published all the documents necessary for the use of your device. EAP150 by ENGENIUS.
USER MANUAL EAP150 ENGENIUS
802.11 b/g/n Multi-function Access Point

natural_image
White EnCerix air purifier with control panel (no visible text or symbols)EAP150
802.11 N Multi-Function Access Point
V1.0
Table of Contents
1 Introduction....4
1.1 Features and Benefits 4
1.2 Package Contents 5
1.3 System Requirements....6
1.4 Applications 6
2 Before you Begin....8
2.1 Considerations for Wireless Installation 8
2.2 Computer Settings (Windows XP/Windows 7)....9
2.3 Apple Mac X OS....12
2.4 Hardware Installation....13
3 Configuring Your Access Point .... 14
3.1 Default Settings....14
3.2 Web Configuration....15
4 System 18
4.1 Operation Mode....18
4.2 Status....20
4.3 DHCP 22
4.4 Schedule 24
4.5 Event Log 26
4.6 Monitor....27
5 Wireless 28
5.1 Status....28
5.2 Basic 29
EnGenius®
2
5.3 Advanced 31
5.4 Security 35
5.5 Filter 41
5.6 WPS (Wi-Fi Protected Setup) 43
5.7 Client List 45
5.8 VLAN 46
6 Network....47
6.1 Status....47
6.2 LAN 48
6.3 Spanning Tree 50
7 Management....51
7.1 Admin....51
7.2 SNMP....52
7.3 Firmware Upgrade 54
7.4 Configure 57
7.5 Reset 58
8 Tools....59
8.1 Time Setting....59
8.2 Diagnosis....60
8.3 LED Control 61
9 Logout 62
Appendix A – FCC Interference Statement 63
Revision History
| Version | Date | Notes |
| 1.0 | Sep. 12, 2011 | First Release |
1 Introduction
The EAP150 is a multi-functioned 802.11b/g/n product with 3 major functions. It is designed to operate in every working environment for enterprises.
The EAP150 is a Wireless Network device that delivers up to 6x faster speeds and 7x extended coverage than 802.11b/g devices. The EAP150 supports use in the home network with superior throughput, performance, and unparalleled wireless range.
To protect data during wireless transmissions, the EAP150 encrypts all wireless transmissions through WEP data encryption and supports WPA/WPA2 encryption. Its MAC address filter allows users to select stations to access the network. The EAP150 is an ideal product to ensure network safety for both home and enterprise environments.
1.1 Features and Benefits
| Features | Benefits |
| High Speed Data Rate Up to 300Mbps | Capable of handling heavy data payloads such as HD multimedia streaming. |
| 10/100 Fast Ethernet | Supports up to 100Mbps networking speed. |
| IEEE 802.11n draft Compliant and backward compatible with 802.11b/g | Fully compatible with IEEE 802.11b/g/n devices. |
| Multi-Functional | Allows users to select AP, WDS AP, or WDS Bridge mode in various applications. |
| Point-to-Point or Point-to-Multipoint Wireless Connectivity | Allows transfer of data from building to building. |
EnGenius®
| Support Multiple SSID (up to 4) in AP mode | Allows clients to access different networks through a single access point and assign different policies and functions for each SSID through the built in software. |
| WPA/WPA1/IEEE 802.1x support | Powerful data security. |
| MAC Address filtering (AP mode) | Ensures secure network connections. |
| User isolation support (AP mode) | Protects the private network between client users. |
| Power-over-Ethernet (IEEE802.3af) | Flexible Access Point locations and saving cost. |
| Save User Settings | Firmware upgrade does not delete user settings. |
| SNMP Remote Configuration Management | Allows remote connection to configure or manage the EAP150 easily. |
| QoS (WMM) support | Enhanced user performance and density. |
1.2 Package Contents
The EAP150 package contains the following items (all items must be in package to issue a refund):
- EAP150
• 12V/1A 100V\~240V Power Adapter
• RJ-45 Ethernet LAN Cable
• CD-ROM with User Manual - Quick Guide
EnGenius®
1.3 System Requirements
The following are the minimum system requirements in order to configure the device.
• Computer with an Ethernet interface or Wireless Network.
- Windows, Mac OS, or Linux based operating systems.
• Web-Browsing Application (example: Internet Explorer, Firefox, Safari, or other similar software)
1.4 Applications
Access Point products are easy to install and highly efficient. The following list describes some of the many applications made possible through the power and flexibility of the use of Wireless Access Points:
a) Difficult-to-Wire Environments
There are many situations where wires cannot be laid easily. Historic buildings, older buildings, multiple buildings, and/or open areas make the installation of a Wired LAN impossible, impractical, and/or expensive.
b) Temporary Workgroups
Consider situations in open areas such as parks, athletic arenas, exhibition centers, temporary offices, and construction sites where one wants a temporary Wireless LAN established and easily removed.
c) The Ability to Access Real-Time Information
Doctors/Nurses, Point-of-Sale Employees, and/or Warehouse Workers can access real-time information while dealing with patients, serving customers, and/or processing information.
d) Frequently changed environments
Show rooms, meeting rooms, retail stores, and manufacturing sites where the network connection needs to frequently be taken down.
e) Small Office and Home Office (SOHO) Networks
SOHO users need a cost-effective, easy and quick installation of a small network.
f) Wireless Extensions to Ethernet networks
Network managers in dynamic environments can minimize the overhead caused by moves, extensions to networks, and other changes with wireless LANs.
g) Wired LAN backup
Network managers implement wireless LANs to provide backup for mission-critical applications running on wired networks.
h) Training/Educational facilities
Training sites at corporations and students at universities use wireless connectivity to ease access to information, information exchanges, and learning.
2 Before you Begin
This section will guide you through the installation process. Placement of the ENGENIUS EAP150 is very important to maximize the EAP150's performance. Avoid placing the EAP150 in an enclosed space such as a closet, cabinet, or wardrobe.
2.1 Considerations for Wireless Installation
The operating distance of all wireless devices cannot be pre-determined due to a number of unknown obstacles in the environment that the device is deployed in. These could be the number, thickness, and location of walls, ceilings, or other objects that the wireless signals must pass through. Here are some key guidelines to ensure that you have the most optimal wireless range.
- Keep the number of walls and/or ceilings between the EAP150 and other network devices to a minimum. Each wall and/or ceiling can reduce the signal strength, resulting in lower signal strength.
- Building materials makes a difference. A solid metal door and/or aluminum stubs may have a significant negative effect on the signal strength of the EAP150. Locate your wireless devices carefully so the signal can pass through a drywall and/or open doorways. Materials such as glass, steel, metal, concrete, water (example: fish tanks), mirrors, file cabinets, and/or brick can also lower your wireless signal strength.
- Interferences can also come from other electrical devices and/or appliances that generate RF noise. The most usual types are microwaves and cordless phones.
2.2 Computer Settings (Windows XP/Windows Vista/Windows 7)
In order to use the EAP150, you must first configure the TCP/IPv4 connection of your computer system.
- Click Start button and select Control Panel.

Windows XP

Windows Vista/Windows 7

Network Connections
EnGenius®
• In Windows XP, click Network Connections
- In Windows 7, click View Network Status and Tasks in the Network and Internet section, then select Change Adapter Settings

Network and Internet
View network status and tasks
Choose homegroup and sharing options
Control Panel Home
Change adapter settings
Change advanced sharing settings
• Right click on Local Area Connection and select Properties

Local Area Connection
Disable
Status
Repair
Bridge Connections
Create Shortcut
Delete
Rename
Properties
EnGenius®
- Highlight Internet Protocol Version 4 (TCP/IPv4) and select Properties
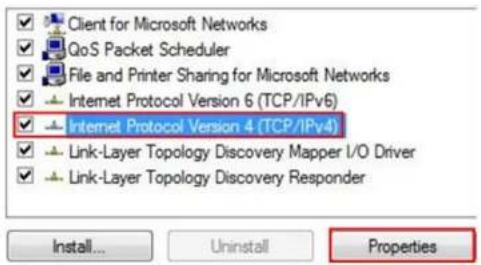
- Select Use the following IP address and enter IP address and subnet mask then press OK.
Note: Ensure that the IP address and subnet mask are on the same subnet as the device.
For example: Device IP address: 192.168.1.1
PC IP address: 192.168.1.2 - 192.168.1.999
PC subnet mask: 255.255.255.0

EnGenius®
2.3 Apple Mac X OS
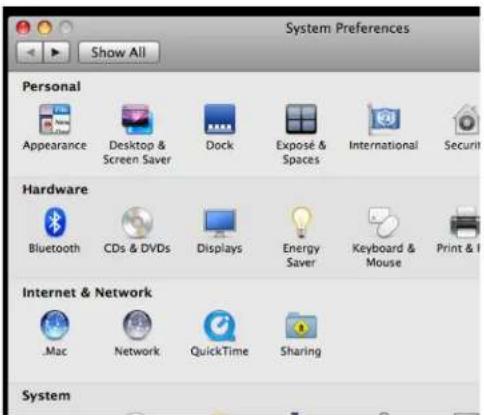
- Open the System Preferences (can be opened in the Applications folder or selecting it in the Apple Menu)
- Select Network in the Internet & Network section
• Highlight Ethernet
• In Configure IPv4, select Manually - Enter IP address and subnet mask then press OK.
Note: Ensure that the IP address and subnet mask are on the same subnet as the device.
For example: Device IP address: 192.168.1.1
PC IP address: 192.168.1.2 - 192.168.1.999
PC subnet mask: 255.255.255.0
- Click Apply when done.

EnGenius®
2.4 Hardware Installation
1) Ensure that the computer in use has an Ethernet Card (RJ-45 Ethernet Port). For more information, verify with our computer user manual.
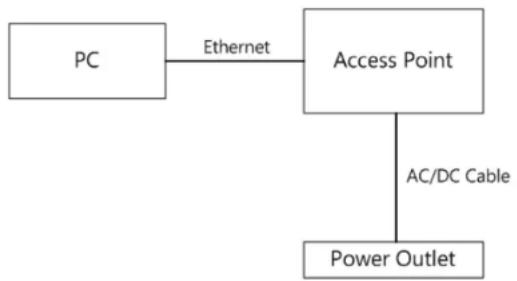
2) Connect one end of the Category 5 Ethernet cable into RJ-45 port of the EAP150 and the other end to the RJ-45 port on the computer that will use the EAP150. Ensure that the cable is securely connected to both the EAP150 and the Computer.
3) Connect the Power Adaptor DC Inlet to the DC-IN port of the EAP150 and the Power Adaptor to the electrical out. Once both connections are secure, verify the following:
a) Ensure that the Power light is on (it will be blue).
b) Ensure that the Wireless light is on (it will be blue).
c) Ensure that the LAN (Computer/EAP150 Connection) light is on (it will be blue).
d) Once all three lights are on, proceed to setting up the computer.
This diagram depicts the hardware configuration.
flowchart
graph TD
    PC["PC"] -->|Ethernet| AccessPoint["Access Point"]
    AccessPoint -->|AC/DC Cable| PowerOutlet["Power Outlet"]
EnGenius®
3 Configuring Your Access Point
This section will show you how to configure the device using the web-based configuration interface.
3.1 Default Settings
Please use your Ethernet port or wireless network adapter to connect the Access Point.
Default Settings
| IP Address | 192.168.1.1 |
| Username / Password | admin / admin |
| Operation Mode | Access Point |
| Wireless SSID | EnGeniusxxxxxx |
| Wireless Security | None |
Note: xxxxxx represented in the wireless SSID above is the last 6 characters of your device MAC Address. This can be found on the device body label and is unique for each device.
3.2 Web Configuration
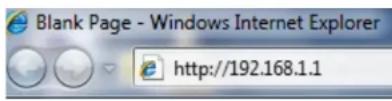
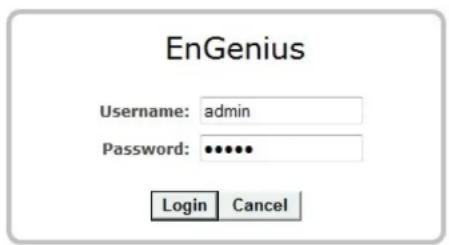
- Open a web browser (Internet Explorer/Firefox/Safari) and enter the IP Address: http://192.168.1.1 Note: If you have changed the default LAN IP Address of the Access Point, ensure you enter the correct IP Address.
- The default username and password are admin. Once you have entered the correct username and password, click the Login button to open the web-base configuration page.
EnGenius®
• If successful, you will see the EAP150 User Menu
EnGenius®
2.4GHz Wireless-N Multi-function AP
Access Point Mode
System
- Wireless
Network
Management
- Tools
Logout
You can use the Status page to monitor the connection status for WLAN/LAN interfaces, firmware and hardware version numbers.
System
Operation Mode Access Point
System Time 2009/01/01 00:05:43
System Up Time 5 min 49 sec
Hardware Version 1.0.0
Serial Number 000000001
Kernel Version 1.0.0
Application Version 1.0.0
WLAN Settings
Channel 11
SSID\_1
ESSID EnGeniusCC3004
Security Disable
BSSID 00:AA:BB:CC:30:04
EnGenius®
- The navigation drop-down menu on left is divided into seven main sections:
- System: This menu includes the Operation Mode, Status, DHCP, Schedule, Event Log, and Monitor.
- Wireless: This menu includes Status, Basic, Advanced, Security, Filter, Client List, and VLAN.
- Network: This menu includes Status, LAN, and Spanning Tree.
- Management: This menu includes the Admin, SNMP, Firmware, Configure, and Reset.
- Tools: This menu includes Time Zone, Diagnostics, and LED Control.
- Logout: Used to logout of the EAP150 User Interface. To login, user must open a new browser window.
4 System
4.1 Operation Mode
Each operating mode offers different features. In order to switch the operating mode, select it from the Operation Mode from the System Menu. There are three operation modes: Access Point, WDS AP, and WDS Bridge.
- Access Point: Allow devices to connect to the EAP150 through a simple wireless connection.
- WDS AP (Wireless Distribution Systems Access Point): Interconnect access points to allow wireless communication wireless devices and access points among them.
- WDS Bridge (Wireless Distribution Systems Bridge): Interconnect access points to allow communication between access points only.

A dialog box will appear to notify you that the system will restart in order for the changes to take effect. Click on the OK button to continue.

EnGenius®
The EAP150 will display how much time it will take to restart the device in the new operating mode as shown below. System mode is changed and module is reloading, please wait 42 seconds.
4.2 Status
This page will display status of the device.
System
Operation Mode Access Point
System Time 2009/01/01 00:05:43
System Up Time 5 min 49 sec
Hardware Version 1.0.0
Serial Number 000000001
Kernel Version 1.0.0
Application Version 1.0.0
| System | |
| Operation Mode | Displays the current mode of operation of the EAP150. |
| System Time | Displays the current time of the EAP150. |
| System Up Time | The elapsed time of operation of the EAP150. |
| Hardware Version and Serial Number | Hardware information of the EAP150. |
| Kernel and Application Version | The current firmware version of the EAP150. |

| WLAN Settings | |
| Channel | Displays the current Wireless Channel in use by the EAP150. |
| ESSID | The SSID (Network Name) of the wireless network (up to 4 SSIDs supported). |
| Security | Current wireless encryption for the corresponding SSID. |
| BSSID | The MAC address of the corresponding SSID. |
4.3 DHCP
The DHCP option in the System menu displays the client IP address assigned by the DHCP Server. You can also set the IP Addresses of the connected devices manually.
Note: Only in Access Point mode.
DHCP Client Table :
This DHCP Client Table shows client IP address assigned by the DHCP Server.
| IP Address | MAC Address | Expiration Time |
| 192.168.1.10 | 00:C0:9F:26:64:EE | Forever |
Refresh
You can assign an IP address to the specific MAC address.
√ Enable Static DHCP IP
| IP Address | MAC Address |
| 192.168.1.100 | 80E3A39B703A |
Add
Reset
Current Static DHCP Table :
| NO. | IP Address | MAC Address | Select |
| 1 | 192.168.1.50 | 00:24:E8:C7:41:0D |
Delete Selected
Delete All
Reset
Apply
Cancel
EnGenius®
The DHCP Client Table shows the LAN clients that have been allocated an IP address from the DHCP Server.
DHCP Client Table :
This DHCP Client Table shows client IP address assigned by the DHCP Server.
| IP Address | MAC Address | Expiration Time |
| 192.168.1.10 | 00:C0:9F:26:64:EE | Forever |
Refresh
| DHCP Client Table | |
| IP address | Displays the IP Address of the client on the LAN. |
| MAC address | Displays the MAC Address of the client on the LAN. |
| Expiration Time | Displays the time of expiration of the IP Address of the client. |
| Refresh | Click this button to update the DHCP Client Table. |
4.4 Schedule
The Schedule option of the System menu allows you to set a schedule when the EAP150's Wireless is active.
The Schedule Table will display:
• NO.: The entry number of the schedule.
• Description: The name given to the schedule.
• Service: Displays whether the wireless service will be activate or not during the scheduled time.
- Schedule: Displays when the schedule will execute.
You will also be able to Add new schedules (at most 10), Edit schedules, Delete Selected schedules, or Delete All schedules.
☐ Enabled Schedule Table (up to 10)
| NO. | Description | Service | Schedule | Select |
| 1 | schedule 01 | Wireless Active | From 11:00 To 12:00---Mon, Wed | |
| Add | Edit | Delete Selected | Delete All |
Apply Cancel
EnGenius®
After selecting Add or Edit, the following form will show up. Fill in the form to set the schedule you want.

| Schedule | |
| Schedule Description | Assign a name to the schedule. |
| Service | The service provided for the schedule. |
| Days | Set which days the schedule will be active. |
| Time of day | Set what time of the selected days the schedule will be active. |
4.5 Event Log
The Event Log of the System menu displays the system events and actions of the EAP150. When powered down or rebooted, the Event Log will be cleared.
View the system operation information.
day 1 00:00:07 [SYSTEM]: WLAN, start LLTD
day 1 00:00:06 [SYSTEM]: TELNETD, start Telnet-cli Server
day 1 00:00:06 [SYSTEM]: HTTPS, start
day 1 00:00:06 [SYSTEM]: HTTP, start
day 1 00:00:05 [SYSTEM]: UPnP, Start
day 1 00:00:05 [SYSTEM]: SNMP, start SNMP server
day 1 00:00:05 [SYSTEM]: SCHEDULE, Wireless Radio On
day 1 00:00:04 [SYSTEM]: NTP, start NTP Client
day 1 00:00:04 [SYSTEM]: DHCP, DHCP Server Stopping
day 1 00:00:03 [SYSTEM]: WLAN[2.4G], Channel = 11
day 1 00:00:03 [SYSTEM]: LAN, IP address=192.168.1.1
day 1 00:00:03 [SYSTEM]: LAN, start
day 1 00:00:01 [SYSTEM]: BR, start
day 1 00:00:01 [SYSTEM]: SYS, Application Version: 1.0.0
day 1 00:00:01 [SYSTEM]: Start Log Message Service!
Save
Clear
Refresh
| Event Log | |
| Save | Save the log to a .txt file. |
| Clear | Clear the log. |
| Refresh | Update the log. |
EnGenius®
4.6 Monitor
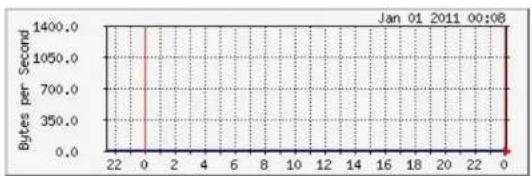
The Monitor option of the System menu displays 2 histogram graphs. The histograms represent the bandwidth usage of both the daily use of the Ethernet and the daily use of the WLAN. If you click on Detail, a new browser window will open with 4 additional histograms (6 total). In the new browser window, you will be able to view the weekly and monthly bandwidth usage for both the Ethernet and WLAN.
Ethernet Daily Graph (5 Minute Average)
line
| Time | Bytes per Second | | ---- | ---------------- | | 0 | 1400.0 | | 22 | 1400.0 || Maximum | Average | Current | |
| RX | 293 B/sec | 293 B/sec | 293 B/sec |
| TX | 1365 B/sec | 1365 B/sec | 1365 B/sec |
WLAN Daily Graph (5 Minute Average)

line
| Time | Bytes per Second | | ---- | ---------------- | | 22 | 0.0 | | 0 | 144.0 | | 2 | 144.0 | | 4 | 144.0 | | 6 | 144.0 | | 8 | 144.0 | | 10 | 144.0 | | 12 | 144.0 | | 14 | 144.0 | | 16 | 144.0 | | 18 | 144.0 | | 20 | 144.0 | | 22 | 144.0 | | 0 | 144.0 || Maximum | Average | Current | |
| RX | 0 B/sec | 0 B/sec | 0 B/sec |
| TX | 144 B/sec | 144 B/sec | 144 B/sec |
Detail
EnGenius®
5 Wireless
5.1 Status
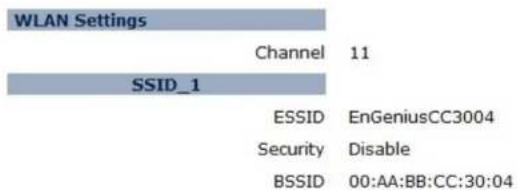
The Status of the Wireless menu displays the current status of the EAP150's wireless configuration.
View the current wireless connection status and related information.
| WLAN Settings | |
| Channel | The wireless channel in use. |
| ESSID | The SSID (Network Name) of the wireless network (up to 4 different SSIDs). |
| Security | Wireless encryption type that is used for the corresponding SSID. |
| BSSID | The MAC address of the corresponding SSID. |
5.2 Basic
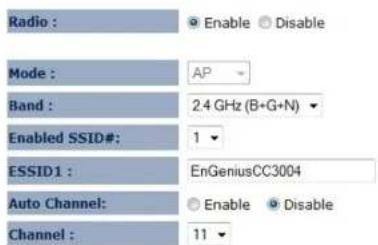
The Basic option of the Wireless menu displays the basic wireless options of the EAP150.
This page allows you to define Mode, Band, Multiple ESSID. You can also set up a static wireless channel or make Wireless device move to a clean Wireless Channel automatically.
Apply Cancel
| Basic | |
| Radio | Enable or Disable the EAP150's wireless signal. |
| Mode | Select between Access Point or Wireless Distribution System (WDS) modes. |
| Band | Select the types of wireless clients that the device will accept. |
| Enable SSID# | Select the number of SSID's (Wireless Network names) you would like (up to 4). |
| SSID# | Enter the name of your wireless network. You can use up to 32 characters. |
| Auto Channel | When enabled, the device will scan the wireless signals around your area and select the channel with the least interference. |
EnGenius®
| Channel | Manually select which channel the wireless signal will use. |
| Check Channel Time | When Auto Channel is Enabled, you can specify the period of device will scan the wireless signals around your area. |
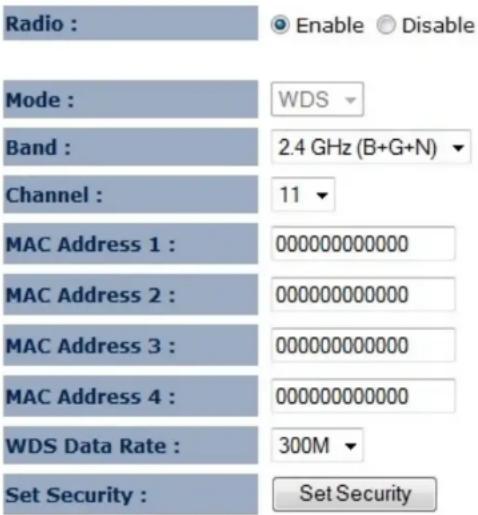
Wireless Distribution System (WDS)
Using a WDS to connect Access Points wirelessly extends a wired infrastructure to locations where cabling is not possible or inefficient to implement.
Note: Compatibility between different brands and models of Access Points is not guaranteed. It is recommended that a WDS network be created using the same Access Point models for maximum compatibility.
Also, all Access Points in the WDS network need to use the same Channel and Security settings.
To create a WDS network, please enter the MAC addresses of the Access Points that you want included in the WDS. There can be a maximum of four access points.
5.3 Advanced
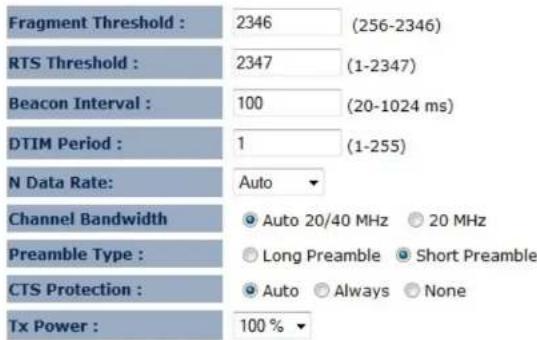
The Advanced option of the Wireless menu displays the advanced wireless options of the EAP150.
It is recommended that the EAP150's default settings are used unless the user has experience with advanced networking.
These settings are only for expert user who is familiar with Wireless LAN procedure. Do not change these settings unless you know what effect the changes will have on your AP. Incorrect settings might reduce wireless performance.
Apply Cancel
| Advanced (Access Point / WDS AP mode) | |
| Fragment Threshold | Specifies the maximum size of the packet per fragment. This function can reduce the chance of packet collision.However, when the fragment threshold is set too low, there will be increased overhead resulting in poor performance. |
EnGenius®
| RTS Threshold | When the packet size is smaller than the RTS Threshold, the packet will be sent without an RTS/CTS handshake, which may result in incorrect transmission. |
| Beacon Interval | The time interval that the device broadcasts a beacon. This beacon is used to synchronize all wireless clients on the network. |
| DTIM Period | A Delivery Traffic Indication Message (DTIM) informs all wireless clients that the access point will be transmitting Multi-casted data. |
| N Data Rate | You can limit the transfer rates between the device and wireless clients. Each Modulation Coding Scheme (MCS) refers to a specific transfer speed. |
| Channel Bandwidth | Set whether each channel uses 20Mhz or 40Mhz transmission frequency. To achieve 11n speeds, 40Mhz channels must be used. |
| Preamble Type | A preamble is a message that helps access points synchronize with the client.Long Preamble is standard based so increases compatibility.Short Preamble is non-standard, resulting in decreased compatibility, but increased performance. |
| Tx Power | Set the power output of the wireless signal. |
These settings are only for expert user who is familiar with Wireless LAN procedure. Do not change these settings unless you know what effect the changes will have on your AP. Incorrect settings might reduce wireless performance.
Apply Cancel
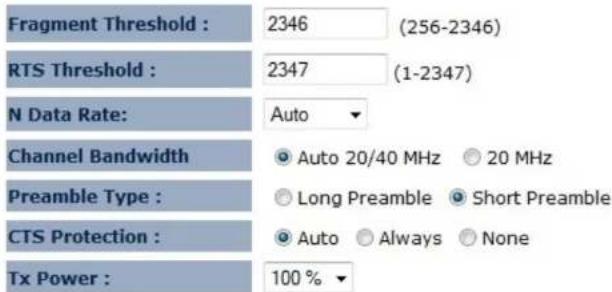
| Advanced (WDS Bridge mode) | |
| Fragment Threshold | Specifies the maximum size of the packet per fragment. This function can reduce the chance of packet collision.However, when the fragment threshold is set too low, there will be increased overhead resulting in poor performance. |
| RTS Threshold | When the packet size is smaller than the RTS Threshold, the packet will be sent without an RTS/CTS handshake, which may result in incorrect transmission. |
| N Data Rate | You can limit the transfer rates between the device and wireless clients. Each Modulation Coding Scheme (MCS) refers to a specific transfer speed. |
| Channel Bandwidth | Set whether each channel uses 20Mhz or 40Mhz transmission frequency. To achieve 11n speeds, 40Mhz channels must be used. |
EnGenius®
| Preamble Type | A preamble is a message that helps access points synchronize with the client.Long Preamble is standard based so increases compatibility.Short Preamble is non-standard, resulting in decreased compatibility, but increased performance. |
| Tx Power | Set the power output of the wireless signal. |
5.4 Security
The Security option in the Wireless menu allows you to set the wireless security settings.
Note: Only in Access Point and WDS AP mode.
This page allows you setup the wireless security. You can turn on WEP or WPA by using Encryption Keys, besides you can enable 802.1x Authentication or RADIUS to coordinate with RADIUS server.

| Security (Access Point / WDS AP mode) | |
| SSID Selection | Select the SSID that the corresponding security settings will apply to. |
| Separate | Separating the SSID from each other (or use of STA) prevents communication and data sharing between wireless stations associated with the SSIDs. |
| Broadcast SSID | If Disabled, the EAP150 will not broadcast the SSID. It will be invisible to the clients. |
| WMM | Wi-Fi Multi-Media is a Quality of Service protocol which prioritizes traffic in the order according to voice, video, best effort, and background.Note: In certain situations, WMM needs to be enabled to achieve 11n transfer speeds. |
EnGenius®
| Encryption | The encryption method to be used on the corresponding SSID.You can choose between WEP, WPA Pre-Shared Key, or WPA RADIUS.·Disabled - No data encryption is used.·WEP - Data is encrypted using the WEP standard. WEP is the Wired Equivalent Privacy security over a wireless network.·WPA-PSK - Data is encrypted using the WPA-PSK standard. This is a later standard than WEP, and provides much better security than WEP. WPA-PSK is Wi-Fi Protected Access using a Pre-Shared Key. This is the equivalent of password protecting your wireless network.·WPA2-PSK - This is a further development of WPA-PSK, and offers even greater security, using the AES (Advanced Encryption Standard) method of encryption.·WPA-RADIUS - This version of WPA requires a Radius Server on your LAN to provide the client authentication according to the 802.1x standard. Data transmissions are encrypted using the WPA standard.If this option is selected:·This Access Point must have a Client Login on the Radius Server.·Each user must have a User Login on the Radius Server.·Each user's wireless client must support 802.1x and provide the login data when required.·All data transmission is encrypted using the WPA standard. Keys are automatically generated, so no key input is required. |
IEEE 802.1x is an authentication protocol. Every user must use a valid account to login to this Access Point before accessing the wireless LAN. The authentication is then processed by a RADIUS server. This mode only authenticates users by IEEE 802.1x, but it does not encrypt the data during communication.
√ Enable 802.1x Authentication
| RADIUS Server IP Address: | |
| RADIUS Server Port: | 1812 |
| RADIUS Server Shared Secret: |
| 802.1x Authentication | |
| RADIUS Server IP Address | The IP Address of the RADIUS Server. |
| RADIUS Server port | The port number of the RADIUS Server. |
| RADIUS Server password | The RADIUS Server password. |
WEP Encryption:

| WEP Encryption | |
| Authentication Type | Please ensure that your wireless clients use the same authentication type. |
| Key type | ASCII: Using characters from the ASCII standard (recommended)HEX: Uses hexadecimal characters. |
| Key Length | The amount of bits the WEP key will use.64 Bit - data is encrypted, using the default key, before being transmitted. You must enter at least the default key. For 64 Bit Encryption, the key size is 10 chars in HEX (0~9 and A~F).128 Bit - data is encrypted, using the default key, before being transmitted. You must enter at least the default key. For 128 Bit Encryption, the key size is 26 chars in HEX (0~9 and A~F). |
| Default Key | Select the key you wish to be the default. Transmitted data is ALWAYS encrypted using the Default Key; the other Keys are for decryption only.You must enter a Key Value for the Default Key. |
| Encryption Key # | Enter the key value or values you wish to use. Only the Key selected as Default is required. The others are optional. |
WPA Pre-Shared Key Encryption:
| Encryption : | WPA pre-shared key ▼ |
| WPA Type : | ○ WPA(TKIP) ○ WPA2(AES) ● WPA2 Mixed |
| Pre-shared Key Type : | Passphrase ▼ |
| Pre-shared Key : | 12345678 |
| WPA Pre-Shared Key Encryption | |
| WPA type | Select the WPA encryption you would like.Please ensure that your wireless clients use the same settings.WPA(TKIP):Uses a Pre-Shared Key with a dynamically generated key for each 128-bit packet.WPA2(AES):Government standard of WPA2 encryption.WPA2 Mixed:Allows the use of both WPA and WPA2 clients on the network. |
| Pre-shared Key Type | Pre-Shared Key format (ASCII or Hexadecimal). |
| Pre-shared Key | Wireless clients must use the same key to associate the device to the EAP150.If using passphrase format, the Key must be from 8 to 63 characters in length. |
WPA RADIUS Encryption:
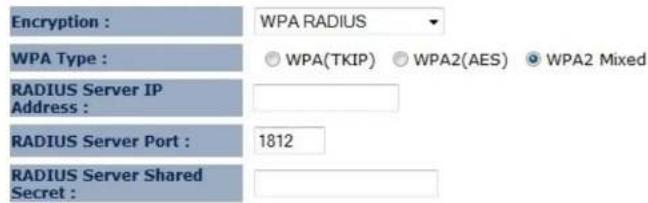
| WPA RADIUS Encryption | |
| WPA type | Select the WPA encryption you would like.Please ensure that your wireless clients use the same settings.WPA(TKIP):Uses a Pre-Shared Key with a dynamically generated key for each 128-bit packet.WPA2(AES):Government standard of WPA2 encryption.WPA2 Mixed:Allows the use of both WPA and WPA2 clients on the network. |
| RADIUS Server IP address | Enter the IP address of the RADIUS Server. |
| RADIUS Server Port | Enter the port number used for connections to the RADIUS server. |
| RADIUS Server password | Enter the password required to connect to the RADIUS server. |
5.5 Filter
The Filter option in the Wireless menu allows users to allow clients with specific MAC Addresses to join the SSID.
Note: Only in Access Point and WDS AP mode.
Using MAC Address Filtering could prevent unauthorized MAC Address to associate with the AP.

Enable Wireless MAC Filtering
| Description | MAC Address |
| rule02 | 80A49E837BA2 |
| Add Reset |
Only the following MAC Addresses can use network:


| Wireless Filter (Access Point / WDS AP mode) | |
| Enable Wireless Access Control | Enable Wireless Access Control.When Enabled, only wireless clients on the Filtering Table will be allowed. |
| Description | Enter a name or description for this entry. |
EnGenius®
| MAC address | Enter the MAC address of the wireless client that you wish to allow connection. |
| Add | Click this button to add the entry. |
| Reset | Click this button if you have made a mistake and want to reset the MAC address and Description fields. |
| MAC Address Filtering Table | |
| Only clients listed in this table will be allowed access to the wireless network. | |
| Delete Selected | Delete the selected entries. |
| Delete All | Delete all entries. |
| Reset | Deselect all entries. |
5.6 WPS (Wi-Fi Protected Setup)
The WPS feature in the Wireless menu follows the Wi-Fi Alliance WPS standard. It eases the set up of security-enabled Wi-Fi networks in homes and/or small office environments.
It reduces the user steps required to configure a network and supports two methods that are familiar to most consumers to configure a network and enable security.
Note: Only in Access Point and WDS AP mode.
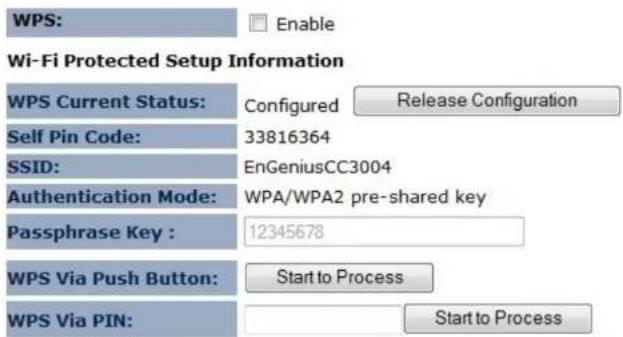
| Wi-Fi Protected Setup (WPS) | |
| WPS | Check to Enable the WPS feature. |
| Wi-Fi Protected Setup Information | |
| WPS Current Status | Shows whether the WPS function is Configured or Un-configured.Configured means that WPS has been used to authorize connection between the EAP150 and the wireless clients. |
| SSID | The SSID (network name) used when connecting using WPS. |
EnGenius®
| Authentication Mode | Shows the encryption method used by the WPS process. This is set as the mode selected in the Security option in the Wireless menu. |
| Passphrase Key | This is the passphrase key that is randomly generated during the WPS process. It is required if wireless clients that do not support WPS attempts to connect to the wireless network. |
| WPS Via Push Button | Activate WPS using a push button. |
| WPS Via PIN | Activate WPS using the PIN code from the WPS device. |
5.7 Client List
The Client List option of the Wireless menu shows all the wireless clients that are currently connected to the EAP150.
Note: Only in Access Point and WDS AP mode.
WLAN Client Table :
This WLAN Client Table shows client MAC address associate to this device.
| Interface | MAC Address | Rx | Tx | Signal(%) | Connected Time | Idle Time |
| EnGeniusCC3004 | 00:02:6F:11:AC:93 | 1852677 | 1832060 | 44 | 10 min 27 secs | 0 secs |
| EnGeniusCC3004 | 00:02:6F:47:65:CA | 1519236 | 1493659 | 36 | 6 min 50 secs | 0 secs |
Refresh
5.8 VLAN
The VLAN option of the Wireless menu allows you to configure the VLAN (Virtual LAN).
Note: Only in Access Point and WDS AP mode.
A virtual LAN, commonly known as a VLAN, is a group of hosts with a common set of requirements that communicate as if they were attached to the same wire, regardless of their physical location.

Apply Cancel
| VLAN | |
| Virtual LAN | Choose to Enable or Disable the VLAN feature. |
| SSID# Tag | Specify the VLAN tag for each SSID. |
| LAN VLAN MGMT | Choose to Enable or Disable the LAN VLAN MGMT feature. |
| MGMT Tag | Specify the VLAN tag for the LAN. |
EnGenius®
6 Network
6.1 Status
The Status option of the Network menu shows the current status of the EAP150's LAN connection.
LAN Settings
IP Address 192.168.1.1
Subnet Mask 255.255.255.0
Gateway IP Address ---
MAC Address 00:AA:BB:CC:30:04
6.2 LAN
The LAN option of the Network menu allows you to modify the device's LAN settings.

| LAN IP | |
| Bridge Type | Select the Bridge type of the LAN.Static IP: Manually specify an IP address and subnet mask for the EAP150 to use.Dynamic IP: The IP address is received automatically from the external DHCP server. |
| IP address | The LAN IP Address of the EAP150. |
| IP Subnet Mask | The LAN Subnet Mask of the EAP150. |
| Default Gateway | The Default Gateway of the EAP150. Leave empty for default setting. |
| DNS Type | Select the DNS type of the LAN.Static DNS: Manually specify the DNS of the EAP150.Dynamic DNS: The DNS is received automatically from the external DNS server. |
| First / Second DNS Address | The first / second DNS address for this device. |
EnGenius®
The DHCP Server feature is only available in Access Point mode.
DHCP Server

| DHCP Server (Access Point mode) | |
| DHCP Server | Enable or disable DHCP feature. The DHCP Server automatically allocates IP addresses to your LAN device. Disabled as default. |
| Lease Time | The duration of the DHCP server allocates each IP address to a LAN device. |
| Start / End IP | The range of IP addresses of the DHCP server will allocate to LAN device. |
| Domain name | The domain name for this LAN network. |
| First / Second DNS Address | The first / second DNS address for this LAN network. |
6.3 Spanning Tree
The Spanning Tree option of the Network menu allows you to set the EAP150 to use the Spanning Tree Protocol. Enabling Spanning Tree Protocol will prevent network loops in your LAN network.
Spanning Tree Settings

| Spanning Tree Settings | |
| Spanning Tree Status | Enable or disable the Spanning Tree Protocol. |
| Bridge Hello Time | The duration of the initial connection between two access points. |
| Bridge Max Age | The maximum amount of time the bridge is connected when transmitting. |
| Bridge Forward Delay | The delay between transmissions between access points. |
| Bridge Priority | The priority port of the Spanning Tree Protocol. |
7 Management
7.1 Admin
The Admin section of the Management menu allows you to change the EAP150 default password and to configure remote management. By default, the password is: admin. The password can contain 0 to 12 alphanumeric characters and is case sensitive.
You can change the password that you use to access the device, this is not you ISP account password.
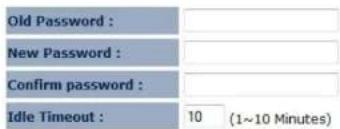
Apply Reset
| Change Password | |
| Old Password | Enter the current password. |
| New Password | Enter your new password. |
| Confirm Password | Reenter your new password. |
| Idle Timeout | Enter Administration Page timeout time (minutes). |
7.2 SNMP
The SNMP section of the Management menu allows you to assign the contact details, location, community name, and trap settings for the Simple Network Management Protocol (SNMP). The SNMP is a networking management protocol used to monitor network-attached devices. SNMP allows messages (called protocol data units) to be sent to various parts of a network. Upon receiving these messages, SNMP-compatible devices (Agents) return data stored in their Management Information Bases.
SNMP is used in network management systems to monitor network-attached devices for conditions that warrant administrative attention.

Apply Cancel
EnGenius®
| SNMP | |
| SNMP Active | Enable or disable the SNMP feature. |
| SNMP Version | You may select the SNMP version you want to deploy.All: Interoperability between SNMPv1 and SNMPv2c devices.v1: The standard SNMP version.v2c: Improvement in performance and security of SNMPv1. |
| Read Community | Specify the password for access the SNMP community for read only access. |
| Set Community | Specify the password for access to the SNMP community with read/write access. |
| System Location | Specify the location of the device. |
| System Contact | Specify the contact details of the device |
| Trap | |
| Trap Active | Enable or disable SNMP trapping feature. |
| Trap Manager IP | Specify the IP address of the computer that will receive the SNMP traps. |
| Trap Community | Specify the password for the SNMP trap community. |
7.3 Firmware Upgrade
The Firmware Upgrade section of the Management allows you to upgrade the EAP150's firmware.
You can upgrade the firmware of the device in this page. Ensure, the firmware you want to use is on the local hard drive of your computer. Click on Browse to browse and locate the firmware to be used for your update.
Browse...
Apply
Cancel
To perform the Firmware Upgrade:
- Download the firmware version that you want to install into the EAP150 and place it in a known location.
- Click the Browse button and navigate to the location of the firmware upgrade file.
- Select the firmware upgrade file. Its name will appear in the Upgrade File field.
- Click the Apply button to commence the firmware upgrade.
Note: The device is unavailable during the upgrade process, and must restart when the upgrade is completed. Any connections to or through the device will be lost.
EnGenius®
Emergency Upgrade
If your firmware upgrade failed, you may enter the Emergency Upgrade WEB page.
- Enter IP address: 192.168.99.9 and enter Emergency Upgrade WEB page.

Note: Refer to 2.2 to configure PC/Notebook IP address to 192.168.99.8.
- Click the Browse button and navigate to the location of the upgrade file and then click Upload.
Emergency Web Server
File Browse... Upload
- Wait for 60 seconds for firmware upgrade and reboot the device.
Updating File.....
Don't Power Down.
Please wait for 58 seconds ...
EnGenius®
- You can access the device again.

EnGenius®
7.4 Configure
The Configure option of the Management menu allows you to save the current device configurations. When you save the configurations, you also can re-load the saved configurations into the device through the Restore Settings. If extreme problems occur press the Reset button of the Restore to Factory Defaults option to set all configurations to its original default settings.
The current system settings can be saved as a file onto the local hard drive. The saved file can be loaded back on the device. To reload a system settings file, click on BROWSE to locate the system file to be used. You may also reset the device back to factory default settings by clicking RESET.

| Configure | |
| Restore to Factory Default | Restores the device to factory default settings. |
| Backup Settings | Save the current configuration settings to a file. |
| Restore Settings | Restores a previously saved configuration file.ClickBrowseto select the file. ThenUploadto load the settings. |
7.5 Reset
In some circumstances it may be required to force the device to reboot. Click on Apply to reboot of the Reset option of the Management menu.
In the event the system stops responding correctly or stops functioning, you can perform a reset. Your settings will not be changed. To perform the reset, click on the APPLY button. You will be asked to confirm your decision. The reset will be completed when the LED Power light stops blinking.
Apply
EnGenius®
8 Tools
8.1 Time Setting
The Time Setting section of the Tools menu allows you to set the EAP150's time.
The device reads the correct time from NTP servers on the Internet and sets its system clock accordingly. The Daylight Savings option merely advances the system clock by one hour. The time zone setting is used by the system clock when displaying the correct time in schedule and the log files.
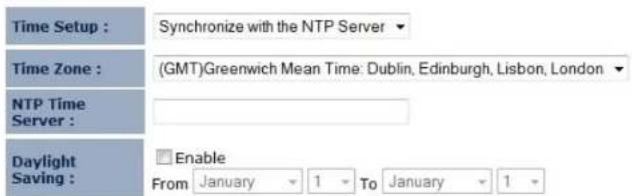
Apply Reset
| Time | |
| Time Setup | Select the method you want to set the time. |
| Time Zone | Select the time zone for your current location. |
| NTP Time Server | Enter the address of the Network Time Protocol (NTP) Server to automatically synchronize with a server on the Internet. |
| Daylight Savings | Check whether daylight savings applies to your area. |
8.2 Diagnosis
The Diagnosis section of the Tools menu allows you to test your network. Type in the IP Address of the device for diagnosis.
This page can diagnose the current network status.


natural_image
Blank white image with no visible content, text, or symbols| Diagnosis | |
| Address to Ping | Enter the IP address you like to see if a successful connection can be made. |
| Ping Frequency | Select the frequency for Ping test. |
| Ping Result | The results of the Ping test. |
EnGenius®
8.3 LED Control
The LED Control section of the Tools menu allows you switch on or off the LED (lights) for Power, LAN interface, and WLAN interface of the EAP150.
You can use the LED control page to control LED on/off for Power, LAN interface and WLAN interface.
LED Control :
Click on Logout button to logout of the EAP150.
This page is used to logout this device.
Logout
Appendix A – FCC Interference Statement
Federal Communication Commission Interference Statement
This equipment has been tested and found to comply with the limits for a Class B digital device, pursuant to Part 15 of the FCC Rules. These limits are designed to provide reasonable protection against harmful interference in a residential installation. This equipment generates uses and can radiate radio frequency energy and, if not installed and used in accordance with the instructions, may cause harmful interference to radio communications. However, there is no guarantee that interference will not occur in a particular installation. If this equipment does cause harmful interference to radio or television reception, which can be determined by turning the equipment off and on, the user is encouraged to try to correct the interference by one of the following measures:
● Reorient or relocate the receiving antenna.
- Increase the separation between the equipment and receiver.
- Connect the equipment into an outlet on a circuit different from that to which the receiver is connected.
- Consult the dealer or an experienced radio/TV technician for help.
FCC Caution: Any changes or modifications not expressly approved by the party responsible for compliance could void the user's authority to operate this equipment.
This device complies with Part 15 of the FCC Rules. Operation is subject to the following two conditions: (1) This device may not cause harmful interference, and (2) this device must accept any interference received, including interference that may cause undesired operation.
IMPORTANT NOTE:
FCC Radiation Exposure Statement:
This equipment complies with FCC radiation exposure limits set forth for an uncontrolled environment.
This device complies with FCC RF Exposure limits set forth for an uncontrolled environment, under 47 CFR 2.1093 paragraph (d)(2).
This transmitter must not be co-located or operating in conjunction with any other antenna or transmitter.
- Table of Contents
- Introduction....4
- Before you Begin....8
- Configuring Your Access Point .... 14
- System 18
- Wireless 28
- Introduction
- Features and Benefits
- Package Contents
- System Requirements
- Applications
- a) Difficult-to-Wire Environments
- b) Temporary Workgroups
- c) The Ability to Access Real-Time Information
- d) Frequently changed environments
- Before you Begin
- Considerations for Wireless Installation
- Computer Settings (Windows XP/Windows Vista/Windows 7)
- Apple Mac X OS
- Hardware Installation
- Configuring Your Access Point
- Default Settings
- Web Configuration
- EnGenius®
- 2.4GHz Wireless-N Multi-function AP
- Access Point Mode
- System
- WLAN Settings
- SSID\_1
- System
- Operation Mode
- Status
- DHCP
- DHCP Client Table :
- √ Enable Static DHCP IP
- Schedule
- Event Log
- Monitor
- Wireless
- Status
- Basic
- Wireless Distribution System (WDS)
- Advanced
- Security
- WEP Encryption:
- WPA Pre-Shared Key Encryption:
- WPA RADIUS Encryption:
- Filter
- WPS (Wi-Fi Protected Setup)
- Client List
- WLAN Client Table :
- VLAN
- Network
- Status
- LAN Settings
- LAN
- Spanning Tree
- Spanning Tree Settings
- Management
- Admin
- SNMP
- Firmware Upgrade
- To perform the Firmware Upgrade:
- Emergency Upgrade
- Emergency Web Server
- Configure
- Reset
- Tools
- Time Setting
- Diagnosis
- LED Control
- Appendix A – FCC Interference Statement
- Federal Communication Commission Interference Statement
- IMPORTANT NOTE:
- FCC Radiation Exposure Statement:
Brand : ENGENIUS
Model : EAP150
Category : Access Point