
magicolor 5430 DL - Printer KONICA MINOLTA - Free user manual and instructions
Find the device manual for free magicolor 5430 DL KONICA MINOLTA in PDF.


| Product Type | Color Laser Printer |
| Model | magicolor 5430 DL |
| Print Speed (Black) | Up to 24 ppm |
| Print Speed (Color) | Up to 24 ppm |
| Print Resolution | Up to 2400 x 600 dpi |
| Processor | 450 MHz |
| Memory | 256 MB (max 768 MB) |
| Paper Input Capacity | 250-sheet standard tray, 50-sheet multipurpose tray |
| Paper Output Capacity | 250 sheets face-down |
| Dimensions (W x D x H) | 17.4 x 20.4 x 14.2 inches (442 x 518 x 361 mm) |
| Weight | Approximately 44 lbs (20 kg) |
| Power Consumption | Less than 850 W (printing), less than 10 W (standby) |
| Connectivity | USB 2.0, Ethernet 10/100Base-TX |
| Supported Media Sizes | A4, A5, A6, B5, Letter, Legal, Executive, Envelopes |
| Toner Cartridge Type | Separate toner cartridges (C, M, Y, K) |
| Duty Cycle (Monthly) | Up to 60,000 pages |
| Maintenance | Replace toner and waste toner box as needed; clean corona wires periodically |
| Safety Features | Automatic power-off, overheat protection, CE marking |
| Spare Parts Availability | Common parts include fuser, transfer belt, maintenance kit; contact authorized dealers |
| Operating Systems Supported | Windows, Mac OS, Linux (PCL, PostScript emulation) |
Frequently Asked Questions - magicolor 5430 DL KONICA MINOLTA
User questions about magicolor 5430 DL KONICA MINOLTA
0 question about this device. Answer the ones you know or ask your own.
Ask a new question about this device
Download the instructions for your Printer in PDF format for free! Find your manual magicolor 5430 DL - KONICA MINOLTA and take your electronic device back in hand. On this page are published all the documents necessary for the use of your device. magicolor 5430 DL by KONICA MINOLTA.
USER MANUAL magicolor 5430 DL KONICA MINOLTA
magicolor® 5430 DL User's Guide
4138-7743-05A
1800760-001E
Trademarks
KONICA MINOLTA and the KONICA MINOLTA logo are trademarks or registered trademarks of KONICA MINOLTA HOLDINGS, INC.
magicolor is a trademark or registered trademark of KONICA MINOLTA PRINTING SOLUTIONS U.S.A., INC.
Copyright Notice
Copyright © 2006 KONICA MINOLTA BUSINESS TECHNOLOGIES, INC., Marunouchi Center Building, 1-6-1 Marunouchi, Chiyoda-ku, Tokyo, 100-0005, Japan. All Rights Reserved. This document may not be copied, in whole or part, nor transferred to any other media or language, without written permission of KONICA MINOLTA BUSINESS TECHNOLOGIES, INC.
Notice
KONICA MINOLTA BUSINESS TECHNOLOGIES, INC. reserves the right to make changes to this guide and to the equipment described herein without notice. Considerable effort has been made to ensure that this guide is free of inaccuracies and omissions. However, KONICA MINOLTA BUSINESS TECHNOLOGIES, INC. makes no warranty of any kind including, but not limited to, any implied warranties of merchantability and fitness for a particular purpose with regard to this guide. KONICA MINOLTA BUSINESS TECHNOLOGIES, INC. assumes no responsibility for, or liability for, errors contained in this guide or for incidental, special, or consequential damages arising out of the furnishing of this guide, or the use of this guide in operating the equipment, or in connection with the performance of the equipment when so operated.
SOFTWARE LICENSE AGREEMENT
This package contains the following materials provided by Konica Minolta Business Technologies, Inc. (KMBT): software included as part of the printing system, the digitally-encoded machine-readable outline data encoded in the special format and in the encrypted form (“Font Programs”), other software which runs on a computer system for use in conjunction with the Printing Software (“Host Software”), and related explanatory written materials (“Documentation”). The term “Software” shall be used to describe Printing Software, Font Programs and/or Host Software and also include any upgrades, modified versions, additions, and copies of the Software.
The Software is being licensed to you under the terms of this Agreement.
KMBT grants to you a non-exclusive sublicense to use the Software and Documentation, provided that you agree to the following:
- You may use the Printing Software and accompanying Font Programs for imaging to the licensed output de-vice(s), solely for your own internal business purposes.
- In addition to the license for Font Programs set forth in Section 1 (“Printing Software”) above, you may use Roman Font Programs to reproduce weights, styles, and versions of letters, numerals, characters and symbols (“Typefaces”) on the display or monitor for your own internal business purposes.
- You may make one backup copy of the Host Software, provided your backup copy is not installed or used on any computer. Notwithstanding the above restrictions, you may install the on any number of computers solely for use with one or more printing systems running the Printing Software.
- You may assign its rights under this Agreement to an assignee of all of Licensee's right and interest to such Software and Documentation ("Assignee") provided you transfer to Assignee all copies of such Software and Documentation Assignee agrees to be bound by all of the terms and conditions of this Agreement.
- You agree not to modify, adapt or translate the Software and Documentation.
- You agree that you will not attempt to alter, disassemble, decrypt, reverse engineer or decompile the Software.
- Title to and ownership of the Software and Documentation and any reproductions thereof shall remain with KMBT and its Licensor.
- Trademarks shall be used in accordance with accepted trademark practice, including identification of the trademark owner's name. Trademarks can only be used to identify printed output produced by the Software. Such use of any trademark does not give you any rights of ownership in that trademark.
- You may not rent, lease, sublicense, lend or transfer versions or copies of the Software Licensee does not use, or Software contained on any unused media, except as part of the permanent transfer of all Software and Documentation as described above.
-
In no event will KMBT or its licensor be liable to you for any consequential, incidental INDIRECT, PUNITIVE or special damages, including any lost profits or lost saving, even if KMBT has been advised of the possibility of such damages, or for any claim by any third party. KMBT or its licensor disclaims all warranties with regard to the software, express or implied, including, without limitation implied warranties of merchantability, fitness for a particular purpose, title and non-infringement of third party rights. Some states or jurisdictions do not allow the exclusion or limitation of incidental, consequential or special damages, so the above limitations may not apply to you.
-
Notice to Government End Users: The Software is a “commercial item,” as that term is defined at 48 C.F.R.2.101, consisting of “commercial computer software” and “commercial computer software documentation,” as such terms are used in 48 C.F.R. 12.212. Consistent with 48 C.F.R. 12.212 and 48 C.F.R. 227.7202-1 through 227.7202-4, all U.S. Government End Users acquire the Software with only those rights set forth herein.
- You agree that you will not export the Software in any form in violation of any applicable laws and regulations regarding export control of any countries.
For EU member states only
This symbol means: Do not dispose of this product together with your household waste!
Please contact the Local Authority for appropriate disposal instructions. In the case of a new device being purchased, the used one can also be given to our dealer for appropriate disposal. Recycling of this product will help to conserve natural resources and prevent potential negative consequences for the environment and human health caused by inappropriate waste handling.
natural_image
Symbol of a trash bin crossed with no text or numbers, representing waste sorting or disposal (no text present)Contents
1 Introduction .... 1
Getting Acquainted with Your Printer 2
Space Requirements 2
Printer Parts 3
Front View 3
Rear View 4
Accessory 4
Front View with Options 4
2 Software Installation 5
Utilities and Documentation CD-ROM 6
Drivers 6
Utilities 6
System Requirements 7
Selecting Driver Options/Defaults (for Windows) 8
Uninstalling the Printer Driver (for Windows) 9
Displaying Printer Driver Settings (for Windows) 9
Windows XP/Server 2003 9
Windows 2000/Me/98SE/NT 4.0 10
Using the Printer Driver 10
Common Buttons 10
OK 10
Cancel 10
Apply 10
Help 10
Easy Set 11
Page Layout 11
Printer Figure 11
Setup Tab 11
Paper Tab 11
Quality Tab 12
Device Options Setting Tab 12
3 Using the Windows Status Display and Printer Status Monitor Center .....13
Working with the Status Display 14
Introduction 14
Opening the Status Display and Showing the Supplies Status 14
Altering the Size of the Status Display Window 14
Using the Status Display 14
Recognizing Status Display Alerts 15
Recovering from a Status Display Alert 15
Closing the Status Display 15
Working With the Printer Status Monitor Center 16
Introduction 16
System Requirements 16
Opening the Printer Status Monitor Center and Showing the Supplies
Status 16
Using the Printer Status Monitor Center 17
Recognizing Printer Status Monitor Center Alerts 18
Closing the Printer Status Monitor Center 18
4 Printer Control Panel and Configuration Menu ....19
About the Control Panel 20
Control Panel Indicators and Keys 20
Toner Supply Indicators 22
Configuration Menu Overview 22
Configuration Menu 23
Special Pages Menu 25
Language Menu 25
Engine Menu 25
Network Menu 28
Consumables Usage Menu 30
5 Using Media 31
Media Specifications 32
Media Types 33
Plain Paper (Recycled Paper) 33
Thick Stock 34
Envelopes 35
Labels 36
Letterhead 37
Postcards 37
Transparencies 38
What Is the Guaranteed Imageable (Printable) Area? 39
Imageable Area—Envelopes 40
Page Margins 40
Loading Media 41
Tray 1 (Multipurpose Cassette) 41
Loading Plain Paper 41
Other Media 44
Loading Envelopes 44
Loading Label Sheets/Postcards/Thick Stock/Transparencies 49
Tray 2/3 (Optional Lower Feeder Units) 51
Loading Plain Paper 51
Duplexing 54
Output Tray 55
Media Storage 56
6 Replacing Consumables 57
Replacing Consumables 58
About Toner Cartridges 58
Replacing a Toner Cartridge 61
Replacing the Waste Toner Bottle 65
Replacing the Transfer Roller 68
Replacing the Transfer Roller 68
Replacing the Ozone Filter 71
Replacing the Transfer Belt Unit 72
7 Maintaining the Printer 79
Maintaining the Printer 80
Cleaning the Printer 82
Exterior 82
Media Rollers 83
Cleaning the Media Feed Rollers (All Trays) 83
Duplex Option Feed Rollers 84
Cleaning the Media Transfer Rollers for Tray 2 and 3 85
Cleaning the Laser Lens of the Printer 86
8 Troubleshooting ....87
Introduction 88
Printing the Configuration Page 88
Preventing Media Misfeeds 89
Understanding the Media Path 90
Clearing Media Misfeeds 91
Media Misfeed Messages and Clearing Procedures 92
Clearing a Media Misfeed in Tray 1 92
Clearing a Media Misfeed in Tray 2/3 96
Clearing a Media Misfeed from the Duplex Option 98
Clearing a Media Misfeed from the Fuser Unit 99
Clearing a Media Misfeed from the Transfer Roller 102
Solving Problems with Media Misfeeds 105
Solving Other Problems 108
Solving Problems with Printing Quality 112
Status, Error, and Service Messages 118
Standard Status Messages 118
Error Messages (Warning) 119
Error Messages (Operator Call) 121
Service Messages 124
9 Installing Accessories ....125
Introduction 126
Antistatic Protection 126
Dual In-Line Memory Module (DIMM) 127
Installing a DIMM 127
Duplex Option 130
Installing the Duplex Option 130
Lower Feeder Unit 133
Kit Contents 133
Installing a Lower Feeder Unit 133
A Appendix ......137
Safety Specifications 138
Technical Specifications 138
Printer 138
Consumable Life Expectancy Chart 141
Our Concern for Environmental Protection 142
What is an ENERGY STAR product? 142
Introduction
1
Getting Acquainted with Your Printer
Space Requirements
To ensure easy operation, supply replacement and maintenance, adhere to the recommended space requirements detailed below.
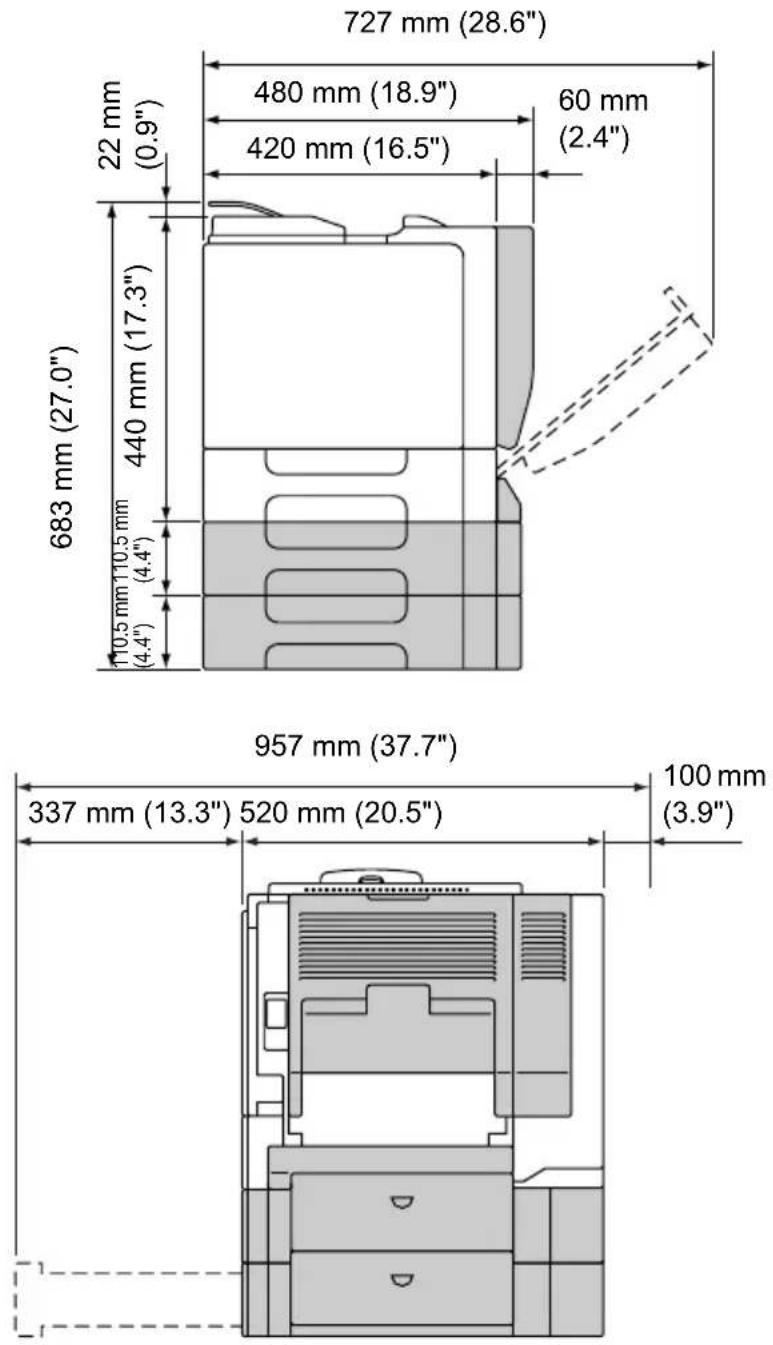

The options appear shaded in the above illustrations.
Printer Parts
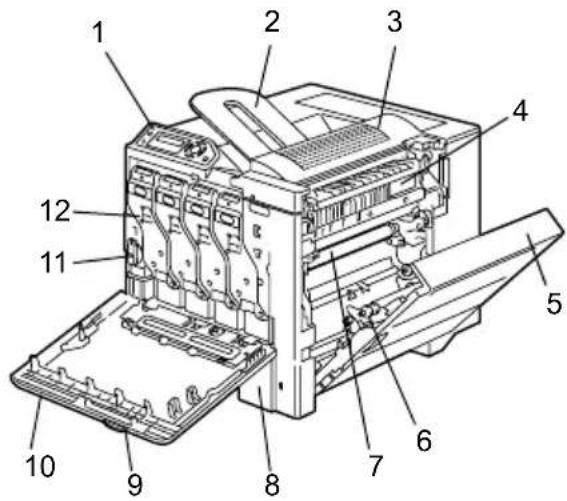
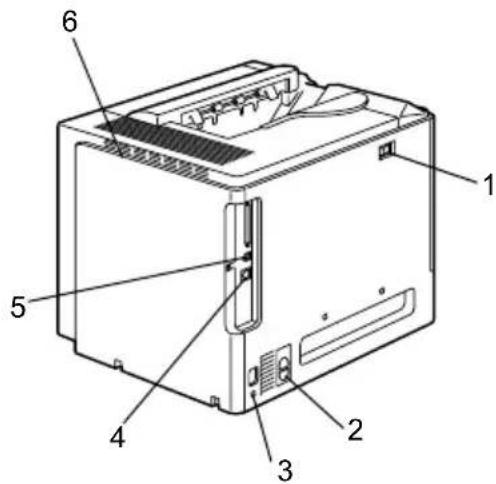
The following drawings illustrate the parts of your printer referred to throughout this guide, so please take some time to become familiar with them.
Front View
1—Control panel
2—Output tray
3—Top cover
4—Fuser unit
5—Right side cover
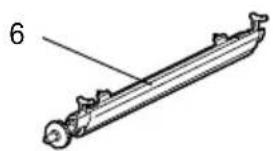
6—Transfer roller
7—Transfer belt unit
8—Tray 1 (Multipurpose cassette)
9—Grip
10—Front cover
11—Waste toner bottle
12—Toner cartridge
natural_image
Technical line drawing of a mechanical component with no visible text or symbols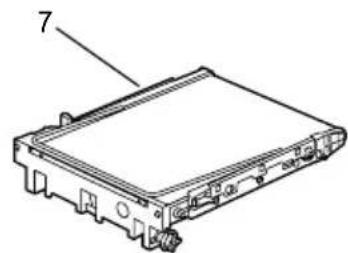
natural_image
Technical line drawing of a rectangular electronic component with labeled part '7' (no text or symbols beyond label)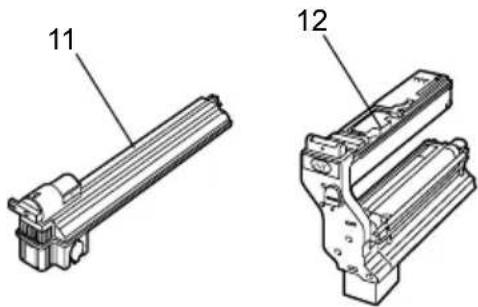
natural_image
Technical line drawings of two mechanical components labeled 11 and 12 (no text or symbols beyond labels)Rear View
1—Power switch
2—Ozone filter
3—Power connection
4—10Base-T/100Base-TX
(IEEE 802.3) Ethernet Interface port
5—USB port
6—Ventilation grilles
Accessory
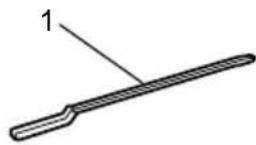
1—Laser lens cleaning tool
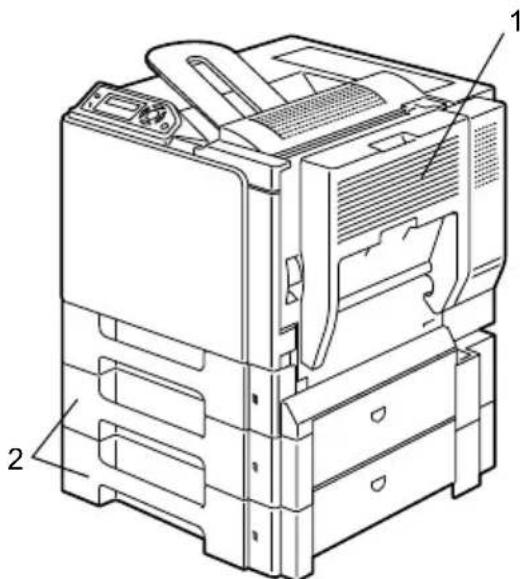
Front View with Options
1—Duplex option
2—Lower feeder units (Tray 2 and Tray 3)
Software Installation
2
Utilities and Documentation CD-ROM
Drivers
| Drivers Use/Benefit | |
| Printer Driver for Windows XP/Server 2003/2000 | These drivers give you access to all of the printer features, including finishing, advanced layout. See also “Displaying Printer Driver Settings (for Windows)” on page 9. |
| Printer Driver for Windows Me/98SE | |
| Printer Driver for Windows NT 4.0 | |
| Printer Driver for Macintosh OS X | |
| Linux |

For details of the Macintosh and Linux printer drivers, refer to the magicolor 5430 DL Reference Guide.
For details on the installation of the Windows printer driver, refer to the magicolor 5430 DL Installation Guide.
Utilities
| Utilities Use/Benefit | |
| Status Display (Windows only) From | the Status Display, the current status of this printer, such as its consumables and error information, can be checked.For details, refer to “Working with the Status Display” on page 14. |
| Printer Status Monitor Center (Windows only) | The status of KONICA MINOLTA products on the same network can be checked.For details, refer to “Working With the Printer Status Monitor Center” on page 16. |
| PageScope Web Connection With the | web browser, the status of printers can be checked, and each setting can be changed.For details, refer to the magicolor 5430 DL Reference Guide. |
System Requirements
■ Personal computer
Pentium 2 400 MHz (Pentium 3 500 MHz or higher is recommended).
■ Operating System
— Microsoft Windows XP Home Edition/Professional, Windows Server 2003, Windows 2000, Windows Me, Windows 98SE, Windows NT 4.0

The 64-bit driver supports x64 operating systems running on AMD64 tel Pentium 4 with EM64T platforms.
- Mac OS X v10.2 or later
- Red Hat Linux 8.0 or later, SUSE Linux 8.1 or later
■ Free hard disk space
- Approximately 20 MB of free hard disk space for printer driver and status display
- Approximately 128 MB of free hard disk space for image processing
RAM
128 MB or more
■ CD-ROM/DVD drive
I/O interface
- 10Base-T/100Base-TX (IEEE 802.3) Ethernet interface port
- USB Revision 1.1 and above compliant port

For details of the Macintosh and Linux printer drivers, refer to the mag- or 5430 DL Reference Guide.
Selecting Driver Options/Defaults (for Windows)
Before you start working with your printer, you are advised to verify/change the default driver settings. Also, in case you have options installed, you should “declare” the options in the driver.
1 Choose the driver's properties as follows:
- (Windows XP/Server 2003) From the Start menu, choose Printers and Faxes to display the Printers and Faxes directory. Right-click the KONICA MINOLTA magicolor 5430DL printer icon and choose Printing Preferences.
- (Windows 2000) From the Start menu, choose Settings and then Printers to display the Printers directory. Right-click the KONICA MINOLTA magicolor 5430DL printer icon and choose Printing Preferences.
- (Windows Me/98SE) From the Start menu, choose Settings and then Printers to display the Printers directory. Right-click the KONICA MINOLTA magicolor 5430DL printer icon and choose Properties. Choose the Printer Properties.
- (Windows NT 4.0) From the Start menu, choose Settings and then Printers to display the Printers directory. Right-click the KONICA MINOLTA magicolor 5430DL printer icon and choose Document Defaults.
2 If you have installed options, proceed with the next step. Otherwise, skip to step 6.
3 Select the Device Options Setting tab.
4 Check that the options have been correctly identified.

Since Auto configure is selected as a default with the driver, installed options are automatically identified. If, for some reason, the options are not correctly identified, follow the operations described in steps 5 through 7.
5 Clear the Auto configure check box.
6 Select an option (one at a time) and click Add. The option moves to the Installed Options list.

If you accidentally add an uninstalled option, select the option in the Installed Options list and then click Remove.
7 Click Apply.

Depending on the version of the operating system, Apply may not appear. If this is the case, continue with the next step.
8 Select the Paper tab. Select the default settings for your printer, such as the default media format you use.
9 Click Apply.
10 Click OK to exit from the Properties dialog box.
Uninstalling the Printer Driver (for Windows)
This section describes how to uninstall the magicolor 5430 DL Printer Driver if necessary.
1 From the Start menu, choose Programs (Windows XP/Server 2003: All Programs), KONICA MINOLTA, magicolor 5430DL, and then Uninstall.
2 In the Uninstall window, select the KONICA MINOLTA magicolor 5430DL. Then click Uninstall.
3 The magicolor 5430 DL driver will be uninstalled from your computer.
4 Restart your computer.
Displaying Printer Driver Settings (for Windows)
Windows XP/Server 2003
1 From the Start menu, choose Printers and Faxes to display the Printers and Faxes directory.
2 Right-click the KONICA MINOLTA magicolor 5430DL printer icon and choose Printing Preferences.
Windows 2000/Me/98SE/NT 4.0
1 From the Start menu, point to Settings, and then click Printers to display the Printers directory.
2 Display the printer driver settings:
■ Windows 2000—Right-click the KONICA MINOLTA magicolor 5430DL printer icon and choose Printing Preferences.
■ Windows Me/98SE—Right-click the magicolor 5430DL printer icon and choose Properties, then select Printer Properties.
■ Windows NT 4.0—Right-click the KONICA MINOLTA magicolor 5430DL printer icon and choose Document Defaults.
Using the Printer Driver
Common Buttons
The buttons described below appear on each tab.
OK
Click to exit the Properties dialog box, saving any changes made.
Cancel
Click to exit the Properties dialog box without saving any changes made.
Apply
Click to save all changes without exiting the Properties dialog box.

Depending on the version of the operating system, Apply may not appear.
Help
Click to view the help.
Easy Set
To save the current settings, enter a name, and then click Save. Afterward, the saved settings can be selected from the drop-down list.
Select Default from the drop-down list to reset the functions in all tabs to display to their default values.
Page Layout
Check this option button to display a sample of the page layout in the figure area.
Printer Figure
Check this option button to display an image of the printer (with all installed options) in the figure area.
Setup Tab
The Setup tab allows you to
■ Print several pages of a document on the same page (n-up printing)
■ Provide a watermark on printed documents
■ Design custom watermarks
■ Specify duplex and booklet printing
■ Specify the paper source
■ Define the type of media
■ Specify different paper for the first page of a document
Paper Tab
The Paper tab allows you to
■ Specify the size of the original document
■ Define custom media sizes
■ Fit printed documents to a specified media size
■ Select the output media size
■ Scale (enlarge/reduce) documents
■ Specify the orientation of the media
■ Specify the number of copies
■ Turn on/off the printer's sorting function
■ Turn on/off the Transmit Once function
■ Print using a form overlay
■ Create/edit a form overlay
Quality Tab
The Quality tab allows you to
■ Switch between color and monochrome printing
■ Specify color matching (Images, Graphics and Text)
■ Specify the resolution for the printout
■ Control the tones of an image (Contrast)
■ Control the darkness of an image (Brightness)
■ Control the color purity of an image (Saturation)
■ Control the clarity of an image (Sharpness)
Device Options Setting Tab
The Device Options Setting tab allows you to
■ Automatically identify installed options
■ Activate the optional lower feeder units (Tray 2/3) and/or the duplex option
■ Enter the user name that is sent with the print job(s)
■ View information about the printer driver
Using the Windows Status Display and Printer Status Monitor Center
3
Working with the Status Display
Introduction
The Status Display shows information about the current status of the printer.
To use Status Display, Bi-directional Support must be enabled (Start > Settings/Printers [and Faxes]. magicolor 5430DL, File/Properties, Ports tab).
Opening the Status Display and Showing the Supplies Status
Use one of the following steps to open the Status Display:
■ Windows XP/Server 2003—From the Start menu, choose All Programs, KONICA MINOLTA, magicolor 5430DL, and then Status.
■ Windows 2000/Me/98SE/NT 4.0—From the Start menu, choose Programs, KONICA MINOLTA, magicolor 5430DL, and then Status.
Altering the Size of the Status Display Window
■ From the Display menu, choose Status (Reduce) to decrease the size of the window.
■ From the Display menu, choose Status (Expand) to increase the size of the window.
Using the Status Display
■ When the background of the right-hand printer graphic is green, the printer is in standby mode or a job is printing normally.
■ When the background of the right-hand printer graphic is red, there is an error and the job has been interrupted. The status of the printer and the error message are shown in the dialog boxes on the left.
The function areas include:
■ Printer Status—Displays text messages that describe the current operational status of the printer.
■ How to Recover—Provides you with explanations of what you need to do in order to correct problems and recover from error conditions.
■ Warning Status—Displays text messages that alert you of conditions such as low toner.
■ Printer Status Figure—Shows a graphic representation of the printer and indicates where the problem is.
■ Printing Status—Displays the status of the current print job.
■ Select Popup Message—Allows you to choose which message(s) you want to bring to the foreground when that particular condition occurs with the printer.
■ Printer Information—Allows you to check various information such as the number of prints.
■ Supplies Status—Displays the usage status (approximate percentage remaining) of each toner cartridge.
Recognizing Status Display Alerts
When the Status Display detects a printing problem, the icon on the Windows task bar changes from green to yellow or red, depending on the severity of the printer problem.
Recovering from a Status Display Alert
When the Status Display notifies you of a printing problem, double-click its icon on the Windows task bar to open the Status Display. The Status Display identifies what type of error has occurred.
Closing the Status Display
To close the Status Display from the File menu, choose Exit.

If you click the X button in the upper-right corner of the Status Display window to close the window, the Status Display remains available at the bottom right of the taskbar. Double-click the icon to open the Status Display window again.
Working With the Printer Status Monitor Center
Introduction
Printer Status Monitor Center is an application that shows the status of multiple printing devices connected to the host through local ports (USB) or network ports. Printer Status Monitor Center locates network printing devices by using the Service Location Protocol (SLP), and only supports printing devices responding to KONICA MINOLTA-specific SLP and PJL queries such as magicolor 2430 DL and magicolor 5430 DL.

If a KONICA MINOLTA product is not compatible with both SLP and KONICA MINOLTA-specific PJL, Printer Status Monitor Center cannot be used.
System Requirements
■ Operating System
Windows XP/Server 2003/2000/Me/98SE/NT 4.0
■ Printer Ports Supported by Printer Status Monitor Center
- Ethernet port
- USB port
Opening the Printer Status Monitor Center and Showing the Supplies Status
Follow the appropriate operation described below to open the Printer Status Monitor Center.
■ Windows XP/Server 2003—From the Start menu, choose All Programs, KONICA MINOLTA, magicolor 5430DL, and then Printer Status Monitor Center.
■ Windows 2000/Me/98SE/NT 4.0—From the Start menu, choose Programs, KONICA MINOLTA, magicolor 5430DL, and then Printer Status Monitor Center.
Using the Printer Status Monitor Center
- Printer Name—Displays the model name of the local printer or printer on the network together with a printer icon. The printer icon changes color according to the connection and printer status. A red icon indicates an error, a yellow icon indicates a warning, and a green icon indicates normal operation. Depending on the setting in the Options dialog box, Status Display or PageScope Web Connection appears when you double-click the printer name.

If the name of the printer cannot be detected, "Unknown" appears next to the Printer name.

If the selected printer is incompatible with Status Display or Page-Scope Web Connection, it will not appear when you double-click the printer name.

If the device is connected to the USB port through a local connection or if "Unable Connect" appears under Status, Status Display or Page-Scope Web Connection does not appear, even when you double-click the printer name.
■ Port—Displays the name of the port where the printer is connected. For a local printer, the type (USB) is displayed. For a network printer, the IP address is displayed.
■ Status—Displays the printer status. The same information for Printer Status in the Status Display is displayed.
■ Supply Status: C,M,Y,K %Remaining—Displays (in percent) the approximate amount of toner remaining in the cartridges. The listed values are, from the left: C (cyan), M (magenta), Y (yellow) and K (black).

Click the heading of each column to switch the order between descending and ascending.
Action Menu
■ Update Printers—Searches again for the printers on the network.
■ Network Printers—Allows the IP address of network printers to be added or removed.
Options
| Status Monitor Application for Network Printers | Specify whether Status Display or PageScope Web Connection appears when the name of the printer in the screen is double-clicked. The default setting is Status Display. This setting only applies to network printers. |
| Timeout Two timeout intervals | ■ Printer Detection Timeout■ Printer Status Query Timeout |
Recognizing Printer Status Monitor Center Alerts
If a red or yellow icon appears, open Status Display or PageScope Web Connection, and then check the detailed information. For details on Status Display, refer to "Working with the Status Display" on page 14. For details on PageScope Web Connection, refer to the magicolor 5430 DL Reference Guide.
Closing the Printer Status Monitor Center
To close Printer Status Monitor Center, choose Exit from the File menu, or click the X button in upper-right corner of the Printer Status Monitor Center window.
Printer Control Panel and Configuration Menu
4
About the Control Panel
The control panel, located on the top of the printer, allows you to direct the printer's operation. In addition, it displays the current status of the printer, including any condition that needs your attention.
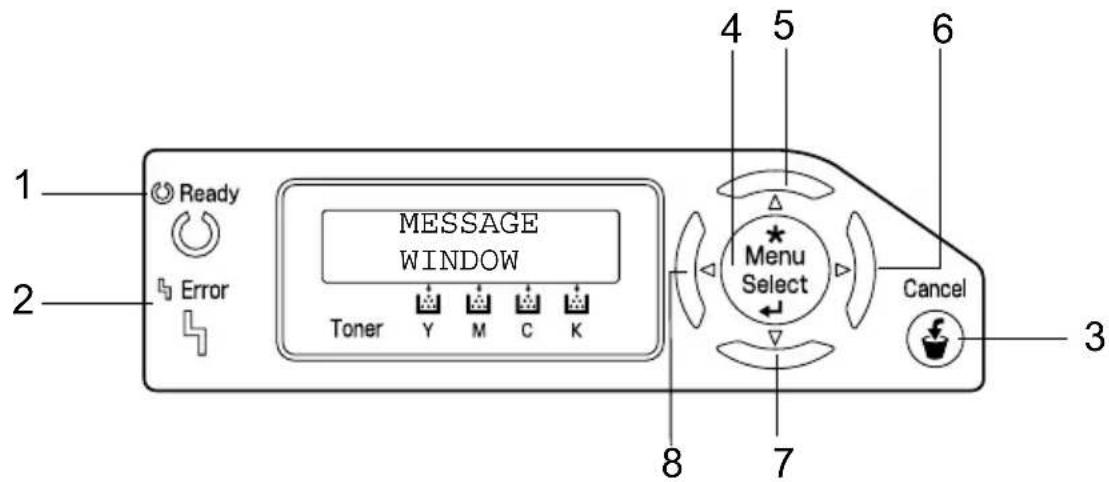
Control Panel Indicators and Keys
| No. | Indicator Off On | ||
| 1 | The printer is not ready[XWDB] Ready | dy to accept data. | The printer is ready to accept data. |
| 2 | No problem. The printer requires | ter requires | operator attention (usually accompanied by a status message in the message window.) |
| No. Key Function | ||
| 3 ■ | Cancels the currently displayed menu or menu choice | ■ Allows you to cancel one or all print jobs that are currently being printed or processed:1. Press the Cancel key.2. Press the Right or Left keys to select either JOB CANCEL/CURRENT JOB or JOB CANCEL/ALL JOBS.3. Press the Select key.The print job(s) is cancelled. |
| 4 | Wters the menu system | ■ Moves down in the menu structure■ Selects the displayed menu choice |
| 5 |  | ■ Moves up in the menu structure■ Within a menu choice that is changeable character by character, scrolls upward through the available characters |
| 6 |  | ■ Moves right in the menu structure■ Moves right through the available menu choices |
| 7 |  | ■ Moves down in the menu structure■ Within a menu choice that is changeable character by character, scrolls downward through the available characters |
| 8 |  | ■ Moves left in the menu structure■ Moves left through the available menu choices |
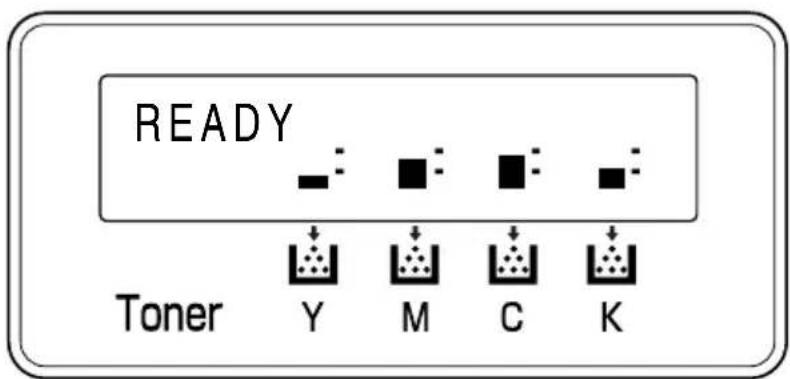
Toner Supply Indicators
The indicators shown below will appear, indicating the amount of toner that remains in the yellow (Y), magenta (M), cyan (C), and black (K) toner cartridges.
Configuration Menu Overview
The menus with settings that can be set from the control panel of the magicolor 5430 DL are structured as shown next page.
Configuration Menu
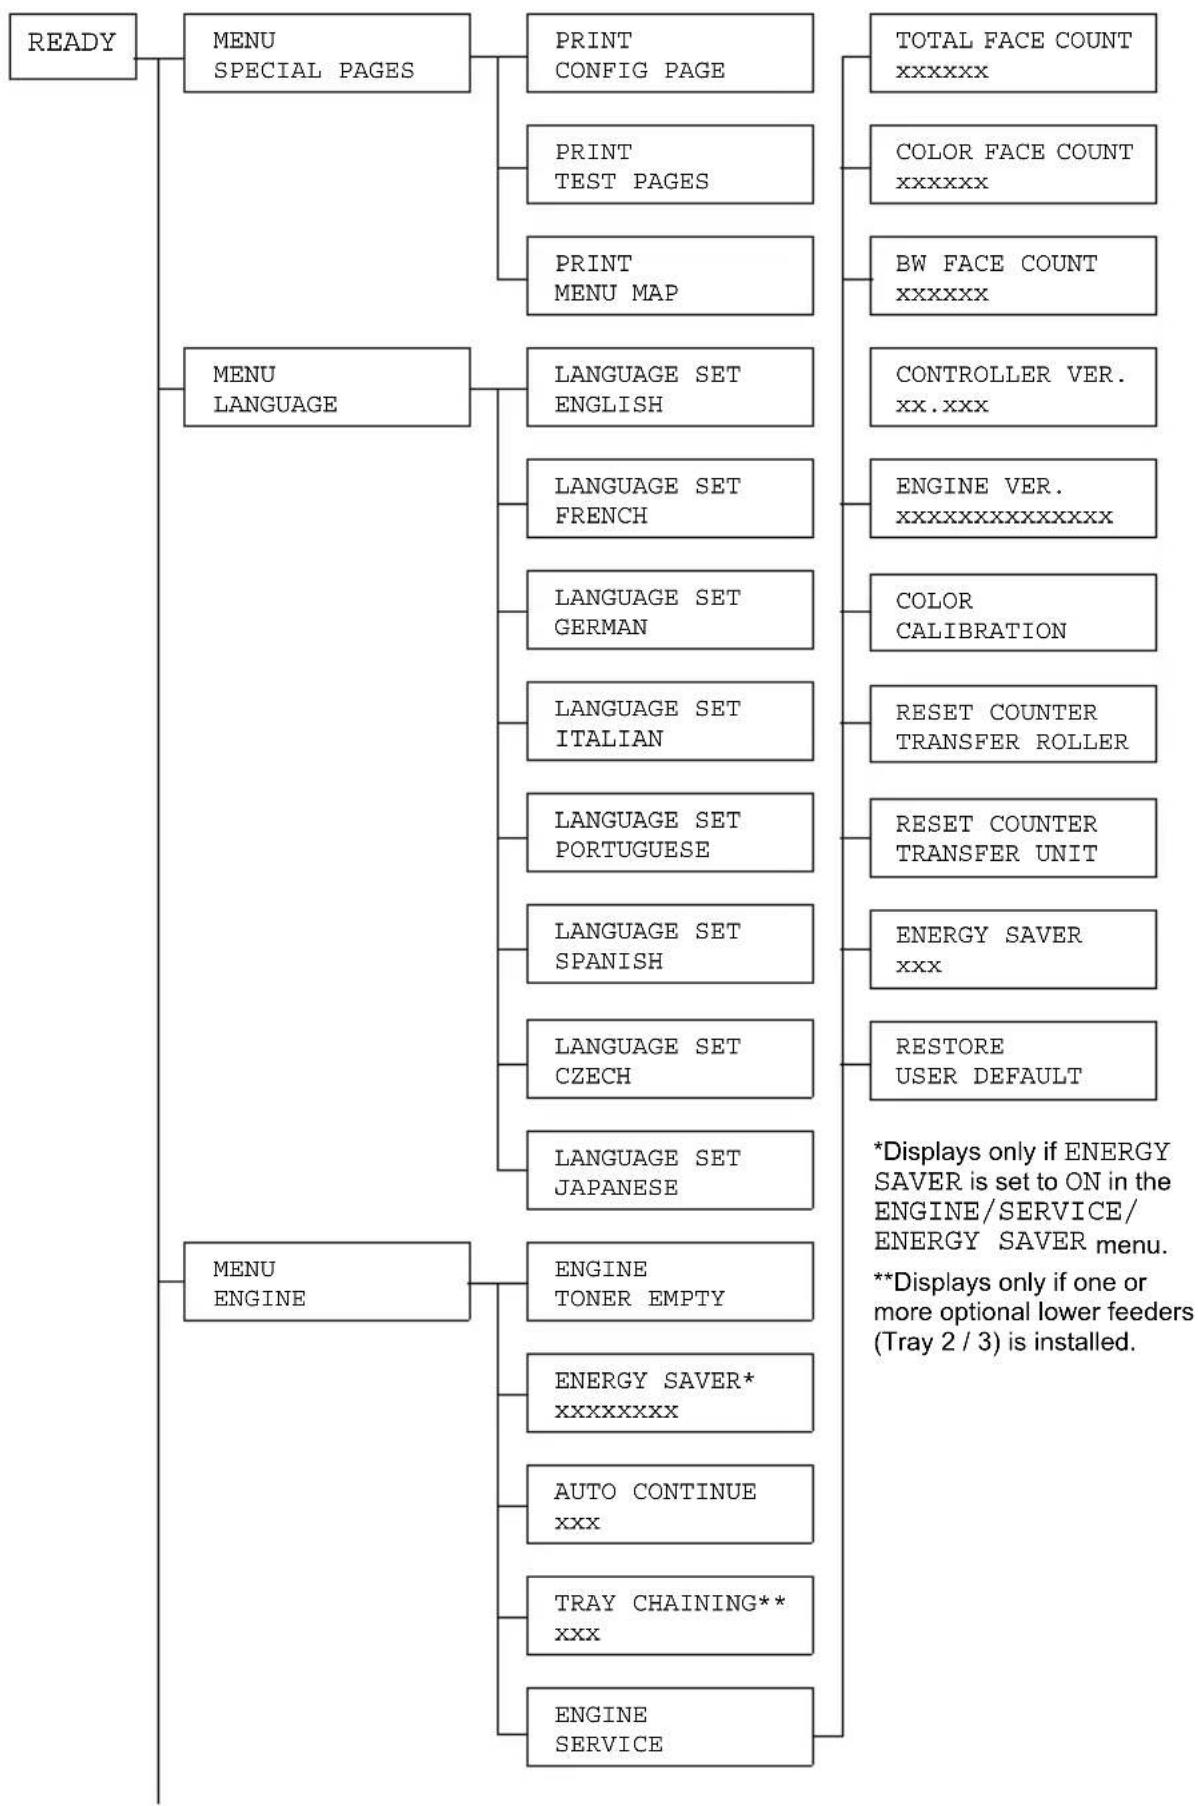
flowchart
graph TD
    A["READY"] --> B["MENU SPECIAL PAGES"]
    B --> C["PRINT CONFIG PAGE"]
    B --> D["PRINT TEST PAGES"]
    B --> E["PRINT MENU MAP"]
    C --> F["TOTAL FACE COUNT xxxxxx"]
    D --> G["COLOR FACE COUNT xxxxxx"]
    D --> H["BW FACE COUNT xxxxxx"]
    B --> I["MENU LANGUAGE"]
    I --> J["LANGUAGE SET ENGLISH"]
    I --> K["LANGUAGE SET FRENCH"]
    I --> L["LANGUAGE SET GERMAN"]
    I --> M["LANGUAGE SET ITALIAN"]
    I --> N["LANGUAGE SET PORTUGUESE"]
    I --> O["LANGUAGE SET SPANISH"]
    I --> P["LANGUAGE SET CZECH"]
    I --> Q["LANGUAGE SET JAPANESE"]
    B --> R["MENU ENGINE"]
    R --> S["ENGINE TONER EMPTY"]
    R --> T["ENERGY SAVER* xxxxxxxx"]
    R --> U["AUTO CONTINUE xxx"]
    R --> V["TRAY CHAINING** xxx"]
    R --> W["ENGINE SERVICE"]
    S --> X["*Displays only if ENERGY SAVER is set to ON in the ENGINE/SERVICE/ ENERGY SAVER menu. **Displays only if one or more optional lower feeders (Tray 2 / 3) is installed."]
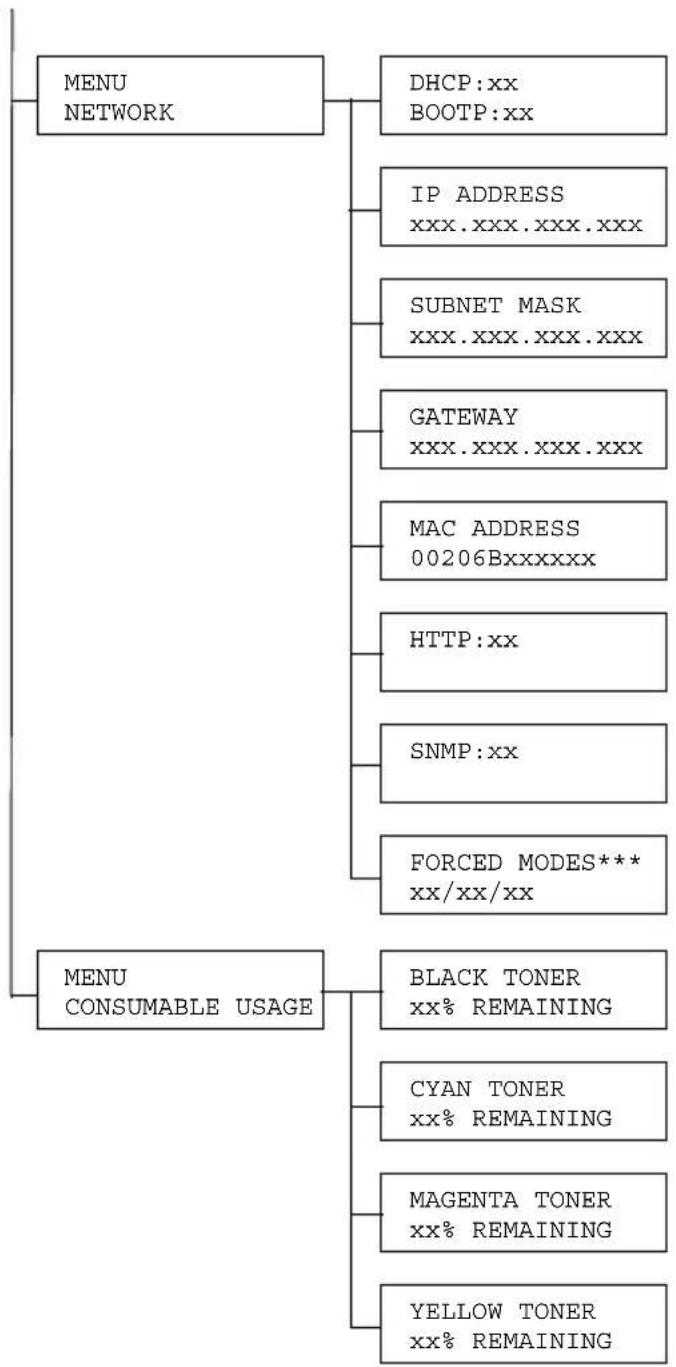
flowchart
graph TD
    A["MENU NETWORK"] --> B["DHCP: xx\nBOOTP: xx"]
    A --> C["IP ADDRESS\nxxx.xxx.xxx.xxx"]
    A --> D["SUBNET MASK\nxxx.xxx.xxx.xxx"]
    A --> E["GATEWAY\nxxx.xxx.xxx.xxx"]
    A --> F["MAC ADDRESS\n00206Bxxxxxxx"]
    A --> G["HTTP: xx"]
    A --> H["SNMP: xx"]
    A --> I["FORCED MODES***\nxx/xx/xx"]
    J["MENU CONSUMABLE USAGE"] --> K["BLACK TONER\nxx% REMAINING"]
    J --> L["CYAN TONER\nxx% REMAINING"]
    J --> M["MAGENTA TONER\nxx% REMAINING"]
    J --> N["YELLOW TONER\nxx% REMAINING"]
***Some older network hubs with fixed communication modes do not communicate properly with automatically configures devices. In such cases, use the NETWORK/ FORCED MODES menu to configure the printer for the appropriate hub settings and enable communication.
Special Pages Menu
| PRINT CONFIG PAGE | Print the configuration page. |
| PRINT TEST PAGES | Print the test pages. |
| PRINT MENU MAP | Print the menu map. |
Language Menu
| ENGLISH/FRENCH/GERMAN/ITALIAN/PORTUGUESE/SPANISH/CZECH/JAPANESE | The display language of the message window can be changed to the required language.The default setting is English. |
Engine Menu
| TONER EMPTY | Settings | STOP / CONTINUE |
| When set to CONTINUE, printing continues even if a toner cartridge is empty.When set to STOP, printing stops when a toner cartridge is empty. | ||
| ENERGY SAVER | Settings | 15 MINUTES / 30 MIN-UTES / 60 MINUTES / 120 MINUTES |
| Sets the length of time until the printer enters Energy Saver mode after it no longer receives print jobs or is not operating.The Energy Saver mode is automatically cancelled when any of the following occurs:■ The printer is restarted.■ A print job is received.■ Any key on the control panel is pressed.■ The front cover or right side cover is opened, then closed.■ A tray is opened, then closed. | ||
| AUTO CONTINUE | Settings | ON / OFF |
| When set to ON, the printer continues printing if the correct size media is not loaded in the specified tray.When set to OFF, the printer stops and displays a message indicating that media should be loaded into the specified tray if the specified tray runs out of media. | ||
| TRAY CHAINING | Settings | ON / OFF |
| When set to ON, the printer automatically switches to a different tray containing media of the same size and type, if the specified tray runs out of media.When set to OFF, the printer stops and displays a message indicating that media should be loaded into the specified tray if the specified tray runs out of media. | ||
| ENGINE SERVICE | Use this submenu to view information related to the engine. | |
| TOTAL FACE COUNT | The number of page faces that have been printed to date. | |
| COLOR FACE COUNT | The number of color page faces that have been printed to date. | |
| BW FACE COUNT | The number of monochrome page faces that have been printed to date. | |
| CONTROLLER VER. | The current controller firmware version. | |
| ENGINE VER. | The printer engine firmware version. | |
| COLOR CALIBRATION | Performs color calibrations in order to adjust the color shift. | |
| RESET COUNTER TRANSFER ROLLER | Resets the counter when the transfer roller has been replaced. | |
| RESET COUNTER TRANSFER UNIT | Resets the counter when the transfer belt unit has been replaced. | |
| ENERGY SAVER | Settings ON / OFF | |
| When set to ON, Energy Saver is enabled.When set to OFF, Energy Saver is disabled and the ENGINE/ENERGY SAVER menu is not displayed. | ||
| RESTORE USER DEFAULT | Resets the ENERGY SAVER, AUTO CONTINUE and TRAY CHAINING menus to the factory defaults. In addition, the PageScope Web Connection administrator password is reset to the default password. For details of PageScope Web Connection administrator password, refer to the magicolor 5430DL Reference Guide. | |
Network Menu
If the printer is connected to a network, the following settings should be specified. For details about each setting, contact your network administrator.
| DHCP | Settings | DHCP SET:ONBOOTP SET:OFF |
| DHCP SET:OFFBOOTP SET:ON | ||
| DHCP SET:OFFBOOTP SET:OFF | ||
| BOOTP | If there is a DHCP server on the network, specifies whether the IP address is automatically assigned by the DHCP server and other network information is loaded (can be set to ON or OFF).Specifies whether the IP address is automatically assigned by BOOTP and other network information is loaded (can be set to ON or OFF). | |
| IP ADDRESS | Setting | 192.168.1.2 |
| Sets the IP address of this printer on the network. Use the Up, Down, Left, and Right keys to enter the value.When manually setting the IP address, first set DHCP and BOOTP to OFF. | ||
| SUBNET MASK | Setting | 255.255.255.0 |
| Sets the subnet mask value of the network. Use the Up, Down, Left, and Right keys to enter the value. When manually setting the Subnet Mask, first set DHCP and BOOTP to OFF. | ||
| GATEWAY | Setting | 192.168.1.1 |
| If a router is used on the network, enter the IP address of the router. Use the Up, Down, Left, and Right keys to enter the value. When manually setting the Gateway, first set DHCP and BOOTP to OFF. | ||
| MAC ADDRESS | Displays Ethernet hardware address for this printer. (It cannot be changed.) | |
| HTTP | Settings | ON / OFF |
| HTTP can be set to ON or OFF. ON enables the Internal Web Page inside the printer, OFF disables it. | ||
| SNMP | Settings | ON / OFF |
| SNMP is a scalable, distributed management suite for managing small to large size networks. SNMP can be set to ON or OFF. | ||
| FORCED MODES | Settings SPEED | /DUP/NEG.: AUTO/AUTO/ON- AUTO/FULL/ON -AUTO/HALF/ON- 100M/AUTO/ON -100M/FULL/ON- 100M/FULL/OFF -100M/HALF/ON- 100M/HALF/OFF -10M/AUTO/ON- 10M/FULL/ON -10M/FULL/OFF- 10M/HALF/ON -10M/HALF/OFF |
| SPEED indicates the network transmission speed. Select from a 10Base-T connection (10M), 100Base-TX connection (100M), or automatic recognition (AUTO). If AUTO is selected, the transmission speed is set depending on the negotiation. Therefore, there is no setting where negotiation (NEG.) is turned off.DUP indicates the communication method for bi-directional communication. Select whether data is sent and received in both directions simultaneously (FULL), or in one direction at a time (HALF), or select automatic recognition (AUTO). If AUTO is selected, the transmission speed is set depending on the negotiation. Therefore, there is no setting where negotiation (NEG.) is turned off.NEG. indicates the negotiation setting (mutually sends and receives information such as the transmission speed and determines the transmission setting). When set to ON, negotiation is performed. When set to OFF, negotiation is not performed. | ||
Consumables Usage Menu
| BLACK TONER | The approximate percentage of toner remaining in the black toner cartridge. |
| CYAN TONER | The approximate percentage of toner remaining in the cyan toner cartridge. |
| YELLOW TONER | The approximate percentage of toner remaining in the yellow toner cartridge. |
| MAGENTA TONER | The approximate percentage of toner remaining in the magenta toner cartridge. |
Using Media
5
Media Specifications
What types and sizes of media can I load?
| Media Media Size | Tray* Duplex | |||
| Inch Millimeter | ||||
| A4 8.2 x 11.7 210.0 x 297.0 | 1/2/3 Yes | |||
| A5 5.9 x 8.3 148.0 x 210.0 | No | |||
| B5 (JIS) | 7.2 x 10.1 182.0 x 257.0 1/2/3 Yes | |||
| Executive | 7.25 x 10.5 | 184.0 x 267.0 1/2/3 Yes | ||
| Folio | 8.3 x 13.0 210.0 x 330.0 2/3 Yes | |||
| Foolscap | 8.0 x 13.0 203.2 x 330.2 2/3 Yes | |||
| Kai 16 | 7.3 x 10.2 185.0 x 260.0 1 Yes | |||
| Kai 32 | 5.1 x 7.3 130.0 x 185.0 1 No | |||
| 16 K | 7.7 x 10.6 195.0 x 270.0 1 Yes | |||
| Legal | 8.5 x 14.0 215.9 x 355.6 2/3 Yes | |||
| Government Legal | 8.5 x 13.0 216.0 x 330.0 2/3 Yes | |||
| Letter | 8.5 x 11.0 215.9 x 279.4 1/2/3 Yes | |||
| Letter Plus 8.5 x 12.7 215.9 | x 322.3 2/3 Yes | |||
| Government letter | 8.0 x 10.5 203.2 x 266.7 1/2/3 Yes | |||
| Statement | 5.5 x 8.5 140.0 x 216.0 1 No | |||
| UK Quarto 8.0 x 10.0 203.2 | x 254.0 1 No | |||
| A4 Transparency 8.2 x 11.7 | 210.0 x 297.0 1 No | |||
| Letter Transparency | 8.5 x 11.0 215.9 x 279.4 1 No | |||
| Japanese Postcard 3.9 x 5.8 | 100.0 x 148.0 1 No | |||
| Double Postcard 5.8 x 7.9 | 48.0 x 200.0 1 No | |||
| Envelope B5 (ISO) | 6.9 x 9.8 176.0 x 250.0 1 No | |||
| Envelope C5 | 6.4 x 9.0 162.0 x 229.0 1 No | |||
| Envelope C6 | 4.5 x 6.4 114.0 x 162.0 1 No | |||
| Envelope #10 | 4.1 x 9.5 104.1 x 241.3 1 No | |||
| Envelope DL | 4.3 x 8.7 110.0 x 220.0 1 No | |||
| Envelope Monarch | 3.9 x 7.5 99.0 x 190.5 | 1 No | ||
| Envelope Chou #3 | 4.7 x 9.2 120.0 x 235.0 1 No | |||
| Envelope Chou #4 | 3.5 x 8.1 90.0 x 205.0 | 1 No | ||
| Envelope You #4 | 4.1 x 9.3 105.0 x 235.0 1 No | |||
| Thick Stock 1, 2—Only supported for letter, A4, or smaller media. | ||||
| Custom, Minimum | 3.6 x 5.9 92.0 x 148.0 | 1 No | ||
| Custom, Maximum | 8.5 x 11.7 216.0 x 297.0 1 Yes | |||
| Notes: *Tray 1 = Multipurpose Tray 2/3 = Lower feeder units (optional) | ||||

For custom sizes, use the printer driver to specify the settings within the ranges shown in the above table.
Media Types
Before purchasing a large quantity of special media, do a trial printing with the same media and check the print quality.
Keep media on a flat, level surface in its original wrapper until it is time to load it. For a list of approved media, refer to printer.konicaminolta.com.
Plain Paper (Recycled Paper)
| Capacity Tray 1(multipurpose) | 250 sheets of 80 g/m2(22 lb) paper; capacity for other weights varies accordingly. | |
| Orientation | Face up | |
| DriverMedia Type | Plain paper (Recycled paper) | |
| Weight 60–90 g/m2(16–24 lb bond) | ||
| Duplexing See page 32 for supported sizes. | ||
Use media that is
Suitable for plain paper laser printers, such as standard or recycled office paper.
Note
Do not use the media types listed below. These could cause poor print quality, media misfeeds, or damage to the printer.
DO NOT use media that is
■ Coated with a processed surface (such as carbon paper, digitally gloss-coated media, and colored paper that has been treated)
■ Carbon backed
■ Unapproved iron-on transfer media (such as heat-sensitive paper, heat-pressure paper, and heat-press transfer paper)
■ Cold-water-transfer paper
■ Pressure sensitive
■ Designed specifically for inkjet printers (such as superfine paper, glossy paper, glossy film, and postcards)
■ Already printed on by another printer, copier, or fax machine
■ Dusty
■ Wet (or damp)
Keep media between 35% and 85% relative humidity. Toner does not adhere well to moist or wet paper.
■ Layered
■ Adhesive
■ Folded, creased, curled, embossed, warped, or wrinkled
■ Perforated, three-hole punched, or torn
■ Too slick, too coarse, or too textured
■ Different in texture (roughness) on the front and back
■ Too thin or too thick
■ Stuck together with static electricity
■ Composed of foil or gilt; too luminous
■ Heat sensitive or cannot withstand the fusing temperature (180°C [356°F])
Irregularly shaped (not rectangular or not cut at right angles)
■ Attached with glue, tape, paper clips, staples, ribbons, hooks, or buttons
Acidic
■ Any other media that is not approved
Thick Stock
Paper thicker than 90 g/m^2 (24 lb bond) is referred to as thick stock. Test all thick stock to ensure acceptable performance and to ensure that the image does not shift.
| Capacity Tray 1 Up to 20 thick stock sheets, depending on their thickness. | |
| Tray 2 and 3 Not supported | |
| Orientation Face up | |
| Driver Media Type | Thick stock 1 (91-150 g/m2) Thick stock 2 (151-210 g/m2) |
| Weight 91–2 | 10 g/m2(25–55.9 lb) |
| Duplexing Not supported | |
DO NOT use thick stock that is
■ Mixed with any other media in the trays (as this will cause printer misfeeding)
Envelopes
Print on the front (address) side only. Some parts of the envelope consist of three layers of paper—the front, back, and flap. Anything printed in these layered regions may be lost or faded.
| Capacity Tray 1 Up to 10 en | velopes, depending on their thickness |
| Tray 2 and 3 Not supported | |
| Orientation Face up | |
| Driver Media Type Envelope | |
| Weight 91–163 g/m2 (25–43 lb) | |
| Duplexing Not supported | |
Use envelopes that are
■ Common office envelopes approved for laser printing with diagonal joints, sharp folds and edges, and ordinary gummed flaps

Because the envelopes pass through heated rollers, the gummed area on the flaps may seal. Using envelopes with emulsion-based glue avoids this problem.
■ Approved for laser printing
Dry
DO NOT use envelopes that have
■ Sticky flaps
■ Tape seals, metal clasps, paper clips, fasteners, or peel-off strips for sealing
■ Transparent windows
■ Too rough of a surface
■ Material that will melt, vaporize, offset, discolor, or emit dangerous fumes
■ Been presealed
Labels
A sheet of labels consists of a face sheet (the printing surface), adhesive, and a carrier sheet:
■ The face sheet must follow the plain paper specification.
■ The face sheet surface must cover the entire carrier sheet, and no adhesive should come through on the surface.
You can print continuously with label sheets. However, this could affect the media feed, depending on the media quality and printing environment. If problems occur, stop the continuous printing and print one sheet at a time.
Format label data within your application. Try printing your data on a sheet of plain paper first to check placement. Check your application documentation for more information on printing labels.
| Capacity Tray 1 Up to 20 label sheets, depending on their thickness | |
| Tray 2 and 3 Not supported | |
| Orientation Face up | |
| Driver LabelsMedia Type | |
| Weight 60–163 g/m2 (16–90 lb) | |
| Duplexing Not supported | |
Use label sheets that are
■ Recommended for laser printers
■ Letter or A4 size (adhesive label stock)
DO NOT use label sheets that
■ Have labels that easily peel off
■ Have backing sheets that have peeled away or have exposed adhesive

Labels may stick to the fuser, causing them to peel off and media misfeeds to occur.
■ Are precut or perforated
Do not use
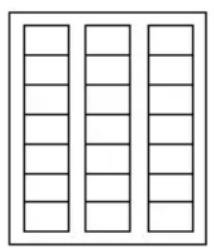
natural_image
Three vertical rectangular panels with empty inner cells, no text or symbols present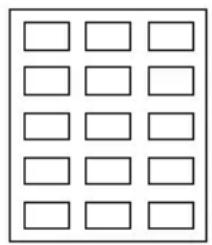
natural_image
Grid of empty rectangular boxes arranged in 4x4 pattern (no text or symbols)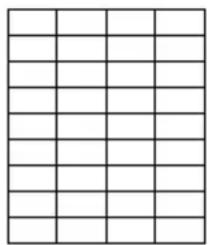
natural_image
Grid pattern with uniform squares, no text or symbols presentShiny backed paper
OK to use

natural_image
Empty white square with a thin black border (no text or symbols)Full-page labels (uncut)
Letterhead
Format letterhead data within your application. Try printing your data on a sheet of plain paper first to check placement.
| Capacity Tray 1 Up to 250 sheets, depending on their size and thickness | |
| Tray 2 and 3 Not supported | |
| Orientation | Face up |
| Driver Media Type | Letterhead |
| Weight 60–90 g/m2 (16–24 lb) | |
| Duplexing See page 32 for supported sizes. | |
Postcards
Format postcard data within your application. Try printing your data on a sheet of plain paper first to check placement.
| Capacity Tray 1 Up to 20 postcards, depending on their thickness | |
| Tray 2 and 3 Not supported | |
| Orientation | Face up |
| Driver Media Type | Postcard |
| Weight 60–1 | 63 g/m2 (16–90 lb) |
| Duplexing Not supported | |
Use postcards that are
■ Recommended for laser printers
DO NOT use postcards that are
Coated
■ Designed for inkjet printers
■ Precut or perforated
■ Preprinted or multicolored (may result in media misfeeds)

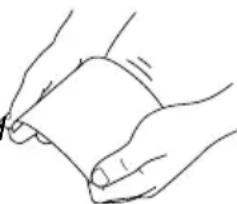
If the postcard is warped, press on the warped area before putting it in Tray 1.
natural_image
Line drawing of two hands holding a piece of paper or tape (no text or symbols)Transparencies

Do not fan transparencies before loading them. Resulting static electricity may cause printing errors.

If you touch the face of the transparencies with your bare hands, print quality may be affected.

Keep the printer path clean. Transparencies are especially sensitive to a dirty media path. If there are shadows on either the top or the bottom of the sheets, see chapter 7, “Maintaining the Printer”.

Remove transparencies as soon as possible from the output tray to avoid static buildup.
You can print continuously with transparencies. However, this could affect the media feed, depending on the media quality, static buildup, and printing environment.
Format the information to be printed on the transparencies within your application. Try printing your data on a sheet of plain paper first to check placement.

If you have problems feeding 20 sheets, try loading only 1–10 sheets at a time. Loading a large number of transparencies at one time may cause static buildup, thus causing feeding problems.
| Capacity Tray 1 Up to 20 transparencies, depending on their thickness | |
| Tray 2 and 3 | Not supported |
| Orientation | Face up |
| Driver Media Type | Transparency |
| Duplexing | Not supported |
Use transparencies that are
■ Approved for laser printing
DO NOT use transparencies that
■ Have static electricity that will cause them to stick together
What Is the Guaranteed Imageable (Printable) Area?
The printable area on all media sizes is up to 4 mm (0.157") from the edges of the media.
Each media size has a specific imageable area, the maximum area on which the printer can print clearly and without distortion.
This area is subject to both hardware limits (the physical media size and the margins required by the printer) and software constraints (the amount of
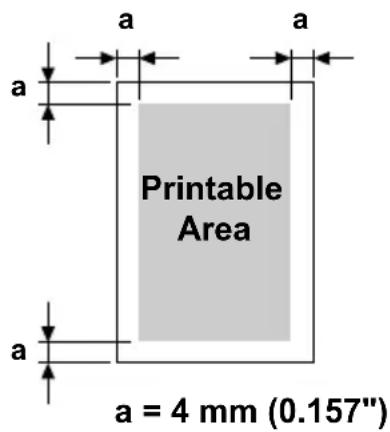
memory available for the full-page frame buffer). The guaranteed imageable (printable) area for all media sizes is the page size minus 4 mm (0.157") from all edges of the media.
Imageable Area—Envelopes
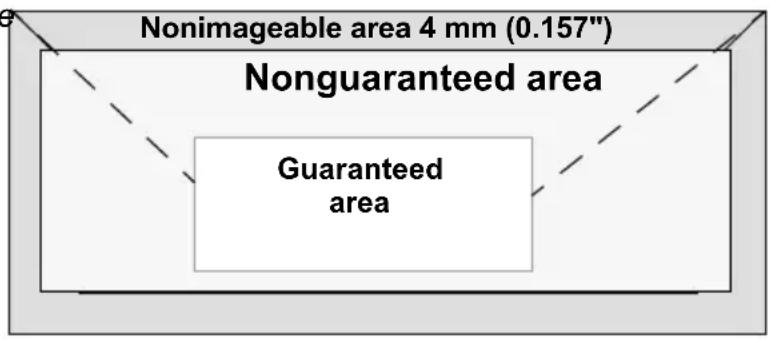
Envelopes have a nonguaranteed imageable area that varies with envelope type.

The envelope print orientation is determined by your application.
Page Margins
Margins are set through your application. Some applications allow you to set custom page sizes and margins while others have only standard page sizes and margins from which to choose. If you choose a standard format, you may lose part of your image (due to imageable area constraints). If you can custom-size your page in your application, use those sizes given for the imageable area for optimum results.
Loading Media
How do I load media?
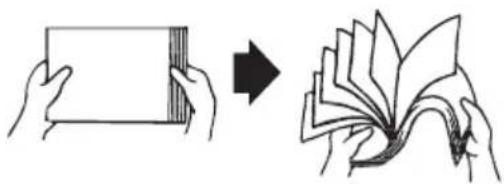
Take off the top and bottom sheets of a ream of paper. Holding a stack of approximately 200 sheets at a time, fan the stack to prevent static buildup before inserting it in a tray.
natural_image
Illustration showing a hand holding a card and folding a folded paper sheet (no text or symbols)
Although this printer was designed for printing on a wide range of media types, it is not intended to print exclusively on a single media type except plain paper. Continuous printing on media other than plain paper (such as envelopes, labels, thick stock, or transparencies) may adversely affect print quality or reduce engine life.
When refilling media, first remove any media remaining in the tray. Stack it with the new media, even the edges, then reload it.
Tray 1 (Multipurpose Cassette)
For details on the types and sizes of media that can be printed from Tray 1, refer to “Media Specifications” on page 32.
Loading Plain Paper
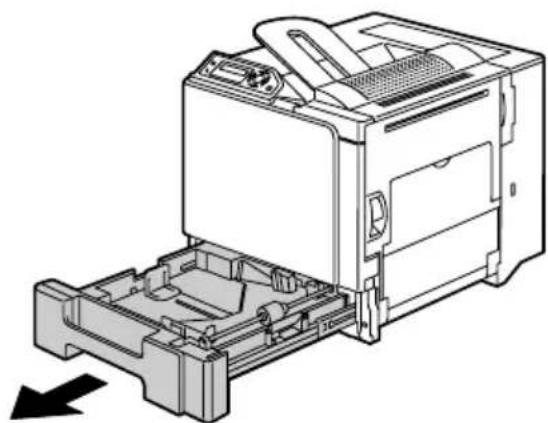
1 Pull out Tray 1.
natural_image
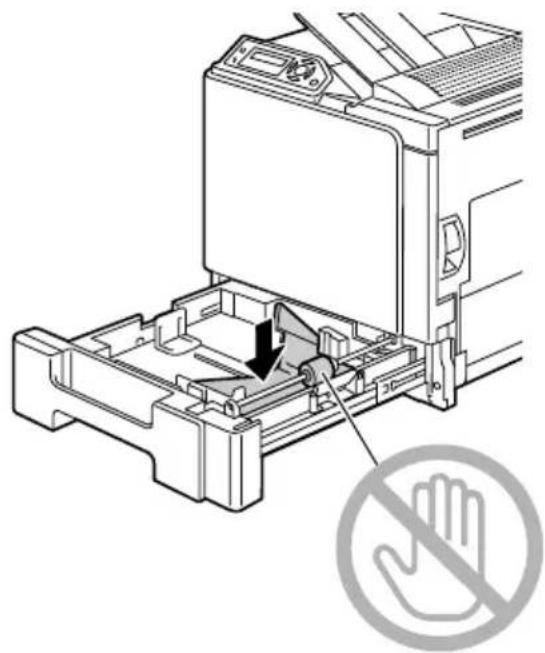
Technical line drawing of a printer internal structure with no visible text or symbols2 Press down on the media pressure plate to lock it into place.
natural_image
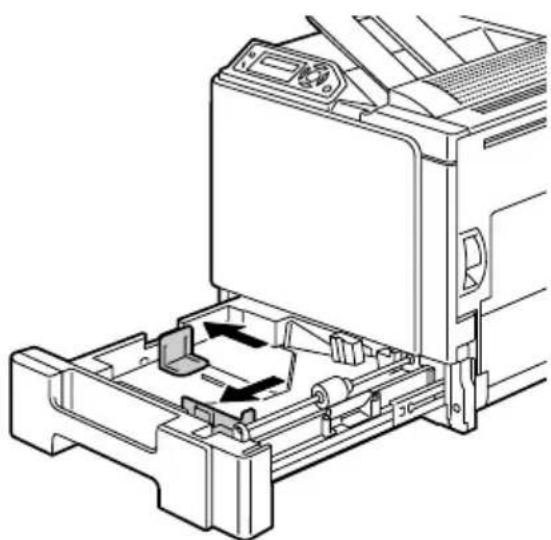
Diagram of a printer's internal structure with a hand symbol indicating no gloves (no text or labels present)3 Slide the media guides to provide more space between them.
natural_image
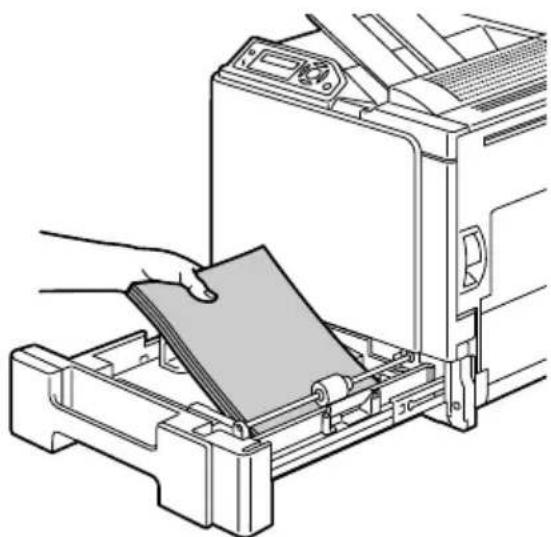
Technical line drawing of a printer internal structure showing frame, tray, and base components (no text or symbols)4 Load the paper face up in the tray.
natural_image
Illustration of a printer being inserted into a paper holder, showing mechanical components and a hand holding the cover (no text or symbols present)
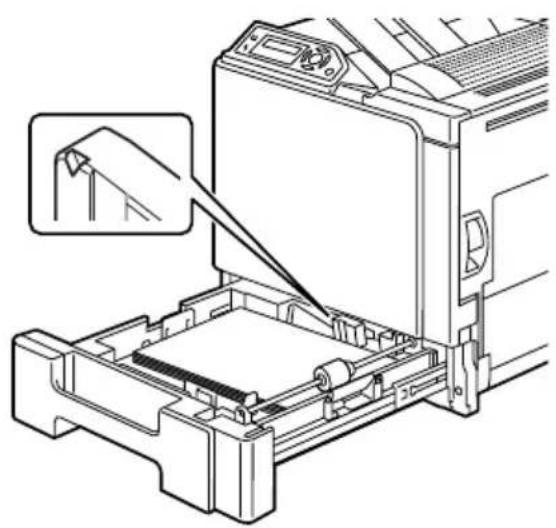
Do not load above the mark. Up to 250 sheets (80 g/m ^2 [22 lb]) of plain paper can be loaded into the tray at one time.
natural_image
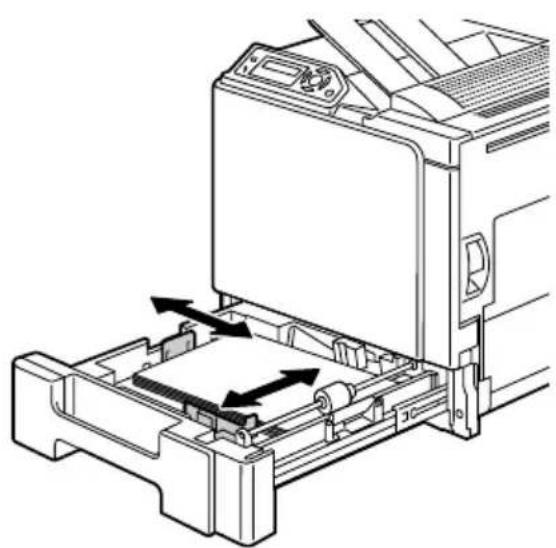
Technical line drawing of a printer or printer with a close-up inset showing a hand holding a small object (no text or symbols present)5 Slide the media guides against the edges of the paper.
natural_image
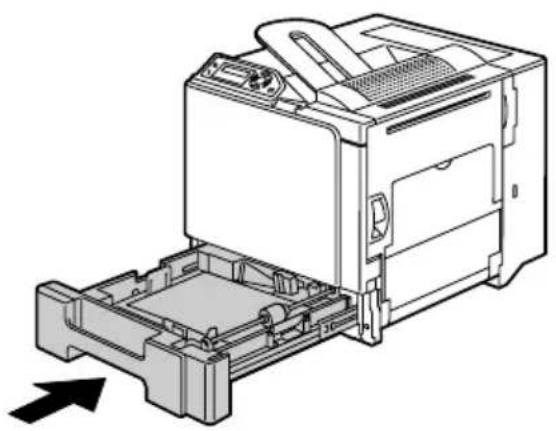
Technical line drawing of a printer or printer mechanism with directional arrows indicating movement (no text or symbols present)6 Close Tray 1.
natural_image
Technical line drawing of a printer internal structure with an arrow indicating orientation (no text or symbols present)Other Media
When loading media other than plain paper, set the media mode (Envelope, Label, Thick Stock 1, Thick Stock 2, or Transparency) in the driver for optimum print quality.
Loading Envelopes
1 Pull out Tray 1.
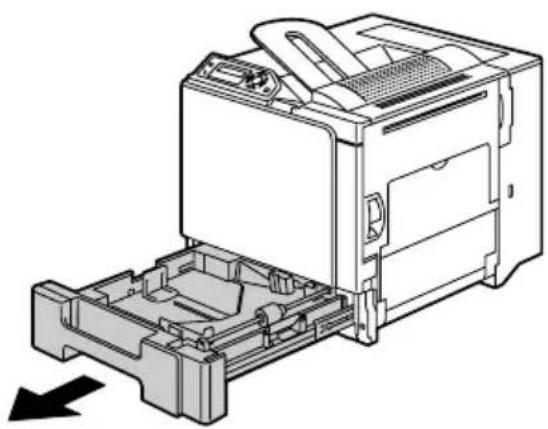
natural_image
Technical line drawing of a printer internal structure with no visible text or symbols2 Remove any media in the tray.
3 Press down on the media pressure plate to lock it into place.
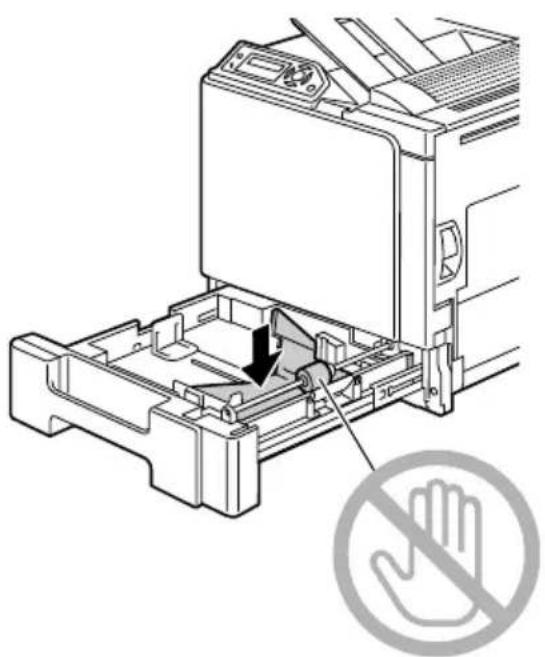
natural_image
Diagram of a printer's internal structure with a hand symbol indicating no gloves (no text or labels present)4 Slide the media guides to provide more space between them.
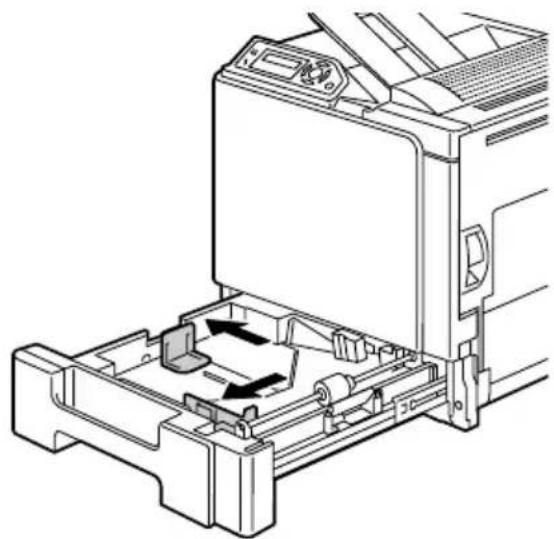
natural_image
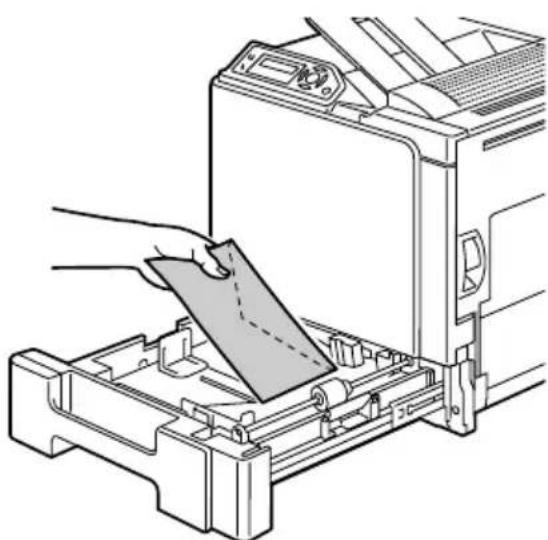
Technical line drawing of a printer internal structure with no visible text or symbols5 Load the envelopes flap side down in the tray.

Before loading envelopes, press them down to make sure that all air is removed, and make sure that the folds of the flaps are firmly pressed, otherwise the envelopes may become wrinkled or a media misfeed may occur.
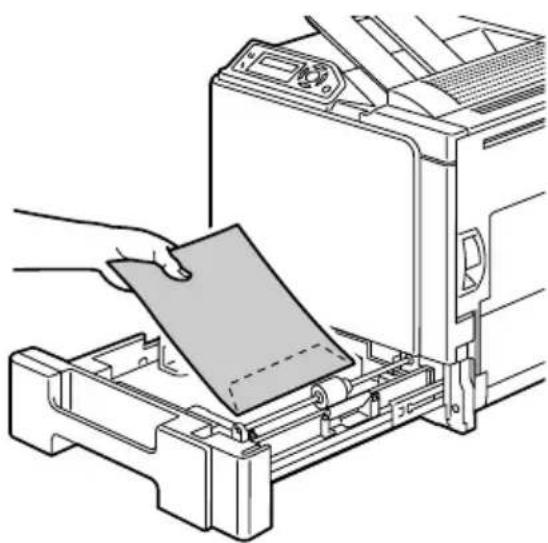
natural_image
Illustration of a printer's internal structure with a hand inserting a paper into it (no text or symbols visible)
Up to 10 envelopes can be loaded into the tray at one time.

For envelopes with the flap along the long edge, load the envelopes with the flap toward the back of the printer.
natural_image
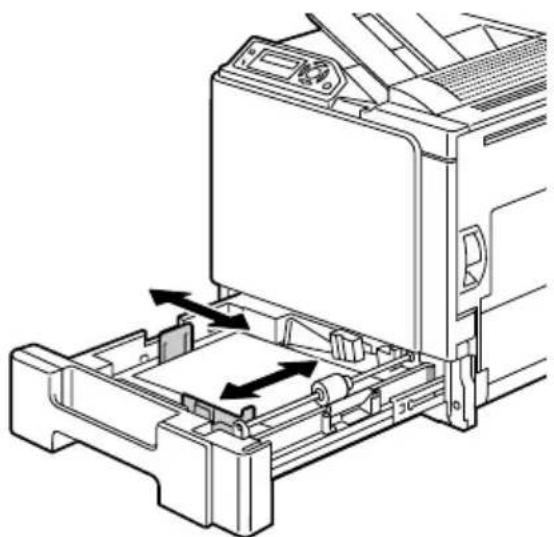
Illustration of a printer's internal structure with a hand inserting a card into the frame (no text or symbols visible)6 Slide the media guides against the edges of the envelopes.
natural_image
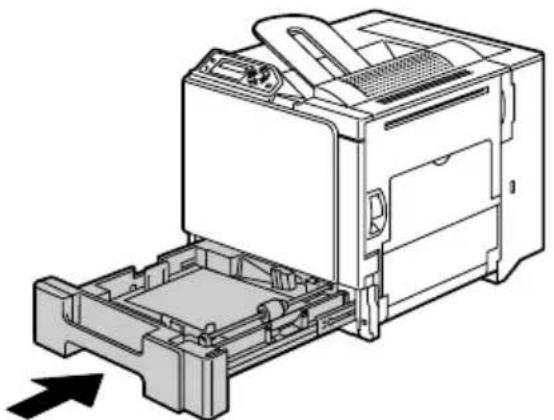
Technical line drawing of a printer internal structure with arrows indicating motion (no text or symbols)7 Close Tray 1.
natural_image
Technical line drawing of a printer internal structure with no visible text or symbols8 Pull the lever, and then open the right side cover.
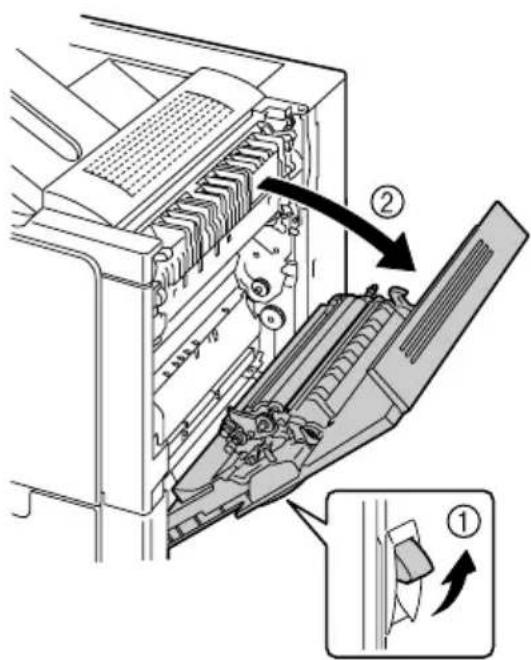
9 Open the door at the side of the right side cover.
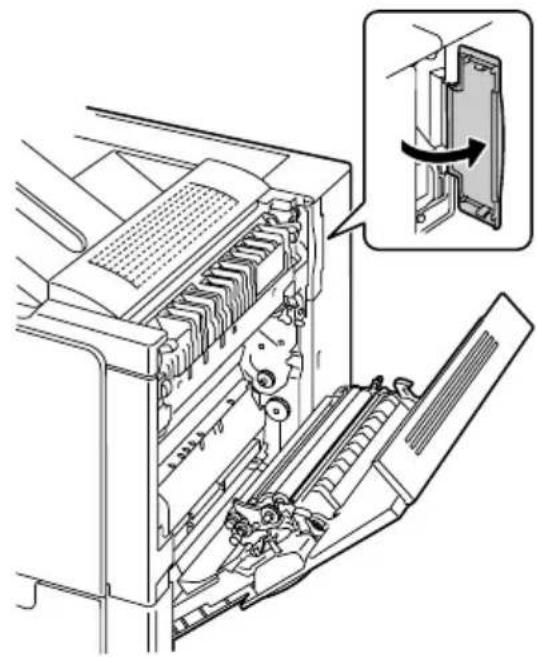
natural_image
Technical line drawing of a computer tower with internal components and an inset showing a close-up of the component (no text or symbols present)10 Turn the two dials on the fuser unit to the setting for envelopes.
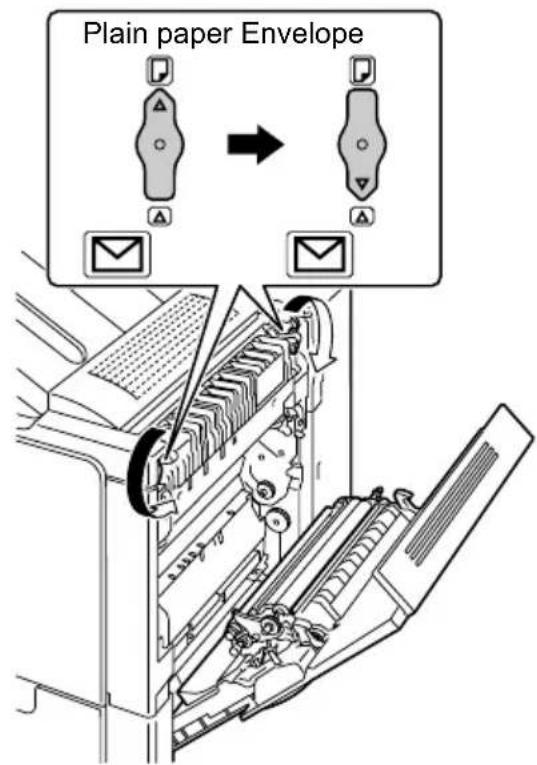
11 Close the door at the side of the right side cover.
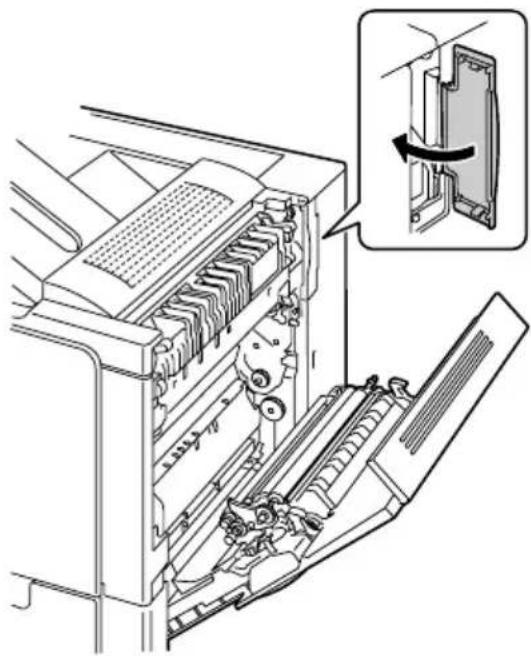
natural_image
Technical line drawing of a printer internal structure with an inset showing a close-up of the component (no text or symbols present)12 Close the right side cover.

Before printing on plain paper, be sure to return the dials on the fuser unit to the setting for plain paper.
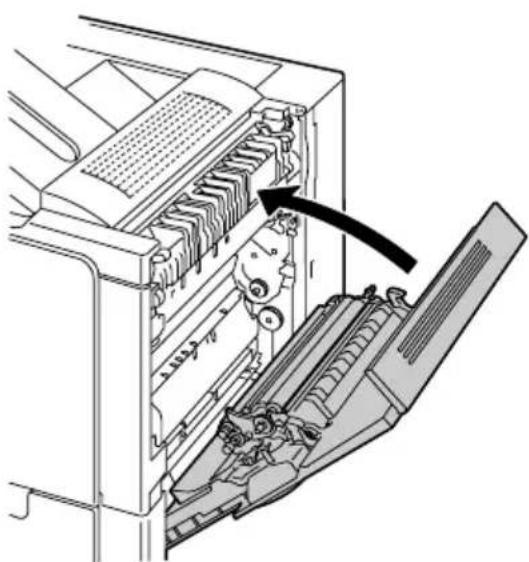
natural_image
Diagram of a computer tower internal structure showing internal components and a directional arrow (no text or symbols)Loading Label Sheets/Postcards/Thick Stock/Transparencies
1 Pull out Tray 1.
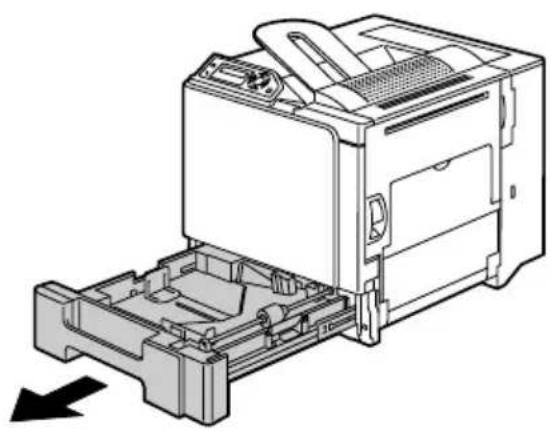
natural_image
Technical line drawing of a printer internal structure with no visible text or symbols2 Remove any media in the tray.
3 Press down on the media pressure plate to lock it into place.
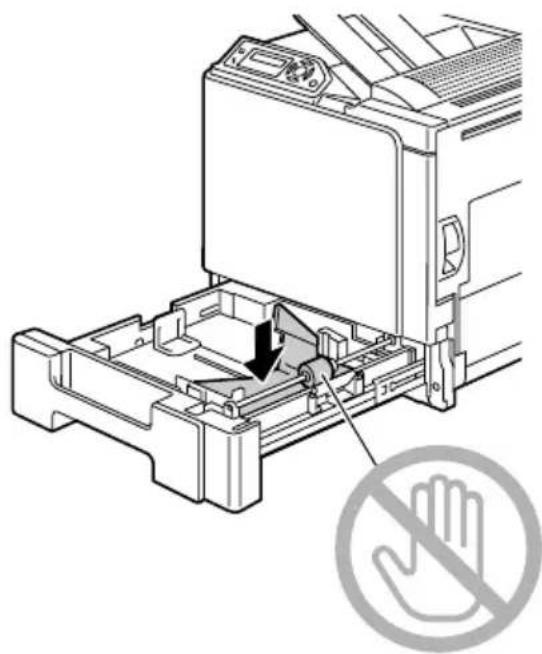
natural_image
Diagram of a printer's internal structure with a hand symbol indicating no hand gesture (no text or labels present)4 Slide the media guides to provide more space between them.
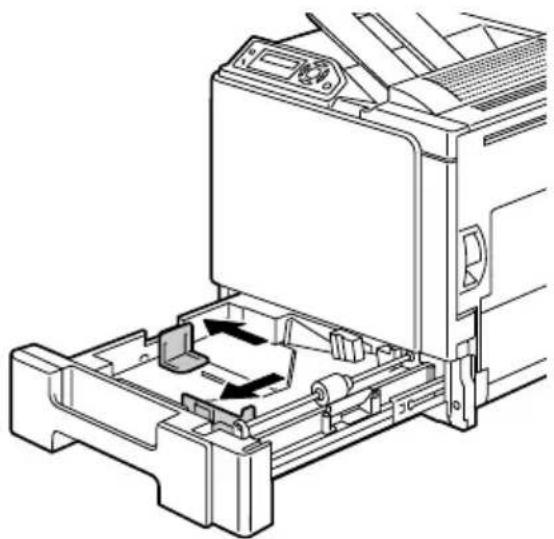
natural_image
Technical line drawing of a printer internal structure with no visible text or symbols5 Load the media face up in the tray.

Up to 20 sheets can be loaded into the tray at one time.
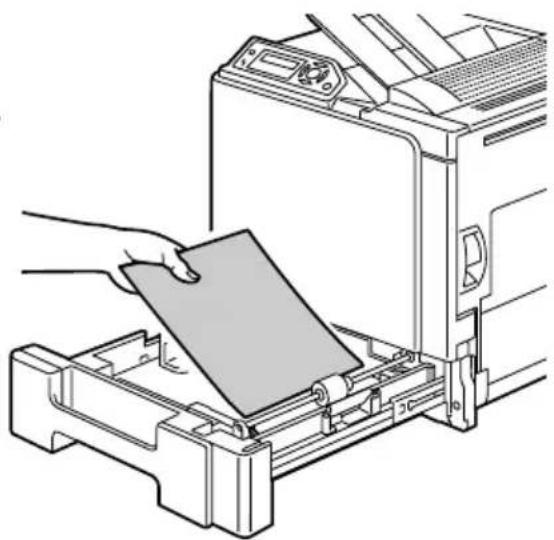
natural_image
Illustration of a printer being placed into a paper holder, showing mechanical components and a hand holding the cover (no text or symbols present)6 Slide the media guides against the edges of the media.
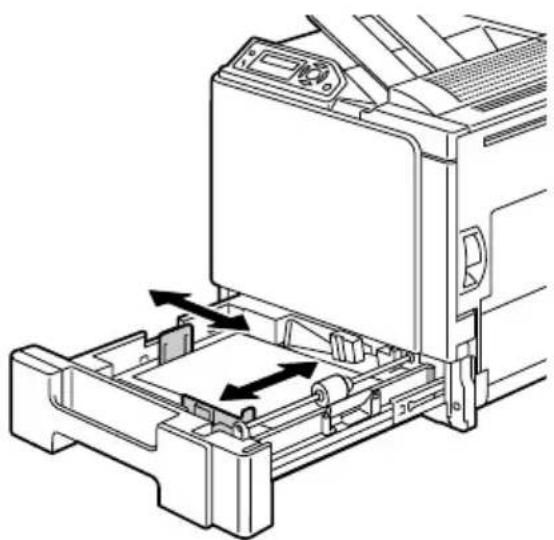
natural_image
Technical line drawing of a printer holder with internal components and directional arrows indicating movement (no text or symbols)7 Close Tray 1.
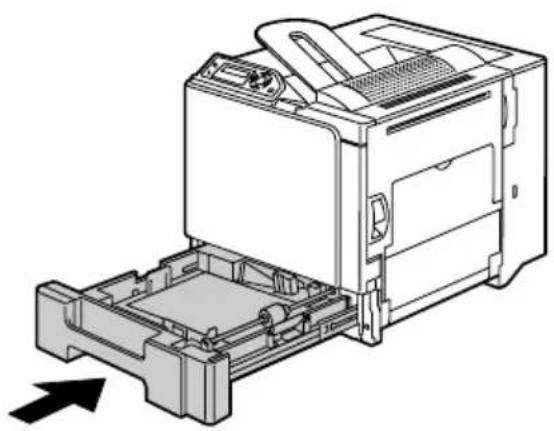
natural_image
Technical line drawing of a printer internal structure with an arrow indicating orientation (no text or symbols present)Tray 2/3 (Optional Lower Feeder Units)
Loading Plain Paper
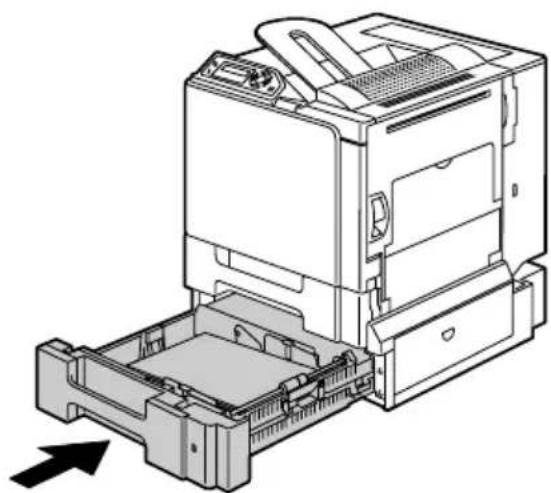
1 Pull out Tray 2 (Tray 3).
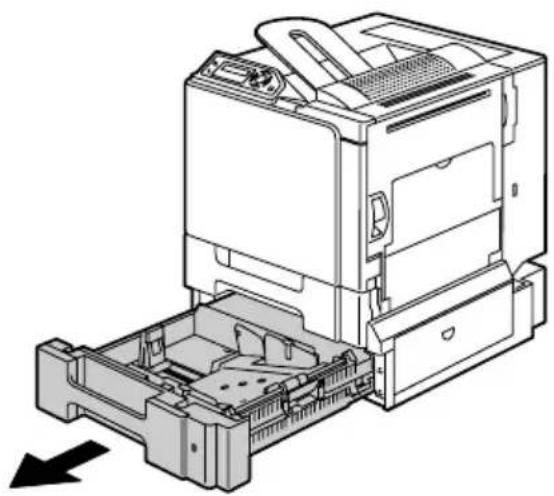
natural_image
Technical line drawing of a printer internal structure with no visible text or symbols2 Press down on the media pressure plate to lock it into place.
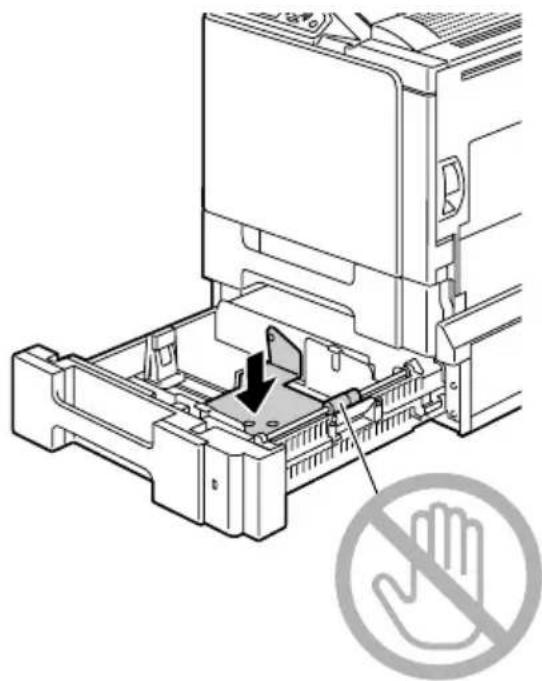
natural_image
Technical diagram of a printer internal structure with no visible text or symbols3 Slide the media guides to provide more space between them.
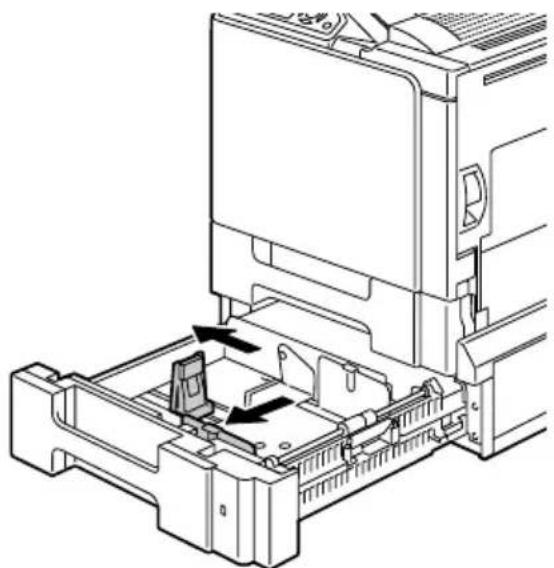
natural_image
Technical line drawing of a printer internal structure with no visible text or symbols4 Load the paper face up in the tray.
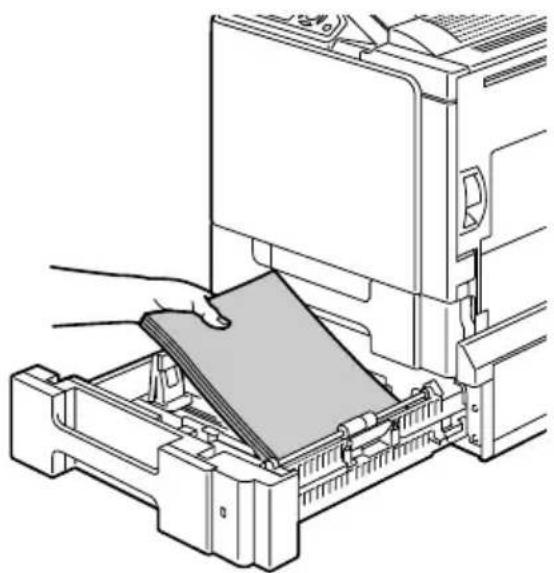
natural_image
Diagram of a printer's internal structure showing paper being inserted into a machine (no text or symbols visible)
Do not load above the mark. Up to 500 sheets (80 g/m² [22 lb]) of plain paper can be loaded into the tray at one time.
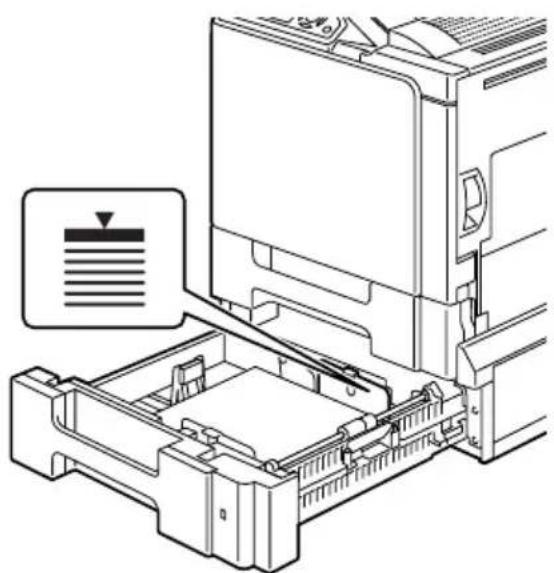
natural_image
Technical line drawing of a printer internal structure with no visible text or symbols5 Slide the media guides against the edges of the paper.
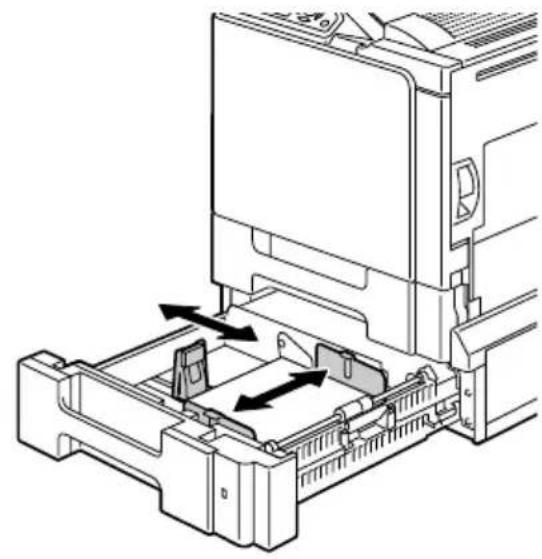
natural_image
Technical line drawing of a printer internal structure with arrows indicating movement or assembly (no text or symbols present)6 Close Tray 2 (Tray 3).
natural_image
Technical line drawing of a printer internal structure with no visible text or symbolsDuplexing
Select paper with high opacity for duplex (2-sided) printing. Opacity refers to how effectively paper blocks out what is written on the opposite side of the page. If the paper has low opacity (high translucency), then the printed data from one side of the page will show through to the other side. Check your application for margin information. For best results, print a small quantity to make sure the opacity is acceptable.
Duplex (2-sided) printing can be done manually or can be done automatically with the duplex option installed and selected.
Note
Only plain paper, 60–90 g/m ^2 (16–24 lb) can be autoduplexed. See “Media Specifications” on page 32 for supported sizes.
Duplexing envelopes, labels, postcards, thick stock, or transparencies is not supported.
How do I autoduplex?
You should verify that the duplex option is physically installed on the printer to have the job duplex successfully. If the duplex option is not installed and duplex job is sent, the control panel will display DUPLEX UNIT NOT ATTACHED.
Check your application to determine how to set your margins for duplex printing.
The following Duplex/Booklet settings are available.
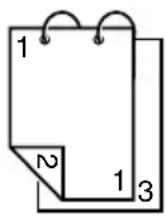 | If “Short Edge Binding” is selected, the pages will be laid out to flip at the top. |
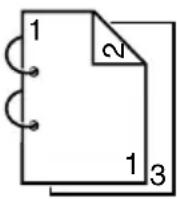 | If “Long Edge Binding” is selected, the pages will be laid out to flip at the side. |
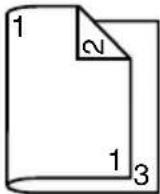 | If “Booklet Left Binding” is selected, the pages can be folded as a left-bound booklet. |
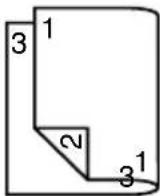 | If “Booklet Right Binding” is selected, the pages can be folded as a right-bound booklet. |
1 Load plain paper into the tray.
2 From the printer driver, specify the layout for duplex printing.
3 Click OK.

With autoduplexing, the back side is printed first, and then the front side is printed.
Output Tray
All media is output to the face-down output tray on top of the printer. This tray has a capacity of 250 sheets (A4/Letter) of 80g / m^2 (22 lb) paper.

If the media is stacked too high in the output tray, your printer may experience media misfeeds, excessive media curl, or static buildup.

Remove transparencies as soon as possible from the output tray to avoid static buildup.
Media Storage
How do I store media?
- Keep media on a flat, level surface in its original wrapper until it is time to load it.
Media that has been stored for a long time out of its packaging may dry up too much and cause misfeeding.
If media has been removed from its wrapper, place it in its original packaging and store in a cool, dark place on a level surface.
■ Avoid moisture, excessive humidity, direct sunlight, excessive heat (above 35^ C [95°F]), and dust.
■ Avoid leaning media against other objects or placing it in an upright position.
Before using stored media, do a trial print to check print quality.
Replacing Consumables
6
Replacing Consumables
Note
Failure to follow instructions as outlined in this manual could result in voiding your warranty.
Note
If an error message (TONER EMPTY, TRANSFER END, etc.) appears, print out the configuration page, and then check the status of the other consumables. For details on the error messages, refer to “Error Messages (Warning)” on page 119. For details on printing the configuration page, refer to “Printing the Configuration Page” on page 88.
About Toner Cartridges
Your printer uses four toner cartridges: black, yellow, magenta, and cyan. Handle the toner cartridges carefully to avoid spilling toner inside the printer or on yourself.

The toner is nontoxic. If you get toner on your skin, wash it off with cool water and a mild soap. If you get toner on your clothes, lightly dust them off as best as you can. If some toner remains on your clothes, use cool, not hot water, to rinse the toner off.

CAUTION
If you get toner in your eyes, wash it out immediately with cool water and consult a doctor.

Contact the following URL for recycling information.
US:http://printer.konicaminolta.com/products/recycle/index.asp
Europe:http://printer.konicaminolta.com
Note
Do not use refilled toner cartridges or unapproved toner cartridges. Any damage to the printer or quality problems caused by a refilled toner cartridge or an unapproved toner cartridge will void your warranty. No technical support is provided to recover from these problems.
When replacing the toner cartridge, refer to the following table. Use the toner cartridge listed for your specific printer. Printer behavior will be severely affected if a unspecified toner cartridge is used.
| Printer Type | Printer Parts Number | Toner Cartridge Type Toner Cartridge | Parts Number |
| AM 5250218-100 | 5250218-2005250218-400 | Standard-Capacity Toner Cartridge -Black (K) 17 | 1710580-001 |
| Standard-Capacity Toner Cartridge -Yellow (Y) 17 | 1710580-002 | ||
| Standard-Capacity Toner Cartridge -Magenta (M) 17 | 1710580-003 | ||
| Standard-Capacity Toner Cartridge -Cyan (C) 17 | 1710580-004 | ||
| EU | Standard-Capacity Toner Cartridge -Black (K) 17 | 1710582-001 | |
| Standard-Capacity Toner Cartridge -Yellow (Y) 17 | 1710582-002 | ||
| Standard-Capacity Toner Cartridge -Magenta (M) 17 | 1710582-003 | ||
| Standard-Capacity Toner Cartridge -Cyan (C) 17 | 1710582-004 | ||
| AP 5250218-350 | Standard-Capacity Toner Cartridge -Black (K) 17 | 1710583-001 | |
| Standard-Capacity Toner Cartridge -Yellow (Y) 17 | 1710583-002 | ||
| Standard-Capacity Toner Cartridge -Magenta (M) 17 | 1710583-003 | ||
| Standard-Capacity Toner Cartridge -Cyan (C) 17 | 1710583-004 | ||
| JP 5250218-300 | Standard-Capacity Toner Cartridge -Black (K) 17 | 1710581-001 | |
| Standard-Capacity Toner Cartridge -Yellow (Y) 17 | 1710581-002 | ||
| Standard-Capacity Toner Cartridge -Magenta (M) 17 | 1710581-003 | ||
| Standard-Capacity Toner Cartridge -Cyan (C) 17 | 1710581-004 |
Note
Do not hold a toner cartridge vertically.
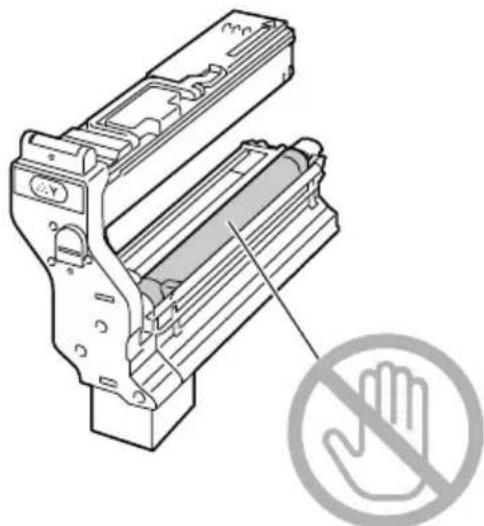
Do not touch the OPC drum surface. This could lower image quality.
natural_image
Technical illustration of a mechanical device with a hand symbol indicating no protection (no text or labels present)Keep toner cartridges:
In their packaging until you're ready to install them.
In a cool, dry location away from sunlight (due to heat).
The maximum storage temperature is 35^ C (95°F) and the maximum storage humidity is 85 % (noncondensing). If the toner cartridge is moved from a cold place to a warm, humid place, condensation may occur, degrading print quality. Allow the toner to adapt to the environment for about one hour before use.
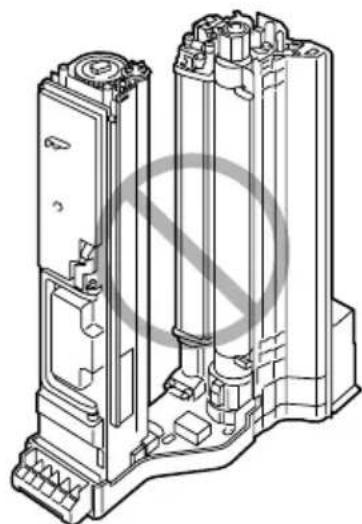
■ Level during storage.
Do not stand or store cartridges on their ends or turn them upside down; the toner inside the cartridges may become caked or unequally distributed.
natural_image
Technical line drawing of a mechanical assembly with two vertical components and internal components (no text or symbols)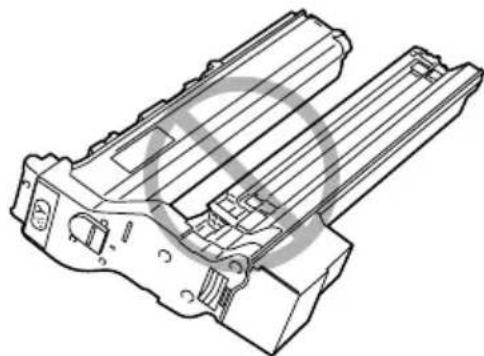
natural_image
Technical line drawing of a mechanical component or housing (no text or symbols visible)■ Away from salty air and corrosive gases such as aerosols.
Replacing a Toner Cartridge
Note
Be careful not to spill toner while replacing a toner cartridge. If toner spills, immediately wipe it off with a soft, dry cloth.
When the message TONER EMPTY appears, follow the steps below to replace the toner cartridge. As an example, the following procedure describes the operation for the yellow toner cartridge.
1 Check the message window to see which color of toner is empty.
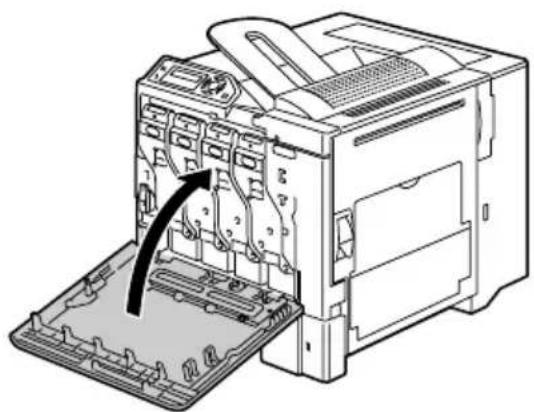
2 Open the printer's front cover.
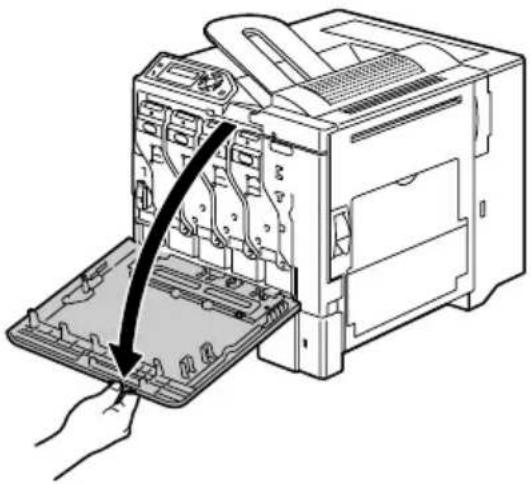
natural_image
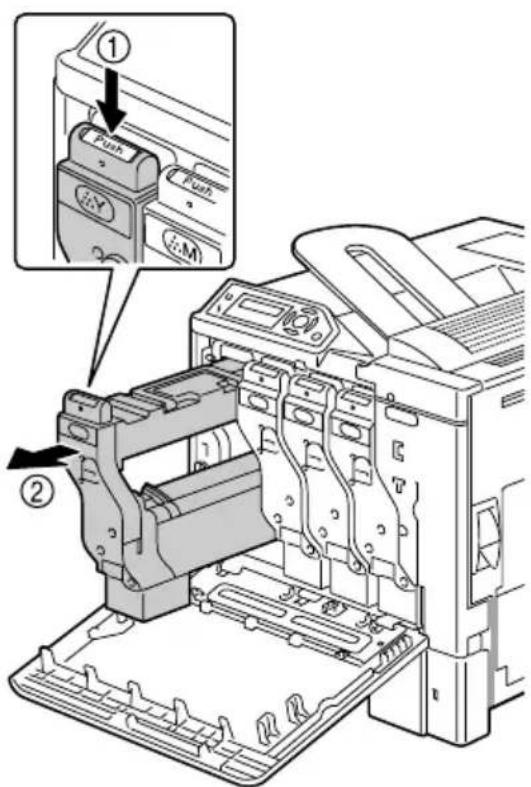
Diagram of a computer tower with an open base and a hand inserting a component (no text or symbols visible)3 Press down the area marked "Push" on the toner cartridge to be replaced, and then slide the cartridge out until the handle is visible.
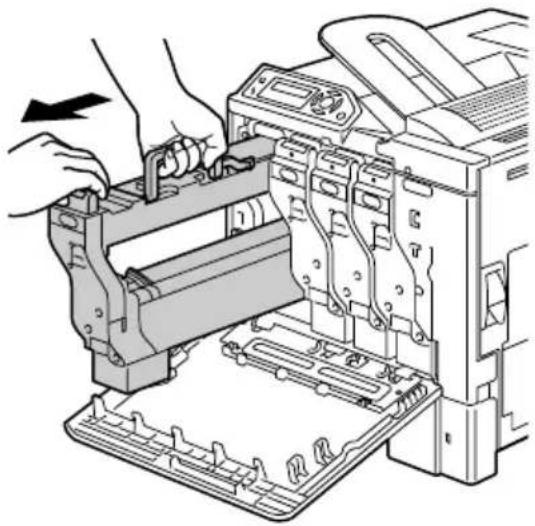
4 Grasp the handle as shown in the illustration, and then slide the cartridge all the way out of the printer.
natural_image
Illustration of a printer's internal structure with hands operating it (no text or symbols visible)Note
Dispose of the toner cartridge according to your local regulations. Do not burn the toner cartridge.
5 Check the color of the new toner cartridge to be installed.
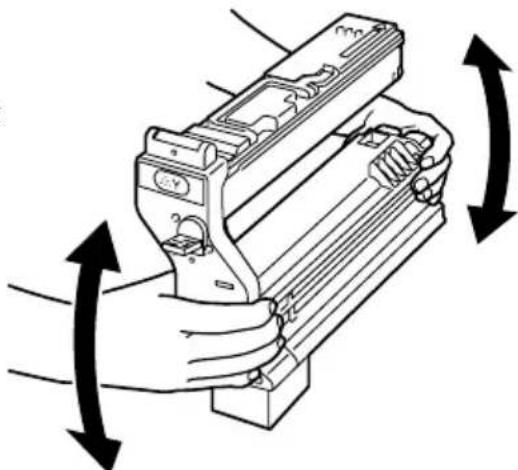
6 Shake the cartridge a few times to distribute the toner.

Make sure that the OPC drum cover is securely attached before shaking the cartridge.
natural_image
Illustration of a hand holding a mechanical device with bidirectional arrows indicating rotation or movement (no text or symbols present)3 ×
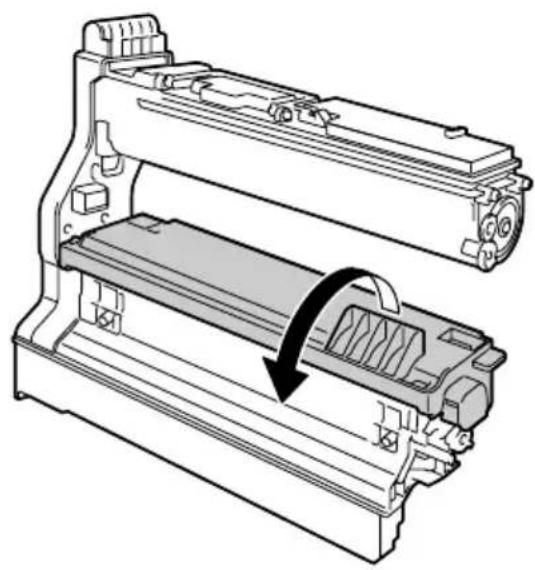
7 Lift the OPC drum cover on the toner cartridge toward you.
natural_image
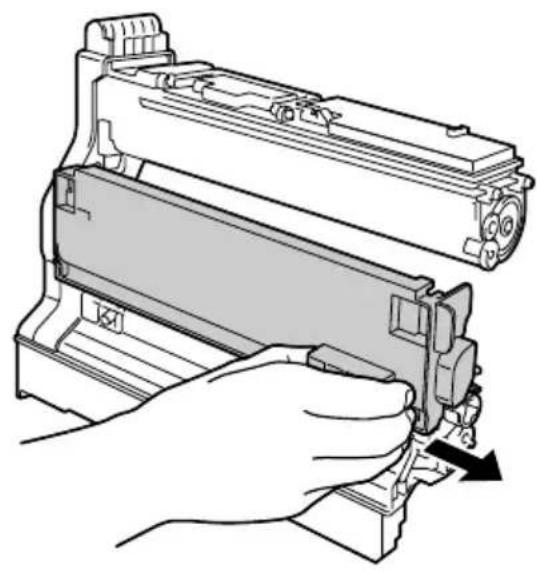
Technical illustration of a mechanical device with internal components and an arrow indicating rotation (no text or symbols)8 Slide the OPC drum cover off of the toner cartridge.
natural_image
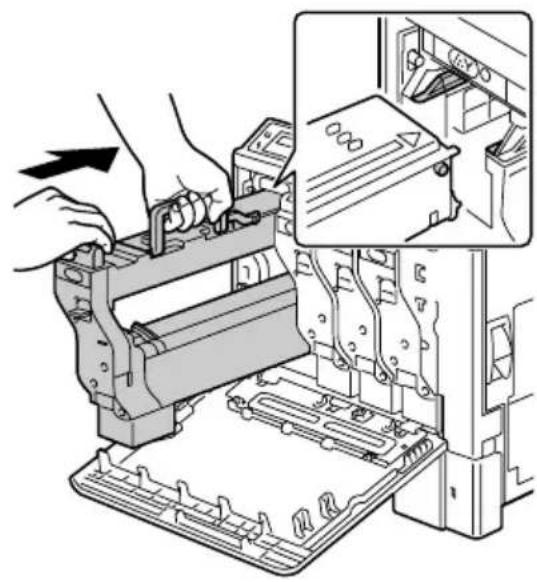
Illustration of a hand operating a printer or scanner device with a black arrow indicating the process (no text or symbols present)9 Holding the toner cartridge by its handle, slide the cartridge into the printer.
natural_image
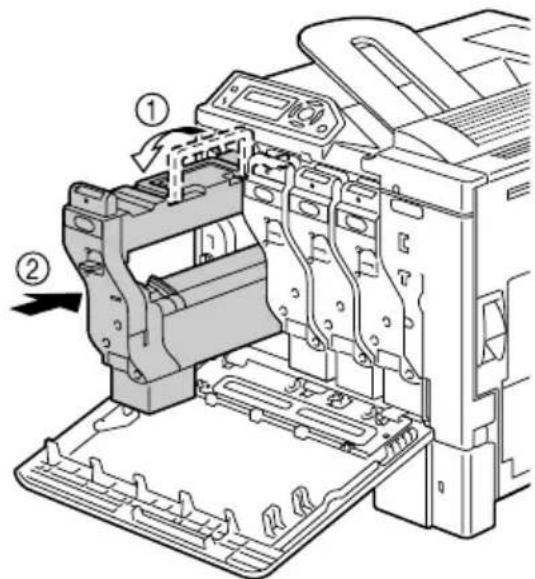
Illustration of a printer presser machine with an inset close-up showing internal components (no text or symbols)10 Lower the handle, and then slide the cartridge the rest of the way into the printer until it locks into place.
11 Remove the protective film from the toner cartridge by slowly pulling it straight out.
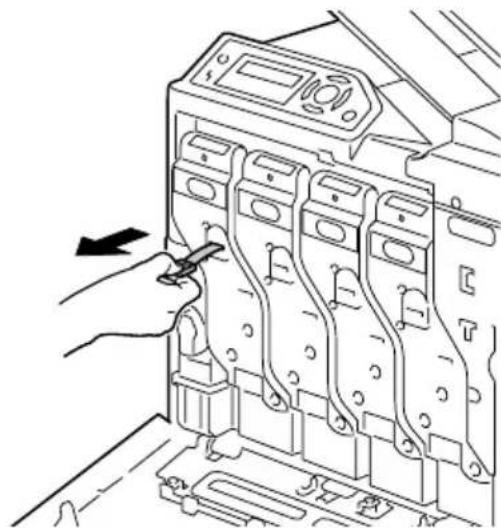
natural_image
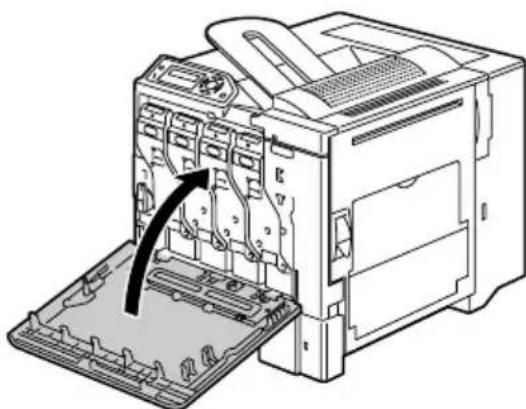
Line drawing of a hand inserting into an electrical component with a tool, showing no text or symbols.12 Close the front cover.
natural_image
Diagram of a computer printer internal structure showing internal components and an open base (no text or symbols)
If the toner cartridge is not fully inserted, the front cover cannot be closed.

The printer must complete a 75-second calibration cycle after the toner cartridge has been replaced. If you open the front cover before the message READY appears, the printer stops and repeats the calibration cycle.
Replacing the Waste Toner Bottle
When the waste toner bottle becomes full, the message WASTE BOTTLE FULL appears in the message window. The printer stops and will not start again until the waste toner bottle is replaced.
1 Open the printer's front cover.
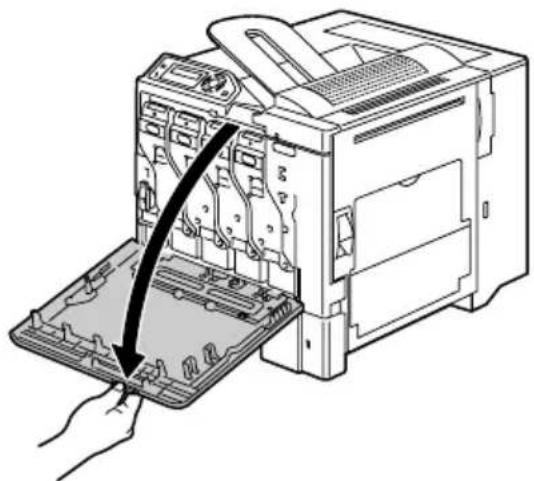
natural_image
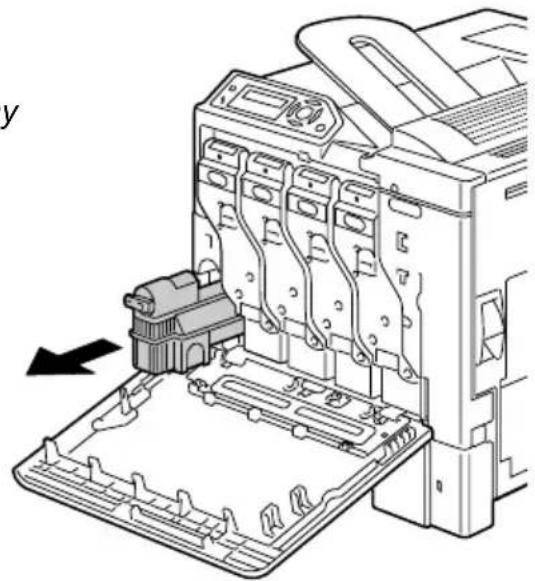
Diagram of a computer motherboard showing a hand inserting a component into a rack (no text or symbols visible)2 Turn the dial on the waste toner bottle counterclockwise until it is in the unlock position.
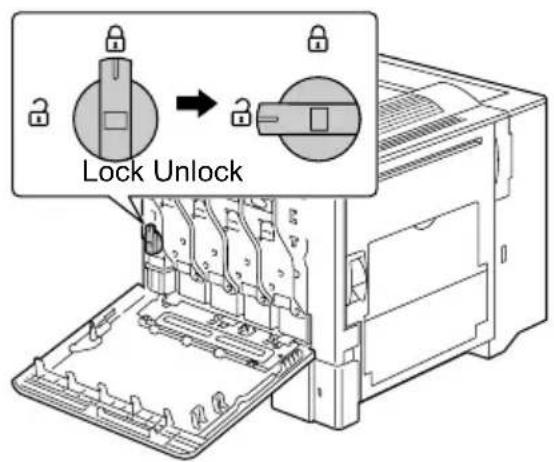
3 Slowly slide the waste toner bottle all the way out.


Be careful not to spill any toner.
natural_image
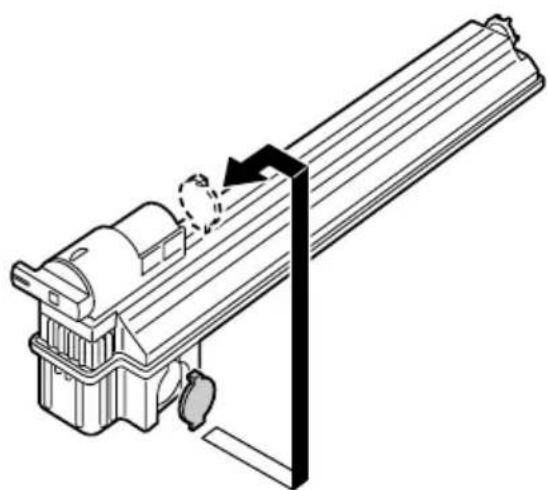
Technical illustration of a printer internal structure with no visible text or symbols4 Remove the cap attached to the side of the waste toner bottle, and then attach it at the position shown in the illustration.
natural_image
Technical line drawing of a mechanical assembly with a rotating shaft and housing (no text or symbols)5 Dispose of the waste toner bottle.
Note
Dispose of the waste toner bottle according to your local regulations. Do not burn the waste toner bottle.
6 Prepare a new waste toner bottle.


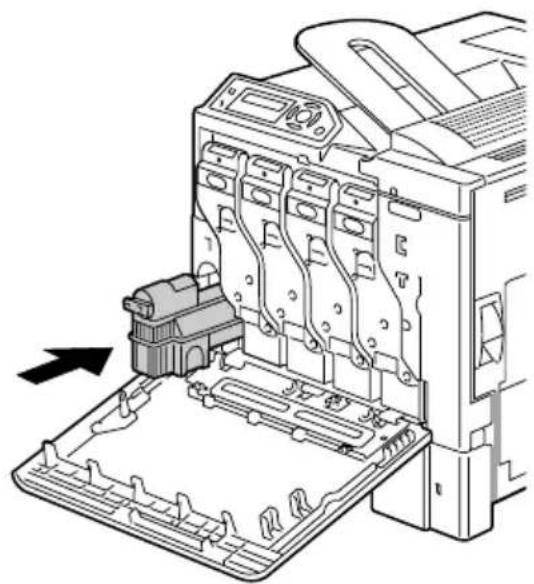
Before installing the waste toner bottle, be sure that the dial on the waste toner bottle is unlocked.
7 Slide the waste toner bottle all the way into the printer.
natural_image
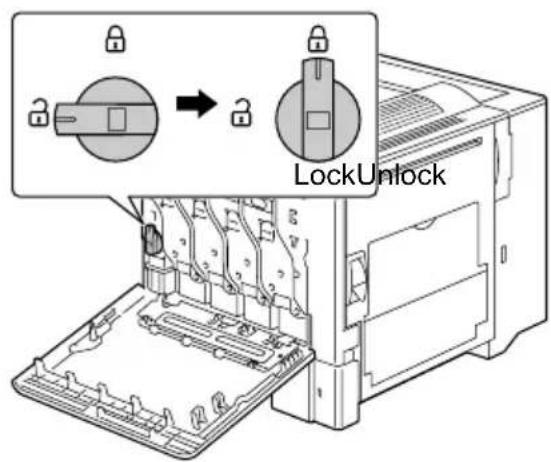
Technical line drawing of a printer internal structure with no visible text or symbols8 Turn the dial clockwise until the waste toner bottle is in the locked position.
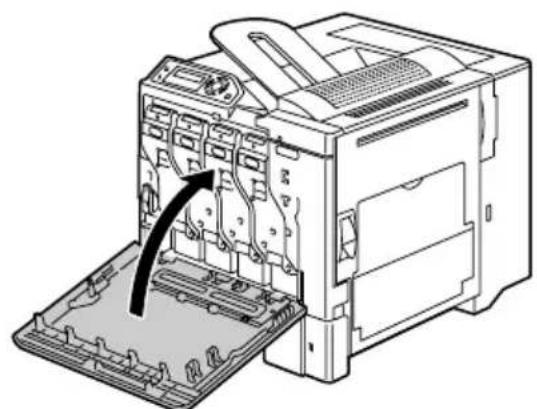
9 Close the front cover.
natural_image
Diagram of a computer printer internal structure showing the base panel and paper holder (no text or symbols present)
If the waste toner bottle is not fully inserted or if the dial is not locked, the front cover cannot be closed.
Replacing the Transfer Roller
When the time to replace the transfer roller is reached, the message
TRANS. ROLLER END appears. Printing can continue even after this message appears; however, since the print quality is reduced, the transfer roller should be replaced immediately.
When replacing the transfer roller, also replace the ozone filter. A new ozone filter is included with the new transfer roller.
Replacing the Transfer Roller
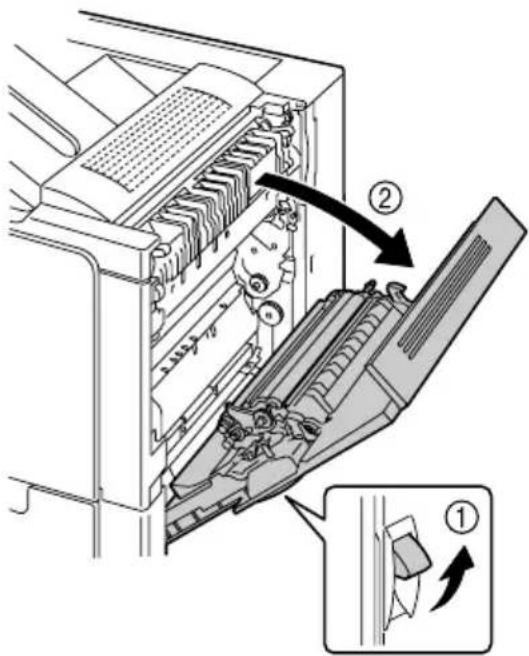
1 Pull the lever, and then open the right side cover.
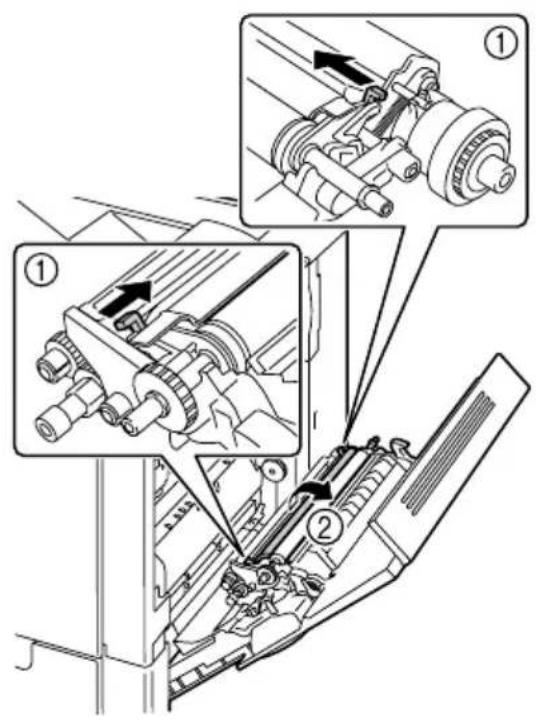
2 While pushing the levers to the inside, move the roller presser toward you.
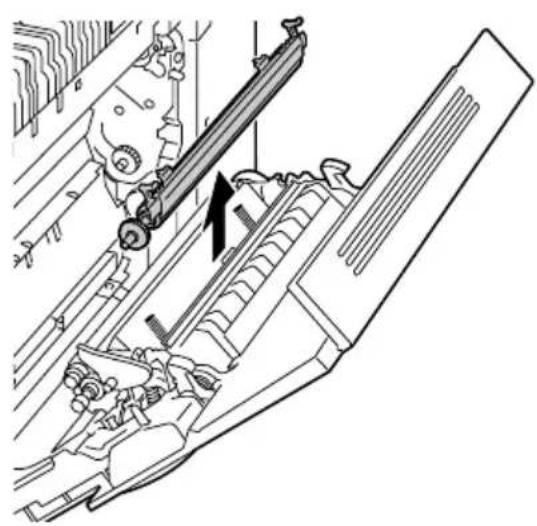
3 While continuing to press the levers, remove the transfer roller.
natural_image
Technical line drawing of a mechanical assembly with no visible text or symbols4 Prepare a new transfer roller.
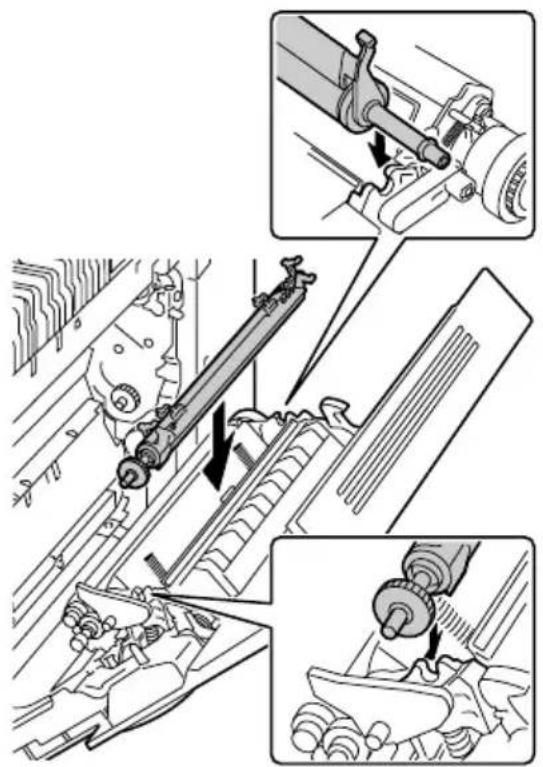
5 While pressing the levers, insert the shaft of the transfer roller into the bearings.
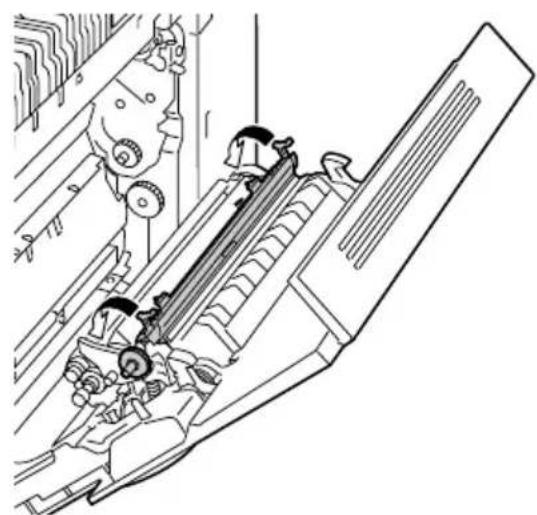
6 Move the levers away from you until it snaps into place.
natural_image
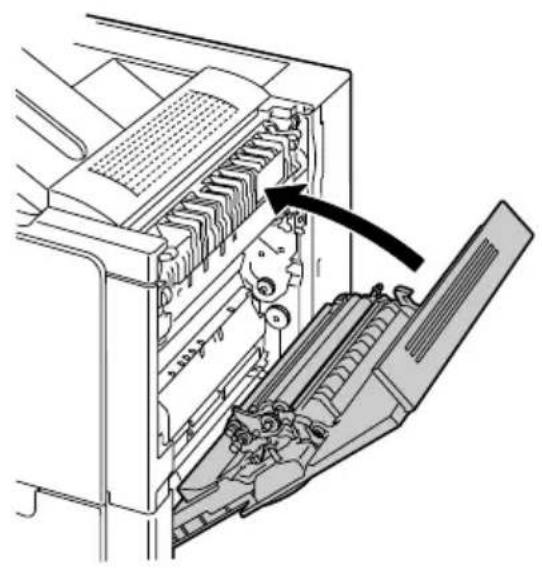
Technical line drawing of a mechanical assembly with gears and rollers (no text or symbols)7 Close the right side cover.
natural_image
Diagram of a computer internal structure showing a mouse inside a rack with an arrow pointing to the component (no text or symbols present)8 Reset the counter in the ENGINE/SERVICE/RESET COUNTER TRANSFER ROLLER menu.
9 Replace the ozone filter, using the following procedure.
Replacing the Ozone Filter
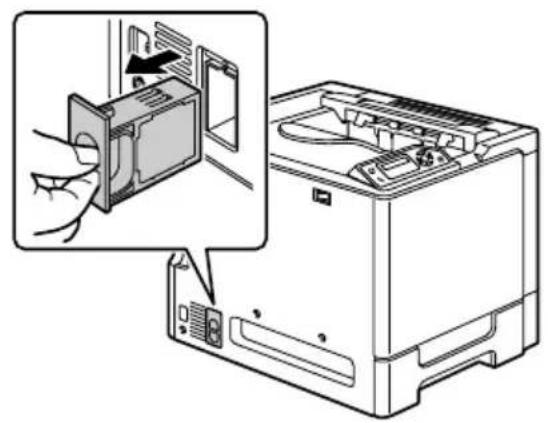
1 Remove the ozone filter from the printer.
natural_image
Diagram showing a computer printer with an open drive and a close-up of its internal components (no text or symbols present)2 Slide the new ozone filter into the printer until it snaps into place.
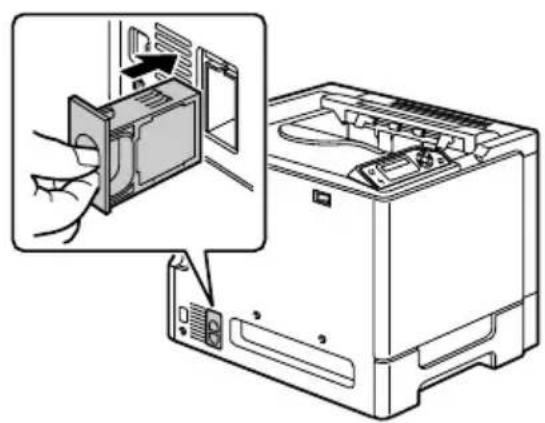
natural_image
Diagram showing a computer device with an open rear panel and a close-up of its internal components (no text or symbols visible)Replacing the Transfer Belt Unit
When the time to replace the transfer belt unit is reached, the message TRANSFER END appears. Printing can continue even after this message appears; however, since the print quality is reduced, the transfer belt unit should be replaced immediately.
1 Open the printer's front cover.
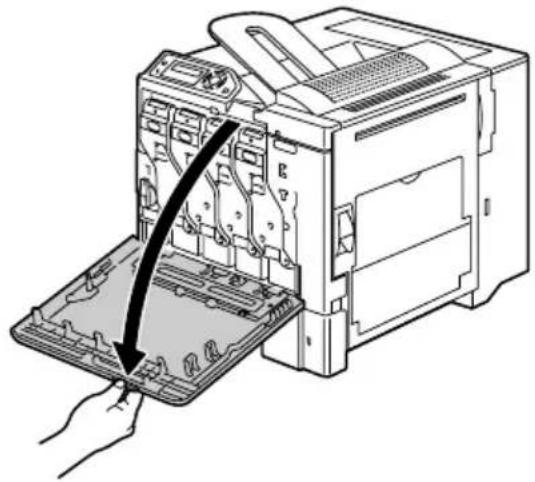
natural_image
Diagram of a computer tower with an open base and internal components being inserted, showing a hand holding the tray (no text or symbols present)2 Turn the dial to unlock the waster toner bottle.
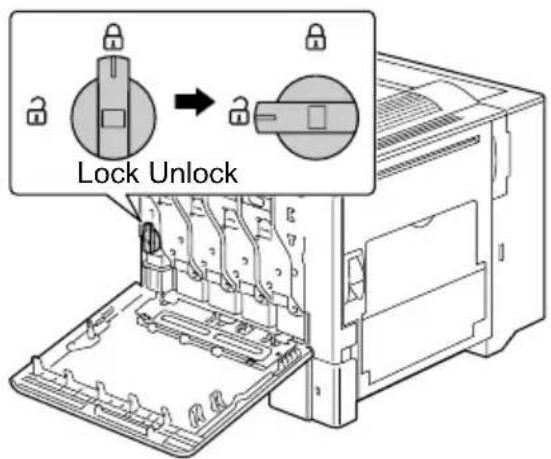
3 Pull out the waste toner bottle and the toner cartridges for about 10 cm (4").
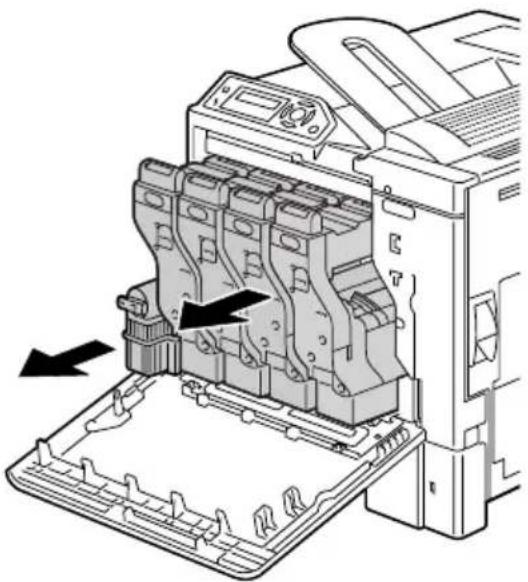
natural_image
Technical illustration of a printer's internal structure showing internal components and part outline (no text or symbols)4 Using a coin, remove the screws on the left side cover.

Be careful not to lose the screws.
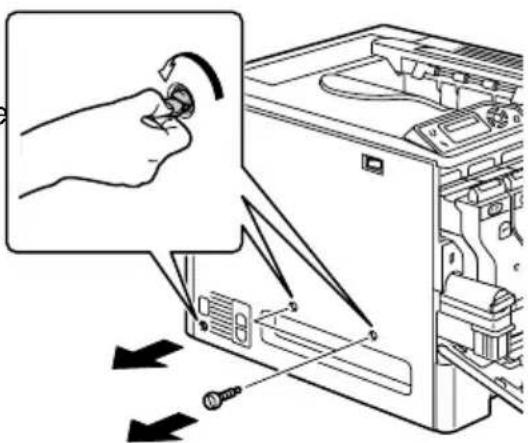
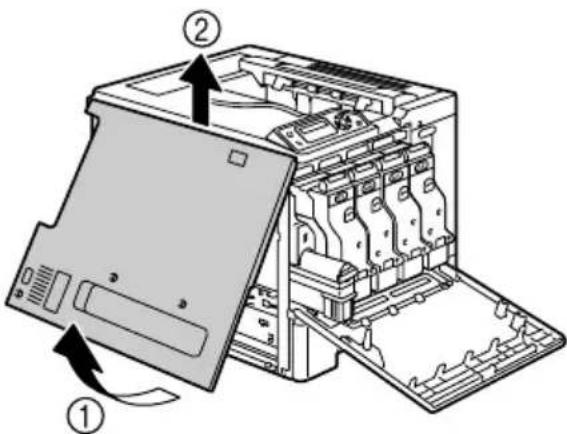
5 Remove the left side cover.
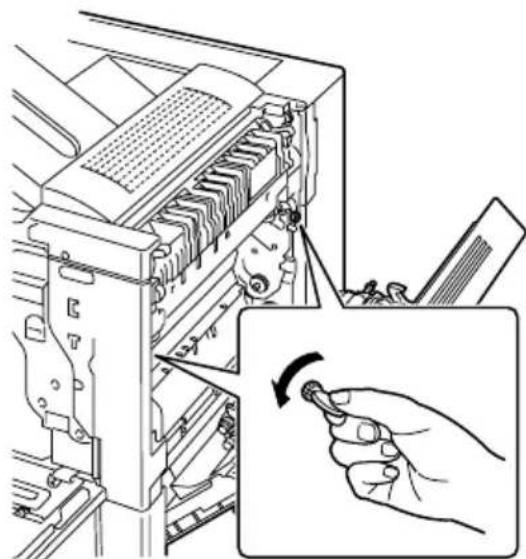
6 Open the right side cover, and then use a coin to loosen the screws securing the transfer belt unit.
natural_image
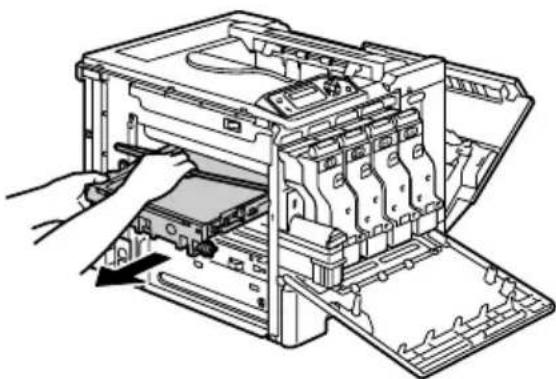
Diagram showing a hand inserting a button into a computer rack with a magnified inset highlighting the mechanism (no text or symbols present)7 From the side where the left side cover was removed, hold the arm, and then carefully pull out the transfer belt unit.
natural_image
Illustration of a printer's internal structure showing paper feeding into a rack (no text or symbols visible)8 Prepare a new transfer belt unit.

Be careful not to touch the surface of the belt.
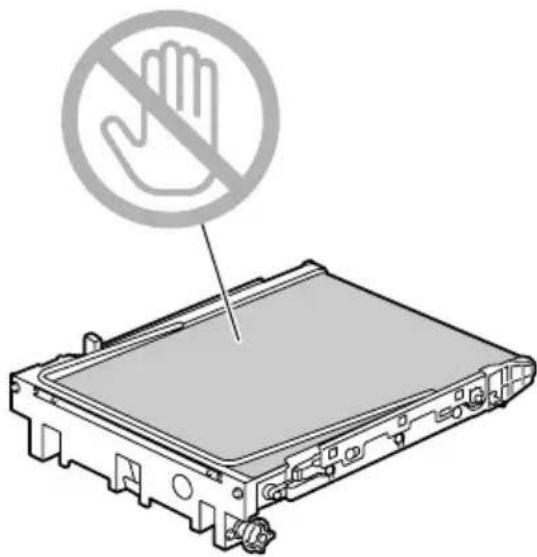
natural_image
Diagram of a device with a no-handled hand symbol pointing to a screen (no text or labels present)9 Insert the new transfer belt unit along the rails.
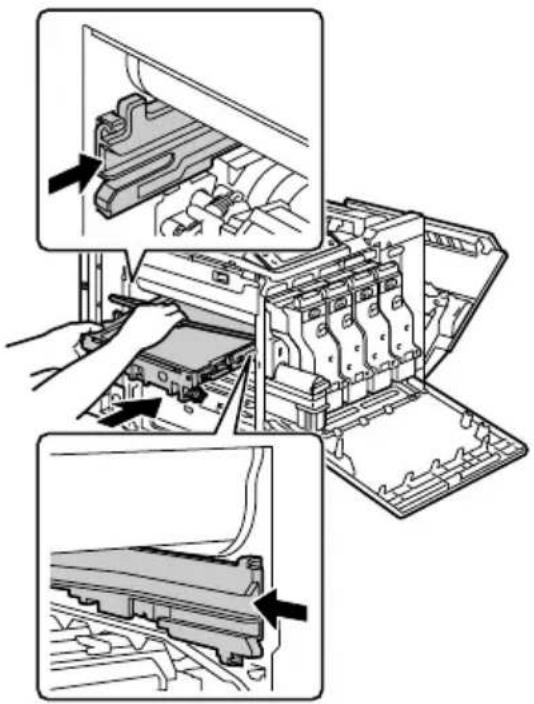
10 Fully insert the transfer belt unit.
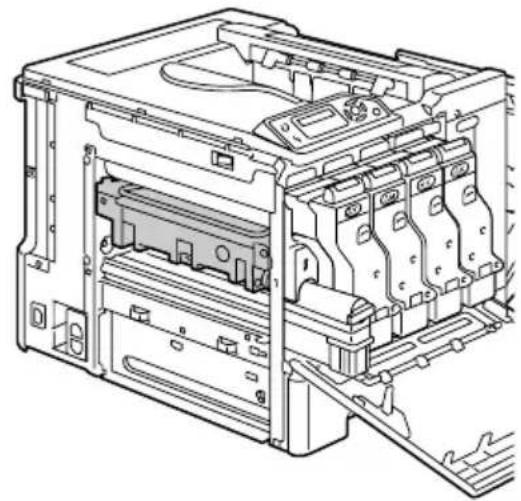
natural_image
Technical line drawing of an internal electronic device casing with visible circuit breakers and mounting brackets (no text or labels)11 From the right side cover side, tighten the screws to secure the transfer belt unit and then close the right side cover.
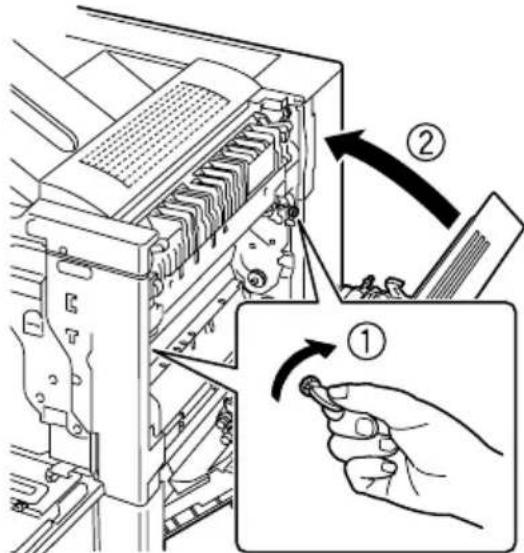
12 Insert the waste toner bottle and the toner cartridges all the way in until they snap into place.
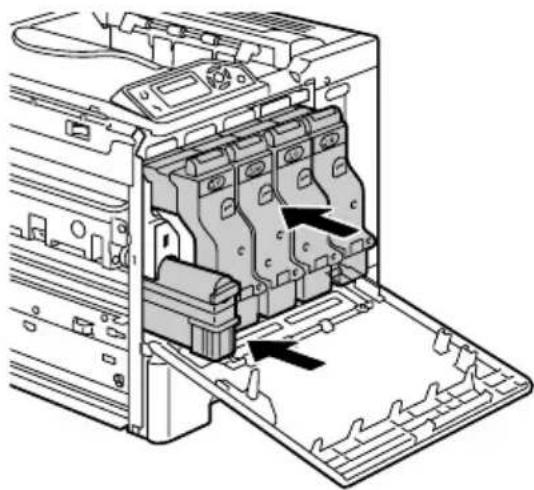
natural_image
Technical diagram of an open industrial machine with internal components and directional arrows indicating flow or movement (no text or symbols present)13 Turn the dial to lock the waste toner bottle into place.
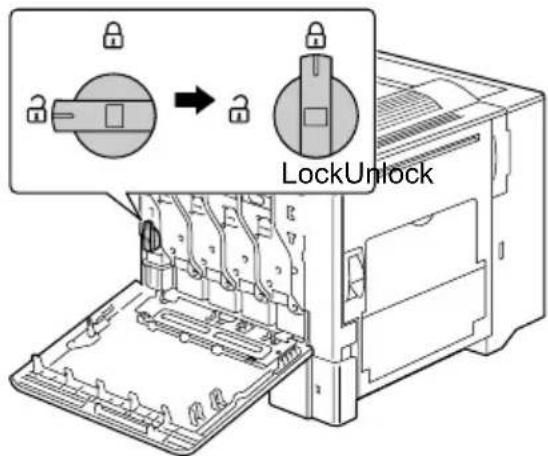
14 Attach the left side cover, and then tighten the screws.
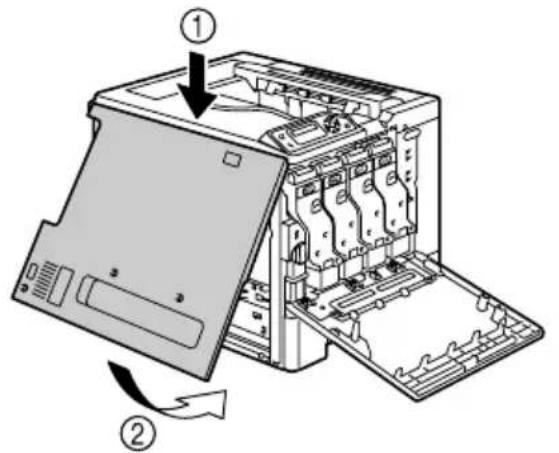
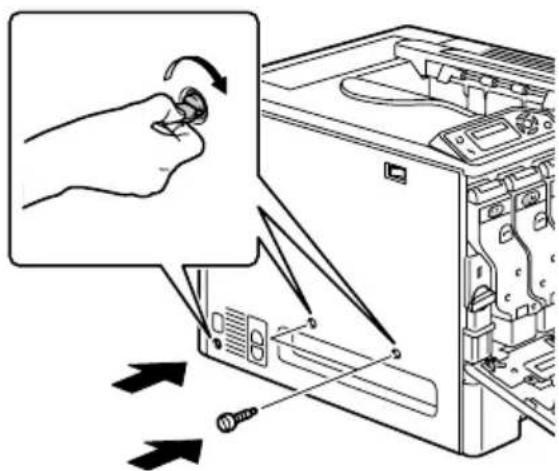
15 Close the front cover.
natural_image
Diagram of a computer printer internal structure showing internal components and an open base (no text or symbols)16 Reset the counter in the ENGINE/SERVICE/RESET COUNTER TRANSFER UNIT menu.
Maintaining the Printer
7
Maintaining the Printer

CAUTION
Read all caution and warning labels carefully, making sure to follow any instructions contained in them. These labels are located on the inside of the printer's covers and the interior of the printer body.
Handle the printer with care to preserve its life. Abuse may cause damage and void your warranty. If dust and paper scraps remain on the inside or outside of the printer, printer performance and print quality will suffer, so the printer should be cleaned periodically. Keep the following guidelines in mind.

WARNING!
Turn off the printer, unplug the power cord, and disconnect all interface cables before cleaning. Do not spill water or detergent into the printer; otherwise the printer will be damaged and an electric shock may occur.

CAUTION
The fuser unit is hot. When the right side cover is opened, the fuser unit temperature drops gradually (one hour wait time).

■ Be careful when cleaning the inside of the printer or removing media misfeeds, as the fuser unit and other internal parts may be very hot.
■ Do not place anything on top of the printer.
■ Use a soft cloth to clean the printer.
- Never spray cleaning solution directly on the printer's surface; the spray could penetrate through the air vents of the printer and damage the internal circuits.
- Avoid using abrasive or corrosive solutions or solutions that contain solvents (such as alcohol and benzene) to clean the printer.
- Always test any cleaning solution (such as mild detergent) on a small inconspicuous area of your printer to check the solution’s performance.
■ Never use sharp or rough implements, such as wire or plastic cleaning pads.
- Always close the printer's covers gently. Never subject the printer to vibration.
■ Do not cover the printer immediately after using it. Turn it off and wait until it cools down.
- Do not leave the printer's covers open for any length of time, especially in well-lit places; light may damage the toner cartridges.
■ Do not open the printer during printing.
■ Do not tap media stacks on the printer.
■ Do not lubricate or disassemble the printer.
■ Do not tilt the printer.
■ Do not touch the electrical contacts, gears, or laser devices. Doing so may damage the printer and cause the print quality to deteriorate.
- Keep media in the output tray at a minimum level. If the media is stocked too high, your printer may experience media misfeeds and excessive media curl.
■ Make sure two people are available to lift the printer when moving it.
Keep the printer level to avoid toner spillage.
■ When lifting the printer, grasp the areas shown in the figure to the right.
Even if an optional lower feeder unit is installed, be sure to lift the printer as shown below. Do not grasp the grip of Tray 2, Tray 3 or the right side cover; otherwise, the lower feeder unit may be damaged.
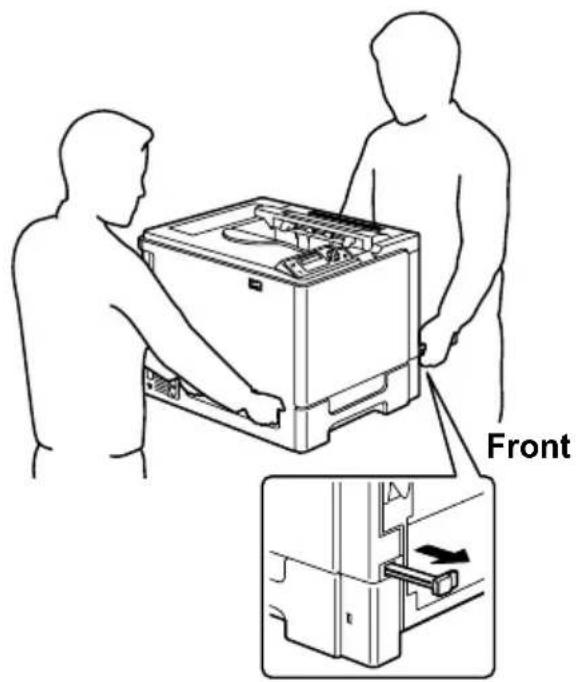
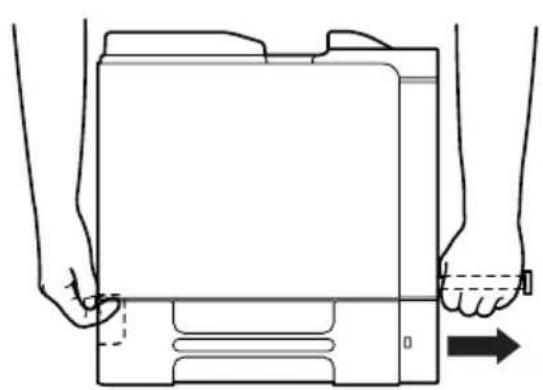
natural_image
Line drawing of hands holding a device with an arrow indicating motion (no text or symbols)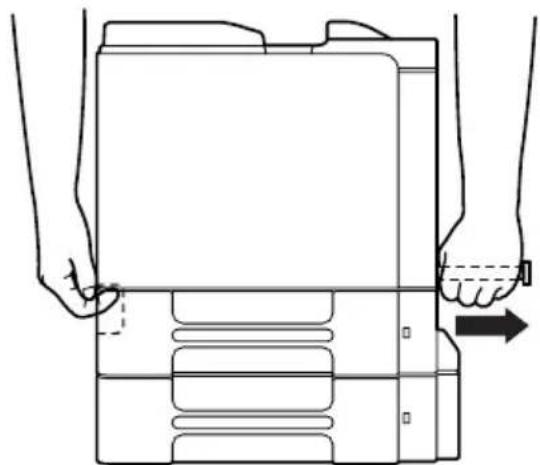
natural_image
Line drawing of a hand pressing down on a device component (no text or symbols)■ If you get toner on your skin, wash it off with cool water and a mild soap.

CAUTION
If you get toner in your eyes, wash it out immediately with cool water and consult a doctor.
■ Make sure any parts removed during cleaning are replaced before you plug in the printer.
Cleaning the Printer

CAUTION
Be sure to turn off the printer and unplug the power cord before cleaning.
Exterior
Control Panel Ventilation Grille
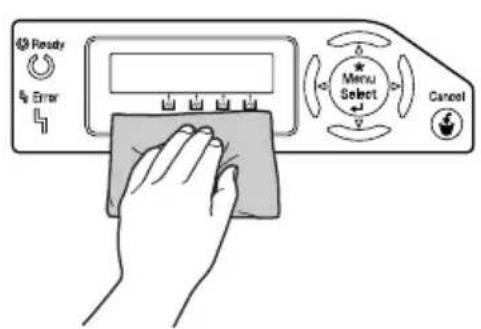
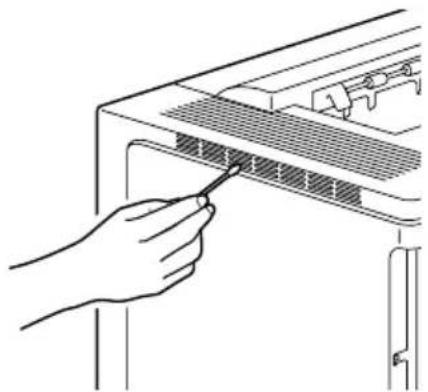
natural_image
Line drawing of a hand inserting a cable into a rack (no text or symbols)Printer Exterior
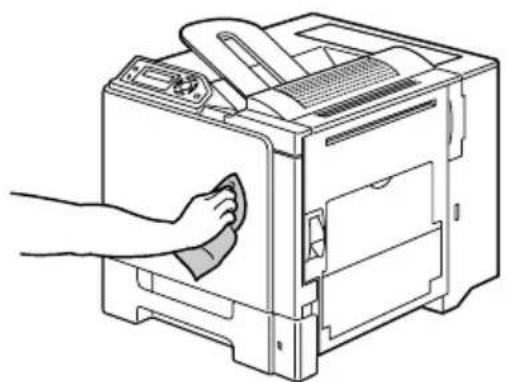
natural_image
Line drawing of a hand cleaning a printer with a cloth (no text or symbols)Media Rollers
The accumulation of paper dust and other debris on the media rollers can cause media-feeding problems.
Cleaning the Media Feed Rollers (All Trays)
1 Pull out the tray.
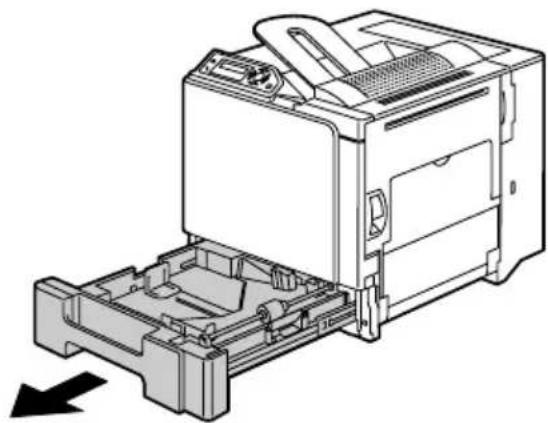
natural_image
Technical line drawing of a printer internal structure with no visible text or symbols2 Clean the media feed rollers by wiping them with a soft, dry cloth.
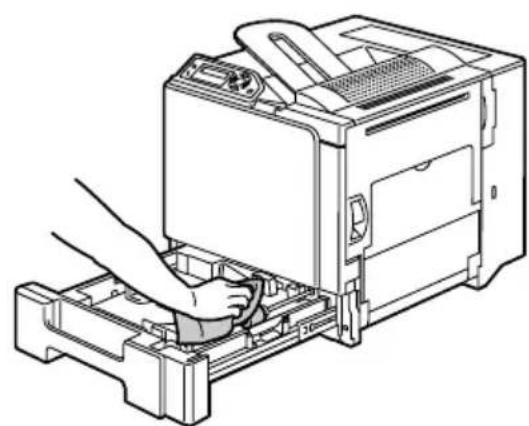
natural_image
Line drawing of a hand inserting a component into a computer chassis (no text or symbols)3 Close the tray.
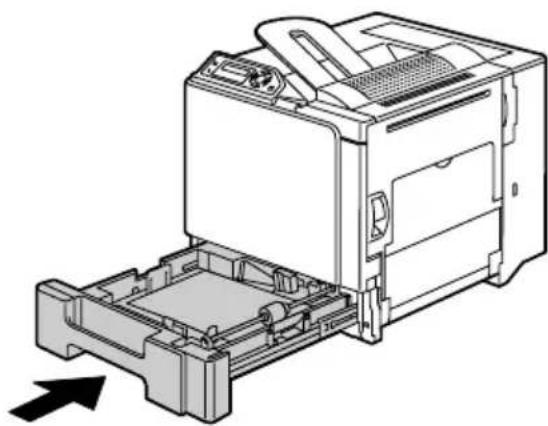
natural_image
Technical line drawing of a printer internal structure with no visible text or symbolsDuplex Option Feed Rollers
1 Open the duplex cover.
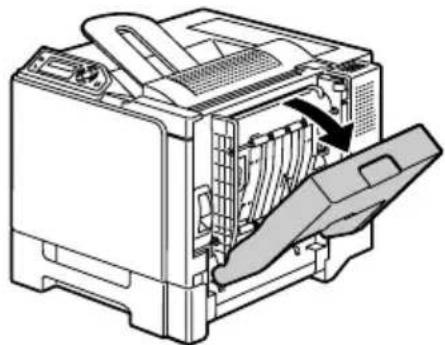
natural_image
Technical line drawing of a computer printer internal structure showing internal components and a handle (no text or symbols)2 Clean the feed rollers by wiping them with a soft, dry cloth.
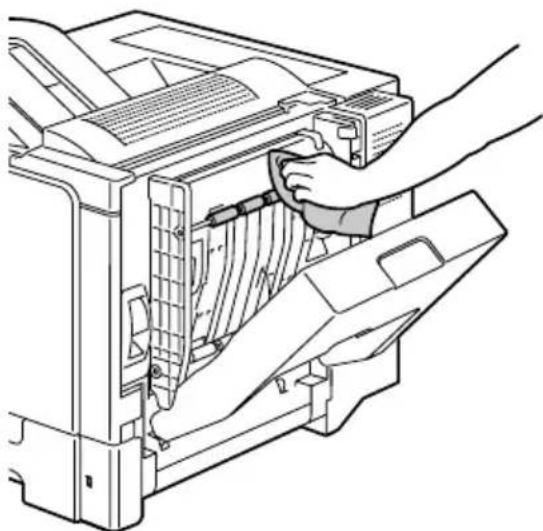
natural_image
Line drawing of a hand inserting or adjusting a printer into a device (no text or symbols present)3 Close the duplex cover.
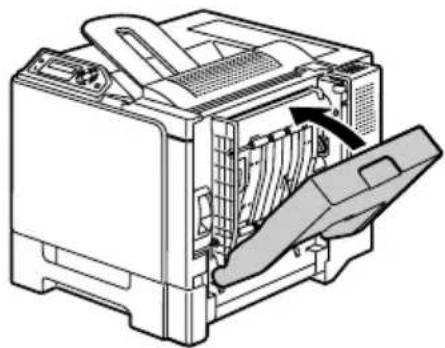
natural_image
Technical line drawing of a computer printer internal structure showing internal components and a handle (no text or symbols)Cleaning the Media Transfer Rollers for Tray 2 and 3
1 Open the right side cover of Tray 2 (Tray 3).
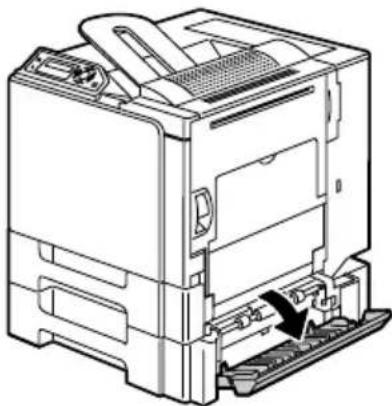
natural_image
Technical line drawing of a computer chassis with an internal component and a base mount (no text or symbols)2 Clean the media transfer rollers by wiping them with a soft, dry cloth.
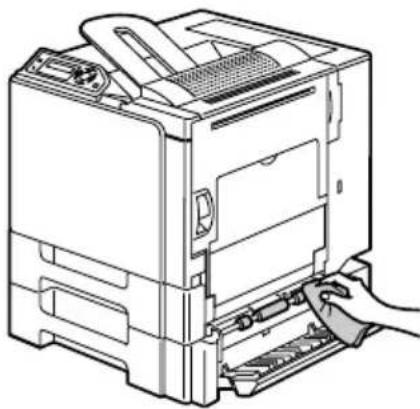
natural_image
Line drawing of a computer tower with an open base and internal components, showing a hand inserting a component (no text or symbols present)3 Close the right side cover of Tray 2 (Tray 3).
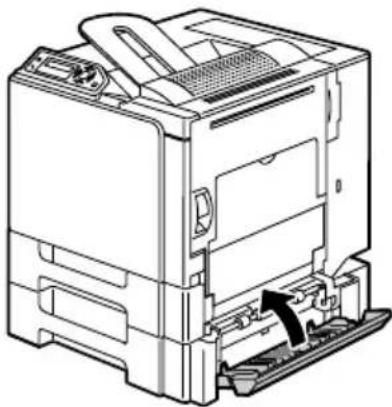
natural_image
Technical line drawing of a computer chassis with an internal component and a black arrow indicating a specific part (no text or symbols present)Cleaning the Laser Lens of the Printer
This printer is constructed with four laser lenses. Clean all lenses as described below.
1 Open the printer's front cover.
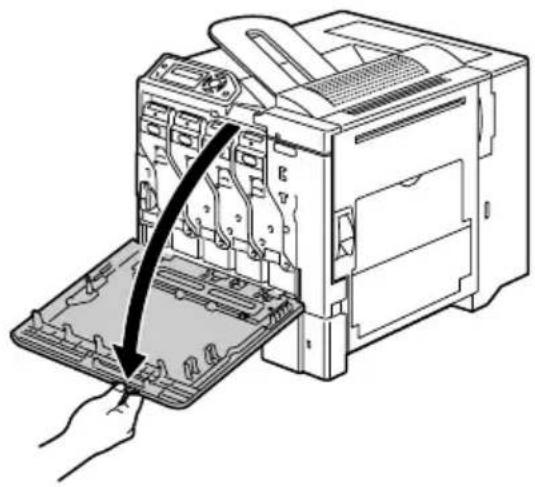
natural_image
Diagram of a computer printer internal structure with a hand inserting a plastic tray into the base (no text or symbols visible)2 Align the marks at the bottom of the toner cartridge, insert the laser lens cleaning tool between the waste toner bottle and the yellow toner cartridge with the cleaning pad pointing down, and then slide it back and forth 2 or 3 times.
3 Clean between each of the toner cartridges in the same way.

The laser lens cleaning tool is included with the printer. Safely store the laser lens cleaning tool so that it will not be lost.
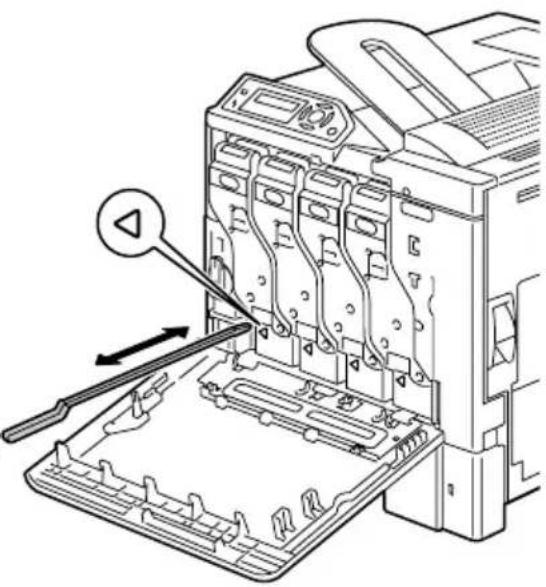
natural_image
Technical line drawing of a printer internal structure with a tool inserted, showing no text or symbols.4 Close the front cover.
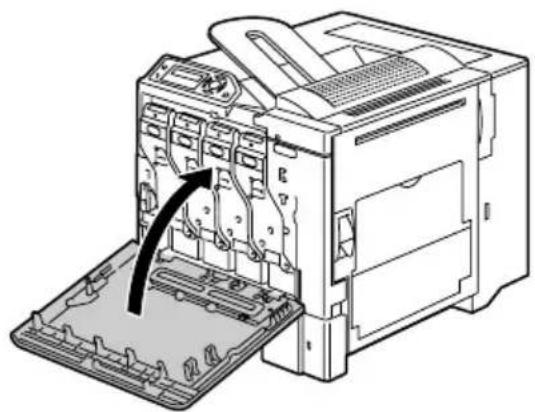
natural_image
Diagram of a computer printer internal structure showing internal components and a base plate (no text or symbols)Troubleshooting
8
Introduction
This chapter provides information to aid you in resolving printer problems you may encounter, or at least guide you to the proper sources for help.
| Printing the configuration page Page 88 | |
| Preventing media misfeeds Page 89 | |
| Understanding the media path Page 90 | |
| Clearing media misfeeds Page 91 | |
| Solving problems with media misfeeds Page 105 | |
| Solving other problems Page 108 | |
| Solving problems with printing quality Page 112 | |
| Status, error, and service messages Page 118 |
Printing the Configuration Page
Print the configuration (CONFIG) page to verify the printer is printing correctly or to check the printer configuration.
| Press Key (once) | Until Display Reads |
| READY | |
| Menu Select← | SPECIAL PAGES |
| Menu Select← | PRINT CONFIG PAGE |
| Menu Select← | The configuration page prints and the printer goes back to READY. |
Preventing Media Misfeeds
| Make sure that... |
| Media matches the printer specifications. |
| Media is flat, especially on the leading edge. |
| The printer is on a hard, flat, level surface. |
| You store media in a dry location away from moisture and humidity. |
| You remove transparencies from the output tray immediately after printing to avoid static buildup. |
| You always adjust the media guides in the tray after inserting the media (a guide that is not properly adjusted can cause poor print quality, media mis-feeds, and printer damage). |
| You load the media printing-side up in the tray (many manufacturers place an arrow on the end of the wrapper to indicate the printing side). |
| Avoid... |
| Media that is folded, wrinkled, or excessively curled. |
| Double feeding (remove the media and fan the sheets—they may be sticking together). |
| Fanning transparencies since this causes static. |
| Loading more than one type/size/weight of media in a tray at the same time. |
| Overfilling the trays. |
| Allowing the output tray to overfill (the output tray has a 250-sheet capacity—misfeeding may occur if you allow media to accumulate more than 250 sheets at one time). |
| Allowing the output tray to fill with more than a few transparencies. |
Understanding the Media Path
Understanding the printer's media path will help you locate media misfeeds.
1 Output tray
2 Toner cartridge
3 Transfer belt unit
4 Laser
5 Tray 1
6 Tray 2 (optional)
7 Tray 3 (optional)
8 Duplex option
9 Fuser unit
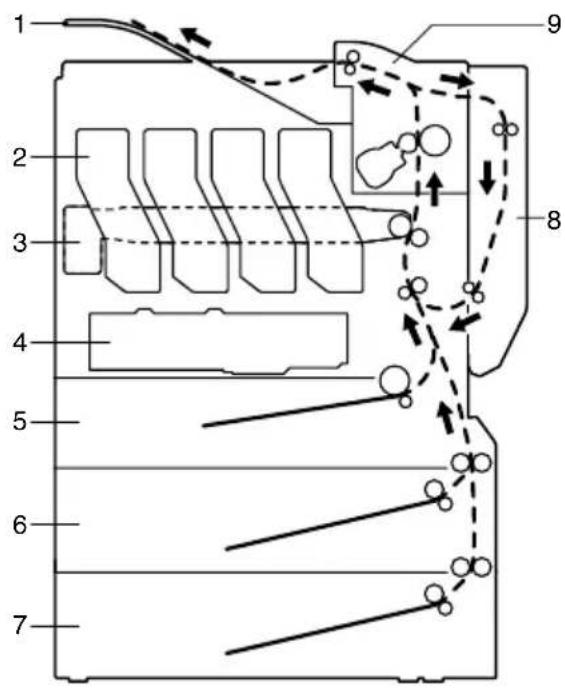
Clearing Media Misfeeds
To avoid damage, always remove misfed media gently, without tearing it. Any pieces of media left in the printer, whether large or small, can obstruct the media path and cause further misfeeds. Do not reload media that has misfed.
Note
The image is not fixed on the media before the fusing process. If you touch the printed surface, the toner may stick to your hands, so be careful not to touch the print face when removing the misfed media. Make sure not to spill any toner inside the printer.

CAUTION
Unfused toner can dirty your hands, clothes, or anything else it gets on. If you accidentally get toner on your clothes, lightly dust them off as best as you can. If some toner remains on your clothes, use cool, not hot water, to rinse the toner off. If toner gets on your skin, wash it off with cool water and a mild soap.

CAUTION
If you get toner in your eyes, wash it out immediately with cool water and consult a doctor.
If, after clearing the media misfeed, the misfeed message in the control panel window persists, open and close the printer's covers. This should clear the misfeed message.
Media Misfeed Messages and Clearing Procedures
| Media Misfeed Message Page Reference | |
| MEDIA JAMTRAY 1 | Page 92 |
| MEDIA JAMTRAY 2 | Page 96 |
| MEDIA JAMTRAY 3 | Page 96 |
| MEDIA JAMDUPLEX LOWER | Page 98 |
| MEDIA JAMDUPLEX UPPER | Page 98 |
| MEDIA JAMFUSER | Page 99 |
| MEDIA JAMTRANSFER ROLLER | Page 102 |
Clearing a Media Misfeed in Tray 1
1 Pull the lever, and then open the right side cover.
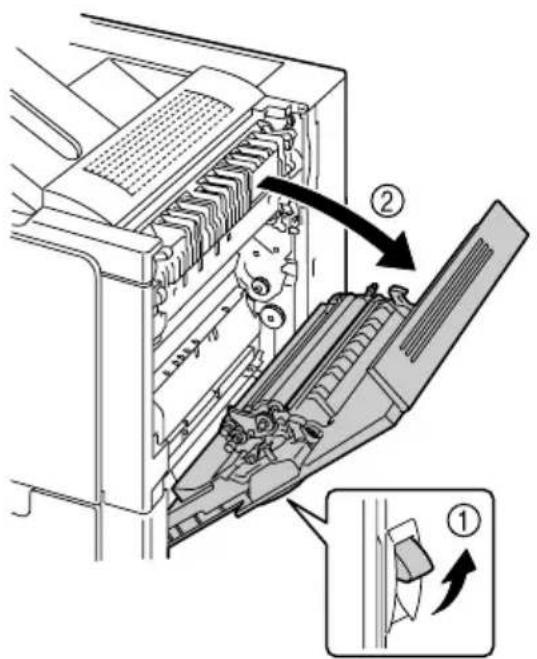
2 Carefully pull out the misfed media.
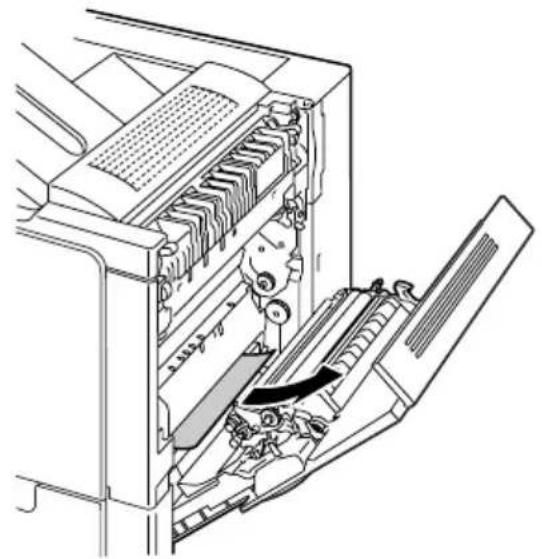
natural_image
Technical line drawing of a computer tower internal structure showing internal components and a directional arrow (no text or symbols)
CAUTION
The area around the fuser unit is extremely hot.
Touching anything other than the indicated levers and dials may result in burns. If you get burned, immediately cool the skin under cold water, and then seek professional medical attention.
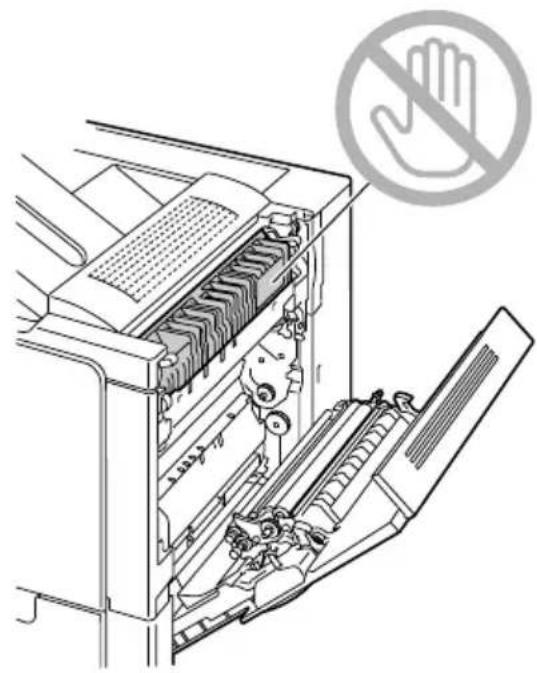
natural_image
Diagram of a printer's internal structure with no visible text or symbols, including a hand symbol (no text or labels present)Note
Decreased print quality may result if the surface of the image transfer belt or the transfer roller is touched.
Be careful not to touch the surface of the image transfer belt or transfer roller.
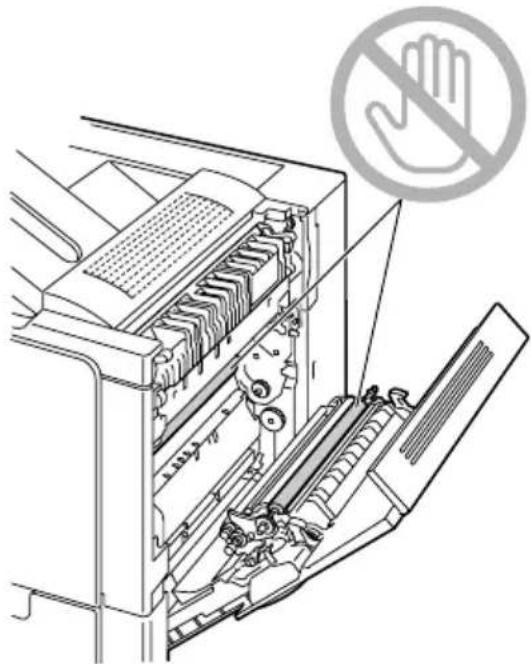
natural_image
Diagram of a printer's internal structure with no visible text or symbols, including a hand symbol (no text or labels present)3 Close the right side cover.
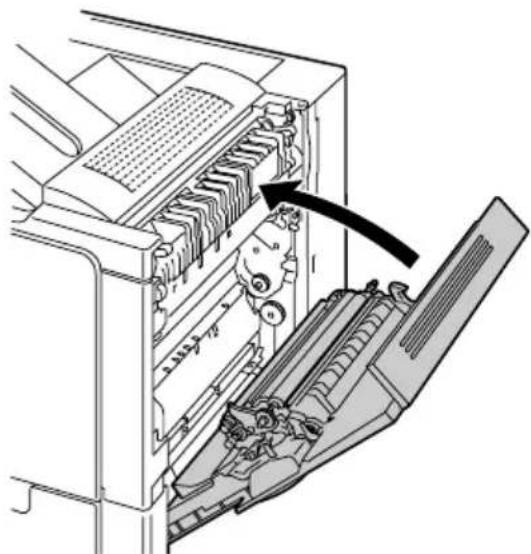
natural_image
Diagram of a computer internal structure showing internal components and a directional arrow (no text or symbols)4 Pull out Tray 1, and then remove all media from the tray.
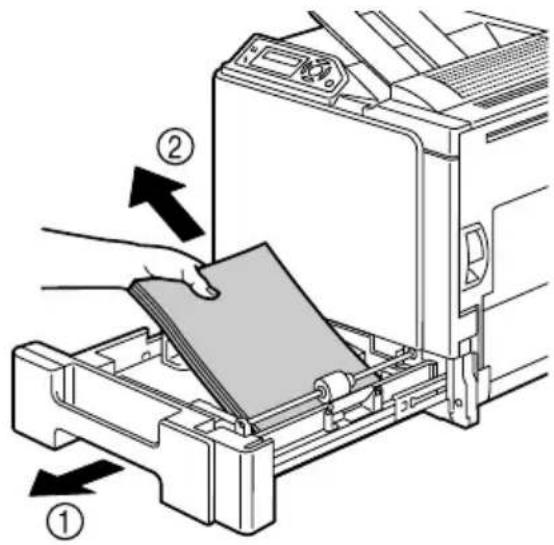
5 Fan the media you removed and then align it well.
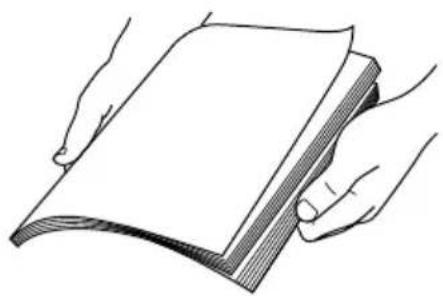
natural_image
Illustration of two hands holding a blank sheet of paper (no text or symbols visible)
If transparencies are loaded, do not fan them; otherwise, static electricity may be produced, resulting in another media misfeed.
6 Load the media face up in Tray 1.

Make sure that the media is flat.

Do not load paper above▼mark.
Do not load more than 10 envelopes or 20 sheets of labels, postcards, thick stock, or transparencies at one time.

Slide the media guides against the edges of the media.
7 Close Tray 1.
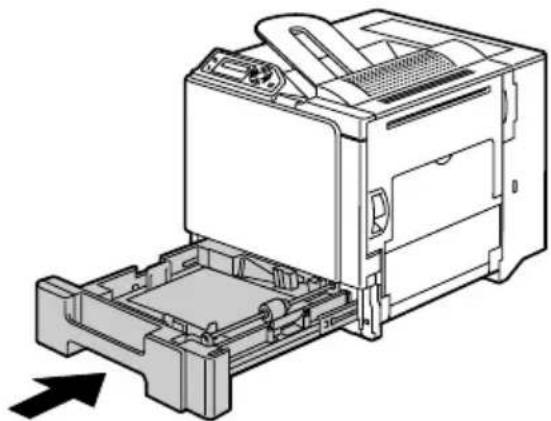
natural_image
Technical line drawing of a printer internal structure with no visible text or symbolsClearing a Media Misfeed in Tray 2/3
1 Open the right side cover of Tray 2 (Tray 3).
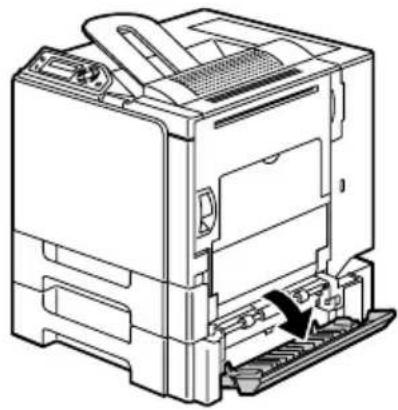
natural_image
Technical line drawing of a mechanical device with internal components and a highlighted section (no text or symbols)2 Carefully pull out the misfed media.
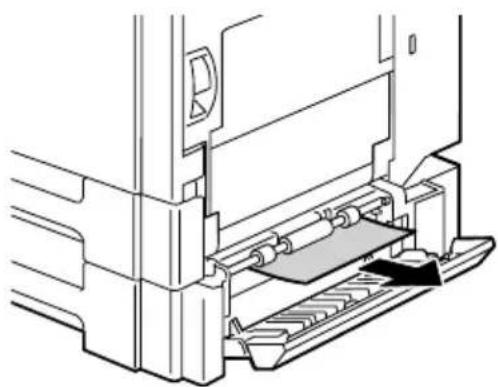
natural_image
Technical line drawing of a mechanical assembly with no visible text or symbols3 Close the right side cover of Tray 2 (Tray 3).
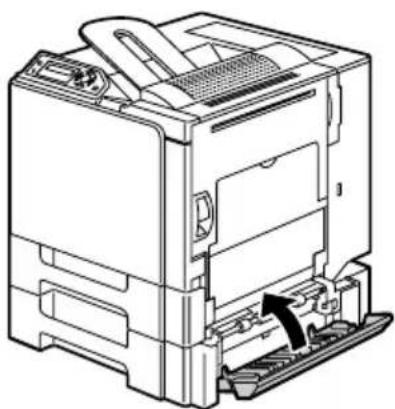
natural_image
Technical line drawing of a computer motherboard showing internal components and a highlighted part (no text or symbols)4 Pull out Tray 2 (Tray 3), and then remove all paper from the tray.
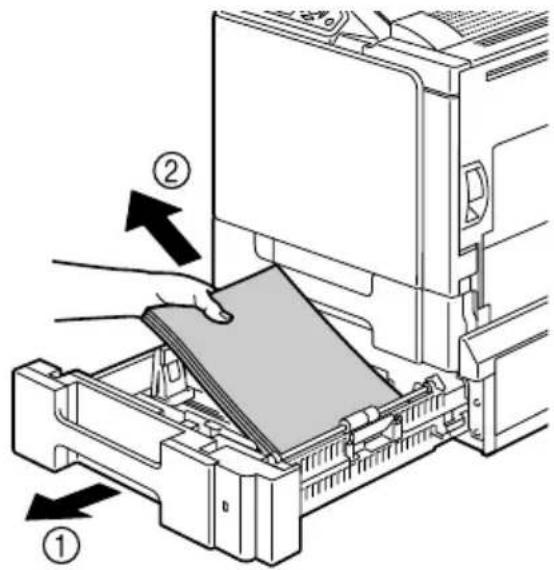
5 Fan the paper you removed and then align it well.
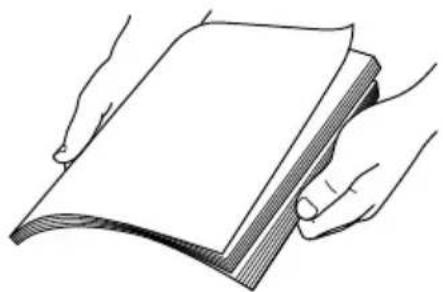
natural_image
Illustration of two hands holding a blank sheet of paper (no text or symbols visible)6 Load the paper face up in Tray 2 (Tray 3).

Make sure that the paper is flat.

Do not load paper above the mark.

Slide the media guides against the edges of the paper.
7 Close Tray 2 (Tray 3).
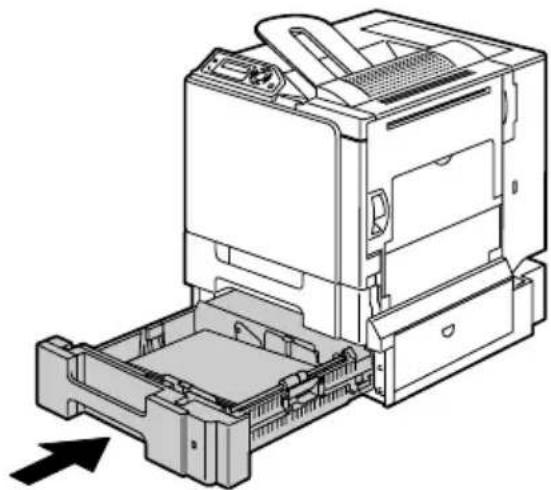
natural_image
Technical line drawing of a printer internal structure showing base, casing, and tray (no text or symbols)Clearing a Media Misfeed from the Duplex Option
1 Open the duplex cover.
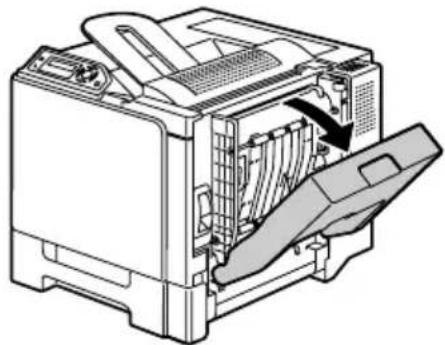
natural_image
Technical line drawing of a computer printer internal structure showing internal components and a handle (no text or symbols)2 Carefully pull out the misfed media.
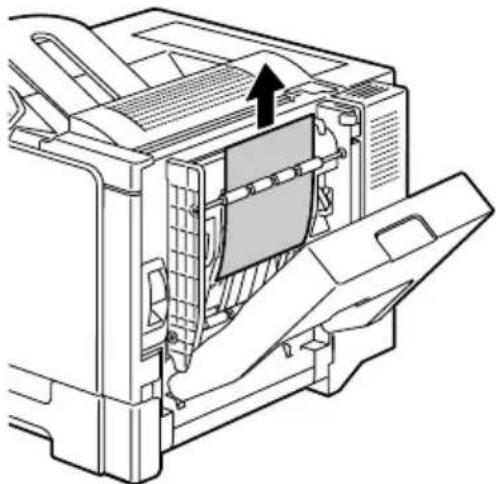
natural_image
Technical line drawing of a mechanical device with an arrow indicating a component (no text or symbols present)3 Close the duplex cover.
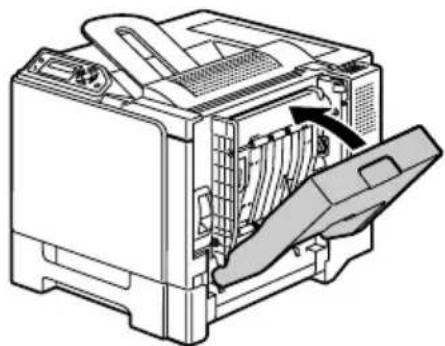
natural_image
Technical line drawing of a computer printer internal structure showing internal components and a handle (no text or symbols)Clearing a Media Misfeed from the Fuser Unit
1 Pull the lever, and then open the right side cover.
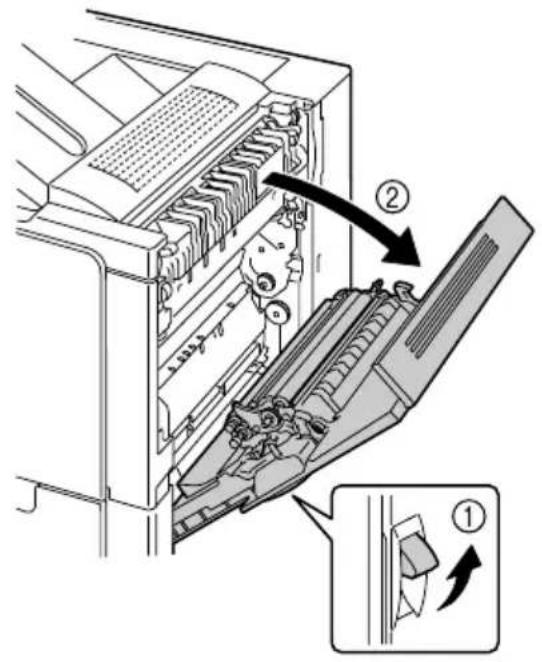
2 Push up the levers of the fuser unit cover, and then open the cover.
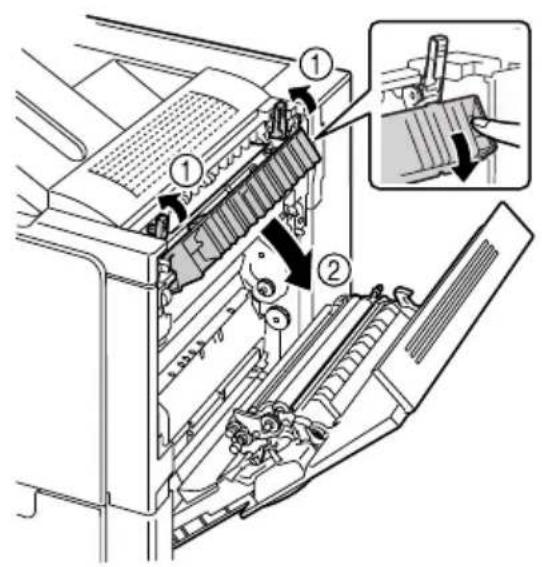
3 Carefully pull out the misfed media.
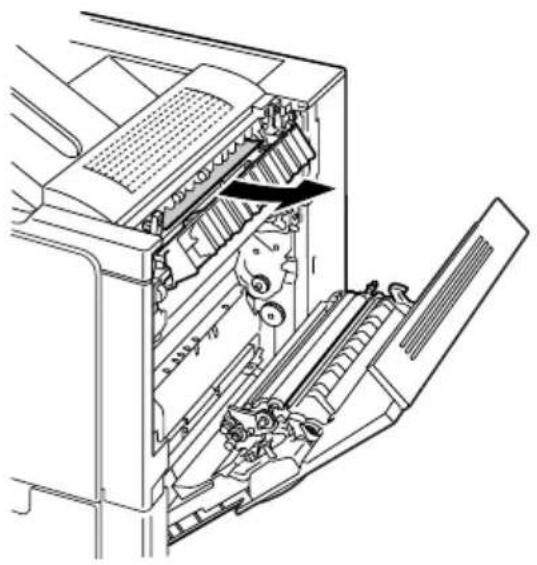
natural_image
Technical line drawing of a mechanical device with internal components and directional arrows (no text or symbols)CAUTION
The area around the fuser unit is extremely hot.
Touching anything other than the indicated levers and dials may result in burns. If you get burned, immediately cool the skin under cold water, and then seek professional medical attention.
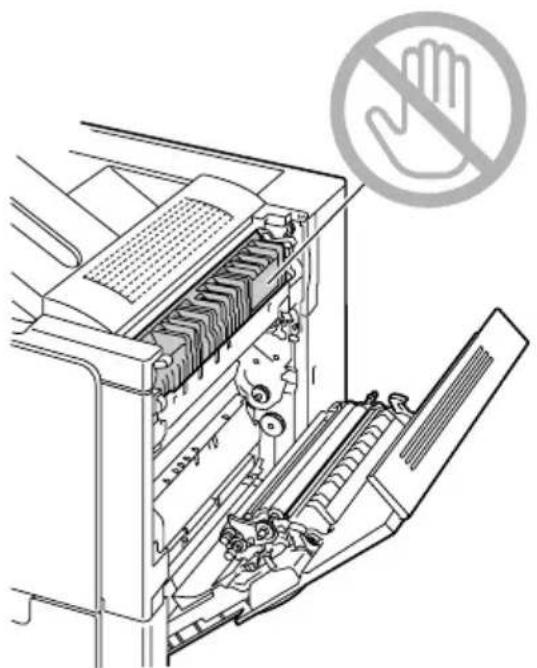
natural_image
Diagram of a printer's internal structure with no visible text or symbols, including a prohibition symbol (no text or labels present)Note
Decreased print quality may result if the surface of the image transfer belt or the transfer roller is touched.
Be careful not to touch the surface of the image transfer belt or transfer roller.
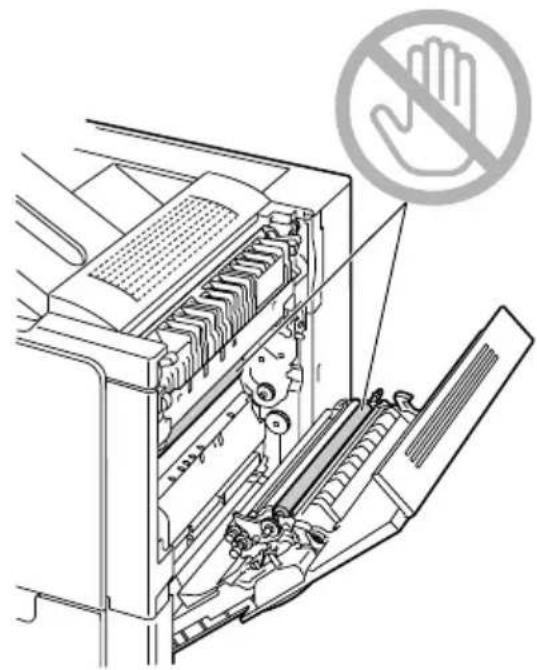
natural_image
Diagram of a printer's internal structure with no visible text or symbols, including a prohibition symbol (no text or labels present)4 Push down the levers.
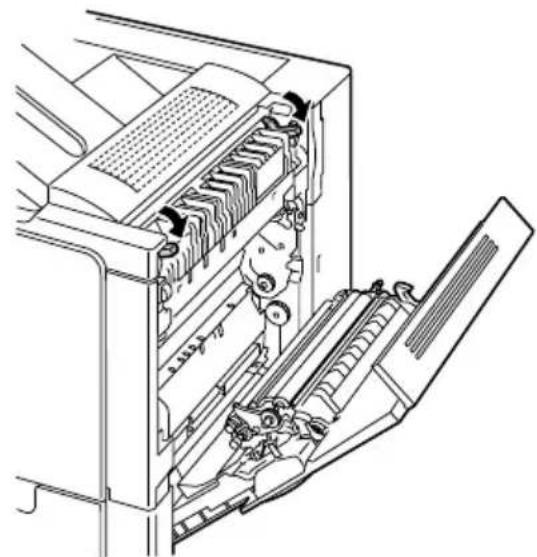
natural_image
Technical line drawing of a computer tower internal structure showing internal components and a separate panel (no text or symbols)5 Close the right side cover.
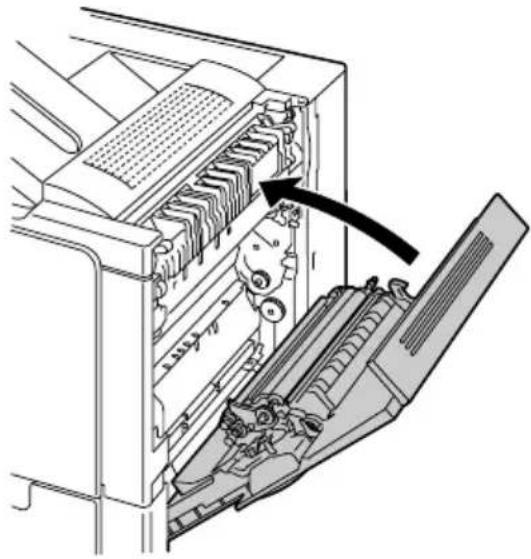
natural_image
Technical diagram of an internal device with a black arrow pointing to a component, showing no text or symbols.Clearing a Media Misfeed from the Transfer Roller
1 Pull the lever, and then open the right side cover.
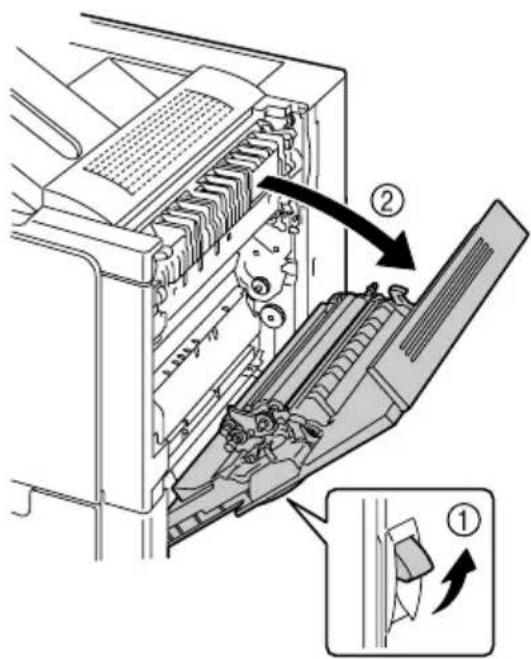
2 Carefully pull out the misfed media.
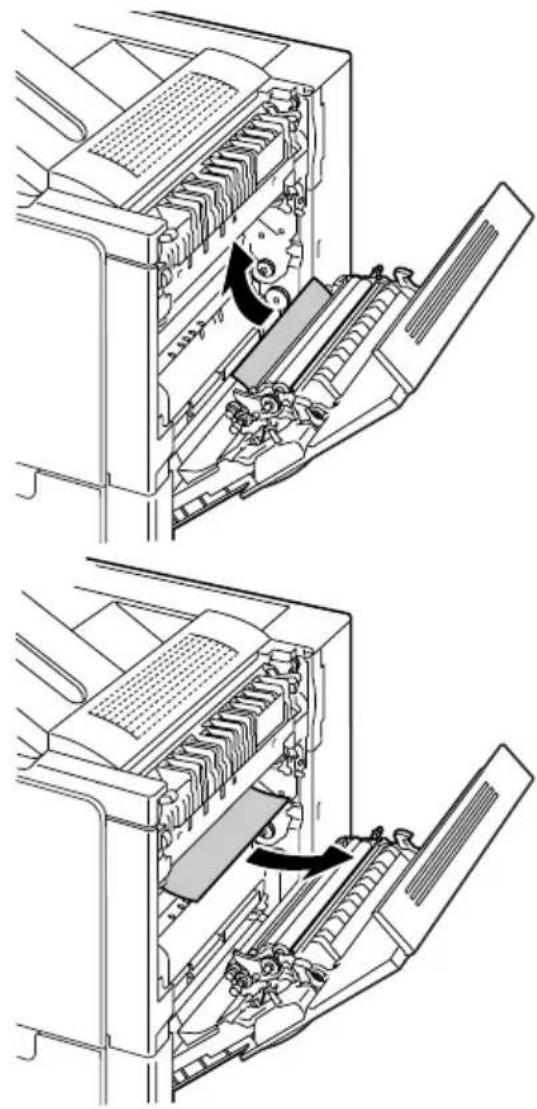
natural_image
Technical line drawing of a mechanical device showing internal components and a close-up view (no text or symbols)
CAUTION
The area around the fuser unit is extremely hot.
Touching anything other than the indicated levers and dials may result in burns. If you get burned, immediately cool the skin under cold water, and then seek professional medical attention.
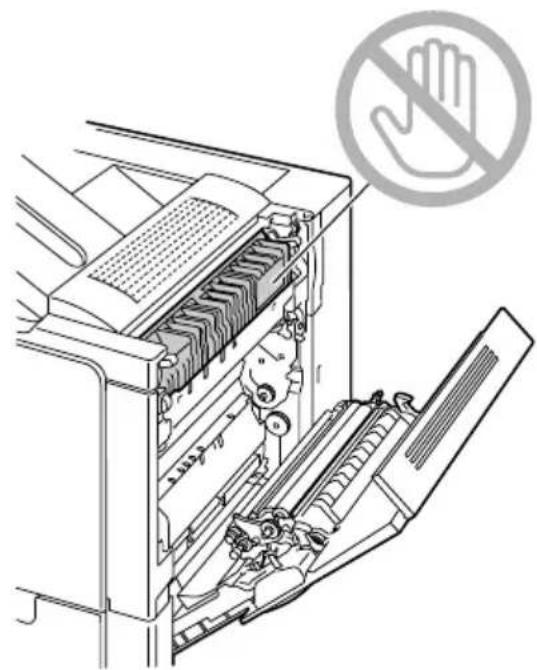
natural_image
Diagram of a printer's internal structure with no visible text or symbols, including a hand symbol (no text or labels present)Note
Decreased print quality may result if the surface of the image transfer belt or the transfer roller is touched.
Be careful not to touch the surface of the image transfer belt or transfer roller.
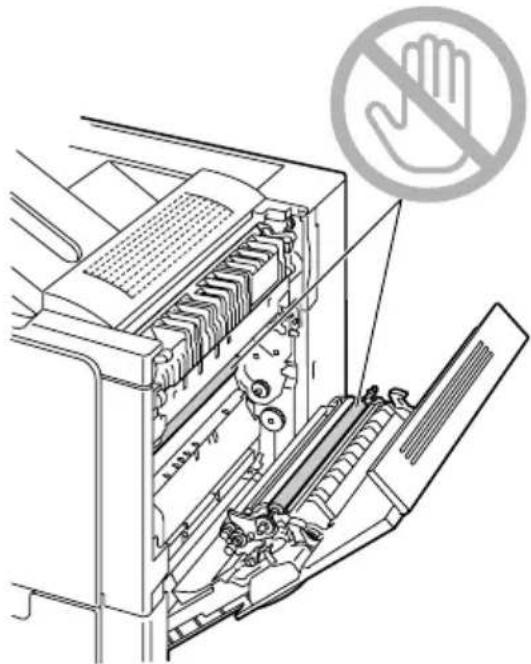
natural_image
Diagram of a printer's internal structure with no visible text or symbols, including a prohibition symbol (no text or labels present)3 Close the right side cover.
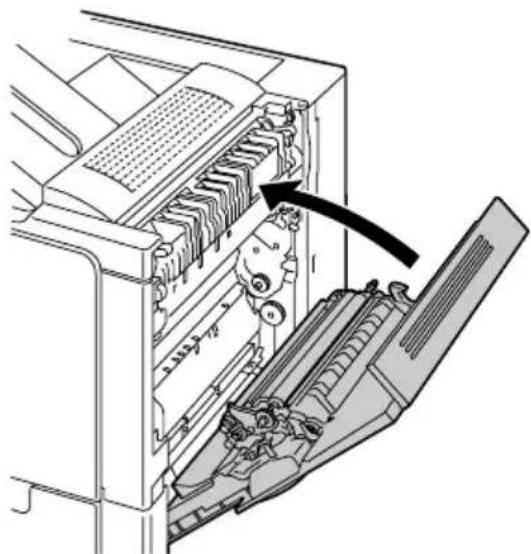
natural_image
Diagram of a computer internal structure showing internal components and a directional arrow (no text or symbols)Solving Problems with Media Misfeeds

Frequent misfeeds in any area indicate that area should be checked, repaired, or cleaned. Repeated misfeeds may also happen if you're using unsupported print media.
| Symptom Cause Solution | ||
| Several sheets go through the printer together. | The front edges of the media are not even. | Remove the media and even up the front edges, then reload it. |
| The media is moist from humidity. | Remove the moist media and replace it with new, dry media. | |
| Too much static electricity is present. | Do not fan transparencies. | |
| Media mis-feed message stays on. | Right side cover needs to be opened and closed again to reset the printer. | Open and close the right side cover of the printer again. |
| Some media remains misfed in the printer. | Recheck the media path and make sure that you have removed all of the misfed media. | |
| Duplex option mis-feeds. | Unsupported media (wrong size, thickness, type, etc.) is being used. | Use KONICA MINOLTA-approved media. See “Media Specifications” on page 32 for supported sizes. |
| Only plain paper, 60–90 g/m2(16–24 lb) can be autoduplexed. See “Media Specifications” on page 32 for supported sizes. | ||
| Make sure that you have not mixed media types in Tray 1. | ||
| Do not duplex envelopes, labels, thick stock, or transparencies. | ||
| Media is still being misfed. | Recheck the media path inside the duplex option and make sure that you have removed all of the misfed media. | |
| Media is misfeeding. | The media is not correctly positioned in the tray. | Remove the misfed media and reposition the media properly in the tray. |
| The number of sheets in the tray exceeds the maximum allowed. | Remove the excess media and reload the correct number of sheets in the tray. | |
| The media guides are not correctly adjusted to the media size. | Adjust the media guides in the tray to match the size of the media. | |
| Warped or wrinkled media is loaded in the tray. | Remove the media, smooth it out, and reload it. If it still misfeeds, do not use that media. | |
| The media is moist from humidity. | Remove the moist media and replace it with new, dry media. | |
| Custom-sized media, envelopes, labels, postcards, thick stock, or transparencies are loaded in Tray 2 or 3. | Special media must be loaded in Tray 1 only. | |
| The recommended transparency or label sheet is facing the wrong way in Tray 1. | Load the transparencies or label sheets according to the manufacturer's instructions. | |
| Envelopes are facing the wrong way in Tray 1. | Load the envelopes in Tray 1 so the flaps are facing down. | |
| If the flaps are on the long edge, set the envelopes in Tray 1 so that the flaps are facing into the printer. | ||
| Media is misfeeding. | Transparencies have collected static electricity in the tray. | Remove the transparencies and load them in the tray one sheet at a time.Do not fan transparencies before loading them. |
| Unsupported media (wrong size, thickness, type, etc.) is being used. | Use KONICA MINOLTA-approved media.See “Media Specifications” on page 32 for supported size. | |
| The media roller is dirty. | Clean the media supply roller.For more details, refer to “Media Roll-ers” on page 83. | |
Solving Other Problems


For details on consumables, access www.q-shop.com.
| Symptom Cause Solution | ||
| Printer power is not on. | The power cord is not correctly plugged into the outlet. | Turn off the printer, confirm that the power cord is correctly plugged into the outlet, and then turn on the printer. |
| Something is wrong with the outlet connected to the printer. | Plug another electrical appliance into the outlet and see whether it operates properly. | |
| The power switch is not correctly turned on (I position). | Turn the power switch off (O position), then turn it back to the on (I position). | |
| The printer is connected to an outlet with a voltage or frequency that does not match the printer specifications. | Use a power source with the specifications listed in appendix A, “Technical Specifications.” | |
| Data was sent to the printer, but it doesn’t print. | An error message is displayed in the message window. | Handle according to the message displayed. |
| The control panel displays TONER LOW much sooner than expected. | The toner cartridge is defective. | Remove the toner cartridge and check it for damage. If it is damaged, replace it. |
| You printed with heavy toner coverage. | See specifications in Appendix A. | |
| You can’t print the configuration page. | The tray is empty. Check that at least Tray 1 is loaded with media, in place, and secure. | |
| The printer’s covers aren’t closed securely. | Make sure the covers are closed securely. Close all covers gently to avoid jarring the printer. Make sure the waste toner bottle and toner cartridges are installed correctly. | |
| There is a media misfeed. | Clear the media misfeed. | |
| Printing takes too much time. | The printer is set to a slow printing mode (for example, thick stock or transparency). | It takes more time to print on special media. When using regular paper, make sure that the media type is set properly in the driver. |
| The printer is set to Energy Saver mode. | It takes time for printing to start in Energy Saver mode. If you do not want to use this mode, disable it. | |
| The job is very complex. | Wait. No action needed. | |
| The printer memory is insufficient. | Add more memory. | |
| A toner cartridge for a different region or a non-genuine toner cartridge is installed (INCORRECT CART. X is displayed in the message window). | Install a KONICA MINOLTA toner cartridge approved for your specific printer. | |
| Blank pages come out during printing. | One or more of the toner cartridges are defective or empty. | Check the toner cartridges. |
| The wrong media is being used. | Check that the media type set in the driver matches the media loaded in the printer. | |
| Printer returned to READY before the menu was changed. | The printer was in the menu structure without a selection being made within two minutes. | When in the menu structure, select your choice within 2 minutes. |
| Not all pages print. | The printer has the wrong kind of cable, or the printer is not configured for the correct cable and port. | Check your cable. |
| The Cancel key was pressed. | Make sure no one pressed the Cancel key while your job was printing. | |
| Not all pages print. | The tray is empty. Check that the trays are loaded with media, in place, and secure. | |
| A document is printed with an overlay file which has been created by a non-magicolor 5430 DL driver. | ||
| Printer resets or turns off frequently. | The power cord is not correctly plugged into the outlet. | |
| A system error occurred. | ||
| You are experiencing duplex problems. | Media or settings are not correct. | |
| For autoduplexing, make sure that you have a duplex option installed. | ||
| Make sure that you are using correct media.■ See “Media Specifications” on page 32 for supported size.■ Do not duplex custom-sized media, envelopes, labels, postcards, thick stock, or transparencies.■ Make sure that you have not mixed media types in Tray 1. | ||
| Make sure that your document has more than one page. | ||
| Make sure the duplex option is installed in the Windows printer driver (Device Option Setting tab). | ||
| In the printer driver (Setup/Duplex/ Booklet), choose “Short Edge Binding” (flipped as on a clipboard) or “Long Edge Binding” (flipped as in a loose-leaf notebook). | ||
| For N-up on duplexed pages, choose Collate only in the driver’s Paper Tab. Do not set collation in the application. | ||
| Symptom Cause Solution | ||
| With N-up on multiple cop-ies, the out-put is incorrect. | Both the driver and the application have been set for collation. | For N-up on multiple copies, choose Collate only in the driver's Paper Tab. Do not set collation in the application. |
| Booklet Left and Right Binding out-put is incor-rect. | Both the driver and the application have been set for collation. | For Booklet Left Binding and Booklet Right Binding, choose Collate only in the driver's Paper Tab. Do not set colla-tion in the application. |
| You hear unusual noises. | The printer is not level. | Put the printer on a flat, hard, level sur-face not to exceed ±1° slant in any direction. |
| The tray is not installed correctly. | Remove the tray that you are printing from and reinsert it completely into the printer. | |
| There is a foreign object stuck inside the printer. | Turn off the printer and remove the object. If you cannot remove it, contact Technical Support. | |
| The web-based utility cannot be accessed. | The PageScope Web Connection Adminis-trator's password is incorrect. | The PageScope Web Connection Administrator password has a 6-char-acter minimum and a 16-character maximum. For details of the Page-Scope Web Connection administrator password, refer to the magicolor 5430 DL Reference Guide. |
Media is wrinkled. | The media is moist from humidity or hav-ing water spilled on it. | Remove the moist media and replace it with new, dry media. |
| The transfer roller or fuser unit is defective. | Check them for damage. If necessary, contact Technical Support with the error information. | |
| Unsupported media (wrong size, thickness, type, etc.) is being used. | Use KONICA MINOLTA-approved media. See “Media Specifications” on page 32 for supported size. For a com-plete list of approved media, go to www.printer.konicaminolta.com. | |
Solving Problems with Printing Quality
| Symptom Cause Solution | ||
Nothing is printed, or there are blank spots on the printed page. | One or more of the toner cartridges are defective. | Remove the toner cartridge and check for damage. If it is damaged, replace it. |
| The printer driver is not set correctly. | Select the proper setting in the printer driver to switch from transparencies to plain paper. | |
| The media is moist from humidity. | Adjust the humidity for media storage.Remove the moist media and replace it with new, dry media. | |
| The media set in the printer driver mismatches the media loaded in the printer. | Load the correct media in the printer. | |
| The power source does not match the printer specifications. | Use a power source with the proper specifications. | |
| Several sheets are being fed at the same time. | Remove the media from the tray and check it for static electricity. Fan plain paper or other media (but not transparencies), and replace it in the tray. | |
| Media is not set properly in the tray(s). | Remove the media, tap it to straighten it out, return it to the tray, and realign the media guides. | |
| The printer is not level. | Put the printer on a flat, hard, level surface not to exceed ± 1^ slant in any direction. | |
Entire sheet is printed in black or color. | One or more of the toner cartridges are defective. | Remove the toner cartridge and check for damage. If it is damaged, replace it. |
Image is too light; there is low image density. | Laser lens is dirty. Clean the laser lens. | |
| The media is moist from humidity. | Remove the moist media and replace with new, dry media. | |
| There is not much toner left in the cartridge. | Replace the toner cartridge. | |
| One or more of the toner cartridges are defective. | Remove the toner cartridges and check them for damage. If one is damaged, replace it. | |
| The media type is set incorrectly. | When printing envelopes, labels, post-cards, thick stock, or transparencies, specify the appropriate media type in the printer driver. | |
Image is too dark. | One or more of the toner cartridges are defective. | Remove the toner cartridges and check them for damage. If one is damaged, replace it. |
Image is blurred; background is lightly stained; there is insufficient gloss of the printed image. | One or more of the toner cartridges are defective. | Remove the toner cartridges and check them for damage. If one is damaged, replace it. |
| Symptom Cause Solution | ||
| The print or color density is uneven. | One or more of the toner cartridges are defective or low. | Remove the toner cartridges and check them for damage. If one is damaged, replace it. |
 | The printer is not level. | Put the printer on a flat, hard, level surface not to exceed ±1° slant in any direction. |
| Irregular print or mot-tled image appears. | The media is moist from humidity. | Adjust the humidity in the media storage area.Remove the moist media and replace it with new, dry media. |
 | Unsupported media (wrong size, thickness, type, etc.) is being used. | Use KONICA MINOLTA-approved media. See “Media Specifications” on page 32 for supported sizes. |
| One or more of the toner cartridges are defective. | Remove the toner cartridges and check them for damage. If one is damaged, replace it. | |
| There is insufficient fusing or the image comes off when rubbed. | The media is moist from humidity. | Remove the moist media and replace it with new, dry media. |
| Unsupported media (wrong size, thickness, type, etc.) is being used. | Use KONICA MINOLTA-approved media. See “Media Specifications” on page 32 for supported sizes. | |
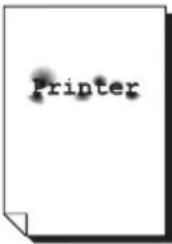 | Media type is set incorrectly. | When printing envelopes, labels, post-cards, thick stock, or transparencies, specify the appropriate media type in the printer driver. |
There are toner smudges or residual images.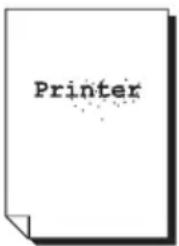 | One or more of the toner cartridges are defective or installed incorrectly. | Remove the toner cartridges and check them for damage. If one is damaged, replace it. |
There are toner smudges on the back side of the page (whether or not it has been duplexed).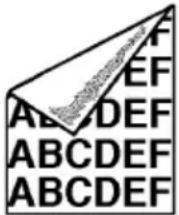 | The media transfer roller is dirty. | Clean the media transfer roller. |
| If you think the transfer roller should be replaced, contact Technical Support with the error information. | ||
| The media path is dirty with toner. | Print several blank sheets and the excess toner should disappear. | |
| One or more of the toner cartridges are defective. | Remove the toner cartridges and check them for damage. If one is damaged, replace it. | |
Abnormal areas (white, black, or color) appear in a regular pattern.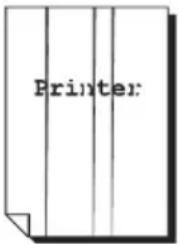 | The laser lens is dirty. | Clean the laser lens. |
| The toner cartridge is defective. | Remove the toner cartridge with the color causing the abnormal image. Replace it with a new toner cartridge. | |
Image defects.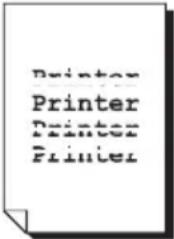 | The laser lens is dirty. | Clean the laser lens. |
| The toner cartridge is leaking. | Remove the toner cartridges and check them for damage. If one is damaged, replace it. | |
| The toner cartridge is defective. | Remove the toner cartridge with the color causing the abnormal image. Replace it with a new toner cartridge. | |
Lateral lines or bands appear on image.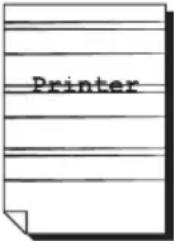 | The printer is not level. | Put the printer on a flat, hard, level surface not to exceed ±1° slant in any direction. |
| The media path is dirty with toner. | Print several sheets and the excess toner should disappear. | |
| One or more of the toner cartridges are defective. | Remove the toner cartridges and check them for damage. If one is damaged, replace it. | |
| Colors look drastically wrong. | One or more of the toner cartridges are defective. | Remove the toner cartridges and verify that the toner is distributed evenly on each cartridge roller, and reinstall the toner cartridges. |
| One or more of the toner cartridges are low or empty. | Check the control panel for an X TONER LOW or TONER EMPTY X message. If necessary, replace the specified toner cartridge. | |
| Colors are not registering properly; colors are mixed or have page-to-page variation. | The front cover is not properly closed. | Make sure that the printer's front cover is closed. |
| One or more of the toner cartridges are defective. | Remove the toner cartridges and check them for damage. If one is damaged, replace it. | |
| The media is moist from humidity. | Remove the moist media and replace it with new, dry media. | |
| Line art does not print in color. | The line art setting for 2400 x 600 dpi requires Color Matching to be turned off. | In the driver, go to Properties/Quality and choose Off in the Color Matching section. |
| If you want color, lower the resolution to 1200 x 600 or 600 x 600. | ||
The color has a poor reproduction or has poor color density.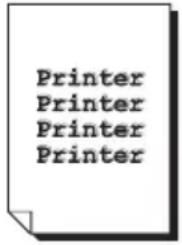 | One or more of the toner cartridges are defective. | Remove the toner cartridges and check them for damage. If one is damaged, replace it. |
If the problem is not resolved, even after all of the above have been performed, contact Technical Support with the error information.
Status, Error, and Service Messages
Status, error, and service messages are displayed in the control panel message window. They provide information about your printer and help you locate many problems. When the condition associated with a displayed message has changed, the message is cleared from the window.
Standard Status Messages
| This message... means... | do this... | |
| CALIBRATING | After replacing the toner cartridges, and after rebooting your printer after environmental changes, your printer automatically pauses to do a 75-second Auto-Image Density Control (AIDC) cycle. This process is provided to make reliable printer operation with optimum output quality possible. | No action needed. |
| CANCELLING JOB | The job is being cancelled. | |
| ENERGY SAVER | The printer is in Energy Saver mode to reduce power consumption during periods of inactivity. When a print job is received, the printer returns to normal power within 30 seconds. | |
| PRINTING | The printer is printing. | |
| PROCESSING | The printer is processing data. | |
| READY | The printer is on and ready to receive data. | |
| WARMING UP | The printer is warming up. |
Error Messages (Warning)
Note
If an error message (TONER EMPTY, TRANSFER END, etc.) appears, print out the configuration page, and then check the status of the other consumables. For details on printing the configuration page, refer to "Printing the Configuration Page" on page 88.
| This message... means... | do this... | |
| FUSER LIFE END | The fuser unit has reached the end of its life. | Contact Technical Support with the error information. |
| FUSER LIFE LOW | The fuser unit is near the end of its life. | If necessary, contact Technical Support with the error information. |
| SIZE MISMATCH | A media size mismatch occurs when AUTO CONTINUE (Engine menu) is set to ON. | Load the correct media size. |
| TONER EMPTY X | The x toner cartridge is empty.(Appears when ENGINE/TONER EMPTY CONTINUE is set) | Replace the toner cartridge. |
| X TONER LOW | The x toner cartridge is low and should be replaced within 200 pages at 5% coverage of letter/A4 pages. | Prepare the specified color toner cartridge. |
| TRANSFER END | The transfer belt unit has reached the end of its life. | Replace the transfer belt unit and reset the counter in the ENGINE/SERVICE/RESET COUNTER TRANS-FER UNIT menu. |
| TRANSFER LOW | The transfer belt unit is near the end of its life. | Prepare a new transfer belt unit. |
| TRANS.ROLLER END | The transfer roller has reached the end of its life. | Replace the transfer roller and reset the counter in the ENGINE/ SERVICE/RESET COUNTER TRANS-FER ROLLER menu. |
| TRANS.ROLLER LOW | The transfer roller is near the end of its life. | Prepare a new transfer roller. |
| TRAY X EMPTY | Tray x (Tray 1, 2, or 3) was specified with the printer driver for printing, but Tray x is empty. | Load media into the specified tray. |
| UNSUPPORTED DIMM | An unsupported DIMM is installed. | Check the DIMM specifications and install a supported DIMM. |
| WASTE:NEAR FULL | The waste toner bottle is nearly full. | Prepare a new waste toner bottle. |
Error Messages (Operator Call)
| This message... means... | do this... | |
| COVER OPEN DUPLEX | The duplex cover is open. | Close the duplex cover. |
| COVER OPEN FRONT | The printer's front cover is open. | Close the front cover. |
| COVER OPEN SIDE | The printer's right side cover is open. | Close the right side cover. |
| COVER OPEN TRAY X | The right side cover of Tray X (Tray 2 or 3) is open. | Close the right side cover of the tray. |
| DRAWER OPEN TRAY X | The specified tray X (Tray 1, 2, or 3) is not installed, or not fully closed. | Insert the tray into the media feed unit. |
| DUPLEX OPTION NOT ATTACHED | Duplex printing was specified with the printer driver, but the duplex option is not installed. | Stop the print job and change the printer driver setting. If necessary, install the duplex option. |
| ERROR MEMORY OVERFLOW | The printer has received more data than can be processed with its internal memory. | Turn the printer off, and then, after a few seconds, turn it on again. Decrease the amount of data to be printed (for example, by decreasing the resolution), and then try printing again. If that doesn't solve the problem, install an optional memory module. |
| ERROR VIDEO UNDERRUN | The amount of data to be printed exceeds the printer's internal data transmission speed. | Turn the printer off, and then, after a few seconds, turn it on again. Decrease the amount of data to be printed (for example, by decreasing the resolution), and then try printing again. |
| FUSERNOT ATTACHED | The fuser unit is not installed. | Contact Technical Support with the error information. |
| INCORRECT CART.X | The x toner cartridge is an unapproved type. | Install the appropriate type (AM, EU, AP or JP), of KONICA MINOLTA toner cartridge. See page 59. |
| MEDIA JAMDUPLEX LOWER | Media has misfed in the duplex option. | Locate and remove the misfeed. |
| MEDIA JAMDUPLEX UPPER | Media has misfed in the duplex option. | |
| MEDIA JAMFUSER | Media has misfed leaving the fuser area. | |
| MEDIA JAMTRANSFER ROLLER | Media has misfed in the transfer roller area. This type of misfeed means that the media did not make it to the paper exit area. | |
| MEDIA JAMTRAY X | Media has misfed while being pulled from the specified tray (x). | |
| MEDIA JAMUNDEFINED | A media misfeed occurred because the printer driver settings for duplex printing are inconsistent (for example, the specified paper type or size is different from that of the loaded paper). | After clearing the media misfeed, check the driver settings. |
| PUT MEDIA : TRAY 1 “MEDIA” | The media type set in the printer driver is different from the type of media loaded into Tray 1. | Load the correct media type into Tray 1. |
| PUT MEDIA : TRAY X "SIZE" | The media size set in the printer driver is different from the size of media loaded. | Load the correct media size into the specified tray. |
| REPLACE TONER X | The x toner cartridge is empty.(Appears when ENGINE/TONER EMPTY STOP is set) | Replace the toner cartridge. |
| SIZE/TYPE ERROR | Unsupported media (wrong size, thickness, type, etc.) is being used. | Load the correct media size and type. |
| SIZE/TYPE ERROR DUPLEX | The media not compatible with duplex printing. | Use the correct media size and type when duplexing. |
| TONER LIFE END X | The x toner cartridge is completely empty.(Appears when ENGINE/TONER EMPTY CONTINUE is set) | Replace the toner cartridge. |
| X TONER NOT INSTALLED | The x toner cartridge is not installed, or an unapproved toner cartridge is installed. | Install the indicated toner cartridge. |
| TRAY X NOT ATTACHED | Tray x (Tray 2 or 3) was specified with the printer driver for printing, but Tray x is not installed. | Stop the print job and change the printer driver setting. If necessary, install Tray x. |
| WASTE BOTTLE FULL | The waste toner bottle is full. | Install a new waste toner bottle. |
Service Messages
These messages indicate a more serious fault that can only be corrected by a customer service engineer. If one of these messages appears, turn the printer off, then turn it on again. If the problem persists, contact your local vendor or authorized service provider.
| This service message... | means... do this... | |
| ERRORAIDC SENSOR | AIDC sensor error. Contact Technical Support with the error information. | |
| ERRORCOMMUNICATION | A communication error occurred in the USB or Ethernet interface. | Check that the interface cable is properly connected to the printer.If the error continues to appear even though the cables are correctly connected, contact Technical Support. |
| ERRORCONTROLLER | Controller internal error. | Contact Technical Support with the error information. |
| ERRORENGINE INTERFACE | A communication error occurred with the engine controller. | Contact Technical Support with the error information. |
| FATAL ERRORCODE:XX | An error has been detected with the item indicated “XX” in the service message. | Reboot the printer. This often clears the service message, and printer operation can resume.If the problem persists, contact Technical Support. |
Installing Accessories
9
Note
Use of accessories not manufactured or supported by KONICA MINOLTA will void your warranty.

This chapter provides information about the following accessories.
| Dual In-Line Memory Module (DIMM) | 512 MB DIMM (Buffered) |
| Duplex Option Auto duplexing | |
| Lower Feeder Unit 500-sheet tray included | |
Note
Installing accessories always requires that the printer and accessories are turned off and unplugged during installation.
Antistatic Protection
Note
Before opening and handling the dual in-line memory module (DIMM), first touch a metal part of the printer to avoid an electrostatic charge building up. When the DIMM is taken out of its conductive bag, hold it by its edges to avoid touching the electronic circuits. When handling the DIMM, be sure to place it on an anti-static mat or a piece of aluminum foil.
Dual In-Line Memory Module (DIMM)

You may need additional memory (DIMM) for complex graphics, and for duplex printing.
Dual in-line memory module (or DIMM) is compact circuit board with surface-mount memory chips.
Your printer comes with 64 MB SDRAM printer memory on board. However, you can upgrade to a maximum of 576 MB of RAM through the installation of an additional 512 DIMM. Your printer comes with one free DIMM slot.
Installing a DIMM
Note
It's very important to protect the printer controller board and any associated circuit boards from electrostatic damage. Before performing this procedure, review the antistatic caution on page 126. In addition, always handle circuit boards by the edges only.
1 Turn off the printer and disconnect the power cord and interface cables.
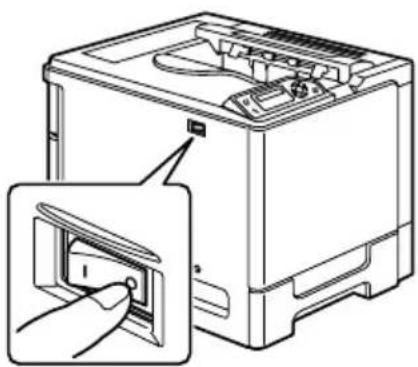
natural_image
Line drawing of a refrigerator with a close-up inset showing the door handle (no text or symbols)2 Using a screwdriver, remove the screw. Then, slide the rear cover to the right and remove it.
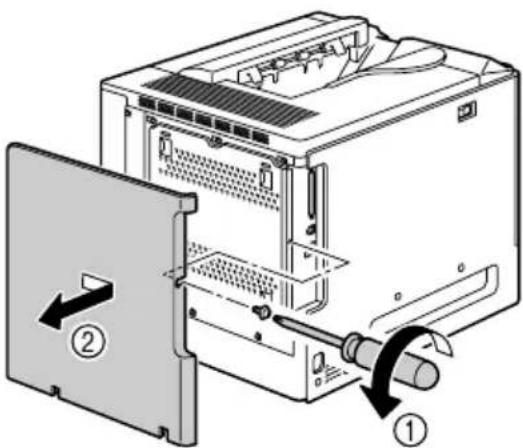
3 Using a screwdriver, loosen the seven screws. (Do not remove them from the printer.)
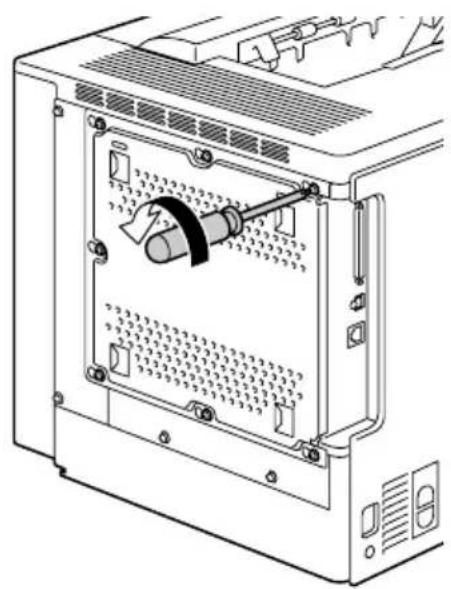
natural_image
Technical line drawing of a computer tower internal panel showing ventilation slots and drive mechanism (no text or labels)4 Slide the panel slightly to the right and lift it off the printer.
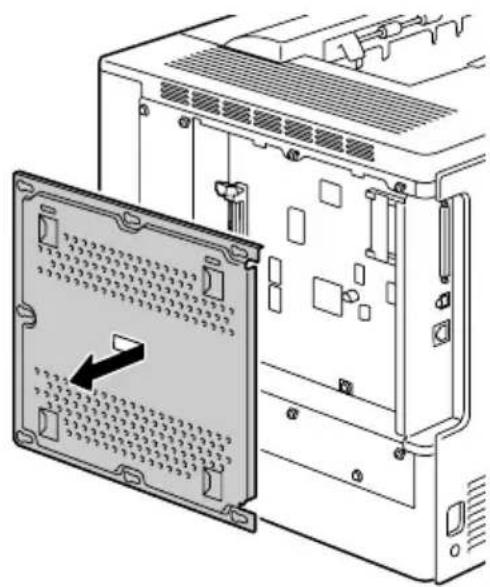
natural_image
Diagram of a computer tower showing internal components and a labeled panel (no text or symbols present)5 Insert the new DIMM straight into the DIMM connector until the latches snap into the locked position.
Observe the keyed side of the DIMM to align it with the connector. If you cannot snap the DIMM into place, do not force it. Reposition it, making sure that the DIMM is seated completely in the connector.
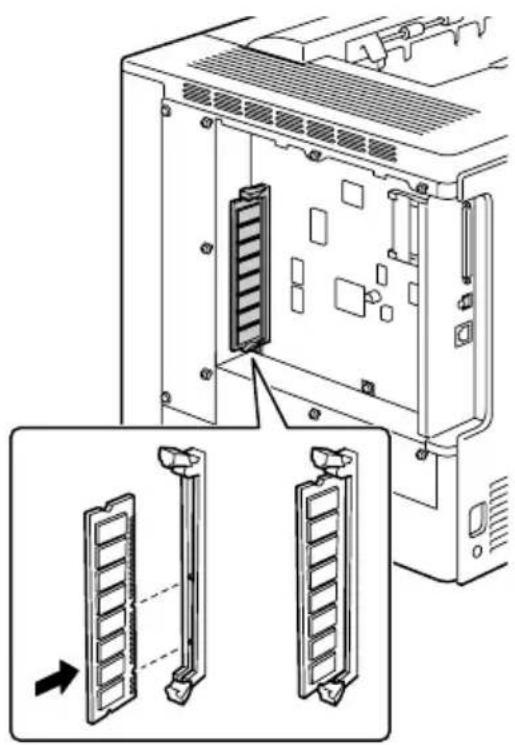
natural_image
Diagram of a computer tower rear panel with two side-mounted drive holders and a zoomed-in view showing internal structure (no text or labels)6 Reinstall the panel and tighten the seven screws.
7 Attach the rear cover.
8 Reconnect all interface cables.
9 Reconnect the power cord, and turn on the printer.
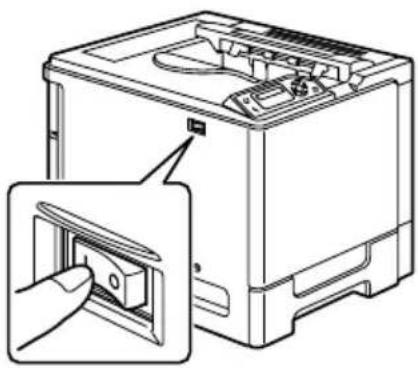
natural_image
Line drawing of a refrigerator with an inset showing a close-up of the door handle (no text or symbols present)10 Print a configuration page (SPECIAL PAGES/PRINT CONFIG PAGE MENU) and verify that the total amount of RAM installed in your printer is listed.
Duplex Option
Duplex (2-sided) printing can be performed automatically with the duplex option and enough memory installed. See "Duplexing" on page 54.
natural_image
Line drawing of a rectangular electronic device casing with ventilation grilles and a handle (no text or symbols)Installing the Duplex Option
1 Turn off the printer.
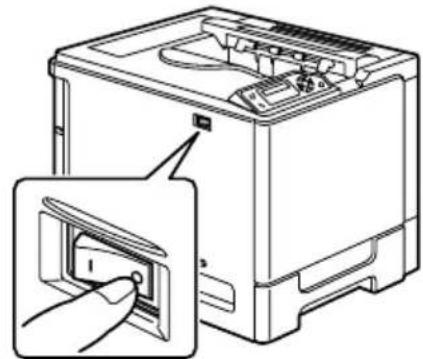
natural_image
Line drawing of a computer washing machine with a close-up view showing the button being inserted (no text or symbols present)2 Remove the cover on the right side cover.
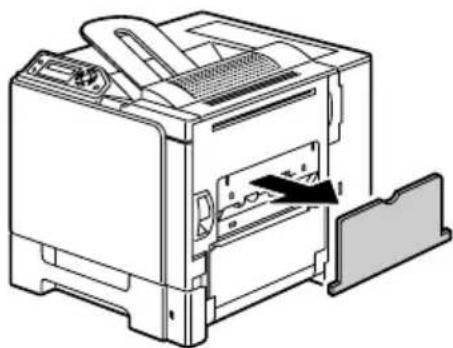
natural_image
Diagram of a computer printer internal structure showing internal components and a folder (no text or symbols)3 Remove the door at the side of the right side cover.
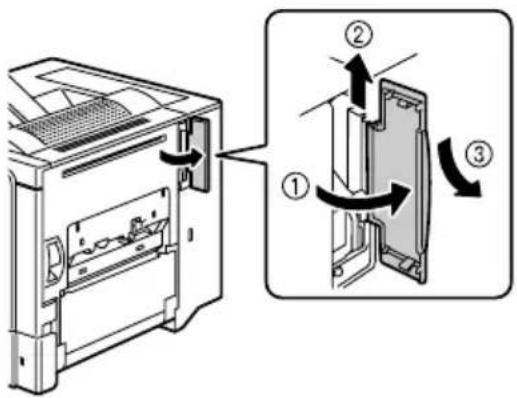
4 Prepare the duplex option.

Before installing the duplex option, open the duplex cover, and then check that the knob is positioned as shown in the illustration. Then, close the duplex cover.
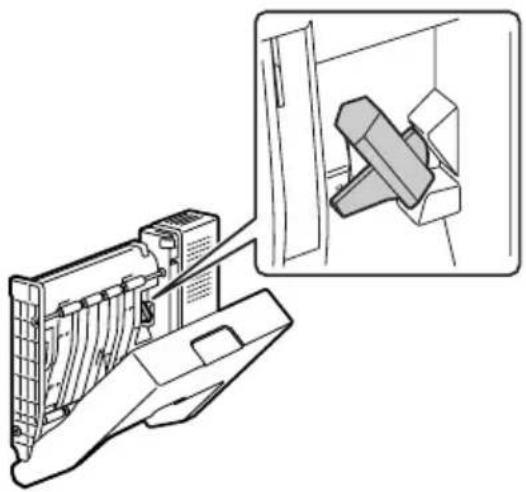
natural_image
Technical line drawing of a mechanical component with an inset view showing a close-up of a component (no text or symbols present)5 Attach the duplex option, as shown in the illustration.
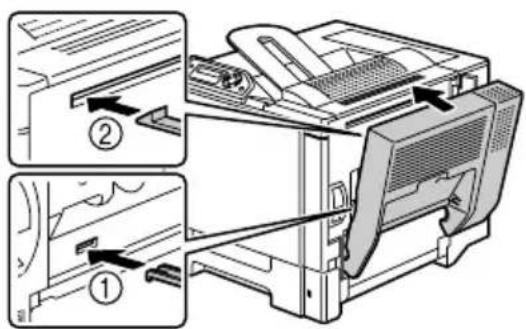
6 Open the duplex cover, and then turn both knobs counterclockwise until they are horizontal to secure the duplex option to the right side cover.
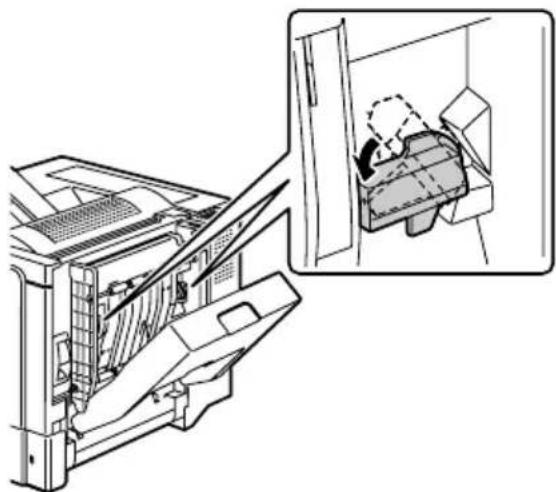
natural_image
Technical line drawing of a mechanical assembly with an inset showing a close-up of a component (no text or symbols present)7 Pull the lever, open the right side cover, and then attach the support wire for the duplex option to the printer.
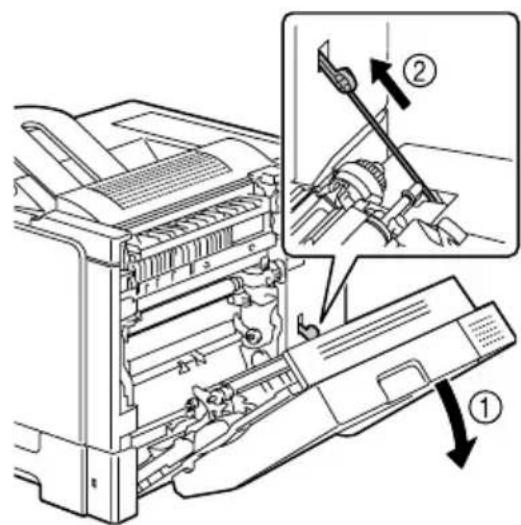
8 Close the right side cover.
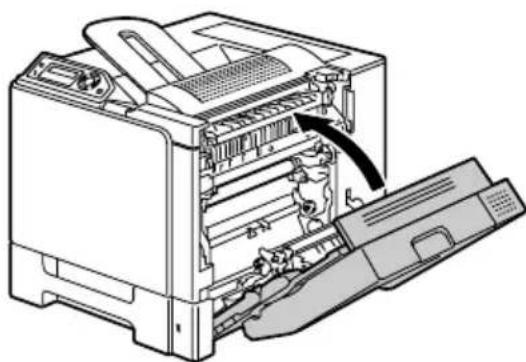
natural_image
Technical line drawing of a printer internal structure showing paper feed, paper tray, and paper holder (no text or labels)9 Install the duplex unit in the driver (Device Options Setting tab).
Lower Feeder Unit
You can install up to two optional lower feeder units (Trays 2 and 3). Each lower feeder unit increases your printer's media feed capacity by 500 sheets.
Kit Contents
■ Lower feeder unit with a tray (500-sheet capacity)
■ Four metal brackets
- Two front brackets
- Two rear brackets
■ Four securing screws
■ Transport guide (used only for Tray 2)
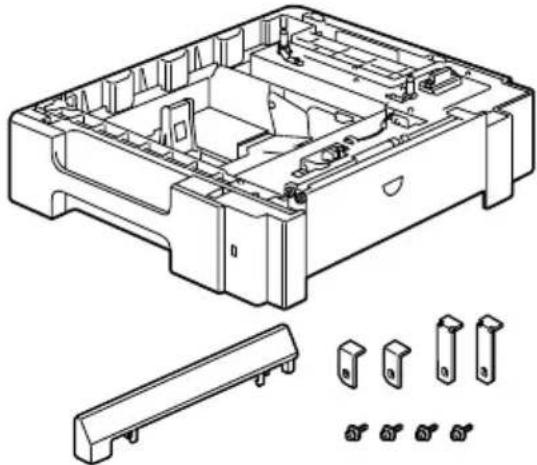
natural_image
Technical line drawing of a mechanical housing assembly with exploded view and component details (no text or symbols)Installing a Lower Feeder Unit
Note
Since consumables are installed in the printer, be sure to keep the printer level when moving it in order to prevent accidental spills.
1 Turn off the printer and disconnect the power cord and interface cables.
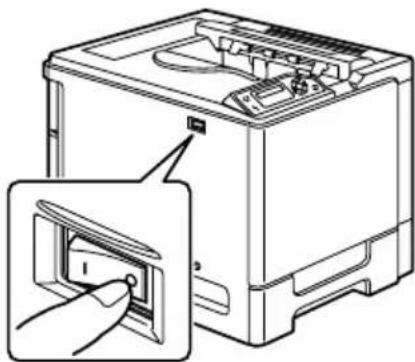
natural_image
Line drawing of a front-loading washing machine with a close-up inset showing the button (no text or symbols)2 Prepare the lower feeder unit.

Be sure to place the lower feeder unit on a level surface.
3 Open the right side cover of the lower feeder unit.
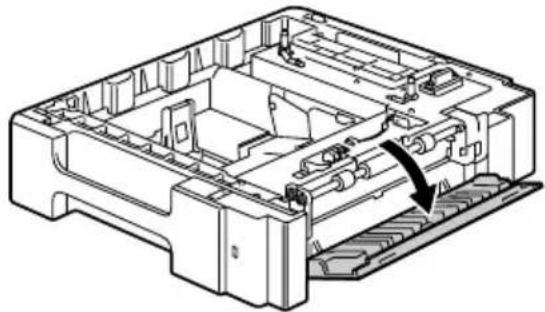
natural_image
Technical line drawing of a mechanical assembly with no visible text or symbols
The right side cover of the lower feeder must be opened before the user can be installed onto the printer.
4 With another person's help, place the printer on top of the lower feeder unit, making sure that the positioning pins on the lower feeder unit correctly fit into the holes on the bottom of the printer.
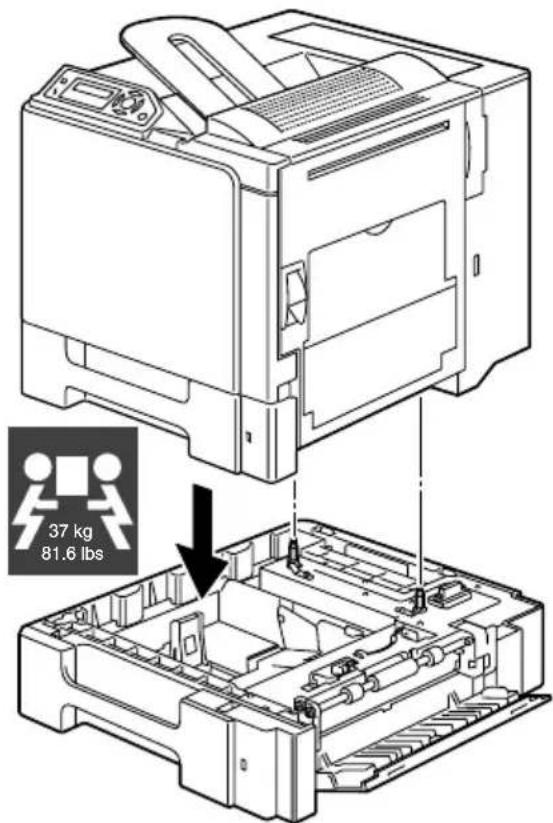

If two lower feeder units are to be installed, stack the two lower er units and secure them together before installing them to the er.

WARNING!
This printer weighs approximately 37 kg (81.6 lb) when it is fully loaded with consumables. The printer must be lifted by two people.
5 Using a screwdriver, install the two securing brackets at the rear of the printer.
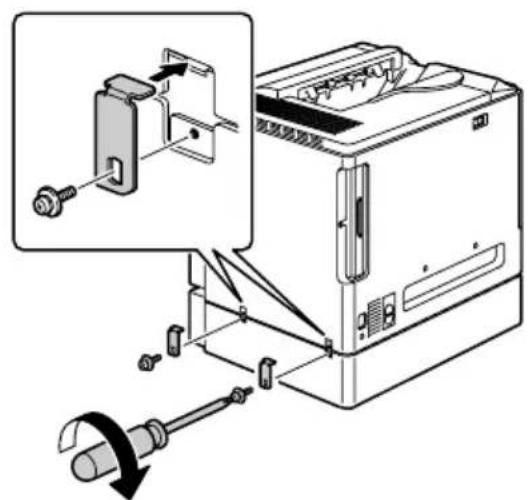
6 Pull out the trays.
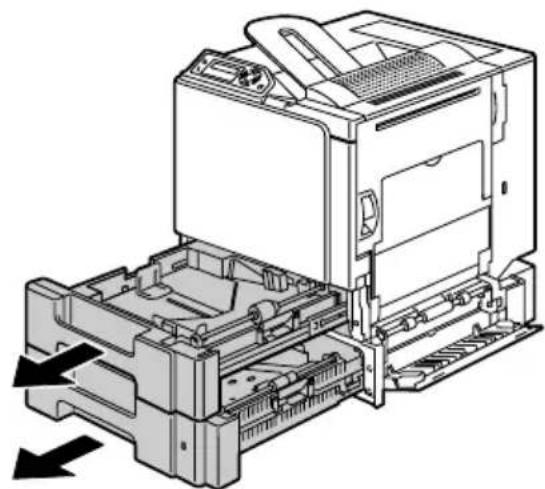
natural_image
Technical line drawing of a printer internal structure with no visible text or symbols7 Install the two securing brackets at the front of the printer.
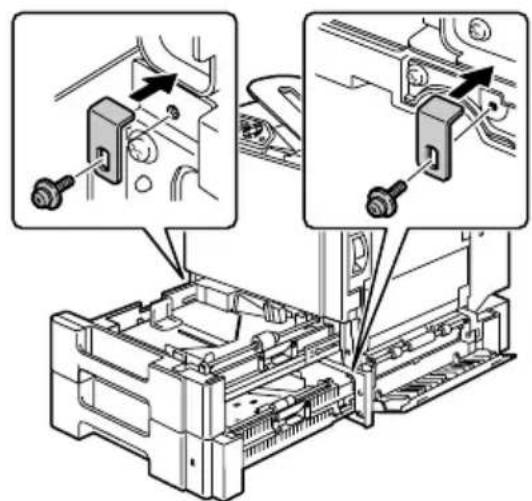
8 Close the trays.
9 Attach the transport guide to the right door of Tray 2.

It is not necessary to attach the transport guide to the right door of Tray 3.
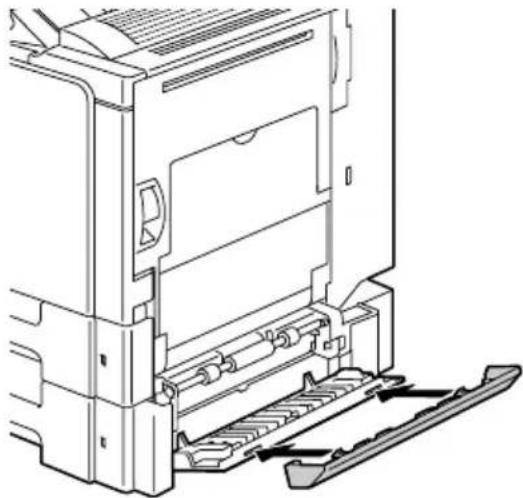
natural_image
Technical line drawing of a mechanical device with internal components and mounting bracket (no text or symbols)10 Close the right side cover of the lower feeder unit.
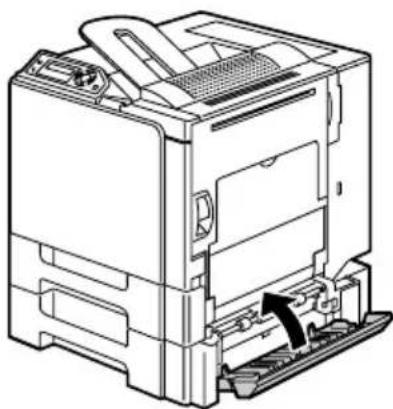
natural_image
Technical line drawing of a computer chassis with an arrow indicating a component (no text or symbols present)11 Install Tray 2 (Tray 3) in the driver (Device Options Setting tab).
Appendix
A
Safety Specifications
| Printer | ||
| Safety standards U.S. | model UL 60950 | -1, CSA C22.2 No.60950-1-03 |
| European model EU Directive 73/23/EECEU Directive 93/68/EECEN 60950-1 (IEC 60950) | ||
| China model GB 4943 | ||
| EMC standards U.S. | model FCC part 1 | 5 subpart B class BICES-003 |
| European model EU Directive 89/336/EECEU Directive 93/68/EECEN 55022 (CISPR Pub. 22) class BEN 61000-3-2EN 61000-3-3 | ||
| China model GB 9 | 254 class B, GB 17625.1 | |
| Australian model EN 55022 class B | ||
Technical Specifications
Printer
| Type Desktop full color tandem | em laser beam printer |
| Print system Semiconductor | laser beam scanning + Dry elec-tron photography method |
| Exposure system 4 laser diode and polygon mirror | |
| Developing system Mono-component SMT | |
| Resolution 2400 dpi × 600 dpi,1200 dpi × 600 dpi or 600 dpi × 600 dpi | |
| First print Simplex (600 dpi) | Monochrome/Full color:14.2 seconds for A4 (plain paper)Monochrome/Full color:14.1 seconds for Letter (plain paper)Duplex (600 dpi)Monochrome/Full color:22.3 seconds for A4, Letter (plain paper) |
| Print speed Simplex (600 dpi) | Monochrome/Full color:20 pages per minute for A4 (plain paper)Monochrome/Full color:21 pages per minute for Letter (plain paper)Duplex (600 dpi)Monochrome/Full color:11.5 pages per minute for A4 (plain paper)Monochrome/Full color:11.8 pages per minute for Letter (plain paper) |
| Warm-up time 30 seconds or less at startup | |
| Media sizes Tray 1 | Paper width: 92 to 216 mm (3.6 to 8.5")Paper length: 148 to 297 mm (5.8 to 11.7")Trays 2 and 3 (Optional)B5 - Legal |
| Paper/Media | Plain paper (60 to 90 g/m2; 16 to 24 lb)Recycled paper (60 to 90 g/m2; 16 to 24 lb)TransparenciesEnvelopesThick Stock 1 (91 to 150 g/m2)Thick Stock 2 (151 to 210 g/m2)Post cardLetterheadLabel sheets |
| Input capacity Multipurpose | cassettePlain paper: 250 sheetsEnvelope: 10 envelopesLabel/Postcard/Thick Stock/Transparency:20 sheetsOptional Lower feeder unitPlain paper: 500 sheets |
| Output capacity Output tray: | 250 sheets (A4, Letter) |
| Operating temperature 10 to 35°C (50 to 95°F) | |
| Operating humidity 15 to 85% | |
| Power supply 110 to 127 V, | 50 to 60 Hz220 to 240 V, 50 to 60 Hz |
| Power consumption 120 V: | 1250 W230 V: 1250 W |
| Amperage 110 to 127 V: 11 | A or less220 to 240 V: 6 A or less |
| Acoustic Noise Printing: 54 | dB or lessStandby: 39 dB or less |
| External dimensions Height | 440 mm (17.3") (Including outer projection)Width: 420 mm (16.5")Depth: 520 mm (20.5") |
| Weight Printer: approximately | 30 kg (66.1 lb)Toner cartridge:Standard in-box cartridge =1.42 kg (3.13 lb) (Y, M, C)/1.46 kg (3.22 lb) (K)Replacement cartridge (Standard-Capacity)=1.52 kg (3.35 lb) (Y, M, C)/1.55 kg (3.42 lb) (K) |
| Interface | USB 2.0 (High Speed) compliant, 10Base-T/100Base-TX (IEEE 802.3) Ethernet |
| CPU | ARM9 926EJ-S 200 MHz |
| Standard memory | 64 MB |
Consumable Life Expectancy Chart
| Item Average Life Expectancy | |
| Toner cartridge Standard | in-box Cartridge:Printed within a constant environment*3,000 pages or more (Continuous)2,750 pages or more (2 pages/job)Printed outside of a constant environment*2,400 pages or more (Continuous)2,200 pages or more (2 pages/job)Replacement Cartridge (Standard-Capacity):Printed within a constant environment*6,000 pages or more (Continuous)5,500 pages or more (2 pages/job)Printed outside of a constant environment*4,800 pages or more (Continuous)4,400 pages or more (2 pages/job) |
| Waste toner bottle 40,000 | pages (Monochrome)10,000 pages (Full color) |
| Transfer roller 120,000 pages | |
| Transfer unit 120,000 pages | |
| Fuser unit 150,000 pages | (Continuous)130,000 pages (2 pages/job) |
| Media feed roller 300,000 pages | |
| Note:*A constant environment is one with a temperature between 15 °C [59 °F] and 25 °C [77 °F] and humidity between 35% and 70%. | |

The values listed in the above table indicate the number of pages for simplex printing using A4/Letter-size media with 5% coverage. The actual life may differ (be shorter) depending on the printing conditions (coverage, paper size, etc.), differences in the printing method, such as continuous printing or intermittent printing (when print jobs of one page are often printed), or the type of paper used, for example, thick paper. In addition, the life will be affected by the temperature and humidity of the operating environment.
Our Concern for Environmental Protection

As an ENERGY STAR® Partner, we have determined that this machine meets the ENERGY STAR Guidelines for energy efficiency.
What is an ENERGY STAR product?
An ENERGY STAR product has a special feature that allows it to automatically switch to a “low-power mode” after a period of inactivity. An ENERGY STAR product uses energy more efficiently, saves you money on utility bills and helps protect the environment.
Index
A
Accessories 126
DIMMs 127
Duplex option 130
Lower feeder unit 133
Antistatic protection 126
B
Booklet binding 111
C
Configuration menu 22
Consumables
Toner cartridge 58
Transfer belt unit 72
Transfer roller 68
Waste toner bottle 65
Control panel 20
D
Dual in-line memory module 127
Duplexing 54
Duplex option 130
E
Electrostatic discharge 126
Envelopes 35
Error messages 119
I
Imageable area 39
L
Labels 36
Letterhead 37
Loading media 41
Lower feeder unit 133
M
Maintenance 80
Media
Clearing misfeeds 91
Imageable area 39
Loading 41
Path 90
Preventing misfeeds 89
Media misfeed
Duplex option 98
Fuser unit 99
Transfer roller 102
Tray 1 92
Tray 2/3 96
Media path 90
Media storage 56
Media type
Envelopes 35
Labels 36
Letterhead 37
Plain paper 33
Postcards 37
Thick stock 34
Transparencies 38
Message window 20
Messages 118
Misfeed problems 105
Clearing 91
Media path 90
Preventing 89
N
N-up 111
0
Output tray 55
Overlay printing 110
P
Page margins 40
PageScope Web Connection 111
Paper tab 11
Plain paper 33
Postcards 37
Preventing media misfeeds 89
Print quality 112
Printer
Parts 3
Printer driver 10
Paper tab 11
Quality tab 12
Setting 9
Setup tab 11
Q
Quality tab 12
S
Service messages 124
Setup tab 11
Static electricity discharge 126
Status display 14
Closing 15
Opening 14
Using 14
T
Thick stock 34
Transparencies 38
Troubleshooting 87
Duplexing 110
Media misfeed 105
Nothing is printed 112
Printer resets 110
Status, error, and service messages 118
W
Wrist strap for antistatic protection 126
- magicolor® 5430 DL User's Guide
- Trademarks
- Copyright Notice
- Notice
- SOFTWARE LICENSE AGREEMENT
- For EU member states only
- Contents
- Getting Acquainted with Your Printer 2
- Using the Printer Driver 10
- Using the Windows Status Display and Printer Status Monitor Center .....13
- Working with the Status Display 14
- Recognizing Status Display Alerts 15
- Recovering from a Status Display Alert 15
- Closing the Status Display 15
- Working With the Printer Status Monitor Center 16
- Recognizing Printer Status Monitor Center Alerts 18
- Closing the Printer Status Monitor Center 18
- Printer Control Panel and Configuration Menu ....19
- About the Control Panel 20
- Configuration Menu Overview 22
- Media Specifications 32
- Media Types 33
- Loading Media 41
- Replacing Consumables 58
- Maintaining the Printer 80
- Cleaning the Printer 82
- Troubleshooting ....87
- Installing Accessories ....125
- A Appendix ......137
- Introduction
- 1
- Getting Acquainted with Your Printer
- Space Requirements
- Printer Parts
- Front View
- Rear View
- Accessory
- Front View with Options
- Software Installation
- 2
- Utilities and Documentation CD-ROM
- System Requirements
- Selecting Driver Options/Defaults (for Windows)
- Uninstalling the Printer Driver (for Windows)
- Displaying Printer Driver Settings (for Windows)
- Windows XP/Server 2003
- Windows 2000/Me/98SE/NT 4.0
- Using the Printer Driver
- Common Buttons
- OK
- Cancel
- Apply
- Help
- Easy Set
- Page Layout
- Printer Figure
- Setup Tab
- Paper Tab
- Quality Tab
- Device Options Setting Tab
- Using the Windows Status Display and Printer Status Monitor Center
- 3
- Working with the Status Display
- Opening the Status Display and Showing the Supplies Status
- Altering the Size of the Status Display Window
- Using the Status Display
- Recognizing Status Display Alerts
- Recovering from a Status Display Alert
- Closing the Status Display
- Working With the Printer Status Monitor Center
- Opening the Printer Status Monitor Center and Showing the Supplies Status
- Using the Printer Status Monitor Center
- Action Menu
- Options
- Recognizing Printer Status Monitor Center Alerts
- Closing the Printer Status Monitor Center
- Printer Control Panel and Configuration Menu
- 4
- About the Control Panel
- Toner Supply Indicators
- Configuration Menu Overview
- Special Pages Menu
- Language Menu
- Engine Menu
- Network Menu
- Consumables Usage Menu
- Using Media
- 5
- Media Specifications
- Media Types
- Use media that is
- Note
- DO NOT use media that is
- Thick Stock
- DO NOT use thick stock that is
- Envelopes
- Use envelopes that are
- DO NOT use envelopes that have
- Labels
- Use label sheets that are
- DO NOT use label sheets that
- Letterhead
- Postcards
- Use postcards that are
- DO NOT use postcards that are
- Transparencies
- Use transparencies that are
- DO NOT use transparencies that
- What Is the Guaranteed Imageable (Printable) Area?
- Imageable Area—Envelopes
- Page Margins
- Loading Media
- How do I load media?
- Tray 1 (Multipurpose Cassette)
- Loading Plain Paper
- Other Media
- Loading Envelopes
- Loading Label Sheets/Postcards/Thick Stock/Transparencies
- Tray 2/3 (Optional Lower Feeder Units)
- Duplexing
- How do I autoduplex?
- Output Tray
- Media Storage
- How do I store media?
- Replacing Consumables
- 6
- About Toner Cartridges
- CAUTION
- Replacing a Toner Cartridge
- Replacing the Waste Toner Bottle
- Replacing the Transfer Roller
- Replacing the Ozone Filter
- Replacing the Transfer Belt Unit
- Maintaining the Printer
- 7
- WARNING!
- Cleaning the Printer
- Exterior
- Media Rollers
- Cleaning the Media Feed Rollers (All Trays)
- Duplex Option Feed Rollers
- Cleaning the Media Transfer Rollers for Tray 2 and 3
- Cleaning the Laser Lens of the Printer
- Troubleshooting
- 8
- Printing the Configuration Page
- Preventing Media Misfeeds
- Understanding the Media Path
- Clearing Media Misfeeds
- Media Misfeed Messages and Clearing Procedures
- Clearing a Media Misfeed in Tray 1
- Clearing a Media Misfeed in Tray 2/3
- Clearing a Media Misfeed from the Duplex Option
- Clearing a Media Misfeed from the Fuser Unit
- Clearing a Media Misfeed from the Transfer Roller
- Solving Problems with Media Misfeeds
- Solving Other Problems
- Solving Problems with Printing Quality
- Status, Error, and Service Messages
- Error Messages (Warning)
- Service Messages
- Installing Accessories
- 9
- Antistatic Protection
- Dual In-Line Memory Module (DIMM)
- Installing a DIMM
- Duplex Option
- Installing the Duplex Option
- Lower Feeder Unit
- Kit Contents
- Installing a Lower Feeder Unit
- Appendix
- A
- Safety Specifications
- Technical Specifications
- Consumable Life Expectancy Chart
- Our Concern for Environmental Protection
- What is an ENERGY STAR product?
- Index
- B
- C
- D
- E
- I
- L
- M
- N
- 0
- P
- Q
- S
- T
- W
Brand : KONICA MINOLTA
Model : magicolor 5430 DL
Category : Printer