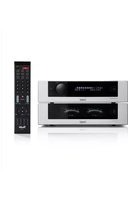
Complete 7 - Receiver Teufel - Free user manual and instructions
Find the device manual for free Complete 7 Teufel in PDF.


| Product Type | Receiver |
| Brand | Teufel |
| Model | Complete 7 |
| Color | Black |
| Dimensions (W x H x D) | 17.3 x 6.5 x 14.2 inches (44 x 16.5 x 36 cm) |
| Weight | 22.0 lbs (10.0 kg) |
| Power Output | 100 watts per channel (8 ohms, 20 Hz - 20 kHz) |
| Number of Channels | 7.2 |
| Wireless Connectivity | Bluetooth, Wi-Fi |
| HDMI Inputs | 4 |
| HDMI Outputs | 1 (ARC compatible) |
| Audio Formats Supported | Dolby Atmos, DTS:X, PCM |
| Power Consumption | 500 W (standby: <0.5 W) |
| Operating Temperature | 41°F to 95°F (5°C to 35°C) |
| Maintenance Cleaning | Wipe with a soft, dry cloth; avoid liquids |
| Safety Precautions | Do not expose to water or humidity; ensure proper ventilation |
| Spare Parts Availability | Remote control, power cord (contact support) |
| Repairability | Moderate: user-replaceable fuses and remote; other repairs by technician |
| Warranty | 2 years |
Frequently Asked Questions - Complete 7 Teufel
User questions about Complete 7 Teufel
0 question about this device. Answer the ones you know or ask your own.
Ask a new question about this device
Download the instructions for your Receiver in PDF format for free! Find your manual Complete 7 - Teufel and take your electronic device back in hand. On this page are published all the documents necessary for the use of your device. Complete 7 by Teufel.
USER MANUAL Complete 7 Teufel
Technical Description and Operating Instructions
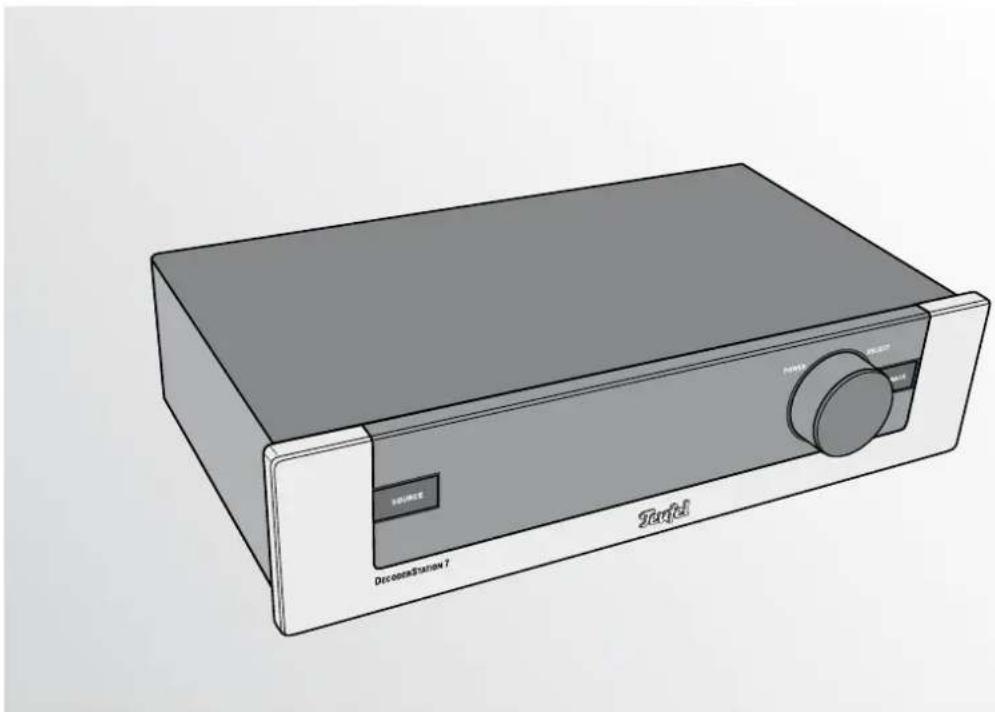
DecoderStation 7
AV Controller/Pre-Amplifier High Definition Audio
Teufel
Contents
General notes and information....3
Trademarks 3
Contact 3
Proper use 3
Safety notes....4
Overview....5
Control elements and connections....6
Setup....8
Remote control....8
Connecting....9
Antennas 9
Inputs for source devices 9
Television/projector....10
Audio outputs....10
Headphones 11
Connecting to a power supply 11
Basic functions ..... 12
Activating and deactivating 12
Automatic activation (CEC) 12
Selecting a source.... 12
Adjusting the volume....12
Mute 12
Menu functions....13
"Tuner" menu 13
"Surround" menu 14
"Tone Control" menu....14
"Speaker Levels" menu 14
"Source Levels" menu 14
Dolby Digital and DTS (standard and HD) ..... 16
Test tone 16
Channel level buttons 16
Dimmer 16
Equalizer....16
Tone/LipSync 17
Adjusting the sound. 17
Setting audio delay.... 17
Direct 17
Info....17
Sleep....17
Radio playback 18
Setting the radio stations 18
Stereo/mono 18
Station memory 18
Care and cleaning 19
Troubleshooting 19
Protecting the environment .....20
Technical data 20
Notice
The information in this document may change without prior notice and in no way constitutes any liability on the part of Lautsprecher Teufel GmbH.
No part of these instructions may be reproduced in any form or be broadcasted in any way electronically, mechanically, by photocopy or recording without the written permission of Lautsprecher Teufel GmbH.
© All trademarks are the property of their respective owners.

Manufactured under licence from Dolby Laboratories. "Dolby", "Pro Logic" and the double D symbol are trademarks of Dolby Laboratories.
dts-hd Master Audio
Manufactured under license under U.S. Patent Nos: 5,956,674; 5,974,380; 6,226,616; 6,487,535; 7,212,872; 7,333,929; 7,392,195; 7,272,567 & other U.S. and worldwide patents issued & pending. DTS-HD, the Symbol, & DTS-HD and the Symbol together are registered trademarks & DTS-HD Master Audio is a trademark of DTS, Inc. Product includes software. © DTS, Inc. All Rights Reserved.
Original packaging
If you wish to exercise your eight-week right of return, we ask that you be absolutely sure to hold onto the packaging. We can only accept the return of a device WITH THE ORIGINAL PACKAGING. Empty boxes are not available!
Complaints
In case of complaint we will need the following information to process your enquiry:
1. Invoice number
Can be found on the sales slip (enclosed with the product) or on the order confirmation received as a PDF document, e.g. 4322543
2. Serial number or batch number
Located on the back of the unit, e.g. serial number: DE00702012040A-123.
Many thanks for your support!
Contact
For questions, suggestions or any other issues please contact our customer service department:
Phone 00800 - 200 300 40 (free of charge)
Fax: +49 (0)30 / 300 930 930
E-mail: servcie@teufelaudio.com
www.teufelaudio.com
Proper use
Only use the unit as described in these operating instructions. Any other use will be deemed as not in accordance with the instructions and may lead to damage to property or even persons.
The manufacturer accepts no liability for damage caused by use not in accordance with the instructions.
The unit is intended for private use.

Before operating the unit for the first time please read the safety notes and operating instructions carefully. This is the only way to use all functions
safely and reliably.
Keep the operating instructions safe and pass them on to anyone who may own the unit after you.
Caution icons
You will find the following caution icons in these instructions:

High risk!
Failure to observe the warning may result in severe personal injury or death.

Moderate risk!
Failure to observe the warning may result in property damage.

Minor risk!
Points which should be observed when handling the unit.
Safety notes

Risk of electric shock!
Deficient electrical installation or excessive grid voltage may result in an electrical shock.
- The AC adapter plug is suitable for use with a power supply voltage of 100–240 V \~ / 50/60 Hz.
- Only use the enclosed mains adapter. When connecting, make sure that the right voltage is present. More detailed information is available directly on the mains adapter.
- Immediately disconnect the AC adapter plug and discontinue using the device if the device emits smoke, you notice burning odour, unusual noises, if the case or the mains adapter is defective or exhibits visible damages.
- The On/Off switch does not disconnect the device from the power supply. You should therefore set up the device so that the AC adapter plug is easily accessible.
- Never open the case of the unit or mains adapter. Repairs may only be carried out by an authorised specialist workshop. Only parts which conform with the original device specifications may be used for repairs. There are electrical and mechanical parts in this unit which are essential in order to avoid exposure to sources of danger.
- Only use the unit in indoor areas.
- Do not operate the unit in moist areas and protect it from drops of water and splash water. Also take care not to stand vases or other containers of liquid on or near the unit in order to avoid liquid getting into the case or the mains adapter. If water or other external objects penetrate the housing, immediately disconnect the AC adapter plug. Then send the device in to our service address.
- Never touch the mains adapter with wet hands.
- Check the unit regularly for damage.
Danger
Danger to children!

Children can become trapped in the packing film when playing and suffocate.
- Do not allow children to play with the unit or the packing film. Danger of suffocation.
- Ensure that children do not remove small parts from the unit or take them off of the unit (e.g. control knobs or plug adapters). They could swallow the parts and choke.
Never allow children to operate electrical devices unsupervised.
Danger
Danger to hearing!
Loud noise may lead to hearing loss.
Particularly when the system is activated and has been set to maximum volume, very high noise pressure may be produced. This may have psychological consequences and also cause physical injury. Children and pets are particularly at risk.
- Set the volume control to a low level.
- When the volume is set high, always keep a certain distance from the unit and never place your ear directly on the speaker.
- To avoid damage to health, avoid extended listening at high volume.
Danger
Danger of chemical burns!
Leaking battery acid may lead to chemical burns.
- Do not allow battery acid to come into contact with skin, eyes or mucus membranes. In case of contact with acid rinse the affected parts immediately with plenty of plain water and if necessary see a doctor.
Danger
Danger of injury/damage!
Incorrect location may result in damage.
- Never use the unit unmounted in vehicles, in unstable locations, on wobbly tripods or furniture, on underdimensioned brackets etc. The device could tip or fall down and cause injury to persons or be damaged itself.
- Arrange the device so that it cannot be knocked over accidentally and make sure that the cables do not pose a trip hazard.
- Do not place the unit near sources of heat (e.g. heaters, ovens, other heat generating equipment such as amplifiers etc.)
Attention Fire hazard!

Improper use may lead to damage or fire.
- Do not place open flames such as burning candles or similar on the unit.
- Ensure sufficient ventilation.
- Do not place the unit in direct sunlight.
- Do not cover the vents with curtains, blankets, newspapers or similar. Heat build-up inside the unit can shorten its lifetime.
Attention Risk of damage!

Power overload due to lightning strike may damage or destroy the unit.
- If the unit is to be left unsupervised for a long period (e.g. during a holiday), or if a thunderstorm is forecast, disconnect the mains adapter from the power socket.
Overview
①

②

③

④
⑤

⑥

Product contents
① 1 x DecoderStation 7
② 1 x remote control (DS 7 RC)
③ 1 x mains adapter
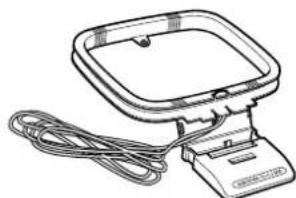
④ 1 x AM antenna
⑤ 1 x FM antenna
⑥ 2 x battery for the remote control
Check to be sure
- Check that all items have been delivered and that nothing is damaged.
- If the delivery is incomplete or you find damage sustained in transit, do not operate the unit but contact our service department (see page 3).
Control elements and connections
Front side

Back side

Item Name Description
| 1 SOURCE | Switch signal source |
| 2 - | Display panel |
| 3 POWER/ SELECT | Control dial/Activation pushbutton |
| 4 BACK Return button | |
Item Name Description
| 5 | FM | Connector jack for USW antenna 5 |
| 6 | AM+/GND | Connector jacks for AM antenna 4 |
| 7 | SERVICE | USB connection (for service only) |
| 8 | OPTICAL | Digital audio input jack for optical cables |
| 9 | COAXIAL 1/2 | Digital audio input jacks for coaxial cables |
| 10 | LINK | Connector jack for additional expansions |
| 11 | AUX 1 | Analogue audio input jack (3.5 mm phone jack) |
| 12 | AUX 2/3 | Analogue audio input jacks (RCA) |
| 13 | HEADPHONE | Connector jack for headphones |
| 14 | RC/PRE OUT | Analogue audio output5.1 mode: Stereo downmix7.1 mode: Rear channels |
| 15 | SURR, SUB, CENTER, FRONT | 5.1 audio output jacks |
| 16 | GND | Ground connection |
| 17 | HDMI OUT | HDMI output jack |
| 18 | HDMI IN 1 - 3 | HDMI input jacks |
| 19 | 12V | Connector jack for mains adapter 3 |
Remote control
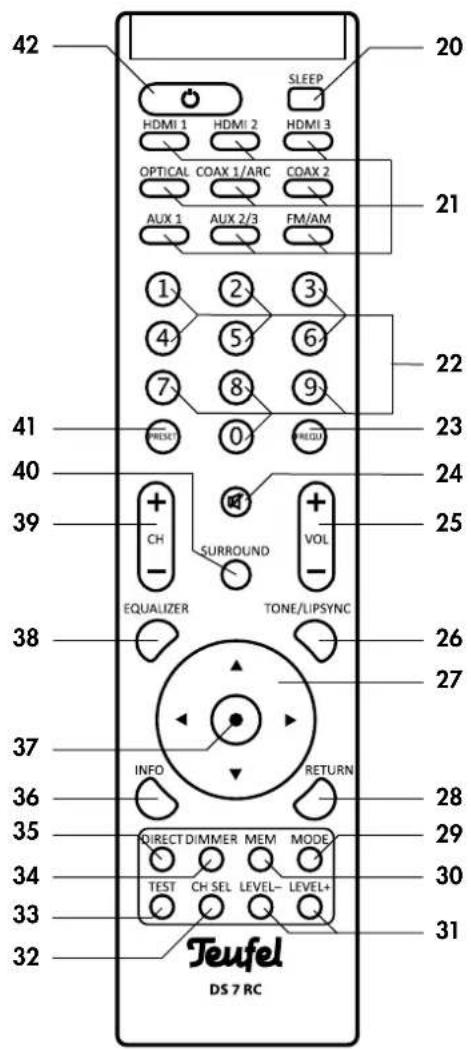
Item Name Description
| 20 | SLEEP | Sleep function |
| 21 | HDMI 1 - 3OPTICALCOAXIAL 1/2AUX 1/2/3FM/AM | Select source device |
| 22 | 1 ... 0 | Number buttons |
| 23 | FREQU. | Radio mode: Enter the tuning frequency |
| 24 | Mute speaker | |
| 25 | VOL +/- | Adjust volume |
| 26 | TONE/LIPSYNC | Adjust the sound,set the delay |
| 27 | ◀▶▲▼ | Navigation buttons |
| 28 | RETURN | Return button |
| 29 | MODE | Switch between mono and stereo in FM radio mode |
| 30 | MEM | Save to station memory slots |
| 31 | LEVEL +/- | Adjust the channel level |
| 32 | CH SEL | Select the channel for the level adjustment |
| 33 | TEST | Activate/deactivate test sound |
| 34 | DIMMER | Select display panel brightness |
| 35 | DIRECT | Emit sound directly (without sound control) |
| 36 | INFO | Display the format of the audio signal |
| 37 | • | Select button |
| 38 | EQUALIZER | Adjust the sound within nine frequency ranges |
| 39 | CH +/- | Radio mode: Select station memory |
| 40 | SURROUND | Activate/deactivate surround mode |
| 41 | PRESET | Radio mode: Select station memory |
| 42 | Turn the DecoderStation 7 on or to standby |
Setup
Location tips
- Select a stable, level base.
• Make sure that the environment is clean and free from dust. - Avoid placing the unit close to sources of heat or in direct sunlight.
- Do not place any heavy objects on the DecoderStation 7 or the cables.
The receiver for signals from the remote control is located at the front of the unit. You should therefore set up the unit so that you can see it from your sitting position.
Remote control
You will need two micro-type or AAA batteries with 1.5 Volt (included in the product contents) in order to operate the remote control.
Inserting batteries
- Gently press down the arrow on the battery compartment cover on the back of the remote control. Push the cover down and out.
- If applicable, remove any old batteries (please observe the disposal notes on page 20).
- Insert the batteries in the battery compartment as shown in the figure.
- Place the cover back on the compartment and push it closed.
Functionality
The remote control relays the control signals by means of infrared light. For this, you will have to point the remote control at the DecoderStation 7. The infrared receiver is located on the front side. Make sure that the infrared light is not obstructed by objects.

Danger

Danger of injury/damage!
Arrange the cables so that they do not pose a trip hazard.
Antennas
Danger

Risk associated with lightning strike!
If you are using outdoor or roof antennas, be absolutely sure that the antenna has lightning.
FM antenna
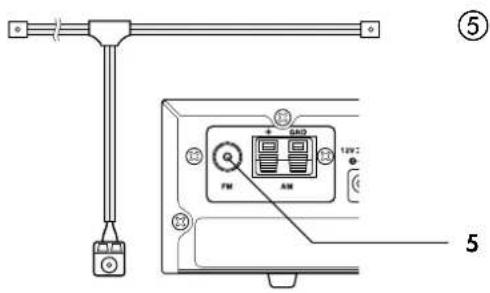
Connect the antenna for receiving FM stations to the jack 5 "FM". This may be a roof/outside antenna, but also a cable television connection. You will need a coaxial connector cable for this.
If an antenna connection is not available at your setup location, you can use the enclosed throw-out aerial ⑤. Push the aerial plug into the jack 5 "FM" and adjust the position of the throw-out aerial for best reception. Then fix the aerial in place.
AM antenna
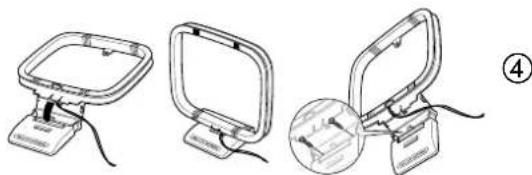
The enclosed antenna ④ receives AM stations. You can set up this antenna to be free standing or screw it onto a (cabinet) wall.
Connect the connector cable of the antenna with the jacks 6 "AM" on the back of the DecoderStation 7. Press down the lever on each of the connector terminals and insert the end of the cable in the opening above it. Re-leasing the lever locks the cable in place.
Inputs for source devices
The DecoderStation 7 offers you three HDMI inputs for digital audio/video signals (HDMI 1, 2 and 3), three analogue audio inputs (AUX 1, 2 and 3), one optical and two coaxial digital audio inputs.
HDMI 1, 2 and 3
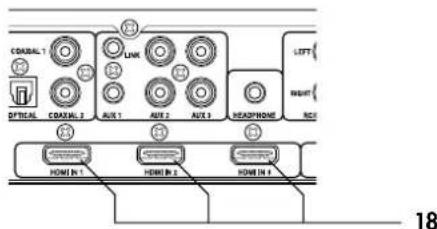
You can connect a source device with a digital video and audio signal to the jacks 18 (e.g. PC, Blu-ray player or video game system). You will need a HDMI cable for this.
If a unit just emits video via HDMI, you can assign one of the DecoderStation 7 audio inputs to the HDMI input this device is connected to and get audio in that way.

OPTICAL
You can connect the optical digital sound output of a source device to the jack 8. You will need an optical cable with a TOSLINK plug for this. Your source requires either an optical 3.5 mm jack or a TOSLINK jack, too.
Coaxial 1 and Coaxial 2
You can connect the coaxial digital audio outputs of up to two source devices to the jacks 9. You will need a coaxial cable with RCA plugs for this.
AUX 1, 2 and 3
You can connect source devices with analogue audio signals to the jacks 11 and 12. The jack 11 (AUX 1) is a 3.5-mm jack for connecting e.g. a MP3 player. The jacks 12 (AUX 2 and 3) are RCA jacks for connecting e.g. a cassette or audio tape player.
If you want to connect a record player, which does not have a line output, use PhonoStation 1 for correct pre-amplification.
Outputs
Television/projector
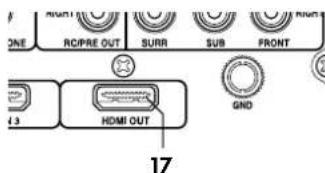
Connect your television set or your projector to the "HDMI OUT" jack 17. You will need a HDMI cable for this.
Audio outputs
Connect your high power amplifier, multi-channel active subwoofer or active speaker to the RCA jacks 15. You will need three stereo RCA cables for this:
| FRONT LEFT/RIGHT | Front left/right channels |
| CENTER Mid-channel | |
| SUB Subwoofer channel | |
| SURR LEFT/RIGHT Rear left/right channels | |
In 7.1 operation, the two additional rear channels are connected to the jacks 14 "RC/Pre Out" (see next paragraph).


RC/Pre Out
You can configure the function of the analogue output 14 "RC/Pre Out" in the "System Setup" menu. (see "5.1/7.1" on page 15):
5.1 operation Converts (via downmix) the 5.1 audio signal on two stereo channels (2.0) in order to, for example, project sound into a second room.
7.1 operation Output of the additional rear channels (REAR).
You can connect your power amplifier or multi-channel active subwoofer, active speaker or a RF audio transmission system to these jacks. You will need a stereo RCA cable to do so.
Headphones
You can connect stereo headphones with a 3.5 mm phone plug to the "HEADPHONES" jack 13. The outputs to the power amplifiers (14 and 15) are automatically deactivated when connecting headphones. They can, however, be reactivated by pushing button 28 "R" on the remote control. This makes it possible to operate the DecoderStation 7 with the active speakers even when headphones are inserted (e.g. while using wireless headphones with transmitter permanently connected).
Danger Danger of injury/damage!

Lower the volume before you pull out the head-phone plug again; otherwise the speakers may expected high sound pressure. This could injure hearing or damage the device.
Connecting to a power supply
- Make sure that your power amplifier, multi-channel active subwoofer or the active speakers are turned off.
- Connect the small mains adapter ③ plug to the jack 19 "12V".
- Connect the mains adapter ③ to a mains socket (100 V–240 V \~ / 50/60 Hz).


Activating and deactivating
If the unit is in standby mode, a red dot will illuminate in the display panel 2.
- Briefly pressing the control dial 3 or the button 42 "O" will activate the device.
Text appears in the display panel 2 when the device is turned on.
- Pushing and holding the control dial 3 or briefly pressing the button 42 " will switch the device back to standby.
- After a certain period of inactivity, the unit will automatically go to standby (see "Automatic deactivation" on page 15).
Automatic activation (CEC)
If your television set is connected via a HDMI cable and supports the CEC standard, you can select automatic activation and deactivation in the menu (see "CEC", page 15).
Selecting a source
After turning the device on, the last used source device is selected.
- With the button 1 "SOURCE" you can switch the source in the following order: HDMI 1, HDMI 2, HDMI 3, OPTICAL, COAXIAL 1, COAXIAL 2, AUX 1, AUX 2, AUX 3, FM (FM radio), AM (AM radio).
- Or you can select the source directly with the function buttons 21 on the remote control.
The selected source is shown in the display panel 2.
Adjusting the volume
- Increase the volume: Turn the control dial 3 clockwise or push the button 25 "VOL +".
- Decrease the volume: Turn the control dial 3 counterclockwise or push the button 25 "VOL -".
The selected volume will appear in the display panel 2 in the range “--” (low) to “10.0 dB” (loud) and is shown as a bar.
Mute
- Pushing the button 24 "☒" mutes the speakers. "MUTE" will appear in the display panel 2.
- Turn the sound back on: Push the button 24 " again or adjust the volume.
Note: Muting only affects the line outputs — headphone output always continues to be active.


You can control the functions and setup of DecoderStation 7 via the main menu. To use the menu:
- Push the control dial 3 "POWER/SELECT" or the button 37 "•". The main menu will appear on the connected screen and in the display panel 2.
- Select the desired sub-menu with the control dial 3 "POWER/SELECT" or the button 27 "▲/▼" and push the control dial 3 or the button 37 "●".
- The sub-menu will open and you can select the next sub-menu or change the values with the control dial 3 or button 27 "▲/▼".
- You accept the setting by briefly pushing the control dial 3 or the button 37 "•".
- You terminate the respective function with the button 4 "BACK" or 28 "RETURN" or abort it and return to the previous menu.
If the menu appears in German, you can change the on-screen menu language to English (the unit display 2 always displays English text):
- Select the item "System Setup".
- Select the item "D/E".
- Select the item "English".
The onscreen menu will now switch to English. - Push the "RETURN" button 28 until only the main menu is visible.
"Tuner" menu
This menu is only available in radio mode (FM/AM).
Station memory (Preset)
You can switch the station memory with the control dial 3 or the arrow buttons 27 "▲/▼".
Frequency
You can adjust the tuning frequency with the arrow buttons 27 "▲/▼";
- Manually: Every time the button is tipped, the frequency is increased or decreased by one increment (FM: 0.05 MHz, AM: 9 kHz).
- Automatically: Holding down the button for a prolonged period of time starts station scanning in the desired direction until a station with sufficiently strong transmitting power is found.
Station search (APS, Auto Tuning)
You can program station memory slots automatically. Confirm to the question "Auto tuning OK?" by briefly pushing the control dial 3 or the select button 37 "•". The device will automatically save the first 30 stations for USW/FM or 10 stations for MW/AM. Already occupied memory slots will be deleted in the process.
Erase memory
You can clear station memory slots this way: Push the select button 37 "•" to erase or the "RETURN" button 28 to abort.


"Surround" menu
With the control dial 3 or the arrow buttons 27 "▲/▼", you can switch surround mode for 2 channel sources in the following order:
2.1 Stereo Stereo only via front left/right and subwoofer
5.1 Stereo Stereo across all channels (upmix)
Dolby PLII Movie Dolby ProLogic II for movies
Dolby PLII Music Dolby ProLogic II for music
DTS NEO:6 Music DTS NEO:6 for music
DTS NEO:6 Cinema DTS NEO:6 for cinema
Some options may not be available if not all satellite speakers are connected.
Dolby Digital and DTS (standard and HD)
The surround mode is fixed for Dolby Digital or DTS coded multi-channel tracks; this menu is therefore not available while these formats are played back.
"Tone Control" menu
Mode
Dynamic Compr.
Dynamic compensation regulates volume differences between individual tracks on CDs or other audio sources and ensures that playback is neither too loud nor too quiet. Possible settings: On, Off.
Cinema EQ
This function reduces the percentage of high tones from the original movie sound mix to perfectly adapt the sound to the acoustics of a living room. Possible setting: On or Off.
Tone
Here you can adjust the sound (high tones and bass tones). Possible values: from -10 dB (decrease) to +10 dB (increase).
Equalizer
With this function, very fine adjustments within nine frequency ranges are available. You can adjust all channels at the same time or each channel separately (the two rear channels are only available in 7.1 operation.) Possible values: each from -20 dB (decrease) to +6 dB (increase). The "Reset" menu item resets all frequency ranges for the selected channel to zero (neutral).
Note: The equalizer is inactive with some high-definition formats.
"Speaker Levels" menu
Here you can adjust the relative volume from “-10” (decrease) to “+10” (increase) for each speaker.
It is recommended to use our sound level meter to optimally adjust the sound level.
"Source Levels" menu
You can adjust the relative volume from “-10” (decrease) to “+10” (increase) for each audio source here.
Here you can assign an audio input to each of the three HDMI inputs.
Example: If you would like to connect a PC without HDMI output: With a DVI to HDMI adapter, you transmit the video signal while the audio signal is present at one of the analogue inputs (Aux) via an RCA cable.
"Speaker Setup" menu
Phase Sub
This allows you to activate and deactivate the phase shift (180°) for the subwoofer. Select the setting, with which the subwoofer produces the loudest and clearest sound.
Lip Sync
Digital image processing in the television set requires some time. In order to keep the image and sound synchronous, delay the sound by a few milliseconds. Here, you can adjust the audio delay from 0 to 100 ms for each HDMI and other inputs in order to keep the sound synchronous.
Speaker Size
Here you can set the size of the speakers in use for optimally driving them. Five configurations are available:
SSSS1 All speakers are small, subwoofer present.
LSSS1 Large front speakers, small center and rear speakers, subwoofer present.
LSSS0 Large front speakers, small center and rear speakers, no subwoofer.
LOSSO Large front speakers, no center speaker, small rear speakers, no subwoofer.
LLLL1 All speakers large, subwoofer present.
The letters represent the speakers: Front left/right, center, surround, rear center (only in 7.1 operation). S (small) stands for small and L (large) for large speakers, O is also possible for the center speaker if none is present. The last number stands for the subwoofer (1 = present, 0 = not present).
If you connect the DecoderStation to a multichannel active subwoofer, select the setting SSSS1.
Crossover frequency
With the crossover frequency, you define the frequency, up to which the subwoofer should be active. Possible values: 80 to 250 Hz in eight steps.
You can also set the edge steepness: This is the level, which is still present at the subwoofer above the crossover frequency. Possible values: -24 dB and -36 dB.
Enter -24 dB for normal speakers. For satellite speakers with bassreflex openings, the acoustic efficiency declines more sharply — so select -36 dB for optimal actuation of the subwoofer.
You can find information on the recommended crossover frequency in the technical data of the satellite speakers in our webshop.
Distance
The surround sound effect may be corrupted if the speakers are positioned at different distances to the listening position. To compensate for these differences in run time, you can set slight signal delays for all channels. Measure the difference from the listening position to the speakers and enter these values in the menu. The system calculates the required delays on this basis.
"System Setup" menu
HDMI
CEC (Consumer Electronics Control)
If this function has been activated (ON), CEC-compatible devices are controlled with a control command issued via the HDMI connection. For example, the DecoderStation 7 and the connected devices are automatically activated and deactivated via the remote control of the TV set.
ARC (Audio Return Channel)
This option offers receiving audio from the TV via the HDMI cable (for TV sets that support this function).
Audio from television sets runs to the DecoderStation 7 through the HDMI cable without having to connect another cable. If the ARC function is activated, the "COAXIAL 1" input (9) is no longer available.
Possible settings: OFF, ON.
!
Important!
Please note that many television sets only have one HDMI input that supports the ARC function.
To use ARC you must also activate CEC.
Note: If the CEC function is activated, standby power consumption increases.
Automatic deactivation
After a certain time of inactivity, the device automatically switches to standby after a preset time. Possible values: 60 min. (default), 30 min., never.
Power On Level
Here you can set the volume of your device when it is activated:
- last: The volume that was set at deactivating.
- fixed: Fixed volume from -40 dB (low) to +10 dB (very loud).
5.1/7.1
With this, you can switch between 5.1 and 7.1 operation and also set the function of the analogue output 14 "RC/PRE OUT" (see page 10), which you can connect a stereo amplifier, active speaker or radio transmission system.
This makes it possible to project sound into another room or connect to the rear center speakers in 7.1 operation using RF audio transmission system (such as Teufel Rear Station 4).
5.1 Converts (via downmix) the 5.1 audio signal to a stereo channel (2.0) to project sound into a second room.
7.1 7.1 Operation with output of the additional rear channels.
D/E
You can set the OSD menu language this way. Possible values: German, English
The menu in the unit display panel 2 is always in English.
System Reset
This resets the device to the factory default.
Surround
With the button 40 "SURROUND", you can switch the surround mode in the following order:
2.1 Stereo Stereo only via front left/right and subwoofer
5.1 Stereo Stereo across all channels (upmix)
Dolby PLII Movie Dolby ProLogic II for movies
Dolby PLII Music Dolby ProLogic II for music
DTS NEO:6 Music DTS NEO:6 for music
DTS NEO:6 Cinema DTS NEO:6 for cinema
Some options may not be available if not all satellite speakers are connected.
Dolby Digital and DTS (standard and HD)
The surround mode is fixed for Dolby Digital or DTS coded multi-channel tracks; this menu is therefore not available while these formats are played back.
Test tone
With this function, you can monitor and set the level for the speaker channels.
- Push the "TEST" button 33. A test sound ("pink noise") will be emitted on all speakers one after another.
- With the adjustment keys 31 "LEVEL +/-" you can adjust the volume of the currently active channel within the range of "-10" to "+10".
- To stop the test sound, push the "RETURN" button 28.
We recommend using a Teufel sound-level meter, which you can order on our website in the accessories area.
Channel level buttons
Here you can increase and decrease the relative volume for each speaker, even during playback.
- Select the desired speaker by pushing the button 32 "CH SEL" several times.
Sub - Subwoofer
Left - Front left
Right - Front right
Center - Center
Sur. L - Surround left
Sur. R – Surround right
Rear L – Rear left
Rear R - Rear right
- With the adjustment keys 31 "LEVEL +/-" you can now adjust the relative volume within the range of "-10" to "+10".
- To exit the function, push the "RETURN" button 28.
Dimmer
With the "DIMMER" button 34 you control display panel brightness. The display brightness changes every time you push the button: bright, medium, dark, off.
Equalizer
As with the menu function (see page 14), this provides you with fine sound adjustment in nine frequency bands. Possible values: each from -20 dB (decrease) to +6 dB (increase).
- Push the "EQUALIZER" button 38.
- Select the desired channel by pushing the "EQUALIZER" button 38 several times or with the arrow buttons 27 "▲/▼".
- Push the button 37 "•".
- Select the desired frequency band with the arrow buttons 27 “◀/▼” and set the level from -20 dB (decrease) to +6 dB (increase) with the buttons 27 “▲/▼”.
- Push the "RETURN" button 28 to finalise the setting.
Note: The equalizer is inactive with some high-definition formats.

Tone/LipSync
With the "TONE/LIPSYNC" button 26, you can adjust the sound and the audio delay.
Adjusting the sound
Briefly tap the "TONE/LIPSYNC" button 26 to access two audio control ranges successively: bass (low tones), treble (high tones)
- Now, adjust the selected range from -10 to +10 with the arrow buttons 27 "▲/▼".
- Push the "RETURN" button 28 to finalise the setting.
Setting audio delay
By pushing and holding the "TONE/LIPSYNC" button 26 for more than a second, you can adjust the audio delay (see the menu function "LIP SYNC" on page 14) for the active input:
- The current value in milliseconds (ms) is shown in the display panel and on the screen.
- Set the audio delay within a range from 0 to 200 ms with the arrow buttons 27 "▲/▼".
- Push the "RETURN" button 28 to exit the setting.
Direct
In direct mode, the audio signal is emitted without sound adjustment.
- Tapping the "DIRECT" button 35 displays the current setting:
Direct OFF – Normal mode with sound adjustment Direct Mode – Direct mode without sound adjustment
- Tapping the "DIRECT" button 35 again switches the mode.
Info
Pushing the "INFO" button 36 shows information on the current audio signal on the screen and in the display panel for approx. three seconds. e.g. "48KHz 2.1 Stereo".
Sleep
You want to fall asleep in your comfortable home cinema? This automatic deactivation function will help and turns off the DecoderStation 7 after a preset time elapses (max. 60 minutes).
- Briefly tap the "SLEEP" button 20 once to show the status of the automatic deactivation function: "Sleep Mode OFF" – Function disabled.
"Sleep Timing xx min" – Deactivation in xx minutes.
- With the arrow buttons 27 "▲/▼", select the desired time for deactivation within a range from 15 to 60 minutes.
- Push the "RETURN" button 28 to exit the setting. The system will deactivate after the preset time has elapsed.

Select one of the two radio modes as a source (see page 12):
FM – Reception of mono and stereo stations from 87.5 to 108 MHz. RDS mode possible.
AM - Reception of mono stations from 522 to 1.629 kHz.
Setting the radio stations
Direct entry of the tuning frequency:
- Tap the "FREQU." 23 button so that the tuning frequency appears in the display panel.
- Enter the frequency without any decimal or comma using the number buttons 22 "1 ... 0".
- Push the select button 37 "•".
Station search:
- Tap the "FREQU." button 23 so that the tuning frequency appears in the display panel.
- Set the tuning frequency with the set buttons 27 "◀/◀":
Manually: Every time the button is tipped, the frequency is increased or decreased by one increment (FM: 0.05 MHz, AM: 9 kHz).
Automatically: Holding down the button for a prolonged period of time starts station scanning in the desired direction until a station with sufficiently strong transmitting power is found.
The set frequency is displayed in the display panel. If the station is received in stereo, the symbol "D will also appear. If the station transmits an RDS signal, the frequency and the name of the station will alternate in the display panel after a short time.
Stereo/Mono
Bothersome interference may occur for weak stereo stations in the FM mode. In this case, you can switch between mono and stereo reception with the "MODE" button 29.
Station memory
The device can save up to 30 FM stations and 10 AM stations. You can conveniently select the saved stations with the push of a button.
Saving stations manually
- Set the desired station as described above.
- Push the "MEM" button 30. The question "Store in P xx" will appear in the display panel.
- With the number buttons 22 "1...0", enter the desired memory slot number or select the desired number with the arrow buttons 27 "◄/►".
- Push the select button 37 "●".
- If the memory slot is already occupied, the question "Overwrite?" will appear. If you would like to select another memory slot, push the "RETURN" button 28 and start from the beginning.

- Push the select button 37 "•" to save. The notice "OK" will appear in the display panel briefly.
The station has now been stored. The device will return to normal operation after five seconds of button inactivity.
Selecting stations from the memory
You can select the occupied stations one after another with the buttons 39 "CH +/-".
Entry of the station memory slot number:
- Push the "PRESET" button 41.
The number of the last memory slot used will appear in the display panel, e.g. "P03". - Enter the number of the desired memory slot (two digits) with the number buttons 22 "1 ... 0".
- Push the select button 37 "●".
Clearing station memory slots
- Access the station memory slot to be cleared (see previous paragraph).
- Briefly push the "MEM" button 30.
The question "Erase P xx?" will appear on the screen and in the display panel. - Push the "RETURN" button 28 to abort.
- Push the button 37 "●" to delete.
The following advice should help you to solve problems. If this doesn't work, please contact our hotline (see page 3). Take note of the warranty instructions.
| Problem Possible cause Solution | ||
| The DecoderStation 7 is not working, the display panel 2 is not illuminated. | The device has no power. Check if the mains adapter plug is connected to the jack 19 “12V” and to the socket. | |
| The device is not working, but the display panel is illuminated. | The volume has been set too low. Increase the volume with the control dial or “VOL +” button 25. | |
| Playback is noisy. Generally | speaking, this is a very low-noise system. The system with exceptional resolution in the high-range area can expose the poor quality of a signal source (e.g. from MP3 files) mostly. | Ensure that the source is sending a clear signal. |
| With stereo sources, for example with radio playback or a MP3 player, the rear satellites and/or center are inactive. | MP3s, radio and many television programmes only have stereo sound. | Use the remote control to switch the decoder to Pro-Logic mode or to one of the DSP modes (5.1 stereo). |
| You are unable to switch the surround configuration. | You are probably using a digital input. If a Dolby or DTS signal is received on this input, the DecoderStation 7 will automatically switch to the correct surround configuration. | |
| No Dolby-/DTS multi-channel sound is issued via the connected digital source. | If digital sources are being played, the DecoderStation 7 automatically recognises the format of the signal source. If the decoder fails to play multi-channel sound, there is presumably no multi-channel signal. Digital signal sources do not always transmit multi-channel sound, but may also emit regular stereo sound (2.0). This is often the case, for example, when receiving a television signal with digital receivers. | Use the remote control to switch the decoder to a Pro-Logic mode or to one of the DSP modes (5.1 stereo). |
| The digitally connected sound card is not transmitting any multi-channel sound when playing computer games. | Many soundchips are capable of producing surround sound in real-time and issuing it via the sound card's analogue outputs. However, digital encoding of the calculated multi-channel sound is also necessary in a Dolby-AC3 stream for transmission via a digital connection. Only if the sound card is capable of real-time encoding and transmission to the decoder, can direct decoding (that is, splitting of the signal into its analogue components) occur.Presently, only very few game consoles such as the Microsoft Xbox 360 or the Sony Playstation 3 and a limited number of sound cards with Dolby® Digital Live support are capable of performing real-time encoding. | Connect your 5.1 sound card to an analogue jack of the DecoderStation 7. |
Protecting the environment
Disposal of the unit

Used units must not be disposed of with household waste.
If the unit is no longer operational, every consumer is required by law to dispose of used devices separately from household waste,
e.g. at a collection point run by the communal authority borough. In this way it is ensured, that used devices are properly recycled and that negative consequences on the environment are avoided.
For this reason, electrical equipment is labelled with the displayed symbol.
Batteries and rechargeable batteries

Batteries and rechargeable batteries must not be disposed of with household waste!
Every consumer is required by law to bring all batteries and rechargeable batteries, whether
they contain harmful substances*) or not, to a collection point run by the communal authority or borough or run commercially, so that they can be disposed of in an environmentally friendly manner.
Please only hand in fully discharged batteries and rechargeable batteries!
*) labelled with: Cd = Cadmium, Hg = Mercury, Pb = Lead
Care and cleaning
Clean the DecoderStation 7 regularly with a soft, damp microfibre cloth. Please be absolutely sure to observe the following notes in the process:
Danger
Risk of electric shock!

In contact with live parts, water can lead to electric shock or short circuit.
• Make sure that no liquid penetrates the unit.
- Disconnect the mains adapter from the socket before cleaning.
Attention
Risk of damage!
Using the wrong cleaning materials may damage the delicate surface of the case.
- If possible, only use plain water without any additives. In case of stubborn marks, a mild soap solution may be used.
- In no circumstances should caustic cleaning products, white spirit, thinners, petrol or similar be used for cleaning.
Technical data
Operating voltage of the mains adapter: 100 - 230 V\~, 50/60 Hz
Power consumption: Operation: max. 30 watts
Standby mode: < 1 watt
Dimensions (W x H x D): 27 x 7 x 17 cm
Net weight: 1.7 kg


This product conforms with Council of the
European Union guidelines 2004/108/EC and
2006/95/EC
Teufel
For questions, suggestions or other issues please contact our customer service department:
No liability is accepted for the accuracy of this information. Technical changes, typographical errors and other errors reserved.


- TECHNICAL DESCRIPTION AND OPERATING INSTRUCTIONS
- DECODERSTATION 7
- CONTENTS
- GENERAL NOTES AND INFORMATION....3
- SAFETY NOTES....4
- OVERVIEW....5
- CONTROL ELEMENTS AND CONNECTIONS....6
- SETUP....8
- REMOTE CONTROL....8
- CONNECTING....9
- BASIC FUNCTIONS ..... 12
- MENU FUNCTIONS....13
- RADIO PLAYBACK 18
- CARE AND CLEANING 19
- TROUBLESHOOTING 19
- PROTECTING THE ENVIRONMENT .....20
- TECHNICAL DATA 20
- NOTICE
- DTS-HD MASTER AUDIO
- ORIGINAL PACKAGING
- COMPLAINTS
- INVOICE NUMBER
- SERIAL NUMBER OR BATCH NUMBER
- CONTACT
- PROPER USE
- CAUTION ICONS
- HIGH RISK
- MODERATE RISK
- MINOR RISK
- SAFETY NOTES
- RISK OF ELECTRIC SHOCK
- DANGER
- DANGER TO CHILDREN
- DANGER TO HEARING
- DANGER OF CHEMICAL BURNS
- DANGER OF INJURY/DAMAGE
- ATTENTION FIRE HAZARD
- ATTENTION RISK OF DAMAGE
- OVERVIEW
- PRODUCT CONTENTS
- CHECK TO BE SURE
- CONTROL ELEMENTS AND CONNECTIONS
- REMOTE CONTROL
- SETUP
- LOCATION TIPS
- INSERTING BATTERIES
- FUNCTIONALITY
- ANTENNAS
- RISK ASSOCIATED WITH LIGHTNING STRIKE
- FM ANTENNA
- AM ANTENNA
- INPUTS FOR SOURCE DEVICES
- HDMI 1, 2 AND 3
- OPTICAL
- COAXIAL 1 AND COAXIAL 2
- AUX 1, 2 AND 3
- OUTPUTS
- TELEVISION/PROJECTOR
- AUDIO OUTPUTS
- RC/PRE OUT
- HEADPHONES
- DANGER DANGER OF INJURY/DAMAGE
- CONNECTING TO A POWER SUPPLY
- ACTIVATING AND DEACTIVATING
- AUTOMATIC ACTIVATION (CEC)
- SELECTING A SOURCE
- ADJUSTING THE VOLUME
- MUTE
- TUNER" MENU
- STATION MEMORY (PRESET)
- FREQUENCY
- STATION SEARCH (APS, AUTO TUNING)
- ERASE MEMORY
- SURROUND" MENU
- DOLBY DIGITAL AND DTS (STANDARD AND HD)
- TONE CONTROL" MENU
- MODE
- DYNAMIC COMPR
- CINEMA EQ
- TONE
- EQUALIZER
- SPEAKER LEVELS" MENU
- SOURCE LEVELS" MENU
- SPEAKER SETUP" MENU
- PHASE SUB
- LIP SYNC
- SPEAKER SIZE
- CROSSOVER FREQUENCY
- DISTANCE
- SYSTEM SETUP" MENU
- HDMI
- IMPORTANT
- AUTOMATIC DEACTIVATION
- POWER ON LEVEL
- 5.1/7.1
- D/E
- SYSTEM RESET
- SURROUND
- TEST TONE
- CHANNEL LEVEL BUTTONS
- DIMMER
- TONE/LIPSYNC
- ADJUSTING THE SOUND
- SETTING AUDIO DELAY
- DIRECT
- INFO
- SLEEP
- SETTING THE RADIO STATIONS
- STATION SEARCH
- STEREO/MONO
- STATION MEMORY
- SAVING STATIONS MANUALLY
- SELECTING STATIONS FROM THE MEMORY
- CLEARING STATION MEMORY SLOTS
- PROTECTING THE ENVIRONMENT
- DISPOSAL OF THE UNIT
- BATTERIES AND RECHARGEABLE BATTERIES
- CARE AND CLEANING
- ATTENTION
- RISK OF DAMAGE
- TECHNICAL DATA
- TEUFEL
Brand : Teufel
Model : Complete 7
Category : Receiver