
Infinity 80mm - Telescope MEADE - Free user manual and instructions
Find the device manual for free Infinity 80mm MEADE in PDF.


| Product Type | Telescope |
| Brand | Meade |
| Model | Infinity 80mm |
| Optical Design | Refractor |
| Aperture | 80 mm |
| Focal Length | 900 mm |
| Focal Ratio | f/11.25 |
| Mount Type | Altazimuth |
| Maximum Useful Magnification | 160x |
| Eyepiece(s) Included | 25 mm and 9 mm (1.25") |
| Finderscope | 6x30 optical finderscope |
| Tripod Material | Aluminum |
| Weight (telescope & tripod) | 12 lbs (5.4 kg) |
| Power Supply | None required (manual operation) |
| Usage | Astronomical and terrestrial observation |
| Cleaning | Use a soft brush or compressed air for dust; lens tissue for smudges |
| Safety Warning | Never point the telescope at the sun without a proper solar filter |
| Warranty | Limited one-year warranty |
| Country of Origin | China |
Frequently Asked Questions - Infinity 80mm MEADE
User questions about Infinity 80mm MEADE
0 question about this device. Answer the ones you know or ask your own.
Ask a new question about this device
Download the instructions for your Telescope in PDF format for free! Find your manual Infinity 80mm - MEADE and take your electronic device back in hand. On this page are published all the documents necessary for the use of your device. Infinity 80mm by MEADE.
USER MANUAL Infinity 80mm MEADE
MEADEINSTRUCTIONMANUAL
80mm | 3.1"
90mm | 3.5" Alt-azimuth Refracting Telescope
102mm | 4.0"
INFINITY SERIES
80, 90, 102mm Telescopes
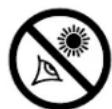
WARNING!
Never use a Meade® telescope to look at the Sun! Looking at or near the Sun will cause instant and irreversible damage to your eye. Eye damage is often painless, so there is no warning to the observer that damage has occurred until it is too late. Do not point the telescope at or near the Sun. Do not look through the telescope or viewfinder as it is moving. Children should always have adult supervision while observing.
INTRODUCTION
Your telescope is an excellent beginner's instrument, and is designed to observe objects in the sky and also on land. It can be your personal window on the universe or allows you to intimately study the behavior of nesting birds on a distant hillside.
The telescope is shipped with the following parts:
- Optical tube
- Alt-azimuth mount with slow motion controls
• Stainless Steel tripod with accessory tray
• Three 1.25" eyepieces:
MA26mm, MA9mm, MA6.3mm
• 90 degree erect-image diagonal prism - 2X Barlow
• Red-dot viewfinder with bracket
The Infinity series of telescopes come in several sizes (apertures) of optical tubes. The heart of the optical tubes is the front lens. It collects and focuses the incoming light from distant objects.
The lens diameter is one of the most
important pieces of information about the telescope. The size of the objective lens determines how much detail you will be able to see in your telescope.
Each optical tube also has a focal length which is the distance the light travels inside the optical tube before it comes to focus.
The focal length information is also important and will help later on to calculate magnification.
Setting up your telescope involves these simple steps:
- Setting up your tripod
- Attach the accessory tray
- Attach the slow motion controls
- Attach the optical tube to the mount
- Attach the viewfinder
- Attach the diagonal prism and eyepiece
- Align the viewfinder
Study the picture on the next page and become acquainted with the parts of your telescope. Then proceed to “Setting up your tripod.”

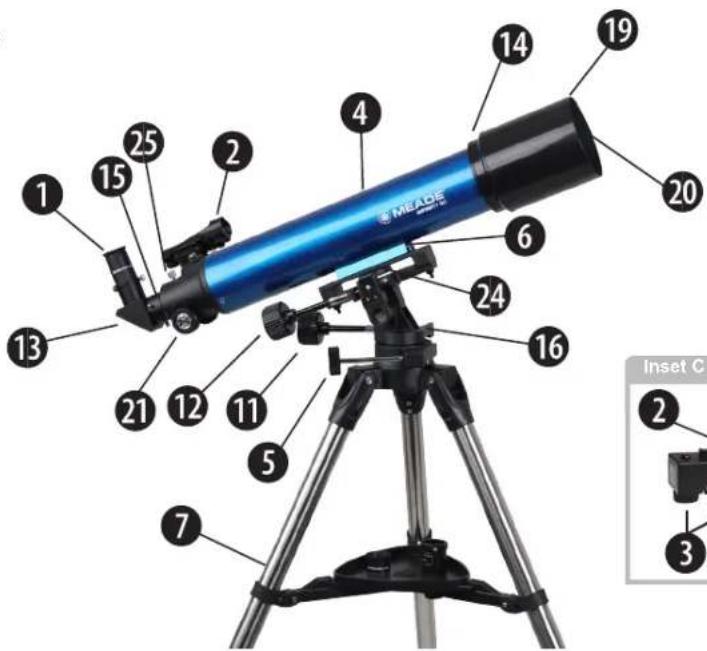
FIGURE 1
Figure 1: Meade Infinity Alt-azimuth Refracting Telescope
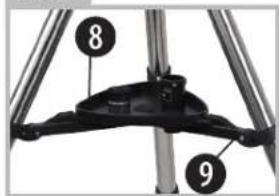
Inset A: Accessory Tray Assembly
Inset B: Tripod Leg
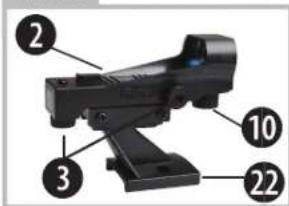
Inset C: Viewfinder Assembly
- Eyepiece
- Viewfinder (see Inset C)
- Viewfinder alignment screws (2) (see Inset C)
- Optical tube assembly
- Horizontal lock knob
- Dovetail mounting rail
- Tripod legs
- Accessory tray
- Leg brace
- Red dot viewfinder power switch
- Azimuth slow motion control knob
- Altitude slow motion control knob
- 90 degree erect-image prism
- Objective lens cell
- Focuser drawtube and thumbscrews
- Alt-azimuth mount
- Adjustable sliding center leg extension (see Inset B)
- Tripod leg lock thumbscrew (see Inset B)
- Dew shield/lens shade
- Front lens cap (not shown)
- Focusing knob
- Viewfinder bracket (see Inset C)
- Viewfinder bracket locking knob (see Fig. 5)
- Optical tube attachment knob
- Focuser lock knob
Inset A
Inset B

SETTING UP YOUR TRIPOD
The tripod is the basic support for your telescope and comes pre-assembled from the factory; except for the accessory tray. The tripod height may be adjusted so that you can view comfortably.
Note: Number in brackets, e.g., (3), refer to the item numbers in Fig. 1.
- To setup the tripod, spread the legs out evenly and place it on a solid surface.
- Set the height of your tripod:
a. Rotate and loosen the leg lock thumb-screw (18) to unlock the leg lock.
b. Slide the inner portion of the leg (17) in or out to the desired length. Repeat for the other two legs.
c. Rotate and tighten the leg lock thumb-screw to re-lock the leg lock.
d. Repeat for the other two legs.
ATTACH THE ACCESSORY TRAY
The accessory tray attaches at the center of the tripod legs and is a convenient place to hold eyepieces and other Meade accessories while observing, such as the Barlow lens.
To attach, place the hole in the center of the accessory tray over the attachment point as shown in Fig 2. Then rotate the tray until the wings of the tray snap into place on the tripod leg brace supports(9).

To remove the tray, rotate the tray so it unlocks from the leg brace supports (9), then remove.
The slow motion control cables (11 & 12) allow you to make fine adjustments to the pointing position of the optical tube. When viewing objects in the night sky, you will notice that the object moves slowly in the eyepiece. This is caused by the Earths rotation. Use the slow motion controls to follow (or "track") these objects as you observe. Note that each axis has its own slow motion control which is independently controlled.
To install, attach the flexible cables (11 & 12) to the mount as shown in Fig 3. The cables are secured in place with a firm tightening of the thumbscrews located at the attachment ends of each cable.


Looking at or near the Sun will cause irreversible damage to your eye. Do not point this telescope at or near the Sun. Do not look through the telescope as it is moving.
4
ATTACH THE OPTICAL TUBE TO THE MOUNT
The optical tube gathers distant light which is focused in the eyepiece. It
attaches to the mount using the optical tube attaching knob (24) and dovetail mounting rail (6).
- To attach the optical tube, first locate the threaded hole on the bottom side of the dovetail mounting rail(6) (Fig 4).
- Using the optical tube attaching knob (24), place the dovetail onto the top of the mount, lining up the threaded
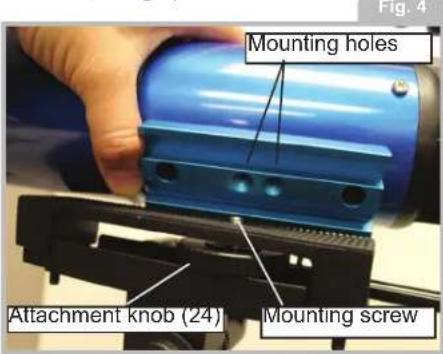
hole near the center of the dovetail rail.
- Turn the optical tube attachment knob (24) counter-clockwise until firm.
- To remove the optical tube, first support the optical tube in one hand. Next, turn the attachment knob (24) clockwise until the OTA detaches from the mount.
ATTACH THE VIEWFINDER
An eyepiece (1) has a narrow field of view. The included viewfinder (2) has a wider field of view and red dot to make it even easier to locate the viewing object. The red dot viewfinder also comes with an easy to install dovetail bracket.
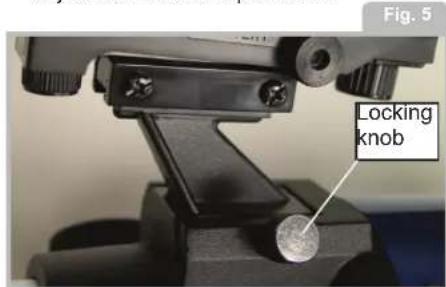
- To install the red dot viewfinder, slide the viewfinder bracket into the dovetail adapter (Fig 5).
- Next, secure the viewfinder in place with the single locking knob.
ATTACH THE DIAGONAL PRISM AND EYEPIECE
The erect-image diagonal prism reflects the light from the optical tube to a more comfortable viewing position. It also corrects the
image orientation so the image is right side up, and correct left-to-right.
- To install, slide the diagonal prism (13) into the focuser draw tube (15).
- Tighten the draw tube thumbscrew to hold the diagonal prism securely (15).
- Next, slide the MA 26mm eyepiece (1) into diagonal prism.
- Tighten the diagonal prism thumbscrew to hold the eyepiece securely.
ALIGN THE VIEWFINDER
Perform the first part of this procedure during the daytime and the last step at night.
- Point the telescope at an easy-to-find land object such as the top of a tele-

Looking at or near the Sun will cause irreversible damage to your eye. Do not point this telescope at or near the Sun. Do not look through the telescope as it is moving.
phone pole or a distant mountain or tower. Look through the eyepiece in and turn the focuser knob (21) until the image is sharply focused. Center the object precisely in the eyepiece's field of view.
- Turn on the red-dot viewfinder by rotating the large knob under the viewfinder lens clockwise (10). Turn the knob to adjust the intensity of the red dot as desired.
- Look through the viewfinder. Turn one or both of the viewfinder's alignment screws (3) until the red-dot is precisely over the same object as you centered in the eye-piece.
- Check this alignment at night on a celestial object, such as the Moon or a bright star, and use the viewfinder's alignment screws to make any necessary refinements.
- When finished, turn off the viewfinder by turning the large knob (10) under the viewfinder lens counter-clockwise until it clicks.
TO MOVE THE TELESCOPE
Your telescope is alt-azimuth mounted. Alt-azimuth is just a complicated way of say-

SUN WARNING
NEVER USE YOUR TELESCOPE
TO LOOK AT THE SUN!
LOOKING AT OR NEAR THE SUN WILL CAUSE INSTANT AND IRREVERSIBLE DAMAGE TO YOUR EYE. EYE DAMAGE IS OFTEN PAINLESS, SO THERE IS NO WARNING TO THE OBSERVER THAT DAMAGE HAS OCCURRED UNTIL IT IS TOO LATE. DO NOT POINT THE TELESCOPE OR ITS VIEW-FINDER AT OR NEAR THE SUN. DO NOT LOOK THROUGH THE TELESCOPE OR ITS VIEWFINDER AS IT IS MOVING. CHILDREN SHOULD ALWAYS HAVE ADULT SUPERVISION WHILE OBSERVING.
ing that your telescope moves up and down and from side to side. Other telescopes may be mounted in different ways.
- To move the telescope in the horizontal direction (azimuth), slightly loosen the horizontal lock knob (5). Loosening this lock allows the telescope to be moved from side to side.
- To move the telescope in the vertical direction (altitude), use the pan handle on the rear of the mount to make coarse adjustments. Note the vertical direction does
not have a locking knob and can be moved at any time.
- Once an object is found, re-tighten the horizontal lock knob (5). You can then rotate the slow motion controls (11 & 12) to make smooth and precise movements and follow (or "track") an object horizontally and vertically as it moves in the eyepiece.
THE MOST IMPORTANT RULE
We have one very important rule that you should always follow when using your telescope:
Have Fun!
THE MEADE 4M COMMUNITY
You haven't just bought a telescope, you have embarked on an astronomy adventure that never ends. Share the journey with others by accepting your free membership in the 4M community of astronomers.
Go to www.Meade4M.com to activate your membership today.

Looking at or near the Sun will cause irreversible damage to your eye. Do not point this telescope at or near the Sun. Do not look through the telescope as it is moving.
Have a good time when you're observing. You may not know everything that there is to know about a telescope or what all the sights in the universe are,
but that's OK. Just point and observe at first.
You will enjoy your telescope even more as you learn more about it. But don't be scared off by difficult terms or complicated procedures. Don't panic! Just relax and enjoy your scope.
You will begin to grow and learn more about astronomy the more you observe. Browse the internet or go to the library and read some books about the stars and planets. Read about astronomers of old. Many of them had telescopes no bigger than the one you are using right now. Galileo, who is one of the first astronomers to use a telescope, discovered four of the moons of Jupiter with a telescope about the same size as yours (and his didn't even focus very well!).
OBSERVING
Observe during the daytime: Try out your telescope during the daytime at first. It is easier to learn how it operates and how to
observe when it is light.
Pick out an easy object to observe: A distant mountain, a large tree, a lighthouse or skyscraper make excellent targets. Point the optical tube so it lines up with your object.
Unlock the lock knob: To move the telescope horizontally you will need to unlock the horizontal lock knob (just rotate to unlock or lock; when locking, only tighten to a "firm feel," do not over tighten).
Use the viewfinder: If you have not done so, align the viewfinder (2) with the telescope's eyepiece (1) as described earlier. Look through the viewfinder until you can see the object. It will be easier to locate an object using the viewfinder rather than locating with the eyepiece. Line up the object using the viewfinders red dot.
Look through the eyepiece: Once you have the object lined up in the viewfinder, look through the optical tube's eyepiece. If you have aligned your viewfinder, you will see the object in your eyepiece.
Focus: Look through the eyepiece and prac-
tice focusing on the object you have chosen.
Try out the coarse and fine adjustment controls: Practice using the fine adjustment control (11 & 12) to move the telescope. These can come in very handy, especially when you wish to move the telescope in very small (fine control) steps.
Observe the Moon: When you feel comfortable with the viewfinder, the eyepieces, the locks and the adjustment controls, you will be ready to try out the telescope at night. The Moon is the best object to observe the
TOO MUCH POWER?
Can you ever have too much power? If the type of power you're referring to is eyepiece magnification, yes you can! The most common mistake of the beginning observer is to "overpower" a telescope by using high magnifications which the telescope's aperture and atmospheric conditions cannot reasonably support. Keep in mind that a smaller, but bright and well-resolved image is far superior to one that is larger, but dim and poorly resolved. Powers above 400x should be employed only under the steadiest atmospheric conditions.

Looking at or near the Sun will cause irreversible damage to your eye. Do not point this telescope at or near the Sun. Do not look through the telescope as it is moving.
first time you go out at night. Pick a night when the Moon is a crescent. No shadows are seen during a full Moon, making it appear flat and uninteresting.
Look for different features on the Moon. The most obvious features are craters. In fact you can see craters within craters. Some craters have bright lines about them. These are called rays and are the result of material thrown out of the crater when it was struck by a colliding object. The dark areas on the Moon are called maria and are composed of lava from the period when the Moon still had volcanic activity. You can also see mountain ranges and fault lines on the Moon.
Use a neutral density filter (often called a “moon filter”) when observing the Moon. Neutral density filters are available from Meade as an optional accessory and enhance contrast to improve your observation of lunar features. Spend several nights observing the Moon. Some nights, the Moon is so bright that it makes other objects in the sky difficult to see. These are nights that are excellent for lunar observation.
Observe the Solar System: After observing the Moon, you are ready to step up to the next level of observation, the planets. There are four planets that you can easily observe in your telescope: Venus, Mars, Jupiter and Saturn.
Nine planets (maybe more!) travel in a fairly circular pattern around our Sun. Any system of planets orbiting one or more stars is called a solar system. Our Sun, by the way, is a single, yellow dwarf star. It is average as far as stars go and is a middle aged star. Beyond the planets are clouds of comets, icy planetoids and other debris left over from the birth of our sun. Recently astronomers have found large objects in this area and they may increase the number of planets in our solar system.
The four planets closest to the Sun are rocky and are called the inner planets. Mercury, Venus, Earth and Mars comprise the inner planets. Venus and Mars can be easily seen in your telescope.
Venus is seen before dawn or after sunset, because it is close to the Sun. You can
observe Venus going through crescent phases. But you cannot see any surface detail on Venus because it has a very thick atmosphere of gas.
When Mars is close to the Earth, you can see some details on Mars, and sometimes even Mars' polar caps. But quite often, Mars is further away and just appears as a red dot with some dark lines crisscrossing it.
Jupiter, Saturn, Uranus, Neptune and Pluto comprise the outer planets. These planets, except for Pluto, are made mostly of gases and are sometimes called gas giants. If they


Looking at or near the Sun will cause irreversible damage to your eye. Do not point this telescope at or near the Sun. Do not look through the telescope as it is moving.
had grown much bigger, they may have become stars. Pluto is made mostly of ice.
Jupiter is quite interesting to observe. You can see bands across the face of Jupiter. The more time you spend observing these bands, the more details you will be able to see.
One of the most fascinating sights of Jupiter are its moons. The four largest moons are called the Galilean moons, after the astronomer Galileo, who observed them for the first time. If you've never watched the Galilean moons in your telescope before,

you're missing a real treat! Each night, the moons appear in different positions around the Jovian sky. This is sometimes called the Galilean dance. On any given night, you might be able to see the shadow of a moon on the face of Jupiter, see one moon eclipse another or even see a moon emerge from behind Jupiter's giant disk. Drawing the positions of the moons each night is an excellent exercise for novice astronomers.
Any small telescope can see the four Galilean moons of Jupiter (Fig 6), plus a few others, but how many moons does Jupiter actually have? No one knows for sure! Nor are we sure how many Saturn has either. At last count, Jupiter had over 60 moons, and held a small lead over Saturn. Most of these moons are very small and can only be seen with very large telescopes.
Probably the most memorable sight you will see in your telescope is Saturn. Although you may not see many features on the surface of Saturn, its ring structure will steal your breath away. You will probably be able to see a black opening in the rings, known as
Fig. 6

the Cassini band.
Saturn is not the only planet that has rings, but it is the only set of rings that can be seen with a small telescope. Jupiter's rings cannot be seen from Earth at all—the Voyager spacecraft discovered the ring after it passed Jupiter and looked back at it. It turns out, only with the sunlight shining through them, can the rings be seen. Uranus and Neptune also have faint rings.
Optional color filters help bring out detail and contrast of the planets. Meade offers a line of inexpensive color filters.

Looking at or near the Sun will cause irreversible damage to your eye. Do not point this telescope at or near the Sun. Do not look through the telescope as it is moving.
What's Next? Beyond the Solar System:
Once you have observed our own system of planets, it's time to really travel far from home and look at stars and other objects.
You can observe thousands of stars with your telescope. At first, you may think stars are just pinpoints of light and aren't very interesting. But look again. There is much information that is revealed in stars. The first thing you will notice is that not all stars are the same colors. See if you can find blue, orange, yellow, white and red stars. The color of stars sometimes can tell you about the age of a star and the temperature that they burn at.
Other stars to look for are multiple stars. Very often, you can find double (or binary) stars, stars that are very close together. These stars orbit each other. What do you notice about these stars? Are they different colors? Does one seem brighter than the other?
Almost all the stars you can see in the sky are part of our galaxy. A galaxy is a large grouping of stars, containing millions or even billions of stars. Some galaxies form a spiral (like our galaxy, the Milky Way) and other galaxies look more like a large football and are called elliptical galaxies. There are many galaxies that are irregularly shaped and are thought to have been pulled apart because they passed too close to—or even through—a larger galaxy.
You may be able to see the Andromeda galaxy and several others in your telescope. They will appear as small, fuzzy clouds. Only very large telescope will reveal spiral or elliptical details.
You will also be able to see some nebulas with your scope. Nebula means cloud. Most nebulas are clouds of gas. The two easiest to see in the Northern Hemisphere are the Orion nebula during the winter and the Triffid nebula during the summer. These are large clouds of gas in which new stars are being born. Some nebulas are the remains of stars exploding. These explosions are called supernovas.
When you become an advanced observer you can look for other types of objects such as asteroids, planetary nebula and globular clusters. And if you're lucky, every so often a bright comet appears in the sky, presenting an unforgettable sight.
The more you learn about objects in the sky, the more you will learn to appreciate the sights you see in your telescope. Start a notebook and write down the observations you make each night. Note the time and the date.
Use a compass to make a circle, or trace around the lid of a jar. Draw what you see
SURF THE WEB
• The Meade 4M Community: http://www.meade4m.com
• Sky & Telescope: http://www.skyandtelescope.com
- Astronomy:
http://www.astronomy.com
• Astronomy Picture of the Day:
http://antwrp.gsfc.nasa.goc/apod
• Photographic Atlas of the Moon: http://www.lpi.ursa.edu/research/lunar_orbiter
• Hubble Space Telescope Public Pictures: http://oposite.stsci.edu/pubinfo/pictures.html

Looking at or near the Sun will cause irreversible damage to your eye. Do not point this telescope at or near the Sun. Do not look through the telescope as it is moving.
in your eyepiece inside the circle. The best exercise for drawing is to observe the moons of Jupiter every night or so. Try to make Jupiter and the moons
approximately the same size as they look in your eyepiece. You will see that the moons are in a different position every night. As you get better at drawing, try more challenging sights, like a crater system on the moon or even a nebula.
Go your library or check out the internet for more information about astronomy. Learn about the basics: light years, orbits, star colors, how stars and planets are formed, red shift, the big bang, what are the different kinds of nebula, what are comets, asteroids and meteors and what is a black hole. The more you learn about astronomy, the more fun, and the more rewarding your telescope will become.
SOME OBSERVING TIPS
Eyepieces: Always begin your observations using the 26mm low-power eyepiece. The 26mm eyepiece delivers a bright, wide
field of view and is the best to use for most viewing conditions. Use the high-power 9mm eyepiece to view details when observing the Moon and planets. If the image become fuzzy, switch back down to a lower power. Changing eyepieces changes the power or magnification of your telescope.
You can also change magnification by using a Barlow lens. The Barlow lens included with your telescope doubles the power of your telescope. Place the Barlow into the eyepiece holder before you insert the eyepiece.
Meade offers a complete line of eyepieces and Barlows for your telescope. Most astronomers have four or five low-power and high power eyepieces to view different objects and to cope with different viewing conditions.
Objects move in the eyepiece: If you are observing an astronomical object (the Moon, a planet, star, etc.) you will notice that the object will begin to move slowly through the telescopic field of view. This movement is caused by the rotation of the Earth and makes an object move through the telescope's field of view. To keep astronomical
objects centered in the field, simply move the telescope on one or both of its axes—vertically and/or horizontally as needed—try using the telescopes coarse and fine adjustment controls(11 & 12). At higher powers, astronomical objects will seem to move through the field of view of the eyepiece more rapidly.
Place the object to be viewed at the edge of the field and, without touching the telescope, watch it drift through the field to the other side before repositioning the telescope so that the object to be viewed is again
STAR CHARTS
Star charts and planispheres are useful for a variety of reasons. In particular, they are a great aid in planning a night of celestial viewing.
A wide variety of star charts are available in books, in magazines, on the internet and on CD Roms. Meade offers AutoStar Suite™ software. Contact your local Meade dealer or Meade's Customer Service department for more information.
Astronomy and Sky and Telescope magazines print star charts each month for up-to-the-minute maps of the heavens.

Looking at or near the Sun will cause irreversible damage to your eye. Do not point this telescope at or near the Sun. Do not look through the telescope as it is moving.
placed at the edge of the field, ready to be further observed.
Vibrations: Avoid touching the eyepiece while observing through the telescope. Vibrations resulting from such contact will cause the image to move. Avoid observing sites where vibrations cause image movement (for example, near railroad tracks). Viewing from the upper floors of a building may also cause image movement.
Let your eyes “dark-adapt:” Allow five or ten minutes for your eyes to become “dark adapted” before observing. Use a red-filtered flashlight to protect your night vision when reading star maps, or inspecting the telescope. Do not use a regular flash-light or turn on other lights when observing with a group of other astronomers. You can make your own red filtered flashlight by taping red cellophane over a flashlight lens.
Viewing through windows: Avoid setting up the telescope inside a room and observing through an opened or closed window pane. Images may appear blurred or distorted due to temperature differences between inside and outside air. Also, it is a good idea to allow your telescope to reach the ambient (surrounding) outside temperature before starting an observing session.
When to observe: Planets and other objects viewed low on the horizon often lack sharpness—the same object, when observed higher in the sky, will appear sharper and have greater contrast. Try reducing power (change your eyepiece) if your image is fuzzy or shimmers. Keep in mind that a bright, clear, but smaller image is more interesting than a larger, dimmer, fuzzy one. Using too high a power eyepiece is one of the most common mistakes made by new astronomers.
Dress Warm: Even on summer nights, the air can feel cool or cold as the night wears on. It is important to dress warm or to have a sweater, jacket, gloves, etc., nearby.
Know your observing site: If possible, know the location where you will be observing. Pay attention to holes in the ground and other obstacles. Is it a location where wild animals, such as skunks, snakes, etc., may appear? Are there viewing obstructions such as tall trees, street lights, headlights and so forth? The best locations are dark locations, the darker the better. Deep space objects are easiest to see under dark skies.
But it is still possible to observe even in a city.
Surf the Web and visit your local library: The internet contains a huge amount of astronomical information, both for children and adults. Check out astronomy books from your library. Look for star charts—these are available on a monthly basis in Astronomy and Sky and Telescope magazines.
ASTRONOMY RESOURCES
• The Meade 4M Community 27 Hubble, Irvine, CA 926
• Astronomical League
Executive Secretary
5675 Real del Norte, Las Cruces, NM 88012
• The Astronomical Society of the Pacific 390 Ashton Ave., San Francisco, CA 94112
• The Planetary Society
65 North Catalina Ave, Pasadena, CA 91106
• International Dark-Sky Association, Inc.
3225 N. First Avenue, Tucson, AZ 85719-2103

Looking at or near the Sun will cause irreversible damage to your eye. Do not point this telescope at or near the Sun. Do not look through the telescope as it is moving.
HAVE A GOOD TIME, ASTRONOMY IS FUN!
SPECIFICATIONS
Infinity 80 model:
| Objective lens diameter | 80mm(3.2") |
| Optical tube focal length | 400mm |
| Focal ratio | f/5 |
| Mounting type | Alt-azimuth |
| Viewfinder | Red-dot |
Infinity 90 model:
| Objective lens diameter | 90mm(3.5") |
| Optical tube focal length | 600mm |

| Focal ratio | f/6.7 |
| Mounting type | Alt-azimuth |
| Viewfinder | Red-dot |
Infinity 102 model:
| Objective lens diameter | 102mm(4.0") |
| Optical tube focal length | 600mm |
| Focal ratio | f/5.9 |
| Mounting type | Alt-azimuth |
| Viewfinder | Red-dot |
What do the specifications mean?
Optical tube focal length is the distance light travels in the telescope before being brought to focus in you eyepiece. Depending on the telescope model, the focal length is either 400mm or 600mm long. Look at the specification table to find out your telescopes focal length.
Objective lens diameter is how big the front lens is on your scope. Telescopes are always described by how large their objective lens is. Depending on your telescope model, the lens diameter is either 80mm, 90 or 102mm.
Other telescopes are 50mm, 8 inches, 16 inches, or even 3 feet in diameter. The
Hubble Space Telescope's objective lens has a diameter of 2.4 meters (that's 7.8 feet across!).
The focal ratio helps determine how fast the photographic speed of a telescope is. The lower the focal ratio number, the faster the exposure. f/5 is faster than f/10. The faster the ratio, the shorter the exposure time is needed when a camera is hooked up to the telescope. For example, the Infinity 80 telescope has fast focal ratio at f/5. Sometimes, astronomers use focal reducers to make slow exposure telescopes have faster focal ratios.
Alt-azimuth mounting simply means your telescope moves up and down (altitude or "alt"), and side to side, (azimuth or "az"). Other mounting configurations are available for other telescopes, such as equatorial mounting.
USE THE SPECIFICATIONS TO CALCULATE THE MAGNIFICATION OF YOUR EYEPIECE
The power of a telescope is how much it magnifies objects. For an Infinity 90, the 26mm eyepiece magnifies an object 23.1

Looking at or near the Sun will cause irreversible damage to your eye. Do not point this telescope at or near the Sun. Do not look through the telescope as it is moving.
times. The 9mm eyepiece magnifies objects 66.7 times.
If you obtain other eyepieces, you can calculate how much magnification they have with your telescope. Just divide the focal length of the telescope by the focal length of the eyepiece.
Focal Length of the Telescope
÷
Focal Length of the Eyepiece
=
Magnification
Look at the specifications. For the Infinity 90, you will see that the focal length of this scope is 600mm. Let's say that you have obtained a 13mm eyepiece. You can tell that what the focal length of your eyepiece is as it is always printed on the side of an eyepiece. Divide: 600 ÷ 13 , which equals 46.15. Round this off to the nearest whole number and the new 13mm eyepiece magnifies objects 46 times.
A great accessory for your telescope is a Barlow lens. If you use a Barlow lens with one of your eyepieces, it doubles the
magnification of your eyepiece. Other types of Barlows can triple or further increase the power of an eyepiece. To find out how much the magnification is when you use a Barlow, multiply your eyepiece's magnification by two.
Eyepiece's magnification x 2
=
Magnification with a 2X Barlow lens
For the Infinity 90 the 26mm low-power eye-piece magnifies an object 23 times. Multiply 23 by 2 and you get 46 times magnification with a Barlow.
It's worth repeating: Keep in mind that a bright, clear, but smaller image is more interesting than a larger, dimmer, fuzzy one. Using too high a power eyepiece is one of the most common mistakes made by new astronomers. So don't think that higher magnification is necessarily better—quite often the best view is with lower magnification value!
TAKING CARE OF YOUR TELESCOPE
Your telescope is a precision optical instru-
ment designed for a lifetime of rewarding viewing. It will rarely, if ever, require factory servicing or maintenance. Follow these guidelines to keep your telescope in the best condition:
- Avoid cleaning the telescope's lenses. A little dust on the front surface of the telescope's correcting lens will not cause loss of image quality.
- When absolutely necessary, dust on the front lens should be removed with very gentle strokes of a camel hair brush or blown off with an ear syringe (available at most pharmacies).
JOIN AN ASTRONOMY CLUB, ATTEND A STAR PARTY
One of the best ways to increase your knowledge of astronomy is to join an astronomy club. Check your local newspaper, school, library, or telescope dealer/store to find out if there's a club in your area.
Many groups also hold regularly scheduled Star Parties at which you can check out and observe with many different telescopes and other pieces of astronomical equipment. Magazines such as Sky and Telescope and Astronomy print schedules for many popular Star Parties around the United States and Canada.

Looking at or near the Sun will cause irreversible damage to your eye. Do not point this telescope at or near the Sun. Do not look through the telescope as it is moving.
14
- Fingerprints and organic materials on the front lens may be removed with a solution of 3 parts distilled water to 1 part isopropyl alcohol. You may also add 1 drop of biodegradable dishwashing paper per pint of solution. Use soft, white facial tissues and make short, gentle strokes. Change tissues often.
CAUTION: Do not use scented or lotioned tissues or damage could result to the optics. DO NOT use a commercial photographic lens cleaner.
CHANGING THE VIEWFINDER BATTERY
If the viewfinder red dot does not illuminate, verify the viewfinder is on by rotating the knob (10) below the viewfinder lens clockwise. If the red dot does not illuminate, the battery may need replacing.
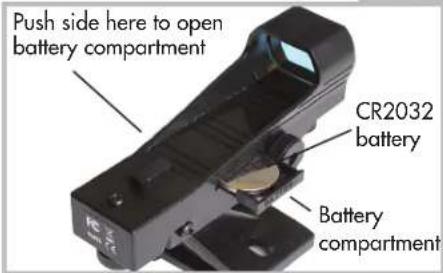
To replace the battery, press the left side of the viewfinder housing labeled "push". The battery compartment will slide out on the right side of the viewfinder (see Fig. 7). Replace the battery with a Lithium CR2032 battery with the positive side up. Then push the battery compartment back


Looking at or near the Sun will cause irreversible damage to your eye. Do not point this telescope at or near the Sun. Do not look through the telescope as it is moving.
into the viewfinder and power on.
OPTIONAL ACCESSORIES
Additional Eyepieces (1.25" barrel diameter): For higher or lower magnifications with the telescopes that accommodate 1.25" eyepieces, Meade Series 4000 Super Plössl eyepieces,
Fig. 7
available in a wide variety of sizes, provide a high level of image resolution and color correction at an economical price. Contact your Meade Dealer or see the Meade catalog for more information. Visit us on the web at www.meade.com.
OBSERVING TIPS
- Try to pick an observing site away from street and house lights and car headlights. While this is not always possible, the darker the site, the better.
- Give your eyes about ten minutes to adjust to the darkness before observing. Give your eyes a rest from observing every ten or fifteen minutes to relieve eyestrain.
- Try not to use a standard flashlight. Experienced observers use red LED flashlights, the red utility light on the Autostar handbox, or tape red cello-phane over their flashlights to use for setup and map reading so they don't have to continually readjust their eyes to the darkness. Be careful not to shine bright lights if there are other observers in the area. Do not shine a flashlight into the telescope while someone is observing!
- Dress warmly. It gets chilly when you're sitting for prolonged periods of time.

Looking at or near the Sun will cause irreversible damage to your eye. Do not point this telescope at or near the Sun. Do not look through the telescope as it is moving.
Meade Factoid
Just below the constellation Orion's famous belt of three stars (in the middle of his sword), is The Great Orion Nebula. This wonderful telescope target is really a cosmic star factory where a glowing gas cloud surrounds hot young stars.
©2014 Meade Instruments Corp.
OBSERVATION LOG
OBSERVER:
OBJECT NAME:
DATE & TIME OBSERVED:
CONSTELLATION:
EYEPIECE SIZE:
SEEING CONDITIONS: EXCELLENT GOOD POOR
NOTES:

DRAWING OF IMAGE
photocopy this page
©2014 Meade Instruments Corp. All rights reserved. Specifications subject to change without notice.
1-800
626-3233
Meade Instruments Corp.
27 Hubble, Irvine,
California


- MEADEINSTRUCTIONMANUAL
- INFINITY SERIES
- WARNING
- INTRODUCTION
- FIGURE 1
- SETTING UP YOUR TRIPOD
- ATTACH THE ACCESSORY TRAY
- ATTACH THE OPTICAL TUBE TO THE MOUNT
- ATTACH THE VIEWFINDER
- ATTACH THE DIAGONAL PRISM AND EYEPIECE
- ALIGN THE VIEWFINDER
- TO MOVE THE TELESCOPE
- SUN WARNING
- NEVER USE YOUR TELESCOPE
- TO LOOK AT THE SUN
- THE MOST IMPORTANT RULE
- THE MEADE 4M COMMUNITY
- OBSERVING
- TOO MUCH POWER
- WHAT'S NEXT? BEYOND THE SOLAR SYSTEM
- SURF THE WEB
- SOME OBSERVING TIPS
- STAR CHARTS
- ASTRONOMY RESOURCES
- HAVE A GOOD TIME, ASTRONOMY IS FUN
- WHAT DO THE SPECIFICATIONS MEAN
- USE THE SPECIFICATIONS TO CALCULATE THE MAGNIFICATION OF YOUR EYEPIECE
- TAKING CARE OF YOUR TELESCOPE
- JOIN AN ASTRONOMY CLUB, ATTEND A STAR PARTY
- CHANGING THE VIEWFINDER BATTERY
- OPTIONAL ACCESSORIES
- OBSERVING TIPS
- MEADE FACTOID
Brand : MEADE
Model : Infinity 80mm
Category : Telescope