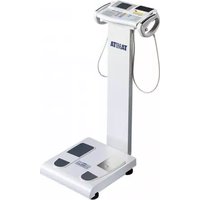
BC-418 - Scale TANITA - Free user manual and instructions
Find the device manual for free BC-418 TANITA in PDF.


| Product Type | Segmental Body Composition Analyzer |
| Brand | Tanita |
| Model | BC-418 |
| Dimensions | 361 x 445 x 110 mm (14.2 x 17.5 x 4.3 inches) |
| Weight Capacity | Up to 200 kg (440 lb) |
| Weight Graduations | 0.1 kg (0.2 lb) |
| Power Supply | AC adapter (included) or 6 x AA batteries |
| Measurement Method | Bioelectrical Impedance Analysis (BIA) with 8 electrodes |
| Measured Parameters | Weight, Body Fat %, Segmental Fat %, Muscle Mass, Segmental Muscle Mass, Total Body Water, Bone Mass, Basal Metabolic Rate, Metabolic Age, Visceral Fat Rating, Body Mass Index |
| Display | Large LCD screen with backlight |
| User Memory | Up to 4 user profiles with memory for 9 readings each |
| Data Output | RS-232C serial port for PC connection |
| Operating Temperature | 5°C to 35°C (41°F to 95°F) |
| Storage Temperature | -10°C to 60°C (14°F to 140°F) |
| Cleaning | Wipe with a soft, dry cloth. Do not use abrasive cleaners or immerse in water. |
| Safety Precautions | Not for use by persons with implanted electronic medical devices (e.g., pacemaker). Avoid use during pregnancy. |
| Spare Parts & Repairability | Contact Tanita authorized service center for replacement parts. Battery compartment accessible. |
| General Information | Professional grade scale for clinical and wellness use. Requires bare feet on electrodes for accurate readings. |
Frequently Asked Questions - BC-418 TANITA
User questions about BC-418 TANITA
0 question about this device. Answer the ones you know or ask your own.
Ask a new question about this device
Download the instructions for your Scale in PDF format for free! Find your manual BC-418 - TANITA and take your electronic device back in hand. On this page are published all the documents necessary for the use of your device. BC-418 by TANITA.
USER MANUAL BC-418 TANITA
Monitoring Your Health
BODY COMPOSITION ANALYZER
BC-418MA III
INSTRUCTION MANUAL


Please read this Instruction Manual carefully and keep it handy for future reference.
Table of Contents
Table of Contents 2
□ Applications....3
□ Advantages 3
Safety Notes 1
Caution Symbols
WARNING 4
CAUTION 4
⚠ Maintenance 5
General Instructions for Accurate Measurement 5
- Product Assembly and Components 6
■ Product Structure 6
■Rear View of Control Box 7
■ Digital Display 7
■ Membrane Switch 8
-
Assembly Instructions 9
-
Preparation for Use 1D
■ Connection and Installation ......10
■ Loading the Printer Paper Roll....11
-
Setting Date and Time 12
-
Mode Selection 13
■ Setting the number of printouts, the printout language, and the printout items ……13
■Setting the Original Mode 14
- Operating Instructions 18
■ Body Composition Analysis 18
■ Weight Only Function 21
■Setting of Clothes Weight 21
■ Explanation of the Print Out 22
- Clearing Paper Jams 24
■Components of the Printer Unit 24
■ Clearing Paper Jams 25
- Troubleshooting 26
■ Problem List....26
☐ RS-232C Interface Instructions 27
Technical Notes 36
☐ THE APPLICABILITY OF THE BMR REGRESSION
FORMULA AND ITS DIFFERENCES WITH THE OLD FORMULA……41
□ Specifications 43
Applications
- This equipment can be used in the screening of certain adult diseases and conditions related body weight and composition.
- It can be used in the monitoring and prevention of conditions caused by excessive deposits of fat tissue, such as diabetes, hyperlipidemia, cholelithiasis and fatty liver.
- It can be used in the monitoring of changes in individuals' body composition, related to differences in the ratio of fat tissue to lean.
- It can be used to assess the effectiveness of individuals' nutrition and exercise programmers, both for health and physical fitness.
Advantages
- BIA is a simple, quick, and non-invasive means of measuring body composition, making it particularly useful for group screenings.
- The Tanita BC-418MA Body Composition Analyzer calculates "body fat ratio," "body fat mass," "fat free mass," "estimated muscle mass," and "Base Metabolic Rate" using data derived by the DXA method using BIA.
- Through the use of 8 electrodes, the BC-418MA Body Composition Analyzer makes it possible to show separate body composition mass for the right arm, the left arm, the trunk, the right leg and the left leg.
Safety Notes
Caution Symbols
Thank you for purchasing this precision crafted Tanila product. For uplift performance and safety, please familiarize yourself with the Caution Symbols below. These symbols are designed to alert the user to potential hazards when using this equipment. Ignoring these Caution Symbols may result in serious injury, or damage to the product. Please be sure to review before proceeding with the INSTRUCTION MANUAL.


- Individuals with a Pacemaker or Other Internal Medical Devices This equipment sends a weak electrical current through the body during measurement. Individuals who have internally implanted medical devices, such as Pacemakers, should not use this equipment due to the risk of malfunction to the device that may be caused by the weak electrical current.
- Inserting and Removing the Power Cord To reduce the risk of electric shock or product damage, never insert or remove the power cord with wet hands.
- Do not under any circumstances dismantle or alter the device, as this could result in electric shock or injury as well as adversely affect the precision of measurements.
- To prevent fire hazard Use only a correctly wired (100-240VAC) outlet, and do not use a multiple outlet extension cable.
- Measurements for physically disabled persons
Physically disabled persons should not attempt to take measurements alone, but instead should have their caretakers assist them in using the device.

- When connecting the BC 418MA to a computer Ensure that the computer conforms to IEC950.
- Cross Contamination
The Body Composition Analyzer should be used with bare feet. Please be sure to clean the scale platform with appropriate disinfectant after each use. Never pour any liquid directly on the scale platform, as it may leak and cause internal damage. Use a soft cloth and appropriate ethyl alcohol to wipe off platform. Do not wipe the platform with strong chemicals. - Interpretation of Results The data provided by this machine, as well as any supplementary information such as diet or exercise programs based on this data, should be interpreted by a licensed professional.
- Please make sure you place the Weighing Platform on a level and stable surface. If the equipment is used when the Weighing Platform is unstable because not all feet are on the surface, there may be a risk or stumbling or inaccurate measurement. Never jump on the Weighing Platform, there may be a risk of stumbling and malfunction of the equipment.
- When handling printer unit, avoid any sharp edges.
- For the BC-119MA: Ensure you use the original AC adapter (MODEL: SA25-053SU). Using an AC adapter other than the original one may cause malfunction. Do not insert or remove the plug by the cable.
- This equipment incorporates a fuse for electrical equipment (2A, 125V.) If an AC adapter other than the original one is used or there is a large surge in electric current, the fuse will blow for safety purposes. If the fuse has blown, the equipment must be inspected again. The fuse is located inside the equipment and users cannot disassemble the equipment easily. Therefore, please contact your nearest Taunla branch office or dealer to change the fuse.
⚠ Maintenance
Since this equipment is accurately manufactured and adjusted, please observe the following instructions.
- Users must not disassemble or adjust this equipment. This should be done by trained maintenance agents or certification offices designated under the NAWT directive.
- Never disassemble the equipment as this may cause malfunction. Users must not disassemble or adjust this equipment. Please inspect the equipment in accordance with the regulations in your country.
- Unplug the unit from the wall outlet when it will not be in use for long periods of time
- In order to reduce the risk of a short circuit, please keep any liquid or metal objects (paper clips, etc.) away from the printer.
- Keep the electrodes clean by wiping them with disinfectant.
- Do not drop the unit, and avoid locations with constant vibration.
- Do not put this equipment in direct sunlight, close to heaters or near direct draughts from air conditioners.
- When transferred to any location where there is a difference of more than 20 degrees centigrade (40 degrees Fahrenheit), wait 2 hours before using.
- When disposing of this unit, please do so in accordance with the prevailing regulations in each country.
△General Instructions for Accurate Measurement
This equipment sends out a very weak electric current to measure impedance (electrical resistance) of the body. Therefore, in principle, users need to use this equipment with bare feet. Moreover, since impedance fluctuates in accordance with the distribution of body fluid, please observe the following instructions for accurate measurement.
- To prevent a possible discrepancy in measured values, avoid taking measurements after vigorous exercise until sufficiently rested.
- To prevent inaccurately low body fat percentage measurements and other measurement errors, always hold both arms straight down when taking measurements.
- As changes in body water and body temperature can have a major impact on measurements, measurements should be made every day at the same time under similar conditions (always urinating before taking measurements, etc.) to get a more accurate picture of the measurements over time.
- Ensure that your arms are not touching your side and that the inner thighs are not touching each other during measurements; if necessary, place a dry towel between your arm and side and/or between your thighs.
- Also, make sure the sales of feet are free of excess dirt, as this may also act as a barrier to the mild current.
- False results may be reported after excessive food /fluid intake, or after periods of intense exercise. * For further details, see the Technical Notes on page 36.
- This equipment is designed for the majority of the population leading healthy lives with a regular lifestyle. For people suffering from sickness, or whose lifestyle is very different from the norm, it is recommended that the data from this product should not be used as an absolute value, but rather as a reference to observe the rate change. 4 For further details, see the Technical Notes on page 36.
- If there are calluses on the roles of the feet, or an individual is wearing thin nylons, accurate measurement may still be possible. Place 0.5ml of water in the center of each electrode. This will act as a conductant, and may allow the current to pass freely through a thin barrier.
- Measurement is sometimes impossible on a surface that is strongly vibrating. In this case, please move the equipment onto a surface with little vibration.
- Do not take measurements while using transmitters, such as mobile phones, which may affect readings.
Temperature Range for Use : 0°C / 35°C
Relative Humidity : 30% / 80% (without condensation)
Temperature Range of Environment : -10°C / 50°C
Range of Relative Humidity : 10% / 90% (without condensation)
To avoid malfunctions, avoid storing the equipment where there is direct sunlight, significant temperature changes, the risk of dampness, a large amount of dust, in the vicinity of fires, or where there is the risk of receiving vibrations or shocks.
| Model Name | Value RangeBC-418MA |
| Voltage Range | 100~240VAC |
| Frequency Range | 50/601Hz |
| Electric Current Range | 550mA |
1.Product Assembly and Components

Product Structure
Please verify that the following components are in the package.
① Paper Dispenser Cover
② Printer Cover
③ Control Panel
④ Digital Display
⑤ Left-hand grip
⑥ Right-hand grip
⑦ Column
⑨ Anterior Electrodes
⑨ Posterior Electrodes
⑩ Level Gauge
⑪ Adjustable feet

Accessories
Printer Paper

Paper Width : 58mm Paper Roll Diameter : Maximum 50mm
Syringe

Instruction Manual
(Technical Notes)

Bottom Cover

Bottom Cover
Attachment Screws

Column Attachment
Screws
Rear View of Control Box

Symbols and their Meanings
| To Turn on the Unit | : To Turn off the Unit | === | Direct current. | ||
| Input, Output | Class II Equipment | FEED | : Advances the paper. | ||
| Type BI applied part | CautionRefer to the attached notes. | CE 2000 | : Low sensitivity with Medical Device Directive 35/42EFC | ||
| P T | Clothes Weight Setting | Weight Scale | TIME SET | Sets the date and time. | |
| Male | Male | Female | Female |
Digital Display
Body weight mark
Indicates that the device is being used to measure body weight
Clothes weight mark
Indicates that the weight of clothes is being subtracted
Gender mark (male)
Indicates that the user is male
Gender mark (female)
Indicates that the user is female
Athlete mark
Indicates that the user is an "atkice"
Ready mark
Indicates that the device is ready to begin measurements


Measurement unit mark (kg)
Indicates that the weight is shown in kilograms
Stabilized mark
Indicates that the displayed figure is stabilized
Unit of height (cm)
Indicates that the bright is shown in centimeters.
Age mark
Indicates that the figure shown is the user's age
Body fat percentage
Indicates that the figure shown is the body fat percentage
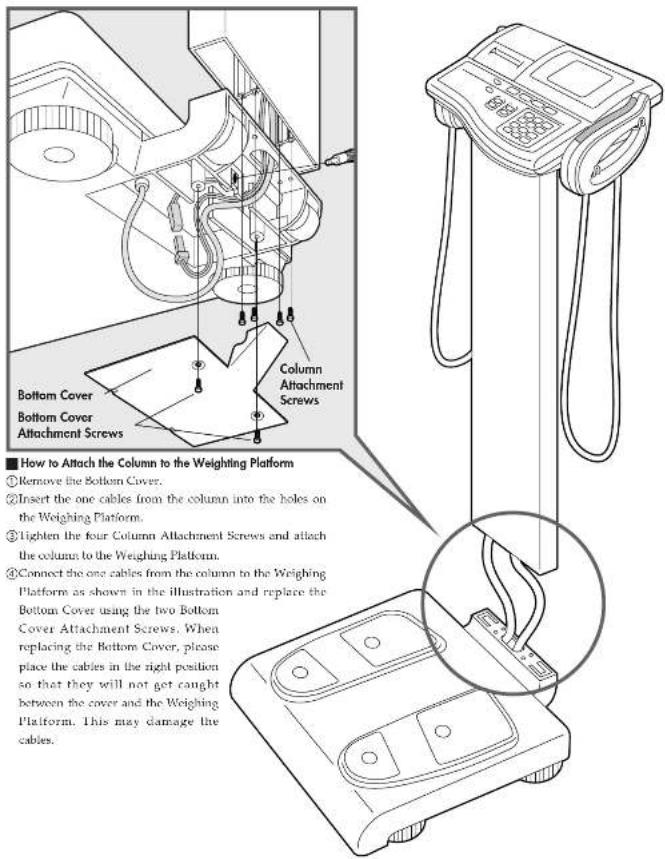
2. Assembly Instructions

Membrane Switch

Tanila delivers "athlete" as a person involved in intense physical activity at at least 10 hours per week and who has a resting heart rate of approximately 60 beats per minute or less. Tanila's athlete definition includes "lifetime of fitness" individuals who have been fit for years but currently exercise less than 10 hours per week.
Tanita's athlete definition does not include "enthusiastic beginners" who are making a real commitment to exercising at least 10 hours per week but whose bodies have not yet changed to require the Athlete mode.
Please see Technical Notes booklet for further explanation.
Digital display

3.Preparation for Use

■ Connection and Installation
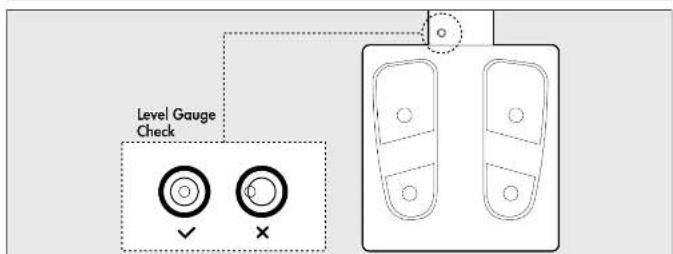
For accurate measurement, place the Weighing Platform on as flat a surfact as possible and adjust the level with the adjustable feet so the bubble in the level gauge is in the center of the frame.

CAUTION
Make sure you place the Weighing Platform on a stable level surface and adjust the level with the adjustable feet. If the Weighing Platform is not stable because not all the feet are on the surface, for example, there is a risk of stumbling or inaccurate measurement.
■ Connection of Plugs
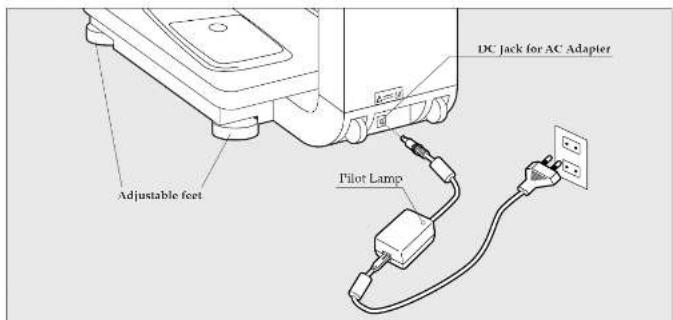
- Insert the plug from the AC adapter into the DC jack on the back of the weighing platform.
- Connect the cable and the AC adapter and insert the plug on the cable into the wall outlet.

• To avoid electric shock, do not insert or remove the plug with wet hands. • To avoid electric shock, do not use the equipment near water.
• To avoid measurement error, do not measure while using equipment that generates radio waves, such as mobile phones.
*Use only the original AC adapter (MODEL: SA25-0535U). Using AC adapters other than the original one may cause malfunction, smoke or fire.
■ Loading the Printer Paper Roll
CAUTION
● Please change the paper roll when red lines appear along the sides of the paper.



- Turn the equipment on by pressing the [☐/☐] key.
"P.End" will flash in the middle of the screen.
This means that there is no printer paper.
* When you do not have any printer paper to replace the old roll, press the | 📊| key. "P.End" will disappear and you can continue measurement.
- Remove the Paper Dispenser Cover.
When you lift up the Paper Dispenser Cover from the back of the Control Box, it can be easily removed.
- Cut off the end of the printer paper where the glue is (about 3 cm) in a straight line.

Please make sure to cut off the part with the glue because the glue may hinder the paper feeding through the printer.
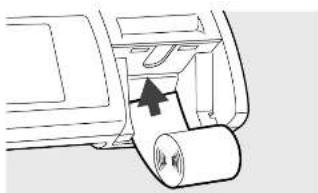
- Insert the printer paper into the slit.
The printer paper is automatically rolled up and the edge of the paper is cut automatically.
Please remove the cut paper.
Please make sure you insert the printer paper straight into the slit.
- Insert the catches of the Paper Dispenser Cover into the guide holes.
* If a paper jam occurs, please refer to 1° 25.

4. Setting Date and Time
5.Mode Selection

Setting the date and time

The printer function is ON in the display shown below.
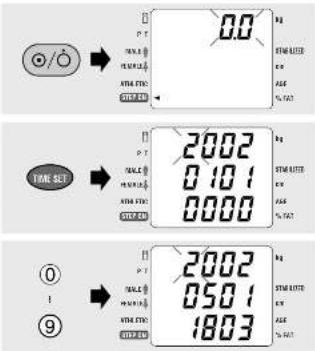
1. Push the []key
The entire display will begin to flash, and then the clothes weight input screen will appear.
2. Push the []
The date and time input screen will appear. The upper row of numbers show the year, the middle row the month and day, and the bottom row the time (hours and minutes).
* If no changes are to be made, press the [ ] again.
3. Input the present date and time.
Input the appropriate numbers, beginning with the top row, in the flashing space.
Example: To input May 1, 2002, 6:03 p.m., press in order the following keys:
□□□□□□□□□□□308110502002

This will return you to the previous input space.
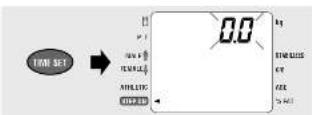
4. Press the []
The date and time are set, and the clock function is running.
The display will now return to the step prior to entering this mode.
The clock function is backed up by the rechargeable battery, but natural electric discharge of the rechargeable battery may occur if the device is not in use for an extended period (more than 2 weeks); this will clear the settings, making it necessary to reset the date and time.
Set the functions (modes) that you want this equipment to start with. The selected modes will be automatically recorded. If it is not necessary to change the settings, the equipment will start up when you simply press the [13key].
![TANITA BC-418 - Press the [] - 1](/content/2026/06/1271279/images/a586e69d8fe70a6b458bc6c7709b6899fc379b6e214e55790fcc8742bf7b798e.jpg)
Setting the number of printouts, the printout language, and the printout items
Select the number of print outs (0 - 9) and language. (English, French, German, Italian, Spanish)


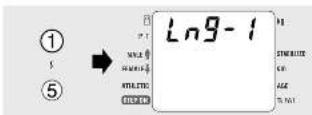


-
While holding down the [0] key, press the [3/0] key. Release the keys after "Prt-1" is displayed on the screen.
-
Select the number of print outs Using the numerical keys, enter the quantity of print outs desired. The maximum number is nine. [1]\~[9]: Quantity of print outs [0]: No printout
-
Language Selection If "0" is selected at step 2, you cannot preset the language. The display will automatically change to the language selection screen. The currently selected language will be displayed as a number.
Example: (LNG-1) means English.
Select the language desired using the numerical keys. [1] : English [2] : French [3] : German [4] : Italian [5] : Spanish
-
Printing selection Printing contents are selected from numerical keys [0] : Short [1] : Long
-
The display will automatically change to the measurement screen after all the input has been completed. If further change to the print settings is desired, please turn off the equipment and follow steps 1 - 4 above.

The equipment will start up with these settings next time you use it.


Setting the Original Mode
This process is utilized to select whether or not you use the target body fat ratio function. (See the printout sample on page 16.)


- Press the key while holding down the key.
[0]: The target body fat ratio function is deactivated [1]: The target body fat ratio function is activated If the number of print outs is set to "0" during the process of "Setting the Number of Print Outs and Language" on page 13, you cannot preset this item.
- After the input is completed, the display will automatically change to the measurement screen.

The equipment will start up with these settings next time you use it.


| Printing selection | Goal Setter Mode Print Out Input | ||
| Short[0] | ON[1] | STANDARD | 12 |
| ATHLETIC | 12 | ||
| TARGET BF 60% | 1 | ||
| OFF[0] | STANDARD | 1 | |
| ATHLETIC | 1 | ||
| Long[1] | ON[1] | STANDARD | 123 |
| ATHLETIC | 123 | ||
| TARGET BF 60% | 13 | ||
| OFF[0] | STANDARD | 13 | |
| ATHLETIC | 13 | ||
For this Printing Selection, please refer to the page 13. For this Goal Setter Mode, please refer to the page 14.
6.Operating Instructions

■ Body Composition Analysis

This explains the procedure when the printer function is turned on. Please be aware that the display may be different if the number of printouts is set to [0].

- Do not wipe the equipment with corrosive chemicals (gasoline, cleaner, etc.). Please use a neutral detergent to clean the equipment.
- When the equipment has been transferred to any location where there is a temperature difference of 20°C or more, wait for at least two hours before using it.
- In taking measurements, please keep the person away from the unit, who uses transmitters such as a mobile phone avoid causing margin errors.
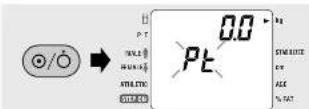


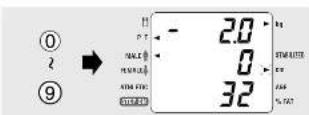

1. Turn on the Power.
Press the | 3019
"0.0" will appear on the upper portion of the display.
2. Enter Clothes Weight.
Enter clothes weight using the numerical keys. Example: if the clothes weight is 2.0 kg, press [2], [.] and then [0]. When the data input is completed, the data will be displayed as a minus number.
3. Select the Body Type.
Select the Body Type from Standard Male, Standard Female, Athletic Male and Athletic Female. Please use the Athletic key when the user is 17 years or older and also meets the following criteria. See page 8 for Janila's definition of "Athlete."
4. Enter Age.
* If the user is 32 years old or younger.
Example: Press [3] and [2].
* If the user is 9 years old or younger
Example. press [0] and [9].
* If ages 16 or less are entered, even if Athletic is selected for the Body Type, it will be automatically changed to Standard.
5. Enter Height.
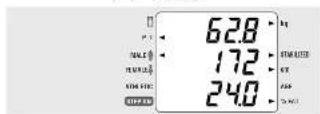
Example: If the user's height is 172 cm, please press [1], [7] and then [2].


6. Set the Target Body Fat Ratio.
After you input the height, "GOAL" will automatically flash on the display. Input the target body fat ratio desired using the numerical keys. Example: 16% = Press [1] and [6]. 9% = Press [0] and [9].
* If the number of print outs is set to "0", nothing will be displayed.
* If the target body fat ratio is set to OFF, the target body fat ratio will not be printed out.

Before you start a body weight management program and set the appropriate personal body fat ratio, please consult your doctor. Tanita is not responsible for setting the appropriate target body fat ratio for specific individuals.
- For details of the desirable body fat percentage, please refer to the Technical Notes. Male athletes may wish to select a single digit body fat percentage as their target. However, this is not recommended for Standard Adults, in particular women, who should avoid becoming excessively loan. Always consult a doctor about the target body fat percentage most suitable for your body type.

- Do not step on the Weighing Platform until the target body fat ratio setting has been completed because the power may be automatically turned off or the measurement may be inaccurate.
* If you want to change the settings, please press the key and the procedure will go back to the former step. Please re-enter the data.
7. After "88888" is displayed on the upper portion of the display, a flashing arrow will appear next to STEP ON.
8. Start Measurement.
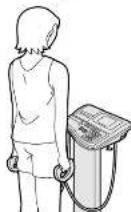
Step on the Weighing Platform with bare feet so they touch the electrodes. Stand in a stable position without bending your knees.

- Do not use the hand grips, as you will only be measuring your body weight this time.

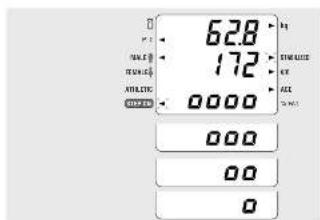


9. Taking Measurement.
Step on the weighing platform in bare feet. Make sure heels are placed on the posterior electrodes, and the front part of the feet are in contact with the anterior electrodes. An arrow will flash next to [STABILIZED] ▶ and the weight will be displayed on the LCD.
10. Measure the Impedance.
When the grips are grasped with both hands, 0000 will appear at the bottom of the display and the impedance measurement will begin. The 0000 marks will disappear one by one during the measurement; after five full cycles, the measurement will be complete.

Grab the grips (two locations) only after the body weight figure on the display has stabilized.
- Do not step off the Weighting Platform until the "0000" symbols disappear completely.
- In cases when measurements of the body fat ratio or the quantity of fat are abnormally small or the error message [E01] is shown on the display, the probable reason is that the soles of the feet and the electrodes are not in full contact. Make sure you step on the Weighing Platform so there is contact between the electrodes and the soles of your feet. If the problem is not solved this way, it is possible that the soles of the feet have calluses and the resistance is too great. Therefore, place about 0.5 ml of water on each of the four electrodes where the feet touch before measurement.
11. Measurement Is Completed.
Once the body weight and impedance measurements have been completed, the overall body fat percentage will be shown at the bottom of the display and a burzer will sound. If the printer is ON, the measurement results will be printed out. * With regard to the measurement result, please refer to P. 22. If the printer is ON, the measurement results (predicted muscle mass, fat mass, and body fat percentage) for each body part can be displayed using the ten-key pad. Select the number of the desired body part on the ten-key pad.
| [4]: | Left arm |
| [6]: | Right arm |
| [0]: | Left leg |
| [.]: | Right leg |
| [5] and [2]: | Trunk |
* See page 13 for details on printer settings. Step off the Weighing Platform.
12. When You Continue to Measure.
After printing is completed, go back to step 3. Measure by entering the data in the same procedure.
13.Finish Measurement.
Press the [@/O] key and turn off the power.
■ Weight Only Function

-
After turning on the unit, press the []key After a momentary display check, "0.0" will appear on the LCD. It measuring units need to be changed, do so at this time by pressing the []key. An arrow on the LCD will follow the selection of weighing units.
-
Weight Measurement. Step on the Weighing Platform. An arrow will light next to [STABILL/ED] ▶ and the weight measurement will be displayed on the LCD.
-
When measuring is complete, press the [ ] key to turn off the power.
- No printer is available when measuring weight only. - If body composition analysis is desired, turn the unit off and then on, using the [①/○] key.
Important Note: There is no automatic weight lock function.
Setting of Clothes Weight
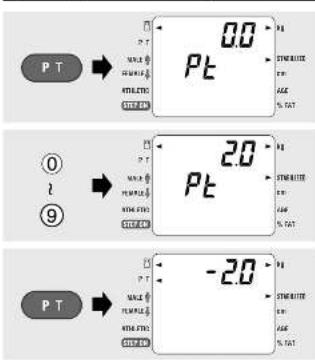
- Press the [] key.
2. Enter the clothes weight.
Example: If the clothes weight is 2.0 kg, press [2], 1.1 and then [0].
When you want to correct an entry, press the [ ] key and enter the data again.
3. Finalizing the setting
Press the | P_T to finalize the clothes weight. The finalized clothes weight is displayed with a minus, an arrow next to P_T lights up, and it becomes possible to measure your weight.
Explanation of the Print Out

NOTE: Please refer to the Technical Notes for details.

Please consult your doctor before you start a body weight management program. Tanita is not responsible for the target body fat ratio.
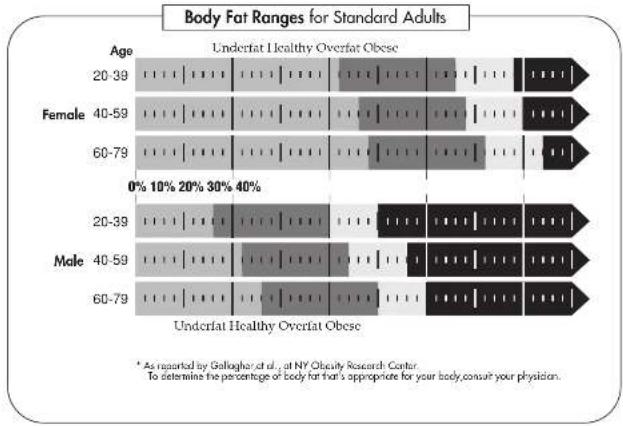
Based on NIH/WHO BMI Guidelines
| Underweight | BMI < 18.5 | |
| Normal Range | 18.5 ≤ BMI < 25 | |
| Pre obese | 25 ≤ BMI < 30 | |
| Obese CLASS I | 30 ≤ BMI < 35 | |
| Obese CLASS II | 35 ≤ BMI < 40 | |
| Obese | CLASS III | BMI ≥ 40 |
7.Clearing Paper Jams

Components of the Printer Unit

* This is a picture of the Control Box without the Printer Dispenser Cover and the Printer Cover, looking down from above.

Clearing Paper Jams
CAUTION
Please pay careful attention to avoid injury from the sharp edge. Please turn off the machine before clearing Paper jams.


- Remove the Paper Dispenser Cover. If you lift up the Paper Dispenser Cover from the back of the Control Box, it can be easily removed.
- Remove the Printer Cover. As shown in the illustration, from the front side of the Control Box, use a finger to lift up the Printer Cover. The Printer Cover is firmly fixed by catches. Please make sure not to drop the Control Box when you remove the Printer Cover.
- Lift up the Automatic Cutter Unit. From the front side of the Control Box, lift up the Automatic Cutter Unit with a finger.
- Raise the Paper Release Lever and remove the jammed paper. Remove the printer roll paper and the jammed paper.
- Return the Paper Release Lever, the Automatic Cutter Unit and the Printer Cover to the normal position. Insert the catches of the Printer Cover into the guide holes of the Control Box and push it down slowly while pressing the catches on both the left and right hand sides until a click is heard. Failure to press down the Paper Release Lever will result in continuous feeding of the printer paper without it being cut automatically.
- Return the printer paper roll. Return the printer paper roll by following the procedure in P. 11 [Loading Printer Paper Roll].
- Return the Printer Dispenser Cover to the proper position. Press the Printer Dispenser Cover down slowly as the catches of the cover go into the guide holes. P. 11.

8.Troubleshooting

Problem List
If problems occur, please refer to the following instructions before you ask for repairs.
| Problem Solution | |
| Nothing appears on the display after pushing [867] key | • Please confirm that the Control Box is properly connected to the AC Adapter and the AC Adapter is properly connected to the cable. |
| E-01 is displayed. | • E-01 is displayed when the impedance shows an abnormal value compared to height and weight.Please make sure that measurement was carried out with bare feet, the electrodes or the soles of the feet were clean, and the feet were correctly in contact with the electrodes. If the foot are dry or have calluses, place water on the electrodes before stepping on the unit.It is possible that the body fat ratio exceeds the measuring capacity. Please stop measuring. |
| E-02 is displayed and the reading of the trunk cannot be obtained. | • This sign is displayed when the body fat percentage of the trunk is too low and is off the measureable range.Please refer to the readings of other parts for the body fat. |
| E-11 is displayed. | • E-11 is displayed when there is a loose connection between the control box and the weighing platform.Confirm that none of connections between the scale and control box are loose or unplugged.There may be excessive vibration which will disturb the measurement process. |
| E-12, 13 or 14 is displayed. | • The equipment requires readjustment. |
| E-16 is displayed. | • Measurement is not possible because impedance is unstable. In order to improve electrical conductivity, please clean the soles of the feet or place water on the electrodes before using the equipment. |
| No print out | • Please confirm the number of print outs selected is more than 0. (See P. 13)• Please confirm that the correct brand of paper is used.• Please confirm that the printer paper roll is placed in the correct position• Please confirm that the printer paper is not jammed. |
| The printer paper does not come out. | • Please confirm the printer paper is not jammed. |
| P.End is displayed and the equipment is incapable of taking a measurement. | • The printer paper is used up. Please put in a new printer paper roll. (See P.11)• Please confirm that the printer paper is being advanced properly.• Please make sure that the Paper Release Lever is not in the "Up" position. (See P. 25) |
| ---- is displayed. | • It is possible that the maximum weight capacity has been exceeded. Please stop measuring. |
| uuuu is displayed.The power has turned off during measurement. | • Do not stand on or put things on the Weighing Platform before starting measurement. Start measurement after confirming there is nothing on the Weighing Platform. |
| Feed Key is not functioning. | • It is possible that the number of print outs selected is 0 or the Weight Scale Mode has been selected. Please select the Body Fat Measurement Mode and select a number larger than 0 for the number of print outs. |
RS-232C Interface Instructions
This section describes the interface for outputting the 8C-418MA Body Composition Analyzer measurement results as RS-252C signals to personal computers and other external devices.

The BC-418MA is in full compliance with IEC601-1 Safety Standard. Only connect IEC950-compliant computers to the BC-418MA.
■ Specifications ■ Signal lines and connection methods
| Communication Standard | EIA RS-232C Compatible |
| Communication Method | Asynchronous Transmission |
| Signal speed | 4800 baud |
| Data bit length | 8 bits |
| Parity | None |
| Stop bit | 1 bit |
| Terminatur | CR+LP |
| Terminal number Signal name | |
| 2 RXD | |
| 3 TXD | |
| 5 GND | |

- Connection example Always use a reverse cable when connecting to an external computer.
| BC-41BMA | |
| 1. | RXD |
| 2. | TXD |
| 3. | GND |
| 4. | |
| 5. | |
- An RS-232C connector (D sub 9-pin female) is located in the lower center on the back of the control box. - Use an RS-232C cross cable when connecting to a personal computer or other device.
RS-232C connector (D sub 9-pin male)


Transmission data
CAUTION
- Transmission data will be output after measurements regardless of the status of the personal computer or other device at the receiving end. For that reason, the personal computer or other device to which data will be transmitted must be put in a reception-ready status before measurement.
(1) Output data items
| Output data (ASCII code) | |||
| Data | kg mode | Byte Length | |
| Date | "dd/mm/yy" (date/month/year) | 10 | |
| Time | "hh:mm" (hour:minutes) | 7 | |
| Body type | 0:standard 2:athlete | 1 | |
| Gender | 1: male 2: female | 1 | |
| Height | xxxx (cm) | 5 | |
| Weight | xxx.x (kg) | 5 | |
| Body fat percentage | xxx (%) | 4 | |
| Fat mass | xxx.x (kg) | 5 | |
| Fat free mass | xxx.x (kg) | 5 | |
| Body water mass | xxx.x (kg) | 5 | |
| Age | xx | 2 | |
| BMI | xxx.x | 5 | |
| DMR | xxxx (kJ) | 5 | |
| Impedance | Whole body | xxx (Ω) | 3 |
| Right leg | xxx (Ω) | 3 | |
| Left leg | xxx (Ω) | 3 | |
| Right arm | xxx (Ω) | 3 | |
| Left arm | xxx (Ω) | 3 | |
| Right leg | Body fat percentage | xxx (%) | 4 |
| Fat mass | xxx.x (kg) | 5 | |
| Fat free mass | xxx.x (kg) | 5 | |
| Induced moderate | xxx.x (kg) | 5 | |
| Left leg | Body fat percentage | xxx (%) | 4 |
| Fat mass | xxx.x (kg) | 5 | |
| Fat free mass | xxx.x (kg) | 5 | |
| Induced moderate | xxx.x (kg) | 5 | |
| Right arm | Body fat percentage | xxx (%) | 4 |
| Fat mass | xxx.x (kg) | 5 | |
| Fat free mass | xxx.x (kg) | 5 | |
| Induced moderate | xxx.x (kg) | 5 | |
| Left arm | Body fat percentage | xxx (%) | 4 |
| Fat mass | xxx.x (kg) | 5 | |
| Fat free mass | xxx.x (kg) | 5 | |
| Induced moderate | xxx.x (kg) | 5 | |
| Trunk | Body fat percentage | xxx (%) | 4 |
| Fat mass | xxx.x (kg) | 5 | |
| Fat free mass | xxx.x (kg) | 5 | |
| Induced moderate | xxx.x (kg) | 5 | |

Data will not be output if the [ ] key is used to switch to the body weight only mode.

Calculations are made using 1kcal = 4.184kJ.
(2) Output data format
Measurement data will be output in the following format.
- A comma (,) is used as a separator between data items.
• The terminators marking the end of data are CR (ASCII code: ODI) and LF (ASCII code: OAI). - If the digits in the data do not reach the stipulated length for fixed length data, the data will be right-justified for output, with a zero (0) (ASCII code: 3011) entered in any empty spaces.
![graph TD A["Comma"] --> B["d d /mm y h mm x x x xx x x x x"] B --> C["Date Time"] C --> D["Comma"] D --> E["x x x x x x x x x x x x x x x x x x x x x x x x x x x x x x x x x x x x x x x x x x x x x x x x x x x x x x x x x x x x x x x x x x x x x x x x x x x x x x x x x x x x x x x x x x x x x x x"]…](/content/2026/06/1271279/images/ba358b4c25eb7b3cef0a9983a3ed6de24e36de50b8091a269ae4527125e69df8.jpg)
Output (Fat Monitor Mode) Format
Remote Mode
All types of data may be entered by connecting the BC-418MA to a PC and switching to Remote mode.
■ Switching to Remote Mode

-
When the unit is switched off, press the [0/0] and [ keys simultaneously.
-
Press [0], [8].
-
Switch Remote mode on and off by pressing [1] or [0].
[1]: Enables Remote mode [0]: Disables Remote mode
-
Press [ ] to confirm.
-
Press the []key.
Only "r S" will appear (standby screen).
⚠️Note To switch off Remote mode, start from the beginning again and select "OFF" at Step 3.
Control Commands
When in Remote mode, the body lat analyzer may be operated remotely by sending control commands from a host.
| commands[D] | □ □ □ LFCR2D□ □ □ □ □ □ □ □LFCRXXX0DD: Set clothing weight (5-byte fixed length)□ □ □ □ LFCRX1D□ □ □ □ LFCRX2D□ □ □ □ □ □ □ □LFCRXXX0SD: Set height (5-byte fixed length)□ □ □ □ □ LFCRXX4D□ □ □ □ □ LFCRXX6D | D7 : Confirm current settingD1 : Set gender male = 1 female = 2D2 : Set body type standard = 0 athlete = 2D4 : Set age (2-byte fixed length)D6 : Set Target BF (2-byte fixed length) |
| commands[G] | □ □ □ LFCR1G□ □ □ LFCR2G | G1: Start measuring body fatG2: Measure weight only |
| Special commands | [ ] [ LFRCHR(01FH) ] [ LFRCHR(01EH) ] | CHRS(01FH): Reset settingsCHRS(01EH): Cancel measurement |
*All fixed-length data right aligned. Enter 13 blanks.
Error Codes
If an error occurs, the body composition analyzer will send an error code to the host.
| □ □ □ □ LBER0 | E00 : Attempted to start measuring without completing settings |
| □ □ □ □ LBER1 | E01 : Error in calculating body fat percentage |
| □ □ □ □ LFCRXXE | EXX 'other error' body fat analyzer switches off |
"See p.26 7. Troubleshooting" for details of errors.
Example of Use
The body composition analyzer is used remotely as follows.

Switch on body composition analyzer.
First, switch on the body composition analyzer.

Check that the unit is in female mode.
A. on check that the unit is connected properly to the computer

Set tare weight
The late weight need not be set if not required. It will then be treated as 0.
Ex: 1kg lane weight
| Host | • body component analyzer | CR0.1000D |
| II commands received | Host: ← D- Dcy Cbl pCflfrn analyer |
| II settings incorrect | Host: ← □ bcy Cbl pCflfrn analyer |

Set gender
Loc male
| Host | -0001 | com | 8001 | Analyzer |
| It commands accurate | Hcs: ← [ ] body [ ] analyer |
| It settings incorrect | Hcs: ← [ ] body [ ] analyer |

Set body type
Ex: standard
| II commands accessed | Host: D Box Composition analyzer |
| II settings incurred | Host: □□□CH2DF body composition analyzer |

Set height
Ex 179cm
| →body composition analysis | CR971003D |
| If commands accessed | Host: ← [P-1] (by C) (by p) (which analyser |
| If settings incorrect | Host: ← [Loy a] (by c) (by f) (which analyser |

Set age
Ex 34
| Host — □ □ □ □ [CH43BD] →body composition analysis |
| If commands accepted | Host ← D → boc OR pafion analyor |
| If settings incorrect | Host ← → boc OR pafion analyor |

Set target BF
Ex: 18%
| Host | □ | □ | □ | □ | CR81BB | •body composition analysis |
| If commands accepted | Host: D E###or###an analyzer |
| If sellings incorrect | Host: □ E###or###an analyzer |

Confirm settings
| Test — | Body comp | EFA2R |
| If commands except | Host + □□□□□□□□□□□□□□□□□□□□□□□□□□□□□□□□□□□□□□□□□□□□□□□□□□□□□□□□□□□□□□□□□□□□□□□□□□□□□□□□□□□□□□□□□□□□□□□□□□□□□○□□□□□□□□□□□□□□□□□□□□□□□□□□□□□□□□□□□□□□□□□□□□□□□□□□□□□□□□□□□□□□□□□□□□□□□□□□□□□□□□□□□□□□□□□□□□□□□□□□□ | |
| Host + □□□□□□□□□□□□□□□□□□□□□□□□□□□□□□□□□□□□□□□□□□□□□□□□□□□□□□□□□□□□□□□□□□□□□□□□□□□□□□□□□□□□□□□□□□□□□□□○□□□□○□□□□□□□□□□□□□□□□□□□□□□□□□□□□□□□□□□□□□□□□□□□□□□□□□□□□□□□□□□□□□□□□□□□□□□□□□□□□□□□□□□□□□□□□□□□□□□○□□□□0□□□□□□□□□□□□□□□□□□□□□□□□□□□□□□□□□□□□□□□□□□□□□□□□□□□□□□□□□□□□□□□□□□□□□□□□□□□□□□□□□□□□□□□□□□□□□□□□□□□0□□□□0□□□□0□□□□0□□□□0□□□□0□□□□0□□□□0□□□□0□□□□0□□□□0□□□□0□□□□0□□□□0□□□□0□□□□0□□□□0□□□□0□□□□0□□□□0□□□□ 0 □ □ □ □ □ □ □ □ □ □ □ □ □ □ □ □ □ □ □ □ □ □ □ □ □ □ □ □ □ □ □ □ □ □ □ □ □ □ □ □ □ □ □ □ □ □ □ □ □ □ ▢ ▢ ▢ ▢ ▢ ▢ ▢ ▢ ▢ ▢ ▢ ▢ ▢ ▢ ▢ ▢ ▢ ▢ ▢ ▢ ▢ ▢ ▢ ▢ ▢ ▢ ▢ ▢ ▢ ▢ ▢ ▢ ▢ ▢ ▢ ▢ ▢ ▢ ▢ ▢ ▢ ▢ ▢ ▢ ▢ ▢ ▢ ▢ ▢ ▢ ▩ ▩ ▩ ▩ ▩ ▩ ▩ ▩ ▩ ▩ ▩ ▩ ▩ ▩ ▩ ▩ ▩ ▩ ▩ ▩ ▩ ▩ ▩ ▩ ▩ ▩ ▩ ▩ ▩ ▩ ▩ ▩ ▩ ▩ ▩ ▩ ▩ ▩ ▩ ▩ ▩ ▩ ▩ ▩ ▩ ▩ ▩ ▩ ▩ ▩ ▢ ▢ ▢ ▢ ▢ ▢ ▢ ▢ ▢ ▢ ▢ ▢ ▢ ▢ ▢ ▢ ▢ ▢ ▢ ▢ ▢ ▢ ▢ ▢ ▢ ▢ ▢ ▢ ▢ ▢ ▢ ▢ ▢ ▢ ▢ ▢ ▢ ▢ ▢ ▢ ▢ ▢ ▢ ▢ ▢ ▢ ▢ ▢ ▢ □ □ □ □ □ □ □ □ □ □ □ □ □ □ □ □ □ □ □ □ □ □ □ □ □ □ □ □ □ □ □ □ □ □ □ □ □ □ □ □ □ □ □ □ □ □ □ □ □ △ △ △ △ △ △ △ △ △ △ △ △ △ △ △ △ △ △ △ △ △ △ △ △ △ △ △ △ △ △ △ △ △ △ △ △ △ △ △ △ △ △ △ △ △ △ △ △ △ △ ▸ ▸ ▸ ▸ ▸ ▸ ▸ ▸ ▸ ▸ ▸ ▸ ▸ ▸ ▸ ▸ ▸ ▸ ▸ ▸ ▸ ▸ ▸ ▸ ▸ ▸ ▸ ▸ ▸ ▸ ▸ ▸ ▸ ▸ ▸ ▸ ▸ ▸ ▸ ▸ ▸ ▸ ▸ ▸ ▸ ▸ ▸ ▸ ▸ ▸ ▪ ▪ ▪ ▪ ▪ ▪ ▪ ▪ ▪ ▪ ▪ ▪ ▪ ▪ ▪ ▪ ▪ ▪ ▪ ▪ ▪ ▪ ▪ ▪ ▪ ▪ ▪ ▪ ▪ ▪ ▪ ▪ ▪ ▪ ▪ ▪ ▪ ▪ ▪ ▪ ▪ ▪ ▪ ▪ ▪ ▪ ▪ ▪ ▪ ▪ ▫ ▫ ▫ ▫ ▫ ▫ ▫ ▫ ▫ ▫ ▫ ▫ ▫ ▫ ▫ ▫ ▫ ▫ ▫ ▫ ▫ ▫ ▫ ▫ ▫ ▫ ▫ ▫ ▫ ▫ ▫ ▫ ▫ ▫ ▫ ▫ ▫ ▫ ▫ ▫ ▫ ▫ ▫ ▫ ▫ ▫ ▫ ▫ ▫ ▫ ▪ ▪ ▪ ▪ ▪ ▪ ▪ ▪ ▪ ▪ ▪ ▪ ▪ ▪ ▪ ▪ ▪ ▪ ▪ ▪ ▪ ▪ ▪ ▪ ▪ ▪ ▪ ▪ ▪ ▪ ▪ ▪ ▪ ▪ ▪ ▪ ▪ ▪ ▪ ▪ ▪ ▪ ▪ ▪ ▪ ▪ ▪ ▪ ▪ ▸ ▸ ▸ ▸ ▸ ▸ ▸ ▸ ▸ ▸ ▸ ▸ ▸ ▸ ▸ ▸ ▸ ▸ ▸ ▸ ▸ ▸ ▸ ▸ ▸ ▸ ▸ ▸ ▸ ▸ ▸ ▸ ▸ ▸ ▸ ▸ ▸ ▸ ▸ ▸ ▸ ▸ ▸ ▸ ▸ ▸ ▸ ▸ ▸ ▩ ▩ ▩ ▩ ▩ ▩ ▩ ▩ ▩ ▩ ▩ ▩ ▩ ▩ ▩ ▩ ▩ ▩ ▩ ▩ ▩ ▩ ▩ ▩ ▩ ▩ ▩ ▩ ▩ ▩ ▩ ▩ ▩ ▩ ▩ ▩ ▩ ▩ ▩ ▩ ▩ ▩ ▩ ▩ ▩ ▩ ▩ ▩ ▩ ▸ ▸ ▸ ▸ ▸ ▸ ▸ ▸ ▸ ▸ ▸ ▸ ▸ ▸ ▸ ▸ ▸ ▸ ▸ ▸ ▸ ▸ ▸ ▸ ▸ ▸ ▸ ▸ ▸ ▸ ▸ ▸ ▸ ▸ ▸ ▸ ▸ ▸ ▸ ▸ ▸ ▸ ▸ ▸ ▸ ▸ ▸ ▸ ▸ ▦ ▸ ▸ ▸ ▸ ▸ ▸ ▸ ▸ ▸ ▸ ▸ ▸ ▸ ▸ ▸ ▸ ▸ ▸ ▸ ▸ ▸ ▸ ▸ ▸ ▸ ▸ ▸ ▸ ▸ ▸ ▸ ▸ ▸ ▸ ▸ ▸ ▸ ▸ ▸ ▸ ▸ ▸ ▸ ▸ ▸ ▸ ▸ ▸ ▸ ▅ ▸ ▸ ▸ ▸ ▸ ▸ ▸ ▸ ▸ ▸ ▸ ▸ ▸ ▸ ▸ ▸ ▸ ▸ ▸ ▸ ▸ ▸ ▸ ▸ ▸ ▸ ▸ ▸ ▸ ▸ ▸ ▸ ▸ ▸ ▸ ▸ ▸ ▸ ▸ ▸ ▸ ▸ ▸ ▸ ▸ ▸ ▸ ▸ ▸ ▼ ▸ ▸ ▸ ▸ ▸ ▸ ▸ ▸ ▸ ▸ ▸ ▸ ▸ ▸ ▸ ▸ ▸ ▸ ▸ ▸ ▸ ▸ ▸ ▸ ▸ ▸ ▸ ▸ ▸ ▸ ▸ ▸ ▸ ▸ ▸ ▸ ▸ ▸ ▸ ▸ ▸ ▸ ▸ ▸ ▸ ▸ ▸ ▸ ▸ ▶ ▸ ▸ ▸ ▸ ▸ ▸ ▸ ▸ ▸ ▸ ▸ ▸ ▸ ▸ ▸ ▸ ▸ ▸ ▸ ▸ ▸ ▸ ▸ ▸ ▸ ▸ ▸ ▸ ▸ ▸ ▸ ▸ ▸ ▸ ▸ ▸ ▸ ▸ ▸ ▸ ▸ ▸ ▸ ▸ ▸ ▸ ▸ ▸ ▸ ▮ ▸ ▸ ▸ ▸ ▸ ▸ ▸ ▸ ▸ ▸ ▸ ▸ ▸ ▸ ▸ ▸ ▸ ▸ ▸ ▸ ▸ ▸ ▸ ▸ ▸ ▸ ▸ ▸ ▸ ▸ ▸ ▸ ▸ ▸ ▸ ▸ ▸ ▸ ▸ ▸ ▸ ▸ ▸ ▸ ▸ ▸ ▸ ▸ ▸ ▰ ▸ ▸ ▸ ▸ ▸ ▸ ▸ ▸ ▸ ▸ ▸ ▸ ▸ ▸ ▸ ▸ ▸ ▸ ▸ ▸ ▸ ▸ ▸ ▸ ▸ ▸ ▸ ▸ ▸ ▸ ▸ ▸ ▸ ▸ ▸ ▸ ▸ ▸ ▸ ▸ ▸ ▸ ▸ ▸ ▸ ▸ ▸ ▸ ▸ ▵ ▸ ▸ ▸ ▸ ▸ ▸ ▸ ▸ ▸ ▸ ▸ ▸ ▸ ▸ ▸ ▸ ▸ ▸ ▸ ▸ ▸ ▸ ▸ ▸ ▸ ▸ ▸ ▸ ▸ ▸ ▸ ▸ ▸ ▸ ▸ ▸ ▸ ▸ ▸ ▸ ▸ ▸ ▸ ▸ ▸ ▸ ▸ ▸ ▸ ▷ ▸ ▸ ▸ ▸ ▸ ▸ ▸ ▸ ▸ ▸ ▸ ▸ ▸ ▸ ▸ ▸ ▸ ▸ ▸ ▸ ▸ ▸ ▸ ▸ ▸ ▸ ▸ ▸ ▸ ▸ ▸ ▸ ▸ ▸ ▸ ▸ ▸ ▸ ▸ ▸ ▸ ▸ ▸ ▸ ▸ ▸ ▸ ▸ ▸ ▨ ▸ ▸ ▸ ▸ ▸ ▸ ▸ ▸ ▸ ▸ ▸ ▸ ▸ ▸ ▸ ▸ ▸ ▸ ▸ ▸ ▸ ▸ ▸ ▸ ▸ ▸ ▸ ▸ ▸ ▸ ▸ ▸ ▸ ▸ ▸ ▸ ▸ ▸ ▸ ▸ ▸ ▸ ▸ ▸ ▸ ▸ ▸ ▸ ▸ ▧ ▸ ▸ ▸ ▸ ▸ ▸ ▸ ▸ ▸ ▸ ▸ ▸ ▸ ▸ ▸ ▸ ▸ ▸ ▸ ▸ ▸ ▸ ▸ ▸ ▸ ▸ ▸ ▸ ▸ ▸ ▸ ▸ ▸ ▸ ▸ ▸ ▸ ▸ ▸ ▸ ▸ ▸ ▸ ▸ ▸ ▸ ▸ ▸ ▸ ▱ ▸ ▸ ▸ ▸ ▸ ▸ ▸ ▸ ▸ ▸ ▸ ▸ ▸ ▸ ▸ ▸ ▸ ▸ ▸ ▸ ▸ ▸ ▸ ▸ ▸ ▸ ▸ ▸ ▸ ▸ ▸ ▸ ▸ ▸ ▸ ▸ ▸ ▸ ▸ ▸ ▸ ▸ ▸ ▸ ▸ ▸ ▸ ▸ ▸ ▯ ▸ ▸ ▸ ▸ ▸ ▸ ▸ ▸ ▸ ▸ ▸ ▸ ▸ ▸ ▸ ▸ ▸ ▸ ▸ ▸ ▸ ▸ ▸ ▸ ▸ ▸ ▸ ▸ ▸ ▸ ▸ ▸ ▸ ▸ ▸ ▸ ▸ ▸ ▸ ▸ ▸ ▸ ▸ ▸ ▸ ▸ ▸ ▸ ▸ |
*Gender, body type, height and age must be ordered
*Once all the necessary items of data have been entered, the unit will determine on the basis of age and gender whether to switch to Altene or Standard mode.
Hence even if you choose where mode, the unit may switch to Standard mode
*If starting in Weight Only mode, only are weight needs to be set.

Start measurement
| Host | □ | hod | ### | ### | analyzer |
| If commands accepted | Host ← → [loc,lon] a analyzer |
| If settings incorrect | Host · E [loc,lon] a analyzer |

During measurement
Commands are not accepted while measuring is in progress. If an error occurs, the body composition analyzer will transmit an error code to the host.
I cel ← error code body composition analyzer
11
Measurement finished
headings will be outputted when measurement is finished.
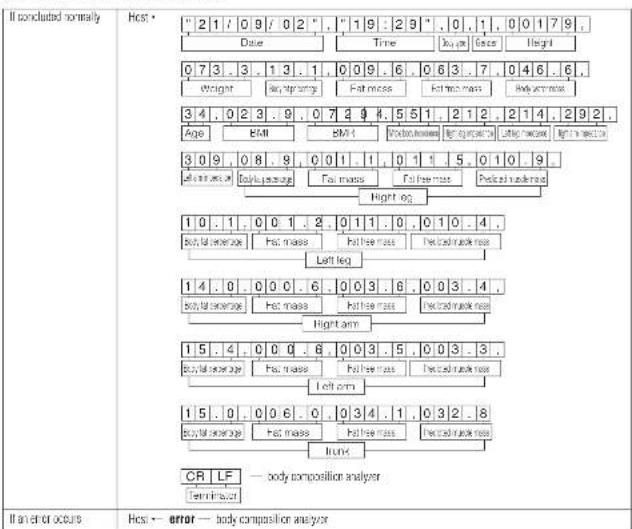
After measurement has finished, all necessary items of data and lane weight are cleared, and the unit waits for further commands.
Res
Resetting
Reset settings

■
Cancel
Cancel measurement

Technical Notes

Reliability of body composition measurements with an 8-electrode BIA
Introduction
This device calculates body fat percentage, fat mass, fat free mass, and predicted muscle mass on the basis of data obtained by Dual Energy X-ray Absorptiometry (DXA) using Bioelectrical Impedance Analysis (BIA).
One of two settings must be selected when taking measurements:
1) Standard (for persons 7 \~ 99 years of age)
2) Athlete (sportsmen/women who exercise considerably more than non-athletes)
Making a distinction by body type in the measurement mode produces more reliable body composition measurements for athletes, whose body compositions differ from those of average persons.
■ Principles of body composition measurement via 8-electrode BIA
BIA is a means of measuring body composition – fat mass, predicted muscle mass, etc. – by measuring bioelectrical impedance in the body. Fat within the body allows almost no electricity to pass through, while electricity passes rather easily through water, much of which is found in muscles. The degree of difficulty with which electricity passes through a substance is known as the electrical resistance, and the percentage of fat and other body constituents can be inferred from measurements of this resistance.
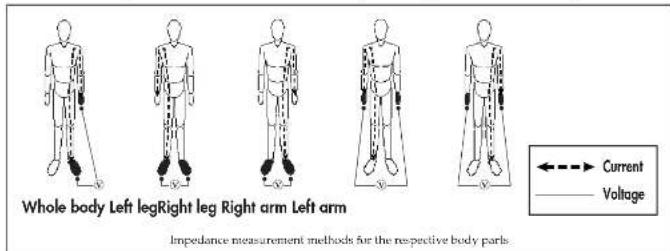
The Tanita Body Composition Analyzer measures body composition using a constant current source with a high frequency current (50kHz, 90μA). The 8 electrodes are positioned so that electric current is supplied from the electrodes on the tips of the toes of both feet and the fingertips of both hands, and voltage is measured on the heel of both feet and the thenar side of both hands. The current flows into the upper limbs or lower limbs, depending on the body part(s) to be measured.
■ Body impedance measurement methods
In the conventional 4-electrode method, current is supplied from the electrodes at the tips of the toes on both feet, with the voltage measured on the heel. This current flows from one lower limb through the lower abdomen and then into the other lower limb, and the bioelectrical impedance (hereinafter, "impedance," ) thus measured is the impedance between the two feet. In the newly developed 8-electrode method, however, current is supplied from the tips of the toes of both feet and the fingertips of both hands, and the voltage is measured on the heel of both feet and the therar side of both hands. This method allows five different impedance measurements to be made – whole body, right leg, left leg, right arm, and left arm – by switching the part of the body in which the current is flowing and the location where the voltage is measured. When measuring impedance in the right leg, for instance, the current flows between the right hand and foot, and the voltage between both feet is measured.
For reference, the impedance measurement methods for the respective body parts are shown in the diagram below.
■ Reliability of body composition analysis via 8-electrode BIA
In deriving the body fat percentage, fat mass, and fat free mass for the whole body, the Body Composition Analyzer uses data acquired by DXA* from both Japanese and Western subjects as well as a regression formula derived through repeated regression analysis using height, weight, age, and impedance between right hand and foot as variables. Measurements of body fat percentage, fat free mass, fat mass, and predicted muscle mass for specific body parts also use a regression formula for each body part derived from repeated regression analysis using height, weight, age, and impedance for individual body parts (right arm, left arm, right leg, left leg, trunk) as variables, based on data acquired through DXA.
A high degree of correlation has been found to exist between the figures for body fat percentage, fat mass, and fat free mass for individual parts and for the entire body calculated with this predictive formula and the figures obtained by DXA, and the results are thus highly reproducible.
Body composition measurements attained by the 8-electrode method are therefore extremely reliable.
※)Measurement of body composition using DXA
DXA was originally designed to measure bone mineral content, but in the full-body scan mode the body fat percentage, fat mass, and fat free mass of individual body parts (arms, legs, trunk) can also be measured. The image below shows one example of body composition measurement results obtained by DXA.

Body composition measurement results obtained by DXA (Lunar Co., Ltd; DFX-L)
■ Causes of errors in impedance measurements
BIA measures impedance and calculates body composition on the basis of this impedance. It is known, however, that impedance can vary due to changes in the quantity and distribution of body water, which accounts for approximately 60% of body weight, as well as changes in body temperature. Therefore, when measurements are being taken for research purposes or on a daily basis, uniform measurement conditions must be ensured.
Consideration should be given to two types of changes in impedance: inter-day changes and intra-day fluctuation (cyclic changes within a single day). In the 8-electrode method, full body measurements use the impedance between the arms and legs, while measurements for specific body parts use the impedance of those particular body parts.
The reasons for changes in impedance are different for the upper limbs and the lower limbs. Given that the impedance of the trunk is extremely low (a mere 5-10% of the impedance between hands and feet), changes involving the trunk can be almost wholly ignored when measuring the impedance between hands and feet, and the changes for the upper and lower limbs are synthesized.
When studying intra-day and inter-day changes with the 8-electrode method, it is thus necessary to determine the respective changes for the upper and lower limbs.
1) Intra-day fluctuations (cyclic activity within a single day)
Peripheral impedance ordinarily rises during sleep and falls during activity. This is believed to occur because extracellular fluid, typified by the blood, moves to the trunk during sleep, reducing the extracellular fluid in peripheral areas and thus increasing impedance, and because the extracellular fluid returns to peripheral areas during activity, causing a drop in impedance.
Intra-day activities during this cycle cause changes in body water volume and distribution due to the consumption of food and drink as well as exercise.
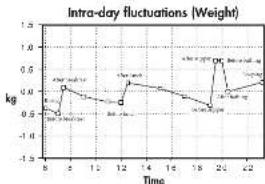
The charts on page 33 illustrate one example of intra-day activities. The changes in weight, impedance, and body fat percentage are shown on the respective vertical axes, while the measurement times are shown on the horizontal axes (plotted points indicate the variation from the average change).
Increases in body weight occurred following the consumption of food or drink, and a sharp decrease was seen between 20:00 and 22:00 because of a bath.
The impedance between the hands and feet, as mentioned earlier, synthesizes the changes in impedance of the upper limbs and the lower limbs.
During the two or three hours of digestion and absorption that followed breakfast and lunch, a decrease occurred in the impedance of both the upper and lower limbs, but the degree of change was larger in the lower limbs than in the upper limbs. This is because the impedance of the upper limbs temporarily increased due to the impact of specific dynamic action (SDA) from the meals but then turned downward as the body fluid mass increased. No such increase or decrease in impedance due to SDA was seen, though, in the lower limbs. After supper, the lower level of activity caused an increase due to lessened extracellular fluid in peripheral areas at the same time that upper and lower limb impedance fell due to digestion and absorption; as a result no clear trend could be seen.
Among the particularly large changes that occurred were decreases in impedance while taking baths and subsequent increases, increases and decreases attributable to exercise, and decreases after tasks such as carrying heavy objects that require use of the upper limbs. In the course of a single day, the largest intra-day change in the lower limbs was the decrease in impedance due to the flow of blood to the lower limbs (blood congestion). No clear trend was noted in impedance in the upper limbs over the course of a single day, but extremely large changes did occur as a result of certain activities in the daily routine.


Intra-day changes are thought to occur in unique cycles arising from differences in the rhythm of individual daily routines, occupations, and day-to-day activities.
Consequently, to obtain consistent measurement figures it is recommended that measurements be taken under the following conditions:
1) Measuring three hours or more after waking up, with normal day-to-day activities carried on during this time (simply sitting or traveling by car will keep impedance high)
2) Measuring three hours or more after last eating (impedance tends to fall for 2 to 3 hours after a meal)
3) Measuring twelve or more hours after vigorous exercise (changes in impedance vary, depending on the type and intensity of the exercise done)
4) Urinating before the measurement
5) Measuring as far as possible at the same time every day in the case of repeated measurements (more dependable measurements can be obtained if body weight and impedance are both measured at fixed times)
Complying with the conditions above should result in very consistent measurements.
When developing this device, the following six conditions were established in deriving the regression formula:
1) No alcohol less than 12 hours prior to measurement
2) No vigorous exercise less than 12 hours prior to measurement
3) No excess food and drink on the day before measurement
4) No food and drink less than 3 hours prior to measurement
5) Urination immediately before measurement
6) No measurements during menstrual period (women)
2) Inter-day changes
The diagrams below offer examples of actual measurements made of inter-day changes. A study was done to determine the degree of change in the impedance between the feet during dehydration; the first two days represent a normal daily routine, while in the latter two days a state of dehydration was induced using a sauna.


Inter-day changes in body fat percentage and impedance measured by BIA between the feet during normal daily routine and during dehydration
No significant inter-day change was measured in body weight, impedance between the feet, or body fat percentage during the normal daily routine. During the dehydrated state, however, a drop in body weight of 1kg was noted, with the impedance between the feet rising approximately 15Ω on the first day of dehydration and 30-35Ω on the second day. As a result, body fat percentage was up by around 1% on the first day of dehydration and by 1.5-2% on the second day.
As mentioned earlier, impedance increases when body weight is reduced (such as by dehydration), and decreases when body weight is increased through excess consumption of food and drink. The inter-day change in impedance is thus inversely proportional to the change in body weight.
These inter-day changes stem from such causes as:
1) Temporary increases in body weight (total body water) through overeating and overdrinking
2) Dehydration due to heavy sweating during vigorous exercise
3) Dehydration due to alcohol consumption or the use of diuretics
4) Dehydration due to heavy sweating during saunas, etc.
Accordingly, it is recommended that instructions be provided to the subject to help eliminate these causes when accurate measurements are needed.
THE APPLICABILITY OF THE BMR REGRESSION FORMULA AND ITS DIFFERENCES WITH THE OLD FORMULA
The New Regression Formula for Basal Metabolic Rate (BMR)
It has long been said among medical and nutritional specialists that "The Basal Metabolic Rate (BMR) is more determined by the Fat Free Mass (FFM) than by the body weight" (Persons of a given body weight with a higher FFM will have a higher BMR), and that from the aspect of evaluating the body composition, should be estimated from the FFM. In addition, in cases of simple estimation formulae which can calculate from the height, weight and age, without evaluating the body composition, there was a problem with excessively high evaluations being given to obese persons with large body weight, and conversely excessively small BMR evaluations given to muscular athletes, though these are not as many in number. Currently, the BMR estimation recursion formula developed by Tanita, the manufacturer of body composition analyzers, based on their research, works by multiple regressive analysis using this FFM, and has a higher degree of accuracy in the individual differences in body composition. In order to derive the BMR, resting respiratory metabolism (Resting Energy Expenditure: REE) was measured using a breath gas analysis device, and this estimation recursion formula was created based on this data.
| 8C-418MA | |||
| Power source | AC adaptor (included) Cester Minus MODEL SA23-053SU CLASS 2Input Voltage: 100-240 VAC 50/60 Hz 350mA Output Voltage: 5 VDC ± 0.3 VRated Current: 3.5 A No Load Input Voltage: 5 VDC = 0.3 V | ||
| Power Consumption | 17.5 W | ||
| Impedance Measurement | Measurement System | 8 polar Bioelectrical Impedance Analysis | |
| Measurement Frequency | 50kHz | ||
| Measurement Current | 90μA | ||
| Electrode Material | Pressure Contact Stainless Steel Fort Fads, The Hand Grips are Metal-Plated in ABS Resin. | ||
| Measurement Style | Whole body, Right leg, Lett leg, Right arm and Lett arm | ||
| Measurement Range | 150 - 1200Ω | ||
| Accuracy at first calibration | 12Ω | ||
| Weight Measurement | Measurement System | Strain Gauge Load Cell | |
| Maximum / Minimum Capacity / Graduation | 200 kg / 0.1 kg | ||
| Accuracy at first calibration | ±0.2kg | ||
| Input Items | Clothes Weight | 0-200 kg / 0.1 kg increments | |
| Gender | Male / Female | ||
| Body Type | Standard / Athletic | ||
| Age | 7-99 years old / 1 year increments | ||
| Height | 90 - 240 cm / 1 cm increments | ||
| Target Body Fat % | 4-55% | ||
| Output Items | Display | Target Body fat % | 4-55% |
| Weight | 0 - 200 kg / 0.1 kg increments | ||
| Gender | Male / Female | ||
| Body Type | Standard / Athletic | ||
| Age | 7 - 99 years old / 1 year increments | ||
| Height | 90 - 240 cm / 1 cm increments | ||
| Weight | 2 - 200 kg / 0.1 kg increments | ||
| BMI | 0.1 increments | ||
| BMR | 1 kJ increments / 1 kcal increments | ||
| Impedance 1 | 150 - 1200 Ω / 1Q increments | ||
| FAT% *2 | 1 - 75% / 0.1% increments | ||
| Fat Mass *2 | 0.1 kg increments | ||
| FFM *2 | 0.1 kg increments | ||
| TBW | 0.1 kg increments | ||
| Predicted Weight | 0.1 kg increments | ||
| Predicted fat mass | 0.1 kg increments | ||
| FAT TO USE/GAIN | 0.1 kg increments | ||
| Fixed/mode Max 2 | 0.1 kg increments | ||
| Others | Desirable Range for FA1% and FM | ||
| Display | 3 Kows, 5 Digits LCD | ||
| Output Data Interface | RS-232C (D-sub 9 pins Female Connector) | ||
| Temperature Range of Usage | 0°C /35°C | ||
| Relative Humidity | 30% / 80% (without condensation) | ||
| Weight of Equipment | 12kg | ||
| Size | Weighing Platform | 377 X 343 X 83mm | |
| Height | 83mm | ||
TANITA UK LTD.
The Ram, Philips Close, Mercury West Draxton, Middlesex. CE TBY, OHMA KIN2019 Tel: +4-1055-135577 Fax: +4-1895-133511TANITA
TAMITA Corporation
14.2.1 chong Huan chi, kezhi liu Tokyo Japan Tel:10313955-2123/10313958-7043 Fax:10313957-3766TANITA Corporation of America, inc.
2023 South Cladrapo Dubai Arlington Heights, Illinois 60025 U.S.A Tel: Free: 7502-028-41029 19. 047-247-824 Fax: 317-610-251 10.3.2017年TANITA Health Equipment H.K.LTD.
Unit 321-339 35-Wing On Pla 82 Mrdy Rong, Ismshatsu East, Koofen, Hong Kong Tel: +852-2535-71 10. 2023年TANITA Europe GmbH
President Strasse 25 D-708a Sredelingen, Germany Tel: 07031-6189-5TANITA France S.A.
Vita Labr.1629 56 Boulevard Gordon. \$2100 Realty-Sun-Gein 12月29日 [Unreadable due to severe pixelation and distortion] BC4187011(3)
- BODY COMPOSITION ANALYZER
- BC-418MA III
- INSTRUCTION MANUAL
- TABLE OF CONTENTS
- APPLICATIONS
- ADVANTAGES
- SAFETY NOTES
- CAUTION SYMBOLS
- ⚠ MAINTENANCE
- △GENERAL INSTRUCTIONS FOR ACCURATE MEASUREMENT
- 1.PRODUCT ASSEMBLY AND COMPONENTS
- PRODUCT STRUCTURE
- REAR VIEW OF CONTROL BOX
- SYMBOLS AND THEIR MEANINGS
- DIGITAL DISPLAY
- BODY WEIGHT MARK
- CLOTHES WEIGHT MARK
- GENDER MARK (MALE)
- GENDER MARK (FEMALE)
- ATHLETE MARK
- READY MARK
- MEASUREMENT UNIT MARK (KG)
- STABILIZED MARK
- UNIT OF HEIGHT (CM)
- AGE MARK
- BODY FAT PERCENTAGE
- ASSEMBLY INSTRUCTIONS
- MEMBRANE SWITCH
- 3.PREPARATION FOR USE
- CAUTION
- LOADING THE PRINTER PAPER ROLL
- SETTING DATE AND TIME
- 5.MODE SELECTION
- SETTING THE DATE AND TIME
- PUSH THE []KEY
- PUSH THE []
- INPUT THE PRESENT DATE AND TIME
- PRESS THE []
- SETTING THE NUMBER OF PRINTOUTS, THE PRINTOUT LANGUAGE, AND THE PRINTOUT ITEMS
- SETTING THE ORIGINAL MODE
- 6.OPERATING INSTRUCTIONS
- BODY COMPOSITION ANALYSIS
- TURN ON THE POWER
- ENTER CLOTHES WEIGHT
- SELECT THE BODY TYPE
- ENTER AGE
- ENTER HEIGHT
- SET THE TARGET BODY FAT RATIO
- START MEASUREMENT
- TAKING MEASUREMENT
- MEASURE THE IMPEDANCE
- MEASUREMENT IS COMPLETED
- WHEN YOU CONTINUE TO MEASURE
- 13.FINISH MEASUREMENT
- ENTER THE CLOTHES WEIGHT
- FINALIZING THE SETTING
- EXPLANATION OF THE PRINT OUT
- 7.CLEARING PAPER JAMS
- CLEARING PAPER JAMS
- 8.TROUBLESHOOTING
- PROBLEM LIST
- RS-232C INTERFACE INSTRUCTIONS
- TRANSMISSION DATA
- OUTPUT DATA FORMAT
- CONTROL COMMANDS
- ERROR CODES
- EXAMPLE OF USE
- SWITCH ON BODY COMPOSITION ANALYZER
- SET TARE WEIGHT
- SET GENDER
- SET BODY TYPE
- SET HEIGHT
- SET AGE
- SET TARGET BF
- CONFIRM SETTINGS
- DURING MEASUREMENT
- MEASUREMENT FINISHED
- RESETTING
- CANCEL
- TECHNICAL NOTES
- RELIABILITY OF BODY COMPOSITION MEASUREMENTS WITH AN 8-ELECTRODE BIA
- INTRODUCTION
- PRINCIPLES OF BODY COMPOSITION MEASUREMENT VIA 8-ELECTRODE BIA
- BODY IMPEDANCE MEASUREMENT METHODS
- RELIABILITY OF BODY COMPOSITION ANALYSIS VIA 8-ELECTRODE BIA
- CAUSES OF ERRORS IN IMPEDANCE MEASUREMENTS
- INTRA-DAY FLUCTUATIONS (CYCLIC ACTIVITY WITHIN A SINGLE DAY)
- INTER-DAY CHANGES
- THE APPLICABILITY OF THE BMR REGRESSION FORMULA AND ITS DIFFERENCES WITH THE OLD FORMULA
- THE NEW REGRESSION FORMULA FOR BASAL METABOLIC RATE (BMR)
- TANITA UK LTD
- TANITA
- TAMITA CORPORATION
- TANITA CORPORATION OF AMERICA, INC
- TANITA HEALTH EQUIPMENT H.K.LTD
- TANITA EUROPE GMBH
- TANITA FRANCE S.A
Brand : TANITA
Model : BC-418
Category : Scale