
NBC20S-R2 - Multimedia Cart Black Box - Free user manual and instructions
Find the device manual for free NBC20S-R2 Black Box in PDF.


| Type | Multimedia Cart |
| Brand | Black Box |
| Model | NBC20S-R2 |
| Material | Steel frame with powder coat finish |
| Shelves | 3 adjustable shelves |
| Dimensions (W x D x H) | 30 x 20 x 38 inches (76 x 51 x 97 cm) |
| Weight Capacity | 200 lbs (90 kg) per shelf |
| Weight | 55 lbs (25 kg) |
| Wheels | 4 locking casters (2 lockable) |
| Lockable Cabinet | Yes, with key lock |
| Cable Management | Integrated wire management channels |
| Power Strip | Built-in 6-outlet surge protector |
| Adjustable Height | No, fixed height |
| Assembly Required | Yes, tools included |
| Color | Black |
| Warranty | 5 years |
| Cleaning | Wipe with damp cloth; mild detergent |
| Intended Use | Schools, offices, presentation rooms |
| Spare Parts | Available through Black Box support |
Frequently Asked Questions - NBC20S-R2 Black Box
User questions about NBC20S-R2 Black Box
0 question about this device. Answer the ones you know or ask your own.
Ask a new question about this device
Download the instructions for your Multimedia Cart in PDF format for free! Find your manual NBC20S-R2 - Black Box and take your electronic device back in hand. On this page are published all the documents necessary for the use of your device. NBC20S-R2 by Black Box.
USER MANUAL NBC20S-R2 Black Box
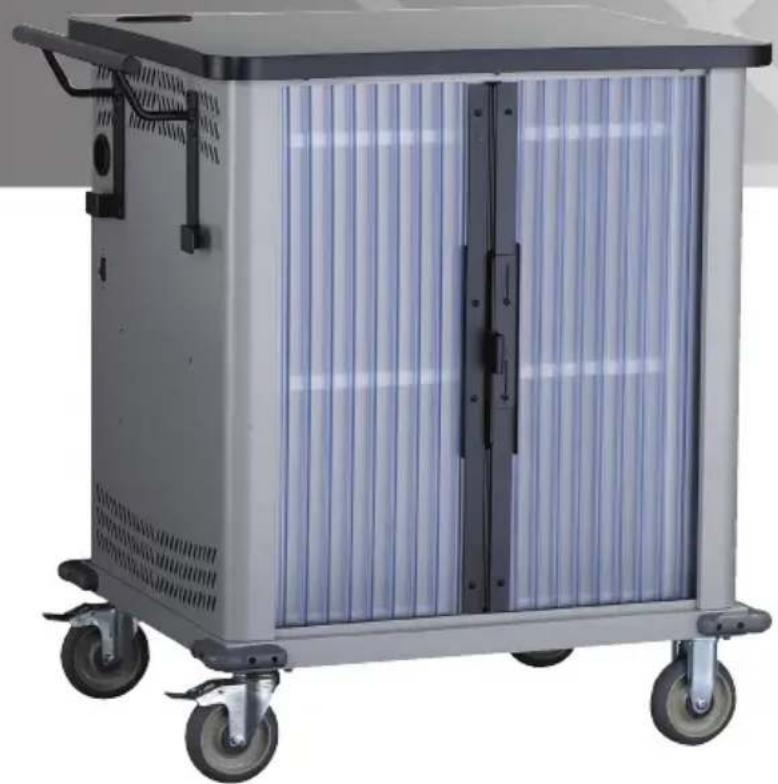
Mobile, secure, and powered storage for up to 32 netbook computers.
The perfect storage solution for institutional netbook computers.
natural_image
Exterior view of a modern office building (no signage)Trademarks Used In This Manual
Black Box and the Double Diamond logo are registered trademarks of BB Technologies, Inc.
The Netbook Cart design is patent pending.
Any other trademarks mentioned in this manual are acknowledged to be the property of the trademark owners.
Table of Contents
1.0 Specifications .... 4
1.1 Overview 4
2.0 What's Included 5
2.1 Front and Rear Views of the Netbook Cart 6
3.0 Electrical Precautions 7
3.1 Other Precautions 7
4.0 Configuration and Setup 8
4.1 Installing the Handle 8
4.2 Fastening Power Bricks to the Dividers 10
4.3 Inserting Dividers Into the Cart 14
4.4 Routing the Power Cords at the Back of the Netbook Cart 15
5.0 Using Your Netbook Cart.... 16
5.1 Charging your Netbook Computers 16
5.2 Moving your Netbook Cart 16
5.3 Locking your Netbook Cart 17
5.4 Timer Instructions 17
1.0 Specifications
Capacity — Holds up to 32 netbook computers
Standards — UL
Power Strip — All: (1) 2-outlet timed power strip, 110–220 V, 50–60 Hz, 15 amp circuit breaker (preset at 15 minute intervals);
NBC20S-R2: (2) 10-outlet power strips, 0.75 amps per outlet max.;
NBC26S-R2: (1) 10-outlet power strip and (1) 16-outlet power strip, both 0.75 amps per outlet max.;
NBC32S-R2, NBC30-R2, NBC27XB-R2: (2) 16-outlet power strips, 0.75 amps per outlet max.
Size — Carts: All: 37.9"H x 26.25"D (96.3 x 66.8 cm);
NBC20S-R2, NBC30-R2, NBC27XB-R2: 30.25"W (76.8 cm);
NBC26S-R2: 35.9"W (91.2 cm);
NBC32S-R2: 41.9"W (106.4 cm);
Netbook Compartment: NBC20S-R2, NBC26S-R2, NBC32S-R2:
11.2"H × 2"W × 11.4"D (28.4 × 5.1 × 29 cm);
NBC30-R2, NBC27XB-R2: 8.1"H × 2"W × 11.4"D
(20.6 × 5.1 × 29 cm)
Weight — NBC20S-R2: 84 lb. (83.5 kg);
NBC26S-R2: 206 lb. (93.4 kg);
NBC30-R2, NBC27XB-R2: 184 lb. (83.5 kg);
NBC32S-R2: 228 lb. (103 kg)
1.1 Overview
The Netbook Cart (NBC) is designed to store, transport, and charge netbook computers, tablet PCs, ultra mobile PCs, and other similar devices. Units are available with capacities for up to 32 separate storage bays. Each unit plugs into a typical 120-volt 15-amp outlet.
Additionally, the NBC27XB-R2 provides storage for up to 27 extended-battery netbooks.
Please read these operating instructions carefully. They contain important advice concerning the use and safety of your NBC. This Netbook Cart must only be used for its intended purpose in accordance with these operating instructions.
2.0 What's Included
- Netbook Cart with 20-, 26-, 27-, 30-, or 32-netbook capacity; unassembled
• (4) casters, including: (2) locking swivel casters and (2) non-locking casters
• (1) 2-outlet timed power strip - Power strips: NBC20S-R2: (2) 10-outlet; NBC26S-R2: (1) 10-outlet and (1) 16-outlet; NBC27XB-R2, NBC30-R2, NBC32S-R2: (2) 16-outlet
- Power management dividers: NBC20S-R2: (22); NBC26R2: (28); NBC27XB-R2: (30); NBC30-R2: (32); NBC32S-R2: (34)
- Handle and power cord wrap
• (6) Allen-head bolts and 5/32" wrench (for mounting handle)
• (1) user's manual
• (2) keys
2.1 Front and Timer Views of the Netbook Cart
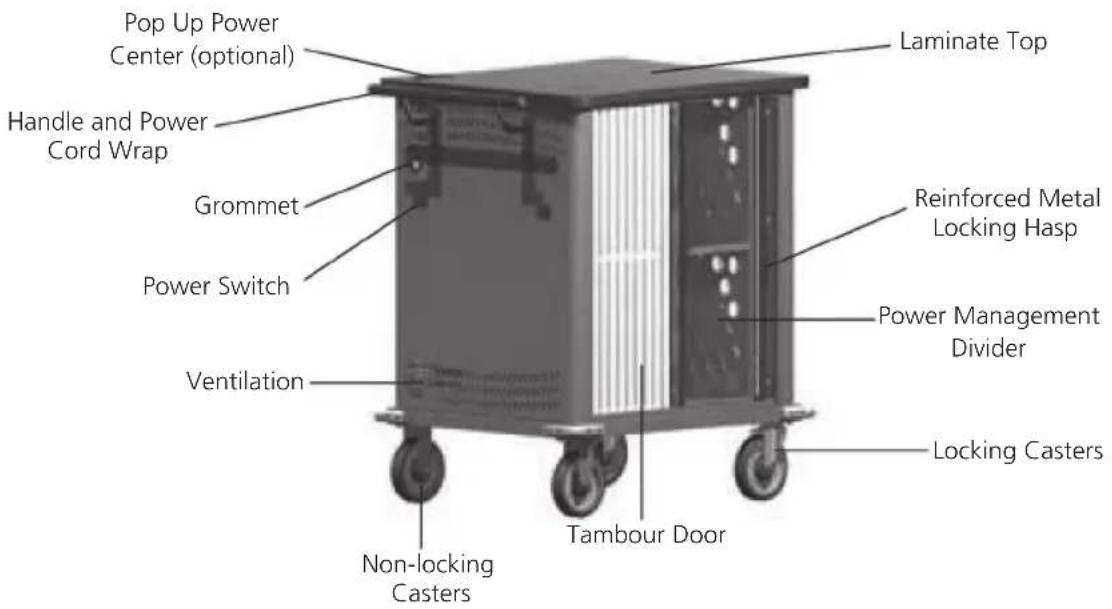
Figure 2-1. Front of unit.
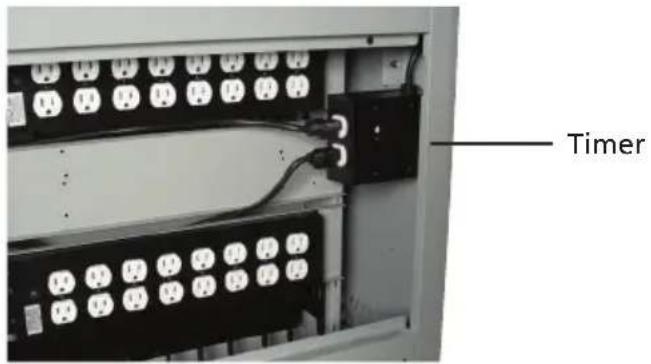
Figure 2-2. Timer installed in cart.
3.0 Electrical Precautions
- The power switch must be in the "OFF" position before plugging the NBC into a wall receptacle.
- The NBC must ONLY be connected to a 120-volt AC 15- or 20-amp power supply.
- The NBC must only be used by adults or with adult supervision.
• Always store the power cord around the cord wraps when transporting the NBC.
- Never pull the NBC by the power cord.
- Do not plug the NBC in if the switch, receptacle(s), or power cord have been damaged. All electrical components on this product must be repaired by a qualified electrician.
- Do not use an extension cord in conjunction with the NBC.
- Do not use liquids in or around the NBC environment.
- Inadequate repair can create significant hazards to users and is not covered by warranty.
- For your safety, it is recommended that a qualified electrician test the circuit you will be plugging the NBC into. The circuit should be checked for ground integrity and appropriate branch circuit protection.
- The NBC ground prong must be present for safe operation. If the plug is damaged or if the ground prong has been removed, it should be replaced by a qualified electrician.
- The use of the NBC including plugging or unplugging netbooks, plugging or unplugging the NBC, operating the control switch, and engaging or releasing the directional and locked casters must be done with adult supervision.
3.1 Other Precautions
- The NBC can be very heavy when fully loaded with netbooks and should be moved about by persons physically able to do so.
- The NBC should only be used for the storage, transport, and charging of netbooks, tablet PCs, ultra mobile PCs, and other similar devices.
- Misuse, incorrect operation, or inadequate repair of the NBC will void the warranty.
4.0 Configuration and Setup
Remove and discard all packaging materials and then lock the lockable casters.
Open and inspect the NBC to verify all doors, locks, and casters are working properly.
Do not plug the NBC into an outlet until all configurations and setup are complete.
4.1 Installing the Handle
It is possible to install the handle/cord wrap on either side of the NBC. Black Box recommends that you mount the handle on the side of the cart with the locking swivel casters.
NOTE: The casters swivel on one side of the NBC and are fixed on the other. Consider maneuverability options before installing the handle.
Step 1. Locate the side of the cart with the locking swivel casters.

Figure 4-1. Handle installation.
Step 2. Place the handle so that the holes in the brackets are aligned with the threaded holes in the side panels.

Figure 4-2. Detail A: Handle assembly.
Step 3. Using the included Allen wrench, tighten four of the Allen-head screws into the threaded holes.
4.2 Fastening Power Bricks to the Dividers
Attach power bricks to the dividers to create separate slots for the netbooks.
Remove a divider to install a netbook power brick on the divider.
Step 1. Lay the divider flat on the work surface. Lay a netbook and a power brick on top of the divider, with the computer end of the power wire toward the top of the divider. Plug the power brick into the netbook. Lay the wire across the two holes at the top of the divider. Make sure that there is some slack between the front hole and the plug.

Figure 4-3. How to thread the electrical cable through the dividers.
Step 2. Note the point where the power wire meets the rear hole in the divider. Measure back 6" toward the power brick and fold the wire in half to create a loop in the center of the wire. This loop will be used in Step 3, page 11. Unplug the power wire from the netbook and remove the netbook from the divider.
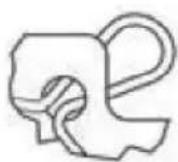
Figure 4-4. Loop the electrical cord and push it through the circular hole at the top rear of the divider.
Step 3. Insert the loop created in Step 2 through the rear small hole at the top of the divider (Figure 4-4). Then, place the plug end of the wire through the loop (Figure 4-5). Make sure that the loop is on the side of the divider (not on top of it—see Figure 4-6). This will ensure that the divider will slide back into the cart. Then, tighten the loop down to the divider, tightening the knot.

natural_image
Simple line drawing of a mechanical clamp or clamping device (no text or symbols)Figure 4-5. Insert the plug end of the wire through the loop.

Keep the loop here
Power brick end
Figure 4-6. Make sure the loop is on the side of the divider, not on top of it.
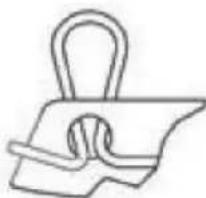
Step 4. Run the wire along the top of the divider and repeat the process of creating a loop in the power cord. Place this loop through the small hole at the front of the divider (Figure 4-7). Now place the plug end of the wire through the loop (Figure 4-8). Pull the end of the cable, tightening the loop (Figure 4-9).
natural_image
Simple line drawing of a binder clip with no text or symbolsFigure 4-7. Create a loop from the power cable and feed it through the hole at the top front of the divider.

natural_image
Simple line drawing of a mechanical clamp or spring with a handle and base (no text or symbols)Figure 4-8. Insert the plug end of the wire through the loop.

Figure 4-9. Pull the cable taught to secure the loop.
Step 5. Wrap the remaining length of power cord around the power brick (see Figure 4-11, page 13.
Step 6. Wrap the plug wire around the brick. Leave at least 7" of extra cable if the divider will be inserted into the bottom shelf, or at least 21" of extra cable if the divider will be inserted into the top shelf.

Figure 4-10. Wrap the remaining electrical cable around the power brick. Leave 7" of extra cable if the divider will be inserted into the bottom shelf, or at least 21" of extra cable if the divider will be inserted into the top shelf.
Step 7. Hold the brick and cords in place by strapping them down using a zip tie or a hook-and-loop tie.

Figure 4-11. Strap the brick and cord in place using a zip tie or hook-and-loop tie (not included).
Step 8. Install the assembled divider into the cart using the following steps.
natural_image
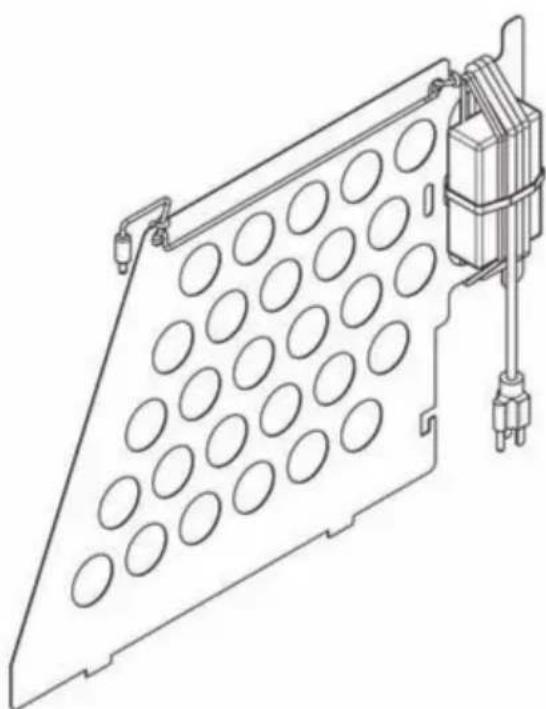
Technical line drawing of a mechanical component with circular holes and a vertical support (no text or symbols)Figure 4-12. A divider with a power brick properly attached.
NOTE: For proper installation, make certain that all power bricks are installed on the same side of every divider.
4.3 Inserting Dividers Into the Cart
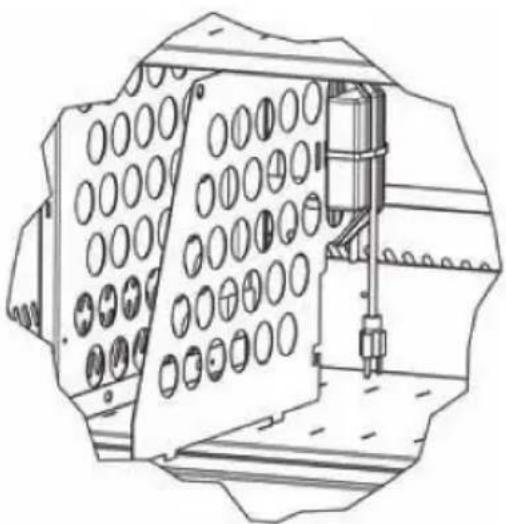
Step 1. Beginning with the top row, insert a divider into the cart.
NOTE: This version of the cart provides additional divider slots to allow the user to customize the size of the storage slots.
natural_image
Technical line drawing of a mechanical assembly with circular components and a central shaft (no text or symbols)Figure 4-13. Begin to insert dividers into the top row of the cart.
Step 2. Then from the back of the cart, insert the power brick plugs hanging from the dividers on the left side of the cart into the power receptacles located on the bottom left of the cart. Repeat with the power brick plugs on the right side of the cart into the power receptacles located on the bottom right of the cart.

natural_image
Technical line drawing of a mechanical assembly with circular components and a central shaft (no text or symbols)Figure 4-14. Netbook Cart dividers with attached power bricks.
Step 3. Plug the power cord from the bottom left receptacles into one of the timer's receptacles and the power cord from the bottom right receptacles into the timer's other receptacle.

natural_image
Technical line drawing of an industrial electrical enclosure with wheels and internal components (no text or symbols)Figure 4-15. Electrical schematic for the back of the Netbook Cart. Note the location of the timer.
In the back of the NBC, insert the power cord from the 10 or 16 electrical outlet unit into the LEFT outlet on the timer and plug the other electrical outlet unit into the RIGHT outlet on the timer. Push the timer tabs (located at the edges of the timer dial) inward towards the center of the dial. This will turn one side of the outlets on while turning the other off.
4.4 Routing the Power Cords at the Back of the Netbook Cart
Step 1. Plug the netbook outlet strips into the timer unit
Step 2. Feed the cord from the timer through the grommet hole on the side nearest the handle and wrap the cord around the handle itself or around the cord wrap below the handle.
Step 3. Plug the timer into a wall outlet.
NOTE: The outlet strips are only to be used for charging netbook computers.
5.0 Using Your Netbook Cart
5.1 Charging your Netbook Computers
- After the netbook computers have been loaded into the NBC as described previously, plug the power cord of the NBC into a suitable receptacle.
- Locate the external power switch on the side panel of the NBC and push the switch to the ON position.
- The charging indicator lights on the netbooks may be visible through the locked tambour doors to verify charging.
5.2 Moving your Netbook Cart
- Turn the external power switch to the off position.
- Remove the NBC plug from the wall receptacle and wrap the cord around the cord wrap or handle.
- Close and secure tambour doors.
- Your NBC comes equipped with two fixed casters and two locking swivel casters. Unlock the casters prior to moving the NBC to a new location.
- When you reach your desired destination, lock the casters to prevent the cart from moving and plug the NBC into a wall receptacle.
5.3 Locking your Netbook Cart
Close the tambour doors. Make sure the sliding lock cover is below the lock hasps, and then slide the doors together.

natural_image
Technical line drawing of a mechanical bracket or housing component (no text or symbols)Figure 5-1. Close the tambour doors and align the lock hasps.
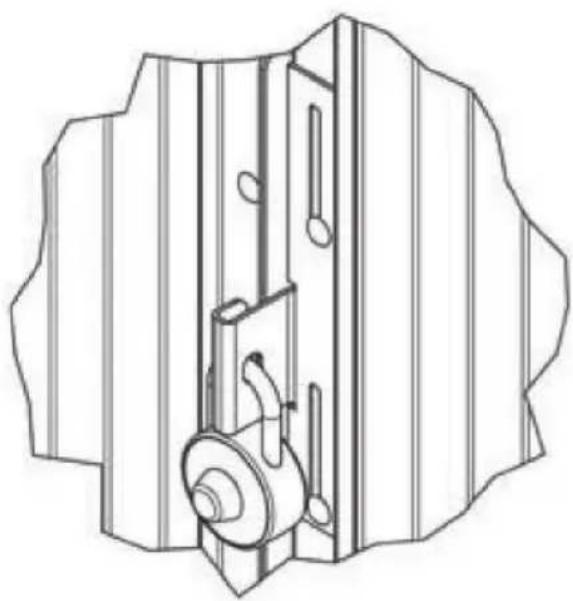
With the doors together, slide the lock cover up over the hasps. Place the lock through the slots in the lock hasps and the sliding cover.

natural_image
Technical line drawing of a door handle assembly (no text or symbols)Figure 5-2. Slide the lock cover up over the hasps.
natural_image
Technical line drawing of a mechanical assembly with internal components (no text or symbols)Figure 5-3. Place the lock through the slots in the lock hasps and the sliding cover.
The rear door panel should be locked by the Tech Coordinator and should not be opened without supervision.
5.4 Timer Instructions
Before using your timer:
- For your safety, we recommend that a qualified electrician test the circuit you will plug the cart into. The circuit should be checked for ground integrity and appropriate branch circuit protection.
- The cart's ground prong must be present for safe operation. If the plug is damaged or if the ground prong has been removed, it should be replaced by a qualified electrician.
- Using the cart, including plugging it in or unplugging it, plugging in or unplugging the laptop or other electrical equipment, or operating the control switch must be done with adult supervision.
The timer comes preset from the factory to alternate power between the power strips at 15 minute intervals. To change time settings, first unplug the timer from the wall. Using a flat blade screwdriver, turn the timer dial to a new number:
Both power strips cannot charge simultaneously.
By plugging the cart power cord into an approved outlet and flipping the red switch located on the left side panel of the cart, the cart will begin charging.
To end power, turn the red switch off and unplug the cart from the wall outlet.
Black Box Tech Support: FREE! Live. 24/7.
Tech support the way it should be.

natural_image
Close-up portrait of a smiling man with short hair, hand near ear (no text or symbols visible)Great tech support is just 30 seconds away at 724-746-5500 or blackbox.com.

BLACK BOX®
NETWORK SERVICES
About Black Box
Black Box Network Services is your source for an extensive range of networking and infrastructure products. You'll find everything from cabinets and racks and power and surge protection products to media converters and Ethernet switches all supported by free, live 24/7 Tech support available in 30 seconds or less.
© Copyright 2013. Black Box Corporation. All rights reserved.
NBC20S-R2, rev. 2
- Mobile, secure, and powered storage for up to 32 netbook computers.
- Trademarks Used In This Manual
- Table of Contents
- Specifications
- Standards — UL
- Overview
- What's Included
- Front and Timer Views of the Netbook Cart
- Electrical Precautions
- Other Precautions
- Configuration and Setup
- Installing the Handle
- Fastening Power Bricks to the Dividers
- Inserting Dividers Into the Cart
- Routing the Power Cords at the Back of the Netbook Cart
- Using Your Netbook Cart
- Charging your Netbook Computers
- Moving your Netbook Cart
- Locking your Netbook Cart
- Timer Instructions
- About Black Box
Brand : Black Box
Model : NBC20S-R2
Category : Multimedia Cart