
Lumiware Cooler - Refrigerator PHILIPS - Free user manual and instructions
Find the device manual for free Lumiware Cooler PHILIPS in PDF.


| Product Type | Refrigerator |
| Brand | Philips |
| Model | Lumiware Cooler |
| Dimensions (H x W x D) | 180 x 70 x 65 cm |
| Weight | 55 kg |
| Total Gross Capacity | 320 L |
| Refrigerator Capacity | 280 L |
| Freezer Capacity | 40 L |
| Energy Efficiency Class | A++ |
| Annual Energy Consumption | 280 kWh |
| Climate Class | SN-T |
| Noise Level | 42 dB(A) |
| Defrost Type | Automatic (frost-free) |
| Temperature Range (Refrigerator) | +1 °C to +8 °C |
| Temperature Range (Freezer) | -18 °C to -24 °C |
| Refrigerant | R600a |
| Lighting Type | LED |
| Number of Shelves | 4 |
| Number of Drawers | 2 |
| Door Alarm | Yes |
| Cooling System | Dynamic cooling |
| Power Supply | 220-240 V, 50 Hz |
| Spare Parts Availability | 5 years after purchase |
| Cleaning Instructions | Wipe clean with damp cloth, mild detergent |
| Safety | Child lock, overheat protection |
Frequently Asked Questions - Lumiware Cooler PHILIPS
User questions about Lumiware Cooler PHILIPS
0 question about this device. Answer the ones you know or ask your own.
Ask a new question about this device
Download the instructions for your Refrigerator in PDF format for free! Find your manual Lumiware Cooler - PHILIPS and take your electronic device back in hand. On this page are published all the documents necessary for the use of your device. Lumiware Cooler by PHILIPS.
USER MANUAL Lumiware Cooler PHILIPS
Worldwide Headquarters
6001 36th Ave.W.
Everett, WA 98203
U.S.A.
www.intermec.com
The information contained herein is provided solely for the purpose of allowing customers to operate and service Intermec-manufactured equipment and is not to be released, reproduced, or used for any other purpose without written permission of Intermec Technologies Corporation.
Information and specifications contained in this document are subject to change without prior notice and do not represent a commitment on the part of Intermec Technologies Corporation.
© 2011 - 2012 by Intermec Technologies Corporation. All rights reserved.
The word Intermec, the Intermec logo, Norand, ArciTech, Beverage Routebook, CrossBar, dcBrowser, Duratherm, EasyADC, EasyCoder, EasySet, Fingerprint, i-gistics, INCA (under license), Intellitag, Intellitag Gen2, JANUS, LabelShop, MobileLAN, Picolink, Ready-to-Work, RoutePower, Sabre, ScanPlus, ShopScan, Smart Mobile Computing, SmartSystems, TE 2000, Trakker Antares, and Vista Powered are either trademarks or registered trademarks of Intermec Technologies Corporation.
There are U.S. and foreign patents as well as U.S. and foreign patents pending.
Wi-Fi is a registered certification mark of the Wi-Fi Alliance.
Microsoft, Windows, and the Windows logo are registered trademarks of Microsoft Corporation in the United States and/or other countries.
Bluetooth is a trademark of Bluetooth SIG, Inc., U.S.A.
Document Change Record
This page records changes to this document. The document was originally released as Revision 001.
| Version Number | Revision Letter | Date Description of Change |
004 C 2/2012 Revised information on ScanNGo bar codes.
003 B 12/2011 Added information on:
- the flashlight feature.
• the Carrier Selection application.
Revised information on:
• the Intermec Settings menus. - upgrading the system software and the operating system.
- GPS procedures.
- ScanNGo bar codes.
002 A 06/2011 Revised to add information on non-incendive (NI) versions of the computer, provisioning the computer, the new ScanDiagnostics application, and how to use the 70 Series as a USB mass storage device. Also corrected the cold boot procedure and removed the compass.
Contents
Before You Begin.... xi
Safety Information.... xi
Global Services and Support xi
Warranty Information.... xi
Web Support.... xi
Send Feedback....xii
Telephone Support ....xii
Service Location Support....xii
Who Should Read This Manual xiii
Related Documents ...... xiii
Patent Information xiv
1 About the Computer Features .... 1
About the 70 Series Mobile Computers ....2
What's New in This Release 4
Overview of 70 Series Features ....5
About the Status LEDs 6
70 Series Accessories 8
About Language Provisioning....10
About the Battery....10
Charge the Battery 10
Change the Battery....11
About Battery Status....13
About Battery Life and Conservation....14
About the Keypad....15
Enter Characters on the QWERTY Keypad .....22
Enter Characters on the Numeric Keypad 22
Enter Characters on the CK70 and CK71 Keypads .....23
About the Power Button....24
About the Intermec Dashboard Button 25
Configure the Screen Backlight 26
Adjust the Volume 26
Use the Imager....27
Use the Flashlight....27
70 Series Mobile Computer User Manual v
Contents
Read Bar Codes....28
Insert a MicroSD Card ......29
Install a MicroSD Card in a CN70 or CN70e .....29
Install a MicroSD Card in a CK70 or CK71....32
Transfer Files To and From Your PC 34
Use Microsoft ActiveSync to Transfer Files 35
Use the Computer as a Mass Storage Device....36
2 About the User Interface and Intermec Applications....37
About the User Interface....38
About the Home Screen ....38
Interact With the Screen....39
Title Bar Status Icons 40
Align the Screen 43
About Intermec Applications 43
Applications Available on the Mobile Computer....43
Applications You Can Download to the Mobile Computer....45
3 Use the Phone 49
About the Phone....50
Activate the UMTS Phone ....50
Activate the CDMA Phone 52
Turn the Phone On and Off....54
About Switching Network Carriers ....54
About the Network Connection....54
Switch Network Carriers....55
Make a Phone Call 57
Make an Emergency Phone Call 57
Contents
4 Use the Camera 59
About the Color Camera....60
Take a Picture 60
Record a Video....61
Save Pictures and Videos to a microSD Card....61
5 Use GPS....63
About the Integrated GPS on Your Computer 64
Use the GPSID Installed on the Computer....64
Improve GPS Performance on the Computer 65
6 Configure the Computer 67
How to Configure the Computer....68
Use Intermec Settings on the Computer....68
Start Intermec Settings....69
About the Structure of Intermec Settings 69
Navigate in Intermec Settings....74
Configure Profile Settings With Intermec Settings 74
Restore Default Settings....75
Hide Menu Items in Intermec Settings 75
Use Intermec Settings Remotely With SmartSystems Foundation .....76
About Network Communications ....76
Configure 802.11a/b/g/n (Wi-Fi) Radio Communications....76
Configure Ethernet Communications .....77
Configure Bluetooth Communications....78
About Serial and USB Communications 81
Create an ISP Connection....82
Create a VPN Server Connection ....84
About Wireless Security 85
Choose Between Microsoft and Funk Security....85
Load a Certificate 95
Contents
7 Manage the Computer 97
Manage the Computer in Your Network 98
Manage the Computer Using SmartSystems Foundation .....98
Manage the Computer Using Third-Party Software .....99
Develop and Install Applications 99
Package Your Application....100
Choose a Target Location....100
Install Applications Using SmartSystems Foundation Console....100
Install Applications Using Microsoft ActiveSync....101
Install Applications Using a Storage Card....101
Launch Applications Automatically ....101
Update the System Software .....102
Update Individual or Multiple Computers Using the SmartSystems Console .102
Update Individual Mobile Computers Using a microSD Card .....103
8 Troubleshoot and Maintain the Computer....105
About the Intermec Dashboard ....106
Troubleshoot Your Mobile Computer....107
Troubleshoot the Wi-Fi Connection....107
Troubleshoot 802.1x Security....108
Check 802.11 Network Status ....109
Troubleshoot Reading Bar Codes....110
Use ScanDiagnostic to Troubleshoot the Scanner....112
Troubleshoot Operating the Computer....112
Call Product Support....114
Find Your Configuration Number....114
Find Your Operating System Version ....115
Reset the Computer....115
Reboot the Computer ....115
Cold Boot the Computer ....115
Clean Boot the Computer....117
Clean the Computer....117
Contents
A Specifications and Default Settings.... 119
Physical and Environmental Specifications....120
CN70 Physical Dimensions....120
CN70e Physical Dimensions....120
CK70 Physical Dimensions 120
CK71 Physical Dimensions ....120
Environmental Specifications....120
Power and Electrical Specifications....121
70 Series Non-Incendive Computer Specifications .....121
Operating System....121
Hardware 121
Back Accessory Interface Pin-outs....122
Touch Screen Specifications 122
Standard Communications....122
Wireless LAN 123
Regulatory Approvals 123
Bar Code Symbologies....123
Imager Reading Distances 124
Default Configuration 132
B Keypads and Keystrokes 141
Standard Characters ....142
CN70 Keypads and Keystrokes....142
CN70e Keypads and Keystrokes....147
CK70 Keypads and Keystrokes 151
CK71 Keypads and Keystrokes 158
C ScanNGo Wi-Fi Configuration Bar Codes....167
Radio Configuration Bar Codes....168
2D Configuration Bar Codes....168
1D Configuration Bar Codes....169
Index 175
Contents
Before You Begin
This section provides you with safety information, technical support information, and sources for additional product information.
Safety Information
Your safety is extremely important. Read and follow cautions in this document before handling and operating Intermec equipment. You can be seriously injured, and equipment and data can be damaged if you do not follow the safety cautions.
This section explains how to identify and understand cautions and notes that are in this document.

A caution alerts you to an operating procedure, practice, condition, or statement that must be strictly observed to prevent equipment damage or destruction, or corruption or loss of data.

Note: Notes either provide extra information about a topic or contain special instructions for handling a particular condition or set of circumstances.
Global Services and Support
Warranty Information
To understand the warranty for your Intermec product, visit the Intermec website at www.intermec.com and click Support >
Returns and Repairs > Warranty.
Disclaimer of warranties: The sample code included in this document is presented for reference only. The code does not necessarily represent complete, tested programs. The code is provided “as is with all faults.” All warranties are expressly disclaimed, including the implied warranties of merchantability and fitness for a particular purpose.
Web Support
Visit the Intermec website at www.intermec.com to download our current manuals (in PDF).
Before You Begin
Visit the Intermec technical knowledge base (Knowledge Central) at www.intermec.com and click Support > Knowledge Central to review technical information or to request technical support for your Intermec product.
Send Feedback
Your feedback is crucial to the continual improvement of our documentation. To provide feedback about this manual, please contact the Intermec Technical Communications department directly at TechnicalCommunications@intermec.com.
Telephone Support
In the U.S.A. and Canada, call 1-800-755-5505.
Outside the U.S.A. and Canada, contact your local Intermec representative. To search for your local representative, from the Intermec website, click About Us > Contact Us.
Service Location Support
For the most current listing of service locations, click Support > Returns and Repairs > Repair Locations.
For technical support in South Korea, use the after service locations listed below:
AWOO Systems
102-1304 SK Ventium 522 Dangjung-dong Gunpo-si, Gyeonggi-do Korea, South 435-776 Contact: Mr. Sinbum Kang Telephone: +82-31-436-1191 Email: mjyun@awoo.co.kr
IN Information System PTD LTD
6th Floor Daegu Venture Center Bldg 95 Shinchun 3 Dong Donggu, Daegu City, Korea Email: jmyou@idif.co.kr or korlim@gw.idif.co.kr
Who Should Read This Manual
This manual is written for the person who is responsible for installing, configuring, and maintaining the 70 Series Mobile Computer.
This manual provides you with information about the features of the 70 Series mobile computer, and how to install, configure, operate, maintain, and troubleshoot it.
Before you work with the 70 Series mobile computer, you should be familiar with your network and general networking terms, such as IP address.
Related Documents
This is a list of related Intermec documents.
• Intermec Settings Command Reference Manual
- Intermec Developer Library (IDL) Resource Kit Developer's Guide
The Intermec website at www.intermec.com contains our documents (as PDF files) that you can download for free.
To download documents
1 Visit the Intermec website at www.intermec.com.
2 Click the Products tab.
3 Using the Products menu, navigate to your product page. For example, to find the CN70 computer product page, click Computers > Handheld Computers > CN70.
4 Click the Manuals tab.
If your product does not have its own product page, click Support > Manuals. Use the Product Category, the Product Family, and Product to find your documentation.
Patent Information
Product is covered by one or more of the following patents:
4882476; 4894523; 4953113; 4961043; 4970379; 4988852; 5019699; 5021642; 5038024; 5081343; 5095197; 5144119; 5144121; 5182441; 5187355; 5187356; 5195183; 5216233; 5216550; 5195183; 5195183; 5218191; 5227614; 5233172; 5241488; 5243602; 5258606; 5278487; 5288985; 5308966; 5322991; 5331136; 5331580; 5342210; 5349678; 5359185; 5371858; 5373478; 5389770; 5397885; 5410141; 5414251; 5416463; 5442167; 5464972; 5468947; 5468950; 5477044; 5486689; 5488575; 5500516; 5502297; 5504367; 5508599; 5514858; 5530619; 5534684; 5536924; 5539191; 5541419; 5548108; 5550362; 5550364; 5565669; 5567925; 5568645; 5572007; 5576529; 5592512; 5594230; 5598007; 5608578; 5616909; 5619027; 5627360; 5640001; 5657317; 5659431; 5671436; 5672860; 5684290; 5719678; 5729003; 5742041; 5761219; 5764798; 5777308; 5777309; 5777310; 5786583; 5793604; 5798509; 5798513; 5804805; 5805807; 5811776; 5811777; 5818027; 5821523; 5828052; 5831819; 5834753; 5834749; 5837987; 5841121; 5842070; 5844222; 5854478; 5862267; 5869840; 5873070; 5877486; 5878395; 5883492; 5883493; 5886338; 5889386; 5892971; 5895906; 5898162; 5902987; 5902988; 5912452; 5923022; 5936224; 5949056; 5969321; 5969326; 5969328; 5979768; 5986435; 5987192; 5987499; 5992750; 6003775; 6012640; 6016960; 6018597; 6024289; 6034379; 6036093; 6039252; 6064763; 6075340; 6095422; 6097839; 6102289; 6102295; 6109528; 6119941; 6128414; 6138915; 6149061; 6149063; 6152370; 6155490; 6158661; 6164542; 6164545; 6173893; 6195053; 6234393; 6234395; 6244512; 6249008; 6328214; 6330975; 6345765; 6356949; 6367699; 6375075; 6375076; 6375344; 6431451; 6435411; 6484944; 6488209; 6497368; 6532152; 6538413; 6539422; 6621942; 6641046; 6681994; 6687403; 6688523; 6732930
There may be other U.S. and foreign patents pending.
1 About the Computer Features
This chapter introduces the 70 Series Mobile Computers with Windows® Embedded Handheld operating system. Use this chapter to learn about the basic features and functions of each computer, as well as the available accessories for it.
About the 70 Series Mobile Computers
The ergonomically designed Intermec 70 Series Mobile Computers are built on the Microsoft Windows Embedded Handheld operating system. They are lightweight, easy-to-use, and run most software developed for the Windows Embedded platform, including standalone, client-server, and browser-based applications.
The 70 Series family of computers consists of four different models: the CN70, CN70e, CK70 and CK71. The CN70 and CN70e have the same features except that the CN70e offers a larger keypad for data-input intensive applications. The CK70 and CK71 have most of the same features, but the CK71 offers a choice of imager options and does not offer a WWAN radio option (phone). For intrinsically safe environments, Intermec offers non-incendive (NI) models of each 70 Series computer. Throughout this manual, all versions of the mobile computer are referred to as 70 Series unless information is specific to a particular model of computer.
In most of the user manual, pictures of the CN70 and CK70 represent the four models of the 70 Series computers.
CN70 Front View

CN70 Back View

CK70 Front View

Chapter 1 – About the Computer Features

What's New in This Release
This version of the user manual contains these updates:
- Added information on the flashlight feature. For more information, see "Use the Flashlight" on page 27.
- Added information about switching network carriers using the Carrier Selection application. For more information, see “About Switching Network Carriers” on page 54.
- Updated Intermec Settings menu information. For more information, see “About the Structure of Intermec Settings” on page 69.
- Updated procedures for upgrading the system software and the operating system. For more information, see “Update the System Software” on page 102
- Updated ScanNGo bar code information. For more information, see "ScanNGo Wi-Fi Configuration Bar Codes" on page 167.
Overview of 70 Series Features
The 70 Series includes these standard features:
• EA30 area imager that can read bar codes and capture images
- (CK71 only) Choice of EA30, EX25, or EV12 imagers
• Multi-processor architecture with 512 MB DRAM and 1G Flash
- CDMA, UMTS, or Flexible Network Radio capability (not available on CK71)
- 802.11a/b/g/n and Bluetooth® radios
• GPS radio on CDMA, UMTS, or Flexible Network Radio computers (not available on CK71)
- 5-megapixel auto-focus color camera
- Customer-accessible microSD slot for memory cards up to 32 GB
- Customer-accessible SIM card slot
- IrDA port with speeds up to 4 Mbps

The 70 Series Mobile Computer with an IEEE 802.11a/b/g/n radio installed is Wi-Fi® certified for interoperability with other 802.11a/b/g/n wireless LAN devices.
Chapter 1 – About the Computer Features
About the Status LEDs
Use the following illustrations and table to understand the status LEDs on your computer. All six status LEDs are not available on every 70 Series computer. For example, the QWERTY versions of the CN70 and CN70e do not have a Green key status LED.
Location of the CN70 Status LEDs
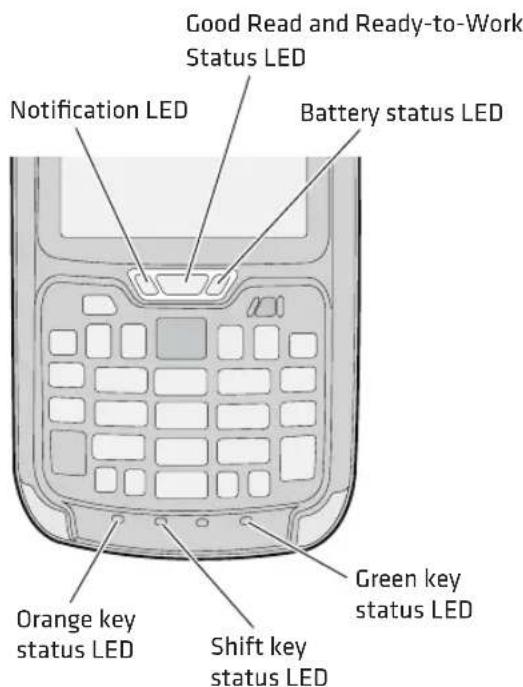
Location of the CK70 Status LEDs

Status LED Descriptions
| LED Color Description | |
| Notification Amber This LED is user-programmable. | |
| Good Read Green The computer successfully decoded a bar code. | |
| Ready-to-Work Blue If you have Intermec Terminal Emulator (ITE), the application is running and connected to the host.If you do not have ITE, you can configure the Ready-to-Work indicator to turn on or off to indicate a healthy state. | |
| Blinking blue ITE is running but not connected to the host.The computer is unhealthy. | |
| Off ITE is not installed or not running.The computer is healthy. | |
| Battery See “About Battery Status” on page 13. |
LED Color Description
Key Status Green The Green function key is enabled.
Orange The Orange function key is enabled.
Shift Red The Shift key is enabled.
70 Series Accessories
The 70 Series computer ships with a battery. All other accessories are sold and ordered separately. For help, contact your local Intermec sales representative.
70 Series Accessories
Accessory Description
| Audio Snap-On Adapter Use the audio adapter to connect the computer to a headset. | |
| Back Accessory Interface Use the back accessory interface to attach accessories such as the magstripe reader adapter to the CK70 and CK71. | |
| CK70/CK71 Battery This battery provides main power to the CK70 and CK71. | |
| CK70/CK71 Magstripe Reader Adapter | Use the magnetic stripe reader to be able to read magnetic cards with the CK70 and CK71 computer. |
| CN70/CN70e Battery This battery provides main power to the CN70 and CN70e. | |
| CN70/CN70e Magstripe Reader Snap-On Adapter | Use the magnetic stripe reader to be able to read magnetic cards with the CN70 and CN70e computer. |
| Desktop Stand Use the desktop stand to hold the 70 Series computer on your desk or a stable surface. | |
| DEX/UCS Snap-On Adapter | Use this adapter to receive and send serial communications through a DEX/UCS connection. |
| DX1 Desktop Dock with USB connectivity | Use the desktop dock with the:• Computer cup to charge the battery while it is installed in the computer.• Battery cup to charge the battery. |
Accessory Description
| DX2 Dual Dock and DX4 Quad Dock. The DX2 and DX4 are available in charge-only and Ethernet configurations. | Use these charger bases with the:• Computer cup to charge batteries while they are installed in the computer.• Battery cup to charge two batteries. |
| Ethernet Snap-On Adapter Use the Ethernet adapter to be able to connect the computer to an Ethernet network. | |
| Handstrap Replacement Kit You can order and install a replacement handstrap for the CN70, CN70e, and CK70/CK71. Each kit contains 5 handstraps. | |
| Holster Use the holster to store the computer when you need your hands free. | |
| RS-232 Snap-On Adapter Use the RS-232 adapter to convert the connector on the bottom of the computer to a serial connector. | |
| Scan Handle Use the scan handle to provide better ergonomics to the computer for high-volume scanning applications. | |
| Tethered Stylus Replacement Kit You can order and install a replacement stylus. | |
| USB Snap-On Adapter Use this adapter to convert the bottom connector of the computer to a USB connector. | |
| Vehicle Dock Use the vehicle dock to provide power and hold your computer while you are using it in a vehicle. | |
| Vehicle Holder Use the vehicle holder to hold your computer while you are using it in a vehicle. | |
| Vehicle Power Adapter Use the vehicle power adapter to provide power to the computer from your vehicle. | |
| Vocollect® Snap-On Adapter | Use this adapter to be able to use the Vocollect voice solution in your warehouse. |
About Language Provisioning
If your 70 Series computer includes language provisioning, you are prompted to select a language provision when the computer starts for the first time. It may take up to 15 minutes to load your language.
Make sure you select the correct language before you tap Provision. If you need to have the language provisioning changed, you will need to send your computer to an Intermec Global Repair Center.
About the Battery

The battery used in this device may present a fire or chemical burn hazard if it is mistreated. Do not disassemble it, heat it above 100 °C (212 °F) or incinerate it. Dispose of used batteries promptly. Keep away from children.
The computers use these rechargeable Lithium-ion battery pack as the main power source:
- 3.7 V, 4000 mAH (14.8 Wh) battery for the CN70 and CN70e
- 3.7 V, 5200 mAH (19.2 Wh) battery for the CK70 and CK71
Charge the Battery
You need to fully charge the battery before using your computer for the first time. Use one of the charging accessories listed in the next table to charge the battery.
70 Series Charging Accessories
Charging Accessory Charging Time
Snap-on adapters Up to 6 hours
DX1, DX2, or DX4 dock Up to 6 hours
CN70, CN70e, CK70, and CK71 Vehicle Power Adapter Up to 6 hours
Change the Battery
If your battery power is low, you need to either charge the battery in the computer, or replace it with a charged battery.
1 Save your files and close any open applications.
2 Press the Power button and choose Hibernate from the menu to suspend the computer.
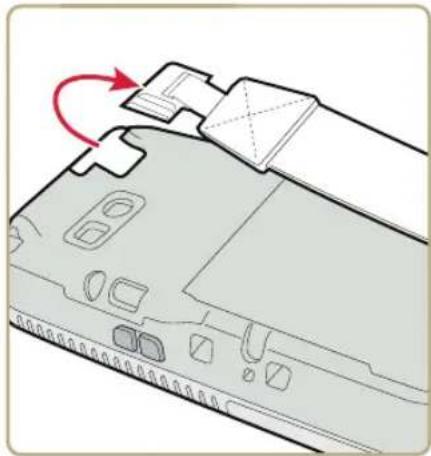
3 Detach the handstrap from the computer.
Detaching the Handstrap From a CN70 or CN70e
natural_image
Diagram of a computer monitor with an open lid and scroll, showing no text or symbolsDetaching the Handstrap From a CK70 or CK71

natural_image
Diagram of a vehicle battery pack with a red arrow indicating rotation (no text or symbols present)Chapter 1 – About the Computer Features
4 Make sure the computer is in hibernate mode and that the screen has turned off.
5 Remove the battery.
- On the CN70 or CN70e, push the battery release toward the bottom of the computer until the battery releases and then lift it away from the computer.

natural_image
Diagram of a device's internal structure showing an open lid and internal components with red arrows indicating movement or force (no text or symbols present)- On the CK70 or CK71, push the battery release toward the top of the computer until the battery releases and then lift it away from the computer.
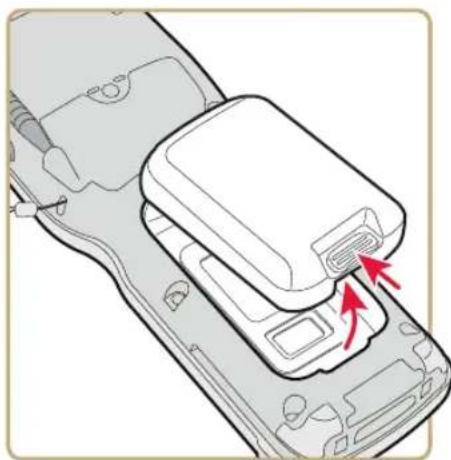
natural_image
Diagram of a mobile phone rear panel with red arrows indicating ports or components (no text or symbols present)6 Insert the top end of a fully charged battery into the computer, and press down firmly on the bottom of the battery. Make sure that the battery release is fully engaged.
About Battery Status
Use the battery icon on the Title bar to see the power status of your battery. If you want more detailed information on your battery such as usage time or voltage, use the Intermec Dashboard. For more information on the Dashboard, see “About the Intermec Dashboard” on page 106.
Understanding the Battery Icon Status
| Battery Icon Status | |
 | Battery is fully charged. |
 | Battery has a high charge. |
 | Battery has a medium charge. You should be able to work for several more hours before changing batteries. |
 | Battery is low. You need to charge or replace the battery soon. |
 | Battery is critically low. You need to replace the battery now. |
 | Battery is charging. |
 | The battery is not installed. |
You can also use the battery status LED to see the charging status of your battery.

Understanding the Battery Status LED
| LED State Description |
| Steady green The computer is connected to a charger and the battery is more than 95% charged. |
| Blinking red The battery is very low. The computer will soon go into Suspend mode. Charge or replace the battery. |
| Steady red The computer is connected to a charger and the battery is charging. |
| Blinking red-amber The battery charging system has encountered an error. The battery is not charging. |
| Steady amber The battery is outside of the allowable charging temperature range. Charging will resume when the battery temperature is back in the acceptable range of 5 °C to 35 °C (41 °F to 95 °F). |
| Off The computer is not on external power and the battery is operating normally. |
About Battery Life and Conservation
Batteries that are stored outside the computer for long periods of time slowly discharge. Intermec recommends storing the battery in a charger to maintain battery performance.
Battery Conservation Tips
| When You Want To: Do This to Save Battery Power: | |
| Use the computer and the Low Battery status icon appears or the Battery light comes on. | Connect the computer to an external power source.Or, save your data and press thePowerbutton and selectHibernate. After the computer turns off, remove the battery and insert a fully charged battery. |
| Stop using the computer for 5 minutes or longer. | Make sure that the low battery icon is not on the screen and the Battery LED is not on. Press thePowerbutton and chooseSuspendto suspend the computer. |
When You Want To: Do This to Save Battery Power:
| Store the computer for more than a day. | If you are storing the computer for a few days, like over the weekend, install a charged battery or connect the computer to a power source.If you are storing the computer for longer, remove and charge the battery, and then store both the battery and computer in a cool location. If you store the battery for several months, recharge the battery to keep it at peak performance. |
| Store the battery outside the computer. | Store the batteries in a charger. |
About the Keypad
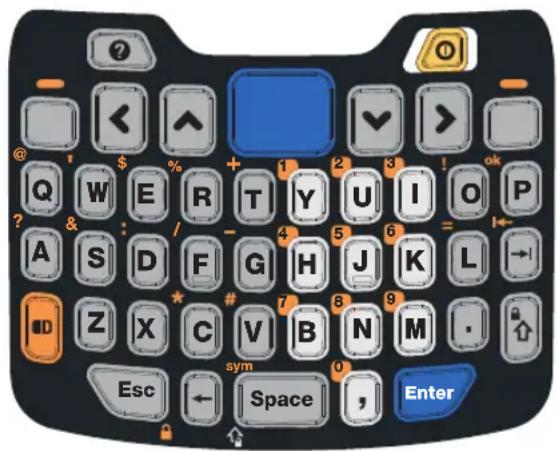
The CN70 comes with either a QWERTY keypad or a numeric keypad. The CN70e comes with either a QWERTY numeric keypad, a phone-style numeric keypad (1-2-3 digits across the top), or a calculator-style numeric keypad (7-8-9 digits across the top). The computer has an ambient light sensor that detects low light and turns on the keypad backlight. By default, the keypad backlight is enabled in low light conditions. You can disable the keypad backlight to conserve power. Use Intermec Settings to configure the backlight. For help, see “Use Intermec Settings on the Computer” on page 68.
CN70 QWERTY Keypad
Chapter 1 – About the Computer Features
CN70 Numeric Keypad

CN70e QWERTY Numeric Keypad

CN70e Calculator-Style Numeric Keypad

CN70e Numeric Keypad

Chapter 1 – About the Computer Features
The CK70 comes with either a large alpha or an alphanumeric keypad. The CK71 comes with either a numeric function keypad or an alphanumeric keypad. The computer has an ambient light sensor that detects low light and turns on the keypad backlight. By default, the keypad backlight is enabled in low light conditions. You can disable the keypad backlight to conserve power. Use Intermec Settings to configure the backlight. For help, see “Use Intermec Settings on the Computer” on page 68.
CK70 Large Alpha Keypad

CK70 Alphanumeric Keypad
![Alt F6 Send End F1 1 2 3 F7 Insert Delete F2 4 5 6 F8 F3 7 8 9 F9 F4 - 0 Enter F10 F5 Ctrl Space F11 F12 F13 F14 F15 F16 A B C D E F F17 F18 F19 F20 F21 F22 G H I J K L F23 F24 M N O P Q R = [ ] (< > - S T U V W X ① ? Y Z](/content/2026/06/1270635/images/80adef3912f6299565c4a522890dfda02e3c98a1bccc72453f66a3c3132f5a45.jpg)
Chapter 1 – About the Computer Features
CK71 Numeric Function Keypad

CK71 Alphanumeric Keypad
![F6 PA1 PrvScr Roll NxtScr F1 7 8 9 F7 PA2 Insert Roll Delete Clear F2 4 5 6 F8 PA3 Fld- Fld+ Help F3 1 2 3 F9 Autolog Return F4 . 0 Enter F10 EEOF Ctrl Space F5 ↑ Ctrl Space F11 Attn F12 F13 F14 Dup F15 Erase F16 Find A B C D E F F17 FldMk F18 Home F19 Hex F20 F21 Keypd F22 G H I J K L F23 Menu F24 NewLn Mode Print SysRq Remove M N O P Q R = : [ ] ( ) < ~ - S T U V W X ① ? Y Z](/content/2026/06/1270635/images/b0a507cc73ff1d58e7410378f8b609887ece9e2c4b9c23ba6e0dc941aff56dc7.jpg)
Enter Characters on the QWERTY Keypad
You need to use the orange modifier key ☐ and the Shift key 🔒 to access all characters and functions on the QWERTY keypad.
To type a character:
- Press the key for that character.
To type a character or access a function on the overlay:
- Press 📋 and then press the key for the character or function.
To only type characters or access functions on the overlay:
- Press ☐ twice to lock the orange modifier key to stay on, and then press the keys for the characters or functions.
To type a single uppercase letter:
- Press 📁 and then the letter key.
To type all uppercase letters:
- Press 🔊 to turn on Caps Lock, and then press the letter keys.
You can still type orange modifier characters by pressing ☐ and then the key for that character.
To turn off Caps Lock, press ⏻.
Enter Characters on the Numeric Keypad
You need to use the orange modifier key ☐ and the green modifier key ☐ to access all characters and functions on the Numeric keypad.
To type a character or access a function printed in orange on the overlay:
- Press ☐ and then press the key for the character or function.
To type a character or access a function printed in green on the overlay:
- Press ☐ and then press the key for the character or function.
To type letters in the upper right corner of a key:
- Press ☐ and then press the key one to three times depending on the position of the letter.
For example, in the upper right corner of the 2 key there are the letters “ABC”:
- To type "c", press 2 2 2.

- To type “C,” press ☐ 1 and then press ☐ 2 2 2.
Note: On the calculator-style keypad, the 2 is replaced by the 8 .
To only type letters:
- Press ☐ to lock the green modifier key, and then press the key one to four times depending on the position of the letter.
While the green modifier key is locked, press 1 to toggle between only uppercase and lowercase letters.
To unlock the green modifier key, press ☐.

Note: If uppercase letters are enabled and you unlock the green modifier key, you may need to press ☐ 1 to type lowercase letters.
Enter Characters on the CK70 and CK71 Keypads
You need to use the orange modifier key ☐, the green modifier key ☐, and the Shift or Caps Lock key ⚙ to access all characters and functions on the Alpha, Alphanumeric, and Numeric Function key pads.
To type a character or access a function printed in orange on the overlay or in the upper left corner of a key:
- Press ☐ and then press the key for the character or function. To type a character or access a function printed in green on the overlay:
- Press ☐ and then press the key for the character or function. To type a single uppercase letter:
- Press 🏠 and then the letter key. To type all uppercase letters:
- Press 🔒 to turn on Caps Lock, and then press the letter keys. You can still type orange or green modifier characters by pressing 🔒 or 🔒 and then the key for that character.
To turn off Caps Lock, press ⏻.
About the Power Button
When you press the Power button, a dialog appears with a list of power options. If you do not select a power options setting, the currently selected action (the button outlined in bold) occurs after the timeout.
The Intermec Power Options Default Screen

flowchart
graph TD
    A["Hibernate (battery swap)"] --> B["Suspend"]
    B --> C["Reboot"]
    C --> D["Cancel"]
    D --> E["Progressed Bar"]
Use the following table to understand the Intermec Power Options.
Note: The Real Time Clock (RTC) will persist through all of the power options as long as it receives power from the Real Time Clock battery.
Intermec Power Options
| Option Description | |
| Hibernate (battery swap) | High power saving mode. Use this setting only for swapping the battery. The computer saves the current system state, registry, and file system and then powers off all radios and internal devices. You can wake the computer by pressing the Power button or connecting the computer to external power. |
Option Description
| Suspend Medium power saving mode. The computer powers off all radios and internal devices not involved in saving the system state, but the phone stays on to receive calls. This option is the default setting. You can wake the computer by pressing the Power button, pulling the scanner trigger, receiving a call, scheduling an event such as an alarm, or by connecting external power. |
| Reboot The computer does not save the current system state, but the registry and file systems are saved. The computer shuts down all running processes and restarts. |
| Cancel The Power Options menu is cancelled. |
| Screen Off Lowest power saving mode. The screen turns off, but the phone, all radios, and internal devices stay on. Tap the screen to turn the screen back on. |
| Shutdown Very high power saving mode. The computer turns off everything. You must press Power or apply external power to restart the computer. |
The Intermec Power Options screen is customizable. You can use Intermec Settings to determine which options are available to end users, the timeout until the default choice is selected, the default action if no option is selected, or to disable the Power Options screen. For more information on customizing the screen using Intermec Settings, see “Use Intermec Settings on the Computer” on page 68 or see the Intermec Settings Command Reference Manual.
About the Intermec Dashboard Button
If the Ready-to-Work light blinks, your computer may be experiencing a problem. Press the Intermec Dashboard button (②) to launch the Intermec Dashboard application and view troubleshooting and status information.
You can press the Ⓞ button at any time to bring up the Intermec Dashboard. If the computer is not healthy, the current issues are displayed at the top of the screen. If the device is healthy, you can use the Dashboard to view device information. For more information, see “About the Intermec Dashboard” on page 106.
Configure the Screen Backlight
The display has an ambient light sensor that automatically adjusts the backlight intensity to conserve power and ensure the display is readable.
By default, the screen turns off when there is no activity with the computer. Press a key or tap the screen to resume activity.
You can configure the screen backlight to turn off.
1 Tap Start > Settings > Power.
2 Tap Advanced on the horizontal scroll bar.
3 Select the screen power off settings for when the computer is on battery power or external power.
You can configure the screen brightness using Intermec Settings or from the Start menu.
1 Tap Start > Settings > System > Backlight.
2 Adjust the slider to the desired brightness level.
3 Tap OK.
Adjust the Volume
You can adjust the computer volume for your needs and your environment. The volume includes sounds you hear when you tap the screen or read bar codes with the imager. You can set the volume to off, very low, low, medium, high, very high (default), or vibrate.
You can also use the buttons on the right side of the computer to adjust the volume:
- The upper button increases the volume.
- The lower button decreases the volume.
You can adjust the volume settings using Intermec Settings or the horizontal scroll menu.
1 Tap the Volume icon at the top of the screen, and then tap the volume icon on the horizontal scroll menu.
2 Use your stylus or the ⏻ and ⏻ keys to adjust the volume slider to the volume you want, select Vibrate, or select Off.
Use the Imager
The computer ships with an internal imager. You can use the imager as a flashlight or to read bar codes.

Note: When the Pictures & Videos application is running, you cannot use the imager.
Use the Flashlight
You can use the EA30 imager as a flashlight. By default, the imager is set to read bar codes. To use the imager as a flashlight, you must remap the Left side lower button.
1 Open Intermec Settings on the mobile computer by tapping Start > Settings > System > Intermec Settings.
2 From the Intermec Settings main menu, tap Device Settings > Keypad.
3 From the Keypad menu, select Button Remapping.
4 From the Left side lower button menu, select Flashlight.
5 From the Flashlight timeout drop-down menu, select how long the flashlight is on and tap OK.
Chapter 1 – About the Computer Features
Read Bar Codes
Depending on the imager model in your computer, you can read 1D and 2D bar code symbologies, composite symbologies, and postal codes.
1 Enable only the bar code symbologies that you need.
2 Use Intermec Settings to choose the predefined imager mode that best suits your environment:
Predefined Mode For Scanning
1D Only 1D labels.
1D and 2D Standard (Default) All types of bar code labels.
1D and 2D Bright Environment In high ambient light, such as outdoors in the sunshine.
1D and 2D Reflective Surface Glossy labels.

Note: You can also select the imager predefined mode in Profile Settings by tapping Start > Profile Settings > Scanning.
3 Point the imager window at the bar code label, and hold the computer steady a few inches from the label.
4 Press the Scan button. The laser pointer and illumination beam or frame appear.
Scanning With the EA30 Imager

5 Use the laser pointer as a guide and aim toward the middle of the bar code. Make sure that the illumination beam or frame covers the bar code you are trying to decode.
When the computer successfully reads a bar code label, you hear a high beep, and the Good Read LED turns on briefly.
6 Release the Scan button.
You can also connect the computer to:
- cordless scanners, such as the SF51 and SR61 through Bluetooth communications. For help, see “Connect to a Bluetooth Scanner” on page 78.
- tethered scanners, such as the SR30, and SR61T through the RS-232 adapter (Model 1000AA03). For help, see “Connect to a Tethered Scanner” on page 82.
Insert a MicroSD Card
You can use a microSD ^™ card to increase file storage and install software. The computers support an optional 32 GB maximum capacity microSD card.

Note: The computer resets when you open the card access door to insert the microSD card. Make sure you completely close the card access door before you use your computer.
Install a MicroSD Card in a CN70 or CN70e
1 Press the Power button to turn off the computer.
2 Remove the handstrap and the battery.
Chapter 1 – About the Computer Features
3 Remove the two Phillips screws and open the card access door.

natural_image
Diagram of a mechanical component with screw holes and a red arrow indicating direction (no text or symbols)4 Slide the SIM card door to the left to unlock it and open the door.

natural_image
Technical diagram of a mechanical component with a highlighted internal area and red arrow indicating a feature (no text or symbols present)5 Slide the microSD card door towards the top of the computer to unlock it and open the door.

natural_image
Technical diagram of a mechanical component with a highlighted internal structure and red arrow indicating motion (no text or symbols)6 Slide the microSD card into place.
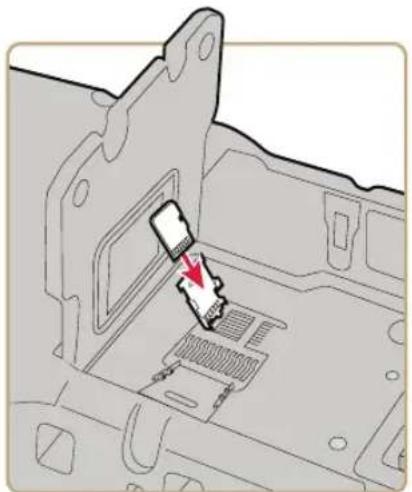
natural_image
Diagram of a device component with a red arrow pointing to a connector (no text or symbols present)7 Close the microSD card door and slide it towards the bottom of the computer to lock it in place.
8 Close the SIM card door and slide it to the right to lock it in place.
9 Close the card access door and replace the two screws.
10 Install the battery. Press down firmly on the bottom of the battery, and make sure that the battery release tab is fully engaged.
Chapter 1 – About the Computer Features
11 Reattach the handstrap.
12 Press the Power button. The computer cold boots.
Install a MicroSD Card in a CK70 or CK71
1 Press the Power button to turn off the computer.
2 Remove the handstrap.
3 Remove the two screws that attach the interface adapter cover to the back of the computer.

natural_image
Mechanical assembly diagram showing a tool inserted into a component with red arrows indicating motion direction (no text or symbols)4 Slide the SIM card door to the left to unlock it and open the door.

natural_image
Diagram of a mechanical component with a highlighted internal structure and red arrow indicating motion (no text or symbols)5 Slide the microSD card door towards the top of the computer to unlock it and open the door.

natural_image
Diagram of a device component with a red arrow indicating a specific area, no text or symbols presentChapter 1 – About the Computer Features
6 Slide the microSD card into place.

natural_image
Diagram of a mechanical component with a highlighted section and arrow indicating direction (no text or symbols present)7 Close the microSD card door and slide it towards the bottom of the computer to lock it in place.
8 Close the SIM card door and slide it to the right to lock it in place.
9 Replace the interface adapter cover and attach with the two screws removed in Step 2.
10 Install the battery. Press down firmly on the bottom of the battery, and make sure that the battery release tab is fully engaged.
11 Reattach the handstrap.
12 Press the Power button. The computer cold boots.
Transfer Files To and From Your PC
The 70 Series computer supports these two methods for transferring files to and from your PC:
• Using Microsoft ActiveSync or Windows Mobile Device Center
• Using the 70 Series computer as a mass storage device.
Use Microsoft ActiveSync to Transfer Files
You can use Microsoft ActiveSync (Windows XP or earlier) or Windows Mobile Device Center (Windows Vista or Windows 7) to establish a connection between your computer and a PC. After you connect to your PC, you can transfer files, synchronize files, remotely debug, and perform other device management activities. ActiveSync and Windows Mobile Device Center are free applications available from the Microsoft website at www.windowsmobile.com/getstarted.
To establish a partnership between your computer and a PC, you need to physically connect your computer to your PC using these accessories:
• USB snap-on adapter (Model 1000AA07)
- USB cable
Using these accessories, you can transfer files to and from your PC using ActiveSync.
1 Connect your mobile computer to your desktop PC using the adapter and USB cable.
2 Download ActiveSync from the Microsoft website and install ActiveSync on your PC.
3 Follow the onscreen instructions to establish a partnership. When the partnership is established, the Microsoft ActiveSync screen appears on your PC.

Use the Computer as a Mass Storage Device
You can connect the 70 Series computer as a mass storage device to your desktop PC. When connected as a mass storage device, you can easily copy files to and from the mobile computer.
1 Go to www.datalight.com and download the Reliance Nitro Windows Driver (RNWD). You will need to login before you can download the driver.
2 Connect the mobile computer to your desktop PC using a USB cable.
3 Open Intermec Settings on the mobile computer by tapping Start > Settings > System > Intermec Settings.
4 From the Intermec Settings Main Menu, tap Device Settings > USB.
5 From the USB function driver menu, select Mass storage - Flash File Store and tap OK.
6 Copy files to and from your desktop PC to the mobile computer.
2
About the User Interface and Intermec Applications
Use this chapter to learn about the Windows Embedded Handheld user interface and how to interact with the screen. You can also use this chapter to learn about the Intermec applications on your computer, as well as additional Intermec applications you can download.
About the User Interface
The user interface for the Windows Embedded Handheld 6.5 operating system is different from previous versions of Windows Mobile. The interface is touch-friendly and easy to navigate. Use the following sections to understand how to interact with Windows Embedded Handheld 6.5.
About the Home Screen
When you turn on your mobile computer, the Home screen is the first screen that appears. The Home screen contains three navigation bars: the Title bar, the horizontal scroll bar, and the Tile bar.
The Windows Embedded Handheld 6.5 Home Screen

Use the Title bar icons to view the current status of information such as signal strength and battery power remaining. For more information on the Title bar icons, see “Title Bar Status Icons” on page 40.
A horizontal scroll bar appears when you tap an icon in the Title bar. This horizontal scroll bar makes it easy to access the applications associated with the Tile bar icons. The horizontal scroll bar also contains a magnifier which improves the touch experience by making parts of the screen large enough to tap with your finger.
Chapter 2 – About the User Interface and Intermec Applications
The horizontal scroll bar also replaces tabs within Windows screens and allows for easier navigation.
Clock & Alarms Screen With Horizontal Scroll Bar

Use the Tile bar to navigate between screens and within applications. The icons available on the Tile bar change depending on the application you are using.
Interact With the Screen
The Windows Embedded Handheld 6.5 interface supports the use of gestures with the finger or stylus to move around the screen. The table below explains the supported gestures.
| Gesture Description |
| Tap Represents the left click of a mouse. |
| Double-tap Represents the left double-click of a mouse. |
| Hold Represents the right click of a mouse when you press and hold on the screen and a context menu appears. |
| Flick Initiates scrolling in the direction (horizontal or vertical) the finger or stylus moves across the screen. |
| Pan Press and hold on the screen and then drag in any direction. |
Chapter 2 – About the User Interface and Intermec Applications
Title Bar Status Icons
Tappable icons in the Title bar immediately show you the status of your network, your phone, the volume, the battery, and the time. Use the following table to understand what the icons mean.
Title Bar Status Icon Descriptions
| Icon Description | |
 | You have a new notification. |
 | You have a new text message. |
 | You have a new email message. |
 | You have a new instant message. |
 | You missed a call. |
 | The speakerphone is on. |
 | The phone is roaming. |
 | An alarm is set. |
 | The microphone is on. |
 | An internet call is in progress. |
 | A Bluetooth headset is detected. |
 | An ActiveSync connection has been established. |
 | There is a problem with the ActiveSync synchronization. |
 | An ActiveSync synchronization is in progress over USB. |
 | A CDMA connection is active. |
 | A CDMA connection is available, but not transferring data. |
Chapter 2 – About the User Interface and Intermec Applications
Icon Description
| 3G | A UMTS network is available. |
| 3G | Connecting to a UMTS network. |
| 3G | A UMTS connection is active. |
| 3G+ | A 3G+ network is available. |
| E | An EDGE network is available. |
| E | Connecting to an EDGE network. |
| E | An EDGE connection is active. |
| G | A GPRS network is available. |
| G | Connecting to a GPRS network. |
| G | A GPRS connection is active. |
| H | An HSDPA network is available. |
| H | Connecting to an HSDPA network. |
| H | An HSDPA connection is active. |
| * | Bluetooth is on. |
| Wi-Fi is on but not connected, and no networks are detected. | |
| Wi-Fi is not connected to a network, and other networks are detected. | |
| Other wireless networks are detected. | |
| Connected to a wireless network. | |
| Synchronizing through a Wi-Fi connection. |
Chapter 2 – About the User Interface and Intermec Applications
Icon Description
| Connected to a wireless network, and other networks are detected. | |
| Information about a new wireless network is available. | |
| A network connection is active. | |
| A network connection is inactive. | |
| The phone has maximum signal strength. | |
| The phone has no signal. | |
| The phone capability is off. | |
| The phone has no service. | |
| The phone is searching for service. | |
| Data is being transferred. | |
| A voice call is in progress. | |
| A voice call is on hold. | |
| There is no SIM card present in the computer. | |
| The volume is off and the phone is set to vibrate. | |
| The volume is on. | |
| The volume is off. | |
| The battery has a full charge. | |
| The battery has a high charge. | |
| The battery has a medium charge. |
Icon Description
| The battery has a low charge. | |
| The battery has a very low charge. | |
| The battery is attached to external power and is charging. | |
| No battery is installed in the computer. | |
| Call forwarding is on. | |
| Voice mail is off. | |
| GPS locator is off. | |
| GPS locator is on. |
Align the Screen
You may need to align your screen if you tap on one area and it registers in a different part of the screen. Make sure you only use the stylus to complete the alignment process.
1 Tap Start (☑) > Settings > System > Screen.
2 Follow the prompts on the screen to complete the alignment process.
About Intermec Applications
Intermec provides many useful applications to help you configure, troubleshoot, and connect your computer to other devices and networks. You can also download additional applications from the Intermec website to help you use all of the features of your computer.
Applications Available on the Mobile Computer
Use this table to understand some of the Intermec applications available on your computer.
Intermec Applications Available on the Mobile Computer
| Icon Application Description | ||
 | Bluetooth Audio | Use the Bluetooth Audio application to connect to a Bluetooth headset or hands-free device. For more information, see “Connect to a Bluetooth Audio Device” on page 81. |
 | Carrier Selection | Use the Carrier Selection application to quickly change your network carrier. For more information, see “About Switching Network Carriers” on page 54. |
 | iGPS Use the iGPS application to improve the performance of GPS on your computer. For more information, see “Improve GPS Performance on the Computer” on page 65. iGPS is only available on computers with phone capability. | |
 | Intermec Settings | Use Intermec Settings to configure your computer. You can use Intermec Settings to individually configure a computer or you can use it through SmartSystems to configure all of your computers. For more information, see “Use Intermec Settings on the Computer” on page 68. |
 | ISpyWiFi Use ISpyWiFi to check your 802.11 status and diagnose issues with the connection. For more information, see “Check 802.11 Network Status” on page 109. | |
 | Profile Settings Use Profile Settings to easily configure the computer for a specific use. You can choose predefined values for the Camera, Power, and Scanning.· Tap the Profile Setting you want to use. You will see a message that changes are saved and a check mark appears next to your choice. For more information on modifying Profile Settings options, see “Configure Profile Settings With Intermec Settings” on page 74. | |
 | ScanDiagnostic Use the ScanDiagnostic application to troubleshoot problems with the internal or external scanner. For more information, see “Use ScanDiagnostic to Troubleshoot the Scanner” on page 112. | |
Icon Application Description
 | Wireless Center Use the Wireless Center to turn radios (Wi-Fi, Bluetooth, phone) on and off and configure settings for each radio. | |
 | Wireless Printing | Use the Wireless Printing application to connect to a Bluetooth printer. For more information, see “Connect to a Bluetooth Printer” on page 80. |
 | Wireless Scanning | Use the Wireless Scanning application to connect to a Bluetooth scanner. For more information, see “Connect to a Bluetooth Scanner” on page 78. |
Applications You Can Download to the Mobile Computer
You can download several Intermec applications from the website that extend the capabilities of your 70 Series computer. All of the applications listed below are available from the Intermec website. Some of the applications require the purchase of a license to run. To find the application you want, go to www.intermec.com > Support > Downloads and then enter the information to find your 70 Series computer.
About eMDI
Intermec Enhanced Mobile Document Imaging Application (eMDI) is a professional document capture application that enables you to capture images of full page documents (8.5 x 11 or A4 paper sizes) with the camera. You can transfer the images from your mobile computer to a PC or server. For more information, see the Intermec Enhanced Mobile Document Imaging User Guide. You can download and use eMDI for a 30-day evaluation period. After the evaluation period expires, you will need to purchase a license.
About Features Demo
Intermec Features Demo provides a simple way to explore the key features of your mobile computer. You will find applications that demonstrate scanning, document imaging, image capture, printing, and GPS functionality. Many of the applications that are part of Features Demo also have separate full-featured versions that you can download and license for your computer.
About Image Capture
The Intermec Image Capture application is provided for use on the 70 Series computers with an EA30 imager. Image capture provides a way for users to capture a high quality grayscale image with a mobile computer. Image Capture also allows you to change settings to provide the best image possible for the conditions present. You do not need to license Image Capture.
About Intermec Browser
Intermec Browser is a locked-down web application for your computer that is compatible with Internet Explorer 6.0. You can configure Intermec Browser for your specific application requirements and design your own web pages. You can download and use Intermec Browser for a 60-day evaluation period. After the evaluation period expires, you will need to purchase a license.
About Intermec Connection Manager
Intermec Connection Manager is a software application and API interface that provides seamless network roaming for Intermec mobile computers configured with one or more wired or wireless technologies (Ethernet, 802.11, GPRS, CDMA). Intermec Connection Manager works in the background to automatically establish and maintain connections. You can download and use Intermec Connection Manager for a 60-day evaluation period. the evaluation period expires, you will need to purchase a license.
About Intermec Launcher
Intermec Launcher is a Microsoft Windows application, designed for Intermec mobile computers, that provides a platform from which other applications may be launched while attempting to provide a locked-down environment. You can configure Intermec Launcher for your specific application requirements. You can download and use Intermec Launcher for a 60-day evaluation period. After the evaluation period expires, you will need to purchase a license.
About Intermec Terminal Emulator (ITE)
Intermec Terminal Emulator (ITE), part of Intermec Client Pack (ICP), is the next generation of Intermec's popular terminal emulation client designed for enterprise-level data collection. It provides a consistent user interface and a common menu structure to simplify the use and management of applications running on Intermec mobile and wireless computers.
ITE is packed with enhancements that improve productivity, reduce errors, and deliver fast return on investment. It supports multiple emulation protocols in a single client and has new features such as session persistence, remote management and configuration, and offers a maintenance plan to keep you up-to-date with the latest releases and upgrades. You can download and use ITE for a 60-day evaluation period. After the evaluation period expires, you will need to purchase a license and maintenance plan.
About SmartSystems Foundation
SmartSystems™ Foundation is an easy-to-use software platform that provides IT Administrators and Integrators a single, integrated portal for hands-free provisioning, deployment, and management of Intermec devices minimizing the effort spent on software upgrades, equipment monitoring, maintenance and troubleshooting.
SmartSystems Foundation provides a consistent way to manage Intermec devices including mobile computers, RFID readers, printers and bar code scanners, located on-site or remote, to make the most of limited IT resources, and lower the total cost of ownership for Intermec data collection equipment. SmartSystems Foundation can be downloaded at no charge from the Intermec website. For more information, visit www.intermec.com/SmartSystems.
Chapter 2 – About the User Interface and Intermec Applications
3
Use the Phone
You can use the phone feature to make and receive telephone calls, as well as transmit data through cellular wide-area networks (WANs).
About the Phone
The 70 Series mobile computer supports two types of cellular technology:
- CDMA
• UMTS

Note: Your Flexible Network Radio mobile computer supports both CDMA and UMTS technology. Your Flexible Network Radio does not support Network Information and Time Zone (NITZ) messages to automatically set the system time.
Phone features on the computer include a speaker and a microphone. You can also use a Bluetooth headset or hands-free kit. The phone feature is enabled by default on WWAN-equipped mobile computers.
After you turn on the phone and activate service with your wireless carrier, you can customize the phone features and network settings. For more information, see the online help on your mobile computer.
Activate the UMTS Phone
You use a SIM card to activate the UMTS phone on your computer. You can purchase the SIM card from your network provider.
1 Press the Power button to turn off the computer.
2 On the CN70 or CN70e:
a Push the battery release tab forward until the battery releases, and lift the battery away from the computer.
b Remove the two Phillips screws and open the card access door.

natural_image
Diagram of a mechanical component with screw holes and a red arrow indicating rotation (no text or symbols)3 On the CK70, remove the two screws and lift the card access door away from the computer.

natural_image
Mechanical assembly diagram showing a tool inserted into a component with red arrows indicating motion direction (no text or symbols present)4 Slide the SIM card door to the left to unlock it and open the door.
Chapter 3 – Use the Phone
5 Slide the SIM card into the slot in the card access door.

natural_image
Technical diagram of a mechanical component with a red arrow pointing to a highlighted internal portion (no text or symbols present)6 Close the SIM card door and slide it to the right to lock it in place.
7 Close the card access door and replace the two screws.
8 Install the battery. Press down firmly on the bottom of the battery, and make sure that the battery release tab is fully engaged.
9 Press the Power button. The computer cold boots.
Activate the CDMA Phone
To activate the CDMA radio module in your mobile computer, you need to contact your wireless carrier and set up an account for each mobile computer. The following table lists the carriers that Intermec currently supports. If your carrier is not listed in the table, please contact Intermec product support to see if it is now supported.
Currently Supported Carriers
Country Carriers
United States Sprint, Verizon
The carrier will require the Mobile Equipment Identifier (MEID) to start the activation process. You can find the MEID:
- on a label located in the upper right corner of the battery compartment.
52 70 Series Mobile Computer User Manual
• on the outside of the computer shipping box.
- in the Version Information menu. Tap Start > Settings > Personal > Phone > Version Information tab.
The activation process is slightly different for each CDMA carrier. Your carrier sales contact and an Intermec representative can guide you through the process.
After you supply the MEID to your carrier, they will respond with values that you must enter using the Windows Mobile Activation Wizard (if required). Some of the supported carriers do not require you to enter any values. The following table shows the carriers, the correct activation method to use, and the values that you need to activate your phone.
Values Required for CDMA Phone
| Carrier Activation Method Activation Values You Need | |
| Sprint Activation Wizard | Master Subsidy Lock (MSL) or activation codeMDNMEID |
| Verizon • Dial *22899• Activation Wizard | None. All parameters are automatically transferred wirelessly. |
After activation, the settings are permanently stored in the CDMA module. Changing the OS loads will not affect any of the settings or activation parameters stored in the WAN modem.
Starting the Activation Wizard
Depending on your wireless carrier, you may need to use the Windows Mobile Activation Wizard to activate your phone.
1 Tap Start > Phone, or tap the Phone button on the Tile bar.
The phone application starts.
2 Tap Menu > Activation Wizard.
Turn the Phone On and Off
Before you can start using your phone, you need to enable it. You can use Wireless Center to enable and disable your phone, as well as Bluetooth and Wi-Fi communications.
1 Tap Start > Settings > Connections > Wireless Center.
2 Tap Phone to turn on the Phone
3 (Optional) To configure the phone, tap Menu in the tile bar at the bottom of the screen.
4 Tap OK when you are done configuring the options.
5 Tap OK to close Wireless Center.
About Switching Network Carriers
Your Flexible Network Radio-enabled CN70, CN70e, or CK70 mobile computer contains a highly configurable WWAN platform. When you switch network carriers, or perform a clean boot, you need to set your cellular carrier, and your network connection.

Note: Your cellular carrier and network connection are set independently of each other. If you select a cellular carrier that is not supported on your current network connection, you must manually switch your network connection.
About the Network Connection

Note: When you perform a clean boot, the selected carrier will default to generic UMTS.
When you perform a clean boot, all user-created network connection entries are deleted, and only the generic UMTS remains. After you perform a clean boot, you can find more information about generic UMTS by tapping Start > Settings > Connections > Connections > Tasks tab > Manage Existing Connections > Modem tab.
Your UMTS connection entry can be automatically built from your carrier issued SIM card. To automatically recreate your network connection, install your SIM card and tap Start > Settings > Connections > Connections > Tasks tab > Automatically configure connection.
Switch Network Carriers
Use the Carrier Selection application to quickly change your WWAN radio network carrier on your Flexible Network Radio-enabled CN70, CN70e, or CK70 mobile computer.
1 Tap Start > Settings > Personal > Carrier Selection.
2 From the Carrier drop-down menu, select the new carrier and tap OK. A dialog box appears asking if you want to switch carriers.
3 Tap Yes to switch carriers.
If the update is successful, the Carrier Selection screen appears and displays the updated carrier information.
If the update is unsuccessful, a message box appears. Tap Ok to return to the Carrier Selection screen.
If you are switching to a CDMA network, or switching from a CDMA network to a UMTS network, you must add the WWAN connection in Intermec Settings.
1 Tap Start > Settings > System > Intermec Settings > Communications > WWAN Radio.
2 Select Add New WWAN Connection.
Chapter 3 – Use the Phone
3 Enter a Connection Name. In the Phone Number field, enter #777 and tap OK. The Manage WWAN Radio State screen appears.

4 From Active Connection, select your Connection Name and Connect Now and tap OK.

Make a Phone Call
After you activate your UTMS or CDMA phone, you are ready to start making phone calls.

Note: Your Flexible Network Radio mobile computer is data only. You cannot make phone calls from the Flexible Network Radio.
1 Press Phone.
2 Tap the keys to enter the telephone number you want to call, and tap Talk.
Make an Emergency Phone Call
You can use the UMTS phone to make an emergency phone call even if the SIM card is missing. When the SIM card is not installed, the phone will show that you have no service. However, if you dial certain emergency numbers (such as 112, 911, 000, 08, 118, 119, and 999) the call will go through.

Note: Your Flexible Network Radio mobile computer is data only. You cannot make phone calls from the Flexible Network Radio.
Chapter 3 – Use the Phone
4
Use the Camera
You can use the color camera to take pictures and record videos.
About the Color Camera
The camera and flash are located on the back of the computer. You run the Pictures & Videos application to access the camera features. In this application, you can:
• take, view, and edit pictures.
- record and launch video clips stored on the computer or a microSD card.
- configure camera options.
You can also send pictures and video clips to others or save an image as the background on the Home screen. If you download the eMDI application, it uses the camera to capture images.

Note: While the Pictures & Videos application is running, you cannot use the imager.
Take a Picture
You can take photos in high, normal, or low quality, with image sizes up to 2048 x 1536 pixels. When you take a picture, the image is saved as a .jpg file and stored in the /My Documents/My Pictures folder.
1 Tap Start > Pictures & Videos.
2 Tap the Camera icon in the grid or the Camera button on the Tile bar, or press Enter.
3 Using the screen as a viewfinder, move the camera until you have the image you want to take a picture of.
4 Press Enter to take and save the picture. If you choose to save your pictures to Main memory, they are saved to permanent storage on your mobile computer.
Record a Video
You need to switch to video mode to record video. When you record video, the video is saved as an .mp4 file and stored in the /My Documents/My Pictures folder.
1 Tap Start > Pictures & Videos.
2 Tap the Camera icon in the grid or the Camera button on the Tile bar, or press Enter.
3 Tap Menu > Video.
4 Using the screen as a viewfinder, move the video camera until you see the scene you want to video record.
5 Press Enter to start recording.
6 When you are done, tap Stop or press Enter to stop recording and save the video.
If you choose to save your videos to Main memory, they are saved to permanent storage on the computer.
Save Pictures and Videos to a microSD Card
Pictures and videos are automatically saved to the main memory on your computer. You can save your pictures and video to a microSD card to easily transport them to another device.
1 Install a microSD card. For help, see "Insert a MicroSD Card" on page 29.
2 Tap Start > Pictures & Videos.
3 Tap the camera icon.
4 Tap Menu > Options.
5 From the Save files to list, select SD card, and tap OK.
Chapter 4 – Use the Camera
5
Use GPS
The 70 Series computer comes equipped with an integrated Global Positioning System (GPS) receiver if your computer has phone capability (WWAN radio). The GPS receiver can deliver standards-based National Marine Electronics Association (NMEA) data strings to GPS applications.
About the Integrated GPS on Your Computer
Intermec recommends that you use the GPS Intermediate Driver (GPSID) instead of directly accessing the GPS hardware. The GPSID is a Microsoft software component that interacts between applications and the GPS hardware.
As a Microsoft software component, the GPSID:
- allows multiple applications to simultaneously access the GPS data stream.
- provides access to GPS data without requiring applications to recognize and parse NMEA syntax.
Use the GPSID Installed on the Computer
To use the GPSID installed on your mobile computer, you need to configure the GPSID settings.
1 Tap Start > Settings > System > External GPS. The GPS Settings screen appears with Programs selected.

2 Select the COM port that you want your programs to use to get GPS data from your computer.
3 Tap Access in the horizontal scroll bar and select the Manage GPS automatically check box.

4 Tap OK.
Improve GPS Performance on the Computer
Use the iGPS application to improve the performance of the GPS on your CN70, CN70e, or CK70 computer. The integrated GPS module has three operating modes:
- Standalone
• MS Assisted (Mobile Station Assisted) - gpsOneXTRA™ (UMTS computers only)
In Standalone mode, the GPS module relies solely on GPS satellites to determine position.
In MS Assisted mode, the computer can determine position without receiving GPS signals directly from satellites; instead, the computer receives GPS signals and information provided by the cellular network. Even when the computer can receive a satellite signal, MS Assisted can improve position accuracy and reduce the time to determine initial position (Time-To-First-Fix). Check with your cell phone carrier for availability and pricing for MS Assisted service.
Qualcomm's gpsOneXTRA Assistance technology provides enhanced operation for Standalone GPS. This option enables the UMTS-enabled computer to automatically download a small assistance data file from the XTRA servers through a brief internet access session. To use this option, you must have a valid and activated WAN data connection.

Note: Internet connection fees may apply.
Another option you can configure with iGPS is the fix interval. The fix interval defines how often the GPS should provide new information. Larger intervals use less power, but many applications require small intervals to work correctly. The default for fix interval, in seconds, is 4. The Flexible Network Radio has a maximum interval of 4.

Note: Anytime you change the GPS settings, the phone module automatically resets.
1 Go to Start > Settings > System > iGPS.
2 In the Fix Interval tab, enter a value for the fix interval. The default setting is 4 and should be optimized for most applications.
3 Tap the Fix Type tab and select one of these options: Standalone (1), MS assisted (2), or Enable gpsOneXTRA (check box).
4 Tap OK.
6
Configure the Computer
Use this chapter to learn about the available methods for configuring your mobile computer and how to use Intermec Settings. You can also use this chapter to learn how to configure network communications and wireless security.
How to Configure the Computer
You can configure many parameters on the computer such as the bar code symbologies it decodes or the network settings. The values you set for these parameters determine how the computer operates.
There are several ways to configure the computer:
- Directly on the computer. You can use Intermec Settings directly on the computer to change only the settings on that computer. For more information, see the next section, “Use Intermec Settings on the Computer.”
- Remotely using Intermec SmartSystems Foundation. When you use SmartSystems, you can remotely configure all of your 70 Series mobile computers as well as other SmartSystems-enabled Intermec computers and peripherals. For more information, see “Use Intermec Settings Remotely With SmartSystems Foundation” on page 76.
- You can use a third-party device management product that supports the computer and Intermec Settings, such as Soti MobiControl or Wavelink Avalanche. For more information, visit the Device Management page on the Intermec website.
You can also configure the computer with configuration bundles that you create using SmartSystems Foundation. For more information, see the SmartSystems Foundation Online Help.
Use Intermec Settings on the Computer
Use Intermec Settings to configure parameters for Intermec applications on the computer as well as some device-specific parameters like volume. You can configure parameters for important functions like data collection and communications.
Start Intermec Settings
Intermec Settings is located on the System screen.
- Tap Start > Settings > System > Intermec Settings. The Intermec Settings Main Menu appears.

About the Structure of Intermec Settings
Use the tables below to help find the parameters in Intermec Settings that you want to configure. Each table contains the parameters for one of the Intermec Settings Main Menu options.
If you see > next to a menu option, there are more screens available in the next level. If you see ... next to a menu option, there is only one more screen available.
Most parameters are saved as soon as you tap OK. Some settings such as the Serial Port Switch require you to reboot the computer for the changes to take effect.
Data Collection Menu
| Data Collection Options Parameters You Can Configure | |
| Internal Scanner | SymbologiesScanner settingsImager settingsDecode security |
| Bluetooth Scanner | SymbologiesScanner settingsImager settingsDecode security |
| Dock Tethered Scanner | SymbologiesScanner settingsScanner port settingsImager settingsDecode security |
| Camera | SymbologiesScanner settingsCamera settingsDecode security |
| BT-Configure on Connect Bluetooth-configure on connect | |
| Magstripe Reader | Enable magstripe readerReader model (read-only) |
Communications Menu
| Communications Options Parameters You Can Configure | |
| Device Name Device name | |
| 802.11 Radio | • Security choice (supplicant)• Security settings (includes Wi-Fi settings such as enable/disable radio)• IP settings• Certificates |
| Ethernet Adapter IP settings | |
| Bluetooth Bluetooth settings (power, discoverable, connectable, and so on) | |
Communications Options Parameters You Can Configure
| WWAN Radio • Add WWAN connection• Edit WWAN connections• Manage WWAN radio• Carrier Selection• WWAN information |
| Serial Port Switch Serial port switch settings (IrDA, docking connector, and back interface) |
Device Settings Menu
| Device Settings Options Parameters You Can Configure | |
| Date and Time Date and time settings | |
| Good Read | Internal scannerTethered scannerBluetooth scanner |
| Sounds | Beeper and voice volumeHeadset beeper volumeVibrate mode intensityScreen tapsKey clicks |
| Backlight Backlight settings (display backlight, keypad backlight, and light level) | |
| Screen | Screen rotationScreen rotation sensor |
| Keypad Button Remapping (Flashlight timeout, Left side lower button, Handle trigger, Center scan button, Left side upper button, Right side upper button, Right side lower button) | |
| Power Management | Power buttonBattery powerExternal powerDevice off sensor |
| USB USB function driver | |
| System Component Versions System component versions (read-only) | |
| IDL Runtime Versions ITC50 (read-only) | |
Device Settings Options Parameters You Can Configure
| Profile Settings Application Whether these parameter options appear in Profile Settings: |
| • Camera |
| • Power |
| • Scanning |
Features Disabled by Policy None (read-only)
Printer Menu
Printer Options Parameters You Can Configure
| Printer (if connected through Bluetooth) | Printer settings (Auto detect printer, memory, display, and so on) |

Note: The Printer menu displays settings for Bluetooth connected printers. The settings that appear in the menu are dependent on the printer that is paired with the device. The printer needs to be using the Wireless Printing application.
GPS Menu
GPS Options
| GPS Bread crumbing settings |
SmartSystems Information Menu
SmartSystems Information Options Parameters You Can Configure
| Identity Identity information (hardware version, firmware version, OS version, and so on) (read-only) |
| Administrator Administrator settings (name, phone, and email) |
| Location Location settings (country, state, city, campus, and detail) |
| Information Device Notes (read-only) |
Virtual Wedge Menu
| Virtual Wedge Options Parameters You Can Configure |
| Enable Virtual Wedge Enable virtual wedge |
| Bar Code Scanner Wedge Bar code scanner wedge settings (bar code scanner grid and label encoding) |
| Magstripe Reader Wedge Magstripe Reader Grid |
Core Messaging Service Menu
| Core Messaging Service Options Parameters You Can Configure |
| Server IP Server IP (read-only) |
| Associated Server IP Associated server IP |
| Broadcast Name Broadcast name |
| Port Port (read-only) |
| Keep Alive Ping Interval Keep alive ping interval |
Device Monitor Menu
| Device Monitor Options Parameters You Can Configure | |
| Device Health Controls | Enable health data collectionEnable device health applicationEnable Blue light (LED)Set rule file locationSet data refresh periods |
| Device Health Screen Captures | Device health screen capture settings (directory and screen capture allowed) |
| Disabled Executables | None (read-only) |
| Device Wipe | Device wipe settings (enable wipe and interval) |
License Manager Menu
| License Manager Options Parameters You Can Configure | |
| About | About settings (read-only) |
| License Vault | None (displays applications that are licensed) |
Location Services Menu
Location Services Options Parameters You Can Configure
Server Server settings (port and enable server)
Virtual GPS Virtual GPS settings
For more information on all parameters in Intermec Settings, see the Intermec Settings Command Reference Manual.
Navigate in Intermec Settings
You can easily navigate through the screens in Intermec Settings to find the parameter you need to configure.
To move down a level in Intermec Settings:
- Tap the menu item in the list.
To move back a level in Intermec Settings:
- Tap Back or Cancel on the Tile bar.
To save a parameter setting:
- Tap OK.
To exit Intermec Settings:
- Tap Menu > Exit or OK.
Configure Profile Settings With Intermec Settings
A profile is a set of predefined values that you can easily apply to the computer to ensure optimal performance in a specific scenario. The end user does not need to figure out the “right” settings because we have already done that work for you. Profile Settings is available from the Start menu so you can make it available to the end user for easy configuration.
Use Intermec Settings to determine the profiles you want the end user to see in the Profile Settings application.
1 Go to Device Settings > Profile Settings Application.
2 Select Camera, Power, or Scanning.
3 From the Camera, Power, or Scanning submenu, check or clear the Display check box for the settings you want to have available to the end user.
4 Click OK to save your selection.
You can easily restore a menu to its default settings or all of the Intermec Settings parameters to their default settings if necessary.
1 Navigate to the menu that you want to restore to defaults.
2 Tap Menu > Restore Menu Defaults.
3 When prompted, tap Yes to restore the menu default settings.
4 If prompted to refresh the computer, tap Yes.
You can restore defaults settings for all parameters.
1 Tap Menu > Restore All Defaults. The applications asks if you are sure you want to restore all defaults.
2 Tap Yes.
After several minutes, all of the default settings are restored.
Hide Menu Items in Intermec Settings
You can hide items in the Intermec Settings menus if you do not want to have them available for other users to access. Hidden items are not saved when you back up your settings in the SmartSystems console.
On the mobile computer, you can:
- hide menu items by tapping and holding the item, and then choosing Hide Menu Item from the popup list. When asked if you want to hide the menu, tap Yes.
- restore all hidden items in all menus, by tapping Menu > Unhide All Items.

Note: When you restore default settings in Intermec Settings, only the settings for visible items are restored to defaults. The settings for hidden menu items are not affected.
Use Intermec Settings Remotely With SmartSystems Foundation
Your mobile computer is SmartSystems-enabled, which lets you open Intermec Settings from the SmartSystems console to remotely configure all of your mobile computers. For more information on SmartSystems, see “Manage the Computer Using SmartSystems Foundation” on page 98.
1 In the SmartSystems console, select a mobile computer and right-click.
2 From the menu, select Intermec Settings.
3 Configure the settings you need to change. As you choose parameters from the tree structure, help for each parameter appears in the upper right pane of Intermec Settings.
4 When you are done making changes, choose File > Save Settings.
For help using Intermec Settings, click Help > Contents. For information on all of the parameters in Intermec Settings, see the Intermec Settings Command Reference Manual.
About Network Communications
You can easily add the mobile computer to your wireless or wired data collection network. You can connect your computer using:
- 802.11a/b/g/n radio communications.
- Ethernet communications.
- Bluetooth communications.
- USB and serial communications.
Configure 802.11a/b/g/n (Wi-Fi) Radio Communications

Make sure all components with antennas are at least 30 cm (1 ft) apart when power is applied. Failure to comply could result in equipment damage.
The mobile computer contains an 802.11 radio to transfer data using wireless communications and to support the TCP/IP network protocols. This section of the manual assumes that your wireless network is set up, including your access points.
By default, the 802.11 radio is disabled. Use the following procedure to enable the Wi-Fi radio using Intermec Settings. If you would like to use ScanNGo bar codes to easily enable the radio and set the default security settings, see Appendix C “ScanNGo Wi-Fi Configuration Bar Codes” on page 167.
1 Tap Start > Settings > System > Intermec Settings.
2 From the Intermec Settings main menu, tap Communications > 802.11 Radio > Radio Enabled.
3 Select the Radio Enabled check box and tap OK. By default, the computer uses Funk security and enables DHCP.
4 Use Intermec Settings to configure any other parameters you need to use for communication with your network.
5 Configure 802.11 security. For help, see “About Wireless Security” on page 85.
Configure Ethernet Communications
To configure Ethernet communications, connect your mobile computer to your Ethernet network using the Ethernet Snap-On Adapter (Model 1000AA01) or an Ethernet dock.
1 Connect the Ethernet snap-on adapter to your mobile computer.
2 Connect the Ethernet cable from your network to the snap-on adapter or dock.
Ethernet communications are automatically enabled on your mobile computer.
3 Make sure that your computer is communicating with the network. The network connection icon (☐) should appear on the title bar.
Configure Bluetooth Communications
Your mobile computer is Bluetooth ^™ -enabled, which lets you connect to other Bluetooth devices, such as scanners, printers, or audio devices.
You need to turn on the Bluetooth radio before you can discover and connect to other Bluetooth devices. By default, the radio is turned off. You can configure Bluetooth communications using Intermec Settings or from the Start menu.
1 Tap Start > Settings > Bluetooth > Mode.
2 Select the Turn on Bluetooth check box.

3 (Optional) If you want your computer to be visible to other Bluetooth devices, choose Make this device visible to other devices.
4 Tap OK.
The Bluetooth radio maintains its state through a reboot or cold boot and maintains virtual COM ports. But, if you clean boot your computer you need to recreate pairings to devices.
Connect to a Bluetooth Scanner
You can connect the computer to an Intermec Bluetooth scanner, such as the SF51 or SR61.
1 Tap Start > Settings > System > Wireless Scanning.
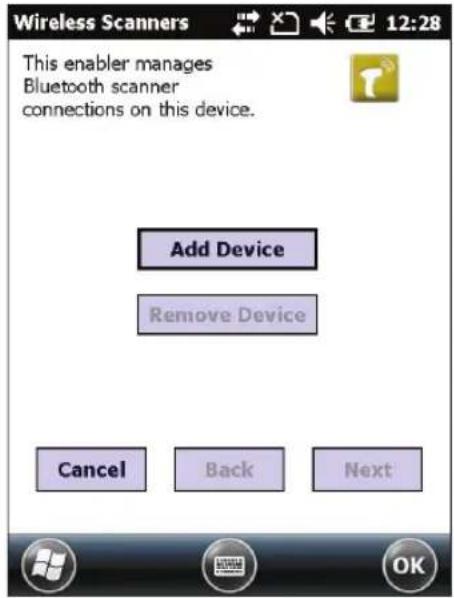
2 Tap Add Device.
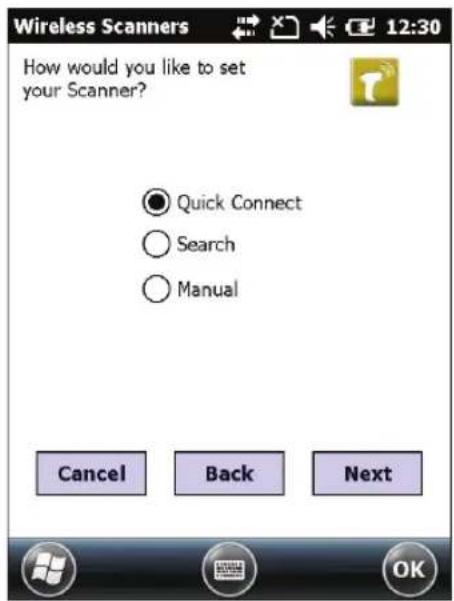
3 Select Quick Connect, Search, or Manual. Follow the onscreen instruction to add a wireless scanner.
Connect to a Bluetooth Printer
To configure your computer for Bluetooth wireless printing, you need to:
- create an application that opens the wireless printing COM port on your computer. For help, see the Bluetooth Resource Kit, which is part of the Intermec Developer Library (IDL), available from the Intermec website at www.intermec.com/idl.
- select the current wireless printer on your computer. For help, see the next procedure.

Note: You can also print wirelessly using Microsoft APIs with Bluetooth extensions for Winsock and Bluetooth virtual COM ports. For help, see the Bluetooth Resource Kit documentation.
1 Tap Start > Settings > System > Wireless Printing.
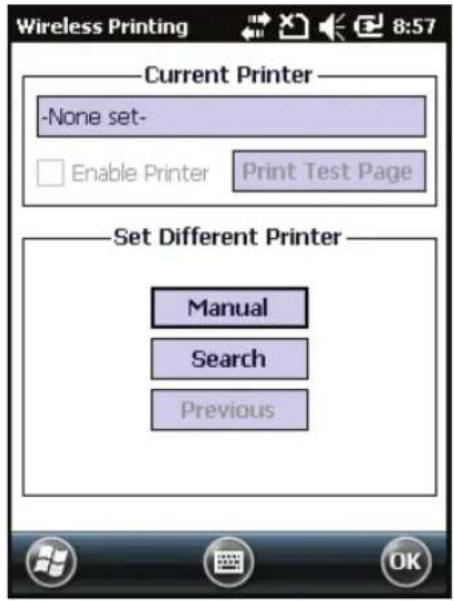
2 Tap Search to find a printer, or tap Manual to enter a device address. Follow the onscreen instructions to select the current wireless printer.
3 (Optional) Tap Print Test Page. The printer prints out a test page.
Connect to a Bluetooth Audio Device
Use the Bluetooth Audio enabler to discover, activate, and connect to Bluetooth audio devices such as a headset. This enables system sounds to be monitored through the headset.
1 Tap Start > Settings > System > Bluetooth Audio.

2 Tap Search to find your Bluetooth headset or hands-free device.
3 Select your device from the list and configure any settings.
4 Click OK when you are done.
About Serial and USB Communications
You can use these 70 Series accessories to transmit data to and receive data from another device through serial or USB communications:
• RS-232 Snap-On Adapter (Model 1000AA03)
• USB Snap-On Adapter (Model 1000AA07)
For more information about these accessories and how to order them, see "70 Series Accessories" on page 8.
Connect to a Tethered Scanner
Use this procedure to connect your mobile computer to an SR30, SR61T, or ASCII tethered scanner and enable RS-232 communications.
1 Tap Start > Settings > System > Intermec Settings > Communications > Serial Port Switch.
2 Select Standard docking and IrDA and tap OK.
If the serial port switch is set to one of the other options, you need to select Standard docking and IrDA and then save and reboot the computer before you proceed.
3 Tap Back to return to the Main Menu.
4 Tap Data Collection > Dock Tethered Scanner > Enable scanner auto-detect.
5 Select the Enable scanner auto-detect check box and tap OK.
6 Perform one of these items based on the type of scanner you are connecting:
- For an SR30 or SR61T scanner, tap Scanner Settings, select SR Intermec Scanner, and then tap OK.
- For an ASCII scanner, tap Scanner Settings, select ASCII, and then tap OK. Set up the appropriate COM port settings by selecting Scanner Port Settings.
7 Connect the RS-232 snap-on adapter with the attached scanner to the bottom of the mobile computer.
Create an ISP Connection
You can create an Internet Service Provider (ISP) connection to send and receive email messages using Messaging (Outlook Email) and view web pages using Internet Explorer Mobile. You need to get your ISP dial-up access telephone number, a user name, and a password from your ISP.
1 Tap Start > Settings > Connections > Connections.
2 Under My ISP, tap Add a new modem connection.
3 Enter a name for the connection, such as "ISP Connection."
4 If you are using an external modem connected to your mobile computer with a cable, select Hayes Compatible on COM1 from the Select a modem list.
5 Tap Next.
6 Enter the access phone number and then tap Next.
7 Enter the User name, Password, and Domain (if provided by an ISP or your network administrator).
8 Tap Finish.
9 On the Connections screen, tap Advanced on the horizontal scroll.
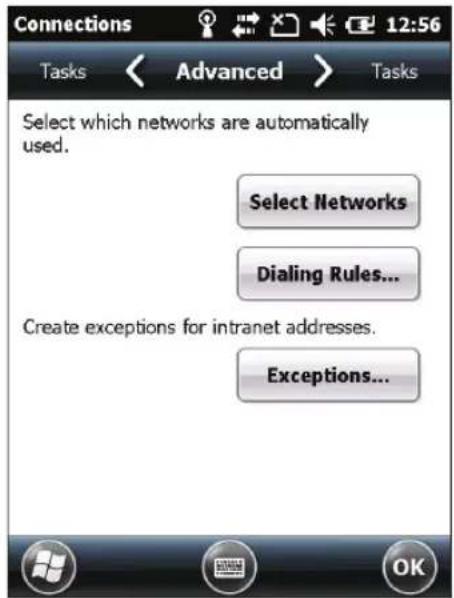
10 Tap Dialing Rules.
11 When the Enable Dialing Rules box appears, tap OK.
12 Tap Edit.
13 In the Name field, enter your phone type (Home, Mobile, or Work).
14 Tap OK until you exit the Connections screen.
Create a VPN Server Connection
You can create a Virtual Private Network (VPN) connection to securely connect to servers, such as a corporate network, through the Internet. Before you can create a VPN connection, you need this information from your network administrator:
- User name
- Password
- Domain name
- TCP/IP settings
- Host name or IP address of the VPN server
After you have located this information, you can create a VPN server connection.
1 Tap Start > Settings > Connections > Connections.
2 Under My Work Network, tap Add a new VPN server connection.
3 Step through the screens to set up your VPN connection.

About Wireless Security
The computer provides five types of security for your wireless network:
• Wi-Fi Protected Access 2 (WPA2™)
• Wi-Fi Protected Access (WPA)
• 802.1x
- LEAP
• WEP
This section explains how to configure wireless security on your mobile computer. Intermec recommends that you implement WPA2 security using PSK (Personal) or 802.1X (Enterprise) key management as appropriate.
You must use either Funk or Microsoft security to implement your security solution. For details, see the next section, “Choose Between Microsoft and Funk Security.” Intermec recommends that you always implement WPA2 security using PSK (Personal) or 802.1X (Enterprise) key management.
If you are using WPA-802.1x, WPA2-802.1x, or 802.1x security, this section also assumes that your authentication server and authenticators are properly configured.

Note: Your security choice does not depend on your authentication server. For example, you can choose Funk security if you use Microsoft Active Directory® to issue certificates.
Choose Between Microsoft and Funk Security
The computer supports both Funk and Microsoft security, which dynamically select wireless networks based on your preferences. The option you choose depends on your network security needs.
- If you are using the computer in a static environment that requires a high level of security, you should use Funk security, which offers CCX v4.0 compliance, support for LEAP and TTLS, and configuration for up to four profiles.
To use Funk security, you need to select a profile. For help, see the next section, "Select a Funk Security Profile."
Chapter 6 – Configure the Computer
- If you are primarily using the computer to connect to Wi-Fi hotspots, you may want to use Microsoft security.
To use Microsoft security, you need to select it as your security choice. For help, see “Select Microsoft as Your Security Choice” on page 90.
Select a Funk Security Profile
You can define up to four profiles for Funk security. Different profiles let your computer communicate in different networks without having to change all of your security settings. For example, you may want to set up one profile for the manufacturing floor and one for the warehouse. By default, the active profile is Profile 1.
Select a Funk Security Profile
Use the following procedure to select a Funk security profile.
1 Start Intermec Settings.
2 Choose Communications > 802.11 Radio > Funk Security.
3 Choose a profile. A list of configurable settings appears.
4 (Optional) In the Profile Label text box, enter a meaningful name for your profile.
5 Configure your security settings. For help, see the next sections.
6 Repeat Steps 3 through 5 for each profile you want to define.
7 Set an active profile by choosing it in the Active Profile list.
8 Save your settings.
Configure WPA or WPA2 Enterprise (802.1x) Security With Funk
Use these procedures to set WPA-802.1x or WPA2-802.1x security on your computer with Funk security.
1 Make sure the communications and radio parameters on your 70 Series are configured.
2 Make sure Funk is selected as your security choice.
3 Start Intermec Settings.
4 Choose Communications > 802.11 Radio > Funk Security.
5 Select the profile you want to configure.
6 For Association, choose WPA or WPA2. Encryption automatically defaults to TKIP or AES, respectively.
7 For 8021x, choose TTLS, PEAP, EAP-FAST, or TLS.
8 If you choose TTLS, EAP-FAST, or PEAP:
a For Prompt for Credentials, choose Enter credentials now.
b Enter a User Name and User Password.
c For Validate Server Certificate, choose Yes.
Note: The correct date must be set on your computer when you enable Validate Server Certificate.

9 If you choose TLS:
a Load a user and root certificate on your computer. For help, see "Load a Certificate" on page 95.
b Enter a User Name and Subject Name.
c For Validate Server Certificate, choose Yes.
Configure WPA or WPA2 Personal (PSK) Security With Funk
Use the following procedure to configure WPA-PSK or WPA2-PSK with Funk security.
1 Make sure the communications and radio parameters on your computer are configured.
2 Make sure Funk is selected as your security choice.
3 Start Intermec Settings.
4 Choose Communications > 802.11 Radio > Funk Security.
5 Select the profile you want to configure.
6 For Association, choose WPA or WPA2.
7 For 8021x, choose None.
8 For Pre-Shared Key, enter the pre-shared key or passphrase.
The pre-shared key must be a value of 32 hex pairs preceded by 0x for a total of 66 characters. The value must match the key value on
Chapter 6 – Configure the Computer
the access point. The passphrase must be from 8 to 63 characters. After you enter a passphrase, the 70 Series internally converts it to a pre-shared key. This value must match the passphrase on the authenticator.
9 Save your settings.
Configure 802.1x Security With Funk Security
Use the following procedure to configure 802.1x-WEP security with Funk security. Intermec recommends that you use WPA2-802.1x instead of 802.1x-WEP if possible.
1 Make sure the communications and radio parameters on your computer are configured.
2 Make sure Funk is selected as your security choice.
3 Start Intermec Settings.
4 Choose Communications > 802.11 Radio > Funk Security.
5 Select the profile you want to configure.
6 For Association, choose Open.
7 For Encryption, choose WEP.
8 For 8021x, choose TTLS, PEAP, or TLS.
9 If you chose TTLS or PEAP:
a Enter a User Name.
b For Prompt for Credentials, choose Enter credentials now.
Enter a User Password.
d For Validate Server Certificate, choose Yes.
10 If you choose TLS:
a Load a user and root certificate on your computer. For help, see "Load a Certificate" on page 95.
b For Validate Server Certificate, choose Yes.
c Enter a User Name and Subject Name.
11 Save your settings.
Configure LEAP Security With Funk
After you configure the communications and radio parameters on your mobile computer and select Funk as your security choice, you can configure LEAP.
1 Start Intermec Settings.
2 Choose Communications > 802.11 Radio > Funk.
3 Select the profile you want to configure.
4 For 8021x, choose LEAP.
5 For Association, choose Open, WPA, WPA2, or Network EAP. Encryption automatically defaults to TKIP if you choose WPA, AES if you choose WPA2, and WEP if you choose Open or Network EAP.
6 For Prompt for Credentials, choose Enter credentials now.
7 Enter a User Name and User Password.
8 Save your settings.
Configure Static WEP Security With Funk Security
Use the following procedure to configure static WEP security with Funk. Intermec recommends that you use WPA2-PSK instead of WEP if possible.
1 Make sure the communications and radio parameters on your computer are configured.
2 Make sure Funk is selected as your security choice.
3 Start Intermec Settings.
4 Choose Communications > 802.11 Radio > Funk Security.
5 Select the profile you want to configure.
6 For Association, choose Open.
7 For Encryption, choose WEP.
8 For 8021x choose None.
Chapter 6 – Configure the Computer
9 Define a value for the keys you want to use. You can define up to four keys (Key 1 through Key 4).
Enter an ASCII key or a hex key that is either 5 bytes or 13 bytes long depending on the capability of the radio. Set a 5-byte value for 64-bit WEP or a 13-byte value for 128-bit WEP. Hex keys must be preceded by 0x and contain 5 or 13 hex pairs.
10 For Transmit key, choose the key you want to use for transmitting data.
11 Save your settings.
Use Open (No Security) Associations with Funk
Use the following procedure to configure your mobile computer for open security using Funk.
1 Start Intermec Settings.
2 Choose Communications > 802.11 Radio > Funk Security.
3 Select the active profile you are using.
4 For Association, choose Open.
5 For Encryption, choose None.
6 Tap OK. Your settings are saved.
Select Microsoft as Your Security Choice
The default security setting is Funk. If you want to use Microsoft Wireless Zero Configuration (WZC) security, you need to select it as your security choice. After you select Microsoft as your security choice, you will be prompted to save your settings and reset the computer for your change to take effect.
With Microsoft as your security choice, you can configure:
- WPA or WPA2
• 802.1x - Static WEP
Select Microsoft Security
Use the following procedure to select Microsoft security.
1 Start Intermec Settings. For help, see "Configure the Computer" on page 67.
2 Choose Communications > 802.11 Radio > Security Choice.
3 From the Security Choice list, select Microsoft Security. An alert box appears telling you that you must save your settings and reboot the computer for the new security choice to take effect.
4 Choose Yes. The computer resets and starts with Microsoft Security as the Security Choice.
Configure WPA or WPA2 Enterprise (802.1x) Security With Microsoft
Use these procedures to set WPA-802.1x security on your computer with Microsoft security.
1 Make sure the communications and radio parameters on your computer are configured.
2 Start Intermec Settings.
3 Choose Communications > 802.11 Radio > Microsoft Security.
4 For Infrastructure Mode, choose Infrastructure.
5 For Network Authentication, choose WPA or WPA2. Data Encryption automatically defaults to TKIP for WPA and AES for WPA2.
6 For 802.1x Authentication, choose either TLS, or PEAP.
7 If you choose TLS:
a Load a user and root certificate on your computer. For help, see "Load a Certificate" on page 95.
b Choose Properties. The Certificates dialog box appears.
c Select the certificate you want to use from the list. The User Logon dialog box appears.
d Enter a User Name and Domain and tap OK.
e Tap OK to exit the Certificates dialog box.
f Press OK to save the Microsoft Security settings.
8 If you choose PEAP:
a Load a root certificate of the authentication server on your computer. For help, see "Load a Certificate" on page 95.
b Press OK to save the security settings and the User Logon dialog box appears.
Enter a User Name, Password, and Domain. Select Save Password if you want to save the password for future authentication sessions.
d Press OK to save the Microsoft Security settings.
Enable WPA or WPA2 Personal (PSK) Security With Microsoft
Use the following procedure to enable WPA-PSK With Microsoft Security.
1 Make sure the communications and radio parameters on your computer are configured.
2 Start Intermec Settings.
3 Choose Communications > 802.11 Radio > Microsoft Security.
4 For Infrastructure Mode, choose Infrastructure.
5 For Network Authentication, choose WPA-PSK. Data Encryption automatically defaults to TKIP for WPA and AES for WPA2.
6 For Pre-Shared Key, enter the pre-shared key or the passphrase. The pre-shared key must be a value of 32 hex pairs preceded by 0x for a total of 66 characters. The value must match the key value on the authenticator. The passphrase must be from 8 to 63 characters. After you enter a passphrase, the computer internally converts it to a pre-shared key.
7 Save your settings.
Configure 802.1x Security with Microsoft
Use the following procedure to configure 802.1x security with Microsoft security. Intermec recommends that you use WPA2-802.1x instead of 802.1x-WEP if possible.
1 Make sure the communications and radio parameters on your computer are configured.
2 Start Intermec Settings.
3 Choose Communications > 802.11 Radio > Microsoft Security.
4 For Infrastructure Mode, choose Infrastructure.
5 For Network Authentication, choose Open.
6 For Data Encryption, choose WEP.
7 For 802.1X Authentication, choose TLS or PEAP.
8 If you choose TLS:
a Load a user and root certificate on your computer. For help, see "Load a Certificate" on page 95.
b Choose Properties. The Certificates dialog box appears.
c Select the certificate you want to use from the list. The User Logon dialog box appears.
d Enter a User Name and Domain and tap OK.
e Tap OK to exit the Certificates dialog box.
f Press OK to save the Microsoft Security settings.
9 If you choose PEAP:
a Load a root certificate of the authentication server on your computer. For help, see "Load a Certificate" on page 95.
b Press OK to save the security settings and the User Logon dialog box appears.
Enter a User Name, Password, and Domain. Select Save Password if you want to save the password for future authentication sessions.
d Press OK to save the Microsoft Security settings.
10 For Network Key Setting, choose Automatic.
11 Save your settings.
Configure Static WEP Security With Microsoft
Use the following procedure to configure static WEP security with Microsoft security. Intermec recommends that you use WPA2-PSK instead of WEP if possible.
1 Make sure the communications and radio parameters on your computer are configured.
2 Start Intermec Settings.
3 Choose Communications > 802.11 Radio > Microsoft Security.
4 For Network Authentication, choose Open.
5 For Data Encryption, choose WEP.
6 For Network Key Setting, choose Enter Key and Index.
7 For Network Key Value, enter an ASCII key or a hex key that is either 5 bytes or 13 bytes long depending on the capability of the radio.
Set a 5-byte value for 64-bit WEP or a 13-byte value for 128-bit WEP. Hex keys must be preceded by 0x and contain 5 or 13 hex pairs.
8 For Network Key Index, select the key you want to use for data transmission.
9 Save your settings.
Use Open (No Security) Associations With Microsoft
Use the following procedure to configure your mobile computer for open security using Microsoft WZC.
1 Start Intermec Settings.
2 Choose Communications > 802.11 Radio > Microsoft Security.
3 For Network Authentication, choose Open.
4 For Data Encryption, choose Disabled.
5 Tap OK. Your settings are saved.
Load a Certificate
To use transport layer security (TLS) with WPA or 802.1x security, you need a unique client certificate on the computer and a trusted root certificate authority (CA) certificate. Certificates are pieces of cryptographic data that guarantee a public key is associated with a private key. They contain a public key and the entity name that owns the key. Each certificate is issued by a certificate authority.
1 Start Intermec Settings.
2 Go to Start > Settings > System > Intermec Settings.
3 Tap Communications > 802.11 Radio > Certificates. The Certificates screen appears.
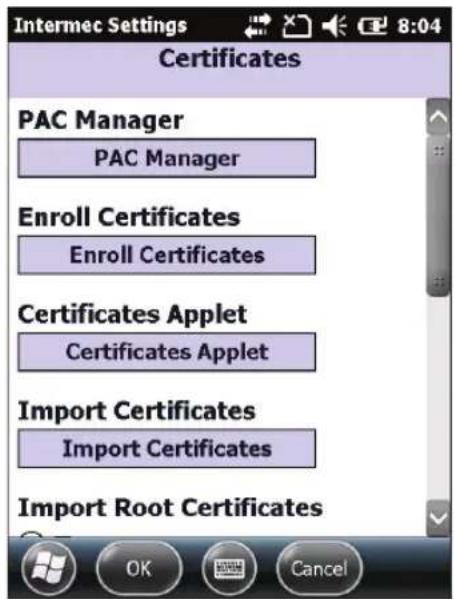
4 To import a certificate chain:
a Tap Import Certificates to install the selected certificate.
b In the CertImportUI screen, tap the <<< button next to the Select pfx to import text field.
c Select the root certificate from the list.
d Tap Import Certificate.
5 To import user and root certificates from a Microsoft IAS server:
a Tap Import Certificates.
Chapter 6 – Configure the Computer
b Tap Web Enrollment.
Enter the User, Password, and Server (IP address) to log into the server.
d Tap OK. A dialog box appears asking if you want to load the root certificate.
e Tap OK. The Enrollment Tool message box appears telling you that the certificate has been added.
f Tap OK to close the message box.
7
Manage the Computer
Use this chapter to learn how to remotely update, configure, and monitor your Intermec mobile computers. You will also find information on installing and developing software applications as well as how to upgrade the system software.
Manage the Computer in Your Network
When you have multiple mobile computers and peripherals in your network, it is essential to have an easy way to manage updates, configure all of the devices, and remotely troubleshoot problems. Intermec provides a free device management software platform called SmartSystems™ Foundation to help you manage your devices. You can also purchase third-party device management software through a vendor.
Manage the Computer Using SmartSystems Foundation
Intermec's SmartSystems Foundation is a software platform that lets you manage all of your SmartSystems-enabled devices simultaneously from a central server. The SmartSystems Foundation console displays all SmartSystems-enabled computers and peripherals in your network.
Intermec SmartSystems Foundation Console
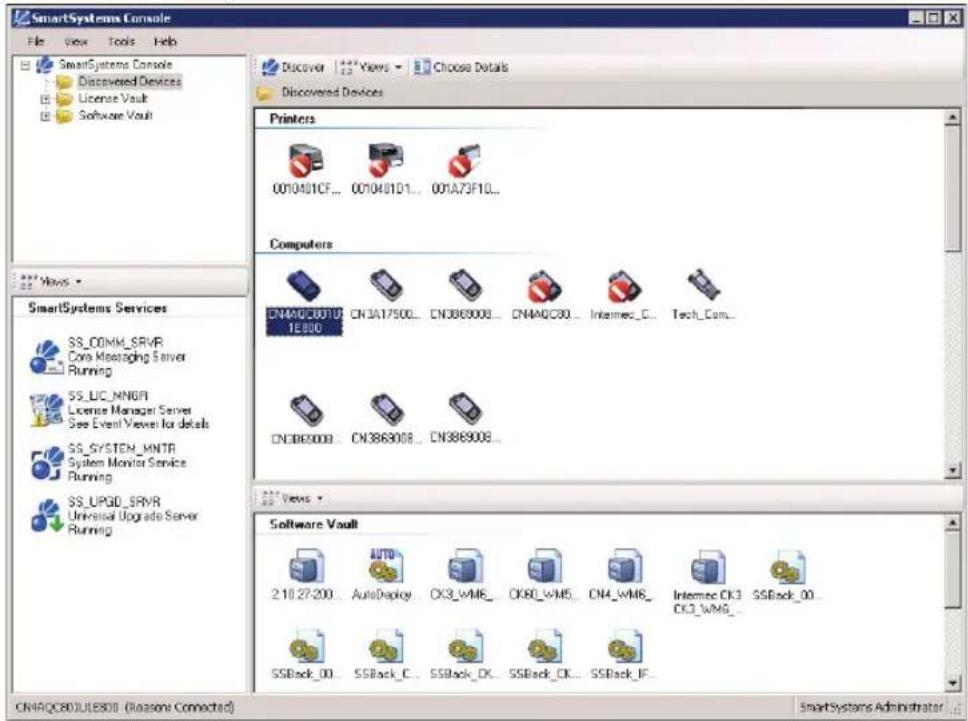
Through the console, you can:
- drag-and-drop configuration bundles, operating system updates, and firmware upgrades to multiple computers.
- save configuration settings from a single device and deploy those settings to many devices simultaneously.
- remotely change settings on SmartSystems-enabled computers and peripherals.
The SmartSystems Foundation console can report on asset locations and battery status, making it easier to manage your mobile devices.
With a Provisioning license, SmartSystems Foundation can automatically push software, configuration settings, and other files to connected mobile computers. The license also enables ScanNGo, which makes connecting additional mobile computers to your wireless network as easy as reading bar codes. You can download SmartSystems Foundation from the Intermec website at no charge. For more information, visit www.intermec.com/SmartSystems. To purchase a Provisioning license, contact your local Intermec sales representative.
Manage the Computer Using Third-Party Software
You can use third-party software such as Wavelink Avalanche to centrally manage your Intermec devices. Device management software enables you to update software, increase security, track your assets, and troubleshoot devices remotely. You can download the Wavelink Enabler for the mobile computer from the Wavelink website. For more information, visit the Intermec website and search for Wavelink Avalanche or visit www.wavelink.com to download the enabler.
Develop and Install Applications
Use the Intermec Resource Kits to develop applications to run on the mobile computer. The Resource Kits are a library of C++, .NET, Java, and web components grouped by functionality that you can use to create applications for the computer. The Resource Kits are part of the Intermec Developer Library (IDL), and can be downloaded from the Intermec website at www.intermec.com/idl.
For more information, see the Intermec Developer Library Resource Kit Developer Guide.
Package Your Application
For very simple applications, the executable file may be the only file you need to deploy. More typically, you will have a set of files to install.
Intermec recommends using .cab files to install your applications. The computer uses standard Windows Mobile .cab files and will install third-party .cab files.
Choose a Target Location
You can have your .cab file place your application in any of these memory locations on the mobile computer:
- The ObjectStore.
- The optional microSD card. Depending on available disk space, you may want to consider installing your application files on the microSD card. Using a card creates the Storage Card folder on the computer.
- The non-volatile Flash File Store. Applications and data in the Flash File Store will persist through a clean boot.
Note: The Flash File Store is erased if you reflash the operating system image.

Files copied to any of these locations are safe when you cold boot the computer as long as the AutoRun system is installed in the appropriate location. When AutoRun is installed on the computer, all .cab files in the CabFiles folder are automatically extracted after a cold boot. For more information about AutoRun, see the Intermec Developer Library Resource Kit Developer Guide.
Install Applications Using SmartSystems Foundation Console
You can use the SmartSystems console to drag-and-drop Intermec applications onto your mobile computer. The console is part of SmartSystems Foundation.
1 Download your application file from the Intermec website and unzip it on your desktop PC.
2 Double-click the application file to install it. The application file should appear in the Software Vault.
3 From the SmartSystems console in the Software Vault, drag-and-drop the application onto each mobile computer in your network, or drop the application on a group of computers contained in a folder.
Install Applications Using Microsoft ActiveSync
When you only have a few computers to update with applications, you can copy files using Microsoft ActiveSync. This procedure assumes that Microsoft ActiveSync is installed on your PC and is up and running.
1 Connect to the mobile computer via ActiveSync.
2 Copy the .cab files from your development PC to the computer.
3 Reboot or cold boot the computer.
4 After the boot process is finished, browse to the .cab files and tap the files to install them.
Install Applications Using a Storage Card
Use a storage card to install applications on one computer at a time or if you have no network connection.
1 Copy your application file to the storage card.
2 Install the storage card in the mobile computer.
3 On the mobile computer, browse to the Storage Card folder and run your application.
Launch Applications Automatically
There are two ways to launch an application automatically on a cold boot:
- Set up your .cab file to place a shortcut to the application in the \Windows\StartUp directory at install time.
- Use AutoRun.exe to start your application at boot time. AutoRun ships on the computer and automates other operations.
Chapter 7 – Manage the Computer
At boot time, AutoRun executes any commands found in its data file, Autouser.dat. For more information on how to use the AutoRun.exe feature, view the Readme.txt file located in the My Device\Flash File Store\2577 directory on your computer.
Update the System Software
The mobile computer uses SmartSystems bundles to update the operating system (OS) and the system software.
You can use these methods to update your mobile computer:
- You can update individual computers, or multiple computers at the same time using the SmartSystems console. For help, see the next section, “Update Individual or Multiple Computers Using the SmartSystems Console”.
- You can update individual computers using a microSD card.
Update Individual or Multiple Computers Using the SmartSystems Console
You can use the SmartSystems console to update the operating system or system software on your mobile computer. The console is part of SmartSystems Foundation and is available from the Intermec website. Before you can update your mobile computer, you need:
- SmartSystems Foundation. To download SmartSystems Foundation, go to www.intermec.com/SmartSystems and click the Downloads tab.
- the SmartSystems bundles you want to install. These SmartSystems bundles are available from the Intermec website at www.intermec.com. Go to Support > Downloads > OS/Firmware/Drivers list.
After you have located these items, you can update your mobile computer using SmartSystems Foundation.
1 Open the SmartSystems console.
2 Make sure the mobile computer is discovered.
3 Make sure the mobile computer is in a powered dock or that power management is disabled.
4 Download the SmartSystems bundle to your PC.
5 Double-click the SmartSystems bundle on your PC to extract the update files to the software vault.
6 From the SmartSystems console, locate the bundle to install and drag them to each mobile computer (or group in a folder) you want to update. The SmartSystems console installs the update on your mobile computers.
After the download is complete, your mobile computer begins the update process and automatically performs a cold boot. The computer then boots into a special Update Loader mode where the computer has no network connections and is completely unusable. This process can take anywhere from 30 seconds to 15 minutes depending on the update.
After the update is complete, the computer boots again.

Note: The SmartSystems console indicates that your mobile computer is offline, by displaying a red stop symbol, until the computer reboots and reconnects to the system.
Update Individual Mobile Computers Using a microSD Card
You can transfer upgrade bundles from your desktop PC to your mobile computer using a storage card. Before you can update your mobile computer, you need:
- the SmartSystems bundles you want to install. These SmartSystems bundles are available from the Intermec website at www.intermec.com. Go to Support > Downloads > OS/Firmware/Drivers list.
- a microSD card formatted to FAT or FAT32.
After you have located these items, you can update your mobile computer using a storage card.
1 Download the SmartSystems bundle to your PC and note the download location.
2 On your desktop PC, navigate to the download location and select the folder with the correct firmware version. For example, umts_wwe or umts_tp.
Chapter 7 – Manage the Computer
3 Transfer the autoflash.img file into the root directory of the microSD card.
4 Turn off your mobile computer and install the microSD card in your mobile computer. For help, see "Insert a MicroSD Card" on page 29.
5 Turn on your mobile computer.
The update process begins. Your mobile computer may restart several times during this process. When the update is complete, the Autoflash Complete message appears.
6 Remove the microSD card.

Note: If you do not remove the storage card, the update process repeats each time the computer reboots.
7 Reboot your mobile computer and follow the setup process.
8
Troubleshoot and Maintain the Computer
If you encounter any problems while using the 70 Series computer, look in this chapter to find a possible solution. You will also find information on routine maintenance.
About the Intermec Dashboard
The Intermec Dashboard is designed to provide proactive monitoring of your mobile computers to prevent downtime. You can easily see the health of the device and can help pinpoint the source of a problem to determine if it is hardware or software related.
Intermec Dashboard displays information such as the status of network connections, battery usage, storage space, and internal devices. It also provides system information such as the operating system, firmware, and hardware configuration.
- Press the Intermec Dashboard button ( ☐) on the computer keypad.
Intermec Dashboard Main Screen

Intermec Dashboard is highly integrated with SmartSystems Foundation. You can use SmartSystems Foundation to remotely monitor the health of your computers. For more information, refer to the SmartSystems online help.
Troubleshoot Your Mobile Computer
Use the troubleshooting tables in this section to fix problems with the Wi-Fi connection, 802.1x security, the imager, or general problems with operating the mobile computer.
If you send the computer in for service, it is your responsibility to save the computer data and configuration. Intermec is responsible only for ensuring that the hardware matches the original configuration when repairing or replacing the computer.
Troubleshoot the Wi-Fi Connection
Use this troubleshooting table to help solve problems with your 802.11 radio connection.
Problems With the Wi-Fi Connection
| Problem Solution | |
| When you turn on the computer after it was suspended for a while (10 to 15 minutes or longer), it can no longer send or receive messages over the network. | Host may have deactivated or lost current terminal emulation session. In a TCP/IP direct connect network, turn off the “Keep Alive” message from host to maintain the TCP session while the computer is suspended. |
| The computer is connected to the network and you move to a new site to collect data. Your computer now shows you are not connected to the network. | Move closer to an access point or to a different location to reestablish communications until you reconnect with the network. |
| The computer appears to be connected to the network, but you cannot establish a terminal emulation session with the host computer. | There may be a problem with the host computer, or with the connection between the access point and the host computer. Check with the network administrator to make sure the host is running and allowing users to log in to the system. |
| The computer appears to be connected to the network, but the host computer is not receiving any information from the 70 Series computer. | There may be a problem with the connection between the access point and the host computer. Check with the network administrator or use your access point user's manual. |
Problem Solution
A network connection icon appears in the toolbar, but then disappears.
The computer may not be communicating with the intended access point. Make sure the network name matches the access point network name. Default network name is “INTERMEC.”
The access point may not be communicating with the server. Ensure the access point is turned on, properly configured, and has 802.1x security enabled.
Troubleshoot 802.1x Security
Use the following table to troubleshoot problems with your 802.1x security that will prevent you from connecting to your network, such as an incorrect password.
Problems With 802.1x Security
Problem Solution
The computer indicates it is not authenticated.
Make sure that:
- the User Name and Password parameters on the computer must match the user name and password on authentication server. You may need to reenter the password on both the computer and authentication server.
- on your authentication server, the user and group are allowed and the group policy is allowed to log into the server. For help, see the documentation that shipped with your authentication server software.
- the IP address and secret key for access point must match the IP address and secret key on the authentication server. You may need to reenter the IP address and secret key on both your access point and authentication server.
- the authentication server software is running on the server PC.
You receive a message saying “The server certificate has expired or your system date is incorrect” after you perform a clean boot on the computer.
Date and time are not saved when you perform a clean boot. Reenter the date and time, and then save your changes.
Check 802.11 Network Status
If you have trouble connecting to your 802.11 wireless network:
- Make sure you have correctly set network parameters on the computer.
- Check your wireless security settings.
Follow the next procedure to verify available access points and networks, check signal strength, and view other diagnostics. If you need to contact Intermec Product Support, this information can be helpful in troubleshooting wireless network connection issues.
1 Tap Start > iSpyWiFi. The ISpyWiFi application launches.
The ISpyWiFi tab shows:
- MAC address and IP address of the 802.11 radio.
- network association status, including the SSID and MAC address of the access point.
- security configuration.
• radio transmit power and signal strength information.
2 Tap the Scan tab to view a list of available 802.11 networks. The list includes the signal strength, channel, and MAC address for each network.
• Tap Scan to refresh the screen.
3 Tap the Supp tab to view radio supplicant information, including a list of supplicant events and authentication status.
- To verify the settings for the currently active security profile, tap Configure Profile. Intermec Settings launches for you to configure 802.11 Radio settings.
• To try reconnecting to the network, tap Reconnect.
• To delete the events in the list, tap Clear Events.
4 Tap the Ping tab to run a ping test to the host.
a In the Host field, enter the IP address of the host.
b From the Repetitions list, choose the number of times the computer will ping the host.
Chapter 8 – Troubleshoot and Maintain the Computer
c Tap Ping. The graph shows the amount of time it takes for the host to return the ping. Tap List to see this information in a list format.
5 Tap the RSSI tab to view the received signal strength of the host signal.
The information box includes the current signal strength, host SSID name, MAC address, data rate, and transmit power.
- Tap Mark to place an arrow marker above the graph.
6 Tap the Conf tab to set up a log file that lists RSSI history.
This screen includes the 802.11 radio driver version and available radio modes.
a Check the Log to File check box.
b (Optional) Change the sample period and number of samples displayed.
c Tap Log File. The Save As screen appears.
d (Optional) Change the name of the saved log file, the folder to which the file will be saved, the content type (log or text), and the location.
e Tap OK.
Troubleshoot Reading Bar Codes
Use this section to troubleshoot problems that may prevent you from being able to read a bar code, such as the symbology not being enabled.
Problems Reading Bar Codes
Problem Solution
You cannot see the illumination beam or frame from the imager when you press the Scan button and aim the imager at a bar code label.
- You may be too far away from the bar code label. Try moving closer to the bar code label and scan it again.
- You may be reading the bar code label “straight on.” Change the reading angle and try again.
- The imager hardware trigger might be disabled in Intermec Settings. To check the setting go to Start > Settings > Systems > Data Collection > Scanner Settings. Hardware trigger should be checked.
| Problem Solution | |
| When you release a Scan button or handle trigger, the Good Read light does not turn off. | The Good Read light will remain on if you configure the computer to use continuous/edge triggering. If you configure the computer for level triggering and the Good Read light remains on, there may be a problem. Press one of the Scan buttons or pull the trigger again without scanning a bar code label. If the light is still on, contact your local Intermec representative. |
| The scanner will not read the bar code label. | Aim the scanner beam to cross the entire bar code label in one pass. Vary the scanning angle.Check the quality of the bar code label. Scan a bar code label that you know will scan. Compare the two bar code labels to see if the bar code quality is too low. You may need to replace the label that you cannot scan.Make sure the bar code symbology is enabled and configured correctly. Use Intermec Settings to check the symbologies. Expand Data Collection > Symbologies beneath devices listed (scanner, virtual wedge) to check and enable symbologies, then scan the bar code label again.Make sure the computer application is expecting input from a bar code. You may need to type this information instead.The scanner may not be turned on or the scanner may be unable to scan a specific bar code. Run the ScanDiagnostic application to help you troubleshoot the problem. For more information, see |
| The scanner does not read the bar code labels quickly, or the scanning beam seems to be faint or obscured. | The scanner window may be dirty. Clean the window with a solution of ammonia and water. Wipe dry. Do not allow abrasive material to touch the window. |
| You scan a valid bar code label to enter data for your application. The data decoded by the scan module does not match the data encoded in the bar code label. | The computer may have decoded the bar code label in a symbology other than the label's actual symbology. Try scanning the bar code label again. Make sure you scan the entire label. |
| The input device attached to the computer does not work well or read bar code labels very quickly. | Set the Scanner Model command to the specific attached input device. Check enabled bar code symbologies and enable only the symbologies being used. |
Use ScanDiagnostic to Troubleshoot the Scanner
Use the ScanDiagnostic application to troubleshoot problems such as the inability to read a bar code or a scanner that does not turn on.
1 From the Home menu, tap Start > ScanDiagnostic.
2 From the Scan Health screen, select the scanner you want to troubleshoot and then tap Diagnose.
The application checks to make sure the scanner is enabled and checks settings to make sure they are optimized.
3 From the Scan Test screen, press and hold the Press to Scan button while aiming at the bar code you want to read.
After the computer scans the bar code, it beeps and the label data, data length, and symbology appear on the screen.
4 Press the right arrow button to view any recommended settings.
5 To accept the recommended settings, tap Apply.
6 Tap OK to exit.
Troubleshoot Operating the Computer
Use this section to troubleshoot problems that may prevent you from being able to operate the computer.
Problems Operating the Computer
Problem Solution
You press the Power button and nothing happens.
Try the following solutions:
- Replace or charge the battery. The battery may be completely drained.
- Remove the battery and press the Reset button to perform a cold boot. For help, see “Cold Boot the Computer” on page 115.
| Problem Solution | |
| The computer appears to be locked up and you cannot enter data. | Press thePowerbutton and selectSuspendfrom the Power Options menu. Press thePowerbutton to turn the screen back on.Press thePowerbutton and selectRebootfrom the Power Options menu.Remove the battery and press theResetbutton to perform a cold boot. For help, see “Cold Boot the Computer” on page 115.Try reloading the firmware. For help, see “Update the System Software” on page 102.If the computer does not boot or reset, contact your Intermec representative for help. |
| The accelerometer does not appear to be accurate. | You may need to calibrate the accelerometer using the Sensor Calibration application. TapStart > Settings > System > Sensor Calibration. Rotate the computer to calibrate all six orientations. |
| You tap the screen and nothing happens. | Align your screen. For help, see “Align the Screen” on page 43. |
| You cannot type a character on the keypad or you can only type uppercase or lowercase letters. | You may have locked a modifier key on the keypad. Press the necessary key sequence to unlock the key. For help, see “About the Keypad” on page 15. |
Call Product Support
If you cannot find the answer to your problem in the “Troubleshooting the Computer” section, you can visit the Intermec technical knowledge base (Knowledge Central) at intermec.custhelp.com to review technical information or to request technical support. If you still need help after visiting Knowledge Central, you may need to call Product Support.
To talk to an Intermec Product Support representative, call:
1-800-755-5505
Before you can call Intermec Product Support, make sure you have the following information ready:
- Configuration number
- Serial number
- Operating system version
- If you are using security, know the type (Funk or Microsoft) and the full set of parameters
• Power management settings - If you are using Intermec Terminal Emulator (ITE), know the version and protocol. If you are not using ITE, know the language your custom application was written in and the tools you used to create it.
You can find most of the information listed above in Intermec Settings. Consult your application developer for information on your custom application.
Find Your Configuration Number
Use the following procedure to help you find the configuration number of your computer.
- Look at the label on the back of the computer.
Find Your Operating System Version
Use the following procedure to find the OS version of your mobile computer.
1 Press the Intermec Dashboard (☐) button to launch the Dashboard.
2 Tap the Information bar. The Information Details page appears and displays information such as the firmware version and the OS version.
Reset the Computer
If the computer does not resume after pressing the Power button, or if the computer or an application locks up, you may need to reset the computer. The computer uses the configuration currently saved in flash memory during the boot process. There are three ways to reset the computer:
- Reboot
- Cold boot
- Clean boot
Reboot the Computer
You may need to reboot the computer to correct conditions where an application stops responding to the system.
- Press the Power button and select Reboot from the menu.
The computer systematically shuts down, restarts, and goes through the initialization process.
Cold Boot the Computer
In some cases where the computer completely stops responding, it may be necessary to perform a cold boot or hard reset. Because cold booting may result in data loss, use this method only if all other recovery methods have failed.
Chapter 8 – Troubleshoot and Maintain the Computer

Note: Cold booting the computer does not guarantee that cached disk data will be saved, so transactional data may be lost during the reset. All other data, such as configuration and network settings, is preserved.
1 Press the Power button to suspend the computer.
2 Remove the handstrap and the battery pack.
3 Press the Reset button in the battery compartment on the back of the computer.
4 Replace the battery and the handstrap.
5 Press Power and wait while the mobile computer boots. When the cold boot is complete, the Home screen appears.
Location of CN70/CN70e Reset Button

Location of CK70/CK71 Reset Button

Clean Boot the Computer

A clean boot erases the memory in the mobile computer, including all applications and data files, with the exception of those found in the Flash File Store, or any removable storage.
If the computer seems to be locked up, try cold booting it. If this process does not work, use a clean boot to get the computer up and running for further troubleshooting.
You can perform a clean boot using the mobile computer.
1 Remove the battery pack from the back of the computer.
2 With a stylus, press the Reset button in the battery cavity.
3 Insert the battery back into the computer, and immediately press and hold the Power button and Volume Down button (the lower button on the right side).
4 Continue to hold the Power button and the Volume Down button down until you are prompted to release them.
5 Press the Volume Up button on the right side to start the clean boot.
6 Wait for the computer to load files from its ROM.
You can also perform a clean boot using the SmartSystems Console.
- Right-click the 70 Series computer and select Intermec Power Tools > Clean Boot Device.
Clean the Computer
To keep the computer in good working order, you may need to clean the imager window, color camera window, and the touch screen. Clean the windows and the touch screen as often as needed for the environment in which you are using the computer. To clean the computer, use a solution of ammonia and water.

There are no user-serviceable parts inside the 70 Series computer. Opening the computer will void the warranty and may cause damage to the internal components.
Chapter 8 – Troubleshoot and Maintain the Computer
1 Press the Power button and choose to suspend the computer.
2 Dip a clean cloth towel in the ammonia solution and wring out the excess.
3 Wipe off the imager window, camera lens, and flash area. Do not allow any abrasive material to touch these surfaces.
4 Wipe dry.
A
Specifications and Default Settings
Physical and Environmental Specifications
CN70 Physical Dimensions
Dimensions 16.9 x 8.0 x 3.4 cm (6.66 x 3.14 x 1.35 in)
Weight 450 g (15.2 oz) with battery
CN70e Physical Dimensions
Dimensions 19.5 x 8.0 x 3.4 cm (7.66 x 3.14 x 1.35 in)
Weight 491 g (16.6 oz) with battery
CK70 Physical Dimensions
Dimensions 23.7 x 8.0 x 4.3 cm (9.33 x 3.16 x 1.69 in)
Weight 562 g (19 oz) with battery
CK71 Physical Dimensions
Dimensions 23.7 x 8.0 x 5.0 cm (9.33 x 3.16 x 1.98 in)
Weight 584 g (19.75 oz) with battery
Environmental Specifications
Operating temperature -20 °C to 60 °C (-4 °F to 140 °F)
Storage temperature -30 °C to 70 °C (-22 °F to 158 °F)
Charging temperature 5 °C to 35 °C (41 °F to 95 °F)
Relative humidity (operating) 5% to 95% non-condensing
Environmental rating IP67 compliant
Drop Specifications All corners and sides from 1.8 m (6 ft) per MIL-STD 810F
Power and Electrical Specifications
Battery type Rechargeable Lithium-ion (Li-ion) battery
Battery capacity
CN70/CN70e: 3.7 V, 4000 mAh (14.8 Wh)
CK70/CK71: 3.7 V, 5200 mAh (19.2 Wh)
Electrical rating 4.37 / 4.8V;2 / 1,5A
70 Series Non-Incendive Computer Specifications
The 70 Series mobile computers with non-incendive (NI) certification comply with the following specifications for North America and Canada regions only.
Location Suitable for use in Division 2 locations
Safety cULus Listing - ISA/ANSI 12.12.01
Gases Class I - Groups A, B, C, D
Dusts Class II - Groups F, G
Fibers and Flyings Class III
Maximum Ambient Temperature T6 rating with a maximum temperature of 50 °C
Operating System
Microsoft Windows Embedded Handheld.
Hardware
Main processor options TI OMAP3, 1 GHz TI OMAP3, 600 MHz
Memory 512 MB RAM
Persistent storage 1 GB Flash
Removable storage up to 32 GB user-accessible microSD card slot
Keypad
CN70: QWERTY, Numeric
CN70e: QWERTY Numeric, Numeric,
Calculator-style
CK70: Large Alpha, Alphanumeric
CK71: Numeric Function, Alphanumeric
Imaging options 5 megapixel color camera and EA30 area imager (all), EV12 (CK71 only), or EX25 (CK71 only)
Back Accessory Interface Pin-outs
The back accessory interface provides power for peripheral devices out the back of the CK70 and CK71 computers.
Pin Pin Name I/O Description
| 1 OTB_PWR Output Power supply for peripheral | |
| 2 GND | |
| 3 OTB_RX Input DTE Data Receive | |
| 4 OTB_TX Output DTE Data Transmit | |
| 5 OTB_I/O_Voltage Input I/O Voltage Level | |
| 6 OTB_ID BiDir | One Wire Bus for ID |
| 7 OTB_RTS | Output DTE Ready do Send |
| 8 OTB_CTS | Input DTE Clear to Send |
Touch Screen Specifications
Transmissive VGA display with high-durability touch screen; 480 x 640 pixels; 8.9 cm (3.5 in) diagonal active area; LED backlight and ambient light sensor.
Standard Communications
• UMTS (not available on CK71)
• CDMA (not available on CK71)
- Flexible Network Radio (not available on CK71)
• GPS (not available on CK71)
• 802.11a/b/g/n
- Bluetooth
- USB Full Speed V2.0 Host
- USB Full Speed V2.0 Client
Wireless LAN
Standards compliant IEEE 802.11a/b/g/n (2.4 GHz and 5 GHz), Single Stream
Data rates up to 72Mbps
Security 802.11i, WPA, WPA2, 802.1x (EAP-TLS, TTLS, , PEAP, EAP-FAST), WEP
Certifications WPA2™ (Enterprise, Personal), WPA™ (Enterprise, Personal), Wi-Fi, WMM®, WMM Power Save, Cisco Compatible Extensions (CCX 4.0)
Regulatory Approvals
FCC, CE, cULus Listed, DEMKO
Bar Code Symbologies
The imagers support all of the bar code symbologies listed in the next table.
Supported Bar Code Symbologies
| AustraliaPost* GS1 DataBar Omni-Directional | |
| Aztec* Infomail* | |
| BPO* Interleaved 2 of 5 | |
| Canada Post* Japan Post* | |
| China Post* KoreanPost* | |
| Codabar Matrix 2 of 5 | |
| Codablock A* Maxicode* | |
| Codablock F* Micro PDF417* | |
| Code 11 MSI | |
| Code 39 PDF417* | |
| Code 93 Planet* | |
| Code 128/GS1-128 | Plessey |
| DataMatrix* | Postnet* |
| Dutch Post* | QR Code* |
| EAN/UPC | Standard 2 of 5 |
| GS1 Composite | SwedenPost* |
| GS1 DataBar Expanded | Telepen |
GS1 DataBar Limited TLC 39*
* These symbologies are not supported with the EV12 imager in the CK71.
Imager Reading Distances
Typical reading distances are done in an office environment using office lights (4 lux). Minimum distances are measured in the dark (0 lux). Both reading distances are provided in respective scan engine integration guides. Contact your local Intermec representative for more information.
Below are the typical and minimum standard reading distances for the 70 Series computer built with an EA30 imager. Also included are typical and minimum standard reading distances for the CK71 with an EV12 or EX25 imager.
Note: Minimum distances depend on the length of the bar code.

EA30 Area Imager Minimum Reading Distances
Minimum distances are measured in the dark (0 lux).
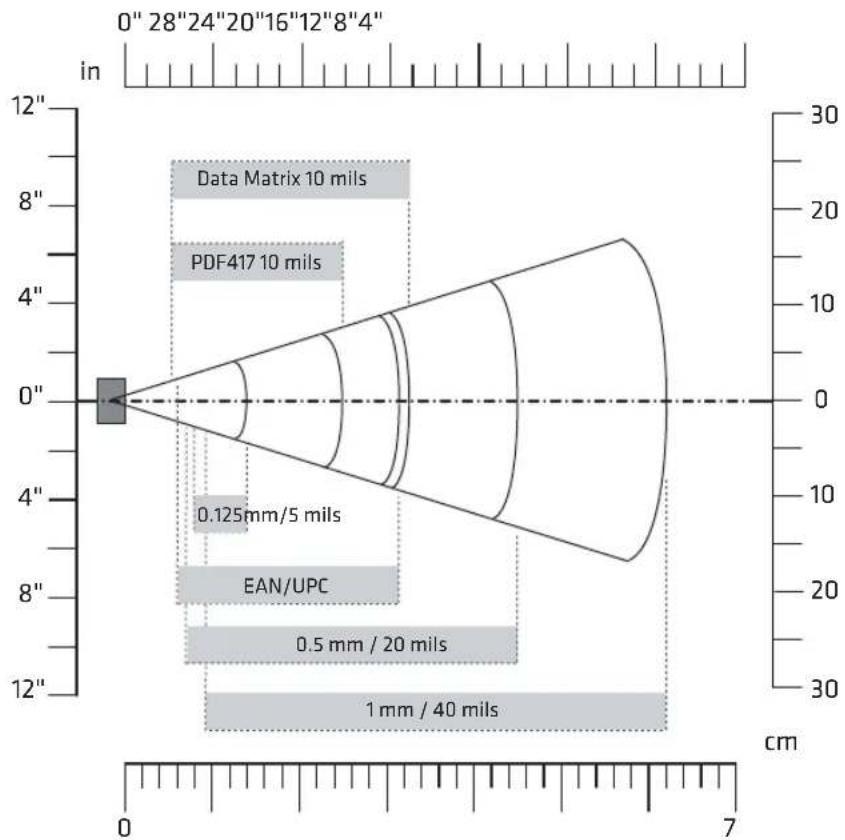
other
| Parameter | Value | | ------------------- | ------------ | | Data Matrix | 10 mils | | PDF417 | 10 mils | | EAN/UPC | 0.125mm/5 mils | | 0.5 mm / 20 mils | 0.5 mm / 20 mils | | 1 mm / 40 mils | 1 mm / 40 mils |EA30 Minimum Reading Distances
| Symbology | Density | Minimum Distance | Maximum Distance |
| Code 39 0.1 mm (4 mils) | 9.5 cm (3.74 in) | 10.5 cm (4.13 in) | |
| 0.1250 mm (5 mils) | 8 cm (3.15 in) | ||
| 0.5 mm (20 mils) | 7 cm (2.76 in) | ||
| 1 mm (40 mils) | 9.5 cm (3.74 in) | ||
| UPC/EAN 100% | 0.33 mm (13.0 mils) | 6 cm (2.36 in) | 31.5 cm (12.4 in) |
| Data Matrix | 0.18 mm (7 mils) | 8 cm (3.15 in) | 15.5 cm (6.1 in) |
| 0.25 mm (10 mils) | 6.5 cm (2.56 in) | 21.5 cm (8.46 in) | |
| 0.38 mm (15 mils) | 5.5 cm (2.17 in) | 31.5 cm (12.4 in) | |
| PDF417 0.25 mm (10 mils) | 5.5 cm (2.17 in) | 25 cm (9.84 in) | |
| 038 mm (15 mils) | 7 cm (2.76 in) | ||
70 Series Mobile Computer User Manual 125
EA30 Area Imager Typical Reading Distances
Typical distances are measured in an office environment (250 lux).

other
| Component | Value | | ----------------- | ----------- | | Data Matrix | 10 mils | | PDF417 | 10 mils | | EAN/UPC | 5 mils | | 0.5 mm / 20 mils | 20 mils | | 1 mm / 40 mils | 40 mils |EA30 Typical Reading Distances
| Symbology | Density | Minimum Distance | Maximum Distance |
| Code 39 | 0.1 mm (4 mils) | 9.5 cm (3.74 in) | 11.5 cm (4.53 in) |
| 0.125 mm (5 mils) | 8 cm (3.15 in) | 14.5 cm (5.71 in) | |
| 0.5 mm (20 mils) | 6.5 cm (2.56 in) | 50 cm (19.69 in) | |
| 1 mm (40 mils) | 9.5 cm (3.74 in) | 75 cm (29.53 in) | |
| UPC/EAN 100% | 0.33 mm (13.0 mils) | 6 cm (2.36 in) | 34 cm (13.39 in) |
| Data Matrix | 0.18 mm (7 mils) | 7.5 cm (2.95 in) | 16.5 cm (6.5 in) |
| 0.25 mm (10 mils) | 6 cm (2.36 in) | 23 cm (9.06 in) | |
| 0.38 mm (15 mils) | 5.5 cm (2.17 in) | 34.5 cm (13.58 in) | |
| PDF417 | 0.25 mm (10 mils) | 5.5 cm (2.17 in) | 26 cm (10.24 in) |
| 0.38 mm (15 mils) | 6.5 cm (2.56 in) | 37 cm (14.57 in) |
126 70 Series Mobile Computer User Manual
EV12 Linear Imager Minimum Reading Distances
The illustration below does not include the 0.12 cm (0.05 in) setback for the CK71. Minimum reading distances are measured in the dark (0 lux).
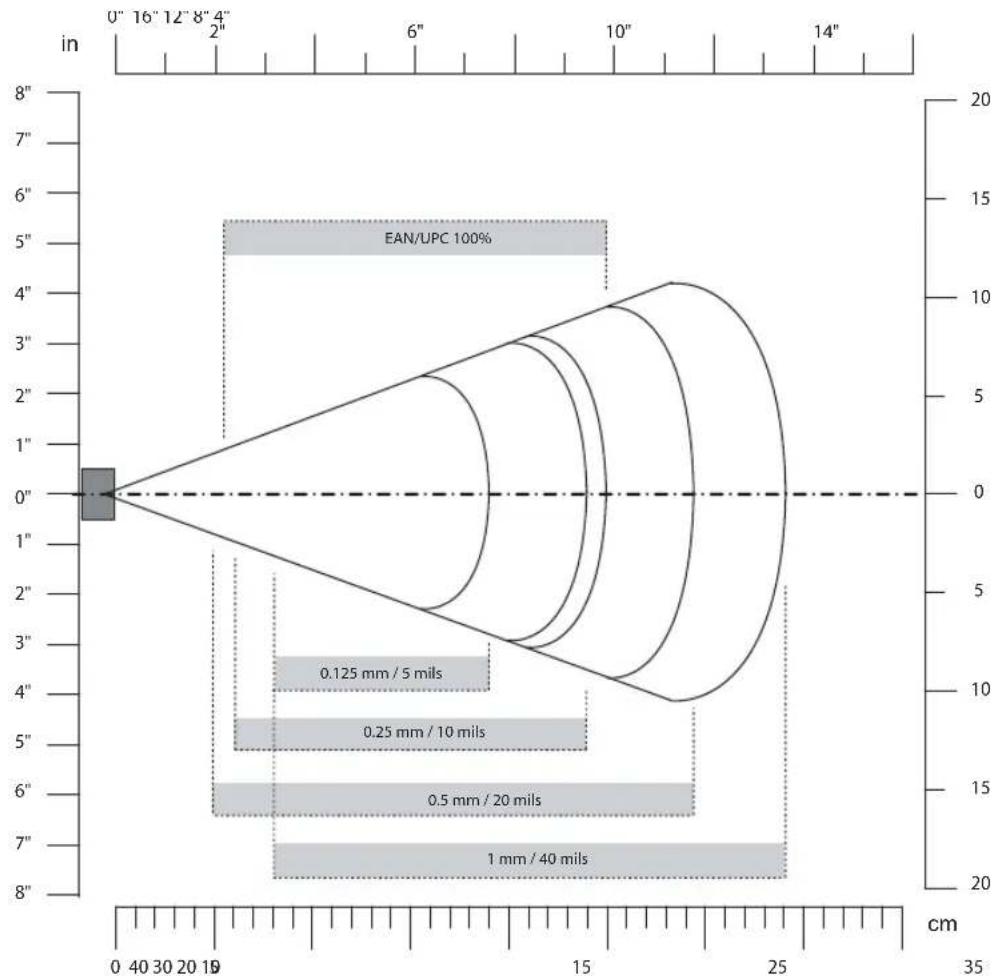
other
| Angle (°) | Distance (mils) | | --------- | --------------- | | 0 | 0.125 | | 1 | 0.25 | | 2 | 0.5 | | 3 | 1 | | 4 | 2 | | 5 | 3 | | 6 | 4 | | 7 | 5 | | 8 | 6 |EV12 Minimum Reading Distances With 0.12 cm (0.05 in) Setback
| Symbology | Density | Minimum Distance | Maximum Distance |
| Code 39 0.15 mm (6 mils) | 9.6 cm (3.8 in) | 17.9 cm (7.1 in) | |
| 0.25 mm (10 mils) | 7.1 cm (2.9 in) | ||
| 0.5 mm (20 mils) | 6.1 cm (2.5 in) | ||
| 1 mm (40 mils) | 8.1 cm (3.2 in) | ||
| EAN/UPC | 0.33 mm (13 mils) | 6.1 cm (2.5 in) | 22.9 cm (9.1 in) |
EV12 Linear Imager Typical Reading Distances
The illustration below does not include the 0.12 cm (0.05 in) setback for the CK71. Typical reading distances are measured in an office environment (200 lux).

line
| Depth (mils) | Value | | ------------ | ----- | | 0.125 | 5 | | 0.25 | 10 | | 0.5 | 20 | | 1 | 40 |EV12 Typical Reading Distances With 0.12 cm (0.05 in) Setback
| Symbology | Density | Minimum Distance | Maximum Distance |
| Code 39 0.15 mm (6 mils) | 9.6 cm (3.8 in) | 19.9 cm (7.9 in) | |
| 0.25 mm (10 mils) | 6.1 cm (2.5 in) | ||
| 0.5 mm (20 mils) | 5.1 cm (2.1 in) | ||
| 1 mm (40 mils) | 7.1 cm (2.9 in)** | ||
| EAN/UPC | 0.33 mm (13 mils) | 5.1 cm (2.1 in) | 27.9 cm (11.0 in) |
** Minimum distance depends on bar code width and scan angle.
EX25 Near-Far Range Imager Minimum Reading Distance
Minimum reading distances are measured in the dark (0 lux). The following graphic does not include the 0.24 cm (0.09 in) setback for the CK71.
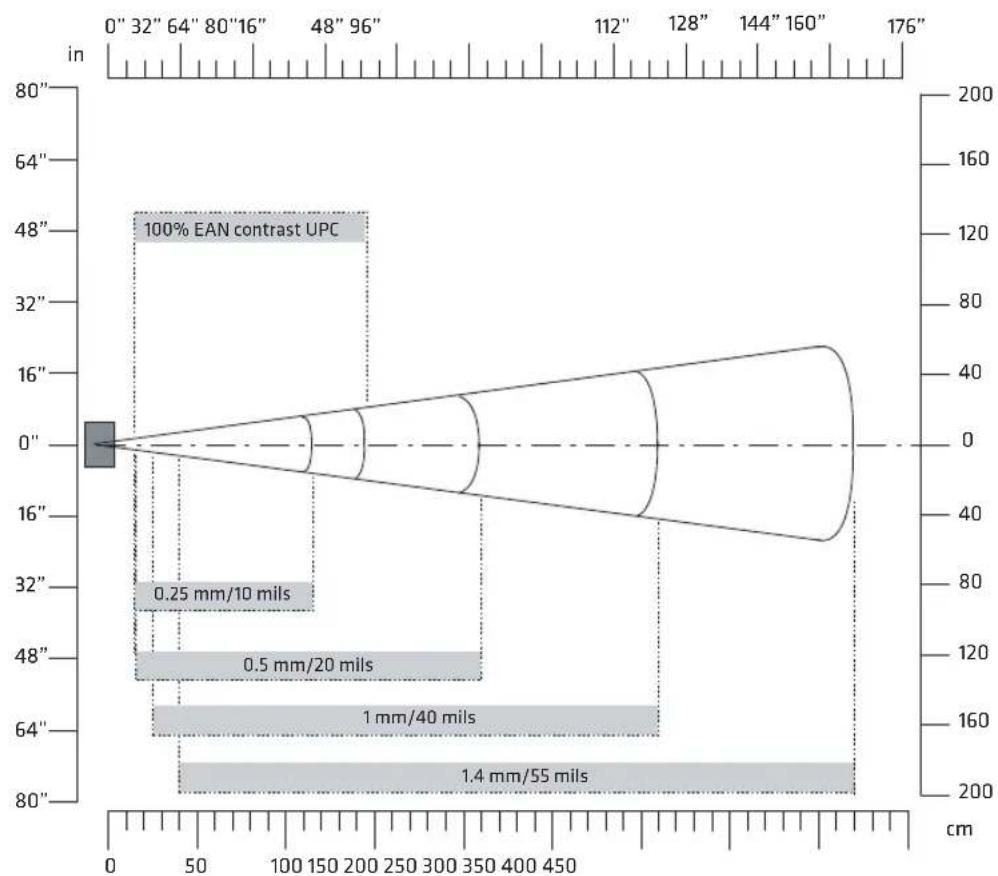
other
| Dimension | Value | | ----------------- | ------------ | | 0' | 0 | | 32" | 0 | | 64" | 0 | | 80" | 0 | | 96" | 0 | | 112" | 0 | | 128" | 0 | | 144" | 0 | | 160" | 0 | | 176" | 0 | | 0.25 mm/10 mils | 0 | | 0.5 mm/20 mils | 0 | | 1 mm/40 mils | 0 | | 1.4 mm/55 mils | 0 |EX25 Minimum Reading Distances With 0.24 cm (0.09 in) Setback
| Symbology | Density | Minimum Distance | Maximum Distance |
| Code 39 | 0.08 mm (3 mils) | 15 cm (5.91 in) | 35 cm (13.78 in) |
| 0.1 mm (2.8 mils) | 15 cm (5.91 in) | 45 cm (17.72 in) | |
| 0.25 mm (10 mils) | 15 cm (5.91 in) | 115 cm (45.28 in) | |
| 0.5 mm (20 mils) | 16 cm (6.30 in) | 210 cm (82.68 in) | |
| 1 mm (40 mils) | 25 cm (9.84 in) | 310 cm (122.05 in) | |
| 1.3 mm (51 mils) | 40 cm (15.75 in) | 310 cm (122.05 in) | |
| EAN 100% | 0.33 mm (13 mils) | 15 cm (5.91 in) | 145 cm (57.09 in) |
EX25 Near-Far Range Imager Typical Reading Distance
Typical reading distances are measured in an office environment (200 lux). The following graphics do not include the 0.24 cm (0.09 in) setback for the CK71.
EX25 Near-Far Range Imager 1D Typical Reading Distances

other
| Distance (m) | Height (m) | | ------------ | ---------- | | 0.25 mm | 10 | | 0.5 mm/20 | 20 | | 1 | 40 | | 2.5 mm/100 | 100 |EX25 1D Symbologies Typical Reading Distances With 0.24 cm (0.09 in) Setback
| Symbology | Density | Minimum Distance | Maximum Distance |
| Code 39 0.25 mm (10 mils) | 15 cm (5.91 in) | 135 cm (53.15 in) | |
| 0.5 mm (20 mils) | 16 cm (6.30 in) | 280 cm (110.24 in) | |
| 1 mm (40 mils) | 25 cm (9.84 in) | 550 cm (216.54 in) | |
| 1.4 mm (55 mils) | 40 cm (15.75 in) | 720 cm (283.46 in) | |
| 2.5 mm (100 mils) | ** | 1200 cm (472.44 in) | |
| Code 128 retro-reflective | 2.5 mm (100 mils) ** 1300 cm (511.81 in) | ||
| EAN 100% 0.33 mm (13 mils) 15 cm (5.91 in) 160 cm (62.99 in) | |||
** Minimum distance depends on bar code width and scan angle.
EX25 Near-Far Range Imager 2D Typical Reading Distances

other
| Depth (mm) | Value | | ---------- | ----- | | 0.25 | 10 | | 0.76 | 30 | | 1.4 | 55 | | 2.5 | 100 |EX25 2D Symbologies Typical Reading Distances With 0.24 cm (0.09 in) Setback
| Symbology | Density | Minimum Distance | Maximum Distance |
| DataMatrix 0.25 mm (10 mils) | 15 cm (5.91 in) | 90 cm (35.43 in) | |
| 0.76 mm (30 mils) | 25 cm (9.84 in) | ||
| 1.4 mm (55 mils) | ** | ||
| 2.5 mm (100 mils) | ** | ||
| 7.5 mm (300 mils) | 20 cm (7.87 in) | ||
** Minimum distance depends on bar code width and scan angle.
Default Configuration
The following tables list the default values of the configuration settings supported on the mobile computer. If you restore the mobile computer to factory default settings, the mobile computer uses these values.
The settings are grouped by function and reflect the organization of Intermec Settings. Not all of the configuration settings are listed in this appendix. For detailed information on most of the settings, see the Intermec Settings Command Reference Manual.
Data Collection Settings
Use data collection settings to configure the imager and to configure the bar codes that you want the imager to be able to read.
Data Collection Settings
| Data Collection Setting Default Value |
| Enable Scanner/Camera Port On |
| BT-Configure On Connect Overwrite with computer settings |
| Enable Magstripe Reader Disable |
Symbology Settings
| Symbology Default Value |
| AustraliaPost Disable |
| Symbology | Default Value |
| Aztec Disable | |
| BPO Disable | |
| CanadaPost Disable | |
| Codabar Disable | |
| Codablock A Disable | |
| Codablock F Disable | |
| Code 11 Disable | |
| Code 39 Enable | |
| Code 93 Disable | |
| Code 128/GS1-128 Enable | |
| DataMatrix Enable | |
| DutchPost Disable | |
| EAN/UPC Enable UPC A, UPC E, EAN | 8, EAN 13 |
| GS1 Composite Disable | |
| GS1 DataBar Expanded Disable | |
| GS1 DataBar Limited Disable | |
| GS1 DataBar Omni-Directional | Disable |
| Infomail | Disable |
| Intelligent Mail | Disable |
| Interleaved 2 of 5 | Disable |
| JapanPost | Disable |
| Matrix 2 of 5 | Disable |
| Maxicode | Disable |
| Micro PDF417 | Disable |
| MSI | Disable |
| PDF417 Enable | |
| Planet | Disable |
| Plessey | Disable |
| Postnet | Disable |
| QR Code | Disable |
| Standard 2 of 5 | Disable |
| SwedenPost Disable | |
| Telepen Disable | |
| TLC 39 Disable |
Symbology Option Settings
| Symbology Option Settings Default Value |
| Preamble None (Disabled) |
| Postamble None (Disabled) |
| Symbology Identifier Disable |
| Multicode Disable |
Scanner Settings
| Scanner Settings Default Value | |
| Trigger Predefined Modes Level | |
| Trigger Mode Level | |
| Aimer Mode Typical aimer | |
| Hardware Trigger Enable | |
| Trigger Timeout (sec) 2 | |
| Aiming Duration (msec) | 500 |
| Turn Off After Good Read | Enable/One-shot |
| Auto-Trigger delay (msec) | 0 |
Imager Settings
| Imager Settings | Default Value |
| Predefined Modes | 1D and 2D Standard |
| Image File Location | \My Documents\MDI |
| Signature Image Capture | Disable |
| Document Imaging | Disable |
| Image Capture | |
| Output Compression | Bitmap |
| Output Compression Quality | 0 |
| Edge Enhancement | None |
| Noise Reduction | 0 |
| Subsampling | None |
| Image Rotation | None |
| Image Lighting Correction | Disable |
Decode Security Settings
| Decode Security Settings Default Value |
| Consecutive Data Validation 0 |
| Identical Consecutive Timeout 300 ms |
| Different Consecutive Timeout 0 |
| Center Decoding Disable |
| Center Decoding Tolerance 0 |
Communications
Use communications settings to configure how the mobile computer communicates with the network.
Communications Settings
| Communications Setting Default Value | |
| Device Name | IntermecCXXX (where XXX indicates the model of mobile computer) |
802.11 Radio Settings
| 802.11 Radio Setting Default Value | |
| Security Choice Funk | |
| Allow Security Changes Enabled | |
| Active Profile Profile 1 | |
| DHCP | Enabled |
| Import Root Certificates | False |
| Import User Certificates | False |
Appendix A – Specifications and Default Settings
| 802.11 Radio Setting | Default Value |
| Import Pac Files False | |
| Radio Bands b/g (2.4 GHz) | |
| Radio Enabled Off |
Ethernet Adapter Settings
| Ethernet Adapter Setting Default Value |
| DHCP Enabled |
Bluetooth Settings
| Bluetooth Setting Default Value |
| Bluetooth Power Off |
WWAN Radio Settings
| WWAN Radio Setting Default Value |
| WWAN Radio Enabled Enabled |
Serial Port Switch
| Serial Port Switch Setting Default Value |
| Serial Port Switch Standard Docking and IrDA |
Device Settings
Use device settings to configure settings on the mobile computer.
Device Settings
| Device Setting Default Value | |
| Date | N/A |
| Time | N/A |
Good Read Settings
| Good Read Setting | Default Value |
| Internal Scanner Good Read Beep | One Beep |
| Tethered Scanner One Beep | |
| Bluetooth Scanner Good Read Beep One Beep |
Backlight Settings
| Backlight Setting Default Value |
| Display Backlight Adjustment Normal |
| Keypad Backlight On Based on Light Level |
| Light Level Low |
Screen Settings
| Screen Setting Default Value |
| Screen Rotations Portrait 0 Degrees |
| Screen Rotation Sensor Disabled |
Sound Settings
| Sound Setting Default Value | |
| Beeper and Voice Medium | |
| Headset Beeper Very Low | |
| Vibrate Mode Intensity 1 Strong Pulse | |
| Screen Taps Off | |
| Key Clicks | Off |
Keypad Settings
| Keypad Setting Default Value | |
| Button Remapping | Scanner |
Power Management Settings
| Power Management Setting | Default Value |
| Enable Power Button Screen | On |
| Screen Options Displayed | Hibernate, Suspend, Reboot |
| Screen Timeout (Seconds) | 5 |
Power Management Setting Default Value
| Power Button Behavior Suspend |
| Device Turns Off After (Battery Power) 5 minutes |
| Screen Turns Off After (Battery Power) Disabled |
| Device Turns Off After (External Power) Disabled |
| Screen Turns Off After (External Power) Disabled |
| Device Off Sensor Disabled |
Profiles Settings Application
Profiles Settings Default Value
| Camera | |
| Disable Camera Scan | Show Option in Profile Settings |
| Enable Camera Scan | Show Option in Profile Settings |
| Power | |
| Always On | Show Option in Profile Settings |
| Maximize Battery Life | Show Option in Profile Settings |
| Normal | Show Option in Profile Settings |
| Scanning | |
| 1D Bar Codes Optimized | Show Option in Profile Settings |
| Bright Sunlight | Show Option in Profile Settings |
| Reflective Labels | Show Option in Profile Settings |
| Standard | Show Option in Profile Settings |
GPS Settings
Use GPS settings to configure how the mobile computer communicates with the GPS network.
GPS
GPS Setting Default Value
| Enable Bread Crumbing Disable |
Core Messaging Service Settings
Use core messaging service settings to configure the message routers between client and server software applications.
Core Messaging Service
| Core Messaging Service Setting Default Value |
| Associated Server IP Null |
| Broadcast Name INTERMEC |
| Port 62241 |
| Keep Alive Ping Interval 30 Seconds |
Device Monitor Settings
Use device monitor settings to configure how the mobile computer monitors the network.
Device Health Controls
| Device Health Setting Default Value |
| Enable Health Data Collection On |
| Enable Device Health Application On |
| Enable Blue Light Off for Ready-to-Work |
| Set Rule File Location \SmartSystems\HealthRules.txt |
| System Device Health Refresh (seconds) 90 |
| Network Device Health Refresh (seconds) 45 |
Device Health Screen Captures
| Device Health Screen Captures Setting Default Value | |
| Directory | \SmartSystems\ScreenCapture |
| Screen Captures Allowed | 3 |
Device Wipe
| Device Wipe Setting | Default Value |
| Enable Wipe | Disabled |
| Interval (in days) | Null |
Virtual Wedge Settings
Use virtual wedge settings to configure the virtual wedge.
Virtual Wedge Setting
| Setting Default Value |
| Virtual Wedge Enable |
| Bar Code Scanner Grid Null |
| Label Encoding (Code Page) 1252 |
| Magstripe Reader Grid Null |
B
Keypads and Keystrokes
Standard Characters
Use the following tables to learn how to enter standard and other available characters and functions with the keypad. If there is no sequence of keystrokes for a particular character or function, it is only available through the soft input panel (SIP), which you can access by tapping the keyboard icon on the touch screen.

Note: You can only enter “8” and “#” characters in the phone or contacts applications.
CN70 Keypads and Keystrokes
CN70 Alphanumeric Characters
| Character Numeric Keypad QWERTY Keypad | |
| a | □□ 2 □A |
| b | □□ 2 2 □B |
| c | □□ 2 2 2 □C |
| d | □□ 3 □D |
| e | □□ 3 3 □E |
| f | □□ 3 3 3 □F |
| g | □□ 4 □G |
| h | □□ 4 4 □H |
| i | □□ 4 4 4 □I |
| j | □□ 5 □J |
| k | □□ 5 5 □K |
| l | □□ 5 5 5 □L |
| m | □□ 6 □M |
| n | 6 6 N |
| o | 6 6 6 O |
| p | 7 P |
| q | 7 7 Q |
| r | 7 7 7 R |
| s | 7 7 7 7 S |
| t | 8 T |
| u | 8 8 U |
| v | 8 8 8 V |
| w | 9 W |
| x | 9 9 X |
| y | 9 9 9 Y |
| z | 9 9 9 9 Z |
| A | 1 2 A |
| B | 1 2 2 B |
| C | 1 2 2 2 C |
| D | 1 3 D |
| E | 1 3 3 E |
| F | 1 3 3 3 F |
| G | 1 4 G |
| H | 1 4 4 H |
| I | 1 4 4 4 I |
| J | 1 5 J |
| K | 1 5 5 K |
| L | 1 5 5 5 L |
| M | 1 6 M |
| N | 1 6 6 N |
| O | 1 6 6 6 O |
| P | 1 7 P |
| Q | 1 7 7 Q |
| R | 1 7 7 7 R |
| S | 1 7 7 7 S |
| T | 1 8 T |
| U | 1 8 8 U |
| V | 1 8 8 8 V |
| W | 1 9 W |
| X | 1 9 9 X |
| Y | 1 9 9 9 Y |
| Z | 1 9 9 9 Z |
| 0 | 0 , |
| 1 | 1 Y |
| 2 | 2 U |
| Character | Numeric Keypad | QWERTY Keypad |
| 3 | 3 | ID I |
| 4 | 4 | ID H |
| 5 | 5 | ID J |
| 6 | 6 | ID K |
| 7 | 7 | ID B |
| 8 | 8 | ID N |
| 9 | 9 | ID M |
CN70 Characters and Functions
| To Enter Numeric Keypad QWERTY Keypad | ||
| @ (at symbol) N/A | ||
| & (ampersand) N/A | S | |
| * (asterisk) | * | C |
| : (colon) N/A | D | |
| , (comma) N/A | X | |
| $ (dollar) N/A | E | |
| ! (exclamation) N/A | O | |
| - (hyphen) | - | G |
| % (percent) N/A | R | |
| . (period) | . | . |
| + (plus) | D - D T | |
| # (pound) | # | V |
Appendix B – Keypads and Keystrokes
| To Enter Numeric Keypad QWERTY Keypad | ||
| ?(question mark) N/A | A | |
| '(apostrophe) N/A | Z | |
| Forward Tab | ||
| Backspace | ||
| Up Arrow | ||
| Down Arrow | ||
| Left Arrow | ||
| Right Arrow | ||
| CapsLock | ||
| Enter | Enter | Enter |
| ok | ||
| Shift | or Space | |
| Space | ||
| Start (Windows) | ||
| Esc | Esc | |
| Talk | ||
| End Call | ||
| Intermec Dashboard | ||
CN70e Keypads and Keystrokes
CN70e Alphanumeric Characters
| Character | Numeric Keypad | Calculator-Style Keypad | QWERTY Numeric Keypad | |||||||
| a |  | [AKT0] | [H0DK] | [8354] | ||||||
| b | [38TG] | [DB53] | 2 |  |  |  | [H43B] | |||
| c |  |  | 2 | [3WSK] | [X3TG] |  |  |  |  | |
| d | [CZZK] |  |  |  |  |  | ||||
| e | [3TSS] | [05SS] | 3 |  |  | [XX7A] |  | |||
| f |  | [8KOT] | 3 |  |  | [ZZDOZ] | [9CYZ] |  |  | |
| g |  | [2725] | [T50D] | [446C] | [2CXT] |  |  | | ||
| h | [8ADG] | [HYSY] | 4 |  | [7YT0] |  | [RX36] | |||
| i | [KAVA] | [KKSC] | 4 | [54VD] |  |  |  | [8046] | [2HAX] | |
| j | [5233] | [Y440] | [6KDO] | [4ZZX] |  |  |  | [2256] | ||
| k | [CATA] |  | 5 |  | [CZA0] | [XAH7] |  | [WKSA] |  | |
| l |  |  | 5 |  |  | [53TS] | [2HTW] | [0203] |  | |
| m | [HH6Z] | [7SKO] |  |  | [4SYD] |  | [03CK] |  | ||
| n | [H707] | [03DZ] | 6 | [XCBT] |  | [CATH] | [AKX4] |  |  | |
| o |  | [CH80] | 6 | [5YDK] | [6WBH] |  | [C30Y] | [AC05] | [430W] | |
| p | [T402] |  |  | [03AH] | [0W5D] |  |  | | ||
| q |  |  | 7 |  | [350K] | [4BX6] | [8K7B] |  | | |
| r | [52K2] | [04YO] | 7 | [X26W] |  |  | [2S8Y] |  | [45WO] | |
| s |  | [H70A] | 7 | [DB05] |  |  |  |  | [0ZC3] |  |
Appendix B – Keypads and Keystrokes
| Character | Numeric Keypad | Calculator-Style Keypad | QWERTY Numeric Keypad | |||||||
| t |  | [6Z03] |  |  | ||||||
| u |  | 8 | [DBXG] | (ZKTD) | 2 |  |  |  | ||
| v |  | 8 | [A6ZB] |  | 2 | [BX43] |  | [V] |  | |
| w |  | 9 |  |  |  |  |  | |||
| x |  | 9 |  |  | 3 | [YBK7] |  | [KBTX] | ||
| y |  | 9 |  |  | 3 |  |  | [Y] |  | |
| z |  | 9 |  |  | 0 |  |  | 3 |  | |
| A |  | 1 |  |  | 8 |  |  |  |  | |
| B |  | 1 |  |  | 7 |  |  |  |  | |
| C |  | 1 |  |  | 0 |  |  | 8 |  | |
| D |  | 1 |  |  | 9 |  |  | [67D8] |  | |
| E |  | 1 |  |  | 7 |  |  |  |  | |
| F |  | 1 |  |  | 0 |  |  | 9 |  | |
| G |  | 1 |  |  | 4 |  |  |  |  | |
| H |  | 1 |  |  | 7 |  |  |  |  | |
| I |  | 1 |  |  | 0 |  |  | 4 |  | |
| J |  | 1 |  |  | 5 |  |  |  | [STW5] | |
| K | [BY4C] | 1 |  |  | 7 |  |  |  |  | |
| L |  | 1 |  |  | 0 |  |  | 5 |  | |
| M |  | 1 | [CWZY] |  | 6 |  |  | [XBXH] |  | |
| N |  | 1 |  |  | 7 |  |  | [ZYBK] | ||
| Character | Numeric Keypad | Calculator-Style Keypad | QWERTY Numeric Keypad |
| O | |||
| P | |||
| Q | |||
| R | |||
| S | |||
| T | |||
| U | |||
| V | |||
| W | |||
| X | |||
| Y | |||
| Z | |||
| 0 | |||
| 1 | |||
| 2 | |||
| 3 | |||
| 4 | |||
| 5 | |||
| 6 |
Appendix B – Keypads and Keystrokes
| Character | Numeric Keypad | Calculator-Style Keypad | QWERTY Numeric Keypad |
| 7 | 7 | 7 | 7 |
| 8 | 8 | 8 | 8 |
| 9 | 9 | 9 | 9 |
CN70e Characters and Functions
| To Enter Numeric Keypad | Calculator-Style Keypad | QWERTY Numeric Keypad | |
| @ (at symbol) N/A N/A | #D Q | ||
| & (ampersand) N/A N/A | #D U | ||
| * (asterisk) | * | * | * |
| : (colon) N/A N/A | #D I | ||
| , (comma) N/A N/A | , | ||
| $ (dollar) N/A N/A | #D E | ||
| ! (exclamation) N/A N/A | #D O | ||
| - (hyphen) | - | - | - |
| % (percent) N/A N/A | #D R | ||
| . (period) | . | . | . |
| + (plus) | #D | - | #D |
| # (pound) | # | # | # |
| ? (question mark) N/A N/A | #D Y | ||
| ‘ (apostrophe) N/A N/A | #D W | ||
| Forward Tab | →I | →I | →I |
| Backspace | ← | ← | ← |

| To Enter Numeric Keypad | Calculator-Style Keypad | QWERTY Numeric Keypad | |
| Up Arrow | |||
| Down Arrow | |||
| Left Arrow | |||
| Right Arrow | |||
| CapsLock | |||
| Enter | Enter | Enter | Enter |
| ok | |||
| Shift | |||
| Space | |||
| Start (Windows) | |||
| Esc | |||
| Talk | |||
| End Call | |||
| Intermec Dashboard | |||
CK70 Keypads and Keystrokes
CK70 Alphanumeric Characters
| Character Large Alpha Keypad Alphanumeric Keypad | ||
| a | A | A |
| b | B | B |
| c | C | C |
Appendix B – Keypads and Keystrokes
| Character Large Alpha Keypad Alphanumeric Keypad | ||
| d | D | D |
| e | E | E |
| f | F | F |
| g | G | G |
| h | H | H |
| i | I | I |
| j | J | J |
| k | K | K |
| l | L | L |
| m | M | M |
| n | N | N |
| o | O | O |
| p | P | P |
| q | Q | Q |
| r | R | R |
| s | S | S |
| t | T | T |
| u | U | U |
| v | V | V |
| w | W | W |
| x | X | X |
| y | Y | Y |
| z | Z | Z |
| A | ||
| B | ||
| C | ||
| D | ||
| E | ||
| F | ||
| G | ||
| H | ||
| I | ||
| J | ||
| K | ||
| L | ||
| M | ||
| N | ||
| O | ||
| P | ||
| Q | ||
| R | ||
| S | ||
Appendix B – Keypads and Keystrokes
| Character Large Alpha Keypad Alphanumeric Keypad | ||
| T | ||
| U | ||
| V | ||
| W | ||
| X | ||
| Y | ||
| Z | ||
| 0 | ||
| 1 | ||
| 2 | ||
| 3 | ||
| 4 | ||
| 5 | ||
| 6 | ||
| 7 | ||
| 8 | ||
| 9 | ||
CK70 Characters and Functions
| To Enter Large Alpha Keypad Alphanumeric Keypad | ||
| @ (at symbol) | N/A | |
| & (ampersand) | ||
| * (asterisk) | ||
| : (colon) | ||
| ; (semicolon) | ||
| , (comma) | ||
| $ (dollar) | N/A | |
| ! (exclamation) | ||
| - (hyphen or minus) | ||
| % (percent) | N/A | |
| . (period) | ||
| + (plus) | ||
| # (pound) | ||
| ? (question mark) | ||
| ‘ (apostrophe) | ||
| = (equals) | ||
| _ (underscore) | ||
| > (greater than) | ||
| < (less than) | ||
| [ (left square bracket) | ||
| ] (right square bracket) | ||
| { (left curly brace) N/A | U | |
| } (right curly brace) N/A | U | |
Appendix B – Keypads and Keystrokes
To Enter Large Alpha Keypad Alphanumeric Keypad
| ~ (tilde) N/A |  | |
| \ (backslash) | 8 | |
| / (forward slash) | 8 | |
| “(quotes) N/A |  | |
| ( (left parenthesis) | R | N/A |
| ) (right parenthesis) | R |  |
| Insert | Z 4 | |
| Delete | Z 6 | |
| Sym | Space | N/A |
| | (broken vertical bar) N/A |  | |
| ( grave) | N/A | W |
| Forward Tab | ← |  |
| Backspace | ← | ← |
| Up Arrow | ^ |  |
| Down Arrow | √ | √ |
| Left Arrow | < |  |
| Right Arrow | > | > |
| CapsLock | ↑ ↑ ↑ ↑ |  |
| Enter | Enter | Enter |
| ok | ? ? ? |  |
| Shift | ↑ | ↑ |

| To Enter Large Alpha Keypad Alphanumeric Keypad | ||
| Space | Space | Space |
| Start (Windows) | ||
| Esc | Esc | Esc |
| Alt N/A Alt | ||
| Ctrl Ctrl Ctrl | ||
| Send Call | ||
| End Call | ||
| Intermec Dashboard | ||
CK70 Function Keys
| To Enter Large Alpha Keypad Alphanumeric Keypad | |
| F1 | |
| F2 | |
| F3 | |
| F4 | |
| F5 | |
| F6 | |
| F7 | |
| F8 | |
| F9 | |
| F10 | |
| F11 | N/A |
| F12 | N/A |
To Enter Large Alpha Keypad Alphanumeric Keypad
| F13 | N/A | |
| F14 | N/A | |
| F15 | N/A | |
| F16 | N/A | |
| F17 | N/A | |
| F18 | N/A | |
| F19 | N/A | |
| F20 | N/A | |
| F21 | N/A | |
| F22 N/A | ||
| F23 N/A | ||
| F24 N/A |
CK71 Keypads and Keystrokes
CK71 Alphanumeric Characters
| Character | Numeric With Function Keys Keypad | Alphanumeric Keypad |
| a | ||
| b | ||
| c | ||
| d | ||
| e | ||
| f | ||
| g | ||
| h | ||
| i | ||
| j | ||
| k | ||
| l | ||
| m | ||
| n | ||
| o | ||
| p | ||
| q | ||
| r | ||
| s | ||
| t | ||
| u | ||
| v | ||
| w | ||
| x | ||
| y | ||
| z | ||
| A |
Appendix B – Keypads and Keystrokes
| Character | Numeric With Function Keys Keypad | Alphanumeric Keypad |
| B |  | |
| C |  | |
| D |  | |
| E |  | |
| F |  | |
| G |  | |
| H |  | |
| I |  | |
| J |  | |
| K |  | |
| L |  | |
| M |  | |
| N |  | |
| O |  | |
| P |  | |
| Q |  | |
| R |  | |
| S |  | |
| T |  | |
| U |  | |
| V |  | |
| W | ||
| X | ||
| Y | ||
| Z | ||
| 0 | 0 | 0 |
| 1 | 1 | 1 |
| 2 | 2 | 2 |
| 3 | 3 | 3 |
| 4 | 4 | 4 |
| 5 | 5 | 5 |
| 6 | 6 | 6 |
| 7 | 7 | 7 |
| 8 | 8 | 8 |
| 9 | 9 | 9 |
CK71 Characters and Functions
| To Enter Numeric With Function Keys Keypad Alphanumeric Keypad | ||
| : (colon) | Space 8 | |
| ; (semicolon) N/A | 5 | |
| , (comma) | N/A | X |
| $ (dollar) | S | N/A |
| ! (exclamation) | W | N/A |
Appendix B – Keypads and Keystrokes
| To Enter | Numeric With Function Keys Keypad | Alphanumeric Keypad | |||||
| - (hyphen or minus) |  |  |  | ||||
| . (period) |  |  |  | ||||
| + (plus) |  |  |  | ||||
| ‘ (apostrophe) |  |  |  | ||||
| = (equals) |  |  | [YH7] | ||||
| _ (underscore) |  |  |  |  | |||
| > (greater than) |  |  |  | ||||
| < (less than) |  |  |  | ||||
| [ (left square bracket) |  |  |  | ||||
| ] (right square bracket) |  |  | [432B] | ||||
| { (left curly brace) N/A |  | [7X5B] | [T48S] | ||||
| } (right curly brace) N/A |  |  |  | ||||
| ~ (tilde) N/A |  |  |  | ||||
| \ (backslash) |  | [268S] |  |  | |||
| / (forward slash) |  |  |  |  | |||
| “ (quotes) N/A |  | [SGAT] |  | ||||
| Insert |  |  |  |  | |||
| Delete |  | [DXBX] |  |  6 6 | |||
| | (broken vertical bar) N/ |  |  |  | ||||
| ' (grave) |  |  |  | ||||
| Forward Tab |  | [2ZZY] | |||||
| To Enter | Numeric With Function Keys Keypad | Alphanumeric Keypad |
| Backspace | ||
| Up Arrow | ||
| Down Arrow | ||
| Left Arrow | ||
| Right Arrow | ||
| CapsLock | ||
| Enter | Enter | Enter |
| ok | ||
| Shift | ||
| Space | Space | Space |
| Start (Windows) | ||
| Esc | Esc | Esc |
| Alt Alt | Esc | |
| Ctrl Ctrl Ctrl | ||
| Intermec Dashboard |
CK71 Function Keys
| To Enter | Numeric With Function Keys Keypad | Alphanumeric Keypad |
| F1 | F1 | F1 |
| F2 | F2 | F2 |
| F3 | F3 | F3 |
| F4 | F4 | F4 |
To Enter Numeric With Function Keys Keypad Alphanumeric Keypad
| F5 | F5 | F5 |
| F6 | F6 | ID F1 |
| F7 | F7 | ID F2 |
| F8 | F8 | ID F3 |
| F9 | F9 | ID F4 |
| F10 | F10 | ID F5 |
| F11 | F11 | ID A |
| F12 | F12 | ID B |
| F13 | ID F1 ID C | |
| F14 | ID F2 ID D | |
| F15 | ID F3 ID E | |
| F16 | ID F4 ID F | |
| F17 | ID F5 ID G | |
| F18 | ID F6 ID H | |
| F19 | ID F7 ID I | |
| F20 | ID F8 ID J | |
| F21 | ID F9 ID K | |
| F22 | ID F10 ID L | |
| F23 | ID F11 ID M | |
| F24 | ID F12 ID N |
CK71 Intermec Terminal Emulation (ITE) Keys
| To Enter Numeric With Function Keys Keypad Alphanumeric Keypad | |||
| Attention |  | ||
| Autolog N/A |  | ||
| Clear |  | ||
| Duplicate N/A |  | ||
| EEOF N/A |  | ||
| Erase N/A |  | ||
| Find | N/A |  | |
| Field + |  | ||
| Field - |  | ||
| Fieldmark | N/A |  | |
| Help | N/A |  | |
| Hex | N/A |  | |
| Home |  | ||
| Keypad | N/A |  | |
| Menu | N/A |  | |
| Mode | N/A |  | |
| New Line | N/A |  | |
| Next Screen |  | ||
| PA1 |  | ||
| PA2 |  | ||
Appendix B – Keypads and Keystrokes
| To Enter Numeric With Function Keys Keypad Alphanumeric Keypad | ||
| PA3 | ||
| Page | ||
| N/A | ||
| Previous Screen | ||
| Remove N/A | ||
| Reset | ||
| Return | ||
| Roll Down | ||
| Roll Up | ||
| System Request | ||
| View | N/A | |
| View Down | N/A | |
| View Up | ||
C
ScanNGo Wi-Fi Configuration Bar Codes
You can use the ScanNGo Wi-Fi configuration bar codes to quickly configure the 802.11 radio in your computer.
Radio Configuration Bar Codes
Use the following ScanNGo bar codes to enable the 802.11 radio and set the defaults for either Funk or Microsoft Wireless Zero
Configuration security. After you scan the bar codes, you will still need to use Intermec Settings or another configuration program to set network-specific settings on your computer and to configure the wireless security.
The CN70, CN70e, and CK70 are available with the EA30 imager only. The CK71 has three imager options: the EA30, EX25, or EV12 imager. If your CK71 has an EA30 or EX25 imager, use the 2D configuration bar codes to configure the radio. If your CK71 has an EV12 imager, use the 1D configuration bar codes to configure the radio. You can find out what imager is in your CK71 by opening Intermec Settings and tapping Data Collection > Internal Scanner > Scanner Settings.

Note: If you are using Microsoft security, you can only use the 1D configuration bar codes.
The following ScanNGo bar codes were created using SmartSystems Foundation. For more information on SmartSystems Foundation, see “Manage the Computer Using SmartSystems Foundation” on page 98.
2D Configuration Bar Codes
You can configure the computer with a 2D imager (EA30 or EX25).
1 Scan the appropriate bar code from the table and wait for the program to start.
2 Follow any instructions on the device.
2D Imager Radio Configuration Bar Codes
When You Want To: Scan This Bar Code
- Set all communication settings to defaults (Wi-Fi, WWAN if applicable)
- Enable Wi-Fi - set Funk defaults
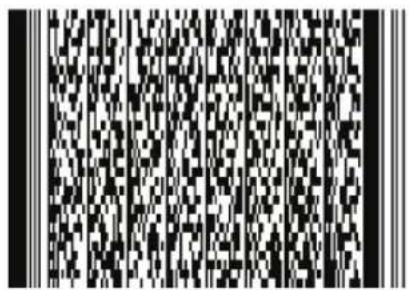
1D Configuration Bar Codes
You can configure the computer with a 1D imager (EV12).
1 Scan the START HERE bar code from the table and wait for the program to start.
2 Scan the 1/9 bar code.
3 Scan the rest of the bar codes in any order.
4 Follow any instructions on the device.
1D Imager Radio Configuration Bar Codes
When You Want To: Scan This Bar Code
- Set all communication settings to defaults (Wi-Fi, WWAN if applicable)
- Enable Wi-Fi - set Funk defaults

When You Want To: Scan This Bar Code
- Set all communication settings to defaults (Wi-Fi, WWAN if applicable)
- Enable Wi-Fi - set Funk defaults

When You Want To: Scan This Bar Code
- Set all communication settings to defaults (Wi-Fi, WWAN if applicable)
- Enable Wi-Fi - set Microsoft WZC defaults







When You Want To: Scan This Bar Code
- Set all communication settings to defaults (Wi-Fi, WWAN if applicable)
- Enable Wi-Fi - set Microsoft WZC defaults



Appendix C - ScanNGo Wi-Fi Configuration Bar Codes
Index
Symbols
.cab files, using to install applications 100
Numerics
70 Series
computer models 2 features 5
802.11 communications, configuring 77
802.11 network status, troubleshooting 109
802.11 radio, default settings 135
802.1x security configuring with Funk 88 configuring with Microsoft 93 troubleshooting 108
A
accessories, described 8
activation wizard, starting 53
ActiveSync establishing a partnership 35 using to install applications 101
aligning the screen 43
alpha keypad, CK70, illustrated 18
alphanumeric keypad CK70, illustrated 19 CK71, illustrated 21
applications developing with Intermec Resource Kits 99
installing with ActiveSync 101
computer as mass storage device 36
Console 100 storage card 101
Intermec, available for download 45
Intermec, available on computer 43
launching automatically 101 packaging 100
troubleshooting 115
ASCII scanner, connecting 82
audio device, connecting with Bluetooth 81
audio snap-on adapter, described 8
AutoRun, description 100
AutoRun.exe, using to start application 101
B
back accessory interface description 8 pin-outs 122
backlight configuring screen 26 keypad behavior 18
bar code default symbology settings 132 radio configuration 168 reading 28 reading, troubleshooting 110 symbologies 123
battery about 10 battery icons, described 13 changing 11 charging 10 charging accessories 10 checking the status 13 conserving battery life 14 descriptions 8 status LED 13
Bluetooth Audio application description 44 audio device, connecting to 81 communications, configuring 78–81 printer, connecting to 80 scanner, connecting to 78
C
calculator-style keypad entering characters on 22 illustrated 17
calling product support 114 camera, description 60
Carrier Selection about 54 described 44
carriers supported 52 switching 55
CDMA phone activating 52 carriers 52
certificate, loading 95
changing the battery 11
characters
entering on CK70/CK71 keypad 23
entering on numeric keypad 22
entering on QWERTY keypad 22
entering with keystrokes 142–166
charging accessories 10
charging the battery 10
CK70
keypads, illustrated 18, 19
keystrokes, listed 151–158
status LEDs 6, 7
CK70/CK71
battery, described 8
entering characters on keypad 23
magstripe reader adapter, described 8
CK71
keypads, illustrated 20, 21
keystrokes, listed 158–166
status LEDs 7
clean boot, performing 117
cleaning computer 117
CN70
keypads, illustrated 15, 16
keystrokes, listed 142–146
status LEDs 6
CN70/CN70e
battery, described 8
vehicle dock, described 9
vehicle holder, described 9
CN70e
keypads, illustrated 16, 17
keystrokes, listed 147–151
cold boot, performing 115
communications
802.11, configuring 77
Bluetooth, configuring78–81
default settings 135
Ethernet, configuring 77
serial 81
USB 81
configuration number, finding 114
configuring parameters 68
conserving battery life 14
Console
using to install applications 100
contact information, Intermec ii
D
Dashboard
about the button 25
button, using 106
description 106
illustration 106
launching 25
default settings
bar code symbologies 132
communications 135
imager 134
restoring Intermec Settings 75
scanner 134
desktop stand, described 8
DX1 desktop dock, described 8
DX2 dual dock, described 9
DX4 quad dock, described 9
E
EA30 area imager, reading distances 125
electrical specifications 121
eMDI, description 45
emergency phone call, making with computer 57
Enhanced Mobile Document Imaging (eMDI) application, description 45
environmental specifications 120
Ethernet
communications, configuring 77
snap-on adapter, described 9
EV12 linear imager, reading distances 127
EX25 imager, reading distances 129
F
Features Demo, description 45
features of 70 Series 5
files, transferring to and from PC 35
fix interval, configuring with iGPS 66
flash file store, using computer as 36
flashlight, using 27
flick, screen gesture described 39
Funk security
configuring 802.1x 88
configuring LEAP 89
Index
Funk security (continued) configuring static WEP 89 configuring WPA Enterprise (802.1x) 86 configuring WPA Personal (PSK) 87 configuring WPA2 Enterprise (802.1x) 86 configuring WPA2 Personal (PSK) 87 profile, choosing 86 using open (no security) associations 90
G gestures, supported 39 Good Read LED description 7 troubleshooting 111 GPS configuring 64 GPSID, overview 64 improving performance 65 modes, described 65 gpsOneXTRA, description 65
H handstrap replacement kit, described 9 hard reset, performing 115 health, monitoring computer 106 Hibernate (battery swap), description 24 holster, described 9 Home screen, understanding 38 horizontal scroll bar description 38 illustration 38
I IDL (Intermec Developer Library) 99 iGPS application description 44 using to improve performance 65 Image Capture, description 46 imager default settings 134 described 27 reading distances 124–132 Intermec Browser, description 46
Intermec Connection Manager, description 46 Intermec Dashboard, about 106 Intermec Developer Library (IDL) 99 Intermec Launcher, description 46 Intermec Resource Kits described 99 downloading 99 Intermec Settings command reference manual link 74, 76 described 68 description 44, 68 hiding menu items 75 main menu illustration 69 menu options 69–74 navigating in 74 restoring default settings 75 restoring menu items 75 starting 69 understanding structure 69 using remotely with SmartSystems 76 using to configure Profile Settings 74 Intermec Terminal Emulator (ITE), description 47 Intermec, contact information ii Internet Service Provider (ISP) connection, creating 82 ISpyWiFi application description 44 diagnosing Wi-Fi status 109
K Key status LED, description 8 keypad backlight behavior 15, 18 illustrated 15 keystrokes for entering characters 142–166 troubleshooting keys 113 Knowledge Central web site 114 Knowledge Central website 114
L language provisioning 10 launching applications automatically 101 LEAP, configuring with Funk 89
LEDs
battery status, described 13
status descriptions 7
Location of the CK70 Status LEDs 7
Location, status LEDs 7
locked computer, troubleshooting 113
M
magstripe reader adapter, described 8
magstripe reader snap-on adapter, described 8
mass storage device, using computer as 36
memory, computer 121
microSD card
about 29
installing in a CK70/CK71 32
installing in a CN70/CN70e 29
updating system software 103
using to save pictures and videos 61
Microsoft security
choosing 90
configuring 802.1x 93
configuring static WEP 94
configuring WPA Enterprise (802.1x) 91
configuring WPA Personal (PSK) 92
configuring WPA2 Enterprise (802.1x) 91
configuring WPA2 Personal (PSK) 92
using open (no security) associations 94
Mobile Equipment Identifier (MEID), locating 52
models of 70 Series computers 2
MS Assisted mode, description 65
N
network
carriers, switching 55
carriers, switching, about 54
connection, troubleshooting 107
non-incendive (NI) specifications 121
Notification LED, description 7
numeric keypad
CK71, illustrated 20
CN70, illustrated 16
CN70e, illustrated 17
entering characters on 22
illustrated 15
0
open associations
configuring with Funk 90
configuring with Microsoft WZC 94
operating system
finding version 115
version 2
P
pan, screen gesture described 39
phone
CDMA, activating 52
features 50
making a call 57
making an emergency call 57
turning on and off 54
UMTS, activating 50
physical specifications 120
picture
saving to a microSD card 61
storage location 60
taking with camera 60
pin-outs, back accessory interface 122
Power button, description of behavior 24
power options
customizing 25
setting 24
power specifications 121
predefined imager mode, choosing 28
printer, connecting with Bluetooth 80
processor, computer 121
product support
calling 114
Knowledge Central web site 114
Profile Settings
application, description 44
configuring with Intermec Settings 74
profile, choosing Funk security 86
Q
QWERTY keypad CN70, illustrated 15 entering characters on 22 illustrated 15 QWERTY numeric keypad CN70e, illustrated 16
R
reading distances EA30 area imager 125 EV12 linear imager 127 EX25 imager 129 Ready-to-Work LED description 7 reboot performing 115 power option description 25 recording a video 61 regulatory approvals 123 reset button, location 116 performing 115 RS-232 snap-on adapter, described 9
5
scan handle, described 9 ScanDiagnostic Intermec application description 44 using to troubleshoot 112 scanner Bluetooth, connecting to 78 default settings 134 supported tethered and cordless 29 tethered scanner, connecting 82 troubleshooting 110 ScanNGo, radio configuration bar codes 168
screen aligning 43 backlight, configuring 26 brightness, configuring 26 gestures 39 no response, troubleshooting 113 specifications 122 Screen Off, power option, description 25
security, wireless 85–96 Sensor Calibration application, using to troubleshoot 113 serial communications, about 81 settings, default, listed 132–140 Shift status LED, description 8 Shutdown, power option, description 25 SIM card, installing 50 SmartSystems Foundation console, illustration 98 Console, using to install applications 100 description 47 downloading 47, 99 monitoring computer health 106 ScanNGo description 99 updating system software 102 using the Console to install applications 100 using to manage computer 98 using with remote Intermec Settings 76 specifications non-incendive (NI) 121 physical and environmental 12 status icons, Title bar 40 status LEDs CK70 6 CN70 6 descriptions 7 storage card, using to install applications 101 storage, computer 121 Suspend, power option description 25 Switching Network Carriers, about 54 symbologies, supported 123 system software updating with microSD card 103 updating with SmartSystems Foundation 102
T
terminal emulation, troubleshooting 107 tethered scanner, connecting 82
tethered stylus replacement kit, described 9
Tile bar
description 38
illustration 38
Title bar
description 38
illustration 38
status icon descriptions 40
transferring files, to and from PC 35
troubleshooting 107–111
802.11 network status 109
802.1x security 108
operation 112
reading bar codes 110
Wi-Fi connection 107
turning on or off phone 54, 57
U
UMTS phone, activating 50
USB communications, about 81
USB snap-on adapter, described 9
V
vehicle dock accessories, described 9
video
recording 61
saving to a microSD card 61
Virtual Private Network (VPN) connection, creating 84
volume, adjusting 26
W
Wavelink Avalanche, downloading the enabler 99
WEP
static, configuring with Funk 89
static, configuring with Microsoft 94
WiFi communications, supported 5
Wi-Fi radio, enabling 77
Wi-Fi, troubleshooting 107
Windows Embedded Handheld, user interface 38
wireless
connectivity, troubleshooting 107
Wireless Center application description 45
Wireless Printing application description 45
Wireless Scanning application description 45
wireless security 85–96
certificate, loading 95
choosing Funk or WZC 85
configuration bar codes 168
Wireless Zero Configuration (WZC), selecting security choice 90
WPA
Enterprise (802.1x) security, configuring with Funk 86
Enterprise (802.1x) security, configuring with Microsoft 91
Personal (PSK) security, configuring with Funk 87
Personal (PSK) security, configuring with Microsoft 92
WPA2
Enterprise (802.1x) security, configuring with Funk 86
Enterprise (802.1x) security, configuring with Microsoft 91
Personal (PSK) security, configuring with Funk 87
Personal (PSK) security, configuring with Microsoft 92
www.intermec.com
Knowledge Central 114
manuals, downloading xi, xiii
Product Support 114
warranty information xi
Intermec
Worldwide Headquarters
6001 36th Avenue West
Everett, Washington 98203
U.S.A.
tel 425.348.2600
fax 425.355.9551
www.intermec.com
© 2012 Intermec Technologies
Corporation. All rights reserved.
70 Series Mobile Computer User Manual

P/N 935-038-004

- Document Change Record
- Contents
- About the Computer Features .... 1
- Series Mobile Computer User Manual v
- About the User Interface and Intermec Applications....37
- Use the Phone 49
- Use the Camera 59
- Use GPS....63
- Configure the Computer 67
- Manage the Computer 97
- Troubleshoot and Maintain the Computer....105
- A Specifications and Default Settings.... 119
- B Keypads and Keystrokes 141
- C ScanNGo Wi-Fi Configuration Bar Codes....167
- Index 175
- Before You Begin
- Safety Information
- Global Services and Support
- Warranty Information
- Web Support
- Send Feedback
- Telephone Support
- Service Location Support
- AWOO Systems
- IN Information System PTD LTD
- Who Should Read This Manual
- Related Documents
- To download documents
- Patent Information
- About the Computer Features
- About the 70 Series Mobile Computers
- What's New in This Release
- Overview of 70 Series Features
- Chapter 1 – About the Computer Features
- About the Status LEDs
- LED Color Description
- Series Accessories
- About Language Provisioning
- About the Battery
- Charge the Battery
- Series Charging Accessories
- Charging Accessory Charging Time
- Change the Battery
- About Battery Status
- About Battery Life and Conservation
- About the Keypad
- Enter Characters on the QWERTY Keypad
- Enter Characters on the Numeric Keypad
- Enter Characters on the CK70 and CK71 Keypads
- About the Power Button
- Intermec Power Options
- About the Intermec Dashboard Button
- Configure the Screen Backlight
- Adjust the Volume
- Use the Imager
- Use the Flashlight
- Read Bar Codes
- Predefined Mode For Scanning
- Insert a MicroSD Card
- Install a MicroSD Card in a CN70 or CN70e
- Install a MicroSD Card in a CK70 or CK71
- Transfer Files To and From Your PC
- Use Microsoft ActiveSync to Transfer Files
- Use the Computer as a Mass Storage Device
- 2
- About the User Interface and Intermec Applications
- About the User Interface
- About the Home Screen
- Chapter 2 – About the User Interface and Intermec Applications
- Interact With the Screen
- Title Bar Status Icons
- Align the Screen
- About Intermec Applications
- Applications Available on the Mobile Computer
- Applications You Can Download to the Mobile Computer
- About eMDI
- About Features Demo
- About Image Capture
- About Intermec Browser
- About Intermec Connection Manager
- About Intermec Launcher
- About Intermec Terminal Emulator (ITE)
- About SmartSystems Foundation
- 3
- Use the Phone
- About the Phone
- Activate the UMTS Phone
- Chapter 3 – Use the Phone
- Activate the CDMA Phone
- Currently Supported Carriers
- Country Carriers
- 70 Series Mobile Computer User Manual
- Values Required for CDMA Phone
- Starting the Activation Wizard
- Turn the Phone On and Off
- About Switching Network Carriers
- About the Network Connection
- Switch Network Carriers
- Make a Phone Call
- Make an Emergency Phone Call
- 4
- Use the Camera
- About the Color Camera
- Take a Picture
- Record a Video
- Save Pictures and Videos to a microSD Card
- 5
- Use GPS
- About the Integrated GPS on Your Computer
- Use the GPSID Installed on the Computer
- Improve GPS Performance on the Computer
- 6
- Configure the Computer
- How to Configure the Computer
- Use Intermec Settings on the Computer
- Start Intermec Settings
- About the Structure of Intermec Settings
- Printer Menu
- GPS Menu
- SmartSystems Information Menu
- Location Services Menu
- Location Services Options Parameters You Can Configure
- Navigate in Intermec Settings
- Configure Profile Settings With Intermec Settings
- Hide Menu Items in Intermec Settings
- Use Intermec Settings Remotely With SmartSystems Foundation
- About Network Communications
- Configure 802.11a/b/g/n (Wi-Fi) Radio Communications
- Configure Ethernet Communications
- Configure Bluetooth Communications
- Connect to a Bluetooth Scanner
- Connect to a Bluetooth Printer
- Connect to a Bluetooth Audio Device
- About Serial and USB Communications
- Connect to a Tethered Scanner
- Create an ISP Connection
- Create a VPN Server Connection
- About Wireless Security
- Choose Between Microsoft and Funk Security
- Chapter 6 – Configure the Computer
- Select a Funk Security Profile
- Configure WPA or WPA2 Enterprise (802.1x) Security With Funk
- Configure WPA or WPA2 Personal (PSK) Security With Funk
- Configure 802.1x Security With Funk Security
- Configure LEAP Security With Funk
- Configure Static WEP Security With Funk Security
- Use Open (No Security) Associations with Funk
- Select Microsoft as Your Security Choice
- Select Microsoft Security
- Configure WPA or WPA2 Enterprise (802.1x) Security With Microsoft
- Enable WPA or WPA2 Personal (PSK) Security With Microsoft
- Configure 802.1x Security with Microsoft
- Configure Static WEP Security With Microsoft
- Use Open (No Security) Associations With Microsoft
- Load a Certificate
- 7
- Manage the Computer
- Manage the Computer in Your Network
- Manage the Computer Using SmartSystems Foundation
- Manage the Computer Using Third-Party Software
- Develop and Install Applications
- Package Your Application
- Choose a Target Location
- Install Applications Using SmartSystems Foundation Console
- Install Applications Using Microsoft ActiveSync
- Install Applications Using a Storage Card
- Launch Applications Automatically
- Chapter 7 – Manage the Computer
- Update the System Software
- Update Individual or Multiple Computers Using the SmartSystems Console
- Update Individual Mobile Computers Using a microSD Card
- 8
- Troubleshoot and Maintain the Computer
- About the Intermec Dashboard
- Troubleshoot Your Mobile Computer
- Troubleshoot the Wi-Fi Connection
- Problem Solution
- Troubleshoot 802.1x Security
- Problems With 802.1x Security
- Check 802.11 Network Status
- Chapter 8 – Troubleshoot and Maintain the Computer
- Troubleshoot Reading Bar Codes
- Problems Reading Bar Codes
- Use ScanDiagnostic to Troubleshoot the Scanner
- Troubleshoot Operating the Computer
- Problems Operating the Computer
- Call Product Support
- 1-800-755-5505
- Find Your Configuration Number
- Find Your Operating System Version
- Reset the Computer
- Reboot the Computer
- Cold Boot the Computer
- Clean Boot the Computer
- Clean the Computer
- A
- Specifications and Default Settings
- Physical and Environmental Specifications
- CN70 Physical Dimensions
- CN70e Physical Dimensions
- CK70 Physical Dimensions
- CK71 Physical Dimensions
- Environmental Specifications
- Power and Electrical Specifications
- Series Non-Incendive Computer Specifications
- Operating System
- Hardware
- Back Accessory Interface Pin-outs
- Touch Screen Specifications
- Standard Communications
- Wireless LAN
- Regulatory Approvals
- Bar Code Symbologies
- Imager Reading Distances
- EA30 Area Imager Minimum Reading Distances
- Series Mobile Computer User Manual 125
- EA30 Area Imager Typical Reading Distances
- EV12 Linear Imager Minimum Reading Distances
- EV12 Linear Imager Typical Reading Distances
- EX25 Near-Far Range Imager Minimum Reading Distance
- EX25 Near-Far Range Imager Typical Reading Distance
- Default Configuration
- Data Collection Settings
- Decode Security Settings
- Communications
- Communications Settings
- Radio Settings
- Appendix A – Specifications and Default Settings
- Device Settings
- GPS Settings
- GPS
- Core Messaging Service Settings
- Device Monitor Settings
- Virtual Wedge Settings
- B
- Keypads and Keystrokes
- Standard Characters
- CN70 Keypads and Keystrokes
- CN70 Characters and Functions
- Appendix B – Keypads and Keystrokes
- CN70e Keypads and Keystrokes
- CK70 Keypads and Keystrokes
- CK71 Keypads and Keystrokes
- C
- ScanNGo Wi-Fi Configuration Bar Codes
- Radio Configuration Bar Codes
- 2D Configuration Bar Codes
- 2D Imager Radio Configuration Bar Codes
- When You Want To: Scan This Bar Code
- 1D Configuration Bar Codes
- 1D Imager Radio Configuration Bar Codes
- Index
- Symbols
- Numerics
- D
- E
- F
- M
- N
- 0
- P
- Q
- R
- T
- U
- V
- W
- Intermec
Brand : PHILIPS
Model : Lumiware Cooler
Category : Refrigerator