
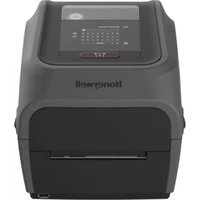
PC42t - Label printer HONEYWELL - Free user manual and instructions
Find the device manual for free PC42t HONEYWELL in PDF.


| Product Type | Direct Thermal / Thermal Transfer Label Printer |
| Model | PC42t |
| Brand | Honeywell |
| Dimensions (W x D x H) | Approximately 220 mm x 180 mm x 170 mm |
| Weight | Approximately 2.5 kg |
| Power Supply | 100-240 V AC, 50/60 Hz, external power adapter |
| Print Resolution | 203 dpi (8 dots/mm) |
| Print Speed | Up to 102 mm/s (4 ips) |
| Print Width | Up to 104 mm |
| Max Media Roll Diameter | 127 mm (5 inches) outer diameter |
| Core Diameter | 25.4 mm (1 inch) or 38.1 mm (1.5 inches) |
| Interfaces | USB 2.0, RS-232 serial, optional Ethernet, optional wireless |
| Print Technology | Thermal Transfer and Direct Thermal |
| Ribbon Length (Thermal Transfer) | 300 m |
| Ribbon Width | 25.4 mm to 110 mm |
| Main Functions | Label printing, barcode printing, text and graphics printing with label design software |
| Maintenance | Clean print head and platen roller regularly; replace print head and platen roller as needed |
| Safety Features | Overheat protection, automatic power-off after inactivity (configurable) |
| Spare Parts Availability | Print head, platen roller, power adapter, main board available through Honeywell service |
| General Information | Desktop label printer suitable for light to medium duty; supports multiple barcode symbologies |
Frequently Asked Questions - PC42t HONEYWELL
User questions about PC42t HONEYWELL
0 question about this device. Answer the ones you know or ask your own.
Ask a new question about this device
Download the instructions for your Label printer in PDF format for free! Find your manual PC42t - HONEYWELL and take your electronic device back in hand. On this page are published all the documents necessary for the use of your device. PC42t by HONEYWELL.
USER MANUAL PC42t HONEYWELL
natural_image
Black Honeywell brand electronic device with a red LED indicator and clear glass cover (no visible text or symbols on the device body)User Guide
Disclaimer
Honeywell International Inc. ("HII") reserves the right to make changes in specifications and other information contained in this document without prior notice, and the reader should in all cases consult HII to determine whether any such changes have been made. The information in this publication does not represent a commitment on the part of HII.
HII shall not be liable for technical or editorial errors or omissions contained herein; nor for incidental or consequential damages resulting from the furnishing, performance, or use of this material. HII disclaims all responsibility for the selection and use of software and/or hardware to achieve intended results.
This document contains proprietary information that is protected by copyright. All rights are reserved. No part of this document may be photocopied, reproduced, or translated into another language without the prior written consent of HII.
Patents
For patent information, please refer to www.hsmpats.com.
Copyright © 2015 Honeywell International Inc. All rights reserved.
Contents
Customer Support.... vii
Product Service and Repair . . . . . . . . . . . . . . . . . . . . . . . . . . . . . . . . . . . . . . . . . . . . . . . . . . . . . . . . . . vii
Limited Warranty ...... vii
Send Feedback...... vii
1 About the Printer....1
About the PC42t Printer 2
Printer Features....2
About the Print Button 3
About the Status LED 4
About Media 5
Load Tear-Off Media....6
Load External Media 10
Load Ribbon 10
Connect the Printer to Power 16
About Printer Command Languages....16
About Direct Protocol 17
About ESim 17
About ZSim....17
How to Set the Printer Command Language ..... 17
Set the Command Language with the Print Button 18
Set the Command Language from the Printer Web Page 18
About Test Labels 19
Print a Test Label When You Turn on the Printer 19
Print a Test Label When the Printer is Ready to Print 20
2 Connect the Printer 21
Install Printer Drivers....22
How to Connect the Printer to Your PC 23
Connect the Printer with a USB Cable 23
Connect the Printer with a Serial Cable 23
Contents
Connect the Printer to Your Network 24
Connect a USB Device 24
Configure the Printer 25
Configure the Printer from the Printer Web Page. 25
Configure the Printer with PrintSet. 27
Upgrade the Firmware. 27
Download the Printer Firmware Update 28
Upgrade Firmware from a USB Storage Device. 28
3 Troubleshoot and Maintain the Printer 29
Contact Product Support. 30
Locate the Printer Configuration and Serial Numbers. 31
Printer Problems and Possible Solutions 32
How to Restore Default Settings 33
Restore Default Settings with the Print Button 33
Restore Default Settings from the Printer Web Page 34
Restore Default Settings with PrintSet 35
Clean the Printhead 35
Replace the Printhead. 36
Clean the Platen Roller 38
Clean the Interior of the Printer 39
Clean the Exterior of the Printer....40
A Specifications....41
Printer Specifications 42
Supported Bar Code Symbologies 45
B Default Settings....47
Default Configuration....48
Serial Port Settings. 48
Ethernet Settings 49
Media Settings 49
Contents
Print Quality Settings 52
General System Settings 52
Manage I/O Settings. 54
Manage Services Settings 54
DNS Network Services....55
Net1 Network Services....55
WINS Network Services....56
Web Server Network Services 56
C Print Labels with INPrint....57
About the INPrint Page 58
Print INPrint Labels 58
Predefined INPrint Label Formats 60
Contents
Customer Support
If you need assistance installing or troubleshooting your product, contact us by using one of these methods:
Knowledge Base: www.hsmknowledgebase.com
Our Knowledge Base provides thousands of immediate solutions. If the Knowledge Base does not help you solve your problem, log into the Technical Support Portal to submit your problem or ask your question.
Technical Support Portal: www.hsmsupportportal.com
Log into the Technical Support Portal to search our Knowledge Base, submit your problem or question, request a call back, or provide feedback. When filling out one of the forms, provide as much detail as possible. You can even include attachments.
Telephone: www.honeywellaidc.com/locations
For our latest contact information, please check our website.
Product Service and Repair
Honeywell International Inc. provides service for all of its products through service centers throughout the world. To find your service center, go to www.honeywellaidc.com and select Support > Contact Support > Service and Repair. Contact your service center to obtain a Return Material Authorization number (RMA #) before you return the product.
To obtain warranty or non-warranty service, return your product to Honeywell (postage paid) with a copy of the dated purchase record.
Limited Warranty
For warranty information, go to www.honeywellaidc.com and click Resources > Warranty.
The limited duration of the warranty for the PC42t printer is as follows:
- The duration of the limited warranty for printers is one year.
- The duration of the limited warranty for the printhead is six months.
Send Feedback
Your feedback is crucial to the continual improvement of our documentation. To provide feedback about this manual, please contact the Technical Communications department directly at ACSHSMTechnicalCommunications@honeywell.com.

Warning: Moving parts are exposed when the cover is open. Make sure the cover is closed before you operate the printer.
Warning: The printhead/motor may be hot. Allow the printhead/motor to cool.
Warning: Do not put your fingers inside the print mechanism when the power is on.
Warning: The tear bar contains sharp edges. Keep fingers and other body parts away from the tear bar.

Caution: Read and review the warnings in this manual carefully before connecting the printer.
Caution: Observe all safety and accident prevention regulations applicable to your specific region and application.
Caution: Do not spray the printer with water. If you are using a host to clean the premises in an industrial environment, remove the printer or protect it carefully from spray and moisture.
Caution: You must implement both hardware and software safety precautions to prevent the possibility of undefined system states.
Caution: You must make sure that dangerous conditions cannot occur under any circumstances, even for a brief period of time.
Caution: Carefully read the warning text on the envelope before using a cleaning card.
Caution: To reduce the risk of electric shock or fire, keep the cover closed and turn off the printer when not in use. No user-serviceable parts inside.
1
About the Printer
This chapter introduces the PC42t printer. It includes descriptions of the printer features and basic operation.
About the PC42t Printer
The PC42t printer is a lightweight, reliable printer that is easy to use. It is designed to print up to 1000 labels a day. Printer features include:
• 203 dpi (8 dots/mm) printing.
- print speeds from 2 to 4 ips (inches per second).
- USB host port for connecting storage devices, scanners, or keyboards.
- USB device port for connecting to a desktop PC.
- support for printer programming languages including Direct Protocol, ZSim, and ESim.
- optional, factory-installed Ethernet interface.
- optional, factory-installed RS-232 serial port interface.
Printer Features
Use the next illustrations to locate printer features.

PC42t Front Panel

PC42t Rear Panel
About the Print Button
Use the next table to understand the functions of the Print button.
How to Use the Print Button
| Print Button Action Description | |
| Press and hold the Print button (while the printer is starting up) | The printer calibrates the media, prints a configuration label, and then lets you select the printer command language: Direct Protocol, ESim, or ZSim. Release the Print button when the printer command language you want to use prints out. |
| Press and hold the Print button for two seconds and then release (when the printer is idle) | The printer prints out several labels to calibrate the media sensor (testfeed). |
| Press and hold the Print button (when the printer is idle) | The printer prints out several labels (testfeed) and then prints the configuration label. |
How to Use the Print Button (continued)
Print Button Action Description
| Press and release the Print button | If the printer is idle, the printer advances media to the beginning of the next label.If the printer is printing, the printing pauses.If the printer has been paused, printing resumes. |
About the Status LED
The status LED turns green, orange, or red to indicate the current status of the printer. Use the next table to understand the states of the status LED.

Status LED States
LED State Description
| Slow blinking green The printer is just starting up.Printing is paused. |
| Fast blinking green The printer is communicating.The simulator (ZSim and ESim) is starting up. |
| Solid green The printer is idle and waiting for the next print job. |
| Blinking orange The printer is upgrading its firmware from an inserted USB flash drive. |
Status LED States (continued)
LED State Description
Blinking red The printer is in Error mode. The printer may be out of ribbon, have ribbon installed (when configured for direct thermal), be out of media, have the printhead lifted, have a label obstructing the printing path, or you may not have performed a testfeed (hold Print button until several labels print). After you have fixed the error, press the Print button to restart printing.
About Media
The printer can print on labels, tags, and continuous (receipt and linered) media. The printer supports both direct thermal and thermal transfer media. To use thermal transfer media, you also need thermal transfer ribbon. The PC42t printer supports media from 1 to 4.33 inches (25 to 110 mm) wide.
Chapter 1 — About the Printer
Load Tear-Off Media
In tear-off printing mode, you manually tear off the media upward against the tear bar.
1 Press in on the cover latches on both sides of the printer and open the cover.

2 Press in on the top of both locking tabs to open the print and ribbon mechanism.

natural_image
Technical diagram of a mechanical device with internal components and red directional arrows indicating movement or force (no text or symbols present)6 PC42t Desktop Printer User Guide
3 Insert the media spindle into the media roll. If there is an empty media core in the media compartment, remove it.
- If you have a 1.0-inch core, insert the media spindle so that the 1^ is facing upward.
- If you have a 1.5-inch core, insert the media spindle so that the 1.5" is facing upward.

natural_image
Mechanical assembly diagram showing a roll being inserted into a machine, with red arrows indicating direction of motion (no text or symbols present)4 Remove the Mylar ^® film from the black mark sensor.
5 Adjust the black mark sensor:
- If you are using black mark media, slide the black mark sensor so that the marks pass over the sensor.
- For all other media types, make sure the black mark sensor is in the center of the media path.

natural_image
Technical illustration of a printer internal structure with red arrows indicating parts (no text or symbols present)Chapter 1 — About the Printer
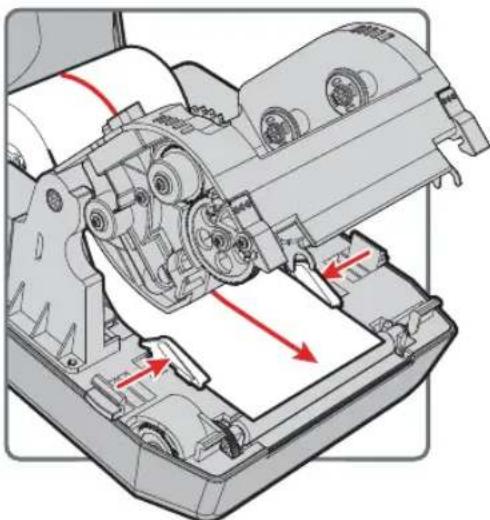
6 Feed the media underneath the print and ribbon mechanism and to the front of the printer.
natural_image
Mechanical assembly diagram showing internal components with red arrows indicating motion or force directions (no text or symbols present)7 Adjust the media holders to the width of the media or liner. Make sure the media lays flat.
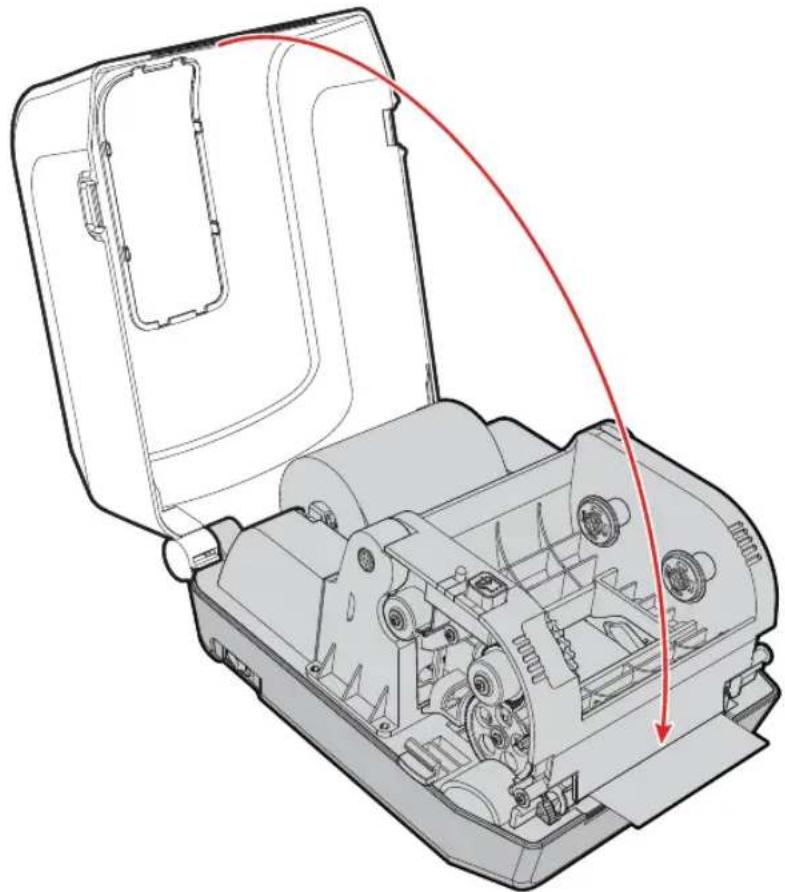
8 Lower the print and ribbon mechanism and press down until both locking tabs snap into place.

natural_image
Technical line drawing of a mechanical assembly with no visible text or symbols9 Close the cover.
natural_image
Technical line drawing of a mechanical device with open casing and internal components, showing red arrows indicating motion or flow (no text or symbols)10 Press the Print button to feed media out to the first label in the roll.
Chapter 1 — About the Printer
Load External Media
You can place the media supply, such as fanfold tickets or tags, behind the printer. You need to purchase an external media holder separately.

Note: Make sure to protect the media from direct sunlight and from dust, dirt, or other foreign particles that can impair the printout quality or cause unnecessary wear to the printhead.
1 Place the media behind the printer.
2 Feed the media into the printer through the external media feed slot.

3 Thread the media through the printer and adjust the media holders and sensor as you would for media that loads inside the printer.
Load Ribbon
You need to use thermal transfer ribbon to print on thermal transfer media. Make sure to select ribbon that matches the face materials of the media to obtain the best durability and print quality.

Note: The PC42t can only use ribbon that is "ink out," which means that the ribbon is loaded with the inked side (the dull side) facing out.
1 Press in on the cover latches on both sides of the printer and open the cover.

Chapter 1 — About the Printer
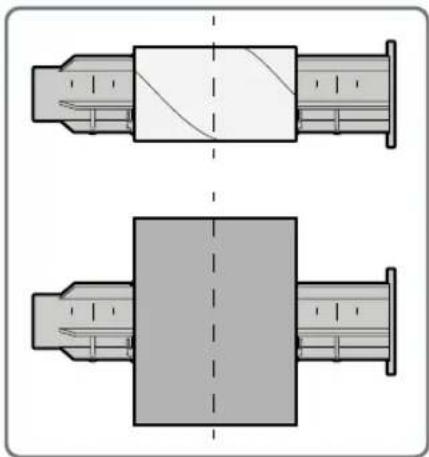
2 Insert one ribbon adapter into the thermal transfer ribbon roll and insert the other ribbon adapter into the empty ribbon takeup core.

natural_image
Diagram of a syringe inserted into a cylindrical container, showing internal components and red arrows indicating flow direction (no text or labels)If your media is not very wide, center the media and the empty ribbon takeup core on the ribbon adapter.
natural_image
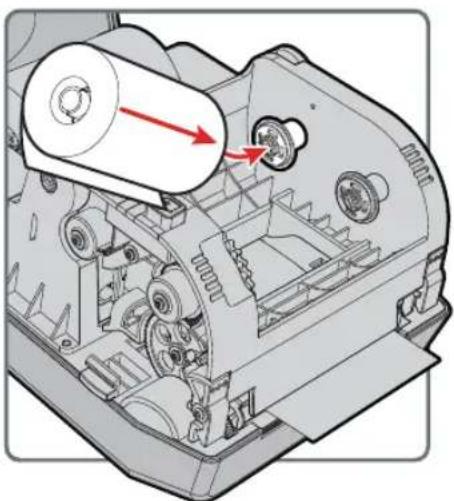
Technical diagram showing two mechanical assembly views with no visible text or symbols3 Place the thermal transfer ribbon roll between the rear ribbon holders. The ribbon should come off of the roll as shown in the illustration.
natural_image
Mechanical assembly diagram showing a cylindrical component inserted into a housing with red arrows indicating direction (no text or symbols present)4 Place the empty ribbon takeup core between the front takeup core holders.
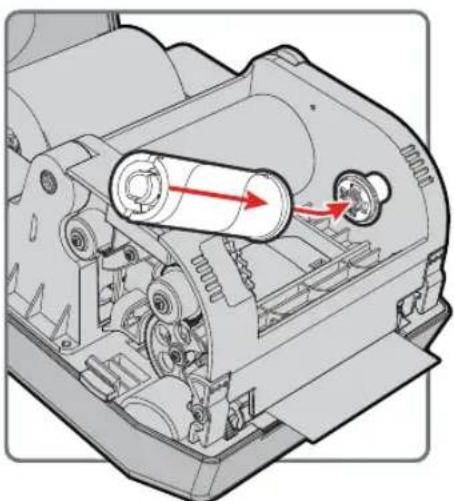
natural_image
Mechanical assembly diagram showing internal components with red arrows indicating flow or movement (no text or symbols present)5 Make sure both ribbon adapters are "locked" into the ribbon wheels on the left side of the print and ribbon mechanism.
Chapter 1 — About the Printer
6 Press in on the top of both locking tabs to open the print and ribbon mechanism.

natural_image
Technical diagram of a mechanical device with internal components and red directional arrows indicating motion (no text or symbols)7 Feed the ribbon down through the opening in the bottom of the print and ribbon mechanism, over the printhead and the front of the mechanism, and attach it to the empty takeup core.

natural_image
Mechanical assembly diagram showing internal components and a red curved arrow indicating rotation (no text or symbols present)8 Turn the slack wheel to take up slack in the ribbon. Make sure the ribbon surface is smooth and that the ribbon is winding correctly.

natural_image
Mechanical assembly diagram showing a motor and gear mechanism with red arrows indicating motion direction (no text or symbols)9 Close the print and ribbon mechanism.
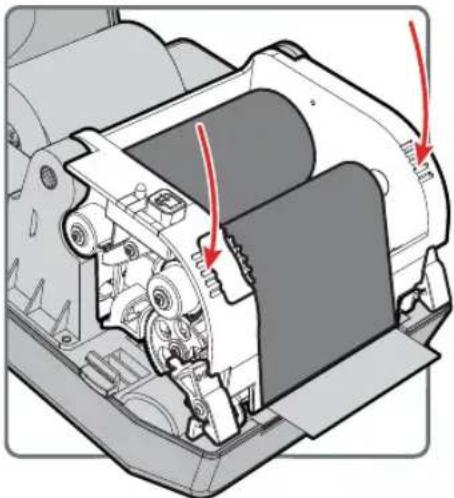
natural_image
Technical diagram of a mechanical assembly with red arrows indicating parts of a component (no text or symbols present)10 Close the printer cover.
Connect the Printer to Power

Caution: Use only the AC power adapter supplied with the printer. The use of a power adapter not approved by Honeywell voids the product warranty and may damage the printer.
Caution: Turn the printer off when not in use.
1 Connect the power adapter to the power port on the rear of the printer.
2 Connect the power adapter to AC power. When the adapter is connected to AC power, the green LED in the adapter connector turns on and stays on.
3 Press the Power switch to turn the power on. As the printer starts up, the green LED turns on and blinks.
The green LED turns on solid green when the printer is ready to print.
You can now set the printer command language or a print a configuration label. For help, see "How to Set the Printer Command Language" on page 17 or "About Test Labels" on page 19.
About Printer Command Languages
A printer command language is a set of instructions that controls printer functions:
- Configure the printer.
- Return the status of the printer.
• Control peripheral devices. - Format a label or receipt for printing.
The printer supports these command languages and language simulator support options:
- Direct Protocol (DP)
- ESim (EPL command language simulator)
- ZSim (ZPL command language simulator)
About Direct Protocol
Direct Protocol (DP) is a flexible printer language that uses an intuitive English-like syntax. Direct Protocol lets you combine predefined layouts and variable data to create labels, tickets, and tags. If you are using bar code software, like BarTender, select Direct Protocol (the factory default) as your printer command language.
About ESim
ESim (EPL command language simulator) interprets Eltron® printing language commands. If you are sending EPL label files to the printer, select ESim as your printer command language. For more information, see the ESim Command Reference Manual.
About ZSim
ZSim (ZPL-II command language simulator) interprets Zebra™ programs without requiring any host programming changes. If you are sending ZPL label files to the printer, select ZSim as your printer command language. For more information, see the ZSim Command Reference.
How to Set the Printer Command Language
You can use one of these methods to change the printer command language:
- Print button
- Printer web page (with Ethernet option installed)
- Printset. For more information, see “Configure the Printer with PrintSet” on page 27.
You may need to configure the media type and print method when you set the command language through the printer web page or the printer configuration software (not applicable when setting the printer command language with the Print button).
Set the Command Language with the Print Button
1 Make sure the printer has media and ribbon (if necessary) installed.
2 Turn off the printer.
3 Press and hold the Print button.
4 Turn the printer on. The green LED turns on and blinks.
The printer calibrates the media, prints out a configuration label, and then it prints labels with the different command languages one at a time at two second intervals.
5 When the label prints out with the command language you want to use, release the Print button.
Set the Command Language from the Printer Web Page
To set the command language from the printer web page, you need to turn on the printer and connect to your Ethernet network.
1 Make sure that the printer has media and ribbon (if necessary) installed.
2 On your PC, open a browser.
3 In the Location or Address bar, type the printer IP address and press Enter. The printer web page appears.

4 Click Login. The Login page appears.
5 Type your Username and Password and click Login. The default username is itadmin and the default password is pass.
6 Click the Configure tab.
7 Click System Settings > General.
8 Select the desired printer command language from the Command Language list, and then click Save.
9 Click the Services tab.
10 Click Restart Printer, and then click Restart. The printer restarts in the command language you selected.
About Test Labels
You can print a test label to check print quality and get configuration information, including lists of the fonts, images, and applications installed on the printer. Use one of these methods to print a test label:
- when you turn on the printer.
- when the printer is ready to print.
- with the printer configuration software.
You can also print test labels from the printer web page, which requires a network connection to a desktop PC. You need to know the printer IP address to view the printer web page. It takes around 10 seconds to acquire the IP address when you connect the printer through Ethernet. If the test label shows the IP address as 0.0.0.0, wait 10 seconds and then print another test label.
Print a Test Label When You Turn on the Printer
You can print a test label when you first turn on the printer.
1 Make sure that the printer has media and ribbon (if necessary) installed.
2 Connect the printer to power and turn on the printer.
3 Press and hold the Print button until the printer calibrates the media, prints a configuration label, and then lets you select the printer command language.
Chapter 1 — About the Printer
Print a Test Label When the Printer is Ready to Print
You can print a test label when the printer is sitting idle and ready to print.
1 Make sure that the printer has media and ribbon (if necessary) installed.
2 Press and hold the Print button until the printer advances media to the beginning of the next label. The printer will then print out a Configuration label.
2
Connect the Printer
This chapter explains how to download the Windows ^® printer drivers and connect the PC42t printer to your PC and an Ethernet network.
Install Printer Drivers
Use InterDriver to install Microsoft Windows printer driver software on your PC. InterDriver is included on the PrinterCompanion CD that shipped with your printer. If you have not yet installed drivers on your PC, run the PrinterCompanion CD and follow the instructions to connect your printer and install the drivers.
If you do not have access to the PrinterCompanion CD but you still need to install driver software, follow this procedure to download InterDriver from the Honeywell website and install the drivers.
1 Open a web browser and go to www.honeywellaidc.com.
2 Select Support > Downloads.
3 Select these items:
a In the Product Category list, select Printers.
b In the Product Family list, select Fixed Printer.
c In the Product list, select PC42t Desktop Printer and then click Submit.
4 In the downloads page, select the latest version of InterDriver. If a Security Warning dialog box appears, click Run.
5 When asked if you want the program to make changes to your computer, click Yes.
6 Follow the onscreen instructions to install InterDriver.
How to Connect the Printer to Your PC
You can connect the printer to your PC using one of these cables:
- USB cable
- Serial cable
Connect the Printer with a USB Cable
The printer supports USB connections to a desktop PC. You do not need to set any parameters for USB communications.

Note: You must install InterDriver to use a USB connection to a Windows PC. For more information, see the PrinterCompanion CD that came with your printer or the InterDriver installation instructions above.
1 Download and install InterDriver on your PC.
2 Connect one end of the USB cable to the USB device port on the back of the printer and when prompted during the InterDriver installation, connect the other end to your PC.
Connect the Printer with a Serial Cable
If you have the optional factory-installed serial port on your printer, you can connect the printer to the serial port on a PC.
1 Connect one end of the serial cable to the connector on the back of the printer and connect the other end to your PC.
2 Configure the serial port settings with the printer web page or with PrintSet.
Connect the Printer to Your Network
If your printer has a factory-installed optional Ethernet port, you can connect the printer to your network. By default, the printer is configured to obtain an IP address through DHCP. If your network uses a different method to assign IP addresses, you need to configure the IP address assignment method by using your printer configuration software through a USB or an optional serial connection.
1 Turn on the printer.
2 Connect one end of the Ethernet cable to the printer and the other end to the network.
3 Print a configuration label to find the IP address for the printer. For help, see "About Test Labels" on page 19.
It takes approximately 10 seconds after the printer LED turns steady green to obtain an IP address. If the configuration label prints an IP address of 0.0.0.0, wait 10 seconds and print another label.
4 Configure any necessary Ethernet settings through the printer web page or PrintSet.
Connect a USB Device
You can use the USB host interface port on the printer to connect keyboards, bar code scanners, or a USB storage device.
1 If you are connecting a USB storage device, make sure the device has a single partition and is formatted as FAT16 or FAT32.
2 Connect the device to the USB host port.
Configure the Printer
You can configure your printer:
• from the printer web page.
- with PrintSet. PrintSet is available on the PrinterCompanion CD. The latest version is available from the Honeywell web site at www.honeywellaidc.com.
Configure the Printer from the Printer Web Page
You can configure most network settings from the printer web page.
1 Start a web browser on your PC.
2 In the address field, type the IP address of your printer and press Enter. The printer web page appears.

Note: If you do not know the IP address of your printer, you can print a configuration label. For more information, see "About Test Labels" on page 19.

3 Click Login.
4 Type your Username and Password in the entry fields, and then click Login. The default username is itadmin, and the default password is pass.
Chapter 2 — Connect the Printer
5 Click Configure. The Configuration Summary page appears.
6 To see a list of printer settings, click Configuration Summary.
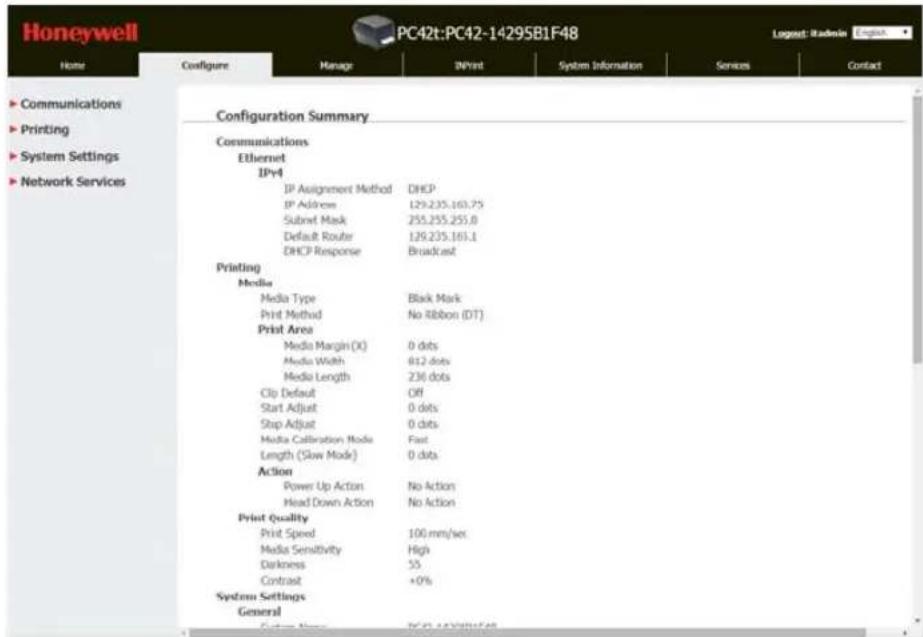
To configure printer settings, use the links in the navigation pane:
• For serial port settings, click Communications.
• For media, print quality, or performance settings, click Printing.
- For display, service, and general settings, and maintenance alert message triggers, click System Settings.
- To set conditions that trigger error, warning, and information alert messages, click Alerts.
Configure the Printer with PrintSet
You can use PrintSet to easily change your printer configuration settings. You can also use the setup wizards in PrintSet to guide you through common configuration tasks.
1 Make sure that you have Windows XP or later running on your PC.
2 Install PrintSet from the PrinterCompanion CD.
3 Connect your printer to your PC using a serial, USB, or network connection.
4 Launch PrintSet and start configuring your printer. For help, see the PrintSet online help.
Upgrade the Firmware
You should check for periodic updates to the printer firmware. Updated firmware can include bug fixes or additional features that you might find useful. The latest version of the firmware is available from the PC42t printer Downloads page on www.honeywellaidc.com.
You can upgrade the printer firmware with a USB storage device.
Download the Printer Firmware Update
Before you can upgrade the printer firmware, you need to download the upgrade file from the Honeywell website.
1 Go to the Honeywell website at www.honeywellaidc.com.
2 Click Support > Downloads.
3 Use Product Category, Product Family, and Product to select the PC42t.
4 Click Submit. The latest software appears on the page.
5 Download the latest firmware version to your PC.
Upgrade Firmware from a USB Storage Device
Use a USB storage device to upgrade the printer firmware.
1 Make sure the USB storage device has a single partition and is formatted as FAT16 or FAT32.
2 Download the printer firmware from the Honeywell website.
3 Copy the firmware upgrade file (typically a .bin format) to the root of a USB storage device.
4 Turn off the printer.
5 Insert the USB storage device into one of the USB host ports.
6 Turn on the printer.
As the firmware upgrade file is loaded into the printer, the status LED blinks orange. This process may take several minutes.
When the printer status LED turns solid green, the printer is ready to use.
3
Troubleshoot and Maintain the Printer
Contact Product Support
If you cannot find the answer to your problem in the “Printer Problems and Possible Solutions” on page 32, try one of these options:
- To find an answer to your question yourself, you can search the database at www.hsmknowledgebase.com.
• To ask an expert a question in the U.S.A. and Canada, call 1-800-782-4263. - To contact an expert outside the U.S.A. and Canada, go to www.honeywellaidc.com > Contact.
Before you call Product Support, make sure you have this information ready:
- Printer serial number
- Printer configuration number
- Firmware type and version
- Printer command language
- Serial port settings (if applicable)
• Media settings - Ethernet settings (if applicable)
You can find all of this information on the printer web pages or on a test label.
Locate the Printer Configuration and Serial Numbers
You can also find the printer configuration and serial numbers on the product label located on the bottom of the printer.

Printer Problems and Possible Solutions
Use this section to find possible solutions to printer problems.
Printer Problems and Possible Solutions
| Problem Possible Solution | |
| The status LED if off, but the power is on. | Make sure the connectors on the power supply are securely plugged into the printer and an AC outlet. |
| The status LED is green, but the printer is not feeding media. | Make sure the correct type of interface cable is securely plugged into both the printer and computer. |
| Only partial labels are being printed. | Try these possible solutions:Make sure that the print and ribbon mechanism is fully locked. Open the printer and lower the printhead completely until both latches click into place.Check to see if a label is caught on the printhead. If you find a caught label, remove the label and clean the printhead. For help, see “Clean the Printhead” on page 35. |
| The print quality is poor. Try these possible solutions:Clean the printhead. For help, see “Clean the Printhead” on page 35.Make sure the ribbon is compatible with the media.Make sure the darkness setting is correct for the media and ribbon combination. | |
| The printer seems to be working but nothing prints. | For direct thermal printing, try these solutions:Make sure that the heat-sensitive side of the media is facing the printhead.Verify that the media is direct thermal media by firmly running your fingernail on the surface of the media. If you see a black line, the media is direct thermal. |
| The printing stops and status LED is red. | Try these possible solutions:Use PrintSet to check the printer error status.There may be a media jam. Open the printer and check for stuck labels or ripped perforations.If a “Printhead Lifted” error is reported and the printhead is closed, make sure the round white sticker is present on the right side of the print and ribbon mechanism. |
Printer Problems and Possible Solutions (continued)
Problem Possible Solution
The printer continues to print or feed when it should stop printing
Check to see if a stuck label is blocking the label gap sensor. Open the top cover, remove the label, and clean the printhead. For help, see “Clean the Printhead” on page 35.
How to Restore Default Settings
If you need to restore factory defaults at any time, you can use:
- the Print button.
- the printer web page.
- PrintSet.
Restore Default Settings with the Print Button
The easiest way to reset the printer to the factory default settings is with the Print button.
1 Turn off the printer.
2 Press in on the cover latches on both sides of the printer and open the cover.
3 Press in on the top of both locking tabs to open the print and ribbon mechanism.
4 Turn the printer on.
5 When the status LED starts blinking green, press and hold the Print button until the status LED turns off.
6 Make sure the media is loaded correctly.
7 Close the print and ribbon mechanism.
8 Close the cover.
Restore Default Settings from the Printer Web Page
If the printer is connected to an Ethernet network, you can restore default settings from the printer web page.
1 On your desktop PC, start a web browser.
2 In the address field, type the printer IP address and then press Enter. The printer web page appears.
3 Click Login in the upper right corner of the screen. The Login page appears.
4 Type your Username and Password in the entry fields and then click Login. Use the default username of itadmin and the default password of pass.
5 Click the Services tab >Restore Defaults.

6 Select the settings you want to restore:
- Check the Network settings check box to restore defaults for all network connections, such as IP address and network name.
- Check the User-Installed Files check box to erase all files you uploaded to the printer memory.
- Check the System Settings check box to restore defaults for system settings, such as media width.
7 Click Restore.
8 Click Yes to continue. The printer restarts and the settings you selected are restored to default values.
Restore Default Settings with PrintSet
If you have PrintSet installed on your PC, you can use it to restore the default settings on your printer.
- Use the Factory Default Wizard in the Printer Tasks box.
Clean the Printhead
Cleaning the printhead on a regular basis is important for the life of the printhead and for the best print quality. You should clean the printhead each time you replace the media. Follow this procedure to clean the printhead using the cleaning card. If you need to clean additional residue from the platen roller or tear bar, use a cotton swab moistened with isopropyl alcohol.

Caution: Never use hard or sharp tools to peel away stuck labels or other material. The printhead is delicate and can easily be damaged.
1 Turn the printer off and disconnect the printer from power.
2 Open the printer, open the print mechanism, and remove the media and ribbon (if installed).
3 Insert most of the cleaning card under the printhead, and then lower the print mechanism.
4 Pull out the cleaning card and raise the printhead.
5 Wait for approximately 30 seconds to allow the cleaning fluid to dissolve the residue.
6 Print a test label to check for print quality. For help, see "Print a Test Label When the Printer is Ready to Print" on page 20.
7 Repeat Steps 3 through 5 if necessary.
8 If necessary, clean residue from the platen roller or tear bar with a cotton swab moistened with isopropyl alcohol.
9 Once the parts are dry, replace the media (and ribbon) in the printer.
10 Close the printer, reconnect power, and turn on the printer.
Replace the Printhead
You need to replace the printhead periodically when it wears out due to the rapid heating and cooling process used during printing. How often you need to replace the printhead depends on factors such as what type of images you print, the type of media or ribbon you use, the amount of energy to the printhead, the print speed, and the ambient temperature of the room you print in. The firmware detects the new printhead when you restart the printer.
1 Turn off the printer and disconnect the power cord.
2 Press in on the cover latches on both sides of the printer and open the cover.
3 Press in on the top of both locking tabs to open the print and ribbon mechanism.
For a thermal transfer printer, remove the ribbon.
4 Pull the printhead latches apart one at a time until the printhead falls forward away from the print mechanism.

5 Carefully slide the printhead out of the mechanism. The printhead is still attached to the mechanism by a ribbon cable and a grounding screw.
6 Unscrew the grounding screw with a #2 Phillips screwdriver.
Chapter 3 — Troubleshoot and Maintain the Printer
7 Disconnect the cable from the printhead and remove the printhead from the printer.
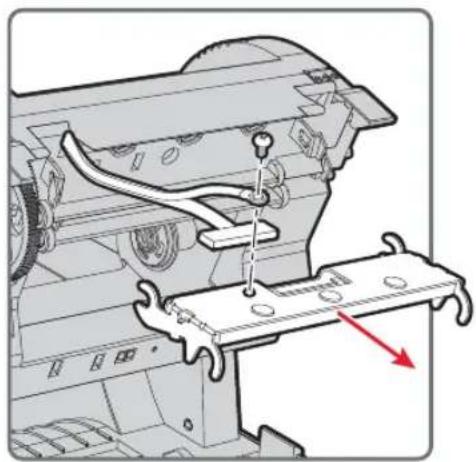
natural_image
Mechanical assembly diagram showing a vehicle's internal components and a lever mechanism (no text or labels)
Warning: Do not touch the printhead surface area.
8 Insert the grounding screw into the grounding cable lug and then fasten the screw to the new printhead.
9 Connect the ribbon cable to the new printhead.
10 Slide the printhead into the holders in the print mechanism.
11 Tilt the printhead up into the printer lid and press it into place.
12 When the printhead is in the correct position, the printhead latches snap into place on the sides of the printhead.
For a thermal transfer printer, install the ribbon.
13 Close the print and ribbon mechanism and the cover.
Chapter 3 — Troubleshoot and Maintain the Printer
Clean the Platen Roller
Follow this procedure to remove, clean, and replace the platen roller as part of standard maintenance for the printer. You should check the platen roller for debris each time you load media and clean it if dirty.

Caution: Never use hard or sharp tools to peel away stuck labels or other material. The platen roller is delicate and can easily be damaged.
1 Turn the printer off and disconnect the power cord.
2 Press in on the cover latches on both sides of the printer and open the cover.
3 Press in on the top of both locking tabs to open the print and ribbon mechanism.
4 Remove the installed media (and ribbon).
5 Pry up on the end of the platen roller near the gear.

natural_image
Mechanical assembly diagram showing internal components with red arrows indicating motion direction (no text or symbols)6 Pull up on the platen roller to remove it from the printer.

natural_image
Mechanical assembly diagram showing internal components with no visible text or symbols7 Remove any adhesive residue from the roller with a cotton swab moistened with isopropyl alcohol.
8 Reverse Steps 5 and 6 to install the roller.
9 Lower the print and ribbon mechanism and press down on each side until the locking tabs snap into place.
10 Close the cover.
Clean the Interior of the Printer
To keep the interior of the printer clean:
• Make sure the media path is clean.
- Make sure sensor mylar covers are free of fingerprints, oil, dirt, and dust.
Clean the Exterior of the Printer
Make sure to keep the exterior of the printer clean. Maintaining a clean exterior will reduce the risk of dust or foreign particles reaching the inside of the printer and affecting printer functionality. Make sure to keep the surface surrounding the printer clean as well.
Honeywell has tested and recommends these cleaning products for compatibility with the exterior of the PC42t printer.
Recommended Cleaners
| Manufacturer Product | |
| Homax Goo Gone | |
| Johnson Virex TB | |
| Metrex Cavi Wipes | |
| Multiple suppliers 70% isopropyl alcohol | |
| Ammonium chloride 10% | |
| Ethylene glycol screen cleaner | |
| Sodium hypochlorite 6% | |
| Orange-Sol Multi-Use Citrus | |
| PDI SANI-CLOTH HB | |
| SANI-CLOTH PLUS SUPER | |
| SANI-CLOTH | |
| PDI and others Alcohol Prep Pads | |
| Quest Chemical Corporation Grime Buster | |
| Spartan Super HDQL 10 | |
| Surgipath Cloro-Wipe Towelette | |
| Techspray Renewal Eco-Shower | |
| Veridien | Viraguard® |
| Vernacare | Tuffiewipes |
A
Specifications
This appendix contains specifications for the PC42t printer.
Printer Specifications
PC42t Physical Specifications
Dimensions: 226 mm x 297 mm x 175 mm (8.9 in x 11.7 in x 6.9 in)
Weight: 2.5 kg (5.5 lbs)
Power Supply Requirements: 100–240 VAC, 50–60 Hz, 1.5 A
Operating Temperature: 5 °C to 40 °C (41 °F to 104 °F)
Storage Temperature: -40 °C to 60 °C (-40 °F to 140 °F)
Relative Humidity: 15 to 80% non-condensing
PC42t Print Speed, Resolution, and General Media Specifications
Print Mode: Direct thermal, thermal transfer
Print Speed (variable): 50, 75, and 100 mm/sec (2, 3, and 4 ips)
Print Resolution: 203 dpi: 8 dots/mm
Print Width: 104 mm (4.09 in) max
Media Width: 25.4 to 110 mm (0.99 to 4.33 in)
Label Roll Diameter (maximum): 127 mm (5 in)
Label Length (minimum): 9.60 mm (.34 in)
Gap Length Between Labels: 2 to 4.5 mm (0.08 to 0.18 in)
Black Mark Length: 3 to 5 mm (0.12 to 0.19 in) can be adjusted from center to extreme left
Media Thickness: 0.0762 to 0.254 mm (3 to 10 mil)
Liner Opacity (maximum): 76% (TAPPI T425)
Ribbon Width: 30 to 110 mm (1.18 to 4.33 in)
Ribbon Roll Diameter (maximum): 68 mm (2.68 in)
Ribbon Core (I.D.): 25.2 to 25.6 mm (0.99 to 1.01 in)
Ribbon Core Length: 30 to 110 mm (1.18 to 4.33 in) notched or notchless
Ribbon Wound Ink Side: Out only
Memory
128 MB flash
64 MB SDRAM (printer use of memory will result in a lower value)
(optional) USB memory device, up to 32 GB
Supported Command Languages
Direct Protocol
ESim
ZSim
Sensors
Label gap sensor
Headlift sensor
Ribbon out sensor
Black mark sensor
Network Services
FTP
Line Printer Remote Protocol (LPR)
Telnet 9100
DHCP
Raw TCP
BOOTP
Web page
Universal Font Scaling Technology and Standard Latin Fonts
Andale Mono
Andale Mono Bold
Univers
Univers Bold
Univers Condensed Bold
OCR-A
OCR-B
CG Triumvirate Condensed Bold
MHeiGB18030C_Medium (Simplified Chinese GB18030)
Appendix A — Specifications
Supported Font Types
TrueType
OpenType
Bitmap
Supported Graphic File Types
Supports 1-bit color depth (black and white) only:
PCX
PNG
GIF
BMP
Drivers
Support for Microsoft Windows XP, Vista, Windows 7, Server 2003, and Server 2008
Supports 32-bit and 64-bit editions
InterDriver also supports Windows 8 and Windows Server 2012
Supported Bar Code Symbologies
1D bar code symbologies:
- Codabar
- Code 11
-
Code 39:
-
Code 39 full ASCII
• Code 39 with checksum -
Code 93
-
Code 128:
-
Code 128 Subset A
• Code 128 Subset B - Code 128 Subset C
- Code 128 UCC
• DUN-14/16
• EAN:
• EAN-8
• EAN-13
• EAN 128
• EAN 128 subset A
• EAN 128 Subset B
• EAN 128 Subset C
• HIBC 39
• HIBC 128
- Industrial 2 of 5
- Interleaved 2 of 5
• ISBT-128
- Matrix 2 of 5
- Straight 2 of 5
- UPC
- Add-on bar code symbologies:
- Add-on 2
Appendix A — Specifications
- Add-on 5
- UPC-5 digits Add-on code
2D bar code symbologies:
- Aztec
- Code 16K
- Code 49
- Data Matrix
- Dot Code
- Grid Matrix
• GS1 DataBar (previously called RSS-14):
• GS1 DataBar Expanded
• GS1 DataBar Expanded Stacked
• GS1 DataBar Limited
• GS1 DataBar Stacked
• GS1 DataBar Stacked Omnidirectional
• GS1 DataBar Truncated
- MaxiCode
- MicroPDF417
• MSI (modified Plessey) - PDF417
- Planet
- Plessey
- Postnet
- QR Code
• USPS 4-State Customer Bar Code - Composite bar code symbologies:
• EAN-8 Composite (CC-A, CC-B)
• EAN-13 Composite (CC-A, CC-B)
• GS1 Composite (previously called EAN.UCC Composite)
• UPC-A Composite (CC-A, CC-B)
• UPC-E Composite (CC-A, CC-B)
B
Default Settings
This appendix contains all of the default settings for the printer.
Default Configuration
Use this appendix to view the default settings on the printer. If you restore the printer to factory default settings, it will use the values listed here. The order of the settings reflects the organization of the printer web page.
Serial Port Settings
This section describes the serial port settings. To view these settings:
- From the printer web page, click the Configure tab > Communications > Serial.

Note: These settings are not accessible unless you have the optional serial port installed and a connection to a PC.
Serial Port Settings
| Setting Description Default | |
| Baud Rate Transmission speed in bits per second (bps) for the serial port. | 115200 |
| Data Bits Number of bits that define a character or byte. 8 | |
| Parity Specifies how the printer checks the integrity of the transmitted data. | None |
| Stop Bits Number of bits sent at the end of every character to allow the receiving signal hardware to detect the end of a character and to resynchronize with the character stream. | 1 |
| Hardware Specifies if hardware flow control (RTS/CTS) is used to manage the rate of data transmission between the device and the host. | Disable |
| ENQ/ACK Specifies if software flow control (ENQ/ACK) is used to manage the rate of data transmission between the device and the host. | Disable |
| XON/XOFF To Specifies if software flow control (XON/XOFF) is used to manage the rate of data transmission to the host. | Disable |
| XON/XOFF From Specifies if software flow control (XON/XOFF) is used to manage the rate of data transmission from the host. | Disable |
Serial Port Settings (continued)
| Setting Description Default | ||
| New Line Character | Defines the characters that the printer echoes to the host to indicate that it has moved to a new line. | CR/LF |
Ethernet Settings
This section describes the Ethernet IPv4 settings. To view these settings:
- From the printer web page, click the Configure tab > Communications > Ethernet.
Ethernet Settings
| Setting Description Default | ||
| IP Assignment Method | Specifies how the printer obtains an IP address. DHCP | |
| IP Address Specifies the unique network-level address that is assigned to each device in a TCP/IP network (IPv4). | 0.0.0.0 | |
| Subnet Mask Specifies a number that defines the range of IP addresses that can be used in a TCP/IP network. | 0.0.0.0 | |
| Default Router Specifies the IP address of a router that is used when a device sends a packet to another subnet or to an unknown destination. | 0.0.0.0 | |
| DHCP Response Specifies if the printer receives DHCP responses by broadcast or unicast. | Br | |
Media Settings
This section describes media settings for the printer. To view these settings:
- From the printer web page, click the Configure tab > Printing > Media.

Note: If the printer is not connected to a network, you need to use PrintSet 5 through a USB connection to configure the media settings.
Appendix B — Default Settings
Media Settings
Setting Description Default
Media Type Selects the type of media that is loaded in the printer. Media with Gaps
Print Method Selects the method of printing that the printer is using. Thermal Transfer
Media Margin (X) Sets the width of the margin from the left edge of the 0 label along the printhead to the edge of the printable area. Unit of measurement is defined in the Unit of Measurement parameter.

Media Width Sets the width of the printable area measured from 812 dots the media margin (X) across the printhead. Unit of measurement is defined in the Unit of Measure parameter.
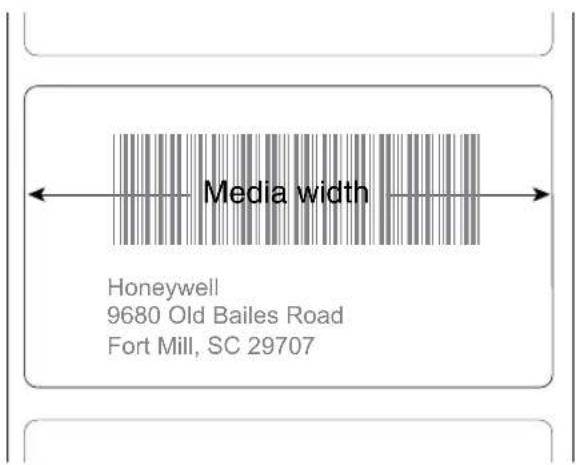
Media Settings (continued)
Setting Description Default
Media Length Sets the length of the printable area measured from one edge of the label to the edge that is closest to the printhead. Unit of measurement is defined in the Unit of Measurement parameter.

| Clip Default Determines if the printer prints items outside the printable area of the label. When this is set to Off, the printer returns an error if any part of a bar code label cannot be printed because that part extends beyond the printable area. When this is set to On, the printer prints all bar code labels, but may also print unreadable, incomplete labels. | Off | |
| Start Adjust Sets the length of media the printer feeds (positive value) or retracts (negative value) before printing a label. Unit of measurement is defined in the Unit of Measure parameter. Range is -9999 to +9999. | 0 dots | |
| Stop Adjust Sets the length of media the printer feeds (positive value) or retracts (negative value) after printing a label. Unit of measurement is defined in the Unit of Measure parameter. Range is -9999 to +9999. | 0 dots | |
| Media Calibration Mode | Selects the mode the printer uses to calibrate media. Use Slow if the printer has trouble identifying gaps or marks in media | Fast |
Appendix B — Default Settings
Media Settings (continued)
| Setting Description Default | ||
| Length (Slow Mode) | If Media Calibration Mode is set to Slow, the printer prints the media length plus 10 mm. This value sets an additional amount of media to be printed. Unit of measurement is defined in the Unit of Measurement parameter. Range is 80 to 3200. | 0 dots |
| Power Up Action Sets the action when you turn the printer on:• No Action• Formfeed - The printer feeds one label.• Testfeed - The printer prints two configuration labels as it calibrates the media sensors. | No Action | |
| Head Down Action | Sets the action when you close the print mechanism after opening it:• No Action• Formfeed - The printer feeds one label.• Testfeed - The printer prints two configuration labels as it calibrates the media sensors. | No Action |
Print Quality Settings
This section describes print quality settings. To view these settings:
- From the printer web page, click the Configure tab > Printing > Print Quality.
Print Quality Settings
| Setting Description Default | |
| Print Speed Sets how fast the printer prints labels. The unit of measure is defined in the Unit of Measure parameter. | 100 |
| Darkness Sets the image darkness for media and ribbon. Adjust this parameter with the Media Sensitivity parameter. Range is 1 to 100. | Variable |
General System Settings
This section describes general system settings. To view these settings:
- From the printer web page, click the Configure tab > System Settings > General.
General System Settings
| Setting Description Default | ||
| System Name Sets the network identification name (WINS name) of the printer. | Printer model number plus the serial number. For example, PC42-14295B1F48 | |
| System Location Sets the location of the printer. Empty string | ||
| System Contact Sets the name of the printer administrator. Empty string | ||
| Display Language Selects the language the printer uses to print text on the test labels. | Simplified Chinese | |
| Display Language (Web Page) Selects the language the printer uses to display text on the web page. | Simplified Chinese | |
| Keyboard Input Selects the language of the external keyboard that is connected to the printer. | U.S./U.K. | |
| Time Sets the current time. System time | ||
| Command Language | Sets the printer command language. If changed, it requires a restart of the printer. | Direct Protocol |
| Unit of Measure Selects the unit of measure that is used to define several printing parameters. | Dots | |
| Zero with Slash | Determines how zero is printed or displayed on the screen. Disable is zero (0), Enable is (∅). | Disable (0) |
Manage I/O Settings
This section describes system I/O settings for the printer. To view these settings:
- From the printer web page, click the Configure tab > System Settings > Manage I/O.
Manage I/O Settings
| Setting Description Default | |
| Ethernet Allows the printer to communicate using Ethernet. | Enable |
Manage Services Settings
This section lists the system services you can manage from the printer. You will only see Manage Services from the menus if you have an Ethernet module installed in the printer. To view these services:
- From the printer web page, click the Configure tab > System Settings > Manage Services.
Manage Services Settings
| Setting Description Default | |
| Web Server Determines if the web server is enabled in the printer. | Enable |
| FTP Determines if the printer can use FTP (File Transfer Protocol). | Enable |
| Net1 Determines if the printer can use Telnet to communicate with Direct Protocol (Fingerprint). | Enable |
| LPR Determines if the printer can use the LPR (Line Printer Server) daemon. | Enable |
| Telnet Determines if the printer can use Telnet to communicate with another device. | Enable |
DNS Network Services
This section describes the DNS settings for the printer. To view these settings:
- From the printer web page, click the Configure tab > Network Settings > DNS.
DNS Network Services Settings
| Setting Description Default | ||
| Primary DNS Server | Sets the IP address of the primary server to which the printer sends DNS requests. The DNS server retains IP addresses and routing information for the TCP/IP network. | 0.0.0.0 |
| Secondary DNS Server | Sets the IP address of the secondary server to which the printer sends DNS requests. The DNS server retains IP addresses and routing information for the TCP/IP network. | 0.0.0.0 |
Net1 Network Services
This section describes the Net1 settings for the printer. To view these settings:
- From the printer web page, click the Configure tab > Network Settings > Net1.
Net1 Network Services Settings
| Setting Description Default | ||
| Queue Selects how the printer handles multiple Net1 connections. | On | |
| Port Number Sets the port number that defines the Net1 TCP port. The range is from 0 to 65535. | 9100 | |
| New Line Character | Defines the characters that the printer echoes to the host to indicate that it has moved to a new line. | CR/LF |
WINS Network Services
This section describes the WINS settings for the printer. To view these settings:
- From the printer web page, click the Configure tab > Network Settings > WINS.
WINS Network Services Settings
| Setting Description Default | ||
| Primary WINS Server | Sets the IP address of the primary server to which the printer sends WINS requests. The WINS server retains IP addresses and routing information for the TCP/IP network. | 0.0.0.0 |
| Secondary WINS Server | Sets the IP address of the secondary server to which the printer sends WINS requests. The WINS server retains IP addresses and routing information for the TCP/IP network. | 0.0.0.0 |
Web Server Network Services
This section describes the Web Server settings for the printer. To view these settings:
- From the printer web page, click the Configure tab > Network Settings > Web Server.
Web Server Network Services Settings
| Setting Description Default | |
| Image Buffer Determines if the image buffer appears in the printer web page. | Enable |
C
Print Labels with INPrint
This appendix explains how to use the INPrint feature to print labels.
About the INPrint Page
The INPrint page features sample web forms you can use to quickly and easily print single labels if you are using the Direct Protocol language on your printer. You select a web form from the list and type information in the fields for that label.
The printer firmware includes several predefined label formats. You can also copy your own label formats to the printer and print them from this page.

PC42t INPrint Web Page
Print INPrint Labels
If the printer is connected to an Ethernet network, you can print labels by entering information in a web form. You access web forms through the printer web page.
1 On your desktop PC, start a browser.
2 In the address bar, type the IP address of your printer and press Enter. The printer web page appears.
3 Click Login. The Login page appears.
4 Type your Username and Password and then click Login. The default value for Username is itadmin and the default value for Password is pass.
5 Click the INPrint tab.
6 Select the web form you want to print:
- If you created the web form yourself, click Customer Downloaded and then select the web form from the list.
- If you want to use one of the Resident web forms, click Resident and then select the web form from the list.
7 Type information in the web form as needed.
8 (Optional) To preview the label on the screen, click Preview.

An Example of a Resident Return Address Label
9 To print the label, click Print.
Predefined INPrint Label Formats
Predefined INPrint Label Formats and Sample Illustrations
Format Name Sample
203_returnadd_3x1.lbx
Honeywell Scanning & Mobility
16201 25th Ave. W.
Lynnwood, WA 98087
203_in_demo_4x6.lbx

Predefined INPrint Label Formats and Sample Illustrations (continued)
Format Name Sample
203_shipaddr_4x6.lbx

203_packslip_4x6.lbx
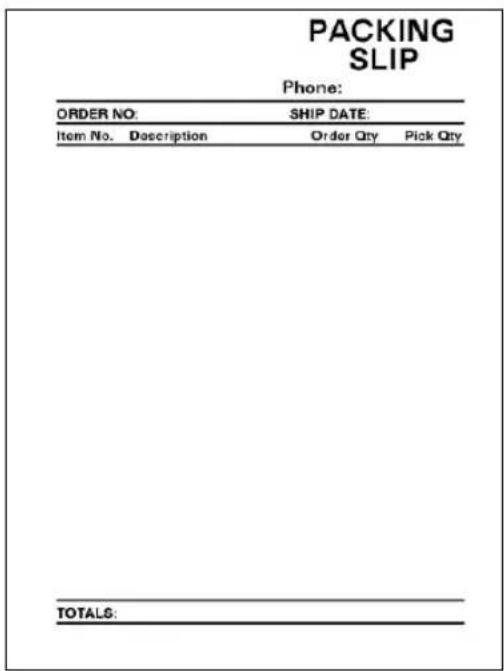
Appendix C — Print Labels with INPrint
Honeywell Scanning & Mobility
9680 Old Bailes Road
Fort Mill, SC 29707
www.honeywellaidc.com
PC42t Desktop Printer User Guide
- Disclaimer
- Patents
- Contents
- About the Printer....1
- Connect the Printer 21
- Troubleshoot and Maintain the Printer 29
- A Specifications....41
- B Default Settings....47
- C Print Labels with INPrint....57
- Customer Support
- Product Service and Repair
- Limited Warranty
- Send Feedback
- 1
- About the Printer
- About the PC42t Printer
- Printer Features
- About the Print Button
- How to Use the Print Button (continued)
- Print Button Action Description
- About the Status LED
- Status LED States
- LED State Description
- Status LED States (continued)
- About Media
- Chapter 1 — About the Printer
- Load Tear-Off Media
- PC42t Desktop Printer User Guide
- Load External Media
- Load Ribbon
- Connect the Printer to Power
- About Printer Command Languages
- About Direct Protocol
- About ESim
- About ZSim
- How to Set the Printer Command Language
- Set the Command Language with the Print Button
- Set the Command Language from the Printer Web Page
- About Test Labels
- Print a Test Label When You Turn on the Printer
- Print a Test Label When the Printer is Ready to Print
- 2
- Connect the Printer
- Install Printer Drivers
- How to Connect the Printer to Your PC
- Connect the Printer with a USB Cable
- Connect the Printer with a Serial Cable
- Connect the Printer to Your Network
- Connect a USB Device
- Configure the Printer
- Configure the Printer from the Printer Web Page
- Chapter 2 — Connect the Printer
- Configure the Printer with PrintSet
- Upgrade the Firmware
- Download the Printer Firmware Update
- Upgrade Firmware from a USB Storage Device
- 3
- Troubleshoot and Maintain the Printer
- Contact Product Support
- Locate the Printer Configuration and Serial Numbers
- Printer Problems and Possible Solutions
- Printer Problems and Possible Solutions (continued)
- Problem Possible Solution
- How to Restore Default Settings
- Restore Default Settings with the Print Button
- Restore Default Settings from the Printer Web Page
- Restore Default Settings with PrintSet
- Clean the Printhead
- Replace the Printhead
- Chapter 3 — Troubleshoot and Maintain the Printer
- Warning: Do not touch the printhead surface area.
- Clean the Platen Roller
- Clean the Interior of the Printer
- Clean the Exterior of the Printer
- A
- Specifications
- Printer Specifications
- PC42t Physical Specifications
- PC42t Print Speed, Resolution, and General Media Specifications
- Memory
- Supported Command Languages
- Sensors
- Network Services
- Universal Font Scaling Technology and Standard Latin Fonts
- Appendix A — Specifications
- Supported Font Types
- Supported Graphic File Types
- Drivers
- Supported Bar Code Symbologies
- B
- Default Settings
- Default Configuration
- Serial Port Settings
- Serial Port Settings (continued)
- Ethernet Settings
- Media Settings
- Appendix B — Default Settings
- Setting Description Default
- Media Settings (continued)
- Print Quality Settings
- General System Settings
- Manage I/O Settings
- Manage Services Settings
- DNS Network Services
- Net1 Network Services
- WINS Network Services
- Web Server Network Services
- C
- Print Labels with INPrint
- About the INPrint Page
- Print INPrint Labels
- Predefined INPrint Label Formats
- Predefined INPrint Label Formats and Sample Illustrations
- Format Name Sample
- Predefined INPrint Label Formats and Sample Illustrations (continued)
- Honeywell Scanning & Mobility
Brand : HONEYWELL
Model : PC42t
Category : Label printer