
PB32 - Label printer HONEYWELL - Free user manual and instructions
Find the device manual for free PB32 HONEYWELL in PDF.


| Product Type | Label Printer |
| Brand | Honeywell |
| Model | PB32 |
| Print Method | Direct Thermal |
| Resolution | 203 dpi |
| Print Speed | Up to 127 mm/s |
| Max Print Width | 108 mm |
| Connectivity | USB, Ethernet, RS-232 |
| Dimensions (W x D x H) | 190 x 210 x 200 mm |
| Weight | 2.5 kg |
| Power Supply | 100-240V AC, 50/60 Hz |
| Display | 2-line LCD |
| Supported Media | Labels, tags, receipts |
| Media Width Range | 25-118 mm |
| Media Thickness | 0.06-0.25 mm |
| Ribbon | Not required (direct thermal) |
| Operating Temperature | 5-40 °C |
| Humidity | 20-80% RH |
| Language Support | Multiple |
| Emulation | ZPL, DPL, EPL |
| Included Accessories | Power cord, USB cable, quick start guide |
Frequently Asked Questions - PB32 HONEYWELL
User questions about PB32 HONEYWELL
0 question about this device. Answer the ones you know or ask your own.
Ask a new question about this device
Download the instructions for your Label printer in PDF format for free! Find your manual PB32 - HONEYWELL and take your electronic device back in hand. On this page are published all the documents necessary for the use of your device. PB32 by HONEYWELL.
USER MANUAL PB32 HONEYWELL
Mobile Label and Receipt Printer

natural_image
Two intermec pens with blue buttons, displayed side by side (no text or symbols visible on the devices themselves)Intermec Technologies Corporation
Worldwide Headquarters
6001 36th Ave.W.
Everett, WA 98203
U.S.A.
www.intermec.com
The information contained herein is provided solely for the purpose of allowing customers to operate and service Intermec-manufactured equipment and is not to be released, reproduced, or used for any other purpose without written permission of Intermec Technologies Corporation.
Information and specifications contained in this document are subject to change without prior notice and do not represent a commitment on the part of Intermec Technologies Corporation.
© 2009–2013 by Intermec Technologies Corporation. All rights reserved.
The word Intermec, the Intermec logo, Norand, ArciTech, Beverage Routebook, CrossBar, dcBrowser, Duratherm, EasyADC, EasyCoder, EasySet, Fingerprint, i-gistics, INCA (under license), Intellitag, Intellitag Gen2, JANUS, LabelShop, MobileLAN, Picolink, Ready-to-Work, RoutePower, Sabre, ScanPlus, ShopScan, Smart Mobile Computing, SmartSystems, TE 2000, Trakker Antares, and Vista Powered are either trademarks or registered trademarks of Intermec Technologies Corporation.
There are U.S. and foreign patents as well as U.S. and foreign patents pending.
Wi-Fi is a registered certification mark of the Wi-Fi Alliance.
Microsoft, Windows, and the Windows logo are registered trademarks of Microsoft Corporation in the United States and/or other countries.
Bluetooth is a trademark of Bluetooth SIG, Inc., U.S.A.
Document Change Record
This page records changes to this document. The document was originally released as Revision 001.
| VersionNumber | Date Description of Change |
| 005 4/2013 | Updated the procedure to set up Bluetooth communications. Added information about the AC18 charger to the troubleshooting table. Updated media specifications in Appendix A. Added the cleaning pen to the list of accessories. |
| 004 5/2011 | Revised battery information. Added procedures for configuring wireless network with PrintSet. |
| 003 2/2011 | Revised to include correct information on how to load media, and how to load media for self-strip printing. |
| 002 12/2010 | Revised to add information for upgrading the firmware. |
Contents
Before You Begin.... ix
Safety Information ix
Global Services and Support ix
Warranty Information...... ix
Web Support ix
Send Feedback....x
Telephone Support x
Who Should Read This Manual ....x
Related Documents ......x
1 Using the PB22 and PB32 Mobile Label and Receipt Printer .... 1
Introducing the PB22 and PB32 Mobile Label and Receipt Printer....2
What's New 2
Identifying the Parts of the Printer 3
Understanding the Control Panel 4
Understanding the Printer Language 6
Changing the Printer Language 7
Understanding the Printer Sounds ....10
Understanding the Backlight .....10
Using the Batteries....11
Installing the Battery....12
Charging the Batteries....13
Understanding the Battery Icons 13
Extending Battery Life....14
Loading Media....15
Printing on Floodcoated Media 19
Understanding the Display Modes....20
Understanding Ready Mode 20
Understanding Information Mode ....20
Understanding Pause Mode....21
Understanding Setup Mode....21
Understanding Error Mode....23
Contents
Understanding Test Mode ......23
Using Test Mode....23
Using Extended Test Mode ....24
Changing Configuration Settings from the Display 25
Printing a Test Page 27
2 Configuring the PB22 and PB32 29
Connecting the Printer to Your PC 30
Connecting the Printer Through the USB Interface 30
Connecting the Printer Through the Serial Port ....31
Connecting the Printer to Your Network....33
Setting Up Bluetooth Communications....33
Setting Up 802.11 Radio Communications....35
Configuring Wireless Printing Using IPL. 38
Configuring Wireless Printing Using Fingerprint 41
Configuring the Printer Settings 43
Changing Configuration Settings From PrintSet 44
Changing Configuration Settings Using the Command Line 44
Changing Configuration Settings from the Printer Home Page .....44
Changing Configuration Settings Using SmartSystems ....45
Upgrading the Firmware....46
Upgrading the Printer Firmware Using PrintSet 46
Upgrading the Printer Firmware Using the Printer Home Page . . . . . . . . . . . . . . . . . . . . . . . . . . . . 48
Upgrading Printer Firmware Using SmartSystems 50
Upgrading the Printer Firmware Using a Communications Program .....50
Downloading Fonts and Graphics....53
3 Troubleshooting and Maintaining the PB22 and PB32....55
Troubleshooting the Printer 56
Contacting Product Support....56
Understanding Error Messages....56
Troubleshooting Printer Problems and Finding Solutions....58
Troubleshooting Communication Problems 60
Using the Line Analyzer in Fingerprint....60
Using Dump Mode in IPL 61
Resetting the Printer 62
Contents
Cleaning the Printer....62
Cleaning the Printhead....63
Cleaning the Platen Roller 64
Cleaning the Printer Exterior....64
Cleaning the Printer Media Compartment ....65
A Specifications....67
Specifications....68
Interfaces....72
RS-232 Serial Interface 72
USB Interface....73
Accessories 74
B Default Settings....77
Factory Default Settings (Fingerprint Printers) 78
Factory Default Settings (IPL Printers)....79
Factory Default Settings (ESC/P Printers) 81
C IPL and Fingerprint Setup Menus....83
IPL Setup Menu 84
Fingerprint Setup Menu....85
Index 87
Contents
Before You Begin
This section provides you with safety information, technical support information, and sources for additional product information.
Safety Information
Your safety is extremely important. Read and follow all warnings and cautions in this document before handling and operating Intermec equipment. You can be seriously injured, and equipment and data can be damaged if you do not follow the safety warnings and cautions.
This section explains how to identify and understand warnings, cautions, and notes that are in this document.

A warning alerts you of an operating procedure, practice, condition, or statement that must be strictly observed to avoid death or serious injury to the persons working on the equipment.

A caution alerts you to an operating procedure, practice, condition, or statement that must be strictly observed to prevent equipment damage or destruction, or corruption or loss of data.

Note: Notes either provide extra information about a topic or contain special instructions for handling a particular condition or set of circumstances.
Global Services and Support
Warranty Information
To understand the warranty for your Intermec product, visit the Intermec website at www.intermec.com and click Support > Returns and Repairs > Warranty.
Web Support
Visit the Intermec website at www.intermec.com to download our current manuals (in PDF).
Before You Begin
Visit the Intermec technical knowledge base (Knowledge Central) at www.intermec.com and click Support > Knowledge Central to review technical information or to request technical support for your Intermec product.
Send Feedback
Your feedback is crucial to the continual improvement of our documentation. To provide feedback about this manual, please contact the Intermec Technical Communications department directly at TechnicalCommunications@intermec.com.
Telephone Support
In the U.S.A. and Canada, call 1-800-755-5505.
Outside the U.S.A. and Canada, contact your local Intermec representative. To search for your local representative, from the Intermec website, click About Us > Contact Us.
Who Should Read This Manual
This user guide is for the person who is responsible for installing, configuring, and maintaining the PB22 and PB32 printer.
This guide provides you with information about the features of the PB22 and PB32, and how to install, configure, operate, maintain, and troubleshoot it.
Related Documents
Here are some related Intermec documents you may find useful:
• Intermec Fingerprint Command Reference Manual
- Intermec Fingerprint Developer's Guide
• Intermec Printer Language (IPL) Command Reference Manual
- ESC/P Programmer's Reference Manual
• ZSim Programmer's Guide
The Intermec website at www.intermec.com contains our documents (as .pdf files) that you can download for free.
To download documents
1 Visit the Intermec website at www.intermec.com.
2 Click the Products tab.
3 Using the Products menu, navigate to your product page. For example, to find the PB21 printer product page, click Printers and Media > Mobile Printers > PB22.
4 Click the Manuals tab.
If your product does not have its own product page, click Support > Manuals. Use the Product Category, the Product Family, and Product to find your documentation.
Before You Begin
1
Using the PB22 and PB32 Mobile Label and Receipt Printer
Use this chapter to familiarize yourself with the PB22 and PB32 mobile label and receipt printer. This chapter contains these sections:
- Introducing the PB22 and PB32 Mobile Label and Receipt Printer
• Using the Batteries - Loading Media
- Printing on Floodcoated Media
• Understanding the Display Modes - Printing a Test Page
Introducing the PB22 and PB32 Mobile Label and Receipt Printer
The PB22 and PB32 is a rugged mobile label and receipt printer that is designed for use with Intermec mobile computers, Intermec vehicle mount computers, and the SF51 and SR61 scanners. The PB22 uses 50.8 mm (2 in) media and the PB32 uses 76.2 mm (3 in) media.
The PB22 and PB32 provides:
- a print resolution of 203 dpi.
- print speeds of up to 101.6 mm per second (4 ips).
- 802.11 b/g or Bluetooth radio options.
Note: Unless otherwise noted, this manual uses the term “printer” to refer to both the PB22 and PB32 printers.
What's New
This version of the user guide includes these changes:
- Updated the procedure to set up Bluetooth communications. See "Setting Up Bluetooth Communications" on page 33.
- Updated the media specifications. See “Specifications” on page 68.
- Added the cleaning pen to the list of accessories. See “Accessories” on page 74.
Identifying the Parts of the Printer
Use this illustration to familiarize yourself with some of the features of the printer.

PB22 and PB32: This illustration shows the important features of the printer. A weather-resistant flap protects the communications ports and the external power connector.
Chapter 1 – Using the PB22 and PB32 Mobile Label and Receipt Printer
Understanding the Control Panel
The printer control panel contains four buttons, a liquid crystal display (LCD), and one LED indicator. Use the four buttons to navigate the menu system and perform functions on the printer.

Printer Control Panel
How to Use the PB22 and PB32 Buttons
Name Button Function
Feed Press to advance the media. The amount of media that

feeds is dependent on the type of media you are using. It will advance by 5 mm (0.2 inch), or feed a configured length of media based on your media and settings.
If the printer is printing, pressing this button causes the printer to pause. Press the button again to resume printing.
Setup Press to display the Setup menu. With ESC/P firmware,

press and hold to cancel printing.
Standby (Power)

Press to put the printer in Standby mode. In Standby mode, power to the radio, the display, and the backlight are turned off.
Press to turn the printer back on and put in Ready mode.
How to Use the PB22 and PB32 Buttons (continued)
Name Button Function
Info Press to display a summary of network connection

information and error conditions. Each setting in the summary information displays on the screen for five seconds.
In Fingerprint and IPL, press this button in Pause mode to cancel the print job. The info button is not functional with ESC/P.
All of the buttons can act as “soft keys,” which means that the function of each button depends on the state of the printer. A small icon appears in the screen next to the button to indicate the function it performs.
Understanding the Soft Keys
Button Soft Keys Description
 | Moves up one level in the menu system. This soft key appears in Setup mode.Increases the value of a number when editing settings such as an IP address. This soft key appears in Setup mode.Pauses the printing job. This icon appears only when you are printing. | |
| + | ||
| II | ||
 | Exit Setup mode and return to Ready mode. | |
 | Moves through the settings at the same level in the menu system. | |
 | OK | Moves down one level in the menu system and saves changes to a setting.Exits a printing job or exits Information mode. |
There is only one LED on the printer: the Ready-to-Work™ indicator.
Understanding the Ready-to-Work Indicator
Indicator State Description
Off One of several conditions:
• The printer is in Standby mode.
• The printer is in Info mode.
- The printer is in Setup mode.
On The printer is turned on and operating.
Blinking One of several conditions:
• The printer is out of paper.
• The media cover is open.
- There is a printer error that requires you to perform an action. For a list of possible problems, see
"Troubleshooting the Printer" on page 56.
Understanding the Printer Language
Your printer comes with Intermec Printer Language (IPL),
Fingerprint, ESC/P, ZSim, and the ability to run any of the printer languages. The language you select affects the functionality of the printer and how you interact with it.
The printer displays the current firmware type and version in Ready mode.
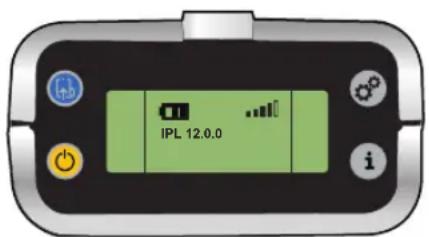
Printer Running IPL Firmware
The first time you turn on the printer, you select the printer language to run on the printer. The language you select automatically runs each time you turn on your printer.
To select the printer language
1 Turn on the printer.
2 Press the appropriate button to select a language.

Changing the Printer Language
The printer language you select affects the functionality of the printer and how you interact with it. You can change the printer language using PrintSet, the printer home page, a communications program like HyperTerminal, or the printer display.
To change the printer language using PrintSet
1 Connect your printer to your PC using a serial cable. For help, see "Connecting the Printer Through the Serial Port" on page 31.
2 Open PrintSet. The Intermec PrintSet dialog box appears.
3 Under My Printers, click the printer you want to work with.
4 Click Printer > Language Wizard. The Language Wizard appears.
5 Follow the prompts to change the printer language.
To change the printer language using Fingerprint and a communications program
1 Connect your printer to your PC using a serial cable. For help, see "Connecting the Printer Through the Serial Port" on page 31.
2 Start a communications program like HyperTerminal.
3 Send the enable administrator rights command:
run "su -p pass admin
4 Send the run command to change the printer language:
setlanguage IPL -r
To change the printer language using IPL and a communications program
1 Connect your printer to your PC using a serial cable. For help, see "Connecting the Printer Through the Serial Port" on page 31.
2 Start a communications program like HyperTerminal.
3 Send the enable administrator rights command:
4 Send the run command to change the printer language:
<STX><ESC>.y, su -p pass admin <ETX>
<STX><EXC>.y,setlanguage FP -r<ETX>
To change the printer language using ESC/P and a communications program
1 Connect your printer to your PC using a serial cable. For help, see "Connecting the Printer Through the Serial Port" on page 31.
2 Start a communications program like HyperTerminal.
3 Enter U-shell. Press the ESC key and type:
4 Send the enable administrator rights command:
5 Send the run command to change the printer language:
{SYS:USH}
su -p pass admin
setlanguage IPL -r
To change the printer language using the display and Fingerprint
1 Press the Setup button. The Setup menu system appears.
2 Press > until you reach Print Defs.
3 Press to enter the Print Defs menu system.
4 Press > until you reach CMD Language.
5 Press to enter the CMD Language menu system.
6 Press until you see the language of you want to select.
7 Press to select the printer language.
Chapter 1 – Using the PB22 and PB32 Mobile Label and Receipt Printer
8 Cold boot the printer:
a Remove the printer battery.
b Replace the printer battery.
c Turn the printer on.
To change the printer language using the display and IPL
1 Press the Setup button. The Setup menu system appears.
2 Press > until you reach Test/Service.
3 Press to enter the Test/Service menu system.
4 Press > until you reach CMD Language.
5 Press to enter the CMD Language menu system.
6 Press until you see the language you want to select.
7 Press to select the language.
8 Cold boot the printer:
a Remove the printer battery.
b Replace the printer battery.
c Turn the printer on.
To change the printer language using the display and ESC/P
1 Make sure the printer is in Ready mode.
2 Turn the printer off.
3 Open the media door.
4 Press and hold the Feed and Power buttons until the display shows "Close Printer Door."
5 Press > until you reach CMD Language.
6 Press OK
7 Press and hold the Power button until the different command languages scroll automatically.
8 Press to select the printer language. The printer reboots.
Understanding the Printer Sounds
The printer plays sounds when certain actions occur.
Understanding the Printer Sounds
| Sound Occurs When: | |
| Power | You insert a battery in the printer.The printer starts charging the battery.You plug in the AC adapter. |
| Hardware You open the media door, close the media door, or insert a cable. | |
| Button You press any of the buttons. | |
| Error | The printer cannot feed paper or print a job because of a hardware issue such as the media door open, a paper jam, or there is no media.An error occurs such as a paper jam, a print error, or the printer is out of range. |
Understanding the Backlight
The screen backlight on the printer behaves the same way as a screen saver on your PC. After a set amount of time elapses without any user interaction, the backlight goes off. The screen backlight turns on when:
• the printer begins printing.
- you press a button.
- you connect the printer to external power.
- you are communicating with or sending data to the printer.
Use the Setup menu to change the amount of time the backlight turns off. Options for backlight are always off, always on, 5 seconds, 10 seconds, 20 seconds, 30 seconds, or 60 seconds.
Using the Batteries
The printer uses a rechargeable 7.4 V 2300 mAh lithium-ion battery (Model AB27) for power. You must fully charge the battery before you can use the printer. The battery retains a charge for up to five days when the printer is in Standby mode.
A fully charged battery can usually print over 300 6-inch labels (PB32) or 500 6-inch labels (PB22) at 25% print density. When the printer reports low battery, it can usually print over 50 6-inch labels at 10% print density. The number of labels you can print varies depending on these factors:
- Age of the battery
• Temperature and humidity of the operating environment
• Printer configuration, including network connection settings - Type of media loaded in the printer
- Amount of data printed for each label
- Threshold at which you configure the low battery warning

Use Intermec Model AB27 battery only. Use of another battery may present a risk of fire or explosion.
The Model AB27 battery may present a fire or chemical burn hazard if mistreated. Do not disassemble, heat above 100 °C (212 °F), or incinerate. Dispose of used batteries promptly. Keep away from children.
Chapter 1 – Using the PB22 and PB32 Mobile Label and Receipt Printer
Installing the Battery
Make sure you fully charge the battery before you use your printer. You can charge the battery before or after you install it into the printer.
To install the battery
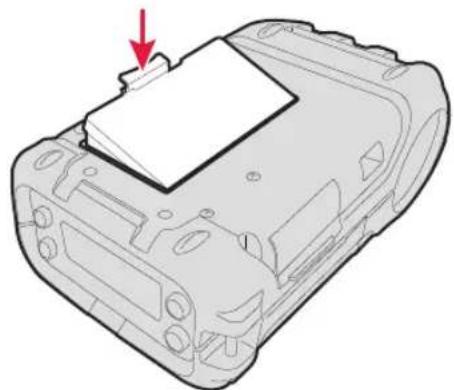
1 Lay the printer upside down on a flat surface.
2 Insert the battery with the tab facing away from the front control panel.

natural_image
Diagram of a device casing with a red arrow pointing to a component, showing internal structure (no text or symbols)3 Insert the edge of the battery under the lip of the printer and then push down until you hear the battery latch click.
natural_image
3D diagram of a device casing with a red arrow pointing to a component (no text or symbols)12 PB22 and PB32 Mobile Label and Receipt Printer User Guide
Charging the Batteries
There are two ways to charge the printer battery:
- Charge the battery in the AC18 4-bay battery charger. It takes approximately 4 hours to charge your batteries using the 4-bay battery charger. For information, see the AC18 4-Bay Battery Charger Instructions.
- Connect AC power to the printer using a 12 VDC power supply and charge the battery while it is in the printer. The battery takes approximately 3 hours to charge while it is installed in the printer.
To charge the battery inside the printer, you need:
- an Intermec 12 VDC power supply (Model AE19).
- an AC power cord.
To charge the battery inside the printer
1 Install the battery in the printer. For help, see the previous section, "Installing the Battery" on page 12.
2 Connect the power supply to the DC power connector on the printer.
3 Connect one end of the power cord to the power supply and then plug the other end into an AC outlet.
Understanding the Battery Icons
The easiest way to tell the status of your battery is to look at the battery icons on the control panel of the printer.
Battery Icon Status
| Icon Status | |
| Battery is fully charged. | |
| Battery has a medium charge. You should be able to work for several more hours before charging or replacing the battery. | |
| Battery is low. Recharge the battery. | |
| Battery is critically low. You need to replace the battery now. | |
Battery Icon Status (continued)
Icon Status

Battery charging error. You may need to replace the battery.

External power connected and there is no battery in the printer.
Extending Battery Life
Follow these guidelines to extend the overall life of your battery:
- Never expose the battery to direct sunlight or temperatures over 50^ (122 °F).
- Only charge the battery inside the printer using a power supply or in the 4-bay battery charger (Model AC18).
- Do not set the backlight to always on. The always on setting disabled automatic power saving modes.
Follow these guidelines to extend the life of your battery between charges:
- Press the Standby button to put the printer in Standby mode.
- Remove the battery if you do not need to use the printer for three days or more.
- Do not operate the printer when the ambient temperature is -20^ (-4°F) or lower. Using the printer in temperatures below freezing reduces the overall battery life.

Note: Rechargeable batteries lose their ability to maintain a charge over time. You can only recharge a battery a finite number of times before you must replace it.
Loading Media
You can use roll or fanfold receipt media with the printer. The PB22 and PB32 ship with a test page printed to verify that the printer works. For information on media, see “Specifications” on page 68.
Additionally, the PB22 and PB32 also support self-strip printing. For more information on how to correctly load media for self-strip printing, see “To load media for self-strip printing” on page 17.
To load media
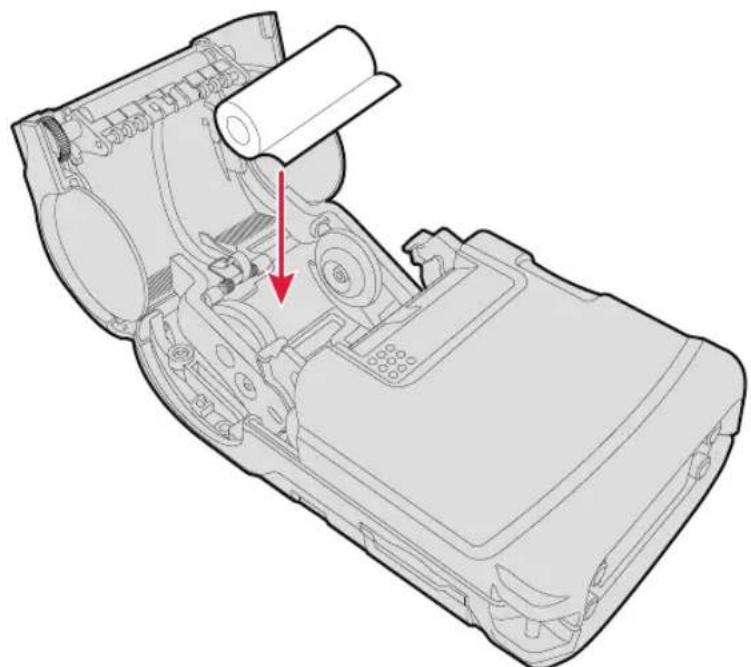
1 Press down on the blue media cover release button until the cover releases.

Chapter 1 – Using the PB22 and PB32 Mobile Label and Receipt Printer
2 If necessary, unlock the media support lock before sliding the two media supports apart.
3 Insert a roll of media and close the media supports so the roll is held firmly in place. Make sure you load the media clockwise so that it pulls off the core from the bottom of the printer.
natural_image
Technical line drawing of a mechanical device interior with a red arrow indicating a component (no text or symbols present)4 Lock the media support lock.

Note: The only time you need to unlock and lock the media support lock again is when you are changing to a roll with a different width.
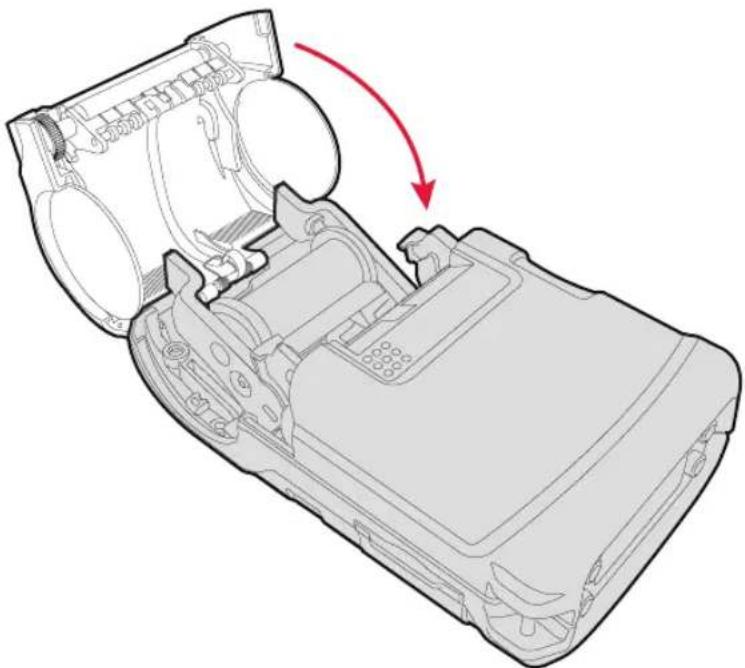
5 Pull out approximately 8 cm (3 in) of the media.
Chapter 1 – Using the PB22 and PB32 Mobile Label and Receipt Printer
6 Close the media cover until it latches.
natural_image
Technical line drawing of a device casing with internal components and a red arrow indicating rotation (no text or symbols)7 Press the Feed button to advance the media.
To load media for self-strip printing
1 Complete Steps 1 through 4 in the previous procedure.
2 Open the self-strip door in the media cover.

natural_image
Technical line drawing of a mechanical component with a paper sheet and red arrow indicating rotation (no text or symbols)3 Remove a label from the roll of media so that you are left with several inches of label liner.
Chapter 1 – Using the PB22 and PB32 Mobile Label and Receipt Printer
4 Feed the label liner over the self-strip bar and out the back of the self-strip door.

natural_image
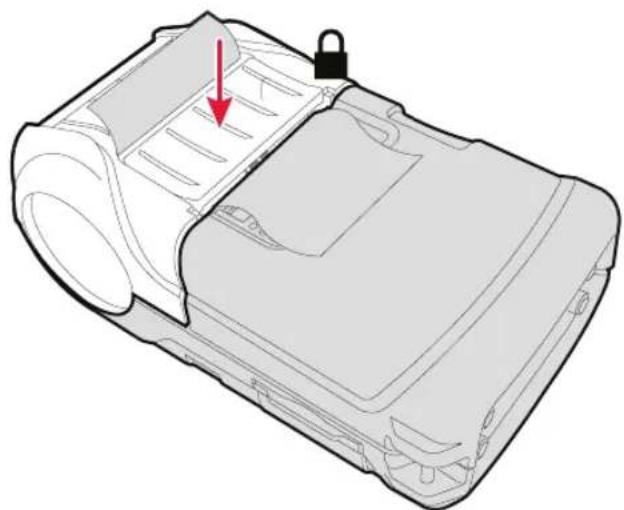
Technical diagram of a mechanical assembly showing internal components and motion arrows (no text or symbols)5 Close the media cover until it latches and press down on the self-strip door to make sure it locks. The separated liner and media spool from the self-strip mechanism.
natural_image
Technical line drawing of a car chassis with a lock and red arrow indicating a component (no text or symbols present)Printing on Floodcoated Media
If you are using colored media, also known as floodcoated media, you may need to adjust the settings to enable better printing.
To configure the printer to print on floodcoated media
1 Press the Setup button.
2 Press until you reach Media.
3 Press or enter the Media menu system.
4 Press > until you reach Advanced.
5 Press to enter the Advanced menu system.
6 Press > until you reach Thermal Management.
7 Press to enter the Thermal Management menu system.
8 Press ▶ until you reach Custom TM.
9 Press to select Custom TM.
To adjust the print speed for floodcoated media
1 Press the Setup button.
2 Press until you reach Media.
3 Press to enter the Media menu system.
4 Press > until you reach Advanced.
5 Press to enter the Advanced menu system.
6 Press > until you reach Min Speed.
8 Press to select a number.
9 Reboot your printer.
7 Press the Feed button to scroll through a list of numbers. Select a number that is appropriate for the floodcoated media. To see a list of sensitivity settings for each media type, go to “Recommended Media Sensitivity and Constant” on page 71.
Understanding the Display Modes
The printer has six display modes to help you effectively interact with the printer: Ready, Information, Pause, Setup, Error, and Test.
Understanding Ready Mode
The printer is in Ready mode when the printer is on and ready to print. The main screen displays the power status, the radio status, and the printer language and version.
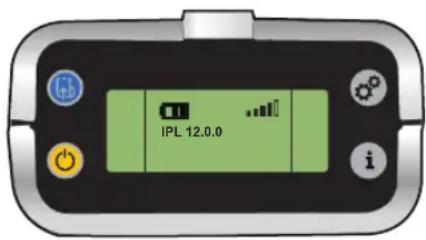
The PB22 and PB32 in Ready Mode
Understanding Information Mode
When the printer is in Information mode, it displays a subset of pertinent information about the printer. If the printer experienced an error, the error message displays first followed by the printer information. Each message displays on the screen for five seconds. After five seconds on the last information screen, the printer exits Information mode.

The PB22 and PB32 in Information Mode
To enter Information mode
- Press the Information button on the control panel.
Understanding Pause Mode
Use Pause mode to momentarily stop printing or to cancel a current print job. When you pause the printer, the Pause mode screen appears. Use the Feed button to both pause and resume printing.

The PB22 and PB32 in Pause Mode
To enter Pause mode
- Press the Feed button while the printer is printing.
To resume printing
- Press the Feed button.
To cancel a print job
1 Press the Feed button to pause printing (Fingerprint, IPL, or ESC/P).
2 Press the Information button (or ✗ soft key) to cancel the print job (Fingerprint or IPL) or press and hold the Pause button in ESC/P.
Understanding Setup Mode
Use Setup mode to change the settings on the printer.

Sample Setup Mode Screen
Chapter 1 – Using the PB22 and PB32 Mobile Label and Receipt Printer
To enter or exit Setup mode
- Press the Setup button.
After you enter Setup mode, there are two editing modes: normal and enhanced.
Editing Settings in Setup Mode
Editing Mode To Navigate To Accept Value
| Normal | Press move among choices.Press to go up a level in menu system. | Press OK. |
| Enhanced | Press move within the editable fields. When the field blinks, you can edit it.Press increase the value of the field. | Press OK. |

Normal Editing Mode: In normal editing mode, you see an up arrow and a right arrow for making selections.
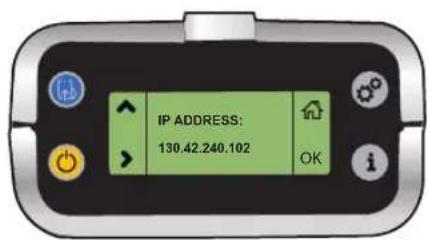
Enhanced Editing Mode: In enhanced editing mode you have a plus sign and a right arrow to change the value of numeric fields.
Understanding Error Mode
The printer enters Error mode when it detects an error condition such as a low battery or a paper fault. Some error messages appear on the screen immediately when they occur, such as DOOR OPEN. Other error messages do not appear until you press the Information button. If there is more than one error at a given time, the errors display in the order that they occurred.

Sample Error Mode Screen
If you encounter an error message, see “Understanding Error Messages” on page 56 for information on how to fix the problem.
Understanding Test Mode
Use Test mode to verify printer settings, test printing, restore factory default settings, or enter Dump mode for troubleshooting purposes. Two test modes are available: Test mode and Extended Test mode.
Using Test Mode
Test mode is a simple sequence of events that requires little user interaction. Extended Test mode requires more user interaction and lets you select which actions you want the printer to perform.
To enter Test mode
1 Make sure the printer is in Ready mode and is loaded with media.
2 Press and hold the Feed and Standby buttons at the same time until Select Media appears on the screen and it displays the type of media you are using.
Chapter 1 – Using the PB22 and PB32 Mobile Label and Receipt Printer
3 Release both buttons. The printer performs a test feed (sensor calibration), prints, and then enters Dump mode.
The printer is now in Dump mode and it scans the communication ports. Any characters received on the communication ports are printed.
4 Press Feed to exit Dump mode.
After you exit Dump mode, the printer returns to Ready mode. For more information on Dump mode, see “Troubleshooting Communication Problems” on page 60.
Using Extended Test Mode
Use Extended Test mode to run additional diagnostic tests, enter Dump mode, or reset the printer to factory defaults.

Sample Extended Test Mode Screen
To enter Extended Test mode
1 Make sure that the printer is loaded with media.
2 Press the media cover release button to open the media cover.
3 Press the Standby button to turn the printer off.
4 Press Feed and Standby buttons at the same time until CLOSE PRINTER DOOR appears on the screen.
5 Close the media cover. You are now in Extended Test mode:
- Press to cycle through the options.
- Press to select a test option.
- Press to exit Extended Test mode.
Options in Extended Test Mode
| Function Description |
| Select Media This option is almost the same as the process in Test mode, except that the printer performs a slow test feed in Extended Test mode. The slow test feed enables the printer to perform a slow sensor calibration which can help resolve mark detection problems. |
| Test Labels This option allows you to print test labels one at a time. Press OK print the next label. |
| Dump Mode This options enters Dump mode. For more information on Dump mode, see “Troubleshooting Communication Problems” on page 60. |
| Factory Default This option restores the factory default settings. Press OK to select this option and then follow the instructions on the screen. |
| Exit to Setup This option exits Extended Test mode and puts the printer in Setup mode. |
| Exit This option exits Extended Test mode. |
Changing Configuration Settings from the Display
You need to enter Setup mode before you can change configuration settings. For more information on entering Setup mode and navigating through the settings, see “Understanding Setup Mode” on page 21.
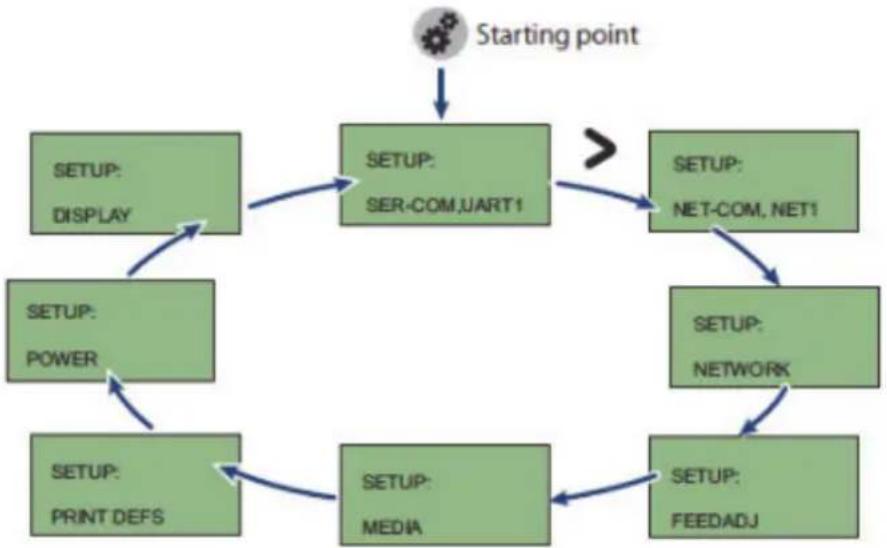
The top levels of the Setup menu are organized in a one-way loop. Each level has several sub-levels.
Chapter 1 – Using the PB22 and PB32 Mobile Label and Receipt Printer
flowchart
graph TD
    A["Starting point"] --> B["SETUP: DISPLAY"]
    B --> C["SETUP: POWER"]
    C --> D["SETUP: PRINT DEFS"]
    D --> E["SETUP: MEDIA"]
    E --> F["SETUP: NET-COM, NET1"]
    F --> G["SETUP: NETWORK"]
    G --> H["SETUP: FEEDADJ"]
    H --> I["SETUP: SER-COM,UART1"]
    I --> J[">"]
The Main Levels of the Setup Menu in Fingerprint

flowchart
graph TD
    A["Starting point"] --> B["SETUP: DISPLAY"]
    B --> C["SETUP: POWER"]
    C --> D["SETUP: CONFIGURATION"]
    D --> E["SETUP: MEDIA"]
    E --> F["SETUP: NETWORK"]
    F --> G["SETUP: SER-COM"]
    G --> B
    G --> H[">"]
The Main Levels of the Setup Menu in IPL
ESC/P supports six types of setup commands:
- Bluetooth: set Bluetooth parameters
- Download: download fonts and graphics to the printer
- Easy print mode: print receipts, tickets, and reports
• Line printer mode: print receipts, tickets, and reports
26 PB22 and PB32 Mobile Label and Receipt Printer User Guide
Chapter 1 – Using the PB22 and PB32 Mobile Label and Receipt Printer
- Query: retrieve information about the printer or a print request, cancel printing, or reset the printer
- Wi-Fi: set Wi-Fi parameters
Printing a Test Page
After you load media in the printer, you are ready to print a test page. You can select from several test page options for each of the printer languages. If you cannot get the test page information to print, see “Troubleshooting the Printer” on page 56.
To print a test page with a printer loaded with IPL
1 Press the Setup button.
2 Press > until you reach Test/Service.
3 Press OK enter the Test/Service menu system.
4 Press ☐ enter the Testprint Config menu.
5 Press oxenter the Config menu.
6 Press to select a testprint.
7 Press OK print the Config testprint of your choice.
To print a test page with a printer loaded with Fingerprint
1 Press the Setup button.
2 Press > until you reach Print Defs.
3 Press to enter the Print Defs menu system.
4 Press > until you reach Testprint.
5 Press to enter the Testprint menu.
6 Press > to select a testprint.
7 Press ox print the testprint of your choice.
Chapter 1 – Using the PB22 and PB32 Mobile Label and Receipt Printer
To print a self test with a printer loaded with ESC/P
1 Press and hold the Feed and Power buttons simultaneously for approximately five seconds.
2 Release the Feed and Power buttons when the printer displays the media you are printing on.
3 Press the Feed button to exit Dump Mode.
2
Configuring the PB22 and PB32
This chapter contains these sections:
- Connecting the Printer to Your PC
- Connecting the Printer to Your Network
- Configuring the Printer Settings
• Upgrading the Firmware - Downloading Fonts and Graphics
Connecting the Printer to Your PC
You can easily connect to the printer to your PC using one of these ports:
- USB port
• RS-232 serial interface port
Connecting the Printer Through the USB Interface
To connect the printer to your PC using the USB port, you need a USB cable (P/N 321-611-xxx) and to install Intermec InterDriver® software. To make sure you have the latest version of InterDriver, you may want to go to the downloads page for the printer on http://www.intermec.com/support/downloads/index.aspx.
To connect the printer through a USB port
1 Open the Interdriver executable.
2 The File Download - Security Warning screen appears. Click Run to run the executable. The Intermec End User License Agreement screen appears.
3 Read the agreement and select the radio button to accept the agreement, and then click Next. The Installation Directory screen appears.
4 The default installation directory is c:\Intermec\InterDriver7. Click Next to use the default directory or specify a different location to install the files. The Installation Information screen appears.
5 Clear the Run Add Print Wizard after unpacking drivers check box and click Finish.
6 On the New Hardware Wizard screen, select Install from a list or specific location and then click Next to continue.

Note: For LPT connections, you must restart your computer for Windows to detect the new hardware. For USB connections, the New Hardware Wizard automatically launches when the printer is connected and turned on.
7 On the Search and Installation Options screen, click Next.
8 On the Hardware Installation warning screen, click Continue Anyway.
9 Click Finish to exit the New Hardware Wizard. InterDriver files are now installed on your computer.
10 Connect the USB cable to the connector on the back of the printer and connect the other end to your PC. You do not need to set up any parameters for USB communications.
Connecting the Printer Through the Serial Port
You can use a serial cable (P/N 075497) to communicate with your PC and run PrintSet, LabelShop, or InterDriver. You can also use the serial port to send commands directly to the printer through a communications program like HyperTerminal.
The serial communication parameters control the communication between the printer and the PC connected on the serial port, referred to as “uart1:” on the printer. Make sure the serial port settings on the printer match the settings on the connected device. The default serial communication settings on the printer are: 115200 baud rate, 8 data bits, no parity, 1 stop bit, and no flow control.
The serial cable you need is not included in the shipping box with the printer.
To connect the printer to a PC through the serial port using PrintSet
1 Connect the 8-pin circular DIN connector to the serial port on the printer. Connect the other end of the serial cable to a serial port on your PC.
2 Start PrintSet.
3 Click File > Add printer.
Or, in the General Tasks list, click Add printer.
4 Click Next.
5 Select Serial, then click Next.
6 Make sure that the COM Port is set to the correct serial port, and that Automatically detect communication parameters is selected. Click Next.
7 PrintSet attempts to connect to your printer. If it cannot find your printer, click Back to review the communication settings, then try again. When PrintSet connects to your printer, click Next.
8 Click Finish. Your printer appears in the My Printers list.
To connect the printer to a PC through the serial port using HyperTerminal
1 Connect the 8-pin circular DIN connector to the serial port on the printer. Connect the other end of the serial cable to a serial port on your PC.
2 On your PC, start the communications program.
3 If necessary, configure the port settings so they match those of your printer:
Flow control: XON_XOFF
4 If you are using HyperTerminal:
a Click OK.
b Click the Settings tab.
c Click ASCII Setup. The ASCII Setup window appears.
d Select these check boxes:
- Send line ends with line feed
- Echo typed characters locally
- Append line feeds to incoming line ends
5 Click OK to save and exit ASCII Setup.
6 Test your connection by typing one of these commands into the communications program window:
- For IPL, press Ctrl and in the communications program window simultaneously type: b, w, c
- For Fingerprint, type:
FF and press Enter.
• For ESC/P, press the ESC key and type:
EZ {AHEAD:10}
The printer responds by feeding a small amount of media.
Connecting the Printer to Your Network
The printer provides two ways to connect to a network:
- Bluetooth radio communications
• 802.11 b/g radio communications
Setting Up Bluetooth Communications
The printer can contain a Bluetooth radio that allows wireless communications with a remote device from distances up to 100 meters (approximately 328 feet) depending on the Bluetooth range capabilities of the remote device, environmental conditions, and obstructions. For the Bluetooth-enabled devices to exchange data, both devices must establish a connection. Bluetooth software is always running in the background.
The printer cannot initiate a Bluetooth connection. One of the devices must request a connection with the printer. The printer then accepts or rejects the connection. Use Intermec Settings on the mobile computer to enable the Bluetooth settings on the printer.
The printer can also connect to Bluetooth scanners, such as the SF51 and the SR61. You can create the bar code labels you need to connect the printer to a Bluetooth scanner using EasySet software. You can download a free version of EasySet from the Intermec website at www.intermec.com.
Each printer equipped with a Bluetooth radio has a unique Bluetooth Device Address (BDA) loaded into its module when manufactured. You can find the BDA on the certification label located on the bottom of the printer.
To set up Bluetooth communications with a mobile computer
- Follow the procedure to discover and connect to Bluetooth devices in your mobile computer user manual.
Note: For maximum security, you need to configure a Bluetooth passcode for the printer. The default passcode for the PB22 and PB32 is “1234.”
To set up Bluetooth communications with a scanner
1 Download and install EasySet.
2 Create these bar code labels using EasySet:
- Administrator reset factory defaults
- Bluetooth parameters - security - not active
- Bluetooth parameters - connect/disconnect - compose BT address
- Bluetooth parameters - security - compose PIN
3 Scan the bar code labels with the Bluetooth scanner.
Understanding Bluetooth Radio Icons
Icon Description

The Bluetooth radio is on and the printer is not connected to a serial cable.

The Bluetooth radio is turned off. The Bluetooth radio turns off when you connect a serial cable.

Setting Up 802.11 Radio Communications
The printer can have an internal 802.11 b/g radio to transfer and receive data using wireless communications. This manual assumes that you have already set up your wireless communications network including your access points. These procedures include information about setting up wireless security for both IPL and Fingerprint versions of the printer.
The printer supports these authentication modes: none, WEP, WPA Personal and Enterprise mode (802.1x authentication), WPA2 Personal and Enterprise mode (802.1x authentication).

Note: WPA and WPA2 Enterprise modes currently support PEAP, TTLS, and LEAP. For LEAP authentication, the printer supports Open EAP, but does not support Network EAP.
To set up the printer to work in your wireless network, you need:
- Serial cable (P/N 075497-xxx).
- Host PC running Windows or Linux.
• Active 802.11b or 802.11g wireless access point. - Communications application, such as PrintSet or HyperTerminal.

Note: If you are using IPL commands with HyperTerminal, you may want to be able to see the commands as you type them on your screen. For help, see “Changing Configuration Settings Using the Command Line” on page 44.
To set up the printer for wireless communications using PrintSet
1 Connect the 8-pin circular DIN connector to the serial port on the printer. Connect the other end of the serial cable to a serial port on your PC.
2 On your PC, start PrintSet.
3 Select your printer from the My Printers list. For more information on how to add a printer to PrintSet, see "To connect the printer to a PC through the serial port using PrintSet" on page 31.
4 In the Printer Tasks list, click Wireless Setup Wizard. If you are prompted for the administrator username and password, type them and click Next.
5 If your wireless access point uses DHCP, select Get TCP/IP parameters automatically. If the access point does not use DHCP, select Use the following TCP/IP parameters and type the device IP Address, Network Mask, Default Router (default gateway), and Name Server (primary DNS server). Click Next.
6 Type the SSID (Network Name). For peer-to-peer access points, select This is an ad hoc network and select the Channel you want to use. The channel setting must be the same on all wireless devices on the ad-hoc network. Click Next.
7 Select the security options required to connect to your wireless network. Click Next.
8 If you selected Static WEP, Dynamic WEP (802.1x), or Wi-Fi Protected Access in Step 7, type the WEP keys or network credentials required for authentication. Click Next.
9 Wait for PrintSet to apply your settings. Click Next, then click Finish to complete the wizard.
To set up the printer for wireless communications using HyperTerminal
1 Connect the 8-pin circular DIN connector to the serial port on the printer, and connect the other end of the serial cable to a serial port on your PC.
2 Start a communications program, like HyperTerminal, and configure these serial port parameters:
| Parameter Default Setting |
| Baud rate 115200 |
| Data bits 8 |
| Parity None |
| Stop bits 1 |
3 From the host PC, check the wireless settings.
If you have an IPL version of the printer, send these commands to the printer:
<STX><SI>wt, SSID<ETX>
<STX><SI>wt, WEP1<ETX>
<STX><SI>wt, WEP2<ETX>
<STX><SI>wt, WEP3<ETX>
<STX><SI>wt, WEP4<ETX>
<STX><SI>wt, AUTH<ETX>
<STX><SI>wt, WPA<ETX>
<STX><SI>wt, WPA2<ETX>
<STX><SI>wt, WPA_PSK<ETX>
<STX><SI>wt, ROAM<ETX>
<STX><SI>wt, PWR_MODE<ETX>
<STX><SI>wt, CHANNEL<ETX>
<STX><SI>wt, AP_MAC<ETX>
<STX><SI>wt, SIGNAL<ETX>
<STX><SI>wt, SPEED<ETX>
<STX><SI>wt, ACTIVE<ETX>
If you have a Fingerprint version of the printer, send this command to the printer:
setup write "wlan", "uart1:"
4 Set up the printer to use the correct SSID and authentication modes. See one of these procedures to configure wireless printing on your IPL or Fingerprint printer.
5 If you are going to use certificates for validation, transfer the certificate to the printer. The printer can accept .pfx, .pem, and .der certificates.
6 Verify that the printer is connected to the access point and make sure it has an IP address allocated to it.
Understanding the 802.11 Radio Icons
| Icon Description | |
 | Excellent signal |
 | Strong signal |
 | Good signal |
 | Weak signal |
 | Poor signal |
 | No signal |
Use the next sections to set most of your wireless communication settings. For help with additional commands and information, see either the Intermec Fingerprint Developer's Guide or the IPL
Developer's Guide. You can download both documents from the Intermec website at www.intermec.com.
Configuring Wireless Printing Using IPL
Use these procedures to configure your printer with IPL for wireless printing.
To configure the printer to use WEP authentication
1 Send these commands to login as an admin and set the SSID:
<STX><ESC>.x, su -p pass admin<ETX>
<STX><SI>ws, SSID, xxxxx<ETX>
where xxxxx can be from 0 to 32 alphanumeric characters.

Note: The default password for logging in as an admin is “pass.” If you changed the password, you need to use your password instead of “pass.”
2 Send these commands to configure the WEP keys. This example sets WEP key 1 to 1234 and enables WEP key 1:
<STX><SI>ws, WEP1, 0x0001020304<ETX>
<STX><SI>ws, .WEP_KEY, 1<ETX>
3 Send this command to activate the settings.
<STX><SI>ws,ACTIVE,1<ETX>
To configure the printer to use WPA-PSK or WPA2-PSK mode
1 Send these commands to login as an admin and set the SSID:
<STX><ESC>.x, su -p pass admin<ETX>
<STX><SI>ws, SSID, xxxxx<ETX>
where xxxxx can be from 0 to 32 alphanumeric characters.
2 Send one of these commands to turn on WPA or WPA2 authentication. Send the WPA-PSK or WPA2-PSK command to set a pre-shared key:
<STX><SI>ws, WPA, ON<ETX>
<STX><SI>ws, WPA2, ON<ETX>
<STX><SI>ws, WPA_PSK, xxxxxxxxxxxx<ETX>
where xxxxxxxxxxxx is a value between 8 and 64 characters.
3 Send this command to activate the settings:
<STX><SI>ws,ACTIVE,1<ETX>
To configure the printer to use WPA or WPA2 Enterprise mode
1 Send these commands to login as an admin and set the SSID:
<STX><ESC>.x, su -p pass admin<ETX>
<STX><SI>ws, SSID, xxxxx<ETX>
where xxxxx can be from 0 to 32 alphanumeric characters.
Note: The default password for logging in as an admin is “pass.” If you changed the password, you need to use your password instead of “pass.”

2 Send one of these commands to enable WPA-802.1x or WPA2-802.1x authentication. You should also send the WPA_PSK command that does not contain a value:
<STX><SI>ws, WPA, ON<ETX>
<STX><SI>ws, WPA2, ON<ETX>
<STX><SI>ws, WPA_PSK, <ETX>
3 Send these commands to configure the EAP_TYPE:
<STX><SI>ws, EAP_TYPE, xxxx<ETX>
where xxxx can be OFF, LEAP, PEAP, or TTLS.
<STX><SI>ws, .EAP_USER, xxxx<ETX>
<STX><SI>ws, .EAP_PASS, xxxx<ETX>
where xxxx is the unique username and the unique password for this protocol.
4 If you are using TTLS, you may need to send this command to set the TTLS outer name:
<STX><SI>ws, TTLS_USER, xxxx <ETX>
where xxxx is the outer name.
5 If you are using certificates for validation, here are some commands you may need to use.
- Send these commands to set a certificate and enable validation:
<STX><SI>ws, CA_CERT, c:/testCA.pfx@export<ETX>
<STX><SI>ws, VALIDATE, ON<ETX>
where c:/testCA.pfx is the location and name of the certificate and export is the passphrase.
- Send these commands to set a common name for server 1 and server 2:
<STX><SI>ws, .SERVER_CN1,xxxxxxxxxx <ETX>
<STX><SI>ws, .SERVER_CN2,xxxxxxxxxx <ETX>
where xxxxxxxxxxxx can be a value from 0 to 64 characters.
- Send this command to make sure your values match those used by the access point:
<STX><SI>wt, [variable name]<ETX>
All variables are returned with the exception of EAP_PASS which always returns “*****” if configured and CA_CERT which transmits the name of the last certificate authority successfully installed. An additional read-only variable for the supplicant state, called STATE, is also returned.
- You may need to send this command several times for the wireless station to connect:
<STX><SI>ws,ACTIVE,1<ETX>
Configuring Wireless Printing Using Fingerprint
Use these procedures to configure your printer with Fingerprint for wireless printing.
To configure the printer to use WEP authentication
1 Send these commands to login as an admin and set the SSID:
run"su -p pass admin"
setup write "wlan", "uart1:"
setup "wlan", "SSID", "xxxxx"
where xxxxx can be from 0 to 32 alphanumeric characters.
Note: The default password for logging in as an admin is “pass.” If you changed the password, you need to use your password instead of “pass.”
2 Send these commands to configure the WEP keys. This example sets WEP key 1 to 1234 and enables WEP key 1.
setup "wlan", "WEP1", "0x0001020304"
setup "wlan", ".WEP_KEY", "1"
setup "wlan", "ACTIVE", "1"
setup write "wlan", "uart1:"
To configure the printer to use WPA-PSK or WPA2-PSK mode
1 Send these commands to login as an admin and set the SSID:
run"su-p pass admin"
setup write "wlan", "uart1:"
setup "wlan", "SSID", "xxxxx"
where xxxxx can be from 0 to 32 alphanumeric characters.

2 Send one of these WPA/WPA2 ON commands to turn on WPA or WPA2 authentication. Send the WPA-PSK or WPA2-PSK command to set a pre-shared key:
setup "wlan", "WPA", "ON"
setup "wlan", "WPA2", "ON"
setup "wlan", "WPA_PSK", "xxxxxxxxxx"
setup "wlan", "ACTIVE", "1"
setup write "wlan", "uart1:"
where xxxxxxxxxxxx is a value between 8 and 64 characters.
To configure the printer to use WPA or WPA2 Enterprise mode
1 Send these commands to login as an admin and set the SSID:
run"su-p pass admin"
setup write "wlan", "uart1:"
setup "wlan", "SSID", "xxxxx"
where xxxxx can be from 0 to 32 alphanumeric characters.
2 Send one of these WPA/WPA2 ON commands to set up WPA-802.1x or WPA2-802.1x authentication. You should also send the WPA_PSK command that does not contain a value:
setup "wlan", "WPA", "ON"
setup "wlan", "WPA2", "ON"
setup "wlan", "WPA_PSK", ""
setup write "wlan", "uart1:"
3 To view the 802.1x values, send this command:
setup write "8021x", "uart1:"
4 Send these commands to configure the EAP_TYPE:
setup "8021x", "EAP_TYPE", "xxxx"
where xxxx can be OFF, LEAP, PEAP, or TTLS.
setup "8021x", ".EAP_USER", "xxxx"
setup "8021x", "EAP_PASS", "xxxx"
where xxxx is the unique username and the unique password for this protocol.
5 If you are using TTLS, you may need to send this command to set the TTLS outer name:
setup "8021x", "TTLS_USER", "xxxx" where xxxx is the outer name.
6 If you are using certificates for validation, here are some commands you may need to use.
- Send these commands to set a certificate and enable validation: setup "8021x", "CA_CERT", "c:/test.pfx@export" setup "8021x", "VALIDATE", "ON" where c:/test.pfx is the location and name of the certificate and export is the passphrase.
- Send these commands to set a common name for server 1 and server 2: setup "8021x", ".SERVER_CN1", "xxxxxxxxxx" setup "8021x", ".SERVER_CN2", "xxxxxxxxxxx" where xxxxxxxxxxxx can be a value from 0 to 64 characters.
- Send this command to make sure your values match those used by the access point: setup write "8021x", "uart1:"
- You may need to send this command several times for the wireless station to connect: setup "wlan", "ACTIVE", "1"
Configuring the Printer Settings
You can change the configuration settings of the printer directly from:
- the display.
• the host PC using PrintSet. - the host PC using the command line.
• the printer home page. - SmartSystems ^TM .
For more information about the IPL and Fingerprint menu systems, see “IPL and Fingerprint Setup Menus” on page 83.
Changing Configuration Settings From PrintSet
PrintSet is a printer configuration tool that you can download from the Intermec website. PrintSet can communicate with your printer through a serial cable or a network connection. It works on all PCs running Windows 98 (or later). PrintSet allows you to easily change all of the setup parameters. It also includes setup wizards to guide you through some common configuration tasks.
Changing Configuration Settings Using the Command Line
You can change configuration parameters by sending commands directly to the printer using your a communications program like HyperTerminal and a serial or network connection.
If your printer is running Fingerprint, use the SETUP command, followed by the node, subnode, and parameters setting. Fingerprint automatically sends feedback to the communications program as you type. If your printer is running IPL, you need to change the HyperTerminal settings to see what you are typing.
To see IPL commands as you type
1 From the HyperTerminal menu, select File > Properties > the Settings tab.
2 Click the ASCII Setup button.
3 Select Echo typed characters locally.
4 Click OK twice.
Changing Configuration Settings from the Printer Home Page
If you are have a printer with an 802.11 wireless radio, you can change configuration settings from the home page of the printer.
To make changes to the configuration
1 Establish a connection between your printer and the network. For help see “Setting Up 802.11 Radio Communications” on page 35.
2 Connect your PC to the same network that the printer is on.
3 Change the printer language to Fingerprint or IPL. For help, see "Changing the Printer Language" on page 7.
4 If you are using Fingerprint or IPL:
a Press the Setup button.
b Press the > until you reach Network.
c Press to enter the Network system menu.
d Press > until you reach IP address.
e Press to view the IP address.
5 Start a web browser.
6 In the address field, type the IP address of your printer and press Enter. The home page of the printer appears.
7 Click Login and enter your administrator name and password.
8 On the home page of the printer, click Configuration.
For help with Fingerprint, IPL, ESC/P, or SmartSystems commands and information, see one of these documents:
• Intermec Fingerprint Command Reference Manual
• Intermec Printer Language (IPL) Command Reference Manual
- ESC/P Programmer's Reference Manual
- SmartSystems Online Help.
You can download these documents from the Intermec website at www.intermec.com.
Changing Configuration Settings Using SmartSystems
You can use the SmartSystems console to change configuration settings on your printer. The printer ships with the SmartSystems client loaded on it. The console is part of SmartSystems and is available from the Intermec website. To download SmartSystems, go to www.intermec.com/products/smrtsysfoundation/index.aspx.
Upgrading the Firmware
The latest firmware and software is available for download from the Intermec website at www.intermec.com. You can upgrade the firmware on your printer using:
- PrintSet. You can download PrintSet from the downloads page for the printer on the Intermec website at www.intermec.com.
• the printer home page. - SmartSystems.
- a serial cable and a communications program, like HyperTerminal.

When upgrading your firmware, make sure the battery in the printer is fully charged. If the printer loses power during the upgrade, the printer may be permanently damaged.
Upgrading the Printer Firmware Using PrintSet
You can only upgrade your printer using PrintSet when the printer is running IPL, Fingerprint, or ESC/P printer languages. To upgrade the printer using PrintSet, you need to install PrintSet to your PC and purchase a serial cable (P/N 075497).
To upgrade the printer firmware using PrintSet
1 If your printer is running ZSim or DSim, change the printer language to IPL, Fingerprint, or ESC/P. For help, see “Changing the Printer Language” on page 7.
2 Connect your printer to your PC using a serial cable. For help, see "Connecting the Printer Through the Serial Port" on page 31.
3 Download the firmware upgrade file (.bin) to your PC:
a Go to www.intermec.com.
b Click Support > Downloads.
c Use the Product Category, Product Family, and Product fields, to select the printer model.
d Click Submit. The available software appears.
e Download the latest firmware version to your PC.
f Extract the .zip file to a folder on your PC.
4 Start PrintSet.
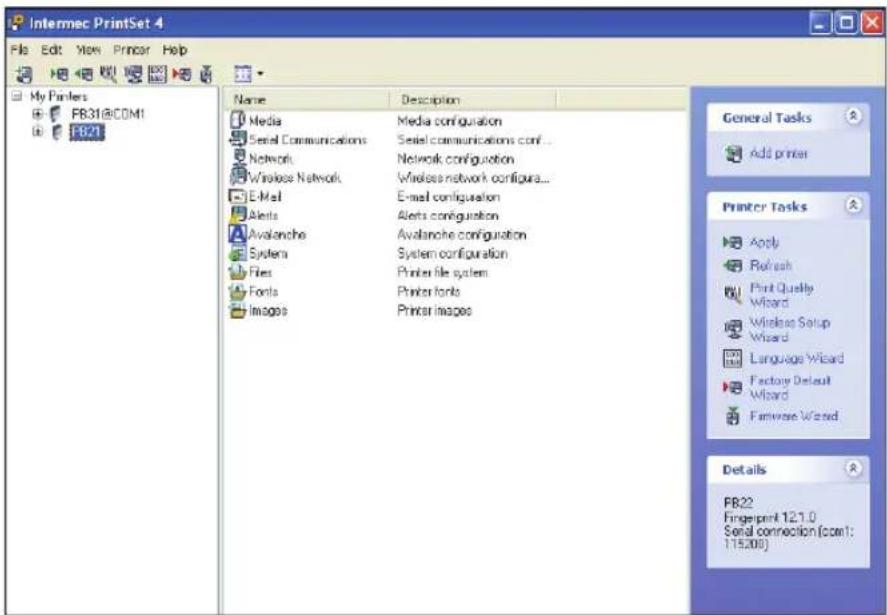
5 Under My Printers, click the printer you want to upgrade.
6 On the right, under Printer Tasks click Firmware Wizard.
7 Click Next. The Firmware Wizard dialog box appears.
8 Click Browse and navigate to the firmware upgrade file (.bin).
Wait approximately 5 minutes for the firmware upgrade to finish.
Upgrading the Printer Firmware Using the Printer Home Page
You can upgrade your printer using the printer home page with a printer with an 802.11 radio running IPL or Fingerprint.
To upgrade using the printer home page
1 Establish a connection between your printer and the network. For help, see “Setting Up 802.11 Radio Communications” on page 35.
2 Establish a connection between your PC and the network your printer is on.
3 Download the firmware upgrade file (.bin) to your PC:
a Go to www.intermec.com.
b Click Support > Downloads.
c Use the Product Category, Product Family, and Product fields, to select the printer model.
d Click Submit. The available software appears.
e Download the latest firmware version to your PC.
f Extract the .zip file to a folder on your PC.
4 If you are using Fingerprint or IPL, use the display to find the printer's IP address:
a Press the Setup button.
b Press until you reach Network.
c Press to enter the Network menu.
d Press until you reach IP Address.
e Press to select and view the IP Address.
f Press the Setup button to exit the menu.
5 Start a web browser.
6 In the address field type the IP address of your printer and press Enter.

7 Click Maintenance. The Maintenance page appears.
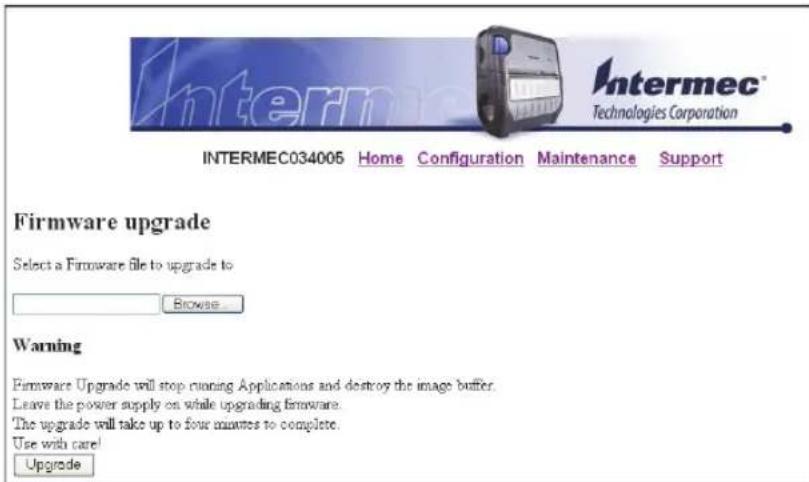
8 When prompted, enter your user name and password.
9 Browse to the firmware upgrade file (.bin) and select it.
10 Click Upgrade.
Wait approximately 5 minutes for the firmware upgrade to finish. The printer automatically reboots.
Upgrading Printer Firmware Using SmartSystems
You can use the SmartSystems console to upgrade the printer firmware. Your printer ships with the SmartSystems client loaded on it. The console is part of SmartSystems and is available from the Intermec website. To download SmartSystems, go to www.intermec.com/products/smrtsysfoundation/index.aspx.
Upgrading the Printer Firmware Using a Communications Program
You can upgrade your printer firmware using a communications program, like HyperTerminal, and a printer running either the IPL, Fingerprint or ESC/P printer language.

Note: Intermec recommends using PrintSet or the printer home page to upgrade the printer firmware. For help, see “Upgrading the Printer Firmware Using PrintSet” on page 46 or “Upgrading the Printer Firmware Using the Printer Home Page” on page 48.
To upgrade printer firmware using a communications program and IPL
1 Connect your printer to your PC using a serial cable. For help, see "Connecting the Printer Through the Serial Port" on page 31.
Or,
Establish a connection between your printer and your network.
"Connecting the Printer to Your Network" on page 33.
2 If you connected your printer to the network, establish a connection between your PC and the network your printer is on.
3 Download the firmware upgrade file (.bin) to your PC:
a Go to www.intermec.com.
b Click Support > Downloads.
c Use the Product Category, Product Family, and Product fields, to select the printer model.
d Click Submit. The available software appears on the page.
e Download the latest firmware version to your PC.
f Extract the .zip file to a folder on your PC.
4 Start a communications program, like HyperTerminal.
5 In the communications program window, type this command:
$$ < \text { STX } > < \text { ESC } >. y, \text { ush } < \text { ETX } > $$
6 Press Enter. You are prompted to enter more information.
7 Type this command:
su -p pass admin.
8 Type this command:
dlk -z
The printer indicates that it is "Upgrading."
9 In the communications program window, click Transfer > Send File. A dialog box appears.
10 In the protocol drop-down box, select Zmodem.
11 Browse to the firmware upgrade file (.bin) and select it.
Wait approximately 5 minutes for the firmware upgrade to finish. When the upgrade is complete, the communications program displays the message, “kernal flashing ok.” The printer automatically reboots.
To upgrade printer firmware using a communications program and Fingerprint
1 Connect your printer to your PC using a serial cable. For help, see "Connecting the Printer Through the Serial Port" on page 31.
2 Download the firmware upgrade file (.bin) to your PC:
a Go to www.intermec.com.
b Click Support > Downloads.
c Use the Product Category, Product Family, and Product fields, to select the printer model.
d Click Submit. The available software appears.
e Download the latest firmware version to your PC.
f Extract the .zip file to a folder on your PC.
3 Start a communications program, like HyperTerminal.
4 Type this command:
run "su -p pass admin"
5 Type this command:
run "dlk -z"
The printer indicates that it is "Upgrading."
6 In the communications program window, click Transfer > Send File. A dialog box appears.
7 In the protocol drop-down box, select Zmodem.
8 Browse to the firmware upgrade file (.bin) and select it.
Wait approximately 5 minutes for the firmware upgrade to finish. When the upgrade is complete, the communications program displays the message, “kernal flashing ok.” The printer automatically reboots.
To upgrade printer firmware using a communications program and ESC/P
1 Connect your printer to your PC using a serial cable. For help, see "Connecting the Printer Through the Serial Port" on page 31.
2 Download the firmware upgrade file (.bin) to your PC:
a Go to www.intermec.com.
b Click Support > Downloads.
c Use the Product Category, Product Family, and Product fields, to select the printer model.
d Click Submit. The available software appears on the page.
e Download the latest firmware version to your PC.
f Extract the .zip file to a folder on your PC.
3 Start a communications program, like HyperTerminal.
4 Reboot the printer.
5 Press Esc.
6 Type this command:
{SYS:USH}
7 Type this command:
su -pass admin.
8 Type this command:
dlk -z.
The printer indicates that it is "Upgrading."
9 In the communications program window, click Transfer > Send File. A dialog box appears.
10 In the protocol drop-down box, select Zmodem.
11 Browse to the firmware upgrade file (.bin) and select it.
Wait approximately 5 minutes for the firmware upgrade to finish. When the upgrade is complete, the communications program window displays the message, “kernal flashing ok.” The printer automatically reboots.
Downloading Fonts and Graphics
The easiest way to download fonts and graphics is to use PrintSet. You can download PrintSet from the downloads page for the printer on the Intermec website at www.intermec.com. Follow the procedures in the PrintSet online help to download fonts and graphics.
For help with Fingerprint, IPL, ESC/P, or SmartSystems commands and information, see either the Intermec Fingerprint Command Reference Manual, the Intermec Fingerprint Developer's Guide, the ESC/P Programmer's Reference Manual, or SmartSystems online help. You can download these documents from the Intermec website at www.intermec.com.
Chapter 2 – Configuring the PB22 and PB32
3
Troubleshooting and Maintaining the PB22 and PB32
Use this chapter to solve problems you may encounter while using the PB22 and PB32. This chapter contains these sections:
- Troubleshooting the Printer
- Resetting the Printer
- Cleaning the Printer
Troubleshooting the Printer
You may have printer operation, print quality, or printer communication problems at some time during the life of the printer printer. It is easy to fix most of the problems and you will find solutions in “Troubleshooting Printer Problems and Finding Solutions” on page 58. If you cannot find the answer to your problem, you may need to contact Product Support.
Contacting Product Support
Before you call Intermec Product Support, you may want to visit the Intermec technical knowledge base (Knowledge Central) at intermec.custhelp.com to review technical information or to request technical support. If you still need help after visiting Knowledge Central, you may need to call Product Support.
To talk to an Intermec Product Support representative in the U.S.A. or Canada, call:
1-800-755-5505
Outside the U.S.A. and Canada, go to www.intermec.com and click Contact to find your local Intermec representative.
Before you call Intermec Product Support, make sure you have this information ready:
- Printer serial number
- Firmware type and version
- Bluetooth, wireless, or serial port settings
You can find all of the information listed above in the printer menu system or on a test print page.
Understanding Error Messages
Use this table to troubleshoot some common error messages you may see display on the printer's screen. Some of the error messages are specific to the type of firmware you have loaded on your printer.
Possible Printer Error Icons and Messages
| Error Icon Error Message Description | ||
| [000Z] | Pause The print job is paused. | |
| [DX07] | Paper out (IPL)Out of Paper(Fingerprint) | The printer is out of paper. Load a new roll of media. For help, see “Loading Media” on page 15. |
| [KT28] | Testfeed not done | The printer did not perform a test feed before printing. It is important to perform a test feed because it calibrates the sensor.To perform a testfeed:In Fingerprint and ESC/P, press theFeedbutton for more than 1 second.In IPL Start and close the media door and then Press theFeedbutton. |
| [70Y6] | Printhead hot The printhead is overheated and needs to cool down. In IPL, wait for printing to resume automatically. In Fingerprint and ESC/P, you need to restart your print job. | |
 | Upgrading The printer is loading new firmware. | |
 | LSS too high,LSS too low | These errors can occur when you run a test feed without any media installed, or if you have incorrect media settings.Load the printer with media (see “Loading Media” on page 15), run Test mode (see “Understanding Test Mode” on page 23), and select the appropriate media type. |
 | IP configuration error | The printer is trying to acquire an IP address from the network. Wait for the printer to complete the task before taking any action. |
 | IP link error No network connection. | |
 | Field out of label You are attempting to print in an area that extends beyond the print window. See the programmer’s reference manual for your type of firmware (IPL, Fingerprint, or ESC/P) for information on how to set the media parameters. | |
Possible Printer Error Icons and Messages (continued)
Error Icon Error Message Description

Door open The printer is not completely closed. Press down on the media cover to make sure it is latched.
Troubleshooting Printer Problems and Finding Solutions
Use this table to troubleshoot some common problems you may encounter with the printer.
Printer Problems and Solutions
Problem Possible Solution
| The printer does not turn on when you press Standby. | Replace the battery with a charged battery.Connect external power to make sure the printer works correctly and to charge the battery. |
| The blue light (Ready-to-Work indicator) is blinking. | Make sure media is loaded and the media cover is closed. For help, see “Loading Media” on page 15.There is a printing error. The screen displays an error message containing information on the error.The printer is paused. The printer is cancelling a print job. |
| Printer keeps printing or feeding when it should stop. | Check media settings. |
| The printout is not in the desired position. | Check for errors in the software application. |
| The printer is not printing with an 802.11 wireless connection. | Verify that the wireless settings are correct. For help, see “Setting Up 802.11 Radio Communications” on page 35.Make sure the printer has an IP address.Make sure the printer is connected to the network.Make sure the printer is in Ready mode. |
| Problem Possible Solution | |
| The printer is not printing with a Bluetooth connection. | • Re-establish a Bluetooth connection with the mobile computer or scanner. For help, see your mobile computer user's manual or “Setting Up Bluetooth Communications” on page 33.• Make sure the mobile computer can print to a known good printer.• Print a Bluetooth test print page to make sure that the mobile computer discovered your printer. For help, see “Printing a Test Page” on page 27.• Make sure the printer is in Ready mode. |
| Printout is faded or weak. | • Fingerprint users: adjust the media constant/ factor and contrast (-10% to +10%).• IPL users: adjust the media sensitivity setting (-10 to +10).• ESC/P users: adjust the Media Sensitivity command or the Set Dark Adjust command. For help, see the ESC/P Programmer's Reference Manual.• Check to see if the printhead needs cleaning. For help, see “Upgrading the Firmware” on page 46. |
| The battery charge is not lasting as long as it should. | • Check the battery date. If the battery is a few years old, the shortened life may be due to normal aging.• Replace the battery. |
| The AC18 4-bay battery charger is not charging the battery. | • Make sure that the battery is seated properly in the charger and the charging status light is on. For help, see the see the AC18 4-Bay Battery Charger Instructions.• Contact Intermec Product Support. |
| The test pages do not print. | • Make sure that the blue light is not blinking. If it is, make sure your printer has media and that the media cover is closed.• Make sure that you can advance media by pressing the Feed button. |
Printer Problems and Solutions (continued)
Problem Possible Solution
Print quality is poor.
- Clean the printhead. For help, see "Upgrading the Firmware" on page 46.
- Check the battery and recharge or replace as necessary. For help, see “Charging the Batteries” on page 13.
- Check the quality of the media. Use only Intermec media to ensure superior print quality and product performance.
- Check that the printer is set to the appropriate Constant/Factory or sensitivity number for the media you are using. If you are using floodcoated media, see “Printing on Floodcoated Media” on page 19.
Troubleshooting Communication Problems
Use Dump mode to verify that the printer is receiving data from the host correctly.
Using the Line Analyzer in Fingerprint
In Dump mode, the printer runs a Fingerprint program called Line Analyzer. The Line Analyzer captures incoming characters on the communication ports and prints them.
The easiest way to enter Dump mode is through Test mode or Extended Test mode. For help, see “Understanding Test Mode” on page 23.
After the printer enters Dump mode, it tells you it has entered Dump mode by printing it on a label. The display shows the Dump mode icon and printer is ready to receive data.
While the printer is receiving data, the Ready-to-Work indicator blinks. After a half of a second, if no more characters have been received, the printer times out. The program considers the transmission terminated and prints out a label.
Printable characters are printed in black-on-white. Control characters and space characters (ASCII 000 to 032 dec) are printed in white-on-black.
As long as a continuous string of characters is being received, the program wraps the lines until the label is full and then starts to print another label. After each character transmission, this information prints:
- Page number
• Number of characters printed on the label
• Total number of characters received so far
When you exit Dump mode, a final label prints to inform you that it is exiting from Dump mode.
Using Dump Mode in IPL
When you enter Dump mode, the printer captures incoming characters on the communication ports and prints them on one or more labels.
If you have IPL firmware on your printer, you can access Dump mode in two different ways with slightly different results:
- You can access Dump mode through Test mode or Extended Test mode and you will receive printouts that look exactly like those produced with the Line Analyzer program in Fingerprint. For more information, see the previous procedure, “Using the Line Analyzer in Fingerprint” on page 60.
- You can access Dump mode from the Setup menu. If you access Dump mode this way, characters are printed on a continuous line along with corresponding hexadecimal numbers.
To enter Dump mode from the Setup menu
1 Press the Setup button.
2 Press > until you reach Test/Service.
3 Press ox enter the Test/Service menu.
4 Press > until you reach Data Dump and then press OK.
5 Press to select Yes and then press . OK
6 Cold boot the printer to exit Dump mode. For help, see the next section.
Resetting the Printer
You rarely need to reset the printer, unless you are upgrading the firmware. If your printer occasionally locks up, you will want to reset it. A reset reinitializes the 802.11 radio and clears the working memory.

Note: The Setup menu is not affected by a reset. Your printer retains all of your configuration settings after the printer powers back up.
To reset the Printer
1 Disconnect the printer from power if externally powered.
2 Remove the battery from the printer for at least one second.
3 Insert the battery back into the printer.
4 Reconnect external power if your printer is externally powered.
Cleaning the Printer
To properly maintain your printer, you must clean it at the recommended interval. Use the next illustration to locate the parts of your printer to clean.
Make sure to clean these parts:
- Printhead
- Platen roller
- Paper sensors
- Tear bar
- Printer exterior
• Media compartment

To avoid possible personal injury or damage to the printer, never insert any pointed or sharp objects into the printer.

Use only the cleaning agents specified in this section. Intermec is not responsible for damage caused by any other cleaning materials used on this printer.
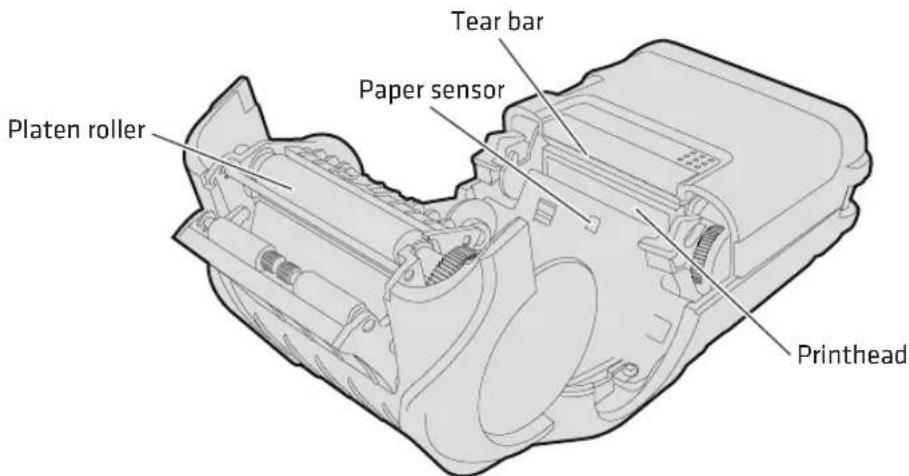
PB22 and PB32 Mobile Label and Receipt Printer: You need to clean these parts regularly.
Cleaning the Printhead
Clean the printhead every five rolls of media to prolong the life of the printhead and ensures that you maintain high print quality.
Clean the printhead with the cleaning swab. The cleaning swab is shipped with the printer and can also be purchased separately from www.intermec.com.

Note: The cleaning swab is the recommended method for cleaning the printhead and platen roller. Using other methods for cleaning may damage the printer.
To clean the printhead
1 Open the media cover.
2 Remove the media and ribbon.
3 Use the cleaning swab or cleaning pen to dissolve any contamination on the line of heat-emitting objects at the front/bottom of the printhead.
4 Wait 30 seconds and carefully rub off any contamination.
Chapter 3 – Troubleshooting and Maintaining the PB22 and PB32
5 Repeat Steps 3 and 4 if necessary.
6 Allow the printhead to dry for a minute or more before loading a new supply of media and ribbon.
Cleaning the Platen Roller
Regular cleaning of the platen roller every five rolls of media prolongs the life of the printhead and ensures that you maintain high print quality.
Clean the printhead with the cleaning swab. The cleaning swab is shipped with the printer and can also be purchased separately from www.intermec.com.

Note: The cleaning swab is the recommended method for cleaning the printhead and platen roller. Using other methods for cleaning may damage the printer.
To clean the platen roller
- Rotate the platen roller and clean it thoroughly with the cleaning swab.
Be sure to clean these parts using the cleaning swab:
- Paper sensors
- Tear bar
Cleaning the Printer Exterior
Make sure to keep the exterior of the printer clean, this will reduce the risk of dust or foreign particles reaching the inside of the printer and affect printer functionality.
To clean the printer exterior
1 Close the media cover.
2 Use a soft cloth, possibly moistened with water or a mild detergent and wipe the printer exterior.
Make sure to keep the surface surrounding the printer clean as well.
Cleaning the Printer Media Compartment
1 Open the media cover.
2 Remove the media and ribbon.
3 Use a brush or air blow the compartment.
Make sure the paper sensors are free of dust.
Chapter 3 – Troubleshooting and Maintaining the PB22 and PB32
A
Specifications
Specifications
This section lists the physical and environmental specifications for the printers.
PB22 Physical Dimensions
Depth: 71.1 mm (2.8 in)
Height: 176.4 mm (6.9 in)
Width: 101.6 mm (4.0 in)
Weight: 678 g (1.5 lb) with battery
PB32 Physical Dimensions
Depth: 81.6 mm (3.2 in)
Height: 182.2 mm (7.2 in)
Width: 127.6 mm (5.0 in)
Weight: 828 g (1.8 lb) with battery
Power Specifications
AC power adapter voltage: 100 to 240 V, 47 to 63 Hz
Printer voltage: 12 VDC, 4.15 A
Operating power: Rechargeable 7.4 V 2300 mAh lithium-ion battery
Temperature and Humidity Specifications
Operating temperature: -15 °C to 50 °C (-5 °F to 122 °F)
Storage temperature: -30 °C to 70 °C (-22 °F to 158 °F)
Charging temperature: 0 °C to 45 °C (32 °F to 113 °F)
Relative humidity: 10 to 90% non-condensing
Sealing: IP54 is used. Paper path and card reader
slots are excluded from IP54.
Memory
RAM: 16 MB
Flash: 64 MB
Print Speed and Resolution
Print speed: 4 ips (100 mm/s)
Resolution: 203 dpi (8 dots/mm)
Print Technology
Printhead: Direct thermal
Maximum print width: PB22 48 mm (1.8 in)
PB32 72 mm (2.8 in)
Media Specifications
Minimum black mark length: 3.17 mm (0.125 in)
Minimum notch length: 6.35 mm (0.25 in)
Minimum notch width (on 12.7 mm (0.50 in)
center of media):
Black mark width: Full width of media
Core inside diameter: 19.05 mm (0.75 in)
Roll outside diameter: PB22 57.15 mm (2.25 in)
PB32 67.31 mm (2.65 in)
Tracking: Center
Maximum caliper for tags: 0.15 mm (0.006 in)
Minimum media length: 12.7 mm (0.5 in)
Maximum media length: Continuous
Appendix A – Specifications
When you order printer media, keep these points in mind:
- Gap, notch, and black marks are used as repeat indicators:
• Gap: Label and fanfold media
- Notch: Tag media
- Black mark: Tag and fanfold media. Black marks are sensed on the side of the media that is thermally sensitive.
- You can use higher caliper media in the printer, but print quality will be reduced.
- Receipt roll stock media is supplied as a continuous roll and has an end of roll indicator. The end of roll indicator is a red marking (on last 3 feet of roll) on the side of the paper that is thermally sensitive.
External Fanfold Media Specifications
Stack height: 70 mm (2.75 in)
Page length: 152 mm (6 in) to 305 mm (12 in)

Note: A 6-inch page length is supplied in 12-inch long stacks (two 6-inch stacks of equal height with the bottom page linked).
Specialty media is required for unique customer environments, including printer operating temperature extremes. Intermec recommends that you test the media in your application.
Supported Media
The printer supports direct thermal label, tag, and receipt media. Both North American and European label media are supported in multiple label lengths. Receipt media is supported in both a top coated and an uncoated paper in continuous roll stock only.

Note: To configure the printer for coated media (floodcoated media), see “Printing on Floodcoated Media” on page 19.
The default media sensitivity number is 180. Use this table as a guide when setting sensitivity numbers.
Recommended Media Sensitivity and Constant
| Sensitivity Constant Description |
| North American Label Media |
| 720 60 Duratherm Lightning Plus |
| 470 52 Duratherm Lightning Perm |
| 450 48 Duratherm III IR |
| 430 100 Duratherm III Synthetic |
| 180 80 Duratherm II Label |
| 180 80 Duratherm III Label |
| 180 80 Duratherm Near IR |
| 150 70 Duratherm 5 mil Tag |
| North America Receipt Media |
| 401 85 Duratherm TC |
| 102 32 Duratherm NTC - 2 |
| 101 30 Duratherm NTC |
| 104 80 Duratherm Receipt - Fanfold |
| 103 100 Duratherm Linerless |
| 430 100 Duratherm II Floadcoated (NTC) |
| 180 80 Duratherm III Floodcoated (TC) |
| 180 80 Duratherm III NIR Floodcoated (FedEx) |
| European Label Media |
| 440 47 Thermal Eco |
| 140 70 Thermal Top |
| 120 47 Thermal Eco Board 140 gr |
Interfaces
This section describes the standard interfaces available on the PB22 and PB32 printers.
RS-232 Serial Interface
The serial adapter is an 8-pin DIN to DB9 connector that connects from the printer to your desktop PC.
Serial Port Default Settings
| Parameter Default Setting | |
| Baud rate 115200 | |
| Character Length or Data Bits 8 | |
| Parity None | |
| Stop Bits 1 | |
| Handshaking None (Fingerprint) | XON/XOFF (IPL) |

Serial Cable (Printer End)
Serial Cable Pinouts (Printer End)
| Plns Signal Description |
| 1 HHC RXD Receive data from host (input) |
| 3 HHC CTS Clear to send from printer (output) |
| 5 HHC RTS Request to send from host (input) |
| 6 HHC TXD Transmit data to printer (output) |
| 8 GND Ground |

RS-232 Serial Cable DB9 Pins (PC End)
Serial Cable Pinouts (PC End)
Pin Signal Description
1 DCD Data carrier detect
2 RXD Receive data from host (input)
3 TXD Transmit data to printer (output)
4 DTR Data terminal ready
| 5 | G | N | D | G | r | o | |
| 6 | D | S | R | D | a | t | a |
u
7 RTS Request to send from host (input)
8 CTS Clear to send from printer (output)
9 RI Ring indicator
USB Interface
To use the USB interface to print from a PC, you need to have the Intermec InterDriver printer driver installed on your PC. For help setting up USB communications, see “Connecting the Printer Through the USB Interface” on page 30.
The USB cable that ships with the printer has a USB Type A connector on one end to connect to the PC and a USB Type B connector on the other end to connect to the printer. You do not need to configure communications for the USB port.

natural_image
Line drawing of a USB connector with a cable (no text or symbols)
USB Type A Connector USB Type B Connector
Accessories
You can use these accessories with the printer. To order accessories, contact your local Intermec sales representative.
AB27 Battery
Use the 7.4 V 2300 mAh lithium-ion battery to provide power to the printer.
Power Supply (Model AE19)
Provides power to the printer and the 4-bay battery charger (Model AC18).
AC18 4-Bay Battery Charger
Use the AC18 to charge up to four batteries at a time. The battery charger is designed to sense when a battery is fully charged and not overcharge it, ensuring long and consistent battery life.
AV14 Vehicle Dock
Use the vehicle dock to attach the printer to a truck.
Cart Mount
Stands the printer vertically when placed on a flat surface. Excellent for cart or desktop use.
Belt Clip
Use the printer belt clip to attach the printer to your belt.
Handstrap
Use the printer handstrap to conveniently carry your printer. With the handstrap attached, you can also attach the shoulder strap.
Media
You can use tag, label, or receipt media with the printer. Printer media does not ship in the box with the printer but may be purchased from www.intermec.com.
Media Core
Use the media core to hold the media in place. The 0.75 inch media core ships with the printer. You can also order the 0.4 inch media core separately.
Intermec Cleaning Swab
Use the Intermec cleaning swab (P/N AE26034) to clean the printhead and platen roller. One cleaning swab is included with the printer. You can purchase additional cleaning swabs from www.intermec.com.
Cleaning Pen
Use the cleaning pen (P/N 757150) to clean the printhead.
Protective Case
Use the protective case to transport and store your printer. The protective case keeps the printer free of dust, dirt, and moisture and still provides easy access to the printer for printing.
Shoulder Strap
Use the shoulder strap in combination with the handstrap to easily carry the printer. The wide padded strap makes it comfortable to wear the printer for long periods of time
Serial Cable
The serial adapter is an 8-pin DIN to DB9 connector that connects from the printer to your desktop PC.
Appendix A – Specifications
B
Default Settings
Factory Default Settings (Fingerprint Printers)
Factory Default Settings for Fingerprint Printers
| Setting Default Value | |
| Xstart 0 | |
| Display | |
| Orientation Normal | |
| Contrast Medium | |
| Media | |
| Width Printhead width | |
| Length 1200 | |
| Test feed mode Fast | |
| Type Variable length strip | |
| Contrast 0% | |
| Xstart 0 | |
| Label constant 80 | |
| Label factor 40 | |
| Print definitions | |
| Clip default Off | |
| Print speed 75 mm/s | |
| Feed adjust | |
| Start adjust 0 | |
| Stop adjust 0 | |
| Power | |
| Low battery indicator | 7.4 V |
| Sleep timer | 20 sec |
| Standby timer | 30 min |
Factory Default Settings for Fingerprint Printers (continued)
| Setting Default Value |
| Bluetooth |
| Discoverable Enable |
| Connectable Enable |
| Encryption Disable |
| Authentication Disable |
| Reserve printer Disable |
| Device name 1-16 characters |
| Passcode 1234 |
Factory Default Settings (IPL Printers)
Factory Default Settings for IPL Printers
| Setting Default Value | |
| Auto detect printer Enable | |
| Display | |
| Orientation Normal | |
| Contrast Medium | |
| Print engine emulation mode None | |
| Media | |
| Form adjust dots X 0 | |
| Form adjust dots Y | 0 |
| Test feed mode Fast | |
| Media type | Continuous |
| Darkness | 0 |
| Sensitivity | 180 |
| Print speed | 3 ips |
| Power | |
| Low battery indicator | 7.4 V |
| Sleep timer 20 sec | |
| Standby timer | 30 min |
| Setting | Default Value |
| Ser-Com | |
| Baud rate 115200 | |
| Data bits 8 | |
| Parity None | |
| Stop bits 1 | |
| Protocol XON/XOFF | |
| Network | |
| IP selection DHCP and BOOTP | |
| IP address 0.0.0.0 | |
| Netmask 0.0.0.0 | |
| Default router 0.0.0.0 | |
| Name server 0.0.0.0 | |
| MAC address Unique | |
| Bluetooth | |
| Discoverable Enable | |
| Connectable Enable | |
| Encryption | Disable |
| Authentication | Disable |
| Reserve printer | Disable |
| Device name | 1-16 characters |
| Passcode 1234 | |
Factory Default Settings (ESC/P Printers)
Factory Default Settings for ESC/P Printers
| Setting Default Value | |
| Auto detect printer Enable | |
| Media dark adjust 100 | |
| Print speed 75 mm/s | |
| Power | |
| Low battery indicator 7.4 V | |
| Sleep timer 20 sec | |
| Standby timer 30 min | |
| Bluetooth | |
| Discoverable Enable | |
| Connectable Enable | |
| Encryption Disable | |
| Authentication Disable | |
| Reserve printer Disable | |
| Device name 1-16 characters | |
| Passcode | 1234 |
| Serial-Com | |
| Baud rate | 115200 |
| Data bits | 8 |
| Parity | None |
| Stop bits | 1 |
| Protocol | XON/XOFF |
| Network | |
| IP selection | DHCP and BOOTP |
| IP address | 0.0.0.0 |
| Netmask | 0.0.0.0 |
| Default router | 0.0.0.0 |
| Name server | 0.0.0.0 |
| MAC address | Unique |
Appendix B - Default Settings
C
IPL and Fingerprint Setup Menus
IPL Setup Menu

flowchart
graph TD
    A["Setup"] --> B["SER-COM"]
    A --> C["NETWORK"]
    A --> D["TEST/SERVICE"]
    A --> E["MEDIA CONFIGURATION"]
    A --> F["POWER"]
    A --> G["DISPLAY"]

    B --> B1["BAUDRATE"]
    B --> B2["DATA BITS"]
    B --> B3["PARITY"]
    B --> B4["STOPBITS"]
    B --> B5["PROTOCOL"]

    C --> C1["IP SELECTION"]
    C --> C2["IP ADDRESS"]
    C --> C3["NETMASK"]
    C --> C4["DEFAULT ROUTER"]
    C --> C5["NAME SERVER"]
    C --> C6["MAC ADDRESS"]

    D --> D1["TESTPRINT"]
    D --> D2["CONFIG"]
    D --> D3["TEST LABELS"]
    D --> D4["FORMAT"]
    D --> D5["PAGE"]
    D --> D6["UDC"]
    D --> D7["FONT"]

    E --> E1["MEDIA TYPE"]
    E --> E2["PAPER TYPE"]
    E --> E3["TESTFEED MODE"]
    E --> E4["LBL LENGTH DOTS"]
    E --> E5["SENSITIVITY"]
    E --> E6["DARKNESS"]
    E --> E7["LBL REST POINT"]

    F --> F1["LOW BATTERY"]
    F --> F2["SLEEP TIMER"]
    F --> F3["STANDBY TIMER"]

    G --> G1["ORIENTATION"]
    G --> G2["CONTRAST"]

    D --> H["THERMAL MGMT"]
    D --> I["MIN SPEED"]

    H --> H1["DATA DUMP"]
    H --> H2["MEMORY RESET"]
    H --> H3["LSS TEST"]

    I --> I1["FORM ADJ DOTS X"]
    I --> I2["FORM ADJ DOTS Y"]
    I --> I3["ADVANCED"]
Fingerprint Setup Menu

flowchart
graph TD
    A["Setup"] --> B["SER-COM"]
    A --> C["NET-COM, NET1"]
    A --> D["NETWORK"]
    A --> E["FEEDADJ"]
    A --> F["MEDIA"]
    A --> G["PRINT DEFS"]
    A --> H["POWER"]
    A --> I["DISPLAY"]

    B --> B1["BAUDRATE"]
    B --> B2["NEW LINE"]
    B --> B3["CHAR LENGTH"]
    B --> B4["PARITY"]
    B --> B5["STOPBITS"]
    B --> B6["FLOWCONTROL"]
    B --> B7["RTS/CTS"]
    B --> B8["ENQ/ACK"]
    B --> B9["XON/XOFF"]
    B --> B10["DATA TO HOST"]
    B --> B11["DATA FROM HOST"]

    C --> C1["IP SELECTION"]
    C --> C2["IP ADDRESS"]
    C --> C3["NETMASK"]
    C --> C4["DEFAULT ROUTER"]
    C --> C5["NAME SERVER"]
    C --> C6["MAC ADDRESS"]

    D --> D1["STARTADJ"]
    D --> D2["STOPADJ"]

    E --> E1["MEDIA SIZE"]
    E1 --> E1a["XSTART"]
    E1 --> E1b["WIDTH"]
    E1 --> E1c["LENGTH"]

    F --> F1["MEDIA TYPE"]
    F1 --> F1a["LABEL (w GAPS)"]
    F1 --> F1b["PAPER TYPE"]
    F1 --> F1c["CONTRAST"]

    F1 --> F1d["TESTFEED"]
    F1 --> F1e["TESTFEED MODE"]

    F1 --> F1f["LEN (SLOW MODE)"]
    F1 --> F1g["ADVANCED"]

    G --> G1["HEAD RESIST"]
    G --> G2["TESTPRINT"]
    G --> G3["PRINT SPEED"]
    G --> G4["LSS TEST"]

    H --> H1["LOW BATTERY"]
    H --> H2["SLEEP TIMER"]
    H --> H3["STANDBY TIMER"]
    H --> H4["ORIENTATION"]
    H --> H5["CONTRAST"]

    I --> I1["LSS AUTO"]
    I --> I2["LSS MANUAL"]
    I --> I3["CLIP DEFAULT"]
    I --> I4["LTS"]
    I --> I5["LTS VALUE"]
    I --> I6["LTS ADJUST"]
    I --> I7["LTS TEST"]

    J["NEW LINE"] --> J1["REC BUF"]
    J --> J2["TRANS BUF"]

    K["THERMAL MGMT"] --> K
    L["MIN SPEED"] --> L
Appendix C - IPL and Fingerprint Setup Menus
Index
Numerics
802.11
radio icons, understanding 37
setting up communications 35
A
AB27 battery 74
AC18 battery charger 13, 74
accessories
AB27 battery 74
AC18 battery charger 74
AV14 vehicle dock 74
belt clip 74
cart mount 74
handstrap 74
power supply 74
serial cable 75
shoulder strap 75
AV14 vehicle dock 74
B
backlight, understanding 10
batteries
AC18 charger 13
charging 13
charging time 11
extending life 14
installing 11, 12
status icons 13
using 11
Bluetooth communications 33
button functions 4
C
cleaning the printer 62
cold boot 62
communication problems 60
using Dump mode in IPL 61
using the line analyzer in
Fingerprint 60
communications
setting up 802.11 radio
communications 35
setting up Bluetooth radio
communications 33
wireless printing with
Fingerprint 41
wireless printing with IPL 38
configuration settings
changing from printer home page 44
changing using the command line
HyperTerminal, sending
printer commands 44
changing with PrintSet 44
changing with SmartSystems 45, 50
display modes 20
configuring, overview 43
connecting to the printer
using USB 30
control panel features 4
D
default settings
ESC/P printers 81
Fingerprint printers 78
IPL printers 79
display modes
error 23
information 20
pause 21
ready 20
setup 21
test 23
downloading fonts and graphics 53
E
error messages and icons
door open 58
field out of label 57
IP configuration error 57
IP link error 57
LSS too high/low 57
out of paper 57
pause 57
printead hot 57
upgrading 57
Error mode 23
ESC/P
change printer language 8
default settings 81
setup commands 26
F
Fingerprint
change printer language 7
configuring wireless printing 41
default settings 78
Fingerprint (continued)
setup menu 25, 85
WEP authentication, configuring to use 41
WPA/WPA2 authentication, configuring to use 42
WPA-PSK/WPA2-PSK authentication, configuring to use 41
firmware upgrade, cold booting 62
H
HyperTerminal
upgrade firmware using 50
view IPL commands 44
|
Information mode 20
IPL
change printer language 8
configuring wireless printing 38
default settings 79
setup commands 26
setup menu 84
view commands as you type 44
WEP authentication, configuring to use 38
WPA/WPA2 authentication, configuring to use 39
WPA-PSK/WPA2-PSK authentication, configuring to use 39
L
language, see printer language
load media 15
M
media
loading 15
recommended sensitivity and constant 71
supported 70
media specifications 69
P
Pause mode 21
power specifications 68
print speed and resolution 69
printer
backlight 10
charging batteries 13
cleaning 62
cold boot 62
communication problems 60
configuring 43
control panel 4
default settings 78
downloading fonts and graphics 53
features 2
home page 44
languages,choosing 6
loading media 15
memory 69
parts 2
printing a test page 27
Reay-to-Work indicator 6
soft keys 5
sounds, understanding 10
troubleshooting problems 58
using the batteries 11
using the buttons 4
printer language
change using ESC/P 8
change using Fingerprint 7
change using IPL 8
change using PrintSet 7
PrintSet
change printer language 7
changing configuration settings 44
downloading fonts and graphics 53
upgrade firmware using 46
R
Ready mode 20
Ready-to-Work indicator states 6
5
setup commands
ESC/P 26
IPL 26
setup menu
Fingerprint 25, 85
IPL 84
Setup mode 21
SmartSystems, changing
configuration settings 45, 50
soft keys, using 5
sounds, status 10
Index
specifications external fanfold media 70 media 69 memory 69 power 68 print speed and resolution 69 print technology 69 supported media 70 temperature and humidity 68
T
temperature and humidity specifications 68 Test mode 23 test page, printing 27 troubleshooting communication problems 60 contacting product support 56 error messages 56 printer problems and solutions 58
using Dump mode in IPL 61 using the line analyzer in Fingerprint 60
U
upgrading firmware using HyperTerminal 50 using PrintSet 46 USB, connecting to the printer 30
W
WEP authentication configuring with Fingerprint 41 configuring with IPL 38 WPA/WPA2 authentication configuring with Fingerprint 42 configuring with IPL 39 WPA-PSK/WPA2-PSK authentication configuring with Fingerprint 41 configuring with IPL 39
Intermec
Worldwide Headquarters
6001 36th Avenue West
Everett, Washington 98203
U.S.A.
tel 425.348.2600
fax 425.355.9551
www.intermec.com
© 2013 Intermec Technologies
Corporation. All rights reserved.
PB22 and PB32 Mobile Label and Receipt Printer User Guide

P/N 934-046-005
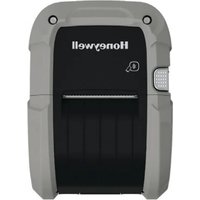
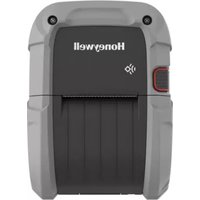
- Mobile Label and Receipt Printer
- www.intermec.com
- Document Change Record
- Contents
- Using the PB22 and PB32 Mobile Label and Receipt Printer .... 1
- Configuring the PB22 and PB32 29
- Troubleshooting and Maintaining the PB22 and PB32....55
- A Specifications....67
- B Default Settings....77
- C IPL and Fingerprint Setup Menus....83
- Index 87
- Before You Begin
- Safety Information
- Global Services and Support
- Warranty Information
- Web Support
- Send Feedback
- Telephone Support
- Who Should Read This Manual
- Related Documents
- To download documents
- 1
- Using the PB22 and PB32 Mobile Label and Receipt Printer
- Introducing the PB22 and PB32 Mobile Label and Receipt Printer
- What's New
- Identifying the Parts of the Printer
- Chapter 1 – Using the PB22 and PB32 Mobile Label and Receipt Printer
- Understanding the Control Panel
- How to Use the PB22 and PB32 Buttons
- Name Button Function
- How to Use the PB22 and PB32 Buttons (continued)
- Understanding the Soft Keys
- Understanding the Ready-to-Work Indicator
- Indicator State Description
- Understanding the Printer Language
- To select the printer language
- Changing the Printer Language
- To change the printer language using PrintSet
- To change the printer language using Fingerprint and a communications program
- To change the printer language using IPL and a communications program
- To change the printer language using ESC/P and a communications program
- To change the printer language using the display and Fingerprint
- To change the printer language using the display and IPL
- To change the printer language using the display and ESC/P
- Understanding the Printer Sounds
- Understanding the Backlight
- Using the Batteries
- Installing the Battery
- To install the battery
- Charging the Batteries
- To charge the battery inside the printer
- Understanding the Battery Icons
- Battery Icon Status (continued)
- Extending Battery Life
- Loading Media
- To load media
- To load media for self-strip printing
- Printing on Floodcoated Media
- To configure the printer to print on floodcoated media
- To adjust the print speed for floodcoated media
- Understanding the Display Modes
- Understanding Ready Mode
- Understanding Information Mode
- To enter Information mode
- Understanding Pause Mode
- To enter Pause mode
- To resume printing
- To cancel a print job
- Understanding Setup Mode
- To enter or exit Setup mode
- Editing Settings in Setup Mode
- Understanding Error Mode
- Understanding Test Mode
- Using Test Mode
- To enter Test mode
- Using Extended Test Mode
- To enter Extended Test mode
- Changing Configuration Settings from the Display
- The Main Levels of the Setup Menu in IPL
- PB22 and PB32 Mobile Label and Receipt Printer User Guide
- Printing a Test Page
- To print a test page with a printer loaded with IPL
- To print a test page with a printer loaded with Fingerprint
- To print a self test with a printer loaded with ESC/P
- 2
- Configuring the PB22 and PB32
- Connecting the Printer to Your PC
- Connecting the Printer Through the USB Interface
- To connect the printer through a USB port
- Connecting the Printer Through the Serial Port
- To connect the printer to a PC through the serial port using PrintSet
- To connect the printer to a PC through the serial port using HyperTerminal
- Connecting the Printer to Your Network
- Setting Up Bluetooth Communications
- To set up Bluetooth communications with a mobile computer
- To set up Bluetooth communications with a scanner
- Understanding Bluetooth Radio Icons
- Icon Description
- Setting Up 802.11 Radio Communications
- To set up the printer for wireless communications using PrintSet
- To set up the printer for wireless communications using HyperTerminal
- Configuring Wireless Printing Using IPL
- To configure the printer to use WEP authentication
- To configure the printer to use WPA-PSK or WPA2-PSK mode
- To configure the printer to use WPA or WPA2 Enterprise mode
- Configuring Wireless Printing Using Fingerprint
- Configuring the Printer Settings
- Changing Configuration Settings From PrintSet
- Changing Configuration Settings Using the Command Line
- To see IPL commands as you type
- Changing Configuration Settings from the Printer Home Page
- To make changes to the configuration
- Changing Configuration Settings Using SmartSystems
- Upgrading the Firmware
- Upgrading the Printer Firmware Using PrintSet
- To upgrade the printer firmware using PrintSet
- Upgrading the Printer Firmware Using the Printer Home Page
- To upgrade using the printer home page
- Upgrading Printer Firmware Using SmartSystems
- Upgrading the Printer Firmware Using a Communications Program
- To upgrade printer firmware using a communications program and IPL
- To upgrade printer firmware using a communications program and Fingerprint
- To upgrade printer firmware using a communications program and ESC/P
- Downloading Fonts and Graphics
- 3
- Troubleshooting and Maintaining the PB22 and PB32
- Troubleshooting the Printer
- Contacting Product Support
- 1-800-755-5505
- Understanding Error Messages
- Possible Printer Error Icons and Messages (continued)
- Error Icon Error Message Description
- Troubleshooting Printer Problems and Finding Solutions
- Printer Problems and Solutions
- Printer Problems and Solutions (continued)
- Problem Possible Solution
- Troubleshooting Communication Problems
- Using the Line Analyzer in Fingerprint
- Using Dump Mode in IPL
- To enter Dump mode from the Setup menu
- Resetting the Printer
- To reset the Printer
- Cleaning the Printer
- Cleaning the Printhead
- To clean the printhead
- Chapter 3 – Troubleshooting and Maintaining the PB22 and PB32
- Cleaning the Platen Roller
- To clean the platen roller
- Cleaning the Printer Exterior
- To clean the printer exterior
- Cleaning the Printer Media Compartment
- A
- Specifications
- PB22 Physical Dimensions
- PB32 Physical Dimensions
- Power Specifications
- Temperature and Humidity Specifications
- Memory
- Print Speed and Resolution
- Print Technology
- Media Specifications
- Appendix A – Specifications
- External Fanfold Media Specifications
- Supported Media
- Interfaces
- RS-232 Serial Interface
- Serial Cable Pinouts (PC End)
- Pin Signal Description
- USB Interface
- Accessories
- AB27 Battery
- Power Supply (Model AE19)
- AC18 4-Bay Battery Charger
- AV14 Vehicle Dock
- Cart Mount
- Belt Clip
- Handstrap
- Media
- Media Core
- Intermec Cleaning Swab
- Cleaning Pen
- Protective Case
- Shoulder Strap
- Serial Cable
- B
- Default Settings
- Factory Default Settings (Fingerprint Printers)
- Factory Default Settings (IPL Printers)
- Factory Default Settings (ESC/P Printers)
- C
- IPL and Fingerprint Setup Menus
- Index
- Numerics
- D
- E
- F
- H
- |
- L
- M
- P
- R
- 5
- T
- U
- W
- Intermec
Brand : HONEYWELL
Model : PB32
Category : Label printer