
SDOCK2U313 - Docking Station StarTech.com - Free user manual and instructions
Find the device manual for free SDOCK2U313 StarTech.com in PDF.


| Product Type | Docking Station |
| Brand | StarTech.com |
| Model | SDOCK2U313 |
| Host Connection | USB-C (Thunderbolt 3 compatible) |
| Video Output | 2x HDMI 2.0 (supports dual 4K @ 60Hz) |
| USB Ports | 3x USB 3.0 Type-A, 1x USB-C (data only) |
| Networking | Gigabit Ethernet (RJ45) |
| Audio | 3.5mm Combo Audio Jack (headphone/mic) |
| Memory Card Slot | SD 3.0 (UHS-I) |
| Power Delivery | Up to 100W (host laptop charging) |
| Power Adapter | Input: AC 100-240V, Output: DC 20V/5A |
| Dimensions (LxWxH) | 8.7 x 3.5 x 1.1 inches (221 x 89 x 28 mm) |
| Weight | 1.2 lbs (550 g) |
| Supported OS | Windows, macOS, Chrome OS, Linux (with drivers) |
| Cable Length | Integrated USB-C cable: 8 inches (20 cm) |
| LED Indicators | Power and Ethernet link/activity |
| Maintenance | Clean with a soft, dry cloth. Do not use liquids. |
| Safety | Use only the supplied power adapter. Keep away from moisture and heat sources. |
| Warranty | 2-year limited warranty |
Frequently Asked Questions - SDOCK2U313 StarTech.com
User questions about SDOCK2U313 StarTech.com
0 question about this device. Answer the ones you know or ask your own.
Ask a new question about this device
Download the instructions for your Docking Station in PDF format for free! Find your manual SDOCK2U313 - StarTech.com and take your electronic device back in hand. On this page are published all the documents necessary for the use of your device. SDOCK2U313 by StarTech.com.
USER MANUAL SDOCK2U313 StarTech.com
USB 3.1 (10 Gbps) Dual-Bay Dock for SATA Drives
SDOCK2U313

*actual product may vary from photos
For the latest information, technical specifications, and support for this product, please visit www.startech.com/SDOCK2U313.
FCC Compliance Statement
This equipment has been tested and found to comply with the limits for a Class B digital device, pursuant to part 15 of the FCC Rules. These limits are designed to provide reasonable protection against harmful interference in a residential installation. This equipment generates, uses and can radiate radio frequency energy and, if not installed and used in accordance with the instructions, may cause harmful interference to radio communications. However, there is no guarantee that interference will not occur in a particular installation. If this equipment does cause harmful interference to radio or television reception, which can be determined by turning the equipment off and on, the user is encouraged to try to correct the interference by one or more of the following measures:
• Reorient or relocate the receiving antenna.
- Increase the separation between the equipment and receiver.
- Connect the equipment into an outlet on a circuit different from that to which the receiver is connected.
- Consult the dealer or an experienced radio/TV technician for help
This device complies with part 15 of the FCC Rules. Operation is subject to the following two conditions: (1) This device may not cause harmful interference, and (2) this device must accept any interference received, including interference that may cause undesired operation.
Changes or modifications not expressly approved by StarTech.com could void the user's authority to operate the equipment.
Industry Canada Statement
This Class B digital apparatus complies with Canadian ICES-003.
Use of Trademarks, Registered Trademarks, and other Protected Names and Symbols
This manual may make reference to trademarks, registered trademarks, and other protected names and/or symbols of third-party companies not related in any way to StarTech.com. Where they occur these references are for illustrative purposes only and do not represent an endorsement of a product or service by StarTech.com, or an endorsement of the product(s) to which this manual applies by the third-party company in question. Regardless of any direct acknowledgement elsewhere in the body of this document, StarTech.com hereby acknowledges that all trademarks, registered trademarks, service marks, and other protected names and/or symbols contained in this manual and related documents are the property of their respective holders.
Table of Contents
Product diagram ....1
Front view....1
Rear view....1
Introduction......2
Packaging contents....2
System requirements....2
Installation 3
Connect the docking station 3
Install a drive....3
Prepare the drive for use .... 3
About driver installation....4
Using the docking station....5
Disconnect a drive from your computer....5
Remove a drive ....5
About the LED indicators....6
Troubleshooting....7
Test the components in your setup....7
Check to see how the drive is listed in Disk Management....7
Technical support....8
Warranty information......8
Product diagram
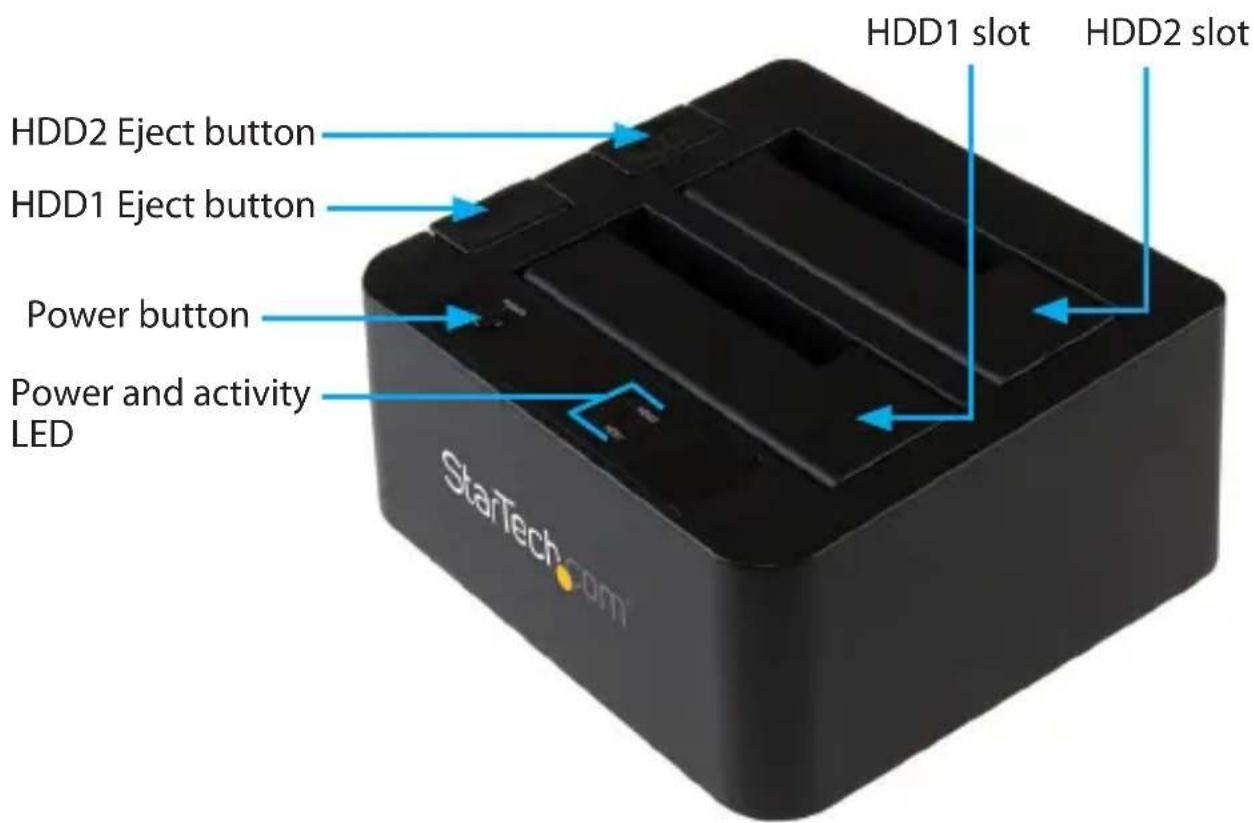
Front view
Rear view
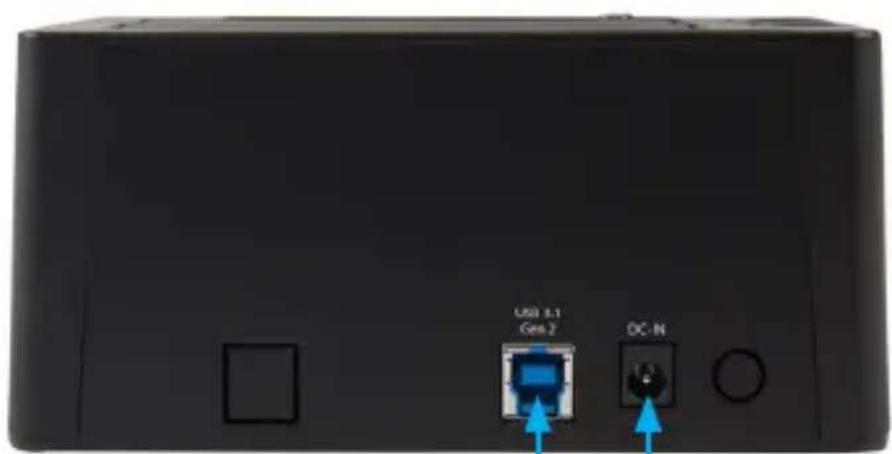
USB 3.1 port Power adapter port
Introduction
Use SDOCK2U313 to easily dock and swap dual drives from your desktop computer or laptop by simply inserting them into the top-loading slots. There aren't any trays or tools required with this docking station and the HDD ejection buttons make it easy to quickly remove drives. SDOCK2U313 supports both 2.5 in. and 3.5 in. SSDs and HDDs. The USB 3.1 capabilities of SDOCK2U313 provide you with greater bandwidth and speed with file transfer rates up to 10Gbps, twice the speed of USB 3.0 (USB 3.1 Gen 1) technology.
Packaging contents
• 1 x USB 3.1 dual-drive HDD dock
- 1 x USB 3.1 A-to-B cable
• 1 x universal power adapter
- 4 x power adapter plugs (NA/EU/UK/AU)
- 1 x quick install guide
System requirements
• USB-enabled computer system with an available USB port
• 2.5 in. or 3.5 in. SATA HDDs or SSDs
Note: To obtain the maximum USB throughput, you must use a computer with a USB 3.1 Gen 2 (10Gbps) port.
System requirements are subject to change. For the latest requirements, please visit www.startech.com/SDOCK2U313.
Installation
Connect the docking station
Warning! Drives and storage enclosures should be handled carefully, especially when they're transported. If you're not careful with your drives, you may lose data as a result. Always handle storage devices with caution.
- Connect the external power adapter from the docking station to a power outlet.
- Connect the included USB 3.1 cable from the drive dock to a USB port on your computer system. Your computer can be turned on or turned off when you connect the USB cable.
- Press the Power button on the top of the drive dock. The LED indicators should light up to indicate that the dock is powered on.
Install a drive
- Carefully align a 2.5 in. or 3.5 in. SATA drive with an HDD slot on the docking station, so that the SATA power and data connectors on the drive are aligned with the corresponding connectors inside of the HDD slot.
- Insert the 2.5 in. or 3.5 in. SATA drive into an HDD slot.
- Press the Power button to turn on the docking station.
After the drive is installed and the docking station is turned on, your computer automatically recognizes the drive and it's accessible as though the drive were installed internally in the system. If your computer doesn't automatically recognize the drive, it's likely that your drive wasn't initialized or it was formatted incorrectly.
Note: When you have two drives inserted in the docking station and you remove one of the drives, the other drive temporarily disconnects as well.
Prepare the drive for use
If you install a drive that already has data on it, after you insert the drive, it appears under My Computer or Computer with a drive letter assigned to it.
If you install a brand-new drive that doesn't contain any data, you must prepare the drive for use.
If you use a computer that's running Windows® 2000, Windows® XP, Windows Vista®, or Windows® 7, do the following:
-
Depending on the OS version that you're running, do one of the following:
-
On your desktop, right-click My Computer.
-
On your desktop, right-click Computer.
-
Click Manage.
- On the Computer Management screen, click Disk Management.
- A dialog window appears and asks you to initialize the drive. Depending on the version of Windows that you're running, you have the option to create either an MBR or a GPT disk.
Note: GPT (GUID partition) is required for drives larger than 2 TB but GPT isn't compatible with some earlier versions of operating systems. MBR is supported by both earlier and later versions of operating systems.
- Locate the disk that is labeled Unallocated. To confirm that the drive is the correct one, check the drive capacity.
- Right-click the section of the window that says Unallocated and click New Partition.
- To initialize the drive in the format of your choice, complete the on-screen instructions.
When the drive is successfully installed, it appears under My Computer or Computer with a drive letter assigned to it.
About driver installation
No driver or software installation is required for this product because the drive dock is natively supported and the drivers are already installed.
Using the docking station
Disconnect a drive from your computer
If the computer that you're using is running a version of Windows, complete the following steps:
- On the task bar notification area on your desktop, click the Safely remove Hardware and Eject Media icon.
- Click the storage device that you want to remove.
- When the message appears indicating that it's safe to remove the device, remove the drive.
Note: If you remove the drive before you receive the notification that it's safe to do so, you could experience lost or corrupted data.
If the computer that you're using is running a version of Mac OS, complete the following steps:
- Close any windows that list the contents of the drive.
- On your desktop, click the USB Storage icon and drag it onto the Trash Can icon on your desktop.
- Wait 5 seconds and then remove the drive from the docking station.
Remove a drive
Note: Make sure that the drive that you want to remove isn't being accessed by the computer before you proceed.
-
To remove the drive from your operating system, do one of the following:
-
On computers running a version of Windows, on your desktop, click Safely Remove Device.
- On computers running a version of Mac OS, on your desktop, drag the drive to the trash can icon.
For more information, see the documentation that came with your operating system.
- Hold the Power button for 3 seconds on the top of the dock and wait for the dock to finish powering down.
- To release the drive, press the Drive eject button on the top of the docking station.
- Pull the drive from the drive slot on the top of the docking station.
About the LED indicators
The docking station includes a power LED indicator (blue) and an activity LED indicator (red) for each HDD slot. For more information about what the LED indicators represent, consult the table below.
LED behavior Meaning
LED indicator is solid blue The dock is turned on and receiving power.
LED indicator is red and blinking regularly A process (like read or write) is being completed.
Warning! Don't remove your drive from the docking station when the red LED is blinking, as doing so could damage your drive and result in data loss.
Troubleshooting
Test the components in your setup
If you followed the steps to set up your docking station and it still isn't working, you can test to make sure that the components of your setup are working correctly and aren't the source of the issue.
Tip: When you test the cables in your setup, you should test each cable individually and use short cables where possible.
To test the components, try the following:
- Use the cables, drives, and dock in another setup. If the components work in the second setup, the problem likely isn't with the components and you can proceed to the second step.
- One component at a time, swap out the cables, drives, and dock for components that you know work in other setups.
Check to see how the drive is listed in Disk Management
To determine if the error is with the drive that you're using, complete the following:
- On a computer running a version of Windows, press the Windows key + R, type diskmgmt.msc, and press Enter.
- Check to see if your drive is listed and do one of the following:
- If the drive is listed as unallocated, you need to reformat the drive. Right-click unallocated and click New Simple Volume. Complete the on-screen instructions to reformat the drive.
Warning! Reformatting a drive erases all of the data on it. Make sure that you back up all of your data before you reformat the drive.
- If the drive is listed as healthy but doesn't have a drive letter next to it, right-click healthy and click Change Drive Letter and Paths. Click Add, assign a drive letter (for example, C:), and click OK.
Note: A formatted drive won't show up in Computer or My Computer until it has a drive letter assigned to it.
Technical support
StarTech.com's lifetime technical support is an integral part of our commitment to provide industry-leading solutions. If you ever need help with your product, visit www.startech.com/support and access our comprehensive selection of online tools, documentation, and downloads.
For the latest drivers/software, please visit www.startech.com/downloads
Warranty information
This product is backed by a two-year warranty.
StarTech.com warrants its products against defects in materials and workmanship for the periods noted, following the initial date of purchase. During this period, the products may be returned for repair, or replacement with equivalent products at our discretion. The warranty covers parts and labor costs only. StarTech.com does not warrant its products from defects or damages arising from misuse, abuse, alteration, or normal wear and tear.
Limitation of Liability
In no event shall the liability of StarTech.com Ltd. and StarTech.com USA LLP (or their officers, directors, employees or agents) for any damages (whether direct or indirect, special, punitive, incidental, consequential, or otherwise), loss of profits, loss of business, or any pecuniary loss, arising out of or related to the use of the product exceed the actual price paid for the product. Some states do not allow the exclusion or limitation of incidental or consequential damages. If such laws apply, the limitations or exclusions contained in this statement may not apply to you.
Hard-to-find made easy. At StarTech.com, that isn't a slogan. It's a promise.
StarTech.com is your one-stop source for every connectivity part you need. From the latest technology to legacy products — and all the parts that bridge the old and new — we can help you find the parts that connect your solutions.
We make it easy to locate the parts, and we quickly deliver them wherever they need to go. Just talk to one of our tech advisors or visit our website. You'll be connected to the products you need in no time.
Visit www.startech.com for complete information on all StarTech.com products and to access exclusive resources and time-saving tools.
StarTech.com is an ISO 9001 Registered manufacturer of connectivity and technology parts. StarTech.com was founded in 1985 and has operations in the United States, Canada, the United Kingdom and Taiwan servicing a worldwide market.
- USB 3.1 (10 GBPS) DUAL-BAY DOCK FOR SATA DRIVES
- FCC COMPLIANCE STATEMENT
- INDUSTRY CANADA STATEMENT
- USE OF TRADEMARKS, REGISTERED TRADEMARKS, AND OTHER PROTECTED NAMES AND SYMBOLS
- TABLE OF CONTENTS
- PRODUCT DIAGRAM ....1
- INTRODUCTION......2
- INSTALLATION 3
- USING THE DOCKING STATION....5
- TROUBLESHOOTING....7
- TECHNICAL SUPPORT....8
- WARRANTY INFORMATION......8
- PRODUCT DIAGRAM
- INTRODUCTION
- PACKAGING CONTENTS
- SYSTEM REQUIREMENTS
- INSTALLATION
- CONNECT THE DOCKING STATION
- INSTALL A DRIVE
- PREPARE THE DRIVE FOR USE
- ABOUT DRIVER INSTALLATION
- USING THE DOCKING STATION
- DISCONNECT A DRIVE FROM YOUR COMPUTER
- REMOVE A DRIVE
- ABOUT THE LED INDICATORS
- LED BEHAVIOR MEANING
- TROUBLESHOOTING
- TEST THE COMPONENTS IN YOUR SETUP
- CHECK TO SEE HOW THE DRIVE IS LISTED IN DISK MANAGEMENT
- TECHNICAL SUPPORT
- WARRANTY INFORMATION
- LIMITATION OF LIABILITY
Brand : StarTech.com
Model : SDOCK2U313
Category : Docking Station