
PM43 - Label printer HONEYWELL - Free user manual and instructions
Find the device manual for free PM43 HONEYWELL in PDF.


| Product Type | Industrial label printer |
| Brand | Honeywell |
| Model | PM43 |
| Print Resolution | 203 dpi (standard), optional 300 dpi |
| Print Speed | Up to 12 inches per second (304 mm/s) |
| Print Width | Up to 4.1 inches (104 mm) |
| Dimensions (W x D x H) | 259 x 462 x 191 mm (10.2 x 18.2 x 7.5 in) |
| Weight | Approximately 15 kg (33 lb) |
| Power Supply | AC 100-240 V, 50/60 Hz, auto-ranging |
| Interfaces | USB 2.0, Ethernet (10/100), RS-232 serial |
| Optional Wireless | Wi-Fi 802.11 a/b/g/n, Bluetooth 3.0 |
| Display | Color LCD with touch screen (optional) |
| Media Types | Continuous, die-cut, black mark, fanfold, roll-fed |
| Ribbon Capacity | Up to 600 m (2,000 ft) length |
| Memory | 256 MB SDRAM, 128 MB Flash |
| Printer Languages | ZPL, IPL, DP, XML, SATO, Zebra, Honeywell |
| Construction | All-metal frame for durability |
| Maintenance | Clean printhead and platen roller with isopropyl alcohol as needed |
| Safety Precautions | Use only supplied power cord; avoid exposure to moisture or extreme temperatures |
| User-Replaceable Parts | Printhead, platen roller, cutter blade (optional) |
| Warranty | 1 year limited warranty (check local terms) |
Frequently Asked Questions - PM43 HONEYWELL
User questions about PM43 HONEYWELL
0 question about this device. Answer the ones you know or ask your own.
Ask a new question about this device
Download the instructions for your Label printer in PDF format for free! Find your manual PM43 - HONEYWELL and take your electronic device back in hand. On this page are published all the documents necessary for the use of your device. PM43 by HONEYWELL.
USER MANUAL PM43 HONEYWELL
PM23c, PM43, & PM43c
Mid-Range Printer

natural_image
Three Honeywell memory units with control panels and display screens, no visible text or symbols on the devices themselves.User Manual
Disclaimer
Honeywell International Inc. ("HII") reserves the right to make changes in specifications and other information contained in this document without prior notice, and the reader should in all cases consult HII to determine whether any such changes have been made. The information in this publication does not represent a commitment on the part of HII.
HII shall not be liable for technical or editorial errors or omissions contained herein; nor for incidental or consequential damages resulting from the furnishing, performance, or use of this material. HII disclaims all responsibility for the selection and use of software and/or hardware to achieve intended results.
This document contains proprietary information that is protected by copyright. All rights are reserved. No part of this document may be photocopied, reproduced, or translated into another language without the prior written consent of HII.
Trademarks
Microsoft, Windows, and the Windows logo are either registered trademarks or registered trademarks of Microsoft Corporation in the United States and/or other countries.
Zebra, Zebra Programming Language (ZPL), and ZPL II are trademarks of ZIH Corp.
Patents
For patent information, see www.hsmpats.com.
Copyright © 2012–2016 Honeywell International Inc. All rights reserved.
Contents
Customer Support....xi
Product Service and Repair xi
Limited Warranty xi
Send Feedback....xi
Safety Precautions ..... xii
Product Identification ..... xii
1 About the Printer....1
About the PM23c, PM43, and PM43c Printer 2
Printer Features 3
About the Front Panel 5
About the Ready-to-Work Indicator 5
About the Print Button 6
About the Icon Front Panel 7
About the Full Touch Display Front Panel 9
About the Ready Screen 10
About the Main Menu 12
How to Navigate in the Main Menu 13
About the Onscreen Keypads 13
About the Printer Wizards 15
About Printer Command Languages....16
About Fingerprint 17
About Direct Protocol 17
About IPL 17
About ZSim 18
About DSim 18
About Smart Printing 18
How to Set the Printer Command Language 18
Set the Command Language from the Printer Web Page 18
Set the Command Language from the Main Menu 19
Printer Options and Accessories 19
Contents
2 Set Up the Printer .....23
Connect the Printer to Power 24
About Smart Calibration 25
About Media 25
About Linerless Media 25
About Tear-Off Printing. 25
Load Media for Tear-Off Printing 26
About the Label Dispenser 27
Load Media for the Label Dispenser 27
Load Media from an External Supply 32
About Cut-Off Printing 33
Load Media for Cut-Off Printing 33
About Ribbon 35
Load Ribbon 36
About Test Labels 37
Print a Test Label with the Icon Printer 38
Print a Test Label with the Full Touch Printer 38
Calibrate the Screen 38
Create and Print Labels 39
How to Print on RFID Media 39
About RFID Tag Position 40
Run the RFID Calibration Wizard 40
Calculate RFID Tag Position 41
3 Connect the Printer....43
About Printer Drivers 44
Install Printer Drivers....44
How to Connect the Printer to Your PC 45
Connect the Printer Using a Serial Cable 45
Connect the Printer Using a USB Cable 46
Contents
About the Parallel Port 46
Connect the Printer Using an IEEE 1284 Cable. 46
How to Connect the Printer to Your Network 46
Connect the Printer to an Ethernet Network 47
About Wireless Communications 48
Configure Wireless Communications from the Web Page ..... 48
Configure Wireless Communications from the Main Menu ..... 49
Install Authentication Certificates 49
About Bluetooth Communications 50
Connect to a Bluetooth Device 50
Configure Bluetooth Communications from the Web Page ..... 51
Configure Bluetooth Communications from the Main Menu ..... 52
About the USB Host Port 52
Connect a USB Device 53
4 Configure the Printer ....55
How to Configure the Printer 56
About the Printer Configuration Menus 56
Configure the Printer from the Main Menu 62
Restrict Access to the Main Menu. 63
Configure the Printer from the Web Page 64
Configure the Printer with PrintSet 5 65
How to Configure the Printer with Programming Commands ..... 66
How to Configure the Printer with SmartSystems 66
Configure the Printer with Touchless Configuration 66
About Uploading Fonts, Images, Applications, Formats, and Web Pages ..... 67
Upload Fonts, Images, Applications, Formats, and Web Forms from the Web Page 67
Upload Fonts, Images, Applications, Formats, and Web Forms from a USB Storage Device. 69
Change Background Image for the Ready Screen. 70
About Printer Profiles 71
Save a Printer Profile from the Web Page 71
Load a Printer Profile from the Web Page 71
Save a Printer Profile from the Main Menu 72
Load a Printer Profile from the Main Menu 73
How to Load a Printer Profile with Programming Commands 73
Install a Configuration File from a USB Storage Device 74
Export a Configuration File to a USB Storage Device 75
Contents
About Menu Shortcuts 75
Create Menu Shortcuts 76
Customize the Printer Web Page 77
5 Troubleshoot the Printer .....79
Contact Support 80
About Printer System Information 81
View Printer Statistics 82
Check the Printer Odometer 83
Set Maintenance Alerts 84
About Alerts 85
Configure Error Alert Notification 85
Maintenance and Error Alerts 85
Troubleshoot Printer Problems and Find Solutions 88
How to Restore Printer Defaults 93
Restore Defaults from the Printer Web Page 93
Restore Defaults from the Main Menu 94
Restore Defaults with a Hardware-Based Reset 94
How to Upgrade the Printer Firmware 95
Download the Printer Firmware Update 95
Upgrade Firmware from the Printer Web Page 96
Upgrade Firmware from a USB Storage Device 96
6 Maintain the Printer .....97
How to Clean the Printer 98
Clean the Printhead 98
Clean the Media Guides. 99
Clean the Exterior of the Printer 100
Clean the Cutter 100
Replace the Printhead 100
Replace the Platen Roller 102
Contents
How to Adjust the Printer 103
Prevent Ribbon Wrinkling 103
Adjust the Printhead Balance....104
Adjust the Printhead Pressure 105
Calibrate the Label Taken Sensor 106
Adjust the Label Gap and Black Mark Sensor 106
A Specifications ....109
Printer Specifications 110
Interface Specifications 121
RS-232 Serial Interface 121
USB Device Interface 122
USB Host Interface 122
Ethernet Interface 123
B Default Settings .....125
Default Configuration....126
Serial Port Settings 126
Ethernet Settings 127
Wireless 802.11 General Settings 128
Wireless 802.11 Network Settings 129
Wireless 802.11 Security Settings 130
Bluetooth Settings 133
Media Settings 134
Print Quality Settings 138
General System Settings 138
Display and Audio Settings 140
System I/O Settings 141
System Network Services 142
System Maintenance Alert Settings 143
C Print Labels with INPrint....145
About the INPrint Page 146
Print INPrint Labels 146
Predefined INPrint Label Formats 147
Contents
Customer Support
If you need assistance installing or troubleshooting your product, contact us by using one of these methods:
Knowledge Base: www.hsmknowledgebase.com
Our Knowledge Base provides thousands of immediate solutions. If the Knowledge Base does not help you solve your problem, log into the Technical Support Portal to submit your problem or ask your question.
Technical Support Portal: www.hsmsupportportal.com
Log into the Technical Support Portal to search our Knowledge Base, submit your problem or question, request a call back, or provide feedback. When filling out one of the forms, provide as much detail as possible. You can even include attachments.
Telephone: www.honeywellaidc.com/locations
For our latest contact information, please check our website.
Product Service and Repair
Honeywell International Inc. provides service for all of its products through service centers throughout the world. To find your service center, go to www.honeywellaidc.com and select Support > Contact Support > Service and Repair. Contact your service center to obtain a Return Material Authorization number (RMA #) before you return the product.
To obtain warranty or non-warranty service, return your product to Honeywell (postage paid) with a copy of the dated purchase record.
Limited Warranty
For warranty information, go to www.honeywellaidc.com and click Resources > Warranty.
Send Feedback
Your feedback is crucial to the continual improvement of our documentation. To provide feedback about this manual, please contact the Technical Communications department directly at ACSHSMTechnicalCommunications@honeywell.com.
Safety Precautions

Note: You may use this printer on an IT power system.

Warning: Moving parts are exposed when the cover is open. Make sure the cover is closed before you operate the printer.
Warning: Do not open the electronics cover. Dangerous voltage!
Warning: Do not remove the bottom plate. Dangerous voltage!
Warning: Do not put your fingers inside the print mechanism when the power is on.

Caution: Double pole/neutral fusing.
Caution: Do not spray the printer with water. If you are using a hose to clean the premises in an industrial environment, remove the printer or protect it carefully from spray and moisture.
Caution: Make sure you place the printer on an even surface that can safely support its weight and supplies.
Caution: You must implement both hardware and software safety precautions to prevent the possibility of undefined system states.
Caution: You must ensure that dangerous conditions cannot occur under any circumstances, even for a brief period of time.
Caution: Observe all safety and accident prevention regulations applicable to your specific region and application.
Caution: Before you use a cleaning card, carefully read the warning text on the envelope.
Product Identification
The machine labels are attached to the underside of the printer and contain information on type, model, serial number, and AC voltage. This document provides warnings regarding personal safety during operation of the printer.
1
About the Printer
This chapter introduces the PM23c, PM43, and PM43c printers, and includes descriptions of printer features and basic operation.
About the PM23c, PM43, and PM43c Printer
The PM23c, PM43, and PM43c printers are rugged label printers that include integrated USB, RS-232, and Ethernet interfaces. You can connect the printers to a single desktop PC, to a wired network, or to a wireless network.
Features of both printers include:
- Print speeds of up to 10 ips (406 dpi printhead) and 12 ips (203 and 300 dpi printhead).
- USB host port for connecting storage devices, scanners, or keyboards.
- USB device port for connecting to a desktop PC.
- Support for printer programming languages including Intermec Fingerprint, Intermec Printer Language (IPL), Direct Protocol, DSim, and ZSim.
- A wide range of printer accessories.
- CCXv4 certified.

Note: The PM23c, PM43, and PM43c printers with an IEEE 802.11a/b/g/n radio installed are Wi-Fi® certified for interoperability with other 802.11a/b/g/n wireless LAN devices.
Printer Features
Use these illustrations to familiarize yourself with the PM23c, PM43, and PM43c printers. Most of the illustrations in this manual show the PM43 printer. The internal parts and back connectors are the same for all printer models.

Front View of PM43 Printer
Chapter 1 – About the Printer

Internal View of the PM43 Printer

Back View of the PM43 Printer
4 PM23c, PM43, and PM43c Mid-Range Printer User Manual
About the Front Panel
There are two front panels available for the PM23c, PM43, and PM43c printers:
- Icon (no display)
- Full touch display
Both versions of the front panel contain the Print button and the Ready-to-Work indicator. The PM43 with the full touch display also has a USB port on the front panel.
About the Ready-to-Work Indicator
The Ready-to-Work indicator on the front of the printer turns on when the printer is ready to print.

Ready-to-Work Indicator Location
Ready-to-Work Indicator Status Description
On Printer is ready for a print job.
Blinking Printer is not ready for a print job.
Off Printer is turned off, not communicating, or not ready to print. For example, the printer may be starting up or performing a firmware upgrade.
About the Print Button
The blue button on the front panel is the Print button. All models of printer have a blue Print button. Use the Print button to feed media, pause print jobs, and print. Use this table to understand the functions of the Print button.
Print Button Behavior
| State of the Printer Printer Behavior | |
| Starting Press the Print button during startup to enter Calibration mode or to restore defaults if the printhead is lifted. | |
| Ready Press the Print button to advance media. | |
| If the print key feature is enabled (on), press the Print button to reprint the last print job. | |
| Press and hold the Print button for more than two seconds to perform the action defined by the Hold Feed Button Action setting. | |
| Printing | Press the Print button to stop or pause printing. The printer will stop after it completely prints one label. |
| Paused Press the Print button to resume printing. | |
| Error Press the Print button to advance media if possible. | |
About the Icon Front Panel
The icon front panel contains icons that light up to indicate printer communications, printer errors, and maintenance issues.

Icon Front Panel on a PM23c, PM43, and PM43c Printer
Use this table to understand what it means when an icon lights up.
Names and Descriptions of Front Panel Icons
| Icon Name Color Description | ||
 | Wi-Fi Communications White Wireless signal. | |
| Off Wireless radio disabled or not installed. | ||
 | Connectivity Flashing | Sending or receiving data.white |
| Off No data is being sent or received. | ||
 | Bluetooth White Bluetooth is enabled. | |
| Off Bluetooth is disabled or not installed. | ||
Chapter 1 – About the Printer
Names and Descriptions of Front Panel Icons (continued)
| Icon | Name | Color | Description |
 | Media Red Out of media or there is a problem with the media (jammed, not loaded correctly). If the printer has a label taken sensor installed and enabled, this icon indicates that a label has been printed but not yet removed. | ||
 | Configuration Error Red There is a printer configuration problem. | ||
 | Ribbon Red Ribbon is out or there is a problem with the ribbon. | ||
 | Printhead Hot Red The printhead is too hot. | ||
 | Printhead Lifted Red Printhead is lifted. | ||
 | General Error Red There is a printer problem not associated with one of the other icons. | ||
 | Pause White The printer is paused. | ||
 | Maintenance Amber Maintenance is required and a lifetime odometer setting has been reached. | ||
| Flashing amber | The firmware is being upgraded, the printer is recovering or restoring the firmware, or the printer is calibrating. Once the process is complete, the printer will turn off. | ||
| Off No maintenance is required. | |||
About the Full Touch Display Front Panel
The full touch display front panel contains a 3.5-inch touch panel and a keypad for entering information or navigating through the user interface.

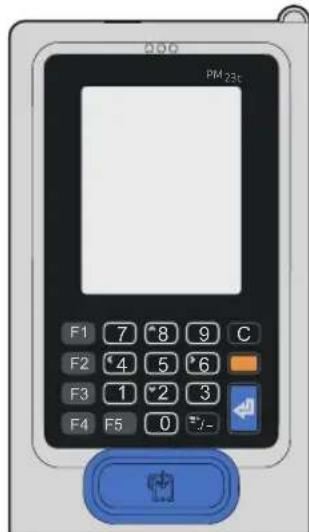
The Full Touch Display Front Panel on a PM43 and PM23c Printer
The full touch screen is a resistive touch panel that supports touch input with fingers, gloved hands, or a stylus. You only need to touch the screen once to make a selection.
Use the keys on the front panel to enter information into the screen or to navigate the Main Menu if the touch screen is not working properly. All of the full touch display printers contain these keys on the front panel: 0 to 9, Enter, . (period), - (minus), Clear, F1 to F5, and an Orange (Shift) key.
Shortcut Keys on the Full Touch Display Keypad
Navigation Shortcut Keys
Enter the Main Menu . (period)/- (minus)
Arrow Up 8
Arrow Down 2
Arrow Left 4
Arrow Right 6
Enter in Menu
Enter button

Break in Fingerprint Application Orange + C
About the Ready Screen
After you turn the printer on, the Ready screen appears when the printer finishes starting up.

PM23c, PM43, and PM43c Ready Screen

Note: Icons for Wi-Fi and Bluetooth status appear only when the optional Wi-Fi/Bluetooth module is installed. The IP address appears when the printer is connected to an Ethernet or wireless network. If there is not Ethernet or wireless connection, serial port information appears on the screen.
By default, the information bar at the bottom of the screen shows the printer command language and the printer IP address. You will see the time and current date only if the real time clock (RTC) is installed. You can customize the screen as necessary to show different kinds of information.
The status bar at the top of the screen includes these icons:
Information and Status Icon Descriptions
| Icon Description of Icon | |
| Printer Information icon. Press the icon to view printing related settings and system information. | |
| Wireless Connection icon. This icon appears when the Wi-Fi/Bluetooth module is installed in the printer and indicates the strength of the wireless network connection:- Strong.- Good.- Weak.- No signal.- 802.11 is turned off.Press the icon to view status and signal strength. | |
| Data transfer icon. Blinks when data is moving through an interface connection to the printer. Press the icon to view detailed information on the connection. | |
| Bluetooth icon. This icon appears when the Wi-Fi/Bluetooth module is installed in the printer and indicates whether the Bluetooth module is enabled or disabled:- Bluetooth is turned on.- Bluetooth is turned off.Press the icon to view detailed Bluetooth information or to use the Bluetooth wizard. | |
About the Main Menu
In the printer Ready screen, press to view the Main Menu.


Note: If you create menu shortcuts, the Main Menu is replaced by the Quick Choices menu.
Press one of the buttons to select the Programs, Settings, Tools, or Wizards menu:
- Select Programs to see a list of programs installed on the printer. This list includes utility programs provided by Intermec as part of the printer firmware, and programs you have installed on the printer.
The Programs item appears in the Main Menu only if the printer is using Fingerprint or Direct Protocol as the command language. - Select Settings to view and change printer settings.
- Select Tools to print test labels, manage a connected USB storage device, restore printer default settings, or save and load printer profiles.
- Select Wizards to see a list of wizards that help you configure printing or communication settings, or calibrate the media sensors.

Note: The printer cannot print while the Main Menu is onscreen. You need to exit the Main Menu and return to the Ready screen to begin printing.
How to Navigate in the Main Menu
Use the status bar buttons to navigate between menus in the Main menu and save changes.
Main Menu Buttons and Descriptions
| Button Description | |
| Returns to the Main menu. | |
| Goes back up one level in the menu. | |
| Returns to the Ready screen. | |
| Saves the configuration changes. | |
| Moves between options in a setting menu. | |
| Moves to additional options not viewable in the menu. | |
Use the horizontal scroll bar for settings with options you can select. Use the onscreen keypads to enter data for the settings.
About the Onscreen Keypads
You can use the onscreen alphanumeric or numeric keypads to make changes to your settings.
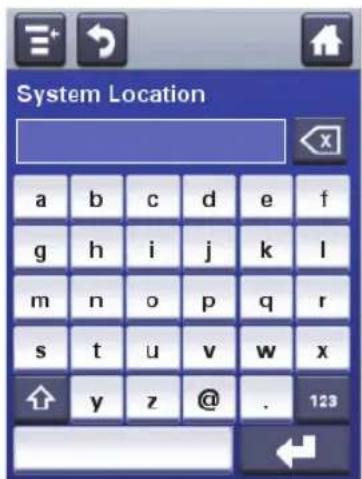
Alphanumeric Keypad
Chapter 1 – About the Printer

Numeric Keypad
![System Location 1 2 3 ! @ # 4 5 6 ^ % * & ( ) 7 8 9 - + = { } , 0 . | \ [ ] : ; < > ", ~ , ? / ABC](/content/2026/06/1268613/images/4efe854b2123ed6f61aed7269927ea51c5f7db02446cc14f1e6cce096d0cf892.jpg)
Extended Numeric Keypad
For all keypads:
- Press to delete the last character you entered.
- Press the available keys to enter your information.
For the alphanumeric and extended numeric keypad:
- Press 123 or ABC to toggle between the alphabetic and numeric keys.
- In the alphabetic keypad, press to toggle between uppercase and lowercase letters.
- In the numeric keypad, press to toggle between shifted and unshifted key characters. For example, press the up arrow to toggle between \$ and # in the numeric keypad.
14 PM23c, PM43, and PM43c Mid-Range Printer User Manual
When you are finished typing, press to return to the menu and then save your information.
About the Printer Wizards
The full touch printer firmware includes several wizards you can use to quickly set up your printer. The available wizards depend on the hardware you have installed in the printer. You can start all of the wizards from the Main menu except for the startup wizard. The startup wizard appears the first time you turn on the printer and after the printer has been reset to the factory default state.

Printing Wizards
Wizard Description
Media Setup Select media and printing type (DT or TTR), media width, length, and X-margin, Start and Stop Adjust values, and print speed.
Print Quality Prints a series of labels to determine the best print quality setting.
Loading Media Shows how to load media.
Loading Ribbon (TTR printers only) Shows how to load ribbon.
Communications Wizards
| Wizard Description |
| Line Analyzer Logs all incoming data on all communications channels and saves the data to a log file. For experienced users. |
| Wireless 802.11 Looks for wireless networks and sets up Wi-Fi communications. Available when Wi-Fi/Bluetooth module is installed. |
| Bluetooth Looks for discoverable Bluetooth devices and sets up Bluetooth communications. Available when Wi-Fi/Bluetooth module is installed. |
Calibration Wizards
| Wizard Description |
| Media Calibrates the label gap sensor and shows current print settings. |
| Screen Calibrates the touch screen. |
| RFID Calibrates the optimal label adjustment and output power setting for the RFID media loaded in the printer. Available when the RFID module is installed. |
| Label Taken Sensor Calibrates the label taken sensor used with the label dispenser. Available when the label taken sensor is installed. |
About Printer Command Languages
A printer command language is a set of instructions that controls printer functions:
- Configure the printer.
- Return the status of the printer.
• Control peripheral devices. - Format a label or receipt for printing.
The printer supports these command languages and language simulator support options:
- Fingerprint
- Direct Protocol (DP)
- IPL (Intermec Printer Language)
• ZSim (ZPL command language simulator) - DSim (DPL command language simulator)
- Smart Printing
About Fingerprint
Fingerprint is a BASIC-inspired general purpose printer language. Use Fingerprint to design custom label formats and write printer application software. If you plan to run Smart Printing applications directly on the printer, without connecting to a PC, select Fingerprint as your printer command language. For more information, see the Fingerprint Command Reference.
The printer uses the Fingerprint printer command language by default.
About Direct Protocol
Direct Protocol (DP) is a subset of Fingerprint that uses a more intuitive English-like syntax. This flexible host-based printer command language can also be used with Smart Printing applications. Direct Protocol lets you combine predefined layouts and variable data to create labels, tickets, and tags. If you are using bar code software, like BarTender, select Direct Protocol as your printer command language.
About IPL
IPL (Intermec Printer Language) is a host-based printer command language. Use IPL to design, modify, and download label formats; write printer application software; and configure the printer. If you are sending IPL label files to the printer, select IPL as your printer command language. For more information, see the IPL Command Reference.
About ZSim
ZSim (ZPL command language simulator) interprets Zebra™ programs (ZPL II or later) without requiring any host programming changes. If you are sending ZPL label files to the printer, select ZSim as your printer command language. For more information, see the ZSim Command Reference.
About DSim
DSim (DPL command language simulator) interprets Datamax™ data streams without requiring any host programming changes. If you are sending DPL label files to the printer, select DSim as your printer command language. For more information, see the DSim Command Reference.
About Smart Printing
Smart Printing refers to the ability of the printer to independently run printing operations without being connected to a host computer. If you are running printer-based applications written in C#, select Smart Printing as your printer command language.
For help creating Smart Printing applications, go to the Intermec Developer Center at www.intermec.com/developer.
How to Set the Printer Command Language
You can use one of these methods to change the printer command language:
- Printer Web page
- Main Menu
- PrintSet 5. For more information, see the PrintSet 5 online help.
Set the Command Language from the Printer Web Page
To set the command language from the printer web page, you need to turn on the printer and connect to your Ethernet or Wi-Fi network.
1 Make sure that the printer has media and ribbon (if necessary) installed.
2 On your PC, open a browser.
3 In the Location or Address bar, type the printer IP address and press Enter. The printer web page appears.
4 Click Login. The Login page appears.
5 Type your Username and Password and click Login. The default username is itadmin and the default password is pass.
6 Click the Configure tab.
7 Click System Settings > General.
8 Select a different printer command language from the Command Language list, and then click Save.
9 Click the Services tab.
10 Click Reboot Printer, and then click Reboot. The printer restarts in the command language you selected.
Set the Command Language from the Main Menu
If you have a full touch printer, you can use this procedure to change the printer command language from the Main Menu.
1 From the Ready screen, press the Main Menu button.
2 From the Main Menu, press Settings > System Settings > General.
3 Scroll down until you reach Command Language.
4 Use the horizontal scroll bar to select the command language you want to use and then save your change.
5 Turn the printer off and then on. The printer starts up in the command language you selected.
Printer Options and Accessories
You can use these printer options and accessories (sold and ordered separately) with the PM23c, PM43, and PM43c printers. Most options are either installed at the factory or can be installed by factory service technicians in the field. Accessories are designed to be installed by the customer.
PM23c, PM43, and PM43c Options and Accessories
| Option or Accessory | Supported Printer | Description |
| 1-inch Hanger PM23c Use the 1-inch hanger when you are using very narrow media. | ||
| Airline Boarding Pass | PM43c Use the airline boarding pass option to print boarding passes from fanfold media. The airline boarding pass options include a ticket shelf, media guides, and an extended tray. | |
| Airline Baggage Tag | PM23c, PM43c | Use the airline media guides and filler to easily load baggage tags in your printer. |
| Door with Bubble Top | PM23c Use the bubble door when printing baggage tags on a roll and you need to have media fully covered. | |
| Collapsible Core PM43, | PM43c | Use the collapsible core accessory to easily remove ribbon from the takeup hub. |
| Cutter PM43, | PM43c | Use the cutter option to cut media into individual labels. |
| Cutter Tray PM43, | PM43c | Use the optional cutter tray accessory to collect the cut-off labels. |
| Door with the Dome Cover | PM23c, PM43c | Use the dome cover to accommodate rolls of media up to 212.725 mm (8.375 inch) outside diameter and protect the inside of the printer from dust and debris. |
| Dual USB Host Port Board | PM23c, PM43, PM43c | Use the dual USB host port board to add the ability to connect multiple USB devices to the printer. |
| DUART Board PM23c, | PM43, PM43c | Use the DUART board to add two UART ports on the back of the printer. |
| Extended Base with Full Label Roll Rewinder | PM43 Use the extended base option with the PM43 printer to be able to rewind a full roll of labels. | |
| Industrial Interface+UART board | PM23c, PM43, PM43c | Use the Industrial interface + UART board to make a UART port on the back of the printer. |
| Label Dispenser with Rewinder and Label Taken Sensor | PM23c, PM43, PM43c | Use the label dispenser to peel labels from the backing and present the labels one at a time for application. |
| Label Taken Sensor | PM23c, PM43, PM43c | Use the label taken sensor with the label dispenser option to detect when labels are removed from the printer and another can be printed. |
| Large Edge Guide PM43 Use the large edge guide to make sure that large rolls of media stay on the hanger. | ||
| Media Cover Lock PM43 Use the media cover lock on the PM43 to make sure the media cover remains closed with an external lock. | ||
| Parallel IEEE 1284 Interface board | PM23c, PM43, PM43c | Use the parallel interface board to make a parallel port on the back of the printer. |
| Real Time Clock PM23c, PM43, PM43c | Use the real time clock to keep track of the current time on the printer. | |
| RFID Module PM23c, PM43, PM43c | Use the RFID module to be able to print on RFID media. The PM23c can print RFID baggage tags. | |
| Rotating Media Supply Hub | PM23c, PM43, PM43c | Use the rotating media supply hub with media that has a 76 mm (3 in) core. The PM43 hub supports up to 212.725 mm (8.375 in) outside diameter roll size. the PM23c and PM43c hub supports up to 152.4 mm (6 in) outside diameter roll size. The hub option also includes a paper low sensor. |
| Short Door PM23c, PM43c | Use the short door to accommodate large rolls of media. | |
| Touchless Configuration | PM23c, PM43, PM43c | Use the touchless configuration option to be able to configure the printer from an RFID reader. |
| Wi-Fi+Bluetooth Module | PM23c, PM43, PM43c | Use the Wi-Fi+Bluetooth module to be able to communicate with your printer wirelessly. |
Chapter 1 – About the Printer
2
Set Up the Printer
Use this section of the manual to learn what you need to do to set up the printer. You will find information about loading media and ribbon, printing a test label, calibrating the full touch screen, and adjusting the printer.
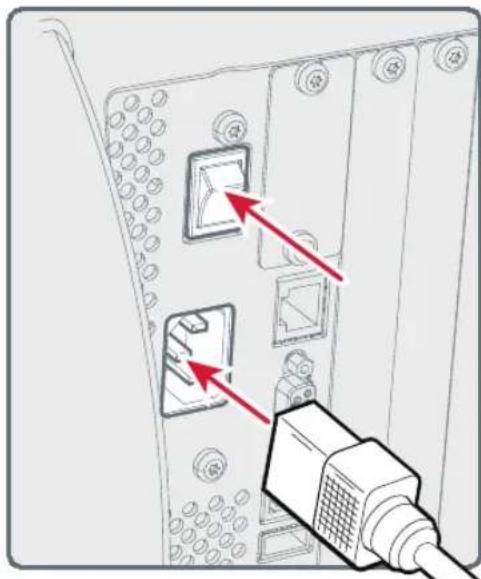
Connect the Printer to Power
The full touch printer goes through a startup wizard the first time you turn on the power. The icon printer goes through an LED startup sequence the first time you turn on the power.
1 Connect one end of the power cord to the back of the printer and connect the other end to AC power.
natural_image
Back panel with two connectors and a USB cable inserted, showing no text or symbols2 Press the power switch to turn on the printer. As the printer starts up:
- a progress bar appears on the full touch interface. When the printer has finished starting up, the startup wizard appears. After you complete the startup wizard, you can choose to complete more wizards or you can go to the Ready screen.
- the icons turn on and then turn off one at a time on the icon printer. When the printer has finished starting up, the blue Ready-to-Work indicator turns on and stays on.
- if Power Up Action is set to Smart Calibration, the printer calibrates media type, printing method, and media length.
If a condition occurs that will prevent printing, the Ready-to-Work indicator blinks.
About Smart Calibration
Smart Calibration detects media type (gap, black mark, or continuous), detects printing method (ribbon or no-ribbon), and calibrates media length. This feature reduces the amount of media needed to set up the printer. Smart Calibration is available as an option for these media settings:
- Power Up Action (default setting)
- Head Down Action (default setting)
- Hold Feed Button Action
About Media
The printers can print on labels, tickets, tags, and continuous stock. The procedure you use to load media depends on how you are operating the printer and the options you have installed.
About Linerless Media
If you are printing on linerless media, follow these guidelines for best results:
- You must install the linerless roller accessory before printing. For more information on this accessory, contact your local Intermec representative.
- When removing printed labels on linerless media, tear the label up towards the top of the printer to prevent media jams.
- Do not use linerless media with the cutter accessory.
About Tear-Off Printing
For tear-off printing, you manually tear printed labels, tickets, and other printed media from the front of the printer. You can use these types of media for tear-off printing:
• Non-adhesive continuous stock
• Self-adhesive continuous stock with liner
• Self-adhesive labels with liner
• Tickets with gaps, with or without perforations
• Tickets with black marks, with or without perforations
Chapter 2 – Set Up the Printer
Load Media for Tear-Off Printing
You can install an optional label taken sensor that detects when the current label is removed and prints the next label.
1 Open the media cover.
2 Turn the printhead lift lever counterclockwise to raise the printhead.

natural_image
Mechanical assembly diagram showing internal components with red arrows indicating motion direction (no text or labels)3 Load a media roll onto the media supply hub. Make sure you push the roll all the way against the inner wall of the printer and adjust the edge guide and the dancer guide to hold the media in place.

natural_image
Mechanical assembly diagram showing a motor and gear mechanism with red arrows indicating motion direction (no text or labels)26 PM23c, PM43, and PM43c Mid-Range Printer User Manual
4 Route the media through the print mechanism.
5 Adjust the printhead balance. For help, see Chapter 6.
6 Adjust the label gap and black mark sensor. The sensor LED should line up with the center of the media. For help, see Chapter 6.
7 Turn the printhead lift lever clockwise to close the printhead. The printer performs the action defined by the Head Down Action setting.
8 Press the Print button to advance the media.
9 Close the media cover.
10 Configure the printer for the correct media type (media with gaps, black mark, continuous fixed length, or continuous variable length).
11 Calibrate the sensors on the printer. You can calibrate the media from the Main Menu (Wizards > Calibration > Media) on a full touch printer or from the web page (Services > Media Calibration) for all models of the printer.
12 Configure the start and stop adjust settings.
About the Label Dispenser
The label dispenser accessory, which includes the Label Taken Sensor, removes the liner from self-adhesive label stock as each label is printed. You manually remove the label at the front of the printer.
After you load media, you need to configure the feed adjust settings. You may need to adjust the recommended values slightly depending on your media type, supply method, and roll sizes, or because of individual differences between printers.
Load Media for the Label Dispenser
If you have the optional label dispenser installed in your printer, the printer will separate self-adhesive labels from the liner. The label taken sensor causes the printer to wait for you to remove a label before printing the next one. You can also install the internal media rewinder if you want to rewind the liner.
Chapter 2 – Set Up the Printer
1 Open the media cover.
2 Turn the printhead lift lever counterclockwise to raise the printhead.

natural_image
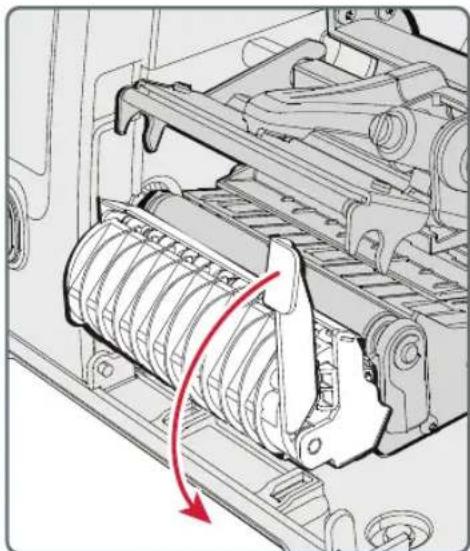
Mechanical assembly diagram showing internal components with red arrows indicating motion or force directions (no text or labels)3 Pull down on the label dispenser lever to open the media path.
natural_image
Mechanical assembly diagram showing a rotating roller mechanism with red directional arrows indicating motion (no text or symbols)4 Load a media roll onto the media supply hub. Make sure you push the roll all the way against the inner wall of the printer and adjust the edge guide and the dancer guide to hold the media in place.

natural_image
Technical diagram of a mechanical assembly with red arrows indicating directional components (no text or symbols present)5 Route the media through the print mechanism and out the front of the printer.
Chapter 2 – Set Up the Printer
6 Insert the media in the opening between the label dispenser and the platen roller.
You can pull the liner through the dispenser and out the bottom of the mechanism or you can route the liner around the internal media rewinder (if installed).
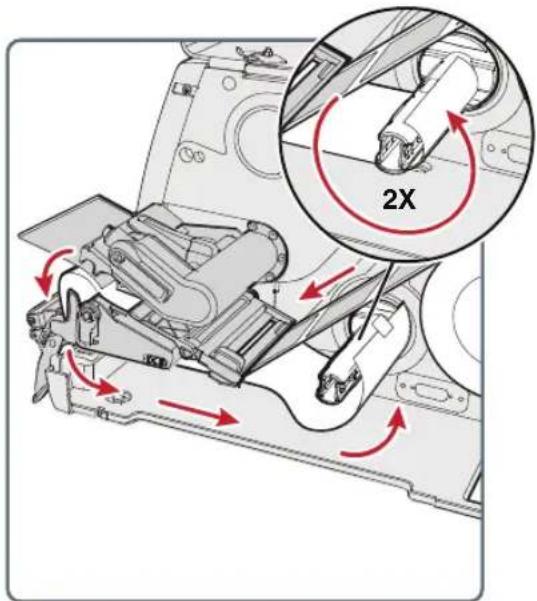
Route the Liner Around the Internal Media Rewinder
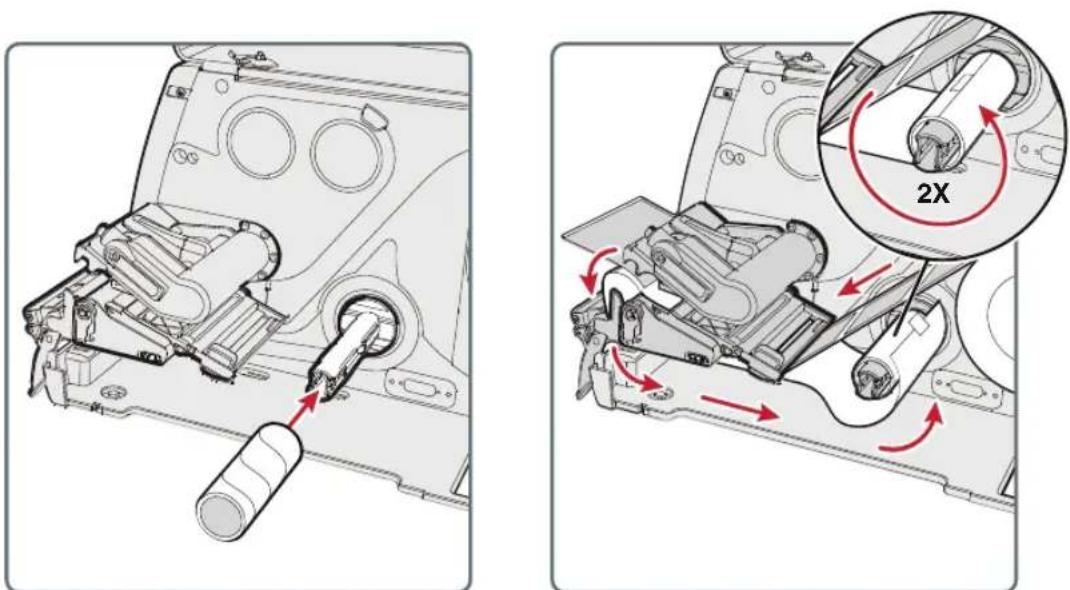
Route the Liner Around a Cardboard Core
30 PM23c, PM43, and PM43c Mid-Range Printer User Manual

Route the Liner Around a Collapsible Core (PM43, PM43c)
7 Pull the liner tight and push the label dispenser lever back into the closed position.
8 Turn the printhead liftlever clockwise to close the printhead.
9 Close the media cover.
10 Press the Print button to advance the media.
11 Configure the printer for the correct media type (media with gaps, black mark, continuous fixed length, or continuous variable length).
12 Calibrate the sensors on the printer. You can calibrate the media from the Main Menu (Wizards > Calibration > Media) on a full touch printer or from the web page (Services > Media Calibration) for all models of the printer.
Chapter 2 – Set Up the Printer
Load Media from an External Supply
You can place the media supply, such as fanfold tickets or tags, behind the printer or underneath it.
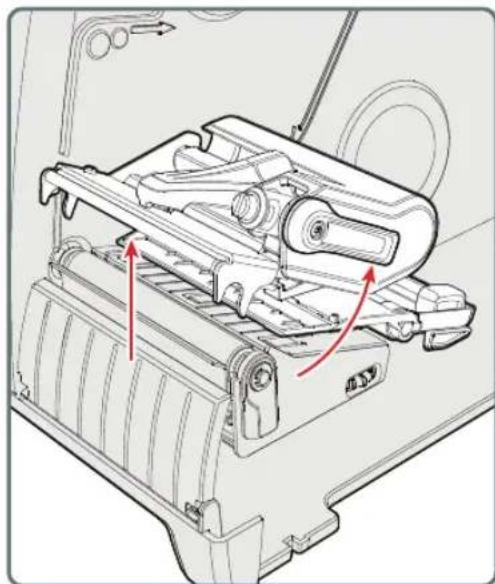
1 Open the media cover.
2 Turn the printhead lift lever counterclockwise to raise the printhead.
natural_image
Mechanical assembly diagram showing internal components with red arrows indicating motion or force directions (no text or labels)3 Feed media through the slot in the back of the printer (or from the slot in the bottom of the printer) and route it through the print mechanism.

natural_image
Technical line drawing of a mechanical device with red directional arrows indicating motion or movement (no text or symbols present)32 PM23c, PM43, and PM43c Mid-Range Printer User Manual
4 Turn the printhead lift lever clockwise to close the printhead. The printer performs the action defined by the Head Down Action setting.
5 Press the Print button to advance the media.
6 Close the media cover.
About Cut-Off Printing
In cut-off printing, each label is automatically cut from the media roll immediately after the label is printed. You can print on non-adhesive, continuous label stock. You can also use self-adhesive labels with a liner, but you must cut only the liner.

Caution: You must not use the cutter to cut through any kind of adhesive, or other soft material, that may stick to the cutting parts and render the cutter inoperable or even damage the electric motor.
The cutter module includes the top of form sensor. You can also install the optional cutter tray accessory, which holds up to 20 labels or tickets.
After you load media, you need to configure the cutter and the feed adjust settings. You may need to adjust the recommended values slightly depending on your media type, supply method, and roll sizes, or because of individual differences between printers.
Load Media for Cut-Off Printing
Cut-off printing is supported by the PM43 and PM43c printers with the cutter installed.
1 Open the media cover.
2 Turn the printhead lift lever counterclockwise to raise the printhead.
Chapter 2 – Set Up the Printer
3 Open the cutter door.

natural_image
Technical diagram of a vehicle's internal components with red arrows indicating motion or movement (no text or symbols present)4 Load a media roll onto the media supply hub. Make sure you push the roll all the way against the inner wall of the printer and adjust the edge guide and the dancer guide to hold the media in place.
5 Route the media through the print mechanism and out through the slot in the cutter.

natural_image
Technical diagram of a vehicle door frame with internal components and red arrows indicating motion or force directions (no text or symbols present)6 Close the cutter.
7 Turn the printer on and close the media cover.
34 PM23c, PM43, and PM43c Mid-Range Printer User Manual
8 Configure the cutter:
- If you have an icon printer, use PrintSet 5 or a printer command language to configure the cutter.
- If you have a full touch printer, continue with the next step.
9 After the printer finishes starting up, press

10 Select Settings > Printing > Cutter.
11 In the Cutter Control options, select Automatic.
You can also enable Partial Cut from the Cutter menu.
12 Press to save your settings.
13 Configure the start and stop adjust settings.
About Ribbon
Thermal transfer printing provides a durable printout that is less vulnerable to chemicals, heat, and sunlight than direct thermal printing. Make sure you select a ribbon type that matches the media you are using and that you configure the printer for thermal transfer media.
The printer supports thermal transfer ribbon rolls with the ink-coated side facing either inward or outward. To determine which type of ribbon you have, place the ribbon on a piece of paper as shown, and use a pen or other sharp object to scratch the ribbon. If you see a mark on the paper, your ribbon is wound ink out.
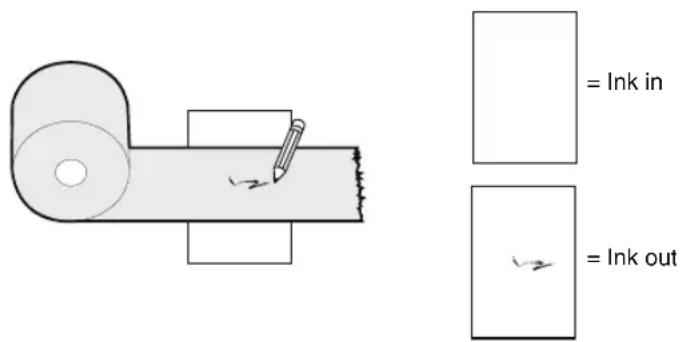
Determining Whether Your Ribbon is Wound Ink In or Ink Out
Chapter 2 – Set Up the Printer
Load Ribbon
1 Open the media cover.
2 Turn the printhead lift lever counterclockwise to raise the printhead.
3 Slide the ribbon roll onto the ribbon supply hub and slide the empty ribbon core onto the ribbon takeup hub.

natural_image
Mechanical assembly diagram showing a motor with rotating shafts and housing, no text or symbols present4 For ribbon that has the ink wound out, place the ribbon on the supply hub with the ribbon wound clockwise. For ribbon that has the ink wound in, place the ribbon on the supply hub with the ribbon wound counterclockwise.
5 Route the ribbon through the print mechanism and pull out approximately 20 cm (8 inches) of ribbon leader.
The dotted line in this illustration shows how to load ribbon with the ink wound in.

natural_image
Mechanical assembly diagram showing a belt drive mechanism with red arrows indicating motion (no text or labels)6 Turn the ribbon takeup hub counterclockwise until the ribbon becomes tight and runs wrinkle-free through the print mechanism.
7 Load media.
8 Turn the printhead lift lever clockwise to lower the printhead. The printer performs the action defined by the Head Down Action setting.
9 Press the Print button to advance the media.
10 Close the media cover.
About Test Labels
Print a test label after you have loaded media and ribbon to verify that you have installed everything correctly and also to get some important information about your printer. The way you print a test label is slightly different between the full touch and the icon printer. Please use the procedure for your printer.
Print a Test Label with the Icon Printer
When you turn on the icon printer, all of the LEDs on the display light up including the Ready-to-Work indicator. One by one, the LEDs turn off as the printer starts up. The first LED to turn off is the Ready-to-Work indicator. The LEDs then turn off following a sequence from the top left LED to the bottom right LED.
1 Connect the printer to power and turn on the printer.
2 The printer goes through its startup sequence and all of the LEDs light up. When the last two LEDs are lit (Printhead Hot and Maintenance), press and hold the Print button until the test label starts to print.
3 Release the Print button.
The series of three test labels prints out.
Print a Test Label with the Full Touch Printer
The first time you turn on the full touch printer or reset to factory defaults, the printer runs a startup wizard to let you enter basic setup information. After the startup wizard finishes, the printer enters Ready mode where you can choose to access the Main Menu and print a test label.
1 Connect the printer to power and turn on the printer.
2 After the startup sequence finishes, the startup wizard begins. After you enter all of the information on the wizard screens, click No when prompted to run other wizards.
3 From the Ready screen, tap the Main Menu button on the status bar.
4 From the Main Menu, tap Tools > Test Labels.
5 Select the test label you want to print and tap it.
Your test label prints. If print quality is low, go to Wizards > Printing > Print Quality.
Calibrate the Screen
If you are having problems with the full touch screen responding when you tap it, you may need to calibrate the screen.
1 On the keypad, press ./- to enter the Main Menu.
2 Press 2 until the Wizard button is selected and then press Enter.
3 Press 2 until Calibration is selected and then press Enter.
4 Press 2 until Screen is selected and then press Enter.
5 Tap the calibration points on the screen until the screen goes blank.
The touch screen then finishes the calibration process and returns you to the Ready screen.
Create and Print Labels
You can use Intermec printer software to design and print labels with the PM23c, PM43, and PM43c printers. You can download label design software and printer drivers from http://www.intermec.com/products/printers_media/software/index.aspx.
You can also use command languages, like Fingerprint, and language simulators, like ZSim, to create and print labels. For more information, see the command reference manual for the language.
How to Print on RFID Media
If you have an LCD printer with the optional RFID module installed, you can print on RFID media. Media containing RFID tags is slightly thicker where the RFID tag is located. The slight thickness of this part of the label may affect print quality. For thermal transfer labels, Intermec recommends using high-quality ink ribbon.
To achieve the best possible print quality, follow these guidelines:
- Run the RFID calibration wizard to determine the best Tag Position and Output Power for RFID media.
- If necessary, modify the Tag Position (TAGADJUST variable) to make sure the RFID labels are properly aligned with the antenna.
- Avoid printing on the thickest part of the label when possible.
For help configuring RFID parameters, see the Fingerprint Command Reference or the IPL Command Reference.
About RFID Tag Position
Tag Position, also referred to as TAGADJUST, specifies the distance (in dots/mm/in) to move the label to align the tag with the RFID antenna. Positive values move the label forward, and negative values move the label back.
Use one of these methods to calculate Tag Position:
- Run the RFID wizard.
- Manually calculate the Tag Position.
Run the RFID Calibration Wizard
Run the RFID calibration wizard to determine the best Tag Position and Output Power (UHF inlays, only) for RFID media.

Note: After you determine the correct RFID media settings, you can save these settings to a printer profile and load the profile when you need to print on the specific RFID media.
1 Make sure the media type and media length are properly configured.
2 From the Main Menu, select Wizard > Calibration > RFID Calibration.
3 To enable the RFID module, select Enable.
4 Load the RFID media.
5 Select OK.
When the calibration is complete, the printer displays the RFID Tag Position and Output Power (UHF inlays, only).
Calculate RFID Tag Position
You can perform a manual calculation to come up with an estimate of the RFID Tag Position. Because this value is an estimate, you may need to slightly adjust the calculated value to achieve the best results.

Note: You do not need to calculate the Tag Position value for the PM23c printer. By default, the Tag Position is set to -13.5 mm and the yAntDist is 135 mm (pivoted antenna) or 136 mm (flat antenna).
1 Make sure Start Adjust and Stop Adjust are set to 0.
2 Measure the yChip value, which is the distance between the RFID chip and the media edge aligned with the tear bar.

3 Note the yAntDist for the PM43/PM43c: 280 dots, 35 mm, 1.378 in.
4 Use this formula to calculate the estimated Tag Position:
TagPosition=yChip - yAntDist
Chapter 2 – Set Up the Printer
3
Connect the Printer
Use this chapter to connect the printer to a PC or to a network. You can use the printer web page or the Main Menu on a full touch printer to configure the settings.
About Printer Drivers
Before you can use the printer with Microsoft Windows printing applications, you need to install printer driver software on the PC. Drivers enable the printer to communicate with your PC and with software applications such as Honeywell PrintSet 5.

Note: Although Windows may auto-detect the printer when you connect it to a PC through a USB port, you still need to install printer drivers on the PC for the printer to operate correctly.
Install Printer Drivers
Before you can use the printer with a Windows PC, you need to install printer driver software on the PC. Drivers enable the printer to communicate with your PC and with software applications such as Intermec PrintSet.
Use InterDriver to install printer driver software on your PC. InterDriver is available from the Intermec website. Follow this procedure to download InterDriver from the Intermec website and install the drivers.

Note: Although Windows may auto-detect the printer when you connect it to a PC through a USB port, you must still install printer drivers on the PC for correct printer operation.
1 Open a web browser and go to www.intermec.com.
2 Select Products > Printers and Media > Industrial Printers.
3 Select your printer model.
4 Click the Downloads tab.
5 In the InterDriver downloads page, click InterDriver - Windows ver. X.XX. If a Security Warning dialog box appears, click Run.
6 Select I accept the terms in the license agreement and then click Next twice.
7 Clear the Read installation instructions check box, and then click Finish. If a User Account control dialog box appears, click Yes to continue. InterDriver extracts the installation files to C:\Intermec\InterDriver7\ on your PC and starts InterDriver Wizard.
8 Make sure that Install printer drivers is selected, and then click Next.
9 Make sure that Install a driver for a Plug and Play printer is selected.
10 Select your printer model from the list, and then click Next. Be sure you select the correct printhead size (203 or 300 dpi), printer language, and so on.
11 (Optional) Type a new Printer Name to change the default printer name. You can also select Use this printer as the default printer to have Windows automatically select this printer when you print documents from your desktop PC. To share this printer with other users, select Share name and type a name for the printer. When you are finished, click Next.
12 Click Finish to install the printer drivers, and then click Close to exit InterDriver Wizard.
How to Connect the Printer to Your PC
You can connect the printer to your PC using one of these cables:
- Serial cable
- USB cable
• IEEE 1284 parallel printer adapter cable (optional)
Connect the Printer Using a Serial Cable
You can use a serial connection to communicate with your PC and to run PrintSet or InterDriver. You can also use the serial port to send commands directly to the printer through a terminal connection.
1 Connect one end of the DB9 to DB9 RS-232 cable to the back of your printer and connect the other end of the cable to a serial COM port on the PC.
2 If necessary, change the PC serial port configuration to match your printer.
Connect the Printer Using a USB Cable
Intermec recommends that you only connect one printer to your PC, either directly or through a hub. You do not need to set up any parameters for USB communications.
1 Download and install the InterDriver software on your PC.
2 When prompted, connect one end of the USB Type A cable to the back of the printer and connect the other end to your PC.
About the Parallel Port
If you want to use a parallel port on the printer, you can choose to have the IEEE 1284 parallel port installed either at the factory or by an authorized Intermec service technician. You can use the parallel port with InterDriver. The parallel port supports Universal Plug and Play (UPnP), compatibility, nibble, byte, ECP, and additional status reporting through IEEE 1284 nibble ID mode.
If you are using a parallel port to communicate with the printer, you need:
- an IEEE 1284 interface adapter installed in the printer.
- a parallel cable to run between the printer and the PC.
Connect the Printer Using an IEEE 1284 Cable
You can connect the printer to your PC using an IEEE 1284 cable if you have the parallel port option installed in your printer.

Note: You must configure all printer settings through the printer Main Menu, the printer web page, or with PrintSet 5 and a USB connection before you use the parallel connection to the printer.
1 Connect one end of the IEEE 1284 cable to the interface adapter port on the back of the printer.
2 Connect the other end of the cable to to parallel port on the PC.
How to Connect the Printer to Your Network
You can connect the printer to your network using the:
- Ethernet interface.
- Wi-Fi + Bluetooth wireless interface.
These network interfaces provide features such as security, FTP server, web page, and Alert handling.
Connect the Printer to an Ethernet Network
Use the Ethernet port to set up the PM43 or PM43c as a network printer. The printer is set to automatically retrieve an IP number from the network (DHCP) when you turn on the printer. You can use the network connection with InterDriver. You can also use it to directly send commands to the printer through a terminal connection (Telnet), or you can send instructions through FTP.
1 Turn the printer off.
2 Connect the Ethernet cable to the Ethernet port in the rear of the printer and connect the other end of the cable to your network.
3 Turn the printer on.
If your printer uses a DHCP server to assign IP addresses, the IP address appears in the lower left corner of the screen.
- For an icon printer, use Intermec PrintSet to retrieve the printer IP address.
If you are not using a DHCP server to automatically assign IP addresses to devices in your network, you must set a static IP address and other network information manually. Continue with the next step.
4 For a non-DHCP network:
- For a full touch printer, from the Main Menu select Settings > Communications > Ethernet > IPv4 or IPv6 and change the settings as needed.
- For an icon printer, configure the Ethernet settings through PrintSet.
IPv4 and IPv6 Ethernet Settings
| Setting Default |
| (IPv4) IP Assignment Method DHCP |
| (IPv4) IP Address 0.0.0.0 |
| Subnet Mask 0.0.0.0 |
| Default Router 0.0.0.0 |
| DHCP Response Broadcast |
| (IPv6) IP Assignment Method Automatic |
| (IPv6) IP Address Automatic |
About Wireless Communications
The printer supports wireless communications when the optional Wi-Fi/Bluetooth module is installed.
You can configure wireless communications:
• from the printer web page.
- from the printer Main menu if your printer has full touch display front panel.
By default, the printer supports DHCP networks.

Note: If you are not using a DHCP network, you need to configure Wi-Fi settings by using Intermec PrintSet through a USB connection to the printer, by sending commands through a serial connection, or by using the wizards and settings menus on a full touch printer.
Configure Wireless Communications from the Web Page
Use this procedure to configure wireless communications from the printer web page.

Note: To configure the printer from the web page, the printer must be turned on and connected to your Wi-Fi or Ethernet network.
1 Open a web browser on your PC.
2 In the address bar, type the IP address of your printer and press Enter. The printer web page appears.
3 Click Login. The Login page appears.
4 Type your Username and Password and then click Login. The default value for Username is admin and the default value for Password is pass.
5 Click the Configure tab. The Configuration Summary page appears.
6 Click Communications > Wireless 802.11. The Wireless 802.11 settings page appears.

7 Change wireless settings as needed. You can also click Default Settings to restore all default Wireless 802.11 settings.
8 Click Save when you are finished.
Configure Wireless Communications from the Main Menu
If you have a touch panel printer, you can configure wireless communications using the Wireless 802.11 wizard. You can also configure wireless communications from the Main Menu.
1 From the Ready screen, press the Main Menu button. The Main Menu appears.
2 Select Settings > Communications > Wireless 802.11.
3 Change settings as needed for your wireless connection.
4 When you are finished, save your changes.
Install Authentication Certificates
If you are using Wireless 802.11 security, you may need to install authentication certificates in the printer for the highest level of security.
1 Make sure you have the printer configured for the correct date and time.
2 On your PC, open an FTP connection to the IP address of the printer.
Chapter 3 – Connect the Printer
3 Transfer your certificate to /home/user/certificates/public.
4 On your PC, open a Telnet session to the printer.
5 Change the directory to: /home/user/certificates/public.
6 Type this command:ls -la.
You should see the certificate that you transferred in Step 3.
7 Use the certinstall script to install the certificate using this format:
Example:
itadmin@PM23-00000000073 /home/user/certificates/public\$ certinstall.sh entrust.cer
8 When you receive confirmation that the certificate was installed, type this command to make sure you see a .pem file and another soft link to the same file: ls -la.
9 Use the printer web page, the Main Menu on a full touch printer, or PrintSet 5 to specify the certificate .pem file to use for security.
About Bluetooth Communications
The printer supports Bluetooth communications when the optional Wi-Fi+Bluetooth module is installed. When Bluetooth is enabled, you can use a Bluetooth bar code scanner to send scanned data directly to a Fingerprint application. You can also make the printer discoverable by other Bluetooth devices, and enable security if required.
You can set up Bluetooth communications:
• from the printer web page.
• from the printer Main Menu.
- using Intermec PrintSet through a USB connection to a PC.
Connect to a Bluetooth Device
If your printer has the full touch display, you can use the Bluetooth wizard to discover and connect to an HID Bluetooth device such as a keyboard or a Bluetooth scanner configured as an HID slave.
1 Make sure your Bluetooth device is turned on and discoverable, and that the device is in range of the printer.
2 From the printer Ready screen, select the Main Menu.
3 Select Wizards > Communications > Bluetooth.
4 Follow the instructions to discover and connect to your Bluetooth device.
If you are unable to connect to the Bluetooth device, you may need to change the printer Bluetooth settings.
Configure Bluetooth Communications from the Web Page
Use this procedure to configure Bluetooth from the printer web page. The printer must be connected to an Ethernet or wireless network and you must know the printer IP address.
1 Open a web browser on your PC.
2 In the address bar, type the IP address of your printer and press Enter. The printer web page appears.
3 Click Login. The Login page appears.
4 Type your Username and Password and then click Login. The default value for Username is admin and the default value for Password is pass.
5 Click the Configure tab. The Configuration Summary page appears.
6 Click Communications > Bluetooth. The Bluetooth settings page appears.

7 Change Bluetooth settings as needed. You can also click Default Settings to restore all default Bluetooth settings.
8 Click Save when you are finished.
Configure Bluetooth Communications from the Main Menu
Use this procedure to configure Bluetooth settings from the printer Main Menu. You may need to configure these settings if you want to connect to a mobile computer through Bluetooth.
1 From the Ready screen, press the Main Menubutton. The Main Menu appears.
2 Select Settings > Communications > Bluetooth.
3 Change settings as needed for your Bluetooth device.
4 When you are finished, save your changes.
About the USB Host Port
You can use the USB host interface port on the printer to connect these peripheral devices:
USB Peripheral Devices
| Device Description | |
| Keyboard Use a standard USB keyboard to send Fingerprint printer language commands directly to the printer or to enter information if you are running a Smart Printing application. | |
| Bar code scanner Use Intermec USB bar code scanners for data input with a Smart Printing application. The printer also supports other USB scanners that use a generic keyboard driver. | |
| USB storage device | Use a USB storage device to load applications, configuration files, fonts, and images into the printer memory, or to perform firmware upgrades. You can also save configuration files to a USB storage device for upload to a printer. The USB storage device must have a single partition and be formatted as FAT16 or FAT32. |
You can also connect a peripheral device through the USB-to-Serial or USB-to-Parallel adapter cable accessories. For information, contact your local sales representative.
Connect a USB Device
You can insert a USB storage device into the USB host port on the front of PM43 or into the USB host port on the back of the PM23c, PM43c, or PM43 printer.
1 If you are connecting a USB storage device, make sure the device has a single partition and is formatted as FAT16 or FAT32.
2 Connect the device to one of the USB host ports.
3 If you connected a USB storage device to an LCD printer, select Tools > USB Menu for more options.

Chapter 3 – Connect the Printer
4
Configure the Printer
Use this chapter to understand the organization of the configuration menu and the different ways you can configure the printer.
How to Configure the Printer
Use one of these methods to view and change printer settings:
- Printer web page
- Main Menu (LCD printers)
- PrintSet 5
- Programming commands
- SmartSystems
About the Printer Configuration Menus
The structure of the printer configuration menus is consistent among the different interfaces. You should see the same organization whether you are accessing the menus through the web page or the printer Main Menu. There are five main printer configuration menus for each interface:
- Communications
- Printing
- System Settings
• Network Services - Alerts
Use the following illustrations to understand where information is located in the printer configuration menus. Not all configuration items appear in each type of interface.
Chapter 4 – Configure the Printer
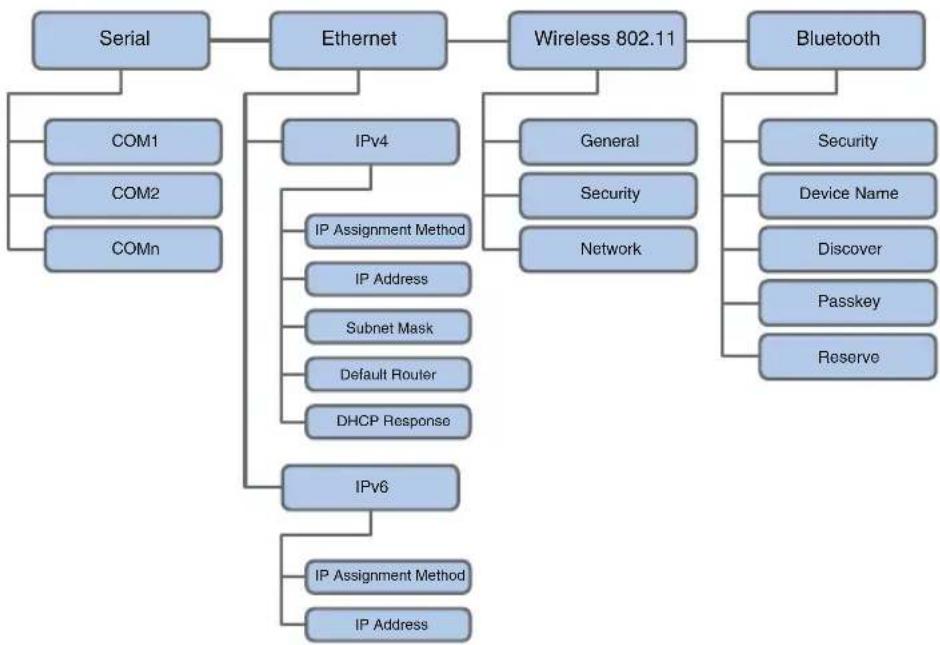
flowchart
graph TD
    A["Serial"] --> B["Ethernet"]
    B --> C["Bluetooth"]
    A --> D["COM1"]
    A --> E["COM2"]
    A --> F["COMn"]
    B --> G["IPv4"]
    G --> H["IP Assignment Method"]
    G --> I["IP Address"]
    G --> J["Subnet Mask"]
    G --> K["Default Router"]
    G --> L["DHCP Response"]
    B --> M["IPv6"]
    M --> N["IP Assignment Method"]
    M --> O["IP Address"]
    B --> P["Wireless 802.11"]
    P --> Q["General"]
    P --> R["Security"]
    P --> S["Network"]
    P --> T["Security"]
    P --> U["Device Name"]
    P --> V["Discover"]
    P --> W["Passkey"]
    P --> X["Reserve"]
The Communications Menu

flowchart
graph TD
    A["COM1"] --> B["Baud Rate"]
    A --> C["Data Bits"]
    A --> D["Parity"]
    A --> E["Stop Bits"]
    A --> F["Hardware"]
    A --> G["ENQ/ACK"]
    A --> H["XON/XOFF To"]
    A --> I["XON/XOFF From"]
    A --> J["New Line Character"]

    K["COM2"] --> L["Baud Rate"]
    K --> M["Data Bits"]
    K --> N["Parity"]
    K --> O["Stop Bits"]
    K --> P["Hardware"]
    K --> Q["ENQ/ACK"]
    K --> R["XON/XOFF To"]
    K --> S["XON/XOFF From"]
    K --> T["New Line Character"]

    U["COMn"] --> V["Baud Rate"]
    U --> W["Data Bits"]
    U --> X["Parity"]
    U --> Y["Stop Bits"]
    U --> Z["Hardware"]
    U --> AA["ENQ/ACK"]
    U --> AB["XON/XOFF To"]
    U --> AC["XON/XOFF From"]
    U --> AD["New Line Character"]
The Serial Communications Menu
PM23c, PM43, and PM43c Mid-Range Printer User Manual 57
Chapter 4 – Configure the Printer

flowchart
graph TD
    A["General"] --> B["Security"]
    B --> C["Network"]
    C --> D["IPv4"]
    D --> E["IP Assignment Method"]
    D --> F["IP Address"]
    D --> G["Subnet Mask"]
    D --> H["Default Router"]
    D --> I["DHCP Response"]
    C --> J["Inner Authentication"]
    C --> K["CA Certificate"]
    C --> L["Client Certificate"]
    C --> M["Client Key"]
    C --> N["Server Common Name 1"]
    C --> O["Server Common Name 2"]
    C --> P["Validate Certificate"]
    C --> Q["PAC"]
    C --> R["Aquire PAC"]
    C --> S["Fast Roaming (CCKM)"]
    C --> T["Mixed Mode (Group=TKIP)"]
    B --> U["Security Type"]
    U --> V["Association"]
    U --> W["Pre-Shared Key"]
    U --> X["Network Key Index"]
    U --> Y["Network Key 1"]
    U --> Z["Network Key 2"]
    U --> AA["Network Key 3"]
    U --> AB["Network Key 4"]
    U --> AC["User Name"]
    U --> AD["Password"]
    U --> AE["Anonymous Name"]
The Wireless 802.11 (Wi-Fi) Communications Menu
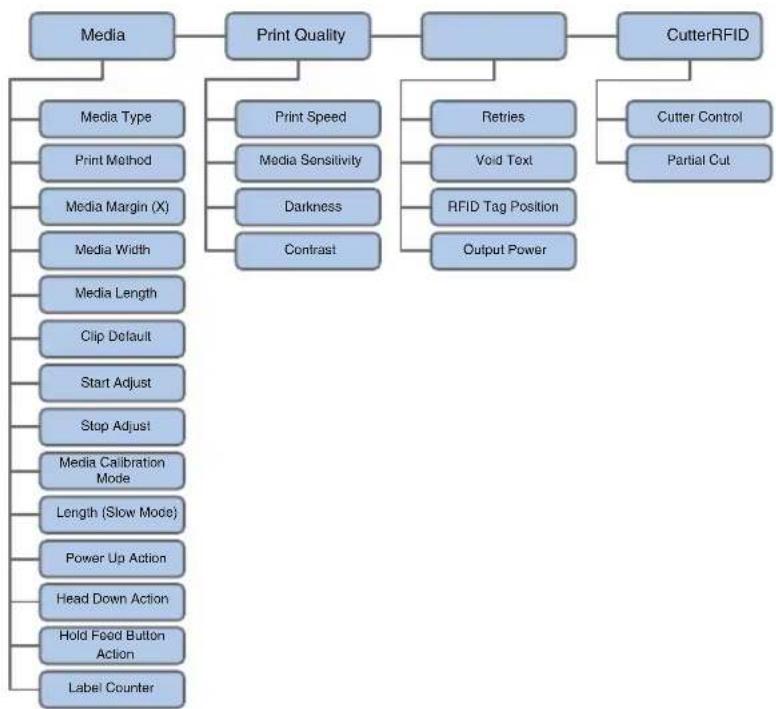
flowchart
graph TD
    A["Media"] --> B["Print Quality"]
    B --> C["CutterRFID"]
    B --> D["Print Speed"]
    B --> E["Retries"]
    B --> F["Void Text"]
    B --> G["RFID Tag Position"]
    B --> H["Output Power"]
    D --> I["Media Type"]
    D --> J["Print Method"]
    D --> K["Media Margin (X)"]
    D --> L["Media Width"]
    D --> M["Media Length"]
    D --> N["Clip Default"]
    D --> O["Start Adjust"]
    D --> P["Stop Adjust"]
    D --> Q["Media Calibration Mode"]
    D --> R["Length (Slow Mode)"]
    D --> S["Power Up Action"]
    D --> T["Head Down Action"]
    D --> U["Hold Feed Button Action"]
    D --> V["Label Counter"]
    C --> W["Cutter Control"]
    C --> X["Partial Cut"]
The Printing Menu
58 PM23c, PM43, and PM43c Mid-Range Printer User Manual
Chapter 4 – Configure the Printer

flowchart
graph TD
    A["General"] --> B["Display"]
    B --> C["Audio"]
    C --> D["Manage I/O"]
    D --> E["Volume"]
    E --> F["Ethernet"]
    E --> G["Wireless 802.11"]
    E --> H["Bluetooth"]
    E --> I["Virtual COM"]
    E --> J["RFID"]

    A --> K["System Name"]
    A --> L["System Location"]
    A --> M["System Contact"]
    A --> N["XML Response Mode"]
    A --> O["Display Language"]
    A --> P["Display Language (Web Page)"]
    A --> Q["Keyboard Input"]
    A --> R["Time"]
    A --> S["AM/PM"]
    A --> T["Date"]
    A --> U["Command Language"]
    A --> V["Alert Notification Method"]
    A --> W["Unit of Measure"]
    A --> X["Zoro with Slash"]
    A --> Y["Time Zone"]
    A --> Z["DST Adjust"]

    B --> AA["Brightness"]
    B --> AB["Idle Information"]
    B --> AC["Time Format"]
    B --> AD["Date Format"]
    B --> AE["Menu Access"]
    B --> AF["PIN"]
    B --> AG["Screen Timeout"]
    B --> AH["Feed Key Access"]
    B --> AI["Information Access"]

    B --> AJ["Manage Services"]
    AJ --> AK["Web Server"]
    AJ --> AL["FTP"]
    AJ --> AM["Avalanche"]
    AJ --> AN["Net1"]
    AJ --> AO["SmartSystems"]
    AJ --> AP["SNMP"]
    AJ --> AQ["Cutter"]
    AJ --> AR["LPR"]
    AJ --> AS["IKEv2"]
    AJ --> AT["SSH"]
    AJ --> AU["Telnot"]
    AJ --> AV["XML"]
    AJ --> AW["Time Server"]

    C --> AX["Maintenance Alerts"]
    AX --> AY["Odometer (User Resettable)"]
    AX --> AZ["Odometer (Printer)"]
    AX --> BA["Odometer (Printhead)"]
    AX --> BB["Replace Printhead"]
    AX --> BC["Clean Printhead"]
    AX --> BD["Faulty Dot"]
    AX --> BE["Media Low Diameter"]
    AX --> BF["Ribbon Low Diameter"]
    AX --> BG["Low Battery"]
The System Settings Menu
Chapter 4 – Configure the Printer
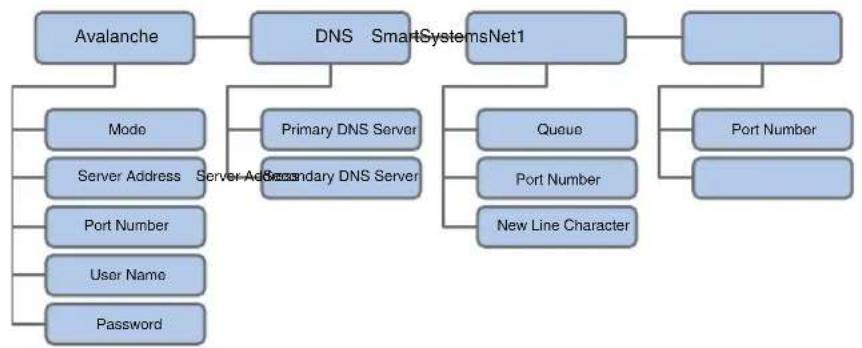
flowchart
graph TD
    A["Avalanche"] --> B["DNS"]
    A --> C["Mode"]
    A --> D["Server Address"]
    A --> E["Port Number"]
    A --> F["User Name"]
    A --> G["Password"]
    B --> H["Primary DNS Server"]
    B --> I["Secondary DNS Server"]
    B --> J["Queue"]
    B --> K["Port Number"]
    B --> L["New Line Character"]
    M["SmartSystemsNet1"] --> N["Port Number"]
    M --> O["Queue"]
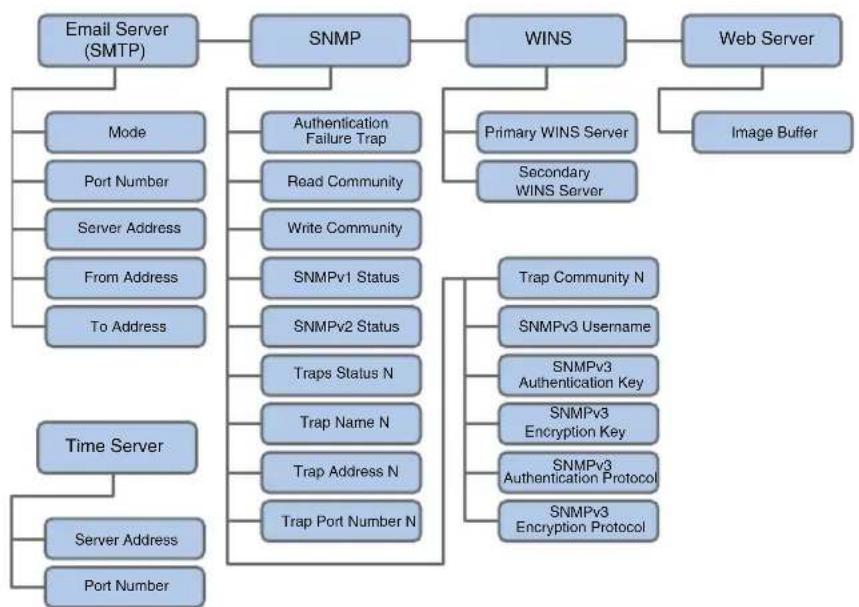
flowchart
graph TD
    A["Email Server (SMTP)"] --> B["SNMP"]
    B --> C["WINS"]
    C --> D["Web Server"]
    B --> E["Mode"]
    B --> F["Port Number"]
    B --> G["Server Address"]
    B --> H["From Address"]
    B --> I["To Address"]
    B --> J["Time Server"]
    J --> K["Server Address"]
    J --> L["Port Number"]
    C --> M["Authentication Failure Trap"]
    C --> N["Read Community"]
    C --> O["Write Community"]
    C --> P["SNMPv1 Status"]
    C --> Q["SNMPv2 Status"]
    C --> R["Traps Status N"]
    C --> S["Trap Name N"]
    C --> T["Trap Address N"]
    C --> U["Trap Port Number N"]
    C --> V["Primary WINS Server"]
    C --> W["Secondary WINS Server"]
    C --> X["Image Buffer"]
    Y["Trap Community N"] --> Z["SNMPv3 Username"]
    Y --> AA["SNMPv3 Authentication Key"]
    Y --> AB["SNMPv3 Encryption Key"]
    Y --> AC["SNMPv3 Authentication Protocol"]
    Y --> AD["SNMPv3 Encryption Protocol"]
The Network Services Menu
Chapter 4 – Configure the Printer
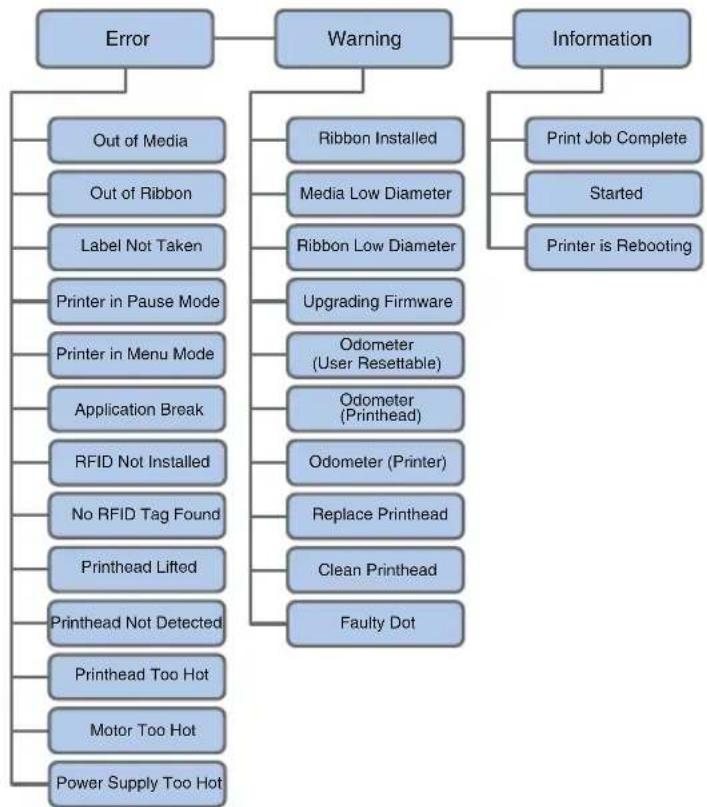
flowchart
graph TD
    A["Error"] --> B["Out of Media"]
    A --> C["Out of Ribbon"]
    A --> D["Label Not Taken"]
    A --> E["Printer in Pause Mode"]
    A --> F["Printer in Menu Mode"]
    A --> G["Application Break"]
    A --> H["RFID Not Installed"]
    A --> I["No RFID Tag Found"]
    A --> J["Printhead Lifted"]
    A --> K["Printhead Not Detected"]
    A --> L["Printhead Too Hot"]
    A --> M["Motor Too Hot"]
    A --> N["Power Supply Too Hot"]

    O["Warning"] --> P["Ribbon Installed"]
    O --> Q["Media Low Diameter"]
    O --> R["Ribbon Low Diameter"]
    O --> S["Upgrading Firmware"]
    O --> T["Odometer (User Resettable)"]
    O --> U["Odometer (Printhead)"]
    O --> V["Odometer (Printer)"]
    O --> W["Replace Printhead"]
    O --> X["Clean Printhead"]
    O --> Y["Faulty Dot"]

    Z["Information"] --> AA["Print Job Complete"]
    Z --> AB["Started"]
    Z --> AC["Printer is Rebooting"]
The Alert Menu
Chapter 4 – Configure the Printer
Configure the Printer from the Main Menu
If you have a full touch printer, you can view or change the configuration settings by pressing the Settings button from the Main Menu.
1 From the Ready screen, press the Main Menu button.
2 From the Main Menu, press the Settings button. The Settings menu appears.

3 Select the settings you want to configure and make your changes.
4 Save your changes when prompted.
Restrict Access to the Main Menu
By default, all menus are available from the Main Menu the first time you turn on the printer. If necessary, you can require a PIN to restrict access to menus or you can disable access to all menus.
| Menu Access Setting | Description |
| Enable (default) All users can access the menus from the Main Menu and from the USB flash drive menu. | |
| Enable with PIN Users need to enter a PIN to access the Main Menu or USB flash drive menu. | |
| Disable Users cannot access the menus from the Main Menu or from the USB flash drive menu. | |
1 Go to the Display menu for the printer:
- From the web page, select Configure > System Settings > Display.
- From the Main Menu on a full touch screen, select Settings > System Settings > Display.
2 Select a Menu Access setting and save your changes.
3 If you select Enable with PIN, you also need to type in a PIN and save your changes.
Configure the Printer from the Web Page
If you are using Ethernet or Wi-Fi communications, you can change configuration settings from the web page of the printer. You should have already connected your printer to your network and obtained an IP address.
1 Open a web browser on your PC.
2 In the address bar, type the IP address of your printer and press Enter. The printer web page appears.

3 Click Login. The Login page appears.
4 Type your Username and Password and then click Login. The default value for Username is itadmin and the default value for Password is pass.
5 Click Configure. The Configuration Summary page appears.
6 To see a complete list of printer settings, click Configuration Summary.
To configure printer settings, click an item in the navigation pane:
- For serial, Ethernet, Wireless 802.11, or Bluetooth settings, click Communications.
• For media or print quality settings, click Printing.
- For display, audio, service, and general settings, maintenance alert message triggers, or to enable and disable 802.11 and Bluetooth, click System Settings.
- To set conditions that trigger error, warning, and information alert messages, click Alerts.
- For network-related settings (such as DNS, WINS, Net1), for web and email server information, or if you are using a network management application such as Intermec SmartSystems, click Network Services.
7 Make any changes to the settings you want to configure.
8 To save your changes, click Save.
To reset all parameters on the page to the default settings, click Default Settings.
Configure the Printer with PrintSet 5
PrintSet 5 is a printer configuration tool that enables you to easily change your configuration settings. You can also use the setup wizards in PrintSet 5 to guide you through common configuration tasks.
1 Make sure that you have Windows XP or later running on your PC.
2 Download PrintSet 5 from the Downloads page of the Intermec website at www.intermec.com/products/printers_media/software/index.aspx.
3 Connect your printer to your PC using a serial, USB, or network (Ethernet or Wi-Fi) connection.
How to Configure the Printer with Programming Commands
You can change configuration settings by sending programming commands directly from your PC to the printer through a terminal program (such as HyperTerminal), a serial connection, or a network connection.
If your printer uses the Fingerprint programming language, use the SETUP GET command followed by the node, subnode, and parameter setting. For example, here is a Fingerprint example that changes your media setting to labels with gaps:
SETUP GET "MEDIA, MEDIA TYPE, LABEL (W GAPS)"
You must log in as an itadmin to perform a SET operation, but you do not need to log in to perform a GET operation.
If your printer uses the IPL programming language, this example changes your media setting to labels with gaps:
<STX><SI>T1<ETX>
For more information on how to change configuration settings with a programming language, see either the Fingerprint Command Reference or the IPL Command Reference.
How to Configure the Printer with SmartSystems
You can use SmartSystems to change configuration settings on your printer. The printer ships with the SmartSystems client loaded on it. The console is part of SmartSystems and is available from the Intermec website. To download SmartSystems, go to www.intermec.com/products/smrtsysfoundation/index.aspx.
Configure the Printer with Touchless Configuration
You can use touchless configuration to configure a printer without turning it on or while it is in the box. If you have the touchless configuration option installed in your printer, an RFID tag receives and stores data from an external IP30 RFID reader and configures the settings when the printer is turned on. The air protocol supported is EPCGlobal Class 1 Gen 2. The available programmable memory is 384 bytes of USER memory bank.
Touchless configuration supports the configuration of these settings:
- Command language
- IPv4 Settings
- Localized language
- RS-232
• Paper type or label/media - SSID
1 Hold the IP30 in a horizontal orientation.
2 Stand in front of the touchless configuration label and hold the IP30 within 10 cm of the packaging surface.
3 Execute the write or read command.
About Uploading Fonts, Images, Applications, Formats, and Web Pages
You can use the printer web page, a USB storage device, or PrintSet to upload fonts, images, applications, formats, and web forms to the printer. You can only delete fonts, images, applications, and web forms that you upload to the printer. You cannot delete the files that are installed as part of the printer firmware.
Upload Fonts, Images, Applications, Formats, and Web Forms from the Web Page
You can use the printer web page to install fonts, images, applications, formats, and web forms to the printer.
1 Open a web browser on your PC.
2 In the address bar, type the IP address of your printer and press Enter. The printer web page appears.
3 Click Login. The Login page appears.
4 Type your Username and Password and then click Login. The default value for Username is itadmin and the default value for Password is pass.
Chapter 4 – Configure the Printer
5 Click the Manage tab. The Overview page appears.
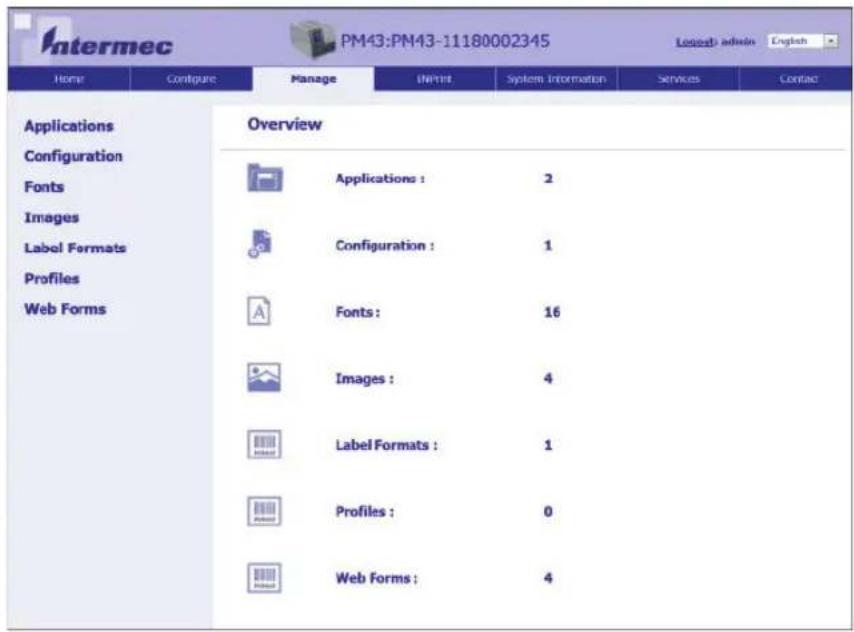
6 Click Applications, Fonts, Images, Label Formats, orWeb Forms. The upload page appears for the option you selected. Here is an example of the page you see if you select to upload fonts.

7 To upload a file to the printer:
a ClickBrowse to locate your file.
b Double-click the file to select it.
c Click Upload. The file uploads to the printer.
8 Click Save when you are finished.
Upload Fonts, Images, Applications, Formats, and Web Forms from a USB Storage Device
You can use a USB storage device to install fonts, images, applications, formats, and web forms to the printer. Use this table to understand where your files need to be located on the USB storage device for the printer to install them.
File Type Directories for the USB Storage Device
| File Type | Directory to Place the File | Installed in this Printer Directory |
| Application /apps /home/user/apps | ||
| Configuration /config | ||
| Configuration profile /profiles /home/user/profiles | ||
| Display images /display /home/user/display | ||
| Fingerprint script /scripts /home/user/scripts | ||
| Firmware | /firmware | |
| Font | /fonts /home/user/fonts | |
| Form/layout | /forms | /home/user/forms |
| Printed images | /images /home/user/images | |
| Installation package (UFF file) | Root of USB storage device | |
| Start file | Root of USB storage device | |
| Web Form | /webforms | /home/user/webforms |
1 Copy your files to a USB storage device using the directories in the table.
2 Insert the USB storage device into one of the USB host ports on the printer.
Chapter 4 – Configure the Printer
3 If you have an icon printer, the files are automatically uploaded to the printer.
If you have a full touch printer, the USB Device menu automatically appears:
a Select Install Resources.
b Select the type of file you want to install. For example, select Fonts to install a font.
c Select the file you want to install and wait until the item turns gray and a checkmark appears next to it. The file is now successfully installed in the printer.
d Continue to another file if you have more files to install.
Change Background Image for the Ready Screen
Use this procedure to customize the Ready screen that appears on the printer when it finishes starting up or is waiting for data. The background image you create must be:
- 320 x 240 pixels.
- named background_idle.png.
1 Create a /display directory on your USB storage device.
2 Copy your background_idle.png file to the /display directory on the USB storage device.
3 Insert the USB storage device into one of the USB host ports on the printer.
4 If you have an icon printer the file is automatically uploaded to the /home/user/display directory on the printer.
If you have a full touch printer, use the USB Device menu to upload the file to the printer.
5 Restart the printer.
The new background_idle.png file you uploaded should now appear in place of the original Ready screen.
About Printer Profiles
After you change printer default settings to meet your needs, you can save those settings as a printer profile. The printer supports multiple profiles that you can save and load at any time. For example, you can create one profile to use when you are printing on continuous label stock, and a different profile to use when you are printing on label stock with gaps.
The following printer settings are not saved in a profile:
- IP address for either IPv4 or IPv6 networks
• Media calibration settings for the label stop sensor - Remote port or remote host values for a remote computer accessing the printer through raw TCP
Save a Printer Profile from the Web Page
From the printer web page, you can save the current settings as a profile that you can load from the printer memory at any time.

Note: This procedure assumes you have already logged in to the printer web page.
1 In the printer web page, click the Configure tab.
2 Click System Settings > General.
3 Click Save As Profile. The Save As Profile screen appears.
4 Enter a name in the Profile field, and then click Save.
Load a Printer Profile from the Web Page
You can load a saved profile from the printer web page.

Note: This procedure assumes you have already logged in to the printer web page.
1 In the printer web page, click the Manage tab.
2 Click Profiles.
The Resident list includes profiles that are saved in the printer memory.
Chapter 4 – Configure the Printer
3 To load a profile from the printer memory, select the profile in the Resident list and then click Activate. The profile is loaded.
To load a profile from another location:
a Click Browse and browse to the location of the file.
b Double-click the file.
c Click Upload. The profile is uploaded to the printer.
Save a Printer Profile from the Main Menu
Use this procedure to save the current settings as a printer profile.
1 From the Ready screen, press the Main Menu button. The Main Menu appears.
2 Select Tools > Profiles. The Profiles menu appears.

3 Select Save. The Save Profile menu appears.
4 Select the Filename text box and type a name for the profile. The profiles can have up to sixteen characters.
5 Press on the SIP to save your profile name and go back to the Save Profile menu.
6 Press ➤ and wait until Complete appears on the screen.
7 Press to return to the Main Menu.
Load a Printer Profile from the Main Menu
Use this procedure to load a saved printer profile on the full touch printer.
1 From the Ready screen, press the Main Menu button. The Main Menu appears.
2 Select Tools > Profiles. The Profiles menu appears.

3 Select Load. The Load Profile menu appears.
4 Select the profile you want to load on the printer and press

5 When Complete appears on the screen, press √ to return to the Main Menu.
How to Load a Printer Profile with Programming Commands
You can load a saved LCD printer profile to another printer by sending programming commands directly from your PC to the printer through a terminal program (such as HyperTerminal), a serial connection, or a network connection. All commands are case-sensitive.

Note: To load printer profiles that modify communication settings that require itadmin rights, you must log in as an itadmin: RUN "su -p pass itadmin".
Programming Commands to Load a Printer Profile
| Connection Programming Commands | |
| Printer running Fingerprint | RUN "/system/usr/bin/cfg -o xmlimportset -k /home/user/profiles/myprofile" |
| Printer running IPL | |
| Telnet connection over Port 23 | /system/usr/bin/cfg -o xmlimportset -k /home/user/profiles/myprofile |
Install a Configuration File from a USB Storage Device
After you save an .xml configuration file to a USB storage device, you can install it on the printer at any time.

Note: If there is more than one configuration file on the USB storage device, the printer imports the first file found in alphabetical order by file name.
1 Insert the USB storage device in the printer USB host port.
2 From the Ready screen, press the Main Menu button. The Main Menu appears.
3 Select Tools > USB Menu.
4 Select Configuration.
5 Select Install Configuration. The printer imports the configuration file.
- For most printer languages, the configuration file is imported directly into the working configuration and is not copied to the / config directory.
- An IPL configuration file is copied to /home/user/config/ipl.
6 Press OK when the confirming message appears.
Export a Configuration File to a USB Storage Device
You can save an .xml configuration file to a USB storage device and install it on other printers.
1 Make sure the USB storage device has a single partition and is formatted as FAT16 or FAT32.
2 Insert the storage device into the printer USB host port.
3 From the Ready screen, press the Main Menu button. The Main Menu appears.
4 Select Tools > USB Menu.
5 Select Configuration.
6 Select Export Configuration. A list of the available files appears.
7 Select the file to export.
8 Press OK when the confirming message appears.
About Menu Shortcuts
If you have a full touch printer, you can create shortcuts to easily access frequently used menus or items, such as profiles, applications, test labels, and wizards. These shortcuts are added to a Quick Choices menu, which replaces the Main Menu. And, the Main Menu appears as the first item in the Quick Choices menu. Except for the Main Menu, which always appears as the first item, items in the Quick Choices menu appear in the order in which they are added.
Menu shortcuts can be very useful in these situations:
- You need to frequently change media. Create a profile for each media type, and then create shortcuts for each profile. To quickly change the printer media settings, press from the Ready screen to display the Quick Choices menu, and select the appropriate media profile.
- You frequently run Smart Printing applications. Create a shortcut for each Smart Printing application. To easily access these applications, press from the Ready screen to display the Quick Choices menu, and select the appropriate application.
Create Menu Shortcuts
If you have a full touch printer, you can create shortcuts for frequently used menus or items.
1 From the Main Menu, select Tools > Quick Choices > Add.
2 To load a profile:
a Select Load Profile and press Enter.
b Select Load Profile again and press Enter. A check mark appears in the box.
c Select the arrow at the bottom of the screen and press Enter.
3 To select applications:
a Select Programs and press Enter.
b To add the Programs menu, select Programs and press Enter. A check mark appears in the box.
Or, select individual applications and press Enter after each selection. A check mark appears in each box.
c Select the arrow at the bottom of the screen and press Enter.
4 To select test labels:
a Select Test Labels and press Enter.
b To add the Test Labels menu, select Test Labels and press Enter. A check mark appears in the box.
Or, select individual test labels and press Enter after each selection. A check mark appears in each box.
c Select the arrow at the bottom of the screen and press Enter.
5 To select wizards:
a Select Wizards and press Enter.
b To add the Wizards menu, select Wizards and press Enter. A check mark appears in the box.
Or, select individual wizards and press Enter after each selection. A check mark appears in each box.
c Select the arrow at the bottom of the screen and press Enter.
6 Press Enter. The next time you press from the Ready screen, the Quick Choices menu (containing the Main Menu and your menu shortcuts) appears.

Customize the Printer Web Page
The printer web page visual presentation is specified using a CSS (Cascading Style Sheet). You can customize the look of the web page by modifying the CSS. The printer web page internally loads the default style.css prior to loading the user customized style.css. The customized style.css does not need to contain the complete set of CSS directives, it may only specify the subset of CSS styles that the user wishes to customize.
1 Retrieve the default CSS file from the printer: http://
2 Modify the style sheet to make the web page look the way you want it and save your changes.
3 Upload the style sheet to the printer using this FTP to printer path: /home/user/webpage/style.css.
Chapter 4 – Configure the Printer
5
Troubleshoot the Printer
Use this chapter to troubleshoot the printer.
Chapter 5 – Troubleshoot the Printer
Contact Support
If you are having trouble using your printer and you cannot find a solution in this user manual or from the Knowledge Base
(www.hsmknowledgebase.com) or Technical Support Portal (www.hsmsupportportal.com), you can contact Customer Support.
For our latest contact information, go to www.honeywellaidc.com/locations.
Before you call Customer Support, have this information ready:
- Printer serial number
- Printer configuration number
- Firmware type and version
- Printer command language
- Installed options
• Media settings - Serial port settings
- Ethernet settings
To find this information, go to the printer Web page or print a test label.
About Printer System Information
Look in the System Information tab in the printer web pages for useful information and statistics on the printer hardware and firmware. You may need this information if you want to contact Intermec Product Support for assistance or troubleshooting.

System Information Tab in Printer Web Pages
View Printer Statistics
Use the printer web page to view important statistics on the printer. You can view everything from printer uptime to the images installed in the printer.
Printer Statistics Available on the Web Page
| Statistic Type Information Available |
| System Information Printer uptime and CPU usage, firmware and kernel versions, printer config and serial numbers, flash and RAM memory information |
| Print Statistics Total labels printed, RFID tag success rate, odometer values, total distance printed (printer and current printhead) |
| Supply Printhead and ribbon information |
| Hardware Options Input/output devices, serial port information |
| Network Interfaces MAC address, TCP/IP, Bluetooth, and 802.11 network information |
| Font Information Name, type, location, and size of installed fonts |
| Bar Code Information Name and type of installed bar code fonts |
| Image Information Name, type, location, and size of installed images |
1 Open a web browser on your PC.
2 In the address bar, type the IP address of your printer and press Enter. The printer web page appears.
3 Click the System Information tab.
4 Click Statistics > System Information. The System Information page appears.

5 For more detailed statistics, click another choice in the Statistics list.
Check the Printer Odometer
You can check the odometer from the printer web page to see the printhead usage and how the current values compare to the alert values.

Note: To check the printer odometer from the web page, the printer must be turned on and connected to your Wi-Fi or Ethernet network.
1 Open a web browser on your PC.
2 In the address bar, type the IP address of your printer and press Enter. The printer home page appears.
3 Click the System Information tab.
4 Click Odometer. The list of current odometer statistics appears.
Set Maintenance Alerts
You can set maintenance alerts to determine the threshold or value at which an alert is sent to you. For example, you can set a value in millimeters printed at which the printer triggers an alert telling you that it is time to clean the printhead.
1 Open a web browser on your PC.
2 In the address bar, type the IP address of your printer and press Enter. The printer web page appears.
3 Click Login. The Login page appears.
4 Type your Username and Password and then click Login. The default value for Username is admin and the default value for Password is pass.
5 Click the Configure tab. The Configuration Summary page appears.
6 Click System Settings > Maintenance Alerts. The Maintenance Alerts settings page appears.
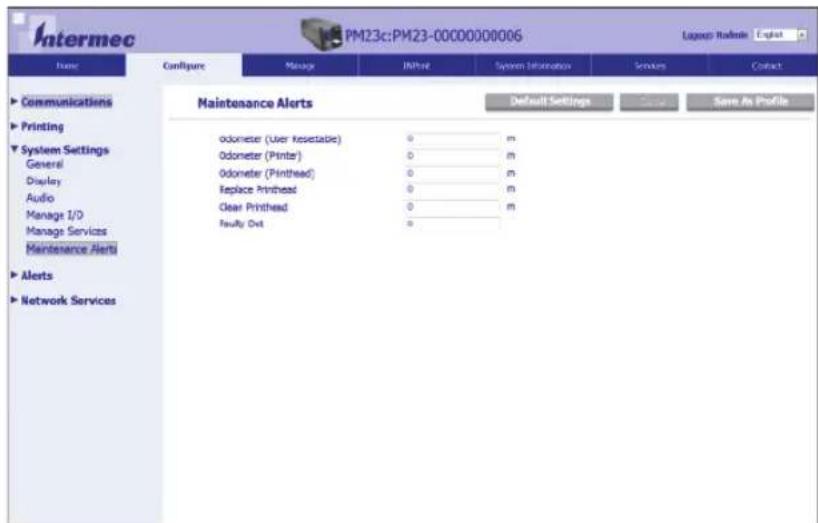
7 Type the values you want to set for each maintenance alert.
8 Click Save when you are finished.
About Alerts
To help maintain the printer, you can configure the printer to send alert messages when certain conditions occur. For example, the printer can send a message when the odometer reaches a certain value, or if the printhead is lifted during printing.
There are three types of alerts:
- Error alerts
• Information alerts - Warning alerts
You configure alert settings in the printer web page. Alert messages can be sent to an email address, an SNMP trap, or both. You can enable or disable each type of alert, set the number of times the alert is repeated, set the unit of measure that determines how often the alert is sent, and change the default text message for the alert.
Configure Error Alert Notification
The way you receive error alerts is determined by the notification method you configure. You can choose between receiving notifications by SNMP trap, email, or SNMP trap + email. To configure the way you are notified about error alerts:
- From the printer Main Menu, select Settings > System Settings > General > Alert Notification Method.
- From the printer web page, login and then click the Configure tab > System Settings > General > Alert Notification Method.
Maintenance and Error Alerts
Use these tables to understand and troubleshoot some common error alerts you may receive and how to fix them.
Maintenance and Error Alerts
Error Alert Solution
Label Not Taken Printing has been stopped because a label is obstructing the label taken sensor. Remove the label to resume printing.
Printhead Lifted Lower the printhead.
Maintenance and Error Alerts (continued)
| Error Alert Solution | |
| Out of Ribbon Load ribbon in the printer. | |
| Out of Media Load media in the printer. | |
| Ribbon Low The diameter of the remaining roll of media is lower than the specified value in the Ribbon Low Diameter setting. Replace the ribbon. | |
| Media Low The diameter of the remaining roll of media is lower than the specified value in the Media Low Diameter setting. Replace the media. | |
| Ribbon Installed The printer is configured as a direct thermal printer and thermal transfer ribbon is installed. Remove the ribbon or configure the printer for thermal transfer media. | |
| Printer in Pause Mode | A print job is paused from the front panel. Press the Print button to resume printing. |
| Printer in Menu Mode | A user entered a menu from the front panel. Press the Home button to return to the Ready screen. |
| Application Break Fingerprint only. An application breaks uncontrolled. | |
| Print Job Complete A print job has been successfully completed. | |
| Odometer (Printer) The printer has reached a limit set in the Odometer (Printer) setting in Maintenance Alerts for the amount of media to print before being alerted. | |
| Odometer (Printhead) | The printhead has reached a limit set in the Odometer (Printhead) setting in Maintenance Alerts for the amount of media to print before being alerted. |
| Odometer (User Resettable) | The printer has reached a limit set in the Odometer (User Resettable) setting in Maintenance Alerts for the amount of media printed since the last reset. |
| Printhead Too Hot The printhead is overheated and needs to cool down. Wait for printing to resume automatically. | |
| Printhead Not Detected | The printer is not detecting the printhead. Check to make sure the printhead is installed and that the printhead cable is firmly connected to the printhead. |
| Error Alert | Solution |
| Faulty Dot The printhead has reached the number of faulty dots set in the Faulty Dots setting in Maintenance Alerts. You may need to replace the printhead. | |
| Replace Printhead The printer has reached a limit set in the Replace Printhead setting in Maintenance Alerts for the amount of media to print before replacing the printhead. Replace the printhead. | |
| Clean Printhead The printer has reached a limit set in the Clean Printhead setting in Maintenance Alerts for the amount of media to print before cleaning the printhead. Clean the printhead. | |
| No RFID Tag Found The printer can not find an RFID tag. | |
| RFID Not Installed You are attempting to write to a tag, but the printer does not support RFID. You must install the RFID module in the printer to be able to write to RFID tags. | |
| Upgrading Firmware The printer is going to start upgrading the firmware. Do not try to send anything to the printer. | |
| Printer is Rebooting The printer is going to restart. Wait until the printer is ready before attempting to communicate with it. | |
| Started The printer is in the process of starting up. | |
| Motor Too Hot | The printer motor has reached its maximum operating temperature limit. Let the motor cool down before you resume printing. |
Troubleshoot Printer Problems and Find Solutions
Use this section to find possible solutions to printer problems.
Print Quality Problems and Possible Solutions
| Problem Possible Solution | |
| The printout is weak. Try these possible solutions in order:Make sure that your media setting is appropriate for hte type of media you are using.The contrast may be too low.Increase the contrast.The printhead pressure may be too low. Increase the printhead pressure.Replace the printhead. | |
| The printout is weaker on one side. | Adjust the printhead balance. |
| There are weak spots on the printout. | Try these possible solutions in order:There may be foreign particles on the media. Clean or replace the media.Make sure that your media and ribbon are compatible.Make sure that you are using high quality media and ribbon.The contrast may be too low.Increase the contrast. |
| The printout is dark or there is excessive bleeding on the media. | Try these possible solutions in order:Make sure your media setting is appropriate for the type of media you are using.The contrast may be too high.Decrease the contrast.The printhead pressure may be too high. Decrease the printhead pressure.The printhead voltage may be incorrect or the energy control may be faulty. For help, contact your Intermec representative. |
| There are dark lines along the media path. | The printhead may be dirty. Clean the printhead. |
| There are white vertical lines on the printout. | Try these possible solutions in order:The printhead may be dirty. Clean the printhead.There may be missing dots on the printhead. Replace the printhead. |
| Part of a dotted line is missing. | Try these possible solutions in order:The printhead may be failing.Replace the printhead.The strobe signal may be failing. For help, contact your Intermec service representative. |
| The inner edge of the printout is missing. | Try these possible solutions in order:The media may not be properly installed or aligned. Reload the media.The media margin or X-start parameter may be set too low.Increase the setting. |
| The content on my printout is compressed. | The print speed may be too high. Lower the print speed. |
| Nothing shows up on my thermal transfer printout. | The ink-coated side of the ribbon may not be facing the media. Reload the ribbon. |
| When I feed or print a label, the ribbon is not taken up. Instead, it spills out the front of the printer. | Make sure the Print Method is set to Ribbon (TTR). |
| The ribbon breaks. Try these possible solutions in order:Make sure your media setting is appropriate for the type of media you are using.Make sure that the ribbon is fitted correctly. Reload the ribbon.The energy control may be faulty. For help, contact your Intermec Service representative. | |
| The ribbon wrinkles. Try these possible solutions in order:The ribbon tension bar may not be adjusted correctly. Use a large straight-slot screwdriver to adjust the ribbon tension bar.You may need to adjust the media edge guide.The printhead pressure may be too high. Decrease the printhead pressure. | |
| The printer is connected to my PC, using a virtual COM port, and printing stops. But, there are no errors to indicate that something is wrong. | Make sure that bidirectional support is disabled. From the printer properties dialog box, click thePortstab, and then clear theEnable bidirectionalsupportcheck box. |
| The printer is connected to a serial port on my PC, but the printer is not working. | Try these possible solutions:Make sure the serial port settings are configured correctly.Make sure the serial cable pinouts are correct and that the cable is not damaged.If you have the Intermec Windows driver for an RS-232 printer installed on your PC, uninstall the driver. |
Networking Problems and Possible Solutions
| Problem Possible Solution | |
| The Ethernet or wireless network connection is not working correctly. | Try these possible solutions:Make sure your network cable is securely connected to your printer and a straight “pin-to-pin” cable, not a “crossover” cable.Make sure your PC is correctly configured for and connected to your network.Make sure your printer is correctly configured for your network. |
| I cannot connect to the printer web page. | If you are connecting your printer with a crossover network cable, you may need to disable the web browser’s proxy settings on your computer to access the printer web page. |
RFID Problems and Possible Solutions
| Problem Possible Solution | |
| The printer has RFID media loaded, but it is not writing to the tags. | After you load RFID media, restart the printer to let the printer identify the RFID media type or run the RFID calibration wizard. |
| The RFID module is installed in the printer, but “RFID” does not appear in the menu. | The printer is not communicating properly with the RFID hardware. For help, contact your local Intermec representative. |
| None of the RFID commands work. | RFID is disabled. Enable RFID from the web page or the Main Menu. Go to Settings (Main Menu) or Configure tab (web page) > System Settings > Manage I/O. |
| Printing on regular media (not RFID) is slow and halted in between labels. | RFID is enabled. Disable RFID from the web page or the Main Menu. |
| I am using an application to write to RFID tags and the printer is printing “VOID” labels. | The printer may not recognize the RFID media type. Restart the printer or run the media or RFID calibration wizard.You may need to modify the TAGADJUST parameter.You may need to adjust the output power (field strength) to the antenna. |
| I receive this message “No RFID tag found.” | Make sure you are using RFID media.You may need to modify the TAGADJUST parameter.The tag may be broken. Try printing on a different label. |
| When I send a TAGREAD or TAGWRITE command, I get this error message: “Tag format error.” | The TAGFORMAT defined for the operation determines the number of required parameters. You may need to modify the TAGFORMAT. For help, see theFingerprint Command Referenceor the IPL Command Reference. For more information, see the EPC Tag Data Standard (v1.1, revision 1.27) available from the EPCglobal website at www.epcglobalinc.org. |
How to Restore Printer Defaults
If you need to restore factory defaults on the printer, you can use the printer web page, a hardware-based reset on the icon printer, or the Main menu on a full touch printer. From the printer web page and the Main Menu on a full touch printer, you can choose to restore default network settings, keep or delete user-installed files, and to restore all system settings.
Restore Defaults from the Printer Web Page
You can restore the defaults of your printer from the printer web page if you are connected to a Wi-Fi or Ethernet network.
1 Start a web browser on your desktop PC.
2 In the address field, type the printer IP address and press Enter. The printer web page appears.
3 Click Login in the upper right corner of the screen. The Login page appears.
4 Type your Username and Password in the text fields and click Login.
5 Select Services > Restore Defaults. The Restore Defaults menu appears with none of the check boxes selected.
6 To restore all default settings, select all of the check boxes and then click Restore. You can also restore only the defaults for specific settings:
- To restore the current network settings, select the Network settings check box.
- To restore all applications, fonts, and other files you have installed on the printer, select the User files check box.
- To restore all current system settings, select the System Settings check box.
7 When you receive a message to reboot the printer on your desktop PC, click OK and restart the printer.
Restore Defaults from the Main Menu
If you have a printer with a full touch display, you can restore the printer to default settings from the Tools menu.
1 From the Ready screen, open the Main Menu.
2 Select Tools > Restore Defaults. The Restore Defaults menu appears with all items in the list selected by default.
3 To restore all default settings, continue with the next step. You can also change the settings that are restored as follows:
- To keep the current network settings, clear the Network settings check box.
- To keep all applications, fonts, and other files you have installed on the printer, clear the User files check box.
- To keep all current system settings, clear the System Settings check box.
4 Tap the right arrow and when prompted tap Yes to restore default settings and reboot. A confirming message appears.
To return to the Main Menu without restoring the default settings, select No. To return to the Restore Defaults list without restoring any defaults, select Cancel.
Restore Defaults with a Hardware-Based Reset
You can restore the printer defaults on a full touch or icon printer by performing a hardware-based reset.

Note: Although this procedure restores all defaults on the full touch printer, it only restores settings on the icon printer. You need to use PrintSet or another method to restore all defaults on an icon printer.
1 Turn the printer off and open the media cover.
2 Turn the printhead lift lever counterclockwise to raise the printhead.
3 Turn the printer on while pressing and holding the Feed button.
4 Release the Feed button when the status bar is nearly full (on the full touch printer) or when the last two LEDs remain lit (on the icon printer).
All of the settings are restored on the printer.
5 Turn the printhead lift lever clockwise to lower the printhead and close the media cover.
How to Upgrade the Printer Firmware
You should check for periodic updates to the printer firmware. Updated firmware can include bug fixes or additional features that you might find useful. The latest version of the firmware is available from the PM23c, PM43, or PM43c printer Downloads page on www.intermec.com.
You can upgrade the printer firmware using:
- the printer web page.
- a USB storage device.
- PrintSet 5. For more information, see the PrintSet 5 online help.

Note: After you upgrade the printer firmware, Intermec recommends that you restore the default settings and calibrate the media sensors.
Download the Printer Firmware Update
Before you can upgrade the printer firmware, you need to download the upgrade file from the Intermec website.
1 Go to the Intermec website at www.intermec.com.
2 Click Support > Downloads.
3 Use Product Category, Product Family, and Product to select the PM23c, PM43, or PM43c.
4 Click Submit. The latest software appears on the page.
5 Download the latest firmware version to your PC.
Upgrade Firmware from the Printer Web Page
You can upgrade the printer firmware from the printer web page. To configure the printer from the web page, the printer must be turned on and connected to your Wi-Fi or Ethernet network.
1 Start a web browser on your desktop PC.
2 In the address field, type the printer IP address and press Enter. The printer web page appears.
3 Click Login in the upper right corner of the screen. The Login page appears.
4 Type your Username and Password in the text fields and click Login.
5 Click the Services tab and then select Firmware Upgrade. The Firmware Upgrade screen appears, showing the current firmware version.
6 Click Browse to locate the upgrade file, select it, and then click Open.
7 Click Upgrade. The printer web page shows that it is upgrading firmware on your printer.
Upgrade Firmware from a USB Storage Device
You can upgrade the printer firmware from a USB storage device. You must place the upgrade file in the root directory on the USB storage device.

Note: For best results, Intermec recommends using a USB storage device that contains no other files besides the upgrade file.
1 Copy the firmware upgrade file to the root directory of the USB storage device.
2 Turn the printer off.
3 Insert the USB storage device into a USB host port.
4 Restart your printer. An upgrading firmware message appears as the upgrade file is loaded into the printer memory. This process may take a few minutes.
5 Remove the USB storage device.
6
Maintain the Printer
Use the information in this section to understand how to clean, adjust, and replace parts of the printer.
How to Clean the Printer
To properly maintain the printer, you should clean it regularly. You can clean these parts of the printer:
- The printhead
• The media guides
• The exterior of the printer - The cutter (if installed)

Caution: To avoid possible personal injury or damage to the printer, never insert any pointed or sharp objects into the printer.

Caution: Use only the cleaning agents specified in this section. Intermec is not responsible for damage caused by any other cleaning materials used on this printer.

Caution: Isopropyl alcohol is a highly flammable, moderately toxic, and mildly irritating substance.
Follow these guidelines for cleaning the printer:
- Always remove the power cord before cleaning.
- Never spray the printer with water. Protect it from water when cleaning the premises.
- Never use any sharp tools for removing stuck labels. The printhead and rollers are delicate.
Clean the Printhead
Cleaning the printhead on a regular basis is important for the life of the printhead and for the print quality. You should clean the printhead each time you replace the media. Follow this procedure to clean the printhead using the cleaning card. If you need to clean additional residue from the platen roller or tear bar, use a cotton swab moistened with isopropyl alcohol.

Caution: Never use hard or sharp tools to peel away stuck labels or other material. The printhead is delicate and can easily be damaged.
1 Turn the printer off and disconnect the printer from power.
2 Open the media cover.
3 Remove the media and ribbon (if installed).
4 Insert most of the cleaning card under the printhead, and then lower the printhead.
5 Pull out the cleaning card and raise the printhead.
6 Wait for approximately 30 seconds to allow the cleaning fluid to dissolve the residue.
7 Repeat Steps 4 through 6 if necessary.
8 If necessary, clean residue from the platen roller or tear bar with a cotton swab moistened with isopropyl alcohol.
9 Once the parts are dry, replace the media (and ribbon) in the printer.
10 Close the media cover, reconnect power, and turn on the printer.
Clean the Media Guides
Both the upper and lower media guides are transparent to allow light to pass between the two parts of the label gap and label mark sensors. It is important to keep these surfaces free of dust, stuck labels, and adhesive residue.
1 Turn the printer off and disconnect the printer from power.
2 Open the media cover.
3 Remove the media and ribbon (if installed).
4 Insert a cleaning card or a soft cloth soaked in isopropyl alcohol between the two media guides to clean them.
5 Wait for approximately 30 seconds to allow the cleaning fluid to dissolve the residue.
6 Once the parts are dry, replace the media (and ribbon) in the printer.
7 Close the media cover, reconnect power, and turn on the printer.
Clean the Exterior of the Printer
Make sure to keep the exterior of the printer clean. Maintaining a clean exterior will reduce the risk of dust or foreign particles reaching the inside of the printer and affecting printer functionality.
- Use a soft cloth, possibly moistened with water or a mild detergent, when cleaning the printer exterior.
Make sure to keep the surface surrounding the printer clean as well.
Clean the Cutter
You should clean the cutter every time you clean the printhead. It is important to keep the cutter clean to prolong the life of the cutter.
1 Turn the printer off and disconnect the printer from power.
2 Open the cutter door.
3 Use a swab soaked in isopropyl alcohol to clean the cutter opening.
4 Once the cutter is dry, close the cutter door, reconnect power, and turn on the printer.
Replace the Printhead
You need to replace the printhead periodically when it wears out due to the rapid heating and cooling process used during printing. How often you need to replace the printhead depends on factors such as what type of images you print, the type of media or ribbon you use, the amount of energy to the printhead, the print speed, and the ambient temperature of the room you print in. The firmware detects the new printhead when you restart the printer.
1 Turn the printer off and disconnect the printer from power.
2 Open the media cover.
3 Remove the media and ribbon (if installed).
4 Turn the printhead lift lever counterclockwise to raise the printhead.
5 Detach the magnetic pressure arm from the printhead bracket and disconnect the two cables from the printhead as you remove it from the printer.

natural_image
Technical diagram of a vehicle engine compartment with red arrows indicating internal components (no text or symbols present)6 Connect the two printhead cables to the new printhead.

natural_image
Mechanical assembly diagram showing a device with red arrows pointing to components, no visible text or symbols7 As you insert the new printhead bracket into the printer, make sure the metal arms on the printhead go around the magnetic pressure arm bar. Attach the magnetic pressure arm to the printhead.
8 Replace the media (and ribbon) in the printer.
Chapter 6 – Maintain the Printer
9 Turn the printhead lift lever clockwise to lower it.
10 Close the media cover, reconnect power, and turn on the printer.
Replace the Platen Roller
If the printer platen roller gets damaged or wears out, it is easy to replace.
On the PM43 printer, you can store a spare platen roller in the holder located under the media holder. Just insert the platen roller as you would into the printer and then turn the latch counterclockwise to secure it to the printer base.
1 Turn the printer off and disconnect the printer from power.
2 Open the media cover.
3 Remove the media.
4 Turn the printhead lift lever counterclockwise to raise the printhead.
5 Rotate the platen roller latch clockwise to detach it from the printer and pull the platen roller away from the printer.

natural_image
Mechanical assembly diagram showing internal components with red directional arrows indicating motion or flow (no text or symbols present)6 Insert the new platen roller into the printer and secure it by turning the latch counterclockwise.
7 Reload media and turn the printhead lift lever clockwise to lower it.
8 Close the media cover, reconnect power, and turn on the printer.
How to Adjust the Printer
You may need to adjust your printer to accommodate how you are printing or to improve printer performance. You can make these adjustments on the printer:
- Ribbon wrinkling
- Printhead balance
- Printhead pressure
- Label taken sensor
- Label gap sensor and label mark sensor
Prevent Ribbon Wrinkling
If you have problems with the thermal transfer ribbon getting wrinkled, try adjusting the ribbon tension bar.
1 Open the media cover.
2 Use a large straight-slot screwdriver to adjust the ribbon tension bar:
- Turn the tension bar screw clockwise to move the bar backward and decrease the tension.
- Turn the tension bar screw counterclockwise to move the bar forward and increase the tension.

natural_image
Mechanical assembly diagram showing a screwdriver inserted into a component with a red arrow indicating motion (no text or symbols present)Adjust the Printhead Balance
If your labels are printing lighter on one side than the other, you probably have an unbalanced printhead. The printer is adjusted at the factory for full-width media. If you are using media that is less than full-width (4 inches or 102 mm), Intermec recommends that you adjust the position of the printhead balance arm so that the printhead is correctly pressured against the media.
1 Open the media cover.
2 If you have thermal transfer ribbon installed, remove it.
3 Turn the printhead lift lever counterclockwise to raise the printhead.

natural_image
Mechanical assembly diagram showing internal components with red arrows indicating motion or force directions (no text or labels present)4 Press down on the blue part of the printhead balance bar and move it:
• outward for wider media.
• inward for narrower media.
5 Close the printhead and load the ribbon.
6 Test and readjust the printhead balance if necessary.
7 Close the media cover.
Adjust the Printhead Pressure
You may need to adjust the printhead pressure on the printer if:
- you are using thicker or thinner media than previously.
- your labels are printing lighter on one side than the other.
- your thermal transfer ribbon starts to crease.
Do not use a higher printhead pressure than necessary. It may increase the wear on the printhead and shorten its life.
1 Open the media cover.
2 Use a straight-slot screwdriver to adjust the pressure screw.

natural_image
Mechanical assembly diagram showing a screwdriver inserted into a housing component with red arrows indicating motion (no text or symbols present)- Turn the screw clockwise to increase the pressure resulting in darker print.
- Turn the screw counterclockwise to decrease the pressure resulting in lighter print.
3 Test and readjust the printhead pressure if necessary.
Calibrate the Label Taken Sensor
If your printer has the optional label taken sensor or the label dispenser (which includes the sensor), use the wizard to calibrate the sensor for your media.

Note: For best results, calibrate the sensor each time you load media or move the printer to a different environment. If you installed the label taken sensor module or the label dispenser in the printer, calibrate the sensor before you begin printing.
Before you calibrate the sensor, load media and ribbon in the printer as necessary.
1 In the Main Menu, select Wizards > Calibration > Label Taken Sensor.
2 Follow the prompts to calibrate the sensor.
Adjust the Label Gap and Black Mark Sensor
The label gap sensor is a transmissive sensor that controls how the printer feeds media by detecting gaps between the labels. The black mark sensor is a reflective sensor that detects black marks on continuous media.
The sensor contains a blue LED which is strong enough to see through media. You can use the blue LED to help determine the proper location for the sensor.
1 Open the media cover.
2 Adjust the label gap and black mark sensor:
- Turn the sensor adjustment knob counterclockwise to move the sensor toward the outside of the printer. - Turn the sensor adjustment knob clockwise to move the sensor toward the inside of the printer.

natural_image
Technical line drawing of a mechanical assembly with no visible text or symbols3 Close the media cover.
Chapter 6 – Maintain the Printer
A
Specifications
This appendix contains specifications for the PM23, PM43, and PM43c printers.
Printer Specifications
Physical Specifications
| PM43 Dimensions: 294.6 x 284.2 x 483.5 mm (11.6 x 11.2 x 19 in) | |
| PM43c Dimensions:(Standard Media Cover) | 181 x 252.5 x 431.8 mm (7.13 x 9.9 x 16.9 in) |
| PM43c Dimensions:(Dome Media Cover) | 244.9 x 252.5 x 500.2 mm (9.6 x 9.9 x 19.7 in) |
| PM23cDimensions:(StandardMedia Cover) | 181 x 205.5 x 431.8 mm (7.13 x 8.1 x 16.9 in) |
| PM23cDimensions:(Bubble Top) | 207 x 205.5 x 431.8 mm (8.15 x 8.1 x 16.9 in) |
| PM23cDimensions:(DomeMedia Cover) | 244.9 x 205.5 x 500.2 mm (9.64 x 8.1 x19.7 in) |
| PM43 Weight: 15.8 kg (35 lbs) | |
| PM43c Weight: 12.7 kg (28 lbs) | |
| PM23c Weight: 9.5 kg (21 lbs) | |
PM43 Printer Width Dimensions

PM43 Printer Length and Height Dimensions

PM43c Printer Width Dimensions

PM43c Printer Length and Height Dimensions

PM23c Printer Width Dimensions

PM23c Printer Length and Height Dimensions
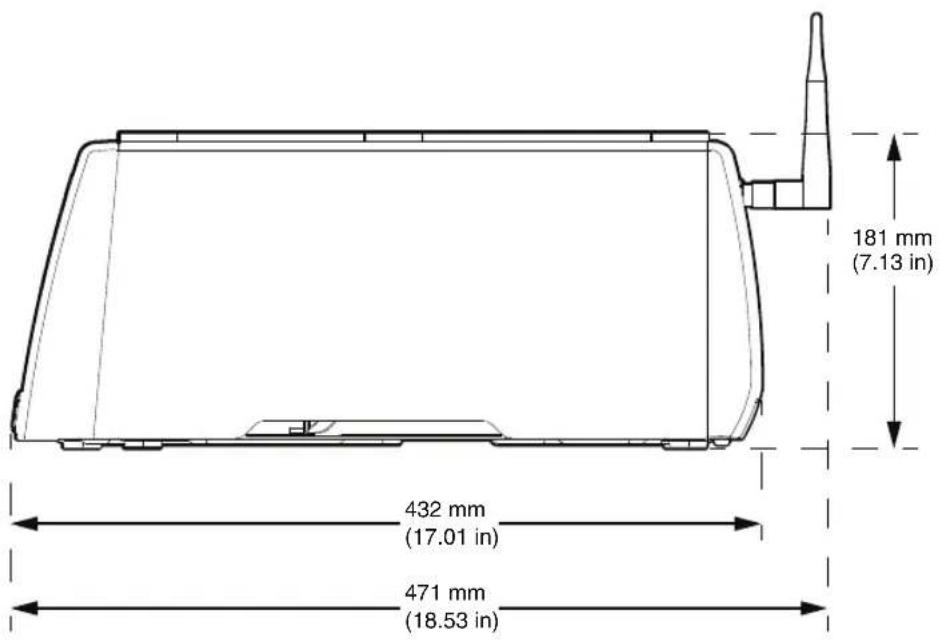
Power Specifications
Power Supply Requirements: 100–240 V, 4 A, 50/60 Hz
Temperature and Humidity Specifications
Operating Temperature: 5°C to 40°C (41°F to 104°F)
Storage Temperature: -20°C to 70°C (-4°F to 158°F)
Relative Humidity: 20 to 80% non-condensing
PM43 Print Speed, Resolution, and General Media Specifications
| Print Mode: Thermal Transfer or Direct Thermal | |
| Print Speed (variable): 203 dpi: 100 to 300 mm/sec (4 to 12 ips) | |
| 300 dpi: 100 to 300 mm/sec (4 to 12 ips) | |
| 406 dpi: 100 to 250 mm/sec (4 to 10 ips) | |
| Print Resolution: 203 dpi: 8 dots/mm | |
| 300 dpi: 11.8 dots/mm | |
| 406 dpi: 16 dots/mm | |
| Print Width: 203 dpi: 108 mm (4.25 in) max | |
| 300 dpi: 106 mm (4.17 in) max | |
| 406 dpi: 104 mm (4.09 in) max | |
| Media Width: 19.05 to 114.3 mm (0.75 to 4.50 in) | |
| Label Roll Diameter (maximum): | 212.70 mm (8.38 in) |
| Label Roll Core (ID): 76.20 mm (3 in) or 38.1 mm (1.50 in) | |
| Label Length (minimum): 6.35 mm (0.25 in) | |
| Gap Length Between Labels: 1.20 to 26 mm (0.05 to 1.02 in) | |
| Black Mark Length: 3 to 25 mm (0.12 to 0.98 in) centered between tickets, 15% maximum reflectance | |
| Media Thickness: 61 to 264 μm (2.40 to 10.40 mil) | |
| Media Density: 57.60 to 250 g/m2 | |
| Liner Opacity (maximum): 76% (TAPPI T425) | |
| Ribbon Width: | 21.59 to 110 mm (0.85 to 4.33 in) |
| Ribbon Roll Diameter: (maximum) | 80 mm (3.15 in) |
| Ribbon Core (I.D.): | 25.40 mm (1.00 in) |
| Ribbon Core Length: | 21.59 to 110 mm (0.85 to 4.33 in) |
| Gap and Black Mark Sensor: | Adjustable from left edge to101.6 mm (4.00 in) |
PM43c Print Speed, Resolution, and General Media Specifications
| Print Mode: Thermal Transfer or Direct Thermal | |
| Print Speed (variable): 203 dpi: 100 to 300 mm/sec (4 to 12 ips) | |
| 300 dpi: 100 to 300 mm/sec (4 to 12 ips) | |
| 406 dpi: 100 to 250 mm/sec (4 to 10 ips) | |
| Print Resolution: 203 dpi: 8 dots/mm | |
| 300 dpi: 11.8 dots/mm | |
| 406 dpi: 16 dots/mm | |
| Print Width: 203 dpi: 108 mm (4.25 in) max | |
| 300 dpi: 106 mm (4.17 in) max | |
| 406 dpi: 104 mm (4.09 in) max | |
| Media Width: 19.05 to 114.3 mm (0.75 to 4.5 in) | |
| Label Roll Diameter (maximum): | 152.4 mm (6 in) with standard cover |
| 212.9 mm (8.38 in) with dome cover | |
| Label Roll Core (I.D.): 76.20 mm (3 in) or 38.1 mm (1.50 in) | |
| Label Length (minimum): 6.35 mm (0.25 in) | |
| Gap Length Between Labels: 1.20 to 26 mm (0.05 to 1.02 in) | |
| Black Mark Length: 3 to 25 mm (0.12 to 0.98 in) centered between tickets, 15% maximum reflectance | |
| Media Thickness: 61 to 264 μm (2.40 to 10.40 mil) | |
| Media Density: 57.60 to 250 g/m2 | |
| Liner Opacity (maximum): 76% (TAPPI T425) | |
| Ribbon Width: | 21.59 to 110 mm (0.85 to 4.33 in) |
| Ribbon Roll Diameter: (maximum) | 62 mm (2.44 in) |
| Ribbon Core (I.D.): | 25.40 (1.00 in) |
| Ribbon Core Length: | 21.59 to 110 mm (0.85 to 4.33 in) |
| Gap and Black Mark Sensor: | Adjustable from left edge to101.6 mm (4.00 in) |
PM23c Print Speed, Resolution, and General Media Specifications
| Print Mode: Thermal Transfer or Direct Thermal | |
| Print Speed (variable): 203 dpi:100 to 300 mm/sec (4 to 12 ips) | |
| 300 dpi: 100 to 300 mm/sec (4 to 12 ips) | |
| 406 dpi: 100 to 250 mm/sec (4 to 10 ips) | |
| Print Resolution: 203 dpi: 8 dots/mm | |
| 300 dpi: 11.8 dots/mm | |
| 406 dpi: 16 dots/mm | |
| Print Width: 203 dpi: 56 mm (2.20 in) max | |
| 300 dpi: 56 mm (2.20 in) max | |
| 406 dpi: 64 mm (2.52 in) max | |
| Media Width: 19.05 to 68.6 mm (0.75 to 2.70 in) | |
| Media Width:(RFID Baggage Tag) | 29 to 54 mm (1.14 x 2.13 in) |
| Label Roll Diameter (maximum): | 152.4 mm (6 in) with standard cover |
| 184.2 mm (7.25 in) with bubble top | |
| 212.9 mm (8.38 in) with dome cover | |
| Label Roll Core (I.D.): 76.20 mm (3 in) or 38.1 mm (1.50 in) | |
| Label Length (minimum): 6.35 mm (0.25 in) | |
| Gap Length Between Labels: 1.20 to 26 mm (0.05 to 1.02 in) | |
| Black Mark Length: 3 to 25 mm (0.12 to 0.98 in) centered between tickets, 15% maximum reflectance | |
| Media Thickness: 61 to 264 μm (2.40 to 10.40 mil) | |
| Media Density: 57.60 to 250 g/m2 | |
| Liner Opacity (maximum): | 76% (TAPPI T425) |
| Ribbon Width: | 21.59 to 68.6 mm (0.85 to 2.70 in) |
| Ribbon Roll Diameter: (maximum) | 62 mm (2.44 in) |
| Ribbon Core (I.D.): | 25.40 (1.00 in) |
| Ribbon Core Length: | 21.59 to 68.6 mm (0.85 to 2.70 in) |
| Gap and Black Mark Sensor: | Adjustable from left edge to 50.8 mm (2.00 in) |
Memory
- 128 MB Flash
• 128 MB SDRAM - USB memory device (optional)
Touch Screen Specifications
• 3.5 inch, portrait orientation
• 262,000 colors
- Resistive display that supports touch input with fingers, gloved hands, or a stylus
- 72 pixels per inch
Supported Command Languages
- Fingerprint
- Direct Protocol
• Intermec Printer Language (IPL) - ZSim
- DSim
- Smart Printing
Media Sensors
- Label gap/tag notch
- Black mark
- Printhead lift
• Media low (with rotational hanger option) - Ribbon present/end (thermal transfer models only)
- Ribbon low
Network Services
- FTP
- HTTP Server
- SNMP v1/2c/3
• SNMP client support for IPv4 and IPv6 - WINS for IPv4
- BOOTP for IPv4
• DNS client support for IPv4 and IPv6
• Line Printer Protocol - Raw TCP (Telnet in/out)
- DHCP client for IPv4 and IPv6 network (dual stack)
- IPv4 and IPv6
- Ping
• IPSEC/IKEv2 over IPv6 - SSH
- Time Server
Resident Fonts
- Andale Mono
- Andale Mono Bold
• Century Schoolbook Roman - CG Times
- CG Times Bold
- Letter Gothic
• OCR-A - OCR-B
- Univers
- Univers Bold
• Univers Condensed Bold
• Univers Extra Condensed
Downloadable Fonts
For broader language and character support, Intermec printers allow download and printing with any Unicode TrueType or TrueType-based OpenType font. Intermec recommends fonts from Monotype Imaging to address global languages. The fonts below have been tested and are available for purchase and download at www.fonts.com.
WorldType Collection fonts support all global languages whereas the other fonts listed support specific languages.
- Angsana New Regular
- Helvetica World
- MSung PRC Medium
- MSung HK Medium
- HYGothic-Medium
- TBMinPro-Light
- NarkisClassicMF
- WorldType Collection J
- WorldType Collection K
- WorldType Collection S
- WorldType Collection T
Supported Font Types
- TrueType
- OpenType
- Bitmap
Supported Bar Code Symbologies
| 1D bar code symbologies: | 2D bar code symbologies: |
| Codabar | Aztec |
| Code 11 | Code 16K |
| Code 39 | Code 49 |
| Code 93 | Data Matrix |
| Code 128 | Dot Code |
| DUN-14/16 | Grid Matrix |
| EAN | MaxiCode |
| HIBC 39 | MicroPDF417 |
| HIBC 128 | MSI (modified Plessey) |
| Industrial 2 of 5 | PDF417 |
| Interleaved 2 of 5 | Planet |
| ISBT-128 | Plessey |
| Matrix 2 of 5 | Postnet |
| Straight 2 of 5 | QR Code |
| UPC | RSS-14 |
| USPS 4-State Customer |
Supported Graphic File Types
• PCX, PNG, GIF, and BMP
Windows Drivers
- Support for Windows XP, Vista, Windows 7, Server 2003, Server 2008
• Supports 32-bit and 64-bit editions
Interface Specifications
Use this section to understand the standard interfaces available on the PM23c, PM43, and PM43c printers.
RS-232 Serial Interface
Use this table to understand the default settings of the serial port.
Default Settings of the Serial Port
| Parameter Default Setting |
| Baud rate 115200 |
| Data bits 8 |
| Parity None |
| Stop bits 1 |
| Hardware Disable |
The printer end of the serial cable is a DB9 pin and the PC end is dependent on the model of the desktop computer.

RS-232 Serial Cable DB9 Pins
| Pin Signal Description | |
| 1 External +5 VDC, Max 500 mA | |
| 2 TXD Transmit data | |
| 3 RXD Receive data | |
| 4 | |
| 5 GND | Ground |
| 6 | |
| 7 CTS Clear to send | |
| 8 RTS Request to send | |
| 9 | |
USB Device Interface
You connect a cable with a Type A connector and a Type B connector from your PC to the printer. The Type A connector plugs into the PC and the Type B connector plugs into the printer.
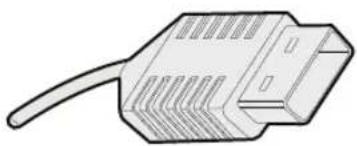
natural_image
Line drawing of a USB connector with a cable (no text or symbols)USB Type A Connector

USB Type B Connector
To use the USB interface to print from a PC, you need to have the Intermec InterDriver printer driver installed on your PC. Intermec recommends that you only connect one printer to each USB port on the PC, either directly or through a hub. You cannot connect other devices, such as a keyboard or a mouse, to the same hub.
USB Host Interface
Use the USB host device to connect USB devices to the printer such as HID bar code scanners, keyboards, USB storage devices, and USB hubs.
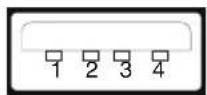
USB Host Interface
USB Host Interface Pins and Descriptions
| Pin Description | ||
| 1 | V | B |
| 2 | D- | |
| 3 | D+ | |
| 4 | Gnd | |
Ethernet Interface
The Ethernet interface has an RJ-45 socket for use with a standard RJ-45 cable. The interface supports 10/100 Mbps Fast Ethernet (10BASE-T, 100BASE-T) and is fully compliant with the IEEE 802.3u standard. You can find the network card MAC address on the back of the printer for a PM43 printer, and on inside the media cover on the base for the PM23c and PM43c printers.

natural_image
Technical line drawing of a computer tower rear panel with visible socket, ventilation slots, and ventilation ducts (no text or labels)MAC Address Label Location on the PM43

natural_image
Technical line drawing of a mechanical device with internal components and no visible text or symbolsMAC Address Label Location on the PM43c
PM23c, PM43, and PM43c Mid-Range Printer User Manual 123
Appendix A – Specifications

natural_image
Technical line drawing of a mechanical device with internal components and mounting base (no text or symbols)MAC Address Location on the PM23c
B
Default Settings
This appendix contains all of the default settings for the printer.
Default Configuration
Use this appendix to view the default settings on the printer. The following tables list the default settings for the printers. If you restore the printer to factory default settings, it will use the values listed here. The order of the settings reflects the organization of the printer web page and Main Menu.
Serial Port Settings
This section describes the serial port settings. To view these settings:
- From the printer Main Menu, select Settings > Communications > Serial > COM1.
- From the printer web page, click the Configure tab, Communications > Serial.
Note: These settings are not accessible unless the printer has a serial connection to a PC.

Serial Port Settings
| Setting Description Default | |
| Baud Rate Transmission speed in bits per second (bps) for the serial port. | 115200 |
| Data Bits Number of bits that define a character or byte. | 8 |
| Parity Specifies how the printer checks the integrity of the transmitted data. | None |
| Stop Bits Number of bits sent at the end of every character to allow the receiving signal hardware to detect the end of a character and to resynchronize with the character stream. | 1 |
| Hardware Specifies if hardware flow control (RTS/CTS) is used to manage the rate of data transmission between the device and the host. | Disable |
| ENQ/ACK Specifies if software flow control (ENQ/ACK) is used to manage the rate of data transmission between the device and the host. | Disable |
| XON/XOFF To Specifies if software flow control (XON/ XOFF) is used to manage the rate of data transmission to the host. | Disable |
| XON/XOFF From Specifies if software flow control (XON/ XOFF) is used to manage the rate of data transmission from the host. | Disable |
| New Line Character Defines the characters that the printer echoes to the host to indicate that it has moved to a new line. | CR/LF |
Ethernet Settings
This section describes the Ethernet IPv4 and IPv6 settings. To view these settings:
- From the printer Main Menu, select Settings > Communications > Ethernet.
- From the printer web page, click the Configure tab, Communications > Ethernet.
Ethernet Settings
| Setting Description Default | ||
| (IPv4) IP Assignment Method | Specifies how the printer obtains an IP address. | DHCP |
| (IPv4) IP Address | Specifies the unique network-level address that is assigned to each device in a TCP/IP network (IPv4). | 0.0.0.0 |
| Subnet Mask Specifies a number that defines the range of IP addresses that can be used in a TCP/IP network. | 0.0.0.0 | |
| Default Router Specifies the IP address of a router that is used when a device sends a packet to another subnet or to an unknown destination. | 0.0.0.0 | |
| DHCP Response Specifies if the printer receives DHCP responses by broadcast or unicast. | Broadcast | |
| (IPv6) IP Assignment Method | Specifies how the printer obtains an IP address (for IPv6 networks). | Automatic |
| (IPv6) IP Address | Specifies the unique network-level address that is assigned to each device in a TCP/IP network (IPv6). | Automatic |
Wireless 802.11 General Settings
This section describes the 802.11 general settings. To view these settings:
- From the printer Main Menu, select Settings > Communications > Wireless 802.11 > General.
- From the printer web page, click the Configure tab, Communications > Wireless 802.11.
Wireless 802.11 General Settings
| Setting Description Default | ||
| Network Name (SSID) | Defines the wireless network. To communicate, all access points and wireless devices must have the same network name, which is case-sensitive. | HONEYWELL |
| Network Type | Selects the radio behavior of the printer.Ad Hoc mode allows the printer to communicate directly with another printer.Infrastructure mode allows the printer to communicate through an access point. | Infrastructure |
| Roaming Controls the roaming inclination of the printer. The higher the level, the less inclined the printer is to switch access points based on the printer received signal strength (RSSI). | Off | |
| Power Mode | Select the power management setting for the radio. Constant Awake provides the highest throughput but draws the most power. Power Savingconserves the most power but provides the lowest throughput. Fast Power Saving turns off components when they are not being used to draw less current. | Constant Awake |
| Channel Sets | the common channel that radios in Ad Hoc mode use to transfer data. Range is 1 to 13 (1 to 11 for FCC only). | 1 |
| Hidden SSID | Determines if the radio is allowed to look for SSIDs that have been hidden to prevent unauthorized devices from connecting to the wireless network. | Disable |
Wireless 802.11 Network Settings
This section describes the 802.11 IPv4 and IPv6 settings. To view these settings:
- From the printer Main Menu, select Settings > Communications > Wireless 802.11 > Network > IPv4 or IPv6.
- From the printer web page, click the Configure tab, Communications > Wireless 802.11.
Wireless 802.11 Network Settings
| Setting Description Default | ||
| (IPv4) IP Assignment Method | Sets how the printer obtains an IP address (for IPv4 networks). | DHCP |
| (IPv4) IP Address | Sets the unique network-level address that is assigned to each device in an IPv4 network. | 0.0.0.0 |
| Subnet Mask Sets a number that defines the range of IP addresses that can be used in an IPv4 network. | 0.0.0.0 | |
| Default Router Sets the IP address of a router that is used when a device sends a packet to another subnet or to an unknown destination. | 0.0.0.0 | |
| DHCP Response | Sets if the printer receives DHCP responses by broadcast or unicast. | Broadcast |
| (IPv6) IP Assignment Method | Sets how the printer obtains an IP address (for IPv6 networks). | Automatic |
| (IPv6) IP Address | Sets the unique network-level address that is assigned to each device in an IPv6 network. | Automatic |
Wireless 802.11 Security Settings
This section describes the 802.11 security settings. To view these settings:
- From the printer Main Menu, select Settings > Communications > Wireless 802.11 > Security.
- From the printer web page, click the Configure tab > Communications > Wireless 802.11.
Wireless 802.11 Security Settings
| Setting Description Default | |
| Security Type Selects the protocol the radio uses to verify its identity and makes sure that it is authorized to communicate on the wireless network. | None |
| Association Selects the security method that the radio uses to get access to the wireless network. | Open/WEP |
| Pre-Shared Key Defines the passphrase that allows the radio to authenticate over the wireless network (for both WPA and WPA2 security). Range is 8 to 64 characters. | None |
Wireless 802.11 Security Settings (continued)
| Setting Description Default | ||
| Network Key Index | Selects the active network key to use for WEP security. Range is 1 to 4. | 1 |
| Network Key 1, Network Key 2, Network Key 3, Network Key 4 | Defines a network key that is used for WEP security. Keys are entered in ASCII or hexadecimal (preceded by 0x) format. | Empty string |
| User Name Sets the name that the printer uses when logging in to the network. Range is 1 to 96 characters. | None | |
| Password Sets the password that the printer uses when logging in to the network. Range is 1 to 96 characters. | None | |
| Anonymous Name | Sets the outer EAP user name that the printer uses for logging in to the network. Maximum length is 96 characters. | Empty string |
| Inner Authentication | Selects the authentication method that is used when the EAP type is EAP-FAST, PEAP, or TTLS. | MSCHAPv2 |
| CA Certificate Sets the name of the Certificate Authority (CA) that verifies the server certificate. This CA should be the same one that was used to sign the server certificate. | honeywell.pem | |
| Client Certificate Sets the name of the client certificate the printer uses to authenticate to the network using EAP-TLS. Maximum length is 128 characters. | None | |
| Client Key Sets the private key the printer uses for EAP-TLS. Maximum length is 128 characters. Use the certinstall.sh script to install the certificate correctly. | None | |
| Server Common Name 1 | Sets the certificate name that is on the primary authentication server. If this value is none, then the value for Server Common Name 2 is used. Range is 1 to 96 characters. | None |
| Server Common Name 2 | Sets the certificate name that is on the secondary authentication server. If this value is none, then the value for Server Common Name 1 is used. Range is 1 to 96 characters. | None |
| Validate Certificate | Determines if the identity of the authentication server is verified using its certificate when using EAP-TTLS, PEAP, or EAP-TLS. Intermec recommends that you set Validate Certificate to Yes. | No |
| PAC Sets the name of the Protected Access Credential (PAC) that is used for EAP-FAST authentication. The printer uses this file if Acquire PAC is on and the current installed PAC fails to authenticate the printer to the network. | eap-fast.pac | |
| Acquire PAC Determines if automatic PAC file provisioning is on for EAP-FAST authentication. | On | |
| Fast Roaming (CCKM) | Determines if the printer can roam from one access point to another without reauthenticating with the server. CCKM only works in wireless networks using LEAP. | Disable |
Bluetooth Settings
This section describes Bluetooth settings for the printer. To view these settings:
- From the printer Main Menu, select Settings > Communications > Bluetooth.
- From the printer web page, click the Configure tab, Communications > Bluetooth.
Bluetooth Settings
| Setting Description Default | ||
| Security Selects the level of security that is used when pairing devices to the printer. If you select Authentication, you must enter a passkey. If you select Auth + Encrypt, you must enter a passkey and traffic is encrypted. | Disable | |
| Device Name Sets the name that identifies the printer in the Bluetooth network. Maximum length is 16 characters. | Printer model number and serial number. For example, PM43-0000000001. | |
| Discover Determines if other Bluetooth devices can detect the printer. | Enable | |
| Passkey Sets the passkey that is used when pairing Bluetooth devices to the printer. Range is 1 to 16 characters (case-sensitive). | 1234 | |
| Reserve Determines if the printer is exclusively reserved for one Bluetooth device. The first Bluetooth device that connects with the printer locks out any other connection attempts. | Disable | |
Media Settings
This section describes media settings for the printer. To view these settings:
• From the printer Main Menu, select Settings > Printing > Media.
- From the printer web page, click the Configure tab, Printing > Media.

Note: If you are using an icon printer that is not on a network, you need to use PrintSet 5 through a USB connection to configure media settings.
Media Settings
| Setting Description Default | ||
| Media Type Selects the type of media that is loaded in the printer. | Media With Gaps | |
| Print Method Selects the method of printing that the printer is using. | Ribbon (TTR) for thermal transfer printers, or No Ribbon (DT) for direct thermal printers | |
| Media Margin (X) | Sets the width of the margin from the left edge of the label along the printhead to the edge of the printable area. Unit of measurement is defined in the Unit of Measurement parameter. | Variable |

Media Settings (continued)
Setting Description Default
Media Width Sets the width of the printable area measured from the media margin (X) across the printhead. Unit of measurement is defined in the Unit of Measure parameter.

Media Length Sets the length of the printable area measured from one edge of the label to the edge that is closest to the printhead. Unit of measurement is defined in the Unit of Measurement parameter.

Media Settings (continued)
| Setting Description Default | ||
| Clip Default Determines if the printer prints items outside the printable area of the label. When this is set to Off, the printer returns an error if any part of a bar code label cannot be printed because that part extends beyond the printable area. When this is set to On, the printer prints all bar code labels, but may also print unreadable, incomplete labels. | Off | |
| Start Adjust Sets the length of media the printer feeds (positive value) or retracts (negative value) before printing a label. Unit of measurement is defined in the Unit of Measure parameter. Range is -9999 to +9999. | 0 | |
| Stop Adjust Sets the length of media the printer feeds (positive value) or retracts (negative value) after printing a label. Unit of measurement is defined in the Unit of Measure parameter. Range is -9999 to +9999. | 0 | |
| Media Calibration Mode | Selects the mode the printer uses to calibrate media. Use Slow if the printer has trouble identifying gaps or marks in media. | Fast |
| Length (Slow Mode) | If Media Calibration Mode is set to Slow, the printer prints the media length plus 10 mm. This value sets an additional amount of media to be printed. Unit of measurement is defined in the Unit of Measurement parameter. Range is 0 to 3200. | 0 |
| LTS Sensitivity Level | Sets the sensitivity of the label taken sensor. Range is 0 to 14. Supported when the Cutter or Label Dispenser accessories are installed. | 0 |
| Power Up Action | Sets the action when you turn the printer on:No ActionFormfeed - The printer feeds one label.Testfeed - The printer prints two configuration labels as it calibrates the media sensors.Smart Calibration - Detects media type (gap, black mark, or continuous, detects printing method (ribbon or no-ribbon), and calibrates media length. | Smart Calibration |
| Head Down Action | Sets the action when you close the print mechanism after opening it:No Action.Formfeed - The printer feeds one label.Testfeed - The printer prints two configuration labels as it calibrates the media sensors.Smart Calibration - Detects media type (gap, black mark, or continuous, detects printing method (ribbon or no-ribbon), and calibrates media length. | Smart Calibration |
| Hold Feed Button Action | Sets the action when you press and hold the Print button for more than 2 seconds:Testfeed - The printer prints two configuration labels as it calibrates the media sensors.Smart Calibration - Detects media type (gap, black mark, or continuous, detects printing method (ribbon or no-ribbon), and calibrates media length. | Smart Calibration |
| Label Counter | Specifies a label counter (from 1 to 49) that SNMP uses to report media counts. | 0 (off) |
Print Quality Settings
This section describes print quality settings. To view these settings:
- From the printer Main Menu, select Settings > Printing > Print Quality.
- From the printer web page, click the Configure tab, Printing > Print Quality.
Print Quality Settings
| Setting Description Default | |
| Print Speed Sets how fast the printer prints labels. The unit of measure is defined in the Unit of Measure parameter. | 100 |
| Media Sensitivity Sets the level of sensitivity of the media to the printhead heat for media and ribbon. | Variable |
| Darkness Sets the image darkness for media and ribbon. Adjust this parameter with the Media Sensitivity parameter. Range is 1 to 100. | Variable |
| Contrast Adjusts the blackness of the printing on the label in 2% increments from -10% to +10%. | +0% |
General System Settings
This section describes general system settings. To view these settings:
- From the printer Main Menu, select Settings > System Settings > General.
- From the printer web page, click the Configure tab, System Settings > General.
General System Settings
| Setting Description Default | |
| System Name Sets the network identification name (WINS name) of the printer. | Printer model number and serial number.For example, PM43-000000011 |
| System Location Sets the location of the printer. | Empty string |
General System Settings (continued)
| Setting | Description | Default |
| System Contact Sets the name of the printer administrator. | Empty string | |
| XML Response Mode | Determines if the printer provides XML responses to printing requests (over Telnet and HTTP). | False |
| Display Language (LCD printers only) Selects the language the printer uses to display text on the screen. | English | |
| Display Language (Web Page) | Selects the language the printer uses to display text on the web page. | English |
| Keyboard Input Selects the language of the external keyboard that is connected to the printer. | U.S./U.K. | |
| Time Sets the current time. System time | ||
| AM/PM Sets AM or PM. AM | ||
| Date Sets the current date. System date | ||
| Command Language | Sets the printer command language. If changed, requires restart. | Fingerprint |
| Alert Notification Method | Selects how you want the printer to notify you of printer alerts. | SNMP Trap + Email |
| Unit of Measure Selects the unit of measure that is used to define several printing parameters. | Dots | |
| Zero with Slash Determines how the zero character is printed and displayed on the screen. Disable (0) or Enable (∅). | Disable | |
| Time Zone | Sets the time zone. | (UTC 00:00)Universal Time |
| DST Adjust | Determines if Daylight Saving Time is automatically adjusted. | Disable |
Display and Audio Settings
This section describes display and audio settings for the printer. To view these settings:
- From the printer Main Menu, select Settings > System Settings > Display or Audio.
- From the printer web page, click the Configure tab, System Settings > Display or Audio.
Display and Audio Settings
| Setting Description Default | ||
| Brightness Selects the brightness of the printer screen. | Medium | |
| Idle Information Selects the information that appears on the printer screen when it is in Idle mode. | IPv4 address | |
| Time Format Selects the format used to display time on the printer. | 24 Hour | |
| Date Format Selects the format used to display date on the printer. | dd/mm/yyyy | |
| Menu Access Determines if the Menu button on the printer web page is accessible. | Enable | |
| PIN Sets the password that allows access to the Menu button on the printer web page, if the Menu Access parameter is set to Enable With PIN. Range is 4 to 16 characters. | 1234 | |
| Screen Timeout Selects how long the printer screen stays on before the screen saver starts. | Disable | |
| Feed Key Access | Determines if the Feed button on the printer keypad is enabled or disabled. | Enable |
| Information Access | Determines if the information bar on the Main Menu is accessible. | Enable |
| Volume | Sets the printer volume. | Off |
System I/O Settings
This section describes system I/O settings for the printer. To view these settings:
- From the printer Main Menu, select Settings > System Settings > Manage I/O.
- From the printer web page, click the Configure tab, System Settings > Manage I/O.
System I/O Settings
| Setting Description Default | |
| Ethernet Determines if the printer is allowed to communicate using Ethernet communications. | Enable |
| Wireless 802.11 Determines if the printer is allowed to communicate using its 802.11 radio. Supported only if the optional Wi-Fi+Bluetooth module is installed. | Enable |
| Bluetooth Determines if the printer is allowed to communicate using its Bluetooth radio. Supported only if the optional Wi-Fi+Bluetooth module is installed. | Enable |
| RFID Determines if the printer is allowed to communicate using its RFID radio. Supported only if the RFID module is installed. | Enable |
| Virtual COM Determines if you can enable the USB port to be used as a virtual serial port. When you change this setting, you must restart the printer to enable the new setting. | Disable |
System Network Services
This section lists the network services you can manage from the printer. You will only see Manage Services from the menus if you have an Ethernet or Wireless module installed in the printer. To view these services:
- From the printer Main Menu, select Settings > System Settings > Manage Services.
- From the printer web page, click the Configure tab, System Settings > Manage Services.
System Network Services
| Service Description Default | ||
| Web Server Determines if the web server is enabled in the printer. | Enable | |
| FTP Determines if the printer can use File Transfer Protocol (FTP). | Enable | |
| Avalanche Determines if the printer can be managed by Wavelink Avalanche. | Enable | |
| Net1 Determines if the printer can use Telnet to communicate with Fingerprint. | Enable | |
| SmartSystems Determines if the printer can be managed by Intermec SmartSystems Foundation. | Enable | |
| SNMP Determines if the printer can use SNMP. Enable | ||
| LPR Determines if the printer can use the line printer server (LPR) daemon. | Enable | |
| IKEv2 | Determines if the printer can use IKEv2. | Disable |
| SSH | Determines if the printer can use Secure Socket Handling (SSH). | Enable |
| Telnet | Determines if the printer can use Telnet. | Enable |
| XML | Determines if the printer can use XML printing. | Enable |
| Time Server | Determines if the printer uses the Network Time Protocol (NTP) to synchronize its time with a network time server. The default Server Address is ntp0.cornell.edu, and the default Port Number is 123. | Disable |
System Maintenance Alert Settings
This section describes the system maintenance alert settings, such as the odometer distance. To view these settings:
- From the printer Main Menu, select Settings > System Settings > Maintenance Alerts.
- From the printer web page, click the Configure tab, System Settings > Maintenance Alerts.
System Maintenance Alert Settings
| Setting Description Default | ||
| Odometer (User Resettable) | Sets the length of media (in meters) that the printer prints before the Odometer (User Resettable) alert is sent, if this alert is configured. Unit of measurement is defined in the Unit of Measure parameter. Range is 0 to 4294967295. | 0 |
| Odometer (Printer) | Sets the length of media (in meters) that the printer prints before the Odometer (Printer) alert is sent. Unit of measurement is defined in the Unit of Measure parameter. Range is 0 to 4294967295. | 0 |
| Odometer (Printhead) | Sets the length of media (in meters) that the printer prints before the Odometer (Current Printhead) alert is sent, if this alert is configured. Unit of measurement is defined in the Unit of Measure parameter. Range is 0 to 4294967295. | 0 |
| Replace Printhead Sets the length of media (in meters) that the printer prints before the Replace Printhead alert is sent, if this alert is configured. Unit of measurement is defined in the Unit of Measure parameter. Range is 0 to 4294967295. | 0 | |
| Clean Printhead Sets the length of media (in meters) that the printer prints before the Clean Printhead alert is sent, if this alert is configured. Unit of measurement is defined in the Unit of Measure parameter. Range is 0 to 4294967295. | 0 | |
| Faulty Dot Sets the number of faulty dots on the printhead before the Faulty Dot alert is sent, if this alert is configured. Range is 0 to 4294967295. | 0 | |
| Media Low Diameter | Sets the minimum diameter of the media roll before the Media Low alert is sent, if this alert is configured. Range is 0 to 200 mm. | 0 |
| Ribbon Low Diameter | Sets the minimum diameter of the ribbon roll before the Ribbon Low alert is sent, if this alert is configured. Range is 0 to 200 mm. | 0 |
C
Print Labels with INPrint
This section explains how to use the INPrint feature to print labels.
About the INPrint Page
The INPrint page features sample web forms you can use to quickly and easily print single labels if you are using the Fingerprint or Direct Protocol language on your printer. You select a web form from the lists and enter information in the fields for that label. You can then preview and print the label.
The printer firmware includes several predefined label formats. You can also copy your own label formats to the printer and print them from this page.

Print INPrint Labels
If the printer is connected to an Ethernet or Wi-Fi network, you can print labels by entering information in a web form. You access web forms through the printer web page.
1 On your desktop PC, start a browser.
2 In the Location or Address bar, type the printer IP address and press Enter. The printer web page appears.
3 Click the INPrint tab.
4 Select the web form you want to print:
- If you created the web form yourself, click Customer Downloaded and then select the web form in the list.
- To use one of the Resident (Intermec-supplied) web forms, click Resident and then select the web form in the list.

5 Type information in the web form as needed.
6 (Optional) To preview the label on screen, click Preview.
7 To print the label, click Print.
Predefined INPrint Label Formats
Predefined INPrint Label Formats and Sample Illustrations
Format Name Sample
203_returnadd_3x1.lbx
HONEYWELL
No:221 Xinhai Street China-
Singapore Suzhou Industrial Park
minimal.lbx
HONEYWELL
Predefined INPrint Label Formats and Sample Illustrations (continued)
Format Name Sample
shipping.lbx

203_demo_4x6.lbx
Predefined INPrint Label Formats and Sample Illustrations (continued)
Format Name Sample
203_shipaddr_4x6.lbx

lifetest.lbx

Appendix C – Print Labels with INPrint
Predefined INPrint Label Formats and Sample Illustrations (continued)
Format Name Sample
203_packslip_4x6.lbx
HONEYWELL
No:221 Xinhai Street China
Singapore Suzhou Industrial Park
PACKING
SLIP
Phone: 13266794755
ORDER NO:
Item No. Description
SHIP DATE: 215.11.17
Order Qty Pick Qty
TOTALS:
Linux Copyright Information
This software is provided in pertinent parts by the following copyright holders:
| Copyright or License Text Link to Source Code | |
| BlueZ - Bluetooth protocol stack for Linux | http://www.bluez.org |
| LPRng, IFHP, and LPRng Tool License | http://www.lprng.com |
| pslash - a lightweight framebuffer splashscreen for embedded devices | http://git.yoctoproject.org/cgit/cgit.cgi/psplash |
| udhop DHCP client http://busybox.net/products.html | |
| Copyright © 1997 Warren W. Gay VE3WWG | http://sourceforge.net/projects/wavplay/ |
| EINA-EFL data type library, Copyright © 2008 Cedric Bail | http://www.enlightenment.org |
| Copyright © 2008 Christian Kellner, Samuel Cormier-lijima | http://www.gtk.org |
| Copyright © 2001, 2002 Brian Stafford | http://www.stafford.uklinux.net/libesmtp/ |
| Copyright © 1996 Markus Franz Xaver, Johannes Oberhumer | http://www.oberhumer.com/opensource/lzo/ |
| Copyright © 2002 Nicolas Pitre Copyright © 2003 Texas Instruments, Inc. Copyright © 2003 Chris Larson. Copyright © 2004 Michael OpdenackerOriginal version: Copyright © 2001 Russell King. | http://tslib.berlios.de/ |
| Mono compilers and tools. Copyright © 2001, 2002, 2003, Ximian and contributors. | http://www.mono-project.com/Main_Page |
| Copyright (C) 2003 WIDE Project. https://fedorahosted.org/dhcpv6/ | |
| Copyright (c) 2002-2008 Matt Johnston Portions copyright (c) 2004 Mihnea Stoenescu | https://matt.ucc.asn.au/dropbear/dropbear.html |
| Copyright (c) 2004, Jan Kneschke, incremental | http://www.lighttpd.org/ |
| Copyright (C) 1994-2008 Lua.org, PUC-Rio. | http://www.lua.org/ |
| Copyright (C) 2004, 2005 WIDE Project. | http://www.racoon2.wide.ad.jp/w/ |
| Copyright (C) 1995, 1996, 1997, 1998,and 1999 WIDE Project. | http://ipsec-tools.sourceforge.net/ |
| Copyright 1989, 1991, 1992 byCarnegie Mellon UniversityDerivative Work - 1996, 1998-2000Copyright 1996, 1998-2000 TheRegents of the University of CaliforniaCopyright (c) 2001-2003, NetworksAssociates Technology, IncPortions of this code are copyright (c)2001-2003, Cambridge Broadband Ltd.Copyright © 2003 Sun Microsystems,Inc., 4150 Network Circle, Santa Clara,California 95054, U.S.A.Copyright (c) 2003-2010, Sparta, Inc | http://www.net-snmp.org/ |
| Copyright (C) 2000-2011 CarstenHaitzler and various contributorsCopyright (c) 1999 - Carsten Haitzler(The Rasterman) | http://www.enlightenment.org/ |
| Copyright (c) 2001, 2002, 2003, 2004,2005, 2006 Expat maintainers. | http://www.libexpat.org/ |
| Copyright 2009 Intermec TechnologiesCorp. All rights reserved.Based on code from Frank Da Cruz'sexcellent book, _Kermit: A File TransferProtocol_, Digital Press, 1986. | http://www.columbia.edu/kermit/ |
| Copyright (c) 1997 Eric S. Raymond http://giflib.sourceforge.net/ | |
| Copyright (C) 1991-1998, Thomas G.Lane. | http://www.ijg.org/ |
| Copyright 2006 Richard WilsonCopyright 2008 Sean Fox | http://www.netsurf-browser.org/projects/libnsbmp/ |
| Copyright (c) 1998-2009 Glenn Randers-Pehrson | http://www.libpng.org/pub/png/libpng.html |
| Copyright (c) 1998-2007 The OpenSSL Project. | http://www.openssl.org/ |
| (C) 1995-2004 Jean-loup Gailly and Mark Adler | http://zlib.net/ |
| Copyright (c) 2003-2009, Jouni Malinenand contributors | |
| (C) Copyright 2000-2008 Wolfgang Denk, DENX Software Engineering, wd@denx.de. | http://www.denx.de/wiki/U-Boot/WebHome |
| Copyright © Freescale Semiconductor, Inc. 2004-2007. All rights reserved. | http://ltib.org/ |
| Copyright (c) 1997-2002 Jean Tourrilhes | http://www.hpl.hp.com/personal/Jean_Tourrilhes/Linux/Tools.html |
| Alessandro Rubini, 2008 http://www.gnudd.com/sw/fiq-engine.html | |
This software is provided by all copyright holders “as is” and any express or implied warranties, including, but not limited to, the implied warranties of merchantability and fitness for a particular purpose are disclaimed. In no event shall any copyright holder or contributors be liable for any direct, indirect, incidental, special, exemplary, or consequential damages (including, but not limited to, procurement of substitute goods or services; loss of use, data, or profits; or business interruption) however caused and on any theory of liability, whether in contract, strict liability, or tort (including negligence or otherwise) arising in any way out of the use of this software, even if advised of the possibility of such damage.
Honeywell
www.honeywellaidc.com
PM23c, PM43, and PM43c Mid-Range Printer User Manual

P/N 935-046-005
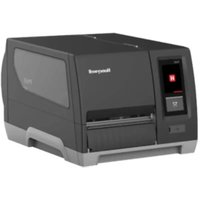
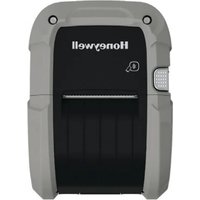
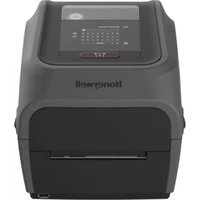
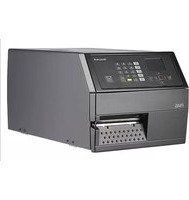
- PM23c, PM43, & PM43c
- Disclaimer
- Trademarks
- Patents
- Contents
- About the Printer....1
- Set Up the Printer .....23
- Connect the Printer....43
- Configure the Printer ....55
- Troubleshoot the Printer .....79
- Maintain the Printer .....97
- A Specifications ....109
- B Default Settings .....125
- C Print Labels with INPrint....145
- Customer Support
- Product Service and Repair
- Limited Warranty
- Send Feedback
- Safety Precautions
- Product Identification
- 1
- About the Printer
- About the PM23c, PM43, and PM43c Printer
- Printer Features
- About the Front Panel
- About the Ready-to-Work Indicator
- Ready-to-Work Indicator Status Description
- About the Print Button
- About the Icon Front Panel
- Names and Descriptions of Front Panel Icons
- Chapter 1 – About the Printer
- About the Full Touch Display Front Panel
- The Full Touch Display Front Panel on a PM43 and PM23c Printer
- Shortcut Keys on the Full Touch Display Keypad
- Navigation Shortcut Keys
- About the Ready Screen
- PM23c, PM43, and PM43c Ready Screen
- About the Main Menu
- How to Navigate in the Main Menu
- About the Onscreen Keypads
- About the Printer Wizards
- Printing Wizards
- Wizard Description
- About Printer Command Languages
- About Fingerprint
- About Direct Protocol
- About IPL
- About ZSim
- About DSim
- About Smart Printing
- How to Set the Printer Command Language
- Set the Command Language from the Printer Web Page
- Set the Command Language from the Main Menu
- Printer Options and Accessories
- 2
- Set Up the Printer
- Connect the Printer to Power
- About Smart Calibration
- About Media
- About Linerless Media
- About Tear-Off Printing
- Chapter 2 – Set Up the Printer
- Load Media for Tear-Off Printing
- About the Label Dispenser
- Load Media for the Label Dispenser
- Route the Liner Around a Collapsible Core (PM43, PM43c)
- Load Media from an External Supply
- About Cut-Off Printing
- Load Media for Cut-Off Printing
- About Ribbon
- Load Ribbon
- About Test Labels
- Print a Test Label with the Icon Printer
- Print a Test Label with the Full Touch Printer
- Calibrate the Screen
- Create and Print Labels
- How to Print on RFID Media
- About RFID Tag Position
- Run the RFID Calibration Wizard
- Calculate RFID Tag Position
- 3
- Connect the Printer
- About Printer Drivers
- Install Printer Drivers
- How to Connect the Printer to Your PC
- Connect the Printer Using a Serial Cable
- Connect the Printer Using a USB Cable
- About the Parallel Port
- Connect the Printer Using an IEEE 1284 Cable
- How to Connect the Printer to Your Network
- Connect the Printer to an Ethernet Network
- About Wireless Communications
- Configure Wireless Communications from the Web Page
- Configure Wireless Communications from the Main Menu
- Install Authentication Certificates
- Chapter 3 – Connect the Printer
- About Bluetooth Communications
- Connect to a Bluetooth Device
- Configure Bluetooth Communications from the Web Page
- Configure Bluetooth Communications from the Main Menu
- About the USB Host Port
- Connect a USB Device
- 4
- Configure the Printer
- How to Configure the Printer
- About the Printer Configuration Menus
- Chapter 4 – Configure the Printer
- Configure the Printer from the Main Menu
- Restrict Access to the Main Menu
- Configure the Printer from the Web Page
- Configure the Printer with PrintSet 5
- How to Configure the Printer with Programming Commands
- How to Configure the Printer with SmartSystems
- Configure the Printer with Touchless Configuration
- About Uploading Fonts, Images, Applications, Formats, and Web Pages
- Upload Fonts, Images, Applications, Formats, and Web Forms from the Web Page
- Upload Fonts, Images, Applications, Formats, and Web Forms from a USB Storage Device
- Change Background Image for the Ready Screen
- About Printer Profiles
- Save a Printer Profile from the Web Page
- Load a Printer Profile from the Web Page
- Save a Printer Profile from the Main Menu
- Load a Printer Profile from the Main Menu
- How to Load a Printer Profile with Programming Commands
- Install a Configuration File from a USB Storage Device
- Export a Configuration File to a USB Storage Device
- About Menu Shortcuts
- Create Menu Shortcuts
- Customize the Printer Web Page
- 5
- Troubleshoot the Printer
- Chapter 5 – Troubleshoot the Printer
- Contact Support
- About Printer System Information
- View Printer Statistics
- Check the Printer Odometer
- Set Maintenance Alerts
- About Alerts
- Configure Error Alert Notification
- Maintenance and Error Alerts
- Error Alert Solution
- Troubleshoot Printer Problems and Find Solutions
- How to Restore Printer Defaults
- Restore Defaults from the Printer Web Page
- Restore Defaults from the Main Menu
- Restore Defaults with a Hardware-Based Reset
- How to Upgrade the Printer Firmware
- Download the Printer Firmware Update
- Upgrade Firmware from the Printer Web Page
- Upgrade Firmware from a USB Storage Device
- 6
- Maintain the Printer
- How to Clean the Printer
- Clean the Printhead
- Caution: Never use hard or sharp tools to peel away stuck labels or other material. The printhead is delicate and can easily be damaged.
- Clean the Media Guides
- Clean the Exterior of the Printer
- Clean the Cutter
- Replace the Printhead
- Chapter 6 – Maintain the Printer
- Replace the Platen Roller
- How to Adjust the Printer
- Prevent Ribbon Wrinkling
- Adjust the Printhead Balance
- Adjust the Printhead Pressure
- Calibrate the Label Taken Sensor
- Adjust the Label Gap and Black Mark Sensor
- A
- Specifications
- Printer Specifications
- Power Specifications
- Temperature and Humidity Specifications
- Memory
- Touch Screen Specifications
- Supported Command Languages
- Media Sensors
- Network Services
- Resident Fonts
- Downloadable Fonts
- Supported Font Types
- Supported Graphic File Types
- Windows Drivers
- Interface Specifications
- RS-232 Serial Interface
- USB Device Interface
- USB Host Interface
- Ethernet Interface
- B
- Default Settings
- Default Configuration
- Serial Port Settings
- Ethernet Settings
- Wireless 802.11 General Settings
- Wireless 802.11 Network Settings
- Wireless 802.11 Security Settings
- Bluetooth Settings
- Media Settings
- Media Settings (continued)
- Setting Description Default
- Print Quality Settings
- General System Settings
- Display and Audio Settings
- System I/O Settings
- System Network Services
- System Maintenance Alert Settings
- C
- Print Labels with INPrint
- About the INPrint Page
- Print INPrint Labels
- Predefined INPrint Label Formats
- Predefined INPrint Label Formats and Sample Illustrations
- Format Name Sample
- Predefined INPrint Label Formats and Sample Illustrations (continued)
- Linux Copyright Information
- Honeywell
Brand : HONEYWELL
Model : PM43
Category : Label printer