
WHP141B - Earphones RCA - Free user manual and instructions
Find the device manual for free WHP141B RCA in PDF.


| Product Type | Wired Earphones |
| Model | WHP141B |
| Brand | RCA |
| Driver Size | 9 mm |
| Frequency Response | 20 Hz - 20 kHz |
| Impedance | 32 Ohm |
| Sensitivity | 105 dB |
| Connector | 3.5 mm stereo jack |
| Cable Length | 1.2 meters |
| Weight | 15 grams |
| Dimensions (earpiece) | 1.5 x 1.5 x 2.0 cm |
| Color | Black / White |
| Microphone | Built-in inline microphone with call control |
| Compatibility | Devices with 3.5 mm headphone jack (smartphones, tablets, computers) |
| Accessories Included | Ear tips (S/M/L), user manual |
| Cleaning Instructions | Wipe with a soft, dry cloth; do not use liquids |
| Safety Warning | Listen at moderate volume to prevent hearing damage |
| Spare Parts Availability | Ear tips only – contact RCA customer service |
Frequently Asked Questions - WHP141B RCA
User questions about WHP141B RCA
0 question about this device. Answer the ones you know or ask your own.
Ask a new question about this device
Download the instructions for your Earphones in PDF format for free! Find your manual WHP141B - RCA and take your electronic device back in hand. On this page are published all the documents necessary for the use of your device. WHP141B by RCA.
USER MANUAL WHP141B RCA
Wireless Headphones With 900 MHz Transmitter
Transmits stereo signal even outside your home!
Follow these precautions to ensure safe usage of your wireless headphones.
-
These wireless headphones have been designed for and should not be used for industrial purposes. The headphones should be installed and used in accordance with the instructions contained in this manual.
-
Read through these instructions completely before Follow the instructions carefully and carry them out in the correct order. Keep the manual on hand for future reference.
-
The power for this headphone system is delivered. Before charging, read the instructions in this manual. Disconnect the power supply from the cradle/transmitter before installing or removing batteries.
-
Always leave easy access to the main power suppl
-
Disconnect the unit from the main power supply d if you will be absent for a long period of time.
-
If you observe smoke or detect a burning odor, im disconnect the device from the main power supply.
-
Never open the unit yourself; you may receive a shock, leading to serious injury or even death. Take the unit to a qualified service center when service is required.
-
Never push objects of any kind into the openings transmitter. They may touch dangerous voltage points and could cause a fire, serious electric shock or even death.
-
Protect the unit from dust, humidity and sources (e.g., fi replace or radiator).
-
The power source should not be in contact with liquids or exposed to the risk of dripping or splashing liquid. Be careful not to place the power source or cradle/transmitter near any object containing liquid (e.g., a vase, glass or bottle).
-
Do not expose the unit to direct sunlight. Its maximum ambient temperature is 35^ Celsius ( 95^ Fahrenheit).
-
The ventilation should not be impeded by covering the unit with any items, such as newspapers, tablecloths, curtains, etc.
-
No flame sources, such as lighted candles, should be placed on or close to the cradle/transmitter.
-
This unit has been designed for use in a dry environment. If, for exceptional reasons, you must utilize the unit out of doors (balcony, veranda, etc.), take care to protect it from dampness (dew, rain or splashes of liquid).
-
The maximum ambient humidity that the device supports is 85 percent. If the unit is cold and you wish to use it in a warm room, wait until any condensation on the unit evaporates by itself before you turn it on.
HEADSET SAFETY (continued)
-
Clean the unit with a soft cloth soaked in a neutral detergent. You may damage the unit if you use an alcohol-based product. If you are unsure if the detergent is alcohol-based, test the cleaning product on the underside of the unit.
-
Unplug this product and take it to a qualified service center under the following conditions:
a. If liquid has been spilled into the product.
b. If the product has been exposed to rain or water.
with, In the product does not operate normally when following the operating instructions.
Audiovox declines all liability for any use that does not comply with the instructions in this User's Manual.
uring storms, or. This device complies with Part 15 of the FCC Rules. Operation of this device is subject to the following two conditions: (1) This device may not cause harmful interference, and (2) this device must accept any interference received, including interference that may cause undesired operation electric
WARNING
Modification of this device to receive cellular radio-telephone service signals is prohibited under FCC rules and federal law.
Changes or modifications to this unit not expressly approved by the party responsible for compliance could void the user's warranty.
Keep your sales receipt to obtain warranty parts and service and for proof of purchase. Attach it here and record the serial and model numbers. These numbers are located on the product.
Model No. ____
Serial No. ____
Purchase Date: ____
Dealer/Address/Phone: ____
TABLE OF CONTENTS
Introduction 5
Features 5
Headphone Set Description 6
Supplied Accessories 7
Battery Installation and Information
Installing the Rechargeable Batteries 7
Charging the Rechargeable Batteries 7
NiMH Rechargeable Battery Memory Effect 8
NiMH Natural Power Discharge ....8
NiMH Battery Warning 8
Connecting the Cradle/Transmitter 9
Operation
Standard Usage 10
Maximum Performance 11
Troubleshooting....11
Specifications....12
Warranty 13
INTRODUCTION
Congratulations on your purchase of this wireless headphone system. The WHP141 utilizes wireless, radio frequency transmission. The headphones and the cradle/transmitter incorporate Double Phase Lock Loop (PLI.) Technology, which locks in the frequency on three channels for clear and stable radio transmission reception. This 900 MHz stereo wireless headphone system features a compact design that enables you to enjoy music and TV sound just about anywhere inside or outside your home. It's simple to connect this system to any sound source, such as a DVD, DBS, CD, TV, VCR, stereo receiver or radio.
FEATURES
900 MHz RF technology lets you roam freely throughout your house. Operating distance up to 150ft/45m*
No line-of-sight limitations
Convenient power, volume and tuning controls located on headphones Automatic Level Control (ALC) and Auto On/Off function
* Range may vary by environment.
HEADPHONE SET DESCRIPTION
For stand-alone functioning, it is recommended that your wireless headphones be powered by rechargeable batteries. The rechargeable batteries should be installed into the battery compartment and recharged before use. (See Battery Installation and Information, page 7).
1 Rechargeab compartment
2 ON/OFF switch
3 Re ch arg in
4 Power LED indicator light


5 Stereo LED ind
6 VOLUME control
7 CHANNEL switch
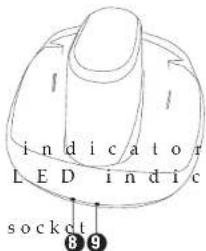
8 Charging LED
9 Audio Signal
10 Charging cable
11 DC IN power supply sock
12 CHANNEL switch
13 Audio input cable

SUPPLIED ACCESSORIES
This headphone system includes accessories that enable you to use your wireless headphone set in a number of ways. (See section on Operation and Standard Usage, page 9)

Main power adapter
[AC/DC: 120 V \~ 60 Hz, 12 V = 150 mA]
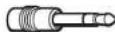
3.5mm/.25 inch jack adaptor

BATTERY INSTALLATION AND INFORMATION
Your wireless headphone unit requires two rechargeable AAA batteries.
Rechargeable batteries are uncharged when you purchase them. Before you can use the wireless headphones, the batteries must be charged for 16 hours. Follow these steps to install and charge the batteries.
Installing the Rechargeable Batteries
Take care to follow these steps to correctly install the batteries.
- On the right headphone, locate the battery compartment (1). Use
c the finger depression on the compartment to turn the battery compartment cover counterclockwise to remove the cover. - Insert two AAA rechargeable batteries, carefully following the markings inside to ensure the batteries are inserted properly, with the + and - ends in the correct positions.
- Replace the battery compartment cover.
Charging the Rechargeable Batteries
To recharge the headset unit, follow the directions below. Note: The cradle/transmitter on the WHP141 is not a recharging cradle, although you may place the headset in the cradle during recharging. Follow these steps to recharge the NiMH rechargeable batteries.
- gMake sure the ON/OFF switch (2), located on the right headphone, is in the OFF position.
- Connect the AC/DC main power adapter to the DC IN power supply socket (11), located on the back of the cradle/transmitter.
- Plug the adapter into an electrical outlet.
- Connect the charging cable (10), located on the back of the cradle/ transmitter to the recharging input (3), located on the right headphone. The headphones can either be placed in the cradle/ transmitter or placed next to the unit. If the headphones are connected correctly, the charging LED indicator light on the cradle/transmitter (8) illuminates.
BATTERY INSTALLATION AND INFORMATION (continued)
The LED indicator on the headphones are properly plugged in to charge. Note that the light does not go out when the batteries are fully charged. The charge current to the headphone is very low and there is no danger in leaving them connected for extended periods of time.
- Charge the rechargeable batteries for 16 hours before using the headphones for the first time. After the initial charge, an overnight charge of 6-8 hours should be enough to return the batteries to a full charge after use.
- New batteries should normally last approximately eight hours before recharging is necessary. Over time, battery replacement may be necessary for maximum life.
NiMH Rechargeable Battery Memory Effect
When an NiMH rechargeable battery is first used, it is important to fully charge it and then allow it to discharge three times in order to maximize the battery's storage capacity. Avoid recharging the battery until it is fully discharged. When a battery is recharged before it is completely discharged, it develops a memory that will limit the amount of charge in the future. This reduces the battery's storage capacity for subsequent charges and so reduces the amount of time your headphones can be used before recharging is necessary.
NiMH Natural Power Discharge
Due to their chemical design, all rechargeable batteries incur some degree of natural discharge. This means they automatically lose their charge in varying degrees, and the battery's capacity drops even when not in use. The size of this power loss varies, depending on the battery's type, size, design, internal resistance and, most especially, the temperature. The higher the temperature, the greater the power loss through natural discharge.
NiMH Battery Warning
If you are using NiMH or NiCd batteries, the batteries will charge when the headphones are powered with the AC power adapter. Do not power the headphones with the AC power adapter if you installed alkaline or other nonrechargeable batteries—this could cause the batteries to leak. Do not mix batteries with different chemistry types (for example, a zinc battery with an alkaline battery). Do not mix new and used batteries. Do not leave batteries installed in the product when not in use for long periods. Respect the environment and the law. Before disposing of rechargeable batteries, ask your distributor if they can be recycled and whether or not the distributor collects rechargeable batteries for recycling.
CONNECTING THE CRADLE/TRANSMITTER
t h e Follow this quick setup guide to ensure trouble-free installation of your headphones. To connect the cradle/transmitter to the audio source, follow these steps.
- Connect the AC/DC main power adapter to the DC IN power supply socket (11) at the back of the cradle/transmitter.
Then, connect the adaptor to an electrical outlet. Important: This power unit is intended
to be correctly oriented in a vertical or floor mount position.
- Insert the audio input cable (13), located on the back of the cradle/ transmitter into the headphone jack of your audio source (e.g., stereo, TV, CD player, DVD, etc.).
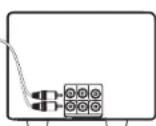
Plugging the transmitt cause the TV speakers to mute. This is normal. The TV simply thinks the user would like private listening and turns the speakers off. If you would like to listen to the WHP141 headphones and have the TV speakers on, you must use the stereo audio outputs of the TV, usually located on the back or side panels. To use any RCA stereo (red/white RCA jack) output from any device such as TV, cable box or AV receiver will require the purchase of a 3.5mm female to RCA stereo Y adapter (not included with the WHP141 model). To use the adapter, simply plug the 3.5 mm jack from the transmitter into the adapter jack, and plug the RCA ends into the audio output of your source. Some TV models may require that you switch the audio outputs to on, usually through the menu system. Please consult your TV owner's manual for specific instructions. Note that this headphone model is compatible with analog stereo outputs only. It is not compatible with digital outputs such as optical or coaxial SPDIF.
- The audio signal LED indicator light (9), located on the front of the cradle/transmitter, illuminates as soon as you have connected the power adapter to the outlet and the audio cable to an active signal source.
English
OPERATION
Standard Usage
- Switch on the audio source (TV, DVD, CD player, etc.) to which the cradle/transmitter is connected. If your audio source is a DVD or CD player, start a disc.
Warning: The cradle/transmitter has an automatic function that switches it off if it does not receive an audio signal for approximately 4 minutes. If the volume on the audio source is too low, the cradle/ transmitter also switches off after four minutes. This feature was installed to comply with current legislation that reduces the amount of radio emissions in the environment. To ensure that this function is not accidentally triggered, set the audio source volume at approximately 50 percent capacity. Consult your component user's manual for details on how to set the volume for headphones. - The cradle/transmitter is now ready to receive an audio signal. The cradle/transmitter is activated automatically when receiving an audio signal from the audio source.
- Check to make sure the audio signal LED indicator light (9) on the front of the cradle/transmitter is lit, indicating that the unit is ready.
- Place the headphone ON/OFF switch (2), located on the right headphone, to the ON position.
- Check to make sure the stereo LED indicator light (5) on the left headphone is lit, indicating a strong signal.
- The cradle / transmitter and the headphones feature double phase lock loops (PLL) for radio frequency transmissions. Select one of the three channels on the back of the cradle / transmitter (12) and the corresponding channel on the left headphone (7). Be sure that the same channel (1, 2 or 3) is selected on both the cradle / transmitter and the headphones. The Phase Lock Loop (PLL) function automatically locks the chosen channel, providing top-quality audio reception with no sound loss.
- Before wearing headphones adjust the volume using the VOLUME control (6), located on the left headphone, to a comfortable volume level.
- When you are through using the headphones, switch them off using the ON/OFF switch (2), and place the audio source on standby.
OPERATION (continued)
Maximum Performance
When the audio source offers a variable volume output, maximum performance can be achieved. Variable volume outputs include headphone jacks, computer speakers and some TV RCA output jacks.
Variable Volume Output. When using an audio source with a variable output jack, you can reduce any distortion and achieve maximum performance by following these steps:
- Set the volume of the audio source component to mid-level.
- Adjust the headphone VOLUME control (6) until the desired result is achieved.
- If the headphone volume is not sufficient, adjust the source volume.
- If distortion occurs, reduce the volume on the source component.
Fixed Volume Output. When using an audio source with a fixed volume output, regulating the volume can be achieved through the headphone VOLUME control (6) only. Examples of fixed volume outputs are RCA jacks (VCR, Tape, Video or CD outputs).
TROUBLESHOOTING
Refer to this troubleshooting section if you encounter any difficulties in setting up and using your headphones.
PROBLEM SOLUTION
No sound heard • Check that your audio source, cradle/transmitter and through the headphones are connected, supplied properly and headphones turned on.
• C
installed in the headset correctly and have been recharged properly.
• and the audio signal LED indicator light (9) on the unit is lit.
- Check that the audio source is delivering a sufficient signal to the cradle / transmitter through the audio input cable (13). Use the VOLUME control (6) to increase the sound level.
- Check to ensure the audio outputs of your TV are "live" when you are connecting to the stereo audio outputs (RCA jack). You may need to go into the TV menu system to ensure these outputs are turned on. Refer to your TV user manual for more details.
• to the same channel. C
TROUBLESHOOTING (continued)
PROBLEM SOLUTION
Poor sound quality or interference - Check to ensure that the sound provided by the audio source is loud enough and of sufficient quality. Make sure the stereo LED indicator light (5) is lit.
• power. Recharge or replace them, if necessary.
• channel (1, 2, or 3) to provide the optimum signal reception. If necessary, try another channel on both the headphones (7) and the cradle/transmitter (12).
the cradle/transmitter is within the operating range. (The effective range of this device is approximately 150ft/45m.*) Move closer to the cradle/transmitter to receive the sound.
C h
Power cut off - The cradle / transmitter has an automatic power off function. When no signal is received through the cradle / transmitter's audio input cable, it switches off. Switch on your audio source again, and use the CHANNEL switches (7 & 12) to adjust reception. If necessary, increase the audio source's volume.
SPECIFICATIONS
| Model | W1IP141 |
| Description | Radio FrequencyWireless Headphone System |
| Transmitter | |
| Carrier Frequency | 900 MHz |
| Effective Range | Up to 150ft/45m – Range may vary by environment. |
| Power Supply | 12V 150 mA |
| Transmission Frequency | UHF – 900 MHz/three channels:912 MHz (1), 912.5 MHz (2), and 913 MHz (3) |
| Headset Power Supply | Two AAA type 1.2V NiMI1 rechargeable batteries included |
12 MONTH LIMITED WARRANTY
Audiorox Electronics Corporation (the "Company") warrants to the original retail purchaser of this product that should this product or any part thereof, under normal use and conditions, be proven defective in material or workmanship within 12 months from the date of original purchase, such defect(s) will be repaired or replaced (at the Company's option) without charge for parts and repair labor. To obtain repair or replacement within the terms of this Warranty, the product along with any accessories included in the original packaging is to be delivered with proof of warranty coverage (e.g., dated bill of sale), specification of defect(s), transportation prepaid, to the Company at the address shown below. Do not return this product to the Retailer.
This Warranty is not transferable and does not cover product purchased, service or used outside the United States or Canada. The warranty does not extend to the elimination of externally generated static or noise, to costs incurred for the installation, removal or reinstallation of the product. The warranty does not apply to any product or part thereof which, in the opinion of the company, has suffered or been damaged through alteration, improper installation, mishandling, misuse, neglect, accident or cExposure to moisture. This warranty does not apply to damage caused by an AC adapter not provided with the product, or by leaving non-rechargeable batteries in the product while plugged into an AC outlet. THE EXTENT OF THE COMPANY'S LIABILITY UNDER THIS WARRANTY IS LIMITED TO THE REPAIR OR REPLACEMENT PROVIDED ABOVE AND, IN NO EVENT, SHALL THE COMPANY'S LIABILITY EXCEED THE PURCHASE PRICE PAID BY PURCHASER FOR THE PRODUCT. This Warranty is in lieu of all other express warranties or liabilities. ANY IMPLIED WARRANTIES, INCLUDING ANY IMPLIED WARRANTY OF MERCHANTABILITY OR FITNESS FOR A PARTICULAR PURPOSE, SHALL BE LIMITED TO DURATION OF THIS WARRANTY. ANY ACTION FOR BREAK OF ANY WARRANTY HEREUNDER, INCLUDING ANY IMPLIED WARRANTY, MUST BE BROUGHT WITHIN A PRIOR OF 24 MONTHS FROM THE DATE OF ORIGINAL PURCHASE. IN NO CASE SHALL THE COMPANY BE LIABLE FOR ANY CONSEQUENTIAL OR INCIDENTAL DAMAGES WHATSOEVER. No person or representative is authorized to assume for the Company any liability other than expressed herein in connection with the sale of this product. Some states/provinces do not allow limitations on how long an implied warranty lasts or the exclusion or limitation of incidental or consequential damage so the above limitations or exclusions may not apply to you. This Warranty gives you specific legal rights and you may also have other rights which vary from state/province to state/province. U.S.A.: Audiovox Electronics Corporation, 150 Marcus Blvd., Hauppauge, New York 11788 CANADA: Audiovox Return Center, c/o Genco, 6685 Kennedy Road, Unit 3, Door 16, Mississauga, Ontario LST 3A5
©2011 Audiovox Corporation
Accessories Group
111 Congressional Blvd., Suite 350
Carmel, IN 46032 USA
WHP141 NA IB 03
Audiovox Canada Limited
c/o Genco,
6685 Kennedy Road, Unit 3, Door 16,
Mississauga, Ontario, Canada L5T 3A5
Trademark(s) Registered
Made in China
- Wireless Headphones With 900 MHz Transmitter
- HEADSET SAFETY (continued)
- WARNING
- TABLE OF CONTENTS
- INTRODUCTION
- FEATURES
- HEADPHONE SET DESCRIPTION
- SUPPLIED ACCESSORIES
- BATTERY INSTALLATION AND INFORMATION
- BATTERY INSTALLATION AND INFORMATION (continued)
- NiMH Rechargeable Battery Memory Effect
- NiMH Natural Power Discharge
- NiMH Battery Warning
- CONNECTING THE CRADLE/TRANSMITTER
- OPERATION
- Standard Usage
- OPERATION (continued)
- Maximum Performance
- TROUBLESHOOTING
- PROBLEM SOLUTION
- TROUBLESHOOTING (continued)
- MONTH LIMITED WARRANTY
Brand : RCA
Model : WHP141B
Category : Earphones