
TA-8030 - Security System Safescan - Free user manual and instructions
Find the device manual for free TA-8030 Safescan in PDF.


| Product Type | Security System |
| Brand | Safescan |
| Model | TA-8030 |
| Dimensions | 200 x 150 x 50 mm |
| Weight | 500 g |
| Power Supply | 12V DC adapter (included) |
| Main Functions | Motion detection, alarm siren, remote control, LED indicators |
| Detection Range | Up to 10 meters |
| Alarm Volume | 110 dB |
| Backup Battery | 9V battery (optional) |
| Maintenance | Clean with dry cloth; avoid moisture |
| Safety Features | Tamper-proof design, low battery indicator |
| Spare Parts | Remote control, sensor units, brackets |
| Repairability | Replaceable battery, modular sensor components |
| General Information | Indoor use only; operating temperature 0°C to 40°C |
Frequently Asked Questions - TA-8030 Safescan
User questions about TA-8030 Safescan
0 question about this device. Answer the ones you know or ask your own.
Ask a new question about this device
Download the instructions for your Security System in PDF format for free! Find your manual TA-8030 - Safescan and take your electronic device back in hand. On this page are published all the documents necessary for the use of your device. TA-8030 by Safescan.
USER MANUAL TA-8030 Safescan
INTRODUCTION AND DIRECTIONS FOR USE
1. BASIC INSTALLATION AND OPERATION
1.1 Package contents 3
1.2 Wallmount installation 4
1.3 Terminal - description of the keys 5
1.4 Fingerprint placement 6
1.5 Installing the terminal in your network 6
1.6 LAN connection 7
1.7 WiFi connection 8
1.8 DHCP: pros and cons 8
1.9 Setting up an administrator user (super admin) 8
1.10 Registering a fingerprint 9
1.11 Registering an RFID card or key fob 9
1.12 Setting a password 10
1.13 Date and time settings 10
1.14 Enrolling users (normal user) 11
1.15 Clocking in / clocking out 12
1.16 Retrieving user and clocking data using a USB stick 12
1.17 Uploading user data to the terminal 13
1.18 Checking clocking data on the terminal 13
3. DESCRIPTION OF ALL FUNCTIONS AND MENU ITEMS
3.1 User management 29
3.2 User Role 29
3.3 Communication 29
3.4 System 30
3.5 Personalize 31
3.6 Data management 31
3.7 Access Control 32
3.8 USB Manager 32
3.9 Attendance search 32
3.10 Short Message 32
3.11 Work Code 33
3.12 Autotest 33
3.13 System Info 33
3.14 Use of biometric data 33
APPENDIX
Door access control schematics 34
2. ADVANCED USAGE SCENARIOS
2.1 User Management 14
2.2 Edit users 14
2.3 Delete users 15
2.4 Expiration Rule 15
2.5 Expiration Rule options 15
2.6 Using work codes 16
2.7 Daylight saving time 18
2.8 Custom user roles 21
2.9 Short Message Service 22
2.10 Customise the function keys 23
2.11 Punch State values 23
2.12 Menu shortcuts 24
2.13 Access control 25
2.14 Holidays 27
2.15 Link between users, access groups time schedules and verification modes 27
2.16 Duress Options 28
INTRODUCTION AND DIRECTIONS FOR USE
Thank you for purchasing the Safescan TA-8000 series Time Attendance terminal; a complete solution for efficient time registration. Before starting to install and use the TA terminal, we recommend that you carefully read this user manual and keep it at hand for future reference. The user manual describes the basic set-up of the device, the advanced settings and usage scenarios as well as details of each menu item of the device. Please also refer to the Quick Install Guide which is included in the retail box of your TA terminal.
1. BASIC INSTALLATION AND OPERATION
1.1 PACKAGE CONTENTS

THE RETAIL BOX CONTAINS THE FOLLOWING ITEMS:
- Safescan TA-8000 series terminal
- Mounting bracket
- Screws and plugs
- Access Control connector plugs (TA-8015 / TA-8025 / TA-8035)
- Screw driver
- 5x RFID cards (TA-8010 / TA-8015 / TA-8030 / TA-8035)
- Ethernet (LAN) cable
- Power adapter (12V)
- Quick Install Guide
1.2 WALLMOUNT INSTALLATION
- Connect the power adapter and Ethernet (LAN) cable* to the terminal. Do not connect the power adapter yet to the mains.
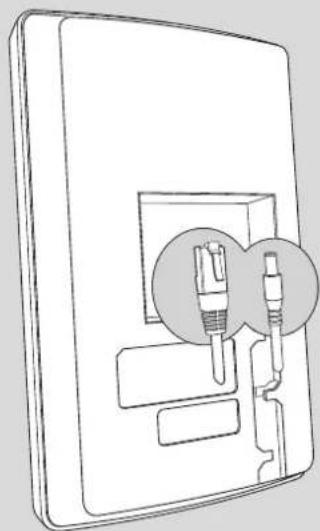
natural_image
Line drawing of a wall-mounted electrical socket with two connectors inserted (no text or symbols)- Drill 4 holes ( 6mm) in the wall on the exact position where you want to install the TA terminal. Use the mounting bracket as a template to determine the exact position of the holes.

natural_image
Mechanical bracket component with mounting holes and threaded fasteners (no text or symbols)- Slide the terminal on the bracket until it fixes itself to the bracket.

natural_image
Line drawing of a payment terminal with a digital display and a mechanical bracket, showing a downward arrow (no text or symbols)- Secure the terminal by fixing the screw at the bottom.
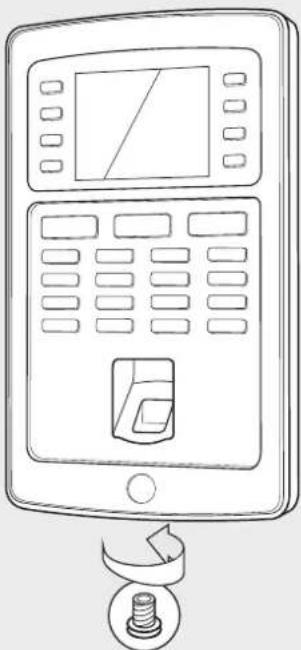
natural_image
Line drawing of a digital payment terminal with a rotary knob and scroll (no text or symbols)- Plug the power adapter to the mains outlet, the terminal will switch on automatically.

natural_image
Line drawing of a mobile payment terminal connected to a charging plug (no text or symbols)*Depending on the model you can also choose to connect the terminal wirelessly to your network via WiFi. Alternatively, all models can also operate as stand-alone devices, whereby clocking data can be retrieved using a USB stick.
Please note: the Mini-USB connector located at the back of the device, next to the Ethernet connector, is not meant for communication between terminal and software (for manufacturer setup operations only).
1.3 TERMINAL - DESCRIPTION OF THE KEYS
- Programmable function keys
- Programmable function keys
- Confirmation key
- Clocking-in state
- Clocking-out activation state
-
Keys for entering alphanumeric values
-
Left/Right navigation / Power
- Back to previous menu step
- Up/Down navigation
- Enter device menu
- USB port
- Reset button

LANGUAGE SETTINGS
The default language of the terminal is English. To change the terminal language:

- Press MENU, use the arrow keys to Navigate to Personalize and press OK.

- Select User Interface and press OK

- Select Language and press OK Navigate to the desired language and press OK
Menu navigation on the device:
Navigation between the menu items of the device is done using the arrow keys (left, right, up, and down). You can validate your choices by pressing OK, or cancel your action by pressing ESC.
Alphanumeric keyboard:
The different modes of the alphanumeric keyboard can be accessed through the IN button :
[Aa] - first letter is Upper case, the rest of the text is lower case
[a] - lower case letters
[A] - upper case letters
[123] - numbers
[symbol] - symbols
The OUT button inserts a space
The left → deletes the text
The key with the symbol → is referred to as the IN key.
The key with symbol is referred to as the OUT key.
1.4 FINGERPRINT PLACEMENT
Recommended fingers: the index finger, middle finger and the ring finger usually give the best results for registering a fingerprint template.
Proper finger placement:

natural_image
Illustration of a finger pressing a green button with a checkmark (no text or symbols)Improper finger placement:


1.5 INSTALLING THE TERMINAL IN YOUR NETWORK
Network connection
Your terminal can be connected to your network, using either Ethernet (Wired LAN) or WiFi (Wireless LAN), depending on the model. First of all, your terminal needs to get an IP address from your network router. To find a free IP address on your network you can use the DHCP protocol, whereby your terminal is automatically assigned an IP address. If you do not wish to use DHCP, you can also manually assign a fixed IP address to your device. First you need to check the IP address of your computer (make sure it is connected to the same network as the terminal!), as the terminal needs to connect to the same IP address range.
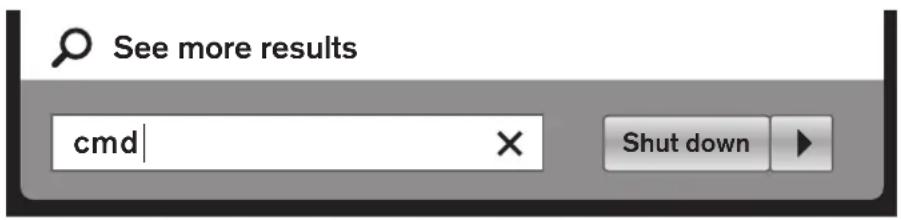
- Press the Windows key on your computer keyboard and type 'CMD' in the search bar. Press Enter.
C:\Windows\system32\cmd.exe
C:\Users\John\ipconfig
C:\Users\John>ipconfig
Windows IP Configuration
Ethernet adapter Local Area Connection:
Connection-specific DNS suffix : networkname.local
Link-local IPv6 Address : fe80::852c:5404:4468:64c6%11
IPv4 Address : 10.0.2.15
Subnet Mask : 255.255.255.0
Default Gateway : 10.0.2.2

C:\Users\John\ping 10.0.2.22
-
A small window will appear on your screen. In this window, type 'ipconfig'.
-
The IP address of your computer will be displayed.
-
To search for a free IP address which you can use for the terminal, type 'ping', followed by your IP address, change the two last digits, and press Enter.
If you see a message such as 'Reply from 10.0.2.22 bytes = 32 time < 1ms TTL = 64', it means that the IP address you selected is not available. Try again with another IP address. If the IP address you selected is available you will see the message 'Destination host unreachable'.
Note down this address since this will have to be entered into the terminal.
1.6 LAN CONNECTION

1.32 Press MNEWigate to COMM using the arrow keys and press OK

Select Ethernet. Press . highlight IP address and press .
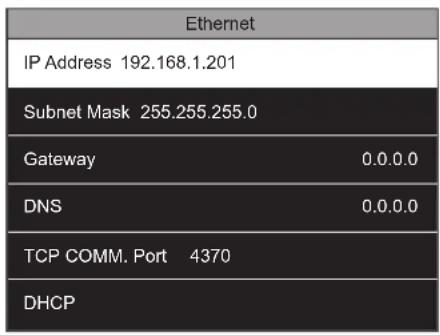


- Enter the free IP address you have found (see 1.5 step 4).
It is not necessary to change the other settings. Press ESC several time to go back to the main screen. Your device is now connected to the network using the Ethernet (LAN) connection.
1.7 WIFI CONNECTION
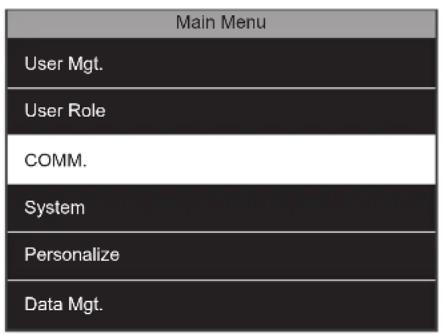
- 3 Press MENU, navigate to COMM using the arrow keys. Press .OK
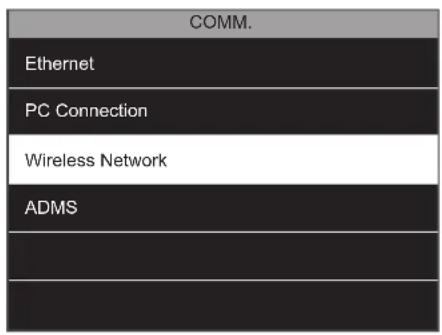
- Select 'Wireless Network'. Press OK

Make sure that the WiFi checkbox is checked. A list of all available networks will be shown. Select the network you want to connect to.
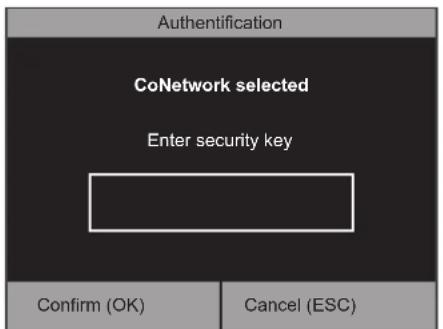
- The terminal will prompt you for the network password. Enter the password using the keypad of the terminal and press OK

- Wait for the connection to be established. The terminal is now connected to the network using the WiFi connection.
1.8 DHCP: PROS AND CONS
Using DHCP will enable you to connect your terminal to the network without having to find a free IP address, thereby simplifying the connection process. The DHCP server will automatically assign a free IP address to the terminal. However, if - for whichever reason - your DHCP server has to be restarted, your terminal might be assigned another IP address, which in turn could cause connection issues. In this situation, you need to manually change the terminal IP address in the Safescan TA-software on your computer.
1.9 SETTING UP AN ADMINISTRATOR USER (SUPER ADMIN)
Why set up an administrator?
Even though it is not mandatory, it is strongly advised to set up an administrator on the terminal. This will prevent employees accessing the menu of the machine and performing unwanted operations. After the administrator user has been registered, access to the menu of the terminal is locked for anyone else.
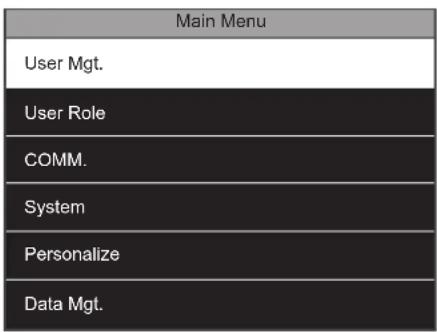
-
- The device will gate to the first Payerable using the arrow keys, press .OK

Select 'New User'. Press .OK
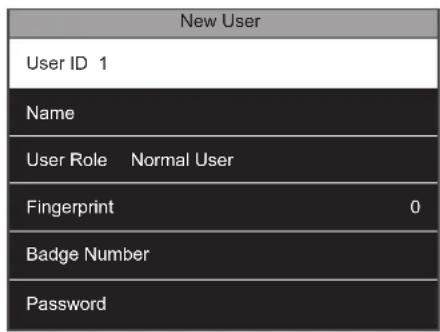
3.
It is not necessary to change this ID. Press the down arrow key to highlight name, and press OK
![Name Please Input IN key to switch input method, OUT key to enter space [Aa]](/content/2026/06/1267121/images/d5e46fb1147b241383f765a65075ebe3abda056f836e258223fe3b60515d0e03.jpg)
- Enter the user name with the alphanumeric keyboard). When you have finished, press OK twice. You can also leave this field empty and edit the user name at a later moment with the Safescan TA PC-software.

- Select User Role and press OK

- Navigate to Super Admin and press .ok
Select the verification mode you want to use. We strongly advise, at least for the Super admin, to enable login with different verification modes. For example you can register a fingerprint and a password, or an RFID card and a password. In case one identification means is not available (anymore), there is always another solution to access the menu.
We recommend to note down the administrator password and store it in a safe place. If you do not have the ability to log into the terminal as administrator, the only option is to do a full reset of the terminal resulting in all data and user settings being lost.
1.10 REGISTERING A FINGERPRINT

- Select 'Fingerprint' and press OK

- Select the finger you want to register, using the arrow keys or the numeric keys, then press OK. The system will take your fingerprint 3 times in order to generate a reliable template. When the enrol has been successful, the system returns to the 'New User' registration page.
1.11 REGISTERING AN RFID CARD OR KEY FOB
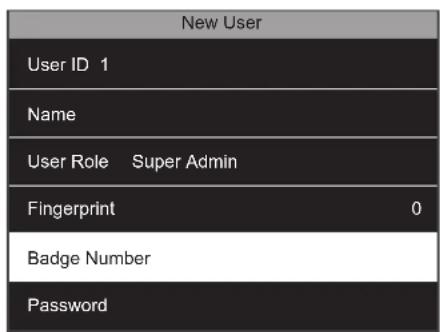
- Select 'Badge Number' and press OK.

- Hold the RFID card/key fob in front of the terminal. You will hear a beep notifying you that the RFID number has been registered, the terminal returns to the New User screen.
1.12 SETTING A PASSWORD
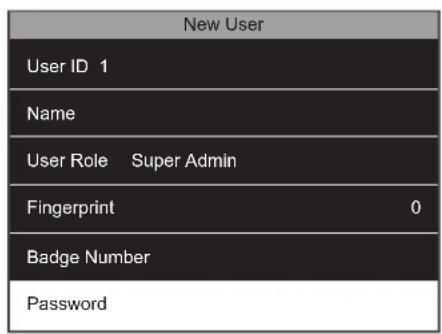
- 2Select 'Password' and press OK.
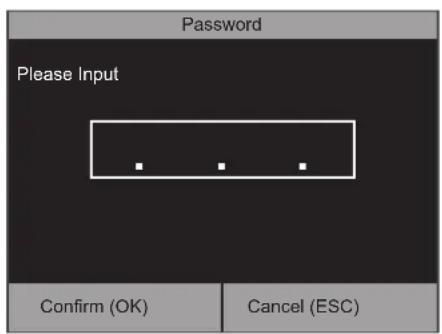
You can enter a password of maximum 8 numeric characters (no letters). Enter your password and press OK. The system will ask you to confirm this password.
Once finished with the registration, you can press ESC. Your Super Admin user has now automatically been saved.
User expiration rule: For more details regarding user expiration dates please see the advanced section of this manual, chapter 2.4.
1.13 DATE AND TIME SETTINGS

- 2 Navigate to 'System', and press OK.

Select 'Date Time' and press OK.
1.13.1 SET THE DATE

- 2Select 'Set Date' and press OK.

Navigate between days, months and years by using the left/right arrows. To set the values you can either increase or decrease the value with the up/down arrows, or enter the value directly with the numeric keyboard. Press OK when finished.
1.13.2 SET THE TIME
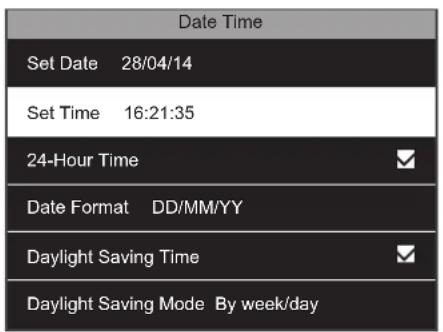
1.2Select 'Set Time' and press OK.

Navigate between hours, minutes and seconds by using the left/right arrows. To set the values you can either increase or decrease the value with the up/down arrows, or enter the value directly with the numeric keyboard. Press OK when finished.
1.13.3 TIME FORMAT

- You can select 24-hour time or 12-hour (AM/PM) time format. To select, check or uncheck the checkbox of the 24-Hour Time option.
FOR AN EXPLANATION ON HOW TO SET UP DAYLIGHT SAVING TIME PLEASE SEE CHAPTER 2.7 OF THIS MANUAL.
1.14 ENROLLING USERS (NORMAL USER)
The user enrolment process of a normal user is identical to the administrator enrollment, see chapter 1.9 to 1.11. The only difference is in the User Role.
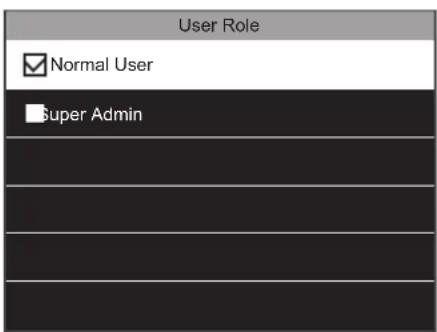
- For a regular user you need to select Normal User.

- In the New User setup screens you will now see "Normal User" in the User Role field.
The basic clocking scenario: the screen of the terminal always displays the clocking status of the system. IN (→) or OUT (→) is displayed at the top bar of the screen, the corresponding symbol is also highlighted at the bottom of the screen. The terminal has two default states: IN (→) and OUT (→). If an employee comes in, they just needs to verify that the terminal clocking status is set to IN (→), and identify themselves (fingerprint, RFID bagde or pin code), their clock-in time is thereby registered. If the employee has finished working, they need to verify that the terminal's clock status is set to OUT (→) and identify themselves - their clock-out time is thereby registered.
- Using fingerprint identification: Select → or →, and press the finger on the fingerprint reader on the terminal.
- Using RFID identification: Select → or → , and swipe the badge/ key fob in front of the RFID reader on the terminal.
- Using password identification: Select → or →, type in the user ID, press OK, type in the password, and press .OK
For more advanced scenarios (such as clocking with workcodes), please refer to the advanced section of this manual, chapter 2.10.

1.16 RETRIEVE USER AND CLOCKING DATA USING A USB STICK
If you do not have access to a network connection, or choose not to install the terminal in your network, you can use a USB stick (USB flash disk) to retrieve the user and clocking data from your terminal and transfer them to the TA-software. It is also possible to upload user data edited in or created with the TA-software into the terminal via a USB stick.
USB Stick requirements
The USB stick has to be formatted in FAT or FAT32. The firmware of your USB stick must support Linux kernel 2.4. This information should be mentioned on the packaging of the USB Stick.
User data:
| Main Menu |
| Access Control |
| USB Manager |
| Attendance Search |
| Short Message |
| Work Code |
| Autotest |
1.3 Assert a USB stick into the USB port at the left side of the terminal. Wait for a few seconds until the USB stick is initialized. Navigate to 'USB Manager', and press OK.
| USB Manager |
| Download |
| Upload |
| Download Options |
Select 'Download' and press .ok
| Download |
| Access Data |
| User Data |
| Work Code |
| Short Message |
Select 'User Data' and press OK The data will now be transferred to the USB stick.
Clocking data:
| Main Menu |
| Access Control |
| USB Manager |
| Attendance Search |
| Short Message |
| Work Code |
| Autotest |
1.3 Assert a USB stick into the USB port at the left side of the terminal. Wait for a few seconds until the USB stick is initialized. Navigate to 'USB Manager', and press OK.
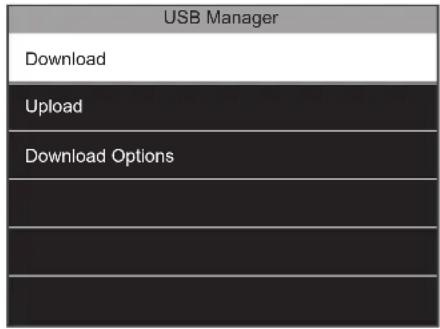
Select 'Download' and press .OK

Select 'Attendance Data' and press OK The data will now be transferred to the USB stick.
1.17 UPLOADING USER DATA TO THE TERMINAL
User data can be edited in the Safescan TA software. If you would like these changes to be reflected on the terminal, you need to upload the user data.
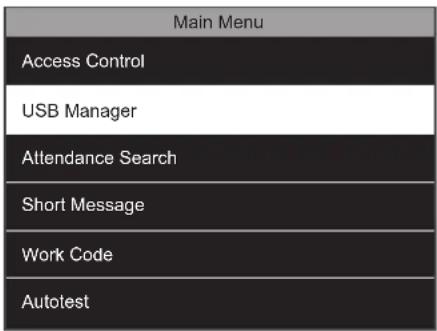
- Insert a USB stick into the USB port at the left side of the terminal. Wait for a few seconds until the USB stick is initialized. Navigate to 'USB Manager', and press OK

- Select 'Upload' and press OK

- Select 'User Data'
1.18 CHECKING CLOCKING DATA ON THE TERMINAL
It is possible to check the clocking data directly on the terminal. By default, a shortcut to this function has been implemented. From the clocking screen, press F6, and identify yourself. The terminal will display a list of your clocking data. A super administrator can see the clocking data of all employees.
| Main Menu |
| Access Control |
| USB Manager |
| Attendance Search |
| Short Message |
| Work Code |
| Autotest |
- Press MENU and navigate to 'Attendance Search'. Press OK

- Enter the ID of the user of whom you want to see the data and press OK. If you leave the box empty, you will see the clocking data of all the users (when identified as Super Admin only).
2. ADVANCED USAGE SCENARIOS
2.1 USER MANAGEMENT
User information can be easily managed directly on the terminal. You can amend any detail of a specific user, delete specific information or an entire user.
| Main Menu |
| User Mgt. |
| User Role |
| COMM. |
| System |
| Personalize |
| Data Mgt. |
- Enter the menu, select 'User Mgt.', press .OK
| User Mgt. |
| New User |
| All Users |
- Select 'All Users' and press OK.
| All Users | |
| 1 | John |
| 2 | Paul |
| 3 | Mary |
| 4 | George |
| 5 | Peter |
- The device will display a list of all users in the terminal's memory. To select a user, navigate with the Up and Down keys, or use the alphanumeric keys. When you have found the right user, press OK
| User: 1 John |
| Edit |
| Delete |
- Two options are available: Edit or Delete.
2.2 EDIT USERS
| User: 1 John |
| Edit |
| Delete |
- Select 'Edit' and press OK. It is now possible to edit all user data. When you are finished, press ESC. The changes will be saved.
2.3 DELETE USERS

- 2Select 'Delete' and press OK.

You will be given several options: Delete User: delete all user information. Delete User role (only available if user has privileges superior to normal user): reset privileges to normal user. Delete Fingerprint Only (only available if fingerprint templates are registered for the
user): delete all fingerprint templates of the user. Delete Password Only (only available if a password is registered for the user): delete user's password. Delete Badge Number Only (only available if a RFID badge is registered for the user): delete the RFID number linked to the user.
NOTE: DELETING A USER DOES NOT DELETE HER/HIS CLOCKING DATA.
2.4 EXPIRATION RULE
It is possible to pre-define the validity of a user in the terminal. This validity can be set to a certain date and/or a given number of clocking actions.

- By default the Expiration rule is not enabled in the system. In order to enable it, press MENU, select 'System' and press .OK

- Select 'Attendance' and press OK

- Select 'Expiration Rule', make sure that the Expiration Rule checkbox is checked and press .OK
2.5 EXPIRATION RULE OPTIONS
There are 3 different options when a user has reached their expiration date/ number of punches.

- Keep user, No audit future punch: The user is kept in memory, they will receive a message on the screen stating that their credentials are invalid. Keep user, and audit future punch: The user is kept in memory,
they will receive a message on the screen stating that their credentials are invalid, but the punches will be still stored in the device. Delete User: The user will be deleted when the expiration rule is matched.
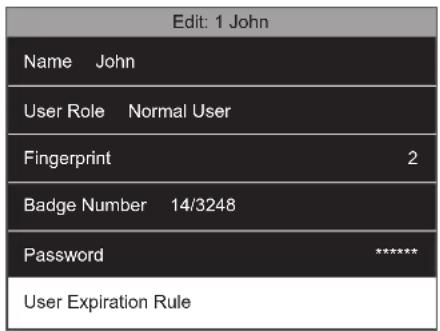
- Once the Expiration Rule has been activated, this option is available for selection in the user details screen. To set an expiration rule, navigate to the User details screen, select 'User Expiration Rule' and press OK
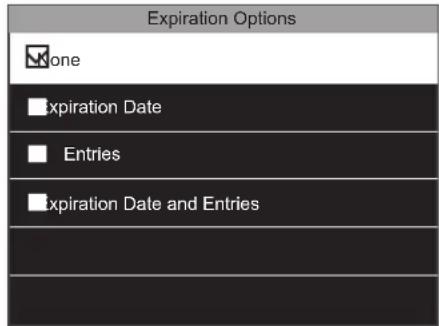
- Select 'Expiration Options' and press OK. The system will display the various expiration options: None: no expiration rule for this user. Expiration date: the user will become invalid at the selected date.
Entries: The user will expire after the selected number of punches.
Expired Date and Entries: The user will only be considered as valid during a certain period, and for a certain number of punches.
2.6 USING WORK CODES
You can adapt the terminal to the clocking needs of your business. If you want to track more than just the clocking in and clocking out time of your employees, you can have your employees clock in with work codes to track the amount of time spent on a specific project, event or task.
2.6.1 CREATE A NEW WORK CODE
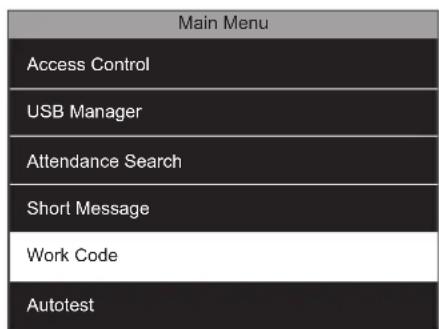
- Enter the menu, navigate to 'Work Code', press OK.

- Select 'New Work Code' and press OK

- The terminal will display the first Work code ID available. You can select a different ID number if you want. Then, select Name and press OK
![Name Please Input IN key to switch input method, OUT key to enter space [Aa]](/content/2026/06/1267121/images/e00eef2750695b0029afaec3eaa84176e3572cbda041e7a3a934ba3225471950.jpg)
- Enter the name of the work code you want to create, for example Customer visit, a project name, Vacation, Sick leave etc.
2.6.2 EDIT AN EXISTING WORK CODE

- Navigate to 'Work Code', press OK

- Select 'All Work Codes' and press OK.

- Navigate to the work code you want to edit and select it by pressing OK
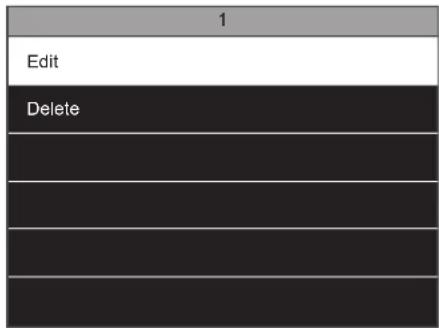
- Select 'Edit' and press OK.
NOTE: YOU CAN ONLY EDIT THE FUNCTION CODE NAME, NOT THE ID.
2.6.3 DELETE A WORK CODE
| Main Menu |
| USB Manager |
| Attendance Search |
| Short Message |
| Work Code |
| Autolest |
| System info |
- Navigate to 'Work Code', press OK.

- Select 'All Work Codes' and press OK.
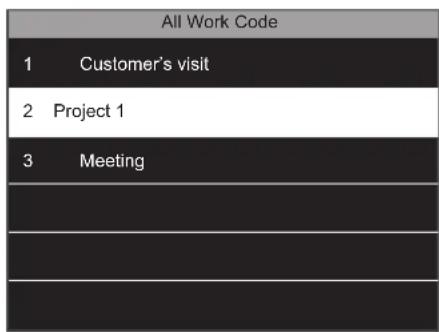
- Navigate to the work code you want to edit and select it by pressing OK
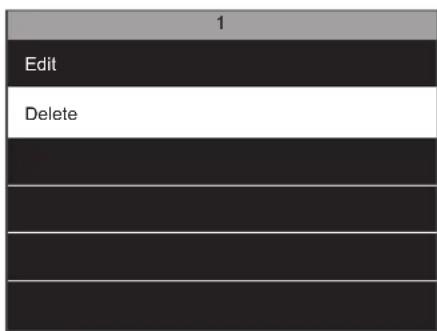
- Select 'Delete' and press OK. The terminal will ask you to confirm your selection.
Make sure that the terminal is set to the desired In/Out status. Press the Work Code button (the default button is F5). Select a work code from the list and press OK. After this the user needs to identify himself with fingerprint, RFID badge or pin code.
2.7 DAYLIGHT SAVING TIME
It is possible to have your terminal automatically change time for summer and winter time. There are two different ways to do this: by date/time, or by week/day. The Date/Time mode is the easiest to set-up: just enter the date and time when daylight saving time begins and ends. The downside of this method is that these dates vary from year to year, meaning they have to be manually set into the terminal every year. Even though the Week/Day mode may seem a bit more complicated to set up, the big advantage is that the daylight saving time does not need to be entered again every year.
NOTE: ONLY THE SUPER ADMIN USER CAN EDIT DAYLIGHT SAVING TIME SETTINGS.
2.7.1 DAYLIGHT SAVING TIME: DATE/TIME SETTING

- From the home screen, press NEPCI identify as a super administrator. Navigate to System, and press OK
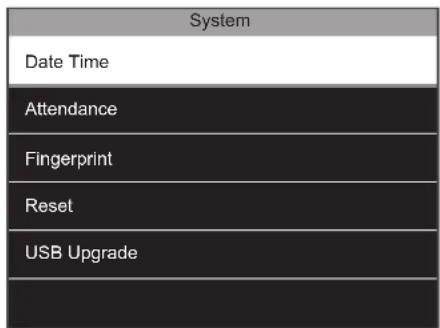
- Select 'Date Time' and press OK
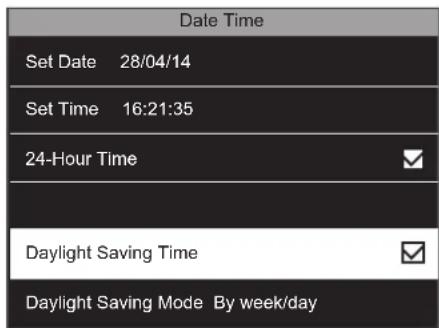
- Make sure that the 'Daylight Saving Time' option is checked. If not, navigate to Daylight Saving Time and press OK
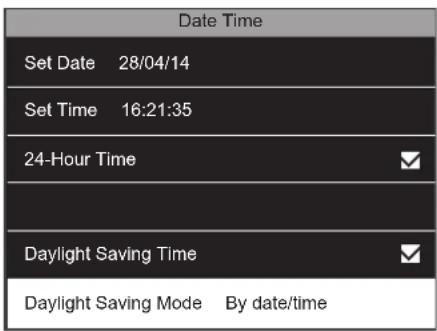
- Navigate to 'Daylight Saving Mode', and select 'By date/time'. Press OK.

- Select 'Daylight Saving Setup' and press OK.
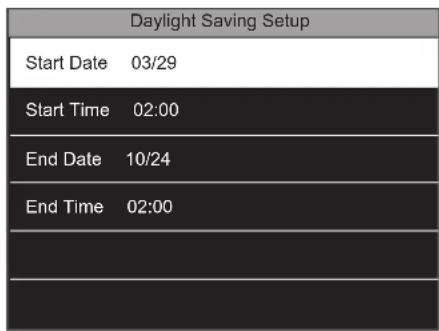
- Select 'Start Date', press OK

- Enter the date when the daylight saving time begins. Confirm by pressing OK.

- Select 'Start Time', press OK.

- Enter the start time. Confirm by pressing OK
| Daylight Saving Setup | |
| Start Date | 03/29 |
| Start Time | 02:00 |
| End Date | 10/24 |
| End Time | 02:00 |
- Select 'End Date', press OK.
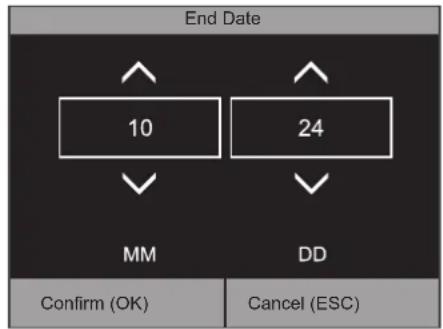
Enter the date when daylight saving time ends. Confirm by pressing OK
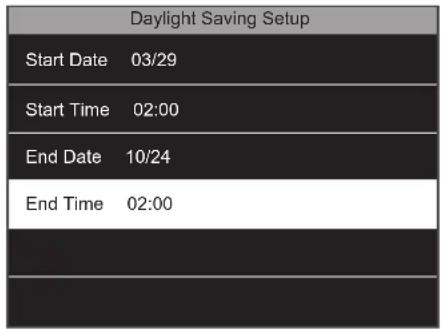
12.19 Select 'End Time', press OK
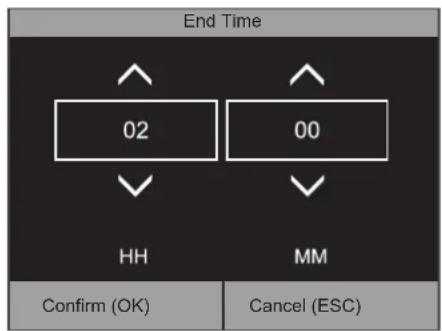
- Enter the end time. Confirm by pressing OK The terminal will now take the entered daylight saving dates and times into account.
2.7.2 DAYLIGHT SAVING TIME: WEEK/DAY SETTING
In some regions there is a fixed rule for when daylight saving time starts and ends. For example, in Europe, Daylight Saving Time always starts on the last Sunday of March at 02:00 AM and ends on the last Sunday of October at 02:00 AM (Central European Time).

- From the home screen, press MENU and identify as a super administrator. Navigate to System, and press OK

- Select 'Date Time' and press OK
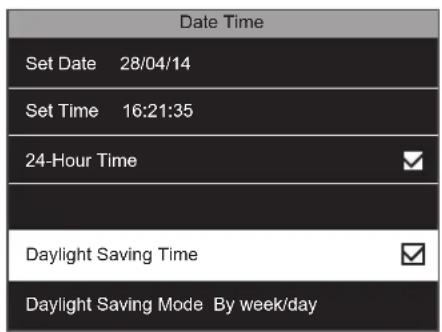
- Make sure that the Daylight Saving Time option is checked. If not, navigate to 'Daylight Saving Time' and press OK

- Navigate to 'Daylight Saving Mode', and select 'By week/day'.

- Select 'Daylight Saving Setup' and press OK
| Daylight Saving Setup | |
| Start Month | 3 |
| Start Week | 5 |
| Start Day | Sunday |
| Start Time 02:00 | |
| End Month | 10 |
| End Week | 5 |
| Start Day Sunday | |
| Start Time | 02:00 |
| End Month | 10 |
| End Week | 5 |
- Select 'Start Month', press OK Select the month when daylight saving time begins (1 = January, 2 = February etc.). In our example we need to select 3 for March. Confirm your selection by pressing OK
7.9.8 Select 'Start Week', and press OK Select the week number in the month. In our example we need to select week number 5. NB: Even if the last Sunday occurs in week number 4 (in 2014 for example) the system will adapt, and select the correct day.
| Daylight Saving Setup | |
| Start Day Sunday | |
| Start Time 02:00 | |
| End Month 10 | |
| End Week 5 | |
| End Day Sunday | |
| End Time 02:00 |
Select 'Start Day', press OK Select the desired day (Sunday in our example). Press OK
| Daylight Saving Setup | |
| Start Day Sunday | |
| Start Time 02:00 | |
| End Month 10 | |
| End Week 5 | |
| End Day Sunday | |
| End Time 02:00 |
Select 'Start Time', press .OK Enter the time when daylight saving time starts (02:00 in our example). Confirm with .OK
| Daylight Saving Setup | |
| Start Month | 3 |
| Start Week | 5 |
| Start Day Sunday | |
| Start Time | 02:00 |
| End Month | 10 |
| End Week | 5 |
- Select 'End Month', press OK. Select the month when daylight saving time ends. In our example we need to select 10 for October. Confirm your selection by pressing OK
| Daylight Saving Setup | |
| Start Month | 3 |
| Start Week | 5 |
| Start Day Sunday | |
| Start Time | 02:00 |
| End Month | 10 |
| End Week | 5 |
Select 'End Week', and press OK Select the week number in the month. In our example we need to select week number 5. NB: Even if the last Sunday occurs on week number 4 (in 2016 for example) the system will adapt, and select the correct day.
| Daylight Saving Setup | |
| Start Day Sunday | |
| Start Time 02:00 | |
| End Month 10 | |
| End Week 5 | |
| End Day Sunday | |
| End Time 02:00 |
- Select 'End Day', press .OK Select the desired day (Sunday in our example). Press .OK
| Daylight Saving Setup | |
| Start Day Sunday | |
| Start Time 02:00 | |
| End Month 10 | |
| End Week 5 | |
| End Day Sunday | |
| End Time 02:00 |
- Select 'End Time', press OK. Enter the time when daylight saving time ends (02:00 in our example). Confirm with .OK
There are two standard user roles in the terminal: Normal User and Super Administrator. It is also possible to define custom roles. These custom roles ("User Defined Roles") allow to grant access to certain functions of the terminal. Creating custom user roles can only be done by the Super Administrator.
Create a new Custom User Role:
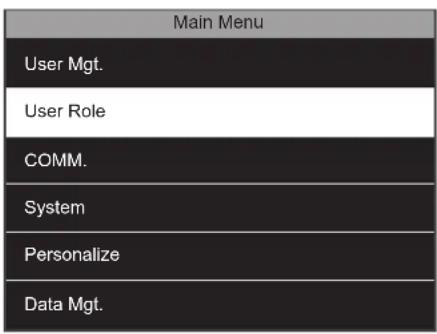
- 3 From the home screen, press MERC identify as Super Admin. Select 'User Role' and press OK

3 customisable user roles are displayed on the screen, select one and press OK.

Check the 'Enable Defined Role' checkbox to make this role appear in the user role list.
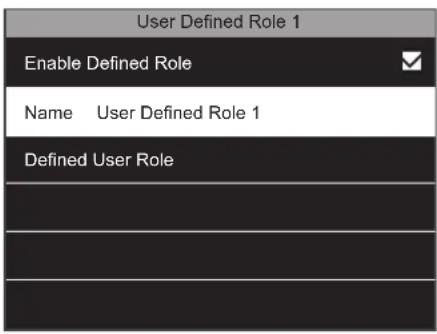
- Select 'Name' and press OK.
![Name Please Input IN key to switch input method, OUT key to enter space [Aa]](/content/2026/06/1267121/images/c7774eb5b720c0e5c38af385c3f46f32d93880fc7335afb6a67eb7bf782d5201.jpg)
- You can give a specific name to the role. Enter the name using the alphanumeric keyboard of the terminal.

- Select 'Defined User Role' and press .OK

- The screen is divided into two sections. The left section displays the main menu items, and the right section displays the sub menu items of the selected item. You can check or uncheck all the functionalities you want to associate with role. For more details regarding the menu items, please refer to chapter 3 of this manual. Press ESC when you have finished.

- From now on, when you create a new user (see chapter 1.14) you will see the User Role that you have just defined appear in the selection options.
The terminal can be used for internal communications purposes. You can create short messages that will be displayed for one or more specific users, or everyone in the company. The message will appear on the screen when the user identifies themselves to the terminal. Only the Super Admin user can create these messages.
Create a new message:
| Main Menu |
| USB Manager |
| Attendance Search |
| Short Message |
| Work Code |
| Autotest |
| System info |
- 3 From the home screen, press MENU and identify as super admin. Select 'Short Message' and press .OK
| Short Message |
| New Message |
| Public Message |
| Personal Message |
| Draft Message |
| Message Options |
Select 'New Message' and press .ok
| New Message | |
| Message | |
| Start date | 29/04/14 |
| Start Time | 14:00 |
| Expired Time (m) | 60 |
| Message Type | Draft |
To type your message, select 'Message' and press OK
| Message |
| [Aa] |
- 65ou can type in your message using the alphanumeric keyboard. Press when you have finished or ESC if you want to cancel.
| New Message | |
| Message | |
| Start date 29/04/14 | |
| Start Time 14:00 | |
| Expired Time (m) 60 | |
| Message Type Draft | |
You can then select a start date and time for your message to be displayed. By default the start date and time are the date and time of creation of the message.
| Set Date | ||
| 2014 | 10 | 15 |
| YYYY | MM | DD |
| Confirm (OK) | Cancel (ESC) | |
Select 'Start Date', press OK
| New Message | |
| Message | |
| Start date | 29/04/14 |
| Start Time | 14:00 |
| Expired Time (m) | 60 |
| Message Type | Draft |
7.8. After this you need to define an expiration time (in minutes) for the message. The value of the expiration time can be set between 1 minute to 65535 minutes. You can also choose to display this message permanently by setting the expiration time to 'never'.
| New Message | |
| Message | |
| Start date | 29/04/14 |
| Start Time | 14:00 |
| Expired Time (m) | 60 |
| Message Type | Draft |
Select the message type. It can either be a draft that is saved into the terminal, but not displayed, or a public message, that will be displayed to everyone clocking on the terminal, or a personal message displayed only to selected users.
By default a message will be shown on the screen for 60 seconds, unless a user presses OK or ESC. To change this value, go to the Short Message menu, select Message Options and Message Show Delay (s). Here you can set the value of your choice.
The terminal has 8 user definable function keys. You can link these keys to different actions. If your employees regularly perform a specific action that you want to keep track of, you can link this action to one of the function keys. You can also use the keys to directly access a specific element of the menu.
2.11 PUNCH STATE VALUES
Each time an employee clocks on the terminal, this clocking action is registered with a punch state value that can be interpreted by the Safescan TA Software. The default values are:
| Action | Punch State value |
| Clock IN | 0 |
| Clock OUT | 1 |
| Break | 2 |
| Return from break | 3 |
By default the Safescan TA software interprets the Punch State Value 4 as an ignored clocking action.
2.11.1 LINK A PUNCH ACTION TO A FUNCTION KEY

- From the main screen, press MIND identify as super administrator. Select 'Personalize', and press .OK
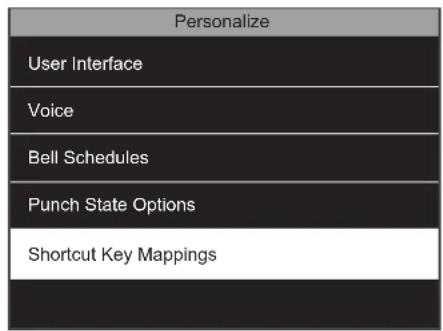
- Select 'Shortcut Key Mappings', press OK.
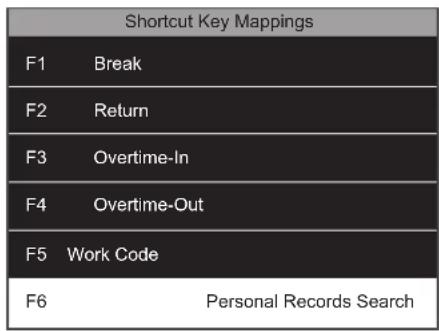
- Select the key you want to edit and press OK
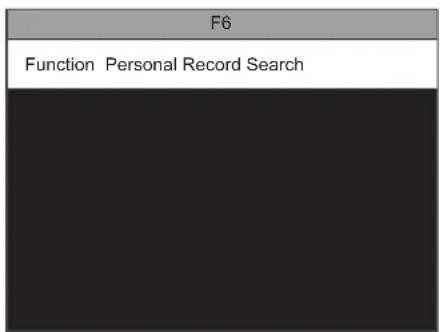
- 6Select 'Function' and press .OK

Tick the 'Punch State' checkbox.
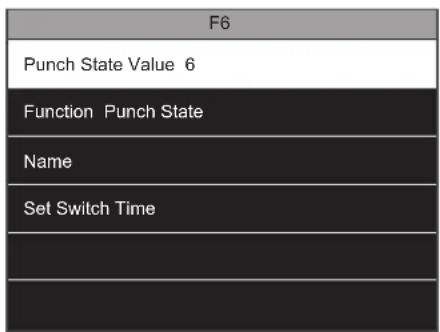
Select 'Punch State Value', press .ok
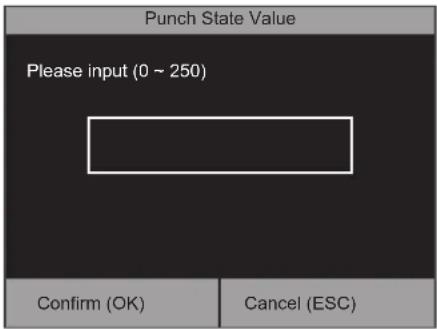
- Since values 0 \~4 are already pre-defined in the Safescan TA Software, please enter a value between 5 and 250.

- Select 'Name', press OK. Fill in the name of your Punch action.
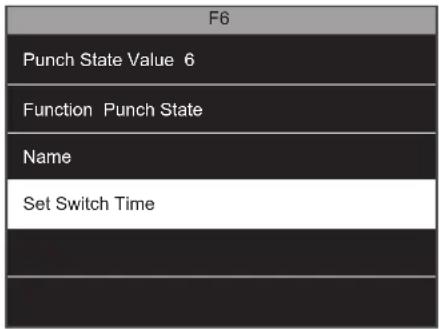
- It is also possible to set a switch time for this punch state. Select 'Set Switch Time', press OK
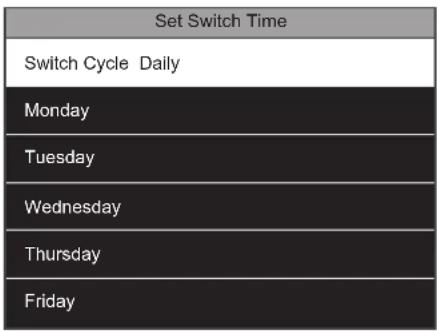
- Select 'Switch Cycle' and press OK to select the days you want to activate the punch state. Press ESC when finished.

- Set the time for each day. Select the day, press , and set the time when the punch state will be activated. Confirm with . OK
You need to set up the Safescan TA software to have it recognise your new Punch State value. For more information, please refer to the Safescan TA Software manual.
2.12 MENU SHORTCUTS

- From the main screen, press MELNIC identify as super administrator. Select 'Personalize', and press OK
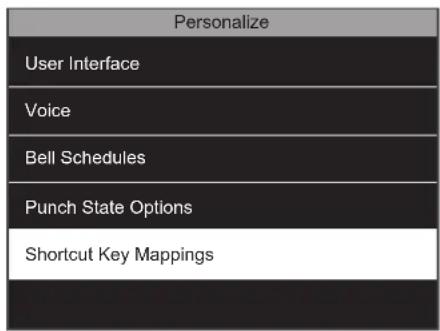
- Select 'Shortcut Key Mappings', press OK

- Select the key you want to edit and press OK.

- 5Select 'Function' and press OK

Tick the checkbox corresponding to the function you want to link to the key.
2.13 ACCESS CONTROL
The Safescan TA-8015 / 8025 / 8035 models are equipped with basic access control capabilities. You can link your terminal to an electric lock, a door sensor, an alarm and a door opening switch. Employees can open a door linked to the device by punching (clocking). It is possible to trigger an alarm in some situations (door left open, coming in under duress, unrecognised user). Please refer to the connection schematics below and Appendix 1.
Please note: You cannot link any Wiegand communication equipment.
To unlock the door, the enrolled user must meet the following conditions:
- The current time should be within the defined access time for the user or the group the user belongs to.
- The group the user belongs to must have access control capability.

2.13.1 ACCESS CONTROL DEFAULT SETTINGS
By default there is only one user access group in the terminal, you can create several groups to accommodate to your company needs.
2.13.2 ACCESS CONTROL TIME SCHEDULES
First, a schedule has to be defined when the door will be allowed to be opened. There are fifty available schedules in the machine. By default schedule number one is used, it allows door opening from Sunday 00:00 to Saturday 23:59. You can either edit this schedule or select another one to edit.
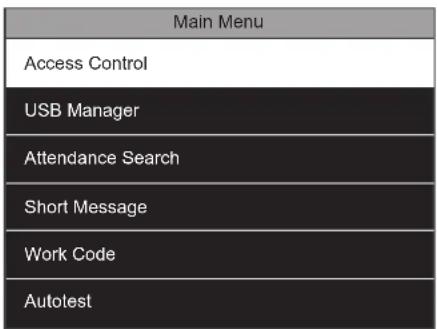
- From the main screen, press MENU and identify as super administrator. Select 'Access Control' and press .OK

- Select 'Time Schedule' and press OK

- The device will display by default the first of the fifty schedules available. You can see day by day the time when the door can be opened. If you want to change the door opening time for a specific day, select the day and press OK

- 5 You can define the start and the end time for this day. When you are finished, confirm with OK, or cancel with ESC.
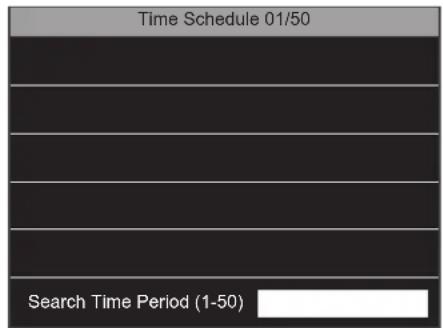
To edit a different schedule just type its number in the search field at the bottom of the screen.
PLEASE NOTE: Each time a group is added, this group should be referenced in the combined verification list. If it is not, users belonging to this group will not be able to use door access, i.e. open the door.

- From the main screen, press MENU and identify as super administrator. Select 'Access Control' and press OK


- Select 'Access Groups' and press OK. Select 'New Group' and press .


- You can change the ID of a new Access Group. You can also choose the default verification (identification) mode for the group. An access group can be linked to up to 3 different Time Periods (= Time Schedules) to accommodate different shift patterns. It is also
possible to decide if special holiday schedules apply to this access group. After all edits have been made press ESC twice to go back to the access control menu. You will now have to register your new group in the combined verification list.
2.13.4 COMBINED VERIFICATION

- From the 'Access Control' screen, select 'Combined Verification' and press .OK

- The system will display the list of the ten possible Combined Verification patterns.
It is possible to link up to five access groups in a combined verification pattern. For example:
| Combined Verification pattern Result | ||
| 01 00 00 00 00 | Users belonging to group | 1 are allowed to open the door. |
| 02 00 00 00 00 | Users belonging to group | 2 are allowed to open the door. |
| 03 02 00 00 00 | Users belonging to group | 3 can only open the door if a user from group 2 is clocking with them. |
You can define several holiday periods and link them with a specific time schedule

- From the 'Access Control' screen, select 'Holidays' and press OK.

- You can either add a new holiday period, or consult the list of previously created holidays. Select 'Add Holiday' and press OK.

- Edit the Start Date and the End Date, and select a time schedule to link to this Holiday. Press ESC when done.
If you select 'All Holidays', the terminal will display the list of all previously created holidays. Select one line, and press OK. You can either delete or edit the selected holiday.
2.15 LINK BETWEEN USERS, ACCESS GROUPS TIME SCHEDULES AND VERIFICATION MODES

flowchart
graph TD
    A["User 1"] --> B["Access Group 1 Access G"]
    B --> C["Time Schedule 1"]
    C --> D["Verification mode 1 Verifica"]
    E["User 2"] --> F["Time Schedule 2"]
    F --> G["Time Schedule 3"]
    H["User 3"] --> I["Time Schedule 3"]
    I --> J["Verification mode 2 Verifica"]
    C --> K["Time Schedule 1"]
User 1 belongs to Access Group 1, they use Time Schedule 1 linked to their group, but is linked with the Verification Mode 1 instead of the Verification Mode 2 linked to their group.
User 2 belongs to Access Group 2, and uses the default Time Schedule and Verification Mode linked to their group.
User 3 also belongs to Access Group 2, they use Verification Mode 2 linked to their group, but is linked with Time Schedule 3.
It is possible to select one or several verification (identification) modes that will trigger an alarm. It is also possible to set the time between the moment the user clocks in or out and the moment the alarm starts.
| Access Control |
| Access Control options |
| Time Schedule |
| Holidays |
| Access Groups |
| Combined Verification |
| Duress Options |
- From the access control screen, select Duress Options and press OK.
| Combined Verification | |
| 1 | 01 00 00 00 00 |
| 2 | 02 00 00 00 00 |
| 3 | 03 00 00 00 00 |
| 4 | 01 00 00 00 00 |
| 5 | 01 00 00 00 00 |
- Duress Function: The alarm will be triggered if the user presses a key mapped as the Duress key before punching. Please refer to the "Customise the function keys" section to learn how to map a key.
Alarm on 1:1 Match: The alarm will be triggered if the user punches with a 1:1 Match.
Alarm on 1:N Match: The alarm will be triggered if the user punches with a 1:N Match.
Alarm on Password: The alarm will be triggered if the user punches with a password. Alarm Delay (s): Set the interval between the punch under duress and the alarm. The value can be between 1 and 999 seconds.
It is possible to use one or more than one way to trigger the alarm. Please note that you can also use a specific user fingerprint to trigger the alarm. This can be enabled in the user page.
About 1:1 and 1:N Matches:
A 1:1 Match occurs when the user first enters their ID, and then present their fingerprint. The terminal compares the fingerprint to the fingerprint template registered for this specific user.
A 1:N Match occurs when the user punches directly with their fingerprint. The terminal compares the fingerprint to all the templates in memory.
3. DESCRIPTION OF ALL FUNCTIONS AND MENU ITEMS
PLEASE NOTE: Your Safescan TA Terminal comes with the optimal settings already factory pre-configured. Changing some of the settings of the machine may cause problems with the device operation. Unless you are certain of the changes you are making, do not change the settings of the device. When in doubt, please contact Safescan's technical support department for assistance.
3.1 USER MANAGEMENT
This section contains user-related functionalities.
New User - register a new user.
- User ID - Unique identifier for the user in the terminal. We advise to follow the terminal's suggestion of the user ID.
- Name - The user name will be displayed every time a user performs a clocking action on the terminal.
-
User Role - There are two basic user roles: Super Admin and Normal User. The super administrator has the right to access every function of the terminal. A normal user is only entitled to perform clocking actions and view his/her own previous clocking data. Additionally you can create user-defined roles. You can assign any menu item to these user-defined roles.
-
Fingerprint - Register the user's fingerprint
-
Password - Register a password for the user (numbers only, maximum 8 digits).
-
User Expiration Rule. Define which expiration rule to apply to the user. Note: expiration rules must be activated in "System -> Attendance".
Expiration Options:
6.1 None. No expiration rule is applied to the user.
6.2. Expired Date. The expiration rule is applied at a given date.
6.3. Entries. The expiration rule is applied after a given amount of punches (= clocking actions).
6.4. Expired Date and Entries. The expiration rule is applied after a given amount of punches within a given timeframe.
- Access Control Rules. Define access control settings for the user.
7.1. Access Group. Link the user to a specific access group.
7.2. Verification Mode. Select the verification mode to apply to the user. It can be the one defined for the group, or any other one.
7.3. Duress Fingerprint. Define a fingerprint that will trigger the alarm if the user is forced to open the door under duress.
7.4. Apply Group Time Period. It is possible to apply the group time period for the user, or to select any other previously defined time period.
- All Users - Displays a list of all users that are registered in the terminal, and when required edit or delete any user.
3.2 USER ROLE
Create, edit and activate custom user roles. A maximum of three different user roles can be defined and managed.
1. User defined Role
1.1. Enable Defined Role - Set the role as active or inactive.
1.2. Name - Define a name for the role.
1.3. Define User Role - Select the active menu items for the user role.
3.3 COMMUNICATION
Set-up the communication between the device and a network.
1. Ethernet - Manage the LAN connection settings.
1.1. IP Address - The default IP address of the device is 192.168.1.201, you might need to change it according to your network settings.
1.2. Subnet Mask - The default value is 255.255.255.0, you can change it if needed.
1.3. Gateway - The default value is 0.0.0.0, you can change it if needed.
1.4. DNS - The default value is 0.0.0.0, you can change it when needed.
1.5. TCP COMM Port - The default communication port is 4370, do not change it unless specifically instructed by a Safescan approved technician.
1.6. DHCP - Dynamic Host Configuration Protocol, used by a server to dynamically allocate an IP address to the device.
1.7. Display in status bar - Toggle the network status information icon on the main screen of the device.
2. Serial Comm
2.1. USB. Enable the USB port of the device for communication with a PC. This should only be enabled at the request of a Safescan technician to perform special maintenance operations.
2.1. USB Baudrate. USB communication speed.
3. PC Connection - Secure the connection between the device and a PC.
3.1. Comm Key - You can set a password on the terminal that would have to be entered in the PC software. By default, there is no password set. This password is numbers only (one to six digits).
3.2. Device ID - If you are using more than one Safescan TA terminal, you need to assign different ID's to each terminal.
4. Wireless Network
4.1. WiFi. Switch WiFi on or off
4.2. Add Wifi Network. Add manually a WiFi network if your network SSID is not displayed on the screen.
4.3. Advanced
4.31. DHCP. Enable DHCP
4.3.2. IP Address. Fill-in an IP address for your device if DHCP is not enabled.
4.3.3. Subnet Mask. Fill-the address of the subnet mask if DHCP is not enabled.
4.3.4. Gateway. Fill-the address of the gateway if DHCP is not enabled.
- ADMS. The device can use the ADMS settings to communicate with computers over the internet. For the moment, even if the functionalities are implemented, the device does not use it.
5.1. Enable Domain Name. Communicate directly with a domain name.
5.2. Server Address. If Domain name is not checked, specify an IP address for communication.
5.3. Server Port. If Domain name is not checked, specify a port for communication.
5.4. Enable Proxy Server. Enable this option if you need to go through a proxy server to communicate.
5.5. Proxy Server IP
5.6. Proxy Server Port
5.7. Display in Status Bar. Display the ADMS connection status in the status bar.
3.4 SYSTEM
Set-up the basic system settings.
- Date Time - All date/time related settings
1.1. Set Date - Set the date of the terminal.
1.2. Set Time - Set the time of the terminal.
1.3. 24-hour time - Choose between 24-hour or 12-hour time format
1.4. Daylight Saving Time - Set up the automatic daylight saving time switching.
1.5. Daylight Saving Mode - 2 modes can be selected: Date/time or Week/day.
1.6 Daylight Saving Setup
Date/time:
1.6.1. Start Date - Fill - in the date and month on which daylight saving time starts
1.6.2. Start Time - Fill - in the hour on which daylight saving time starts.
1.6.3. End Date - Fill - in the date and month on which daylight saving time ends.
1.6.4. End Time - Fill - in the hour on which daylight saving time ends and return to normal time.
Week/day:
1.6.5. Start Month - Select the month on which daylight saving time starts (1 is for January, 12 is for December)
1.6.6. Start Week - Select the week number in the month where daylight saving time starts.
1.6.7. Start Day - Select the day in the week
1.6.8. Start Time - Select the hour of the day.
1.6.9. End Month - Select the month when daylight saving time ends.
1.6.10. End Week - Select the week number in the months where daylight saving time ends.
1.6.11. End Day - Select the day in the week.
1.6.12. End Time - Select the hour of the day.
- Attendance
All settings regarding the way users' clocking actions and data are handled.
2.1. Duplicate Punch Period (m) - Select the amount of time to ignore double clocking actions (between 1 and 60 minutes).
2.2. Attendance Log Alert - Generates an alert when the available space becomes insufficient (between 1 and 99).
2.3. Cyclic Delete ATT Data - Specify the maximum number of attendance records that can be deleted when their number reaches the upper limit defined in Attendance Log alert.
2.4. Confirm Screen Delay (s) - Specify the time for displaying the authentication result (between 1 and 9 seconds).
2.5. Expiration Rule - Apply the expiration rules defined in Expiration Rule Options.
2.6. Expiration Rule Options - Set the rules to apply when a user has reached her/his expiration rule.
2.6.1. Keep user, No audit future punch - Keep the user, but do not save the new attendance records.
2.6.2. Keep User, And audit future punch - Keep the user and continue to record the attendance records.
2.6.3. Delete user - Delete the user from the terminal.
- Fingerprint
Settings for the fingerprint sensor.
3.1. 1:1 Match Threshold - Evaluates the similarity between the fingerprint and the template for one given user (user gives his/her ID before presenting his/her fingerprint in front of the sensor).
3.2. 1:N Match Threshold - Evaluates the similarity between the fingerprint and all the enrolled templates (the user clocks in/out only with the fingerprint).
3.3. FP Sensitivity - Fingerprint sensitivity setting: the default value is medium, you can change it to 'high' if the machine is installed in a dry environment, you can set it to 'low' if the machine is installed in a humid environment.
3.4. 1:1 Retry Times - Set the number of retry times when using the 1:1 verification process.
3.5. Fingerprint algorithm - You can choose between two fingerprint identification algorithms. By default, the machine uses the version 10.0 of the algorithm. You can set it to the version 9.0 if you want to use your terminal together with previous Safescan TA terminals (TA series 800, or 900). Please note: if you change the algorithm version, you will have to register again all the existing fingerprint templates.
3.6. Fingerprint Image - Choose if you want to display the fingerprint image when enrolling a user.
-
Reset - Reset all options to factory default and restart the machine
-
USB Upgrade
It is possible, if needed, to upgrade the firmware of your terminal with a file on a USB stick.
Change settings of the system according to your personal preferences.
1. User Interface
1.1. Language - Select the language of the terminal.
1.2. Lock Power Key - You can choose to disable the power-off button, to prevent unwanted power off of the terminal. If the option is unchecked, you can switch off the terminal by holding the power button for 3 seconds. If the option is checked, it is not possible to switch off the terminal by pressing the power button.
1.3. Menu Screen Timeout (s) - The device will return to the main screen if no action is performed during the set amount of time (the function can be disabled, between 60 and 99999 seconds).
1.4. Idle Time to Sleep (m) - The device will go into sleep mode after the amount of time defined in this option (from 1 to 999 minutes). You can wake up the device by pressing a key or by presenting your finger to the sensor.
1.5. Main Screen Style - You can choose which information is displayed on the main screen. Style 1 displays the in and out icons and the time and date. Style 2 displays the functions linked to the function keys.
2. Voice
2.1. Voice Prompt - Choose to enable the sound effects of the machine (the sound that is played during power on and power off).
Please note: this setting does not disable the authentication sound messages.
2.2. Keyboard Prompt - You can switch on or off the sound played when you press any key on the keyboard.
2.3. Volume - Adjust the volume of the sounds emitted by your terminal.
3. Bell Schedules
The terminal can play ringtones according to a defined schedule.
3.1. New Bell Schedule - Add a new scheduled bell.
3.2. Bell Status - Enable the selected bell
3.3. Bell Time - Select the time for the bell to ring.
3.2.1. Repeat - Select the day(s) for the bell to ring.
3.2.2. Ring Tone - Select a ringtone for the bell.
3.2.3. Internal bell delay (s) - Specify the playing duration of the bell.
3.4. All Bell Schedules - Displays a list of all the scheduled bell set in the terminal. It is possible to edit or delete any of these items.
4. Punch State Options
4.1. Punch State Mode
4.1.1 Off. Any status key (including the IN → or OUT → keys) becomes unavailable.
4.1.2 Manual Mode - The status keys are switched manually, the status disappears after the defined time.
4.1.3 Auto Mode - The terminal switches status automatically at the user-defined times.
4.1.4 Manual and Auto Mode - The terminal switches status automatically at the user-defined times. It is also possible to switch the status keys
4.1.5 Manually. The terminal switches back to the automatically defined status after a defined time.
4.1.6 Manual fixed Mode - The terminal keeps the status defined on a manual switch.
4.1.7 Fixed Mode - The terminal can only use the status defined in the menu.
4.2. Punch State Timeout (s) - Specifies the number of seconds a status will be displayed.
4.3. Punch State Required - Specifies if a status needs to be selected when clocking.
- Shortcut Key Mappings - The function keys of the terminal can be used as shortcuts to many menu items, they can also be used as Punch State Keys for clocking operations.
3.6 DATA MANAGEMENT
Perform terminal data related operations such as deleting, backing-up or restoring data from a previous back-up.
1. Delete Data
1.1. Delete Attendance Data - You can delete attendance data, choose if you want to delete all data or just the data of a specific period.
1.2. Delete All Data - Delete all users, clocking data and access control data.
1.3. Delete Access Control - Delete access control records.
1.4. Delete Admin Role - Change all administrators to normal users.
- Backup Data. It is possible to create a backup of your terminal either on a USB drive, or on the terminal itself.
2.1. Backup to Device - You can backup your data directly on a specific memory location of the terminal.
Please Note: you can only store one backup on the device.
2.1.1. Backup Content - There are two different types of data you can backup: The Business Data, and the System Data.
2.1.2. Backup Notes - You can add a note to the backup (backup date, backup name etc)
2.1.3. Backup Start - Start the backup process
2.3. Backup to USB Disk - You can also backup your data on a USB Stick.
Please Note: If there is already one backup on the USB Stick, it will be overwritten.
- Restore Data - You can restore your terminal data from a previous backup from this menu.
3.1. Restore from Device. Restore from a backup saved on the device.
3.2. Restore from USB Disk. Restore from a backup saved on a USB Stick.
All access control related settings
1. Access Control Options
1.1. Door Lock Delay (s). Set the number of seconds the lock stays unlocked after opening.
1.2. Door Sensor Delay (s). Set the number of seconds the door can stay open before triggering the alarm. This will only function if a sensor is connected to the terminal.
1.2. Door Sensor Type. Select the type of sensor to use with the terminal.
1.3. Door Alarm Delay (s). Set the time before triggering the alarm if an abnormal door sensor state is detected.
1.4. Retry Times to alarm. Set the number of rejected identifications before triggering the alarm.
1.5. NC Time Period. Select the time period when the door is always closed.
1.6. NO Time Period. Select the time period when the door is always open.
-
Time Schedule. It is possible to define up to 50 different time schedule (= time period). For each time schedule you can define the time frame when the door can be opened. It is possible to link up to three time schedules to an Access group, or user.
-
Holidays. In order to adapt to special holiday schedules, you can link a specific time schedule to a certain period.
3.1. Add Holidays. Add a new holiday
3.2. All Holidays. Display the list of all holidays.
- Access Groups. Allow management of time zones and the identification methods by groups of employees. By default employees use their group time period settings. When a new user is created, they are linked to access group 1 by default. Users can be assigned to any given group from the user edit screen.
4.1. New Group. Create a new group.
4.2. All Groups. Display the list of all groups.
-
Combined Verification. Define the group(s) allowed to open the door.
-
Duress Options. The terminal offers several ways of triggering an alarm if an employee has to open the door under duress (= being unwillingly forced to open the door).
6.1. Duress Function. When enabled, pressing the "Duress Key" before clocking will open the door and trigger the alarm. The "Duress Key" can be linked to any function key of the device.
6.2. Alarm on 1:1 Match. The alarm will be triggered every time a user uses the 1:1 Match authentication process.
6.3. Alarm on 1:N Match. The alarm will be triggered every time a user uses the 1:N Match authentication process.
6.4. Alarm on Password. The alarm will be triggered every time a user uses the password authentication process.
6.5. Alarm Delay (s). Set the delay before the alarm is fired.
3.8 USB MANAGER
If you can not, or do not want to use a network connection to communicate with the PC software, the terminal allows you to retrieve or send the data via a USB drive.
- Download. Send the data from the terminal to the USB Stick.
1.1. Attendance Data - The clocking data.
1.2. User Data - All user related information.
1.3. Short Message
- Upload. Send the data from the USB drive to the terminal.
2.1. User Data - Upload user data after editing in the software.
2.2. Short Message
2.3. Screen Saver
2.4. Wallpaper
- Download Options
3.1. Delete ATT Data
3.9 ATTENDANCE SEARCH
If you do not have access to the Safescan TA PC software, it is always possible to check the attendance logs directly on the terminal. Enter the ID of the user of whom you want to check the data. If you do not provide a user ID, the system will display the clocking data of all users.
3.10 SHORT MESSAGE
You can display short messages to the users directly on the terminal screen. These messages can be displayed to one or several chosen users, or to everyone.
- New Message - Create a new message.
1.1. Message - Type the text of the message.
1.2. Start Date - Define the date upon which the message will be displayed from.
1.3. Start time - Define the time upon which the message will be displayed to.
1.4. Expired Time (m) - Define for how long the message will be available for consultation.
1.5. Message Type - Define the type of the message.
1.5.1. Public - A public message will be displayed to everyone clocking on the terminal.
1.5.2. Personal - A personal message will be displayed to one or several chosen user(s).
1.5.3. Draft - Choose draft when you want the message to be stored in the terminal's memory, but not displayed yet.
- Public Messages - Displays a list of all public messages stored in the terminal. These messages can be viewed, edited, or deleted.
- Personal Messages - Displays a list of all personal messages stored in the terminal. These messages can be viewed, edited, or deleted.
-
Drafts Messages - Displays a list of all draft messages stored in the terminal. These messages can be viewed, edited, or deleted.
-
Message Option
5.1. Message Show Delay (s) - Select the amount of time a message is displayed.
3.11 WORK CODE
Work codes (can also be referred to as function codes) can be used to track special activities / events during working hours. You can link a clocking to a work code.
- New Work Code - Define an ID and a name for a new work code.
- All Work Codes - List of all the work codes present in the terminal. It is possible to edit the name of a specific work code, or to delete it from the terminal.
3. Work Code Options
3.1. Work Code Required - When enabled, users will be prompted to select a work code every time they clock in/out.
3.2. Work Code Must Defined - When enabled, users have to select a work code from the existing work codes list. If not, it is possible to enter a number, even if this number does match any work code ID in the work code list.
3.12 AUTOTEST
Various tests to verify if the terminal is working properly.
-
Test All. Run all the tests.
-
Test Test LCD. Test LCD display.
-
Test voice. Test speaker.
-
Test Keyboard. Test the keyboard.
-
Test Fingerprint Sensor. Test the fingerprint sensor.
-
Test Clock RTC. Test the device clock.
3.13 SYSTEM INFO
Information about the terminal.
- Device Capacity - Number of enrolled users, administrators, passwords, fingerprint templates, RFID cards, and attendance logs.
- Device Info - Various information of the device, including the serial number, the fingerprint algorithm, and the MAC address.
- Firmware Info - Version numbers of the various services running on the terminal.
3.14 USE OF BIOMETRIC DATA
The system used by Safescan does not store any image of the fingerprint, but only an anonymous, mathematical reference template. The personal features of the fingertip are vectorised in unique points and converted by the terminal into a complex numerical code, using a special algorithm. The corresponding employee number is then linked to this value. The fingerprint image can never be reproduced by the terminal or exported from the terminal – only the numerical code is stored. Misuse of personal data by unauthorised persons is thereby avoided.
Since all Safescan TA terminals offer a dual authentication option, in case your employee(s) have any concerns with clocking by fingerprint, there is always the option for the employee to choose their own 8-digit PIN code and identify themselves with this code to the terminal.
Safescan, as the device supplier, shall not be held legally accountable, directly or indirectly, for any consequences arising due to the use of our products. For any conflict regarding privacy when using our products, please contact your employer directly.
PLEASE NOTE: ALWAYS USE A QUALIFIED ENGINEER TO INSTALL DOOR ACCESS CONTROL ON THE TA TERMINAL
- Share power with the lock

flowchart
graph TD
    A["12V"] --> B["NC LOCK"]
    C["AGND"] --> B
    D["AL +"] --> B
    E["AL -"] --> B
    F["NC"] --> B
    G["COM"] --> B
    H["NO"] --> B
    I["SENSOR"] --> B
    J["AGND"] --> B
    K["BUTTON"] --> B
    B --> L["12V"]
    B --> M["AGND"]
    N["AL +"] --> O["NO"]
    P["AL -"] --> Q["SENSOR"]
    R["NC"] --> S["AGND"]
    T["COM"] --> U["BUTTON"]
    V["NO"] --> W["FR 107"]
    X["SENSOR"] --> W
    Y["AGND"] --> W
    Z["BUTTON"] --> W
    W --> AA["NO LOCK"]
- Do not share power with the lock

flowchart
graph TD
    A["12V AGND"] --> B["AL +"]
    A --> C["AL -"]
    A --> D["NC"]
    A --> E["COM"]
    A --> F["NO"]
    A --> G["SENSOR"]
    A --> H["AGND"]
    A --> I["BUTTON"]
    J["12V AGND"] --> K["AL +"]
    J --> L["AL -"]
    J --> M["NC"]
    J --> N["COM"]
    J --> O["NO"]
    J --> P["SENSOR"]
    J --> Q["AGND"]
    J --> R["BUTTON"]
    S["NC LOCK"] --> T["+"]
    U["DC POWER"] --> V["+"]
    W["DC POWER"] --> X["+"]
    Y["NO LOCK"] --> Z["+"]
    style A fill:#f9f,stroke:#333
    style J fill:#f9f,stroke:#333
- Other connections

flowchart
graph TD
    A["12V"] --> B["DC POWER"]
    C["AGND"] --> B
    D["AL+"] --> E["Alarm"]
    F["AL-"] --> E
    G["NC"] --> E
    H["COM"] --> I["Door Sensor"]
    J["NO"] --> I
    K["SENSOR"] --> I
    L["AGND"] --> M["Exit Button"]
    N["BUTTON"] --> M


- INTRODUCTION AND DIRECTIONS FOR USE
- BASIC INSTALLATION AND OPERATION
- DESCRIPTION OF ALL FUNCTIONS AND MENU ITEMS
- APPENDIX
- ADVANCED USAGE SCENARIOS
- PACKAGE CONTENTS
- THE RETAIL BOX CONTAINS THE FOLLOWING ITEMS:
- WALLMOUNT INSTALLATION
- TERMINAL - DESCRIPTION OF THE KEYS
- LANGUAGE SETTINGS
- Menu navigation on the device:
- Alphanumeric keyboard:
- FINGERPRINT PLACEMENT
- INSTALLING THE TERMINAL IN YOUR NETWORK
- Network connection
- C:\Windows\system32\cmd.exe
- C:\Users\John\ipconfig
- LAN CONNECTION
- WIFI CONNECTION
- DHCP: PROS AND CONS
- SETTING UP AN ADMINISTRATOR USER (SUPER ADMIN)
- Why set up an administrator?
- 3.
- REGISTERING A FINGERPRINT
- REGISTERING AN RFID CARD OR KEY FOB
- SETTING A PASSWORD
- DATE AND TIME SETTINGS
- SET THE DATE
- SET THE TIME
- TIME FORMAT
- ENROLLING USERS (NORMAL USER)
- RETRIEVE USER AND CLOCKING DATA USING A USB STICK
- USB Stick requirements
- Clocking data:
- UPLOADING USER DATA TO THE TERMINAL
- CHECKING CLOCKING DATA ON THE TERMINAL
- USER MANAGEMENT
- EDIT USERS
- DELETE USERS
- NOTE: DELETING A USER DOES NOT DELETE HER/HIS CLOCKING DATA.
- EXPIRATION RULE
- EXPIRATION RULE OPTIONS
- USING WORK CODES
- CREATE A NEW WORK CODE
- EDIT AN EXISTING WORK CODE
- DELETE A WORK CODE
- DAYLIGHT SAVING TIME
- DAYLIGHT SAVING TIME: DATE/TIME SETTING
- DAYLIGHT SAVING TIME: WEEK/DAY SETTING
- Create a new Custom User Role:
- PUNCH STATE VALUES
- LINK A PUNCH ACTION TO A FUNCTION KEY
- MENU SHORTCUTS
- ACCESS CONTROL
- Please note: You cannot link any Wiegand communication equipment.
- To unlock the door, the enrolled user must meet the following conditions:
- ACCESS CONTROL DEFAULT SETTINGS
- ACCESS CONTROL TIME SCHEDULES
- COMBINED VERIFICATION
- LINK BETWEEN USERS, ACCESS GROUPS TIME SCHEDULES AND VERIFICATION MODES
- About 1:1 and 1:N Matches:
- USER MANAGEMENT
- New User - register a new user.
- Expiration Options:
- USER ROLE
- User defined Role
- COMMUNICATION
- Ethernet - Manage the LAN connection settings.
- Serial Comm
- PC Connection - Secure the connection between the device and a PC.
- Wireless Network
- SYSTEM
- Date/time:
- Week/day:
- User Interface
- Voice
- Bell Schedules
- Punch State Options
- Punch State Mode
- DATA MANAGEMENT
- Delete Data
- Access Control Options
- USB MANAGER
- ATTENDANCE SEARCH
- SHORT MESSAGE
- WORK CODE
- Work Code Options
- AUTOTEST
- SYSTEM INFO
- USE OF BIOMETRIC DATA
- PLEASE NOTE: ALWAYS USE A QUALIFIED ENGINEER TO INSTALL DOOR ACCESS CONTROL ON THE TA TERMINAL
Brand : Safescan
Model : TA-8030
Category : Security System