
Sh 24 - Voice recorder GRUNDIG - Free user manual and instructions
Find the device manual for free Sh 24 GRUNDIG in PDF.


| Product Type | Voice Recorder |
| Brand | Grundig |
| Model | Sh 24 |
| Recording Format | MP3, WMA |
| Internal Memory | 4 GB (expandable via microSD up to 32 GB) |
| Recording Modes | HQ (High Quality), SP (Standard Play), LP (Long Play) |
| Microphone | Built-in directional microphone |
| Speaker | Built-in speaker |
| Display | LCD screen with backlight |
| Power Source | 2x AAA batteries (not included) or internal rechargeable battery (USB charging) |
| Battery Life | Up to 20 hours (depending on mode) |
| USB Connection | USB 2.0 for data transfer and charging |
| Dimensions | 100 x 30 x 15 mm |
| Weight | 50 g (without batteries) |
| Headphone Jack | 3.5 mm |
| Voice Activation | VOR (Voice Operated Recording) |
| Noise Reduction | Built-in noise reduction filter |
| Password Protection | Yes, for secure files |
| Playback Speed | Adjustable |
| File Organization | Folder system for easy management |
| Operating Temperature | 0°C to 40°C |
| Storage Temperature | -20°C to 60°C |
| Included Accessories | USB cable, earphones, user manual |
| Spare Parts Available | Battery, USB cable, earphones |
| Care and Cleaning | Clean with soft dry cloth; avoid solvents |
Frequently Asked Questions - Sh 24 GRUNDIG
User questions about Sh 24 GRUNDIG
0 question about this device. Answer the ones you know or ask your own.
Ask a new question about this device
Download the instructions for your Voice recorder in PDF format for free! Find your manual Sh 24 - GRUNDIG and take your electronic device back in hand. On this page are published all the documents necessary for the use of your device. Sh 24 by GRUNDIG.
USER MANUAL Sh 24 GRUNDIG
The CE mark confirms that the device corresponds to the relevant guidelines of the European Union.
CE



4 Netzbetrieb Mains operation Funzionamento con la rete Fonctionnement sur secteur Gebruik met de adapter Nätdrift Netdrift Funcionamiento a red

Supply Voltage
Battery, rechargeable battery, mains operation
Battery/rechargeable battery condition indicator (plus recording indicator): Lights up when recording. Goes out when the batteries/rechargeable batteries are weak. Recording is still possible until the motor stops (sound signal).
Battery operation with two 1.5V/LR6/AA batteries (alkaline-manganese), leak-proof. Remove batteries from the unit when they are exhausted or if the unit is not to be used for a long period of time. No responsibility will be accepted for damage caused by leaking batteries!
Rechargeable battery operation with rechargeable batteries 462. Charge the rechargeable batteries in the unit with the power supply/charging unit 679. Charging time approx. 22 hours. During charging, the unit can be used with all functions.
Battery/rechargeable battery compartment
Press and hold down the LID LOCK button, then remove sliding cover from the unit.
Inserting batteries: Ensure correct polarity (+/-); see figure [2]. Inserting rechargeable batteries: Observe correct polarity and position. Insert the rechargeable battery with the removed sheathing into the compartment with the lateral charging contact; see fig. [3]. Refit and close sliding cover.
Mains operation with the power supply/charging unit 679; see figure [4].
Slide the plug till the end stop into the portable dictation machine.
Inserted batteries are disconnected; the rechargeable batteries 462 is charged.
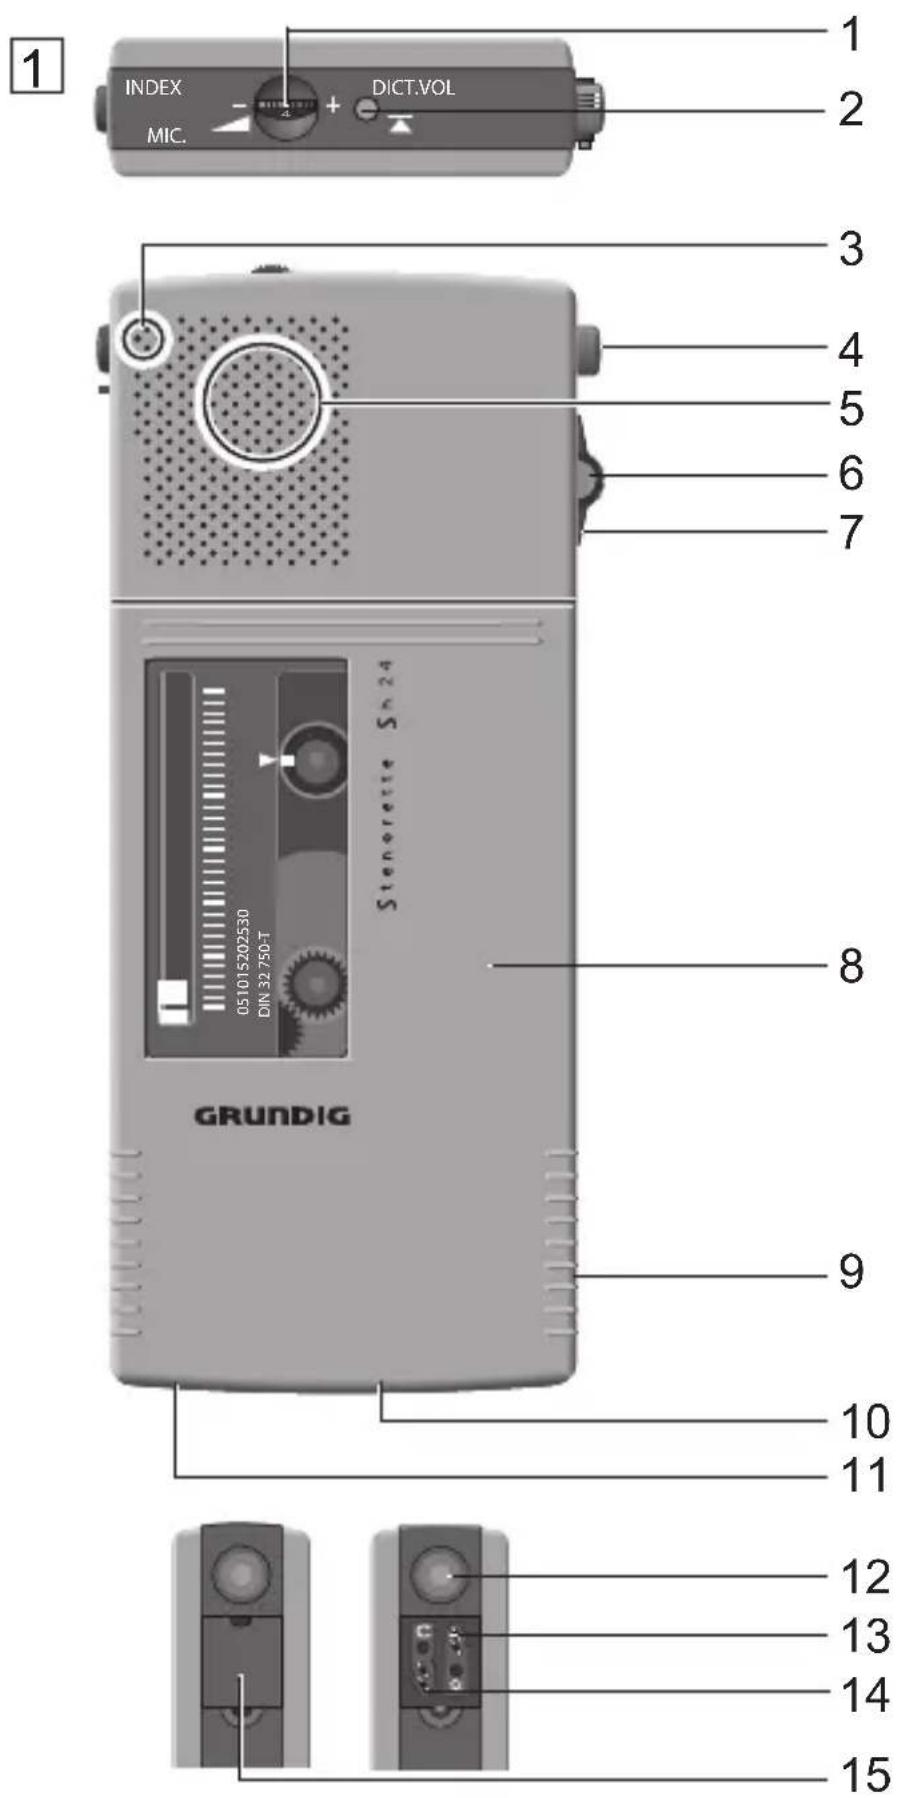
Controls and Sockets
Please open folder at beginning of booklet!
1 Playback volume control (turn)
2 DICT. indication Lights up during recording.
3 Microphone
4 Recording button Press the "▲" DICTATE" button (locks in).
5 Loudspeaker
6 Switch-on lock red-green Prevents accidental switching on.
7 Slide-switch
▶ Fast forward (search)
Stop
▶ Start playback Start recording:
Press " ▲ DICTATE" button beforehand (locks in).
Stop recording: Set sliding switch briefly to "REWIND" or "FFWD".
◀ Rewind (search)
8 Sliding cover
9 ◀ LID LOCK button: Press and slide cover down.
10 Mains/charging unit 679 connection
11 VA switch for voice-activated start/stop during recording.
12 INDEX button: end mark: Press the button briefly during recording. Info mark: Press the button longer during recording. Index mark: Press the button during playback.
13 Microphone connection
14 Earphone connection
15 Cover: Press and slide down.
General
Do not expose the unit and the steno-cassettes to temperatures above 55°C. Note on Environmental Protection
Do not throw exhausted batteries in the household refuse. Hand over the old batteries to your dealer of public collecting points when buying new ones.
GB
Low energy consumption – environment-friendly materials – environment-compliant packing:
Grundig dictation machines are conceived and fabricated according to the highest environmental requirements.
Accessories indicated in the text are not supplied with the unit.
Please make sure to choose only genuine accessories from Grundig. Product liability and warranty service are provided only in this case. The use of non-Grundig accessories or those which are not recommended and approved by Grundig automatically void any warranty claims towards Grundig.
Switch-on lock

Switch-on lock red green
Red visible:
Unit protected against inadverten switch-on.
Automatic switch-off
If the machine remains switched on inadvertently, the current function is continued till the end of the cassette. After emitting several sound signals, the machine switches off. To put the machine into operation again, set the slide-switch to STOP" then select the desired function.
Cassette compartment

Inserting/removing steno-cassette accessories):
Press and hold down the 🔊 LID LOCK" button and pull off the sliding cover.
Remove steno-cassette by tilting it out sideways.
For inserting the steno-cassette, see figure [1] at the beginning of booklet. Close sliding cover.
Steno-cassettes
Store steno-cassettes in their Multibox (transport precaution, accessories).
For dispatch: correspondence folder 741 (accessories) for two steno-cassettes and dictation documents (DIN A4).
Microphone and recording indicator
Conference recordings
The housing base is designed so that the dictation machine can vertically be placed on a table.
GB
Dictation

Speak over the dictation machine.
The figure shows the optimum position of the dictation machine. The high-quality microphone allows also for recordings over greater distances. (Microphone position see Fig. [1])
DICT. Indication
(plus battery/rechargeable battery indicator)
– Ligths up during recording.
- Goes out when the batteries/rechargeable batteries are exhausted.
Recording
Press "△DICTATE" button (locks in).
Set slide-switch to "START":
- "DICT." lights up; tape runs.
- A warning signal sounds if no cassette is fitted and at tape end.
Recording
Recording pause
Set the slide-switch to STOP":
- "DICT." goes out.
- Recording button “▲ DICTATE” remains locked in.
Set slide-switch to "START":
- "DICT." lights up; tape runs.
Text correction
Switch the slide-switch to "REWIND".
- The “▲ DICTATE” button disengages.
- The tape rewinds until you release the slide-switch ("START").
Please note:
- At end marks or info marks, the unit stops for approx. 1 s (see "Fast forward wind/rewind").
Resuming dictation
During "START", press "DICTATE" button (locks in) at desired text passage:
- “DICT.” indication lights up; tape runs.
Concluding recording
Briefly move slide-switch to “REWIND” (or “FFWD”):
- The“▲DICTATE” button unlocks.
Set slide-switch to "STOP".
Recording
Start/stop voice activated
(Voice Activation)
During speech pauses when recording (more than 4 seconds) the device stops. Recording resumes when you speak; otherwise like "Recording".
You can set different sensitivity levels for Voice Activation:
"OFF" = VA off
“LOW” = VA for dictation
"HIGH" = VA for conference recording
GB
Erasing recordings
Erasing words or text passages
Press and hold down the "DICTATE" button.
Keep slide-switch in “REWIND” position for duration of erasure:
- “DICT.” indication lights up.
Release "→DICTATE" button (locks in):
- The tape is rewound and is erased.
Erasure of a steno-cassette
outside the unit: With instant eraser 616 (accessories).
End mark
During recording it is possible to mark the dictations by end marks.
These end marks are recognized by all GRUNDIG dictation machines provided with the search function. See chapter “Fast Forward / Rewind”.
Info mark
Record spontaneous ideas, information or advice even within a dictation.
Use messages to communicate with staff.

Press the "INDEX" button for a longer time to record an info mark and release the button to record an end mark.
The desktop dictation and transcription machine Dt 3230 has special functions for the indication, playback and search of text passages which have been recorded with the info marks.
Note: The recording time between the text marks should be at least 10 seconds to make sure that the search function finds the marks.
Text Marks
Recording brief messages during a dictation.
You wish to record a brief message during the dictation.
- Press and hold down the "INDEX" button.
- Speak your message after the info mark.
- Release the "INDEX" button after your message. The end mark sounds. You can resume the dictation.
GB
Recording longer messages.
You wish to record a longer message or you wish to interrupt a dication by stopping the tape to prepare a message.
Recording is still switched on.
- Set the slide-switch to "START".
- Press and hold down the "INDEX" button. This records the info mark.
- After the info mark signal, set the slide-switch to "STOP".
- Release the "INDEX" button.
- Set the slide-switch to "START".
- Dictate your message. You can interrupt recording as often as you wish.
- Terminate your message by briefly pressing the "INDEX" button. When releasing the button, an end mark will be recorded.
Index mark

Press the "INDEX" button during
playback when the text passage to be marked is reached. The machine records the index mark additionally without erasing the text.
Note:
Let the person who will do your typing know what to do when an index mark is heard on the tape.
Examples: – insert correction tape.
– read enclosed index note.
- call back for consultation.
Playback
Playback
Starting playback
Set slide-switch to "START":
- A warning signal sounds if no steno-cassette is fitted.
Adjust desired volume (turn).
Concluding playback
Set slide-switch to "STOP".
GB
Fast Forward/Rewind
Rewind and fast forward without search
Move the slide-switch briefly to the desired function (“FFWD” or “REWIND”), let go of it and then move the slide-switch immediately to the desired function again.
Rewind with search function
Set the slide-switch to "REWIND" and hold in place. The tape winds backwards and stops, when you release the slide-switch ("START").
At end marks or info marks, the unit stops for approx. 1 s in front of the marking: release slide-switch "START"), or, if you wish to continue rewinding, keep slide-switch in "REWIND" position.
Fast forward with search
Keep slide-switch in "FFWD" position. At end marks or info marks, the unit stops for approx. 1 s after the marking. Release slide-switch, or, if you wish to continue fast forward winding, keep slide-switch in "FFWD" position.
Care and Maintenance
The housing should only be cleaned with a soft cloth which picks up dust. Polishing or cleaning agents may damage the surface.
Parts contacting the tape should be checked from time to time for contamination by tape abrasion, see illustration at the end of this booklet.
GB
If cleaning should be necessary, use a cotton wrapround soaked in cleaning benzine. Never use a metallic or other hard object!
- Remove the steno-cassette from the cassette compartment.
- Switch on device: “△ DICTATE” - ▶ START”. Warning signal because there is no steno-cassette in the cassette compartment! The device switches off.
- Press one of the two bolts in direction of the cassette compartment.
- Clean the tape-contacting parts: Rubber pinch roller B, capstan C, sound head D, and erase head E.
In the event of malfunctions, contact your specialised dealer.
Subject to technical alterations and alterations in styling. E. and O.E.
Figure to text "tape contacting parts", page 13
GRUNDIG
Business Systems
- CE
- SUPPLY VOLTAGE
- BATTERY, RECHARGEABLE BATTERY, MAINS OPERATION
- BATTERY/RECHARGEABLE BATTERY COMPARTMENT
- CONTROLS AND SOCKETS
- GENERAL
- LOW ENERGY CONSUMPTION – ENVIRONMENT-FRIENDLY MATERIALS – ENVIRONMENT-COMPLIANT PACKING
- ACCESSORIES INDICATED IN THE TEXT ARE NOT SUPPLIED WITH THE UNIT
- SWITCH-ON LOCK
- AUTOMATIC SWITCH-OFF
- CASSETTE COMPARTMENT
- INSERTING/REMOVING STENO-CASSETTE ACCESSORIES)
- STENO-CASSETTES
- MICROPHONE AND RECORDING INDICATOR
- CONFERENCE RECORDINGS
- DICTATION
- SPEAK OVER THE DICTATION MACHINE
- DICT. INDICATION
- RECORDING
- RECORDING PAUSE
- TEXT CORRECTION
- CONCLUDING RECORDING
- START/STOP VOICE ACTIVATED
- (VOICE ACTIVATION)
- ERASING RECORDINGS
- ERASING WORDS OR TEXT PASSAGES
- ERASURE OF A STENO-CASSETTE
- END MARK
- INFO MARK
- TEXT MARKS
- RECORDING BRIEF MESSAGES DURING A DICTATION
- RECORDING LONGER MESSAGES
- INDEX MARK
- NOTE
- PLAYBACK
- STARTING PLAYBACK
- CONCLUDING PLAYBACK
- FAST FORWARD/REWIND
- REWIND AND FAST FORWARD WITHOUT SEARCH
- REWIND WITH SEARCH FUNCTION
- FAST FORWARD WITH SEARCH
- CARE AND MAINTENANCE
- GRUNDIG
- BUSINESS SYSTEMS
Brand : GRUNDIG
Model : Sh 24
Category : Voice recorder