
5P1550IR - Uninterruptible power supply EATON - Free user manual and instructions
Find the device manual for free 5P1550IR EATON in PDF.


User questions about 5P1550IR EATON
0 question about this device. Answer the ones you know or ask your own.
Ask a new question about this device
Download the instructions for your Uninterruptible power supply in PDF format for free! Find your manual 5P1550IR - EATON and take your electronic device back in hand. On this page are published all the documents necessary for the use of your device. 5P1550IR by EATON.
USER MANUAL 5P1550IR EATON
natural_image
3D rendering of a gray industrial electronic device with a display and control panel (no visible text or symbols)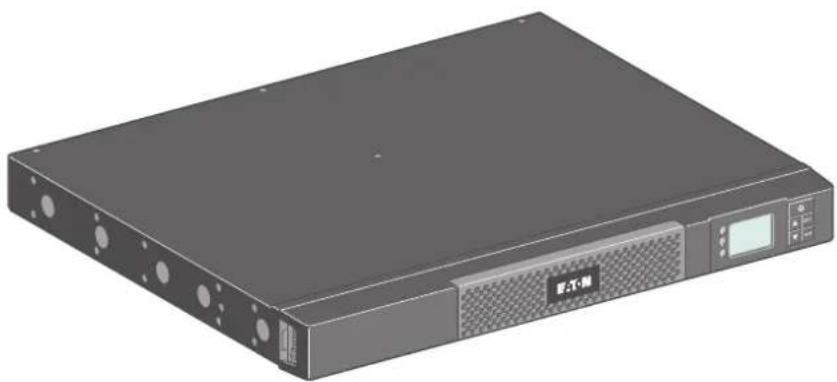
natural_image
3D rendering of a black server or rack device with ventilation grilles and a control panel (no visible text or symbols)Installation
and user manual
Tower models
5P 650i
5P 850i
5P 1150i
5P 1550i
1U Rack models
5P 650i R
5P 850i R
5P 1150i R
5P 1550i R
Certification Standards
UPS directives:
• Safety: IEC 62040-1: 2008 (C2)
• EMC: IEC 62040-2: 2005, VCCI
• Performance: IEC 62040-3: 2010
CE mark (EN 62040-1: 2008 and EN 62040-2: 2006 (C1))
Class B emission level CISPR 22: 2005 + A2 2006 (EN 55022)
Harmonics emission: IEC 61000-3-2 edition 3.2: 2009
Flickers emission: IEC 61000-3-3 edition 2: 2008
VCCI Notice
The EC Declaration of Conformity is available upon request for products with a CE mark. For copies of the EC Declaration of Conformity, contact Eaton Power Quality or check Eaton website: www.powerquality.eaton.com
Special Symbols
The following are examples of symbols used on the UPS or accessories to alert you to important information:

RISK OF ELECTRIC SHOCK - Observe the warning associated with the risk of electric shock symbol.

Important instructions that must always be followed.
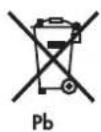
Do not discard the UPS or the UPS batteries in the trash. This product contains sealed lead acid batteries and must be disposed as it's explain in this manual. For more information, contact your local recycling/reuse or hazardous waste center.
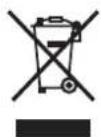
This symbol indicates that you should not discard waste electrical or electronic equipment (WEEE) in the trash. For proper disposal, contact your local recycling/reuse or hazardous waste center.

Information, advice, help.
1. Introduction......4
1.1 Environmental protection....4
2. Presentation....5
2.1 Standard installations....5
2.2 Tower rear panels....6
2.3 Rack rear panels 7
2.4 Control panel 8
2.5 LCD description....9
2.6 Display functions 10
2.7 User settings 10
3. Installation 12
3.1 Unpacking and contents check....12
3.2 Installation of tower models....13
3.3 Wall installation of rack models (650i R / 850i R / 1150i R)....13
3.4 Installation of rack models (650i R only) 14
3.5 Installation of rack models (850i R / 1150i R / 1550i R)....14
3.6 Communication ports 15
4. Operation.... 16
4.1 Start-up and Normal operation.... 16
4.2 Starting the UPS on Battery 16
4.3 UPS Shutdown 16
4.4 Operation on Battery Power 16
4.5 Return of AC Input Power....17
4.6 UPS remote control functions 17
5. Maintenance 18
5.1 Troubleshooting....18
5.2 Battery-module replacement 19
6. Appendices 21
6.1 Technical specifications....21
1. Introduction
Thank you for selecting an EATON product to protect your electrical equipment.
The 5P range has been designed with the utmost care.
We recommend that you take the time to read this manual to take full advantage of the many features of your UPS (Uninterruptible Power System).
Before installing 5P, please read the booklet presenting the safety instructions.
Then follow the instructions in this manual.
To discover the entire range of EATON products and the options available for the 5P range,
we invite you to visit our web site at www.eaton.com/powerquality or contact your EATON representative.
1.1 Environmental protection
EATON has implemented an environmental-protection policy.
Products are developed according to an eco-design approach.
Substances
This product does not contain CFCs, HCFCs or asbestos.
Packing
To improve waste treatment and facilitate recycling, separate the various packing components.
- The cardboard we use comprises over 50 % of recycled cardboard.
• Sacks and bags are made of polyethylene.
- Packing materials are recyclable and bear the appropriate identification symbol

| Materials Abbreviations Number in | the symbols | |
| Polyethylene terephthalat PET 01 | ||
| High-density polyethylene HDPE 02 | ||
| Polyvinyl chloride PVC 03 | ||
| Low-density polyethylene LDPE 04 | ||
| Polypropylene | PP | 05 |
| Polystyrene | PS | 06 |
Follow all local regulations for the disposal of packing materials.
End of life
EATON will process products at the end of their service life in compliance with local regulations.
EATON works with companies in charge of collecting and eliminating our products at the end of their service life.
Product
The product is made up of recyclable materials.
Dismantling and destruction must take place in compliance with all local regulations concerning waste.
At the end of its service life, the product must be transported to a processing centre for electrical and electronic waste.
Battery
The product contains lead-acid batteries that must be processed according to applicable local regulations concerning batteries.
The battery may be removed to comply with regulations and in view of correct disposal.
2.1 Standard installations
Tower models
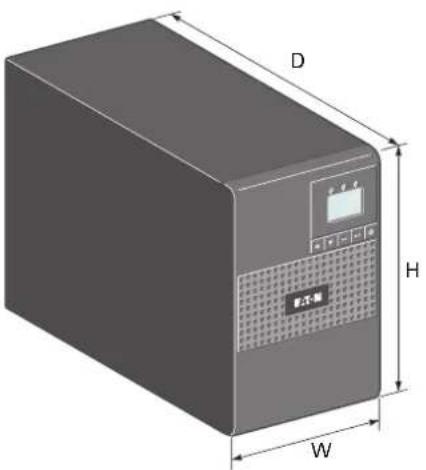
| Description | Weights (kg/lb) | Dimensions (mm/inch)D x W x H |
| 5P 650i 7.52 / 16.60 34 | 5 x 150 x 233 / 13 | 6 x 5.9 x 9.2 |
| 5P 850i 9.93 / 21.90 34 | 5 x 150 x 233 / 13 | 6 x 5.9 x 9.2 |
| 5P 1150i 10.91 / 24.10 | 345 x 150 x 233 / | 3.6 x 5.9 x 9.2 |
| 5P 1550i 15.95 / 35.20 | 445 x 150 x 233 / | 17.5 x 5.9 x 9.2 |
Rack models
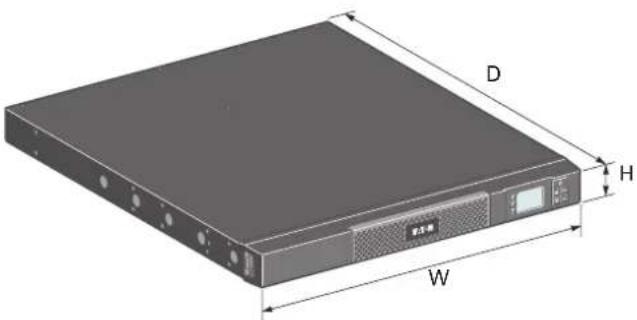
| Description | Weights (kg/lb) | Dimensions (mm/inch)D x W x H |
| 5P 650i R 8.6 / 19.00 3 | 63.5 x 438 x 43.2 / | 14.3 x 17.2 x 1.7 |
| 5P 850i R 13.8 / 30.40 | 509 x 438 x 43.2 / | 20.0 x 17.2 x 1.7 |
| 5P 1150i R 14.64 / 32.70 | 509 x 438 x 43.2 | / 20.0 x 17.2 x 1.7 |
| 5P 1550i R 19.36 / 42.70 | 554 x 438 x 43.2 | / 21.8 x 17.2 x 1.7 |
2. Presentation
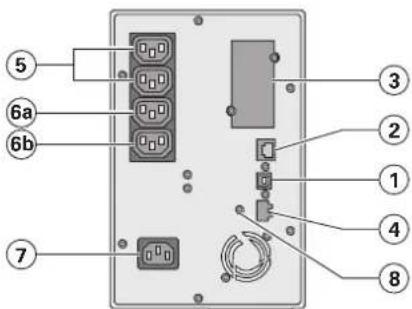
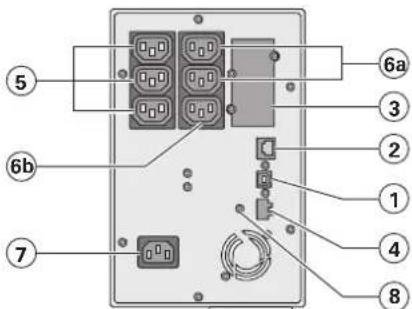
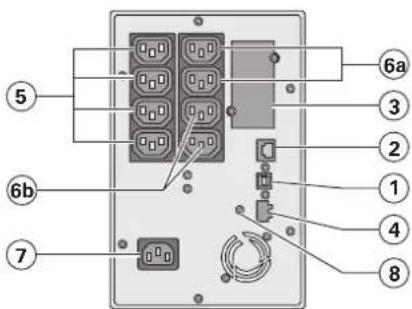
2.2 Tower rear panels
5P 650i
5P 850i
5P 1150i
5P 1550i
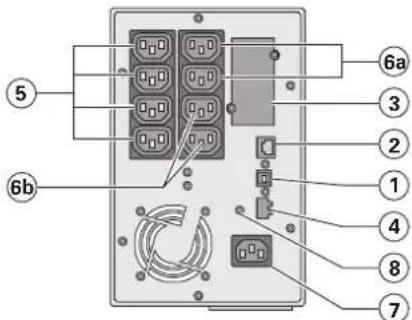
(1) USB communication port
(2) RS232 communication port
(3) Slot for optional communication card
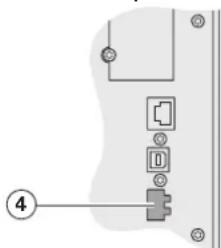
(4) Connector for ROO (remote ON/OFF) or RPO (Remote Power Off) control
(5) Outlets for connection of critical equipment (Primary group)
(6a) Group 1: programmable outlets for connection of equipment
(6b) Group 2: programmable outlets for connection of equipment
(7) Socket for connection to AC-power source
(8)Groundscrew
2. Presentation
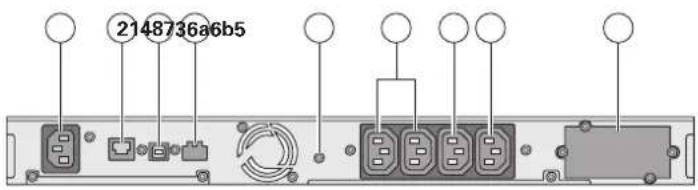
2.3 Rack rear panels
5P 650i R / 5P 850i R
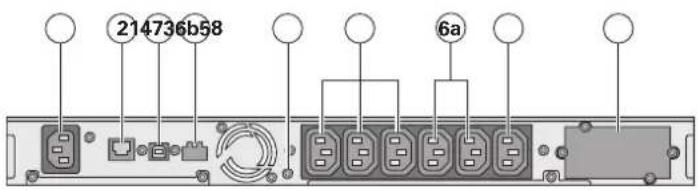
5P 1150i R
5P 1550i R
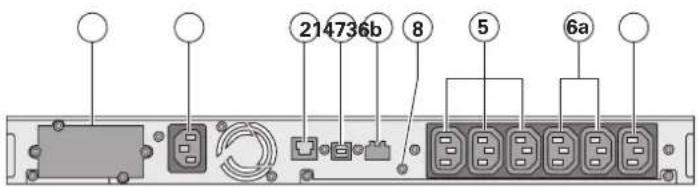
(1) USB communication port
(2) RS232 communication port
(3) Slot for optional communication card
(4) Connector for ROO (remote ON/OFF) or RPO (Remote Power Off) control
(5) Outlets for connection equipment (Primary group)
(6a) Group 1: programmable outlets for connection of equipment
(6b) Group 2: programmable outlets for connection of equipment
(7) Socket for connection to AC-power source
(8) Ground screw
2. Presentation
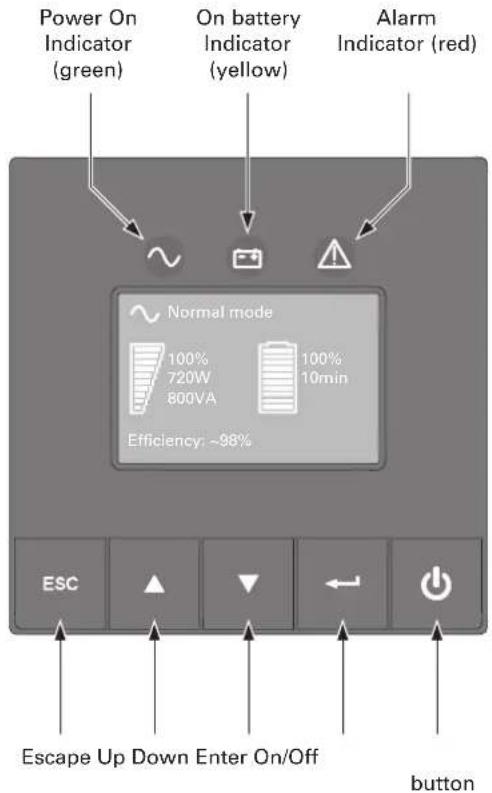
2.4 Control panel
The UPS has a five-button graphical LCD. It provides useful information about the UPS itself, load status, events, measurements and settings.
Tower models
Rack models
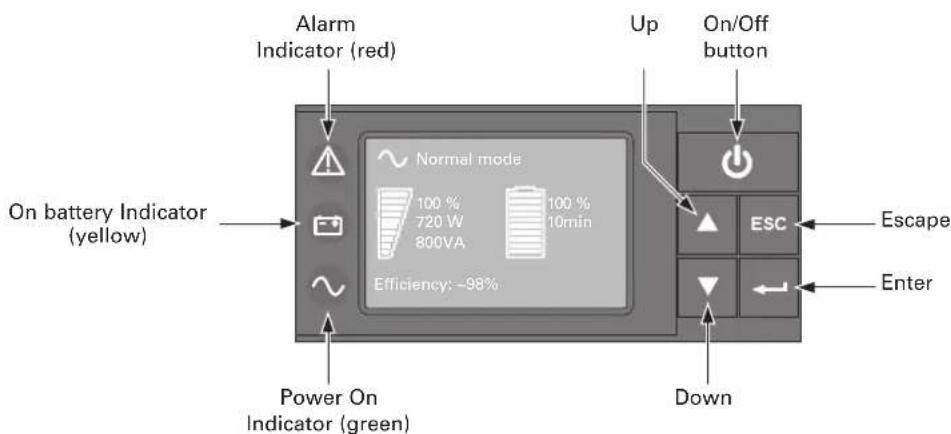
The following table shows the indicator status and description :
| Indicator Status Description | ||
| Green | On The UPS is operating normally | |
| Yellow | On The UPS is on battery mode | |
| Red | On | The UPS has an active alarm or fault. See trouble-shooting on page 18 for additional information. |
2.5 LCD description
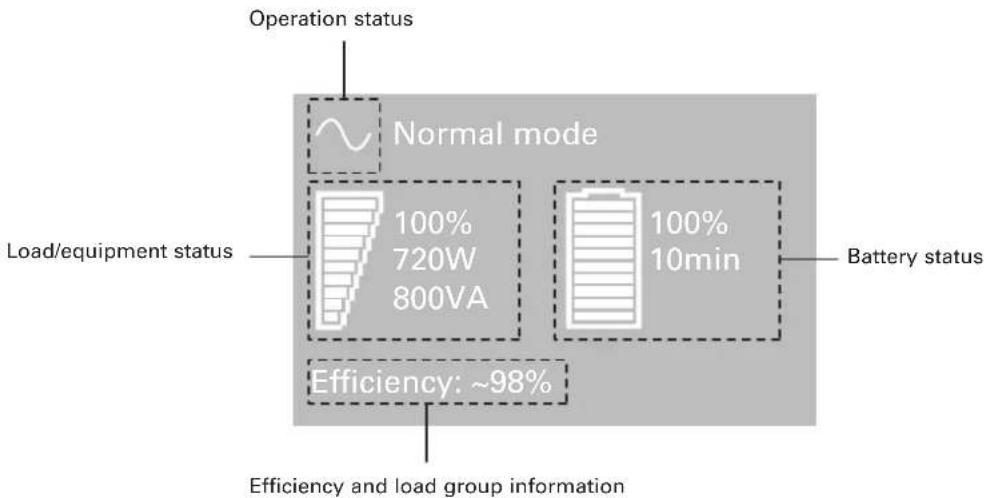
As default, or after 5 minutes of inactivity, the LCD displays the screen saver.
The backlight LCD automatically dims after 10 minutes of inactivity. Press any button to restore the screen.
The following table describes the status information provided by the UPS
Note. If other indicator appears, see troubleshooting on page 18 for additional information.
| Operation status Possible cause Action | ||
Standby mode | The UPS is OFF, waiting for start-up command from user | Equipment is not powered until ⏻ button is not pressed. |
Normal mode | The UPS is operating normally. The UPS is powering and protecting the equipment. | |
In AVR mode No beep No beep | The UPS is operating normally but the utility voltage is outside normal mode thresholds. | The UPS is powering the equipment through a Automatic Voltage Regulation device.The equipment is still normally protected. |
On Battery Battery LED is on 1 beep every 10 seconds Battery LED is on 1 beep every 10 seconds | A utility failure has occurred and the UPS is in Battery mode. | The UPS is powering the equipment with the battery power. Prepare your equipment for shutdown. |
End of backup time 1 beep every 3 seconds 1 beep every 3 seconds | The UPS is in battery mode and the battery is running low. | This warning is approximate, and the actual time to shutdown may vary significantly.Depending on the UPS Load, the "Battery Low" warning may occur before the battery reaches 20 % capacity. |
2. Presentation
2.6 Display functions
Press the Enter (button to activate the menu options. Use the two middle buttons (and) to scroll through the menu structure. Press the Enter (button to select an option. Press the button to cancel or return to the previous menu.
Menu map for Display Functions.
| Main menu Submenu Display information or Menu function | ||
| Measurements Load | W VA / Load A pf / Output V Hz / Input V Hz /Battery V min / Efficiency / Power usage | |
| Control Load Segments | Group 1: ON / OFF | Group 2: ON / OFFThese commands overrule user settings for load segments. |
| Start battery test Starts a manual battery test | ||
| Reset fault state Clears active faults | ||
| Restore factory settings Returns all settings to original values (UPS restart required) | ||
| Reset power usage Clears power usage measurements | ||
| Settings Local settings | Sets product general parameters | |
| Input / output settings Sets Input and output parameters | ||
| ON / OFF settings Sets ON / OFF conditions | ||
| Battery settings Sets battery configuration | ||
| Fault log | Displays event log or alarms | |
| Identification | UPS Type / Part Number / Serial Number / Firmware release / Com card address | |
2.7 User settings
The following table displays the options that can be changed by the user.
| Description Available settings | Default | settings | |
| Local settings | Language | [English] [Français] [Deutsch][Italiano] [Português] [Español][Русский]Menus, status, notices and alarms, UPS fault, Event Log data and settings are in all supported languages. | EnglishUser selectable when UPS is powered for the first time. |
| LCD settings | Modify LCD screen brightness and contrast to adapt to room light conditions. | ||
| Audible alarm | [Enabled] [Disabled on battery][Always disabled]Enable or disable the buzzer if an alarm occurs. | Enabled | |
| In/Out settings | Output voltage | [200 V] [208 V] [220 V] [230 V][240 V] | User selectable when UPS is powered for the first time. |
| Input thresholds | [Normal mode] [Extended mode] Extended mode reduces lower input voltage to 150 V before UPS transfers to battery.This can be used if the load can withstand low voltage supply. | Normal mode | |
| Sensitivity | [High] [Low]High: for sensitive equipment, UPS will easily transfer to battery when utility conditions are becoming bad.Low: for equipment that can withstand bad utility conditions, in that case, the UPS will not transfer to battery. | High | |
| Load segments - Auto start delay | [No Delay] [1 s] [2 s]...[65354 s]The connected load is powered after the specified delay. | Group 1: 3 sGroup 2: 6 s | |
| Description Available settings Default settings | |||
| In/Out settings | Load segments- Auto shutdown delay | [Disable] [0s] [1 s] [2 s]...[65354 s]During a power outage, authorises to keep some equipment running while turning off other equipment.This feature allows to save battery power. | Group 1: DisableGroup 2: Disable |
| Overload prealarm | [10 %] [15 %] [20 %] ... [100 %][105 %]Gives a warning when a predefined critical percentage of load is reached. | [105 %] | |
| ON/OFF settings | Cold start [Disable] | [Enable]Enables the product to be started on battery power.First cold start always disabled. | Enable |
| Forced reboot [Disable] | [Enable]If mains recover during a shutdown sequence:- if enabled, shutdown sequence will complete and wait 10 seconds prior to restart- if disabled, shutdown sequence will not complete and restart will occur immediately. | Enable | |
| Auto restart [Disable] | [Enable]Enables the product to restart automatically when mains recovers after a complete battery discharge. | Enable | |
| Energy saving [Disable] | [Enable]If enabled, UPS will shutdown after 5min of back-up time, if no load is detected on the output. | Disable | |
| Sleep mode [Disable] | [Enable]If disabled, LCD and communication will turn OFF immediately after UPS is OFF.If enabled, LCD and communication stays ON 1h30 min after UPS is OFF. | Disable | |
| Remote command | [Disable] [Enable]If enabled, shutdown or restart commands from software are authorised. | Enable | |
| RPO delay [0 s] [1s] | [2 s]...[180 s]Delays remote power off command | [0 s] | |
| Battery settings | Automatic battery test | [No test] [Every day] [Every week][Every month]Available only if battery charge mode is set to constant charge. | Every week(in constant charge, otherwise following ABM battery test method) |
| Low battery warning | [1 %] [2 %] ... [100 %]The alarm triggers when the set percentage of battery capacity is reached during a back-up time. | 20 % | |
| Restart battery level | [1 %] [2 %] ... [100 %]If set, automatic restart will occur only when percentage of battery charge is reached. | 0 % | |
| Battery charge mode | [ABM cycling] [Constant charge] ABMCycling | ||
| Deep discharge protection | [Yes] [No]If set to Yes, the UPS automatically prevents battery from deep discharge by adapting end of back-up time voltage threshold. | Yes | |
3. Installation
3.1 Unpacking and contents check
Tower models
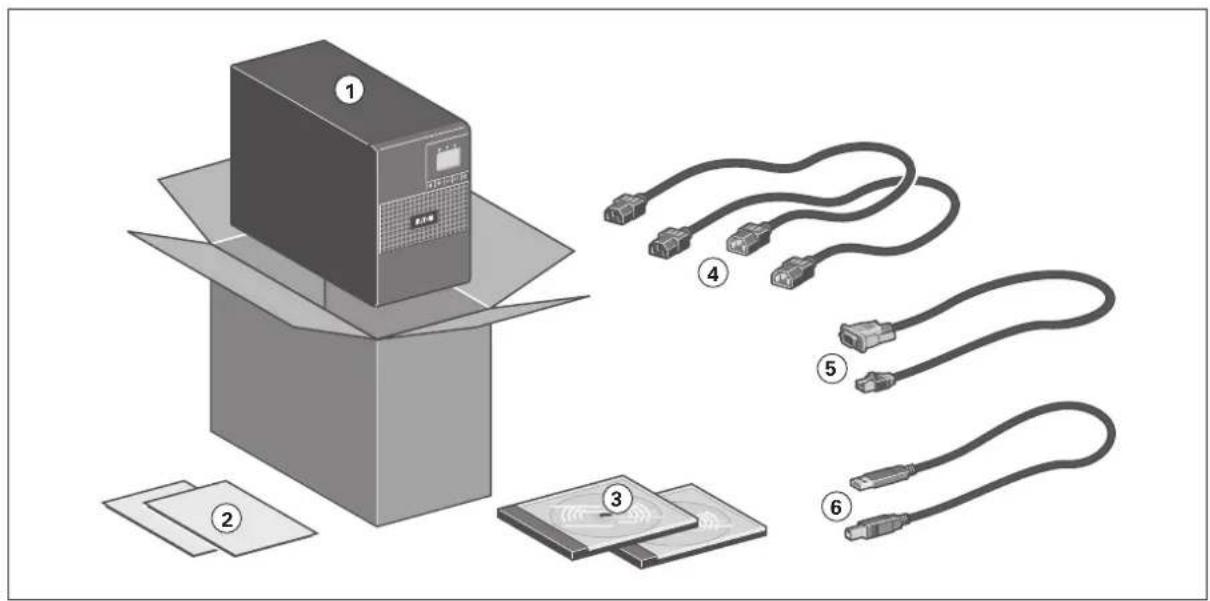
Rack models
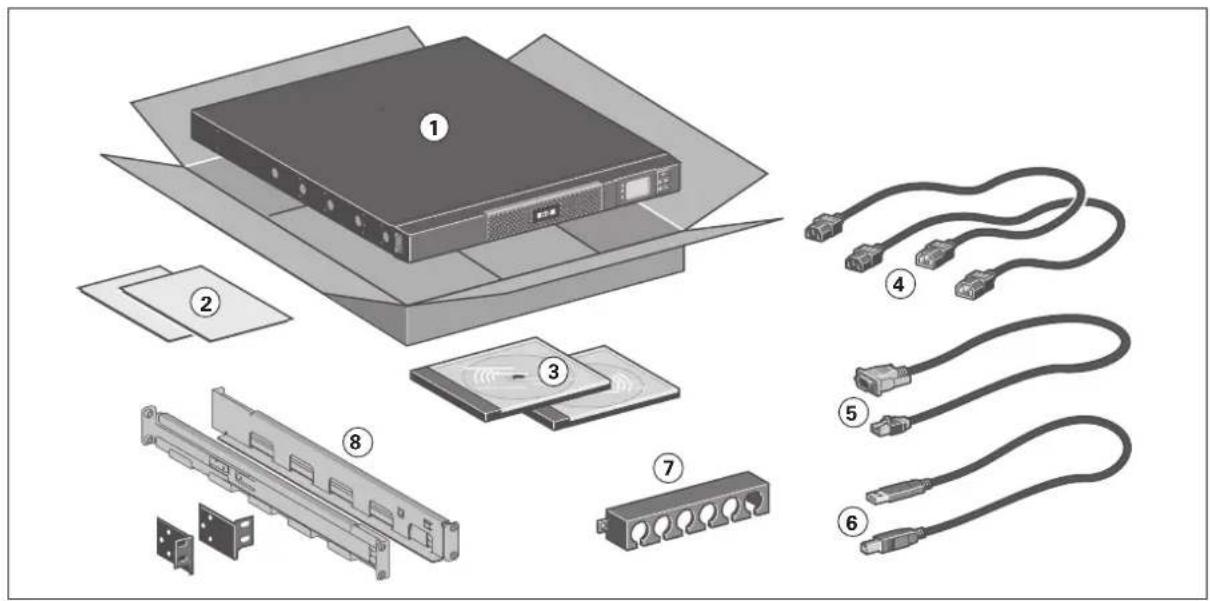
(1) 5P UPS
(2) Quick start and safety instructions
(3) User manual and IPSS (Intelligent Power Software Suite) CDROM
(4) 2 connection cables for the protected equipment
(5) RS232 communication cable
(6) USB communication cable
(7) Cable locking systems (1 x 4 outlets 650i R and 850i R models; 1 x 6 outlets 1150i R and 1550i R models)
(8) 1U Rack kit (ears only for 650i R model)

Packing materials must be disposed of in compliance with all local regulations concerning waste. Recycling symbols are printed on the packing materials to facilitate sorting.
3. Installation
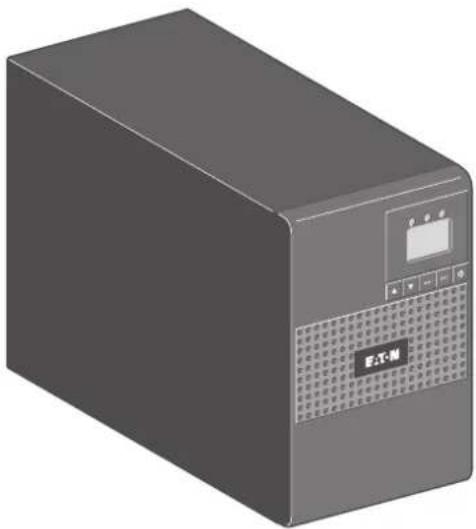
3.2 Installation of tower models
natural_image
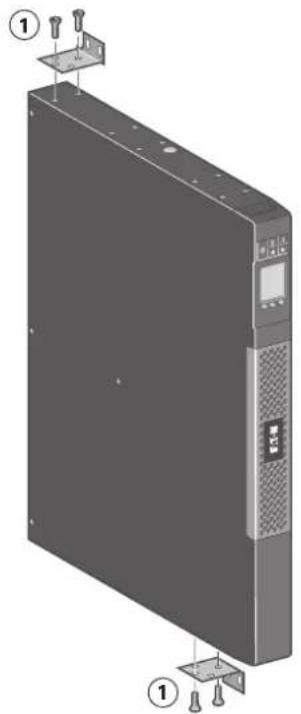
3D rendering of a gray industrial electronic device with ventilation grille and control panel (no visible text or symbols)3.3 Wall installation of rack models (650i R / 850i R / 1150i R)
natural_image
Diagram of a server rack with labeled components (no text or symbols present)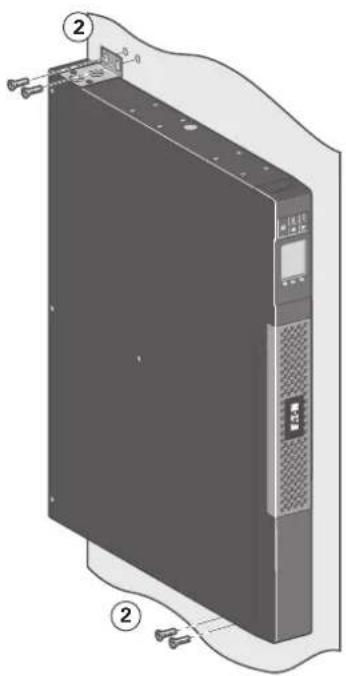
natural_image
Diagram of a server rack with labeled components, showing front panel and side connectors (no text or symbols present)3. Installation
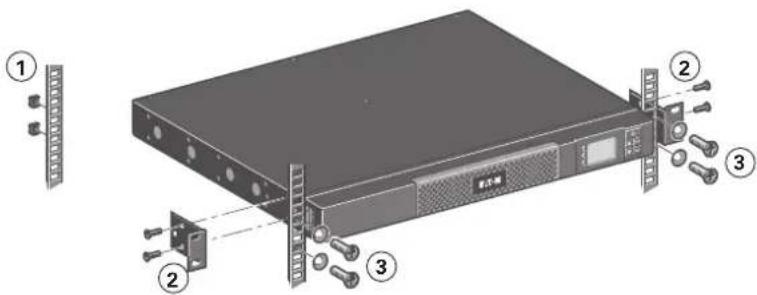
3.4 Installation of rack models (650i R only)
Follow steps 1 to 3 for rack mounting.
3.5 Installation of rack models (850i R / 1150i R / 1550i R)
Follow steps 1 to 4 for module mounting on the rails.
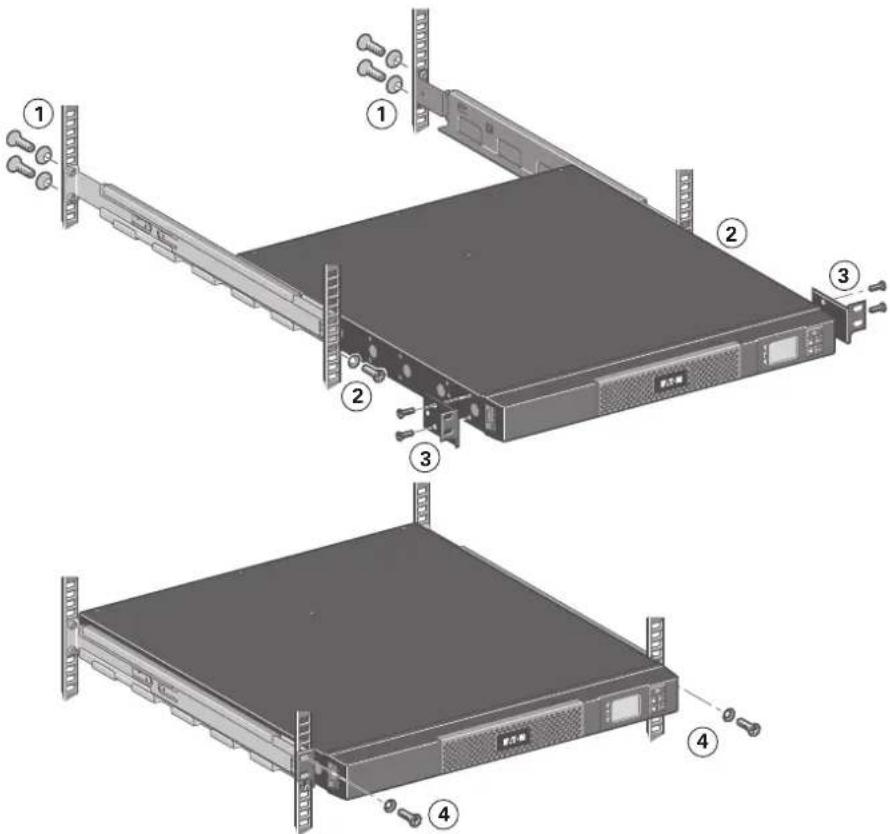

The rails and necessary hardware are supplied by EATON.
3.6 Communication ports
Connection of RS232 or USB communication port
The RS232 and USB communication ports cannot operate simultaneously.
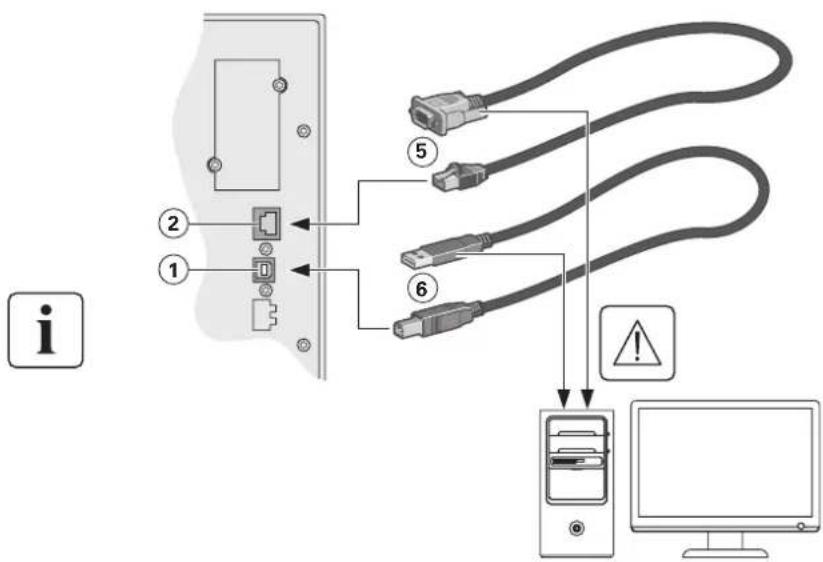
- Connect the RS232 (5) or USB (6) communication cable to the serial or USB port on the computer equipment.
- Connect the other end of the communication cable (5) or (6) to the USB (1) or RS232 (2) communication port on the UPS.
The UPS can now communicate with EATON power management software.
Installation of the communication cards (optional)

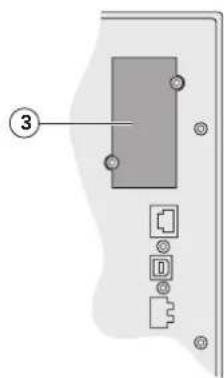
It is not necessary to shutdown the UPS before installing a communication card.
- Remove the slot cover (3) secured by screws.
- Insert the communication card in the slot.
- Secure the card cover with the 2 screws.
Characteristics of the optocouplers communication port (optional)
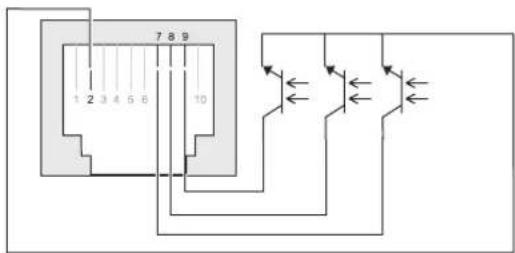
- Pins 1, 3, 4, 5, 6, 10: not used
• Pin 2: common (user) - Pin 7: low battery
• Pin 8: operation on battery power
• Pin 9: UPS ON, equipment supplied
n.o.: normally open contact
When a signal is activated, the contact is closed between the common (pin 2) and the pin for the corresponding signal.
Contact characteristics (optocoupler)
• Voltage: 48 V DC max
• Current: 25 mA max
Power: 1.2 W
4. Operation
4.1 Start-up and Normal operation
To start the UPS:
- Verify that the UPS power cord is plugged in.
- The UPS front panel display illuminates and shows EATON logo.
- Verify that the UPS status screen shows ⏻.
- Press the ⏻ button on the UPS front panel for at least 2 seconds.
- Verify that the UPS power cord is plugged in.
- The UPS front panel display illuminates and shows EATON logo.
- Verify that the UPS status screen shows ⏻.
- Press the ⏻ button on the UPS front panel for at least 2 seconds.
The UPS front panel display changes status to "UPS starting...". - Check the UPS front panel display for active alarms or notices. Resolve any active alarms before continuing. See "Troubleshooting" on page 18.
If the △ indicator is on, do not proceed until all alarms are clear. Check the UPS status from the front panel to view the active alarms. Correct the alarms and restart if necessary. - Verify that the indicator illuminates solid, indicating that the UPS is operating normally and any loads are powered and protected.
The UPS should be in Normal mode.
4.2 Starting the UPS on Battery

Before using this feature, the UPS must have been powered by utility power with output enabled at least once.
Battery start can be disabled. See the "Cold start" setting in "ON/OFF Settings" on page 11.
To start the UPS on battery:
- Pressthe ⏻ button on the UPS front panel until the UPS front panel display illuminates and shows a status of "UPS starting...".
The UPS cycles through Standby mode to Battery mode. The 📋 indicator illuminates solid. The UPS supplies power to your equipment.
- Check the UPS front panel display for active alarms or notices besides the "Battery mode" notice and notices that indicate missing utility power. Resolve any active alarms before continuing. See "Troubleshooting" on page 18.
Check the UPS status from the front panel to view the active alarms. Correct the alarms and restart if necessary.
4.3 UPS Shutdown
To shut down the UPS:
- Press the ⏻ button on the front panel for three seconds. The UPS starts to beep and shows a status of "UPS shutting OFF...". The UPS then transfers to Standby mode, and the ∼ indicator turns off.
4.4 Operation on Battery Power
Transfer to battery power
- The connected devices continue to be supplied by the UPS when AC input power is no longer available. The necessary energy is provided by the battery.
• The ∼ and -1 indicator illuminates solid.
• The audio alarm beeps every ten seconds.

The connected devices are supplied by the battery.
Low-battery warning
• The and indicator illuminates solid.
• The audio alarm beeps every three seconds.

The remaining battery power is low. Shut down all applications on the connected equipment because automatic UPS shutdown is imminent.
End of battery backup time
• LCD displays "End of backup time".
• All the LEDs go OFF.
• The audio alarms stops.
4.5 Return of AC Input Power
Following an outage, the UPS restarts automatically when AC input power returns (unless the restart function has been disabled) and the load is supplied again.
4.6 UPS remote control functions
The 5P offers a choice between two remote control functions.
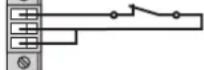
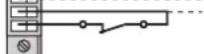
- RPO: Remote Power Off allow a remote contact to be used to disconnect all the equipment connected to the UPS. Restarting the UPS requires manual intervention.
- ROO: Remote ON/OFF allows remote action of button ⏻ to shut down the UPS.
These functions are obtained by opening a contact connected between the appropriate pins of connector (4) on the rear panel of the UPS (see figures below).
Remote control connection and test
- Check that the UPS is OFF and disconnected from the AC input source.
- Remove connector (4) after unscrewing the screws.
- Connect a normally closed volt-free contact (60 V DC / 30 V AC max., 20 mA max., 0.75 mm ^2 cable cross-section) between the two pins of connector (4) (see diagram).
ontact open: UPS shutdown
contact closed: UPS start-up (UPS connected to AC power and AC power is available)
Note. The local ON/OFF control using button ⏻ overrides the remote-control function.

ROO

RPO
contact open: UPS shutdown, LED goes ON.


return to normal operation, deactivate the remote external contact and restart the UPS by pressing button ⏻.
- Plug connector (4) into the back of the UPS.
- Connect and restart the UPS following the previously described procedures.
- Activate the external remote shutdown contact to test the function.

Warning. This connector must only be connected to SELV (Safety Extra-Low Voltage) circuits.
5. Maintenance
5.1 Troubleshooting
| Operation status Possible cause | Action | |
Batteries disconnected | The UPS does not recognise the internal batteries | If the condition persists, contact your service representative |
| The batteries are disconnected Verify | that all batteries are properly connected. If the condition persists, contact your service representative. | |
Overload | Power requirements exceeds the UPS capacity (greater than 105 % of nominal) | Remove some of the equipment from the UPS. The UPS continues to operate, but may shutdown if the load increases. The alarm resets when the condition becomes inactive. |
End of battery life | The end of the battery life is reached. | Contact your service representative for battery replacement. |
Event | An UPS event occurs | |
| Example:Remote Power OFF, the RPO contact has been activated to shutdown the UPS and now prevents restart. | Set the contact back to its normal position and press ⏻ button to restart. | |
UPS fault | The UPS has an internal fault. The UPS | S does not protect the equipment anymore.Note.the alarm message and the UPS Serial Number, then contact your service representative. |
5.2 Battery-module replacement
Safety recommendations
The battery can cause electrocution and high short-circuit currents. The following safety precautions are required before servicing the battery components:
- remove watches, rings, bracelets and all other metal objects from the hands and arms,
• use tools with an insulated handle.
Battery tray removal on tower models
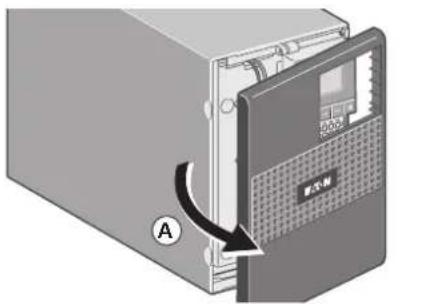
A - Remove the front panel.
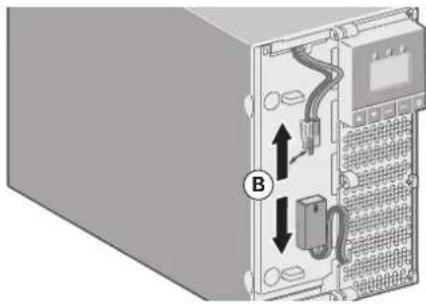
natural_image
Diagram of an internal server rack with labeled connection points (no text or symbols present)B - Disconnect the battery block by separating the two connectors (never pull on the wires).
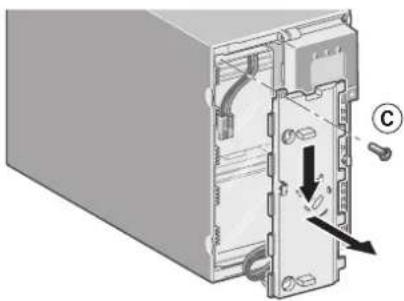
natural_image
Diagram of a computer tower internal structure showing a door, socket, and cable (no text or labels)C - Remove the plastic protection cover in front of the battery (one screw).
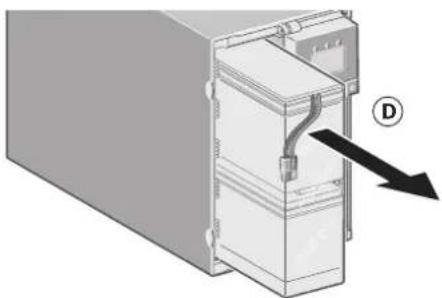
natural_image
Diagram of a server rack with an open door and cable, showing internal components and a labeled arrow (D), no text or symbols present.D - Pull the plastic tab to remove the battery block and replace it.
Mounting the new battery module
Carry out the above instructions in reverse order.

- To ensure safety and high performance, use only batteries supplied by EATON.
• Take care to firmly press together the two parts of the connector during remounting.
5. Maintenance
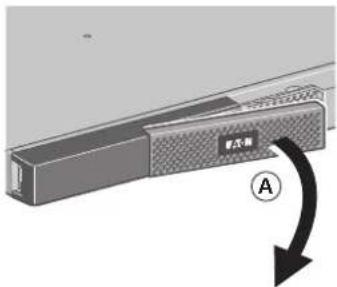
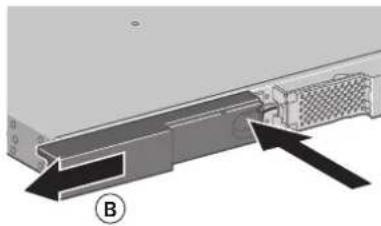
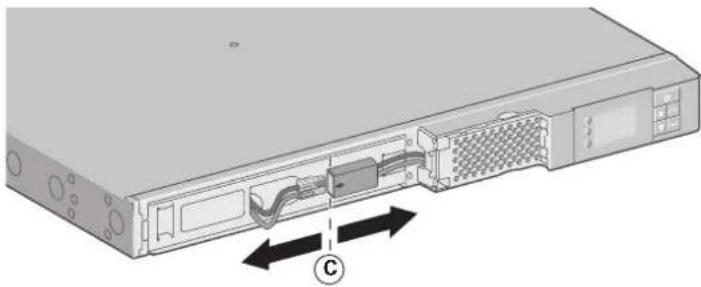
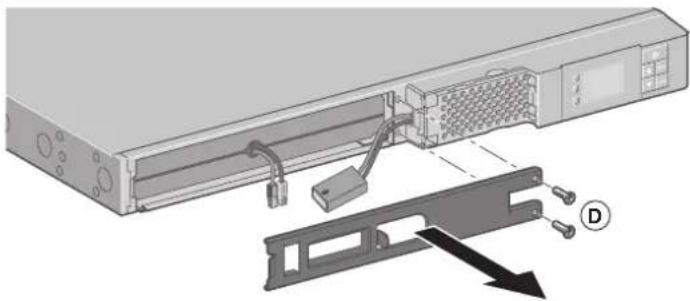
Battery tray removal on rack models
natural_image
Diagram of a mechanical assembly with arrows indicating direction (no text or symbols)A - Remove the front panel.
B - Remove the left-hand side of the front panel by pushing the button and then by sliding the part.
natural_image
Diagram of a server rack with internal components and directional arrows indicating ports (no text or symbols)C - Disconnect the battery block by separating the two connectors (never pull on the wires).
natural_image
Diagram of a server rack with attached cable and connector, showing internal components and a labeled component (D) without any text or symbols.D - Remove the metal protection cover in front of the battery (two screws).
natural_image
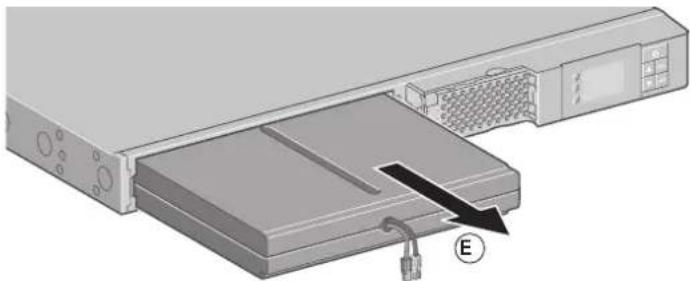
Diagram of a computer rack with an attached drive and cable, showing no text or symbolsE - Pull the plastic tab to remove the battery block and replace it.
Mounting the new battery module
Carry out the above instructions in reverse order.

• To ensure safety and high performance, use only batteries supplied by EATON.
• Take care to firmly press together the two parts of the connector during remounting.
6.1 Technical specifications
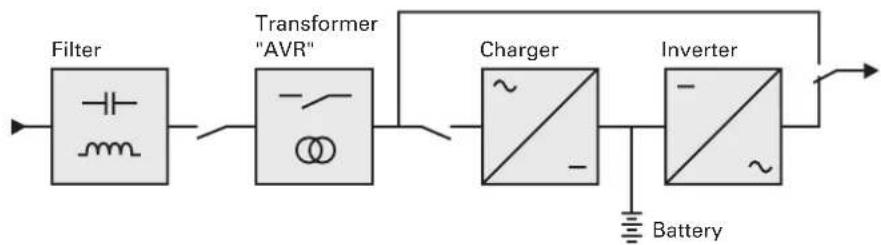
flowchart
graph LR
    A["Filter"] --> B["Transformer 'AVR'"]
    B --> C["Charger"]
    C --> D["Inverter"]
    D --> E["Battery"]
| Tower 5P 650i 5P 850i | 5P 1150i 5P 1550i | |||
| Rack 5P 650i R 5P 850i | R 5P 1150i R 5P 1550i R | |||
| Output Power@ 230 V | 650 VA420 W | 850 VA600 W | 1150 VA770 W | 1550 VA1100 W |
| Output Power@ 208 V | 585 VA378 W | 765 VA540 W | 1035 VA693 W | 1395 VA990 W |
| Output Power@ 200 V | 585 VA378 W | 765 VA540 W | 1035 VA693 W | 1395 VA990 W |
| AC Input power | ||||
| Rated input voltage single phase 200-240 V | ||||
| Input voltage range | 160 to 294 V (1) | |||
| Inputfrequencyrange | 47 to 70 Hz (50 Hz system), 56,5 to 70 Hz (60 Hz system) (2) | |||
| Output on battery power | ||||
| Voltage 200/208/220/230/240 V (-10/+6 %) (3) | ||||
| Frequency 50/60 Hz ±0.1 Hz | ||||
| Battery (sealed lead acid, maintenance free) | ||||
| Standard Tower | ||||
| 1 x 12 V9 Ah | 2 x 12 V7 Ah | 2 x 12 V9 Ah | 3 x 12 V9 Ah | |
| Rack | ||||
| 2 x 6 V9 Ah | 4 x 6 V7 Ah | 4 x 6 V9 Ah | 6 x 6 V9 Ah | |
| Environment | ||||
| Operatingtemperature range | 0 to 35 °C | 0 to 40 °C | ||
| Storagetemperature range | -15 to +50 °C | |||
| Relative humidity | 0 to 90 % (without condensation) | |||
| Noise level | < 40 dBA | |||
(1) The high and low thresholds can be adjusted using UPS settings (up to 150-294 V).
(2) Up to 40 Hz in low -sensitivity mode (programmable using UPS settings).
(3) Adjustable to 200/208/220/230/240 V, must be set to the identical AC power source value.
When the appliance is used in EU area, use an external circuit breaker in front of line with rating 16 A, 250 V which is IEC/EN 60898-1 standard compliant;
When the appliance is used in America area, use an external circuit breaker in front of line with rating 20 A, 250 V.
This product is designed for IT power distribution system.
- Certification Standards
- VCCI Notice
- Special Symbols
- Introduction......4
- Presentation....5
- Installation 12
- Operation.... 16
- Maintenance 18
- Appendices 21
- Introduction
- Environmental protection
- Substances
- Packing
- End of life
- Product
- Battery
- Standard installations
- Presentation
- Tower rear panels
- Rack rear panels
- Control panel
- LCD description
- Display functions
- User settings
- Installation
- Unpacking and contents check
- Installation of tower models
- Wall installation of rack models (650i R / 850i R / 1150i R)
- Installation of rack models (650i R only)
- Installation of rack models (850i R / 1150i R / 1550i R)
- Communication ports
- Connection of RS232 or USB communication port
- Installation of the communication cards (optional)
- Characteristics of the optocouplers communication port (optional)
- Contact characteristics (optocoupler)
- Operation
- Start-up and Normal operation
- Starting the UPS on Battery
- UPS Shutdown
- Operation on Battery Power
- Transfer to battery power
- Low-battery warning
- End of battery backup time
- Return of AC Input Power
- UPS remote control functions
- Remote control connection and test
- ROO
- RPO
- Maintenance
- Troubleshooting
- Battery-module replacement
- Safety recommendations
- Battery tray removal on tower models
- Mounting the new battery module
- Battery tray removal on rack models
- Technical specifications
Brand : EATON
Model : 5P1550IR
Category : Uninterruptible power supply