
WS-7034TWC-IT - Environment thermometer LA CROSSE TECHNOLOGY - Free user manual and instructions
Find the device manual for free WS-7034TWC-IT LA CROSSE TECHNOLOGY in PDF.


| Product Type | Environmental Thermometer (Indoor/Outdoor) |
| Model | WS-7034TWC-IT |
| Indoor Station Dimensions | 2.36 x 0.88 x 5.90 in (60 x 22.5 x 150 mm) excluding stand |
| Remote Sensor Dimensions | 2.32 x 0.86 x 2.55 in (59 x 22 x 65 mm) |
| Indoor Station Power | 2 x AAA 1.5V Alkaline batteries |
| Remote Sensor Power | 2 x AA 1.5V Alkaline batteries |
| Temperature Measurement Range (Indoor) | 14.1°F to 139.8°F (-9.9°C to 59.9°C) |
| Temperature Measurement Range (Outdoor) | -39.8°F to 139.8°F (-39.8°C to 59.9°C) |
| Temperature Accuracy | ±1°F (±0.5°C) |
| Transmission Frequency | 915 MHz |
| Maximum Transmission Range | 330 feet (100 meters) open space |
| Number of Supported Remote Sensors | Up to 3 (optional, sold separately) |
| Display Features | Indoor/outdoor temperature, min/max with time, time (12/24h), °F/°C selectable |
| Battery Life | Up to 24 months |
| Mounting Options | Table stand (included) or wall mount for indoor station; bracket for remote sensor |
| Cleaning Instructions | Clean with soft, damp cloth. Do not use solvents or scouring agents. |
| Safety Warnings | Not a toy. Keep out of children's reach. Avoid extreme temperatures and shock. |
| Warranty | 1-year limited warranty (North America only) |
| Made In | China |
| FCC ID | OMO-01RX (receiver), OMO-01TX (sensor) |
Frequently Asked Questions - WS-7034TWC-IT LA CROSSE TECHNOLOGY
User questions about WS-7034TWC-IT LA CROSSE TECHNOLOGY
0 question about this device. Answer the ones you know or ask your own.
Ask a new question about this device
Download the instructions for your Environment thermometer in PDF format for free! Find your manual WS-7034TWC-IT - LA CROSSE TECHNOLOGY and take your electronic device back in hand. On this page are published all the documents necessary for the use of your device. WS-7034TWC-IT by LA CROSSE TECHNOLOGY.
USER MANUAL WS-7034TWC-IT LA CROSSE TECHNOLOGY
tools and technology for home and office
TABLE OF CONTENTS
| Topic | Page |
| Quick Setup 3-5 | |
| Inventory of Contents 6 | |
| Detailed Setup Guide | |
| Battery Installation 7 | |
| Setting the Time 7-8 | |
| Selecting Units of Measurement | 9 |
| Features | |
| Minimum and Maximum Temperatures | 9-10 |
| Resetting Minimum and Maximum Temperatures | 10 |
| Adding additional remote temperature sensors (optional) | 11-12 |
| Mounting | 12-13 |
| Troubleshooting | 14-15 |
| Maintenance and Care 16 | |
| Specifications | 17-18 |
| Warranty Information 19-24 |
QUICK SETUP
Hint: Use good quality Alkaline Batteries and avoid rechargeable batteries.
- Have the indoor temperature station and remote temperature sensor 3 to 5 feet apart.
- Batteries should be out of both units for 10 minutes.
- Place the batteries into the remote temperature sensor first then into the indoor temperature station.
(All remote temperature sensors must be started before the indoor temperature station) - DO NOT PRESS ANY BUTTONS FOR 10 MINUTES.
In this time the indoor temperature station and remote temperature sensor will start to talk to each other and the
display will show both the indoor temperature and an outdoor temperature. If the indoor temperature station does not display both temperatures after the 10 minutes please retry the set up as stated above. After both indoor and outdoor temperatures are displayed for 10 minutes you can place your remote temperature sensor outdoors and set your time.
The remote temperature sensor should be placed in a dry, shaded area. The remote temperature sensor has a range of 330 feet. Any walls that the signal will have to pass through will reduce distance. An outdoor wall or window will have 20 to 30 feet of resistance and an interior wall will have 10 to 20 feet of resistance. Your distance plus resistance should not exceed 330 ft. in a straight line.
NOTE: Fog and mist will not harm your remote temperature sensor but direct rain must be avoided.
To complete the set up of your indoor temperature station after the 10 minutes have passed please follow the steps on pages 8-9.
INVENTORY OF CONTENTS
- The indoor temperature station (Figure 1)
- The remote temperature sensor (TX29U) and mounting bracket.
- 3 each, 1/2" Philips screws.
- One strip of double sided adhesive tape.
- Instruction Manual and Warranty Card.
Figure 1

ADDITIONAL EQUIPMENT
(not included)
- 1 Philips screwdriver.
- 2 Fresh AAA Alkaline batteries.
- 2 Fresh AA Alkaline batteries
DETAILED SETUP GUIDE
Battery Installation
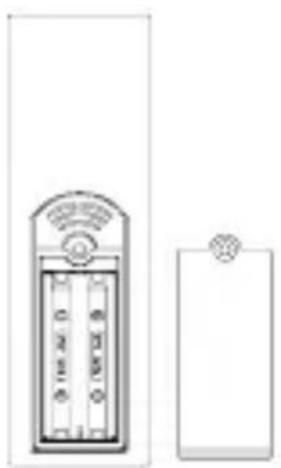
- Install 2 AA batteries in the remote temperature sensor. Make sure they do not spring free, or start-up
natural_image
Illustration of a thermometer and a hanging device (no text or symbols visible)problems may occur.
- Install 2 AAA batteries in the indoor temperature station. Do not press any buttons for at least ten minutes.

Setting the Time
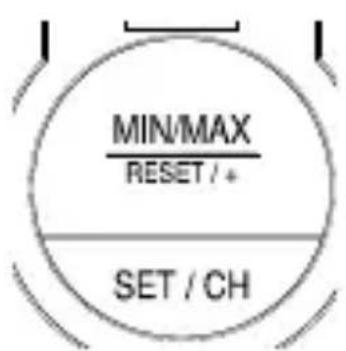
- Press and hold the "SET" button for 5 second, "12h" will appear in the TIME LCD.
-
Press and release the “MIN/MAX” button to select either 12h time (am/pm) or 24h time
-
Press and release the “SET” button 2 times, the hour will flash in the upper left corner.
-
Press and release the “MIN/MAX” button to set the hours
-
Press and release the “SET” button to move to the minute setting
- Press and release the “MIN/MAX” button to set the minutes.
- Press and release the “SET” button to activate the clock.
Note: When in 12h mode, there is only a “PM” display, which appears under “TIME.” If there is no display here it is AM. Make sure you set the time accordingly.
Selecting Units of Measurement
- Press and hold the “SET” button for 5 second until “12h” or “24h” appears in the TIME LCD.
- Press and release the “SET” button again, “°F” will appear in the TIME LCD.
- Press and release the “MIN/MAX” button to shift between °F and °C.
- Press and release the “SET” button twice to activate settings.
FEATURES
Minimum and Maximum Temperatures
- Press and release the “MIN/MAX” button, “MIN” appears next to the indoor and remote temperatures.
- The recorded minimum temperature is displayed. The time of the minimum outdoor temperature will also flash.
- Press the “MIN/MAX” button, “MAX” appears next to the indoor and remote temperatures.
- The recorded maximum temperature is displayed. The time of the maximum outdoor temperature will also flash.
- Press and release the “MIN/MAX” button to exit min/max mode.
- To view optional additional sensors, press and release the “SET” button while viewing the minimum or maximum.
Resetting Min and Max Temperatures
To reset both the minimum and maximum temperatures—press and hold the “RESET/+” button for 4 seconds.
Adding Additional Remote Temperature Sensors (optional)
The WS-7034U-IT is able to receive signals from 3 different remote temperature sensors. Following are some brief instructions for the basic set-up of remote temperature sensor units with the WS-7034U-IT. These extra remote temperature sensors can be purchased through the same dealer as this unit, or by contacting La Crosse Technology directly.
When setting up multiple remote temperature sensors, it is important to remove the batteries from all existing units in operation, then to insert batteries
first into all the remote temperature sensors. Second install batteries into the indoor temperature station and do not press any buttons for ten minutes.
Transmission problems will arise if this is not done correctly.
To view the temperature of a different remote temperature sensor unit, press and release the “SET/CH” button. A shift from one number to the next should be observed in the OUTDOOR LCD.
MOUNTING
Note: To achieve a true temperature reading, avoid mounting in direct sunlight. We recommend that you mount the remote temperature sensor on a North-facing wall. The sending range is 330ft; obstacles such as walls, concrete, and large metal objects will reduce the range. Place both units in their desired location before permanently mounting.
Remote Temperature Sensor
- Remove the mounting bracket from the remote temperature sensor.
- Mount the bracket in the desired location with either screws or adhesive tape.
- Reattach the remote temperature sensor into mounting bracket.
Indoor Temperature Station
The indoor temperature station comes with the table stand already mounted. If you wish to use the table-stand all that is required is to place the indoor temperature station in an appropriate location.
- To wall mount the indoor temperature station first remove the table stand.
- Next insert an appropriate screw in your desired location.
- Using the integrated hanging hole on the back of the unit, slip indoor
temperature station over the screw and pull down to secure.
TROUBLESHOOTING
NOTE: For problems not solved, please contact La Crosse Technology via e-mail or phone, or visit our website, www.lacrossetechnology.com
Problem: The LCD is faint Solution: Replace batteries
Problem: No outdoor temperature is displayed.
Solution:
- Remove all batteries, reinsert into remote temperature sensor first, then into the indoor temperature station.
- Place remote temperature sensor closer to the indoor temperature station.
- Be sure all batteries are fresh.
- Place remote temperature sensor and indoor temperature station in position
so the straight-line signal is not passing through more than two or three walls.
Problem: Temperatures do not match if units are placed next to each other.
Solution:
Each temperature sensor is manufactured to be accurate to within 1 degree plus or minus and under normal conditions, so two sensors could be as much as 2 degrees different.
However, the difference can be exaggerated further because the sensors are designed for different working environments. The indoor sensor is less responsive to ambient air currents because of the shielding effect of the display's case. In addition, the case can act as a heat sink to absorb and store heat from external sources (i.e. handling of the case or radiant heat). Also, the much greater range of the outdoor temperature sensor requires a different calibration curve than the indoor range. Error is usually greater at the extreme ends of a range, making it harder to compare different ranges with different curves. Under non-laboratory conditions, it
is difficult to compensate for the above factors and obtain an accurate comparison.
MAINTENANCE AND CARE INSTRUCTIONS
- Extreme temperatures, vibration, and shock should be avoided to prevent damage to the units.
- Clean displays and units with a soft, damp cloth. Do not use solvents or scouring agents; they may mark the displays and casings.
- Do not submerge in water.
- Do not subject the units to unnecessary heat or cold by placing them in the oven or freezer.
- Opening the casings invalidates the warranty. Do not try to repair the unit. Contact La Crosse Technology repairs.
SPECIFICATIONS
| TransmittingFrequency | 915MHz |
| Measuring Temperatures | |
| Indoor Temperature Station | 14.1°F to 139.82°F with 0.2 °F resolution. (-9.9°C to 59.9°C with 0.1°C resolution). |
| Remote Temperature Sensor | -39.8 °F to 139.8°F with 0.2°F resolution. (-39.8°C to 59.9°C with 0.1°C resolution). |
| Temp accuracy | +/- 1°F (+/- .5°C). |
| Transmitting range | Maximum 330 feet (100m) open space. |
| Temperature check | |
| Indoor Every 10 seconds. | |
| Outdoor Every 4 seconds | |
| Batteries—(Alkaline recommended) | |
| Remote Temperature Sensor | 2 x AA, 1.5V |
| Indoor Temperature Station | 2 x AAA, 1.5V |
| Dimensions: (L x W x H) | |
| Indoor Temperature Station | 2.36 x .88 x 5.90 in. (excluding table stand) (60 x 22.5 x 150 mm). |
| Remote Temperature Sensor | 2.32 x 0.86 x 2.55 in. (59 x 22 x 65 mm). |
| Battery life Up to | 24 months. |
WARRANTY INFORMATION
La Crosse Technology, Ltd provides a 1-year limited warranty on this product against manufacturing defects in materials and workmanship.
This limited warranty begins on the original date of purchase, is valid only on products purchased and used in North America and only to the original purchaser of this product. To receive warranty service, the purchaser must contact La Crosse Technology, Ltd for problem determination and service procedures. Warranty service can only be performed by a La Crosse Technology, Ltd authorized service center. The original dated bill
of sale must be presented upon request as proof of purchase to La Crosse Technology, Ltd or La Crosse Technology, Ltd's authorized service center.
La Crosse Technology, Ltd will repair or replace this product, at our option and at no charge as stipulated herein, with new or reconditioned parts or products if found to be defective during the limited warranty period specified above. All replaced parts and products become the property of La Crosse Technology, Ltd and must be returned to La Crosse Technology, Ltd.
Replacement parts and products assume the remaining original warranty, or ninety (90) days, whichever is longer. La Crosse Technology, Ltd will pay all expenses for labor and materials for all repairs covered by this warranty. If necessary repairs are not covered by this warranty, or if a product is examined which is not in need or repair, you will be charged for the repairs or examination. The owner must pay any shipping charges incurred in getting your La Crosse Technology, Ltd product to a La Crosse Technology, Ltd authorized service center. La Crosse Technology, Ltd will pay ground return shipping charges to the owner of the product to a USA address only.
Your La Crosse Technology, Ltd warranty covers all defects in material and workmanship with the following specified exceptions: (1) damage caused by accident, unreasonable use or neglect (including the lack of reasonable and necessary maintenance); (2) damage occurring during shipment (claims must be presented to the carrier); (3) damage to, or deterioration of, any accessory or decorative surface; (4) damage resulting from failure to follow instructions contained in your owner's manual; (5) damage resulting from the performance of repairs or alterations by someone other than an authorized La Crosse Technology, Ltd authorized service center; (6) units used for other than home use (7) applications and uses that this product was not intended or (8) the products inability to receive a signal due to any source of interference.. This warranty covers only actual defects within the product itself, and does not cover the cost of installation or removal from a fixed installation, normal set-up or adjustments, claims based on misrepresentation by the seller or performance variations resulting from installation-related circumstances.
LA CROSSE TECHNOLOGY, LTD WILL NOT ASSUME LIABILITY FOR INCIDENTAL, CONSEQUENTIAL, PUNITIVE, OR OTHER
SIMILAR DAMAGES ASSOCIATED WITH THE OPERATION OR MALFUNCTION OF THIS PRODUCT. THIS PRODUCT IS NOT TO BE USED FOR MEDICAL PURPOSES OR FOR PUBLIC INFORMATION. THIS PRODUCT IS NOT A TOY. KEEP OUT OF CHILDREN'S REACH.
This warranty gives you specific legal rights. You may also have other rights specific to your State. Some States do no allow the exclusion of consequential or incidental damages therefore the above exclusion of limitation may not apply to you.
For warranty work, technical support, or information contact:
La Crosse Technology
2809 Losey Blvd. S.
La Crosse, WI 54601
Phone: 608.782.1610
Fax: 608.796.1020
e-mail:
support@lacrossetechnology.com
(warranty work)
sales@lacrossetechnology.com
(information on other products)
web:
www.lacrossetechnology.com
FCC DISCLAIMER
This device complies with part 15 of the FCC rules. Operation is subject to the following two conditions:
(1) This device may not cause harmful interference.
(2) This device must accept any interference received, including interference that may cause undesired operation.
FCC ID: OMO-01RX (Receiver), OMO-01TX (sensor)
Freq. 915 MHz La Crosse Technology Made in China WS-7034it
All rights reserved. This handbook must not be reproduced in any form, even in excerpts, or
duplicated or processed using electronic, mechanical or chemical procedures without written permission of the publisher.
This handbook may contain mistakes and printing errors. The information in this handbook is regularly checked and corrections made in the next issue. We accept no liability for technical mistakes or printing errors, or their consequences. All trademarks and patents are acknowledged.
- THIS DEVICE MAY NOT CAUSE HARMFUL INTERFERENCE, AND
- THIS DEVICE MUST ACCEPT INTERFERENCE RECEIVED, INCLUDING INTERFERENCE THAT MAY CAUSE UNDESIRED OPERATION.
- QUICK SETUP
- Hint: Use good quality Alkaline Batteries and avoid rechargeable batteries.
- INVENTORY OF CONTENTS
- ADDITIONAL EQUIPMENT
- DETAILED SETUP GUIDE
- Battery Installation
- Setting the Time
- Selecting Units of Measurement
- FEATURES
- Minimum and Maximum Temperatures
- Resetting Min and Max Temperatures
- Adding Additional Remote Temperature Sensors (optional)
- MOUNTING
- Remote Temperature Sensor
- Indoor Temperature Station
- TROUBLESHOOTING
- Solution:
- MAINTENANCE AND CARE INSTRUCTIONS
- WARRANTY INFORMATION
- FCC DISCLAIMER
Brand : LA CROSSE TECHNOLOGY
Model : WS-7034TWC-IT
Category : Environment thermometer