
48784 - Saucepan MORPHY RICHARDS - Free user manual and instructions
Find the device manual for free 48784 MORPHY RICHARDS in PDF.


| Product Type | Saucepan |
| Brand | Morphy Richards |
| Model | 48784 |
| Material | Stainless Steel |
| Capacity | 1.8 Liters |
| Diameter | 18 cm |
| Height | 8.5 cm |
| Weight | 0.95 kg |
| Compatible Hobs | Gas, Electric, Ceramic, Induction |
| Oven Safe | Up to 180°C |
| Lid Included | Yes, Glass Lid |
| Handle Material | Stainless Steel with Silicone Grip |
| Dishwasher Safe | Yes |
| Warranty | 2 Years |
| Country of Origin | China |
| Color | Silver |
| Non-Stick Coating | No |
| Induction Compatible | Yes |
| Heat Resistant | Handle up to 200°C |
| Easy Grip Handle | Yes |
Frequently Asked Questions - 48784 MORPHY RICHARDS
User questions about 48784 MORPHY RICHARDS
0 question about this device. Answer the ones you know or ask your own.
Ask a new question about this device
Download the instructions for your Saucepan in PDF format for free! Find your manual 48784 - MORPHY RICHARDS and take your electronic device back in hand. On this page are published all the documents necessary for the use of your device. 48784 by MORPHY RICHARDS.
USER MANUAL 48784 MORPHY RICHARDS
Register online for your 2 year guarantee. See back of this instruction book for details. (UK and Ireland customers only) www.morphyrichards.co.uk
flavour Savour

natural_image
Modern kitchen pot with digital display showing 04:00 time and 'morphieschords' branding (no text on pot or background)i Please read and keep these instructions
Getting the best from your new appliance...
Safety
Never touch the outer surface of the slow cooker pan during it's operation or before it has cooled down. Use oven gloves when removing the lid or stainless steel cooking pan.
Efficiency
Removing the lid will allow valuable heat to escape, reducing the efficiency of your slow cooker and increasing the cooking time. Try not to remove the lid more than 3 or 4 times to stir or add ingredients.
Enjoy the benefits
Slow cooking gives you convenient, versatile and flavoursome food. Longer cooking times allow better distribution of flavours, giving them time to blend and season the food. A slow cooker heats food gently, making it a great way to cook meats, less expensive cuts in particular, such as stewing beef, which are tenderised through the long cooking process. Remember, there are no limits to the potential uses of your slow cooker, only your imagination!
SC48784 MUK Rev2
C €
For competitions, product hints and tips and much more, join us online at our blog, Facebook or Twitter pages.
www.homeofthehouseproud.com
www.facebook.com/LoveYourHome
www.twitter.com/LoveYourMorphy
If you have a problem or complaint, please call our dedicated UK based helpline before returning your product to the retailer from where it was purchased.

UK Helpline: 0844 871 0960
Replacement Parts: 0844 873 0726
Ireland Helpline: 1800 409 119
For details of other Morphy Richards products, plus replacement parts and accessories, please see our website:
www.morphyrichards.com
flavour Savour Easy set-up
Easy set-up guide
Please also refer to the main instruction booklet, which contains important safety information and more detail on how to use Flavour Savour.
natural_image
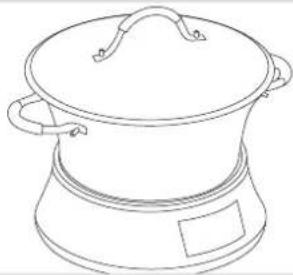
Line drawing of a cooking pot with lid and side handles (no text or symbols)This guide tells you how to use the Flavour Savour to seal / brown approximately 1kg of meat and then use the 1:30 hour stew or 8 hour slow cook programme. For all other programmes, please see the full instructions.
To Use the Seal / Brown Function
1

Place the pan ③ on to the base unit ⑤, plug the Flavour Savour in.
The display will show the default screen (left.) The Seal / Brown icon 11 and time display 9 will be flashing.
Add an appropriate amount of oil to the pan for the quantity of meat you wish to seal.
2

Press the 'Accept' button 10. The Flavour Savour will beep for approximately 2 seconds and the display will stop flashing. The pan will then start to heat up and the timer 9 will begin to countdown. The oil will take approximately 5 minutes to reach the correct temperature for sealing/browning meat (i.e. when the timer reads 00:10)
3
natural_image
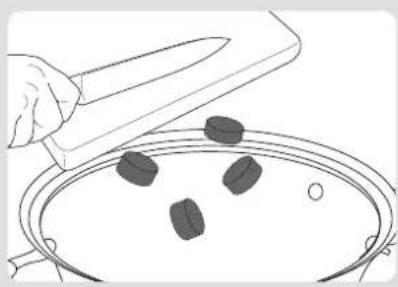
Line drawing of a hand slicing dark food items from a pan (no text or symbols)Add the meat to pan and stir regularly until the outside of the meat is sealed/browned. When the timer reaches zero, the base will beep and the cooking process will stop. If your meat is sealed before the 15 minutes is up, hold down the 'Accept' button 10 for approximately 3 seconds. The base will beep and the cooking process will stop. If you need to continue, repeat the process from stage 2 above.
To use the 1:30 Stew Function
4

When the sealing/browning process is complete, add your remaining ingredients (as per the recipe). Press the 'Function / Time' button 8 once and the following screen will appear (left) Press the 'Accept' button 10 twice, the base will then beep for approximately 2 seconds before the cooking process begins. Replace the lid when using the Flavour Savour on this setting. For countdown timer and keep warm, please see point 6.
OR to use the Slow Cook Function
5

When the sealing/browning process is complete, add your remaining ingredients (as per the recipe). Press the 'Function / Time' button 8 twice and the following screen will appear (left) Press the 'Accept' button 10 twice, the base will then beep for approximately 2 seconds before the cooking process begins. Replace the lid when using the Flavour Savour on this setting. For countdown timer and keep warm, please see point 6.
Countdown Timer and Keep Warm Function
6

At the end of the cooking process the product will beep and automatically switch to keep warm. Keep warm will last for up to two hours and counts up from H0:00 to H2:00. At the end of the 2 hours, the display will show 'H' which will stay on the screen until the hot plate reaches ambient temperature (approximately 40°C). The screen will then go blank.
Pressing any button will take you back to the screen shown when first turned on.
Features
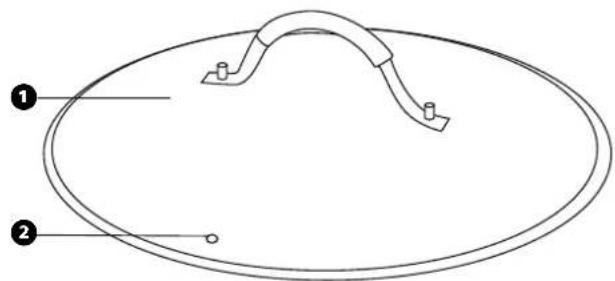
① Glass lid
② Steam vent
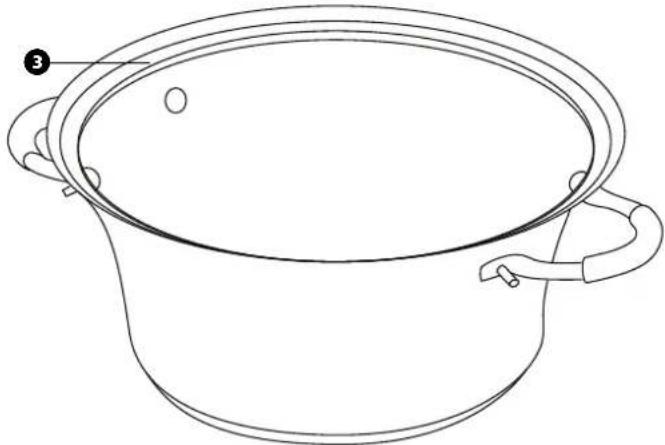
3 Stainless steel cooking / serving pan (either 4.5L or 6.5L depending on model)
④ Heating element
5 Base unit
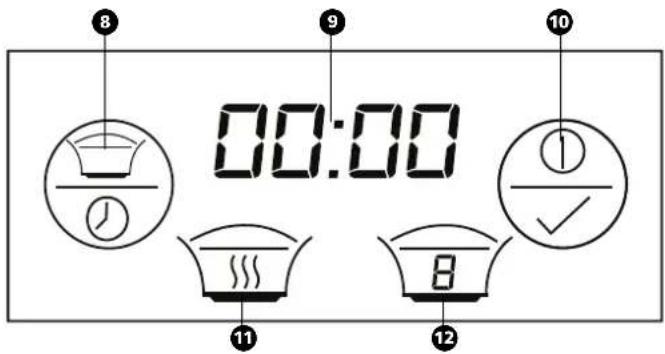
6 Control / Display panel (see enlarged diagram)
⑦ Drain hole x2 (underneath)
8 Function / Time button
9 Time display
10 Accept button
⑪ Seal / Brown icon and Stew Icon
12 Slow Cook icon
Key

Seal/Brown icon

Stew icon

Slow Cook icon
natural_image
Line drawing of a cooking pot with handles and a lid, no text or symbols present
Cooking Capacity
- The 6.5 litre Flavour Savour has a maximum working capacity of 5 litres.
- The 4.5 litre Flavour Savour has a maximum working capacity of 3.5 litres.
- The capacity can be found on the rating label, located underneath the product.
Before using the Flavour Savour for the first time
Remove all labels and tags from the product.
Wash the stainless steel pan and lid in hot soapy water with a sponge or dishcloth. DO NOT use a scouring pad or other abrasive material as this will mark the stainless steel. Rinse the pan and lid thoroughly and dry.
IMPORTANT: DO NOT IMMERSE THE FLAVOUR SAVOUR BASE IN WATER
Please note:
During initial use, you may notice a slight odour due to the burning off of manufacturing residue. This is completely normal, does not effect the food being cooked and will disappear after a few uses.
Flavour Savour Hints & Tips
- All ingredients should be at room temperature before adding. If chilled, allow to come to room temperature, as cold food will affect the cooking time.
- Meat can be used chilled from the fridge, but do not use frozen meat. Use the browning function to seal the meat.
-
Make sure all frozen ingredients are thoroughly thawed before use.
-
If using cold stock in the slow cooking recipe (for example, wine) you will need to pre-heat the ingredients. Start with the browning function first, adding all the ingredients. When the 15 min time is up, continue with the slow cooking function.
- In traditional stove top slow cooking, it is advised to coat the meat in flour before browning. There is no need to do this in the Flavour Savour. Simply brown / seal the meat as instructed. If the liquid needs to be thickened, add and stir in a corn flour / cold water paste mix 30 minutes towards the end of the cooking time.
- If using meat on the bone (for example, chicken thighs, spare ribs, etc), the slow cooking process can make the meat fall away from the bone - this is normal, and results in a richer flavour. However, watch out for small bones that could be in the liquid.
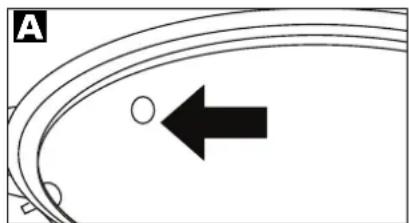
- Do not over fill the pan, as the recipes on pages 9-12 of this instruction booklet are designed for maximum capacity, and allows room above the food for even cooking. The capacity can be found on the rating label, located underneath the product. If using your own recipe, do not fill above the handle rivets that can be seen inside the pan. A
natural_image
Diagram showing a curved track with an arrow pointing to a circular marker, labeled 'A' in the top-left corner (no text or symbols on the diagram itself)- The lid will become very hot in use. The silicon insulated handles will stay cool, allowing you to lift the lid with. However, it is advisable to take the precaution of using oven gloves when doing this.
-
Ingredients should be evenly distributed throughout the pan. However, root vegetables are better placed in the lower half of the pot to start cooking. All ingredients should be immersed in the cooking liquid.
-
To ensure even cooking, root vegetables should be cut to size (approx 20mm cubed).
- If the pan over boils, this will usually be because it has been over filled, so remove some of the ingredients and /or liquid.
- In general, tough meats like stewing meat require longer cooking times which are ideal for slow cooking. For the stew function, a better quality cut of meat is required to suit the 1:30–1:45 cooking time.
- Chicken and quality cuts of meat require less time to cook. You should therefore use the lower value of the time range – for example, for level 1 use 8 hours.
- For dumplings, add to the stew 30-45 minutes before the end time. You can add these to the surface, and there is no need to submerge in the liquid.
- Ham joints should be left in the plastic wrapper, if supplied. If not, use a suitable heat resistant plastic bag or tie with butchers string to prevent the ham from falling apart during the cooking.
- If using the stew setting, allow the cooked food to rest for 10 minutes in the pan before serving. This allows the hot (boiling) food to cool before eating.
- When you have become experienced at using your Flavour Savour, you can begin to create your own recipes, but it is advisable to follow an existing recipe as a guide. If using ingredients such as pasta, milk, cream, sea food or shell fish in a recipe, these should be added 30 minutes towards the end of the cooking of the other ingredients. Coconut milk and rice pudding recipe does not apply.
-
Do not leave raw, uncooked food in the pan for any length of time. Start the cooking process as soon as possible. If you have to delay the cooking, store the food in a fridge, and when ready, allow to come back to room temperature.
-
If a previously cooked recipe has gone cold, use the stew setting at 1:30hrs to reheat the food. Depending on the recipe, this can take 30-45 minutes to reheat. Ensure the food is hot before serving.
- If you are cooking half quantities, cooking time can usually be reduced to two thirds. Check that the food is thoroughly cooked before serving.
- Adapting existing recipes from conventional cooking to use in a slow cooker may require reducing the liquid used, as liquid does not evaporate to the same extent.
- Where stock is required, use boiling water.
- When cooking joints of meat, start by covering with boiling water or stock. This can be reduced towards the end of the cooking time.
- Uncooked red kidney beans must be soaked and boiled for 10 minutes to remove toxins before use in the Flavour Savour.
- If required pour off excess oil after browning.
- If using stock or sauces from jars or containers, heat first in a microwave and then add to the pan. Alternatively add 30 minutes to the cooking time.
Explanation of Terms
Browning/Sealing:
Before stewing or slow cooking meat, it is important that the meat is sealed / browned first. This means to cook the meat lightly on the outside in hot oil before starting the stewing or slow cooking process (the meat should still be raw in the middle). Sealing / browning your meat in this way helps it to retain flavour as well as moisture.
Stewing:
With respect to the Flavour Savour, stewing means to cook your meat and / or vegetables in a liquid (eg wine, stock, water) in between 1 hour 30 minutes and 1 hour 45 minutes.
Slow Cooking:
Slow cooking is a way of cooking food over a long period of time (usually between 4 and 10 hours) in a liquid (eg wine, stock, water). As the name suggests, food is cooked more slowly and gently, often meaning that meat will be more tender. Meats with a higher fat content are well suited to slow cooking as the process allows the fat to melt, leaving the meat very tender.
Instructions for Use
Place the base 5 on to a dry, level, heat resistant surface, away from the edge of the work surface. Do not use on the floor.
Please note:
If the product is switched on and not in use, the timer display light will switch off to standby mode after 30 minutes.
Flavour Savour Sealing/Browning Function
Place the pan ③ on to the base unit ⑤ and plug the Flavour Savour in. The display ⑥ will show the default screen B.
B

The time display ⑨ and the Sealing Function icon ⑪ will both be flashing. Add an appropriate amount of oil to the pan for the quantity of meat you wish to seal.
See recipes on pages 9-11 of this instruction booklet.
We recommend that approximately two tablespoons of vegetable oil is suitable to seal between 800g-1200g of meat. This can however be varied depending on personal taste and the amount of fat in the meat being sealed.
To select the Sealing function, press the 'Accept' button 10 once. The Flavour Savour will beep for approximately 2 seconds and the display will stop flashing. The pan will then start to heat up and the timer 9 will begin to countdown. The oil will take approximately 5 minutes to reach the correct temperature for sealing / browning meat (i.e. when the timer reads 00:10). A good way to test if the oil if hot enough is to add a small piece of meat or onion to the pan. If it sizzles when it hits the oil, the temperature is sufficient to seal / brown. If it does not sizzle, let the pan heat up for another minute or so and then test it again.
Add the meat to pan and stir regularly until the outside of the meat is sealed / browned. When the timer reaches zero, the base will beep and the cooking process will stop. If your meat is sealed before the timer reaches zero, hold down the 'Accept' button 10 for approximately 3 seconds. The base will beep, the cooking process will stop and the screen will return to the default display B.
If your meat needs a few extra minutes sealing after the timer has reached zero, simply press the 'Accept' button to start the sealing/browning function again. As explained above, to cancel the sealing function before the timer reaches zero, hold down the 'Accept' button 10 for approximately 3 seconds.
Due to the high temperature that the Flavour Savour operates at in Seal / Brown mode, you should only carry out a maximum of two 15 minute programmes in quick succession. If you try to select the programme a third time and the unit is hot, the following screen will show --:-- and the 'Seal / Brown' icon 📄 will flash Ⓐ.
C

The function cannot be selected again until the product has cooled down sufficiently. This should however not cause any difficulties as it should always be possible to seal/brown the required amount of meat in 30 minutes (2 x 15).
Please note:
Do not start the 'Sealing / Browning' function without the pan ③ on the base ⑤ as this will make the product overheat. You should also not start the 'Sealing / Browning' function without adding your oil to the pan.
Sealing/Browning on your gas or electric hob in your Flavour Savour Pan
If you prefer, you can use your Flavour Savour pan on your gas or electric hob to seal / brown your meat.
Simply add your oil as detailed above and place the pan on your stove. The oil may heat up slightly more quickly on your hob, so use a small piece of meat / onion as explained previously to test the temperature.
Sealing / browning meat tip When sealing large quantities of meat, we suggest you split the meat into smaller batches to make the job easier. As the meat should be stirred at all times during the process, smaller quantities of meat are easier to handle.
Stew Function
Place the pan 3 on to the base unit 5. Add your ingredients as per the recipe instructions you are following. Whether you have used the 'Seal / Brown' function or just turned the Flavour Savour on, the display screen showing should be the default one D.
D

Press the 'Function / Time' button ⑧ once and the display will change to E.
E
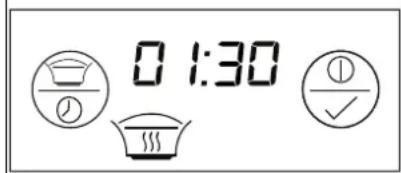
The time display 9 and Stew Icon 10 will both be flashing. Press the 'Accept' button 10 to choose Stew function. The Stew icon 11 will then stop flashing.
(Please note that if you have selected the Stew Function by mistake, you can return to the previous screen by holding down the 'Function / Time' button 8 for approximately 2 seconds.)
You can then select either the 1 hour 30 minute or 1 hour 45 minute programme (dependent on which recipe you are following). To select the 1 hour 30 minute programme, press the 'Accept / Start / Stop' button 10. To select the 1 hour 45 minute programme, press the 'Function / Time' button 8. The Time Display 9 will then change to show 01:45. Press the 'Accept' button 10.
The time will then stop flashing and the base will beep for approximately 2 seconds before the cooking process begins. The timer will then countdown to zero. If more cooking time is required you can repeat the stew setting. You must however determine how much extra cooking time you need.
If for any reason you need to cancel the cooking process before the timer has reached zero, hold down the 'Accept' button 10 for approximately 3 seconds. The base will beep, the cooking process will stop and the screen will return to the default display B.
During the stew function, steam will escape through the steam vent. Ensure the vent is positioned at the back of the product. WARNING: The steam and vent will be hot.
Slow Cook Function
Place the pan ③ on to the base unit ⑤. Add your ingredients as per the recipe instructions you are following. Whether you have used the 'Seal / Brown' function or just turned the Flavour Savour on, the display screen showing should be the default one as below F.
F

Press the 'Function / Time' button ⑧ twice and the display will change to Ⓖ.
G

The time display ⑨ and Slow Cook Icon ⑫ will both be flashing. There are three different Slow Cook programmes available – 1, 2 and 3. The difference is the amount of time that each programme can be set for. Each programme has a different icon as below:

Between 8 and 10 hours (low)

Between 6 and 8 hours (medium)

Between 4 and 6 hours (high)
If you wish to use Slow Cook programme 1, press the 'Accept' button 10.
If you wish to use Slow Cook programme 2, press the 'Function /Time' button ⑧ once (Slow Cook icon 2 will appear), before pressing the 'Accept' button ⑩.
If you wish to use Slow Cook programme 3, press the 'Function /Time' button ⑧ twice (Slow Cook icon 3 will appear), before pressing the 'Accept' button ⑩.
The time will then stop flashing and the base will beep for approximately 2 seconds before the cooking process begins and the timer will then countdown to zero.
Once you press the 'Accept' button 10, the Slow Cook icon 12 will stop flashing and just the time will flash. (Please note that if you have selected the 'Slow Cook Function' by mistake, you can return to the previous screen by holding down the 'Function / Time' button 8 for approximately 2 seconds)
You are then able to select the amount of time you would like the Slow Cook programme to run for. Pressing the 'Function / Time' button 8 allows you to cycle through the times available. When the time you want is displayed, press the 'Accept' button 10.
The time will then stop flashing and the base will beep for approximately 2 seconds before the cooking process begins. The timer will then countdown to zero.
If for any reason you need to cancel the cooking process before the timer has reached zero, hold down the 'Accept' button ⑪ for approximately 3 seconds. The base will beep, the cooking process will stop and the screen will return to the default display H.
H

Keep Warm
At the end of the cooking process the product will beep and automatically switch to keep warm. Keep warm lasts for up to two hours and counts up from H0:00 to H2:00. At the end of the 2 hours, the base will beep and the display will show H which will stay on the screen until the hot plate reaches ambient temperature (approximately 40°C).
0

The screen will then go blank. Pressing any button will take you back to the screen shown when first turned on.
Please note that the Keep Warm function can be stopped at any time during the 2 hour period by holding down the 'Accept' button for approximately 2 seconds.
After cooking
Switch off at the mains socket and unplug the unit.
Important: Ensure base unit is cool before storing in the pan.

Cleaning and Taking Care of Your Flavour Savour
- The pan and lid can be washed in a dishwasher. Alternatively, you may use hot, soapy water with a non-abrasive scouring pad. Do not use abrasive cleaners or detergents.
- Do not immerse the power base in water or any other liquids. To clean, use a damp cloth and dry thoroughly.
- Ensure the base of the pan, and the hot plate surface are clean, free from burnt-on food, and dry before use. The outer base of the pan can be cleaned with a metal scouring pad if required, to remove stubborn stains.
- When adding ingredients and liquid to the cooking pot, avoid over filling. If an over-spill does occur that runs down into the base, switch off and unplug from the mains socket, remove the pan, and allow the liquid to drain away through the drain holes. Fully clean away any excess food or liquid that may have lodged in the recess between the heater plate and the metal reflector, wipe over with a damp cloth, and dry thoroughly before next use.
Recipes
Beef Stew
4.5L 6.5L
| Beef, cubed 700g 1kg |
| Potatoes, cubed 500g 700g |
| Carrots, sliced 500g 700g |
| Leeks, sliced 3 medium 3 large |
| Onion, chopped 1 2 |
| Beef stock 1L 1.5L |
| Corn flour 1tbsp 3tbsp |
| Mixed herbs 2 tsp 3 tsp |
| Salt and freshly ground black pepper |
When using the browning / sealing function, always add 30ml (2 tbsp) of cooking oil to the pan first.
Method
- Use browning / sealing function to brown meat and fry onions. (Fry meat in two batches for the 6.5L)
- Mix in rest of ingredients.
- Switch to slow cook setting.
• Cook for maximum time for the setting. - Thicken with corn flour / water mix (see page 10).
- Add dumplings 30 minutes to 1hr before end.
Chicken and White Wine
| 4.5L 6.5L | ||
| Chicken breasts | 6 10 | |
| Butter | 30g | 40g |
| Onion, chopped | 1 large | 2 large |
| Mushrooms, sliced | 250g 400g | |
| White wine | 3 tbsp | 5 tbsp |
| Chicken stock | 500ml | 750ml |
| Mixed herbs | 1tsp 2 tsp | |
| Corn flour | 3 tbsp | 5 tbsp |
| Egg yolks | 2 3 | |
| Double cream | 100ml | 150ml |
| Salt and freshly ground black pepper | ||
Method
- No need to use browning / sealing function.
- Add all ingredients except flour, egg and cream to pan and set to slow cook.
- Thicken with corn flour / water mix (see page 10).
- Once cooked, mix egg and cream together with a little of the hot liquid and stir into the dish.
- Chicken recipes are usually cooked for the shortest time for each setting. e.g. 8hrs 6 hrs 3-4hrs
Boiled Ham
4.5L 6.5L
| Gammon joint | 1.1kg | 1.8kg |
Method
- No need to use browning / sealing function.
- Place gammon in pan and cover with boiling water.
- Can be cooked for the min or max time for each setting.
Vegetable soup
| 4.5L 6.5L | ||
| Vegetable selection | 1.75kg | 1.8kg |
| Vegetable stock | 1.5L 2L | |
| Mixed herbs | to taste | to taste |
| Salt and freshly ground black pepper | ||
Method
- No need for browning / sealing function.
- Add all ingredients at once, and cook for the maximum time for the setting.
- Liquidise when cooled.
New England Beef
| 4.5L 6.5L | ||
| Beef joint, topside | 1kg | 1.5kg |
| Bouquet garni | 1 l | |
| Thyme | 112 tsp | 2 tsp |
| Peppercorns | 112 tsp | 2 tsp |
| Shallots | 8 10 | |
| Carrots | 400g 550g | |
| Swede | 200g 300g | |
| Water, enough to cover joint | ||
When using the browning / sealing function, always add 30ml (2 tbsp) of cooking oil to the pan first.
Method
- Use browning / sealing function to brown all sides of beef.
- Add rest of ingredients and cook for minimum time for the setting.
• Thicken sauce with corn flour for gravy.
Bolognese sauce
| 4.5L 6.5L | ||
| Minced beef 1kg 1.5kg | ||
| Onions, chopped 2 3 | ||
| Celery, sliced 4 sticks 6 sticks | ||
| Garlic cloves, crushed 2 3 | ||
| Tomato puree 5 tbsp 7 tbsp | ||
| Flour 1 tbsp 3 tbsp | ||
| Can tomatoes 2 cans 3 cans | ||
| Beef stock 400ml | 600ml | |
| Mushroom, sliced | 200g | 300g |
| Mixed herbs 1 tsp | 2 tsp | |
| Salt and freshly ground black pepper | ||
When using the browning / sealing function, always add 30ml (2 tbsp) of cooking oil to the pan first.
Method
- Use browning / sealing function to brown mince, a bit at a time.
- Add onions, garlic and celery and fry until soft.
- Switch to slow cook.
- Add the other ingredients and stir well.
- Add the tomato puree.
- Stir well.
- Can be cooked for minimum to maximum time for the setting.
- Thicken with corn flour / water mix (see page 10).
Sausage Pot
| 4.5L 6.5L | |
| Oil | 1 tbsp 1 tbsp |
| Sausages | 1 kg 1.5 kg |
| Onions, chopped 2 large | 3 large |
| Carrots, sliced | 4 5 |
| Leeks, sliced | 2 3 |
| Beef stock 1ltr | 1.5ltr |
| Chutney | 4 tbsp 6 tbsp |
| Worcestershire sauce | 3 tbsp 5 tbsp |
| Salt and freshly ground black pepper | |
When using the browning / sealing function, always add 30ml (2 tbsp) of cooking oil to the pan first.
Method
- Use browning / sealing function to brown sausages in batches.
- Add vegetables and fry until soft.
- Switch to slow cook.
- Add rest of ingredients and cook for minimum time for the setting.
Beef Curry
| 4.5L 6.5L | ||
| Vegetable oil | 4 tbsp 4 tbsp | |
| Cooking apples, peeled cored and chopped | 2 large | 3 medium |
| Onions, chopped 3 medium | 3 large | |
| Stewing steak, cubed | 1kg 1.5kg | |
| Curry powder | 4 tsp | 5 tsp |
| Beef stock 650ml | 1L | |
| Mango Chutney | 4 tbsp 5 tbsp | |
| Sultanas | 100g | 150g |
| Tinned tomatoes, chopped | 400g | 600g |
| Lemon juice | 2 tbsp 3 tbsp | |
| Corn flour | 3 tbsp 5 tbsp | |
| Salt and freshly ground black pepper | ||
When using the browning / sealing function, always add 30ml (2 tbsp) of cooking oil to the pan first.
Method
- Use browning / sealing function to brown the meat, a bit at a time.
- Add onions and fry until soft.
- Switch to slow cook
- Add other ingredients and stir well.
- Add the tomato puree.
- Stir well.
- Can be cooked for minimum to maximum time for the setting.
- Thicken with corn flour / water mix (see page 10).
Thickening with cornflour
Make a cornflour paste by mixing the advised amount of flour (see recipe) with a little cold water until a smooth paste is achieved. Mix this into a cup of the hot liquid taken from the cooking pan, when the flour has fully mixed into the liquid add this back into the rest of the ingredients and stir well until the corn flour is evenly distributed. This can be done 30 minutes from the end of the cooking time. Alternatively if the cooking time has already elapsed, and keep warm has started, mix in as above an switch onto slow cook 3 for 15 minutes.
Thai Beef Curry
| 4.5L 6.5L | |
| Butter 40g 60g | |
| Stewing beef, cubed 700g 1kg | |
| Onion, chopped 1 2 | |
| Garlic cloves, crushed 3 4 | |
| Peanut butter 4 tbsp 6 tbsp | |
| Coconut milk 400g 800g | |
| Potatoes, quartered 500g 700g | |
| Curry powder 3 tbsp 4 tbsp | |
| Thai fish sauce 3 tbsp 4 tbsp | |
| Soft brown sugar | 3 tbsp 4 tbsp |
| Beef stock | 500ml 1L |
Method
- Melt butter in pan on browning / sealing function and add meat, garlic and onion and brown. (fry meat in two batches for the 6.5L)
- Add onions and garlic and fry until soft.
- Add other ingredients and stir well.
- Switch to slow cook.
- Can burn a little to bottom of pan but not badly. Best to use slow cook functions.
BBQ Ribs
| 4.5L 6.5L | ||
| Ribs | 1kg | 1.5kg |
| BBQ sauce | 200ml | 300ml |
Method
- Marinade ribs in the sauce for a few hours or overnight.
- Place in pan and cook for required time.
- All programmes work but the longer the cook time the more tender the meat is.
Syrup Sponge Pudding
| 4.5L 6.5L | |
| Butter 125g 125g | |
| Golden syrup | 4 tbsp 4 tbsp |
| Caster sugar | 100g 100g |
| Eggs | 2 2 |
| Self raising flour | 200g 200g |
| Milk | 2 tbsp 2 tbsp |
| Lemon juice | 2 tbsp 2 tbsp |
Method
- Butter inside of a 1.25l pudding basin and line bottom with baking paper.
• Pour the syrup into the bottom of the basin. - Cream butter and sugar until smooth and creamy.
- Gradually mix in eggs and flour and stir in milk and juice. Spoon mixture on top of syrup and cover with pleated baking paper. Tie with string and make a handle.
- Place into Flavour Savour and fill with boiling water half way up the sides.
• Best cooked on fast stew setting for 1:45hr
Rice Pudding
| 4.5L 6.5L | |
| Butter 40g 60g | |
| Pudding rice | 150g 250g |
| Sugar | 150g 250g |
| Milk | 1.5L 2L |
| Nutmeg | Pinch 1 tsp |
Method
- Butter inside of slow cooker with butter.
- Add all ingredients to pan and stir.
- Best results on low setting 1 (8-10hrs) otherwise can burn to bottom of pan.
Chocolate Cake
| 4.5L 6.5L | |
| Cocoa 50g 50g | |
| Boiling water 6 tbsp 6 tbsp | |
| Baking powder 1 tsp 1 tsp | |
| Self raising flour 175g 175g | |
| Caster sugar 150g 150g | |
| Oil 150ml 150ml | |
| Eggs 3 3 | |
Method
- Line a 7" cake tin with baking paper.
- Mix the cocoa with boiling water to a paste.
- Mix flour, baking powder and sugar together in a bowl.
- Beat eggs and oil together and add to mixture together with chocolate paste, mix well.
- Pour into tin and cover with foil. Tie with string and make a handle. Place into slow cooker and fill with boiling water half way up the sides.
- Best cooked on fast stew setting for 1:45hr
Berry Cobbler
| 4.5L 6.5L | ||
| Fresh fruit / berries (raspberries, blackberries, blueberries etc) | 700g 1.2kg | |
| Sugar | 100g 150g | |
| Self raising flour | 100g | 200g |
| Suet | 50g 100g | |
| Salt | Pinch | Pinch |
| Lemon zest | 1 Lemon | 2 Lemons |
| Milk | 3-4 tbsp | 6-8 tbsp |
Method
- Place the fruit inside the flavour savour and stir in half the sugar.
- Mix the rest of the sugar with the flour, suet, salt and lemon zest.
- Add milk to bind into a dough, do not handle too much.
- Place balls of the dough on top of the fruits in the centre, do not let them touch the sides of the pan as they will expand.
- Cook on any setting for the lowest time of the range.
HELPLINE
If you have any difficulty with your appliance, do not hesitate to call us.
We are more likely to be able to help than the store from where you bought it.
Please have the following information ready to enable our staff to deal with your query quickly.
- Name of the product.
- Model number as shown on the underside of the appliance.
- Serial number as shown on the underside of the appliance.
| UK Helpline | 0844 871 0960 |
| Replacement Parts | 0844 873 0726 |
| Ireland Helpline | 1800 409 119 |
Website
You may also contact us through our website, or visit the site to browse and purchase appliances, spare parts and accessories from the extensive Morphy Richards range.
www.morphyrichards.com
IMPORTANT SAFETY INSTRUCTIONS
The use of any electrical appliance requires the following common sense safety rules.
Primarily there is danger of injury or death and secondly the danger of damage to the appliance. These are indicated in the text by the following two conventions:
WARNING: Danger to the person!
IMPORTANT: Damage to the appliance!
In addition, we offer the following safety advice.
Location
- This appliance is intended to be used in household and similar applications such as:
farm houses;
by clients in hotels, motels and other residential type environments;
bed and breakfast type environments.
It is not suitable for use in staff kitchen areas in shops, offices and other working environments.
• Always locate your appliance away from the edge of the worktop.
- Keep your appliance away from any hot burners and heated ovens.
- Ensure that the appliance is used on a firm, flat, heat resistant surface.
- Ensure that sufficient space is left above and around all sides of your appliance to allow air to circulate.
- Do not use the appliance outdoors or near water.
- IMPORTANT: Do not use too close to curtains, draperies, walls, cupboards and other flammable materials.
- WARNING: Do not use underneath cupboards.
Personal safety
- WARNING: Do not touch the appliance or other hot parts during or after use, use the handles or knobs, and always use oven gloves when removing the pan lid.
- To protect against the risk of electrical shock do not put base in water or in any other liquid.
- Do not touch hot surfaces. Use oven gloves or a cloth when removing lid or handling hot containers.
- Extreme caution must be used when moving an appliance containing hot food, water, or other hot liquids.
- This appliance is not intended for use by persons (including children) with reduced physical, sensory or mental capabilities, or lack of experience and knowledge, unless they have been given supervision or instruction concerning use of the appliance by a person responsible for their safety.
Mains cable
- The mains cable should reach from the socket to the appliance without straining the connections.
- Do not let the mains cable hang over the edge of the worktop where a child could reach it.
- Do not let the cable run across an open space e.g. between a low socket and table.
- Do not let the cable run across a cooker or hot area which might damage the cable.
- Never leave the appliance connected to the socket outlet when not in use.
- If the supply cable is damaged, it must be replaced by the manufacturer, its service agent or similarly qualified persons in order to avoid a hazard.
Children
- Children should be supervised to ensure that they do not play with the appliance.
- Teach children to be aware of dangers in the kitchen, warn them of the dangers of reaching up to areas where they cannot see properly or should not be reaching.
- Children are vulnerable in the kitchen, particularly when unsupervised and if appliances are being used or cooking is being carried out.
- Never allow a child to operate this appliance.
Other safety considerations
- Do not switch on the cooker if the pan is empty.
- Allow the lid and stainless steel cooking pan to cool before immersing in water.
- Never cook directly on the base unit. Use the stainless steel cooking pan.
- Do not use the lid if cracked or chipped.
- Do not switch on the appliance when it is upside down or laid on it's side.
- The lid and stainless steel cooking pan are fragile. Handle them with care.
- Do not operate with a damaged cord or plug or after the appliance malfunctions or has been damaged in any manner. Contact Morphy Richards for advice.
- Do not attempt repairs - the appliance contains no user-serviceable parts. Call our helpline for advice.
- The use of attachments or tools not recommended by Morphy Richards may cause fire, electric shock or injury.
- Do not place on or near a hot gas electric burner or in a heated oven.
- Only use for intended purpose.
- Unplug from the socket when not in use, before putting on or taking off attachments, and before cleaning.
- Do not move the appliance whilst hot.
- This appliance is not intended to be operated by means of an external timer or a separate remote-control system.
• Always use the cooking pan supplied with this appliance. Do not use another pan.

ELECTRICAL REQUIREMENTS
Check that the voltage on the rating plate of your appliance corresponds with your house electricity supply which must be A.C. (Alternating current).
If the socket outlets in your home are not suitable for the plug supplied with this appliance, the plug should be removed and the appropriate one fitted.
WARNING: The plug removed from the mains cable, if severed, must be destroyed, as a plug with a bared flexible cable is hazardous if engaged into a live socket outlet.
Should the fuse in the 13 amp plug require changing, a 13 amp BS1362 fuse must be fitted.
WARNING: This appliance must be earthed.
Registering Your Two Year Guarantee
Your standard one year guarantee is extended for an additional 12 months when you register the product within 28 days of purchase with Morphy Richards. If you do not register with Morphy Richards within 28 days, your product is guaranteed for 1 year. To validate your 2 year guarantee register with us online at
www.morphyrichards.co.uk
N.B. Each qualifying product needs to be registered with Morphy Richards individually.
Please note that the 2 year guarantee is only available in the UK and Ireland. Please refer to the one year guarantee for more information.
Your One Year Guarantee
It is important to retain the retailer's receipt as proof of purchase. Staple your receipt to this back cover for future reference.
Please quote the following information if the product develops a fault. These numbers can be found on the base of the product.
Model no.
Serial no.
All Morphy Richards products are individually tested before leaving the factory. In the unlikely event of any appliance proving to be faulty within 28 days of purchase, it should be returned to the place of purchase for it to be replaced.
If the fault develops after 28 days and within 12 months of original purchase, you should contact the Helpline number quoting Model number and Serial number on the product, or write to Morphy Richards at the address shown.
You may be asked to return a copy of proof of purchase.
Subject to the exclusions set out below (see Exclusions), the faulty appliance will then be repaired or replaced as appropriate and dispatched usually within 7 working days of receipt.
If, for any reason, this item is replaced or repaired during the 1 year guarantee period, the guarantee on the new item will be calculated from original purchase date. Therefore it is vital to retain your original till receipt or invoice to indicate the date of initial purchase.
To qualify for the 1 year guarantee, the appliance must have been used according to the instructions supplied.
Exclusions
Morphy Richards shall not be liable to replace or repair the goods under the terms of the guarantee where:
1 The fault has been caused or is attributable to accidental use, misuse, negligent use or used contrary to the manufacturer's recommendations or where the fault has been caused by power surges or damage caused in transit.
2 The appliance has been used on a voltage supply other than that stamped on the products.
Morphy Richards products are intended for household use only. See usage limitations within the location safety instructions.
Morphy Richards has a policy of continuous improvement in product quality and design. The company, therefore reserves the right to change the specification of it's models at any time.
3 Repairs have been attempted by persons other than our service staff (or authorised dealer).
4 The appliance has been used for hire purposes or non domestic use.
5 The appliance is second hand.
6 Morphy Richards reserves the right not to carry out any type of servicing or repair work, under the guarantee, at its discretion.
7 Batteries and damage from leakage are not covered by the guarantee.
- This guarantee does not confer any rights other than those expressly set out above and does not cover any claims for consequential loss or damage. This guarantee is offered as an additional benefit and does not affect your statutory rights as a consumer.

For electrical products sold within the European Community. At the end of the electrical products useful life, it should not be disposed of with household waste. Please recycle where facilities exist. Check with your Local Authority or retailer for recycling advice in your country.
morphy richards
The After Sales Division Morphy Richards Ltd
Mexborough, South Yorkshire, England, S64 8AJ
Helplines (office hours)
UK 0844 871 0960
Spare Parts 0844 873 0726
Republic of Ireland 1800 409 119
SC48784 MUK Rev2 12/10
For details of other Morphy Richards products, plus replacement parts and accessories, please see our website:
www.morphyrichards.com


- Getting the best from your new appliance...
- Safety
- Efficiency
- Enjoy the benefits
- flavour Savour Easy set-up
- Easy set-up guide
- To Use the Seal / Brown Function
- To use the 1:30 Stew Function
- OR to use the Slow Cook Function
- Countdown Timer and Keep Warm Function
- Features
- Key
- Cooking Capacity
- Before using the Flavour Savour for the first time
- IMPORTANT: DO NOT IMMERSE THE FLAVOUR SAVOUR BASE IN WATER
- Please note:
- Flavour Savour Hints & Tips
- Explanation of Terms
- Browning/Sealing:
- Stewing:
- Slow Cooking:
- Instructions for Use
- Flavour Savour Sealing/Browning Function
- B
- Sealing/Browning on your gas or electric hob in your Flavour Savour Pan
- Stew Function
- Slow Cook Function
- Keep Warm
- After cooking
- Cleaning and Taking Care of Your Flavour Savour
- Recipes
- Method
- Thickening with cornflour
- HELPLINE
- Website
- IMPORTANT SAFETY INSTRUCTIONS
- WARNING: Danger to the person!
- IMPORTANT: Damage to the appliance!
- Location
- Personal safety
- Mains cable
- Children
- Other safety considerations
- ELECTRICAL REQUIREMENTS
- Registering Your Two Year Guarantee
- www.morphyrichards.co.uk
- Your One Year Guarantee
- Exclusions
- morphy richards
Brand : MORPHY RICHARDS
Model : 48784
Category : Saucepan