
5030 - Mp3 player ENERGY SISTEM - Free user manual and instructions
Find the device manual for free 5030 ENERGY SISTEM in PDF.


| Product Type | MP3 Player |
| Brand | Energy Sistem |
| Model | 5030 |
| Storage Capacity | 8 GB (typical) |
| Display | 1.8-inch color TFT |
| Audio Formats | MP3, WMA, WAV, FLAC |
| Video Playback | AMV, AVI (converted) |
| Image Viewing | JPEG, BMP, GIF |
| FM Radio | Yes, with presets |
| Voice Recording | Built-in microphone |
| Battery | Li-ion rechargeable, 500 mAh |
| Playback Time (audio) | Up to 12 hours |
| Charging | USB 2.0, 2 hours full charge |
| Connectivity | USB 2.0, 3.5mm headphone jack |
| Expandable Memory | microSD card slot, up to 32 GB |
| Dimensions | 90 x 40 x 10 mm |
| Weight | 45 g |
| Included Accessories | USB cable, earphones, manual |
| Care & Cleaning | Wipe with dry cloth, avoid moisture |
| Safety | Keep away from heat and magnetic fields |
| Spare Parts & Repairability | Battery replaceable by technician |
Frequently Asked Questions - 5030 ENERGY SISTEM
User questions about 5030 ENERGY SISTEM
0 question about this device. Answer the ones you know or ask your own.
Ask a new question about this device
Download the instructions for your Mp3 player in PDF format for free! Find your manual 5030 - ENERGY SISTEM and take your electronic device back in hand. On this page are published all the documents necessary for the use of your device. 5030 by ENERGY SISTEM.
USER MANUAL 5030 ENERGY SISTEM
The items supplied with your phone might vary depending on the software and accessories available in your region or offered by your service provider. You can obtain additional accessories from your local Doro device. The supplied accessories provide the best performance with your phone.
-
Earpiece
-
Left selection button
-
Call button
-
Speed dials
-
Voice mail
-
Keypad lock
-
Silent/Input method
-
Microphone
-
Torch shortcut
-
Message shortcut
-
End call/Power on/off
-
Arrow buttons
-
Right selection button
-
Charging socket
-
Headset socket
-
Loudspeaker
-
Assistance button
-
Battery cover
-
Lanyard hold (lanyard is not included)
Contents
Congratulations on your purchase 1
Get started.... 1
Insert the SIM card and battery 1
Charge the phone.... 2
Get to know your phone.... 2
Assistive functions.... 2
Turn the phone on and off ....
Start-up wizard 3
Navigate the phone 3
Enter text 4
Phone settings.... 5
Calls.... 7
Make a call.... 7
Call from the phonebook 8
Receive a call.... 8
Volume control.... 8
Call options 9
Speed dial 9
SOS calls 10
Call log....10
Call settings 11
Phonebook....14
Add contact....14
Manage phonebook contacts....14
Phonebook settings 15
ICE (In Case of Emergency) 16
Assistance button 17
Make an assistance call 17
Activation 18
Number list 18
Activate text messages (SMS) 19
Assistance settings 19
Messages....20
Create and send text message (SMS) 20
Outbox and Sent....21
Message settings 21
Connectivity 24
Network setup 24
Bluetooth ® 24
Sound & Display 26
Audio setup C 26
Tone setup (ringtone)....26
Ringtone volume C 26
Silent 27
Alert type....27
Extra tone....27
Wallpaper....27
Text size 27
Idle display....28
LCD backlight....28
Brightness 🙏 28
Additional functions ......28
Alarm....28
Calendar....29
Daily reminder 29
Calculator....30
FM radio....30
Torch....32
Status....32
Reset settings....32
Display status symbols 33
Display main symbols 33
Troubleshooting....34
Safety instructions....36
Network services and costs....36
Operating environment 36
Medical units 37
Areas with explosion risk 37
Li-ion battery....37
Protect your hearing....38
Emergency calls....38
GPS/Location based functions 38
Vehicles....38
English
Protect your personal data ....39
Malware and viruses....39
Care and maintenance 40
Warranty.... 41
Specifications 41
Copyright and other notices.... 41
Hearing aid compatibility ....42
Specific Absorption Rate (SAR) 43
Correct disposal of this product 44
Correct disposal of batteries in this product 44
Declaration of Conformity....44
FCC/IC....44
FCC notice....44
RF exposure information (SAR) 45
Congratulations on your purchase
Doro 5030 is a good-looking phone bringing you widely spaced, conve keys, predictive text, direct memories and an SMS button for easy dia and texting. A crisp colour display and enhanced sound simplify usage even more. Other practical features include a torch, reminders, wake-up alarm, vibrating ringer and one-touch assistance dialling with SMS alert For more information about accessories or other Doro products please visit www.doro.com.
Get started
Insert the SIM card and battery
IMPORTANT!
Turn off the phone and disconnect the charger before removing the battery cover.

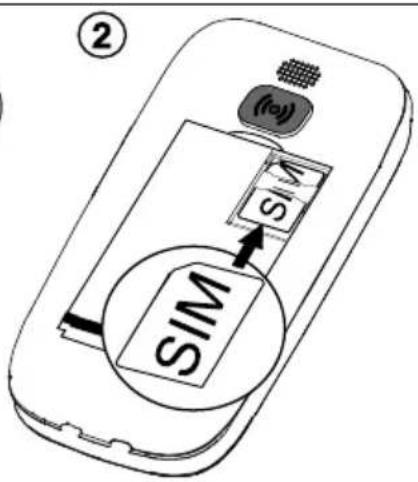

- Remove the battery cover and the battery if it is already installed.
- Insert the SIM card as shown, by gently sliding it into the holder. Take care not to scratch or bend the contacts on the SIM card.
- Insert the battery by sliding it into the battery compartment with the contacts facing downwards to the right. Replace the battery cover.
Charge the phone

CAUTION
Only use batteries, chargers and accessories that have been approved for use with this particular model. Connecting other accessories may be dangerous and may invalidate the phone's type approval and warranty.
When the battery is running low, is displayed and a warning signal is heard.
-
Connect the mains adapter to a wall socket and to the charging socket ☐. The battery charge indicator is animated while charging. It takes approximately 3 hours to fully charge the battery. Wh the charger is connected to the phone, is displayed briefly, and when it is disconnected.
-
When charging is completed, it is displayed on the screen. If the phone is turned off when the charger is connected to the phone only the battery charge indicator will be shown on the disp
Note! To save power the LCD backlight goes off after a while. Press a button to illuminate the display. Full battery capacity will not be reached until the battery has been charged 3–4 times. Batteries degrade over time, which means that call time and standby time will normally decrease with regular use.
Save energy
When you have fully charged the battery and disconnected the charger from the device, unplug the charger from the wall socket.
Get to know your phone
Assistive functions
Use the symbols below to guide you through supporting sections in the manual.

Seeing

Hearing

Handling

Safety
Turn the phone on and off
- Press and hold on the phone to turn it on or off. Confirm with Yes to power off.
- If the SIM card is valid but protected with a PIN code (Personal Ic tification Number), PIN is displayed. Enter the PIN code and press OK (upper left corner of keypad). Delete with Clear (upper right corner of keypad).
Note! If PIN and PUK codes were not provided with your SIM card, pl contact your service provider.
Attempts: # shows the number of PIN attempts left. When no more a tempts remain, PIN blocked is displayed. The SIM card must then be locked with the PUK code (Personal Unblocking Key).
- Enter the PUK code and confirm with OK.
- Enter a new PIN code and confirm with OK.
- Re-enter new PIN code and confirm with OK.
Start-up wizard
When starting the phone for the first time, you can use the Start-up ward to set some basic settings.
- Press Yes to change or No if you do not want to change.
The default language is determined by the SIM card. See Phone setting p.5 on how to change language, time and date.
Tip: You can run the start-up wizard later if you want. From standby mode, press Menu→Settings→General Start-up wizard.
Navigate the phone
Standby (idle mode)
When the phone is ready to use, and you have not keyed in any chaters, the phone is in standby.
- Press to return to standby mode.
- Press left selection button — to access the phone Menu or right selection button— Name to access your saved contacts in the phonebook.
Tip: You can always press to return to standby.
Scroll
- Use the arrow buttons ↕ to scroll in menus.
Step-by-step instructions
The arrow (→) indicates next action in step-by-step instructions. To confirm an action, press OK. To select an item, scroll or highlight the iteming ∪/and then press OK.
Example:
- Press Menu → Phonebook → new contact- Adv.
To perform the example on your Doro 5030 you should do the followi
-
Press Menu, scroll to Phonebook and press OK.
-
Select -New contact- and press Add.
Enter text
Enter text manually
Select character
- Press a numerical key repeatedly until the desired character is shown. Wait a few seconds before entering the next character.
Special characters/smileys
-
Press ✱ for a list of special characters.
-
Select the desired character with / and press OK to confirm.
Move the cursor within text
- Use / to move the cursor within the text.
Upper case, lower case and numerals
- Press # to choose between upper case, lower case and numerals. See Input mode, p.5.
Change writing language
-
Press and hold # for a list of available languages.
-
Select language with ∪/and press OK to confirm.
Enter text with predictive text
In some languages you can use the Smart ABC (eZiTypet method which uses a dictionary to suggest words.
- Press each key once, even if the displayed character is not the one you want. The dictionary will suggest words based on the keys you have pressed.
Example
- Press 3, 7, 3, 3 to write the word "Fred". Complete the word before looking at the suggestions.
- Use ∪/to view the suggested words.
- Press Select and continue with the next word. Alternatively, press 0 to continue with the next word.
- If none of the suggested words are correct, use manual input mod
Note! See Predictive text, p.21 for more information.
Input mode
- Press # to change input mode. The icon on the top left of the d play indicates the input mode.
| Abc | Sentence case with predictive text |
| ABC | UPPER CASE with predictive text |
| abc | lower case with predictive text |
| Abc | Sentence case |
| ABC UPPER CASE | |
| abc lower case | |
| 123 | Numerals |
Phone settings
Time & date
Set the time and date
-
Press Menu → Settings → General Time & date:
-
Set time to enter the time (HH:MM).
-
Set date to enter the date (DD/MM/YYYY).
-
Press OK to confirm.
Tip: You can also set the phone to automatically update the time and date according to the current time zone. In Time & date select Auto time
On. Automatic update of date and time does not change the time have set for the alarm clock or the calendar. They are in local time. Updating may cause some alarms you have set to expire depending on network support and subscription.
Set the time and date format
- Press Menu → Settings General Time & date Set → format:
• Time format 12 hours or 24 hours.
- Date format and select the desired date format.
- Press OK to confirm.
Language
The default language for the phone menus, messages, etc. is determin by the SIM card. You can change this to any other language support the phone.
- Press Menu → Settings → General Language.
- Use ∪/to select a language.
- Press OK to confirm.
Block function
- Press Menu Settings General Block Junction.
- Select each function you want to disable and press Off.
- Press Done to confirm.
PIN code options
-
Press Menu Settings Security SIM look:
-
On to activate the PIN code. You need to enter the PIN code every time the phone is started.
- Off to deactivate the PIN code.
IMPORTANT!
If enabling Off-mode and the SIM card is lost or stolen, it is unprotected.
- Automatic to start the phone without the PIN code. The phone remembers it automatically, but if the SIM card is moved to
another phone (lost or stolen) the PIN code needs to be enter when the phone is started.
- Press OK to confirm.
Change PIN code
- Press Menu → Settings → Security Passwords PIN. →
- Enter current PIN code and press OK.
- Enter new PIN and press OK. Repeat to confirm.
Keypad lock
You can lock the keypad to prevent the keys being accidentally pressed for example, when your phone is in your handbag.
Incoming calls can be answered by pressing even if the keypad is locked. During the call, the keypad is unlocked. When the call is ended rejected, the keypad is locked again.
- Press and hold * to lock/unlock the keypad.
Note! The main local emergency number can be dialled without unlocking the keypad.
Activate
-
Press Menu → Settings → Security Keypad lock:
-
Auto keylock to select the time delay for automatic keypad locking.
-
Unlock mode to select Single key to unlock the keypad with * or Dual key to lock/unlock with right selection button (Name/Unlock) and *.
-
Press OK to confirm.
Calls
Make a call
- Enter the phone number including the area code. Delete with Clear
- Press ☐ to make a call. Press Abort to cancel the call.
- Press to end the call.
Tip: For international calls, always use + before the country code for best operation. Press twice for the international prefix +.
Call from the phonebook
- Press Name to open the phonebook.
- Use ∪/to scroll through the phonebook, or quick search by pressing the key corresponding to the first letter of the entry, see ter text ☐, p.4.
- Press Options → Call to dial the selected entry. If needed, select the number.
Alternatively, press to dial.
- Press Abort or to cancel the call.
Receive a call
-
Press to answer, or press Silent to switch off the ringsignal and then Reject to reject the call (busy signal).
Alternatively, press to reject the call directly. -
Press to end the call.
Volume control
Use / to adjust the sound volume during a call. The volume level is indicated on the display. If you use a hearing aid or have hearing diff ties when using the telephone in a noisy environment, you can custom the phone's audio settings, see Audio setup p.26.
Silent
Silent is a fixed profile with Keypad tone, Message tone and Ringtone abled, while Vibration, Tasks, Daily reminder and Alarm are unchanged.
- Press and hold shortcut button# to activate/deactivate silent mode.
Headset
When a headset is connected, the internal microphone in the phone is automatically disconnected. If available, use the answer key on the headset to answer and end calls.

CAUTION
Using a headset at high volume may damage your hearing. Adjust the volume level carefully when using a headset.
Call options
During a call the selection buttons give access to additional functions.
Options (left selection button)
• Hold/Retrieve to hold/retrieve the current call.
- End single call to end the current call (same as).
- New call to call another number (Conference).
- Phonebook to search the phonebook.
- Messages to write or read text messages.
- Mute to disable the microphone.
SPK on (right selection button)
The loudspeaker allows you to speak without holding the phone close the ear.
- Press SPK on to activate. Speak clearly into the phone microphone at a maximum distance of 1 m. Use to adjust the loud-speaker volume.
- Press SPK off to return to normal mode.
Note! Loud background noises (music, etc.) may interfere with the sou quality.
Speed dial
Use A-B, 0 and 2-9 to speed dial an entry from standby.
- Press and hold the corresponding key to speed dial.
Add speed dial numbers
- Press Menu → Settings → Calls Speed dial.
- Select A → Add and select an entry from the phonebook.
- Press OK to confirm.
- Repeat to add speed dial entries for buttons 0, 2-9.
Tip: To change contact, select an existing entry and press options Edit/Delete.
- Selection buttons have multiple functions. The current function is shown above the selection button on the display.
Edit contact information
- Press corresponding button, A or B.
- Use ∪/to highlight the name or the number, then press Edit to edit.
- Press OK to confirm. Delete with Clear.
SOS calls
As long as the phone is switched on, it is always possible to place a call by entering the main local emergency number for your present location followed by ____.
Some networks accept calls to emergency numbers without a valid SIM card. Contact your service provider for more information.
Call log
Received, missed and dialled calls are saved in a combined call log. 20 calls of each type can be stored in the log. For multiple calls rela the same number, only the most recent call is saved.
- Press
Alternatively, press Menu→Call log.
- Use ∪/to select:

Received call
Dialled call
Missed call
-
Press ☐ to dial, or Options:
-
Call to call the contact.
• View to show details for the selected call. - Send SMS to send a text message.
- Delete to delete the call.
- Delete all to delete all calls in the call log.
- Save to save the number in the phonebook. Create new create new contact, or Update update existing contact.
Call settings
Voice mail
If your subscription includes an answering service, callers can leave a voice mail message when you cannot answer a call. Voice mail is a work service and you may need to subscribe to it first. For more information and for the voice mail number, contact your service provider.
- Press Menu → Settings → Nonebook Voice mail.
-
Select Empty → Add:
-
Phonebook to add a contact from the phonebook. Press OK to confirm.
• Manual and enter name and number. When done, press Save.
To edit or delete an existing entry, select it and press OpEdits/Delete.
Call voice mail
- Press and hold shortcut button 1 .
Tip: If activated reminder in the messages settings, a reminder signal be heard after 10 minutes if not listening to new voice mail message see Reminder, p.23.
Call time
During a call, the duration of the call is shown. You can check the d tion of your calls.
-
Press Menu → Settings → Calls Can time:
-
Last call to show the elapsed time of the most recent call.
- Outgoing calls to show the elapsed time of all made calls.
- Received calls to show the elapsed time of all received calls.
-
Reset all → Yes to reset all.
-
Press OK to confirm.
Call waiting
You can handle more than one call at a time, put the current call or and answer the incoming call. When activated, an alert tone is heard there is an incoming call while talking.
- During a call, press Options → Answer.
Activate call waiting
- Press Menu Settings Calls Call setup.
- Select Call waiting→Activate.
- Press OK to confirm.
Tip: Repeat and select Deactivate to disable call waiting, or Query status to display if call waiting is active or not.
Answer mode
- Press Menu Settings Calls Answer mode.
- Select Any key→On to be able to answer incoming calls by pressing any button (exemption).
- Press OK to confirm.
Call divert
You can divert calls to an answering service or to another phone num Set up which calls should be diverted. Select a condition and press 0 then select Activate, Deactivate or Query status for each.
- Press Menu → Settings → Calls Call setup Call →vert:
• Voice calls to divert all voice calls.
- Unreachable to divert incoming calls if the phone is turned off or out of range.
- No reply to divert incoming calls if unanswered.
- If busy to divert incoming calls if the line is busy.
- Cancel diverts to cancel all call divert settings.
- Press OK to confirm.
Caller ID
Display or hide your phone number on the recipient's phone when you call.
-
Press Menu → Settings → Calls Call setup Caller ID:
-
Set by network to use default setting by the network.
- Hide ID to never show your number.
-
Send ID to always show your number.
-
Press OK to confirm.
Call barring
Your phone can be restricted to disallow certain types of calls.
Note! A password is needed to apply call barring. Contact your service provider to get the password.
- Press Menu → Settings → Calls Call setup Call barring.
-
Select Outgoing calls:
-
All calls to answer incoming calls but not calling.
- Internat.calls to block calls to international numbers.
-
Int. except home to block international calls except to the country associated with the SIM card.
-
Press OK to confirm.
-
Select Incoming calls:
-
All calls to call but not to receive incoming calls.
-
When roaming to block incoming calls while roaming (operating in other networks).
-
Press OK to confirm.
- Select Cancel all to cancel all call barring (password needed). Press OK to confirm.
Fixed dial (FDN)
You can limit calls to certain numbers saved on the SIM card. The list allowed numbers is protected by your PIN2-code.
Note! The PIN2-code is needed to apply fixed dial. Contact your service provider to get the PIN2-code.
-
Press Menu → Settings → Security Fixed dial:
-
Mode → On to enable or Off to disable.
-
Fixed numbers → Add and enter the first allowed number. Alternatively, select an entry and press OptionsAdd, Edit or Delete.
-
If needed, enter PIN2 and press OK to confirm.
Note! You can save parts of phone numbers. For example, if you save 01234, allows calls to all numbers starting with 01234. It is possible place an SOS call by entering the main local emergency number follow by even when fixed dial is activated. When fixed dial is activated you are not allowed to view or manage any phone numbers saved on SIM card. You are not able to send any text messages either.
Phonebook
The phonebook can store 100 entries with 3 phone numbers in each entry.
Add contact
- Press Menu Phonebook -New contact- Add.
- Enter a 📁 Name for the contact, see Enter text 📋, p.4. Delete with Clear.
- Use ∪/∩ to select 📋 Mobile, 👁 Home or 🌐 Office and enter the phone number(s) including the area code.
- When done, press Save.
Tip: For international calls, always use + before the country code for best operation. Press twice for the international press.
Manage phonebook contacts
-
Press Menu Phonebook.
-
Select a contact, then press Options:
-
Call to call the contact.
- Send SMS to create text message. See Create and send text message (SMS), p.20.
- View to show details for the selected contact.Phone = storage set to Phone and SIM = storage set to SIM, see Phone-book storage, p.15.
- Edit to edit the contact. Use / to scroll. Delete with Clear. When done, press Save.
- Add to add contact.
- Top 10 to set the entry as one of the first 10 contacts listed the phonebook. See Top 10, p.15.
- Delete to delete the selected contact or Delete all to delete all contacts. Press Yes to confirm or No to abort.
- Copy all → From SIM to copy all phonebook contacts from the SIM card to the phone memory, or From phone to copy all contacts from the phone memory to the SIM card. Press Yes to firm or No to abort.
- Send vCard → Send by SMS to send the selected phonebook contact as a vCard via text message. Enter the phone number of the recipient.
Alternatively use // to scroll through the phonebook, or quick search by pressing the key corresponding to the first letter of the entry, see Enter text, p.4. Press OK to send.
- Send vCard → Send by Bluetooth to send the selected phone-book contact as a vCard via Bluetooth See Bluetooth p.24.
- Press OK to confirm.
Phonebook settings
Top 10
Set an entry as one of the first 10 contacts listed in the phonebook.
- Press Menu → Settings Calls Top 10.
- Select one of the empty entries and press Add.
- Use ∪/to scroll through the phonebook, or quick search by pressing the key corresponding to the first letter of the entry.
- Press OK to save the selected entry, or press Back to discard changes.
Tip: You can also add anentry from the phonebook. Select the contact and press Options Top 10.
Delete a top 10 entry
- Select the entry in the top 10 list and press Options Delete.
Phonebook storage
- Press Menu Settings Phonebook Storage.
- SIM to save up to 3 phone numbers and one e-mail address p contact.
- Phone to save 100 contacts with 3 phone numbers each Mobile, Home, Office. As well as one e-mail address, and Phonebook picture to assign images to contacts and Ringtone to assign specific ringtones to contacts.
- Press OK to confirm.
Note! Number and length of the phone numbers/contacts that can be stored will vary depending on SIM card/service provider preferences.
Owner number
The phone number assigned to your SIM card is saved as Owner nun if this is allowed by the card. You can also select to add additional numbers.
Add numbers
- Press Menu → Phonebook → Owner number Empty Add.
- Enter name and number, see Enter text, p.4.
- When done, press OK.
ICE (In Case of Emergency)
First responders can access additional information such as medical information from the victim's phone in case of emergency. In the event of a trauma, it is critical to have this information as early as possible to crease the chances of survival. All fields are optional, but the more information provided the better.
- Press Menu → Phonebook → E.
- Use ∪/to scroll the list of entries.
- Press Edit to add or edit information in each entry, see Enter text ☐, p.4. Delete with Clear.
ID
- Name: enter your name.
- Birth: enter your date of birth.
• Height: enter your height.
• Weight: enter your weight. - Address enter your home address.
- Language: enter your preferred language.
• Insurance: enter your insurance provider and policy number.
Contact 1:, Contact 2: and Doctor:
- Press Options to Add or Delete a contact from the phonebook, or Save to accept the current entry. If possible, add your relationship to your ICE contacts in the phonebook, such as “ICE Wife Mary Smith”.
Important info
- Condition: enter any medical conditions or medical devices (e.g. diabetic, pacemaker).
- Allergies: enter any known allergies (e.g. penicillin, bee stings).
• Blood type: enter your blood type.
• Vaccination: enter any relevant vaccination. - Medication: enter any medication that you are treated with.
- Other info: enter other information (e.g. organ donor, living will, consent to treat).
4. When done, press Save.
Assistance button

CAUTION
When an assistance call is activated the phone is pre-set to handsfree speakerphone mode. Do not hold the device near your ear when the handsfree mode is in use, because the volume may be extremely low
The assistance button allows easy access to contact your predefined h numbers (Number list) should you need help. Make sure that the assis tance function is activated before use, enter recipients in the numbers list and edit the text message.
Make an assistance call
- When help is needed, press and hold the assistance button for 3 seconds, or press it twice within 1 second.
The assistance call begins after a delay of 5 seconds. In this time you can prevent a possible false alarm by pressing - An assistance text message (SMS) is sent to all recipients.
- The first recipient in the list is called. If the call is not answered in 25 seconds, the next number is called. Calling is repeated 3 times or until the call is answered, or until is pressed.
Note! Some private security companies can accept automatic calls from their clients. Always contact the security company before using their phone number. Programming '999' into the assistance button is blocke
Tip: The assistance function may be configured so that the recipient of the call must pre☐ (zero) to confirm, in order to stop the alarm sequence. See Confirm with "O", p.19.
IMPORTANT!
Information to the recipient of an assistance call, when Confirm with "O" is activated.
- After receiving the assistance message, each number in the Number list is called sequentially.
- To confirm the assistance call, the recipient needs to press
- If the recipient doesn't press 0 within 60 seconds (after answering) the call will be disconnected and the next number in the sequence will be called.
- If the recipient presses 0 within 60 seconds, the call is confirmed and no further call attempts will be made (assistance sequence interrupted).
Activation
Select how to activate the assistance function using the assistance button.
-
Press Menu → Settings → Assistance Activation:
-
On Normal to press and hold the button for approximately 3 seconds, or press it twice within 1 second.
- On (3) to press the button 3 times within 1 second.
-
Off to disable the assistance button.
-
Press OK to confirm.
Number list
Add numbers to the list that is called when the assistance button is pressed.
IMPORTANT!
Always inform recipients in the Number list that they are listed as your assistance contacts.
- Press Menu → Settings → Assistance Number list.
- Select Empty → Add → Phonebook to add a contact from the phonebook.
Alternatively, press Manual to add names or numbers manually. See Add contact, p.14.
- Press OK to confirm.
- Repeat until you have 5 contacts (maximum).
Tip: To edit or delete an existing entry, select it and press→Options Edit or Delete.
Activate text messages (SMS)
A text message can be sent to the contacts in the numbers list when assistance button is pressed.
Activation
-
Press Menu → Settings Assistance SMS Activation:
-
On to send a text message before calling.
-
Off to call without sending a text message first.
-
Press OK to confirm.
Create assistance message
- Press Menu → Settings → Assistance SMS Message.
- Select Edit and write the message, see Enter text, p.4.
- Press OK to confirm.
Note! You must write a message if you activate the SMS function.
Assistance settings
Confirm with "O"
You can activate the Confirm with "O" function. This is especially recommended if there is a risk that the assistance call is answered by a v mail or answering service. If the recipient doesn't 0 within 60 seconds the call will be disconnected and the next number in the sequer will be called. If the recipient pres 0 within 60 seconds, the call is
confirmed and no further call attempts will be made (assistance sequence interrupted).
-
Press Menu → Settings → Assistance Confirm with "0".
-
Select On to enable, or Off to disable.
-
Press OK to confirm.
Signal type
Select the notification signal type for the assistance sequence.
- Press Menu → Settings → Assistance Signal type:
• High to use loud signals (default).
- Low to use one low signal.
- Silent no sound indication, like a normal call.
- Press OK to confirm.
Messages
Create and send text message (SMS)
Note! Before you can send any text messages, you need to save your message centre number. The number to your service centre is supplied by your service provider and is usually set on the SIM card. If not, you enter the number yourself.
- Press the shortcut button ☑, or press Menu→Messages→write message.
- Write your message, see Enter text, p.4, then press To.
- Select a recipient from Phonebook. Alternatively, select Enter number to add recipient manually and press Done.
- Press Add to add more recipients.
Tip: You can modify the recipients by selecting one, press Options → Edit/Delete/Delete all.
- When done, press Send.
Note! If you choose to add multiple recipients, you will be charged for each recipient (maximum 10). For international calls, always use + before the country code for best operation. ■\$ twice for the international prefix +.
Outbox and Sent
 | Text message unread Text message sent | |
 | Text message read Text message unsent |
- Press shortcut button email. Alternatively press Menu→Messages.
- Select Inbox, Outbox or Sent.
- Select a message and press Read. Use/to scroll up/down.
-
Press Options:
-
Reply to write your reply, then press Send. The message is sent immediately.
- Call to call the contact.
- Delete to delete or Delete all to delete all. Press Yes to delete or No to return.
- Forward to forward the message. Edit the message (if desired), then press Send.
- Use number → Call to call the selected number.
-
Details to view details of the message.
-
Press OK to confirm.
Message settings
Predictive text
- Press Menu Settings Messages Predictive text.
- Select On (default) to enable, or Off to disable.
- Press OK to confirm.
Writing language
- Press Menu Settings Messages Writing language.
- Select language with ∪/∩.
- Press OK to confirm.
Tip: During text input, press and 📁 for a list of available languages.
Write speed
You can change the speed at which keypad characters repeat before cursor moves on to the next character.
- Press Menu → Settings Messages.
- Select Write speed→Slow, Normal or Fast.
- Press OK to confirm.
Memory status
- Press Menu Settings Messages.
- Select Memory status to display the percentage of memory space used on the SIM card and in the phone memory. Phone memory store up to 200 messages.
- Press Back to return.
Storage
-
Press Menu Settings Messages Storage
-
SIM (default) to store messages on the SIM card.
-
Phone to store messages in the phone memory.
-
Press OK to confirm.
SMS centre
- Press Menu Settings Messages SMS centre Edit.
- Enter the service centre number. Press Clear to delete.
- Press OK to confirm.
Input method
With Input method you can select to write your text messages with special, distinguishing language specific characters (Unicode) or to write with more simple characters. Automatic allows special characters. Special characters takes up more space and the size of each message is reduced to 70 characters. GSM alphabet converts any special character plain alphabet characters, e.g. I becomes I. Each message can contain 160 characters.
-
From SMS settings, select Input method:
-
Automatic (default) to allow special characters.
-
GSM alphabet to convert any special character to plain alphabet characters.
• Information function description. -
Press OK to confirm.
Cell broadcast
You can receive messages on various topics from your service provider such as weather or traffic conditions in a particular region. For available channels and relevant channel settings, contact your service provider. Cell broadcast messages cannot be received when the device is roami
- Press Menu → Settings Messages Cell broadcast:
• Activation to turn information On or Off.
- Read messages to read the message.
• Languages to select language On or Off.
- Channel settings to select from which channels to receive/subscribe messages. Use the options Subscribe, Cancel subscription, Add, Edit and Delete to define your channels.
- Press OK to confirm.
Reminder C
The reminder alerts you once if you haven't checked your messages o listened to your voice mail within 10 minutes from receipt. When notif press 📄 to end the notification and no more reminder is heard.
- Press Menu → Settings Messages Reminder.
- Select On to enable, or Off to disable.
- Press OK to confirm.
Vibration C
The text message vibration alert is several short vibrations.
- Press Menu → Settings → Messages Vibration.
- Select Messages:
- Short (4 seconds)
- Long (12 seconds)
- Press OK to confirm.
Note! If Alert type is set to Ring only the phone will not vibrate.
Delivery report
You can select if you want the phone to notify you when your text message has reached the recipient.
Note! Contact your service provider for detailed subscription costs befo activating.
-
Press Menu → Settings → Messages Delivery report:
-
Select On to enable, or Off to disable.
-
Press OK to confirm.
Delete
Delete all messages or all within a folder.
-
Press Menu → Settings → Messages Delete.
-
Select Inbox, Outbox, Sent or Delete all → Yes to delete all messages.
Connectivity
Network setup
Your phone automatically selects your (service providers) home network if this is within range. Contact your service provider for more informati
- Press Menu → Settings → General Network setup.
-
Select one of the following options and press OK to confirm:
-
New search to perform new search if connection is lost.
- Select network to view available network, a list of available network operators is displayed (after a short delay). Select desire operator.
- Network mode to select another network. Select Automatic to select network automatically or Manual to select network manually.
Services
This menu may contain pre-programmed services from your network provider depending on network support and subscription.
- Press Menu → Settings → General Services.
Bluetooth®
You can connect wirelesses to other Bluetooth compatible devices such as headsets or other phones.
IMPORTANT!
When you are not using Bluetooth connectivity, turn off Function on/off or Visibility. Do not pair with an unknown device.
Activate Bluetooth®
- Press Menu Settings Bluetooth Function on/off On.

- Press OK to confirm.
Bluetooth® settings
Visibility
- Press Menu Settings Bluetooth Visibility On.
- Press OK to confirm.
Note! To prevent other devices from finding your device, select Off. Even if you select Off, paired devices can still detect your device.
Device name
- Press Menu → Settings → Bluetooth Device name.
- Enter the name your Doro 5030 should appear with for other Bluetooth ® devices.
- Press Done to confirm.
Search device
- Press Menu → Settings → Bluetooth Search device.
- Select a device from the list and press Bond to connect. If Bluetooth® is not enabled, press Yes to activate.
- When connecting to another Bluetooth device you need a shared password. Enter the password and press OK.
My device
Add new devices or view saved.
- Press Menu → Settings → Bluetooth My device.
-
Select device from the list and press Options:
-
Rename to change the name of the device.
- Delete to delete the device from the list.
-
Delete all to delete all devices from the list.
-
Press OK to confirm.
Audio path
-
Press Menu Settings Bluetooth Audio path:
-
Phone to answer incoming calls with the phone.
-
Forward BT to forward incoming calls to the Bluetooth device.
-
Press OK to confirm.
Sound & Display
Note! Silent needs to be set to Off to access Tone setup, Volume, Alert type and Extra tone.
Audio setup
If you use a hearing aid or have hearing difficulties when using the d in a noisy environment, you can adjust the audio settings.
-
Press Menu → Settings → Sound Audio setup:
-
Normal for normal hearing in normal conditions (default).
-
High for moderate hearing impairment or use in a very noisy environment.
• HAC mode for use with hearing aid. -
Press OK to confirm.
Note! Try different settings to find the one that suits your hearing the best.
Tone setup (ringtone)
Select a ringtone with the best tone curve adjustments and frequency to best fit your needs.
- Press Menu → Settings → Sound Tone → setup Ringtone.
- Use ∪/to select one of the available melodies, the melody is played.
- Press OK to confirm or Back to discard changes.
Tip: Set up the Alarm, Message tone, Keypad tone, Power on and Power off in the same way.
Ringtone volume
- Press Menu Settings Sound Volume
- Use ∪/to change the ringtone volume.
- Press OK to confirm.
Silent
- Press Menu Settings Sound Silent.
- Select On to enable, or Off to disable.
- Press OK to confirm.
Tip: From standby mode, press and hold shortcut button activate or deactivate silent mode.
Alert type
Select to use ringtone and/or vibration for incoming calls.
-
Press Menu → Settings → Sound Alert type:
-
Ring only for ringtone only.
• Vib. only for vibration only.
• Vib. and ring for vibration and ringtone. - Vib. then ring to start with vibration and adds ringtone after a short while.
-
Silent for no sound or vibration, the display light is lit.
-
Press OK to confirm.
Extra tone
You can select to enable warning and error tones to alert you of low tery power, phone and SIM card errors, etc.
- Press Menu Settings Sound.
- Select Extra tone→ Warning or Error.
- Select On to enable, or Off to disable.
- Press Done to save.
Wallpaper
- Press Menu Settings Display Wallpaper.
- Use ∪/to display available wallpapers.
- Press OK to confirm.
Text size
You can adjust the text size for the menu and messages.
-
Press Menu → Settings → Display.
-
Select Text size → normal or Large.
- Press OK to confirm.
Idle display
In standby mode the display can show clock only, clock and the service provider, or all information.
- Press Menu → Settings → Display.
- Select Idle display→ Clock only, Clock & Operator, All info or No information.
- Press OK to confirm.
LCD backlight
Select the delay time for the display backlight.
- Press Menu → Settings → Display.
- Select LCD backlight→15 sec., 30 sec. or 1 min.
- Press OK to confirm.
Brightness
You can adjust the brightness of the display.
- Press Menu → Settings → Display.
- Select Brightness → Level 1, Level 2 or Level 3.
- Press OK to confirm.
Additional functions
Alarm
- Press Menu Alarm On.
- Enter the alarm time using the keypad and press OK to confirm.
- Select Single to set one single alarm.
-
Select Repeated to repeat the same alarm time several days. Scroll through the list of days and press On to enable or Off disable the alarm for each day.
-
Press Save to confirm.
Tip: To edit an alarm, press Edit or Off to stop the alarm.
Snooze or stop
When the alarm sounds:
- Select Stop to stop.
- Select Snooze to repeat after 9 minutes.
Note! The alarm will work even when the phone is powered off. Do n power on your phone if wireless phone use is prohibited or when it n cause interference or danger.
Calendar
Add task
- Press Menu Organiser Calendar Options Add task
- Enter date, then press.
- Enter time, then press.
- Enter subject, see Enter text, p.4.
- When done, press OK.
Options
-
Press Menu Organiser Calendar Options
-
Select View to show tasks for the selected date.
-
Select Jump to date and enter the date.
-
Press OK to confirm.
View all
- Press Menu → Organiser → Calendar.
- Select a task and press Options View all.
- Press Options → Edit, Delete or Delete all.
- Press OK to confirm.
Note! The calendar reminders will work even when the phone is power off. Do not power on your phone if wireless phone use is prohibited (when it may cause interference or danger.
Daily reminder
- Press Menu Organiser Daily reminder Add.
- Enter time, then press.
-
Enter subject, see Enter text 📋, p.4
-
Press OK to confirm.
Snooze or stop
When the alarm sounds:
- Select Silent → OK to stop.
- Select Snooze to repeat after 9 minutes.
Note! The reminder will work even when the phone is powered off. Do power on your phone if wireless phone use is prohibited or when it may cause interference or danger.
Tip: For more options select an existing entry, and press OptiShip reminder, Add, Edit, Delete or Delete all.
Calculator
The Calculator can perform basic mathematical operations.
- Press Menu → Calculator.
- Enter the first number. Us# to enter decimal points.
- Enter the next number and press OK.
-
Repeat steps 2–4 as necessary.
-
Use the arrow buttons to select an operation (+, -, x, ÷) and press
Select = and press OK to calculate the result.
FM radio
The FM radio has a frequency range from 87.5 to 108.0 MHz. To listen to the radio you need to connect a compatible headset that works antenna.
Turning the radio on
- Connect a headset to the headset socket.
- Press Menu → FM radio. The radio is turned on. The tuned frequency is displayed.
- Select channel using ∪ or ∩.
Tip: Press to return to standby mode. The radio will continue to play
Volume
-
Press Menu → FM radio → Options Volume.
-
Use ∪ or to adjust the volume.
- Press OK to confirm.
Save frequency
- Press Menu → radio Options Save → frequency.
- Enter a name for the new channel, see Enter text, p.4.
- When done, press OK.
Switch off
- Press Menu → FM radio→Options Switch off.
Tip: Disconnecting the headset will also turn off the radio.
Loudspeaker
- Press Menu → FM radio → Options Loudspeaker On. →
- Select On.
- Use ∪/to adjust the sound volume.
- To turn off, select Off.
Channel list (editing the channel list)
- Press Menu FM radio → Options channel list.
-
Select the channel you wish to edit and press Options:
-
Play to play the selected channel.
- Delete to delete the channel. Press Yes to confirm or No to return to the channel list.
-
Edit to edit the channel name, then press to edit the frequency, use# to enter the decimal point. When done, press Save.
-
Press Yes to confirm.
Manual input (change the search mode)
-
Press Menu → FM radio → Options Manual input:
-
Fine tune to tune manually with ∪ or ∩.
-
Auto search to use automatic station search with or ∩.
-
Press OK to confirm.
Note! This will overwrite all previously saved channels.
Auto save
- Press Menu → radio Options.
- Select Auto save to automatically install available radio stations in channels 1-9.
- Press OK to confirm.
Note! This will overwrite all previously saved channels.
Torch
- Press Menu Torch.
- Select Off to power off.
Tip: Press and hold shortcut button to power on the torch. Release to power off.
Torch settings
- Press Menu → Settings General Torch.
-
Select Time:
-
1 min to power off automatically after 1 min.
- 5 min to power off automatically after 5 min.
-
No limit to power of manually.
-
Select Sound:
- Select On to enable, or Off (default) to disable.
- Press OK to confirm.
Note! The torch will drain the battery very quickly. Remember to power off the torch after use.
Status
Scroll through the Status list to get further information about the icons shown on top of your display. Icons shown on the display varies pending on your phone status.
- Press Menu → More Status.
- Use ∪ or to scroll the list.
- Press Back to return to standby mode.
Reset settings
-
Press Menu Settings Security.
-
Select Reset settings to reset the phone settings. All the changes that you have made to the phone settings will be reset to default settings.
-
Enter the phone code and press OK to reset.
Tip: The default phone code is 1234.
Reset all
-
Press Menu → Settings → Security.
-
Select Reset all to delete phone settings and content such as contacts, number lists and messages (SIM memory is not affected).
-
Enter the phone code and press OK to reset.
Tip: The default phone code is 1234.
Display status symbols
 | Signal strength | No network coverage |
 | Ring only | Voice mail message received |
 | Ring + vibration | Alarm active |
 | Vibration only Battery level | |
 | Silent Call divert activated | |
 | Roaming (in other network) | Bluetooth on, visible to others |
 | Missed call | Bluetooth on, invisible to others |
 | Headset connected Bluetooth connected | |
 | Unread text message/SMS |
Display main symbols
 | Mute |  | Charger connected |
 | Message sending success |  | Charger removed |
English
 | Message sending failed |  | Headset in |
 | Error Headset out |  | |
 | Warning |  | Speaker on |
 | Query |  | Speaker off |
 | Done (confirmed) |  | Incoming call |
 | New message |  | Outgoing call |
 | Battery level low |  | Call ended |
 | Searching |  | Missed call. Press Read to see the missed calls. |
 | Assistance button call |  | Call on-hold |
 | vCard message Outgoing SOS |  | |
 | Volume control |  | Processing, please wait |
Troubleshooting
Phone cannot be switched on
| Battery charge low | Connect the power adapter and charge the battery for 3 hours. Full battery capacity is reached after the battery has been charged 3-4 times. |
| Battery incorrectly installed | Check the installation of the battery. |
Failure to charge the battery
| Battery or charger damaged | Check the battery and charger. |
| Battery should only be charged in temperatures between 0 °C and 40 °C | Improve the charging environment. |
| Charger incorrectly connected to phone or power socket | Check the charger connections. |
Standby time decreases
| Battery charge capacity too low | Install a new battery. |
| Too far from base station, phone is constantly searching for signal | Searching the network consumes battery power.Find a place with a stronger signal, or temporarily turn off the phone. |
Failure to place or receive calls
| Call barring activated De | deactivate call barring. If this does not solve the problem, contact your service provider. |
PIN code not accepted
| Wrong PIN code entered too many times | Enter the PUK code to change the PIN code, or contact your service provider. |
SIM card error
| SIM card damaged Check the condition of the SIM card. If it is damaged, contact your service provider. | |
| SIM card incorrectly installed | Check the installation of the SIM card. Remove the card and reinstall it. |
| SIM card dirty or damp | Wipe the contact surfaces of the SIM card with clean cloth. |
Failure to connect to network
| SIM card invalid Contact your service provider. | |
| No coverage of GSM service | Contact your service provider. |
Weak signal
| Too far from base station | Try again from another location. |
| Network congestion Try | calling at a later time. |
Echo or noise
| Regional problem from bad network relay | Hang up and redial. This may switch to another network relay. |
Failure to add a contact
| Phonebook memory full | Delete contacts to free up memory. |
Failure to set a function
| Function not supported or subscribed from network | Contact your service provider. |
Safety instructions

CAUTION
The unit and the accessories can contain small parts. Keep all of the equipment of the reach of small children.
The mains adapter is the disconnect device between the product and mains power. The mains socket outlet must be close to the equipment and easily accessible.
Network services and costs
Your device is approved for use on the GSM 900/1800/1900 MHz networks. To use device, you need a subscription with a service provider.
Using network services may result in traffic costs. Some product features require support from the network, and you may need to subscribe to them.
Operating environment
Follow the rules and laws that apply wherever you are, and always turn off the unit whenever its use is prohibited or can cause interference or hazards. Only use the u its normal user position.
Parts of the unit are magnetic. The unit can attract metal objects. Do not keep crew cards or other magnetic media near the unit. There is a risk that information stored them can be erased.
Medical units
The use of equipment that transmits radio signals, for example, mobile phones, can interfere with insufficiently protected medical equipment. Consult a doctor or the manufacturer of the equipment to determine if it has adequate protection against external radio signals, or if you have any questions. If notices have been put up at health facilities instructing you to turn off the unit while you are there, you should comply. Totals and other health care facilities sometimes use equipment that can be sensitive external radio signals.
Implanted medical devices
To avoid potential interference, manufacturers of implanted medical devices recommend a minimum separation of 15 cm between a wireless device and the medical vice. Persons who have such devices should:
• Always keep the wireless device more than 15 cm from the medical device.
- Should not carry the phone in a breast pocket.
- Hold the wireless device to the ear opposite the medical device.
If you have any reason to suspect that interference is taking place, turn the phone immediately. If you have any questions about using your wireless device with an implanted medical device, consult your health care provider.
Areas with explosion risk
Always turn off the unit when you are in an area where there is a risk of explosion low all signs and instructions. There is a risk of explosion in places that include are where you are normally requested to turn off your car engine. In these areas, spark can cause explosion or fire which can lead to personal injury or even death.
Turn off the unit at filling stations, and any other place that has fuel pumps and a pair facilities.
Follow the restrictions that apply to the use of radio equipment near places where 1 is stored and sold, chemical factories and places where blasting is in progress.
Areas with risk for explosion are often - but not always - clearly marked. This also plies to below decks on ships; the transport or storage of chemicals; vehicles that liquid fuel (such as propane or butane); areas where the air contains chemicals or ticles, such as grain, dust or metal powder.
Li-ion battery
This product contains a Li-ion battery. There is a risk of fire and burns if the batter is handled improperly.

WARNING
Danger of explosion if battery is incorrectly replaced. To reduce risk of fire or burns, do not disassemble, crush, puncture, short external contacts, expose to temperature above 60ircC (140°F), or dispose of in fire or water. Recycle or dispose of used batteries according to the local regulations or reference guide supplied with your product.
Protect your hearing
This device has been tested to comply with the Sound Pressure Level requirement Ia down in the applicable EN 50332-1 and/or EN 50332-2 standards.


WARNING
Excessive exposure to loud sounds can cause hearing damage. Exposure to loud sounds while driving may distract your attention and cause an accident. Listen to a headset at a moderate level, and do not hold the device near your ear when the loudspeaker is in use.
Emergency calls
IMPORTANT!
Mobile phones use radio signals, the mobile phone network, the terrestrial network and user-programmed functions. This means that connection cannot be guaranteed in all circumstances. Therefore, never rely only on a mobile phone for very important calls such as medical emergencies.
GPS/Location based functions
Some products provide GPS/Location based functions. Location determining functionality is provided “As is”. No representation or warranty are made as to the accuracy of such location information. Use of location-based information by the device may not be uninterrupted or error free and may additionally be dependent on network service availability. Please note that functionality may be reduced or prevented in certain environments such as building interiors or areas adjacent to buildings.

CAUTION
Do not use GPS functionality in a manner which causes distraction from driving.
Vehicles
Radio signals can affect electronic systems in motor vehicles (for example, electronic fuel injection, ABS brakes, automatic cruise control, air bag systems) that have been correctly installed or are inadequately protected. Contact the manufacturer or its representative for more information about your vehicle or any additional equipment.
Do not keep or transport flammable liquids, gases or explosives together with the air or its accessories. For vehicles equipped with air bags: Remember that air bags fill air with considerable force.
Do not place objects, including fixed or portable radio equipment in the area above airbag or the area where it might expand. Serious injuries may be caused if the mo phone equipment is incorrectly installed and the airbag fills with air.
It is prohibited to use the unit in flight. Turn off the unit before you board a plane wireless telecom units inside a plane can pose risks to air safety and interfere with communications. It may also be illegal.
Protect your personal data
Protect your personal data and prevent leakage or misuse of sensitive information
- While using your device, be sure to back up important data.
- When disposing of your device, back up all data and then reset your device to prevent misuse of your personal information.
- Carefully read the permissions screen when downloading applications. Be particularly cautious with applications that have access to many functions or to a significant amount of your personal information.
- Check your accounts regularly for unapproved or suspicious use. If you find any sign of misuse of your personal information, contact your service provider to deliver or change your account information.
- In the event your device is lost or stolen, change the passwords on your accounts to protect your personal information.
- Avoid using applications from unknown sources and lock your device with a pattern password, or PIN.
Malware and viruses
To protect your device from malware and viruses, follow these usage tips. Failure to so may result in damages or loss of data that may not be covered by the warranty service.
- Do not download unknown applications.
- Do not visit untrusted websites.
- Delete suspicious messages or email from unknown senders.
- Set a password and change it regularly.
- Deactivate wireless features, such as Bluetooth, when not in use.
- If the device behaves abnormally, run an antivirus program to check for infection.
- Run an antivirus program on your device before you launch newly-downloaded applications and files.
- Do not edit registry settings or modify the device's operating system.
Care and maintenance
Your unit is a technically advanced product and should be treated with the greatest Negligence may void the warranty.
- Protect the unit from moisture. Rain, snow, humidity, and all types of liquids can contain substances that corrode the electronic circuits. If the unit gets wet, you should immediately power off the phone, remove the battery and allow the unit dry completely before you replace it.
- Do not use or keep the unit in dusty, dirty environments. The unit's moving parts and electronic components can be damaged.
- Do not keep the unit in warm places. High temperatures can reduce the lifespan for electronic equipment, damage batteries and distort or melt certain plastics.
- Do not keep the unit in cold places. When the unit warms up to normal temperature, condensation can form on the inside and can damage the electronic circuit
- Do not try to open the unit in any other way than that which is indicated here.
- Do not drop or shake the unit. If it is treated roughly the circuits and precision mechanics can be broken.
- Do not use strong chemicals to clean the unit.
- Do not disassemble, open, crush, bend, deform, puncture or shred.
- Do not modify or remanufacture, attempt to insert foreign objects into the battery, immerse or expose to water or other liquids, expose to fire, explosion or other hazard.
- Only use the battery for the system for which it is specified.
- Only use the battery with a charging system that has been qualified with the system per IEEE-Std-1725. Use of an unqualified battery or charger may present a risk fire, explosion, leakage, or other hazard.
- Do not short circuit a battery or allow metallic conductive objects to contact battery terminals.
- Replace the battery only with another battery that has been qualified with the system per this standard, IEEE-Std-1725. Use of an unqualified battery may present risk of fire, explosion, leakage or other hazard.
- Promptly dispose of used batteries in accordance with local regulations.
- Battery usage by children should be supervised.
- Improper battery use may result in a fire, explosion or other hazard.
For devices that utilize a USB port as a charging source, the device's user manual include a statement that the device shall only be connected to CTIA certified adapte products that bear the USB-IF logo or products that have completed the USB-IF comance program.
The advice applies to the unit, battery, power adapter and other accessories. If the phone is not working as it should, please contact the place of purchase for service. Don't forget the receipt or a copy of the invoice.
Warranty
This product is guaranteed for a period of 12 months from the date of purchase. In unlikely event of a fault occurring during this period, please contact the place of purchase. Proof of purchase is required for any service or support needed during the guarantee period.
This guarantee will not apply to a fault caused by an accident or a similar incident damage, liquid ingress, negligence, abnormal usage, non-maintenance or any other circumstances on the user's part. Furthermore, this guarantee will not apply to any fault caused by a thunderstorm or any other voltage fluctuations. As a matter of precaution we recommend disconnecting the charger during a thunderstorm.
Batteries are consumables and are not included in any guarantee.
This guarantee does not apply if batteries other than DORO original batteries are used.
Specifications
| Network: | GSM 900/1800/1900 MHz |
| Dimensions | 117 mm x 53 mm x 14 mm |
| Weight | 78 g (including battery) |
| Battery | 3.7 V / 800 mAh Li-ion battery |
| Operating ambient temperature | Min: 0°C (32°F)Max: 40°C (104°F) |
| Charging ambient temperature | Min: 0°C (32°F)Max: 40°C (104°F) |
| Storage temperature | Min:-20°C (-4°F)Max: 60°C (140°F) |
Copyright and other notices
Bluetooth ® is a registered trademark of Bluetooth SIG, Inc.
vCard is a trademark of the Internet Mail Consortium.
eZiType ™ is a trademark of Zi Corporation.
Wi-Fi is a trademark or a registered trademark of the Wi-Fi Alliance.
microSD is a trademark of SD Card Association.
Java, J2ME and all other Java-based marks are trademarks or registered trademarks Sun Microsystems, Inc. in the United States and other countries.
The contents of this document are provided "as is". Except as required by applicable law, no warranties of any kind, either express or implied, including, but not limited to the implied warranties of merchantability and fitness for a particular purpose, are main in relation to the accuracy, reliability or contents of this document. Doro reserves the right to revise this document or withdraw it at any time without prior notice.
Google, Google Maps™, Gmail, Google Calendar, Google Checkout, Hangouts, YouTube the YouTube logo, Picasa and Android are trademarks or registered trademarks of Google, Inc.
This product is licensed under the MPEG-4 visual and AVC patent portfolio licenses for the personal and noncommercial use of a consumer for (i) encoding video in compliance with the MPEG-4 visual standard ("MPEG-4 video") or the AVC standard ("AVC video") and/or (ii) decoding MPEG-4 or AVC video that was encoded by a consumer engaged in a personal and non-commercial activity and/or was obtained from a video provider licensed by MPEG LA to provide MPEG-4 and/or AVC video. No license is granted or shall be implied for any other use. Additional information including that relating to promotional, internal and commercial uses and licensing may be obtained from MPEG LA, L.L.C. See www.mpegla.com. MPEG Layer-3 audio decoding technology licensed from Fraunhofer IIS and Thomson.
Other product and company names mentioned herein may be the trademarks of their respective owners.
Any rights not expressly granted herein are reserved. All other trademarks are proper of their respective owners.
To the maximum extent permitted by applicable law, under no circumstances shall D or any of its licensors be responsible for any loss of data or income or any special dental, consequential or indirect damages howsoever caused.
Doro does not provide a warranty for or take any responsibility for the functionality, tent, or end-user support of third-party apps provided with your device. By using an you acknowledge that the app is provided as is. Doro does not make any representations, provide a warranty, or take any responsibility for the functionality, content, or user support of third-party apps provided with your device.
Content copyright
The unauthorised copying of copyrighted materials is contrary to the provisions of the Copyright Laws of the United States and other countries. This device is intended solely for copying non-copyrighted materials, materials in which you own the copyright, or materials which you are authorised or legally permitted to copy. If you are uncertain about your right to copy any material, please contact your legal advisor.
Hearing aid compatibility
Note! For hearing aid compatibility, turn off Bluetooth connectivity.
This phone is hearing aid compatible. Hearing aid compatibility is not a guarantee that a specific hearing aid will work with a specific phone. Mobile phones contain radio transmitters that may interfere with hearing aid performance. This phone has been tested for use with hearing aids, for some of the wireless technologies that it uses, there may be some newer wireless technologies that have not been tested yet for using with hearing aids. To ensure that a specific hearing aid works well with this phone, them together before making a purchase.
The standard for hearing aid compatibility contains two types of ratings:
- M: To use your hearing aid in this mode, make sure that your hearing aid is set to "M-mode" or acoustic coupling mode, and position the phones receiver near the hearing aid's built-in microphone. For the best results, try using the phone in different positions relative to your hearing aid—for example, placing the receiver slightly above the ear may result in better performance for hearing aids with microphone positioned behind the ear.
- T: To use your hearing aid in this mode, make sure that your hearing aid is set to "T-mode" or telecoil coupling mode (not all hearing aids have this mode). For the results, try using the phone in different positions relative to your hearing aid—for example, placing the receiver slightly below or in front of the ear may result in be performance.
Your device meets the M3/T4 level rating.
Specific Absorption Rate (SAR)
This device meets applicable international safety requirements for exposure to radio waves. Your mobile device is a radio transmitter and receiver. It is designed not to exceed the limits for exposure to radio waves (radio frequency electromagnetic fields) recommended by international guidelines from the independent scientific organization ICNIRP (International Commission of Non-Ionizing Radiation Protection).
The radio wave exposure guidelines use a unit of measurement known as the Speci Absorption Rate, or SAR. The SAR limit for mobile devices is 2 W/kg averaged over grams of tissue and include a substantial safety margin designed to assure the safe of all persons, regardless of age and health.
Tests for SAR are conducted using standard operating positions with the device transmitting at its highest certified power level in all tested frequency bands. The highest SAR values under the ICNIRP guidelines for this device model are:
Head SAR: 0.65 W/kg
Body SAR: 1.00 W/kg
During normal use, the SAR values for this device are usually well below the values tested above. This is because, for purposes of system efficiency and to minimize interference on the network, the output power of your mobile device is automatically decreased when full power is not needed for the call. The lower the power output of the device is lower its SAR value.
This device meets RF exposure guidelines when used against the head or when positioned at least 0.5 cm away from the body. When a carry case, belt clip or other f device holder is used for body-worn operation, it should not contain metal and shou provide at least the above stated separation distance from the body.
The World Health Organization (WHO) has stated that current scientific information do not indicate the need for any special precautions when using mobile devices. If you interested in reducing your exposure, they recommend you reduce your usage or use hands-free accessory to keep the device away from your head and body.
Correct disposal of this product

(Waste Electrical & Electronic Equipment)
(Applicable in countries with separate collection systems)
This marking on the product, accessories or manual indicates that the product and electronic accessories (e.g. charger, headset, USB cable) should not be disposed of other household waste. To prevent possible harm to the environment or human health from uncontrolled waste disposal, please separate these items from other types of waste and recycle them responsibly to promote the sustainable reuse of material resources. Household users should contact either the retailer where they purchased this product, or their local government office, for details of where and how they can take these items for environmentally safe recycling. Business users should contact their supplier and check the terms and conditions of the purchase contract. This product and electronic accessories should not be mixed with other commercial wastes for disposal. This product is RoHS compliant.
Correct disposal of batteries in this product
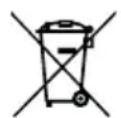
(Applicable in countries with separate collection systems)
The marking on the battery, manual or packaging indicates that the battery in this product should not be disposed of with other household waste. Where marked, the chem symbols Hg, Cd or Pb indicate that the battery contains mercury, cadmium or lead at the reference levels in EC Directive 2006/66. If batteries are not properly disposed these substances can cause harm to human health or the environment.
To protect natural resources and to promote material reuse, please separate batterie from other types of waste and recycle them through your local, free battery return system.
Declaration of Conformity
Doro hereby declares that Doro 5030 conforms to the essential requirements and of relevant regulations contained in the Directives 1999/5/EC (R&TTE) and 2011/65/EU (RoHS). A copy of the Declaration of Conformity is available. doro.com/dofc.
FCC/IC
FCC notice
This device complies with part 15 of the FCC Rules. Operation is subject to the following two conditions: (1) This device may not cause harmful interference, and (2) this device must accept any interference received, including interference that may cause undesire operation.
This equipment has been tested and found to comply with the limits for a Class B device, pursuant to part 15 of the FCC Rules. These limits are designed to provide sonable protection against harmful interference in a residential installation. This equipment generates, uses and can radiate radio frequency energy and, if not installed and used in accordance with the instructions, may cause harmful interference to radio communications. However, there is no guarantee that interference will not occur in a particular installation. If this equipment does cause harmful interference to radio or television reception, which can be determined by turning the equipment off and on, the user is encouraged to try to correct the interference by one or more of the following measure
- Reorient or relocate the receiving antenna.
- Increase the separation between the equipment and the receiver.
- Consult the dealer or an experienced radio/TV technician for help.
- Connect the equipment to an outlet on a circuit different from that to which the receiver is connected.
The FCC can require you to stop using your unit if such interference cannot be eliminated.
Doro has not approved any changes or modifications to this device by the user. Any changes or modifications could void the user's authority to operate the equipment.
RF exposure information (SAR)
THIS DEVICE MEETS FCC LIMITS FOR EXPOSURE TO RADIO WAVES
Your mobile device is a radio transmitter and receiver. It is designed not to exceed limits for exposure to radio waves (radio frequency electromagnetic fields) adopted by the Federal Communications Commission (FCC). These limits include a substantial safety margin designed to assure the safety of all persons, regardless of age and h
The radio wave exposure guidelines use a unit of measurement known as the Speci Absorption Rate, or SAR. The SAR limit for mobile devices is 1.6 W/kg.
Tests for SAR are conducted using standard operating positions with the device transmitting at its highest certified power level in all tested frequency bands. The highest SAR values under the FCC guidelines for this device model are:
Head SAR: 0.813 W/kg
Body SAR: 1.010 W/kg
During use, the actual SAR values for this device are usually well below the values tested above. This is because, for purposes of system efficiency and to minimize interference on the network, the operating power of your mobile device is automatically decreased when full power is not needed for the call. The lower the power output of device, the lower its SAR value.
Body-worn SAR testing has been carried out at a separation distance of 1.0 cm. To RF exposure guidelines during body-worn operation, the device should be positioned at least this distance away from the body.
Organizations such as the World Health Organization and the US Food and Drug Administration have suggested that if people are concerned and want to reduce their
exposure, they could use a hands-free accessory to keep the wireless device away for the head and body during use, or reduce the amount of time spent using the device
While there may be differences between the SAR levels of various phones and at various positions, they all meet the government requirement. The FCC has granted an Equipment Authorization for this model phone with all reported SAR levels evaluated in compliance with the FCC RF exposure guidelines. SAR information on this model phone is on file with the FCC and can be found under the Display Grant section of http://www.fcc.gov/oet/ea/fccid after searching on FCC ID: WS5DFB0060
Model: DFB-0060
Doro 5030 (2021,2031)
FCC ID: WS5DFB0060
English
Version 1.1
www.doro.com
- Contents
- English
- Congratulations on your purchase
- Get started
- Insert the SIM card and battery
- IMPORTANT!
- Charge the phone
- CAUTION
- Save energy
- Get to know your phone
- Assistive functions
- Turn the phone on and off
- Start-up wizard
- Navigate the phone
- Standby (idle mode)
- Scroll
- Step-by-step instructions
- Enter text manually
- Select character
- Special characters/smileys
- Move the cursor within text
- Upper case, lower case and numerals
- Change writing language
- Enter text with predictive text
- Example
- Input mode
- Phone settings
- Time & date
- Set the time and date format
- Language
- Block function
- PIN code options
- Change PIN code
- Keypad lock
- Activate
- Calls
- Make a call
- Call from the phonebook
- Receive a call
- Volume control
- Silent
- Headset
- Call options
- Options (left selection button)
- SPK on (right selection button)
- Speed dial
- Add speed dial numbers
- Edit contact information
- SOS calls
- Call log
- Call settings
- Voice mail
- Call voice mail
- Call time
- Call waiting
- Activate call waiting
- Answer mode
- Call divert
- Caller ID
- Call barring
- Fixed dial (FDN)
- Phonebook
- Add contact
- Manage phonebook contacts
- Phonebook settings
- Top 10
- Delete a top 10 entry
- Phonebook storage
- Owner number
- Add numbers
- ICE (In Case of Emergency)
- ID
- Contact 1:, Contact 2: and Doctor:
- Important info
- When done, press Save.
- Assistance button
- Make an assistance call
- Activation
- Number list
- Activate text messages (SMS)
- Create assistance message
- Assistance settings
- Confirm with "O"
- Signal type
- Messages
- Create and send text message (SMS)
- Outbox and Sent
- Message settings
- Predictive text
- Writing language
- Write speed
- Memory status
- Storage
- SMS centre
- Input method
- Cell broadcast
- Reminder C
- Vibration C
- Delivery report
- Delete
- Connectivity
- Network setup
- Services
- Bluetooth®
- Activate Bluetooth®
- Bluetooth® settings
- Visibility
- Device name
- Search device
- My device
- Audio path
- Sound & Display
- Audio setup
- Tone setup (ringtone)
- Ringtone volume
- Alert type
- Extra tone
- Wallpaper
- Text size
- Idle display
- LCD backlight
- Brightness
- Additional functions
- Alarm
- Snooze or stop
- Calendar
- Add task
- Options
- View all
- Daily reminder
- Calculator
- FM radio
- Turning the radio on
- Volume
- Save frequency
- Switch off
- Loudspeaker
- Channel list (editing the channel list)
- Manual input (change the search mode)
- Auto save
- Torch
- Torch settings
- Status
- Reset settings
- Reset all
- Troubleshooting
- Safety instructions
- Network services and costs
- Operating environment
- Medical units
- Implanted medical devices
- Areas with explosion risk
- Li-ion battery
- WARNING
- Protect your hearing
- Emergency calls
- GPS/Location based functions
- Vehicles
- Protect your personal data
- Malware and viruses
- Care and maintenance
- Warranty
- Copyright and other notices
- Content copyright
- Hearing aid compatibility
- Specific Absorption Rate (SAR)
- Correct disposal of this product
- Correct disposal of batteries in this product
- Declaration of Conformity
- FCC/IC
- FCC notice
- RF exposure information (SAR)
Brand : ENERGY SISTEM
Model : 5030
Category : Mp3 player