
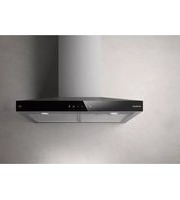
DHD793GW - Range hood DE DIETRICH - Free user manual and instructions
Find the device manual for free DHD793GW DE DIETRICH in PDF.


| Product Type | Cooker Hood |
| Brand | De Dietrich |
| Model | DHD793GW |
| Mounting Type | Wall-mounted |
| Width | 90 cm |
| Depth | 50 cm |
| Height (min-max) | 60-120 cm |
| Net Weight | 20 kg |
| Power Supply | 220-240 V, 50 Hz |
| Motor Power | 250 W |
| Extraction Rate (max) | 700 m³/h |
| Noise Level (max) | 65 dB(A) |
| Lighting | 2 x 3 W LED |
| Grease Filter Type | Aluminium, washable |
| Charcoal Filter (optional) | Yes, replaceable |
| Controls | Touch panel with display |
| Energy Class | A |
| Annual Energy Consumption | 50 kWh |
| Grease Filter Efficiency | Class B |
| Lighting Efficiency | Class A |
| Airflow (boost mode) | Yes |
| Automatic Shut-off Timer | Yes |
| Filter Saturation Indicator | Yes |
| Ducted / Recirculation | Ducted (recirculation possible with kit) |
| Remote Control | No |
Frequently Asked Questions - DHD793GW DE DIETRICH
User questions about DHD793GW DE DIETRICH
0 question about this device. Answer the ones you know or ask your own.
Ask a new question about this device
Download the instructions for your Range hood in PDF format for free! Find your manual DHD793GW - DE DIETRICH and take your electronic device back in hand. On this page are published all the documents necessary for the use of your device. DHD793GW by DE DIETRICH.
USER MANUAL DHD793GW DE DIETRICH
1
natural_image
Diagram showing a downward arrow and a rectangular object on a horizontal line, labeled '2' (no text or symbols on the diagram itself)
natural_image
Diagram of two rectangular panels with vertical supports and dotted lines indicating motion or movement, labeled '3' (no text or symbols on the panels themselves)
natural_image
Illustration of a hand holding a circular device with a screwdriver, showing internal components (no text or symbols)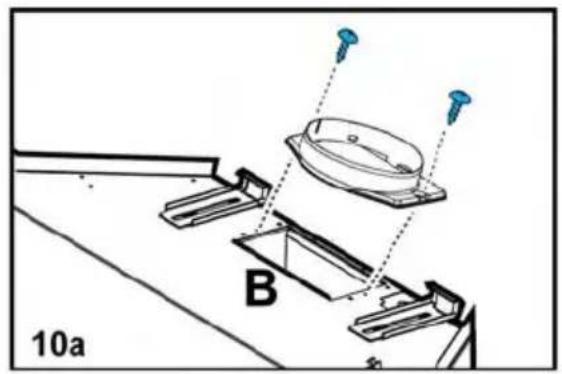

*OPTION.

6a
*OPTION.
RHD92X
6b
Dear Customer,
You have just acquired a DE DIETRICH hood, and we would like to thank you.
Our research teams have created this new generation of appliances for you. Their quality, design, features and technological advances make them exceptional products, and reveal our unique know-how.
Your new DE DIETRICH hood will blend harmoniously into your kitchen and will perfectly combine extraction performance and ease of use. We wanted to offer you a product of excellence.
In the DE DIETRICH product range, you will also find a wide choice of hobs, ovens, microwaves, dishwashers, cookers, fridges, freezers, that you can coordinate with your new DE DIETRICH hood.
Visit our website www.dedietrich-electromenager.com, where you will find our latest innovations as well as useful and complementary information.
DE DIETRICH Setting New Values
As part of our commitment to constantly improving our products, we reserve the right to make changes to them based on technical advances to their technical and functional features and appearance.

Warning : Before installing and using your appliance, please carefully read this Guide to Installation and Use, which will allow you to quickly familiarise yourself with its operation.
www.dedietrich-electromenager.com

Contents
UK - Instruction on mounting and use....34
Use....34
Description of the hood....34
Caution 34
Installation 34
Electrical connection 35
Mounting....35
Operation 36
Maintenance 36
Cleaning 36
Grease filter....36
Charcoal filter (filter version only)....36
Replacing lamps....37
Troubleshooting....37
After-sales service 37
UK - Instruction on mounting and use
Consult the designs in the front pages referenced in the text by alphabet letters.
Closely follow the instructions set out in this manual. All responsibility, for any eventual inconveniences, damages or fires caused by not complying with the instructions in this manual, is declined.
Note: the elements marked with the symbol “(*)” are optional accessories supplied only with some models or elements to purchase, not supplied.
Use
The hood is designed to be used either for exhausting or filter version.
Ducting version
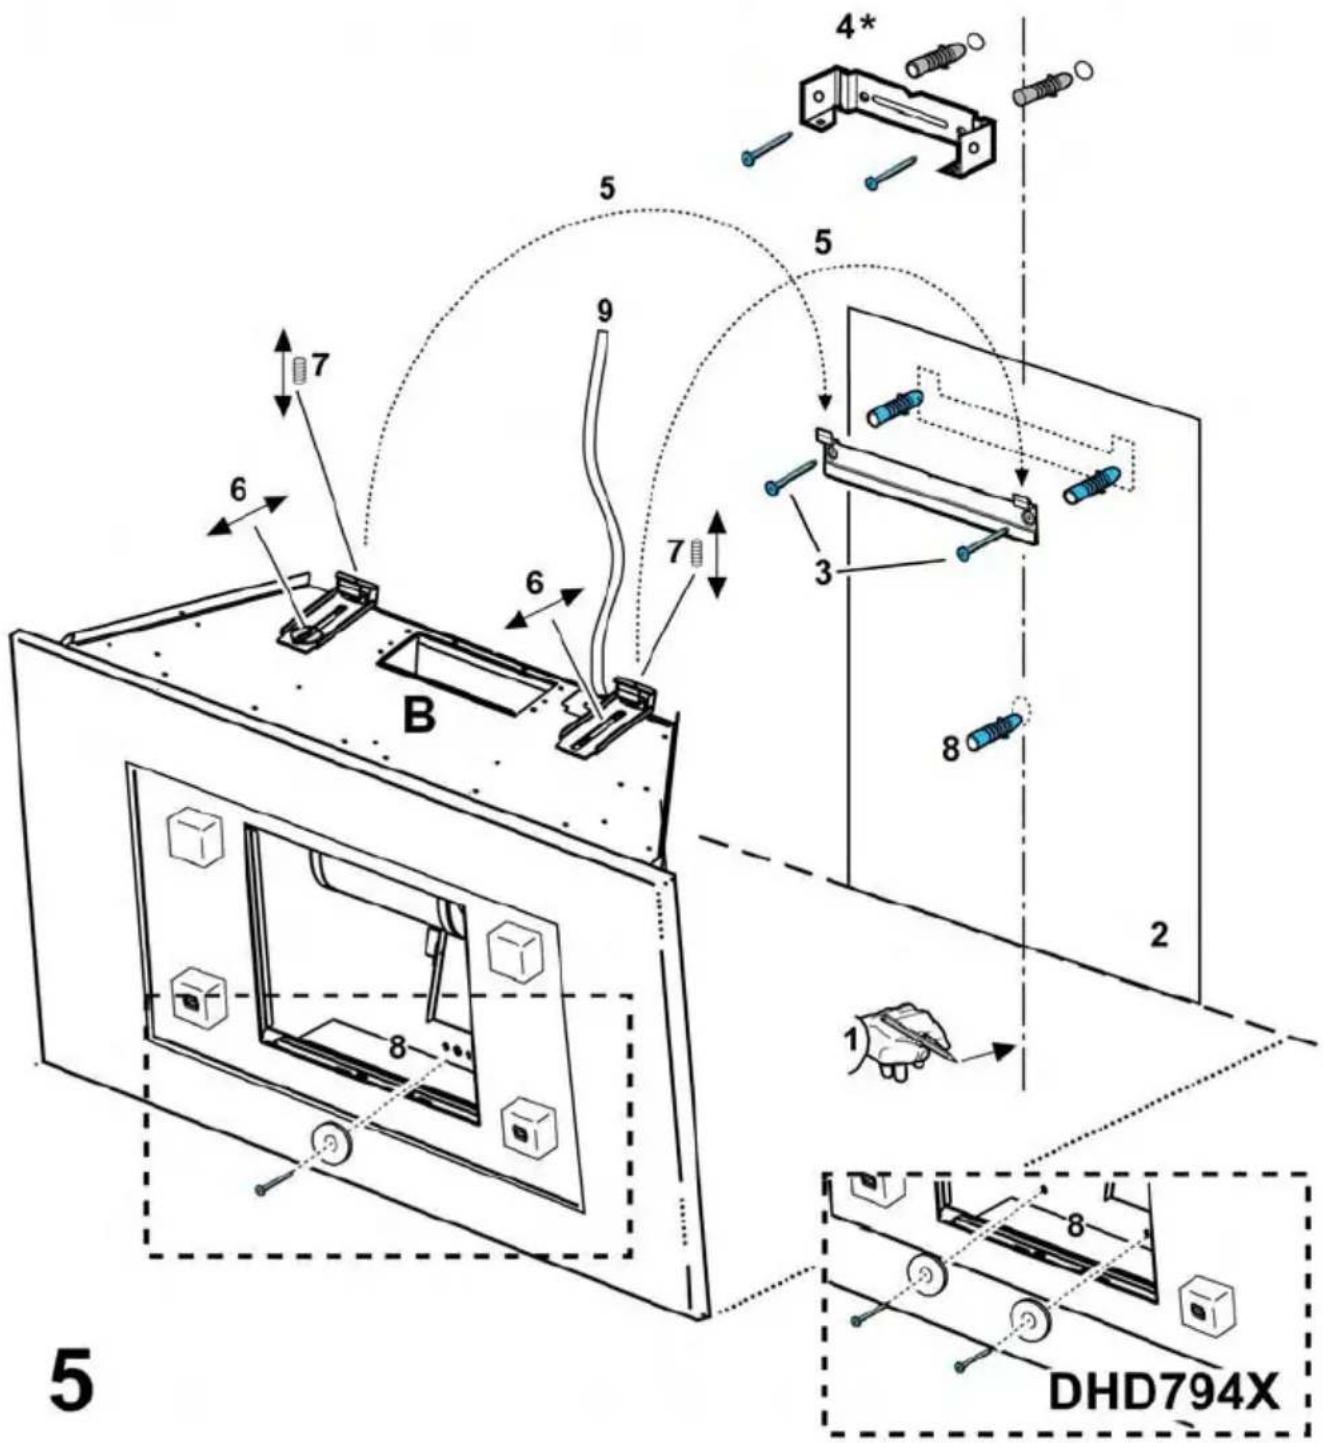
The hood is equipped with a top air outlet B for discharge of fumes to the outside (exhaust pipe and pipe fixing clamps not provided). Fig. 5-6
Attention!
If the hood is supplied with carbon filter, then it must be removed.
Filter version
Should it not be possible to discharge cooking fumes and vapour to the outside, the hood can be used in the filter version, fitting an activated carbon filter and the deflector F on the support (bracket) G, fumes and vapours are recycled through the top grille H by means of an exhaust pipe connected to the top air outlet B and the connection ring mounted on the deflector F (exhaust pipe and pipe fixing clamps not provided). Fig. 5-6
Attention!
If the hood is not supplied with carbon filter, then it must be ordered and mounted.
Description of the hood
Fig. 1
- Control panel
- Grease filter
- Grease filter release handle
- Halogen lamp
- Perimeter suction panel

Caution
Keep this use manual with your apparatus. If the apparatus has to be sold or ceded to someone else, make sure that this manual is also sent.
Read this manual carefully before installing or using your apparatus because it contains important information for your safety and for whoever installs or uses it.
This apparatus has been created to be installed in a kitchen and for normal domestic use.
Do not use it for commercial or industrial purposes or other purposes for which it was not created.
Do not modify or try to modify the characteristics of this apparatus. It would be dangerous for you.
Using over a fuel (wood, carbon) cooking top is not authorised.
If the filtering hood is installed in a kitchen heated by an apparatus connected to a fireplace (e.g. a stove), the filtering version of the hood must be installed. Do not use the hood without fat filters.
Do not use steam or pressure cleaning equipment on your apparatus (for reasons of electrical safety).
WARNING! Do not connect the appliance to the mains until the installation is fully complete.
Before any cleaning or maintenance operation, disconnect the hood from the mains by removing the plug or disconnecting the home mains switch.
The appliance is not intended for use by children or persons with impaired physical, sensorial or mental faculties, or if lacking in experience or know-how, unless they are under supervision or have been trained in the use of the appliance by a person responsible for their safety.
Children should be monitored to ensure that they do not play with the appliance.
Never use the hood without effectively mounted grating.!
The hood must NEVER be used as a support surface unless specifically indicated.
The premises must be sufficiently ventilated, when the kitchen hood is used together with other gas combustion devices or other fuels.
The suctioned air must not be conveyed into a conduit used for the disposal of the fumes generated by appliances that combust gases or other fuels.
The flaming of foods beneath the hood itself is severely prohibited.
The use of exposed flames is detrimental to the filters and may cause a fire risk, and must therefore be avoided in all circumstances.
Any frying must be done with care in order to make sure that the oil does not overheat and burst into flames.
As regards the technical and safety measures to be adopted for fume discharging it is important to closely follow the relations provided by the competent authorities.
The hood must be regularly cleaned on both the inside and outside (AT LEAST ONCE A MONTH, it is in any event necessary to proceed in accordance with the maintenance instructions provided in this manual)..
Failure to follow the instructions as concerns hood and filter cleaning will lead to the risk of fires.
Do not use or leave the hood without the lamp correctly mounted because of the possible risk of electric shocks.
We decline any responsibility for any problems, damage or fires caused to the appliance as the result of the non-observance of the instructions included in this manual.
Installation
The minimum distance between the supporting surface for the cooking vessels on the hob and the lowest part of the range hood must be not less than 45cm from electric cookers and 65cm from gas or mixed cookers.
If the instructions for installation for the gas hob specify a greater distance, this must be adhered to.

Electrical connection
The mains power supply must correspond to the rating indicated on the plate situated inside the hood. If provided with a plug connect the hood to a socket in compliance with current regulations and positioned in an accessible area. If it not fitted with a plug (direct mains connection) or if the plug is not located in an accessible area apply a bi-polar switch in accordance with standards which assures the complete disconnection of the mains under conditions relating to over-current category III, in accordance with installation instructions.
Warning: Before re-connecting the hood circuit to the mains supply and checking the efficient function, always check that the mains cable is correctly assembled.
Mounting
Fig. 5-6
Before beginning installation:
- Check that the product purchased is of a suitable size for the chosen installation area.
- To facilitate installation, remove the fat filters and the other parts allowed and described here, dismantle and mount it.
To remove see also the relative paragraphs.
- Remove the active carbon (*) filter/s if supplied (see also relative paragraph). This/these is/are to be mounted only if you want to use the hood in the filtering version.
- Check (for transport reasons) that there is no other supplied material inside the hood (e.g. packets with screws (*), guarantees (*), etc.), eventually removing them and keeping them.
- If possible, disconnect and move freestanding or slide-in range from cabinet opening to provide easier access to rear wall/ceiling. Otherwise put a thick, protective covering over countertop, cooktop or range to protect from damage and debris. Select a flat surface for assembling the unit. Cover that surface with a protective covering and place all canopy hood parts and hardware in it.
- Disconnect the hood during electrical connection, by turning the home mains switch off.
- In addition check whether near the installation area of the hood (in the area accessible also with the hood mounted) an electric socket is available and it is possible to connect a fumes discharge device to the outside (only suction version).
- Carry out all the masonry work necessary (e.g. installation of an electric socket and/or a hole for the passage of the discharge tube).
Expansion wall plugs are provided to secure the hood to most types of walls/ceilings. However, a qualified technician must verify suitability of the materials in accordance with the type of wall/ceiling. The wall/ceiling must be strong enough to take the weight of the hood. Do not tile, grout or silicone this appliance to the wall. Surface mounting only. An aesthetic flue can be purchased as an optional accessory. Check with the assistance centre whether the model in your possession envisages this possibility.
We advise installing the hood after having purchased the flue to check with certainty the most suitable installation.
- Trace a central line on the wall in order to ease mounting (1), position the hole template in a way that the middle line printed on top corresponds to the central line marked previously and the lower side of the mask corresponds to the lower part of the hood once mounted. (2).
- Make 3 holes ∅ 8 mm with a drill and fix the support bracket with two dowels and screws to the wall (3), insert the third dowel into the lower hole.
- Only for chimney installation: Apply the support bracket „G“ to the adherent ceiling, use the chimney support bracket as a hole scheme (if present, the small eyelet found on the support should coincide with the line previously traced on the wall) and trace with a pencil 2 holes, drill the holes (∅8mm), insert 2 plugs.
Fasten the support bracket to the wall with 2 5x45mm screws (4).
- Open the vapour scheme and remove the grease filters (see relevant paragraph).
- Hang the hood (5), regulate the position (6-7) and fasten it securely with one screw and washer(8).
- Carry out electrical connections (9), but leave the hood disconnected from the general electrical main panel.
• Install the flange supplied on the exit hole of the hood (10a). - Carry out the connection of one tube (11 – tube and ties for fastening not included, they need to be bought) for the fume discharge to the connection ring placed on top of the extractor motor unit.
The other end of the tube should be connected to a fume expulsion device towards the outside, in case the hood is used in extractor version.
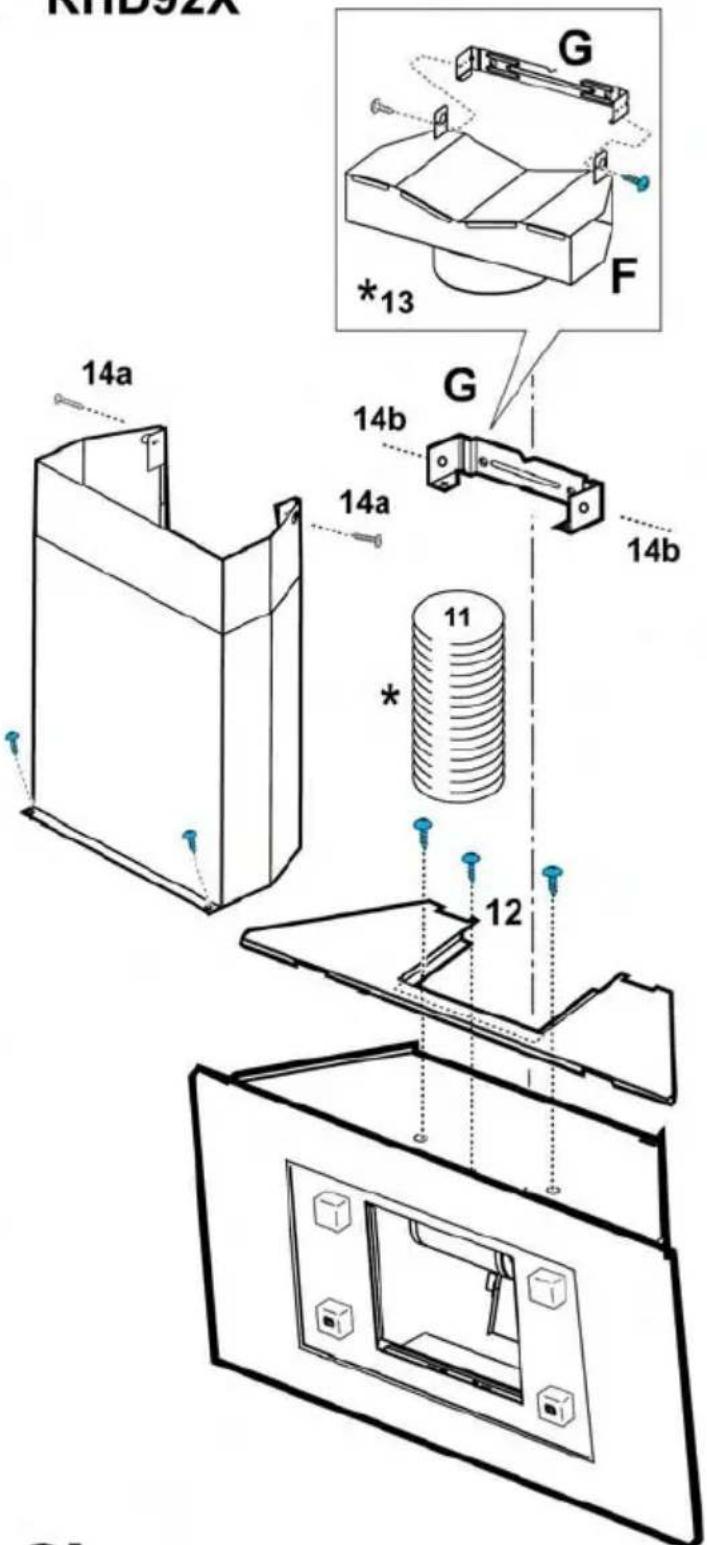
• Fix the upper cover with 3 screws.(12)
Note: this is supplied already mounted in some cases.
- Only for chimney installation: In case you want to use the hood in filtering version, fasten the deflector F to the support bracket, and connect the other side of the tube to the connection ring placed on the deflector (13).
Apply the chimneys and fasten them on with two screws (14a) to the chimney support bracket „G“ (14b). and make the lower part of the chimney slide into the suited part on top of the chimney.
- Mount the grease filters and close the vapour scheme.
Warning! If the hood has to be used in extractor version, remove, if supplied, the carbon filter and the fastening wand (placed on the back of the grease filters – see relative paragraph).
If the hood has to be used in filtering version, make sure that the carbon filter is already mounted on the back of the grease filter, or in case it's missing, buy it and install it.
Note – only for installation without chimneys: In case you want to use the hood in filtering version, install the grille/deflector instead of the flange (10b).
Operation
To select the functions of the hood just touch the commands.

Light key ON/OFF

Intensive speed selection key (suction power) - duration 5 minutes - press again to return to previous setting.

High-speed selection key (suction power).

Medium-speed selection key (suction power) - when flashing it indicates the need to wash or replace the carbon filter. This signal is normally deactivated. Press keys 1 and 2 at the same time to activate it. At first only key 1 will flash and then both keys 1 and 2 to indicate activation. Repeat the operation to deactivate the signal. At first keys 1 and 2 will flash and then only key 1 to indicate deactivation.

Low-speed selection key (suction power) – when flashing it indicates the need to wash the fats filter.

Motor key OFF (stand by) – excludes the electronics – reset wash/replace filters signals. MOTOR OFF
Press briefly to switch the motor off.
RESET FILTERS SIGNALS
After having carried out maintenance of the filters, press the key for 3 seconds. Flashing led 1 (fats filter) or 2 (carbon filter) will stop flashing.
EXCLUDING THE ELECTRONICS
Press the key for 3 seconds. The hood command electronics will be excluded.
This function can be useful during the product cleaning operations.
Just repeat the operation to reinsert the electronics.
If the hood fails to operate correctly, briefly disconnect it from the mains power supply for almost 5 sec. by pulling out the plug. Then plug it in again and try once more before contacting the Technical Assistance Service.
Maintenance
ATTENTION! Before performing any maintenance operation, isolate the hood from the electrical supply by switching off at the connector and removing the connector fuse.
Or if the appliance has been connected through a plug and socket, then the plug must be removed from the socket.
Cleaning
The cooker hood should be cleaned regularly (at least with the same frequency with which you carry out maintenance of the fat filters) internally and externally. Clean using the cloth dampened with neutral liquid detergent. Do not use abrasive products. DO NOT USE ALCOHOL!
Warning:
Failure to carry out the basic cleaning recommendations of the cooker hood and replacement of the filters may cause fire risks.
Therefore, we recommend oserving these instructions.
The manufacturer declines all responsibility for any damage to the motor or any fire damage linked to inappropriate maintenance or failure to observe the above safety recommendations.
Maintenance of the panel
Dismantling:
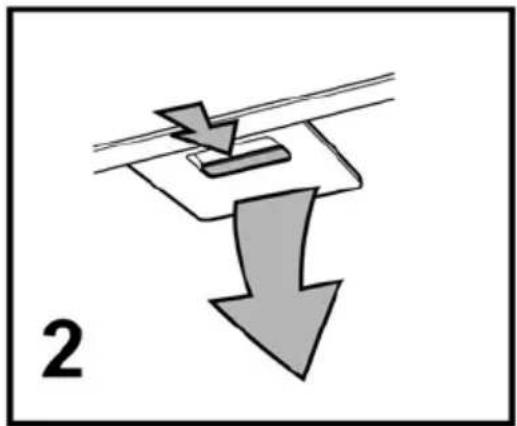
Extract with decision (LOWER SIDE) and rotate upwards.
Cleaning:
the panel should be cleaned with the same frequency as the fat filters, using a cloth soaked in neutral liquid detergents.
Avoid the use of products containing abrasives. DO NOT USE ALCOHOL!
Montage:
Proceed in the reverse direction for dismantling.
Attention! Always check that the panel is fixed in its place well.
Grease filter
Fig. 2
This must be cleaned once a month (or when the filter saturation indication system – if envisaged on the model in possession – indicates this necessity) using non aggressive detergents, either by hand or in the dishwasher, which must be set to a low temperature and a short cycle.
When washed in a dishwasher, the grease filter may discolour slightly, but this does not affect its filtering capacity.
To remove the grease filter, pull the spring release handle.
Charcoal filter (filter version only)
Fig. 3
It absorbs unpleasant odours caused by cooking.
The charcoal filter can be washed once every two months (or when the filter saturation indication system – if envisaged on the model in possession – indicates this necessity) using hot water and a suitable detergent, or in a dishwasher at 65^ C (if the dishwasher is used, select the full cycle function and leave dishes out).
Eliminate excess water without damaging the filter, then put it in the oven for 10 minutes at 100^ C to dry completely. Replace the mattress every 3 years and when the cloth is damaged.
- Montage
Open the steam screen and remove the grease filter. Install the carbon filter on the back of the grease filter and
fix with two rods.
Attention! The rods are included in the carbon filter packing and not on the hood.
- To dismantle the filter act in the reverse manner.
CLEANING AND UPKEEP OF YOUR APPLIANCE
To keep your appliance in good working order, we recommend that you use Clearit household products.

Professional expertise for the general public
Clearit offers you professional products and adapted solutions for the daily upkeep of your household and kitchen appliances.
You may find them in conventional retail outlets, along with a complete line of by-products and consumables.
Replacing lamps
Fig. 4
Disconnect the hood from the electricity.
Warning! Prior to touching the light bulbs ensure they are cooled down.
-
Using a flat head screwdriver or equivalent tool, carefully pry loose the light cover.
-
Remove the damaged light and replace with a new 12 Volt, 20 Watt (Maximum) halogen light made for a G-4 base SUITABLE FOR USE IN OPEN LUMINAIRES. Follow package directions and do not touch new light with bare hands.
-
Reinstall the light cover. (it will snap shut).
If the lights do not work, make sure that the lamps are fitted properly into their housings before you call for technical assistance.
This appliance is marked according to the European directive 2002/96/EC on Waste Electrical and Electronic Equipment (WEEE). By ensuring this product is disposed of correctly, you will help prevent potential negative consequences for the environment and human health, which could otherwise be caused by inappropriate waste handling of this product.

The symbol ■ on the product, or on the documents accompanying the product, indicates that this appliance may not be treated as household waste. Instead it shall be handed over to the applicable collection point for the recycling of electrical and electronic equipment. Disposal must be carried out in accordance with local environmental regulations for waste disposal.
For more detailed information about treatment, recovery and recycling of this product, please contact your local city office, your household waste disposal service or the shop where you purchased the product.
Troubleshooting
| SYMPTOMS SOLUTIONS | |
| The hood is not working... | Ensure that:• The power is not cut off.• A speed has been selected. |
| The hood is not operating effectively... | Ensure that:• The selected motor speed is sufficient for the quantity of smoke and vapours to be cleared.• The kitchen is sufficiently ventilated to allow for fresh air intake.• The carbon filter is not worn (hood operating in recycling mode). |
| The hood stopped working | Ensure that:• The power is not cut off.• The single-pole cut-off device was not activated. |
After-sales service
Any maintenance on your equipment should be undertaken by:
- either your dealer,
- or another qualified mechanic who is an authorized agent for the brand appliances.
When making an appointment, state the full reference of your equipment (model, type and serialnumber).
This information appears on the manufacturer's nameplate attached to your equipment.

- Contents
- UK - Instruction on mounting and use
- Use
- Ducting version
- Attention!
- Filter version
- Description of the hood
- Fig. 1
- Caution
- Installation
- Electrical connection
- Mounting
- Fig. 5-6
- Before beginning installation:
- Operation
- Light key ON/OFF
- RESET FILTERS SIGNALS
- EXCLUDING THE ELECTRONICS
- Maintenance
- Cleaning
- Warning:
- Maintenance of the panel
- Dismantling:
- Cleaning:
- Montage:
- Grease filter
- Fig. 2
- Charcoal filter (filter version only)
- Fig. 3
- - Montage
- CLEANING AND UPKEEP OF YOUR APPLIANCE
- Professional expertise for the general public
- Replacing lamps
- Fig. 4
- After-sales service
Brand : DE DIETRICH
Model : DHD793GW
Category : Range hood